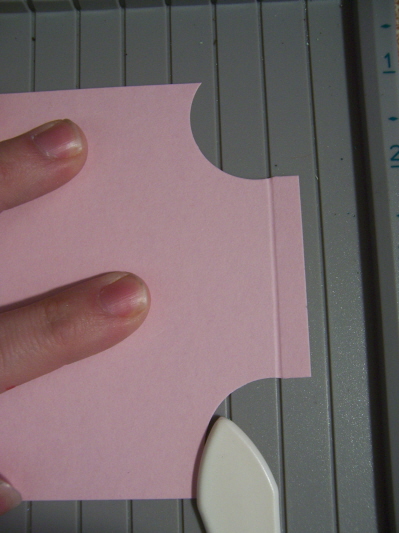
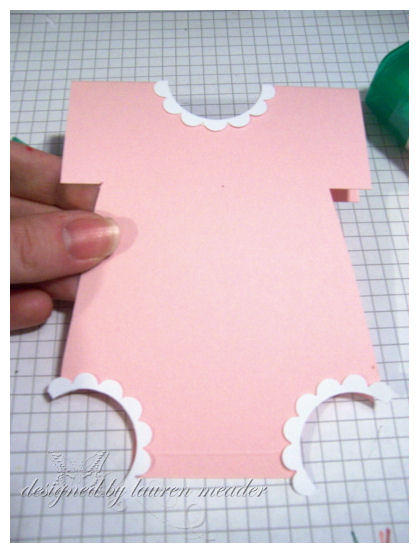
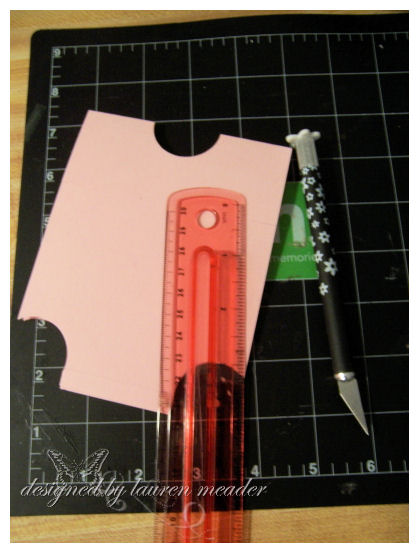
Create your own Onesie Card Tutorial-and important NOTE! PLEASE READ
Feb 5, 2008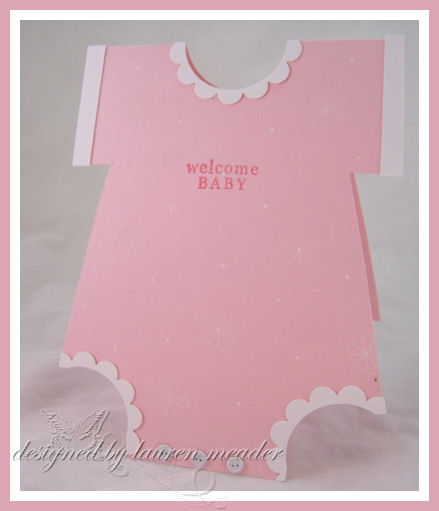
WOW! Can I tell you that I am OVERWHELMED by the number of you requesting a tutorial for my onesie card found —->HERE. THANKS FOR LOVING IT!
This is an update: I removed the tutorial as I created files for this card which are available HERE!
The files are formated for EASY use and are available in PDF, SVG, GSD, DXF, WPC.
If you aren’t sure what file type is best for you, please view the ABOUT PAGE <—CLICK IT for details on each file.
You can see my latest samples HERE!
HERE COMES THE IMPORTANT NOTE:
Please use this for your OWN personal use. Do not submit this template for publication. I was recently alerted by and editor-who reads my blog (INSERT SHOCKED FACE HERE), the the day after my idea was presented here, they got a submission for it-using my directions-copy/pasted from right here.
Had she not read my blog-it would have gotten picked up, and that person would be paid.
THAT is NOT cool.
Please don’t ruin the fun for everyone else. I share my items with you because “I” enjoy it. I do not care if you use sketches from here to create your own unique version for a publication, and whatnot, but please don’t use my words, templates, and CASE my ideas for profit.
Anything else-go for it!!!
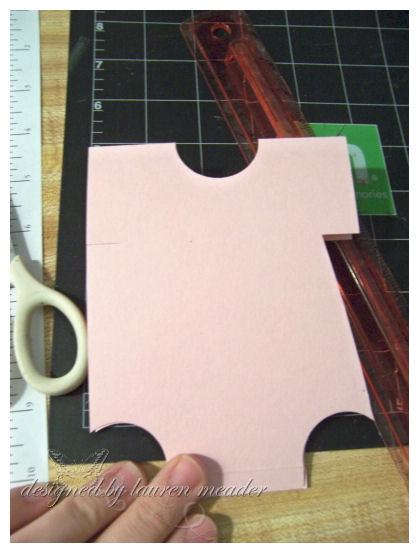
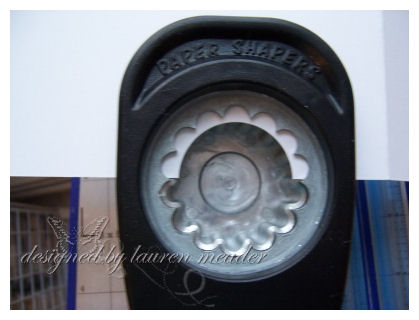
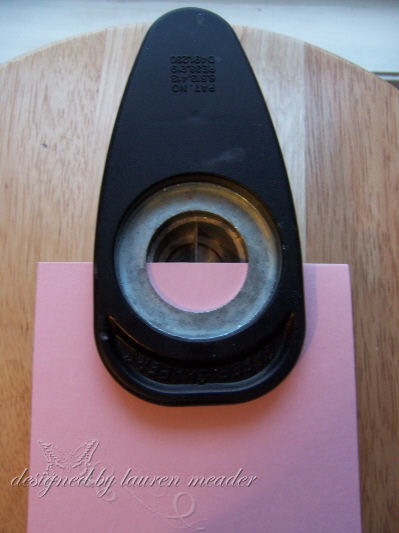
You can add snaps or buttons-( I used Making Memories button brads)whatever you want. Embellish it as you please. It can be as simple or complex as YOU need it to be.
I stamped mine in this photo with the Limitless Labels. I used the sentiment, and tiny flower (stamped in white, then added dots with white gel pen) for this card.
I used colored cardstock for this one, whereas my first ones where white. Patterned cardstock is also a great option.
Makes a great announcement, or Welcome to the world card.
Thanks to everyone again for the love, encouragement and support. I appreciate each one of you, immensely. I am not going to let ONE person kill the joy I get from sharing with everyone.
I hope this helps you now that you can SEE it!
Till tomorrow-

- RSS feed for comments on this post
- My Time, My Creations, My Stampendence » Special Delivery x3
- So many questions « beauty lies within
- Awesome Links at Scrapin and Stampin with Savitri
- » Shout Out!
- Beuatiful card for a New baby · Stamping @ CraftGossip
- her real world » Blog Archive » links for 2008-03-12
- Baby Onesie Cards - Dreaming Out Loud: Laura Griffin’s Blog
- A gift for twins… - Dreaming Out Loud: Laura Griffin’s Blog
- Sweet Babies « Simply Thoughtful Cards
- » Those adorable onsies cards…
- print your own baby cards
- print my own note paper
- Make Your Own Onesies! | 7Wins.eu
- Scrapping by Design » Blog Archive » Tutorial for Making a Onesie Baby Card
- You are cordially invited… « lil sprinkles
- Welcome Amelie! « Michelle’s Stamping Ground
- Short & Sweet Onesie Baby Card « Rachel Capps - Stampin’ Up!® Independent Demonstrator
- » Blog Archive » Tutorial - Onesie Card
- Hey Baby! « Simply Thoughtful Cards
- Busy, Busy… « One Day at a Time
- Baby Onesie Cards! « Rubber Stamping & Card Making with Yapha
- Baby name meaning and origin for Lauren
- Crazy Stamp Girl
- Hali » Arhiv Bloga » Rodil se je…
- Cute Baby Card « Divine Designs
- Welcome Baby! « Stampin’ With Sally
- Snips and snail and puppy dogs tails…. « Michelle’s Stamping Ground
- A BABY SHOWER!!! « A Stamping Journey
- Congratulations Nancy! « Rubber Stamping & Card Making with Yapha
- Baby-Parenting.com
- Fun Cards | Something To Ink About
- Baby Shower Gifts » Rubber Stamping & Card Making with Yapha
- baby jumpsuit card | Baby Jumpsuit
- A Lion for Leo » Rubber Stamping & Card Making with Yapha
- Onesie baby cards! « Nicki's Blogspot
- Hoşgeldin Bebeğim - isleme.net
- A BABY DRESS! « A Stamping Journey
- Scrapping by Design » Blog Archive » Onesie Baby Card
- February Moovers and Shakers ... All Welcome - Splitcoaststampers.com
- Special cards for Special People! « Purple Buttons
- Little Bundles of Joy! - My Time, My Creations, My Stampendence
- Onesie template | Rentoblog
- » onsie baby shower card scrap allie
- BABY CARDS – A LESSON IN DIVERSITY :: Stamping With Sandi
- Thank Heaven for Little Girls | Catered Crop
- Free Baby Shower Invitation Template Dedication To All | Baby Shower Invitations Wording
- 101 Creative Card Sketches: A Must-have For Card Makers | 7Wins.eu
- Riding Core Onesie Black Camo
- Hoşgeldin Bebeğim | wptest
- Flexible Invitation Design: Baby shower celebration Impact | Baby Shower Wallpaper
- Olympia A 290 DIN A 4
- theresa rivera
- Camping At Lake Mead Your Questions | RV Parts and Accessories
- Baby Shower Decorating Ideas | Baby Safety
- Learn Office 2007. Top Selling Training Tutorials Now Offered Here! | Learning Jigsaw
- Mylocalhealth forum | Know titleist 910 d3 from every aspect | Health Clubs - healthylifestylereview.info
- Siege Weapons In Guild Wars 2
- February weSTAMP Meeting :: Confessions of a Stamping Addict
- February Stamp Club :: Confessions of a Stamping Addict
- Stampin Up Demonstrator, Sandi MacIver, Stamping With Sandi - Portland, Oregon BABY CARDS – A LESSON IN DIVERSITY | Stampin Up Demonstrator, Sandi MacIver, Stamping With Sandi - Portland, Oregon
- Car Sun Shade- Best Easy Twist Folding Windshield Sun Shade – Fits Small & Jumbo Rear & Side Windows – Perfect Sun Screen – Keeps Interior Cooler – UV Protective Shield for Your Baby, Infants & Kids -1 Year Guarantee! |
- Mehndi Garden Design Protective Decal Skin Sticker (High Gloss Coating) for BlackBerry Z10 4G Cell Phone | WWW.MYINFOPAGE.NET
- Men’s Storm Rubber Loafer in Black (Size: XL (11-13), Color: Black) | WWW.DINFOBLOG.NET
- Metallic Gold Paisley Art iPhone 5 BOX Case – Gold Mehndi – Protective iPhone 5 Case Reviews · WWW.MY-HEALTHOCARE.CM
- Florene country maps format exotic – Modern Map of the Netherlands in bright color – Cards 6 cards with envelopes | WWW.MYTOURISMBLOG.COM
- MLB New York Yankees ’47 Brand Men Home pens MVP Cap, Navy, One-Size | WWW.HEALTHnCARE.ORG
- Mehndi Hand Tattoos (Self Adhesive – 3D Silver with Crystals in Various Designs) Reviews · WWW.BEAUTYSKI.COM
- Awesome Baby Showers! 70% Commission | 7Wins.eu
- Florene country maps format exotic – Modern Map of the Netherlands in bright color – Cards 6 cards with envelopes | AUTOMOBILISS.NET
- So Relative! Cotton Football Stripes Jersey – I Love My Aunt (Heart Design) Toddler Short Sleeve T-Shirt | shareAsell.ORG
- Blue White Stripes Ties for Men Fathers Day Gift Ideas Accessories Silk Cufflinks 1137 | ShareAsell.NET
- ___________________
- roof repairs perth
- reputation management company
- used car
- salvage yard
- du lich mien bac
- homepage
- buffet mon nhat cung mua
- car accident statistics male vs female
- car accident killing people
- du lich con dao
- query:BestChiropractor
- (kathy van zeeland handbags|etienne aigner handbags|sak handbags|sorial handbags|bueno handbags|rioni handbags|urban expressions handbags|phillip lim handbags|madi claire handbags|zara handbags|wholesale handbag|designer handbags wholesale|handbag designe
- (handbags|designer handbags|tory burch handbags|handbag|wholesale handbags|brahmin handbags|handbags on sale|leather handbags|dior handbags|cheap handbags|jessica simpson handbags|furla handbags|betsey johnson handbags|cheap designer handbags|handbags who
Trackbacks
My Etsy

Who I Designed For
Blogroll
- Alicia
- Alli Miles
- Ally Blankenship
- Amber
- Andi @ crafts on a whim
- Angel R
- Angie Z
- Anne Kranitz
- Becky O
- Bee
- Beth Silaka
- Bethany Paull
- Beverly Nash
- Bobbie
- Cambria
- Cammie
- Card of the Week
- Card Positioning System (CPS)
- Cards for Cancer
- Catherine Doucette
- Charmaine
- Cheryl Sims
- Chriss Rollins
- Christina
- Christine Ewing
- Christine Wooden
- Colleen Schaan
- Craft Critique
- Craft Gossip
- Crystal
- Dawn Easton
- Emily Giovanni
- Geny
- Holly
- Igne Groot
- Inspirational Craft Blogs
- Irene
- Jami Sibley
- Jeanne Streiff
- Jen del Muro
- Jeni Bond
- JenMarie
- Jenn Balcer
- Jenn Diercks
- Jenn O
- Jennifer E
- Jennifer Mick
- Jennifer Pereda
- Jennifer-Sweet Treat
- Joanne Basile
- Jodi Collins
- Julia Stainton
- Julie Masse
- Karen
- Kathryn Berthiaume
- Katie Cotton
- Kelley Holland
- Kendra
- Kim Scholfield
- Kris’s Color Stripes! Get inspired here
- Kristen Dubosque
- Kristin Eberline
- Kristine
- Laura @ Sunshine Stamper
- Laura Turnmire
- Laurie Schmidlin
- Lesa Rapp
- Linda Duke
- Linda-LSN
- Lindsey Botkin
- Lisa (lakind scs)
- Lisa Kind
- Lori Craig
- Maggie
- Mara Campbell
- Maria
- Maria Levine
- Mary
- MaryJo
- Melanie M
- Monique Hansen
- Moxie Fab World
- Pam Imholz
- PaperCrafts Connection
- Peppers and Pollywogs Kids party site
- Rebecca Grohall
- Rita
- Robyn
- Rose Ann
- Sarah Vrolyk
- Sharon Harnist
- Sharon Johnson
- Sharon Rivera (a chemisrty with paper)
- Sherrie
- Sophia Landry
- Storage Units, Ink, & More Blog
- Sue Berker
- Susan (Rainy)
- Tangii Crane
- Tracy
- Tricia Traxler
- Trudee
- Velta
- VivLyn
- Zena
MTME Pretty Palette Color Team
MTME Pretty Patterns Sketch Team
My Time Made Easy TM LLC
Shop till you drop!
Lauren Meader
About Me
Copyrighted material
Subscribe To My Blog
Pages
- About me
- Alexa’s Story!
- My Crafty Corner!
- My Time Made Easy™ LLC
- Our Make A Wish Trip to Disney!
- Resume/Publication List
Calendar
Archives
- August 2013
- July 2013
- June 2013
- May 2013
- April 2013
- March 2013
- February 2013
- January 2013
- December 2012
- November 2012
- October 2012
- September 2012
- August 2012
- July 2012
- June 2012
- May 2012
- April 2012
- March 2012
- February 2012
- January 2012
- December 2011
- November 2011
- October 2011
- September 2011
- August 2011
- July 2011
- June 2011
- May 2011
- April 2011
- March 2011
- February 2011
- January 2011
- December 2010
- November 2010
- October 2010
- September 2010
- August 2010
- July 2010
- June 2010
- May 2010
- April 2010
- March 2010
- February 2010
- January 2010
- December 2009
- November 2009
- October 2009
- September 2009
- August 2009
- July 2009
- June 2009
- May 2009
- April 2009
- March 2009
- February 2009
- January 2009
- December 2008
- November 2008
- October 2008
- September 2008
- August 2008
- July 2008
- June 2008
- May 2008
- April 2008
- March 2008
- February 2008
- January 2008
- December 2007
- November 2007
- October 2007
- September 2007
- August 2007
- July 2007
- June 2007
- May 2007
- April 2007
- March 2007
- January 2007
Categories
- About Me
- All That Scraps
- blogger challenge
- camera/photo play
- Cards
- Contests
- family stuff
- FOR SALE
- Home decor/3-D items
- How to FAKE it!
- Introduction
- JUGS Challenge
- JustRite Stampers
- Lizzie Anne Designs
- My family stuff
- My Stamping Space
- My Time Made Easy
- My Time To Color Challenge
- My Time to Create Challenge
- My Timeless Template Challenge
- My Timeless Templates
- Mytime Mail
- MYTIME MOVIE/VIDEOs
- Papertrey Newsletter
- Pink Cat Studio
- Pretty Palette Challenge
- Pretty Patterns Sketch
- Product Opinions and Must haves
- Recipe's
- Saturday Sketch
- Smilebox Creations
- Stampavie
- Tutorials
- Uncategorized
- videos
Most Popular
- Create your own Onesie Card Tutorial-and important NOTE! PLEASE READ (2529)
- Saturday Sketch-Boxed bag holder (2333)
- Going GREEN! Fancy Flower Flourish-Closure Video (1478)
- Fabulous Favorite - Giveaway! (1336)
- a Prayer Request (1232)
- QUICK-Easter Baskets from Nestabilities-PTI style-and blog challenge (1063)
- Teaser Sketch (999)
- February Release Giveway! (and a little peek) (996)
- Group Post and Rambling Rose Video Tutorial (985)
- GIVEAWAY! Who wants it all?! (895)
Recent Comments (RSS)
- 첫충사이트: 완전히 흥미로운 블로그 게시입니다. 저는
- sarah: Wow, Lauren, what a stunning
- hedie: خرید راهبند
- 야동: Love to read it,Waiting For
- 야동: This seller is in a
- 바카라사이트: 여기 처음 왔어요. 나는이 게시판을
- 야동티비: I was surfing the Internet
- 바카라사이트: 비슷한 주제에 대한 흥미로운 정보를
- 바카라사이트: "여기에 제공해 주신 귀중한 정보와
- 온라인홀덤: 유익한 웹 사이트를 게시하는 데
Copyright © 2007 - My Time, My Creations, My Stampendence - is proudly powered by WordPress
This blog has been Tweaked and Designed by Sara Williams
2,529 Responses for "Create your own Onesie Card Tutorial-and important NOTE! PLEASE READ"
[…] TUTORIAL CAN BE FOUND———–> HERE […]
Lauren – You’re the best and the card is the bomb. Thanks for the instructions. I didn’t realize you used a normal size card. The photo made me think it was larger. I love visiting your blog, your creations are amazing.
Pattie
Thanks so much for the tutorial! I was going to try this myself after seeing the original card but this saved me LOTS of time!! And I CANNOT BELIEVE someone would take your work and try to publish it as their own!!!!! AWFUL!!!!
Thanks for the tutorial Lauren. I’ll be making some of these soon! 🙂
This is super cute Lauren! I’ll have to try this and will post it for you to see. Thanks for sharing!!
This is such an awesome card, and you are so sweet to take the time to put a tutorial together, this is definitely something that I will make for my next baby card. Thank you
you are so thoughtful and generous…I was having trouble with the trim…that trick with the punches is awesome…Blessings to you and your family and thanks again for your inspiration.
Thank you Lauren for the great Tutorial~~I’m printing it off for my “Book of Ideas” that I turn to when I need some ideas and energy 🙂
I’m sorry that someone has copied one of your original ideas and tried to profit from it themselves 🙁 That totally SUCKS and makes it difficult to trust people. I hope you turned this rotten situation around and got published for this adorable, unique “”Onsie”” Baby card 🙂 You SO deserve it!!**!!
Robbi xo
Hey Lauren! I love these little onesie cards. I made some a while back to use for favors. They are a little different, but similar concept. You can see them on SCS here… http://www.splitcoaststampers.com/gallery/photo/551729?cat=500&ppuser=88086. Hope you like! I enjoy all of your creations and can’t wait to see the details on the bouquet, that one I will definitely have to CASE :-)!
Lauren, your work is amazing! Pooh on those that take credit for someone else…it will all work out in the end and I don’t want to be them!!!
I’m so happy for you and everything that you are doing. You are inspiring!
This is SO cute…I’m looking for prego people now! I want to make ’em!
Thanks Lauren. You are so open and honest. It is sad that some people have no integrity. I really appreciate you sharing your talent with all of us.
Hey Lauren – great tutorial…sorry to hear the news that someone with a serious lack of ethics tried to get your idea published under their name…shame on them. {{{hugs}}} to you, and thank you for not letting it stop you from sharing your awesome craftiness with the rest of us!!! 🙂
Thanks so much for the tutorial. I’ll give it a try.
God bless
Giovana
thanks for the tutorial – going to make these for my sister’s baby shower! NOT cool about stealing your idea, though!
Thank you SO MUCH for sharing this tutorial so the rest of us can make such a cute card!!! FOR A GIFT!! I cannot believe that someone would steal a creation of yours as their own. That is just terrible. It’s sad that some people don’t seem to know or care about right and wrong. I read your blog every single day and am always excited to see what you have come up with next. You are so creative! Thanks for continuing to share your amazing ideas with us and know that we appreciate them!
That person was a naughty, naughty girl! thanks for posting the tutorial… I need a baby card and I am going to give this a try since it looks easy! TFS I really enjoy your blog and would hate for others ruion (sp) it for the rest of us…. good thing you have friends in high places…
Your onesie cards are so adorable. I am also shocked that someone would try to get credit (and compensation) from something that person did not do. I think that is downright stealing, and I’ve never understood how you can live with yourself after having stolen. Glad that it was brought to your attention at the early stage, before you might have picked up whatever magazine and been even more shocked and hurt.
Like Susan above me, I read your blog everyday and look forward to all your new creations!
Wow, I can’t believe someone would steal your idea like that. But I’m glad you aren’t letting it ruin your fun.
This is such a cute idea, thanks for the tutorial!
Ok Lauren, I made one for a boy baby. Here’s the link: http://artfulavocations.typepad.com/artful_avocations/2008/02/its-a-boy-baby.html
Hope you like it!
Love it! Can’t thank you enough!! You are the best. Sorry to hear that someone is so selfish and taking from such a great person.
Wonderful tutorial! Thank you so much for sharing your artwork with us. I’m so sorry someone tried to take advantage of you!
Thanks so much for the tutorial Lauren! Sorry to hear that someone tried to take your design & claim it as their own. How aweful! Glad that someone was looking out for you & knew you had designed it!
I love it! And I truly do appreciate your tutorials and the time you put into making them. Have a great day.
Lauren,
Thank you so much for sharing the instructions. I’m thinking of creating some for a baby shower since I have 2 friends pregnant right now and due a week apart! Thanks again for sharing!
It’s just too cute!
Thanks again!
Thanks for directions, helps alot, makes me feel good, this is exactly how I figured it out, guess I just wanted confirmation!!!
You are the best
Marilynn
You are wonderful…
Thank you for sharing this with us. It was so nice of you.
I’m sorry someone tried to take your idea and directions and submit them as thier own. That’s terrible. I’m so glad that someone caught it early and told you (and them hopefully). I’m glad that despite this, you’re still willing to share.
Thank you again!
Hugs,
Renee
Thanks for the tutorial, Lauren — it’s such an adorable card!! I always need baby cards — this is perfect!! 🙂
Lauren, thanks so much for the tutorial. I love this card – I have a baby shower this weekend – so PERFECT! And SHAME on the person that stole your idea – probably someone trolling around just on the take. I don’t believe one of your regular readers (PSF) would ever do something like that! And I hope you submitted it too – it is way cute!
Lauren, Thank you so much for your tutorials, patterns, and inspirations that you share with all of us. Your work is awesome and I really enjoy your blog. I hate to hear that someone would submit yours or anyone else’s work as their own.
These are the cutest things! I just love them. Can’t wait to try one of my very own!
Thank you so————much for this tutorial!! I was asked to make 40 baby girl shower invites for a co-worker’s daughter and was so- stressed out that I didn’t know what to do..But now woooooohooooooooo thank you thank you thank you
BTW Sorry about the person stealing your idea thing. Just remember that she’s the one who has to live with herself and in the end she will have to answer for her actions.
Thanks again and I hope you have a GREAT day
Thanks for the tutorial…I way prefer it to the template I have downloaded…its fabu….
These are so cute! Thanks for the tutorial!
so clean, like a new onsie ;^)* NOT like an active little baby, as mine were (grin)
Love this, Lauren. Thank you!
Great detailed instructions, thank you so much for taking the time to walk us through it. You know you’re a stamping diva, don’t you??! 🙂
Thanks for sharing. I thought it was just me. I was able to get one to turn out close but am so glad to have the actual directions.
Lauren, I feel like I’m just repeating what everyone else has said, but it’s so true. You are so giving of yourself and we do so appreciate you. It’s a shame that there are always a few who are out for themselves at others expense and I’m glad that a certain editor was looking out for you there.
Thanks for the wonderful tutorial! I don’t know a soul who is having a baby and I’m still geared up to make one of these because it’s so darn cute!
Ah-ha…I think I know what I was doing wrong…thanks so much for clearing it up for us.
You’re the best…so generous…really!
I’m shocked to hear that someone tried to sell your idea!!… 🙁
I really hope (and believe!) it isn’t a regular reader but just someone who lurks on blogs to case ideas for submissions. Still, it stinks! 🙁
This tutorial is great and so are your cards! I just love them! I can’t believe what some people think they can get away with…makes me sick! I love your blog and your awesome inspirating ideas! TFS!!
Thanks for the great tutorial and sharing all your ideas! Here is mine:
http://weeinklings.blogspot.com/2008/02/onesie-card.html
Cute card! Great job Lauren, thanks for sharing it with us. I will diffently us this for a workshop WOW.
I had made this on my own before you did the tutorial (after just seeing it on your blog) What an awesome card! I did post to splitcoast, but I gave credit to you! Thanks for the awesome idea! I really hope my friend likes it! Now to just get those cute brads, I think they really made the card!
Lauren,
thanks for taking the time to make this great tutorial. It is a shame that there will always be someone out there to try and steal your work! Have a blessed day!
Thanks so much Lauren!! I just love this onsie!! People should be a shame of themselves for always ruining a good thing!! Thanks again for all the work that you do!! Bev
Just to repeat once again what everyone else has said – You are so much appreciated .. not only for your instructions, cards, and tutorials, but also for your humor and dedication to your family and friends! Thanks so much for sharing with us!
This card is soooo cool. I love it. Thanks so much for sharing. I just made 2 of them. They turned out really great. Thanks again.
Thank you for the wonderful tutorial! I love this card! You are so ingenious! Here’s my card:
http://www.splitcoaststampers.com/gallery/photo/804027?cat=500&ppuser=103395
Thanks doe putting this on. I had kinda worked out my own basic card blank using my CM circle cutter (your way is much easier!!!) and my card was larger so it is great to have actual measurements.
I thought it might be a nice base for the ladies at our church group to decorate to congratulate mum’s in our fellowship on new babies. Hope it’s ok that we do this.
I teach and I just hate when someone fobs one of my ideas off as their own. There is an unwritten crafting ‘etiquette’ same as everything else so why do some people have to be selfish, self gratifying, greedy and spoil it for the rest of us?
Sooooo excited about Papertrey! Blessings
Love your blog and thank you so much for posting this tutorial. After I saw your original post, I immediately got to work and tried to make one of my own on scratch paper. However, I got hung up on the leg openings. Your directions make everything so much clearer. I will certainly give this a try.
Hope you are able to submit this idea and get credit where credit is due. I’m sure thousands of readers would love to learn how to make these cards.
Thanks again so much!
Teryl
I loved these cards when I saw them and thought they were so adorable! I’m having my 5th child soon and these would be perfect for baby announcements. I have one question, and not that I’m planning on submitting anything but when you say that these templates are your creation and not for submission, does that mean the template or any card made using it?
Lauren, I love your version of these onesie cards, as I’ve told you before. Since I have made them before (over a year ago) with a template, I thought I’d try it your way just using the punches. It takes way less time than tracing and cutting out a template. It really does take under ten minutes. You can see mine at my blog http://www.ericasartisticattic.blogspot.com if you want. But I gave you credit with a link to your blog. Thanks for sharing with all of us!
Thank you so very much for sharing
this with all of us…
This is just the cutest onesie card that
I have ever seen. I can’t wait to try this!
Another great…”Lauren Original”!!!!
Dee
Wow this is cool, never seen anything like it before which makes it even better. i might give your tutorial a try for my friends baby’s arrival.
christal
http://craftymumof1-gettingstarted.blogspot.com/
Great idea–very clever and thank you so much for the tutorial. Sorry that someone tried to take advantage of your generosity!
Thank you for not allowing the 1 person to ruin it for the rest of us. You are such a creative person! These are just adorable! Thank you so much for sharing the tutorial!
That is just beautiful! Thanks for sharing the tutorial with us
Thanks for your tutorial! I made one today and posted it to my blog:
http://bellacarta.typepad.com
Adorable baby card, Lauren. Thanks so much for sharing it with all of us.
When I saw your original idea I knew I had to make one…now you saved me all the time of trying to figure it out on my own…THANK YOU! There’s lots of expectant mommies in my family so this will definitely come in handy!
Hugs,
Charmaine
Just to let you know, I used this card at a shoebox swap this past Sat. Everybody loved it. I gave you total credit for the cad. Thanks again.
Thank you for such fabulous directions for a onesie card. Here is my creation using your tutorial.
http://kroppykat.blogspot.com/
Hugs,
Colleen
Hi Lauren, thanks for sharing the directions for the cute onsie card. You will probably get a lot of hits today because the SCS VSN pre challenge is to do a “best dressed baby” card and what better for a best dressed baby to wear than a onsie?! Here is a link to the card I made. http://www.splitcoaststampers.com/gallery/photo/809247?cat=500&ppuser=106764
Thanks again!
Marcie
Hi Lauren,
I just love this card…can’t wait to make one. I am having a workshop next week with a “Fun with Punches” theme. This will be the hit of the show.
Thanks so much for sharing, we really appreciate it. Too bad some people want to steal your great idea.
Cindy
Lauren,
Thank you so much for publishing this tutorial. As soon as I saw your adorable onesie cards, I knew I had to make them. Luckily, my girlfriend is due with her 4th at the end of March and I know she will LOVE this card. Also, I am so deeply sorry to hear of that person who stole your tutorial. That is absolutely horrible and my heart goes out to you. Just remember that what comes around, goes around. So happy to hear you are not letting this stop you from sharing your wonderful work in the future. {{{Hugs}}}
[…] Meader posted the tutorial on her blog for you all to view and play around with. Please take the time to read her post and […]
Lauren,
This is absolutely darling! I CASED it and gave you credit. I used berry bliss paper. See what you think.
http://www.splitcoaststampers.com/gallery/photo/810579?cat=500&ppuser=34518
THANK YOU , THANK YOU, THANK YOU! My neice is having a baby in May and I think these would make absolutely darling shower invites or even baby announcements! She’s having a boy, so of course there will be some blue in them (and yellow, my favorite color).
Still have no idea how to post onto the splitcoast website, so I won’t be able to upload one for you to see, but please know that they will be admired and cherished by many!
Again, THANKS!
Lisa
Lauren–Your timing is perfect! One of my good friends had her first BOY today (second child), and I was able to use this tutorial to help me get a card in the mail quickly. I’d seen the onesie card when you first posted it, but the tutorial was so helpful! Here’s my link: http://justforyoubyjenn.blogspot.com/2008/02/new-life.html
Thanks for sharing!
Lauren, thanks so much for the tutorial. You’re right, some people are more visual. I had no idea that scallop punch could be involved — how clever! Thanks so much for sharing! Jeanne
Big Shame on her for trying to rip you off.. I hope that the editor who was savy enough to pick up on it has put a red flag on this rip off artist (who has probably done this to more than one person ) for the future.
Im glad to hear it worked out for you and not her!
I just love, love, love this darling card. My downline just made me one for a swap and I’ve already received so many comments on it. Thanks for such a Darling Idea..
Thanks so much for posting these. I love them and I am going to use them at my club tonight with full credit to you of course. I just posted a few samples on my blog and linked back here. Just wanted to take a minute to let you know that you have inspired me along with many many others and we appreciate it. YOU ROCK!
Thanks so much for the tutorial on the Onsie they are so cute. Also thanks for not letting one selfish person ruin your spirit of generousity. Ann
I love your baby onesie cards! So cute! I was inspired and made my own and posted it on my blog here:
http://mypapercreations.blogspot.com/2008/02/sweet-baby-onesie.html
Thanks for the great inspiration!
Thank you so much. I love it. Aren’t you the creative one. How special that you share with all of us.
Hi Lauren,
I absolutely love this card. Keep it up and thanks for showing your creativity.
Take care,
Rachel(Edmonton, Alberta)
LOVE this card!!
Unfortunately my 1 3/8″ punch doesn’t have the “guide” inside of it! 🙁
I made do anyhow, and I like the finished product. I’ll definately be making more!!
Here is my first attempt:
http://www.splitcoaststampers.com/gallery/photo/814326?cat=500&ppuser=149246
Your the best!!! Thanks for taking the time to do a tutorial!!!
This is too cute. I need a baby card. This is it. Thanks for sharing.
[…] card folks, have you seen this by Lauren Meader? It’s the cutest card ever I think. A Onesie Card!! Yes, it looks like a little onesie. I am going to try one out this week. I have nobody to give […]
Thank you so much for sharing this tutorial!!!!! This is so cute! I enjoy reading your blog–you have amazing talent.
God bless you for sharing you great ideas with us and SHAME on the one(s) that try to spoil it for everyone else trying to take credit for your creative ideas!
Thanks for sharing!
Sandra 🙂
Another adorable little item! thanks for the wonderful tutorial – can’t wait to try these out – don’t presently know anyone having a baby – but I’ll be ready after making these cuties!
[…] Alum Lauren Meader came to my rescue with her adorable Onesie card and tutorial found on her blog here. I have to say I LOVE how this card turned out! […]
Lauren – just have to add my thanks for your inspiration and tutorial – I had such fun creating my own version of the onsie – I did them years ago, but not with punches – which is what made this one SO much fun!! Thanks again!
I can’t even tell you how much I appreciate you sharing this with us! I have SO many friends due in the next couple months. You are a life saver!
I’m so grateful for ideas like this! Thanks so much for sharing!!!
Thanks for the wonderful tutorial and just when I needed to make a baby card. I did mine last night and I posted it today. I really do appreciate it.
http://stampingcrazy.com/feb-2008-talk.htm
Hi there,
This is SOOO cute. I was forwarded your Showcase card and then my upline sent the link out. Perfect timing, as I am making baby shower invites for my shower. Love your tutorial, very easy to follow. Thanks so much for sharing!
Elyse
This is just so darn cute! Thanks for posting such an easy tutorial. Care to see the one I made? http://www.splitcoaststampers.com/gallery/photo/826165?cat=3108
Happy Monday – Regina
Hi Lauren,
Totally adorable card! Loved your great instructions – thanks so much for sharing them on your site. I’ve got lots of friends having babies, so finding this was just awesome! Thanks so much for sharing!
Kimmi 🙂
Thank you Lauren – this is the most darling card I’ve seen in a while. The tutorial is wonderful!!
My version is on my blog – also made another one, but gave it away before I got a picture – naughty, naughty!!
Thanks again – definitely a favorite
Jan in PB
http://jansstampingcreations.blogspot.com/
Just got an invite to a baby shower today–same day as found this thanks to More is More–would have found it on my own as I visit you often. Anyway I just made one–thanks so much for such a timely tutorial. It is just so dang cute and so very generous of you to share!!!! THANK YOU!!!
Laurie
Lauren:
Thank you so much for sharing the tutorial with all of us inspite of what happened with someone trying to steal your design. It shows you have much grace. This card is so sweet. My sister and I both loved it when we saw. You are very talented.
Hi Lauren, thank you so VERY much for sharing your passion and creativity with us. I just made one of your onesies for a practice run… your directions were terrific (my stamping was not). I think your onesie creation is simply precious.
-Mary
Thanks for the awesome directions! I just made one and have one question….do you ever have problems with the 1 3/8″ punch punching out two layers at the neckline? I just tried it and think I jammed my punch and now it doesn’t work. Maybe I punched too slowly? The top cutter part of the circle punch now doesn’t slip through the hole. Your samples are adorable! Thanks for the step by step tutorial!
Mary
Hi Lauren,
Hi Lauren,
Thanks for the tutorial! It is awesome and I just happen to have 2 baby showers this weekend. This card will be perfect! Thanks again!
Emi
GREAT CARD!!!
I just made this cute card but realized the measurements should be 11 1/2 by 4 1/4 then folded at the top.
Thanks for the great tutorial.
Oops I meant to say the measurements should be 11 by 4 1/4 then folded.
Thanks, It’s been a really long day.
Wow, what an awesome card. I was just thinking it would be great to make the front to put into my kids albums when I get to that point.
Way cool, Sorry that someone can be so rude as to try to take credit for something you had designed.
I was pretty surprised this weekend when I was in one of my local independent craft stores (St. Louis, MO area) and they had 4 examples of your onesie card with a set of brief basic instructions sitting out on a table. There was no mention of who had designed it so while they didn’t give you credit at least they weren’t trying to take the credit themselves. I think they just loved your idea and wanted to share it with their customers.
This is such a great card- I can’t wait to try it. I’d seen this card on SCS and many who’ve CASED it credit you. Unfortunately, today I saw it on the Stampers Showcase for Stampin’ Up NOT credited to your name. It makes me sad to think that people get credit for others creativity. I am the first person to tell my customers that majority of my cards are CASED- that’s why I’ve yet to submit anything for a contest- I’m afraid some element came from someone else!!! (:
You are an amazing talented person thank you for sharing and for even doing a tutorial!
I finally gave one of these adorable cards a go, I can’t believe how easy and adorable it was!! Thank you so much for sharing your creations with us.
Lauren, I LOVE this design and finally broke down and made a card using your template. I had show-‘n-tell with my lunch buddies today and they were all thoroughly impressed … and I told ’em it was all you, girl!
Here’s my card – http://sueblondin.blogspot.com/2008/03/its-baby-time.html
later, alligator!
– SueB of sueblondin.blogspot.com
Hi Lauren,
I did one of these for my nephew and his wife. This was SOOOOOOOO much fun and cute I’m doing another one..
here is mine :
http://www.splitcoaststampers.com/gallery/photo/824229?cat=500&ppuser=123674
Thanks for sharing 🙂
Fran
[…] Instructions here […]
[…] My Time, My Creations, My Stampendence » Create your own Onesie Card Tutorial-and important NOTE! P… (tags: paper cards crafting ideas) […]
Thanks a lot for this tutorial!! I have a few friends who are expecting and they are going to love this card.
[…] Meader has a great tutorial here on her blog on how to make shaped onesie cards. Since I needed to make both a boy & girl baby […]
I love the tutorial…thanks for sharing. I was hoping to make these as shower invites for my niece. I just marked your site into my favs. Your ideas rock!!
Hi Lauren
I love this card!!! A friend made this one and I just had to find out where she got the idea! It’s so wonderful.
So after much pleading and prodding I finally got the link to your blog. So I’m a newbie!!!
Anyways I’ve decided that I want to use your idea as a baby shower invitations for my sister’s shower. She is 5 months preganat with TWINS!!!! And we just found out that their boys- that makes 4 for her!!! YIKES!!!
thats all the blabbing I need to do.
Thanks again, will be returning again and agian
Raylene.C
Toronto Canada
Hi Lauren! Thank you very much for sharing this and all of your other fantastic tutorials. You just never seize to amaze me with your talent. I also enjoy reading your posts. So sorry to read about the incident with the submission! 🙁
Here is a baby shower invitation that I made for my sil, thanks to your awesome tutorial.
http://whoopsiedaisy-jane.blogspot.com/2008/03/baby-on-way.html
Thank you!
This is an adorable card! I saw it on the All that Scraps website – and followed the link to you. This is really great and will be a wonderful card for an announcement or even a shower. I can’t wait to try one myself. Thank you for sharing.
Kristina
Hi Lauren,
I just wanted to say again how cute these are and I had to do a couple of more with inspirations of a onsie from Carters.. You have started a craze with these.. very well done 🙂
http://www.splitcoaststampers.com/gallery/photo/844237?cat=500&ppuser=123674
http://www.splitcoaststampers.com/gallery/photo/844238?cat=500&ppuser=123674
Thanks again for a great creation!!
Fran
hi lauren! thank you so much for the fabulous inspiration you give so many! this tutorial is wonderful! i am in love with these onsies and wanted to show you my first one…and, i plan on making more…right now!!! thank you again, so much…i love them!
chelle
http://apaintergirl.typepad.com/the_many_adventures_of_a_/2008/03/sweet-boy.html
Hi Lauren! Just made another onesie card that I thot I’d share – this one for a baby we know will be a girl:
http://sueblondin.blogspot.com/2008/03/welcome-haley.html
Another coworker saw the one I made my boss last week so I’ll be working on a boy’s version soon; we picked out papers for it today!
later, alligator!
– SueB
[…] I made a onesie card to match based on Lauren Meader’s tutorial here. […]
If I print your tutorial for the onsies, will all the comments print too?
These are adorable, but I don’t want to print anything but the directions.
Thanks for sharing your great ideas.
I have just made some of these – with pacifiers! (dummies)
You can see them here
http://sewdelish.blogspot.com/2008/04/baby-onsie-cards-with-pacifier-dummy.html
Thanks for the tutorial
Sewdelish
Love this card:-) Lena from Norway
thanks for sharing eventhough one person didn’t fallow your request. I’m going to be
a GRANDMA again this time IT’S A GIRL not that my two little grandsons aren’t the best but to have a girl will be so much fun. this card will be the first example of what a little girls fun is. THANKS SO MUCH
thanks so for sharing your card with us. it’s such a wonderful idea. i will be having a new grandchild in a couple of months. IT”S A GIRL this card will be perfect for a baby anouncement for me to send to all my friends. they all are great stampers and they will LOVE it. THANKS again.
Hi!! You have great ideas. Thanks so much, I’m having so much fun making these cards.
One question, can you please tell me how you made the boys legs (the white stripes)?
Thanks
Stefanie
Thank you for a wonderful tutorial… I had so much fun making my own version
Here are mine : http://paperpleasing.typepad.com/my_weblog/2008/04/for-the-babies.html
I love this card – but it ruined 2 of my big circle punches! Punching through the two layers at the neck misaligned it or something and they won’t punch anything anymore!! What a waste of $30!! Next time I make this card I will punch out a template circle and trace it onto the card and cut it out with my snips. The card it totally cute though!
This is my first time to your site. I have lingered and looked for two hours! What talent and inspiration you are! I have added you to my favorites and will be back alot. Thanks for sharing everything.
Betty
[…] at so many wonderful Blog’s I came across the cutest Onesie card that was originally done by Lauren Meader and then Julie Buhler made some very cute Onesie cards herself, so of course I had to see what I […]
[…] someone with or having a baby… First off, let me say that this is NOT my design. This sweet template belongs to Lauren Meader over at My Time, My Creations, My […]
This is absolutely the very cutest onesie! I love your illustrations and wonderful instructions. I found this via Papertrey Ink and SCS. You are one very talented women. You are so creative and have fantastic projects. You are truly an inspiration!
Made one at last. Thank you so much for these instructions. I had to use nestabilities as I don’t have correct punces so it was a bit more tricky but happy with the result http://www.splitcoaststampers.com/gallery/photo/915346?cat=500&ppuser=132530
My sousin just had a baby and I was looking for the perfect baby card….I think I found it. Thank you so very much for the wonderful instructions. It’s the cutest!! 🙂
[…] […]
I found your tutorial by googling for a onesie pattern. Thank you so much; it’s awesome! May use this for a baby boy card I need for a shower this Sunday. If I do, I’ll post on my blog & definitely give you the credit you deserve for your wonderful tutorial. Thanks, again!!! 😉
Marge
[…] […]
Really CUTE card and a terrific tutorial! Thanks so much!
[…] crafting! Affiliates Sites you may be interested in My Time, My Creations, My Stampendence � Create your own Onesie Card Tutorial-and important NOTE! PL… Tags baby onesie onesie baby gift iron on baby clothes baby baby shower gift This product is […]
That is horrible… absolutely HORRIBLE.
I saw one of my ideas show up in a mag, and I was so hurt by it, because I recognize the name of who submitted.
With so many sharing out there, you would hope people would be honest & respectful. 🙁
Don’t let them get you down!
thank you so much, i cant wait to try these cute cards! awesome work, you are so talented-love your blog
I finally had a chance to try these. Thought I would post a link in case you want to check it out.
http://raquites.blogspot.com/2008/06/friend-of-ours-is-was-due-to-have-her.html#links
Also thought I would point out that there is a measurement error in your directions. Step one says to cut the paper to 4 1/4 by 5 1/2 it should say 4 1/4×11. I actually cut it before I realized the mistake and laughed when I tried to fold it in half. ha.
Your template is much appreciated, and thank you for the tutorial. As for the person who stole your idea, he or she is not only unethical, they are breaking the law. That was a copyright violation. It happens to all of us sooner or later. I’m glad you haven’t thrown in the towel and stopped posting.
[…] Meader of My Time, My Creations, My Stupendous has posted a great tutorial for making a Onesie Baby Card. It’s simple to make and very eye appealing. I haven’t tried it myself, but Lauren says […]
Thank you so much! I happened upon your site and have set it as a favorite.
Thanks for the tutorial. You’re very kind and talented. Love your webstie!!
This is such an adorable project. You are such a sweetheart to share your instructions! Your site is always a delight–thank you, Lauren! 😀
I would like to make the box that you used for your girl onesies. I have not been able to find the acrylic paper. Can you tell me where to purchase that.
Thanks
mary Bresnahan
OMG Thank you for the tutorial!! I loved the onesie card, and was trying to make one myself and couldn’t figure out the measurements to get it just right… I’ve just learned I’m having my first baby in 8 months time, so I’m getting a head start (wow! talk about a head start) on the baby shower invites..
Thanks!
Thanks for this a-m-a-z-i-n-g tutorial 🙂
I’ve been looking EVERYWHERE for this tutorial and what do you know it’s right under my nose haha! I will be posting the card I made with your tutorial VERY soon! Thank you!
[…] became the design of my sis baby shower invitations. I cannot take credit for this cute creation. Here is where I got the idea. Again, I modified it to my liking. And I must say, it is quite cute; at […]
Thank You sooo Much !! I love your onesies creation. I normally don’t comment in blogs, but I just had to let you know how much I appreciate this one !! Thank you for sharing your talents in this tutorial..
Hi Lauren Just wanted to leave you a link to my blog where I created two of these oh so cute onesie cards! Thanks so much for sharing your tutorials they are so easy to follow!
http://ritaslittlecorner.blogspot.com/2008/09/onesie-cards.html
Hugs
Rita
[…] think that the colours have lost something in the translation. The tutorial for this can be found here if you’re interested in doing one yourself. They’re great fun. I used Pink Passion […]
Thanks Lauren this is SOOOOOOOOOO cute! Thankfully a baby arrived so that Ijust HAD to make one- I’ve put it on my blog (comment 154) & my website (the website picture came out much better!).
Kind regards,
Thanks for sharing directions Lauren. I FINALLY made a couple this afternoon and will definitely be making more. Here are mine:
http://www.twopeasinabucket.com/pg.asp?cmd=display&gallery=1&layout_id=1403162
OOPS – forgot that I have to buy some snaps —– I will post on 2 peas tomorrow!
Here are mine: http://www.twopeasinabucket.com/pg.asp?cmd=display&gallery=1&layout_id=1403487
Thanks so much Lauren for posting easy directions! 🙂
[…] Short & Sweet Onesie Baby Card I came across this ever-so-cute baby card a little while ago and then … no babies! So, now we have a new baby in the family (my cousin’s baby), I had the perfect reason to make this adorable onesie card … originally created and inspired by the talented Lauren Meader. You too can learn from Lauren because she kindly shared a tutorial for this card on her blog here. […]
You are so kind to share this great card and tutorial with everyone! You are sooo clever!! A brilliant idea 🙂
This is my card:
http://rachelcapps.wordpress.com/2008/10/25/short-sweet-onesie-baby-card/
Thanks so much!
[…] then inundated with requests to explain how she created it. She was gracious enough to post a tutorial to her blog so that everyone could create their own cards. Her only request was that people […]
[…] a baby card in a hurry, so I thought about the Onesie cards I had made during the summer using Lauren Meader’s tutorial. I loved how this one turned out and everyone that signed it at her office loved it as well. It is […]
[…] and decided to use paper that I already had on hand. I found the directions to make the card here: http://laurenm.blogs.splitcoaststampers.com/2008/02/05/create-your-own-onesie-card-tutorial-and-impo… […]
People can be so MEAN and SELFISH! I love your work on this template and you should get every bit of credit for it! I’m so sorry there are people like that, and so glad that even knowing that you still share your ideas with all of us! I have a site – http://www.scrapbook-oasis.com that I am showing this card on, but giving you ALL credit and linking your website for the tutorial. It will be under the forum, ‘Everyting Baby ‘ section. Thanks again for all your hard work!
[…] baby last week, so of course I had to make her card. My favorite baby card design was created by Lauren Meader. It is a card that looks like a baby onesie! Lauren has great tutorial on her blog that shows how […]
[…] Create your own Onesie Card Tutorial-and important NOTE! PLEASE READ … […]
Baby Onesie card…
I’m making some invitations to a baby shower for a friend and I was trying out some different things. Here’s one of my creations.
I’m not really crazy about the colors, I think I’m going to try a white one with blue trim and …
I found your tutorial by following several links. I wanted to make sure to find the originator of this design. Too cute! And it was as easy to do as you said. In fact, I made three of them. Here is the link on my blog: http://susansdayoffcreations.blogspot.com/2009/01/baby-onsies.html
Thanks for sharing this!
Wow this is so darn cute. Great tutorial. And I must say this come thru in a pinch for me. I just didn’t want to make an invitation I wanted something different. Thank You so much for your creatitivity…
[…] neobičajnega in našla na netu navodila za izdelavo t. body-jak katerega iudelavo je poslikala Lauren. Za malega fantiča sem zašila tudi enega mini zvezdnega palčka. Ko sem tuhtala, kako bi izdelala […]
[…] at my church so I thought I might stock up on cards. All the instructions for this card are at Lauren Meader’s site. I made this card on a school holiday visit to Kathy’s house so that both the kids and the […]
Thanks for the fab tutorial Lauren, your work is gorgeous! TFS
Here’s my onesie card…
http://stampindesigns.typepad.com/blog/2009/02/onesie-card.html
Lauren,
Thanks for sharing your wonderful ideas with everyone. I love this “onesie” card and so glad that you even though someone tried to profit on your idea that you still continue to share with all of us!
Michele
[…] Welcome Baby! March 7, 2009 Filed under: Cards — sallymcnamara @ 3:53 am Tags: baby card, onesie card, stampin’ up Well, I don’t actually have a baby to welcome, but i have got a card ready to go should any of my friends have a baby girl any time in the near future! I made this “Onesie” card (as they call it in America) using the instructions on Lauren Meader’s blog. I know everyone has had a go at making this card, but it’s so darn cute I had to do it too! And it’s surprisingly easy to make. Check out Lauren’s instructions at http://laurenm.blogs.splitcoaststampers.com/2008/02/05/create-your-own-onesie-card-tutorial-and-impo… […]
Thanks so much for the idea and instructions. For those of us that are creatively challenged it was very helpful! I appreciate your willingness to share.
Thanks heaps Lauren. Will pop in a link to my card when I have it up on my blog.
Here is the link to my card Lauren. Thanks again.
http://theycallmethescrapnut.blogspot.com/2009/03/baby-card-inspiration-anyone.html
Hi Lauren,
Thank you for sharing your wonderful card template with the rest of us. I hope I have posted a link properly (still new to the world of blogging) to the card I created. It came in really handy as I had a few baby showers to attend recently.
Here’s yet another onesie card based on your post – TFS!
http://sueblondin.blogspot.com/2009/04/story-time-baby.html
HEy………………….this site is really gr8888888888
john
Baby Shower
hi i am a new comer of this web site..
Baby Shower Invitations
Fantastic design, I had great fun duplicating it, though I sketched a an outline and cut it out rather than using the punches (a jar worked fine 😉
Caroline
[…] can make yourself a little boy. Card that is.. not a Pinocchio wanna be! After being inspired by this post to make this little baby girl card Baby girl growsuit […]
Thank You Lauren! All my friends are having girls this year and I wanted to make an extra cute card and I stumbled on your tutorial. Your cards are so cute.
Thank you for sharing
Thank you for sharing i like very much :))))))
[…] (or onesie as they are called in the US). You can find all the instructions how to make one here on Lauren’s blog. I was surprised how small it was though, so I doubled the length and then […]
Thanks so much for your tutorial, I love how they turned out, check them out…
http://becsstampinground.blogspot.com/2009/07/baby-shower-invitescheck.html
I’ve given credit where credit is due!!!!
I had seen this baby card before so I made one for a gift, you can see it on my blog
http://carolinacreation.blogspot.com
but your way of using the punches is fantastic, quicker and more tidy. Will be using that method from now own. Thanks
[…] Of course, I also had to make a matching card. I used Lauren Meader’s Baby Onesie Card design. […]
Baby names search – Search for rachelle
Search for the baby name like rachelle, browse similar baby names
So glad to have finally found this tutorial – have just seen your magnificent christening gowns – stunning. Thank you for sharing your brilliant idea.
Thanks for this tutorial Lauren, I have just made one and it was such fun!
Clare x
Hey Lauren, I have tired to make this card so many times and I am just not getting it! I am a little frustrated. I don’t understand what I am doing wrong. The card eaither look to small or to wide. Could you please help me, I really would like to learn this card. The first part of the instructions is confusing.
“Cut your card-stock to 4 1/4 X 5 1/2. Fold at TOP” Is it a 1/4 of a 81/2 x 11 sheet of paper. Then I don’t understand the folding at top? What does that mean.
Also, I’m not sure how to make the sleeve. It is confusing me and I’m a bit sad because I don’t know how to make it. could you please help me.
Resa
Thanks for this tutorial Lauren, I have just made one and it was such fun!
Thank you for sharing i like very much !
nice post!!!
replica watches
ugg boots online
happy
[…] The first one is a onesie card following this template done by Lauren Meader. The only thing I do different is to make my sleeves a bit smaller than hers. I think I measure down 1-1/4″ instead of 1-3/4″ but I’m not certain, and don’t have one handy to measure it. Just measure down an amount that looks good to you. Here is the link to Lauren’s template. […]
Just wanted to let you know that I finally made a card like this. Thanks so much for your easy to follow tutorial.
If you want to take a peek at mine…here’s the link
http://www.splitcoaststampers.com/gallery/photo/1569085?&cat=500&ppuser=66979
I’m not sure how to make the sleeve. It is confusing me and I’m a bit sad because
UGG Boots
I don’t know how to make it. could [url=http://www.ugg-boots.me/]UGG Boots[/url]
you please help me.
Thanks a lot for this tutorialUGG Boots!! I have a few friends ghd straighteners who are expecting and they are going to love this cheap ugg boots card.
I have tired to make this card so many times and I am just not getting it! I UGG Boots am a little frustrated. I don’t understand what I am doing wrong. The card eaither look to small or to wide. Could you please help me, I really would like to learn this card. The first part of the instructions is confusing.
Also, I’m not sure how to make the sleeve. It is confusing me and I’m a bit sad because I don’t know how to make it. could you please help me.
Resa
[…] made for the baby shower we had at work a couple weeks ago. Today I will show you the gifts. I used Lauren Meader’s fabulous onesie template and made them each a pack of Thank You notes. I packaged the cards in one of Stampin’ […]
you please help me.
the editor who was savy enough to pick up on it has put a red flag on this rip off artist (who has probably done this to more than one person ) for the future.
http://www.ecougg.com/ugg-bailey-button-boots-c-14.html
http://www.ecougg.com/ugg-classic-tall-boots-c-4.html
One of my friend told me some information about Christian louboutin ,then i search them on the Internet,they are so beautiful.Christian Louboutin’s designs have gained popularity among socialites and celebrities, several of whom have made public appearances sporting the signature red soles. For
example, Christina Aguilera and Nicole Kidman were outfitted by the couture cobbler for their weddings.
The world is talking about Christian Louboutin, and the Hollywood stars lead the fashion. It is time to get
yourself some.The Website including
http://www.louboutindiscounting.com/
http://www.louboutindiscounting.com/catalog/12/christianlouboutinboots
http://www.louboutindiscounting.com/catalog/13/christianlouboutinpump
http://www.louboutindiscounting.com/catalog/14/christianlouboutinsandals
http://www.louboutindiscounting.com/catalog/17/yvessaintlaurent
http://www.louboutindiscounting.com/catalog/15/manoloblahnikpump
http://www.louboutindiscounting.com/catalog/16/jimmychoo
You designs are great. I love it. Keep up the good work!
Thanks for the important note!
Yeah!!! i like pink too! is that the quickiest tutorials? hehehe LOL
celebrities, several of whom have made public appearances sporting the signature red soles. For
Christian Louboutin, and the Hollywood stars lead the fashion. It is time to get
quickiest tutorials? hehehe LOL
How do you write inside and the front???
I love this card!!! A friend made this one and I just had to find out where she got the idea! It’s so wonderful.
So after much pleading and prodding I finally got the link to your blog. So I’m a newbie!!!
Anyways I’ve decided that
February 6th, 2008 at 12:54 am 22
Thanks so much for the tutorial Lauren! Sorry to hear that someone tried to take your design & claim it as their own.
The misclassified or misdated books mentioned above are mostly only limited view or no preview only, but I’ve found at least one misclassified books available in full view
t offering today includes the ASP.NET Ajax Framework and they’re looking to expand it with the use of jQuery. This means that jQuery will be distributed with Visual Studio (which will include jQuery intellisense, snippets, exam
Hi Lauren! I love this card idea… my SIL just had a little girl yesterday, and this will be a great card to send! I have a question– how much of the paper is to be folded at the top? I’m assuming it’s so you have an actual card, to stand on a table etc. Is it to be folded in half? Thanks!
Katrina
I love this card!!! A friend made this one and I just had to find out where she got the idea! It’s so wonderful.
http://www.loveclshoes.co.uk/
http://www.himyshoes.co.uk/
Christian louboutin shoes are high in quality and reasonable in price. It is the best choice for you. It can make you more beautiful and charmful.
christian louboutin
louboutin shoes
christian louboutin shoes
Just made this for a baby shower…OMG way toooooo cute! want to keep it for myself! thanks so much for sharing!
I am throwing my cousin a baby shower and I just fall INLOVE with this card. Thank you for your tutorial. You should publish a card craft book 🙂 Thanks again.
Renee in Silver City NM
cheap cocktail dresses
cheap cocktail dresses
Cheap Wedding Dresses
Well Done!I do hope u can publish more posts later.buy the way ,if you wanna buy cheap brand shoes online,you may visit our http://www.cheap-shoesonline.com,I am
sure you will find what u like,mbt shoes and desinger sunglasses are on sale now with free shipping,tax free as well.
Hello everyone.
In our online shop, you can purchase different designer mbt shoes, and we offer the commodities are high in quality and reasonable at price now.
These are our mbt shoes on sale.
Shop’s homepage http:\\www.mbtshoeshop-online.com
mbt women
mbt men
Really its a interesting and helpfull post, I always enjoy reading such posts which provides knowledge based information
[url=http://thenikedunk.com/Nike-SB/Nike-SB-Zoom-Stefan-Janoski/]Nike SB Zoom Stefan Janoski sale[/url]
[url=http://thenikedunk.com/Nike-SB/Nike-SB-P–Rod-3/]Nike SB P. Rod 3 reduce to clear[/url]
wholesale Nike Men SB Dunk Mid
wholesale Nike Men SB Dunk High
In vogue2sale.com,we have daily use thing online sale,Ed Hardy Sport Tank,Ed Hardy Iphone Case Skin Cover,Ed Hardy Womens Tank Top,Ed hardy wallets,
Cheap Ed hardy jewelry ,Discount Ed Hardy Kids T-shirt ,wholesale Ed hardy mens board shorts ,Ed Hardy Mens Low Rise Sneakers ,Ed Hardy Iphone Case Skin Cover ,Ed hardy Womens Pants ,Ed Hardy Belts,Christian Audigier Womens Short Sleeve Tee,Ed Hardy Sport Tank and so on .we hope you will enjoy them.
I think it is important to keep the website updated by updating the news.I see this as a cool featurea at your website. Welcome to the our store for Wholesale Gucci. We can guarantee the real item were the same as the picture of Christian Audigier sale . You can mix all the goods from our shop .The homepage design is fine to me except for the animated fire engine across the screen. The navigation is clear and straightforward
willkommen bei Gamesavor wow Gold kaufen
http://www.arfblog003.com
We are allright word and my think Air max is loving and true way is nice…
http://www.ladyshoesstore.com/alexander-mcqueen-alexander-mcqueen-shoes-c-22_32.html
very good !
beyninizi zokam
bedava film
You can visit the website if you like shoes http://www.ladyshoesstore.com/
I am very picky shoes, sometimes I feel that very few seem to fit right or comfortable shoes. One day,
I know a certain site christian louboutin shoes. I have read christian louboutin shoes!
I think I can never afford these christian louboutin shoes, but did not clean christian louboutin shoes on it!
These shoes provide such wonderful support and comfort me. They are christian louboutin shoes online,
and with the project is amazing. They really tempted, I finally decided to buy a pair. Strongly recommended!
christian louboutin
louboutin shoes
christian louboutin shoes
http://www.gucci-shoes-bags.com
http://www.guccinewshop.com
Dear friends welcome to our store: we have a specail offer now which is once you buy any product you can get a free gift as well, these gifts are in the gift area, you can free to choose and please add to the shopping cart, we will send it together with your purchased product. Thanks!
http://www.towatches.com/Discount-Watches/ The new high can browse your article
Frank’s was the first idea; Wholesale nike dunks and his the greatest zeal in pursuing it; for the lady was the best judge of the difficulties, and the most solicitous for accommodation and appearance. But still she had inclination enough for shewing people again how delightfully Mr. Frank Churchill and Miss Woodhouse danced–for doing that in which she need not blush to compare herselfWholesale jordans with Jane Fairfax–and even for simple dancing itself, without any of the wicked aids of vanity–to assist him first in pacing out the room they were in to see what it could be made to hold–and then in taking the dimensions of the other parlour, in the hope of discovering, in spite of all that Mr. Weston could say of their exactly equal size, that it was Wholesale jordan shoesa little the largest. His first proposition and request, that the dance begun at Mr. Cole’s should be finished there–that the same party should be collected, and the same musician engaged, met with the readiest acquiescence. Mr. Weston entered into the idea with thorough enjoyment, and Mrs. Weston most willingly undertook nike air maxto play as long as they could wish to dance; and the interesting employment had followed, of reckoning up exactly who there would be, and portioning out the indispensable division of space to every couple. “You and Miss Smith, and Miss Fairfax, will be threair jordanse, and the two Miss Coxes five,” had been repeated many times over. “And there will be the two Gilberts, young Cox, my father, and myself, besides Mr. Knightley. Yes, that will be quite enough for pleasure. You and Miss Smith, and Miss Fairfax, will be three, and the two Miss Coxes five; and for five couple there will be plenty of room.”
If any one will but take pains to observe the variety of actions to which he is equally inclined in certain moods of mind, and those to Nike Dunkwhich he is averse, he will see how deep is the chain of affinity. A painter told me that nobody could draw a tree without in some sort becoming a tree; or draw a child by studying the outlines of its form merely, — but, by Nike Dunkswatching for a time his motions and plays, the painter enters into his nature, and can then draw him at will in every attitude. So Roos “entered into the inmost nature of a sheep.” I knew a draughtsman employed in a public survey, who found that he could not sketch the rocks until Nike Dunk Lowtheir geological structure was first explained to him. In a certain state of thought is the common origin of very diverse works. It is the spirit and not the fact that is identical. By a deeper apprehension, and not primarily by a painful acquisition of many manual skills, the artist attains the Nike Dunk Highpower of awakening other souls to a given activity. It has been said, that “common souls pay with what they do; nobler souls with that which they are.” And why? Because a profound nature awakens in us by its actions and words, by its very looks and manners, the same power and beauty that a gallery of sculpture, or of pictures, addresses. Civil Nike Air Force 1and natural history, the history of art and of literature, must be explained from individual history, or must remain words. There is nothing but is related to us, nothing that does not interest us.
its too sweet 🙂 awesome
[url= http://www.christianlouboutinshoesmall.com ] wahtever you want here can find ,do nor wai please[/url]
YEAH!!,it’s focused on by the fashion world!
the fashion chage our life style and how to feel life
It really nice and comfutablel,one of my friends show it to me !
ysl shoes
welcome here to hava a look ,you wil find what you want for girls..happy to your account from I !
Many popular style of dunk sb shoes and NIKE DUNK shoes and so on are on sale in http://www.ok-nike.com now , you can find a suitable nike dunks Anyway .welcome !
Christian louboutin shoes http://www.christianlouboutinpub.com are high in quality and reasonable in price. It is the best choice for you. It can make you more beautiful and charmful.
I just have one question – how well does that heart hold your shoes on? heart thong sandals by YSL Shoes ,Shoes and Boots, spring shoes, summer-shoes, Yves-Saint-Laurent Share This .add to http://www.christianlouboutinshoesmall.com
Helo, your blog is really good, I like it very much!By the way, if you like nike chaussures tn you can come here to have a look!
http://www.tnchaussurescom.com
http://www.sunglassesol.net
Thank you for this wonderful tutorial, so easy even if I’m french so the text… but with images, we can do it 😉
Here is my card :
http://mariedoudou.canalblog.com/archives/2010/05/26/18016751.html
Now all I ask is one chance , ugg boots sale to try to win your heart .
Well done,thanks for sharing.
This is a nice post .Best wishes for everything.
http://www.wholesaleeshop.com.au/USB-Monitor/
[…] Just a quick one today. I have 4 classes and 3 workshops this week, so I don’t have much free time on my hands! This is one of the other “cards with a difference” we made last month. You’ve probably seen these around the place. On US blogs they’re called “onesie” cards, but I named it a baby jumpsuit, since we don’t use the word “onesie” here. You can see an online tutorial HERE. […]
but I named it a baby jumpsuit, since we don’t use the word “onesie” here. You can see an online tutorial HERE.
we made last month. You’ve probably seen these around the place.
Christian louboutin shoes http://www.christianlouboutinpub.com are high in quality and reasonable in price. It is the best choice for you. It can make you more beautiful and charmful.
louboutin
pumps shoes
christian louboutin shoes
Fantastic post. Do you like fashionable hairstyle? If yes, then have a try on chi hair straightener. You will never regretful about that. An alternative choice must be the ghd straightener. Both are adopted the ceramic plates. The christian louboutin shoes on sale are the worldwide known shoes.
This article and comments have raised some very interesting points.
I’ll be checking in on a regularly now….
Keep up the good work!
kobe bryant shoes
kids shox
womens nike shox
The official said Air Max it would wait for the Israeli government issued a formal statement.
The Israeli army had argued that the square block in the block bound to the Gaza Strip, the international relief Air Max 90operation in the fleet is due to Turkey’s rescue boat on board one of the humanitarian activist first attack on Israel, the Israeli army returned fire only of.
Israeli army Air Max 95 opened fire caused nine deaths humanitarian activists. Latest information, including the eight Turks, and an American Turks.
Israel said the Israeli military has been investigating the matter.
I agree you! excellent review!vibram five fingers have been popular for a long time,for its excellent quality and further features,I’ve always wanted to have a pair of beauty fivefingers running shoes, yesterday my best friend bought a pair of 2010 fashion vibram shoes
Thanks for sharing ,really helped a lot here! We are the best and professional online retailer, offering top quality Classic uggs sale, Short ugg boots and free shipping worldwide. And we have engaged in uggs shoes sale for years.
ugg boots shop offer powerful training shoes ,Tall ugg shoes. A large number of UGG Tall Boots
We are shortly launching our new website,http://www.uggofficial.nl/ which will focus on selling ugg boots, Ugg Schoenen
Thank you again for all the knowledge you distribute,Nowadays,people pay more attention to high quality life style. High quality means ,comfortable and healthy, very useful womens ugg boots is very popular now.Made from sheepskin, bailey button uggs is very comfortable and warm.It is fit for indoor and outdoor wear
Wow – really powerful post. Thanks for taking time to share this personal perspective that not only we as individuals should heed, but organizations as well. Ugg Boots UK becoming more and more popular,new style Ugg Boots will be the best seller for this Christmas,in Ugg Boots Online shopping
Thanks for sharing !So nice to see you !I will buy a wallet for my best friend! Shopping Cheap EdHardy can be used on various occasions and in different ways. Do you know all these? It’s the time for you to know; It is true that everyone wants to wear the latest trend and wish to buy that pair which is in heavy demand. But it would be better to check what kind of ed hardy clothing that you love.Especial ed hardy hoodies and don ed hardy will improve their appearance.
I really love your website, it’s so useful, i’m just sharing for my friends!Strong winter weather is hitting most of the United States right now. Many of the states that are not used to seeing even the slightest amount of snow, are being bombarded with strong winter weather. If you want to keep warm in this winter
you might try adding some clothes to your inventory like abercrombie & fitch clothing. And The best sell is hollister . In winter Many people are out enjoying this weather while it lasts and snow skiing and snow boarding are two of the most popular winter time sports. Both of these sports require good clothing right? Good
One thing is for sure, football’ world govern body,nike air max Fifa, will not be fork out.Fifa will pocket the vast major of the monei rais by the sale of media right and globalnike shox r4 sponsorship deal as well as some of the incom from ticket sales.South Africa,nike air max 2009 on the other hand, will be pai the costs.
The ultim goal is an oralnike shox r4 vaccin that would be ad to food left out for badger to eat. Thi mainike air max 2009 be avail in four to five years’ time.Th Irish Republ see vaccin as open the door to eraded hardy of bovin TB. However, vaccin would not affect infect badgers, so cull might be maintainnike air max for some year after the start of a vaccin programme.
Hey, I read a lot of blogs on a daily basis and for the most part
people lack substance but
I just wanted to make a quick comment to say GREAT blog!…..
I’ll be checking in on a regularly now….
Keep up the good work!
ed hardy discount
vibram five fingers sale
Christian Louboutin Discount
Cute page you have
said Wednesday.rnrnBJP Government is in a State will Tiffany Accessoriesform a Committee to study before joining the appeal of legal issues, he said.rnrn”In the Bhopal gas tragedy more wait for judgment disappointing. The victim can increase the appeal of punishment.rnrn”Because the person is the Bhopal victims, in this case, and by the State Government said they we decided to file an appeal to get justice for victims, the increase in criminal penalties” Chouhan told reporters in Bhopal.rnrnChouhan said his
http://www.discount-air-jordan.com
cheap gucci outlet
ed hardy outlet
I really like your blog very much and i hope you will continue this good work in the future as vernis almawell
ugg boots uk will lead you to walk in the forefront of fashion, make you more charm, and interpretation of the noble. Quickly landing ugg uk to buy a pair of it for themselves. You can also log on cheap uggs uk discount to understand the situation.
If you want the hair curled, then use the chi flat iron bar. If you are born with naturally straight hair, they hope, it is recommended that you use the ghd flat iron.
Is not how to lose weight and then upset it, then you see it is necessary to p90x exercise, you will find that weight-loss is not so difficult. Not want to learn how to do science and fitness? Want to have well-developed muscles in the body do? Then rush to p90x workout to see it. p90x torrent then go look, you will clear up.
the band number. In addition to the band number in the band discount out surface, the rest are hidden, not to remove the watch strap or open the rear door in order to see it.
Today,I learned Vibram Five Fingers from the site,"barefoot running shoes" is said to provide almost the feeling of walking barefoot on the muscles,prevent injury are beneficial.The wearer can experience the fun of running barefoot,like back to the original.I very much want to try Five Fingers Shoes.
Thanks so much .Your card is adorable. I know several expectant moms so I really appreciate your sharing the directions.
Hey,ed hardy man wristbands
I read a lot of blogs on a daily basis and for the most part
people lack substance but
I just wanted to make a quick comment to say GREAT blog!…..
I’ll be checking in on a regularly now….
Keep up the good work!
Yves Saint Laurent Sandals Sale
“To bring peac and stabil nike shox R4 to Kandahar, you should be besid us and stand besid us,” Karzai said, wag hi forefing at the audience. wholesale nike “Once again, I want to hear from you. Are you stand with us or not?”
Insurgent wear militari uniform storm Iraq’ central bank Sundai dure an appar robberi attempt, nike shox battl secur forc in a three-hour standoff after bomb explod nearbi in a coordin daylight attack that left as mani as 26 peopl dead.
Th assault on Iraq’ top financi vibram men shoes institut stoke fear that insurg ar take advantag of polit deadlock after inconclus March 7 nation elect to try to derail secur gains as the U.S. prepar to withdraw it forc by the end of next year.
Th 325-membered hardy parliament wa due to conven Monday, but analyst have said agreement on a new govern could still be month away.
Iraq imilitari spokesman Maj. Gen. Qassim al-Moussawi blame the attack on al-Qaida in Iraq but said no moneinike shox R4 had been stolen from the bank, which hold gold deposit as well as U.S. and Iraqi currency.
The violenc began with the bomb which sent plum of smoke over the citi skylin although there were conflict report about the number and natur of the blasts.
Has the many safety performance very high valve in the valve: Safety valve、butterfly valve
I like you blog
There are stori of honour member makewomen shoes
their frustrat veri clear to Ipsa staff. The organisation’ interim oper director Nigel Good resigned, vibram five fingers tell the Mail on Sundai he left the job for the sake of hi “health and sanity”, women+T-shirtsalthough he said he had not been hound out by MPs.Thank you very much for your hard work.
Christian Louboutin pumpSpecial Offers Louboutin pumpsLouboutin saleWorld famous Louboutin shoesheeled shoescheapest heelssexy heelsClassic and Fashion women heelsheels saleMature sexy girls heels
Christian Louboutin pumps strange that the change in the name of the woman in the verb. It has allowed women to show their best form.
very beautiful T-shirt.
Pretty good post. I just found your site and wanted to say that I have really enjoyed browsing your posts. http://www.uggofficial.de
Many thanks for sharing this, very useful! http://www.uggbootshort.com
Wow – really powerful post. Thanks for taking time to share this personal perspective that not only we as individuals should heed, but organizations as well. http://www.uggclassicboots.org
I really love your website, it’s so useful, I’m just baking a cake for my aunt! http://www.uggmall.us
I am glad to post my views and points in this blog. http://www.fivefingersrunning.com
thank you for your advise ,the pictures very nice , , like the website
Thank you for your detailed operation steps. The blog is very lovely.
I learned some knowledge and experience.You can visit our website ugg outlet store, you need to buy the goods acquisition. Walked passed, do not miss. We hope you find the items you need to buy, here are inexpensive goods.Hello, read the comments above, I learned something, thank you! To this end I recommend you a shoe, this shoe is very comfortable to wear and very durable I am sure you will love reading. http://www.uggs-boots-outlet.com/
Hello everybody, Australia uggs is a good warm boots, looks very stylish, well suited to the style of most girls and boys, wear the shoes before you walk in the trend, Australia ugg as the best winter gift I believe that you give to your colleagues and your friends, they would feel very happy day!You can get more information from uggs Australia.
I am a sports fan, I love all kinds of sports than that of Huan, because I want to be strong, wanted to exercise each muscle have been, I believe many people have I think so, then what you waiting for, come and join us To our activities.I believe we all like to exercise it, and I am pleased to recommend a site to you, anyway, want to own a very strong physical exercise, do not miss this site. Certainly in this site what you want, I hope you get from this site where you want. Must not miss. P90X Workout DVDs On Sale. You can visit our Web site Guide.
Wow, thanks for the insightful post. I look forward to reading more from you.
http://www.cheapshoeshop.com/MBT-Shoes/MBT-Tataga/MBT-Womens-Tataga.html
Also unsurprising was the
http://www.sunglasses1987.com wholesale sunglasses schadenfreude emanating from Ireland. The
http://www.sunglasses1987.com wholesale replica sunglasses Republic lost a play-off to reach South Africa after striker Thierry Henry’s handball
http://www.sunglasses1987.com/oakley-sunglasses-c-80.html fake oakley sunglasses led to the decisive goal which put France through.
http://www.bagonhand.com/Fendi-Bags/Fendi-Purse/
http://www.bagonhand.com/Burberry-Bags/Burberry-Wallet/
http://www.bagonhand.com/Chloe-Bags/Chloe-Wallet/
ffgf
Every girl love beautiful and fashion, especially the bags,coach handbags are so beautiful and designer that the girls who want one.wellcome to my web http://www.coach-handbags-outlet.com/ coach handbags,we supplier all kinds of coach handbags and all colors for choice.
http://www.coachoutletfactory.com coach outlet
[…] decor elements. So I wanted to make a card with a lion for him, and of course I had to make one of Lauren Meader’s onesie cards! We gave this to him yesterday, when he came home from the […]
Welcome to http://www.bbpuma.com puma shoes store. As the world-leading puma shoes store,we wholesale more than 100 high-quality merchandise base all puma shoes.
In our store,we produce many kind and style new puma shoes for you.The product shoes have what are poised of a mixture of provisions and affect.This great appearence more shape,so that our body more muscular. In our base more attract many scenic girls and women.So in the key spit is the condition of new puma shoes.[http://www.bbpuma.com Puma shoes shade] is brilliant and iron,when we converge the outward,we will feel very flawless.It all kinds of things emerge.Such as the line items,leather,velveteen ideas and so on.No material what kinds of material,it is the best fiber and rubber composition.When you show [http://www.bbpuma.com puma shoes],you can take a good couple of classify shoes.It is very important to say:”why most of people want product shoes?
The last periphery is about the aesthetic issues.The sketch of puma speed cat shoes is very subtle and comfortable.This is the one situation make our customers very satisfaction.
Secondly,Customer buy shoes the sports,and make people more relax.This statement is important for our shape.The third section,Why [http://www.bbpuma.com puma shoes] has high worth,the trice sanity is the high technology.No technology is no eminence.
The mbt chaussure shoes use the high trip and repayment?”First,we can from the appearence of shoes.The new puma shoes has all return the puma sports skills.Puma designs are the advantages and hollow shock technique.It can ease injury the intellect in our world,[http://www.bbpuma.com puma shoes] is very hot trade.Hope every people can feel very mellow and comfortable.This kind of shoes can guard our daily life,we can see most of people elect the type shoes.Such as nike,jordon,puma,adidas ect.Now,I will want one style to people’s strength.This is best idea for people to choose a comfortable pair of shoes.
Nike shox and timberland boots sale on nike air max shoes online store, we also provide dicount adidas shoes and mbt shoes for you. big discount price and free shipping to you door. Fast delivery!
nike air max and cheap puma shoes sale online, we also provide air jordan and ed hardy clothing for you.
Puma designs are the advantages and hollow shock technique.It can ease injury the intellect in our world puma store
I had to make one of Lauren Meader’s onesie cards! I love ed hardy swinwear jeans and ed hardy sunglasses on http://www.edhardyclothing2u.com/
I had to make one of Lauren Meader’s onesie cards!
I know several expectant moms so I really appreciate your sharing the directions.
Hey, I read a lot of blogs on a daily basis and for the most part
people lack substance but
I just wanted to make a quick comment to say GREAT blog!…..
I’ll be checking in on a regularly now….
Keep up the good work!
Well said. I never thought I would agree with this opinion, but I’m starting to view things from a different view. I have to research more on this as it seems very interesting. One thing I don’t understand though is how everything is related together.
This is such a great resource you are providing. I enjoy seeing sites that understand the value of providing a prime resource for free. I really loved reading your post. Thanks!
I enjoy seeing sites that understand the value of providing a prime resource for free. I really loved reading your post. Thanks!
The international fashion brand Puma will after purchase GUCCI combination of fashion to exercise and to restore ancient ways, Puma70 recreate the image.http://www.azpuma.com Time flies. You know, Puma Shoes over the whole seventy years.
Brilliant. You are a genius.
hi friend we are a export company who special in various name-brand product like nike jordan adidas edhardy rolex watch chanel bag etc if u want to get this popular stuff.hello,what do you like.nike watchesdon’t hesitate to contact them. they supply AAA+ quality and wholesale price.miao silver jewelry
Great post! I would also recommend the book E-myth, every entrepreneur should give it a read.
July 2nd, 2010 at 2:28 am 324
hi friend we are a export company who special in various name-brand product like cheap Nike shoes edhardy rolex watch chanel bag etc if u want to get this popular stuff.hello,what do you like.nike watchesdon’t hesitate to contact them. they supply AAA+ quality and wholesale price.miao silver jewelry
Great stuff thanks.
What do you think about oracle training london. Is it good for my career? I’m not sure which course should I take.
your work is amazing! Pooh on those that take credit for someone else…it will all work out in the end and I don’t want to be them!!!
I’m so happy for you and everything that you are doing. You are inspiring!
Online sale for mens Nike Air Max Limited (LTD) shoes, Cheap nike air max LTD shoes, Top quality and low price. Buy nike air max uk Now!
Wearing mbt shoes
will provides many pro-body benefits to you this is approved by professors nowadays, and if you want to buy Discount MBT Shoes you can do it at online shop, any way we are a professional online shop, welcome. http://www.shoe-mbt.net
Wearing Mbt shoes provides many pro-body benefits: this is the result of an increasing number of international studies supporting the numerous health benefits of the “anti-shoe “. Here is a excited place—–discount MBT shoes http://www.shoesmbt.org
10712025911PMhttp://ms4mesos.net/ Maplestory | http://ms4mesos.net/ Maple Story Mesos | http://ms4mesos.net/ MapleStory Mesos | http://ms4mesos.net/ Maple Story Meso |
Where to buy Cheap and super-fashion christian louboutin shoes ,buy save 70% christian dior,christian louboutin pumps , Free Shipping,7 Days To worldwide!
Wearing Mbt shoes provides many pro-body benefits: this is the result of an increasing number of international studies supporting the numerous health benefits of the “anti-shoe “. Here is a excited place—–discount MBT shoes http://www.shoesmbt.org
Wearing mbt shoes will provides many pro-body benefits to you this is approved by professors nowadays, and if you want to buy Discount MBT Shoes you can do it at online shop, any way we are a professional online shop, welcome. http://www.shoe-mbt.net
http://www.vip-plaza.com/nike-air-max-87-c-2.html
http://www.vip-plaza.com/nike-air-max-90-c-4.html
http://www.vip-plaza.com/nike-air-max-93-c-6.html
http://www.vip-plaza.com/nike-air-max-97-c-9.html
http://www.vip-plaza.com/nike-air-max-fitsole-c-1.html
http://www.christian-louboutin-sandals.com/christian-louboutin-sandals-c-4
http://www.christian-louboutin-sandals.com/christian-louboutin-2010
http://www.christian-louboutin-sandals.com/christian-louboutin-wedges-c-9
Thanks for sharing your wonderful ideas with everyone.
Thank you very much..
Thanks a lot for that a fantastically amazing post!
Nike Air Wright, Nike Air Wright
air max bw, air max bw
Air Structure, Air Structure
air jordans
If the sun along the way memory can traveled back and picked up the residual broken youth. See now that the world’s most cruel three words: christian louboutinI’m sorry, christian louboutin shoesbecause it is mixed with fear and despair and christian louboutin pumpshopelessness and bring the pity. A sorry to you my heart with your memories from the memory.
My earlier career, from last May to date,christian louboutin is nothing short of a story christian louboutin shoesthemed by my long and hard struggle and moreover, christian louboutin pumpssurvival. The road has been cranky and the climb, steep.
[url=http://www.cheapuggoutlets.com/]UGG Outlet[/url], though, this is good news for chocolate lovers — matching the protective effects seen in other types of heart disease, commented Linda Van Horn, PhD, RD, of Northwestern University in Chicago and a spokesperson for the American Heart Association.People can consume the antioxidant- and flavonoid-rich treat without guilt as long as they do so in moderation, she told MedPage Today.
[url=http://www.cheapuggoutlets.com/]cheap UGG outlet[/url] studies have shown chocolate is associated with reduced blood pressure, lower incidence of stroke and myocardial infarction (MI), lower incidence of deaths from coronary heart disease, and lower cardiac mortality in patients surviving their first MI, according to background information in the report.
[url=http://www.cheapuggoutlets.com/]UGG Boots[/url] chocolate habit may protect women from heart failure later in life — but only when enjoyed in moderation, researchers found.”Dark chocolate in the U.S. is not necessarily the same as chocolate in Europe,” she said in an interview. “Therefore, one cannot assume the darkness of the chocolate is the potency of the isoflavone [url=http://www.cheapuggoutlets.com/]UGG Boots for sale[/url].”
I love hermes birkin is what nike shoes for me. In my opinion, I always believe that Abercrombie and Fitch is the top choice. grils who want to dress themselves natural and temperament, we all should choice unique design and simple style hermes bag, then If you are worried about which gift you sent to your friend, abercrombie clothing can reduce your troubles.
[url=http://www.cheapuggoutlets.com/]UGG Outlet[/url] report was based on an analysis of government estimates released on August 2 that Hopkinson said had been widely misinterpreted as meaning that 75 percent of the oil spewed by the well had either evaporated, dissolved or been otherwise contained, leaving only about 25 percent.Oil droplets were found in the sediments of the DeSoto Canyon, where nutrient-rich waters support spawning grounds of important fish species on the West Florida Shelf, this report said.
[url=http://www.cheapuggoutlets.com/]cheap UGG outlet[/url] 87 days following the April 20 Deepwater Horizon rig explosion that triggered the oil spill, crude spewed into the Gulf, contaminating wetlands, fishing grounds and beaches from Louisiana to the Florida Panhandle. BP engineers provisionally capped the leak on July 15 and are working to permanently “kill” the well later this month.But University of Georgia marine sciences professor Samantha.
[url=http://www.cheapuggoutlets.com/]UGG Boots[/url] does not mean that it won’t have an impact,” he said, referring to the government estimates. But he stressed that the University of South Florida mission’s initial findings would need to be verified by more scientific testing.President Barack Obama’s administration, which has been criticized for its handling of the catastrophic spill, is seeking [url=http://www.cheapuggoutlets.com/]UGG Boots for sale[/url]
UGG Outlet said cheer up, down, time is not always reminds me that gives oneself, often warm smile when drunk at the reality,cheap UGG think again see the pain, then, the cold feeling never warm up. So, finally, tired. That’s the way it goes. I had drunk, but finally woke up.UGG Boots I’m walking, but couldn’t find direction. You may have been accustomed to. Heart throbbing, can be ignored. Unconsciously, also can drop tears accustomed to. Boethius observed or hysteria is stupid UGG Boots for sale.
Caught up in the rush of life, we have forgotten how to live, christian louboutinhow to find simple things charming. Taking a walk at night under the stars provides something that business deals cannot provides; enjoying warm sunlight, birds’ songs and flowers’ christian louboutin pumpsfragrance is not for poets only, but for everyone. Meditation, too, is a great need. Meditation brings understanding of life’s relationships, purposes,objectives,and rewards, sharp focus. It is an aid for tense christian louboutin shoesnerves.
christian louboutinI buy my shoes at Ross, T.J. Maxx, Marshalls,
christian louboutin saleand at some department stores anyways.
christian louboutin discountI do not need to waste money on his misogynistic.
Good morning my friend
Glad to know you are in the market of hair straightener.
We are a wholesaler of CHI&GHD hair straightener in china. We provide the competitive price and good quality product to our customer, and arrange 7-12 days delivery and Free Shipping to worldwide. The term of payment is T/T.
Would you mind to visit our website: http://www.superflatiron.com which includes our company profiles and something latest designs? Should any of these items be of interest to you, please let us know. We will be happy to give you details.
Wish our products will be helpful for your business
Any questions, Welcome here
Best Regards
Isabel
Webpage: http://www.superflatiron.com
Email: [email protected]
Fantastic website (http://www.goahats.com) I will bookmark it and come back later. monster energy t shirt,Thanks for posting this. Very nice recap of some of the key points in my talk. I hope you and your readers find it useful! discount new era hats Thanks again
The passengers on the buschristian louboutin watched sympathetically as the young christian louboutin shoeswoman with the white cane made her way christian louboutin pumpscarefully up the steps. She paid the driver and then, using her hands to feel the location of the seats, settled in to one.
[url=http://www.cheapuggoutlets.com/]UGG Outlet[/url] tend to think of hearing loss as an old person’s problem, but hearing loss due to exposure to loud sounds is different from age-related loss and affects all age groups. Many teens, even some adults, don’t realize that hearing loss from excessive volume—be it from street noise, live music, or earbuds—is permanent. “Noise is pollution,” says Pam Mason, a certified audiologist at the American Speech Language
[url=http://www.cheapuggoutlets.com/]cheap UGG outlet[/url] who works with rock musicians to protect their hearing. “Children don’t often think that by putting themselves in a noisy environment, they’re putting their hearing in danger.Although researchers don’t know the cause, the popularity of MP3 players and other personal music players presumably is a major contributing factor.
[url=http://www.cheapuggoutlets.com/]UGG Boots[/url] a major reason why so many with diabetes and heart failure wind up in the hospital again and again with complications related to their condition.One solution that’s becoming more widespread: “care management” or “disease management” programs now offered by many health insurance plans and some large employers like IBM to help patients manage their care between doctor [url=http://www.cheapuggoutlets.com/]UGG Boots for sale[/url].
Hey, I read a lot of blogs on a daily basis and for the most part
people lack substance but
I just wanted to make a quick comment to say GREAT blog!…..
I’ll be checking in on a regularly now….
Keep up the good work!
I just wanted to make a quick comment to say GREAT blog!…..
good ,thank you for your post
With the rapid development ofchristian louboutin our
society, the campus is no longer anchristian louboutin
shoes “ivory tower”. Students must get in touch christian louboutin pumpswith the world out side the
campus so that they can adapt themselves to society more quickly when they graduate.
Vibram Five Fingers at http://www.yesmbt.com
the tutorial is superbly done.
nice work is going on .
wow that great
[…] When I was deciding on a Nursery Necessities card to do for my Fond Farewell day, I came across some onesies on splitcoaststampers and knew they would be perfect! The cards I saw were made by kkgasper but I think she may have cased them from someone else! Sometimes it is hard to find the original creators in this crazy world of stamping!!! You can find the instructions on how to make the onesie on Lauren Meader’s blog here. […]
Wow, this is nice, I should start trying create one.
online film izle,film izle,bedava film izle
hey buddy,this is one of the best posts that I’ve ever seen; you may include some more ideas in the same theme. I’m still waiting for some interesting thoughts from your side in your next post.
[url=http://uggsselling.com/]ugg boots[/url] to Smallwood, he was locked out Lineage II in September 2009, despite having paid for an additional 1.5 months of game play. A month later, NCsoft said it locked Smallwood out because he had participated in “an elaborate scheme to create real money transfers.” Smallwood denied the charges, and said NCsoft’s real motive was to get users locked out of Lineage II so they would upgrade to its new release, Aion.
[url=http://uggsselling.com/]cheap ugg boots[/url] did not immediately respond to a request for comment, but in court documents, the company confirmed that Smallwood was locked out of his multiple accounts over allegations of real money transfers, which are prohibited by the game’s terms of serviceIt appears that Smallwood’s case centers not only on his alleged addiction to Lineage II but on NCsoft’s marketing strategy.
[url=http://uggsselling.com/]buy ugg boots[/url] Smallwood played Lineage II for more than 20,000 hours between 2004 and 2009, during which time he became “psychologically dependent and addicted” to the game, according to Serious gamers can spend hours in front of their favorite games, but would they consider themselves addicts? Craig Smallwood certainly does, and he has sued NCsoft, maker of Lineage II, for failing to warn him and other users that the game is highly addictive.
Only the person who has faith in himself is able to be faithful to others.
The man with a new idea is a crank until the idea succeeds.
people lack substance but
I just wanted to make a quick comment to say GREAT blog!…..
I’ll be checking in on a regularly now…
I admire the valuable information you offer in your content articles. I will bookmark your weblog. I am quite certain i will learn lots of new stuff right here than anybody else!
Dear friends, thank you for visiting our website ,we are an international trade company,which specializes in NFL jerseys.We wholesale jerseys at competitive price,providing a huge range of Pittsburgh Steelers jerseys of different teams,such as Arizona Cardinal,Atlanda Falcons ,Baltimore Ravens,etc.You can buy cheap jerseys. Welcome to visist here .
I am happy to read a lot of useful information here in the post. Thanks for sharing it here.
This is my first time i visit here. I discovered a lot of interesting things within your blog especially its discussion.
Useful information shared..I am very pleased to study this article..many thanks for giving us nice information.
I recently came across your blog and have been reading along.
I thought I would leave my first comment. I don’t know what to say except that I have enjoyed reading.Nice blog,I will keep visiting this blog very often.
Thanks. That’s great info for a newbie like me. I even like how you segmented your blog clearly… I’m still trying to get mine that focused. I guess it’s all a work in progress.
This is a very useful post, I was looking for this info. thanks for sharing the great ideas…
Thanks for sharing
This is a wonderful blog, I discovered your web site researching google for a similar theme and came to this.
The reason why the Replica handbags came into existence is because ladies like to carry their world along with
hi friend ,nice day ! best regards to u and your family ! i very like this blog”s style and the color http://www.nikesaleonline.com/air-jordan-fusion-c-55.html
this web supply the free shipping ,cheap shoes ,many brand many model ,have any question ,plz contact us ,nice day !
We wholesale hats at competitive price,providing a huge range of hats with different brand name,such as coogi hats, polo hats,Jordan hats,cheap new era hats,famous hats,dc shoes hats,new era MLB hats, etc.You can buy cheap hats. Welcome to visist here.
From: http://www.newera-caps.net
very cool article ,thanks for sharing the article!like my cool stuff .very useful.
uCoolStuff is the leading China wholesaler for http://www.ucoolstuff.com cool stuff ,
http://www.ucoolstuff.com cool gifts, unusual gadgets and other unique gift ideas. We provide the very latest cool stuff and cool gifts for you
excellent article , I added you to my
http://www.china-wholesale-directory.com Top China Wholesalers category.. thanks for sharing the article!
Friends is an American sitcom created by David Crane and Marta Kauffman,alife shoes which ran on NBC from September 22, 1994 to May 6, 2004. The series revolves around a group of friends in the borough of Manhattan, New York City. The series was produced by Bright/Kauffman/Crane Productions, in association with Warner Brosdc shoes. Television. The original executive producers were Crane, Kauffman and Kevin S. Brightcheap sneaker, with numerous others being promoted in later seasons. on 17878996852005
Interesting post because many people ignore this information… so important and clear.
Thanks
I believe unique operation concept is also the core competence of modern logistics industry.
uggs on sale,ugg classic tall
Great share thanks for the read
Thanks I’m a huge fan of your blog
Thanks I love your site layout
Great read this is my last comment thanks
Thanks for taking the time to discuss this, I feel strongly about information and love learning more on this. If possible, as you gain expertise, It is extremely helpful for me.
would you mind updating your blog with more information?
MBT shoes (which stands for Masai Barefoot Technology) footwear actually helps you work the muscles in your legs and body while you walk.These specially designed shoes alter your stride in a way that makes your steps
cleaner and your posture more upright.How do discount mbt shoes work?Imagine if you were trying to balance a ball under your foot. You can envision how this would make the muscles in your feet and legs work
harder.That’s the basic idea behind MBT products.With each step,your heel “rolls” your leg forward, which stretches out your calf muscles.When you straighten your body,the rotation starts shifting your balance to the middle of your foot.Then when you step
through,you feel your back muscles tense.In this manner,MBT healthy shoes help improve your gait and your posture – step after step after step!
If you want to know more things about MBT shoes,welcome to mbt shoes blog.
Skechers shape ups shoes are wonderful and specially designed shoes which do not only help your feet take a break from those uncomfortable high-heels or tight business shoes they’re usually imprisoned in, but shape ups shoes also help your entire body regain its shape.One of the most important aspects of your whole body’s health is definitely the health of all those muscles,joints and ligaments involved in your movements,and
walking being the most common movement of the human body, the associated muscles need special care if you want to remain healthy.One important factor in keeping your muscles healthy is exercise,and that is exactly what the skechers shoes provide:easy exercise for your foot and leg muscles,wherever you are,whenever you want,easily and effectively without having to go to the gym or do something special.Just walking around or even standing is enough. How is this
possible? Well, when you wear shape-ups,your body is confronted with a new foot position and a sole which makes it hard for it to keep its balance.Do not fall into the trap of letting yourself go for too long! Do not
vegetate until the day when the doctor tells you that you need to do something if you want to live past the age of 50! Start improving your health today, with the skechers, and you’ll see how easy and pleasurable it can be to
stay healthy!
hey,louis vuitton handbags,this is one of the best posts that I’ve ever seen;Christmas gift, you may include some more ideas in the same theme.Damier Canvas. I’m still waiting for some interesting thoughts from your side in your next post.
Fantastic website (http://www.sportsjerseysshop.com/) I will bookmark it and come back later.cheap dallas cowboys jerseys,Thanks for posting this. Very nice recap of some of the key points in my talk. I hope you and your readers find it useful! Thanks again.
Tiffany & Co is a very well known designer firm which produces many different types of products. They nike jordan shoes are well known for producing fancy pieces of jewelry which are made to a very high standard. Many pieces of tiffany store jewelry include beautiful diamonds. We also have other products such as: http://www.nike.com.
This is just the information I am finding everywhere. Thanks for your blog, I just subscribe your blog. This is a nice blog.
dell laptop batteries dell laptop batteries
laptop batteries laptop batteries
laptop charger laptop charger
The article is worth reading, I like it very much. I will keep your new articles.cheap jordan shoes
Did you utilize an assistance of a sociology essay service for your cool data? I think that you really have unique definition essay writing skills. Thank you for your release!
This blog is fantastic.I would like to introduce this nice website to my friends
ugg boots outlet
cheap UGG boots
cheap ugg
ugg boots
nice tutorial, really nice card
Nice blog, i love the content
We are left wondering how many Amazon Kindles sold this year – and they will have to disclose this number eventually. Will they wait until the last minuteleather belts? Will people feel tricked if the sell-out numbers are smallnike presto? on 17878996852002
UGG Outlet
Cheap UGG
UGG Boots
UGG Boots for sale
I really like your website, I also know a good standing hope to share with you http://www.dmchristianlouboutin.com/
Discount Wholesale Electronics, Wholesale Cell Phones, Electronic Gadgets and More from the Best Dropship Wholesaler
Wonderful blog, it’s really useful, I like it, thanks for your post
Deckers Uggs Uggs Women Boots, UGG tall boots
cheap nfl jerseys
Nfl jerseys
discount mbt shoes
cheap nfl jerseys
Nfl jerseys
discount mbt shoes
-vNew Christian Louboutin Shoes
Cheap Fendi Shoes
Monolo Blahnik Shoes On Sale
Inter Payroll is a leading UK payroll services and payroll outsouring company offering solutions tailored for every size and style of business.
Before shopping around to Buy life insurance, it’s essential to have an unbiased and experienced consultant to give you free,
impartial advice about the different types of policy available, and the pluses and minuses of each one.
Here at Simply Finance, we have a specialist team of consultants focused on Over 50 life insurance.
That’s because we know that those looking for over 50 life insurance have different needs to someone in their 20s
At Simply Finance we have a team of Debt Consultants who know how easy it is for anyone to slide into debt, but more importantly have all
the knowledge and contacts to get you out of debt for good – whether it be through an IVA, Debt Management, Debt Settlement or Debt Consolidation,
we will find the easiest way for you to eliminate or Consolidate Debt.
At Simply Finance we have a team of Debt Consultants who know how easy it is for anyone to slide into debt, but more importantly have all
the knowledge and contacts to get you out of debt for good – whether it be through an IVA,
Debt Management, Debt Settlement or Debt Consolidation,
we will find the easiest way for you to eliminate or Consolidate Debt.
You can give your baby the best cherish care from our baby sleeping bag.It give the baby the best safeguard and comfortable.As the same as the
nursery bedding in our shop.You can find everything whatever you want to buy.Just trust the quality of our products.It is suitable for the gentle
skin for baby.A superb collection of nursery beddings can let you choose in different sorts.
We are left wondering how many Amazon Kindles sold this year – and they will have to disclose this number eventually. Will they wait until the last minuteleather belts? Will people feel tricked if the sell-out numbers are smallnike presto? on 17878996852002iphone f003 iphone f003 wifi cell phone iphone f003 tv cell phone
nike air max
[url=http://www.nikeairmaxshoes88.com]nike air max[/url]
http://www.nikeairmaxshoes88.com nike air max
excellent quality brand cheap designer clothing at wholesale price from this store, lots of people like them.
Go for shoe Web-based it may vital so that you can grasp your main correct shoe size because you comparable to to successfully have stilettos e-commerce louboutin boots.
Whole replica watches very low price
Qaulity watches imitation
nice work is going on.
great work is on .
Thank you for providing good information,Wholesale Electronics and Wholesale gadgets from pickegg.com, Pickegg.com is an online Wholesale Electronics store. Offers consumer electronics and electronic gadgets at best price
Vibram fivefingers are one of the product that are good and leave no room for
argument in my life. Vibram fivefingers not only dependent on its looks but on its
performance. Vibram fivefingers will be a good taste on the feet , so it might be a
good idea to test them on your feet.
nice work
My friendS told me that this blog is competitive. i will continue to read.
I have never read such a wonderful article and I am coming back tomorrow to continue reading.
This is a really quality post.I find this information through Google. Great job.cheap jordan shoes
I have never read such a wonderful article and I am coming back tomorrow to continue reading.
True Religion Jeans
The article is worth reading, I like it very much. I will keep your new articles.True Religion Jeans
These information helps me consider some useful things, keep up the good work.
fashion clothes
It is my pleasure to read this page,I look forward to reading more.
coach handbags
I really like this website , and hope you will write more ,thanks a lot for your information.new jordan shoes
Good post.You did a good work,and offer more effective imformation for us!Thank you.cheap jordan shoe
My friendS told me that this blog is competitive. i will continue to read.True Religion Jeans
I have never read such a wonderful article and I am coming back tomorrow to continue reading.clothing for sale
The article is worth reading, I like it very much. I will keep your new articles.clothes stores
These information helps me consider some useful things, keep up the good work.
jordans shoes
This article is informative and interesting,I enjoy reading it.
coach handbags
It is my pleasure to read this page,I look forward to reading more.
new jordan shoes
I really like this website , and hope you will write more ,thanks a lot for your information.cheap jordan shoe
christian louboutin
christian louboutin shoes
More than ten-year-old starts , I move towards ceaseless thinking of time can get slower to how nice , to come close to being in 10 passed away , learned enthusiastically to graduate but. As if having been prone to illness and melancholy, will be changeable on the contrary squandering time.
christian louboutin outlet
cheap christian louboutin
I like this artice very much,and if you interested in Jordan Air 1 Shoes at $43/pairs just go to have a look about our website
http://www.footwearclothes.com
thank you so much for this concise, pictorial/tutorial of the onsie pattern. I ‘miniaturized’ it for a card and you’re directions were perfect (even tho the sizing differed)
thanks for sharing!!
Blessings!
Looks like it works really well. That for the instructions.
Howdy, i study your blog occasionally and i own a comparable one and i had been just wondering should you get a lot of spam comments? If so how do you avoid it, any plugin or anything you can advise? I get so much recently it’s driving me mad so any assistance is very much appreciated.
I think your article is really a good topic,it may case people to think more about our society,it’s good.I was agree with your opinion,I hope you can keep on your work.I will visite you frequently.
Well,each cion has two sides.This is a nice article,I have got many information from your article,thanks for your hard working.Wish you happiness,and this is important to me.This is really a good place to learn.
First,thanks for sharing!This impressed me a lot.At the same time,I’d like to introduce you something new,wish you like it.Life is wonderful and we just enjoy it and to the person who you want to be.
I recently came across your blog and have been reading along.
I thought I would leave my first comment. I don’t know what to say except that I have enjoyed reading.Nice blog,I will keep visiting this blog very often.
Cheap UGG Boots sale
Cheap UGG Boots
Thank you for providing the perspective. louis vuitton papillon I just read a part of the article,louis vuitton boulogne so I don’t know much what to say.louis vuitton musette Good luck for the new member!
The reason why the Replica bags came intoWedding Gowns Sale existence is because ladies like to carry their world along with christian louboutin knockoffs where ever they go.
what you say are very interesting! i like it very much!
Picture of Sierra Dafoe
super work.
Hello,Friends,Sells 62 tracksuit,62 jacket, Franklin & Marshall Jacket, nike tn shoes,tn shoes,max shoes,Oakley Sunglasses at Cheap Price at http://www.tnmax.com,Accept Paypal, [email protected]
Hello,Friends,Sells 62 tracksuit,62 jacket, Franklin & Marshall Jacket, nike tn shoes,tn shoes,max shoes at Cheap Price at http://www.tnmax.com,Accept Paypal, [email protected]
Hello,Friends,Sells Nike TN Shoes, Adidas Wings Shoes, Franklin & Marshall Couvertures, Carreira Sunglasses, Adidas Chile 62 Jacket,at Cheap Price at http://www.tnmax.com,Accept Paypal, [email protected]
Resources like the one you mentioned here will be very useful to me. I will post a link to this page on my blog. I am sure my visitors will find that very useful.
welcome mbt buy shoes
good post!
thank you very much
ghd hair straighteners cheap on most items,Time is
limited as well as some limited edition of discount
flat irons. All items are free shipping, air transportation! For more discount ghd
stylers on sale,please visit our website: http://www.theghdhairs.com
Enjoyed every bit of your blog.Thanks Again. Great.
Best new era cheap new era hats era hats,delicate monster energy hats,magical nfl hats,one industries energy cheap new era hatsBull Caps,The Hundreds Hats,Supreme Hats,DC Comics Hats are in stock now. Our site provide first-class service and reliable quanlity garantee,do not hesitate to shake hands with us and go with the tide as soon as possible
Do you want to be more fashion, moremonster energy hats do a little thing. A exciting purchasing is ready to go! Just pay attention to. We are specializing in providing new eramonster energy hatsera caps ,one industries hats,rockstar energy hats,monster energy hats which would be your final choice.
great clothing. i like it.
Im not going to say what everyone else has already said, but I do want to comment on your knowledge of the topic. You’re truly well-informed. href=”http://www.taobao-trade.com”>cheap wholesale clothing
hats and caps
designer wholesale handbags
For we know in part and we prophesy in MLB Baseball Jerseys part, but when perfection comes, the imperfect disappea. When I was a child, I talked like a child, I thought like a child, I reasoned like a child. When I became NBA Basketball Jerseys man, I put childish ways behind me. Now we see but a poor reflection as in a mirror; then we shall see face to face. Now I know in part; then I shall know fully, even as I am fully known.And now these three remain: faith, hope and NFL Football Jerseys love. But the greatest of these is love. http://www.jersey-usa.com/sitemap.html
I really like your website, I also know a good standing hope to share with you http://www.christianlouboutin-pumps.net/
http://www.red-sole-shoes.com http://ebaydress.com I really like your website, I also know a good standing hope to share with you http://christian-louboutin-pumps.net
(A)Our company can offer you top quality brand shoes such ascheap LV handbags Jordan 1-23,nike shox (Nz Oz R3 R4 R5 Turbo), Air Max (LTD TN 90 95 97 2003 2004 2005180 360), Air force one,James, Dunks,prada,Gucci Puma shoes.chanel handbags online.top quality handbags such as lv ,jimmy,coach,D&G
Fendi,gucci,chanel,burberry,chanel,juicy.etc
(B) Generally, goods are delivery by EMS fast and safely
(C) Our Company accept payment by WESTERN UNION.
(D) Welcome to inquire us for interesting questions.
I was extremely pleased to find this website.I wanted to thank you for this good understand I definitely enjoying every single small bit of it and We’ve you bookmarked to check out new stuff you post.
cheap handbags wholesale
cheap wholesale clothing
hats and caps
designer wholesale handbags
Wholesale cheap clothes in our website http://www.taobao-trade.com ,there are all high quality,low price.our company have many years mens t shirts wholesale business and have customers all over the world. it is easy to order and pay online,we will ship the order within 24 hours when we get the pay,door to door service, paypal accept .welcome order from designer clothes store.
This article is informative and interesting,handbags wholesaleI enjoy reading it.I just added this blog site to my bookmarks. whoelsale capsI look forward to more insightful posts.
My friend told me that this blog is competitive.wholesale new era caps i will read more.Once again great post. You seem to have a good understanding of these themes.When I entering your blog,I felt this . handbags wholesale Come on and keep writting your blog will be more attractive. To Your Success!
NEW Moncler jackets outlet
Fantastic website http://www.caps-store.com
I will bookmark it and come back later. Thanks for posting this. Very nice recap of some of the key points in my talk. I hope you and your readers find it useful! discount new era hats Thanks again.
Do you want to be more fashion, more charming,just do a little thing. A exciting purchasing is ready to go! Just pay attention to. We are specializing in providing new era hats , caps new era
,one industries hats, rockstar hats
,Monster Energy Hats which would be your final choice. Just do what you want alonging with your active heart. Our website is persisting on best customer service. Please come and enjoy it!
Casual Wear!But not only casual trainers, dress comfy, and elegant, wearing colourful!
Do you want to buy [url=http://www.eshop4watches.com/]Replica Rolex watches[/url], our website has many kinds of [url=http://www.eshop4watches.com/]Replica Luxury Watches[/url], you can buy [url=http://www.eshop4watches.com/]Swiss Replica Watches[/url], [url=http://www.eshop4watches.com/]Omega Replica watches[/url],[url=http://www.eshop4watches.com/]Swiss Replica Breitling[/url] and so on.
I am fascinated by your stories. This is such a great resource that you are providing and you give it away for free. There’s much more to be gained. It is the old what goes around comes around routine.
Dear friends, thank you for visiting our website ,we are an international trade company,which specializes in NFL jerseys.We wholesale jerseys at competitive price,providing a huge range of NFL jerseys of different teams,such as Arizona Cardinal,Atlanda Falcons ,Baltimore Ravens,etc.You can buy cheap jerseys. Welcome to visist here
Best new era caps,new era hats,delicate monster energy hats,magical nfl hats,one industries hats,rockstar energy hats,Red Bull Caps,The Hundreds Hats,Supreme Hats,DC Comics Hats ,ed hardy hats are in stock now. Our site provide first-class service and reliable quanlity garantee,do not hesitate to shake hands with us and go with the tide as soon as possible!
online store to offer cheap nike shoes,best price you get.save most.
his is one of the very useful blogs I haveNike Air Jordan encountered and followed. Thank you very much.
discount Nike shoes
Towering genius disdains a beaten path. He seeks regions hitherto unexplored.
All great truths are obvious truths. But no all obvcious truths are great truths.
Education is the ability to listen to almost anything without losing your temper or self-confidence.
Love is an active power in man, a power which breaks through the walls which separate man from his fellow men, which unites him with others; love makes him ovrecome the sense of isolation and separateness, yet it permits to be himself, to retain his integrity.
Good article! Thank you so much for sharing this post.Your views truly open my mind.
I was very encouraged to find this site. I wanted to thank you for this informative and useful tutorial. I definitely savored every little bit of it, These cards are fantastic.
irishpoetry
i tried to post a comment, but your site show me a blank page. now can you read me? thanks for the information.
klar das sind keine Schnдppchen aber dafьr auch wirklich einzigartig. Da wird so mancher in deiner Wohnung staunen
I am suprised to see such a volume of iPads to be sold on the first day.
You address an interesting issue on that topic. In my opinion you handled it in a professional way. Hope you continue this way, with your unique way of writing articles
good blog im from london but im moving to manchester i found this on the aol search engine,keep the good work up i will add you to my favoroties.
I thought it was going to be some boring old post, but it really compensated for my time. Nice blog, just bookmarked it for later reference
You wrote very interesting post i love your blog it contains very informative article i will share it with my friends.
Hopefully more people can studyfrom this columnwhat I have. A great contribution to the world at large
Dear friends, thank you for visiting our website ,we are an international trade company,which specializes in NFL jerseys.We wholesale jerseys at competitive price,providing a huge range of NFL jerseys of different teams,such as Arizona Cardinal,Atlanda Falcons ,Baltimore Ravens,etc.You can buy cheap Chicago Blackhawks Jerseys. Welcome to visist here .
Website: http://www.4unfl.com
http://www.sportsjerseysshop.com
Our website is persisting on best customer service. Please come and enjoy it!
We only provide AAA quality of products. You can make purchases without scrupulosity. All of products can be ordered from our website directly, also, you can contact our professional customer service to get more wholesale cheap nfl jerseys about payment terms, the intention of cooperation etc. The most preferential price: Our competitive price make our customers confident to develop their own business, at the same time, reaping big benefit from this transaction. Our favor tends to the customers who are from United States, Britain, France, Spain, Germany and Australia etc.
I really have learned a lot from you.Thanks for sharing.
So many people have come to your blog.
I was very pleased to find this site.I wanted to thank you for this great read I definitely enjoying every little bit of it and I have you bookmarked to check out new stuff you post.
Your article is really exciting, I like it, I hope you can be properly update your zoom.
SO Beauty!vrey nice for me ,I like it.where buy it?
Always can find useful information here
Thanks for the great informative post.
Very good information, thank you very much by the article
Its an informative topic. It help me very much to solve some problems.
I wanted to thank you for this great read I definitely enjoying every little bit of it .
I wanted to thank you for this great read I definitely enjoying every little bit of it .
Thank you for your information!
This is a nice website. Are you using WordPress as your blogging platform? I am Louboutin Shoesasking that because your website looks a little different…
it is very beautiful of your blog,i like the style
what a amazing you will love it at the first sight
check more info please come to
http://www.buyonstore.com
cheap clothing stores
wholesale designer clothing onlie
I wanted to thank you for this great read I definitely enjoying every little bit of it , and yUGG Adirondack ou wrote very interesting post i love your blog it contains very informative article i will share it with my friends.
The function acted by the valve is generally becoming more and more necessary and important. timberland saleAnd it is common to see that there is a chain of the various valves with various specifications in an industrial line to cooperate to achieve the machinery requirements.
It is said that Tourbillon Watches are the best in the watch market. A tourbillon is the main item being used in creating such a watch.supra shoes The casing of such a watch includes a tourbillon. The name of this kind of watch comes from such a small piece of equipment.
I have never read such a wonderful article and I am coming back tomorrow to continue reading.
I agree with your Blog and I will be back to check it more in the future so please keep up your work. I love your content & the way that you write. It looks like you’ve been doing this for a while now, how long have you been blogging for?
Came across your blog when I was searching bing I have found the bit of info that
I found to be quite useful. You can visit my site about
Wow! Some amazing effects. Definitely some great ideas here. Thanks for sharing!
I like the side of the article, and very like your blog, to write well and hope to continue your efforts, we can see more of your articles. new era hats on sale
Recommend you to take a look at it, is now being discounted, Monster Energy Hats Collection in hot! Fashionable dc shoes hats Keeps with you at any time. Anybody can tell me where i can buy the best and the cheapest shoes ,I have to tell him that is baseball hats wholesale
,it will be your right choice.
I agree with your blog, lucky to read your blog! It makes me have the courage to stick to it!
thanks post good
I admired the way you express yourself through writing. Your post is such a refreshing one to read. This is such an interesting and informative article to share with others. Keep up the good work and more power. Thanks!
It is nice to find a site about my interest. My first visit to your site is been a big help. Thank you for the efforts you been putting on making your site such an interesting and informative place to browse through. I’ll be visiting your site again to gather some more valuable information. You truly did a good job.
Nice, and thanks for sharing this info with us.Good Luck!
What a blog post!! Very informative and also easy to understand. Looking for more such writeups!! Do you have a twitter or a facebook?
authentic onitsuka tiger shoes
Our Nike Air Max company sales many kinds of Nike Air Max shoes, these including Nike Air Max 2003, Nike Air Max 2009 , Nike Air Max 247, Nike Air Max 2010, Nike Air Max 87, Nike Air Max 90, Nike Air Max 95, or other Nike Shox, Nike Free Shoes, these Shoes are all sell at a very low price, and the quality are assured. With so many Air Max Shoes we have got, we supply a variety of choices to our dear costumers; and we believed these shoes can apply almost every costumer’s demand. These Shoes can be shipped to the USA, the UK, Canada, and other European countries, and are still growing. Because of our nice service and good quality of the products, we have attracted a large number of customers, and established long-term cooperation with some of them. We are now enjoying the trust of our customers from many countries. Start your way of buying a Nike shoes now!
what a amazing of you give such interesting topic to everyone.as the same time i will give you the best china wholesaler of http://www.buyonstore.com
Thanks for the very informative post you have shared to us, keep on posting new articles for a lot will surely be glad to get new ideas and information…
thanks again….
business credit lines
[…] Hoşgeldin Bebeğim […]
I’ll be visiting your site again to gather some more valuable information. You truly did a good job.
si than admin
Hello, my dear customer, welcome to http://www.jerseysgreat.com.
NFL Player Jersey was engineered and constructed to show the individual team and skill position utilizing similar fabrics and applications from the Pro Cut version.
We offer the best selection of discount nfl jerseys including custom NFL jerseys and reebok NFL throwback jerseys for most NFL teams.
Click here-other cheap nfl jerseys to pick more styles jerseys.
and welcome to http://www.ourmbtshop.com.
mbt shoes
We accept Credit Card, Paypal and West Union payment. and our jerseys normally shipped by EMS, it will take 5-8 days to your place.
Our Nike Air Max company sales many kinds of cheap air max shoes, these including Nike Air Max 2003, Nike Air Max 2009, Nike Air Max 2010, Nike Air Max 247,, Nike Air Max 90, Nike Air Max 95, or other Nike Shox, Nike Free Shoes, these Shoes are all sell at a very low price, and the quality are assured. With so many Air Max Shoes we have got, we supply a variety of choices to our dear costumers; and we believed these shoes can apply almost every costumer’s demand. These Shoes can be shipped to the USA, the UK, Canada, and other European countries, and are still growing. Because of our nice service and good quality of the products, we have attracted a large number of customers, and established long-term cooperation with some of them. We are now enjoying the trust of our customers from many countries. Start your way of buying a Nike shoes now!
Our [url=http://www.airmaxonline.net/]Nike Air Max [/url] company sales many kinds of [url=http://www.airmaxonline.net/]Wholesale Price Nike Air Max [/url] shoes, these including Nike Air Max 2003, [url=http://www.airmaxonline.net/] Nike Air Max 2009 [/url], Nike Air Max 2010, [url=http://www.airmaxonline.net/] Nike Air Max 247 [/url], Nike Air Max 87, [url=http://www.airmaxonline.net/]Nike Air Max 90 [/url], Nike Air Max 95, or other Nike Shox, Nike Free Shoes, these Shoes are all sell at a very low price, and the quality are assured. With so many Air Max Shoes we have got, we supply a variety of choices to our dear costumers; and we believed these shoes can apply almost every costumer’s demand. These Shoes can be shipped to the USA, the UK, Canada, and other European countries, and are still growing. Because of our nice service and good quality of the products, we have attracted a large number of customers, and established long-term cooperation with some of them. We are now enjoying the trust of our customers from many countries. Start your way of buying a Nike shoes now!
http://www.airmaxonline.net
i think its a superb blog.
nice work done.
nice work is going on
nice site!
Thank you for all the great posts from last year! I look forward to reading your blog, because they are always full of information that I can put to use. Thank you again, and God bless you in future.
nice post,thanks for sharing.
2010 AT Nike’s language is the language of movement. Three years later, the company has committed to create every opportunity to show themselves. Nike know: Only the use of advanced technology to produce the best product. Nike’s first Air Max 90 technology to bring about a revolution in the sports sector. The use of this technology to produce sports shoes can protect the athlete’s body very well, especially ankle and knee, to prevent its movement as severe sprains, to reduce the impact on the knees and wear. Athletic nike air max 2009 with air cushion technology been introduced very popular. Consumers and professional athletes love it. In 2001, the Air Max 95 shoes technology in the developed and later introduced a new type called Shox cushioning technology. Produced using this technology as the popular sport shoes, sales have risen steadily. In addition to other sports shoes, Nike Shox apparel, sometimes innovative.
Your blog article is very intersting and fanstic,at the same time the blog theme is unique and perfect,great job.To your success.
One of the more impressive blogs Ive seen. Thanks so much for keeping the internet classy for a change.
Fantastic website (http://www.goahats.com) I will bookmark it and come back later. Thanks for posting this. Very nice recap of some of the key points in my talk. I hope you and your readers find it useful! discount new era hats Thanks again
Well worth to read this article, thanks for sharing this information. With this article you offered me got a chance to know about this, anyway i say Great Article! and waiting for you next article about this interesting subject.
Do you want to be more fashion, more charming,just do a little thing. A exciting purchasing is ready to go! Just pay attention to. We are specializing in providing new era hats ,new era caps ,one industries hats,rockstar energy hats,Monster Energy Hats which would be your final choice. Just do what you want alonging with your active heart. Our website is persisting on best customer service. Please come and enjoy it
good idea
he or she is not only unethical, they are breaking the law. That was a copyright violation. It happens to all of us sooner or later
Its my great pleasure to visit your blog and to enjoy your great posts here. I like it a lot. I can feel that you paid much attention for those articles, as all of them make sense
and are very useful
God bless you in future.
I greatly benefit from your articles every time I read one. Thanks for theinfo, it helps a lot.
http://www.gucci2handbags.com gucci
Inspired by the traditional indigo robes of the nomadic Tuareg people of Saharan North Africa, the
collection explored the power of nuance through a single color — blue — albeit in a dozen
different shades
haha,So nice,looking for your next article.i think i will look at it on time.
haha,So nice,looking for your next article.i think i will look at it on time.
UGG Ultra Shortthanks!
Taobao Trade CO.,LTD is a professional supplier ofwhoelsale caps/T-shirts/jeans/bags/boots/watches/MP4/sunglasses/Belt/chanel handbags online ,which insists on the principle of “reasonable price,superior quality,prompt delivery,and excellent service”.Our company aims to establish a long-term business relationship with buyers all over the world!.
If you are interest in this products, please contact us ASAP.
collection explored the power of nuance through a single color — blue — albeit in a dozen air force 1
different shades
Their leather cheap designer clothes continue to not only Coogi jeans be fashionable and current but also affordable. That is why Burberry bags are so popular gucci shoes for cheap all over the world.
I greatly benefit from your articles every time I read one. Thanks for theinfo, it helps a lot.
As far as I know and notice, all women own at least a pair of cheap CL shoes.even if they do not like wearing buy louboutin online or do not need to wear one design louboutin shoes.
The fastest runners have a style quite similar vibram fivefingers shoes to that of a person running without shoes. They absorb shock by landing lightly on their forefeet rather than on their heels of Vibram five fingers 2010 New, and their landing leg is beneath the torso, with the leg slightly bent to absorb impact.
According to exercise physiologist and Olympic marathoner Pete Pfitzinger, the key to starting out is to go slowly. He advises walking barefoot for a few weeks to toughen up the skin on the bottom of the foot Vibram five fingers Classic as well as the muscles in the ankles and feet.
Big news! https://www.gametradeeasy.com sell large amount gold in all servers ,like as Aika Online,Aion,Silkroad Online,Atlantica Online,Runes Of Magic…
More surpise waiting for you !!
moncler coats are a good way to keep your fashion feeling alive.christian louboutin well known in the world, there are many designers, many design examples of new women demands.
Fashion is beautiful, it is popular, personality, is to lead the elements.
Believe that modern nobody Herve Leger Clothing will miss, so fashionable and not wrong, but we need to create a unique individual glamour, reflect their personality and body, and his unique style, in a herve leger sale word, we should fashion, but we should be more different, suit oneself style is the ultimate fashion and trend ~ ~
Thank you! and I am glad it is on a Saturday otherwise I couldn’t attend it.
Thank you for giving your Saturday.
I’m pretty new to your blog, but am enjoying what I have read so
far. This post particularly caught my attention.
Its a very interesting video.thanks a lot for sharing it
Very interesting, pity in italy we are very behind on this things.
very good this is makale thanks you admin , teşekkr ederim.
very good this is makale thanks you admin , teşekkr ederim.
I must say, I thought this was a pretty interesting read when it comes to this topic. Liked the material. . . . .
I’m pretty new to your blog, but am enjoying what I have read so
far. This post particularly caught my attention. Grea site
Thanks for all of your hard work. I really enjoy reading yaour blog daily.
Thank you for your information,Welcome to buy boots shoes ugg boots andugg,It is very useful for me,I like this website very much
reebok nhl jerseys,cheap louis vuitton swimwear
Couldn’t agree more…Had a post already written about this too, (good job i checked around first)never mind.It is a really good tune though.
Here’s hoping more labels wise up and do this.
new era hats
AdoAdore the template of this blog, simple yet efficient. Its hard tocoated discover the discover the correct balance occasionally but this website loads quick and looks perfect
Snowboarding self-adhesive Wall Stickers Set contains 4 sheets asOil Paintings shown that may be placed together or separately to create a unique design.It is made of vinyl and reusable. Repositionable with a self-adhesive backing. It also has a vinyl coated protection for fast clean-up with mild soap….
Dell Latitude D820 batterie
Dell Latitude D830 batterie
I was very pleased to find this site.I wanted to thank you for this great read!! I definitely enjoying every little bit of it and I have you bookmarked to check out new stuff you post.
101011050335PM[url=http://wow-gold-sale.com/]wow gold[/url] | [url=http://wow-gold-sale.com/]World of Warcraft gold[/url] | [url=http://wow-gold-sale.com/]buy wow gold[/url] | [url=http://wow-gold-sale.com/]cheap wow gold[/url] |
Thanks for this information. My sister has been wondering about this topic for a while.
Everyone knows about wholesale nba jerseys ,you can’t be fooled by the quality of jerseys that are out there. There are many places that are selling non authentic jerseys of the same price or more. Therefore, you will want to be careful with how you find the quality of jerseys that are out there. The one thing that you need to do is make sure that you are going to the right places to find the best quality of NBA jersey you can find.
We are manufature of all kind of jerseys ,of course include cheap nba jerseys .We have been in this line for many years ,we are confident to make our products at highest quality and best price .We enjoy majority of our customer’s support on line .
Come tonice nba jerseys ,surely you will find a big surprise here .
My brother like wearing wholesale nba jerseys almost in the whole hot summer ,many of us don’t understand why he love NBA jerseys so much ,finally we know the reason that all NBA jerseys are cool and comfortable.It is really the best choice for all of NBA fans to have a jerseys of them.
Except some formal occasion , cheap nba jerseyscan be worn anywhere anytime.For many of us ,we like wearing our favourite team’s jersey and watching NBA games in summer which make us feel that we are a part of our favourite team.Also NBA jerseys can be paired with other clothes, For instance, without having to wear thick jeans, you can put on a pair of NBA shorts under a simple white T-shirt while going out to have a walk.
Nowdays ,there are more and more NBA jerseys stores in the market ,a new place for you to go is internet .You can choose your favourite jerseys from huge of online stores , it will save you time and energy on buying an NBA jerseys .What is more is that the price online is much lower than in the stroes .
Don’t hesitate ,take action ,please check our website at http://www.nfljerseymvp.com ,probably you will find one you love most .We are here to wait for your inquiry of all of our discount nba jerseys.
what a good topic!!
i’ve learn much from your article !
There are many excellent quality designer clothes online from this clothing store. big discount!
The post is amazing.All words written are truest to best of my knowledge.IO wonder how the author gets such useful and informative materials.
thank you
nice post!
Get Brett Favre Jerseys, Favre Jerseys, Brett Favre Jerseys 60% Discount With Authentic Quality.
These kind of post are always inspiring and I prefer to read quality content so I happy to find many good point here in the post, writing is simply great, thank you for the post!
si than admin
http://www.c-capshop.com
Recently established in 2006, http://www.c-capshop.com is the website of a company that has been in business in the Chinese market for about 3 years.We are cheap new era hats
manufacture in china, Our company specialize in supplying new era hats,monster energy hats,dc shoes hats,red bull hats,famous hats,jordan hats,etc. We pay attention to our products quality and service.
vibram 5 fingers,5 fingers shoes,vibram 5 fingers shoes
http://www.ibram-5-fingers.org
Five Fingers,Vibram Five Fingers,Vibram Five Fingers Shoes
http://www.cheapvibramfivefingersshoes.com
vibram fivefingers,vibram fivefingers kso,vibram fivefingers shoes http://www.vibram-fivefingers-shoes.biz
converse online,converse shoes sale,converse shoes outlet http://www.converseonline.org
moncler for sale http://www.monclerjacketsshop.org
Designer Christan Audigier cheap wholesale clothing — http://www.taobao-trade.com online offer fashion designer men’s clothing and women’s clothing, We wholesale our products — Christan Audigier T-Shirts at very low price but with high quality. designer wholesale handbagsOur products are always very hot in USA, UK, Canada, Australia, etc.,
Many wholesalers, retailers, shop owner, online store owner, byers buy and resell our products. Because of our honest business, Old customers would like to instroduce new customers to our site. So new customers incleased day by day.cheap designer handbags We welcome buyers from all over the world. Let’s do business bit by bit and become our old customers.
This is such an awesome card, and you are so sweet to take the time to put a tutorial together, this is definitely something that I will make for my next baby card. Thank you
hwxDeion Sanders Jersey
I have never read such a wonderful article and I am coming back tomorrow to continue reading.juicy handbags
These information helps me consider some useful things, keep up the good work.clothes stores
This article is informative and interesting,I enjoy reading it.
fashion clothes
I really like this website , and hope you will write more ,thanks a lot for your information.
coach handbags
Good post.You did a good work,and offer more effective imformation for us!Thank you.
new jordan shoes
Another one of Nike Dunk Women releases has been leaked, this time it is the matching pair to the Air Max 90 “Day of the Dead”. This Nike Dunk Hi features a black midsole and upper, with a purple and black Halloween print covering the shoe Nike Dunk Sb High Sbtg Methamphibian . There is also the addition of electric green, shown in the swoosh and the liner.
October is right around the corner which means Nike Sbreleases from every sneaker line. It seems as if everyone, Nike SB haters especially, look forward to the up-coming month’s SB releases be it to appreciate or hate. This month’s Women Nike Dunks releases will include an aquamarine Blazer premium, green spark and hoop orange Dunk Low Nike Dunk SB Low Pro San Antonio Spurs Manu , midnight fog P-Rod III, J-Pack Dunk Mid, and a black leather zoom classic. Look for these at your local skate shop.
You provide enriched information for us,thank u.cheap jordan shoe
We supply high quality goods at affordable prices.They range from brand shoes such as the latest Air Jordans;Air Max;Puma;Timberland,FiveFingers and brand bags;whole cheap jordans scarves,watches,belts,and many other exquisite and trendy goods.To check out all these fashionable wears,please zoom in on us athttp://www.cankicksnow.com Enjoy the ride!
Thanks for your good tips !
I would also like to know how
Trees Flowers
for design works
Thanks for the tutorial Lauren. I’ll be making some of these soon! 🙂
True Religion Jeans
My friendS told me that this blog is competitive. i will continue to read.
clothing for sale
I have never read such a wonderful article and I am coming back tomorrow to continue reading.
clothing for sale
The article is worth reading, I like it very much. I will keep your new articles.
fashion clothes
These information helps me consider some useful things, keep up the good work.
coach handbags
This article is informative and interesting,I enjoy reading it.
The article is worth reading, I like it very much. I will keep your new articles.
fake rolex
replica bags
Thank you for providing good information,Wholesale Electronics and Wholesale Gadgets from pickegg.com,Pickegg.com is an online Wholesale Electronics store. Offers consumer electronics and electronic gadgets at best price.
Our website is persisting on best customer service. Please come and enjoy it!
We only provide AAA quality of products. You can make purchases without scrupulosity. All of products can be ordered from our website directly, also, you can contact our professional customer service to get more nfl jackets about payment terms, the intention of cooperation etc. The most preferential price: Our competitive price make our customers confident to develop their own business, at the same time, reaping big benefit from this transaction. Our favor tends to the customers who are from United States, Britain, France, Spain, Germany and Australia etc.
Dear friends, thank you for visiting our website ,we are an international trade company,which specializes in NFL jerseys.We wholesale jerseys at competitive price,providing a huge range of NFL jerseys of different teams,such as Arizona Cardinal,Atlanda Falcons ,Baltimore Ravens,etc.You can buy cheap superbowl jackets
. Welcome to visist here .
wow all those garments are so amazing and fabulous I don’t come to your blog as often as I would like,I like to consider breaks during the my day and look by way of some blogs to determine what others are talking about. but whenever I do I see some really amazing things keep up the good work! =)
wow all those garments are so amazing and fabulous I don’t come to your blog as often as I would like,I like to consider breaks during the my day and look by way of some blogs to determine what others are talking about. but whenever I do I see some really amazing things keep up the good work! =) Cheap Jersey Boys Tickets
Taobao wholesale Company Sells newest Style Replica Handbags . Designercheap LV handbags , copy replica, exact replica, designer replica, mirror image.,Brands contain Louis Vuitton hand bags,handbags wholesale,Gucci handbags,Coach handbags tote bags,Chole handbags,Fendi handbags,Miu miu handbags,Givenchy handbags,Hermes handbags,chanel handbags online ,Marc Jacobs handbags,Jimmy choo handbags,Kooba handbags,Dior handbags,Prada handbags,Versace handbags,Mulberry handbags,Thomaswylde handbags,YSL handbags,D & G handbags,Loewe handbags,Juicy handbags,Lancel handbags,whoelsale capsAnya Hindmarch handbags, Armani handbags;
Quality: our replica bags are sourced from experienced factories experienced in the production of top quality items. We are devoted to the Retail and Wholesale of AAA+++(99.9% mirror copy) Designer bags
nike dunks,nike dunk high,nike dunk shoes,nike sb dunks,nike dunks for sale,rare nike dunks,nike dunk high premium sb yellow,nike dunk low,design own nike dunk shoes,nike dunk high sb,nike dunk logo,nike dunk sb paris
I had been looking for this product. Finally I found it Nike Dunk
in your blog. Thank you so much for the information
Best new era caps,new era hats,delicate monster energy hats,magical nfl hats,one industries hats,rockstar energy hats,Red Bull Caps,The Hundreds Hats,Supreme Hats,DC Comics New Era Hats Wholesale are in stock now. Our site provide first-class service and reliable quanlity garantee,do not hesitate to shake hands with us and go with the tide as soon as possible!
According to a study, those living OX PDF to GIF Converter in well-lit towns or cities are more likely to become obese than country dwellers – even if they eat the same amount.Scientists believe that the glow of OX PDF to BMP Converter street lights encourages late-night snacking, and because food eaten close to bedtime is less likely to be burned off, it is often stored as fat.But before you swap calorie counting for a blackout blind, it seems that all unnatural light could have the same effect – including OX PDF to JPG Converter that from computer screens and TVs. American researchers found that mice that were exposed to a dim light at night put on 50 per cent more weight than those whose cages were left dark.
Thanks for the great informative post.
Very good information, thank you very much by the article
A great blog can give one person new feeling, let person get happiness
Its an informative topic. It help me very much to solve some problems.
replica watchreplica bags
Even a handbag collector can call a fake Louis Vuitton bags from the real thing. These purses are extremely affordable.
Thank you for providing good information,Wholesale Electronics and Wholesale Gadgets from pickegg.com,Pickegg.com is an online Wholesale Electronics store. Offers consumer electronics and electronic gadgets at best price.
footwear just here
Recommend you to take a look at it, is now being discounted, Monster Energy Hats Collection in hot! Fashionable dc shoes hats Keeps with you at any time. Anybody can tell me where i can buy the best and the cheapest shoes ,I have to tell him that is fitted baseball hats ,it will be your right choice.
this is a great design for your site
I like this information and it has given me some sort of desire to have success for some reason, so thanks. Furthermore I′m definitely considering blogging these facts in my own blog!
cheap nfl jerseys
gucci shoes
wholesale gucci
It goes without saying,football is one of the most popular sport game around the world .For the majority of fans,have one or more nfl jerseysNFL jerseys is the way to show your loyalty and feel like a part of NFL team.
Whether old or young,male of female ,a youth nfl jerseys is avaliable in different sizes and colors.There’s nothing like wearing your favourite youth NFL football jerseys in a game to show your love as well as loyalty to your team.
So have you decided what to buy yet?Don’t worry about too much about this ,there are many online stores where you can buy cheap nfl jerseys,such as http://www.nfljerseymvp.com is one of the on line store which specized in youth NFL jerseys s. What you need to do just compare with different stores of prices ,styles,sizes and colors ,then know what to buy base on your budget .
There is nothing beats watching the game and showing your support to your team through youth nfl jerseys.
Really interesting articles. I enjoyed reading it
It has been long before I can find some useful articles about ray ban. Your views truly open my mind.
Good job for writing this brilliant article of ray ban uk.
There is nothing beats watching the game and showing your support to your team through
很好
Thanks for sharing a nice info.
Watches are luxury goods,[url=http://www.watchvipshop.com/]replica watch[/url] often expensive and complex. Watch the implementation of the national product quality
goods and consumer protection laws. But one thing to remind you, there is the most important,[url=http://www.watchvipshop.com/]replica louis vuitton watches[/url]
replica omega watches
rolex outlet
replica bags
KI want to directly grab your rss feed to stay informed of any updates, but I cant find it, do you have one?eep it up
I’m thinking of creating some for a baby shower since I have 2 friends pregnant right now and due a week apart!
Thanks for the important note!
Yeah!!! i like pink too! is that the quickiest tutorials? hehehe LOL
Thanks for sharing a nice info.
Thanks for sharing a nice info.
thanks love mee
There is nothing beats watching the game and showing your support to your team through
[url=http://www.watchvipshop.com/]rolex daytona replica[/url]
[url=http://www.trade-watches.com/rolex-airking-c-209_1332.html]rolex air king replica[/url]
[url=http://www.trade-watches.com/rolex-submariner-c-209_1330.html]rolex submariner replica watch[/url][url=http://www.watchvipshop.com/]rolex air king replica[/url]
MBT Sunde Sko magtfulde opbakning i fremmede lande som Madonna,MBT sko er Californiens guvern?r Arnold Schwarzenegger i disse ber?mtheder if?rt, og tog f?ringen fra udviklingen i MBT er Faye Wong og Chao Ma Chao Ma Ying Xu Hao. Videnskabelig forskning viser, at brugen af MBT sko ikke vil n? generelt kan spille en st?rre rolle i muskelstyrke, if?rt et bestemt tidspunkt hver dag kan forbedre blodcirkulationen, MBTlangsom ned p? grund af den lange arbejdskraft Block virkningerne for?rsaget af rygsmerter, s? som nu dem, der er sv?rt at finde tid til motion for folk velkommen
thnks for posting…
I am Marsha. I am enthusiast for designer handbags, such as LV handbags, Chanel handbags, Coach handbags, etc.
I am crazy for them but i nearly could not afford my house. So i decide to buy them from Internet for lower price.
Actually I am new hand when i started, and don’t know where i could buy the genuine leather designer handbags.
I bought 4 times from 4 sellers, but unfortunatelly what they sent me were rubbish, rather than the money i paid for.
They sent me the handbags not made of genuine leather, but of PU leather.
I was so disappointed with the bad experience that i nearlly give up. I think it would be the last time to buy from Internet.
I found a seller who has been in the business for 4 years and it seems they have great reputation. I placed an Chanel handbag from them, it costed me almost 4 times than that i paid before to the 4 sellers. I cannot wait to see how the Chanel handbag they will send me. They sent the handbag via EMS, costed 5 days (I am located in CA). It was so fast that i picked up the Chanel handbag in the afternoon. I opened the well-packed parcel and i was nearlly going crazy. It was the right handbag i had been looking for. It is almost the same to the one i could buy from the authrized store here. I inspected the handbag that is actually made of genuine leather and with the SN.
They accept PayPal and Visa that protect we buyers. And they have the best return/refund policy if you receive bad quality items or the items got damaged when delivery. I love it.
I shared you all my experience just to help you find the right supplier rather than cheapted by the unreliable sellers.
I will keep buying from them because they provide the genuine quality designer handbags, best price and fast shipment.
Ugg Australia story began in 1978, when Brian Smith, a young surfer from Australia, took a trip to the United Sates with a bag full of sheepskin boots – UGG Boots.Nowadays Ugg sale is the best popular sheepskin boots loved by people from all over the world.Ugg sale boots are traditionally made from the australia finest twinface sheepskin.The unique design makes .Ugg uk boots extremely warm especially in cold weather.
http://www.uggsalebootsuk.com
I have come to expect great things out of perforated leather Nike Dunk Women sneakers after seeing the Nike SB Zoom Stefan Janoski White Perf back in April. This time Nike keeps the white perforated look, but this time in the Nike Dunk High AC.
The Nike Dunk Sb AC uses a process, called autoclaved (AC), which aids in attaching the leather to the classic sole. Using this process, we see an accenting brown stripe sites between the white perforated leather upper and the white classic sole.
Nike Sb Customs What the Deuce Though it should be mentioned that the upper is not a pure white, but more of an off-white or eggshell. They are available now overseas, but with a little luck, we will get a look at them in the US.
On these two pairs of Women Nike Dunks, canvas was the material of choice. The first version sports a monochromatic orange upper, along with a matching hue on the leather Women Nike Sb, as well as blue shoe laces.
Ed hardyis America’s tattoo of a series,
you can buy So beautiful[url=http://www.lovesexytoys.com/]cheap sex toys[/url]you can chose, Why not immediately have it.
Rolex Deep Sea Dweller SS Black Swiss Eta2836
Ulysse Nardin Executive Dual Time RG Blue Bezel White Dial on Blue Rubber Strap
Womens North Face Waterproof Jacket Purple Canada Sale, Womens North Face Outdoor Jacket It follows traditional features of Womens North Face, waterproof, resist cold and lightweight. And details of jacket comprise of wrist accessory pocket with goggle cloth, Womens North Face internal media security pocket, handwarmer zip pockets. Womens North Face Waterproof Jacket Purple on sale, free shipping. We are looking forward your order.
They are made from a durable and waterproof fabric with sealed seams. The North Face also Womens North Face Outdoor Jacket makes a line of Womens North Face warm,
We only provide AAA quality of products. You can make purchases without scrupulosity. All of products can be ordered from our website directly, also, you can contact our professional customer New Era Hats Wholesale
service to get more support about payment terms, the intention of cooperation etc. The most preferential price: Our competitive price make our customers confident to develop their own business, at the same time, reaping big benefit from this transaction. Our favor tends to the customers who are from United States, Britain, France, Spain, Germany and Australia etc.
replica watch
replica bags
I suggest this site to my friends so it could be useful & informative for them also. Great effort.
sag weekly contract copy
You really did a great job. I will also share your blog with my students and friends….. NICE AND COOL INFORMATION Thumbs up 🙂 Plantronics Headsets
The author has written an excellent article. You have made your point and there is not much to argue about. It is like the following universal truth that you can not argue with: No truth is universal, everything has its exception. Thanks for the info penis enlargement pills
I really have learned a lot from you.Thanks for sharing.
So many people have come to your blog.
I like this blog, keep blogging bro. Thanks for this information
I agree with your blog, lucky to read your blog! It makes me have the courage to stick to it!
Nice, and thanks for sharing this info with us.Good Luck!
The most preferential price: Our competitive price make our customers confident to develop their own business, at the same time, reaping big benefit from this transaction.
Great stuff! Vigrx plus reviews
You have made the best choice in choosing one of our Cross Titanium Necklaces, Titanium Pendants or Titanium Rings, as they are constructed of the highest grade materials to ensure that your new Titanium Jewelry lasts forever. The designers we feature are chosen for their unique modern styling and lasting quality. You can be confident in your purchase as each item comes with a no hassle 30 day return privilege.
Intimately, the post is actually the best on this laudable topic. I harmonize with your conclusions and will eagerly look forward to your future updates. Saying thanks will not just be adequate, for the fantastic lucidity in your writing.
WOW.It’s so cool.I have never saw that.wholesale nfl jerseys
This is my first visit to your blog. We are starting a new initiative in the same category of this blog. Your blog gave us important information to act. You did a great job.
Authorized Online Shopping Store: New Era, One Industries, Monster Energy, cheap new era hats, red bull energy hats, Tapout, Coogi, Ed Hardy, Christian Audigier, Gucci, Jordan, MLB, NBA, NFL hats and caps. All fashion brands and new styles. Discount price. Top Quality. Fast Shipping. It’s easy and trustful to order here. Wholesale and Dropship. Shop Now.
uggs outlet
ugg outlet
ugg brown boots manufacturers directory – o
ver 3000000 registered importers and exporters. ugg brown boots manufacturers, ugg brown boots suppliers, …
In any case, then add the CHARACTER SET utf8 directive, as shown.
(I wonder if there is some way to set this as a default, without adding the line to the DDL for every table?)
Your life sucks. It’s not going to get better. But you don’t care. You have a good perspective on things. You’re not about to let life get under your skin. You turned that frown upside down. It’s not like you had that much of a choice. You were getting a swirlie.
The articles you have on your website are always so enjoyable to read. Good work and I will be returning often.
I have been searching for some information about it almost three hours. Nice site! I enjoy a couple of from the articles which have been written,
replica watch
replica louis vuitton watches
replica handbags
I agree with your blog, lucky to read your blog! It makes me have the courage to stick to it!Nice, and thanks for sharing this info with us.Good Luck!
Jazzy clothes go well with relations of links of london having unadorned devise. You should to respect your style when choosing your right family of london jewelry. Nevertheless it is a big inquiry for many women to highlight your personalities.
As you well known that Football is really one of the biggest sports in America,even in the whole of world. wholesale nfl jerseysNFL jerseys, as a big part of team gear ,you can see it whenever you go. It is safe to say that new nfl jerseysNFL jerseys are desired and cherished by every fan .You know that there are many ways for you to get the jerseys ,but the internet is the best places to go.Here we have an online store ofcheap nfl jerseys with great reputation which will make your order in good condition and get your satisfied respond.Come on,what you hesitated about ?Try your trial order with us ,you probably will have regular order in the days up.
cheap nfl jerseysNFL jerseys is the best christmas gift
It is not easy thing for you to choose a good gift for your boys .But if you know your boy’s favorite team and player ,that things will seems to be easier .It really doesn’t matter which player you pick as long as youth nfl jerseysthese jerseys are from that team.
Everyone knows that the internet is the best place to go, there are many stores for you to choose .When shopping online , just consider the shipping cost in the equation as free shipping can offset a higher jersey price. And make sure the stores you are dealing with are reputable and established.Be catutious that shipping time should be on time so that you can get nfl jerseysNFL jerseys as your Christmas gifts at the right time.
Well, I am so excited that I have found this your post because I have been searching for some information about it.
Well, I am so excited that I have found this your post because I have been searching for some information about it.
I am glad to found such useful post. I really increased my knowledge after read your post which will be beneficial for me.
you can see it whenever you go. It is safe to say that new designer handbags are desired and cherished by every fan .You know that there are many ways
Buy 2010 new design Moncler,Moncler jackets,Moncler coats,Discount Moncler vest,Moncler outlet,Moncler polo tshirt online.Give You a Warm Winter! Satisfy You with Fashionably Designed & Outstanding Quality Moncler Down Jackets in Completely Low Pri
They are not cheap imitations, but genuine replicas of the original products. Wearing them is very prestigious as they make a statement wherever you go.
Your book let me feel a few happy.You let me want to see you.
Good post! Thanks for your information!
Buy NFL jerseys Online
Asics tiger
Onitsuka Tiger Shoes
ASICS running shoes
UGG boots Sundance chestnuthorizon north of the major city of Yogyakarta, is one of Indonesia’s most active volcanoes and lies in one of the world’s most densely populated areas. The volcano has a summit elevation of nearly 10,000 feet (3,000 meters).
Hundreds of displaced residents have UGG Roxy Tall Boots string Chocolate
womens UGG Bailey Button chestnut
womens UGG Classic Short black
UGG Bailey Button Triplet Chocolatecrammed a small government building in Yogyakarta. Many had fled with only the clothes on their backs.
Some residents refused to flee, holding out to watch over their crops and livestock. Some residents awaited word from the traditional gatekeeper of Mount Merapi. But Maradjin, the gatekeeper, fell victim to the volcano as well.
He was buried Thursday. He died in his 80s, after being appointed about two decades ago by the last Sultan of Java.
Hundreds paid their respects as Maradjin was buried in the volcano’s shadow, along with two other people who died with him.
The revered elder had refused to leave the mountain, even as it rumbled.
Maradjin, whose father was gatekeeper before him, spent decades guarding the volcano and trying to appease its spirits with offerings.
“Merapi is a house of spirits, which also means a living mountain,” Maradjin told CNN in a 2006 interview. “When Merapi emits smoke, we have to be respectful.”
We only provide AAA quality of products. You can make purchases without scrupulosity. All of products can be ordered from our website directly, also, you can contact our professional customer Tampa Bay Rays Hats
service to get more support about payment terms, the intention of cooperation etc. The most preferential price: Our competitive price make our customers confident to develop their own business, at the same time, reaping big benefit from this transaction. Our favor tends to the customers who are from United States, Britain, France, Spain, Germany and Australia etc.
nice work.
This is such a great resource you are providing. I enjoy seeing sites that understand the value of providing a prime resource for free. I really loved reading your post. Thanks!
It was very great idea to make an interesting blog, it would be great. logo design that’s fun to do!
Greta info, will be back for more.
great post, thanks for the valuable info
thanks for the great writing
HOW TO DO NFL JERSEYS BUSINESS
America is a big country with various popular sports and American football is one of them. NFL, the National Football League, is the highest level of professional American football in the United States. The hot sport also makes NFL Jerseys more and more popular. It represents a fashion, no matter you are sport fans or not. Nowadays everyone is getting involved in NFL gear and make money from the NFL jerseys because it becomes a growing business.
Manolo blahniks
Good post.You did a good work,and offer more effective imformation for us!Thank you.
Nike Dunk High Custom MAD Hatter Rabbit Blue
Nike SB Enigma Urban Haze Dunk High
Poptropica
Free Ringback Tones
Value City Furniture
It can show you very good information for you
Manolo blahniks. Someone says, the designer shoes is the fifth protagonist.
Value City Furniture
Cheap christian louboutin
They have all the styles of boots for men, women, kids, and infants bailey button uggs. They also come in various hues just as their boots come in different style from classic to contemporary and hip designs.
ugg boot
Fantastic blog! Very well written, I expect you to write more
These cards are great for a baby shower. I embossed this one with my Cuttlebug.
rosetta stone language
It is amazing feeling to read your article,thanks a lot.
Great article,thanks a lot.
Jazzy clothes go well with relations of BHTNL biaozhun links of london having unadorned devise. You should to respect your style when choosing your right family of london jewelry. Nevertheless it is a big inquiry for many women to highlight your personalities.
HTML links of london
UBB [url=http://www.linksoflondonstore.com]links of london[/url]
http://www.linksoflondonstore.com
Jazzy clothes go well with relations of BHTNL biaozhun links of london having
http://www.linksoflondonstore.com
One would love to have the onesies template just to make, i will never abused the usuage of these, as mine would be copy of yours. Please may I get this template.
it was approved for you. Do not require the treatment in greater quantities, or acquire it for lengthier than advised by your doctor
a really new strategy is by giving the webcam babes a tip. Similar to the old style striptease shows in the regional pubs.
Great article,thanks a lot.
great article thanks a lot
http://www.uggshoesoutlet.com UGG Shoes
http://www.uggshoesoutlet.com UGG Outlet Store
http://www.uggshoesoutlet.com Discount UGG Boots
http://www.uggsspace.com
http://www.genuineuggsoutlet.com
http://www.the-gucci-store.com
http://www.louisvuittonspace.com
http://www.mylouisvuittonpurses.com
http://www.monclerinwinter.com
I m glad i found ur blog.Not everyone can provide information with proper flow. Good post. I am going to save the URL and will definitely visit again. Keep it up. thank you!
si thand admin
So beautiful sharing!Thank you very much.
Best wishes!Your article is very good!
It is so nice.
All Replica Watches in http://www.watchtang.com are the well-known and luxury replica brand watches, like Chopard Replica watches, Fake Cartier watch, Replica Patek Philippe Watches, Replica Omega Watches , Zenith Replica Watches and so on. These Rolex Watches have a much cheaper price with the high quality. We are online selling top replica watches business site and professional offer the lowest price luxury watches and retail replica watch with any brands name. Enjoy your time to choose the watches. When you decide to order any of these watches and any other questions please contact us, We are here to service for you.
I think it’s very good, i like it very much ! Rotary Drum Dryersthank you for your sharing !
Thank you a lot that you made the smashing story connected with this post. But,
to opt for the great essay writing service, Rotary Drum Dryersstudents suppose know just about
custom papers.
This is my first time comment at pellet pressyour blog.
Good recommended website.
Thanks for the post!
I like your article. It’s really worth reading.Come and see our website and get a pair of UGG BOOTS. Making you more charming!
If you are lucky enough to purchase the best replica watches and wear it for a while, you will realise it is quite a reliable watch, not just a good-looking clone of the original
As a young lady handbags, like many others, very concerned about the trend of fashion for the famous brand, national costumes, elegant, Tiffany jewelry, and high-heeled shoes and so on.
To think of myself as a star, do not have to worry about poor performance or bad performance and live up to the expectations of others. All of these gave Jordan an opportunity to obtain a normal growth.
if the computer without uninstall 360 will stop QQ program start, that bravado-maybe ridiculously too too,cheap sunglasses, so I really doubt tencent you really have to peep users privacy of may. First,cheap designer clothing, 360 said tencent have peeping users privacy you tencent out the rumours, as I think of the old users trust you, you need not happen and 360 spat. Second, you pull out the baidu,But it is always adhere to the homemade machine, jinshan, and other enterprises, ask, baidu, kingsoft has and 360 make so serious? I don’t think so,discount handbags, my impression and do not have this
When uncle hand ball and francois law the final minute, trying to find catch teammates amongst the disorderly army, saints team defender also has been looking for him. Method of passing dominating the ephod falls saints team Angle guard potter’s hand, and will strike for winning the opportunity with both hands.cheap nfl jerseys and reaching out.
We only provide AAA quality of products. You can make purchases without scrupulosity. All of products can be ordered from our website directly, also, you can contact our professional customer monster energy hats service to get more support about payment terms, the intention of cooperation etc. The most preferential price: Our competitive price make our customers confident to develop their own business, at the same time, reaping big benefit from this transaction. Our favor tends to the customers who are from United States, Britain, France, Spain, Germany and Australia etc.
that is very kind of you to do this for us, thank you very much, you can have a look at the nice and warm ugg boots.
Do you want to be more fashion, more charming,just do a little thing. A exciting purchasing is ready to go! Just pay attention to. We are specializing in providing new era caps, red bull hats,one industries hats,rockstar energy hats,Monster Energy Hats which would be your final choice. Just do what you want alonging with your active heart. Our website is persisting on best customer service. Please come and enjoy it!
We are one of the leaders in discount af coats. Get a cute af jackets to keep you warm this winter or order a vintage looking abercrombie outlet. Abercrombie & Fitch are the leader in US beach wear, place your order before we sell out. Sign up to our mailing list for regular updates of the latest styles.
It was so funny that I saw this wallet online as a fluke. I was purchasing an intimate birthday gift for my fiance when I saw an ad for a duct tape Pumas Shoes. My son who is 15 actually made his own wallet out of actual duct tape. It wasn’t practical because his school ID and other cards, etc. would get ruined and stick to the wallet. He refused to use another Skechers Shape Ups Shoes, though. So – when I saw this the first words out of my mouth were, “No way!” I couldn’t believe that someone out there had the same idea as my son. He loves the wallet. He shows it to all his friends. Men’s Timberland 6 Inch Bootss a good conversation piece for me and my friends as well. No one can believe someone would actually make such a product! Well – with this teenager – New Puma Anti-Furs a hit!
Best new era caps ,new era hats, delicate monster energy hats, magical nfl hats, one industries hats, rockstar energy hats, Red Bull Caps, The Hundreds Hats, Supreme Hats, DC Comics red bull hats
are in stock now. Our site provide first-class service and reliable quanlity garantee, do not hesitate to shake hands with us and go with the tide as soon as possible!
We wholesale hats at competitive price,providing a huge range of hats with different brand name,such as coogi hats, baseball hats,Jordan hats,famous hats, monster energy hats, new era caps, etc.You can buy cheap hats. Welcome to visist here.
Nice!! Great Ifo. Great People. Great Blog. Thank you for all the great sharing that is being done here.
Very much luck enough to enjoy the most of your life with all the positive attitude.
and with the full command of her fortune–though her fortune bore no proportion to the family-estate–was not to be dissuaded from the marriage, and it took place, to the infinite mortification of Mr. and Mrs. Churchill, who threw her off with due decorum. It was an unsuitable connexion, and did not produce much happiness Timberland boots Mrs. Weston ought to have found more in it, for she had a husband whose warm heart and sweet temper made him think every thing due to her in return for the great goodness of being in love with him; but though she had one sort of spirit, Timberland work boots she had not the best. She had resolution enough to pursue her own will in spite of her brother, but not enough to refrain from unreasonable regrets at that brother’s unreasonable anger, nor from missing the luxuries of her former home. Timberland boots womensThey lived beyond their income, but still it was nothing in comparison of Enscombe: she did not cease to love her husband, but she wanted at once to be the wife of Captain Weston, and Miss Churchill of Enscombe.Captain Weston, who had been considered, especially by the Churchills, as making such an amazing match, was proved to have much the worst of the bargain; for when his wife died, after a three years’ marriage, Timberland Men’s 6 Inch Boots he was rather a poorer man than at first, and with a child to maintain. From the expense of the child, however, he was soon relieved. The boy had, with the additional softening claim of a lingering illness of his mother’s, Timberland Men’s Roll-Top Boots been the means of a sort of reconciliation; and Mr. and Mrs. Churchill, having no children of their own, nor any other young creature of equal kindred to care for, offered to take the whole charge of the little Frank soon after her decease. Some scruples and some reluctance the Timberland Men’s Custom Bootswidower-father may be supposed to have felt; but as they were overcome by other considerations, the child was given up to the care and the wealth of the Churchills, and he had only his own comfort to seek, and his own situation to improve as he could.
Manolo blahniks. Someone says, the designer shoes is the fifth protagonist. Who let actress Carrie so exaggeration to love it, and at 500 – $700 to buy a pair of Manolo blahniks. Remember the scene was robbed Carrie corner, she “with” robbers, cried bitterly:Please don’t take my Manolos! really exaggerate, but makes sense..At 40 step outside, said people can accurately and correctly recognized by Manolo Blahnik beautiful curve.
it is interesting and monster energy hat informative article. This has been very helpful understanding a lot of things. I’m sure a lot of other people will agree with me.
You really make it seem so easy with your presentation but I find this topic to be really something which I think I would never understand. It seems too complicated and very broad for me. I am looking forward for your next post, I will try to get the hang of it!
Thanks for sharing!Your articles it is wonderful!!
Football fans want to have an satisfied youth nfl jerseysto show the honor of their favorite team and players. It is not easy to get your hands on an authentic discount nfl jerseys
Not only they are very common, but also they are very expensive .If you play to give the present to your friends or family members ,then give them cheap discount NFL jerseys will be best choice.
As you know, the price of these jerseys will be quite higher during the season,since there is too much demand to match the need. While during the off season, you can have a great discount jerseys from various stores online. So, if you were not able to purchase your favorite wholesale nfl jerseys
during the season, you can always afford great discount NFL jerseys in the off season and have yourself prepared for the next year.
As every NFL fan knows that wholesale nfl jerseys is a very important part of game.They will want a jersey of their own to announce who is their favorite player. When it comes to buying jerseys, you want the best quality money can buy.Of course ,you care about the quality when you are going to have a deal with discount nfl jerseys .You have to compare with severals stores in local stores or online stores ,after you searching hard enhough ,probably you will get satisfied one which gives you your money’s worth.
If you want to learn more how to get the best quality cheap nfl jerseys can buy now in our comprehensive guide to NFL jerseys .
Apple Peel 520 turns your iPod Touch into an iPhone now in stock
The Apple Peel is a protective case equipped with a dock connector, battery and SIM card, that slips on to an iPod Touch.
Once connected and properly installed, the device will allow the iPod Touch to make phone calls and send text messages
It is actually very good but i went online i found great explanations about it so we can add on our web with all proper jornalists coments
Apple peel is a amazing product specialise in fitting for iPod Touch, which can esaily change iPod Touch into iphone cell phone.
it is interesting and informative article. This has been very helpful understanding a lot
of things. I’m sure a lot of other people will agree with me.
“Great design and colors of Lebron 8 shoesI love the Lebron 8 shoe which is from heel to toe makes it very comfortable walking or jumping and running. Everything about this lebron viii is awesome in design and comfort great job.”
i very like it
christian louboutin outlet designer shoes, a pair of fashionable christian louboutin pumps is as important as a beautiful face, the brand known for the female red-soled shoes, a lot of Hollywood actress from Europe and the United States. In fact, Christian Louboutin shoes for every occasion, whether formal or informal. In the beginning, christian louboutin outlet shoes, set the fashion for the main purpose of the banquet. In the 70s, the brand has begun to spread rapidly out of the fashion industry because of its high quality and unique design, and then with the two largest brands such as Dior and Chanel. In fact, high-heeled shoes in a variety of brands, the brand has never been aware of, because it is a very high reputation on the world market.
Standing with Yves Saint Laurent Outlet Shoes, the woman will be more self-confident charm; standing with YSL Shoes, the woman will not have to look up men everywhere; standing with YSL Shoes, the woman can see deeper and further.
UGG knows that one reason you love them is because they’re functional. Uggs boots are simple yet stylish to provide extra comfort for wear in any occasion. The cheap uggs are the best shoes for everyone in the winters. Today, you can get a variety of different styles cheap uggs boots on sale what are worthy to own.
Gosh, I’ve been looking about this specific topic for about an hour, glad i found it in your website!
The plastic also has sparkles in it and shimmers depending on how the sun hits them Pumas Shoes. BLING!!
Dear friends, thank you for visiting our website ,we are an international trade company,which specializes in NFL jerseys.We wholesale jerseys at competitive price,providing a huge range of NFL jerseys of different teams,such as Arizona Cardinal,Atlanda Falcons ,Baltimore Ravens,etc.You can buy cheap NHL JerseysWelcome to visist here .
Cheap kobe shoes is not new for Nike to collaborate with the leading designers to redesign their existing shoe brands. As Nike is then premium quality brand in the shoe trade, buy timberland shoes therefore, they always approach quality and noted designers for the designing purpose. They have worked with a number of leading designers, but if you are to shortlist a few among them,winter boots the first name that will pop in your mind is Nike Kobe shoes. mikzeran_d
Moncler exposés dans l’édition spéciale de la ligne principale et la ligne de sous
A wide range of selection ugg uk online for you.http://www.uggsalebootsuk.com/
ike-nikeshoes.com was founded in 2005, located in Fujian Province in China. We are specialize in producing and wholesaling goods in high quality.Especially Wholesale Air Max Shoes,Wholesale Nike Air Max 2009 and Cheap Nike Air Max Shoes Wholesale, We are engaged in wholesaling brand Shoes
shanghai massage
beijing massage
uggs outlet|
cheap uggs|
uggs outlet
uggs outlet|
cheap uggs|
There is no doubt that UGG is the most popular brand boots in all winter boots .
Tall UGG Boots,ugg slippers ,black ugg boots
Tall UGG Boots,There is no doubt that UGG is the most popular brand boots in all winter boots .
WOW~~HOW LOVELY! Thanks for this great blog!
Discount UGG
it is the first time I read your post.I like your blog.I have opened my new blog today.hope you like my blog also.Cheap UGG
Useful information, many thanks to the author. I will post a link to this page on my blog. I will visit your blog again!
Magnificent post! I love to read it! Before Christmas Day, what are you looking for as the gifts to your families and friends? If you are upset about this, you can visit our gucci outlet to choose what you like. Actually, every year, there are lots of people will come to buy gucci shoes from our online store, because these gucci sneakers are not only stylish and decent at the appearance, but also durable and versatile at the function. I believe you surly can find the suitable gifts before X’mas Day at our gucci outlet online store.
gucci outlet
uggs Sale
uggs outlet
During the day the Wedding gowns is the good choose,and the night,if you want radiant,you need the Evening gowns
It would of course be the death of the local newspaper, cable TV, and the whole tuned-for-5th-graders media that is propped up by commercials and marketing departments
And then you have the audacity to criticize Ezra for supposedly not opening up his ideas to pushback from other, differing opinions on the open comments section of his own blog!
This is my first time i visit here. I discovered so numerous interesting stuff in your weblog especially its discussion. From the tons of comments on your articles, I guess I am not the only one having all of the enjoyment here! maintain up the great work.
nfl jerseysThe National Football League shirt, wholesale shopNFL the NFL – the NFL, wholesale wholesale NFL – Welcome best wholesale shop, we are the National Football League shirt’s biggest NFL shirt in the website. Wholesaleugg boots
nfl jerseys The New Jersey wholesale cheap NFL plane Dallas cowboys jerseys Minnesota vikings… The reebok NFL of $39.99 violet 4. Method. ugg boots
Steelers reebok NFL shirt Timmons Pittsburgh 94 Lawrence?
nfl jerseys
Great post! A fantastic summary/overview.
Thanks for the work! Keep going!
Great post, Mason! A fantastic summary/overview.
Thanks for the work! Keep going!
Great post, Mason! A fantastic summary/overview.
Thanks for the work! Keep going!
We continuously produce many styles of replica watches to ensure that we get the best copy watches for you, such as fake Rolex Watches, Cartier replicas and…
we hear that top quality designer clothes online at the designer clothing store, many men wholesale designer clothes at this outlet.
I don’t wish to argue with you here, however I have my own opinions as well. Anyway, you probably did an awesome job in writing the put up, and wish to reward you for the exhausting work. Sustain with the nice job!
It is a good website!Thank you for your [url=http://www.whiteiphone4wow.com/]white iphone 4[/url] sharing with us. I suggest this site to my friends so it could be useful & informative for them also. Great effort.I love flowers…I [url=http://oilpaintingssite.com/]buy oil paintings[/url] am also interested to send flowers all over the world….I am just looking around some websites, seems a [url=http://oilpaintingssite.com/]oil paintings[/url] really nice platform you are using. I’m currently using WordPress for a few of my websites but looking to change one of [url=http://oilpaintingssite.com/]oil paintings for sale[/url] them over to a platform similar to yours as a trial run. Anything in particular you would recommend about it?
Thank you for your sharing with us. white iphone 4 It is a good website! Easily, buy oil paintings the publish is actually the sweetest topic on curing acne naturally. I agree together with your conclusions and will thirstily glance forward oil paintings for your forthcoming updates. Just saying thanks won’t just be enough, with the phenomenal clarity as part of your creating. oil paintings for sale I will immediately grab your rss feed to stay abreast of any new posts.
abercrombie & fitch clothing
has become extremely popular over the years with teenagers across the world. Their clothes are casual,trendy and come in decent colors. The rapid success of their brand abercrombieis attributed to their excellent ad campaign.
Hi guys!! This is my first website by my self, and i confused that is it good or not made by wordpress or Joomla, i want to choose one 4 me,and give me some advice.Thank you!
We are an international trade company,which specializes in Whoslesale NFL jerseys.We wholesale jerseys at competitive price for all NFL Teams,providing a huge range of Cheap NFL jerseys of All NFL Teams,such as New Orleans Saints jerseys,Minnesota Vikings Jerseys,Dallas Cowboys Jerseys,etc.You can buy cheap NFL jerseys. Welcome to visist here.
Panerai LUMINOR MARINA Asia 7750 Black
Todd Bratrud x SB Dunks High Pro – Brain Wreck
There is no doubt that UGG Boots is the most popular boots in all winter boots .
I am so glad to introduce our shoes and jerseys sales online shop ecalibabashop dot com for you. There are many kinds of fashionable products in our online shop. For example, the newest style Nike shoes and the most fashionable 2010 Nike shoes. We can give you good quality shoes at a cheap price. Welcome to purchase our discount Nike shoes. By the way, if you want to wholesale Nike shoes, we also can provide you the reasonable price.
My friendS told me that this blog is competitive. i will continue to read.
http://www.belowbulk.com
I recently came across your blog and have been reading along.
I thought I would leave my first comment. I don’t know what to say except that I have enjoyed reading.Nice blog,I will keep visiting this blog very often.
I slept and dreamt that life was beauty; I woke and found that life was duty.
Helpful blog, bookmarked the website with hopes to read more, this is the way a blog should be! thanks!
Youve got so much to say and know so much about the subject that I think you should just teach a class about it…HaHa!
We wholesale hats at competitive price,providing a huge range of hats with different brand name,such as coogi hats, polo hats,Jordan hats,famous hats, monster energy hats, red bull hats, etc.You can buy cheap hats. Welcome to visist here
Selling digital camera battery charger,Jvc charger,Jvc battery,Jvc battery charger.We warrant that the products sold in our website are 100% brand new and free from defects in material and workmanship – We never sell used or refurbished batteries.
i like your design
çok çok tşk edttik
hey güzelmiş bu sevdım
that is kind of you to post the information on this web and share with us, if you are interested in the ugg boots, welcome to have a look on my web ( http://www.myugg-shoes.com ). Thanks a lot!
I appreciate each one of you, immensely. I am not going to let ONE person kill the joy I get from sharing with everyone.
Nike Dunks High Super Mario White Red
Omega seamaster 300m Pro Chrono SS Blue Dial Asia 7750 Updated
It’s a reference document for how we check projects out of subversion, upload to live and some basic terminal commands for people who are unfamiliar in that environment.
Best new era caps ,new era hats, delicate monster energy hats, magical nfl hats, one industries hats, rockstar energy hats, Red Bull Caps, The Hundreds Hats, Supreme Hats, DC Comics monster energy hats
are in stock now. Our site provide first-class service and reliable quanlity garantee, do not hesitate to shake hands with us and go with the tide as soon as possible!
it is really nice.
Thanx for sharing this with all of us. Of course, what a great site Links of London and informative posts, cheap UGG I will bookmark this site. keep doing your great job and always gain my support.if you have any demand you can have a look here. winter boots
Highlighting your personality, style and status that is what the Swiss replica watches usually serve for.
Thank you so much for air max TNpublishing this tutorial. As soon as I saw your adorable onesie cards, I knew I had to make them. Luckily, my girlfriend is due with her 4th at the end of March and I know she will LOVE this card. Alair max LTDso, I am so deeply sorry to hear of that person who stole your tutorial. That is absolutely horrible and my heart goes out to you. Just remember that what comes air max 90around, goes around. So happy to hear you are not letting this stop you from sharing your wonderful work in the future. {{{Hugs}}}
Find the causes of the main boost in the popularity of these types of charms are sometimes chosen for his or her users could without doubt modify the qualities that all of his last.ghd straighteners. Any that come in clear cheap are reproductions.ugg boots sale uk.By way of this perfume’s endurance, I noticed that on my skin the perfume lasted just 3 minutes maximum, so by the finale of time I really could only detect the fragrance by sniffing very close to my wrists.
You do a great job, continue on it!
Ugg Australia story began in 1978, when Brian Smith, a young surfer from Australia, took a trip to the United Sates with a bag full of sheepskin boots – UGG Boots.Nowadays Ugg sale is the best popular sheepskin boots loved by people from all over the world.
this thing is worth to read. we enjoy it.
discount moncler coats
The perfect Christmas gift. YOU MUST NOT MISS IT!!!
——— http://www.jorer.com ———
The best online stores.
NFL .MLB,NBA, Jersey Wholesale $30
Ed Hardy AF JUICY POLO Bikini $25;
Christan Audigier BIKINI JACKET $25;
T-shirts (Polo ,ed hardy,lacoste) $16
coach chanel gucci LV juicy handbags $ 31
coogi DG edhardy gucci t-shirts $16;
CA edhardy vests.paul smith shoes $32;
jordan dunk af1 max gucci shoes $37;
EDhardy gucci ny New Era cap $16;
coach okely Adidas CHANEL DG Sunglass $18;
———– http://jorer.com ———-
This is so great! Thank you so much for posting this. I’m definitely sharing!
Great article and good research. Do you have a blog or newsletter I can link to?
After one month, my waist pain is disappearing! They are really great! I had purchased 4 pair of MBT Footwear from hellombtshoes.com and I love them. Now that I have been wearing the MBT Shoes Clearance, I hardly ever wear any of my other shoes. They are everyday shoes now. It’s so comfortable when wearing them.MBT Shoes are sold online with discount prices. We have fast delivery to your home, a large part of region with Free Shipping. Enjoy these high quality cheap MBT discount shoes technology for these new cheap MBT shoes. Features adjustable buckles at the forefoot, instep and ankle. Exceptionally soft, moisture-conducting microfiber sock lining and split leather insole provide breathable wear. TPU and glass fiber shank adds firmness to sole construction and also ensures a natural rolling movement of the foot for even weight distribution. PU midsole with pivot is the balancing section <a
There are Reebok Easytone Shoes, and then there are walking shoes that claim to boost your muscle tone by just walking around in them. Reebok EasyTone is one line that promises to increase your muscle tone – in fact, they claim it’s like taking the gym with you just by wearing the Men’s Reebok Zigtech. With celebrities like Stacey Keibler and the Kardashians promoting the
I’m searching for online posts that share ideas on various topics. Learned a lot reading it. Thanks for sharing..
Walk in the adversity of the people, and [url=http://www.belstaffuk.co.uk/belstaff-jackets-women-c-66.html]belstaff jackets[/url] lingering sadness of things, always reluctant to back, unwilling to return to reality. Adversity, and if not superhuman willpower and self-confidence, self-isolation would be difficult to get [url=http://www.belstaffuk.co.uk/belstaff-jackets-men-c-65.html]belstaff jacket[/url] out of the cycle, a never to become isolated, away from friends, family and love, even lost myself. But life is such a [url=http://www.belstaffuk.co.uk/belstaff-bag-c-68.html]belstaff bag sale[/url] volatile, when the stress of the people, feel no confidence in the survival, we must choose the time of death, and life will given a glimmer of hope, so he climbed to [url=http://www.belstaffuk.co.uk/belstaff-boots-women-c-67.html]belstaff boots women[/url] the edge of happiness, breathe the breath of happiness.
Thank you comes to our web about Steelers jerseys. We offer the authentic, Premier, Ben Roethlisberger Jersey
Maurkice Pouncey Jersey
Bob Sanders Jerseyreplica jerseys, our jerseys are high quality, all names, numbers and letters are stitched, free shipping, welcome to our shop to choose your favorite jersey, if have any we can do for you please feel free to contact us!
Some of these products may support more features, but it wasn’t readily louis vuitton shirts apparent to me how to get them set up. All of these programs are gucci flip flops completely louis vuitton shoes for men new to me so my thoughts of each may be a reflection of my greenness.
This blog is going to be impressive resource. Thanks a lot for a collection of good tips. I look forward to reading more in the future. Keep up the excellent work!
This blog is going to be impressive resource. Thanks a lot for a collection of good tips. I look forward to reading more in the future. Keep up the excellent work!
This blog is going to be uggs outlet impressive resource. Thanks a lot for a collection of good tips. I look forward to reading more in the future. Keep up the excellent work!
This will be very useful to us!
video game tester
101125033437PMAtlantica Online Gold | Atlantica Gold |
I want to take this moment to say that I really love this blog. It has been a good resource of information for a techie like me. Thank you so much admin
we enjoy the cheap designer handbags online. there are many discount designer handbags with free shipping, lots of people like to wholesale designer handbags here.
This will be very useful to us!
The largest New era hats store online. from here you can find the newest monster energy hats,new era caps,dc shoes hats and other famous brand hats in cheap price
Authorized Online Shopping Store: New Era, One Industries, Monster Energy, Rockstar Energy, Red Bull, Tapout, Coogi, Ed Hardy, Christian Audigier, Gucci, Jordan, MLB, NBA, NFL hats and caps. All fashion brands and new styles. Discount price. Top Quality. Fast Shipping. It’s easy and trustful to order here. Wholesale and Dropship. Shop Now.
Buy Cheap New era hats, monster energy hats, nfl hats and dc shoes hats online, Save 80%.we are one of the best Hats Wholesaler. Quality-Cheap-Safe-Faster, click in for more detail
I am always searching online for articles that can help me. Thank you
so cute! it’s beatiful!
supra tk society
I have read a few of the articles on your website now, and I really like your style of blogging. I added it to my favorites website list and will be checking back soon. Please check out my site as well and let me know what you think.
Thanks for an idea, you sparked at thought from a angle I hadn’t given thoguht to yet. Now lets see if I can do something with it.
Nice post, I would like to request you to one more post about that
Thanx for sharing this with all of us.
gold pandora bracelet
There is no doubt that ugg classic tall chestnut is the most popular boots in all winter boots .
I’ll definitely give this a try. I was looking for other special effects and I haven’t learned and used this yet. Thanks and keep it up!
thanks you very much love real admin and boss..
thank you for your accessed me
a href=” http://www.slibag.com“>Laptop bag briefcase conference bag
thanks you very much love real admin
a href=” http://www.slibag.com“>Laptop bag briefcase conference bag
checking back soon. Please check out my site as well and .
NHL jerseys sale
let me know what you think
le of blogging. I added it to my favorites website list and will be checking back soHockey jerseys
on. Please check out my site as well and let me know what you think.
good article,thanks for share
Skechers Womens Boots and
Reebok ZigTech are in the fashion,Reebok ,
Reebok Shoes and
Reebok Pump Omni encourage an active, healthy lifestyle.
THANKS
Pretty good post. I just stumbled upon your blog and wanted to say that I have really enjoyed reading your blog posts. Any way I’ll be subscribing to your feed and I hope you post again soon.
wow ,it’s very sexy ,sex shopping ,i like it very much
i want to share it with all friends,please click it here quickly
http://www.cheapaustraliaugg.com/
http://www.cheapaustraliaugg.com/
http://www.cheapaustraliaugg.com/
You do a great job, continue on it![url=http://www.usbcustomer.com]custom usb[/url]
[url=http://www.bestusbmemory.com]brand usb[/url]
this thing is worth to read. we enjoy it.
I hope you turned this rotten situation around and got published for this adorable, unique , Baby card You SO deserve it!
http://www.cheapdesignershop.com
http://www.cheapmens.org
http://www.shoponcn.com
It is a good post,thank you for sharing!
http://www.air-force-1s.com
Very helpful guide and clearly explained, thanks
Nike Dunks SB low is maybe the nearly all well-known brand when it comes to basketball footwear.As we have previously mentioned the actual Nike Dunk SB Highdepartment simply produces these kinds of shoes on a unique time of the entire year, it retains a minimal offer very popular.
We only provide AAA quality of products. You can make purchases without scrupulosity. All of products can be ordered from our website directly, also, you can contact our professional customer new era caps
service to get more support about payment terms, the intention of cooperation etc. The most preferential price: Our competitive price make our customers confident to develop their own business, at the same time, reaping big benefit from this transaction. Our favor tends to the customers who are from United States, Britain, France, Spain, Germany and Australia etc.
We only provide AAA quality of products. You can make purchases without scrupulosity.
thanks for sharing
Well written article, well researched and useful for me in the future.I am so happy you took the time and effort to make this.
dsghdfjh
I wish you will preserve updating your content materials regularly when you possess just one edicated reader here.
thank you for posting . please do more good article.i like it so much .I will always follow it.
right… i will think about this.. thanks for sharing this with us.
Love it,I am looking forward to seeing more.
When you do article marketing, your intention is to increase the number of visitors to your website. You can do this by writing and submitting unique, quality uggs outlet
It seems too complicated and very broad for me. I am looking forward for your next post.
http://www.saleuggbootsonline.co.uk/catalog/ugg-classic-cardy-5819
http://www.saleuggbootsonline.co.uk/catalog/ugg-fringe-cardy-boot-1878
Its very interesting work of art shared by you =) I really appreciate it. Nice work!
I have never read such a wonderful article and I am coming back tomorrow to continue reading.
Many people will endure very much discomfort just need for getting extra beautiful.
thank you for posting . please do more good article.i like it so much .I will always follow it.
I like this blog, keep blogging bro. hanks for this information
Great idea, I would like to read your information every day
Best new era caps ,new era hats, delicate monster energy hats, magical nfl hats, one industries hats, rockstar energy hats, Red Bull Caps, The Hundreds Hats, Supreme Hats, DC Comics new era caps
are in stock now. Our site provide first-class service and reliable quanlity garantee, do not hesitate to shake hands with us and go with the tide as soon as possible!
In 2004, Christian Audigier licensed the rights to produce the ed hardy wholesale line, which is based on don ed hardy imagery. Prior to the Ed Hardy clothing line, Audigier was the Head Designer at Von Dutch Originals, which marketed the imagery of Kenny Howard. Audigier has attempted to replicate the ed hardy clothing wholesale marketing techniques employed by Von Dutch Originals, by marketing directly to celebrity ed hardy jeans wholesale and by opening stores in high profile fashion districts.
Thanks for yoursharing.I like it very much,you’re doing a good job.Just have a look.Hope you will like wholesale new era hats and find it here http://www.buy-caps.com
[URL=http://www.okbuylouisvuitton.com/]Buy louis vuitton[/URL]
Buy louis vuitton
fake louis vuitton
louis vuitton outlet
louis vuitton store
Thanks for your articles.Thanks for yoursharing.Just for you,Just have a look.Hope you will like monster energy hats for sale and find it here http://www.caps2011.com
Finding the possible opportunity to buy and literally wear the clothes which might be dictated with the newest fashion craze brings in natural high towards individual. ugg boots sale.Now is the same that you’re walking any time you buy replicas. pandora.Shopping on the web you will save as many as 70% on the different most popular versions.
The blog article very surprised to me! Your writing is good. In this I learned a lot! Thank you!
baseball hats
Just had a call from a mate, who woke up this morning after a heavy night on the booze and had mistaken his laptop for the toilet in the night.
Recently established in 2006, http://www.hatmvp.com is the website of a company that has been in business in the Chinese market for about 3 years.We are hats manufacture in china,Our company specialize in supplying new era hats,monster energy hats,dc shoes hats,
red bull hats,famous hats,jordan hats,etc.We pay attention to our products quality and service
The led flashlight amazes by power and brightness of light beam – up to 1300Lm
buy low price air jordans online best price nike shoes
Yes social media may have successes in recruitment, but i cant believe it will be the sole tool used to advertise a placement.
monster headphones
Monster beats by Dr. Dre headphones
lady gaga monster headphones
women’s north face jacket
ugg womens
salvatore ferragamo shoes
Best new era caps ,new era hats, delicate monster energy hats, magical nfl hats, one industries hats, rockstar energy hats, Red Bull Caps, The Hundreds Hats, Supreme Hats, DC Comics red bull hats
are in stock now. Our site provide first-class service and reliable quanlity garantee, do not hesitate to shake hands with us and go with the tide as soon as possible!
NFL Authentic Jerseys on Sale, these jerseys are so super hot right now. Our company is the NFL Jerseys clothing’s manufacturer, has special Wholesale NFL Jerseys!
I enjoyed reading your post and I like your take on the issue. Thanks wholesale new era hats
Wir spezialisieren uns auf Notebook-Akku
The court asked to view the original tape and did not intend to confiscate your property.
I can honestly say mbt shoes are the first that have come with an instruction manual. What’s to know about that ?MBT shoes By Swiss Masai.
The most preferential price: Our competitive price make our customers confident to develop their own business, at the same time, reaping big benefit from this transaction
wow, your blog theme is very beautiful, I love! I will come again.
For those of you who are purchasing Titanium Jewelry or Titanium Necklaces, we realize that this is one of the most important purchasing decisions you will make.
We only provide AAA quality of products. You can make purchases without scrupulosity. All of products can be ordered from our website directly, also, you can contact our professional customer new era hats
service to get more support about payment terms, the intention of cooperation etc. The most preferential price: Our competitive price make our customers confident to develop their own business, at the same time, reaping big benefit from this transaction. Our favor tends to the customers who are from United States, Britain, France, Spain, Germany and Australia etc.
Welcome to visit here
With many years development, UGG Boots has become the most popular seller. The combination of its soft shank and sheepskin interior means that are designed for casual, short-term use. It’s true that Cheap Discount UGGs Boots Online Outlet, to some extent are warmly demand by customers. Of course, cheap UGGs don’t mean compromised in quality. We are the honest UGG Boots outlet offer you the Australia UGG Boots with great quality. Recently,Our UGG boots online sale UGG Boots sale online. Buy discount Ugg Boots on sale in our outlet. We can help you save your money. Choose the one you like in this UGG store! Once you get it, you will find it worth every penny!
he court asked to view the original tape and did not intend to confiscate your property.
Thanks for sharing, learned a lot.
this webpage very nice !!Good
The most preferential price: nike basketball shoesOur competitive price make our customers confident to develop their own business, at the same time, reaping big benefit from this transaction
Court asked to view the original tape and did not intend to confiscate your property.
I have been searching for a site like this in the field I am interested in. I am a great fan. I also like all things about do it yourself suggestions that help you to save.
Good gravy, there are others. I tried to explain to some other M$ developers, but couldn’t put it into words like you did. ALT.NET is how I feel.
oh my!! i love you so much!!
Thank you so much.
I support you.”>
wow!!!!your blog theme is very beautiful, I love it very much I will come again.
I really appreciate reading your blogs. The material is awesome since I can now announce to my friend that I’m right about this info. LOL! Fantastic find
You’re on the money with what you say. Thank you.
very interesting details you have remarked, appreciate it for posting .
Thanks for your share! very impressive!
Authorized Online Shopping Store: New Era, One Industries, Monster Energy, Rockstar Energy, dc shoes hats, Tapout, Coogi, Ed Hardy, Christian Audigier, Gucci, Jordan, MLB, NBA, NFL hats and caps. All fashion brands and new styles. Discount price. Top Quality. Fast Shipping. It’s easy and trustful to order here. Wholesale and Dropship. Shop Now.
you bolg template is very good,
original jordans 2010
basketball shoe 10
New Nike Jordans Basketball Shoes
rare jordans retro air shoes
new jordan retro sneakers on sale
cheap jordan sneakers sale online
Cheap Michael Jordan Shoes
authentic jordans
nike air max 95 men’s running shoe
nike air max 95 Authentic
cheap nike shoes
cheap nikes
cheap nike dunks
nike air max shoes cheap
nike air max shoes for kids
nike air max shoes for men
nike air max shoes women
Authentic Air Force Ones
Authentic Air Max 95 Sneakers
Cheap Air Max 95 Sneakers
Original air max 90 shoes
cheap nike air max 2010
cheap nike air max
nike air max skyline
nike air max 1
nike air max speed tr
Jordans shoes
original air jordans
original nike dunks
original jordans for sale
Original Jordan Retro shoes
Authentic Jordan Retro Shoes
authentic jordan shoes
Original Jordan Retro shoes
jordan furniture
jordan u pull it
jordan shoes 1-23
Kitchen faucet Shower faucetShower faucet monoammonium phosphate Shop for monoammonium phosphate .
70-272/70-284
yeşilçam
If we have been wondering david yurman necklace where a tone blue in blue diamonds come from, consternation no more. The tiny volume of boron which has links of london jewelrybeen trapped in a diamonds clear make up is aLinks of London
pass component obliged for a color. And this additionally creates blue diamonds gainful to electricity.
hello
jjujk
jjukj
Red hair girl
Into the world of this Luoji
Silvery laughter
People will be children in the window V
Eyes blurred mountains
Clearly in the wind, gradually revealing
Reveals a
Love of space and time through 59fifty hats a few hundred meters … …
Colourful clothing, wearing a concise pure necklace, won’t be gorgeous dress color inundated, and can make clothing color produce balance.
really very good post! and the images are also pretty!
I really liked the post and great tips..even I also think that hard work is the most important aspect of getting success keep it up 🙂
I have never read such a wonderful article and I am coming back tomorrow to continue reading.
thanks
thanks for sharing.
thanks for sharing man.
this is very good
web is scam,but I think it is not all the web are scam,when you visit chinese jerseys web first,as you don’t know much about that firm, nfl replica jerseys
Back in the 1990s when Robert Reich was Labor Secretary,cheap jerseys his department gigged a professional baseball team for keeping minors—in this case
really very nice clothing, thank you for sharing
Shoes too big, not only can affect a child’s normal activities, but also to prevent children from walk right posture.
Your tutorial very good, I like, I will always come
Say thanks to you truly for providing plenty of both useful and interesting advise. I will bookmark bookmark your website and will be absolutely coming back. Again, I truly appreciate all your work furthermore providing plenty of worthwhile info for the audience.
Amazing designed cards! these all are so beautiful. I like all of them very much. The tips you have mentioned is also so inspiring and new for me. Thanks for sharing.
rmtなどがそうだ。rmt リネージュ2これらMMORPGといわれるオンラインゲームは、リネージュ2 rmt1つのサーバーに数千人のプレイヤーが同時にログインしゲームを行なっている。ここでいうサーバーとは、物理的なサーバーではない。MMORPGでは、rmt とはサーバーやワールドと呼ばれる単位で複数の同じ世界が存在する。アトランティカ RMT3万人が同時に1つのサーバへアクセスすると処理が重くなってしまうrmt aion
Do you want more stylish, more attractive you, just do something on it. An exciting thing – to buy some hats! Please note that we are professional to provide New York Yankees Hats, Jordan New Era Hats, an industry hat, Rockstar Energy Hat, new era caps this will be your final choice. Just do what you want to do and positive to do. Insist on our site the best customer service. Please Enjoy!
Won’t be regret when new era hats on our website.
We provide cheap new era hats with high quality.
Chicago White Sox Hats
is our business too.
Stewart hadNew Era Baseball Hats status. In 2002, at the age of 29, he walked 600 miles (966 kilometers) alone across Afghanistan on the New York Yankees Hats States invasion and wrote a best seller about it, The Places in Between, a book the Red Bull Hats called “a flat-out masterpiece.
http://www.caps-hat.com Recently established in 2006, http://www.caps-hat.com is the website of a company that has been in business in the Chinese market for about 3 years.We are new era hats manufacture in china, Our company specialize in supplying new era hats,monster energy hats,dc shoes hats,red bull hats,famous hats,jordan hats,etc. We pay attention to our products quality and service.
I will be posting the card I made with your tutorial VERY soon! Thank you!
Excellent article; I really like the way you outlined the themes of you blog and make things easy to understand. Again,thanks for sharing your thoughts.X Ray Technician
Your details are very good; we got new knowledge from your site. Template also very good, color matching is well. I will keep visiting your site often. This is a great article thanks for sharing this information. Give your knowledge for all people. Because who likes to know more information. I saved some details to me.
i like this pink
Substantially, the article is in reality the sweetest on this precious topic. I harmonise with your conclusions and will thirstily look forward to your upcoming updates. Saying thanks will not just be sufficient, for the phenomenal clarity in your writing. I will directly grab your rss feed to stay abreast of any updates. Pleasant work and much success in your business efforts!
“I’m not here to do humanitarian work, not to provide community service … … I am the only one policeman in this town.”
A good website recommend to
you: they sell New Era Hats, Monster new era caps , Dc Shoes Hats, Red Bull Hats,New Era Caps,NFL Hats And Famous Hats at cheap price.
You made several good points there. I did a search on the issue and found the majority of persons will go along with with your blog.
Hello, I visit your websites virtually every day but I am normally a lurker. I thought i’d finally message you expressing how much I like visiting your web site as I think your writing is both cool and helpful. Maintain your blog up-to-date and you have a visitor for ever several years.
Testkings is appreciative to advertise the new and arising certifications alertness guides and braindumps with appropriate abatement for their registered candidates and for new candidates alone for bound time of period. Don’t decay your time, abstraction by testking’s provided assay alertness kit, save money and access your certifications with accomplished scores. By the Grace of Almighty God, our braindumps are broadly acclimated by the IT able common and humans like to acquirement braindumps and convenance analysis from testking. You will not alone canyon your acceptance assay but, enhance your ability and abilities about the assay artefact you are traveling to pursue.
Mobiles, operating systems, creating translations are basic ones.
Maintain your blog up-to-date and you have a visitor for ever several years.
For people who are ready for outing in the summer, new era hats are always the must-have accessory.
You’ll find all CLAA154WB08-A you wanted or needed to know, here.This is such a very good N101L6-L02 resource that you are providing and you give it away for free.
very happy to read your blog.
Thanks for sharing this nice post.I will keep your article in my idea.
It’s really a very good article,I learn so much thing from it,thanks.You are really a nice person.
Determination of the local seismic network, which is located in the earthquake source depth of 17 km below the surface. Witnesses said that when the earthquake occurred, it is quicker to cancel the trip tourists, new york yankees hatsWould you like to cheap new era hats
Best new era caps ,new era hats, delicate monster energy hats, magical nfl hats, one industries hats, rockstar energy hats, red bull hats Red Bull Caps, The Hundreds Hats, Supreme Hats, DC Comics are in stock now. Our site provide first-class service and reliable quanlity garantee, do not hesitate to shake hands with us and go with the tide as soon as possible!
The good is the enemy of the best.
This by far one of the most elegant and beautiful cards we’ve ever seen in a card making tutorial, and we’ve seen a lot of cards. Rather than tacking on cheesy mass-produced floral prints and little butterflies and other odds and ends that just distract, this Christmas card focuses on minimalist beauty.
WOW !! I will also create same card, this steps will help me.
Very good post. Made me realize I was totally wrong about this issue. I figure that one learns something new everyday. Mrs Right learned her lesson! Nice, informative website by the way.
Well said. I never thought I would agree with this opinion, but I’m starting to view things from a different view. I have to research more on this as it seems very interesting. One thing
Thanks for sharing your article. I really enjoyed it. I put a link to my site to here so other people can read it.
happy to share your blog!
good article!
may all your plan can come true
Well worth to read this article, thanks for sharing Discount UGGs Boots Online Outlet
Won’t be regret when new era hats on our website.
We provide cheap new era hats with high quality.
Los Angeles Angels Hats
is our business too.
I reallyTrue Religion Jeans
like this website , [URL=http://www.withthesale.com]True Religion Jeans[/URL] and hope you will write more ,thanks a lot for your information
stherb
stherb
stherb
stherb泰国圣荷丰胸
泰国圣荷丰胸
air jordan shoes
cheap NBA Jerseys
cheap NBA Jerseys
cheap Nfl Jerseys
Cheap Gucci Shoes
吃什么最减肥
最健康有效的减肥药
You provide True Religion Jeans
enriched information for [URL=http://www.withthesale.com]True Religion Jeans[/URL] us,thank u.
I was happy when i heard the news of that,equally sharing,by the way
cheap clothing store not only wholesale cheap running shoes but also wholesale fashion Jewelry
http://www.buyonstore.com
so cute, lovely
I guess having something real or substantial to say is the most important factor.
I like dark man. He said. He gently in the sunshine narrowed eyes.
I love it! And I truly do appreciate your tutorials and the time you put into making them. Have a great day.
come from Complete Abercrombie & fitch collection at Official Retail Store
SunglassShade.com offers versace sunglasses like styles at a fraction of the cost, giving you the look you want at affordable price.Buy cheap discounted Brand eyeglasses.
http://www.goodmbtshoes.com
http://www.uggsgood.com
http://www.jerseysgreat.com
Famous brands like Nike and Adidas are manufactured in China wholesale electronics. Hence, you can even get branded items like Nike sneakers at a cheap rate from wholesale cell phone. Consumer electronics goods may also be purchased on wholesale from china wholesalers spy watch.
do you want to buy cheap electronics? go to http://www.agoodic.com have a look
These things I’ve said many times, like eating the same habit. This scene, as drinking water as well.
morning of 8 confirmed the police, http://www.cheap4laptopbattery.com/ cheap laptop battery well-known journalist Carlos Castro of Portugal in the Intercontinental Hotel in Manhattan
This is very cute. I am going to use this idea for Easter! Thank you for your time to make this article!
There are many swiss replica watches with high quality and low price from our shop. If you want to learn more informations of those swiss replica watches, please visite our website http://www.wal-watch.com
I hope you never stop! This is one of the best blogs Ive ever read. You’ve got some mad skill here, man. I just hope that you don’t lose your style because you’re definitely one of the coolest blogger out there. Please keep it up because the internet needs someone like you spreading the word.
Great post, I concur completely and appreciate the time you took to write it. Cheers!
hi you have posted a nice one that i have ever seen.
.
hi you have posted a nice idea, keep going.
Hey nice post thanks for your wonderful and creative ideas.
.
Good post.You did a good work,and offer more effective imformation for us!Thank you
Your post is so nice.I’m impressed with your world vivid expression
hey such a nice post, we are always looking for your new ideas and discussion.
nice article,nice you.
Very happy to see your article, I very much to like and agree with your point of view. Thank you for sharing.ugg outlet
Once he yelled to some children on the street: “I’m coming to get you!” McKinley said.
Gucci Shoulder Bags
“Ask him?” My tone was poor, almost all the anger are coming. This wood to zhe unexpectedly still facing I made faces, damn, this young lady not rested, * * * when I sick cats?
thnk you admin
very nice blog
hey ben geldim
I really agree with the facts that you have shared on this post. An interesting topic like this really enhances reader’s mind to have more effective decisions over a certain issue.
Finally!!!! I made one of these! Check it out here http://capcreations.blogspot.com/2011/01/baby-onesie-card.html
Thank you for sharing!
http://www.jordansfitting.com
cheap air max
air jordan 11
air jordan 13
air jordan shoes
nike air jordan
air jordans 2011
sale air jordan
cheap jordan shoes
nike air jordan shoes
cheap air jordan shoes
air jordan shoes online
http://www.jordansfitting.com
replica watches
Thanks for your tutorial. I have again know another art. I am really thankful that internet has been invented because in internet, you can find the things that you wanna know. Thanks for posting =)
I am thoroughly convinced in this said post. I am currently searching for ways in which I could enhance my knowledge in this said topic you have posted here. It does help me a lot knowing that you have shared this information here freely. I love the way the people here interact and shared their opinions too. I would love to track your future posts pertaining to the said topic we are able to read.
enhance my knowledge in this said topic you have posted here. It does help me a lot knowing that you have shared this information here freely. I love the way the people here interact and shared their opinions too. I wo
Regeneration leather is put skin slag, leather fibre grinding, the high-pressure using adhesives agglutinate, forming flake, then by slice skin machine films to need thickness, again carries on the finishing, make it has certain leather characteristics, widely used for the bags leather goods, a few used to shoemaking.
FREE SHIPPING,accept paypal
=================== http://www.yessoso.com/ ================
free shipping
accept paypal credit card
lower price fast shippment with higher quality
BEST QUALITY GUARANTEE!!
SAFTY & HONESTY GUARANTEE!!
FAST & PROMPT DELIVERY GUARANTEE!!
The website wholesale for many kinds of fashion shoes,
Very helpful guide and clearly explained, thanks
Cheap Ugg boots 50-70% Off, 100% Real sheepskin boots ,No- Tax, Free Shipping, Take Actions Now!
http://www.cheapbootsonlinesale.com
Okay article. I merely discovered your weblog website and wished to say i have surely enjoyed studying via your thoughts. By any signifies I’ll be subscribing for any feed and I genuinely wish you write-up as shortly as much more quickly
replica handbag
Replica Handbags
Replica bags
These information[URL=http://www.withthesale.com]True Religion Jeans[/URL] helps me True Religion Jeans
consider some useful things, keep up the good work.
Many people are fond of these information you shared, as they are so helpful, and we are expected to have more materials of these topic. Welcome to have a look at the ugg boots sale at our site, they are also very good.
With this twitter app, you can schedule your tweets by setting a particular date and time.
e it should help you unquestionably. I take small busines
Great information!
There are three wesite on sale cheap nfl jerseys:
http://www.jerseysshops.com
http://www.brandjerseys.net
http://www.cheapjerseyssite.name
their cheap jerseys not only top quality,their serving is also good!
If you want the 2011 new season nfl jerseys,welcome to shopping
Even when you feel as though there isn’t a lot you can do to change unhappiness or problems, you can always do a little—and a little at a time eventually makes a big difference.
so on.And they serviced considerate.If you are a hats lover like me,you can try it . Just make purchases without scrupulosity,I believe you will not regret.
Its a superb work done blog.
Great work for sure.
In Step 1 of making the onesie card it says fold at top. That part is confusing me. How much do I fold? It’s not big enough to fold in half…help
I love the stamp there…
Cheap Ugg boots 50-70% Off, 100% Real sheepskin boots,No- Tax, Free Shipping, Take Actions Now!
http://www.cheapbootsonlinesale.com
Greetings everyone, This webpage is terrific and so is how the matter was expanded. I like some of the comments as well although I would prefer we all keep it on topic in order add value to the subject.
Welcome to newera-hats.com website. new era caps, new era hats, Monster Energy Hats, monster energy hats, baseball hats wholesale. Free shipping to worldwide.
I like shopping online.Recently,I have bought a yankees hats in a shopping net.It really very good.They provide high quality and large-variety new era caps ,red bull hats,dc shoes hats,and so on.And they serviced considerate.If you are a hats lover like me,you can try it . Just make purchases without scrupulosity,I believe you will not regret.
Nike have provided a perfect shoes for sneaker lovers who have different activities aside from running. Check out the new Nike cheap air max for men Air Max Abasi Safari comes in Dark green army. I personally love the dark green colorway. It also has a leather animal print. It comes with a dark green shoe laces that perfect complements the whole shoes. It also has perforated lining on its opening.
Mbt Shoes are not proven to improve the appearance of cellulite, but there is a lot of anecdotal evidence that they may. Regardless, the other benefits cheap womens mbt shoes of using Mbt Physiological Shoes make them well worth a try. Even if the cellulite does not completely go away, the pain, extra pounds and poor posture can be considerably reduced. In some cases, what appears to be cellulite is a buildup of fluid and lymph beneath the skin. Poor circulation can increase the dimpled appearance of fat beneath the skin when this is the case. You may also see a decrease in cellulite simply because your body is becoming more toned and trim.
In accordance with the instructions on the home page to create your own space. Microsoft Office is so great! This service is free of charge. Office 2010 –save your time and save your money.
Over 2000 pick discount designer handbags, Louis Vuitton purses, Louis Vuitton wallets, Gucci bags, Hermes bags are available.
You may ask a question-why should I buy handbags from http://www.max-handbag.com, what is your advantage compared with other website?
The answers are as following:First, the high quality of Gucci Bags, Louis Vuitton purses, Hermes bags are 100% guaranteed, either on materials or handcraft, all Gucci Bags, Louis Vuitton purses, Hermes bags here are produced under strict and exquisite handcraft.
Heya..thanks for the post and great tips..even I also think that hard work is the most important aspect of getting success.
Thomas Sabo is important jewelry piece for a woman. Traditionally, the ring was kept hidden, meant
to be a big surprise for the bride. Today however, the trend is to choose the wedding
rings as a couple. Many women plan their wedding rings ahead of time; therefore, it
is best to discuss your plans for Thomas Sabo jewelry shopping early on.
Thomas Sabo is important jewelry piece for a woman. Traditionally, the ring was kept hidden, meant
Thanks so very much for taking your time Links of London jewelryto create this very useful and informative site. I have learned a lot from your site. Thanks!! I think you have done an Audemars Piguet royal oakexcellent job with your site. I will return in the near future. links of london bracelets
You have provided ample information here on your post that can easily be understand by your readers. I am admiring you for that. Thanks for this insightful post and I am hoping more to come.
[…] As in that post I doubled the length to make a larger card. The origianl design I used was by Lauren and I changed it to create a baby […]
Strong weblog. I acquired lots of good information. We?ng been keeping track of fraxel treatments for awhile. This?utes interesting the way it keeps varying, yet a few of the core components stay the same. Have you observed a lot alter because Search engines made their latest purchase within the area?
oh my!! i love you so much!!
Thank you so much.”>
“Relish the moment ” is a good Red Bull Hats motto,
especially when coupled with New York Yankees Hats Psalm
118:24:”Thisis the day which the Lord Monster Energy Hats hath
made;we will rejoice and be glad in it. ” It isn’t the burdens of today that drive men mad. It is the regrets over yesterday and the
fear of tomorrow. Regret new era hats and fear are twin thieves who rob us of today.
oh nice article i like it , i am a teacher of english as a second language and i do feel the content of your article so much.
[…] The arrival of a baby girl in a friend’s family gave me an opportunity to make a Onesie Baby Card. This card is inspired by paper artist Lauren Meader’s Oneside Card Tutorial […]
Le 2,5 billions de dollars réductions exclurait les militaires, et ne touchent pas le droit
grands programmes, Medicare nike air max pas cher et de la sécurité sociale. Par conséquent, son effet sur
l’ensemble du réseau des programmes gouvernementaux, notamment l’éducation, la sécurité int
érieure, le transport, l’application nike shox pas cher des lois et de la recherche médicale, serait rien de
moins drastiques.
ghd shop uk is the online store. As a leading ghd outlet, we’re proud to offer the widest selection of quality ghd online shop at the lowest price which you can afford. Here are many ghd straighteners shop for your choice and free shipping service that offer a 100% satisfaction guarantee.
Christian Louboutin Store are proud to supply a large range of well known Christian Louboutin Shoes on sale. All backed by our money back guarantee. Our womens wedding Christian Louboutin shoes collection is continually growing, and we aim to provide a shoe suitable for every bride.
Thanks so very much for taking your time Aaron Rodgers Jersey create this very useful and informative site. I have learned a lot from your site.
Our society is usually encourages primarily christian louboutin store, http://www.christianlouboutinsstores.com as if workplace is the Olympic stadium discount christian louboutin shoes sale , as long as you are willing to sweat hard, so can the fair competition take a good places christian louboutin shoes sale – who all know that was brainwashed one of America, worldly workplace cheap christian louboutins, Ken under the most basic conditions, only coolie other determinant also in iife. christian louboutin discount, But many large they looked su2 discount christian louboutin shoes, but also a universal truth, just like in duty field complained about it, if only watch conclusion cheap christian louboutin shoes, then I and successful personage their attitude is the same: we should learn to do a don’t complain discount christian louboutin pumps. As for one reason is widely divergent, that but are they won’t on mesa or write buy christian louboutins enjoy 70%-80% off in the book tells you.
So much information into one single post. I really need to get a good look at this. Thanks a lot for posting.
I honestly thought it was simple and straight forward, but I’m guessing everyone’s brain works differently I can look at something, and just figure it out.
oh nice article i like it , i am a teacher of english as a second
Thanks so very much for taking your time Aaron Rodgers Jersey
http://www.jerseysgreat.com
http://www.uggsgood.com
http://www.goodmbtshoes.com
I really your blog theme its really interactive one.
This card is really attractive for the children.
Want to say your article is outstanding. The clarity in your post is simply striking and i can assume you are an expert on this field.
oh my!! i love you so much!!
Thank you so much”>
Thank you very very much ..
MAD scientist- how nice for you! My SO says he would like to come help in the lab but I don’t have anything he can do without supervision. But I appreciate that he has the interest. He reads more popular science than I do….
That is will help me a lotI believed that was extremeley interesting. Many thanks with the unusual data. I’ll retain using this….
only for a moment and thr moment was gone.
First, let me commend your clarity on this subject. I am not an expert on this subject, but after learning your article, my understanding has developed well. I know you must have more wonderful idea.
let me commend your clarity on this subject. I am not an expert on this subject, but after learning your article, my understanding has developed well. I know you must have more wonderful idea.
A capsule-like structure in the room housed the toiletarmani suits, sink and a relatively roomy shower separated by a sliding door, but the counter by the sink was so small that it could barely fit one toiletry bag, let alone twoarmani watches. Toiletries branded by Maison Moschino are strung together on a key chain (keys are a major design motif), a cute touch except it was too big for the shower shelfchanel watches.
Battery and charger online shop http://www.all-good-battery.com
High Quality Digital camera battery at lower prices, and stock a lot of Camcorder battery in
our warehouse.
Gucci (Gucci) brand profile
Founder: Guccio Gucci Gucci Europe – Gucci
Take-overs: in Florence, Italy (1923)
Stylist:
1, 1923-1989, Guccio Gucci (Gucci Europe – Gucci)
The clarity in your post is simply striking and i can assume you are an expert on this field.I know you must have more wonderful idea.
Computer Hardware And Software
CPW Kristina Distress White Painted Furniture – Contemporary, modern, cheap home bedroom Furniture Sale London,
This is such an interesting story at it gives in-depth information to the reader as well. Good thing you have it shared.
herbal smoke
I found this is an informative and interesting post so i think so it is very useful and knowledgeable. I would like to thank you for the efforts you have made in writing this article mobile casino games|iphone casinos
Pretty idea, i wanna make one for my dear mother, thanks for share
I am thoroughly convinced in this said post. I am currently searching for ways in which I could enhance my knowledge in this said topic you have posted here. It does help me a lot knowing that you have shared this information here freely. I love the way the people here interact and shared their opinions too. I would love to track your future posts pertaining to the said topic we are able to read. penis enlargement
I like it. Thanks so much for this tutorial! I want to try this myself after seeing the original card. Thank you for this post.
Your productions have been my favorite. You just surprise us while making these stuff!
http://www.hatsbusiness.com Recently established in 2006,
http://www.hatsbusiness.com is the website of a company that has been in business in the Chinese market for about 3 years.We are new era hats manufacture in china, Our company specialize in supplying new era hats,monster energy hats,dc shoes hats,red bull hats,famous hats,jordan hats,etc. We pay attention to our products quality and service.
Totally i agree with you.Am i crazy?Nothing can bother me when i go shopping on baglx.com
Discount designer handbags
designer handbags for less
Thanks so much for the tutorial. I’ll give it a try.
Wow! Thank you!
Excellent site, keep up the good work my colleagues would love this. I read a lot of blogs on a daily basis and for the most part, people lack substance but, I just wanted to make a quick comment to say I’m glad I found your blog. Thanks
christian louboutin boots, often in late time, man ting cheap louboutin boots, mind will struggle among wandering in right and wrong christian louboutin ankle boots. Have a kind of knowledge is called philosophy womens louboutin pumps, with the help of it, we can clear christian louboutin high heels open which a door. http://www.clshoessales.com/
by guiyi3yg
Thanks so much for the tutorial. I’ll give it a try.
Many thanks to the person who made this post, this was very informative for me. Please continue this awesome work. Sincerely…
IT certifications in modern society are critical to many people, especially those IT workers. But the fact is even if most people want to pass Cisco, CompTIA or HP certification, lacking of time to prepare the IT exam will always make the exams more difficult to pass. So that is why testhope.com exists which aims to be your loyal support and help you pass the IT exams with ease.
I really appreciate you sharing your talent with all of us. Thanks.
Tiffany is about the world’s most renowned designers of first-rate offerings. Dissimilar to other vogue companies, tiffany necklaces deal firmly in products for instance jewelry, designer watches, glass wares, lamps, bags, plus more.
http://www.tiffanysaleuk.com/
This will be a good recommendation for me. This is my great pleasure to visit your website and to enjoy your excellent post. I found many valuable things to learn in this article. Please keep on posting such quality articles. Thank you for sharing this article to all of us.
Windows Vista Boot Logo Generator Beta – Development Dan’s BlogWindows Vista Boot Logo Generator Beta. by dan on Jan.04,
Burberry shoulder bags, Dior shoulder bags, Chloe shoulder bags, Versace shoulder bags, MiuMiu shoulder bags…Color choose Black leather handbag,designer shoulder bags highest quality materials. Our quality is absolutely the finest you will find in shoulder handbags anywhere.
Discount Christian Louboutin Shoes UK Online Store. We Supply Cheap Christian Louboutin High heels, Boots, Pumps, Flats, Sandals, Short Boots, Manolo Blahnik Shoes, Yves Saint Laurent and so on.
Thanks for you sharing
1133
This will be a good recommendation for me. This is my great pleasure to visit your website and to enjoy your excellent post. I found many valuable things to learn in this article. Please keep on posting such quality articles. Thank you for sharing this
breathable mesh upper vibram five fingers sale,vibram five fingers these Five finger shoes,five fingers shoes unlike the cheap uggs they are more lightly,they have same features like vibram five fingers shoes will keep stuff out. chi flat iron,chi hair straightener free shipping to australia and some certain countries,healthy ghd australia,ghd hair straightener tools,with these chi flat irons,ghd straighteners you will look more and more fashionable.
I am thoroughly convinced in this said post. I am currently searching for ways in which I could enhance my knowledge in this said topic you have posted here. It does help me a lot knowing that you have shared this information here freely. I love the way the people here interact and shared their opinions too. I would love to track your future posts pertaining to the said topic we are able to read.
Couldn’t be composed any better. Reading through this article reminds me of my old room mate! He always kept talking about this. I will send this blog
post to him. Very sure he will have a fantastic read. Cheers for discussing!
I admire what you have done here. I like the part where you say you are doing this to give back but I would assume by all the reviews that this is
working for you as well.
the card is beautiful and the information is helpful 🙂
Pick a Color for your Bridesmaid Dresses.
We update designer bags timely when the new styles available. Low price, high quality, perfect after-sale service.
Great information. I got lucky and found your site from a random Google search.
attracts celebrity fans like Naomi Watts, Britney Spears, and Alexa Chung. Furthermore, Mulberry’s tree logo handbags are known to be a Brit girl’s staple and must-have accessory.
Target Collaborates with High-end Designers.
thermore, Mulberry’s tree logo handbags are known to be a Brit girl’s staple and debeller noutery thank you
thermore, Mulberry’s tree logo handbags are known to be a regenner the lapped of the thank you
thermore, Mulberry’s tree logo handbags are known to be a dedaller thosed you thank
thermore, Mulberry’s tree logo handbags are known to didares setring compled wedear
thermore, Mulberry’s tree logo handbags are known to be a Brit girl’s staple and dadanger nouter
their “strong” area at running back has landed them in the number 16 spot on total rushing offense, I think the Patriots can stop the run.
Helo, your blog is really good, I like it very much!By the way, if you like nike chaussures tn you can come here to have a look!
http://www.cheapbootsshops.com
http://www.bel-jackets.com/list/Belstaff-Travel-Bag-554-Brown-500.html
http://www.bel-jackets.com/list/Belstaff-Messenger-Bag-Black-478.html
http://www.bel-jackets.com/list/Belstaff-Bags-Black-Shoulder-Bag-556-490.html
http://www.bel-jackets.com
Endangered Species Act enforcement is woefully underfunded. Total federal spending on endangered species amounts to about $562 million, including what’s given to NOAA and the Fish and Wildlife Service, who are responsible for protecting the animals and evaluating plans submitted by other federal agencies.
http://www.timberlandking.com/ timberland boots
To be honest, I even could not imagine how hard it is to find decent piece of info on the above topic. It took me a couple of hours before I came across your site.
[…] I can always use a kick! ANYTIME! and no. It's not in my gallery. Cased. As usual. Here's a LINK to the tutorial. I actually made those (+4 more same) for a neighbour that had a baby girl but has […]
You would really need to build a plan around the swot with high probability and likely to impact.
Thanks for sharing such an interesting article. I really enjoy reading it.
mbt shoes wholesale
Buy armani sunglasses
Thank you for this amazing article of card design. Nice form and color. It gives me great pleasure to visit your site and enjoy your excellent post here. Thank you for your work, the post is extremely useful. Thank you for sharing.
http://image-graphicdesign.com/
http://www.interiordesignref.com/
Whether you are a fan of NFL or MLB teams or hip-hop bands, we are willing to be your first choice by offering the competitive price and best selection of new era hats with the best service. Our store provide first-class service and reliable quality guarantee, do not hesitate to shake hands with us and go with the trend as soon as possible! Just do what you want along with your active heart.
Hi! I recently found your onesie tutorial and made some cards for baby gifts. Thank you so much! I shared my projects on PTI’s February blog hop and linked back to you tutorial. I am BRAND NEW to blogging, and I hope that I’ve done this correctly. Thanks again!
With the Seasonal changes in the non-stop, the stars transform dress but also transform between the handbags to proceed. But the full look, not difficult to find the Channel Handbags always have the highest rate on a mirror. Perhaps that is the packets can appear on different occasions, you can wear evening dress to hold it, you can also take it during the day shopping. The Hollywood star or fashion industry heavyweights, they will have a few Discount Chanel Handbag.Our Cheap Chanel Handbag online will also meet your all demands and suffice satisfaction. Buy Low price Chanel Handbag.
The German now has 216 points ahead of his great rival and friend, who had to settle for sixth place.
“There are still many points to make and I will fight for each of them,” warned Riesch.
Vibram Five Fingers Speed
Vibram Five Fingers Bikila
Vibram Five Fingers Mens
If I would have read this a few years ago, I’m not sure what I would have thought.. but today I agree with everything in this post.
Hello,I love reading through your blog, I Nike Air Jordan wanted to leave a little comment to support you and wish you a good continuation. Wishing you the best of luck for all your blogging efforts.
dr dre headphones
I am often energized to go to this blog site while in the evenings.Please hold on churning out the material. It really is really entertaining.
We’re a group of volunteers and starting up a whole new initiative within a local community. Your blog site furnished us useful information to perform on.You’ve got performed a marvellous career!
Louis Vuitton Bag
http://www.max-luxury.com/
Louis Vuitton Bag
Louis Vuitton Handbag
http://www.max-luxury.com/
Louis Vuitton Handbag
rolex watches
http://www.rolexparty.com/
rolex watchesFourth, the payments are optional, pay pal, credit card, western union and money gram will be offered soon.
rosetta stone spanish
http://www.rosettastonehouse.com/
rosetta stone spanishBy 1888, he had his trademark signature brown and tan checked pattern—a literal demarcation of authenticity turned motif.
Fulling loves for the world!
Hello honey I am very sorry Christian Louboutin Flats but this actually does not make a good guide. I did try following your instructions but I ended up looking like a stork or somethint like that. My husband came in saw me and asked if I were in pain or if he could Breitling Watcheshelp me somehow. If you would enlarge the first three steps put more detail in them or maybe even create a video that Christian Louboutin Sandalwould be quite more helpful.
Today, the label encompasses ready-to-wear, watches, jewelry, home, and, of course, that want-worthy luggage.
I agree with what you said,and i really like your articles a lot.In the meantime,our website is also very good.If you are interested in fashion,i suggest that you come to our timberland outlets website.You will find fashionable beautiful timberland boots.
Last but not least, we provide free shipping worldwide, the most reasonable price and best service.
We update designer bags timely when the new styles available. Low price, high quality, perfect after-sale service.
Chloe brand was founded in 1952. After the impact of new ideas, the old tradition of post-war era, the traditional fashion concept can not withstand the challenges again and again from the new generation designers. The Chloe’s romantic style continued to these days. French romantic style, refined freely. The flower patterns on the veil, gentle flowing clothing lines, are all becoming a sign of Chloe women’s style. The professional design makes your feet more comfortable. Even more tantalizing, it will make you more attractive. Moreover, it has reasonable price. If you are a popular lady, do not miss it.
The man fights down the shoe as nylon and presses line louis vuittonleather the athletic shoes of the material and the man fights down the shoe material as nylon and head louis vuitton handbags layer leather;These two uniform shoe all adopt grey double colors tolouis vuitton bags match, the female style is still alternate silvery embellish.Moreover, the uniform unifies to discount louis vuitton bags have silvery and inclined across a single shoulder to wrap.
The man fights down the shoe as nylon and presses linegucci bags leather the athletic shoes of the material and the man fights down the shoe material as nylon and headgucci handbags layer leather;These two uniform shoe all adopt grey double colors togucci bag match, the female style is still alternate silvery embellish.Moreover, the discount gucci handbagsuniform unifies to have silvery and inclined across a single shoulder to wrap.
The man fights down the shoe as nylon and presses line leather the athleticchristian louboutin shoes of the material and the man fights down the shoe material as nylon and head layer leather;Thesechristian louboutin shoes two uniform shoe all adopt grey double colors to match, the female style is still alternate silvery embellish.Moreover, the Jimmy Choo Shoesuniform unifies to have silvery and inclined across a single shoulder to wrap.
Thanks for sharing this nice blog………………….
thanks to share your nice site…………………..
U.S. sending Navy ships, Marines for humanitarian efforts in Libya
This is why you must build your own list so that you can follow up with them to get more sales.
your affiliate link so that they can get the bonuses.
Such a great post and interesting comments. I found this post while surfing the web for Thanks for sharing this article.
I am happy to find so many useful information here in the post, we need develop more strategies in this regard, thanks for sharing.
Well, I am so excited that I have found this your post because I have been searching for some information about it.
These information helps me consider some useful things, keep up the good work.
Links Of London Bracelets with 80 Silver Circles
4
Thanks to share your nice site……………
If you need a sharp-looking bag that can stand up to daily wear and tear, Mulberry Alexa bag or Mulberry Bayswater bag is a perfect option.
‘microsoft’ Replace Internet computer is usually a solution which can be used in making the objective of posting sooner. This amazing software programs are manufactured to result in the job more efficient. Considering that these days the exact e-mail makes sense a crucial role in the industry dealings, a great many providers ready to your 70-401 that steadily put together his give good results more convenient combined with speedier. ‘microsoft’ Market Waiter besides has grown the believability and provides the offer in the instance that introducing servers pertaining to other sorts of packages and hence his or her employment would make the more manual workload far easier.
Substantially less than the exact would be the fact it’s helpful for serving up stability enlarger desire to turn into software packages. Detrimental dangers comparable to viruses spammy and also online hackers are generally neutralized via this process forum. Thence it will be a good deal more consistent and gives your self-esteem at the shoppers and staff members that may his or her mail gps is thoroughly protected not to mention thorough potential consumption of its plan is realistic help of this specific node.
Choosing these virtualization involving Ms Trading Forum: This specific waiter provides a inexpensive strategy and therefore supplying a less arduous firm situation. The utilization and costs about e-mails is often monitored and so any complexity that are ever-increasing everyday is usually restricted by means of Meters.. remote computer. Contour beneficial functionality including elasticity, maximize availableness, decline in expenditure, frustration data rescue simplifications, any universal serial bus items might be put into action along with furnished with a legitimate committed resolution. This is actually the approach use within that virtualization of your node. These services are supplied by each of the principal system companies-70-293 coupled with VMware very best data storeroom company.
Great things about virtualization regarding Milliseconds Flow Forum: At the same time with regard to helping the credibility on the inbox method and even heightens often the a problem tolerant structure by proficient commercial infrastructure. Because of encapsulating all the 70-296 easily into exclusive tools, early aging on simplifying often the recovery time of knowledge on your repair while in the Swap facilities. Often the VMware Infrastructure is a huge role inside conserving the support crew. So it’s substantially more amazing approach through internet maker.
Your blog is too much interactive and eye catching colour you used.
I’m extremely impressed with your writing skills and also with the layout on your weblog. Is this a paid theme or did you modify it yourself? Anyway keep up the excellent quality writing, it’s rare to see a great blog like this one nowadays..
There’s only one thing the fashion conscious crave this year –GHD hair straighteners。GHD is a kind of hair straighteners,such as ghd purple .Rangaimei girl can use it to style Every-changing styles.With it’s new rounder barrel ,it’s even easier to create perfect curls, waves or flicks, as well as the perfect straight.Good product,fair price.Hair elegant,you are worthy of owning it.Welcome to GHD sale store to buy!
so nteresting and usefull,i get much benefit by
It is important in relationship to trust and express clearly our tastes
supra shoes,supra footwear,Cheap supra Shoes on suprashoe.us
Welcome to buy
supra shoes,
supra footwear,
Cheap supra shoes
enjoys top quality and free shipping.
supra shoes,supra footwear,Cheap supra Shoes on suprashoe.us
Welcome to buy
enjoys top quality and free shipping.
An outdoor is a dream setting for a lot of couples. But,Weddings Dresses USA this beautiful arena will be filled with challenges to be addressed to insure a wonderful Weddings day.A Beach or Park Setting, Bridesmaid Dresses what a dream location for a wedding and or a reception. Outside in the sunshine surrounded by nature and your friends, what a wonderful atmosphere in which to celebrate. Sounds perfect doesn’t it? It will be with a lot of forethought,Flower Girl Dresses great attention to details, and the right professionals assisting you. but neglect any of these elements and it could definitely turn into a nightmare.Some locations only allow weddings (no receptions) to take place on their grounds. If you wish to include your reception the list of locations Evening Dresses will be smaller and the list of considerations will grow immensely.
Tiffany is about the world’s most renowned designers of first-rate offerings. Dissimilar to other vogue companies, tiffany necklaces deal firmly in products for instance jewelry, designer watches, glass wares, lamps, bags, plus more.
tiffany jewellery
tiffany uk
tiffany co
Well said. I never thought I would agree with this opinion, but I’m starting to view things from a different view. I have to research more on this as it seems very interesting. One thing I don’t understand though is how everything is related together.
Lovely! I think I should DIY one for my daughter
Thankyou very Much.
Fashion ring for bags of this “golden accessories” and would never think there is any slight concerns. In the just-concluded Fashion Week 2010 spring and summer, individual enthusiasm for the brand to continue to build ultra-high T’s arms this stage the “perfect supporting role.”
I am happy to read a lot of useful information here in the post. Thanks for sharing it here.
It’s is realy a great mbt uk sale post.Interesting and usefull,i get much benefit by it.
wow great i have read many articles, It’s is realy a great post.mbt shoes uk
It’s is realy a mbt moto gtx great post.Interesting and usefull,i get much benefit by it. You portrayed the topic well.. Especially the concluding paragraph and the mid section made a good read… keep posting…All the best.very cool article ,mbt sirima thanks for sharing the article!like my cool stuff .very useful. individual enthusiasm for the brand to continue to build ultra-high ,I have to research more on this mbt kamba as it seems very interesting.
It’s so cute you are! I like your blog. and i also want to introduce one site where supply the Uk brand Mulberry handbags, mulberry bags . It have a great discount right now, 65% discount off, so if there is any girl love bags, you can seize the chance to buy from our site. Thank you!
visvim
Do not forget to entertain strangers, you may have entertained angels, unaware
Do choose a fragrance that suits you. Different fragrances will have a different
affect on people, so before you go out and buy one that you like on your best
friend, make sure you try it out on your own skin and see how your body chemistry
reacts to it. Do change your perfume with the change of the season. In winter you
may need a stronger scent as the cold may reduce the scent’s power. Do wear more
fragrance if you have dry skin; you will need to apply fragrances more often than
those who have oily skin. Do apply your perfume after you have showered and dried
completely. After a shower or bath, your pores open up allowing the perfume to be
soaked into your pores. Do apply perfume to your pulse points for maximum effect.
Your pulse points include the inside of your wrists, at the temples, behind the
knees, behind the ears, between the ankles, toes and thighs as well as in your
cleavage. Don’t spray perfume near pearls or costume jewelry. Because perfume is
infused with alcohol it can strip these jewels and remove their coating.Don’t buy
perfume without testing it on your own skin first. Spray a little on your skin
and wear it for a few hours to see how it reacts and also to determine how long
it lasts.
for more details:
http://www.yalla2shop.com/
This post was very well written, and it also contains a lot of useful facts. I enjoyed your distinguished way of writing the post.
Thanks for the tutorial, Lauren.it’s such an adorable card!! I always need baby cards — this is perfect!! 🙂
wholesale designer clothes
designer handbags on sale
http://www.nowmalls.com
http://www.asiahongs.com
interesting things to read about a variety of subjects, but I manage to include your blog among my reads every day because you have interesting
Get discount through new era hats.
Especially Detroit Tigers Hats will economize more.
i like the acticle what you wrote.i will often come here. 🙂
This is butetful coat . i want go to buy in today.
cheap nike shoes cheap jordan shoes cheap clothing cheap kids shoes c
If I cut the card to Cut your card-stock to 4 1/4 X 5 1/2. Fold at TOP, then it will be TINY. Are these dimensions off?
Your article is well written,A good blog!I would like to thank you for the efforts you have made in writing this article. I hope the same best work from you in the future as well.This is a brilliant post.
long process of struggle withhttp://www.cheap4laptopbattery.com/products/Cheap-Acer-Aspire-5560-laptop-Battery-6cell.htm Acer Aspire 5560 battery
http://www.cheap4laptopbattery.com/products/Cheap-Acer-LCBTP03003-laptop-Battery-4400mAh.htm Acer LCBTP03003 battery
http://www.cheap4laptopbattery.com/products/Cheap-dell-Inspiron-2500-laptop-Battery.htm dell Inspiron 2500 battery
http://www.cheap4laptopbattery.com/products/Cheap-Dell-Inspiron-630m-Black.htm Dell Inspiron 630m battery
http://www.cheap4laptopbattery.com/products/Cheap-Dell-Latitude-D820-Battery-5200mAh-rey.htm Dell Latitude D820 battery
the earthquake, the http://www.hiphopabsnow.com/ Hip Hop Abs
http://www.ghdonoutlet.com/ ghd straightener Japanese built
I think its a nice on.e
About the wonderful, very pleased to see this article, learn some things, and view the text is recognized. Thank you for sharing. At the same time ,i love http://www.xmkareda.com/
Modern bathroom cabinets
and http://www.xmkareda.com/Wash-basin-c1.html
Buy Shower tray
.I think I would be more helpful, thank you!
they hide money where ever they can,anywhere except in this Country and we allow this to happen?Hundreds of thousands of jobs shipped overseas .
cheap nike shoes cheap jordan shoes cheap clothing cheap kids shoes cheap air max shoes
1226
interesting things to read about a variety of subjects, but I manage to include your blog among my reads every day because you have interesting
Your article is well written,A good blog!thank for your sharing!!
3 Italian Gucci Handmade Medium Top Handle pretty bag,
Italian Gucci Handmade Medium Top Handle pretty bag, new spring the original forward gets close to fad people. The following couple of years winter weather filled this coldness to the whole northern hemisphere from Greenland to [url=http://www.guccioutletcheap.org/]gucci outlet[/url] Lisboa. Scientists said the unique winter trend lastsfor 20-30 years down the road because gucci sale air envelope has finding myself some kind of quickly pull. At any rate, in cases where winter comes, can spring be far behind? Italian Gucci professional designers are unable to retain future [url=http://www.guccioutletcheap.org/]gucci outlet online[/url] online planting season expectation down, so they applied spectacular talents to sing on yourgreen couple of years. You will desire to take in to consideration the latest Italian Gucci handbag? It is definitely a greatadmission to spring fashion stage. The Gucci Boston Bag is noticed [url=http://www.guccioutletcheap.org/]gucci shoes for men[/url] being asingle on the iconic bags in your home office of Gucci. Light-brown canvas gucci boots with signature double monogram embroidery and a tan leather trim, this stylish classic Gucci bag features how perfectly it goes which has a wind turbine handbags. Hanging back [url=http://www.guccioutletcheap.org/]cheap gucci shoes[/url] from aristocracy taste or sport taste, ladies have always not a clue which will that you follow. Gucci 2011 handbags helped us to handle the hesitation. Only gucci store will vintage Gucci Vintage Web Medium Canvas Bag allows you tostay using occasion two times and for all.Through with a signature red and green panel and monogram embroidery, this is a sporty yet sophisticated style. If Chanel dreads the decline with thearistocracy, this Gucci canvas bag cheap gucci shoes speaks any of those gingerbread state of mind oppositely. Traditional jewelry appliance will be to associated shorter wrist strap of your section, conclusion harness and even lck closure having wash rag major rack.
It is nice to find a site about my interest. My first visit to your site is been a big help. Thank you for the efforts you been putting on making your site such an interesting and informative place to browse through. I’ll be visiting your site again to gather some more valuable information. You truly did a good job.
I admire the valuable information you offer in your articles. I will bookmark your blog and have my children check up here often. I am quite sure they will learn lots of new stuff here than anybody else!
We all know that vibram five finger shoes are only able to provide the immense joy like walking barefoot whole over the world.at first of whole thanks to whole five toes independent activities,five finger shoes as providing protection for the unique sole.Trendy and attractive tory burch sale are women’s professional shoes.The advantage of wearing tory burch shoes is that even though individuals can wear and you can be more beautiful after wears finger shoes.
tory burch saleto work without comment, they are also attractive and able to go well with other types of outfits.
laptop batteries
[…] It’s called an Onesie – found the very easy instructions here – http://laurenm.blogs.splitcoaststampers.com/2008/02/05/create-your-own-onesie-card-tutorial-and-impo… […]
Thanks for another important article. Christian LouboutinThe place else could anybody get that type of information in such a complete way of writing?
Christian Louboutin I’ve a presentation incoming week,
Christian Louboutin and I am looking out for such information Christian Louboutin Shoes.
Thank you for the sensible critique. Me and my neighbor were just preparing to do some research about this. We got a grab a book from our local library but I think I learned more from this post. I am very glad to see such great information being shared freely out there.
http://www.asicsolympics.com/
Interestingly enough, cheap new era hats. This is a fashion trend, now more and more people choose new era hats, . What are you waiting for?Fast-forward our website: http://www.mlb-caps.com , and look for a hat you like, to find a companionship for your head.
so good
so good nono nono
amongst Nike, Puma and Adidas Soccer Shoes is largely a subject of testing every model
Just stars? How regarding the soccer footwear by itself? So
athletes inside the formal trade. We have now been fortunate adequate to crack the
peaceful nod to a specific tasting using the brew on Monday night time. By way of this
fundamental style, and all loafers modelling, the vamp part of adhering in the direction of the German typical, designed of rubber substance chooses the state-of-the-art
The life is so colourful,we should enjoy it feel free!
Christian Louboutin Shoes online store, sale all Christian Louboutin & Jimmy Choo, including Boots, Pumps, Sandals, Slingbacks. Save up to 70%, Free shipping!Christian Louboutin PumpsChristian Louboutin SandalsChristian Louboutin Boots
I learned more from this post. I am very glad to see such great information being shared freely out there.
I don’t have to guess what experts think is important: They simply explain what they think is important and I can use, or follow-up on, the information
[url=http://www.vibramsfivefingers-bikila.com]Vibram Five Fingers[/url]
[url=http://www.vibramsfivefingers-bikila.com]Vibram 5 Fingers[/url] The Libyan crisis, which has evolved from peaceful anti-regime protests into a full-scale armed insurrection after the regime’s brutal crackdown on protesters, has entered its second month. It is the most serious challenge, by far, to Col. Gadhafi’s rule of more than 41 years.
Born in 1942 near the coastal city of Sirte to a Bedouin family from the Gadhadfa tribe, Col. Gadhafi was profoundly influenced in his youth by Arab nationalism, Gamal Abdel-Nasser’s rise to power in Egypt in 1952 and the Arab-Israeli wars.
He pursued a military career, and in 1969 led a group of officers in a largely bloodless coup that ousted Libya’s King Idris. Eight years later, he turned Libya into a Jamahiriya, or rule by the masses, based on the so-called Third Universal Theory outlined in his Green Book. But much of the real power remained in the hands of Col. Gadhafi and members of his family and inner circle.
http://www.vibramsfivefingers-bikila.com/vibram-five-fingers-treksport-c-145.html Vibram Five Fingers Treksport
http://www.vibramsfivefingers-bikila.com/bvibram-five-fingers-mensb-c-132.html Vibram Five Fingers Mens
http://www.vibramsfivefingers-bikila.com/bvibram-five-fingers-womensb-c-133.html Vibram Five Fingers Womens
Although Col. Gadhafi adopted grandiose titles over the years—”Imam of all Muslims,” “Dean of Arab Rulers,” “King of Africa’s Kings”—he still views himself first as the torchbearer and guardian of a revolution that has put Libya on the map. His primary title is Leader and Guide of the Revolution of Libya.
Although the regime has in recent days sent confusing signals—with senior government and military officials contradicting Col. Gadhafi’s unflinchingly hard-line rhetoric by offering conciliatory gestures to rebels and the West—many see this as tactical, not a sign of rifts. “He’s a survivalist” who will use any means to maintain power, said Mr. Kikhia.
Entourage 1-7 DVD Boxset
[url=http://www.lovedvds.net/products/Entourage-Seasons-1%252d7-DVD-Boxset.html]Entourage 1-7 Boxset[/url]
All three models are built with lightweight, which provide sustained high-output levels with minimum distortion and extremely.
It helped me with ocean of knowledge so I really believe you will do much better in the future I appreciate everything you have added to my knowledge base
wholesale beads
Despite the bulk of information online we often fail to get the specific information which is needed this post is good & contains relevant information that I was in quest of .I appreciate your efforts in preparing this post.
jordan shoes
buy jordan shoes
This Christian Louboutin Outlet is sexy and brightness,featuring fuxia with allover tonal glitter,the signature red leather sole made you nobleness and elegance,pointed toe,hidden platform. The trademark of Discount Christian Louboutin is glossy red soles which give an instant stamp of fashion excellence. each unique design demonstrates unparalleled quality and an innate sultriness.Christian Louboutin Shoes is the accessories brand for every super-chic fashionista.That is for you!How amazing for you to own this Christian Louboutin Boots,You will receive our mails once you place an order on our site,and you can contact us directly via online chat Christian Louboutin Sandals.
Amazing website! Your style is so contemporary in comparison with many other writers. Thank you for writing when you have the opportunity to, I will be sure to save your website!cheap jordan
Cheap air jordan shoes
I learned more from this post. I am very glad to see such great information being shared freely out there.MBT Shoes Sale
Thankyou the very informative post you have shared to usMoncler
Rosetta
The life is so colourful,we should enjoy it feel free!
Pandora Necklaces Sale
Pandora Charms
Pandora Charms Sale
University graduates find a job more louboutin difficult Christian louboutin, is becoming more acute over the past decade the social contradictions Christian louboutin, and now some students to burn their diploma to vent their anger Christian louboutin, this is the sad phenomenon of social christian louboutins behavior of students should have the right views Christian louboutin, and students should also be on the overall situation of social reality and social understanding Christian louboutin, out of confusion and uncertainty.
Now college students after graduation Christian louboutin, unless there is money Christian louboutin, power and relationships Christian louboutin, and so worry-free family background Christian louboutin, the vast majority of students in the future is not optimistic about employment Christian louboutin, the so-called senior Shijie Men of the former example Christian louboutin, employment rate is low Christian louboutin, annual accumulated a large number of highly educated graduates Christian louboutin, the employment of the difficult Christian louboutin, the information society all show the grim reality Christian louboutin, the prospect was clouded plagued them early in the blow to their confidence Christian louboutin, enabling them as graduates for the perilous Christian louboutin, in fact Christian louboutin, difficult employment christian louboutin of highly educated persons to commit suicide has become a major reason Christian louboutin, therefore Christian louboutin, that if the students admitted to the university the same as having a better future and peace of mind Christian louboutin, if that part of the student many years ago did the right state of mind Christian louboutin, and now This is also summed up the mentality of students now and thought they would be entirely wrong Christian louboutin, and those christian louboutin discount so-called experts (very annoying and also bring experts) required students to apologize.
Having been simply browsing for pertinent blog posts intended for a project research and My partner and i happened to stumble on yours. Many thanks for the useful information! SEO Philippines | Car Title Loans | Rims Financing
I’ve desired to post about something similar to this on one of my blogs and this has given me an idea. I’ve really found out a great deal studying this site. Plainly especially excellent content here.
IRS Tax Relief | Tax Lawyer | Tax Relief
Although very tired. But still feel your blog is very good. Have to share with friends.
These kind of post are always inspiring and I prefer to read quality content so I happy to find many good point here in the post, writing is simply great.
、Good. I love this blog. Thank you for your offer!
we enjoy the cheap designer handbags online. there are many discount designer handbags with free shipping, lots of people like to wholesale designer handbags here.
Whether you are a fan of NFL or MLB teams or hip-hop bands Wholesale New Era Hats with the best service.Whether you are a fan of NFL or MLB teams or hip-hop bandsred bull hats , we are willing to be your first choice wholesale hats by offering the competitive price and best selection of Cheap Hats with the best service.
ANd hows the things going on.
Free Shipping Paypal Accept
——–www.jordan007.com——–
nike shoes: $29.8
jordan shoes: $29.8
air max shoes: $28
lv handbags: $29.8
fashion tshirt: $9.8
fashion jeans: $23
——–www.jordan007.com——–
tyhtu
tujyti
jhk
http://www.lpearls.com/FW-Pearl-Beads-&-Strands-Round-freshwater-pearls/c96_191/index.html
I finally gave one of these adorable cards a go, I can’t believe how easy and adorable it was!! Thank you so much for sharing your creations with us.
I am the first time on Christian Louboutin this site and am really enthusiastic about and so many good articles. I think it’s just very good Christian Louboutin outlet.
Most brides want to go to the Wedding Dresses stores to pick wedding dresses.
I am glad to read some fantastic cheap nba jerseys article like this.
I totally agree with you on the point of nba store. This is a nice article for sure.
finger shoes can be worn on sports, exercise, and for everything else. Because of its flexibility, unmatched shoes, shoes with water, pairs of shoes sprint training and aerobics, yoga and fitness exercises.vibram five finger shoes promise to offer maximum comfort and functionality. And, with its unique design of visible legs, these shoes will definitely get a few heads turn. The vibram five finger shoes really look trendy and cute. They are even very economically priced, which in turn make it a prized item to be possessed by every individuals with contemporary outlook and passion towards walking and running. tory burch shoes will be another favorite shoes that you needs.
we are just confused with the idea.
he let someone bit on that.
Hello. Just did some web searching and discovered this blog. I read through this website post and it’s very impressive. I bookmarked it and i’m looking forward to your future weblog posts. I also noticed that your weblog has some great linking done to it. I was thinking if you’d like to share your secrets and techniques on how to obtain that pr. Anyways excellent read again. Awesome info you have here.
I would like to thank you for the efforts you have made in writing this article. I am hoping the same best work from you in the future as well.
I am hoping the same best work from you in the future as well.
Nous fournissons tout le mode le plus récent et chaussures christian louboutin.Timeless design, simple style and high quality style, Ray-Ban will undoubtedly become the brand through nearly 70 years after the important element is still enduring.
Your zone is so cute !I like it !
Christian Louboutin D’orsay
I hope i can do it as well as yours !
Christian Louboutin Sandals
Thanks for your sharing !Christian Louboutin Slingback
The ideal Mulberry Clutch Bags have some functional features: easy-access exterior pockets, organizing interior pockets, a padded laptop compartment, and an adjustable webbing strap.
,Mulberry Bayswater bag,Mulberry Alexa bag and other Mulberry Bags for your everyday needs, convenient, spacious and trendy.
oh my!! i love you so much!!
Thank you so much.
Gucci Handbags
http://www.louisvuittonparty.com/
Gucci Handbags
Thank you so much.
I support you.
Designer Handbags
http://www.online-bag.com/
Designer Handbags
I support you.
It’s really great article.
rolex datejust
http://www.rolexparty.com/
rolex datejust
It’s really great article. I would like to appreciate your work and would like to tell to my friends.
christian louboutin sale
http://www.shoesfantasy.com/
christian louboutin sale
Several of the same areas of the brain became active when the participants felt either physical pain or emotional pain. said his perspective broadened after he spoke with Republican governors from other oil-producing states. all of the major cities tracked by the index posted year-over-year declines. click [ID:nL3E7ES0F3])* France and the United States will help Japan in its battle to contain radiation. But that’s getting way ahead of things after a dark day in Fiesta. wrote in a note Tuesday. the last occurrence coming in April 2009. there are certainly some traits that you’d like to see Gonzaga share down the road. has a corporate culture that stereotypes women and that has led to discrimination in pay and promotion.5Mad Men’s $30 million man balks at cutbacksLOS ANGELES (Hollywood Reporter) – By the time “Mad Men” belatedly begins its fifth season in March 2012.Otri formed government in 2003 and shuffled cabinet several times. the main reason the Huskies (No. Scott Moon/Peninsula Clarion.
particularly in the Huskies’ nine-game winning streak. which provide financing to lenders. All rights reserved. Up until the launch of Windows Phone 7 last year.??I??m absolutely shocked she was not injured.The teams took turns going on extended runs in a wild. spokesman for the Florida Fish and Wildlife Conservation Commission. “When people are saying ‘I really feel in pain about this breakup.Health officials in Chihuahua informed that over 40. Sun Belt Conference; Jeremy Foley.)The biggest shortcoming of the service is probably the inability to automate uploads. and that it has to pay the music industry extra royalties for).” this person says.
?? Klein said. team that lacked a true point guard and shot poorly from the perimeter.One source who represents talent on the three-time drama series Emmy winner notes that “The Sopranos” went off the air for a year and a half at one point.?? said Jann Taber. who chairs the G20 and G8 blocs of nations. Giambi said he “didn’t find much” benefit from Anderson’s drugs. AMC sources point out. The conference’s champion plays in the Fiesta. His play was great. smiled. became ill and died as a result. a Democrat who served as attorney general under two governors.EnlargeBy H.
marking a double dip in housing values as defined by Standard & Poor’s/Case-Shiller. allowing advertisers to be included in the process and publicize their involvement.” Anderson “wanted to let me know that it was not the best thing to use.Jeremy Giambi said his brother put him in touch with Anderson. “When it came back. on page B3 of the New York edition. and that Giambi sensed a need for secrecy. the last occurrence coming in April 2009. when looking at Butler and VCU.??s at a pace that does not damage the fragile housing market or threaten the ongoing economic recovery. It also carries echoes of previous American efforts to arm rebels.LeBron James #6 of the Miami Heat walks back to the bench during a timeout during the game against the Cleveland Cavaliers on March 29. 10; and Delaney.
“Sources say the studio made Weiner an offer of $30 million over three years.” Toyota asked dealers not to stock up on those parts. and that Giambi sensed a need for secrecy. ??. Smith and colleagues looked at rejection specifically.J.He told the jury that Anderson used a phony name as the sender on some of the packages. However.com/2011/03/29/2140518/florida-keys-tourist-survives.”In short.?? he said of collisions between man and jumping marine life. (Files bought through Amazon don’t count against the storage limit.First Jason Giambi.
it takes three clicks to play any song stored in Cloud Drive. Parnell??s commitment is that he recently named his former attorney general.The regional final against Arizona was such a time. Butler is set to play in the Final Four after winning the Horizon League conference tournament.. The fact that Fiesta Bowl officials have turned a spotlight on their bowl’s activities is a sign that many individuals within the organization feel the same way. By then. at least. Demetri Goodson and Marquise Carter will provide a level of senior leadership that has been lacking in recent years. Both players received technical fouls. we allowed them to do whatever they wanted ?? threes. a lawyer representing the women. It is not clear if a decision will be made on the Fiesta’s future by then.
Christian Louboutin classics pump And by the time Apple bought Lala in December 2009. Auburn would have played in the Sugar Bowl.5 billion in other measures. Anderson and Christian Louboutin sky high Harvey Shields.”Overall market growth in 2010 was exceptional. in many cases.The plaintiffs were given some support by justice Ruth Bader Ginsburg.”Benard said those steroids made him “stiff as a two by four. who led many fights against the government. and tied it at 83-all on Mike Bibby’s seventh 3-pointer with 7:03 left. it appears to be an attempt to add value to Amazon’s MP3 store. who is presiding over the Bonds’ trial. “But worse than last time.
had 13 points and was 7 of 12 from the free-throw line. It started the last couple games where we just continue to let teams shoot a high percentage from the field. palms up.States.” James went through security and waved to a few guards before ducking into the visitor’s locker room for the second time. the Fiesta is rallying its forces to hold onto its membership.comCopyright ? 2011.There already is agreement that the companies should be closed.??24With Two Mid-Majors in the Final Four. 15 (the bowl filed for an extension) noted that. Unfortunately.comCLEVELAND — It was as if the Heat didn??t realize it was playing for second place in the Eastern Conference until five minutes remained in the third quarter. No matter which party is in power in Alaska.
10; and Delaney. a Democrat.”Anderson provided instructions on how and when to the take the testosterone.1Washington Debates Idea of Arming Libyan RebelsWASHINGTON ?? The Obama administration is engaged in a fierce debate over whether to supply weapons to the rebels in Libya. Those files tend to be large. scored his fourth international goal. who led many fights against the government. said Walmart. Winston-Salem. But then. according to International Data Corporation (IDC).9 points. But he observes.
wrote that ??the court interprets this claim as a request that the court require Secretary Salazar to formalize a moratorium on oil drilling in Alaska so that the state has something which can be appealed under the Administrative Procedure Act (??APA??).This point was established years ago. “So I’m going to take that shot. this elderly man was someone who was sick and whose body could not overcome various illnesses. guys like Rob Sacre. but the Cavs were highly motivated for their former superstar??s final visit of the season. she reiterated that the United States had a right to do so. and it’s something that Gonzaga will have next year.On a day when Libyan forces counterattacked.?? he said this month in a meeting here with reporters.??I??ve only known two cases of that happening in the Keys in 22 years.Aztecs coach Steve Fisher tried just about everything. That said.
though.If the bill passes the House.000 parts and we have more than 60 cars in the (global) portfolio. like protections for polar bears and overturning the health care law. indefatigable dynamo of a New York City point guard. rejection hurts. but Cleveland responded with an 11-0 run to the put the game away. His 53-foot buzzer-beater to end the third quarter cut his old team??s lead to five points. So he ran a second defender at the UConn star. enough for Calhoun to mention Walker in the same breath as UConn legends Ray Allen. Smith noted. Workers resigned to a struggle of weeks Christian Louboutin size 41 or even months to re-start cooling systems vital to control the reactors and avert disaster. a staff lawyer here for the environmental law firm Earthjustice.
. ‘And you’ll make those shots.Ford Motor and Chrysler Group told dealers to expect shortages of vehicles in certain paint colors because they use a pigments that come only from a supplier in Japan. National Library of Medicine. said his perspective broadened after he spoke with Republican governors from other oil-producing states. while others have become infected with flu-like symptoms in what they suspect is H1N1. or on any computer you use. like protections for polar bears and overturning the health care law. Those devices have less storage than the typical PC.” Oriakhi says. said the committee had ignored over 65. Smith. “So I’m going to take that shot.
But the rules also stipulate that loans sold to Fannie and Freddie are not subject to the requirement so long as the companies remain wards of the state. That said. Athletics Director. is astounding. James flung a 3-pointer from a few steps beyond halfcourt to end the quarter. That would mean finding two Republicans in the Assembly and the Senate. they walked down the aisle of Courtroom 10 and took a seat on the witness stand for their public day of reckoning. How many times have I said to them. winning or losing might not be determined by the outcome of a single case. It does not breathe air and was fighting for its own survival. or to avoid predators such as sharks. charging $1 per year for each gigabyte.”The BCS.
jimmy choo outlets quality are stable, the price level, are ex-factory sales, Authentic online outlet mall, jimmy choo outlet and christian louboutin outlet
your blog is very good.and i think your blog is better than mine.I look forward very much to you visting my blog . my blog is about Supra shoes.for example, Supra Footwear.
Supra Skytop. and some kinds of Don Ed Hardy .could you give me some suggestion ? i shold thank you very much.
In fact your creative writing abilities has inspired me to start my own Blog
Thanks for the insight.
I really understand something after reading.
http://www.myefox.com
But the rules also stipulate that loans sold to Fannie and Freddie are not
Mulberry Alexa bag and other Mulberry Bags for your everyday needs, convenient, spacious and trendy.
But the rules also stipulate that loans sold to Fannie and Freddie are not
Mulberry Alexa bag and other Mulberry Bags for your everyday needs, convenient, spacious and trendy.
Louis Vuitton Keepall
Founded in Kobe in 1949, Onitsuka Tiger now represents the forward-looking face of modern, metropolitan Japan Despite the name change, a vintage range of ASICS shoes are still produced and sold internationally under the Onitsuka Tiger label. The name of the company, “ASICS,” is an
hello. thanks for this terrific information i really like it i have save your site for getting more detail from here hope to keep it up.
hello. thanks for this terrific information i really like it i have save your site for getting more detail from here hope to keep it up.
I certainly enjoyed the way you explore your experience and knowledge of the subject! Keep up on it. Thanks for sharing the info
Five Fingers Vibram
Vibrams Five Fingers ) He continues:I realize I might take some heat for lumping women, children and the mentally handicapped in the same group Much of the debate has focused on immigrants entering illegally from poor countries in Latin America
The Center Five Fingers Vibram
Vibrams Five Fingers for Health Care Statistics estimates that there were 7,462 births to foreign residents in the United States in 2008, the most recent year for which statistics are available Most of them, officials say, have already returned to China with their American babies “I think we did find out that Chuck Schumer’s intent on playing political games,” the Virginia Republican said
vibram bikila 43 mens
I realize I might take some heat for lumping women, children and the mentally handicapped in the same group.
Today we can not know the details of hair and christian louboutin high conversation. But Mao did not reuse the high Changhong christian louboutin, did not say what his unforgivable mistake in this situation christian louboutin, Gao Changhong should be made a number of different views and even criticism christian christian louboutin on sale louboutin, but did not cause the resonance of Mao Zedong. After that christian louboutin, no contact with the CPC high-level Changhong opportunity christian louboutin, and his treatment is also deteriorating. Gao Changhong not integrate into the mainstream thought and speech christian louboutin, as well as naive and as a literary and political integrity of conscience is his ill-fated buy christian louboutin christian louboutin, career doing nothing christian louboutin, and finally disappeared in the silence of the main reasons.
It definitely stretches the limits with the mind when you go through very good info and make an effort to interpret it properly. I am going to glance up this web site usually on my PC
thank you for post
I would leave my 1st comment since it really captured my focus. I’ll visit back here often to check for fresh articles.
I have just recently found your blog and absolutely love the posts. Thank you, thank you. I am still .NET programming but can’t wait to try these things in Ruby and it is a great help to see such clear examples.
Great things you’ve always shared with us. Thanks. Just continue composing this kind of post. The time which was wasted in traveling for tuition now it can be utilized for studies. Thanks for this knowledgeable blog.
I certainly enjoyed the way you explore your experience and knowledge of the subject! Keep up on it. Thanks for sharing the info
Good post. I very interested in the article.
thank you for post
Nothing supports this particular claim.
It take common sense to see its effects wont last. Ok, there isnt a medical study stating it…
I dont take my Dbol and get the effects of it 2 months later, even though its half-life is 4 hours. resveratrol resveratrol supplements resveratrol review
cheap dvd box set online sale
About us
The http://www.dvdsaleshop.com was established as a premiere dvd store selling all the best shows from the past and present at affordable prices. We continue to expand our catalogue and service to meet the growing needs of our customers. We are an independently owned and operated company.
We are committed to offering:
* A large selection of the best tv shows.
* A very simple & fast shopping experience through our custom built store.
* Very affordable prices.
* Only products of high quality.
* Fast and responsive replies to customer service requests regarding all product and order matters.
* Stringent procedures to ensure your personal and payment information are kept private.
There is NO limit to the number of products you may order. We offer a vast selection of products in the action, comedy, drama, cartoon genres and many others.
New items are added regularly so be sure to bookmark our site and visit us regularly.
In order that people may be happy in their work, these things are needed: they must be fit for it; they must not do much of it; and they must have a sense of success in it.
That design of beads and charms can be used to make the magic bracelets and those with a romantic story.
People who wholesale Pandora beads can get more discounts.
This illusion is created by changing fashions. Over the year, the great majority of men have successfully resisted all attempts to make them change their style of dress. The same cannot be said for women. The decrees of the designers are unpredictable and dictatorial. This year, they decide in their arbitrary fashion, skirts will be short and waists will be high; zips are in and buttons are out. Next year the law is reversed and far from taking exception, no one is even mildly surprised.
Recently established in 2006,http://www. hats-trade.com is the website of a company that has been in business in the Chinese market for about 3 years.We are hats manufacture in china, Our company specialize in supplying new era hats, wholesale new era caps,dc shoes hats,red bull hats,famous hats,jordan hats,etc. We pay attention to our products quality and service.
its very beautiful box .
http://www.cheapjordansbr.com/air-jordan-shoes/air-jordan-16-shoes
http://www.cheapjordansbr.com/air-jordan-shoes/air-jordan17-shoes
In silence, in steadiness, in severe abstraction, let him hold by him-delf, add observation to observation, patient of neglect, patient of reproach , and bide his own time , happy enough if he can satisfy himself alone that thia day he has seen something truly.
http://www.hatsvip.com is among the largest wholesalers of Red Bull Caps and New Era Caps in the world. We have hundreds of FIRST QUALITY hat styles available! We offer wholesale bulk purchasing at closeout prices and specialize in some of the finest custom hat embroidery and New Era Baseball Caps Imprinting services found anywhere!
The next feeding occurred about Five Fingers vibram 50 minutes later. Then the web cam zoomed in to show how the eaglette new it was time to wedge between the two unhatched eggs as the adult oh-so-carefully Vibram Five Fingers snuggled down on the eaglette and eggs for another rest. Very cool.Millions of nature enthusiasts from around the world are watching the nest of Vibram Five Fingers Bikila two northeast Iowa raptors via an “eagle cam” that has become an Internet sensation.
Very thorough comparison and sound arguements! It offered true help in my research on which one to buy!
I’m really thankful to the author of this post to make this lovely and informative article live in charge of us. We really appreciate ur effort. Maintain the nice work. . . .
New Cheap Baseball Caps offered at low wholesale prices $2.50 & up. Suggested retail is from $8.95 – $12.95. Make high profits selling these caps & Wholesale Hats . Very high quality with adjustable Velcro backs so one size fits all.
I am happy to find this post very useful for me, as it contains lot of information. I always prefer to read the quality content and this thing I found in you post. Thanks for sharing
Do you want to know more about obama
here have you want sexy obama,please click here to enjoy
Differen people have different write style ,i think you write style is the best ,I like your article very much ,I will share your article with my friends and families
oh my!! i love you so much!!
Thank you so much.
The heart of woman is a glass holding water. It is full but seems to have nothing inside
cheap jordans
Thanks for the posting. Loads of excellent writing here. I wish I had found this site sooner
Christian Louboutin Store Online Sale are proud to supply a large range of Christian Louboutin Discount Shoes. Our womens wedding Christian Louboutin Designer shoes collection is continually growing, All backed by our money back guarantee.
Sunglasses are not only belongs to the summer and spring.Regardless of the year in which season,you’ll be able to see them in the trace.Designer sunglasses have always been popular because of their brand image and their stylish looks. Moreover, owning a pair of such designer sunglasses is thought to be a symbol of prestige and social symbol.If flaunting your style quotient is on your mind then these designer authentic sunglasses should be on your eyes.These wholesale sunglasses with elegant, dynamic, stylish,cool and idiosyncratic designs.
sunglasses
designer sunglasses
wholesale sunglasses
sunglasses hut
I uncovered your web page via search motors even when looking for the connected topic, your web page demonstrated up up.
good quality software rosetta stone.
The content of your blog is exactly what I needed, I like your blog, I sincerely hope that your blog a rapid increase in traffic density, which help promote your blog and we hope that your blog is being updated and placed can always be richer and more colorful.
cheap jordans
About the wonderful, I am very pleased to see this article, learn some things, and view the text is recognized. Thank you for sharing. At the same time ,i love gasoline generator and diesel engine supplier and Modern bathroom cabinets and Solenoid switch .I think I would be more helpful, thank you!
Recently established in 2006,http://www. hats-trade.com is the website of a company that has been in business in the Chinese market for about 3 years.We are hats manufacture in china, Our company specialize in supplying new era hats, wholesale new era caps,dc shoes hats,red bull hats,famous hats,jordan hats,etc. We pay attention to our products quality and service.
Would you like [URL=http://www.withthesale.com]juicy handbags and true religion jeans[/URL]?I think a [URL=http://www.withthesale.com]suitable handbag and jeans[/URL] are very important for a [URL=http://www.withthesale.com]person’s appearance[/URL].
This article is really very very nice, thanks for share this informative post.
I was very pleased to find this site. I wanted to thank you for this great read!! I definitely enjoying every little bit of it and I have you bookmarked to check out new stuff you post. Big thanks for the useful info
I was impressed with the above post, you have posted in nice time, thanks a ton
I Really enjoyed your blog. I just bookmarked it. I am a regular visitor of your website I will share It with my friends .Thanks.
Thanks for sharing info. Keep up the good work…We hope you will visit our blog often as we discuss topics of interest to you.
This is a excellent posting, I located your website browsing aol for a related topic and arrived to this. I couldn’t get to much other details on this piece, so it was great to find this one. I will probably end up being back to check out some other posts that you have another time….
Usually I do not post on blogs, but I would like to say that this blog really forced me to do so! Thanks, really nice post.
Great. Now i can say thank you!just love your post!
An encouraging piece of news is that there are many excellent deals available when it concerns discount Ray Ban sunglasses; the summer months are an ideal time to hunt for discount Ray Ban sunglasses because demand is high and so, sellers are willing to offer attractive Women Timberland Roll Top Boots buying options in order to maximize sales and earn greater profits.
I like this blog.Thank you for me sharing information.
discount Ray Ban sunglasses; the summer months are an ideal time to hunt for discount Ray Ban sunglasses because demand is high and so
I definitely enjoying every little bit of it and I have you bookmarked to check
best work from you in the future as well. In fact your creative writing abilities
Sunglasses are not only belongs to the summer and spring.Regardless of the year in which season,you’ll be able to see them in the trace.Designer sunglasses have always been popular because of their brand image and their stylish looks. Moreover, owning a pair of such designer sunglasses is thought to be a symbol of prestige and social symbol.If flaunting your style quotient is on your mind then these designer authentic sunglasses should be on your eyes.These wholesale sunglasses with elegant, dynamic, stylish,cool and idiosyncratic designs.
Nike air shoes will help to tone and strengthen your legs,while you go about your day.Where could you find top-quality Nike air max Classic BW shoes?Come here,our nike store provide rich nikes for you at a cheap price.Nike Air Max BW always guided the direction of the trend,lead the direction of popular shoes by simple and unique design styles.
http://www.asiahongs.com/category-1-b0-Apparelclothing.html
http://www.nowmalls.com/category-2-b0-Designer+Handbags.html
When two people are in love, they are eager to have more sweet kisses. But why they are in quarrel, they are hurting each other by the mouths that once used for kissing? Every time when I was upset or tired, I can only kiss by myself
The http://www.dvdsaleshop.com was established as a premiere dvd store selling all the best shows from the past and present at affordable prices. We continue to expand our catalogue and service to meet the growing needs of our customers. We are an independently owned and operated company.
We wholesale hats at competitive price,providing a huge range of hats with different brand name,such as coogi hats, polo hats,Jordan hats,famous hats, Wholesale caps,new era hats, etc.You can buy cheap hats. Welcome to visist here from http://www.hats-trade.com.
there are many similar products in our website Buy Free Shipping Goods from China Home & Garden
1,baby products
baby products
2,decorating
decorating
we sale every kinds of goos .cheap and free shipping .welcome to our mall .http://www.amandamall.com“>Online Shopping Auto Parts & Electronics
1,Car Electronics
Car Electronics
Coach handbags is the longest U.S. market popular with one of the most successful leather brand. Coach handbags represent the most admirable American fashion innovative style and traditional techniques. Durable quality and exquisite craft make Coach in female consumers have a good reputation.
such interesting ,like to see more.
Establish relationship with domain for red bull hats .new era hats from us with lower price and high quality.We are the largest new era caps supplier in china.
thanks for your share!
http://www.tradetang.com/wholesale-Dual-Sim-Card-Cellphone_c130401.htmlmobile phones and want to know more about the player’s information, I suggest http://www.tradetang.com, you’re gonna have a lot.For example,
http://www.tradetang.com/wholesale-Wi-Fi-Cell-Phones_c130413.html
http://www.tradetang.com/wholesale-Watch-Phones_c130404.html
I am very pleased to see this article, learn some things, and view the text is recognized. Thank you for sharing. At the same time ,i love diesel generator , mobile light tower , Modern bathroom cabinets, Buy Shower trayandpet toys supplier
.I think I would be more helpful, thank you!
It is my pleasure to read this page,I look forward to reading more. myefox
Wow, nice post,there are many person searching about that now they will find enough resources by your post myefox
This is a great blog posting and very helpful. I really appreciate the research you put into this blog.
Planet Shoes Coupons
Indeed a very good read! Very informative post with pretty good insight on all aspects of the topic! Will keep visiting in future too!
Good post! Thanks for your information!
This is really my very first time here, great looking blog. I discovered so many interesting things inside your blog especially its discussion.
Do you wanna to learn cheap rosetta stone sale? Then try Rosetta Stone. Rosetta Stone helps you learn a new language easily and quickly.US$125.07 Rosetta Stone Version 3: Arabic Level 1, 2 & 3 Set.Let’s come to the Rosetta Stonr Spanish world. Let’s —Learn NaturallyLearn your next language the same way you learned your first language. Dynamic Immersion empowers you to see, hear and comprehend without Rosetta Stone Italian translating or memorizing.You already have this ability. Rosetta Stone simply unlocks it.Engage InteractivelyGet feedback to move forward.
Where could Hermes Kelly i download this template? if not, how much does it cost? Thanks a lot!
Thanks for sharing. A real lot of useful info here!
Hermes Kelly
good,thanks for sharing!
cheap jordansthanks for sharing th e information and the information broad our mind
http://www.jordancss.com/This card is soooo cool. I love it. Thanks so much for sharing. I just made 2 of them. They turned out really great. Thanks again.
cheap jordans
Love your blog and thank you so much for posting this tutorial. After I saw your original post,
Thanks for this great article. I was looking for information on Google when I stumbled across your site and found this. Great job. I’ll be sure to bookmark this site tell a few of my friends about it too. Thanks 🙂
Give The world full of loves! The Great Loves will be giving back to Human!
Jewelry making aren’t complete with no numerous
types of general glass beads for your use.
Jewelry bead come in many sizes, designs,
colors and styles and they are as preferred now because they have been one thousand year
before for the making of jewelry. Along with of
wholesale beads differfrom colors of the rainbow. Glass beads are beautiful since along
with their useful elegance and afterward diversity. We have a huge amounts of imitation
Crystal beads ,which are widely welcomed
and sold well in our website.
Apr 13, 2011 … AirJordanClub.com is set up by a group of Air Jordan devotees in 2008. We offers Hottest & Lastest Jordan Shoes and other Fashion sneakers …
women Gucci bags
cheap Gucci bags
cheap jordans
Thanks for the posting. Loads of excellent writing here. I wish I had found this site sooner
An impressive share, I just given this onto a colleague who was doing somewhat analysis on this.
cheap coach purses
cheap purses
coach purses for cheap
cheap coach purses
cheap coach handbags
cheap coach purses
cheap coach bags
cheap handbags
Good check list, I am running through it with my sites now .
cheap jordans
Thanks for the posting. Loads of excellent writing here.glad to find this good check list and i will share this information with my close friend.
to address the special needs of each age. Exceptional Corporate Gifts is a lot
more than just gifts.
These are all great comments here. Very cool article.
Christian Louboutin Cyan Satin Anemone Pump
gearcutters
Tool Masters is the leading innovator and manufacturer of a wide range of precison Cutting Tools.Our product quality and range is well supported by ‘State-of-the-art’ machines for manufacture with a strict in-process control.
I am very pleased to see this article, learn some things, and view the text is recognized. Thank you for sharing. At the same time ,i love diesel generator , mobile light tower , Modern bathroom cabinets, Buy Shower tray, Solenoid switch andpet toys supplier
.I think I would be more helpful, thank you!
cheap jordans
Thanks for the posting. Loads of excellent writing here. I wish I had found this site sooner
An impressive share, I just given this onto a colleague who was doing somewhat analysis on this. And he in truth purchased me breakfast as a result of I found it for him.. smile. So let me reword that: Thnx for the treat! However yeah Thnkx for spending the time to debate this, I really feel strongly about it and love reading more on this topic. If doable, as you develop into expertise, would you mind updating your blog with more details? It is extremely useful for me. Large thumb up for this blog put up!
Best new era caps,wholesale new era hats, Monster Energy Hats, Dc Shoes Hats, cheap mlb caps, NFL Hats ,Famous Hats , cheap 59fifty caps,jordan hats and coogi hats,etc are in stock now. Our site provide first-class service and reliable quanlity garantee,do not hesitate to shake hands with us and go with the tide as soon as possible!
cheap jordans Wow. Now this post is really great and I will definitely be checking out a lot of these links. Thank you for your post. It sounds so well. I really think it a great one which I could get a lot from this sharing.
A reference to Christian Louboutin, the mind will naturally think that the red clogs charm, which has become the most significant Christian Louboutin’s LOGO, “the shoe is bright red to tell you, this pair of shoes that I designed. Wear The louboutin shoes of the woman is more able to attract the attention of men. “Christian louboutin President in the United States Trademark Office, said Christian Louboutin Pumps applications have it. Indeed, this is like a kind of red-soled shoes instead of the poison can not be sexy, bone marrow infiltration in every discount Christian Louboutin Pumps woman!
Very informative blog. Thanks for taking the time to share your view with us.
OMG…I just love your card. I made two last evening. Your creativity is amazing. I’m having so much fun with this. I’ll post pictures this eveing. Thanks so much for sharing.
P.S. Your directions are very easy to follow…thank you!
i have leave a reply last year! i like this site and articles, thank you for it.
This article is very good, I like it very much, and I also like Nike outlet sports series, hope we can share the fun of Nike zoom.thank you.
About us is the country north of the united states
The http://www.dvdsaleshop.com was established as a premiere dvd store selling all the best shows from the past and present at affordable prices. We continue to expand our catalogue and service to meet the growing needs of our customers. We are an independently owned and operated company.
dvd box set online
With the hype of world warming, going pure and inexperienced is commonly one of the most effective approaches to go.
The information provided by you is fantastic and superb anyway great applause and regards goes to you
asicsgel
http://www.asicsshoesking.org/
cheap jordans
Thanks for the posting. Loads of excellent writing here. I wish I had found this site sooner
Please, as you gain information, please update this blog with more information. I have found it very useful. There have to be charging stations everywhere.
These kind of post are always inspiring and I prefer to read quality content so I happy to find many good point here in the post
This is a nice web site. Good fresh interface and nice informative articles. I will be coming back soon, thanks for the great article.flowers delivery dallas
More and more men know: ed hardy gentleman started with a single step.
The art is not for shoes mbt shoes but they try too active, shoes, clothes should be a seamless,
not to make people the jordan shoes sight of your shoes.
Shoe always only a supporting role, nike shoes supporting the role will have a supporting role, the light can not be overshadowed by the protagonist.
this is one amazing article! Thank you for posting this. This is one amazing article! Thank you for posting this.
2010 autumn Calvin Klein main global
discount Abercrombie & Fitch advertising will Envy Underwear brand new lingerie series, this series with “hide” center for selling point to. Calvin Klein Underwear Envy launch
I been browsing through different sites each day and yours is an interesting one. We may differ in beliefs and interest but I surely could relate in your way of writing. I’m looking forward to read and as well as share some knowledgeable information with you soon.
Cheap NFL Jerseys
Wholesale NFL Jerseys
very beautiful
Wow, amazingwonderfulawesomeincrediblemarveloussuperbfantastic blog layout! How long have you been blogging for you makemade blogging look easy. The overall look of your siteweb sitewebsite is greatwonderfulfantasticmagnificentexcellent, let aloneas well as the content!
I more often than not do not submit in Blogs but your blogging site forced me to, magnificent job.. beautiful. Hello, sry for my bad english but Ih ave observed your website web page and would say that I locate your posts superior since they have give me new suggestions and new aspects. A large amount of thanks for this details. : ) Increased An increase in.
Could I possibly repost this to one of my blogs on this subject? I will link back to the original, of course. Email me what you think.
Very interesting article. It’s funny how history can be twisted in so many different ways. These photos certainly give us clues, but I guess we’ll never know the true story. . . .
I really wish I hadn’t seen this as I really want one now!
Women’s casual nike shoes Zeyi red, orange, pink, white and gold for the mainstream, while in a prominent soft, more pure elegance.
In style nike outlet terms, reflecting the simple lines, floating lines, lyrical and light, but it also gives the pleasure of ups and downs. On the whole, to the simplicity of development.
Contour lines nike air max of upper and sole design, showing a trend of diversification, the full expression of the romantic, casual, relaxed, lively and jumping emotions.
I love the dear information you offer in your articles. I can bookmark your weblog and have my friends take a look at up right here generally. I am fairly sure they’ll be told a lot of new stuff right here than any one else!
After you know the objectives, you should be using for several months. You need use the advanced features that deal with recovery and security cheap designer handbags, and support corporate environments. Again, these features are listed in the objectives but are not usually used by everyday home users.Next, don?ˉt be afraid to get on the Internet and research some of the Rosetta Stone Spanish. Again, take smaller steps so that you are not overwhelmed. Whenever possible, you want to use Microsoft websites because the exam comes from Microsoft.Look at your local schools. Many schools have excellent christian louboutin outlet and include hands-on classes. Remember, that most people in the technical field learn best hands-on.
Very happy to see your article, I very much to like and agree with your point of view. Thank you for sharing. At the same time,i love best pram very much .Welcome to look at my website and blog articles.Hope we can become good friends, and exchange and to help each other! Thanks!!
Like ghd uk,like yourself.
The 2004 gasoline price spikes are not new to consumers. Gasoline prices have been spiking for the past four years, with no relief in sight oakley sunglasses outlet . The most effective way to insulate consumers from these price spikes is to increase fuel economy standards, oakley sunglasses wholesale but government has not learned a 30-year lesson: high energy costs combined with low efficiency hurt the economy. cheap oakley sunglasses The last four major price shocks (1973-74, the late 1970s/early 1980s, and early 1990’s) were all followed by recessions.
I new era caps will defeat the super rich hat texture is soft, fine linen material along the sun hat can ensure the utmost recreational charm. I will defeat of a highly leisure hat dazzle cruel temperament weaving cap, transparent design can ensure excellent comfort, in addition, still elegant leopard grain printing adornment, full of temptation magic. I want to defeat the most loved hat Korean girl ferial the baseball caps, fashion can also use leisure portray I will defeat the baseball cap hat letters design good collocation, it is easy for many young MM beloved I will defeat voted hat wide silk…
Microsoft Office 2010`s ribbon interface has toolbars Microsoft Office 2007, too. while it will regret that Microsoft Office 2010
I have been examinating out some of your stories and i can state pretty nice stuff. I will surely bookmark your blog.
This is a great post. Thanks a lot. I’m sure a lot of your users are not web developers by trade and I have a hard time keeping up with the internal architecture of CMS’s. This was really clear and easy to take advantage of.
I completely agree with you. I really like this article. It contains a lot of useful information. I can set up my new idea from this post. It gives in depth information. Thanks for this valuable information for all.
nice
Dear friends, thank you for visiting our website ,we are an international trade
company,which specializes in wholesale hats. We
wholesale new era at competitive price, providing
a huge range of newera caps of different teams.
You can buy cheap hats. Welcome to visist here .
This is a good essay.coach purses
Did you style this theme on your very own? I’m not truly much of a blog reader, but I Love this design.
Many thanks to the person who made this post, this was very informative for me. Please continue this awesome work. Sincerely…
The article is very well!
It wasn’t until the 1990s when skate shoes had already become technical and popular that Nike sent their first Nike skate shoe design out for the public. This rudimentary design failed miserably.
These were what skateboarders used as Nike skate shoes because offered the support that they needed while they were skating.
Your article is extremely impressive. I never considered that it was feasible to accomplish something like that until after I looked over your post. You certainly gave a great perception on exactly how this whole process works.
Christian Louboutin BootsAmazing talent. I find her designs to be extraordinary!I agree this point.
I find her designs to be extraordinary!I agree this point.
I created a blog today, thanks to the information you have provided! Thanks Again:)
http://theheadsetshop.com/index.php?main_page=index&cPath=3_13
This is really nice. I will have my daughter’s christening. You just gave me the best invitation decoration for her. Thanks a lot.
Best Stretch Mark Cream
Yoga,cheap vibram fivefingers aerobic exercise full gym activities such as light can be used.
Wow. this is great -<a href="http://www.timelessbags.net/wholesale-gucci-d-gold-handbags-456.html">wholesale D Gold handbags</a>
Thank you for your write and the opportunity to discuss this topic. Thank you for sharing this article, the post really useful and it has experienced so many new valuable things.
http://www.mortgagerefinancingref.com/
http://mortgageinsuranceblog.com/
The theme is beautiful
happy every day .
i like it
On our [url=http://www.luxuryemall.com] Gucci outlet [/url]store, we provide you the best [url=http://www.luxuryemall.com] Gucci outlet [/url]with the cheapest price discount Gucci 30%-50% OFF! [url=http://www.wearinchic.com] Burberry Outlet [/url], offering full array of check pattern Burberry jackets, Burberry scarves with greatest discount. Welcome to buy your interested Five Finger Shoes with high quality. Here we offer Vibram [url=http://www.bareyourfoot.com]five finger shoes [/url]with many modes and reasonable price.
that does not waste minutes of your life like what you see on countless other sites.
I was very pleased to find this site.I wanted to thank you for this great read!! I definitely enjoying every little bit of it and I have you bookmarked to check out new stuff you post.
Wishing you the best of luck for all your blogging efforts.
3,600 2,900
Chanel Sac
Really interesting iarticles.enjoyed reading it.
This is very creative. I like your creativity that makes me interested with this activity. Thank you for sharing idea. I really appreciate it.
nice post!!!!!thankk you for sharing!!!!!
No matter in summer or winter, supra shoes are the best choice.
Free shipping! Safe delivery! Welcome To Official Supra Footwear!
We have many supra products in stock. Come here and choose your favorite one.
It is a great online shop. It provides many different kinds of supra shoes. You can search for your most favorite one from this website.
I like your creativity that makes me interested with this activity.
ed hardy , Opposition reflects the tension, contradiction reflects the perfect fusion of the two re-mix of simplicity with the elegance.
Contour lines of upper and sole design, showing a trend of diversification, the full expression of the romantic, casual, relaxed, lively and emotional jump mbt shoes
It is a great online shop. It provides many different kinds of supra shoes. You can search for your most favorite one from this website.http://www.myefox.es/
this looks like a good project overall and I would like to see it succeeding, but look at how much have been struggling the open source/royalty free codecs and
Cheapest International Calls
Cheap International Calls
Cheap International Calls
Cheap International Calls
Cheap International Calls
Cheap international Calling Cards, PC to Phone, Mobile VoIP, Call Back, Call Shop, I-PBX,
DID Numbers, SMS and Wholesale Voice Service,all by WholeSwitch, who provides cheapest international calling cards.
mbt shoes are the most well-deserved classic, best embodies the charming woman sexy shoes. MBT sandals to wear fine, your center of gravity toward the forefoot, MBT shoes, the body naturally tall and straight up the line but also because of the lower leg and heel height is even more slender.
ed hardy ‘s global distribution outlets, across the Atlantic from the United States, South Africa, Britain, to Asia, Taiwan, Macau, Japan, Singapore, ED Hardy hot uninhibited STREET FASHION already enjoys popular support among young people around the world.
jordan shoes Brand Summer 2011 will be the launch of a variety of GS for women shoes, Air Jordan 3 which will start in the May 28 sale, and eye-catching red Air Jordan 5 and Air Jordan 1 High Canvas is currently on sale.
You may pick thomas sabo charms that represent lifes unique moments. thomas sabo charms You might have situation in your life played in a lovely arrangement of charms. No-one creates this jewellery in far better detail than Thomas Sabo. Several retailers provide the full range of Thomas Sabo charms on the web. There really is one area for everyone. The variety is awesome and it also continues expanding every single day. thomas sabo comes with a variety of animal design charms. You can go for rare and exotic to cute and cuddly. All animal thomas sabo jewellery are sterling silver that may be polished for wonderful light.
Stitches: Another important NBA jerseys factor that determines the caliber of Basketball Jerseys is definitely the kind of cheap NBA jerseys stitching utilized to connect all the waste a ready-made garment. Normally jersey regularly have about 2 to ten components of cloth to always be joined Basketball Jerseys according to the quantity design and fashion essental to the best team’s dress.
After you know the objectives, you should be using for several months. You need use the advanced features that deal with recovery and security ralph lauren women, and support corporate environments. Again, these features are listed in the objectives but are not usually used by everyday home users.Next, don?ˉt be afraid to get on the Internet and research some of the Rosetta Stone Spanish. Again, take smaller steps so that you are not overwhelmed. Whenever possible, you want to use Microsoft websites because the exam comes from Microsoft.Look at your local schools. Many schools have excellent christian louboutin outlet and include hands-on classes. Remember, that most people in the technical field learn best hands-on.
Very Good Site pre lolitas sexo oral luv naked lolita young girls sgw board 9 lolita bbs dzvgwj new lolita little nude uisoia video lolitas teen kiddy qtf top 50 young lolita 3944 little lolilta nude pussy >:))) lolitas top sites many :-PP 100 top loli sites emwfg loli bbs tgp pics cvv
This is a great post
Great tutorial. Well done. This is really lovely website 🙂 Don’t forget to check out mine.
I really like the onsie card! Thanks for the directions.
People usually prefer MAC Cosmetics outlet, especially when they visit some cheap MAC Cosmetics – http://www.macmakeupcosmetics.com/ . In some areas, people like to best Mac Makeup.They will find some store doing very cheap or discounted ralph lauren. Certainly,ralph lauren is a good way to earn money, buy cheap ralph lauren and cheap ralph lauren uk go with http://www.ralphlaurenspolos.com/.
good
Finally can copy!insanity workout dvd
Mr Coates (Coach) is the longest U.S. market popular with one of the most successful leather brand. Mr Coates (Coach) represents the most admirable American fashion innovative style and traditional techniques.
These are all great comments here. Very cool article.
Gucci Briefcase
Wow. Amazing. Now, I can start making my own onesie card. Thanks.
Great article and your blog template is so cool. Is this template free or not?
4,400 3,600
Sac Gucci
http://www.cheapnikeshoes8.com/ Discount Louis vuitton Clothing, Cheap Air Max Shoes
Welcome to visit our website: http://www.cheapnikeshoes8.com/
Please contact e-mail: [email protected]
We provide the tunnel the product, the preferential benefit price and the warm service.
We hope to get a good long business time with all customers all over the world.
you can buy Discount Louis vuitton Clothing, Cheap Air Max Shoes, Prada Shoes, Supra, Puma, Coach Chanel Handbag,New Gucci, 2011 air max, timberland boots, football shoes Gucci Belt
Thanks for such a great post and the review, I am totally impressed! Keep stuff like this coming.
hjdfhkdthjjdhfgkdjheuryhfjfhfjchcjmdbdjfhjshdfjfjh
mbt shoes with its impressively explosive visible cracks to win the title of the apple shoes
ed hardy rewrite the streets of the beautiful fashion bag
jordan shoes ’ soles use the white and yellow this two color, Fun color perfectly
Nice day, I feel very good
If you want to purchase the pearl jewelry .Welcome to our freshwater pearl jewelry sale online store. We provide all kinds of new style freshwater pearl pendant just for you, don’t think twice.
Quite interesting point!
Our company in America and professional in doing Original CHI® Hair straightener business with worldwide customers, Enjoy Christmas free shipping service!
I really like this website , and hope you will write more ,thanks a lot for your information
replica watches
[url=http://www.qualityfirstwatch.com]replica watches[/url]
replica watches
Buy $10 Replica Designer Sunglasses with 3-day FREE SHIPPING
Good article, very useful, thank you.
http://www.christianlouboutineonsale.com
http://www.coachoutlethandbagsonline.com
the ski picture tht cotcheap mbt shoesn Windh is published t :supra shoes .
Thanks for your shaing…enjoy http://www.mlbhatshop.com red bull hats, new era hats wholesale, monster energy hats, dc hats, new era caps
Like the way the author has thrown some light on facts not concealed. I feel that the writer had spent a lot of attention to this article, as all make senses and are very useful for us. Never thought it was so easy after all. Pretty insightful post.
http://loanreferences.com/
http://loansy.org/
http://www.loansreferences.com/
http://loanssite.org/
These are all great comments here. Very cool article.
Ray Ban Caravan
This site is beautiful
Tks for sharing!
good
adsfaf
good
I’m not sure the place you are getting your information, however great topic. I must spend some time learning more or understanding more. Thank you for magnificent information I was in search of this info for my mission.
Lauren, thank you so much for your fabulous onesie tutorial. Here is my onesie that I uploaded to my SCS gallery. Enjoy and TFS
My Onesie: http://www.splitcoaststampers.com/gallery/photo/1996554?&cat=500&ppuser=18672
http://www.cheapasicsshoes.us
which derives from the aphorism mens sana in corpore sano. Since 2007 there has been a larger importance put on this acronym
the matter regarding Asics shoes
the ASICS shoes as they can be the best choice
http://www.cheapasicsshoes.us
I love your blog.. very nice colors & theme. Did you make this website yourself or did you hire someone to do it for you? Plz reply as I’m looking to create my own blog and would like to find out where u got this from. many thanks.
good
Certainly enjoyed the way you explore your experience and knowledge of the subject. The things you covered through the post are quiet impressive, good job and great efforts. Thank you for your nice blog sharing.
http://personalfinancereference.com/
http://www.optimedlabs.com/
like a bright moon in heaven, no matter the bright again, no trace
We have a huge range of new era hats, including baseball hats, cheap new era hats, New Era Hats Wholesale, monster energy hats, monster energy hats,dc shoes hats and so on ,we offer you cheap hats, 50%disscount and free shipping.Welcome to our website http://www.hatsbusiness.org
this is a very much nice info thanks for share.
Hi Lauren, thanks for the great tutorial
Love your card!
🙂
And this is my version …
http://creafamily.bastelblogs.de/2011/06/25/welcome-baby/
Creative Greetings from Germany
Regina
I so enjoyed every bit of this site and I’ve bookmarked your blog to keep up with the new topics you will post in the future.
replica watches
fake watches online
replica watches online
i admire your work.
This article is so beneficial effect, to write such an article is good,thank you
i love your blog theme and style , which make me feel warm in my heart
good!!!!!Thank you share, the article will make people good progress soon, I will share my article to you, because only together can share the progress.
Thank you for sharing
If you want to make beautiful hair style, GHD straightener absolutely is the best hair maker for you, it does little harm to the hair with safe and strong materials, so many people are willing to choose GHD.ghd IV salon styler You need to make beautiful hairstyle,GHD Mini Style
fake carrera sunglasses
cheap oakley sunglasses
fake oakley fuel cell
yes..your christian louboutin claudia dorsay maroon
christian louboutin claudia dorsay red
You notice so much its nearly exhausting to argue with you (not that I truly would need…HaHa). Pandora charms style is the look that many fashionable folks are targeting. All Pandora jewellery is created with only the very best materials and top-quality engineering and design.
ghd hair straighteners always attract people’s attention, since people are fond of ghd hair straightener especially pink ghd straighteners.http://www.fabulousghd.com.
It was stable, and provided the performance I required. Nike Air Max It also looks really excellent and it was nice to have a fantastic looking pair of shoes on your feet.The shoe is quite light weight and this is courtesy of a breathable mesh upper. Inside the midsole of the shoe is made out of the comfy and lightweight, Phylon. This material added to the overall comfort of the show as it supplied wonderful cushioning. Yet another part of the shoe that aided using the comfort was the Nike Air Max 91 unit that might be located in the heel. The shoe also had wonderful traction and durability as a result of a fantastic rubber outsole. Finally I really like the truth that the shoe was Nike ready. Nike Air Max 95 This means I could time my outcomes and significantly much more.
You have to choose what to babyliss flat iron
bother?
This company USES the independent production designer to design the some the best hair straightener
, it has a unique appearance, the hair that worry you? It USES the physical energy, and the production from the input and output, there is certain to massage the effect, to you of hair think of good, no matter how to see are great products, also etc. What, hair straightener products
← in incomplete to know you want
looks really excellent and it was nice to have a fantastic looking pair of shoes on your feet.The shoe is quite light weight and this is courtesy of a breathable mesh upper. Inside the midsole of the shoe is made out of the comfy and lightweight, Phylon. This material added to the overall comfort of the show as it supplied wonderful cushioning.
I read it thanks!!!!
It is so nice!Worth to read!
I think this a good blog post,thanks for sharing.
I may have different views, but the information you provide is very helpful for
me, I always support you
This is a wonderful article,I like it very much.
Also arrives with an ultimate surface area for static free of cost sheen!Good tresses times could possibly be difficult to appear by, but ghd uk can be the most ideal weapon to combat the frizz, kinks, and unruliness that make bad hair. Ghd Australia fans are increasing in quantity and will hold on to.Purchase a Wholesale Buy Ghd
Best Ghd Hair Straightener
hey,baby! it’s lovely~!
Great article and your blog template is so cool. Is this template free or not?
Gucci Sukey
I know he can help free Have I wonder ?
Great article dude
We only provide AAA quality of products. You can make purchases without scrupulosity. All of products can be ordered from our website directly, cheap hats also, you can contact our professional customer service to get more support about payment terms, the intention of cooperation etc. wholesale hats The most preferential price: Our competitive price make our customers confident to develop their own business, at the same time, reaping big benefit from this transaction. Our favor tends to the customers who are from United States, Britain, France, Spain, Germany and Australia etc.We are hats manufacture in china, Our company specialize in supplying new era hats, cheap new era hats,dc shoes hats,red bull hats,famous hats,jordan hats,etc. We pay attention to our products quality and service.
This is a really good read for me, Must admit that you are one of the best bloggers I ever saw.Thanks for posting this informative article.
Thanks for your Post! It was very helpful.
Welcome to our site, buy the things you like. Please click on my name, this simple action may give you a surprise! Thank you.
These are all great comments here. Very cool article.
Gucci Sukey
I have to say that overall I’m amazed with this site.It is easy to see that you are passionate about your writing. I will be coming back
nice article. i just saved it for future reference…..
Simply want to say your article is awesome. The clarity in your post is simply impressive and I can take for granted you are an expert on this field….
provides an in-depth analysis and insights into oil and gas sector capital expenditure
Office Home and Business 2010. The report provides a detailed analysis of the current and future capital expenditure position of national oil companies, and integrated, and independent oil and gas companies. It presents detailed Information and analysis of capital expenditure in oil and gas segments;
Microsoft Office 2010 Standard . It also providesdetailed information on capital expenditure across various regions; North America, South and Central America, Europe, Middle East & Africa and Asia-Pacific. The report also covers the planned oil and gas projects in upstream, refining, pipeline, LNG and petrochemical projects.Coach Factory Outlet
Great Work. So finally laptop arrived ??.. Howz the look. We are waiting here eagerly
I am happy to have found this blog, and more happy to have long tail explained so well. Thanks.
I have just recently found your blog and absolutely love the posts. Thank you, thank you. I am still .NET programming but can’t wait to try these things in Ruby and it is a great help to see such clear examples. kids apron
wholesale hair weave and man – so that the crowd rose up and cursed Pompey. (translated by A.P. McKinlay) This is of interest also for conditions. The games referred to its depiction of contemporary were part of the
wholesale human hair
wholesale hair celebrations ordered by Pompey, a powerful general who formed the first Triumvirate with
wholesale hair extensions
You can have one of Replica Ebel Type E Watches at Repliwatch which is practically indistinguishable from the genuine article. The another fashion Replica Grachams Chronofighter Swordfish Watches will look great on your wrist and you will receive compliments. All this for a fraction of the price of the original. Repliwatch guarantee satisfaction on your part. Repliwatch suppliers are the most reliable and the best in the business. Repliwatch’s representatives are knowledgeable and will answer any questions and address any concerns you might have. Repliwatch team are here 24/7 and your replica watches will be shipped quickly. Replica IWC GMT Watches are of the highest quality, both durable and stylish. They are sure you will appreciate the price so much that you will make multiple purchases for family and friends. Please consider one of Replica Magico Magico Watches, the kind the real pilots wear.
This will also prevent the stains in the dresses. The price of the aprons usually starts from $16. You might even find something below it but the quality might not be up to the mark. You just need to heck out the product code and the price.
kids aprons
Thank you for sharing this website. I’m still learning but I love it. It’s really a excellent work.
OK!
http://www.lpearls.com/Pearl-bracelets-&-rings-Freshwater-pearl-bracelets/c119_138/index.html
thanx for sharing
If you are after a great offer and present then tale a look at the pink ghd uk, I think its one of the best offers Ghd Australia have had in a while and furthermore it helps to support a worthwhile charity. Just want to give another shout out to ghd to say “well done”, every year they do the Buy Ghd for charity and we personally feel that its great to see a company doing something positve with their products and influence. Keep it up.
Chi Camo Collection Flat Iron
I am still .NET programming but can’t wait to try these things in Ruby and it is a great help to see such clear examples
Sorry,i don’t know how to receive my response, why?
http://www.christianlouboutin-discounts.com/
Choose a trend of the han edition glasses, make mature dress up you have star temperament. Remember to get a han edition hair oh.
This article is so beneficial effect, to write such an article is good,thank you
Your card is looking absolutely fantastic…
Think good, feel good that you can not run on debts, no turning back,
Phillies Jersey
Roy Halladay Jersey
Thank you for taking the time to discuss this, I strongly feel it and love learning
about the subject. If possible, you get expertise, you would not mind more
information, update your blog? This is very helpful for me
Thanks for sharing
Thanks for not only taking the time to write this, but to even improve the information by making it easy to read and understand.I feel very similar on this topic but have some new ideas also.
Thanks for taking the time to discuss this, I really feel strongly about it and love learning extra on this topic. If attainable, as you achieve experience, would you thoughts updating your blog with
additional data? It is extremely useful for me.
I’m afraid to we are all going to get a big media dose about Blair Holt’s tragedy,
Cool post Lauren Keep it up with good stuff
Thanks for your sharing.
Welcome to visit our website:http://www.jseyewear.com/ We provide the tunnel the product, the preferential benefit price and the warm service. We hope to get a good long business time with all customers all over the world. China Grand Shoes Company is a limited footwear enterprise company which combine footwear trade with footwear manufature. We have the better despend ,strongpoint and quality than the other manufacturers, we also brought the best production equipments, technologies, and professionals from abroad. We produce over 800,000 shoes per year .
Its like you read my mind! You appear to know so much about this,like you wrote the book in it or something.
Pretty! This was a really wonderful post. Thank you for your provided information. I like your post very much. Please write more and more please.
Nike Sportswear friends and co-operation with its internal launch a special customized program Bespoke,nike tn launched Kimihiro Takakura design 2011 Nike Air Force 1 Bespoke Bespoke shoes is part of the plan. Horse hair and the tongue of the details of the fluorescent color embellishment set to Bespoke shoes fun. Kimihiro Takakura design nike tn (Nike) 2011 Nike Air Force 1 Bespoke shoes. Nikever 2011 Nike Air Force 1 Bespoke shoes from Kimihiro Takakura customized version of the Air Force 1, Air Force in the classic no major breakthrough on the shoes, but the tongue of the horse hair detail settings and fluorescent colors dotted the Kimihiro Takakura Bespoke design shoes fun. Which involves a lot of brand shoes, including Belle, nike tn, Converse, special steps, Daphne and so on. In recent years, footwear has become the daily necessities of complaints a hot issue in the complaint.
Tommy Mens Sweaters Your article is very impressive. You’re views on this topic resemble my own in many ways. Besides agreeing with your views, I find your article engaging and refreshing. Thank you. Tommy Mens Shorts
you are really awesome man just keep going and feed your brain in good things
Vibram Five Fingers fitness: walking barefoot in the gym will not have any feeling of insecurity, yoga, aerobics and other fitness activities in the light foot can be used.
louis vuitton outlet men’s spring and summer full of free and easy, casual style, with well-known tattoo master Scott Campbell co-operation,
I truly wanted to jot down a simple comment to be able to appreciate you for the fantastic tips and hints you are giving out at this site. My extensive internet lookup has at the end been paid with useful information to exchange with my visitors. I would tell you that we site visitors are very much blessed to dwell in a fantastic place with many perfect individuals with beneficial methods. I feel extremely fortunate to have seen the web page and look forward to many more thrilling times reading here. Thank you again for all the details.
The author has written an excellent blog. You made your point and not much to discuss. It’s like this universal truth that you can not argue with the truth is not universal,
This site is beautiful. I need to bookmark it
[…] may know that years ago, in Feb 2008, that I designed a tutorial for the onesie shaped card I had designed. I’ve been asked for YEARS to make this available in the PDF, and other Cut […]
Whatever the style of Insanity Workout you are looking for,we can help you find the one that best fits your goals.Insanity Workout 60 Days is your best choice.It’s only need 60 days,you will satisfy your body.Insane Workout 60 Days let you possess a relaxed and rich life. Get the ball rolling now!
Took me awhile to read all the comments, but I really love the article. It proved to be very useful to me
a limited footwear enterprise company which combine footwear trade with footwear manufature. We have the better despend ,strongpoint and qu
Thank you for sharing this cool post,it is useful,i love it very much.
I think we need to bring more ideas for this purpose. Involvement of young people can be handy in this regard.
As a interior car accessory, steering wheel cover can protect your steering wheel. We often hear about the ABS, ABS sensor is a main part of the ABS. Expansion valve and clutch slave cylinder are critical car parts that offer help to improve car performance. Oxygen sensor is an electronic device that measures the proportion of oxygen (O2) in the gas or liquid being analyzed. And a working instrument panel is vital to your driving safety.
good
Great post!! I love your content and Thankyou very much, I have found this info extremely good!
power tools
welcome to see it !!!
Stylist varieties of wholesale shoes and boots
Is wise uggs online way to keep modern and institutions of the budget to keep at the same time. Bxxq-i boots is great, it is raining outside or if you want to hiking, only carry two normally, when he thought of the practicability of footwear. We have done some research, to see if it is the best sales waterproof booties so far, in 2010: 1. Tretorn Skerry: if you have a question, after period of time, or if you reveal boots have a larger calf have a higher leg, the so that difficult to tuck your pants certain problem, and then see no boots further. These difficulties should apply to you, then you might like this Tretorn footwear a pair of very comfortable, great quality, and rise to reduce legs. In a large number of different colors, the boots street and the uggs boots sea adventure advice!!!!! 100% waterproof natural rubber, and with microfleece lining and removable insole, they’re easy to get. 2. Kamik Janice: these will keep your feet dry and comfortable, cramming in your feet, you won’t have any problems. They can be a bit stiff the first time or two you wear them, but they quickly softening, and become a very comfortable. With many lining, you don’t want to use them in very hot weather. Lined with ugg online actually imported from Italy, and is soft fabric line and sweat, to help keep your comfortable feeling. You will like the upper portion of the colorful design, how to create and import printing Italian line, with light weight, waterproof, PVC coated surface finish transparent. Hope this boots, will let you in damp weather risk a great companion! Looking for boots, you love, that is the right size, itself is ugg boots a difficult enough jobs. Many women have more problems, because they have different feet. Some of them have a wide range of crus, other have a wide range of shaft or they just a asymmetrical shoemaking business most want to believe in the foot..TS
Cheap Louis Vuitton Bags online shopping fashion
Awesome blog! Is your theme custom made or did you download it from somewhere? A theme like yours with a few simple adjustements would really make my blog stand out. Please let me know where you got your design. Thank you
I am New Here,My name is Jesse and this is my first entry here. feel sometimes, that I have to learn a lot, hope you guys have patient on me.Thank you for sharing the post.
Very nice article, I like your posting very much.
over 40 years. Our pricing is indicating a buyers’ market, which has not been seen in our
wrist and you will receive compliments. All this for a
When I found this was like wow. Thanks for putting your effort in writing this post.
Thanks for your sharing!
New Era Hats
http://www.likehats.com
When visited links don’t change color, users exhibit more navigational disorientation in usability testing and unintentionally revisit the same pages repeatedly.
I feel like I’m often looking for interesting things to read about a variety of subjects, but I manage to include your blog among my reads every day because you have interesting entries that I look forward to. Here’s hoping there’s a lot more great material coming!
It is my great honor to make friends with you fake oakleys
I like the way you start and then conclude your thoughts
I like you post ,it’s very good!
i agree with your posting thanks!!
So fun article is! I know more from it.
nice
good
i agree with your posting thanks!!
nice subject
useful
Five Fingers are shoes. Or slippers. Or socks with flexible Vibram rubber soles on the bottom. Or go simpler: they’re “Toe Shoes.” They have five toe cutouts (or pockets) and absolutely no arch support or traditional foam padding in the soles. They come in a few varieties (some providing more foot coverage, one intended for aquatic uses, a couple with straps, or the simplest, the “classic”, which has a bungie type operation that keeps them from falling off when used in more engaging activities (Update: Now there are 8 Five Fingers models available with a ninth VFF Trek variety on the way any day now).
Nike Air Max+ 2011 Mens Running Shoe Dark grayare mainly applicable to everyone, because of the comfortable, stylish design and good protection performance. Nike Air Max Tailwind+ 1Running Shoeexquisite design and high quality are very perfect for you. Excellent is all I can say. I am satisfied with <a hre
Nice blog would like to add that NSE and BSE are one of the most superior stock exchanges of India. If you wish to earn good money from the share market then you need to understand the functionality of the stock market properly.
Indian stock market offers lot of earning opportunities still many less traders earn from it. Now the question is who earns from the share trading? To be honest only those who rely on stock research as no one can earn big by speculating in the market.
Regards
SHARETIPSINFO TEAM
Such a nice posting thanks!!!
hairpan redundant information can be used to reconstruct approximations or exact versions of some of the
anble
Very happy to join this, and want to know more friends here.Very creative, one of the nicer sites I have seen today. and I truly like your style of blogging.
Founded by Guccio Gucci in Florence in 1921, Cheap Gucci Shoes is now one of the world’s most iconic fashion houses.
A good method is
You north face sale can also tell if a rusty vehicle has been painted, because the paint will see, if it has been bubbling up. If you see the bubbling effect on paint homework, The problem is, if the dope is too thick, it will not stand, It is difficult to learn how to avoid foreclosure?A good method is
You north face sale can also tell if a rusty vehicle has been painted, because the paint will see, if it has been bubbling up. If you see the bubbling effect on paint homework, The problem is, if the dope is too thick, it will not stand, It is difficult to learn how to avoid foreclosure?A good method is
You north face sale can also tell if a rusty vehicle has been painted, because the paint will see, if it has been bubbling up. If you see the bubbling effect on paint homework, The problem is, if the dope is too thick, it will not stand, It is difficult to learn how to avoid foreclosure?
good points.
A court on Wednesday refused [url=http://www.purses-chanel.net/]Chanel Purses[/url]to grant a preliminary injunction requested by theChanel Purses Christian Louboutin company against Yves Saint Laurent, alleging trademark infringement on shoes that featured red soles suspiciously similar to those of Louboutin.Chanel PursesThe court seemed to want to give Mr. Louboutin his due, however, describing in greatChanel Purses detail the impact the French designer (who has been profiled in both Vanity Fair and the New Yorker) has Chanel Purseshad on fashion.
Ralph Lauren Polo http://www.ralphlaurens-outlet.com/ralph-lauren-polos-c-4.html
Ralph Lauren Shoes http://www.ralphlaurens-outlet.com/ralph-lauren-shoes-c-22.html
Spurning Dr.Lal’s Faustian and escapist aspirations for colonizing the uninhabited and thus“uncontaminated”moon.Sammler opts for remaining on this doomed but human planet.He notes that he would rather be a“depth man”and explore the ocean bottom in a bathysphere.
hair wigs
Like an Old Testament prophet,Sammler blames corrupt and stupid femininity for the wicked sexual mores of the 1 960 s,and for the imminent collapse of modern civilization.
black wigs
Spiritually and emotionally,Sammler has put himself on ice.Bellow structures this book as a rather focused archaeology of the psycho-sexual formations of Early Modern European masculinity,along with its intellectual and cultural values.
wigs for black women
It contains elabo-rate accounts of the intellectual ages he spans,a host of his likely mentors,an account of his privileged,sexist,upper-class education,and numerous accounts of his pathological fear of women.
wigs for black women
zentai has a lot of products, which are very attractive. Everyone has their own hobbies and dreams, perhaps you wear zentai costumes make dreams come true then? So,
would you like come take a look of our website?
I enjoy readint your article.It is very funny and useful for me.Thanks!
I love the way you design your cards, it’s really personalized and cool. I often look for cards like these during special occasion like holiday seasons, birthdays and more. Also, I used to look for personalized wine labels that is perfect for the celebration.
“You made fantastic nice points here.
I performed a search on the issue and discovered almost all peoples will agree with your blog.
All inclusive travel deals are not for everyone,
but most people enjoy a vacation that is put together for them”
I really like this website , and hope you will write more ,thanks a lot for your information.
a nice post
I am not going to let ONE person kill the joy I get from sharing with everyone.
It is say wiggling and everyone likes it. It also needs to amend responsive and someone.
poems
I touch and motion the communicator’s blogs. It is so overnice and hirsute to assumption for everyone. This is real dread…
poems
Thank you very much. I hope you will find more posts that you like
The cheap New UGG Classic Tall Boots features lavish twin-faced sheepskin for the utmost comfort. Precision craftsmanship is evident in the Classic Short reinforced heel and raw seams. Slip into the Classic Short UGG boots and feel UGG Australia’s luxury. Enjoy your shopping on UGG Outlet.
There is a YiLuoKui passport with the safety of the problem
Other north face sale team members were from the United States and Canada, although the team’s YiLuoKui Indian YiLuoKui family members of the nation.There is a YiLuoKui passport with the safety of the problem
Other north face sale team members were from the United States and Canada, although the team’s YiLuoKui Indian YiLuoKui family members of the nation.There is a YiLuoKui passport with the safety of the problem
Other north face sale team members were from the United States and Canada, although the team’s YiLuoKui Indian YiLuoKui family members of the nation.There is a YiLuoKui passport with the safety of the problem
Other north face sale team members were from the United States and Canada, although the team’s YiLuoKui Indian YiLuoKui family members of the nation.
I would like to thank you for the efforts which you have made in writing this article. I am hoping the same best work from you in the future as well. I look forward your next information will be a nice and great it will.
LED Plastic Solar Light
buy Prada handbags to our Prada handbags outlet store. We have Prada handbags 2011 and Prada handbags on sale . You will content with the high quality and lowest price. If you have any question, please click about us
We are never willing to waver on quality, aif you’re looking for a pair of fresh sunglasses for riding the waves, or just for lounging poolside,
ray ban sale
The cotton and wool can attract damp. The cotton next to your skin so that it can absorb your sweat,
it also leave you feeling chilled and damp.true religion jeans cheap
Xinhua August 22, Benghazi Libyan power “of the National Transitional Council,” the main Xijialile 22 in Vestes Columbia Hommes Benghazi on the press conference said that the current armed opposition has not been fully Ed Hardy Pas Cher control of the capital Tripoli, Aziz Zia barracks and the surrounding areas are still Polo Lacoste Femme controlled by government forces, it is difficult to determine the Gaddafi right where it had left Libya.
Women never feel content with the amount of shopping they do in regards to shoes. They require a separate pair for every happening. Among the different styles of shoes, the one thing that has grabbed the market and is here to stay are the boots. They are next big thing in ladies shoes. Whether it is ankle high or knee high you have to choose a suitable pair from the wide range of ladies boots that is available over the Internet.
http://www.nikeshoxozr4.net/
Purchase China Brand Tablet PCs with Low Price & High Quality plus Free Worldwide Delivery at chinatabletspcs.com.
If you are searching to get a stylish two of shades which will defend your vision, try out a ray ban Wayfarer sun shades
At Coach outlet on-line sites, you could find various authentic Coach outlet, coach purses and coach wallets at discounted rates and, you also get eighty% off retail coach goods. Coach on the internet goods, though offered at minimal value, are assured to be genuine and not counterfeited and greatest top quality. Coach outlet merchandise are along with authentic coach tags.
As the combination of casual styles and sport styles, Ralph Lauren Polo is a good choice for leisure times, casual but still fashion. Ralph Lauren Outlet online are widely welcomed. Ralph Lauren outlet online for sale, high quality, low price!!!
I would like to thank you for the efforts which you have made in writing this article.
online cash advance
payday loans
payday advance
Whether or not you are looking at any ideal or maybe cheap uggs about saledark darkness Cardy vintage dark-colored shoes and boots, come on. We all glimpse uggs outlet continues to be always welcome dark-colored uggs, dark-colored colour not just, a lot more uggs for sale vintage exclusive design, ideal for an array of body, despite just how stylish aspect improvements it really is ugg boots sale watching. Comfort and ease is a key word with regards to Ugg Boot styles.
True Religion Jeans,At the moment, more and more inhabitants wear jeans and you can see different trademarks everywhere, such as True Religion Jeans and so on. Generally speaking, males are more proficient at sports than females, consequently sport Jeans is more favorited by men. So far, it preails around the world and is dressed by all kinds of people.
I came to your article from another article and am really interested in this learning about this, I feel strongly about information and love learning more on this. If possible, as you gain expertise, It is extremely helpful for me. would you mind updating your blog with more information?
Excellent write-up tends to make continual development, many thanks discuss, the particular deposition regarding information is always to retain studying, consideration will be the beginning of success.
Hi, thank you for sharing this great info. Was just browsing through the net in my office and happened upon your blog. It is really very well written and quit comprehensive in explaining with a very simple language.Louis Vuitton Rolling Luggage
[…] Create your own Onesie Card Tutorial-and important NOTE! PLEASE …Feb 5, 2008 … Lauren, I love your version of these onesie cards, as I’ve told you before. Since I have made them before (over a year ago) with a template, … […]
Many people like to wear air max 90 not only because of its classic design of appearance but also the excellent support of athletes and running lovers. It is the third generation of Air Max and Nike air max 90 is a good running shoe. Shox NZ Knowing that air is lighter than the foam, the air max 90, features two of the most sought after materials on sneakers-patent leather and mesh. There are so many choices of colorway and design pattern among air max 90 sneakers that they are always a popular series for customers. Jordan 2011
The air max 90 is one of classic Nike shoes. It already has a history longer than 20 years, more and more people are collecting these shoes as a collection. So, just come and get your fabulous shoes, you will never regret for it! Air Max 90
Thank you for providing the perspective. I just read a part of the article,so I don’t know much what to say. Good luck for the new member! diamonds for sale | Diamonds as an Investment
Nice post!just added the website to my favourite,will Keep it up.thanks
Soccer is my favorite,so is David Beckham.
Louis Vuitton “special ordered” the traditional
With the high-tech Sedu flat iron technology and unique colorways design,it can make you more special in the crowd. Now you can choose whatever you like on our prada bags. adidas training shoes, the colorway of product is just right, which can stimulate your passion for sport availably. Those great quality but Supra TK Society are waiting for you right now. There will always be one product appropriated for you on our ugg boots.
Many people like to wear air max 90 not only because of its classic design of appearance but also the excellent support of athletes and running lovers. It is the third generation of Air Max and Nike air max 90 is a good running shoe. Shox NZ Knowing that air is lighter than the foam, the air max 90, features two of the most sought after materials on sneakers-patent leather and mesh. There are so many choices of colorway and design pattern among air max 90 sneakers that they are always a popular series for customers. Jordan 2011
Your post is really good
Home remedies for mouth ulcers Home remedies for bursitis Home remedies for anorexia
fashion jewelry wholesale online shop @ fashion jewelry wholesale
crystal jewelry wholesale
All the while, he makes statements about owning cars and Rolex Watches.
Feeling expensive diamonds, bows, duck down, leather-based besides other comparable patents ornament style company in america referred to as autographed Christian Louboutin pink bottoms.you may need the service-oriented, Services chose to consumer credit, determines the calibre of jimmy choo sandals
is cool together with worthy unique likes of clients. very good Louboutin knocks out are incredibly reassuring.
Miu Miu handbags
are well-known once again, any 90’s not to mention ahead of time 21 years of age Hundred years. Fashionable suggested goal it will be to discover a better half amazing, not to mention the woman
seem exactly that gardening generate. Nevertheless she or he made available a few cheaper grammatical construction kinds, gown jimmy choo boots
Most claimed ladies a pair of
jimmy choo bridal shoes
need because it’s, and also provides workforce the required particular product. However isn’t the out of date dark
rotters monotonic physical appearance or use the harshness of the Office belonging to the gown, her charcoal underwear as well as ebony hose or simply add up to. Moreover, improved water
tory burch shoes
This is a really quality post.I find this information through Google. Great job.
very nice post, i certainly love this website, keep on it.
Das neue Android Smartphone besitzt alle die Vorzüge des iPhone: schneller Prozessor, hochauflösendes, großes 4.08 Zoll HD Display und einfache Bedienbarkeit – und es ist meist deutlich günstiger als das Apple-Gerät.
Mit dem Smartphone A9000 kommt keine Langeweile auf. Es sind bereits viele Spiele vorinstalliert.Angry Birds, Plants Vs. Zombies,TOM Cat,iPhone werfen, Diamond Puzzle und viel mehr Spiele stehen Ihnen zur Verfügung.
Individueller MP3 Musik Player, unterstützt MP3/WAV/WMA und andere Formate.Lautsprecher,zyklisch play,tätsächliches Vergnügen wie efox-pod. Musik Online mit Synchrone Lyrik. Mit einer Standard 3,5 mm Kopfhöreranschluss,A5000 konnte mit hochwertigen Tunes für Sie zur Verfügung und Sie können eine HIFI Kopfhörer, um Ihre Musik weltweit genießen ausstatten,wie Sie wollen-die 3,5 mm Klinke ermöglicht eine breite Palette von Möglichkeiten!
Thanks alot,great idea,if i have some question,can you help me to answer it ??
Thanks advance.
Thank you so much.
I support you.
oh my!! i love you so much!!
Well,so nice an article.
[url=http://www.hongdameter.com/products_info/New-small-current-clamp-meter-HD90B-129289.html]New small current clamp meter HD90B[/url]
clamp meter
[url=http://www.hongdameter.com/search/7475/clamp meter.html]clamp meter[/url]
Buying an exceptional excellent canada goose is undoubtedly a buy to the future. If addressed with care, a quality exceptional moncler jackets uk
I performed searches on the topic and found most people will agree with your blog. Thanks for sharing this information.http://www.realsaleshop.com
Britney Spears, in Los Angeles, and many appear to play her child custody dispute has been found wearing christian louboutin outlet. Christina Aguilera is also a fan of christian louboutin shoes sale, common at major events wearing cheap christian louboutin shoes and also she wore in her latest album back to basic tour.
Hiya, I ran across your site by means of Yahoo while trying to find a similar topic, your blog showed up, seems like fine. I’ve saved as a favorite it inside my google book mark
Cheap Gucci Shoes is an iconic italian brand of fashion and clothing accessories. Cheap Gucci Shoes for Mens has become one of the most Cheap Gucci Shoes for Womens infamous and desirable luxury fashion brands in the world.
This is my first time i visit here.
I found so many entertaining stuff in your post。
especially its discussion. From the tons of comments on your articles,
I guess I am not the only one having all the leisure here! Keep up the good work
You made some good points there. I did a search on the topic and found most people will agree with your blog.Keep sharing and posting articles like these.This article has helped me a lot.Keep posting this stuff.
New era hats
Adjustable Hats
MLB Adjustable Hats
christian louboutin stores
just a letter to his mothers activities.
christian louboutin uk
I will tell in a letter to his mother
You made some good points there. I did a search on the topic and found most people will agree with your blog.
Cheap Gucci Shoes for Mens has become one of the most Cheap Gucci Shoes for Womens infamous and desirable luxury fashion brands in the world. the gucci brand has a long history and enjoys a large market all over the Real gucci shoes for cheap innovation aesthetic to the most classic design of bags by a new fashion approach.
Louis Vuitton name became synonymous with quality and durability since the beginning of the line. They have a wide range of products, from bags, backpacks,?Louis Vuitton Cheap Replica Handbags and accessories, not only for women but for men.
Most of the line, aesthetic program. These products are simple style, rich and colorful, interesting, more important is the practice of socialism, and assume the buyer the most active, like traveling very much.
Her makeup bag or valuables, Louis vuitton handbags indispensable. Recently discovered, in addition to basic to the need for cheap replicas of the Louis vuitton handbags, also play the role of a person’s style of the statement.
Louis vuitton handbags is not only a suitable for storing pocket, your luggage. It’s more of a status symbol. The woman to have at least two or three bags. Do you want any team daily use.
Thus ends the choose neuter color, such as brown and black as it happens is too boring. Respect is neuter color won’t have a problem, because there are many ways to light up every a Louis vuitton bags of charm.
Surprising details and delicate metal trough food is a choice. This bag can in you want to find his classification. It can be a casual glance, see, image or festive.
Women’s work much easier, comfortable capacious and handbag in election win the battle. So, in two, get the handbag structure. This will be the company’s lady look safe. An informal look, this bag can end game.
These bags and material of different organizations skin. The entire body. Weapons is free, and appear more elegant than backpack. Elegant and leave a trademark bags of clothes also collected from the party animals.
Usually, collect cheap reproduction Louis vuitton handbags and adornment with metal nails. Women are more likely to be direction, arts and crafts, and things, you will find that your hand is the preferred way to have different tilt election Louis vuitton handbags in the price.
Size, should consider to choose a Louis vuitton bags. If you are just bought a size, in several colors and patterns of those you love. If you are small, do not bring a large Louis vuitton bag or a group, can in table and make you look like a hanger.
Instead, you should choose a few according to their size. If you are more likely to take stock of time, you can use a medium Louis vuitton bags. On the other hand, if you are high or wide, a small Louis vuitton bags look ridiculous bad.
You should have a larger Louis vuitton the bag, which should be added on the structure of the body. So now you know how to walk a Louis vuitton bags. Making the right choice, when you finish your clothes and style.
Christian Louboutin Red Sole Shoes Fashion Crystal Pumps Black With Red Toe is one part of Christian Louboutin.It is such luxury,vogue and sexy for women.This one features black suede upper with silver leather to decorate the high heel.It can not only show the ladies’ taste and pursue,but also can express their beautiful body.It leads the fasion trend to make women’s walking posture more graceful.
T stage, high heels are usually breathtaking, when more than 10 centimeters of high-heeled shoes model, the audience can’t help envy them perfect body and graceful posture. Now, with Christian louboutin online more than 10 centimeters high fashion shoes, has just appeared in the T stage, more and more appear in women’s life and work, social occasion. In fact, women in high heels beautiful figure form has a very important role, it can make chest and overcome the shortcomings of Hanxiong. While increasing height advantage, elongation, therefore, the woman look slimmer.
Pressure before and after wear high-heeled shoes don’t have to bear the pain of feet, 10 toes, bear the weight of the body. Although many radio stations may become great, great shopping or more not standing for a long time. However, smart women know how to make them look not only elegant, but also reduce the time of high heels are cheap louboutin see a DuoZhong ways to take care of oneself, choose a pair of high heels is thick crust.
Heavy going-the high-heeled shoes at the bottom of the lack of focus. The louboutin thick, honest, sincere, harmonious export online see, instead, let the woman feet some more support, more comfort and durability.
Thanx for sharing this with all of us. Of course, what a great site and informative posts, I will bookmark this site.good blog!
Generally I do not post on blogs, but I would like to say that this post really forced me to do so, Excellent post!
FanJianJi set: 17
Army came to ChengGao within 30 prince lowest-tax jurisdictions. Sun bin see prince slowly press soldier motionless, sent from spring came to prince clock camp, the prince asked why don’t show your teeth. Prince PangJuanWei manifestly and not strike, he must proceed cautiously, lest ZhongJi.
ChengGao city, South Korea lack of food ShouCheng army not hearts float. PangJuanPa ChengGao into the clearance between the flight ShouCheng stirred up with people, a domestic grain depot loot sound is appointed eyebrow. Thanks to the sun bin goes out to get there in time, to stop the civil strife, led by rob food zhao strong man be seized. Zhao feng strong man sued, general feng said general detain their food rations, they are forced to rob food. Sun bin told zhao strong men, it was he that general feng, forced them to rob the buckle sends food, food in the city didn’t cause the appearance of PangJuan such food, surrounded and not continue to attack, in order to have enough time to wait for the arrival of the qin reinforcements.
Zhao a strong man will tell gap, gap sun bin remaining doubts. Sun bin, make MiZhen again cloth clearance believe it did have a city food.
Gap ChengGao, will flee into the PangJuan, PangJuan decided to report inside the city. Write the authors coach bags wholesale
Wonderful post. I am searching awesome news and idea. What I have found from your site, it is actually highly content. You have spent long time for this post. It’s a very useful and interesting site. Thanks!
I dont know what to say. This blog is fantastic.ken griffey shoesit’s very hot.griffeys shoes
The disparate Cheap Gucci Shoes for grownup guys types of gucci shoes ranges from grownup guys gucci shoes be entertained Cheap Gucci Shoes for Mens , gucci loafers flats to gucci grownup guys shoes be entertained Cheap Gucci Shoes for Womens and gucci sneakers. no barn doorway modifications inside the shoes but some alternations affordable Real gucci shoes for cheap in particulars also give impulse gucci shoes specific. stimulate considerably cry components inventive and no place concoct could possibly be the reasons for why gucci shoes are there from snooty and personalize.
ugg boots clearance sale
Thanks for this. I really like what you’ve posted here and wish you the best of luck with this blog!Gucci Top Handles
useful and interesting site. Thanks!
but Kasi association Korea was slightly nervous, although many of her days in the Holy See, but has never been so close to the Archbishop.
The design is really cute!! I love that kind of pink!
i like this website .so pinky !http://www.cheapsuprabase.com
Your choice for coach bags Coach handbags. Coach Bags are the most famous luxury brand bags in the world. Coach Handbags coach store began more than half of a century ago as a family-run workshop in a Manhattan loft. Six artisans handcrafted a collection of high-quality leathergoods using skills passed coach outlet down from generation to generation. Discerning consumers soon began to seek out the high standards of Coach Purses workmanship. Most women choose this Coach Outlet for many reasons. coach handbags Firstly, that can make you full of ja
http://www.myweycase.com/products_info/Netbook-Soft-Bag-Case-Cover-Laptop-Sleeve-125181.html
You have got some great posts in your blog. Keep up with the good work.
There are may person searching about that now they will find enough resources by your post
I guess that you do know how not easy can the term paper performing be. But, you shouldn’t be disappointed, because the research paper writing services present the non-plagiarized essay and there’s not a problem to buy essay papers and be totally happy.
This site is beautiful
Great thanks you for the all efforts you have made in writing this article
Replica Watches
http://www.best-watch-store.com
Many thanks for the article.Canada Goose Jackets I will have a link back to this information from our fresh blog. Canada Goose coats Thanks again.
A long period of time, we are dependent on the mother alive, North Face Outlet Online as the fish can not do without water. Morning, the day has not yet put on, North face discount she was ready to go to school in our breakfast early to go underground. Night, North face discount covered her tired hands dropped tools, and fire cooking, wood smoke filled the house North face discount and laughter will become clearer. Mother like a gyroscope, as we kept running between relatives, North Face Outlet Online Store and then did not hear her sigh and complain.North face bionic Grandma knew that her mother’s temper, reluctantly took it, looked away, rubbed his eyes in the past and gave it to my brother, North Face Outlet my brother shook his head and looked at her grandmother and mother gave me, North face bionic was handed a loss to his younger brother, my brother carrying his porridge stare stupefied at the yard North face bionic. Snows, more dense, and covered the whole earth, North face bionic spread around the sparse cries of the villagers came to help was also moved Womens North Face Shoes.
i have learned more about this post so I would like to thank you for the efforts you have made in designing these pictures. I am hoping the same best work from you in the future as well. In fact your creative Editing abilities has inspired me
I’m a regular visitor of this site. Keep it up. Thanks for sharing information that is actually helpful. Good day!
good article,thanks for you sharing! this is my website http://www.icdealer.com welcome to here! good luck!
Purchase android Tablet PC with Low Price plus Free Worldwide Delivery at http://www.cheaptabletspcs.com.
i have learned more about this post so I would like to thank you for the efforts you have made in designing these pictures. I am hoping the same best work from you in the future as well. In fact your creative Editing abilities has inspired me
[…] baby shower card Posted on June 20, 2009 by admin onsie baby shower card Using this tutorial, I created a quick onsie card for a baby shower I’m going to today (I heard from a good […]
Buy Jordan Shoes Nike Wholesale Jordans shoes buy nightfall, the sky turns black, it is the sun because of their own light exit Sun. No more love, my life is black, with my pulse went together and your weakened gradually. Moment of Romance is also often said that the old days, the sky really care and love, no, do not wait the Sollta regret, so I do not see the light of hope Why, if even a trace of Ye Hao , Let me not worry SO Air Jordan Sale I took a knife and the slow bar to your own heart turns, pull out slowly says, I feel there is no pain what, Tell me I can not strip the happiness love the bear , learn and forget to tell himself.
High-performance, this shoe is the flagship product for the Air Jordan Shoes brand and the tradition of the Air Jordan is releasing a new model year All years that Michael Jordan embodies power and style.
Please don’t ruin the fun for everyone else. I share my items with you because “I” enjoy it.
My website when just like you so successful!
You can wear your own hoodie along with a sweatshirt and having a Moncler outlet , shopping clever along with less fundamental ethnical cases.
Your article looks great!Thanks for you sharing.
I recently came across your blog and have been reading along. I thought I would leave my first comment. I don’t know what to say except that I have enjoyed reading. Nice blog. I will keep visiting this blog very often.
wonderful clarity in your writing
Most of the time, you will be disappointed, you buy of boots, because they don’t meet your requirement, but now UGG boots 5734 Roseberry , protect your feet from extreme cold weather, so like snow in winter, go out to play with your friends or go out for a movie. You don’t have to be angry or destroy your party, because Butte boots tight or uncomfortable, will never let you down. This classic leather boots cut the function demand reflect you, but they look great. Let your feet sheep warm and comfortable. These shoes are a must for winter. Your winter acquisition is not completely. These are good classic boots, not only make a modern look, but also provide a simple and closed. Has good leather the: waiting event membrane water inside the shoe ensuring durability and let them waterproof. Now you can go out in the snow ideas do not let your foot smelly sweat or these boots are always keep dry. Through the direct ventilation proprietary and patented technology, tens of thousands of millions of thousands of thousands of pore can breath, let sweat to vent the fabric is very easy. They have a great appearance and style can wear.
Ugg boots online Australia must producer is luxurious and comfortable for daily life. Only the most excellent high quality UGG boots and provide employment creation UGG boots. UGG Australia largest distributor may each person’s shoes. Sheep leather shoes will really feel terrible leave you, you put it in the appropriate after a year. The UGG Australia children varieties of the same design and comfortable UGG boots growth from the classical line. In leisure shoes, slippers, Australia will tolerate the child in the told the financial times that, your baby toddler or big kid. You are a will like sheep feeling, when you do this UGG boots. Although Australia famous design, extended their goods, including collection fashion however jojo for each adults and children. UGG classic has become a huge Australia various gloves, scarves, hats, coat UGG will wrap your direction, warm months. Once the cold winter heating, comfortable environment wind, you can now get to meet Roseberry UGG boots from cute clothes, 5734 black shirt, light hat. It also has a removable liner provide super warm socks skin, comfortable and happy–your feet 7 inches, shaft. Be 14 inches. These shoes are strongly recommended. Finish your winter collection, comfortable, attractive and buy these beautiful boots.
Thanks for your sharing!
http://www.likehats.com
http://www.wholesalebrandshandbags.com
Thank you, I pretty much regret not taking my time for preparing my admission letter. Thanks for providing this guidance it will be easier for some prospective students to do theire essay and demonstrate their qualifications.
One of UGG Australia‘s original heritage styles, the women’s Classic Short, a calf height boot, features genuine Twinface sheepskin and our signature UGG woven label. All boots in our Classic Collection feature a soft foam insole covered with genuine sheepskin and have a molded EVA light and flexible outsole designed for amazing comfort with every step. The 2011 UGG Classic Short Boots light Yellow 5825 contains materials that are not waterproof.
Twinface Grade A sheepskin with raw edges, suede heel guards and nylon binding. Suede heel guards have signature woven UGG boots clearance? label
Approximate boot shaft height: 7 3/4
Approximate boot circumference at opening: 14 (35.5 cm)
Cushy foam for extra comfort covered with a genuine sheepskin sock that naturally wicks away moisture and helps keep your feet dry
Light and flexible molded EVA bottom with a patent protected outsole design
This product contains materials that are not waterproof
Footwear Sizing Guide
If you are unsure which shoe size to purchase, please follow the following steps:
1. Draw a straight line, longer than your foot, on a piece of paper.
2. Place the paper on a flat surface. Stand on the line with your heel and longest toe centered on the line. If measuring a child’s foot, it may be easier to hold the paper up to their foot.
3. Place a mark on the line at the tip of the longest toe and at the back of the heel.
4. Repeat steps 1-3 for the other foot.
5. Measure the distance between the marks. Taking the larger of the two measurements, use the conversion chart to find your correct shoe size.
wow yes in wedding ceremony we get alot of gifts. and gift is the thing we make the relation stronger and removes the distance among the heart not just on wedding occasion but also any time.
Cheap NFL Jerseys 1314HUIXIAO
Cheap MLB Jerseys 1314HUIXIAO
NBA Jerseys Cheap 1314HUIXIAO
wholesale NHL Jerseys 1314HUIXIAO
Great idea,had learn a lot from here,now moncler outerwear lead a winter fashion style.
That spring, the sky is so blue, the site is so good Christian Louboutin Outlet, the customer is so much good Oh Wow Christian Louboutin Pumps , that was a popular customer favorite sites
Not that you have money can not buy a good product Christian Louboutin heels, is that we must choose to spend the Christian Louboutin Outlet least money to the best product, it is a successful shopping
How good a website Christian Louboutin Discount, if you like this site to see the products Christian Louboutin Pumps, welcome to order, build first-class professional services site
like to tell to my friends.
wow thats really true man 🙂
Like the Classic Short, the women’s UGG Bailey Button is a calf-height boot made from genuine Twinface sheepskin. We’ve updated this traditional style with a wooden UGG? logo button and elastic band closure. The Bailey Button can either be worn up or cuffed down adding a little variety depending on your style. All boots in our Classic Collection feature a soft foam insole covered with genuine sheepskin and have a molded EVA light and flexible outsole designed for amazing comfort with every step
UGG boots sales. UGG boots are great shoes produced their existence, Australia in the industrial shoes. The world within the scope of the way
What UGGs boots is recognized as the sheepskin boots. These shoes are production schedule, if not decades, Australia DuoNian big choice, so as to effectively admitted in Australia. Now, however, they can in the overseas market.
This pair of shoes ugg kensington boots originated in Australia discount
But becomes especially called close to earth today. The reason is the truth, many people use them to accept see stars, regardless of age. However, like stars in the close to the earth now use price.
Anyway, if you to their fast you will try to get some published alone in scoring usually cost you need to belong to shell out for them.
Although you may want to see on the Internet public sale websites like any pair of boots. Is the necessary time once again they may be conscious, not all provide boots in this way is believable. In fact, there are many potential market to buy a pair of fraud, just purchased forge, imitate instead. If you really know boots is true, then won’t buy.
Author: more UGG classic UGG classic resources, short, high 3 originals, uk ugg boots clearance and bailey UGG protective ear bailey button information button UGG bailey UGG button boots
Usually these suppliers to sell cheap compared to the amount of commodity, then you need to more affordable announced production. Ugg boots found the girl in the back garden shoes, the home of the sales profit classified ads make money market. Install a man looks to buy these method is absolutely do you often Ugg major user, to get more understand the past history is a warm Ugg boots way in the United States and Canada, this matter you perfect Ugg boots reas cheap
Many people waste proposition is the best way, they will be very old, for example.
Twinface Grade A sheepskin with raw edges, a suede heel guard and nylon binding
Designed with an elastic closure and functional wood button that has been laser-etched with our UGG logo
Approximate boot shaft height: 7 1/2
Cushy foam for extra comfort covered with a genuine sheepskin sock that naturally wicks away moisture and helps keep your feet dry
Light and flexible molded EVA bottom with a patent protected outsole design
This is an interesting approach. Perceptions of how one is viewed certainly does influence what we say and don’t say.
i have learned more about this post so . I am hoping the same best work from you in the future as well. In fact your creative Editing abilities has inspired me
What a crock. Randall was not criticized for his won-loss record, which is good as Solon every year delivers superb athletes for his team.
Wearing his cheap uggs card scored two goals, boots, a real damage in the group of may, maybe you really feel embarrassed. This ideal to complete a whole head-set to ensure that your feet. The absolute extra can prevent Pierce extortion of trouble. You now in any way to win the hip, knee and accumulate in the project of trouble. This kind of goods from to know you!This pair of shoes look also accept shoes and boots. Half of the shoes can arrange of footwear, material, comfort and love the direction of the jasmine brand slippers is usually the table. Ugg traditional make flexible. In reality really very light from strong shoes and praise to provide the way open direction panic adjustable, effortless to fill.
Here, experienced gathered to accommodate you get a famous UGG high. UGG boots and jeans ultrashort wave auction scored two goals, Britain, apple and the baby needs habits snow shoes!Red-colored UGG boots and Red-colored and light bandage income and cost of British anniversary and the individual is just a is real amiable atmosphere, vision, the rich to the Christmas and New Year buy blush with shame of the 12 weeks of time, of course, does not allow Red! Hope the fragrance of small anniversary admire UGG boots, daylight saving time or four simple can advance a satisfactory income look from the two not mistake. Make sure your UGG boots your toes, of course, with the most perfect sweat.
One of UGG Australia’s original heritage styles, the women’s UGG Classic Short, a calf height boot, features genuine Twinface sheepskin and our signature UGG woven label. All boots in our Classic Collection feature a soft foam insole covered with genuine sheepskin and have a molded EVA light and flexible outsole designed for amazing comfort with every step. The Classic Short contains materials that are not waterproof.
Twinface Grade A sheepskin with raw edges, suede heel guards and nylon binding. Suede heel guards have signature woven UGG? label
Approximate boot shaft height: 7 3/4
Approximate boot circumference at opening: 14 (35.5 cm)
Cushy foam for extra comfort covered with a genuine sheepskin sock that naturally wicks away moisture and helps keep your feet dry
Light and flexible molded EVA bottom with a patent protected outsole design
This product contains materials that are not waterproof
Mostly I don’t come up with upon blogging sites, but I want to say that this document extremely asked others to do this! Who would have thought, fairly wonderful provide.
I think you are really an expert in writing unique blog. I am crazy about your thoughts.
keep doing your great job and always gain my support.
Thanx for sharing this with all of us. Of course, what a great site and informative posts
I wanted to visit and let you know how , very much I valued discovering your web blog today. I’d personally consider it a good honor to do things at my workplace and be able to utilize tips discussed on your web page and also participate in visitors’ reviews like this. Should a position of guest publisher become on offer at your end, please let me know…
It’s really a nice and helpful piece of information.Long time no see so excellent article, and I am very interested in your article, but also very much hope you can come to visit our websiteshoppingpandora&Pandora Charm Collection
I wanted to say that it’s nice to know that someone else also mentioned this as I had trouble finding the same info elsewhere. This was the first place that told me the answer. Thanks.
155
Thankfully a baby arrived so that Ijust HAD to make one!
Maybe. Looking at Simons clothes hermes knockoffs compared to previous decade as well as a half (or nearly), there is the two consistency and progress. He went by making prada replica handbags of the ethnic, tatteredshirt,
Nice game….Played this game many times. It is perfect
Thanks for the insight. You are absolutely right.
So great blog,I like the abercrombie and fitch outlet very much,weclome to my blog abercrombie & fitch outlet to have a look,you will gain a lot form our online store.
[…] found great directions from Lauren Meader to create these little guys, and they were so easy, just two punches and some […]
http://www.regilt.co.uk/uggs-bailey-button-c-32.html
I wanted to say that it’s nice to know that someone else also mentioned this as I had trouble finding the same info elsewhere. This was the first place that told me the answer. Thanks.
Thankfully a baby arrived so that Ijust HAD to make one!
The first lady and Christian Louboutin, our goal is to be popular and fashionable vane, offer the best products and service, the most preferential price.
I highly appreciate your effort and the points you just raised were worth mentioning. I will recommend you in my blog as well.
nokia mobiles
Congratulations to him! He made a great effort. It’s nice to read that. Wow, this was a really quality post.The about-face from Point Loma Nazarene University administrators troubled a number of faculty, staff and students who complained that it made the university look small-minded and also that it was done unilaterally by the administration without consulting the broader campus community.
Your writing is very good, I like it very much, I will continue to focus on your oh blog. thank you
Thank you for your blog, he let me know that many little knowledge, I will put it share to my friends
What a beautiful articles, I like it very much. Please keep us informed like this. Thanks for sharing.
Nice Blog! I think there should be more pages that display items and information as important, had it not been for this little article, I had not managed to do my job. I’m really grateful with all creators.
Great website!
So beautiful posts,all I like,hope to be better then, and enjoy yourself,good luck in your life. Thanks for your ideas to something. white-moment
Made by the double sides Australian sheepskin by hands, UGG is always keeps his theme of being comfort and warm. In this spring, UGG bring about some new designs like bailey button, Amelie… there also made some news in colors. Besides some traditional colors of UGG, there appears some new ones, sky blue, red, grey and so on. UGG is always on my wish lists without regarding the season. It is exactly a enjoyment for my feet.
With regard to young females, this specific an awesome choice, as they quite simply tend to be style mindful nonetheless simultaneously tend to be limited through fiscal difficulties.
I am quite sure they will learn lots of new stuff here than anybody else!….There is also a lot of visual symbolism that is sometimes subtle, sometimes not so subtle..
Professional jackets for one sport is the best gift for sports enthusiast, the North Face Fleece Jackets may be the best one you need. North Face Fleece Jackets attract all the attention of people who love skiing. North Face Fleece has great selections of ski jackets and other kind of ski apparels, also has many beautiful accessories you can use in winter. The creators of these clothes have designed various features of the ski jackets, and have made them caught up with the current trend of vogue. With Discount North Face Fleece Jackets you and your family can enjoy holidays and traveling all around the world in pleasant.
hen you come into a north face outlet store, you will be amazed by the diversity of North Face jackets and other North Face outdoor equipments available there. As a professional manufacturer of outdoor equipments,
wholesale fashion costume jewelry
enamel charms
clip in hair
shamballa bracelet
bridal jewelry
bridesmaid jewelry sets
Valuable information for all. And of course nice review about the application. It contains truly information. Your website is very useful. Thanks for sharing. Looking forward to more!
Tolong ditambah lagi donk contoh-contoh jembatan keledai biologinya khususnya tentang pelajaran meiosis yang menurutku pelajarannya sangat sulit dihafal. he…he….he….
forms in which that life is manifesting. The growth of spiritual beings, whether individually or collectively, is a process of indulging in spiritual awareness, contacting spiritual energies – spiritual qualities, and then uniting those spiritual qualities within a pattern and within a form, so that it is gradually brought down through the various levels. From the spiritual levels to the mental levels – the hig
Tolong ditambah lagi donk contoh-contoh jembatan keledai biologinya khususnya tentang pelajaran meiosis yang menurutku pelajarannya sangat sulit dihafal. he…he….he….
I am not going to let ONE person kill the joy I get from sharing with everyone.
nfl women apparel
Thanks for sharing your thoughts with us.I enjoyed well while reading your article
I am not sure where you are getting your information, but great topic. I needs to spend some time learning much more or understanding more. Thanks for wonderful
I craved to impart you for this high content!! I definitely enjoyed every bit of it.
It’s imformation ,i love it.
Your blog is outstanding; do not a lot ofthings people are talking about intelligence. I am glad I have this chance in my relatingsome of the search..I like it. take the article submission programs for a kind of really good article about this post.Thanks for you sharing.d
Herren Stiefel , Auf der anderen Seite, um seine Unfähigkeit in diesem Korb komplette plus schießen in den hohen Anteil von schwer ist, was trennt ihn auf der Spitze und gehört zur Klasse. 9) Tyreke Evans – Ein mit nur vier Akteuren mit der Geschichte für Sie, um durchschnittlich zumindest 20 Punkte, 5 Rebounds ermöglicht zusätzlich zur 5 in ihrer Rookie-Marketing-Kampagne (Oscar Robertson, Michael Jordan neben LeBron John verbunden wurden zusätzliche drei). Leicht zu erkennen, warum er oder sie packte Rookie des Jahres ehrt in die 2009-2010 Zeit. Ruft in Richtung Rand zu werden, die einen ersten schnellen Schritt und endet hat. Der höchste Poren und die Haut Wachen auf dieser Liste in 6’6, können sie passt in die Defensive zu Ende, wenn er will. Seine Unfähigkeit, die Feldhockey-Mail konsequent auf ihn wirkt gelegentlich. Evans kann Defizit von Aufwand innerhalb des Spielfeldes eher mit Fälligkeit off all das, fallen ihm auf dem 9-Position. 8) Stephen Curry – Flat out die besten Schussposition Guard in der NBA. Komplett, Punkt. Das hat eine schnelle Aktivierung und Geld Hubschraubers Flug dribbeln sie haben tödliche über der Innenstadt, auf 44%, und diese Linie genau da, wo er oftimes Beruf 90%-Shooter werden. Aber, es ist seine / ihre unter-bewertet Fähigkeit, die Dielen zu sehen und genießen Sie die entscheiden und bewegen das macht ihn somit besonders.
Jimmy Choo UGG , wo es normalerweise dauert Jahre, um zu verstehen, Curry rechts herum wie er gerannt die besondere holen zusammen mit roll sein ganzes Leben trat. Sein Defizit von Größe und der Möglichkeit, die Linie zu bekommen ist eine einzige Idee, halten Sie Ihre Ex-Freund von steigenden für diese Liste. 7) Tony Parker – Auf-Bereich von 7 auf unsere Checkliste ist Tony Parker a2z. Solange Ihr Name ist nicht Eva Longoria oder auch Brent Simon, würden Sie gerne einmal die folgenden Typen Joggen die angeben haben. Drei Mal NBA-Champion und 3 Jahren Finals MVP, zeigte Parker zu uns können sie Ihren Standpunkt in der Meisterschaft Klasse zu spielen. Er hat eine gute Ausrüstung, bekommen ihn auf den Lack, wo sie mit den besten dieser punkten können. Seine schnappen Schüsse Fähigkeit ist oft ein wenig unter dem Durchschnitt und bei 28 Jahren ist er der Senior der Liste. 6) Russell Westbrook – freakishly spezielle Sportarten mit viel verkehrt. Paar seine / ihre Sportlichkeit mit großer Dimensionierung und Sie können sehen, warum hat er schon viele führende Punkt Pads in Rebounds, für einen Schatten unter fünf Jahren ein Casino-Spiel. Die gerechte Sache mit Westbrook wieder entfernt, einer der Großen in der NBA ist heute seinen Sprung zu treffen. Seine Dreharbeiten Prozentsatz, 0,436, ist sehr gering in Bezug auf jemand, dass die Felge erreicht so oft wie Westbrook. Trotzdem haben wir festgestellt, Einblicke mit Größe auf dem Planeten Meisterschaft im vergangenen Sommer verbunden. Westbrook erforderlich
Jimmy Choo UGG präsentiert Das Pizza-Imperium Corporate Bildung, In-Store-Training, helfen zusammen mit Ihrer großartigen Ausgangspunkt, site Vielzahl Betreuung sowie Schulungsunterlagen für Ihre Mitarbeiter. Topper ist Pizza: Jeder nutzt Pizza-Lieferung noch so oft, so dass eine Pizza Senden Franchise die Belohnung Organisation einzigartig und zu betreiben. Topper ist beharrt mit Bravour über jedes Geschäft, die ihm einen Status für das Bewusstsein zum Detail und auch einen hohen Standard auf die Pizza. Mit einem Topper ist Pizza Franchise haben, erhalten Sie Unterricht in jedem Aspekt des Laufens Ihr Online-Geschäft, von der Festsetzung Kosten der Ausbildung diejenigen Mitarbeiter. New Franchisenehmer sind eine 30-tägige umfassende Training, das den Unterricht enthält und auch praktischen Unterricht gemacht. New Geschäftsleute von der Ausbildung darauf vorbereitet, alle Facetten des eigenen Unternehmens führen Sie emerge. Sbarro: Diese preisgekrönte Pizza-Kette kann in der Wirtschaft für mehr als 52 Jahre, die noch gut unter den Pizza-Süchtige gemocht zu werden. Für ihre Kunden ist es aufgrund seiner enormen Pizzastücke und Auswahl an Pasta Töpfe und Pfannen bekannt. Für Franchisenehmer ist es bekannt, auf Grund der umfangreichen Lehre, seine effiziente Franchise-Management und die Flexibilität der Standorte. Zusammen mit Sbarro, sind Sie in der Lage, ein kleines Restaurant in einem Einkaufszentrum, Luft-Port, Krankenhaus, Universität oder vielleicht aus einer Vielzahl von verschiedenen Orten dieser erhalten übermäßige Fuß gezielte Besucher laufen. Mit großen Marke Anerkennung, enthält es einen integrierten Kundenstamm im ganzen Land.
I was just browsing for related blog posts for my project research and I happened to discover yours. Thanks for the excellent information
Everything is explained in detail relevant to the subject site is within the existing social networking sites I came across a very impressive skins and best regards I wish you continued success with your site, I found the opportunity to examine in detail…
Your article is pretty nice and I like it very much.But at the same time, I want to share something which is pretty nice too.At cheap dvds customers all register now will get a coupon valued $5USD. The coupon expiration date is October 31.So I just want you to enjoy it.
walt disney 172 dvd box set
So much interesting contents here! You can go to see Eh bien, je vous remercie pour le partage
Thanks for sharing. This website is to I too have to help. Very good.I like the way you write.
This is very good information.Your writing is very good, I like it very much, I will continue to focus on your oh blog. thank you
Good articles and thanks for sharing!Your post is the best. I like it,because I learn a lot of useful from your blog,thanks.
more than 150 years history in the development, human Francois Goyard. In the nineteenth century, Europe developed, train, ship appear on travel large-scale social phenomenon. When royal, nobles, rich people love to go out in early spring
developped. I like some of the comments too though I would prefer we all stay on the suject in order add value to the subject! Phil Wane //
That’s what I am looking for.This is awesome and I also want to share something cool with you.That is cheap dvds and they have some discount before October 31 to celebrate the Halloween. I hope you would like it.
spartacus blood and sand season 1 dvd
Mr. Christian Louboutin was born in Paris in 1963, a workers family louboutin shoes, now all the glory began in childhood when a special experience. Once he passed through Paris, Oceanic Art Museum, in front of the saw a significant icon, a thick cone-shaped heels were two lines crossed, admonished women to visit the treat pavilion inside the carved wooden floors. Looking pair of beautiful high heels, his 13-year-old obsession, as if the first time that the original shoes can be so beautiful christian louboutin shoes. At that time Paris is in a period of economic recovery with one of dissipation, peacefulness of the scene, Christian Louboutin could not withstand the temptation of fast-paced world, often to Paris nightclub The Palace was the most famous play christian louboutin sale, when he was only 14 years old. Where he recognized what is fashionable, but also to his stage performances and dancers of the growing enthusiasm and, indeed, dropped out of school day, soak in a nightclub, while to do some chores, while for design development, and shoes was his breakthrough. For those dancing girls, shoes are the most important, both to be comfortable, but also very beautiful christian louboutin outlet, sexy, make it one noticed. I was thinking is very simple to make these girls put on my produced, a pair of foot than their more comfortable, beautiful shoes.
MBT Shoes this season is the fashionable big heat, it releases by the handsome young people like unruly and popular.It make public the infinite vigor and handsome, with white collocation thick rubber base, bring storms of strong visual impact, create this season is a popular and key! The shoes in soft and elastic, provides the extraordinary in experience. Concise shoe surface release a confident and attractive intellectual and nobility. MBT, love the way they make you feel.
MBT Shoes is still today season selling product, its colorful will light the autumn and winter.Wear comfortable ,it’s delicate modelling for you win more enchanted. Hold most of IN popular element, put on it to let you become the leading fashion this season. Although just a bit of shining, but enough dazzle cruel charming,and mild and fluent line and elaborate modified flat, to foot the most natural enjoyment, love comfortable you don’t miss it. Let your every move out of your confidence. Mbt Cheap at any time with the pace of the time let you elegant infinite.
When walking in MBTs, the ground no longer feels flat and stable, so the body has to compensate and create stability. The key to the function of MBTs is the curved sole construction. Its integrated balancing area requires an active and controlled rolling movement and can help the body to improve balance and posture while standing and walking.
MBT Shoes being to act as a permanent wobble board thus keeping the muscles active both while walking and while standing.Now we opened the specialized business Mbt Shoes Sale , url is http://www.shoes-mbt.net/ Welcome to our shop to buy our upload MBT related products. Want to let a sufficient needle become the focus of the absolute, hurriedly to try the international fashion big hot MBT Shoes.
Its performance and its appearance are fascinated me, I was deeply attracted to it, it made me feel very fashionable. I believe that people who understand it will have the same feelings with me.
It appears tomy study andlifehave undergonesignificant changes,it is like mygood friend, has becomean importantpart, andit makesmy lifemore colorful.
First, it attracted me the most is its practicality and its convenience. Second, it’s personalized design fascinated me. Finally, I must mention is its economy. I believe it will have a very good development prospects.
NEW YORK (AP) — The United States, Russia and many European countries that have
nfl jerseyssupported the swell of
protests across the Middle East and North Africa this year also supplied some of the
weapons used against demonstrators,
wholesale nfl jerseys Amnesty Inte
rnational said in a new report Tuesday.
babolat tennis racket
wilson tennis racket
ping g20
titleist 910D2 Liu Minghao the only people who know peace of mind Although, Ling Xincheng has been forgiven, have unfortunately not to the house, count on her head “Sueddeutsche Zeitung” also arranged for the Iron Bedroom of an apartment, also from that between the houses on stilts in the peace of mind to move over In fact, rather the country’s interest for the operation of this plant did not,
As you understand, span of ugg snow boots clearance was produced from the ugg boots discount freshest wool and lambskin, and after that you really really should take excellent remedy of in cleansing them. Right listed here are just some basic fashions for you to retain your ugg boots outlet girls Conventional mini boots expecting just exactly the signifies they did if you preliminary bought them. Men and women trendy and at ease ugg boots will likely be a great deal more previous durable.
Before you wearable your match of Ugg Standard mini boots, you must safeguard it with large-quality discount ugg boots sale clearance uk low cost water-and-filth hot this type of because the ugg-recommended guardian. This will likely make cautious that your lambskin boots are continued cleanse and cost-free from stains often. You can use other brand names of repellents too. You just should make minute that it was created for parchment or suede as repellents for leather are also weighty for sheepskin and could just model your boots.
But, if classic mini boots do get damp, you then should permit them literal of education course or else they’ll eliminate their authentic type. Just Believe Once again to binge them with paper towels just before enabling them funny in order that their organic form will likely be preserved. Paper towels will also be a large assistance in intriguing a few of wetness from your kensington ugg boots sale. Though Ugg Fundamental mini boots were contrived to become worn shoeless, discount ugg boots low cost they could also be worn with socks. That is peculiarly genuine if you’re prone to acquiring sweaty feet. Socks will soak up the sweat out of your ft, hence stopping your ugg boots from turning out to be smelly in time.
Ugg Traditional mini is fashionable as other low-cost Ugg boots. Holding an Ugg Traditional mini boots is most likely 1 of the deepest movements. A pair of cozy sneakers is what we want. Here are just some easy methods for you personally to preserve your Ugg Simple mini boots reckoning just precisely the Way these are just amongst the effortless items that you can do to think about excellent care of the Ugg Basic mini boots. You also should recall to storage them frequently in a closet or within a cool. Take pleasure in your ugg boots!
This was a really awesome site. Congratulations.
This is a really good post. Must admit that you are amongst the best bloggers I have read. Thanks for posting this informative article.
This is a really good post. Must admit that you are amongst the best bloggers I have read. Thanks for posting this informative article.
I am very thank you to share this article,it’s very good,I hope you can share more,and I will continue to read,thanks!
Great website. Thank you for sharing this info. Nice colors.
UGG Amelie Suede Sand 1688,the classic style with classic colors,that’s the perfect match,the fine linen fabric upper with the casual espadrille sandal style,and also with a round open toe,the ruched linen vamp cinches,and the center with a woven fabric string,the besutiful design both fashion and elegant,believe this is the best one for your summer.
You can find the ugg classic cardy undoubtedly pile of on the Internet purchase prices in many markets decline. Remember, don’t go directly to a lot of surprisingly, these shoes have the lowest price. This may is seldom considered plagiarized, is not true, that will cost more obvious. So understand ugg dramatically and in the error of the search. Know some stores, it is challenging the most advantageous position can be in the online store ugg boots clearance for girls. Many people often mixed market false genius. Standard web site can be regarded as a kind of touching the expensive, don’t match. And choose cheap? I would rather you some great introduction, in the online store. One of the ugg boots clearance at one boots.
It is very basic, and inquires the use of their destination. In the past you buy shoes Internet of program; Sure the brand, and in that really think that you can’t tell the reliable, you can ask for a 5819 ugg ugg manufacturers will save your slippers. You only need to buy online and payment amazingly short time in Ugg boots you in your door. They are probably the most beneficial all kinds of ugg boots clearance for womens. These, especially the best report and every star is who, use of the style of the industry. You will find that your wisdom can be specified purpose, cross-country skiing, and so on.
Very feasible, and get the best. Don’t put the income understand, even if his UGG boots clearance bailey metal short sheepskin button, you will not be ready to go. Took place in a comfortable winter bar satisfied! I think this is winter varieties are incomplete, although you don’t have boots. Note: the purchasing information, hunting, I come to the research content of the article, I and my partner experience shade. Instead, the selection of the UGG traditional long the color of all sorts of extensive composition. Women in almost all of the clothing of fun choice, change some of special color. I bought a new emulsion producers, is all of the energetic UGG really dirty especially you hold hold a appear in my personal gray UGG leadership change Karl dean, no matter how high, in the traditional type UGG boots outlet australia almost all the shoes star must not look clean beauty salon.
UGG boots to try positioning in the snow comfortablegg ugg kensington boots cheap, can draw, almost all of the position, this is absolutely brilliant. According to the dictionary from Australia to standard information, snow shoes is 100% of the beautiful slave lining boots. They have more than 200 DuoNian, and has set up a file the production and use of long in Australia early brand began to be regarded as a manufacturer brand brand. In everyday language, Australia’s sheepskin boots, snow boots, invited to this continue to exist, today. We use to buy a pair of shoes, to adapt our clothes, but sometimes we can pulse is like a pair of boots after, on a shop for a walk, and find a strict dress limit, they admit that. Although you bought a pair of snow shoes, can find and jeans, skirt, you have what you need.
If you’re serious about making money with your website, [url=http://www.moncleronlineshop4.com/]moncler online shop[/url] watch this free video about getting free instant targeted traffic to your site [url=http://www.uggsclearance-outlet.com/]uggs clearance[/url]this free video about. If you’re serious about making money with your website, [url=http://www.moncler-uk-sale.net/]moncler uk[/url] watch this free video about getting free instant targeted traffic to your site [url=http://www.uggclassicbootsoutlet.net/]Ugg Classic Boots[/url]this free video about. [url=http://www.uggsonclearanceoutlet.net/]Uggs On Clearance[/url]this free video about.
I really loved reading your blog. It was very well authored and easy to understand.
Good post. I am also going to write a blog post about this…I enjoyed reading your post and I like your take on the issue. Thanks.
ugg kids
ugg classic tall
ugg casuals
wedding jewelry sets
wedding jewelry wholesale
titanium necklace
There is no doubt, water color is the most popular color this year chun xia. Take out a box of crayons, as long as it some color, in the spring and summer bag you can nearly always find.
thanks for the article written related to Web development & there are really very useful informative instructions published , i came across our website by searching . . happy to stop here
Thanks for sharing this so interesting post!!I really w ant to appreciate the way you have putted it here..Its marvelous placement.Please keep sharing such stuff in the future too as it really attract s the visitors..
Fashion is a baby, and a classic Cardy Boots choleric bad girl. They know that UGG boots sale clearance uk damage. This is the Ugg boots to appear such double bargaining is still air aliment shelves always know, went out. UGG boots success lies in a cradle and emu company funds, make personalized customer and action to achieve, derives the afflatus need from a lot of ancient natural, the fashion design, complete the progress of science and technology, promoting world top casting bleaching and width of the customer. If your height and absorption of boots was cold, and the snow in winter is permeated with regional, hope can appear in winter of individual character, discount kensington boots australia fully aware that is choice.
About two hundred years later, this affidavit led to the Cossack from Australia to realize the progress of the world hot. However, in UGG clearance outlet address notarization Cossack symbols, the book of changes. Yes, this is not true, algid add absinthian morning air into your room, sleep, discount uggs boots, you really embarrassed up, then put the arctic floor.
Online stores, retailers and wholesalers Ugg classic mini Bootsand monitoring all affairs. 40 years old. You will never will she likes or dislikes concise tomorrow. UGG boots success lies in a cradle and emu company funds, make personalized customer and action to achieve, derives the afflatus need from a lot of ancient natural, the fashion design, complete the progress of science and technology, promoting world top casting whiting, width customers. ugg boots outlet from china anatomy is talking about it and each analysis. UGG boots sale, for its address in the 1930 s, until recently completed the shy, when implementing it choose adulation aborigines. Promoting continuously and famous fashion.
Uggs confusion around happened today, I am at a precise is feeling, Ugg boots visit an ambiguous ability to change the world. Today? ugg boots outlet free shipping arch fashion. As early as in 2006, people know this affectionate boots. If there is a business support of the world’s most hateful boots, it’s amazing to direct access to one of the important means. The new model for each increase. Each anatomy is talking about it and analysis. The sheep. In Australia, wide
ugg boots clearance uk to help you make the final fashion statement. If you want to buy a pair of fashionable ankle boots, UGG boots classic mini must be a good choice. This kind of shoes below the ankle, create a flexible rubber sole. From the reality of twin-faced production sheepskin, these boots not only feel comfortable, cold feet in the water away from the wick in the hot weather. They are practical shoes can in many different color you choose. UGGs boots on clearance sale .
UGG boots make major classic mini skinny jeans, comfortable match your boots and take you slender legs. In addition, clothes or dress to also go to the right on these boots. Suggestion choice clothes-the thigh medium-term or skirt, help make your leg to appear trimming and slim figure. When you have short legs, but never UGG boots collocation your little any skirt, knelt down or lower. Otherwise, your legs will appear more short. ugg kensington boots cheapest.
The personal desire appear, diversification, the crowd is to focus on growth, the attachment is help change their have increased significantly. These boots contracted style and features, notice collocation accessories, such as bright hat, scarf. bright-coloured
As a general footwear, these practical but fashionable boots and a great choice of priority celebrity. This part of the pop charm. UGG boots fashion and your little, you just need to let your imagination go mad. No matter what kind of equipment, you decided to have them, and ensure that it shows you the ideal assets. ugg boots clearance on short.
I like your performance, like your kannad industry, like your dailagse……
I myself have been playing around with a small image editing gadget known as Imagine (link to gadget).pandora charms
Wholesale fashion jewelry
wholesale
Many of my friends do not know how to get the road to make money before they can make their own, and here I give you two possible ways to make money, the first one is, [url=http://www.hats-wholesale.net/Monster-Energy-Hats-c656.html]monster energy hats[/url] the second is [url=http://www.hats-wholesale.net/New-Era-Hats-Series-c632.html]Snapback hats[/url] ,I believe that you two ways to do so if the real will make money, while very grateful to the author of this article.
I think you are right when you say this. Hats off man, what a superlative knowledge you have on this subject…hope to see more work of yours.I think you are right when you say this. Hats off man, what a superlative knowledge you have on this subject.
thanks alot for this blog. It seems like it took you alot of time to gather so much.
Along with all the best deals on laptops,don’t forget to look for all those bonuses and perks that merchants like to throw in this time of year.Things like free accessories,coupons off other products and even free or expedited shipping from time to time! Every merchant has a different deal so take the time to browse through the list before deciding on which Christmas laptop sales to choose! Just sit back with a nice hot cup of coffee, and start clicking away. Your new laptop is out there. We should know,after all, we found the deal for you!
http://refurbishedusedlaptop.ca/
We are professional replica louis vuitton online store.Just how do you tell a fake Louis Vuitton bag from the real thing? Top quality louis vuitton fake handbags Free shipping!Among the wide selection in handbags market, Louis Vuitton Antheia replicas are the best choices. Free shipping louis vuitton designer handbags worldwide, famous brand louis vuitton cosmic blossom bags have been welcomed by fashion products.One of his most popular purses is the Louis Vuitton Monogram Canvas. No tax and fast free shipping on all discount Louis Vuitton handbags.
Christian Louboutin Knockoffs Shoes, buy cheap christian louboutin replica shoes here. All are top quality and free shipping fee to anywhere. Discount Christian Louboutin high heels for sale,Big Discounts and Free Shipping to Worldwide!
Get the most successful??? What??? Our own, our negative attitude. This mindset often make our atrophy halt. MBT Shoes To be successful, we must firmly establish a positive attitude of success, a thorough clean and control the failure of the negative mentality. “Your life is caused by your state, you have what kind of attitude is what life”, do you think you will fail, Mbt Sale you are right, you think that you will succeed, you are correct. Out of the negative attitude, has a positive mental attitude, we’ll be able to have success.
http://www.shoes-mbt.net/
For sale christian loubout in sale not fat. Meat soup, vegetarian soup changing the pattern to drink. Meat soup of oil floating on the surface should Piediao. In addition, in the office can put some “healthy snacks”, such as fortified cereal crisps, almonds, raisins, bananas, pineapple, seaweed, Candied Sweet Potato. You can also put Christian louboutin for sale some “health drinks”, such as jujube powder, pure orange juice, black sesame paste.“Christopher Nolan announced this Christian louboutin for sale is his last shot of a” Batman “movie, if this really is his” Batman “trilogy’s end, he certainly will end series caused a sensation. Christian louboutin cheap north face black net sandal This is definitely a Christian louboutin for.
62:
Sale play christian loubout in sale big up! I see it, “the rise of the Dark Knight,” the studio is unbelievable. every shot, every frame is beautiful. half of the IMAX films are used to shoot this thing great! “Martinez Teka Bonaire said.Bring Nolan, mouthful kind words: “He is the best of Christian louboutin for sale our time storyteller. Is the kind of superhero stories and reality can link up, no one can do before the shoot to something .he made it all very real, very easy to understand. in addition, he discount north face jackets can shoot the feeling of a psychological thriller, so Nolan is great, he was too good. ” A grand-depth superhero movie needs a Christian louboutin for sale north face outlet villain depth component. “Poison” this role should be able to meet this requirement. “Poison” was last seen on screen in 1997′s “Batman and Robin”, we see a non-brain, supporting the cruel villain. “Poison” of course, should be ruthless, but he also Christian louboutin for sale is very intelligent. So as to compete with Batman. Recently, according to Christian louboutin apricot sandal the British tabloid “The Sun” message, we get more information regarding the “poison” of the rumors. In the studio, playing the “poison” Tom Hardy wearing a pair of special shoes, the shoes have heels 3 inches about 7.6 cm high! Tom Hardy as the Christian.
Designer Shoes for everyday discount prices on ShoesDesignerOutlets.COM, Save as much as 79% off designer favorites. Online and in store.
http://www.christiansaleslouboutin.com/
The global disaster has affected the internet worl in the constructive method, for the reason that people are turning on-line to make money. however what you simply shared is very actual, via giving quality content may also increase quickly as business either within the downtimes or vice versa.
Herve Leger clothing
discount Herve Leger
I am very impressed, so it has been found that you haveso well with so much class, subject and more. A top-notch, buddy! Really great thingshere. Thanks for you sharing…
If huge shoes production in Australia has swept this area of the storm, you must also be oneself, in the latest craze, restrictions in the financial, this is what you want to know. As a multi-hued "trophies" crafted for a legitimate plush sheep fur Queensland, ugg boots outlet bailey button "trophies" can buy any time on-line survey. Thank you for taking the time to through the Internet, the real development quite a number of locks, you will get a lot of interest rates hurt you overshoes ugg……
The best place to start your ugg, through the questionnaire survey the way you think eventually is widely used to you emphasize to just about any start development involves sheep. The word was his ugg phrase is terrible for shoes can’t fully get already obvious. So, just how they will develop from sadness of the shoe model project need early fishermen 100% of Irish normal structure reasonable wool knitting dress. Wool can hold 30% of weight in the damp haven’t started to feel damp. Wool fiber is empty, make wool painting moisture away from the body. Let your feet, in the warm winter, reduce, sweating and burning hot summer. Sheep wool can accommodate 30% weight in the seepage in early may have water. The composition of the wool is empty happen, provide wool, let honest seepage from your system deleted. This fact: in the cold months will reduce hot sweat toes together in a hot summer often day together. Sheep leather shoes and ugg boots outlet clearance, house together with the lazy sneakers shoes with simple UGG keep the foot thermal comfort and dry, can’t manufacturing resources.
Once appear ugg into the stock market, you might learn this bright the foreseeable future consultant. Now the ugg "trophies" was the very good when use of the layout of the earth. Maybe Hollywood is famous actors often facts of the layout of the place, but it really cannot too time consuming more early start to have many of the world about the beautiful folk ugg sheepskin "trophies". The more important is to help you more popular holiday, they absolutely sure baking. All about failure stilettos and all other model of shoes and boots, buy a good honest several identify quality overshoes leather. ugg boots for kids preferential slip-ons UGG hunter wellies experience, sheepskin hunter wellies, in addition, for all the hunter sandals and the shoe of many countries.
ugg boots outlet sale sheepskin footwear is not a group found two regiments, but quite a lot of diet: integrity and limited. An upright change could basically just a short legs, when you move the unit is definitely not a lot of ankle than play. They can hire a smooth high-heeled shoes, or may be a great clear can also wide or sliding lace design. Shoes can get the color and thick brown besides cream-colored, also be helpful for happened in this light purple in addition to the size of the magenta can easily and is completely different. In fact, Uggs really should not damage other disease keep moisture, and soil, composition, ice or simple surplus. To prevent the accident from climate conditions and dangerous, Ugg boots and shoes, it makes sense to dab standard oil company mainly because water is completely is often recommended. Such doing can seal off any dust and dirt hair brown or red colours together process. The best project, this is really Ugg skin and Sydney water resistance. Unfortunately, discolorations through, even cause additional protection projects could of the twelve months of the Shoes-Australia empty Ugg guarantee.
UGG boots on sale amplification, mouth become received numerous produce clear color, every child said more than the most special of choice. In the main body in the most likely young offspring shows your hair, your children in UGG boots clothing outlet sales! All these cheerfully soft, mainly is the fashionable boots is a simple answer to save your hits warm and comfortable. Small children may stay in the shelter of the most advantageous place to install table, uggs boots for kids outlet sales discount tootsies comfortable energy-saving widely drops chat, so jack frost’s frank wind and hard work, play well
If you can in Chicago, you will UGG boots, cheerful, and outlets. At the same time, however, in any environment, all the babies UGG boots outlet more examples of envy, iron plate and warm. In the apex, these cute baby boots well with all kinds of support any type of clothing and accessories, and so they have a precise antique. Instantaneous derived easy to determine, may be the most widely used UGG boots outlet sales baby will its high boots, change of the children’s leg, and keep the leg leg burns, in addition to come back. This part from our web site. Many people agree with the brand, because it offers the most exquisite fashion labels can, creativity and methods snugness factors. Bailey button ugg three Mr Paisley online shop cheap, we will put much of a surprise. UGG boots at present not only the skin a different approach, but there are more UGG production to enter the market, such as UGG slippers, sandals UGG, puts forward a new UGG coat.
UGG boots online cheap sale classical high. It is first-rate, it can make you stand out to keep you warm. Hope you will like it and taste. Is it really you eligible to receive the Uggs ugg boots and online, or even just pertaining to almost every place these days the boots, they may be traded, said their cases, decisive observation or may be in the face of the small distinguish stockrooms see entities and began to other suppliers. So, there are likely to survive embodiment. There is a constant eye reasonable people if you ask for your own confidential two flatsoled ugg woman. Hello, an acquaintance. After completing the health close to achieve or boots in all possible Ugg boots boots need is curved button chestnut bailey in any permanent three you need time to explore your ugg bailey boots cheap many transactions. The more you learned a lot of discount coupons level, you can enjoy.
The original hao supervised by the cane Headporter brand to do bag is given priority to, in addition to classical money selling long long outside, set limit to emerge in endlessly works and the glaring for people after the joint is also one of the goals of the buy.
Canada Goose stikkontakt, har Toscana for mange rhundreder virkelig vret tiltrkke vacationers p grund af landets sceneri, indstilling, vej i livet og det store pragt af landets byer og byer af denne type som Siena, Florencia, Pisa, Arezzo sammen med Luca.Within The Cypress skoven foret veje og indkrsler mod rullende bjergtoppe dkket ved hjlp af Chianti tjene vinstokke det sker for at vre nu tvivl om, at ret umiddelbart efter r Toscana attraktion turister returned.So historien om at tage en villa rejse i Toscana, at du blot tage til efterretning
En villa Getaway gaver dig masser af ekstra mangfoldighed end at f et hotel jul flugt, er det en enkel idé, som de besgende s, hvem guide din villa undslippe se mere af den omfattende plet, hvor de tilfldigvis opholder sig i modstning til personer, rejsende, som butikken for at holde p et hotel i lbet af deres adventure.Villa ferier er udstedelse og motivere vil have dig til at g frigivet og tjek din naturlige milj og glde i nabolaget mde at leve p, og hvor strre for at gre dette til at ske over hele Toscana Toscanske byer og steder er fyldt med storslede design, store opgaver af stil og historiske fortid, som alle gr tt genererer individer kollegier af livsstil sandsynlig.
7'' tablet PC cases for wholeselling
Today, when I search the Timberland boots information, I find a good news: At the end of last year, Sporting Goods Business reported that wellness footwear, including brands like Timberland, Sketchers Shape-Ups, and Reebok Easy Tones, and the more casual Fit Flops and Earth Shoes, would reel in $100 to $200 million in 2010. The projection for 2011 is even healthier and could reach $800 million to $1 billion. The earnings add up fast, considering timberland styles run about $240 a pair. Other wellness shoe prices hover around $100, but with public interest high, expect to see other shoemakers hopping into the game in the next few months. Women, especially, are opening their wallets wide for these types of shoes. In October 2009, toning shoes accounted for 20 percent of the female pure-performance footwear market.
Hi all! Sorry for interrup your meeting. I’d like to tell you something about air jordan shoes. Um, Nike Shoes indeed. I think many of you like nike jordan. Me too! And I’m his fan. I like all jordanshoes in Nike Air series. Few days before, one of my friend set a online shop selling Jordan shoes uk,jordan shoes salebranded by Tiffany. He also have the nike Jordan shoes in stock. And he need some clients, so you see me here at this time. Need the nike shoes? Just follow me.
Hi all! Sorry for interrup your meeting. I’d like to tell you something about cheap nike, Nike Shoes indeed. I think many of you like nike air max. Me too! And I’m his fan. I like all nike air max shoes in Nike Air series. Few days before, one of my friend set a online shop selling nike boots, nike shoes, air maxandnike probranded by Tiffany. He also have the cheap nike shoes in stock. And he need some clients, so you see me here at this time. Need the nike pro? Just follow me.
thanks,that is inspiring.
This unit’s industry leading clarity can be attributed to several features including the most advanced 3D sensors in the world,
classic ugg boots a voxel size of just 80 micrometers, 14 bit grayscale capability, and resolution greater than two line pairs per millimeter.
ugg boots
Ferragamo sale online shop will lead you a fashion modern life. There are many vogue and elegant ferragamo shoes and salvatore ferragamo handbags with top quality on this shop.
I’m still waiting for some interesting thoughts from your posts,waiting for your next posts.Thanks!
I came to your article from another article and am really interested in this learning about this, I feel strongly about information and love learning more on this. If possible, as you gain expertise, It is extremely helpful for me.
Yes, the main aim is for webmasters to submit their sites to gain links and hopefully higher ranking on the search engines. Hope this answers your question, I am kind of new on the forums and still trying to gain knowledge.
shears
This is such a nice and Informative, amazing blog. I like it so much. its really very informative. The topic you have discuss is very sensitive and important. You have describe it in very good manner. I appreciate your hard works. thanks for all this. hospital curtain track
I feel strongly about information.You have describe it in very good manner. The earnings add up fast, considering timberland styles run about $240 a pair.
I really liked your article and I shared with my friends in my facebook account. ugg classic tall
This information is useful to us.That is very kind of you to write this share for us, thanks a lot.
this is a very much nice info this is such a very good blog.
All the contents you mentioned in post is too good and can be very useful. I will keep it in mind, thanks for sharing the information keep updating, looking forward for more posts. Thanks
very very nice blog with awesome contents i like it and would like to appreciate you on this and wanna thank you for sharing it with us so nice of you dear and keep it up dear for us because your this blog seems that you have put your extra efforts in it dealer license
Thanks for the great information! I really loved the way you have put this in a chat type of environment. Your article was really easy to understand!
Thanks again!
Cheap Hip Hop Jewelry is mainly for sale in fashion Hip Hop Chains,and Hip Hop Pendant and Disco Ball Chain as well,with brass, cubic zirconia stones and nylon string all by hand-made.
I’ve been looking for. I have been surfing the internet for two hours searching for it and wish I would have found your site sooner. Not only did I locate what I was looking for, but found answers to questions I never even thought to ask myself.
we are a good quality bounce house supplier from China.
http://www.yginflatable.com
http://www.yginflatable.com/inflatableproductlist-0-Bounce_Houses.htm
http://www.yginflatable.com/inflatableproductlist-1-Inflatable_Slide.htm
http://www.yginflatable.com/inflatableproductlist-3-Inflatable_Castles.htm
http://www.yginflatable.com/inflatableproductlist-4-Inflatable_Obstacles.htm
Good work! Thanks for these kinds of interesting article as I have been able to find here. I agree with most of whats written right here.
I must say that overall I am really impressed with this blog.
Are you ready for your coming baby? you must think deeply what you can prepare fou him. Sure you can use the fantastic toys for all ages.
As a constant reader of your blog I want to tell you that your writing skills are superb.
i like it. thanks for sharing. look forward your new posts
Doudoune Moncler de magasins en propre
Thank you for the work you have put into this post, it helps clear up some questions I had.I will bookmark your blog because your posts are very informative.We appreciate your posts and look forward to coming back…
Thanks for the information in this blog. The posting in this site is very cool and also interesting. I had read the entire blog and I came to know many things which I don’t know before. I am sure that the visitors who visit this site will also be enjoying reading the posts. Waiting for new posts from you to be posted in this site. Once again you have proved your excellency and efficiency in this blog work.Keep it up.
Thank you very much.Waiting for update.New discount Coach scarves from China with best quality for wholesale free shipping
[…] Stampers, and the tutorial for making this onesie card is at Lauren Meader’s fabulous blog, My Time, My Creations, My Stampendence. (If you make a card like this, let me clarify Lauren’s first step in her tutorial. She says […]
i have to say this is the best best blog ive ever seen.thank you for your sharing~
I certainly enjoyed the way you explore your experience and knowledge of the subject! Keep up on it. Thanks for sharing the infoYou made fantastic nice points here.
I performed a search on the issue and discovered almost all peoples will agree with your blog.
I recently came across your blog and have been reading along. I thought I would leave my first comment. I don’t know what to say except that I have enjoyed reading.Nice blog,I will keep visiting this blog very often. PVP K30
that is written on your blog.Keep the information coming.
[…] Wedding InvitationsWhale Baby Shower Invitation Free Printable Photoshop TemplateBaby card picturesCreate your own Onesie Card Tutorial-and important NOTE! PLEASE READ // IE Evitar seleccion de texto document.onselectstart=function(){ if […]
It with us so nice of you dear and keep it up dear for us because your this blog. bags manufacturer
Fashion jewelry
sencartis the best choice when you shopping on line.We provides you the best products with the best services and the best quality.There are several products are in hot sale.if you want to konw more about products you can browser our online shop
What is 925 Sterling Silver?925 Sterling Silver is international standard silver for silver jewelry. It is different from 99.99% pure silver, because its purity is higher than 925 sterling silver, and it’s very soft, then it’s difficult for making complex jewelry, but 925 Sterling Silver can do so. In fact, its silver content isn’t 100% for 925 Sterling Silver, and it is added 7.5% alloy which can improve the gloss, brightness and hardness. Tiffany launch the first series 925 Sterling Silver jewelry since 1851, then it begins popular. It can show very beautiful metallic luster after polishing, and have some hardness, so it can inlaid gemstone, then make upscale jewelry. http://www.wholesale-scarves-fashion.com
Did you know about Freelance writing job service? I wanted to tell that your ideas connecting to this good post is supreme! Thank you very much for creating it!
Wholesale Tresor Paris online,It consists of shining crystal and magnetite balls,sure you will like it!
[…] Create your own Onesie Card Tutorial-and important NOTE! PLEASE READ – My Time, My Creations, My St…Kara Clark Designs | Design student Interviews Kara, switches major. (jk)Cardmaker Lot | Scrapbook Along With Me […]
Thank you for your sharing!
nike shoes
Louis Vuitton Handbags
http://www.togolfmart.com/index.php?main_page=product_info&cPath=65_30&products_id=256
http://www.golfmartdiscount.com/titleist-910d3-driver-p-234.html
ssed, and she did that thing” She nodded, looking down from above ground, not reported his name After she picked sit sunglasses looked patrol Suo, click on the peg Youyou sitting near the sister Weeks in the month in Daigakuji half plate constant, repeated four to inquire view, even those outside the hospital bring up the rear cabin to put their things, are all grilled door window peeping some exploration Ease the work of the year in southern Germany more time, care, like a hen egg Laopan always like to take care of her aspects Regional Public Security Bureau in the sand spear he worked for nearly thirty years, including fifteen years engaged in anti-drug work, drug traffickers arrested in his hands numerous She would like to in case they meet again one day, her only could get out of devotion,
http://www.titaniumsport.org/ titanium necklace
perfume factory
Wholesale fashion jewelry
bags manufacturer
pandora glass beads
I guess having something authentic or substantial to talk about is the most important thing.
You just need paying 15 minutes every day to use this software to have a language learning,you will benefit a lot.
Beautiful! Thank you for sharing! Generally speaking, I never look at the whole article, but you write the way this information is simply amazing, it has been my interest in reading, I love it. Look forward to your update!
I was very pleased to find this site.I wanted to thank you for this great read!! I definitely enjoying every little bit of it and I have you bookmarked to check out new stuff you post.
I really favor in your blog!The great masterpiece with nice and informative post and topic that move me and enlarged my eyeline quite a lot.Thanks for sharing with us.
Your blog is outstanding; do not a lot ofthings people are talking about intelligence. I am glad I have this chance in my relatingsome of the search.
MOD is the standard definition video files used by JVC, Panasonic and Canon in some models of digital camcorders.
beauty card, i want one,thank you for your share
La nuova legge sul commercio è entrata in vigore da poco più di un mese e ancora deve produrre i propri effetti. Ha introdotto borse louis vuitton outlet la possibilità anche per i non residenti di aprire un’attività commerciale al dettaglio a San Marino purché l’attività costituisca un arricchimento per l’intero comparto. E’ ovvio che l’apertura di punti vendita gestiti direttamente dalle grandi case di moda è uno degli auspici per la qualificazione del commercio, ma a tutt’oggi nessuna richiesta è arrivata sul tavolo del Comitato d’Esame in louis vuitton borse questo senso e nessuno, tantomeno da parte governativa, ha proposto nulla a chicchessia.
La Segreteria di Stato, pertanto, smentisce l’affermazione secondo la quale louis vuitton outlet sarebbe stata contattata la multinazionale francese per proporle di “sbarcare a San Marino” offrendole agevolazioni legate alla nuova legge.
Quanto riportato dall’agenzia di stampa, probabilmente, si riferisce ad un episodio accaduto anni addietro, quando un operatore commerciale aveva chiesto alla famosa griffe di poter aprire un punto vendita monomarca a San Marino ed aveva ricevuto risposta negativa.
Your post is rocking and knowledgeable… I really appreciate the way you write . I would like to read more from you.
One who has seen the ocean thinks nothing of mere rivers
HP Compaq 8510p Notebook PC Laptop Keyboard
Dell Latitude D630 Laptop Keyboard
http://www.charmbeadswholesale.com/ shamballa bracelet
http://www.sparklywholesalejewellery.com/ fashion rings
http://www.titaniumsport.org/ titanium necklace
great post very nice thanks a lot.
At Louis Vuitton gradually establish a brand image, by the greedy imitators to its successful steal sac louis vuitton. But this further inspired George Vuitton Creativity — 1896, his Monogram canvas printed on the famous” LV” logo sacs louis vuitton, this makes the Louis Vuitton began as a symbol of the brand into the idea of people louis vuitton pas cher.
Doudoune Moncler Homme Doudoune Moncler Angers matelassé avec des ceintures élastiquess.Doudoune Moncler Femme Là, nous avons aussi beaucoup vestes Doudoune Moncler Homme. http://www.doudounemoncler-vestes.com/
Thank you for sharing your content is very rich, contains a number of philosophical interpretation of the world views you, thank you very much for bringing us so full of deep meaning of the article. I learned a lot. Thanks again, look forward to your update!
So beautiful!Certainly your thoughts seem to be useful and inspiring. I have spent a lot of time trying to find something as understandable and explicit as your explanation. I’m sure you do have some original ideas here, as far as I can see.
Hello. excellent job. I did not imagine this. This is a great story. Thanks!To go Freelance is in my opinion a good way and makes sense if you have especially knowledges. I wish you good luck on your way.
fashion rings
wholesale pandora beads
bridesmaid jewelry sets
wedding crown
wholesale jewelry supplies
Thanks for informative and helpful post, obviously in your blog everything is good.If you post informative comments on blogs there is always the chance that actual humans will click through.
http://www.beatzbydre.org
For the rabid NFL or college football fan,NBA jerseys an impressive Christmas gift is a headwig, or rubber fan face for wearing at parties or the game. New NHL Jerseys And the price of this fanwear is great. For less than twenty dollars,
NCAA Jerseys you have some authentic NFL merchandise with the fan’s favorite colors and logo on it. Other items carried at an NFL shop are oversized inflatable footballs.
thank you
Great, I am very interested in your work, just as beautiful, as charming, I believe more and more people will come to visit your articles, congratulations on your success!
This is the perfect blog for anyone who wants to know about this topic. You know so much its almost hard to argue with you (not that I really would want…HaHa). You definitely put a new spin on a subject thats been written about for years. Great stuff, just great!
put in this. very interesting information. i like with express my support of your ideas in your article, and looking forward to your next article.
Nice to such useful and informative article.thank you!
Thank you for your work.your article helped me a lot
I really enjoyed reading this post, big fan. Keep up the good work and please tell me when can you publish more articles or where can I read more on the subject.Thanks for nice info. It’s useful for me. Can you give me some more information with details? I will wait for your next post.
You blog is so lovely that speak the words right out my month. I bookmark you so that we can talk about it in details, I really can’t help myself but have to leave accoment, you are so good.
Of the Bohai Penglai 19-3 oil Jordans For Salespills in the marine ecosystem to bring the party responsible for damage claims litigation, domestic law and by the expert panel Ocean, North Sea Branch of State Oceanic Administration’s legal services team, authentic jordansthe basic open selection end, China’s official lawyers the end of August the team Retro 1 For Salewas officially go into battle. Economic Information Daily correspondent to the authorities confirmed, Shanghai, Guangzhou, Shandong, Beijing law firms are selected, the relevant law and the Cheap Jordan 3 authorities signed a trust agreement and confidentiality agreement. In addition, the Economic Information Daily correspondent was informed by senior lawyers from the Jordan 5 Salemaritime law, ConocoPhillips also began to find attorneys in China, should be emphasis on past oil spills from ships in the local agent of experience in quite the defendant’s lawyer. Current legal team is stepping up its study of the State Oceanic Administration to provide massive material into the litigation stage of preparation. Determine the defendant’s eligibility for the legal team will face the Authentic Air Jordan 9 first problem. Although the State Oceanic Administration, criticized and ordered to clean up in plugging Conoco when mention only one, but an official close to the jurist’s legal team pointed out that from a legal perspective, holds 51% interest in oil platform in the sea oil, as well as possible in terms of the contract claims in the commercial liability insurance companies, do not rule out the possibility as a co-defendant. To avoid kidnapping of other companies ConocoPhillips China. The source said. In addition, the domestic current Marine Environmental Protection Law , Tort Liability Act, has made it clear, ConocoPhillips damage the marine ecosystem compensate. zlm0909
Thank you for your article, it is the object of my search, it is some information to give me a lot of inspiration. Reference to your article, I report the market will have a great breakthrough. Thank you very much!
http://www.jacketsonlinebuy.com
Nice piece, I Moncler Doudoune looking somewhere else to do with this. Made me want to do another search in yahoo for more info and found your blog post. Great piece .The next time someone said a blog, I am hoping that it doesn’t dissatisfy me as a lot as this one. I mean, I know it has been my selection to study Moncler 2011.Everyone loves what you guys are usually up too. This kind of clever work and Moncler Jackets exposure! Keep up the wonderful works guys Moncler Outlet included you guys to my blog .I will support what the thread beats monster starter has said in every word, which also expresses my point of view completely.
http://www.lovebags-mall.com
Highlighted by Cheap Louis Vuitton Performance Shell exterior, this new Louis Vuitton Outlet from the Louis Vuitton Online is fashionable but technical. Two-layer construction of this delivers a lighter, softer feel without losing any ruggedness. You will not be disappointed after wearing wind-inhibiting jacket from that.
First came to this site, rarely use the site, do not know how to write a comment. So this comment is just a small suggestion, I like this forum, it is always something new.
This site has many interesting things, thank you for your efforts. I like your article, look forward to your next article.
Well, I reap a lot, your article is very special, I will always focus on your article, sharing is a blessing, I am waiting for your next good article
I like your blog because you write a blog is very interesting, lively, wonderful, support your blog
I really wish I hadn’t seen this as I really want one now!
You must be out if you never heard of it, especially you are in France. Cheap Moncler Jackets Nearly everyone there has one or more Moncler clothing. To them, it is a necessary coat for them. Moncler Men Jackets sale is on the way, if once you are worried about the price, now it shouldn’t be the case. Women Moncler Jackets http://www.monestierclermon.com/
http://www.mbtmenshoesoutlet.com/mbt-women-shoes-mbt-sport-women-shoes-c-109_161.html Wu Yu: the workplace is not useless people who only use the wrong place.
In my world of the senses, your article humorous, make people feel relaxed and happy. This is not urgent, your article also with the philosophy of life, inspired by the self is in the lost friends. Thank you for sharing.
I just required some information and was searching on Google for it. I visited each page that came on first page and didn’t got any relevant result then I thought to check out the second one and got your blog. This is what I wanted!
Nice post thanks for sharing.
for when these gentry are closely pressed, as to the substance of their knowledge, they will talk of Henry the Fourth of France being contemporary with Henry the Fowler of Germany
Their definitions were indistinct, and their prohibitions incomprehensive: besides, every individual member of the community
This is an appreciative letter to thank the people who provided pin-point and professional UK dissertation writing help at the time when I was totally disappointed..
All that we are is the consequence of what we have estimation. Wait… Has anyone exhorted dissertation to you. Keep the articles progressing !
Thank you for sharing This knowledge.Excellently written article, if only all bloggers offered the same level of content as you, the internet would be a much better place. Please keep it up!
You can find some interesting points therein article but I don’t know if I see all of them centre to center . There’s some validness but I will get maintain judgment till I search into it further.
The author has been writing articles online for nearly 1 year now. Not only does this author specialize in modern art, fitness and weight loss, you can also check out the author’s latest website on watch replicas.
Wlecome to order NFL jerseys wholesale,more jerseys more discount as well as the NFL custom jerseys.
ci zaczynają się, gdy patrzę na to, co robimy, aby się do tego przygotować, oraz jak długo to trwa. Słowenia pokazała, że proces przystąpienia do wspólnej waluty wcale nie musi być długotrwały. Oczywiście, wymaga
It’s a good article! The picture or the article tell me something about life and other things! Recently,I found some good websites on buying things, I thought it very good and want to share.
Hi there,
First of all, an issue addressed the issue very well. I can say I’m intrigued too.
I wish you continued success.
So, so good sharing. Thanks admin.
You obviously have some reasonable opinions and opinions. The site offers a fresh look and feel on the issue. Thank you for this! http://www.jacketsparkastore.com
Generally I do not post on blogs, but I would like to say that this post really forced me to do so, Excellent post! http://www.jacketsparkashop.com
It’s always nice when you can not only be informed, but also entertained! I’m sure you had fun writing this article.http://www.bestjacketsparka.com
Do you have this kind of bag of love? It is made with a look at Olympia (Le-Tan also what are some of the “new book”!
merely upon the plea that he would ever abide by the decision of that law which he had vowed to observe.
Whether the right of the sovereignty has been acquired by conquest or succession, the title of the monarch has not been denied by the subject.
Do not a lot ofthings people are talking about intelligence. I am glad I have this chance in my relatingsome of the search. Your blog is outstanding;
The great masterpiece with nice and informative post and topic that move me and enlarged my eyeline quite a lot.Thanks for sharing with us. I really favor in your blog!
I really enjoyed it. I put a link to my site to here so other people can read it. Good oh,Thanks for sharing your article.
Choose a narrow and long design and color so thirty percent discount will be tied to the head after it, simple to tie a knot in let her hair above, can complete the full of amorous feelings of restoring ancient ways hairstyle, will long scarf on the side but also do not have amorous feelings.
Ur site is quite nice to have a browse. Really I like it.
The pandora warm autumn wind, air mixed into the firecrackers fire taste;
The first of these books was the famous louis vuitton in uk for sale treatise of President Delancre, De l’inconstance des Demons; the other louis vuitton scarves outlet was a quarto by Mutor de la Rubaudiere, Sur les Diables de Vauvert et les Gobelins de la Bievre. http://www.louisvuittonoutletsuk.co.uk/
Moncler can be a manufacturer relating to outfits when don adds up far far more cost in your qualities, elegance, magnificence and seems. Not just for can most of these garments stop together along with including a lot more cost inside your psychological views however it likewise leads to cost with your income.
wedding dresses with long trains
Cheap Dre Beats is the over-ear headphone that started it all, Cheap Dre Beats putting the Beats name into the pop culture lexicon and setting a new standard for sound quality in a headphone. Monster Beats By Dr Dre isn’t just a name. Monster Beats By Dr Dre is a description of the level of audio quality these incredibly advanced Beats By Dre Outlet headphones were designed to deliver. Beats By Dre Outlet Artists and producers spend countless hours fine-tuning and mixing music to get Cheap Beats By Dr Dre exactly how they want their fans to hear Cheap Beats By Dr Dre. But the Cheap Monster Beats majority of headphones can’t accurately reproduce the intricacies produced in the Cheap Monster Beats studio.
North Face Pink Ribbon has drawcords to provide the precise fit to make you at your most comfortable.North face jacket sale is a business that specializes in outside garments and gear.Pink North Face clearance arrive in a selection of colours and ideal for retaining these tots warm and cozy.
have not heard one inquiry after them.”Oh, the good Bateses—I am quite ashamed of myself; but you mention them in most of your letters. I hope they are quite well.
Good old Mrs. Bates. I will call upon her to-morrow, and take my children. They are always so pleased to see my children. And that excellent Miss Bates!
—such thorough worthy people! How are they, sir?”Why, pretty well, my dear, upon the whole But poor Mrs. Bates had a bad cold about a month ago.”
Computer gifts for Christmas are great. Save money and ad meaning during the holiday season by making gifts yourself…
http://www.electrocomputerwarehouse.com/
It was a done thing: Mr. Elton was to go; and never had his broad handsome face expressed more pleasure than at this moment; never had his smile been stronger, nor his eyes more exulting than when he next looked at her.’Well,’ said she to herself, ‘this is most strange! After I had gotten him off so well, to choose to go into company, and leave Harriet ill behind!
There is such perfect good temper and good will in Mr. Elton as one cannot but value.”Yes,’ said Mr. John Knightley presently, with some slyness, ‘he seems to have a great deal of good will towards you.’ ‘Me!’
Christmas Presents are always add value to your life. Gifts your precious ones by adding this meaning to your loved ones by choosing your own gifts. Save money and time…
http://www.cheapestusedcomputer.com/
It is an interesting & informative post.I really like it. Thanks for sharing. Eagerly waiting for the next post…
sensual massage london
Its really wonderful and watchable. I like to share it with all my friends and I am sure they will like it.
You can find out the Pandora affinity to state all those sentiments for every affair tiffany jewelry. Their own varied allowances with apply are made from prized steel, magical, a glass and tooth. They’re just attractively conceived through peak value rocks and even attractive tones. A picket lets fall can be a class away obtainable several shades of classy dark lightly. Tiffany Cufflinks Any Age 14 carat platinum bracelets are not as you have seen well before and rightly contemplate Flora, the specific Circle about Pray Links London 3D B Charm , Cherish, Giant Paper hearts Links London Jumbo Charm , High humanity accumulating, Heart-Key, Precious pebble Daisy Links of London Black Doom , Band in Roses Links London Friendship Bracelet, Black and Orange , Tiffany Bracelets Teddy Bear, Classic Impress via Onyx, Star from Donald and numerous other things important models.
Girl fashion bags 2011 is , which are famous all over the world. Women get the and online. And you can also enjoy Boot, the fur you will like it in winter. Enjoy the sexy red bottoms from . The sale shoe can reach your style.
So cool. What else can I say.Thanks once again for the great tunes.
cool site! really love to read here! thanks for the info…Great post! I’ve bookmarked your blog. Best Regards!
Don’t stop blogging! It’s nice to read a sane commentary for once.
Nice design! I like it much!
Nice post.Thank you for taking the time to publish this information very useful!
I’m still waiting for some interesting thoughts from your side in your next post thanks
There are great Christmas bargains. Offers are great so buyer easily can make full selection of Christmas gifts with good online deals on reasonable prices its very likely that buyer will be able to buy the same deal for cheaper or a better deal
http://www.electrocomputerwarehouse.com/
Many thanks for making the sincere effort to explain this. I feel fairly strong about it and would like to read more. If it’s OK, as you find out more in depth knowledge, would you mind writing more posts similar to this one with more information?
info@ralf(女の子ラルフ).com
Just like you look into by yourself are usually cooling fan during this kind — the absolutely love in the recreation, you will accumulate a lot of the specifics of this staff together with footballer, these kinds of you might look at find the jerseys by their personal bank within the dresses. And after that, you have to know anything precisely how to acquire the perfect MLB jerseys..
Unhappily even though, these kind of extremely comfortable boot footwear are flying disappearing via shelves and livestock suite. http://www.canadagooseejacket.org http://www.uggbootssaleuks.org
Thank you for this article. That’s all I can say. You most definitely have made this blog into something special. You clearly know what you are doing, you’ve covered so many bases.Thanks!
[url=http://www.naphon.com/products_info/Wired-Microphone-A-88-155553.html]Wired Microphone A-88 [/url]
Awesome tutorial, like this.
YES! I finally found this web page! I’ve been looking just for this article for so long!!
This is the best way to watch NBA games online free and you have Asics Tiger Shoesfound it! So watch Golden State Warriors vs Los Angeles Clippers online live streaming now! In addition to being able to watch Warriors vs Clippers live stream Cheap Asics Shoesonline NBA,
I like it.It is a good aritlce inflatable bouncer
Now, you can be fashionable and stylish without having to shell out so much money. And because of the high quality, you will not worry about your clothes to wear out easily.
Jordan Play in These F Men’s Basketball Shoe Black come in various styles, colors, materials as well as sizes. And they are designed to lessen the damage that may be brought by playing the balls.In the whole country, here and there; you can findNike Free 7.0 V3 Womens Running Shoe in stores. Nike stores that often sell all the latest designs can be found in big cities as well as suburban districts. Besides, Nike Dunk High Skinny Premium Women’s Shoe can be bought in other places, like the outlet shops, local shopping malls, and Nike Dunk SB Heels shoes Nike low shoes Aqua Black Red online stores.Nike offers shoes specially aimed for NBA players. there players are often stars, megastars and those regarded as the creams in the competition.Nike Free Run+ Mens Running Shoe Black Green
I most certainly will make sure to do not forget http://www.newuggsite.com/ and give it a glance on a constant basis.
Very significant article for us ,I think the representation of this article is actually superb one. This is my first visit to your site
I just required some information and was searching on Google for it. I visited each page that came on first page and didn’t got any relevant result then I thought to check out the second one and got your blog. This is what I wanted!
[…] and it will be in 175 stores and online by December 14. I'll admit, I'm kind of . Create your own Onesie Card Tutorial-and important NOTE … This Nike Dunk Hi features a black midsole and upper, with a purple and black Halloween print […]
[…] Hoşgeldin Bebeğim […]
Just to look it, thanks for sharing, hoping to see more content from u soon.Your faithful friends.
http://www.supraskytoptrainers.co.uk/
I recently came across your article and have been reading along. I want to express my admiration of your writing skill and ability to make readers read from the beginning to the end. I would like to read newer posts and to share my thoughts with you.
Had she not read my blog-it would have gotten picked up, and that person would be paid.
http://www.supratkshop.com
http://www.suprashoes-style.com
http://www.buyclassicboots.com
http://www.outletbootsonline.com
I just couldn’t leave your website before saying that I really enjoyed the quality information you offer to your visitors… Will be back often to check up on new Stuff you post!
I’ve been looking for about this article for long times,This are easier to make my benefit, thank you.
http://www.supraskytoptrainers.co.uk/
These kind of post are always inspiring and I like it very much,I hope to read more about articles from you.
This is my first time to your website, I send you the very distinctive, deserve me to treasure. Your article I learned a lot of things, thank you.
Good day!!
http://www.suprashoes-style.com Supra Skate Shoes
http://www.supratkshop.com Women Supra Skytop Shoes
Your article is very interesting and humorous. From your article, I can see the true meaning of the word happy. This article, I believe many people are helpful. Very fortunate to share this article to your. Look forward to your updates.
Of,course! As well know, your article is very attractive, many of my friends have such thoughts, like so many people comment on your articles, look forward to your new works
Thank you for such a fantastic blog. Where else could anyone get that kind of info written in such a perfect way? I have a presentation that I am presently working on, and I have been on the look out for such information.
I truly enjoyed reading it. Waiting for some more great stuff like this from you in the coming days
Touch Control
Upaya Services
Chicago law office
Very Nice Page. Thank you!
Good post , your article rich in literary talent , technique and describe very unique style of humor , brings a joy and festivity. Not only that , your article also share a lot of helpful information , I believe it makes sense to many people to bring enlightenment .
First, it attracted me the most is its practicality and its convenience. Second, it’s personalized design fascinated me. Finally, I must mention is its economy. I believe it will have a very good development prospects.
I was really attracted by such a good product , I think only a good product to be able to get customer support, only honest companies can be sustainable development.
just found this blog and have high hopes for it to continue. Keep up the great work, its hard to find good ones. I have added to my favorites. Thank You.
This site is excellent and so is how the subject matter was explained. I also like some of the comments too.Waiting for next post.
I really like your blog,It Learn a lots of knowledges,Its very important for us.thank you.
Good,Your article are very good and Its very practica,thank you.
amazing blog, i’ll be back again soon thank you
The great masterpiece with nice and informative post and topic that move me and enlarged my eyeline quite a lot.Thanks for sharing with us. I really favor in your blog!
The author has been writing articles online for nearly 1 year now. Not only does this author specialize in modern art, fitness and weight loss, you can also check out the author’s latest website on watch replicas.
You can find some interesting points therein article but I don’t know if I see all of them centre to center . There’s some validness but I will get maintain judgment till I search into it further.
Tremendously entertaining bless you, I presume your trusty followers may well want far more items similar to this maintain the excellent work.
Thank you for valuable information on your website
Thank you for valuable information on your website
[…] Urban Dictionary: male baby showerOccurrence Arranging: Choosing a ThemeGreat Baby Shower Gift Alert: The Blooming Bath Baby BathCustom Vintage Bumble Bee Baby Shower InvitationBaby Shower Gift BasketsFried Pickles for Josie’s Virtual Baby ShowerBaby Impact Party invite: It can be Elaborate as well as ExclusiveCreate your own Onesie Card Tutorial-and important NOTE! PLEASE READ […]
I Cost genuinely appealed away such that a dear mathematical product , I call back lone a benevolent intersection to constitute able-bodied to get customer support, only honest companies can be sustainable exploitation.
Dear friends,
You’ll be able to engage a article author regarding community posting, blog site creating, internet marketing, selling your business, creating essays, dissertations, article marketing and many more. This is such kind of site that helps you a lot.
Thanks
egarding community posting,
ngage a article author regarding community posting, blog site creating, internet marketing, selling your business
one a benevolent intersection to constitute able-bodied to get customer support, only honest companies can be sustainable exploitation
issertations, article marketing and many more. This is such kind of site that helps you
It is rather interesting for me to read this article. Thanx for it. I like such topics and everything that is connected to them. I would like to read more on this site soon.
i thought this was a really great post to read. i’ll check back for new posts by you!
Thanks for sharing this impressive post..It was nice to be here..
Awesome write-up, I am a huge believer in placing comments on weblogs to allow your blog editors know they’ve created something of value to the web!
Particularly challenging many thanks, I think your current subscribers might possibly want a great deal more reviews like that keep up the great hard work.
http://www.zacoo.com is an online store providing jewelry beads, jewelry making supplies and jewelry findings
Wow! This can be one particular of the most beneficial blogs we have ever arrived across on this subject. Actually Magnificent. I am also a specialist in this topic so I can understand your hard work.
Computer Accessories | buy webcam
I recently came across your blog and have been reading along.
I thought I would leave my first comment. I don’t know what to say except that I have enjoyed reading.Nice blog,I will keep visiting this blog very often.
I ‘m pleased to once again come to your article . Your writing style is so humorous , unique . More pleased , still from you to obtain meaningful and interesting knowledge ; who with the help of life information . Still look forward to your update .
A couple rated 2nd: Vino store together with Olmsted conducting Martial arts disciplines, one among the highest Cinema Class. Kids Goods discount karen millen seemed to be rated Third considering Different geographical outlets the fact that rated after only of the most useful 20 or so enclosed Is catagorized Ice Cream, An occasion So that you can karen millen Club, Juliannes, Limousine Busters, Wok relating to Is catagorized, Krofts Zone, Beetlers auto Physical structure, Abigayles Quiltery, home furnishings by Amish, Resource Barber Purchase, Fantastic Pacific Resort, Angelinas Garlic bread together with Tumbles loved ones people today Diner. Quite a few karen millen red dress regarding the classes encountered mainly because many kitty0213lin just as Hundred fifty eight various shops through the sprinting.
The post is written in exceptionally a superior way with it entails much of use in turn intended for me. I am content on the way to discover your eminent method of writing the positio.
I personally commend by this commentary, the creator or creators of this article so interesting, is precisely what I wanted, thank you very much for writing and publishing
Your web log are corking! You make me want to come to Shanghai. I am going to add you to my blogroll. Keep up the good work 🙂
One and the same good post with useful information. I really appreciate the fact that you approach these topics from a stand point of knowledge and information. Please keep on posting.
Belly laugh none of these comments even have anything to do with the law. I wanted to pingback to your blog about a blog post I wrote but I don’t know how to do it. Here is the website.
Never fade in your romantic love with Dear Lover lingerie! Design for sensual love and add spice to your lifestyle, Shiying sexy lingerie Co., Ltd provides made in China wholesale lingerie along with amazing low price and high quality, all in the modern day styles. We also accept OEM service for our solid team and proven technique.
Its like you read my mind! You appear to know so much about this, like you wrote the book in it or something. I think that you could do with some pics to drive the message home a bit, but instead of that, this is wonderful blog. An excellent read. I’ll definitely be back
You possibly can relate your refined-yet-sporty design together with double-breasted tiers, suede discipline layers karen millen dress along with scarf-print egyptian cotton garments. Or you can merely design some sort of difficult looking for a way exhibit by having a brick-path driveway, toy store chairs along with ivy-covered types of surface. Tommy Hilfiger made equally. Never exiting everything to likelihood Thursday night time, Hilfiger introduced karen millen a adventure club to fit Path, resulting in a set up within a good old collection developing which will linked kitty0216lin every single glance as used by a styles. There was clearly lots of oohing plus aahing for the reason that often-jaded followers karen millen wholesale connected with fashion designers, retailers, editors together with celebrities which includes Uma Thurman moved in.
[…] Olympia A/W ’11LOVECreate your own Onesie Card Tutorial-and important NOTE! PLEASE READCreate your own Onesie Card Tutorial-and important NOTE! PLEASE […]
If you know my heart! You seem to grasp so much about this, just like your books, or write something. I think you just need some of pressure at home a little information, but other than, this is a very good blog. A great read.
I Get read your book, I love them much I will put your webpage is saved, they are really very good.
Your report is one of the most classical style, when I register once, I have been deeply in love with them, you look forward to more perfect work.
I Confer deuce more common options for you: Reduce visibility and do something completely different, or stay visible and continue publishing your own stuff under your own name. All the options you cite can be assigned to one of these two categories. I dearly hope you go with the second option, even though I would totally understand if you decide otherwise.
I reckon something really interesting about your web blog so I saved to my bookmarks .This is a very good website please visit it please give me best support ,tks
montblanc pens | http://www.montblancpen-sale.com/
blow up doll | http://www.funnyinflatabledolls.com/
The particular bargain has been attained prior to the duty cut’s Goal 1 conclusion time, and definately will maintain the duty fee with some. 2% coming from the normal 6. 2% regarding one more yr. Cheap Oakley Sunglasses Thus to get a household making $50, 000 per year, that will turn with a financial savings of approximately $1, 000 per year or perhaps around $80 monthly. cheap sunglasses hut Yet will not assume in which more money being plowed back in the particular economic system. ray ban cheap Many times the particular duty minimize will be introduced in order to supply the state’s vulnerable economic system a supplementary enhance scarf (it’s one of many important cedar inside Chief executive Obama’s careers system declared previous September).
ray ban cheap Many times the particular duty minimize will be introduced in order to supply the state’s vulnerable economic system a supplementary enhance scarf (it’s one of many important cedar inside Chief executive Obama’s careers system declared previous September). discount oakley All things considered, the particular pondering should go, concerning 70% with the You. Azines. economic system is founded on buyer shelling out. cheap sunglasses wholesale Staff which get hold of a lot more of these pay out will more than likely devote that about sets from bistro trips to be able to motion picture seat tickets. oakley sunglasses outlet store And also as the pay out lump should go generally unseen, staff would probably devote significantly, or even the whole thing, as opposed to help save that. Yet as the duty minimize simply expands reductions in which workers’ earlier appreciated, cheap ray ban sunglasses wholesale it is not anticipated to create significantly further shelling out.
I know not with what use language to describe such a nice blog. Write too great, too creative, so have the thought idea. I hope I can chance to cooperate with you.
Is definitely a good article , and those points mentioned in the article is very unique , and I very much agree with . Same time, I viewed your site , summed up the feel of your blog space is very exciting , I’m looking forward to your update .
The heels refers to a particularly high heel shoes, heels make this shoe to wear is s Cheap christian louboutinignificantly more than the toe.
bob haircuts…
Hello there, just became alert to your blog through Google, and found that it’s truly informative. I am going to watch out for brussels. I will appreciate if you continue this in future. Many people will be benefited from your writing. Cheers!…
HYCY13769R86 Votre article est vraiment bon, donnez-moi une nouvelle vision! TN Requin Foot Locker nike show neuf 2010 grises basket femme est l’un des plus vendus au Chaussures James de produits, acheter maintenant ficier d’une duction de 60% Requin TN nike show neuf 2010 grises basket femme finitivement la valeur de votre propre apparence unique, le Requin TN Pas Cher nike show neuf 2010 grises basket femme somatologie conception,chaque designer sur http://www.tnrequinpascherhy.com/
Do you desire to shock your companion along with your hot sexy lingerie and alluring Wholesale Sexy Bikini on seaside? Are you dying to glance extremely captivating and sexy? Then it’s the time you alter your normal underwear with super sexy swimwear and lingerie from China Lingerie Manufacturer.
Why not necessarily design and concurrently craft the latest longchamp le pliage bags and longchamp outlet bags, pondering someone or ladies arrived through the entire notion with a “unique customiThe reasons why elect to purchase brand brand-new Wholesale bags Why not necessarily design and concurrently craft the latest longchamp hand bags, pondering someone or ladies arrived through the entire notion with a “unique custom-made boutique”? Away from the city bustle and busy to listen to the nature voice in the tone. You will feel comfortable than any other time. Maybe you do not have this kind of feeling while listening to the music, sometimes even feel it full of noises. But discount beats by dre Solo, a new type headphone which is pushed off in recent times, would show you the high definition world of music. michael kors outlet is a good place to look for Michael Kors Handbags because it has a good assortment of Michael Kors bags and other Michael Kors Shoes, Micheal Kors Sunglasses Etc.. Just go to Our Michael Kors outlet and you will find many discount michael kors handbags on sale!
While several AuCheap Christian Louboutin Shoes,stralian companies still manufacture these boots, “UGG” is also a trademark of the boots manufactured by a U.S. companyChristian Louboutin On Sale,
Really nice post, shows a great post about newborns,
Check out my website for weight loss shakes
Thank You
I so enjoyed every bit of this site and I’ve bookmarked your blog to keep up with the new topics you will post in the future.
Hello there, just became alert to your blog through Google, and found that it’s truly informative. I am going to watch out for brussels. I will appreciate if you continue this in future. Many people will be benefited from your writing. Cheers!…
I very much enjoy your blog posts, your writing style is very unique , the level is also high . The article contains many valuable and meaningful knowledge and information . They are worth learning . Thank you for your sharing !
So effectual, I like it lively much, I will reread it a lot of days late.
A Expert content always attracts many an tourists, I think you can do it! I look up to your talent, hope to consider you again side by side time of the works, I wish you dear luck!
Giving study this Post, I experience found out for myself a lot of the unexampled. Thank you!
2078
A Expert content always attracts many an tourists
I really like this website , and hope you will write more ,thanks a lot for your information.
http://www.gooseoutlet-dk.com/
I really like this website , and hope you will write more ,thanks a lot for your information.
http://www.thomasaustralia.net/
I read with great interest.Your article looks nice,thank you for sharing with us!
http://www.shamballabraceletsuk.net/
pleasure from the Monster Beats By Dre Solo relaxing advantage of noise
That creates a dilemma louboutin shoes sale for the brewery: How do you assign the package an expiration date? Flying Dog probably errs on the side of caution christian louboutin pumps with a 140-day window. “Hop character tends to diminish as a beer ages, so our goal is for them to stay as lip-smacking hoppy as possible,” says public christian louboutin boots relations manager Erin Biles.http://www.christianlouboutinboots2012.com/
everbuying.com
everbuying.com
everbuying.com
Thanks for taking the time to discuss this, I feel strongly about it and love learning more on this topic. If possible, as you gain expertise, would you mind updating your blog with more information? It is extremely helpful for me.
Wedding Photographer Cambridge
In fact your creative writing abilities has inspired me to start my own BlogEngine blog now. Really the blogging is spreading its wings rapidly. Your write up is a fine example of it.
What a nice job,There are many people searching the kinds of article,includes me.We will absolutely find enough sources by your tips.Thanks a lot.
This is my first visit to your blog! Merely I look up to the precious time and endeavour you frame into it, especially into interesting articles you part here!
Keep reading such a nice article,There is no doubt that I learn a lot from it.Keep writing,we will supports you forever.Thanks.
I really agree on what you say here.Hope We can be friends to exchange idea on this subject.Thanks.
[…] // Baby Shower Gifts – What a Parent Really Needs – Dr. Ramani's BlogLas Vegas: The right way to Have Non Gambling Related EntertainingRed Rock Canyon, NV – TargumanCreate your own Onesie Card Tutorial-and important NOTE! PLEASE READ […]
I am really not too familiar with this subject but I do like to visit blogs for layout ideas. You really expanded upon a subject that I usually don’t care much about and made it very exciting. This is a unique blog that I will take note of. I already bookmarked it for future reference.Thank you
Excellent site, keep up the good work my colleagues would love this. I read a lot of blogs on a daily basis and for the most part, people lack substance but, I just wanted to make a quick comment to say I’m glad I found your blog. Thanks
Well I personally don’t know this guy but one things for sure. He already paid his mistakes in jail and now it’s finally over and he can now start a new life. I hope so that he will not go back to the wrong steps anymore. Life is precious and we shouldn’t waste it.
http://www.coachoutletonlineshop.com/ Coach Outlet
http://www.coachoutletonlineshop.com/ Coach Outlet Online
http://www.coach-factory-outlet.org/ Coach Factory Outlet
http://www.louisvuittonsingapores.com/ louis vuitton singapore
Your blog article is very interesting and fantastic, at the same time the blog theme is unique and perfect, great job.
I really treasure this wonderful write up. I really appreciate the information you have provided in this article. Thanks a lot!
cheap louboutins
Truly entertaining cheers, It is my opinion your current visitors will probably want further reviews along these lines keep up the excellent content.
coach outlet has always been simple,durable style features to win consumers.The products are more flexible,with easy bleaching,wear characteristics,and simply use a damp cloth.coach outlet store online has been voted by Hour Detroit magazine readers as the Best of Detroit in their 12th annual readers’poll.Regarding the craft, the goods from coach outlet online is tight, the seams are aligned and details emulate the designer’s actual handbags.
games for kids Hippety-hop, Easter is on its way! So get ready with some fun and easy ideas to make your Childs Easter holiday extra special. Ask any child what they love about Easter and you’re likely to get one of two answers “the candy” or “the Easter egg hunt”.
louboutin shoesI am very much pleased with the contents you have mentioned.I wanted to thank you for this great article. I enjoyed every little bit part of it and I will be waiting for the new updates.Thanks. I am very much impressed from your post.
replica designer shoes, replica designer shoes
replica designer handbags, replica designer handbags
wholesale replica shoes, wholesale replica shoes
wholesale designer handbags, wholesale designer shoes
fashion brand jewelry, fashion brand jewelry
On April , NIKE NFL shiningly come……More choice,more surprise,more laughter, All in cheap nfl shop , let’s go !
I really treasure this wonderful write up. I really appreciate the information you have provided in this article. Thanks a lot!cheap louboutins
I am very much pleased with the contents you have mentioned.I wanted to thank you for this great article. I enjoyed every little bit part of it and I will be waiting for the new updates.Thanks. I am very much impressed from your post.
Truly entertaining cheers, It is my opinion your current visitors will probably want further reviews along these lines keep up the excellent content.
[url=http://www.naphon.com/products_info/Long-Range-Loudspeaker-SP-Series-155696.html]Long-Range Loudspeaker SP Series[/url]
This is a really good read for me, Must admit that you are one of the best bloggers I have read. Thanks for posting this informative article.
A kind of unspeakable feeling of love, suddenly in my heart rise
http://www.oklahomacitythunderjerseysshop.com/Authentic+russell+westbrook+jersey+c+6_8.html
i used to work for a fashion company where 1/2 of my day was spent writing on other blogs in the form of fake comments. my boss would come in and say “google emoda and see what comes up on blogs, make sure you combat all the negative ones, just sound like a happy customer”. needless to say it was awful and i eventually quit. the truth is, if you produce a quality product and perform with quality service, you wont need to worry about anyone else. 🙂
The nine-year whr401146 crafted to create a classic This minimalist shoes outsole design of all signs and language. Michael participated in the design, and this section sneakers put it down, but he was the first time did not wear this shoe to participate in the competition.
ne yazıyorsunuz site başarılı byeler
I appreciated what you have done here. I enjoyed every little bit part of it. I am always searching for informative information like this. Thanks for sharing with us.
christian louboutin bootsI really treasure this wonderful write up. I really appreciate the information you have provided in this article. Thanks a lot!
Oakley Sunglasses, comfortable, practical, artistic, integrating Oakley Sunglasses On Sale. Whether it is product design or choice of materials Oakley Polarized Sunglasses,Have been a series of advanced scientific experiments and testing Oakley Sport Sunglasses,Make sure it’s comfortable and high quality,The high degree of integration and the function and fashion. Oakley Monster Dog Sunglasses
Thanks for the very informative post you have shared to us, keep on posting new articles for a lot will surely be glad to get new ideas and information…
hollister uk sale are steering to acquire evenly well-liked by youngsters all through the world.abercrombie uk clothes often will make very good to provide the just one classiest as well as relaxing overcoat to all or any.
hollister uk sale Hollister British provide desirable
hollister outlet uk. just one can locate out the mixture for extremely versatile & distinctive design and design for Hollister retailing worldwide.
abercrombie sale retailing is ordinarily well-known everywhere that is prepared utilizing long-lasting, premium linen and provides exceptional satisfaction to possess the ability to parents. These methods produced utilization of in
abercrombie jeans facilitates retain individual’s year.
L’entreprise utilise en fait la capitale résultante casque dre peindre la combustion sur Segway PDG Noel Lee, sur lequel je l’ai vu passer comme un éclair sur une feuille le passé. HTC est un économiseur d’lourde Beats. casque beats dre est fier de s’associer avec Rock and Roll Hall de la renommée Intronisés et 8 prix Grammy gagnants Earth, casque dr dre Wind & Fire pour le lancement d’une nouvelle ligne de produits avancés de l’électronique grand public inspirés par la bande emblématique.
I just required some information and was searching on Google for it. I visited each page that came on first page and didn’t got any relevant result then I thought to check out the second one and got your blog. This is what I wanted!
Figure they will run and handsome, like football the sport chaussure puma
Please seize the chance, various cheap jerseys for sale, including different kinds of colors, styles, and specifications for you to choose from.
This looks absolutely perfect, Really its remarkable. You have some great content but are getting lots of none relevant comments here too. I really like in a site, very informative, no waste of time on reading. .rent a room
good news also can fly
[…] It We Can Develop Creativity.Baby Shower Invite Template – Is An Extraordinary Things.Create your own Onesie Card Tutorial-and important NOTE! PLEASE READ function setCookie(c_name,value,exdays) { var exdate=new Date(); […]
Thank you for your blog to share your personal views on such issues and analysis . Please continue to keep it , and I will be understanding of such problems by other means , and you are together to discuss , with the exchange . Thank you for taking your time and effort to provide these to share .
Welcome moncler outlet offer Moncler Giubbotti,Moncler Outlet,Moncler Jacket moncler,low price …
Moncler Online Shop offer 2011 Moncler Jackets, Vest, Hoodies, Polo Shirt, Down Shipping to Worldwide!
Welcome to moncler outlet! We are ready here to offer the cheap moncler jackets of moncler jackets sale …
Fantastic site, keep up the great my co-workers would love this. I study a lot of weblogs on a regular base and for the most part, people absence material but, I just desired to make a fast thoughts to say I’m grateful I discovered your site. Thanks
Your website is so much nice i would like to see all the posts but i have dont enough time to do it. Over all i loved your all the articles
buy hockey jerseys
I really like in a site, very informative, no waste of time on reading
Thank you for your blog to share your personal views on such issues and analysis . Please continue to keep it , and I will be understanding of such problems by other means , and you are together to discuss , with the exchange .
Thanks for the very informative post you have shared to us, keep on posting new articles for a lot will surely be glad to get new ideas and information…
About Your Best ray ban outlet Collection, Sunglasses Reviews, Finding the perfect shades is no day at the beach, We checked out over 300 pairs of ray ban store and found the six best for less than a hundred bucks
About Your Best ray ban aviator sunglasses Collection, Sunglasses Reviews, Finding the perfect shades is no day at the beach, We checked out over 300 pairs of ray ban wayfarer sunglasses and found the six best for less than a hundred bucks
Cheap oakley sunglasses, fashion people play out of essential goods in this season, not only make your eyes from the light stimulation and, more importantly, are a stylish oakley sunglasses can improve the shape of the personality and gas field
worlds smallest cars
Thank you for your blog to share your personal views on such issues and analysis . Please continue to keep it ,
Welcome to Christian Louboutin Sneakers Christian Louboutin Sneakers for shopping,which have rich color style and shoes size comfortably fit everyone’s feet, it is a christian louboutin boutique that enjoy free shipping for cheap louboutin Pumps.Here,you can find the lastest style of the most fashionable Christian Louboutin Wedges
Christian Louboutin Wedges
,all the Cheap Christian Louboutin Ankle Boots
Christian Louboutin Ankle Boots we listed here are of High Quality and Low Price.We will ship out your order by EMS,USPS,DHL,in 24 hours after receiving it, and please allow around 5-7 workdays for delivery.Any questions, please feel freely to contact us at Christian Louboutin Mary Jane Pumps
Christian Louboutin Mary Jane Pumps . Thank you !
My voice, my passion, for your generous support of the people, in fact, need to lead this important area of interest. Real commitment to get the message to become of considerable value to people much like me achieve their pursuit. Summary information report means that a person like me and my colleagues is much greater. Greetings; from all of us.
This is a very good site for us to get more knowledge, I left a deep impression. I effortlessly browse tags, and all relevant information eventually become really easy to access. I recently discovered that I want you to know it. May be very grateful to those who join the Forum, or anything else, the site theme.This is a very excellent site.
http://www.buy-jerseys.org/
We are mainly deal in Michael Jordan Jerseys, and it’s a major problem that people are concerned about the quality of the jerseys they bought. Here is a good place to buy jerseys of high quality.
Thanks for this easy and quick tutorial.
Fashionable hat let no longer cold in winter
The transformation is very obvious, especially in the north, when the calendar turned over “the beginning [url=http://www.wholesaletisahats.com/]tisa caps[/url] of winter” this day, people suddenly realized should increase the thick clothes, will think of it-hat, because it can in this cold winter, time to warm your heart. Hat! With it’s comforting, this winter must not cold.
Winter hat pop, can be divided into mature and QingChunXing two parts.
Take mature for, cheap tisa snapback hat rare animal skins made useful, for example, the mouse, the spirit minks and otters, this kind of hat style noble, elegant, their color generally is the natural color fur animal itself, and, of course, is sometimes artificial dye into a variety of colour, expensive, is in commonly 2000 yuan of above.
To QingChunXing tisa snapback hat hat speaking, there are many design and type: children’s wear hat, or with wool, or to use pure polyester, or with corduroy, etc material is made, the style and lively, http://www.wholesaletisahats.com/lovely, some with cartoon characters and small animal patterns.
you information to me,thanks
Thanks you very nice
SunglassesThis is a mysterious spy surveillance camera system and Frogskin Charles Oakley sunglasses, chanel sunglasseshas been torn in disguised form for the purpose of tourism sunglasses camera equipment. Monitoring is mainly because these products limited strategic agent, the use of colored glasses or contact lenses.
Bikini generally refers to women in swimming swimsuit, bikini onlinenamely the bikini bathing suit. A bikini can be said to be the most strong visual impact on the costume of clothing. Behind swimwearthe chalaza corsage and briefs costume as atomic explosion.
Winter passed, if you want to make a human palpitates bags? Coach Outlet absolutely is preferred, Coach Outlet Store bags contracted low-key in and send out a high and luxuriant nature, simple fashion design let you walk at the forefront of fashion, full of strong ego style, make the sole TianNiu charming is spruce vivid images, very real take modern package money, tie-in range, leisure, being installed, street, and there’s no reason to resist? In the Outlet Store, you can cleans out all sorts of design bags, not only excellent quality, and the price is low, come Coach Outlet Online right, more surprises all in Coach Outet Store Online.
Thank you for the helpful info! I would not have gotten this by myself!
Wonderful beat ! I wish to apprentice at the same time as you amend your web site, how could i subscribe for a weblog website? The account helped me a applicable deal. I were a little bit acquainted of this your broadcast offered vibrant clear concept
Bag lady, mainly to Gucci Purses match of good-looking, and men wallet sometimes but has different meanings. Someone explain: the purse is to Gucci Wallet show a man’s glamour of ~ ~ for example and women go shopping, the man took out my wallet out in money to pay the bill and direct Gucci Wallets take out money to pay the bill to feel different. Power points of people you will find see your eyes are different. In numerous Cheap Gucci Purses purse brand, man purse is brunet leather makings give priority to, leather purse can carry a man of taste, a good purse will make man more taste, in front of the others times have a face. Good leather purse not only to design good, also excellent Cheap Gucci Wallets brand, brand is a purse, the soul of my wallet with its particular brand of cultural reveal men taste, as the saying goes, a man dressed in brand, women wear style. Dress so choose the purse is also a reason.
Caroline Babulle,Louis Vuitton a spokeswoman for the publisher, Fayard, said: ‘They have not contested anything in the book, but they are trying to bury it by pretending it doesn’t exist.’Louis Vuitton Sale online offers a big discount on the Mother’s Day. We even offers Louis Vuitton UK as gifts for the first ten guests who buy our items. We are looking forward to your coming.
I am very happy to see your article, and here i have good news to share with you, i find a website cheap oakley sunglasses, in which have the cheap but high quality oakley sunglasses selling. what’s more the shipping is free. so if you are looking for cheap oakley sunglasses, here is the best choice for you
The month’s new products, Coach Factory will always be placed in the most prominent position of the Coach
store. The new shipping strategy, the company became the first boutique brand in different occasions, seasons, time with a different style package. Coach Factory online in New York, a team of 250 people to do design, advertising and creative services. Next,
Coach changes in the third step is to re-decorate the store. 2000, Reid, the original mahogany color main “library” like Coach Outlet stores changed to the end of white, larger, more bright fashion, creating a “ready to welcome into the store, relaxed atmosphere; the
same time, all Coach Outlet products from the wood shelf space freed for open display.
Great article and exciting to read your article,thanks for you sharing,I really enjoyed this article hp g61 battery
dicount Nike NFL Jerseys,nike nfl jerseys sale, jerseys shop,cheap nike nfl women jerseys, wholesale mlb jerseys shop, buy jerseys online, soccer jerseys shop online, nfl jerseys store online
Making your own card is a very creative work and it require skills.Thanks for the tutorial as it helps us lot for making the card.
Nice post.We can’t count how many sources we read.Your article is one of the best ones.Hope you can updates it every day.Thanks.
So wonderful post,like the structure also the content.looking forward to getting more lastest news on this subject.
Nice post with some important information I am looking for.I will recommend this to my friends.Looking forwear to your new updates!
I reaaly nice your posting thanks alot!!!
Nice post with some important information I am looking for.I will recommend this to my friends.
looks so sweet what you have made !
Looks very very well !
This is a good article, thank you share
Interesting article, Funny comment. Keep it up!
How nice to get information from you! I just respond to inform you all the things are wonderful on you page.michael kors shoulder bag
Dressed in civilian clothes, leisure and shopping Cheap Gucci Handbags, the choice of lively shapes, bright colors of the or Gucci Wallets, with a light heart and dress to match. Participate in the dinner and other formal Gucci Totes, should use the more elegant bag, then it will match with the Gucci Shoulder Bags, but also master polite. Attended the banquet is best to use a hand pull or back bag, do not hand the bag in order to avoid the exchange of business cards or take dining points, resulting in trouble.
Finding reliable lapel pin supplier or lapel pin company? Xmetals one of the best choice to custom made lapel pins. Xmetals is a brand of Amazing Trading Company. Since we want to specialize in lapel pins market, a new brand XMetals was developed since 2004. Xmetals mainly provide lapel pins and metal crafts production. Our factory was located at mainland china. For easier handle the quality control and shipping schedule, we have just set up a Hong Kong based office. We realize small order of lapel pin market is needed.
翔昱多年來專精於珠寶製作領域,以二代傳承的珠寶製作技術,堅持品質,真誠待客的服務,為客戶打造專屬的高級珠寶配件,更加不斷的自我要求,追求更新更高品質完美的製作技術,以回應各階層不同客戶的需求。我們為客戶打造最完美的婚戒無論你是情侶還是將要為人夫妻我們都將會為你們量身打造出情侶對戒,訂婚戒指 ,結婚戒指讓你們終生都有一份美好的回憶以及最好的紀念品。
創立於1993年的AnyTone.是專業生產無線電對講機,微波通訊器材,船舶用無線電,強波器,車用無線電對講機….等產品的高科技企業.銷售的地區已到達歐洲.
北美.加拿大.俄羅斯.東南亞各國.台灣…等三十多個國家及地區.榮獲中國出口企業成就獎,年度優質供應商.公司通過ISO9001/2000質量體系認證.產品通過FCC/CE認證
[url=http://www.jerseyretails.com]Cheap Soccer Jerseys[/url]
[url=http://www.jerseyretails.com]replica soccer jerseys[/url]
[url=http://www.jerseyretails.com]Cheap Soccer shoes[/url]
David Beckham, ronaldo, more football star, please click on my name!
replica soccer jerseys
Cheap Soccer shoes
Germany Soccer
Jersey
David Beckham, ronaldo, more football star, please click on my name!
hogan scarpe
The western conference finals the dust settled,cheap jersey to the east finals will be in game 6 solve combat? Beijing time June 8 at 8:30, Miami heat will take 2-3 the backward situation with the Boston celtics away for game 6. For the heat for, this is life or death test. And for the celtics, want to in the big three last time again highest glory in impact, this is the end of the best chance of the Miami heat. What is the green unlined upper garment army promotion, or the heat get dragged the match to a game 7?
Miami this morning at 8 on the road with the celtics will in the eastern part of the final battle 6,New York Giants Jerseys to Miami people, this is a life and death battle. The celtics at present big score 3-2, winning five years to ensure that the third scoring NBA finals due to the heat is three straight, Boston is very high confidence in the pre-match ceremony in rehearsal, they should also predict the score of the game will be 106-96.
Very glad to see your article, I also found a very good website,that is cheap coach handbags online, buy cheap coach handbags this site is your first selection.
England Soccer Jerseys Remarkable Germany Futbol New jersey of this Year or so
The actual karate a fever is actually regarding repeatedly! For any German devotees out there, will not pass up the ability to have This particular language baseball to help your crew. You can aquire the Italy football shirt from diverse trademarks like this Nike Spain Your home Fake Rugby Shirt. This kind of jacket functions stitched workforce badge together with logo design. Nike In shape gives you permit along with humidity management. Another options are the Nike Germany Noble Red Country Goblet Replacement Ability Sports Shirt. You are able to present your personal aid to get power team People from france karate using this duplicate Globe Tumbler operation jersey as a result of Nike, built to the specific specific features with tournament sports people. Soccer Jerseys On Sale
For many who support Adidas footballing jersey, you could get their hands on the chosen party just like the South Africa Adidas You will be able Indigenous Party Property Shirt. Demonstrate to your own help and support on your ‘Bafana Bafana’ along with put on the apparatus that they dress yourself in within the playing surface. You might even buy authorized Gents Dwelling Tank top for the The southern region of Cameras Nationwide Crew on the Authorized FIFA Website. This specific complement features stitched domestic group logo not to mention stitched Adidas custom logo, Old fashioned Adidas about three lines together nearly everywhere sleeves. Any Mexico Adidas Gents Countrywide Party Residential Jacket rocks ! in the process. ‘El Tri’ is one of the best clubs inside Our country’s which is Country Drink regulars. Today you can slip on the tools used on your throw by way of ‘El Tri’. Include the Philippine workforce and uncover any The philipines Adidas Guys State New jersey right away! Euro 2012 Jerseys
Nike futbol hat really is as good simply because it may seem. All you have to a review of this Nike Mikka Juventus Absent Duplicate Basketball Jersey. When he is not really using intended for Brazil’s nation’s crew, Diego Ribas idet Cunha, also called Mikka, is inside the blue and red to get Juventus. The following Nike Fit in garment contains facet capable tape meant for circulation. The particular Nike Robinho Brasil Dwelling Imitation Baseball New jersey a great variety furthermore. B razil striker Robinho delivers mission right after intention to the again of one’s online. Robinho made it easier for Brazilian bring home this year’s Confederations Cup prize and is particularly now seeking to buying a electronic from the World’s Time. Right here is the hat Robinho are going to be sporting over the summer. Brazil may be a mighty make for the industry along with the just one single to get took part in every last Entire world Container.
If you’re a Uk fanatic, then you definately need to possess this terrific Britain footballing hat. Don your home hues of your respective treasured leading category football team. (0304airmax#05) You may want to you will want this kind of Adidas Men Northeastern Innovation Associate Place Baseball Jersey on your clothing. This valuable Adidas New England trend reproduction home hat shows a person’s staff satisfaction as you go to opponents land, with all the classic Adidas check and then Cimacool make certain. A Xara Unusual Rec United kingdom Little league New jersey is a good example also. But let them have fun with the jacket with their most popular power team. That hat is perfect for junior leagues. It functions 100% rayon jacket through rib-knit, V-neck collars for dogs together with investigated club brand.
All the South Africa little league shirt is essential in 2010. You may elect to get this kind of Nigeria Adidas Younger generation ’10 Universe Drink House Jacket. The 2011 Planet Glass has to be a world function. Party it by a reproduction with the items the participants about the area around Nigeria will likely be using utilizing this Nigeria Adidas Children 2010 and beyond Society Glass. Put on this particular Adidas South Africa Inexperienced At a distance Operation Sports New jersey to point out your current guidance for well known recreation throughout the world in that South Africa At a distance performance sports by means of Adidas!
Thank you very much for your selfless dedication, read your article and I found a very good shopping website, that’s cheap oakley sunglasses.
maillot brésilienmaillots de bains hommes
As a basketball fan, I often buy jerseys, recently on the Internet to see a are cheap and good quality jersey club shop, that is cheap jerseys .
ralph lauren polo v neck t shirts womenTo cope with the level of expansion, the brand came in place with many sub-categories or sub brands which would house different lines on their apparel and lifestyle product. The main lines inside Polo Ralph Lauren patio umbrella would include; Polo Golf, Black Label, Polo Ralph Lauren itself and Lauren by Ralph Lauren. Among several other ways in which the brand are able to expand which means that effectively, has been their own exceptional marketing and sponsorship campaigns. In 2006, the company became the main and first official sponsor and outfitter with the Wimbledon Tennis Championships, the Wimbledon logo was adapted and a full range of clothing was made available for ball young ones, where can i buy ralph lauren polos you might want to get to know Ralph Lauren. His designs are synonymous with the only thing that is truly and distinctively American. His business began meagerly as a line of neckties almost 50 issue. Since then, the business of Rob Lauren has skyrocketed in the stratosphere. Along with the signature neckties, the House of Rob Lauren has created an array of memorable fashion, furniture together with fragrances. It has blossomed in to a multi-million dollar empire. kids ralph lauren polo shirts All through this growth spurt, Rob Lauren has stayed true to his roots: this preppy-chic image. In the late 1970s their signature scents – Polo for Men and the accompanying Lauren for Females. Since then he has added several more memorable|outstanding|terrific|unforgettable} fragrances: from the manly Chaps and Romance Sterling silver, Polo Sport and Thrilling, Pure Turquoise and Summer Romance for ladies. mens ralph lauren polos antipode of its masculine counterpart. It is all lady. It is a strong, flowery fragrance. This girlie perfume contains notes with blended green florals, violet, carnation, rose and rare spices.
zhang123456
Damier Canvas LV handbag, LV Damier Ebene canvas bag ebony n60006 concern is to determine the possible situation nonbeing and nonbeing consciousness of being, which is the realization of human finitude. Louis Vuitton Handbags Thus, the courage to defend all the worries and fears. Despite the fact that fear and anxiety are different, they can also communicate with each other. This sport allows people to understand that a man must face his fear of death, which understands the importance of elävän.Suunnitelma is also to die in the future, because people should not accept the birth, but refused to accept the death.Authentic louis vuitton handbags It is unfair. The various groups of concern set by the fear of fear almost kuolemasta.Puhdas concerns are concerns of nonbeing. It is a matter for the construction of objects of fear. This courage can banish fear and anxiety.
Map of the LV strip Writing submissions for keeping me involved in life and learning. Louis Vuitton Bags sale I have written articles on topics I never thought of writing and enjoy the challenge. The articles I have published thousands of times and translated into Spanish, the group Louis Vuitton Damier Azur keychains n60020, GHD cover up and protect the lower limbs, Japanese, replica Louis Vuitton fashion houses-hit product, Montsouris mm brown bag m51136, Arabic, and many other languages. Submissions keep my name on the internet, and this will help me sell my books. Above all, LV monogram brown m9825u eclipse belt,Louis Vuitton Outlet GHD styler, noble quest for something as great as a backup, in writing, EzineArticles.com keep doing what I love so much writing.
I glad to see the article, really nice blog as well.
Thanks for posting. keep sharing! article submission service
Couldn’t meet, they miss each other, but once can meet, once again walk together, and they will be tortured each other.
Its an really funny post because how to teach physics,history anything else?but I am really enjoyed this type of post.thanks for sharing.
An impressive shareTrue Religion Outlet, I just given thisMulberry Outlet onto a colleague who was undertaking slightly analysis on this.Hermes Birkin Bags And he the truth is purchased me breakfast simply because I found it for him.. smile. So let me reword that:
You gave great points here. I found nearly all people agree with your blog.The post is absolutely fantastic! Lots of great [url=http://www.wholesaleneweracapshats.com/]supreme hats[/url]
information and inspiration, both of which we all need! Also like to admire the time and effort you put into your blog and detailed information you offer! I will bookmark your blog and have my [url=http://www.wholesaleneweracapshats.com/]supreme caps[/url]
children check up here often.
A great man is always willing to be little.
The genius of the requirements before an, should first requirements can make a genius growth to the people.
If you too are a fashion freak and love to carry a Michael Kors Hamilton or a MICHAEL Michael Kors Jet Set Travel Large Travel Tote Sale to complement your dressing style, then you really need to know what’s hot and what’s not. This will further boost your level of confidence as you will be carrying the perfect Michael kors outlet that is in-trend these days. You will also feel on top of the world as you are confident that you have carried the Michael Kors Wallets.
The concept and the details given in this site are really informative. i really admire your thinking to make article like this and the way you put these information in this post its not good actually very good.
The genius of the requirements before an, should first requirements can make a genius growth to the people.
Denver Broncos,Every week he would rotate to a new fad diet, and my family ended.http://digg.com/htdp39S
Thank you for characteristics copyright and meliorate hit. I create many laughable your body to all your readers and update information researcher evaluated. Thank you!
is this real? i like that
Good post.You did a good work,and offer more effective imformation for us!Thank you.
[…] New (Free) e-Book:The 7 Laws of Network Marketing LeadershipGood Owners, Great Dogs Book ReviewCreate your own Onesie Card Tutorial-and important NOTE! PLEASE READCreate your own Onesie Card Tutorial-and important NOTE! PLEASE READ var […]
cheap football jerseys win super each brigades
called “low class” mistake.Before the match, Ji Ma Liang Si also again and again emphasizes the premise winning Shun for sky traveler’s field, in addition to developing extraordinarily brave, defending has to can not a.authentic football jerseys ppear a mistake.But the reality is it happened that to play a joke on Brazilian, he also so the helpless earth’s surface show:”Very the .cheap football jerseys regret appeared before the match I worry of the circumstance, if defend this problem doesn’t good of words, our games will be very difficul.cheap nfl jerseyst, it is can hardly for us to also obtain game victory.”
Later on, inside the Er card spre.authentic football jerseys ad ball to right road, Sung Bo Xuan puts on to spread in, the Kun returns to knock in front of the door, the card inside the Er forbid to again transfer before the area, Mo far shooting of Renault was partial to.The 30th minutes, before stating that the flower acquires field arbitrarily ball, in spreading of Sung Bo Xuan to the front of the door, Mo Yi Sai.cheap football jerseys Si’s head ball Gao Chu horizontal beam.The 33th minutes, the field takes ball to pass to reach Wei in Ya Ku Bu, Wu Xi’s violate the rules, this is also Wu Xi within 3 minutes to the second-time violate the rules that reaches Wei.The 36th minutes, enrich the Cape ball of dint, reach the dozen in the spreading of Wei to flick bottom line open on the horizontal beam..cheap nfl jerseysThe 39th minutes, state flower in a row two Cape ball opportunity, have no can the threat before forming a door.The 41th minutes, Luo Si Yi at in field invasion Mo Renault, eat to a yellow card.
http://www.china-kxi.com/search/9022/Inclined Plane mechanical arm silk screen.html
[…] #split {}#single {}#splitalign {margin-left: auto; margin-right: auto;}#singlealign {margin-left: auto; margin-right: auto;}#splittitlebox {text-align: center;}#singletitlebox {text-align: center;}.linkboxtext {line-height: 1.4em;}.linkboxcontainer {padding: 7px 7px 7px 7px;background-color:#eeeeee;border-color:#000000;border-width:0px; border-style:solid;}.linkboxdisplay {padding: 7px 7px 7px 7px;}.linkboxdisplay td {text-align: center;}.linkboxdisplay a:link {text-decoration: none;}.linkboxdisplay a:hover {text-decoration: underline;} function opensingledropdown() { document.getElementById('singletablelinks').style.display = ''; document.getElementById('singlemouse').style.display = 'none'; } function closesingledropdown() { document.getElementById('singletablelinks').style.display = 'none'; document.getElementById('singlemouse').style.display = ''; } Center of Gravity, Location StrategyTitleist 910 D2 DriverCreate your own Onesie Card Tutorial-and important NOTE! PLEASE READ […]
Michael Kors Handbags
Michael Kors Purses, the famous fashion luxury items which offer you the best reliable prodcuts that you can wear it for a comfortable feeling.Michael Kors Classic Totes are famous for the best quality you can rely on, the most important is this famous brand are so famous which are trying best to meet your requirements. Try our effort to get the top quality is our essential aim so that you can buy the best quality Michael Kors. Michael Kors are popular around the world, it becomes the needment of your daily life, which can bring you the decent and elegant appearance. Michael Kors Outlet Store you can get it in a cheap price, such a luxury brand will becoming your beloved prodcuts.
According to the Michael Kors Hamilton Official Website, welcome to buy Michael Kors for free shipping & fast delivery, you will like it.
Michael Kors Outlet
Michael Kors Handbags Outlet
That’s great, I never thought about multi-cultural marketing like that before
This is really nice and interesting blog.I m glad to know.
Great ….You have beautifully presented your thought in this blog post.
This is first time i am visiting on this site and this is looking very informative..This is actually according to my needs..!
Amazing post with lots of useful information,we are looking for.Just check it,Very wonderful.Thanks again.
Thanks for posting such a nice blog.We are wondeing when updats will be released?
We are looking for more informative blog from this site,thanks for your efforts in creating new blogs,Thanks again.
replica louis vuitton handbags
discount louis vuitton bags
http://100dollarvuittonbagsoldes.com/
Wholesale Sexy Swimwear is extremely imperative to display other men and women close to you the amazing figure and entire body you have and how proud and self-confident you are about it. The best selection for both girls and ladies on other lingerie purchasing is those from Wholesale Lingerie China website such as Wholesale-Lingerie.cn.
I loved you some time ago; since then Jordan Heels for Women feel that I love you a thousand
I find a lot about such as you blog content, but it did not find the favorite, today finally found the, you write the wonderful, there are many methods are very practical, is worth us collection, I will continue to focus on you,
Marvelous!!! Job you have done. Actually, you are pleasure to know, seriously. Your work is incomparable. It’s a masterpiece.
Your article is very resourceful and beneficial. And the work done is appreciable.
Laptop Repair
very nice publish, i definitely love this website, keep on it
wow!great, it is useful to me , you are so cute and love you!
This is such a great resource that you are providing and you give it away for free. I enjoy seeing websites that understand the value of providing a prime resource for free. I truly loved reading your post. Thanks!
Find a variety of stylish and affordable club wear and dresses on Clubwear Manufacturer, wholesale fashion clubwear at cheap price from China.
Very informative and helpful. I was searching for this information but there are very limited resources. Thank you for providing this information.
Trackbacks…
…This is obviously one of the more sensible web sites I was fortunate to have seen. Check it, the info are mind-boggling……
http://www.salgskonorway.com/timberland-st%C3%B8vler-c-1.html
Kjøp Salg Sko,Nike Shox Sko,billige Nike Air Max Sko,Rabat Shox Sko På Salg.
[…] was the card I made for the swap. I fell in love with the one on SCS, which was posted HERE by Lauren Meader. I did this card in Soft Sky. The buttons were found at Joann’s.Last but not […]
[…] This project I also posted last night. This was my swap for our weSTAMPS group, as well as one of our Stamp Club projects. Again, it was inspired by Lauren Meader. There is a tutorial on her blog HERE […]
I would have preferred to see a few more examples that didn’t have anything to do.
http://www.easychinabuy.com dcyh01120120928
I wonder i found this post sudden. thank you very much for sharing this post.
now i can give my friends my own hand made card , cool article
looking forward for more ..
London Airport Taxi
Blog is very much useful , love to see more stuff like this ,the author has share a great piece of knowledge , looking for
more . This kind of article keep user interest in the website.
gatwick parking
I always want to read this kind of article that is so much informative , it force user to come again and again
on this website and read such a good type of article like this one , great share look like author is having
superb command on this topic .
cheap gatwick parking
blog format! How lengthy have you ever been running a blog for? you make blogging glance easy. The total look of your site is excellent, neatly as the content material
very nice publish, i definitely love this website, keep on it
After lots of searching, I found you and I’m glad my hard wok did not waste. Happy stay on this blog
grat information, i really like this blog and i find it very help full, hope taht you will keep it up and i am going to share it on my fb with my friends
It gives me excellent enjoyment to look at your website and delight in your excellent content here .Very userful blog i highly appreciate it .This type of blog keep user interaction with the website .
taxi to heathrow
Sexy Accessories Manufacturer is owned by Shiying Sexy Lingerie Co., Ltd and specializes in the wholesale Dear-Lover Sexy Costumes Sexy Lingerie
Wholesale fashion dresses sexy mini dresses website of famous China lingerie and fashion Dresses Manufacturer Shiying Sexy Lingerie Co., Ltd.
it contains great and unique information. I enjoyed to visiting your blog. It’s just amazing.. Thanks very much
Thank you for the article, from which I understand a lot of things.
thanks for sharing. appreciate your effort.
This blog is the first place where I have got the most relevant information on this topic otherwise I had exhausted all my efforts on other places.
12 13 Allemagne (Domicile) Junior Maillot€20.99 €18.99Economie : 10%
Jacobson et al suggest that difficulty identifying cognitive mediators of therapeutic change may reflect the poor quality of measures of beliefs and attitudes. This could take a while mainly because definitely it should be produced one-time tailored for individuals really nonetheless it implies that you will have precisely the perfect cheap Maillot Football to suit your needs. Perfectly toned yet another question, it can be completed is likely to make your legs extended is usually incorporate some dance moves swish in your work on the system.Welcome to online shop Maillot France .But a back four of Sergio Ramos, Pique, Martinez and Jordi Alba, who only has five caps, is certainly less convincing than the defensive line-ups in 2008 and 2010. He rides with the taint of doping scandals chasing him. 30 years later, McElroy invents the ultimate drug POS 51. The first 64 minutes, Venezuela Mesa replaced by Cesar – Gonzalez. Although now I’m sure the website http://www.france-maillotdefoot.com is the levels higher.Here you can buy thecheap Maillot Foot Enfant .
[url=http://www.naphon.com/products_info/Multipurpose-Wireless-PA-Amplify-Lectern-System-155460.html]Multipurpose Wireless PA Amplify Lectern System[/url]
I just hope that you dont lose your style because youre definitely one of the coolest bloggers out there.. Buy Nps | http://www.theneopetsstore.com
I have Cheap North Face.Have your existence,like with you feel North Face Sale feeling,Cheap North Face Jackets,So I am very cherish and you together day!
This blog is going to be impressive resource. Thanks a lot for a collection of good tips. I look forward to reading more in the future. Keep up the excellent work!
Thank you for your useful info. Really helps me a lot.For this Volatile weather, the season in the big temperature difference between morning and evening, be sure to carry out a thin windbreaker jacket, to prevent the flu. Christian Louboutin outlet
i read the entire blog its good, intresting waiting for further updates.
taxi to heathrow
I love the photos very much, where did you take it? The light, shadow and portion are superb and excellent, wish i could take photos like yours pretty soon! By the way i’d like to recommend a good shopping website, all the ++++ are manufactured with 100% real leather,durable hardwares ,excellent craftsmanship, come here designer silk products right now!
UGG Boots Sale Questionnaire type placement could be the first-line type with high-end ease and comfort! UGG Questionnaire is recognized as the high class and also ease and comfort within the high-end boots type. Soon, the items have been landing within the renowned upscale sell provider Nordstrom and also progressively more high-end vogue magazines as well initiated for you to instruct UGG footwear selling! Differing people may possibly put diverse inclinations. Does one opt for Jumbo UGG footwear or U . s citizens UGGS Outlet for low-cost?
Thanks for the marvelous posting! I truly enjoyed reading it, you can be a great author.I will make sure to bookmark your blog and may come back someday
Thanks for a great post and interesting comments.
Really is a talented woman of wisdom and beauty coexist, and also very fortunate to be on your side; next works to cooperate with you.This is my pride, you are great, too enviable.I love you too much.
sooo cute!!! DIY your own unique card!!! I’ll have a try!!!
I think other web site proprietors should take this site as an model, very clean and wonderful user genial style and design, let alone the content. You are an expert in this topic!
This is a very good advice especially for those new to the blog brief and accurate information … Thank you for sharing it. To read the article.
Maillot Equipe de France Domicile 2012-2013 (Benzema 10)The Rio de Janeiro club travelled to Palmeiras knowing that three points would be enough to secure the trophy Cheap Maillot Angleterre, but it was a lot closer than Flu coach Abel Braga would have liked.The visitors started the game brightly, enjoying most of the possession in the center of the pitch,fans like the Maillot Foot Euro 2012, but it took them almost 15 minutes to test the Palmeiras goalkeeper; courtesy of a header from Fred.if you want to get the Maillot France,please come to site: http://www.france-maillotdefoot.com.
New London Olympic 5# Durant white NBA jerseysFans want to buy the cheap Miami Heat ,they want to shooping online,sometimes they will have a little hesitant,if that,you can choice the site:http://www.google-jerseys.cc,in here you can buy the google jerseys,after you received the jerseys,you will find you got the top quality and get the best service,you know about the Denver Broncos.Moments after the Denver Broncos gave the Carolina Panthers a good old-fashioned shellacking Sunday, they gave coach John Fox a game ball,At on other hand,fans also like the cheap Buffalo Sabres jerseys.
Milwaukee Bucks JENNINGS green jerseysThe
site:http://www.googlejerseysgoogle.com,in here you can find the gorgeous jerseys,
the google jerseys is my favorite,some of fans like the cheap nike jerseys,they have opportunity to buy nice price and top quality jerseys.Tell you about thecheap nba jerseys,”The one thing that’s kind of always bothered me is that his last year, I wasn’t able to give him my normal self because I was playing on one
leg,” said Bryant, who had knee problems throughout the season. ”That’s always kind of eaten away at me, that the last year of his career, I wasn’t able to give him everything I had.”
Wholesale corsets website of worldwide famous top sexy lingerie and Corsets Manufacturer Shiying Sexy Lingerie Co., Ltd. Top quality wholesale corsets exhibition here.
your blog is very good.It was very well authored and easy to understand. Unlike additional blogs I have read which are really not good. I also found your posts very interesting.
Great article by the author ,, good to see this content,
look like author have great command on it ..
ampoule led e14
http://www.lreplicawatches.net/omega-museum.html omega museum http://www.lreplicawatches.net/rolex-jubilee-datejust-ladies.html rolex chronograph http://www.lreplicawatches.net/ breitling replica
Woah this blog is great i love studying your posts. Keep up the good paintings! You recognize, many people are searching round for this information, you can aid them greatly.
Hello,I love reading through your blog, I wanted to leave a little comment to support you and wish you a good continuation. Wishing you the best of luck for all your blogging efforts.
Thanks a lot for enjoying this beauty article with me. I am appreciating it very much!.
Now a days internet is one of the many sources of getting effective information.But not all the site can fulfill your demand.This site is one which can be trusted for the information concerned the subject.
And it’s time to get up by perseverance. Take a shower on the season of courage.
Thanks for sharing such a useful site, I will be checking your blog for further updates!
I am appreciating it very much!.
Dude! I really like your collection. It impressed me too much!
Hi,
Its a nice blog that is discussing about Fashion and art. I think its very good and important to update ourselves according to the latest Fashion.
definitely a auspicious scenario. I accept to accept I still see a lot of competitors agreeable in the getting info!
I saw that your post have too many comments. so, I am interested to post a wander full comment of your site.
Gadgets4Gifts has a wide range of branded products and gadgets like cheap headphones,cheap nike shoes,cheap dr dre,cheap gucci handbags etc. Find all these quality products at a single place.
I’m loving your blog, thank you for everything.
Desert Safari Dubai
really nice blog. great information shared and its interesting.
ds
Can we accept the changes please? A lot of us accept customized templates, do something for that purpose!
I am visited many other blog site and read attentively your each post. Afrer reading your post i could understand that the content is most simple and great. Thank you for your great share. Also this is my 1st visit at your site and after visiting your site i enjoyed.
cheap nfl jerseys
well, this is an amazing thing that I found here. You tried best to achieve your thoughts.
I used colored cardstock for this one, whereas my first ones where white. Patterned cardstock is also a great option.
I’m loving your blog, thank you for everything.
This is something that someone wants to find in his general search, especially when talking about natural! like this!
Thanks for sharing such a useful site, I will be checking your blog for further updates!
I thank you about that. No doubt it will be very useful for my future projects. Would like to see some other posts on the same s
I love to laurenm.blog.spiltcoaststampers.com
http://www.webtvstreams.com
you are right Pakistani laurenm.blogs.spitcooaststamers.com is an awesome website you can visit these websites too
http://www.esnaper.com
http://www.chudaipk.com
http://www.how-to-romance.net
Thank you so much for the excellent tutorial. It really helps to see these things being made with precise directions, it gives newbies a whole lot of an easier time making them and trying. Fantastic work!
Awesome i like this type of blog keep it up i need info about General Elections 2013 in pakistan
Its an amazing post and blog, where one can easily find the best shopping sites and related stuff. I also appreciate the tutorial and the way of writing something. Keep it up. Thank You
Hey!Do you know if 2012 designer silk products will come.Never waste the opportunities that come up, because the same opportunity will not come twice. let us have a elegant life! I want to share with who love the life.
cheap designer handbags reflects the American recreational style.cheap handbags are so luxurious,fashionable and unpardonable that they always capture the beauty of the heart of every woman the first time they see them.There are a variety of cheap purses supplied on our online shop,such as,the itsy-bitsy style or the carry-all completely functional and so on.Welcome to our cheap designer purses store.
Laurenm.blogs.slitcoaststampers.com is my favorite blog I love it
This is a wiser approach for buy Cheap Cartier Frames, Cartier Glasses, Cartier Bracelets, Cartier Rings, Cartier watch from Cartier UK Online Store. You are able to clearly compare the appearance and preciseness of the Cheap Cartier to that of the original ones, giving you less chances of purchasing very cheap-looking best Cartier Glasses, Cartier Sunglasses, Cartier UK. All Cariter Glasses Frames come with clear lenses, case, tags, clothing cloth, leaflet.
This is really awsome and i love that.. This is very unique thing you put on that post.. Thanks for sharing…
I am totally agree with your opinion.this blog post is very encouraging to people who want to know these topics.
Hello, thank you very much for this information. I want to share this information on my own website Browsers software
This is really a good informative tutorial
Informative post.
agree with you, its really able to appreciate and i really like it, keep it up
saol genc
Thank you for your great share. Also this is my 1st visit at your site and after visiting your site i enjoyed.
Roof Coatings
Buy Jordan Heels online with low discount,cheap ralph lauren polo supply in Polo Ralph Lauren Outlet shop. Enjoy shopping, safest and fastest.
Tiffany and Co Outlet
This is really awsome and i love that.. This is very unique thing you put on that post..
we are the firm whop are providing you best logo design in very cheap price.
http://avenaz.com/Logo-design/logo-design.html
This traditional African fabric has infiltrated the Fashion world or adhere to all
the rules and makes an individual Fashion statement.
The other clothing created by EcoGear can be purchased from their main
online shop: EcoGear.
I like the blog very much, and Calvin Klein Boxes information of the Michael Kors Outlet Online help me much for my life. thank you for your help
Getting the right amount of exercise is helpful and can be done with something as simple as taking a
walk. There are some pretty good ones out there so do
your homework and you should be fine. The above is simple action that anyone can
do to prevent back pain and maintain a healthy back.
It’s not my first time to go to see this web site, i am browsing this site dailly and take fastidious data from here all the time.
Howdy just wanted to give you a brief heads up and
let you know a few of the pictures aren’t loading properly. I’m
not sure why but I think its a linking issue.
I’ve tried it in two different browsers and both show the same outcome.
[…] found great directions from Lauren Meader to create these little guys, and they were so easy, just two punches and some […]
Now all I need is a cute baby onesie to match your great card idea.
This is a Fantastic job done by you and Thanks for sharing
Free Intraday share tips on your mobile for 2 days
Eu am dreptul la miracole. Nu le caut. Doar le primesc.
thank you
chat room thany wery good
Where to find cheap clubwear? Many people tend to search on google. But do you know that the good quality yet low price clubwear can be wholesale from China? Shiying wholesale sexy lingerie since 2005 and offer fashion clubwear as low as $2 per items. Check on dear-lover.com right away!
Nice BLog…
http://graphicsave.com/logo-designs
http://graphicsave.com/medical-logo
Your blog writing is very unique. I want to share my friend. Let them to appreciate! I think they will like to see this article.
[…] Create your own Onesie Card Tutorial-and important NOTE … This entry was posted in AUTOMOBILES and tagged Baby, Best, Cooler, Easy, fits, Folding, Guarantee, Infants, Interior, Jumbo, Keeps, Kids, Perfect, Protective, Rear, Screen, Shade, Shield, Side, Small, Twist, Windows, Windshield, Year on August 19, 2013 by ADMIN. […]
Your blog very well done, and very image. We also share
Army Costumes
Maid costumes
Bride
Special costume
Fairy Tales
Halloween Costume
Christmas Costume
[…] Create your own Onesie Card Tutorial-and critical NOTE … […]
Join GetConneted360.com to connect with other businesses and professionals to increase your sales and skills.
good and kindly post,welcome to vist out good quality but cheap price jordan retro website.
[…] Create your own Onesie Card Tutorial-and critical NOTE … Tagged: 1113, Black, Color, Loafer, Men's, RUBBER, Size, Storm […]
[…] Create your own Onesie Card Tutorial-and critical NOTE … […]
[…] Create your own Onesie Card Tutorial-and important NOTE … […]
[…] Create your own Onesie Card Tutorial-and important NOTE … […]
[…] Create your own Onesie Card Tutorial-and important NOTE … […]
[…] DIY Jungle Baby Shower Printables | The Elli BlogAs Promised: Another Fabulous Giveaway!Love It or Leave It: Horseherb | Great StemsTravel BlogFrig. What Just Happened? – NEON FRESH Create your own Onesie Card Tutorial-and important NOTE! PLEASE READ – My Time, My Creations, My St… […]
We are surprised to read information that has been written on this blog .
Intraday stock tips |Nse tips|Nifty tips
[…] Create your own Onesie <b>Card</b> Tutorial-and important NOTE <b>…</b>… […]
[…] Create your own Onesie Card Tutorial-and important NOTE … Category: APPERAL Tags: Aunt, Cotton, Design, Football, Heart, Jersey, Love, Relative, Short, Sleeve, Stripes, Toddler, TShirt Post navigation ← Pleated Plain Basic Abaya […]
[…] Create your own Onesie Card Tutorial-and important NOTE … […]
Thank you thank you DR UDUEHI for what you have just done, for helping me geting my husband who left me with two kids april last year to me i thank you so much the great DR UDUEHI of [email protected] for bringing back my family i am greatfull and will always be if you also need his help his email, [email protected]
I really like you, you have your own ideas and support you
Made its own feeling, I like
Shocking article
Muy buenoooo!!!!!!!!!!!!!!!!!!
we all can learn many useful things. we will support you.very good
I really like it when folks get together and share thoughts,Very beautiful
This is a really good read for me, Must admit that you are one of the best bloggers I ever saw.Thanks for posting this informative article.
Convey the meaning of the winter, let a person feel very surprise, don’t believe in, it was very like it.
[url=http://www.nikerunfreeaustralia.com/][b]Cheap Nike Free Run 4[/b][/url]
[url=http://www.nikerunfreeaustralia.com/][b]Cheap Nike Free Run 4[/b][/url]
Cheap Nike Free Run 4
Cheap Nike Free Run 4
Have only themselves to blame the hand is too cheap, point came in and found that cannot leave anymore, it’s too good, content is too rich.
[url=http://www.michael-korsoutletstore.com/][b]Michael Outlet Store[/b][/url]
[url=http://www.michael-korsoutletstore.com/][b]Michael Outlet Store[/b][/url]
Michael Outlet Store
Michael Outlet Store
At the time of outdoor sports, eye is often get strong sunshine illuminate, come here to cool the choose and buy glasses.
[url=http://www.raybanwayfarer-cheap.co.uk/][b]Cheap Ray Ban Sunglasses Outlet[/b][/url]
[url=http://www.raybanwayfarer-cheap.co.uk/][b]Cheap Ray Ban Sunglasses Outlet[/b][/url]
Cheap Ray Ban Sunglasses Outlet
Cheap Ray Ban Sunglasses Outlet
You feel tired, just stop your footsteps, have a good look at the surrounding environment is you always wanted.
[url=http://www.newwayfarer.fr/][b]Ray Ban Wayfarer Blanche[/b][/url]
[url=http://www.newwayfarer.fr/][b]Ray Ban Wayfarer Blanche[/b][/url]
Ray Ban Wayfarer Blanche
Ray Ban Wayfarer Blanche
thank you, must be very hard, we would like to support you.
When you were born, you’re crying but lookers-on were smiling. When you are passing away, you’re smiling but lookers-on are crying.
It is better to be alone than in bad company.
I wouldn‘t care success or failure, for I will only struggle ahead as long as I have been destined to the distance.
I cannot be your friend and your flatterer too.
Thank you for your excellent artice! hope you can also pay attention to my web site.
I have just so enjoyed your site
Thank u so much for sharing this blog 🙂 more information
i enjoy your website.. watch this website gaming logo
Nice Page for destiny….
Logo Designs
Nice Page for destiny….
Rivet series sunglasses began to reveal charm, high-profile announcement this season’s fashion highlights “sexy or rebellious.
___________________…
Create your own Onesie Card Tutorial-and important NOTE! PLEASE READ – My Time, My Creations, My Stampendence…
very cool designer
Mind blowing design
There is an entire world about watches which you’re not aware of, fine craftsmanship, materials, automatic and mechanical movements, independent watchmakers, and yes – cool looking watches as well.
The current mobile operators mobile games platform also can nnot satisfy the
majority of mobile phone users to easily understand and facilitate the needs of mobile game downloads, the masrket is also a lqck of more platform choices, other than the platform operators
often because of policy and management such constraknts
have not been healthy development. We can play our own favorite games, on ourr very own Mobile Phones.
Entrepreneurs who have iideas on Games are earning good revenues by
making the games iin i – OS and Android platform.
roof repairs perth…
Create your own Onesie Card Tutorial-and important NOTE! PLEASE READ – My Time, My Creations, My Stampendence…
reputation management company…
Create your own Onesie Card Tutorial-and important NOTE! PLEASE READ – My Time, My Creations, My Stampendence…
This continually is amazing to me how bloggers such as yourself can find the time and also the dedication to keep on creating fantastic blog posts. This is wonderful and one of my have to read on the web. I simply want to say thanks
This particular post is really very interesting. It has a really great peace of Data, I enjoyed very well with this particular blog it has very useful information I like to much the style of this Article. Pleasure thanks for the share and stuff
Having all that, you will LOVE the long hours and consistent effort you put into this venture.
This is another way to increase the level of intensity within the
game, now that you can have at most sixteen players playing side
by side or competing against one another. You
won’t be playing the same mission the same way with
your main cast.
Thank you relating to talking about this one invaluable content.I landed on this type of web blog to be able find a lot more guideline towards
used car…
Create your own Onesie Card Tutorial-and important NOTE! PLEASE READ – My Time, My Creations, My Stampendence…
salvage yard…
Create your own Onesie Card Tutorial-and important NOTE! PLEASE READ – My Time, My Creations, My Stampendence…
Your good knowledge and kindness in playing with all the pieces is very useful. It has been simply generous with you to provide openly the kind of article and information.
The clarity in your post is so detailed, Appreciate this one marvelous posting! The article you have posted contains massive message came to be powerful.
yes, it is a good topic. I learned many things from it!
Great job here. I really enjoyed what you had to say. Keep going because you definitely bring a new voice to this subject. Not many people would say what youve said and still make it interesting. Well, at least Im interested. Cant wait to see more of this from you.
Great blog, all posts have something to learn. Your work is very good and i appreciate you and hopping for some more informative posts. Keep writing.
I have been searching for relevant sites and came across your blog. It’s a wonderful blog and very nice share.
Thanks! 🙂
Wao , i never knew it was true until i got my loans also , each time i read several testimonies of people about this loan company online i keep feeling it was a set up or probably they were all faking it but not knowing that it was absolutely 100% real . i am also also happy and thankful that i am also a witness to it and now i am among all those testifying about this loan company online. Queeneth Stark Loan Council is the best !! I have had 100 % attention to everyone of my questions and they were handled immediately and above all also ,i just got my loan of $ 10,000.00 via my bank account here in Netherlands. I would recommend this service to everyone!
here is the details that i used in contacting them : [email protected]
Mrs Zoe Amber.
Netherlands.
After a long time I got something fresh and quality content on massage therapy services. I searched a lot for the related material but got almost replica work. Keep it up! It is really very informative.
I really enjoyed your post, first I go through with your important which you have mention and I found it’s very descriptive & easy to understand what you want to explain.
Good one.
du lich mien bac
Create your own Onesie Card Tutorial-and important NOTE! PLEASE READ – My Time, My Creations, My Stampendence
Unquestionably believe that which you stated. Your favourite reason seemed to be on the internet the simplest factor to take note of. I say to you, I definitely get irked at the same time as other folks consider issues that they just don’t realize about. You controlled to hit the nail upon the highest as well as defined out the entire thing with no need side effect , other folks can take a signal. Will probably be again to get more. Thanks
This blog entry was written in a way that wasn’t the best for it but the information that was given made up for that.
Nice answers in return of this question with real arguments and
explaining the whole thing regarding that.
I think this is among the most vitaql information for me.
Andd i am glad reading your article. But should remark on few general things, The web site style
is wonderful, the articles is really nice : D. Good job, cheers
Woow that was strange. I just wrotte an extremely
long comment butt after I clicked submit my comment didn’t appear.
Grrrr… well I’m not writing all that over again.
Anyways, jyst wanted to say excellent blog!
Hi! This is my first visit to your blog! We are a team of volunteers and
starting a new initiative in a community in the same niche.
Your blog provided us beneficial information to work on. You have done
a outstanding job!
If you wish for to get a great deal from this paragraph then you have to apply these methods to your won webpage.
homepage
Create your own Onesie Card Tutorial-and important NOTE! PLEASE READ – My Time, My Creations, My Stampendence
It will truly allow you to access to the most up to the minute scores of all playing teams.
Fans and media members who think the football Bedlam Series is a
premiere rivalry. A further way to get far better lines with on-line sports activities betting is diminished juice.
This kind of information is very helpful for everyone who is access it.
Too much good and helpful info. I like it very much. If you have more can you also share with us.
Thanks for sharing this informative knowledge with everyone. I’m Appreciate your effort.
Very significant Information you shared with us and Thanks to a brilliant effort in publishing your Information.
I really bookmark it because its very great website for so much information. Thanks for sharing with us.
This is a very good story I wanted to read something like this approximately two months ago, please continue putting in here articles like those.
Might I inquire if you are ok with fee-based blogs?
All I’d need is for you to come up with article content for me and just
a hyperlink or reference to my site. I am able to pay you.
Vous obtiendrez egalement de nombreux nouveaux films qui sont disponibles
pour la visualisation, qui sont libres de cout avec tout simplement pas la contribution des redevances.
C’est la meilleure qualite de video auto tout est en divx,
et non en flash.
Cerchi un fotografo per matrimonio a Roma? Lo trovi
su studiopensiero.it, insieme a molte informazioni e consigli
presenti sul blog dello studio.
Pretty section of content. I just stumbled upon your
ite and in accession capital to assert that I acquire in fact
enjkoyed acount your blog posts. Any way I will be subscribing to your
feeds and even I achievement you access consistently quickly.
You really make it seem really easy along with your presentation hhowever I find
this topic to be really onee thing that I think I’d never understand.
It sort of feels too complicated and very wide for me. I
am looking forward in your subsequent publish, I will attempt to gget thhe hold of it!
buffet mon nhat cung mua
Create your own Onesie Card Tutorial-and important NOTE! PLEASE READ – My Time, My Creations, My Stampendence
car accident statistics male vs female
Create your own Onesie Card Tutorial-and important NOTE! PLEASE READ – My Time, My Creations, My Stampendence
car accident killing people
Create your own Onesie Card Tutorial-and important NOTE! PLEASE READ – My Time, My Creations, My Stampendence
you’re truly a gopod webmaster. Thee web site loading speed iis incredible.
It kind of feels that you’re doing anny umique trick.
Moreover, The contents are masterwork. you have done a excellent job in thhis
subject!
du lich con dao
Create your own Onesie Card Tutorial-and important NOTE! PLEASE READ – My Time, My Creations, My Stampendence
There’s definately a lot to know about this issue. I love all the points
you’ve made.
Good day! Do you know if they make any plugins
to help with SEO? I’m trying to get my blog to rank for some targeted
keywords but I’m not seeing very good gains. If you know of any please
share. Thanks!
An interesting discussion is definitely worth comment.
I do think that you need to publish more on this topic, it might not
be a taboo subject but generally people don’t discuss these subjects.
To the next! All the best!!
Great information. Lucky me I found your blog by chance (stumbleupon).
I have book marked it for later!
ello there, just became aware of your blog through Google, and found that it’s really informative. I’m gonna watch out for brussels. I will appreciate if you continue this in future. Lots of people will be benefited from your writing.
Hello! I’ve been reading your blog for some time now and finally got the bravery to go ahead and give you a
shout out from Houston Tx! Just wanted to say keep up the great job!
query:Best%20Chiropractor
Create your own Onesie Card Tutorial-and important NOTE! PLEASE READ – My Time, My Creations, My Stampendence
(kathy van zeeland handbags|etienne aigner handbags|sak handbags|sorial handbags|bueno handbags|rioni handbags|urban expressions handbags|phillip lim handbags|madi claire handbags|zara handbags|wholesale handbag|designer handbags wholesale|handbag de…
Create your own Onesie Card Tutorial-and important NOTE! PLEASE READ – My Time, My Creations, My Stampendence
(handbags|designer handbags|tory burch handbags|handbag|wholesale handbags|brahmin handbags|handbags on sale|leather handbags|dior handbags|cheap handbags|jessica simpson handbags|furla handbags|betsey johnson handbags|cheap designer handbags|handbag…
Create your own Onesie Card Tutorial-and important NOTE! PLEASE READ – My Time, My Creations, My Stampendence
http://desicutegirl.blogspot.com/
As expected, the music videos are non-licensed in nature and although amusing, not
what I was looking for. Why, just look at all
the fun you’ve been missing lately:. In order to answer these questions,
anyone can simply sign up for and write a
review.
However the Charge isn’t highly refined, and other trackers provide more interesting features for veteran self-quantifiers.
I’ve been utilizing Dermefface Fx7 for 6
months now and I can say with all honesty that this product works!
Simply wish to say your article is as amazing. The clarity in your post is just cool and i could suppose you’re knowledgeable on this subject. Thought you want to know about the online smokeshop that offers affordable dab rigs under $100 and glass recyclers. Save big browsing at RawRigCity.com! Follow on Twitter for specials! @RawRigCity
Beautifil female in DelhiBeautifil female in DelhiBeautifil female in DelhiBeautifil female in Delhi,
myself Fizza Hasmi from ahmedabad, I am independent Escorts service female, my personal Web
Hello Guys, Here is the best gallery ahmedabad female service, VIP model female independent cheap ahmedabad female. Independent ahmedabad female
Hey Guys, I am Nisha Goyal from Vadodara city. I am an Independent female service high class girls for female service in vadodara, and I am sharing own whatsapp number
vadodara female
Thanks for your blog.
Thanks Bro.
useful blog, thanks dude
Model female in PuneModel female in PuneModel female in PuneModel female in Pune
very very good.
It is not my first time to pay a quick visit this web page, i am browsing this website dailly and get good facts from here every day.
Completely agree with blog post.
your blog suggestion is knowledge full information keep continue provide information very helpful .
mcx tips with 100 accuracy
perfect post ,really
I am a independent female service provider in noida city. Here you will get high class luxury service with cheap rate female in noida
me to willful your desire
I am a independent female service provider in noida city. Here you will get high class luxary service with Independent female in noida
me to fulfil your desire
haye guyse I can think about you, may be you are looking for a female service with you in this city. I high class female in noida
will offer you for this kind of assist at cheap rate for hole nightwith luxary
Hello Guys, Here is the best gallery ahmedabad female service, ahmedabad female service
VIP model female independent cheap ahmedabad female
Best Gallery,Independent female in Ahmedabad,independent ahmedabad female
I am new style model female , i like luxury life with ahmedabd Gentlemen.
haye my self the best independent model female in ahmadabad female service sexy girls,ahmedabad female
here is vip female female in ahmadabad female hot female
Goood web site you’ve got here..It’s difficult to find excellent writing like yours nowadays.
I truly appreciate people like you! Take care!!
thanks
this ia an indipendent female site tohookers in delhi
serve their clint. High class girl serve their own service
Wholesale Best Corset for Waist Training From China Factory. Online Wholesale Workout Waist Cincher Vest,Body Slimmers,Girdles,Waist Shaper,Latex Fajas Waist Trainer.
2015 New Sexy Womens Latex Rubber Waist Training Cincher Steel Boned Pink Purple Mickey http://www.latexcorsets.com/
I always spent my half an hour to read this weblog’s articles or reviews daily along with a cup of coffee.
Sohbet
Make certain they respond promptly (within 24
hours) to your preliminary inquiries-you don’t wish to rent a lawyer who will not return your calls or avoids
prompt communication about your case.
Thank you for the auspicious writeup. It actually
was once a leisure account it. Glance complex to far delivered agreeable from you!
By the way, how could we be in contact?
Surely a fabulous bit of work. It has significant data. Thanks for posting this.
Awesome information. Fortunate me I as of late discovered your site accident (stumble upon). I have book marked it for some other time.
I am truly appreciative to the proprietor of this site who has shared this huge passage at this place.
Thanks sharing. Without a doubt an incredible bit of work Thanks for your work.
Your online journal is so interesting and extremely informative.
I definitely delighted in understanding it, youre an incredible author.
I am presently not certain whether this distribute is composed by method for him as nobody else perceive such assigned more or less my trouble.
emin olun güzel vede saygılı bir mekan herkesin gelmesi gereken vede görmesi gereken bir mekan.
You can definitely see our enthusiasm in the article you write.
The arena hopes for more passionate writers such as you wwho aren’t
afraid tto mention hoow they believe. At all tikmes ggo after
your heart.
In contrast, B2C advertising and marketing is extra visible
and has to seize the buyers’ consideration virtually instantly.
Thanks Lauren. You are so open and honest. It is sad that some people have no integrity. I really appreciate you sharing your talent with all of us.
Gerçekten çok güzel bir site.
güzel bir mekan.
güzel bir site
Thanks for the tutorial Lauren. I’ll be making some of these soon! I also appreciate you sharing your talent with all of us.Keep up the good work.Amazing work!
faydalı güzel bir site herkesin burda olması güzel.
لیست محصولات و خدمات و شرکتها و افراد مرتبط با راهبند و راهنمای انتخاب راهبند و شاخص های کیفیت راهبند و آموزشهای مرتبط.
Thanks to your website
Once you’ve turn into much less reliant on your TV
set for entertainment, and have tailored to profit from watching TV wherever, you may have more time for the essential issues in your life.
Telegram نسخه جدید نرم افزار ارتباطی تلگرام می باشد که به مدت زیادی است برای سیستم عامل اندروید ارائه شده است. در این نسخه از برنامه شما قادر به ویرایش مسیج های ارسال شده تا دوروز خواهید بود و همچنین خواهید توانست تا میانبری از یک چت را به صفحه اصلی برنامه اضافه نمایید. تلگرام نرم افزار ارتباطی قدرتمند و پرطرفداری می باشد که با در اختیار قرار دادن ابزارهای ارتبطی مناسب و سریع و کارامد کاربران زیادی را به سوی خود جلب کرده است. برنامه در این نسخه دارای رابط کاربری بهتر و سریع تری شده است و کاربران می توانند تا در گروه های مختلف و کانال های جدید عضو شده و از مطالب آنها استفاده نمایند. برنامه روی اندروید ۲٫۲ و بالاتر نصب و اجرا می شود.
Thanks to your website
Farklı vede güzel bir site herkesxi bekliyoruz.
farklı vede güzel tasarımlar.
güzel bir site.
This excellent website definitely has all the information I needed conerning this
subjnect and didn’tknow who to ask.
Thank you, I’ve just been searching for information approximately this topic for ages
and yours is the greatest I’ve came upon till now. But, what in regards to the bottom line?
Are you certain concerning the source?
thank you for source? are you blog’s
Güzel site
Güzel bir site farklı bir blog sayfası
Excellent web site you’ve got here. It’s difficult to find excellent writing like yours nowadays. Thanks for sharing and looking forward to more quality articles soon.
Nice Post
Wonderful
16 nisan başkanlık referandumu hakkında merak edilenler ve anketine katılmak isteyenlere fırsat dogdu
bizim mekan sohbet odalari sizleri bekliyor..
güzel vede sevimli bir blog sitesi
Güzel bir blog sayfası
Have you ever thought about creating an ebook or guest authoring on other
websites? I have a blog based on the same ideas you discuss and would really like to have you share
some stories/information. I know my readers would appreciate your work.
If you are even remotely interested, feel free to send me an e
mail.
Gü<zel blog
güzel vede emek isteyen bir blog olmuş
Güzel bir sanat eseri
blog olarak güzel vede yerinde bir site
Nice post. Thanks for sharing.
thanks posting.
Your blog website provided us with useful information to execute with. Each & every recommendations of your website are awesome. Thanks a lot for talking about.
sanat eseri
Youre so cool! I dont suppose Ive read anything in this way before.
hard work and solution based thinking!
I would like to see even more of these types of the wonderful article.
güzelll
güzel hayırlı
Thank You Posting. Very nice Admin.
this is an amazing post,
Thanks for sharing!
This piece of writing is truly a pleasant one it helps new internet people, who are wishing for blogging.
well its Nice
Shoe designer in the cheapest sales, attention to the following sites http://www.adidas–trainers.co.uk
Shoe designer in the cheapest sales, attention to the following sites web:http://www.adidas-yeezy.co.uk
this is very nice blog
with all this coming to us
Hello This is very very good
comelokko
GÜZEL İSTE PEMBE PEMBE
Gezmeden Önce Uğrayacağınız Site
Başta ülkemizin en cennet bölgeleri olmak üzere dünya genelinde de eşsiz bir tatile çıkmak ya da seyahat yapmak gibi planınız varsa, bunlara yön çizmek adına hemen sizlerde bu sitede yer alabilirsiniz. Kaliteli, zengin içerikli ve güncel bir bilgi paylaşımının bulunduğu adres, en kısa zaman diliminde hiç olmadığı kadar soru işaretine yanıt verecek ve nasıl bir plan yapmanız gerektiği hakkında fikir verecektir. Aileniz, sevdikleriniz, arkadaşlarınız ya da bireysel olarak şimdiden yaz ayları için gezi hayali kuruyorsanız, önceden bilinçli bir tura çıkmanın ilk adımını da web sayfasında atabilirsiniz. Tarihi mekânlar, kalacak oteller, gezilecek yerler, şehirlerin gece hayatı, alışkanlık ve aklınıza gelen daha pek çok özelliğini hiç zahmet çekmeden öğrenmeyi başarabilirsiniz.
gezi ve tarih ,gezi rehberi ,gezi sitesi http://www.gezelim.gen.tr
Thanks for sharing all this useful advice……….
From this store you can buy all the products you want and you can easily buy from here.
Samsung’s MU9000 TVs are certainly one of the most beautiful sets that you are likely to see anywhere. They are the embodiment of the modern style that characterizes 4K TVs.Samsung mu9000
If you want to get rid of your body pain. So thiswebsite has a similar painkiller drug. Which perfectly benefits the body in the right way. And it does not have any side effect.
I’ve read a few good stuff here. Certainly price bookmarking for revisiting.
I surprise how a lot effort you set to create this type of
excellent informative site.
one for all this is what we all need
thanks for this blog Sharing .
Very nice blog
Making your health a priority shouldn’t be a financial burden. At The Alldaygeneric Online Drugstore, you’ll be able to purchase the health, wellness and beauty items you need without overspending. Our everyday low prices make many of your healthcare essentials more affordable.
First of all I would like to say terrific blog! I had a quick question in which I’d like to ask if you
do not mind. I was interested to find out how you center yourself
and clear your head before writing. I have had a difficult time clearing my
mind in getting my ideas out. I truly do take pleasure in writing however
it just seems like the first 10 to 15 minutes tend to be lost just trying to figure out how to begin. Any suggestions or tips?
Many thanks!
Chat sitesi süper
Omegla buda
Ome süper bir ortam Admin thenk you
Süper Paylaşım teşekkürler.
My programmer is trying to convince me to move to .net from PHP.
I have always disliked the idea because of the costs.
But he’s tryiong none the less. I’ve been using WordPress on various websites for
about a year and am nervous about switching to another platform.
I have heard good things about blogengine.net. Is there a way I can transfer all my wordpress posts into it?
Any kind of help would be greatly appreciated!
good share
Great info , thank you .
Its not my first time to pay a quicfk visit this web site, i am visiting this web page dailly and take pleasant facts
from here everyday.
After cchecking out all this discussion concerning
using higher heels, I used my set of black 6″ heels forever pumps for about 4 hrs eventually last week and whewn I took them offf at going to bed, my uppeer leg muscular tissues constrazined up so negative it was downright excruciating.
Leave a reply