Winner of the $10 Gift Certificate!
Mar 8, 2013Congrats to the random winner of our $10 Gift Certificate to My Time Made Easy ™ LLC is:
cute bunny.
i think my favourite project was Scrappinmad-Karien’s
—————————————————————————
Congrats to Angela! Please contact [email protected] to redeem your gift certificate!

March: Year in Review (Giveaway)
Mar 3, 2013- Lauren Meader <—you are here!
- Debbie Marcinkiewicz
- Jackie Randolph
- Karien van der Westhuizen
- Kimberly Morrow
- Lisa Kind
- Lori Hairston
- Lori Kalus
- Mary Vogel
- Pattie Goldman
- Tangii Crain
- Tracy Holmes
Now leave a comment back here after you check out what the team has done, and tell me what your favorite project was. Then you will be entered for your chance to win a $10 Gift Certificate to use towards your next purchase at My Time Made Easy ™ LLC. It’s THAT simple.
Winner to be announced on the 7th!
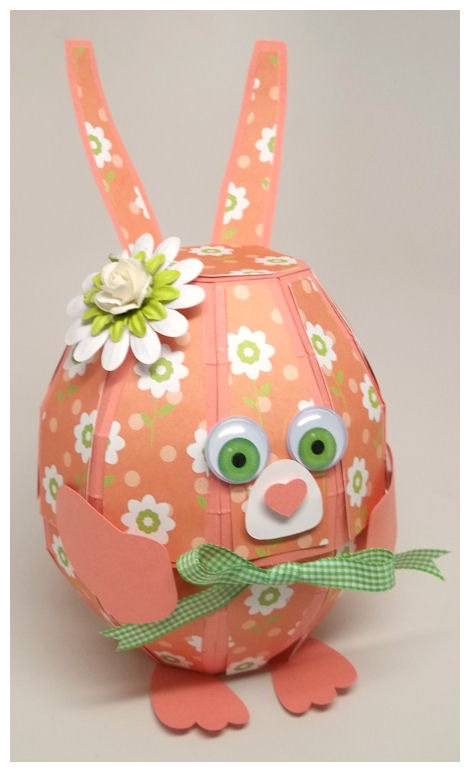
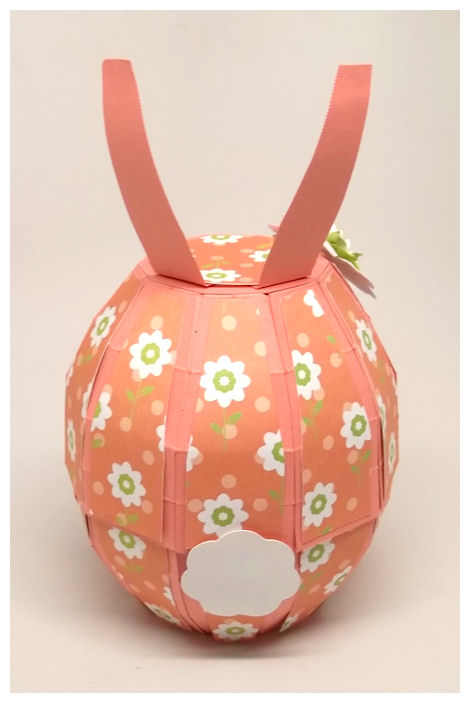
Now I like to usually combine old & new products, and since I had another project using our Egg-stra Special template that fit in perfectly I thought no time would be better.

I knew I wanted to use it to create a bunny, and I had NO IDEA what colors, papers etc I wanted to use, so I let my daughter Amber decided that this color from the Fun Flowers © would be cute, so we went with it.
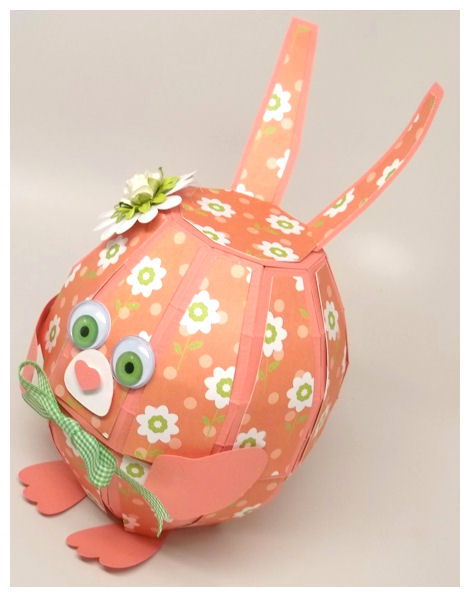
So we made the body, and then layered on the paper. Then the next obvious step was to make it into an actual bunny.
I used some GOOGLIE eyes I had on hand.
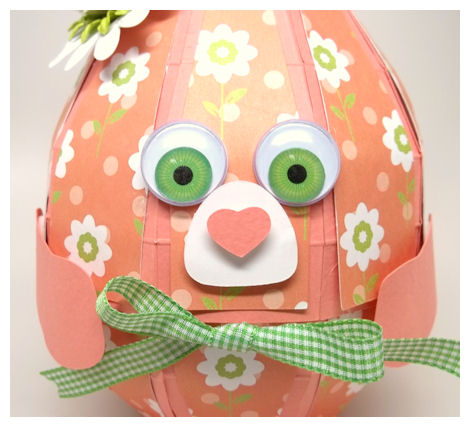
I used the muzzle, heart nose, arms and feet from the Bouncing Bunny © cut file.
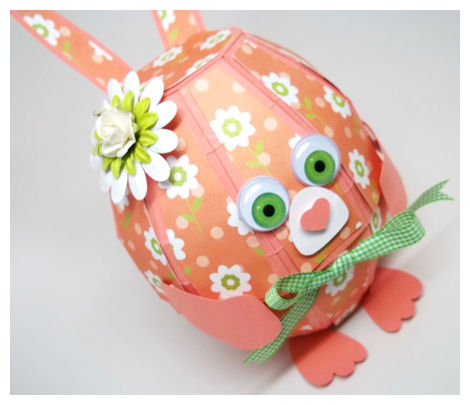
I just used some decorative layers for the ears. Added some flowers, and a little bow to match.
Cute and simple, and my daughter LOVED it. Mission accomplished.
You can now create your own Easter Egg or bird’s egg, or design this to look like your own bunny, or try a chickie, a bird, owl, or anything that has a oval body! A little creativity will go a LONG way with this one.
We want to see what you do, so if you do decide to try something “out of the box” send a link, email us, post ir on Facebook or Pinterest.
I’ll be back to announce our WINNER of the $10 Gift Certificate on the 7th.
Good Luck!
A little something…
Mar 2, 2013I am going to share what I have created with our newest cut file we have released this month called Bag-sket.

Available in PDF, SVG, GSD, DXF, WPC
Completed Project Size:
2 3/4 X 2 1/2 Inch Wide
5 Inches Tall
The team had suggested this as a card, and I felt allowing it to become a super quick “bag-sket” would be even better!
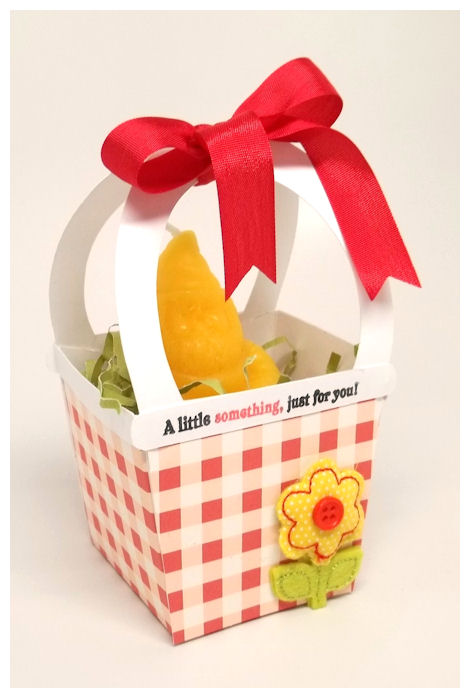
Whether you want a “bag”, or a card, this sweet little “bag-sket” is a great two for the price of one, cut file. Now you can have a super cute basket shaped card, OR a fun little treat bag, designed to look like a basket. Perfect for Easter, Spring, Mother’s Day, or whenever!

My sample here was super simple!
I used white cardstock as my base, then I cut my Bag-sket panel and decorative layers using the Picnic of Patterns © collection, as I felt it was very SPRING and basket like! LOL!
I added my sentiment from the Secret Surprise © set, as it was PERFECTION!
I love the little felt flower sticker in the corner, and my sweet little GNOME candle peeking out of the “grass”!
I hung this on the door of my friend who actually hates GNOMES because I wanted her to SMILE and think they CAN be cute! If she still hates them than she can enjoy burning the candle. If she loves him then she can keep him on her desk and think of me! LOL!
She is still undecided as to his fate, but it did make her laugh 😀 Her daughter instantly took the basket for herself and is storing her own little items in it. Gotta love recycling.
Until tomorrow!
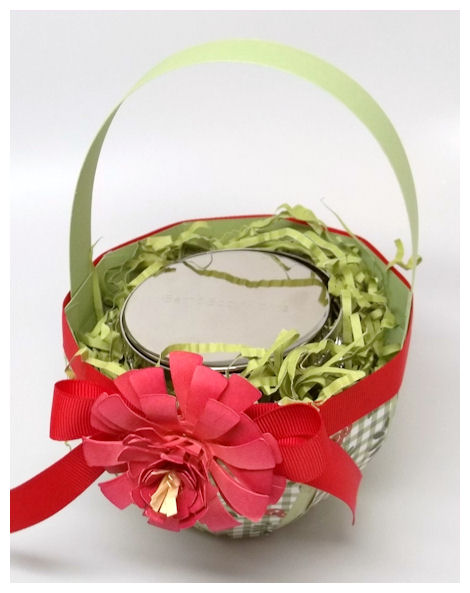
Egg-stra Special Basket
Mar 1, 2013- Lauren Meader <—you are here
- Lori Kalus
- Karien van der Westhuizen
Today I will get to share yet another fun project using one of our newest templates the Egg-Stra Special Template.
As I mentioned previously *The bottom could be used on its own to create a “basket”, or the top could be used on its own to create a bee hive!* So I thought I’d share the basket sample here today!
Using *just* the bottom of the Egg-Stra SpecialTemplate today to make my sweet basket here:
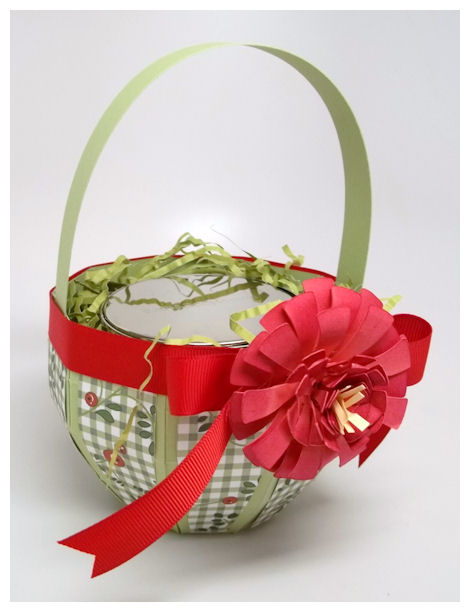
I had a large candle from Bath & Body Works that I wanted to give to my mom’s friends sister (follow that ?) who is going through chemo for Colon Cancer. It is their Stress Relief scented one that smells amazing. It fit just perfectly in here, and it is in a silver leaf patterned holder too.
Simple gift that cost about $6
I don’t KNOW her friends sister personally, but I do know my mom’s friend, so I made this in hopes that this little something will brighten her day, and let her know my family is praying for her.
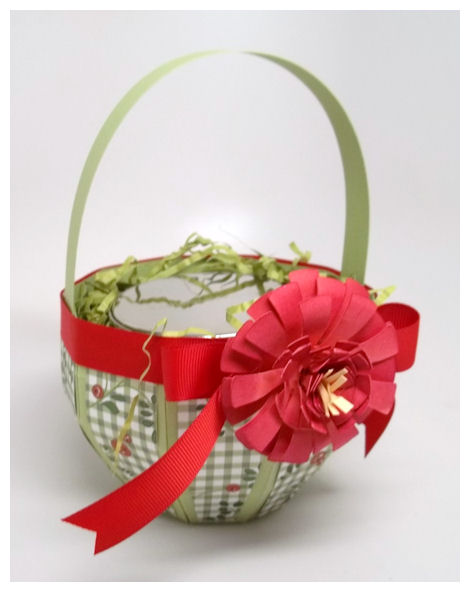
I wanted to keep it quick and simple since I was on limited time (I am currently in school! Long story.), but still wanted to make something from the heart, so I used a celery cardstock as my base, and chose the Farmhouse Fresh © paper collection for my basket. I chose this pattern because is mimicked a basket weave, but has the leaves and berries too.
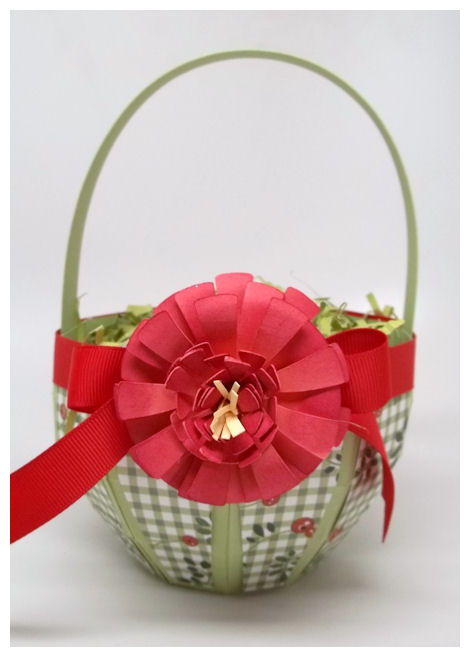
So keeping it simple I dressed it up by adding my flower which I made using the Rolled Bloom Modern ©. These flowers are SO easy to use, and its so fun to be able to say I MADE THAT FLOWER!!! People’s jaw will usually DROP when you say that 😀 Gotta love it.
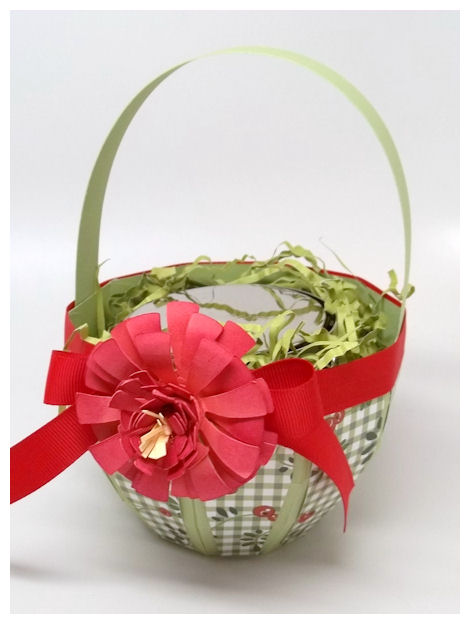
I believe this took about a 1/2 hour, start to finish. Not too bad considering it would take me that long just to get out the door to the store. I was able to customize it to fit my wants/needs and NOT leave the house. It took 2 pieces of cardstock (at 0.09 cents each) and 1 piece of paper that I printed myself (so maybe 0.20 cents at most, given cardstock, and ink use), then my flower was a 1/2 sheet of cardstock, so another say 0.06 cents at most! So a total gift wrap cost of 0.44 CENTS to make, and I saved my money on gas, and saved my time running out to the store.
I ended up placing this in a large cello bag, and tied it off with a tag I had created previously, and just printed/cut and went. Due to my hectic work schedule I didn’t have time or energy to get a final photo, but you get the idea.
My mom said her friends sister was very touched by the gesture and she couldn’t believe someone who didn’t know her would make something just for her. Now THAT is heart warming. I have been on the other end of such gifts when Alexa had Leukemia and I can tell you they made all the difference. From the handmade cards to anything else people sent for her or I, it was SO TOUCHING to think that people took a moment to think of us and send something along. The entire wall of her hospital room was FULL of cards from people all over the world! People/staff all over the hospital would come by to admire the handmade cards from people all over the world. It was so amazing. We still have every single one!!!!!
I’m telling you its little gestures that make the biggest difference.
So give it a try. Make something simple for anyone who may need a little pick me up. I bet you end up feeling better than they do! LOL!
OR if you make a ton of stuff and have NO ONE to give them to, try sending them to a Cancer center in your area! Or maybe you have another organization that has touched your life. Any place that people are in need of care it is appreciated, I promise you. You can spend your time doing something you love, and then you get to give back to those less fortunate.
It’s a win, win!
See you back here tomorrow.
March Collection Winner!
Mar 1, 2013It’s so hard to choose just one. Lauren you are constantly inspiring and your creativity always shines through. I always look forward to seeing what you will come up with next. The beautiful jeweled Egg-stra Special Template shared by Debbie Marcinkiewicz was so detailed. I loved the sting of pearls in a flourish along the sides and the added touch of the silk flower were the perfect finishing touches. I can see using this template as a jewelry box. The Frog Prince using the Display template by Lori Hairston was so inventive. The lipgloss as a treat inside was the perfect play on the theme and beautifully done. Well done to all of the design team! Thank you again so much!
————————————————————————
Alicia contact me at [email protected] to redeem your prize!
Spring Has Sprung! March Release is Here!
Feb 28, 2013March is here! Our winner for the entire March Release will be announced later today! So be sure if you haven’t yet, pop on by to our designers to enter yourself to win our ENTIRE March Release in the post below this one.
We have an amazing collection of coordinating items this month with Spring in mind.
My company focuses on the “complete package”. We work hard to offer coordinating products that are easily interchangeable with previously released products. We really enjoy being able to share the ideas and versatility each product holds.
Given the tough economy, we announced on the 27th, that as of today, we have now decreased our prices by 20%!
I may be a company owner, but I am really just like you. I’m a stay at home mom to 3 children, living on one primary income. I get to share what I love with the world and enjoy what I do. I KNOW how hard it can be to try to keep your family going, while maintaining your sanity through crafting, and be able to afford to buy some items without a lot of guilt! So after much debate I feel this change will help all our very valued customers 😀
So here is what we have that is NEW for MARCH:
We have released:
2 NEW! Pretty Packaging Templates
4 NEW! Pretty Impressions Stamp Set Singles
1 NEW! Pretty Printable Digital Paper Collection
Also be sure you check out our Pretty Package Collection, where you will always save 25%!
We’d like to introduce you to our 4 NEW Design Team members today!
We are excited to have them join our team. Each has a NEW project for you today, so please WELCOME them. Also be sure you check out our entire team today,as we are each sharing some creative ways to use the *NEW* products for March as well!
- Lauren Meader
- Debbie Marcinkiewicz
- Kimberly Morrow
- Lisa Kind
- Lori Hairston
- Lori Kalus
- Pattie Goldman
- Tangii Crain
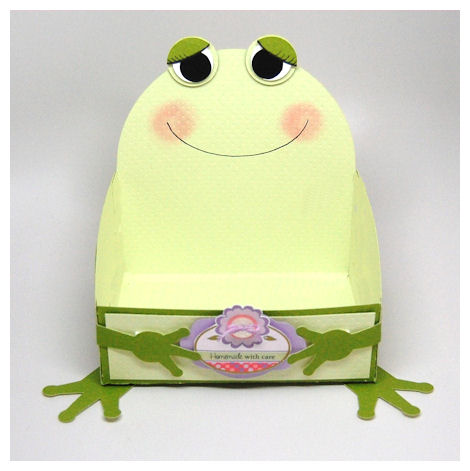
Today I am going to share another fun project using our NEW! Display template.
This template can be used to display ANYTHING you want…
This template actually came about because I was going to a baby shower of a family friend and her theme was FROGS!
She was having a baby girl, and her entire room was purple and green with froggy accents. I ALWAYS have to stick to the theme and I even made the centerpiece as well, my very first Diaper Cake! Photos on that at the end of the post 😀
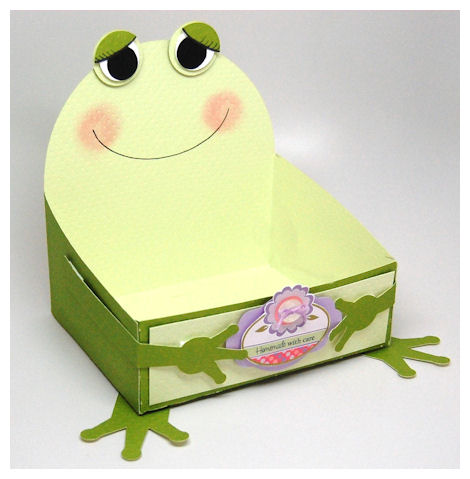
I used a fun embossed cardstock that was double sided. It was cute because the dots reminded me of the frogs skin. One side of the cardstock was olive, and the other a very pale green.
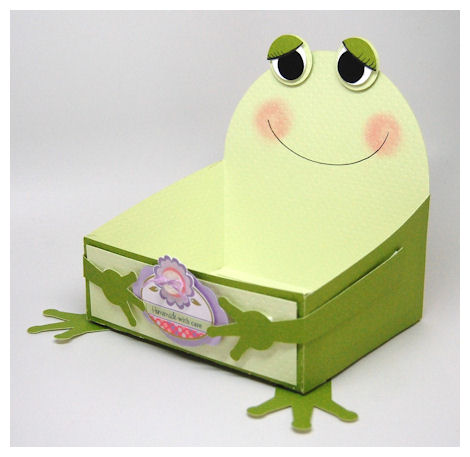
Perfect because it was just like the frogs skin. The inside being lighter, like the belly of the frog.
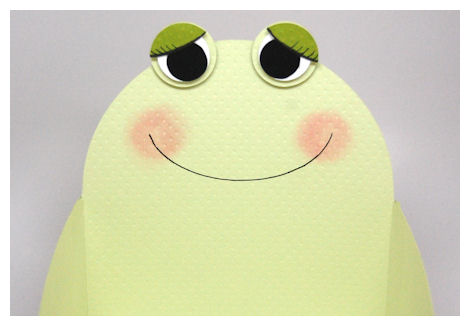
I added eyelashes to the frog eyes with a marker. Brushed on some chalk for the cheeks, and used a oval to draw on a mouth! ANYONE could do this!
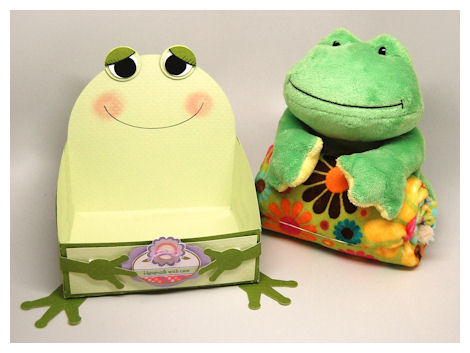
I found a super cute handmade SOFT baby blanket on Etsy that was a frog, and I just HAD to get it for her. Once it arrived I was trying to think HOW I would package it up. As you know I am all about the packaging. THAT blanket sparked this entire template.
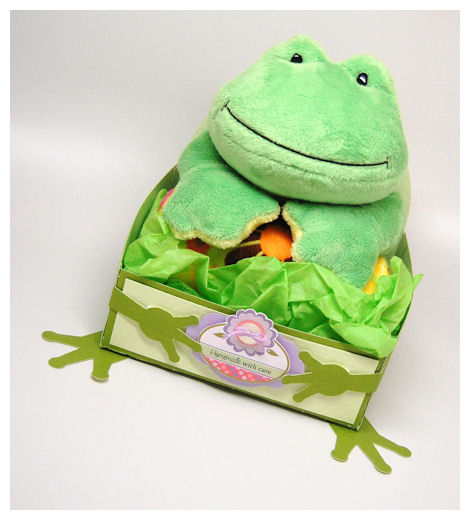
I rolled it up, and placed it into my cut Frog themed Display box!
The Frog piece COME WITH the template, so no need to try to make your own. A great box for boys too 😀 Or Princess & the Frog themed party maybe?!
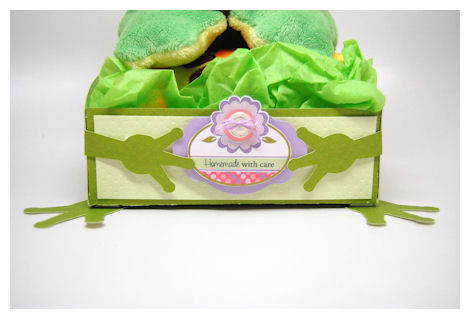
I love how the frog hands are holding the little tag, and the feet are sticking out.
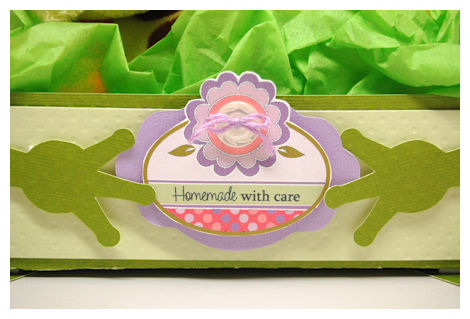
The tag was created using the Round Off © set, colored digitally, and layered onto a tag cut out of lavender using the Fine Finish © tag cut file.
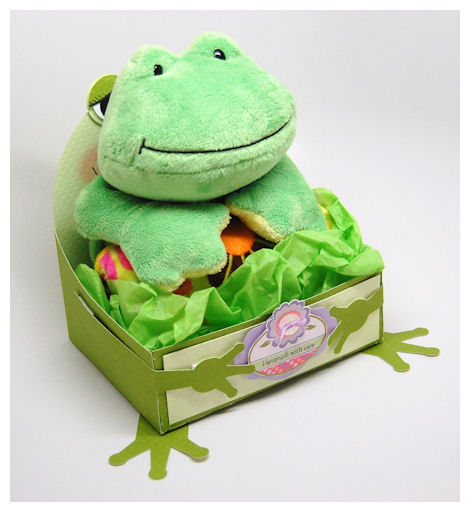 I have to say it was a BIG hit!
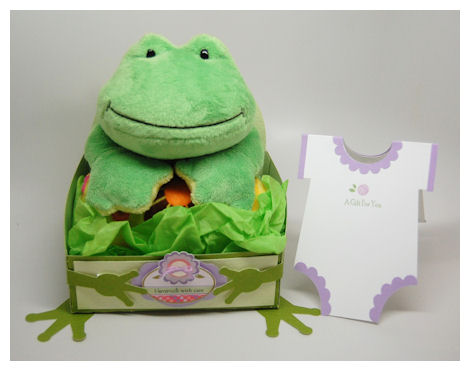
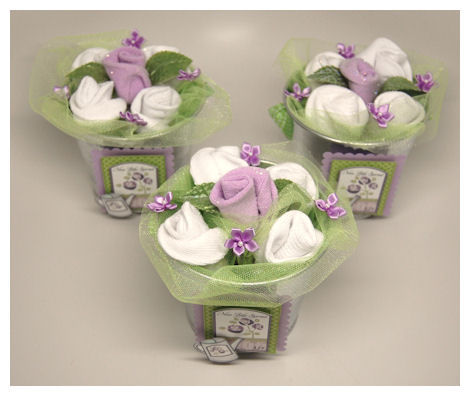
Here is the gift set, completed
I used the Lil’ One-sie © cut file to create my card for the gift.
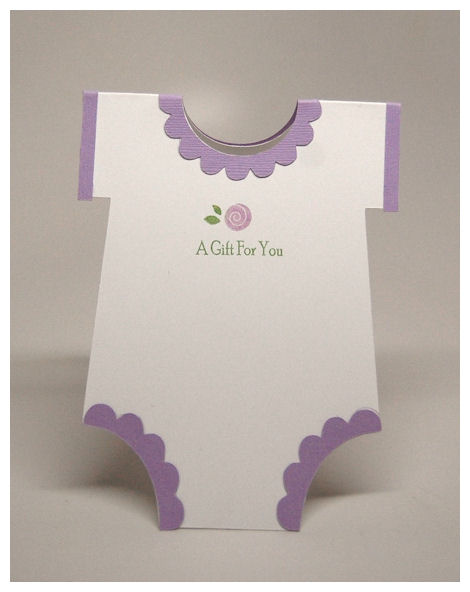
The rose is from our A Spot of Tea ©set, and the sentiment is from the Bringing Home Baby © set. Simple & easy, but OH-SO-CUTE!
As was the diaper cake I made, as requested for the centerpiece of the shower!

My very first one, I was SO PROUD of it.
My 8 year old daughter Amber helped by wrapping ALL the diapers.
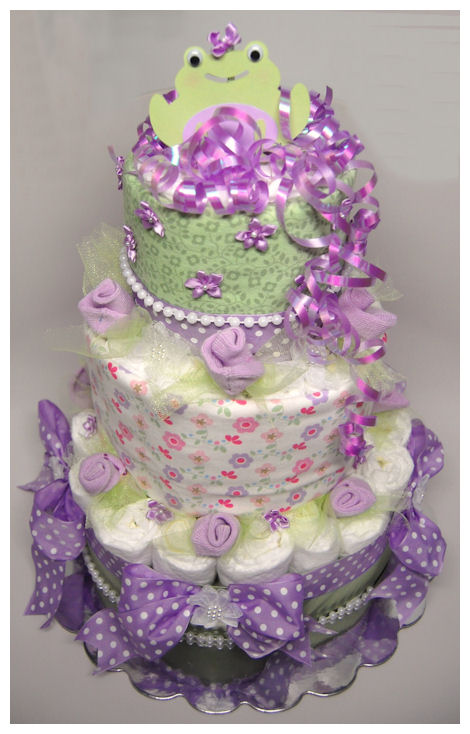
I then layered them and wrapped them with my receiving blankets.
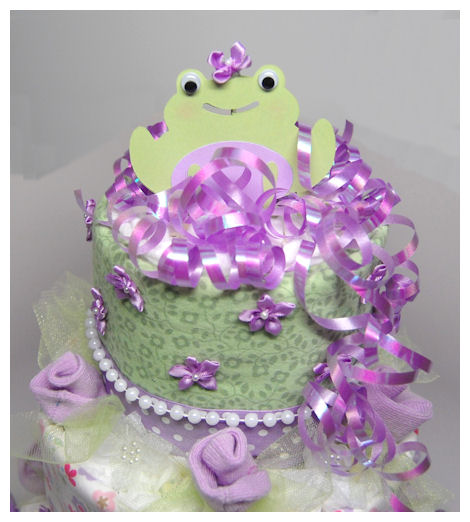 I made the little frog from cardstock., and placed her on top of the diaper cake with some pretty spiral ribbon I curled.
 I added some ribbon, pearls, and some little ribbon flowers. In between the layers I rolled baby socks into “roses” and I wrapped them with tulle “leaves”, and added them to the layers.
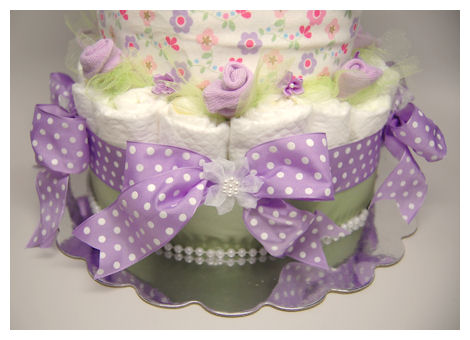
NOTHING is GLUED! The blankets and baby socks are all usable, as are the entire package of diapers!
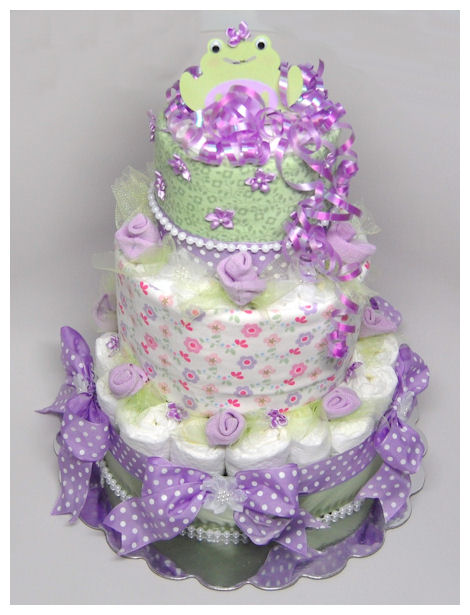
I bought a cake board that is basically scalloped silver cardstock. It provided a sturdy base and made it look more professional.
I was pretty happy with how well everything turned out considering I never made one before. People couldn’t believe I never made one before (yes giving my own horn a little TOOT!) I hadn’t had that much fun in a LONG time!!
I had also made the centerpieces, as you may recall a while ago

These flower pots used the Tending The Garden © 50 Images – Digital set!
I LOVE digital images because you can nix, match and resize everything to suit your needs, as I did here.
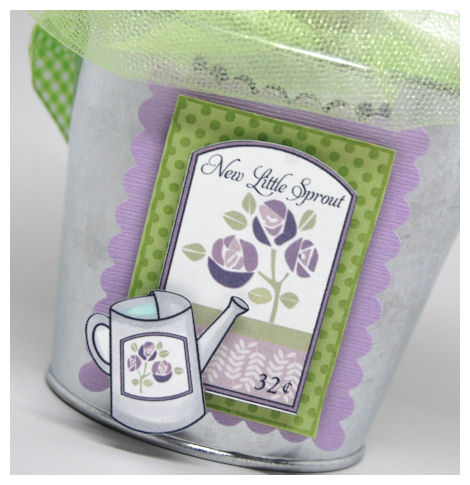
Filled the flower pots with the little “rose” baby socks. Just like on my cake.
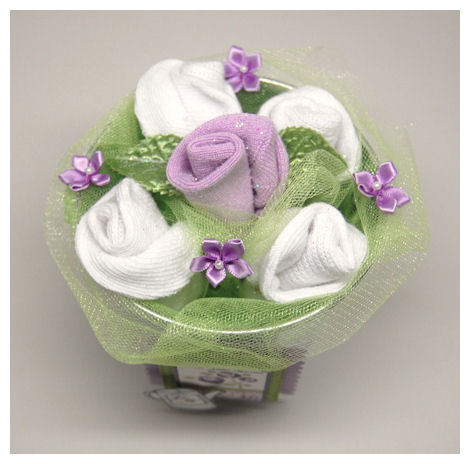
This was the back side…same little frog as my cake topper!
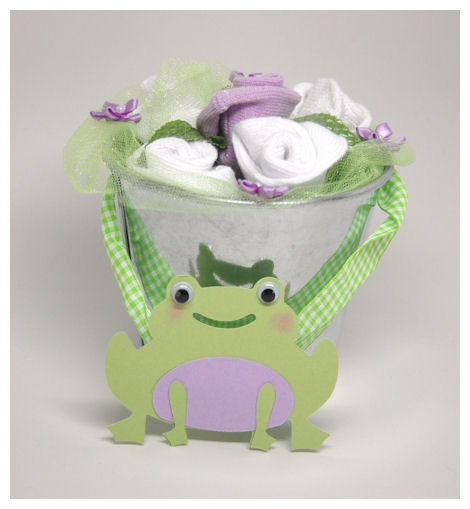
I made 15 in all.
We tied balloons to the centerpieces as well.
It turned our really pretty.
I hope that got your creative wheels a churnin’!
I’ll be back to announce our winner for the March Release items.
Come back tomorrow because we will have many more fabulous project ideas for you all to try.
Put it on DISPLAY! Giveaway
Feb 27, 2013Welcome back to our Day 2 Preview at My Time Made Easy ™ LLC.
We all have so much to share, so I hope you will take a moment to visit our talented designers, because if you do you could have a chance to win an amazing prize package!!
Today we’d like you to leave a comment HERE telling us WHO had your favorite project so far (from yesterday’s projects, and today’s) and what you liked about it.
Today’s Projects
Display
Egg-stra Special
Yesterday’s Projects:
Egg-stra Special
· Lauren Meader
· Debbie Marcinkiewicz
Display
· Kimberly Morrow
· Lisa Kind
On the 1st we will randomly pick a winner to receive the ENTIRE release collection!
Best of Luck!
Now if you like to have a plethora of gift ideas at your finger tips then please view our Gallery for project samples, and alternative ways to use all our amazing coordinating products!
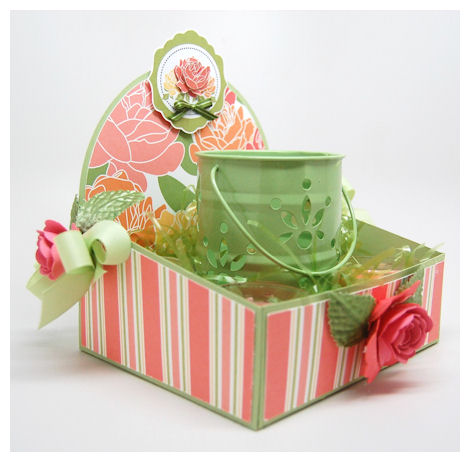
Today I am sharing another preview of our 2nd template we are releasing this month tomorrow on the 1st.
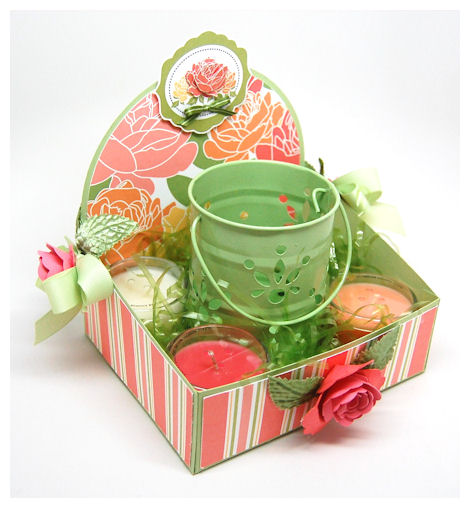
Available in PDF, SVG, GSD, DXF, WPC
Completed Project Size:
6 Inches Tall
6 Inches Wide
5 Inches Long
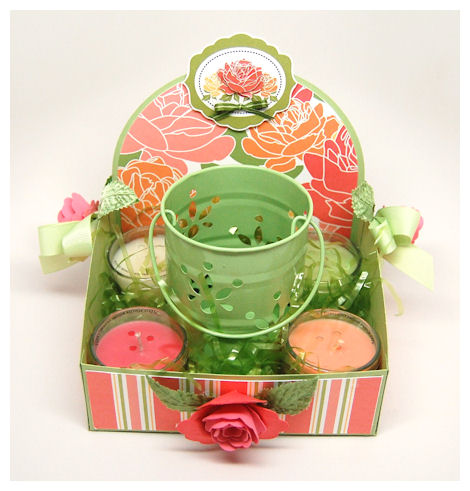
This gift box was designed for when it is time to “display” your gifts! It offers the perfect open box concept to hold and display your gifts with pride!

Here I packaged up some sweet scented candles from Bath & Body Works, and a candle holder I got at the Target $1 spot. In total the gift cost about $7. Of course I wanted to dress it up, and make it look more “expensive” and “special” so I use the Display template to do just that.
NOTE: This box even comes with a fun set of Frog pieces to further expand the possibilities! More on that later this week!
This box can be made to display in any room and become any favorite creature or character too
Whatever you choose to “display” it is sure to pack that special something to make everyone take notice!
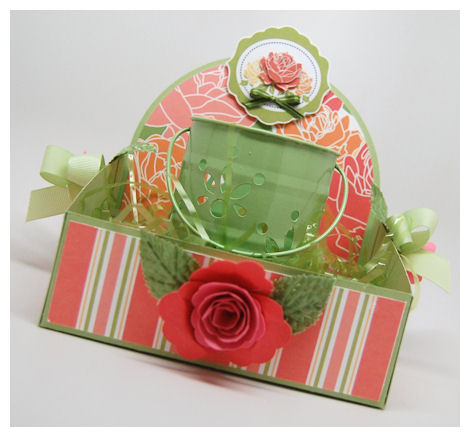
I chose to use the Parade of Patterns © stripe and roses pattern for my box design, and it matched my candles and holder to perfection!
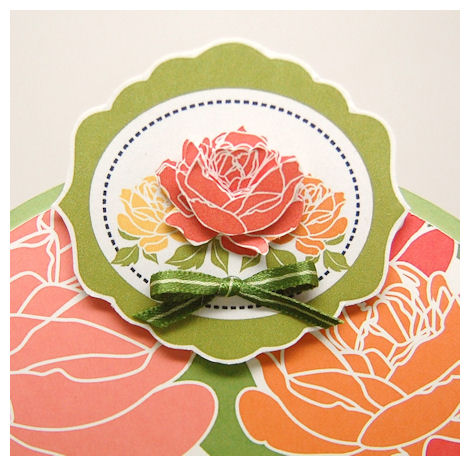
My top tag was created using the roses from the Well Rounded © set, and the label from the Framed Elegance © set, which was cut out using the Framed Elegance © Pretty Pieces Cut File. The rose was printed and cut out several times to create some dimension.
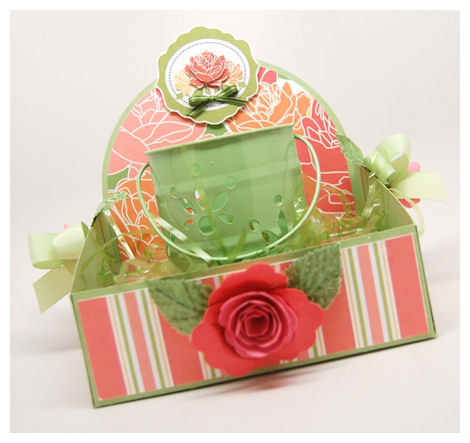
The rose in the front of the box, and the sides was made using the Rolled Bloom Scalloped ©
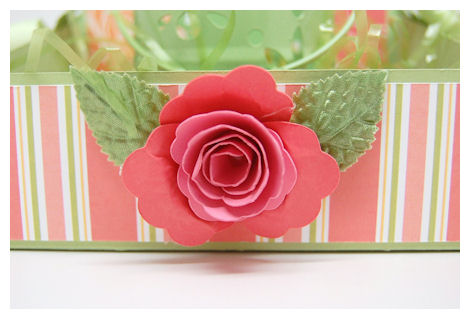
Then I made the roses on the sides as well
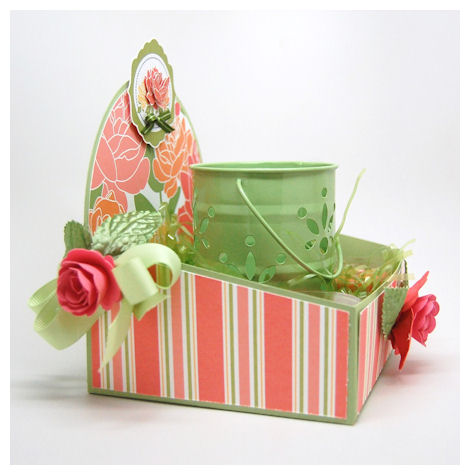
I think they really add the little something SPECIAL!

You can fill this up with a plethora of gifts from gifts for baby, clothing items, cards, candles, plants, bath & beauty products, art supplies, homemade treats, or handmade sweaters, scarves, candy and MORE!
So what are YOU going to choose to “DISPLAY” in here?!
Thank you all again for stopping by. We cannot wait to hear what you have liked about this release so far!
As you know tomorrow is our official release, so you can get all our NEW products then.
We will also announce our winner of the entire March Release then as well.
See you tomorrow.
A little something Egg-stra Special!
Feb 26, 2013Welcome Back!
While today I am thinking about Spring, here in New Hampshire we’ve just had quite the snowstorm with 12 feet of snow, at least. It stuck to the trees, and is just a beautiful sight to behold. It’s almost too pretty to wish away just yet!
That being said despite the snow we are plowing ahead and thinking Spring which really isn’t too far around the corner March 20th. So for our March Release we ARE thinking Spring and getting ready for the next holiday-Easter.
SO here is who you will want to visit today for the first previews of what it to come:
Egg-stra Special
Display
As you have come to know our Official Release in on the first. We have many great things to come and one of those great things is that we are decreasing our prices by 20% on the First of March, and we will be announcing 4 NEW Design Team members as well. I hope you will welcome them when the time comes 😀
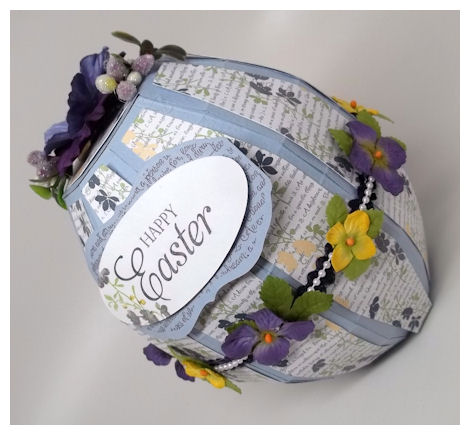
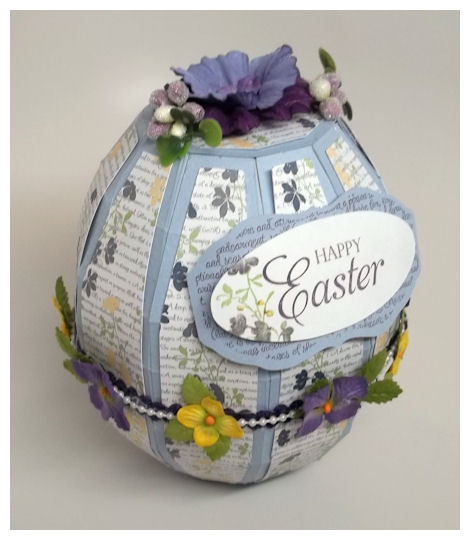
Today I am previewing the Egg-stra Special template.
They always say “which came first, the chicken or the egg?”, and in my case, the egg came before the products, so all my items used are older products!! Our design team will have samples using NEW products today.
Available in PDF, SVG, GSD, DXF, WPC
Completed Project Size:
- 6 Inches Tall
- 5 Inches Around
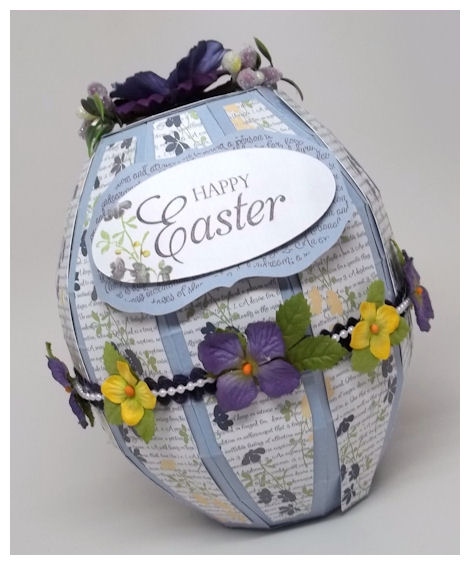
Looking for something a little “egg-stra” special to give this Easter? Do you love opening up those plastic eggs each Easter to see what tiny treasured treat is awaiting your discovery inside?!
Ever wish those little eggs were BIGGER?! Look no further! We have this amazing free-standing, 3 dimensional egg!
Well now you have your very own larger version made from cardstock!
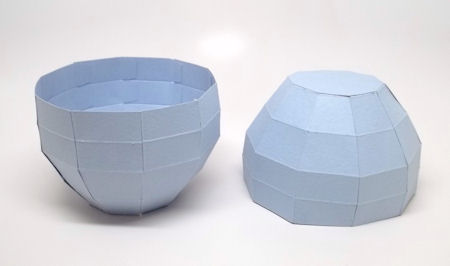
These are the two pieces (Top & Bottom) opened up so you can see just how the egg opens!

I’m not yet sure what I am going to place in my egg, but I’m thinking a Lindt Chocolate bunny, and some truffles as filler.
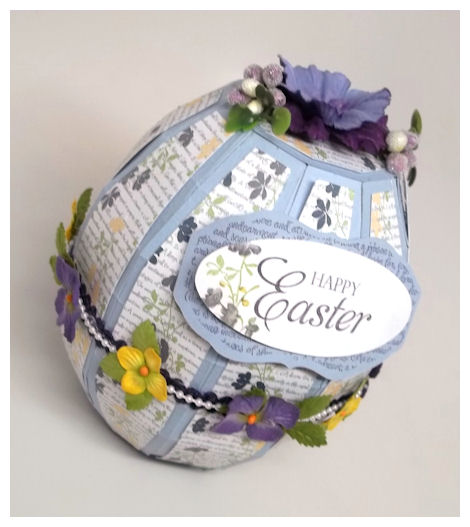
I used an amethyst cardstock for the egg, and then chose the stunning floral/text pattern from the Amethyst Sparkle © collection.
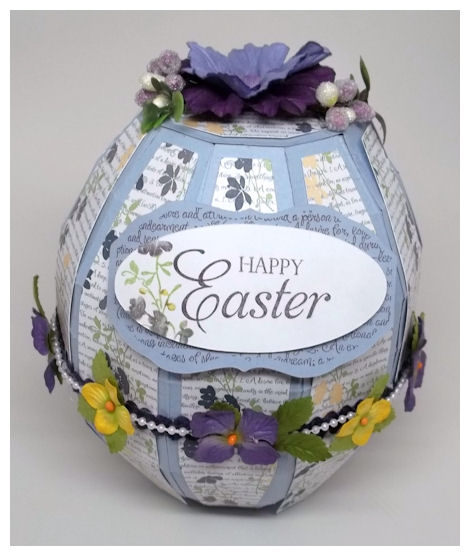
I then cut my label using the Occasional Label © cut file, where I stamped on my text from the Occasional Labels © set. The Happy Easter sentiment is from our Sentimental Occasions © set which is fabulous, and works perfectly with the frames and cut file. The flowers on the side of my label matched my paper, and are from the Framed Elegance © set.
I LOVE being able to mix and match everything to get one cohesive project.
Around the edge I added some velvet ric rac in eggplant, and some pearls, with some pretty Prima flowers all along the edge.
So may possibilities for this template.
You can now create your own Easter or bird’s egg, or design this to look like a bunny, a chickie, a bird, owl, or anything that has a oval body! A little creativity will go a LONG way with this one.
*The bottom could be used on its own to create a “basket”, or the top could be used on its own to create a bee hive!*
This template can be used to hold gifts for Easter, a new baby or mom to be, a plush toy, stuffed animal, candy, homemade treats of any kind, jars of jam, egg decorating kit/items, games, soup or dip mixes, baking items…to name a few.
Whatever you decide to enclose in this fun template is sure to feel egg-stra special!
Please view our Gallery for project samples, and alternative ways to use all our amazing coordinating products!
Also if you haven’t already, you can follow us on Pinterest, as we have over 16 pinboards full of ideas, we are also on Facebook-so LIKE US there, and follow us on Twitter!
We will return tomorrow for more great gift ideas previewing our latest products.
Whoo…Loves FREE Templates?
Feb 13, 2013Well I sure hope YOU do!
♥ Happy Valentines Day Everyone ♥
In honor of this day, I thought I’d release a *NEW* template, based on something that I L♥VE! On top of that I thought we’d find a way to make that special template available to you for FREE!
Keep reading!
Now through February 21st 12am (EST), when you purchase $14 of product (or more) you can earn this ADORABLE new template called Whoo’s Birthday FREE!!
THIS IS HOW:
When you place your order of $14 (or more) add Whoo’s Birthday to your cart, and enter the COUPON CODE: WHOOLOVES at checkout!
Hurry over as this promotion ends February 21st
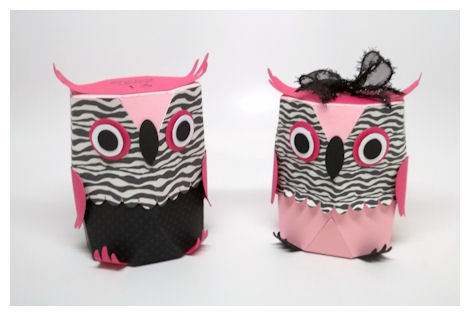
Whoo’s Birthday *FREE!*
(with purchase of $14 or more)
Available in PDF, SVG, GSD, DXF, WPC
Completed Project Size:
2 1/2 X 3 Inches Around
4 1/4 Inch Tall
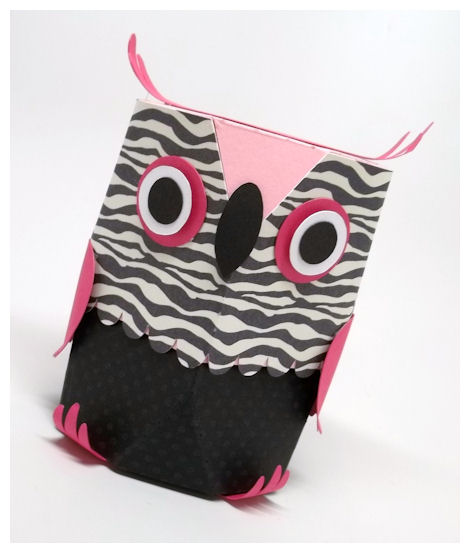
Whoo doesn’t love owls?! (Not you? Don’t worry, there are more ideas)
They are personally a favorite of mine, and I have many throughout my home.
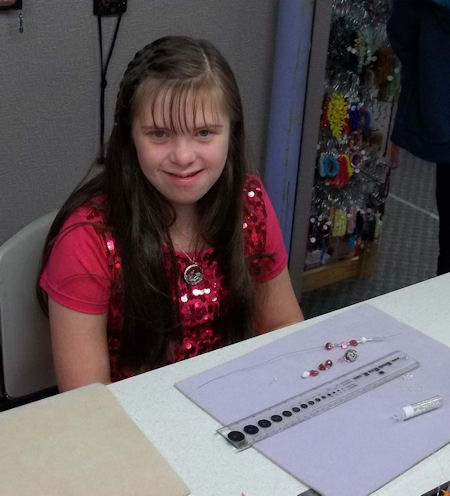
I created this adorable owl themed gift box after viewing a FLAT version of an origami owl. I thought it was SO CUTE, but I wanted a dimensional version of the flat paper picture I saw. The idea came to me because I purchased a unique locket like necklace from a company called Origami Owl, for my daughter Alexa, on her 13th birthday.
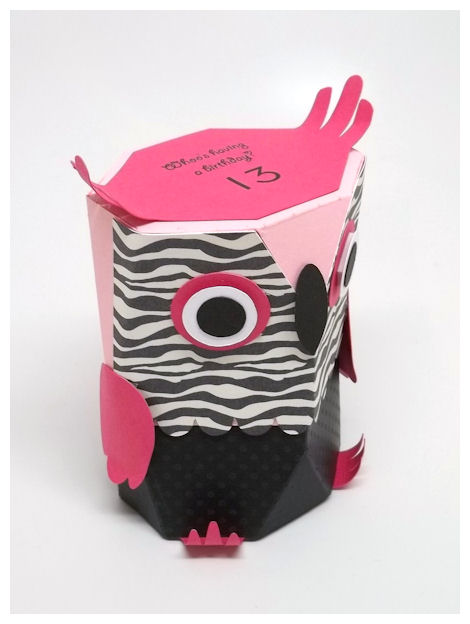
That is HOW the name came to be “Whoo’s Birthday”!
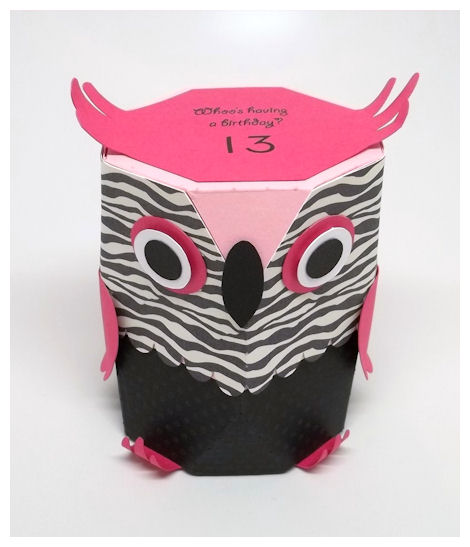
The sentiment is from the Critters with Heart © set, and the numbers 13 are from the Harriet Hop-Along Birthday© set. Pretty perfect!
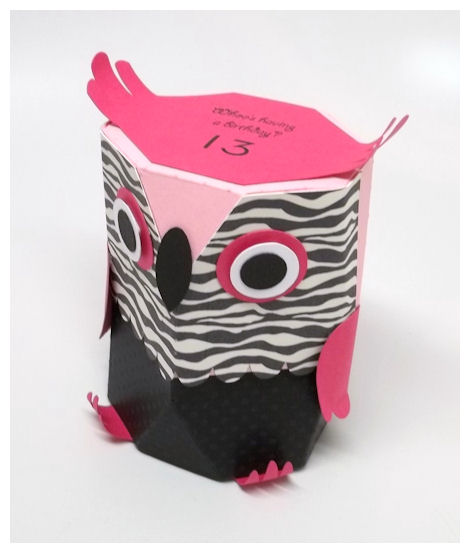
Alexa also loves owls, and she LOVES pink, and of course zebra print, or anything black & white! (The paper will be released in April-sorry I couldn’t resist using it here, so stay tuned!)

The angles of the box are unique, and will allow you to use your own creativity (and maybe some of our other products) to create a variety of other “creatures”, or even characters/people.
This is the PLAIN version
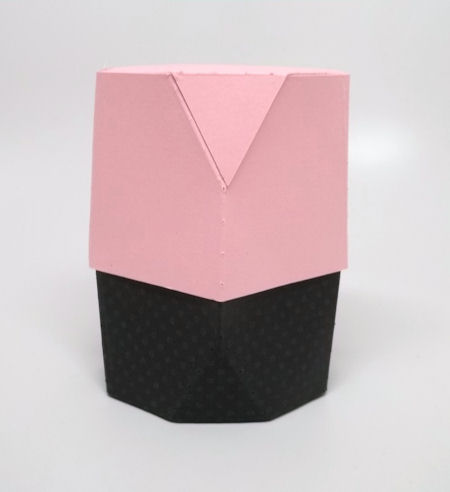
Add a little creativity…
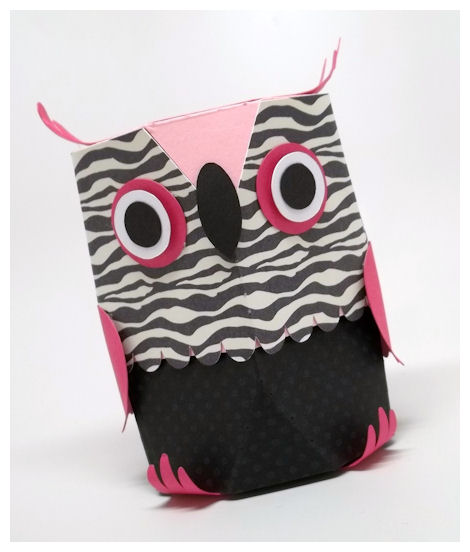
and you get this UBER cute Owl!
I can picture this being a fox, raccoon, skunk, or bunny, to name just a few.
“Whoo” ever you make this box into it is sure to be a surprise, and loved to pieces!
So make sure you go get yours FREE (with the purchase of $14 or more), for a limited time only!
Now you are most likely wondering what I gave Alexa for her very special 13th Birthday!
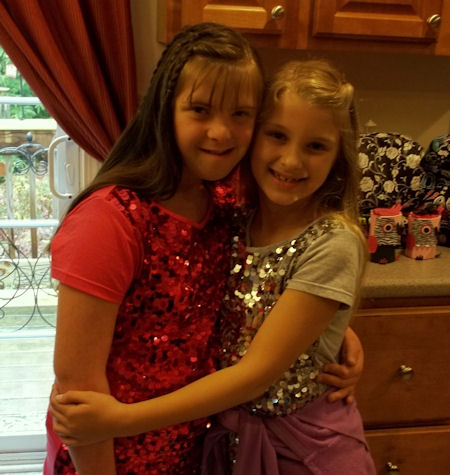
You can see in the background it was a ton of stuff, but the most special thing was her necklace from Origami Owl. I had meant to share this for some time now, but had to wait until we were releasing this fun new template!
ABOUT the necklace:

So I have this pretty bligned out locket, and I have chosen charms to customize it, to tell the story of Alexa’s life.
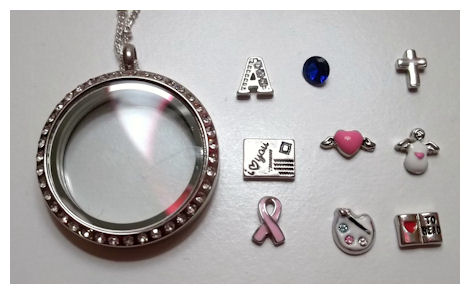
Here are the charms, and what they mean to me, for telling Alexa’s story
The Bling A is for Alexa. She has this internal sparkle, and really lights up the hearts of everyone who knows her. She is also at that age where the more BLING the better (I can totally relate!)
The Pink Ribbon is in honor of her surviving Leukemia! (Note: They DO have an orange ribbon, but since pink is Alexa’s favorite color, I opted to just go with it-it doesn’t really matter what color, it was the MEANING it had). I mean seriously Alexa is so strong and brave! I don’t know how she got through all that. Ok maybe I do…
The Cross-I pray God always watch over her, and that she have a strong Faith in him. I know I wouldn’t have gotten through anything with her if I didn’t have Faith in God. He has carrried me through many scary times in life, and always the lowest of lows, and scariest times were event concerning Alexa.
The Angel-I honestly believe Alexa is MY angel here on earth. I feel like she has shown me the world in ways I’d never see it otherwise. She IS a little part of a BIG plan God has us. She teaches me what is important and keeps me grounded. Also I believe Alexa has her own guardian angel with wings of STEEL!!! I believe it has taken her to and through many life altering obstacles.
The heart with wings, has a few meanings. Always follow her heart and love to the fullest. Also, Alexa had open heart surgery when she was 21 days old. So I associate this with her getting through that by God’s grace.
A Sapphire for September, the month she was born.
The painters palette-Alexa LOVES to paint, draw and color! She hopes to illustrate and write her own poems/books some day!
The book is because Alexa has always loved to read! It is her favorite thing to do. You will always find her with a book.
The Letter that says I Love You-Alexa also LOVES to write and dreams of one day becoming an author of children books or poems. She is forever writing me letters! I save every single one. Doctors told me I’d be lucky if she ever knew her own name, and here she is writing me notes, and creating poems, and stories with such detail, its AMAZING. I’m so glad I never let the doctors infuence me in any way because I truly would have missed out on the greatest gift I have ever received, my heart, my Alexa.
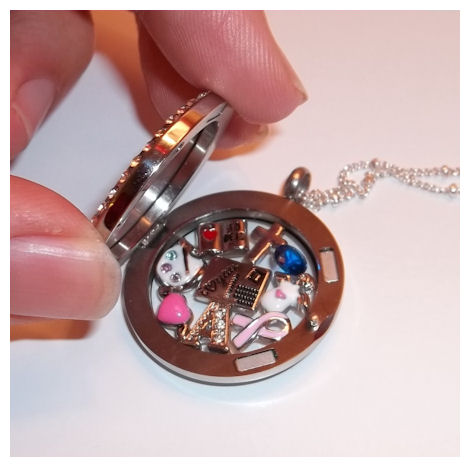
It’s amazing that one piece of jewelry can capture such an amazing story!
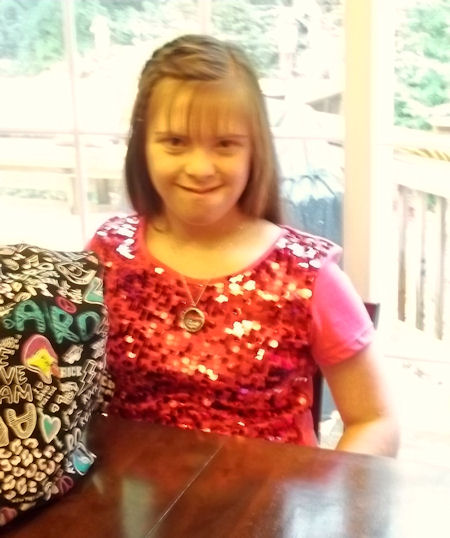
This was the BLURRY photo, after she got it, and put it on!
This one is much better!! She gets TONS of compliments on it when she wears it. It’s funny because she is so shy, she isn’t big on drawing attention to herself (I know hard to believe when you buy a SPARKLY shirt like a disco ball! LOL!).
I got my origami owl locket necklace and pieces from my dear friend Tessa Miller-Schweder!
If you want to view their products you can check them out here www.charmedmemories.origamiowl.com She is designer 3671.
Here is her Facebook Page
https://www.facebook.com/charmedmemoriesbyt
Don’t worry if you don’t have Face Book because you can email her at [email protected]
I believe she may be having a GIVEAWAY on her blog —> https://kraftymama.blogspot.com/ so check her out and let her know I sent you 😀
We will return on the 27th to prepare projects for the March Release, so please come back then!
Happy Valentines Day!
I wanted to showcase it in the most special way, for such a special day. I have to say it turned out better than I had hoped for. All the pieces just made that flat origami owl come to life. I could make so many of these.
February Year in Review
Feb 3, 2013- Lauren Meader
- Debbie Marcinkiewicz
- Kimberly Morrow
- Lisa Kind
- Lori Hairston
- Lori Kalus
- Pattie Goldman
- Tangii Crain
- Tina Hale
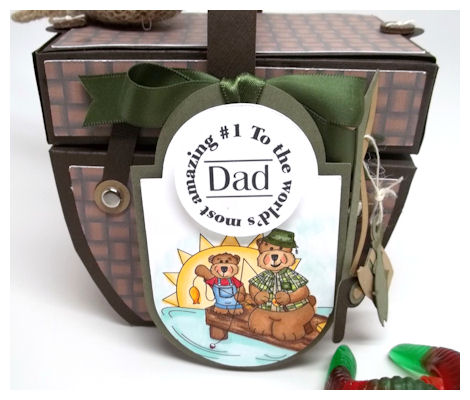
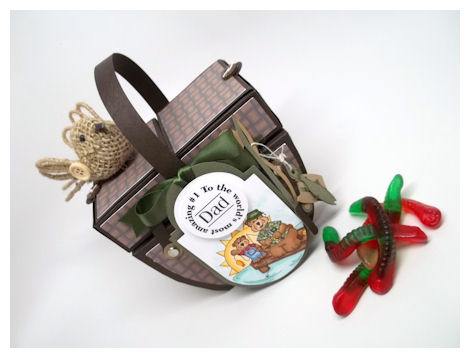
I figure since its been ALL about the girls from me this week I’d share a cute idea for the MAN (or dad) in your life. With Valentines Day on the horizon I wanted to make something for Jason that he could enjoy. He loves Gummy Worms, Swedish Fish and anything SOUR! Upon thinking of a fun way to package those items, as I stared at the gummy worms it hit me-TACKLE BOX!
So I got to work, using the Grammy’s Sewing Kit © to create my little treasure.
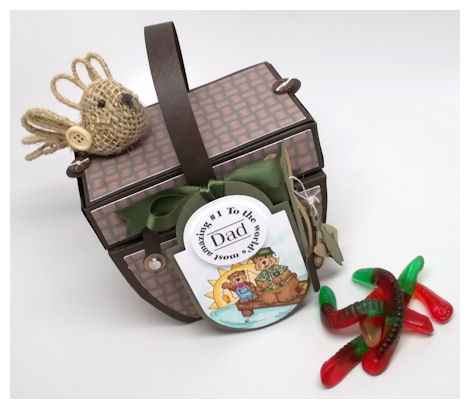
I used the Well Woven © paper collection so the template would look like a “basket”.

I used the cute Let’s Go Fishing Single © image for my tag. I had a blast coloring it in. it has been a while since I used my Copic markers.
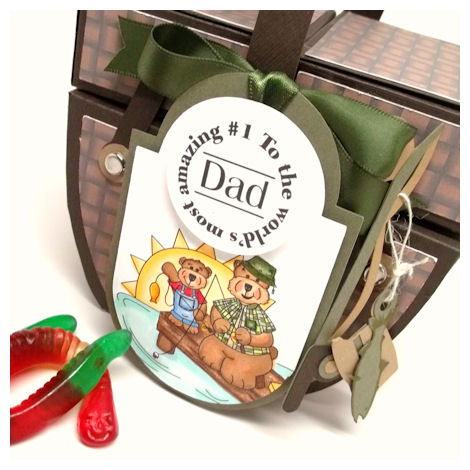
The tag was cut using the Round Up Tag © cut file. I added the sentiment from the
My Etsy

Who I Designed For
Blogroll
- Alicia
- Alli Miles
- Ally Blankenship
- Amber
- Andi @ crafts on a whim
- Angel R
- Angie Z
- Anne Kranitz
- Becky O
- Bee
- Beth Silaka
- Bethany Paull
- Beverly Nash
- Bobbie
- Cambria
- Cammie
- Card of the Week
- Card Positioning System (CPS)
- Cards for Cancer
- Catherine Doucette
- Charmaine
- Cheryl Sims
- Chriss Rollins
- Christina
- Christine Ewing
- Christine Wooden
- Colleen Schaan
- Craft Critique
- Craft Gossip
- Crystal
- Dawn Easton
- Emily Giovanni
- Geny
- Holly
- Igne Groot
- Inspirational Craft Blogs
- Irene
- Jami Sibley
- Jeanne Streiff
- Jen del Muro
- Jeni Bond
- JenMarie
- Jenn Balcer
- Jenn Diercks
- Jenn O
- Jennifer E
- Jennifer Mick
- Jennifer Pereda
- Jennifer-Sweet Treat
- Joanne Basile
- Jodi Collins
- Julia Stainton
- Julie Masse
- Karen
- Kathryn Berthiaume
- Katie Cotton
- Kelley Holland
- Kendra
- Kim Scholfield
- Kris’s Color Stripes! Get inspired here
- Kristen Dubosque
- Kristin Eberline
- Kristine
- Laura @ Sunshine Stamper
- Laura Turnmire
- Laurie Schmidlin
- Lesa Rapp
- Linda Duke
- Linda-LSN
- Lindsey Botkin
- Lisa (lakind scs)
- Lisa Kind
- Lori Craig
- Maggie
- Mara Campbell
- Maria
- Maria Levine
- Mary
- MaryJo
- Melanie M
- Monique Hansen
- Moxie Fab World
- Pam Imholz
- PaperCrafts Connection
- Peppers and Pollywogs Kids party site
- Rebecca Grohall
- Rita
- Robyn
- Rose Ann
- Sarah Vrolyk
- Sharon Harnist
- Sharon Johnson
- Sharon Rivera (a chemisrty with paper)
- Sherrie
- Sophia Landry
- Storage Units, Ink, & More Blog
- Sue Berker
- Susan (Rainy)
- Tangii Crane
- Tracy
- Tricia Traxler
- Trudee
- Velta
- VivLyn
- Zena
MTME Pretty Palette Color Team
MTME Pretty Patterns Sketch Team
My Time Made Easy TM LLC
Shop till you drop!
Lauren Meader
About Me
Copyrighted material
Subscribe To My Blog
Pages
- About me
- Alexa’s Story!
- My Crafty Corner!
- My Time Made Easy™ LLC
- Our Make A Wish Trip to Disney!
- Resume/Publication List
Calendar
| M | T | W | T | F | S | S |
|---|---|---|---|---|---|---|
| 1 | 2 | 3 | 4 | 5 | 6 | 7 |
| 8 | 9 | 10 | 11 | 12 | 13 | 14 |
| 15 | 16 | 17 | 18 | 19 | 20 | 21 |
| 22 | 23 | 24 | 25 | 26 | 27 | 28 |
| 29 | 30 | |||||
Archives
- August 2013
- July 2013
- June 2013
- May 2013
- April 2013
- March 2013
- February 2013
- January 2013
- December 2012
- November 2012
- October 2012
- September 2012
- August 2012
- July 2012
- June 2012
- May 2012
- April 2012
- March 2012
- February 2012
- January 2012
- December 2011
- November 2011
- October 2011
- September 2011
- August 2011
- July 2011
- June 2011
- May 2011
- April 2011
- March 2011
- February 2011
- January 2011
- December 2010
- November 2010
- October 2010
- September 2010
- August 2010
- July 2010
- June 2010
- May 2010
- April 2010
- March 2010
- February 2010
- January 2010
- December 2009
- November 2009
- October 2009
- September 2009
- August 2009
- July 2009
- June 2009
- May 2009
- April 2009
- March 2009
- February 2009
- January 2009
- December 2008
- November 2008
- October 2008
- September 2008
- August 2008
- July 2008
- June 2008
- May 2008
- April 2008
- March 2008
- February 2008
- January 2008
- December 2007
- November 2007
- October 2007
- September 2007
- August 2007
- July 2007
- June 2007
- May 2007
- April 2007
- March 2007
- January 2007
Categories
- About Me
- All That Scraps
- blogger challenge
- camera/photo play
- Cards
- Contests
- family stuff
- FOR SALE
- Home decor/3-D items
- How to FAKE it!
- Introduction
- JUGS Challenge
- JustRite Stampers
- Lizzie Anne Designs
- My family stuff
- My Stamping Space
- My Time Made Easy
- My Time To Color Challenge
- My Time to Create Challenge
- My Timeless Template Challenge
- My Timeless Templates
- Mytime Mail
- MYTIME MOVIE/VIDEOs
- Papertrey Newsletter
- Pink Cat Studio
- Pretty Palette Challenge
- Pretty Patterns Sketch
- Product Opinions and Must haves
- Recipe's
- Saturday Sketch
- Smilebox Creations
- Stampavie
- Tutorials
- Uncategorized
- videos
Most Popular
- Create your own Onesie Card Tutorial-and important NOTE! PLEASE READ (2529)
- Saturday Sketch-Boxed bag holder (2333)
- Going GREEN! Fancy Flower Flourish-Closure Video (1478)
- Fabulous Favorite - Giveaway! (1336)
- a Prayer Request (1232)
- QUICK-Easter Baskets from Nestabilities-PTI style-and blog challenge (1063)
- Teaser Sketch (999)
- February Release Giveway! (and a little peek) (996)
- Group Post and Rambling Rose Video Tutorial (985)
- GIVEAWAY! Who wants it all?! (895)
Recent Comments (RSS)
- 첫충사이트: 완전히 흥미로운 블로그 게시입니다. 저는
- sarah: Wow, Lauren, what a stunning
- hedie: خرید راهبند
- 야동: Love to read it,Waiting For
- 야동: This seller is in a
- 바카라사이트: 여기 처음 왔어요. 나는이 게시판을
- 야동티비: I was surfing the Internet
- 바카라사이트: 비슷한 주제에 대한 흥미로운 정보를
- 바카라사이트: "여기에 제공해 주신 귀중한 정보와
- 온라인홀덤: 유익한 웹 사이트를 게시하는 데
Copyright © 2007 - My Time, My Creations, My Stampendence - is proudly powered by WordPress
This blog has been Tweaked and Designed by Sara Williams