June Release Preview: Simply Stunning Gifts
May 30, 2013The end of the school year nears, and Summer is just about here!
It is time to show you some of the products we are releasing tomorrow, June 1st.
I don’t know about you but I have tons of gifts to give all year round, especially with the end of the school year. Today we are all sharing our latest template Tapered Off, and the many great gift ideas you can use no matter what the occassion, event or season.
- Lauren Meader
- Dawn Barwick
- Jackie Randolph
- Karien vab der Westhuizen
- Kimberly Morrow
- Lisa Kind
- Lori Hairston
- Lori Kalus
- Mary Vogel
- Pattie Goldman
- Romaine Rancier
- Tracy Holmes
- Wendy McGaffey
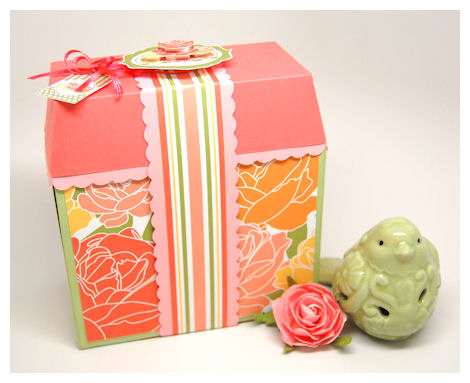
Tapered Off $3.99
Available in PDF, SVG, GSD, DXF, WPC
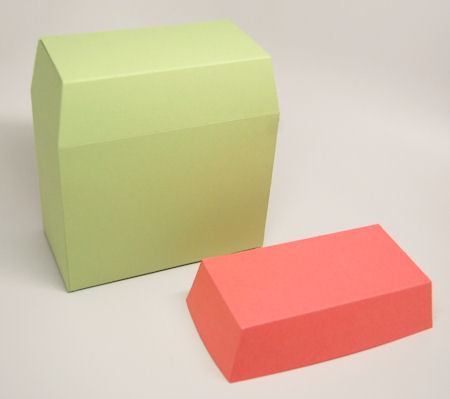
The box has 2 parts. The box itself, and an optional lid for a finished look.
Completed Project Size:
- 6 Inches Tall
- 6 Inches Wide
- 3 1/8 Inches Deep

This amazing package has a tapered top, giving it the name Tapered Off. This is a fantastic sized gift box with many limitless possibilities. The many layers included allows you so many fun design options, including an “cap” topper to top off this fun tapered package!
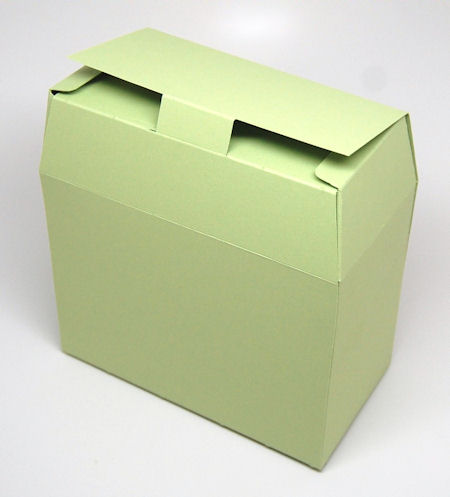
The way it unfolds open allows you many gift giving options as well! You can even add a window to the front and/or back.

Here I chose to use come pretty patterned paper from the Parade of Patterns ©. The decorative layers allow you to quickly and easily cover the box, but the lid really can help you dress it up a bit more.
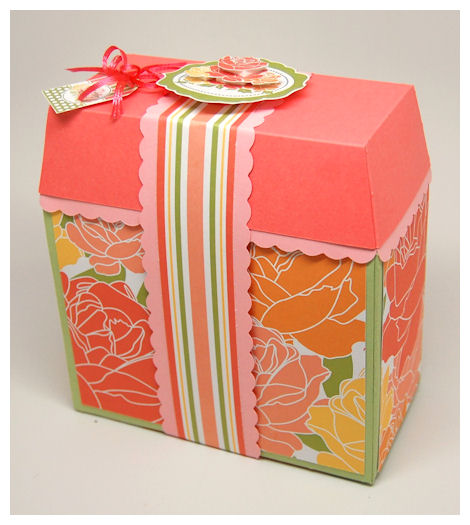
I added the scalloped detail to my lid using the Border Builders Open Scallop © cut file, and I also made a simple band with the striped pattern in the Parade of Patterns © paper and then layered the scallops again from the Border Builders Open Scallop ©, for a simple touch of elegance, without a lot of work. It just slips right off the box.

The tag topper was created using the Framed Elegance © set, and was cut using the Framed Elegance © cut file. I used the roses from the Well Rounded © set. I cut and layered them several times for a little more depth and interest. It was quick and easy, and looks really pretty in real life.
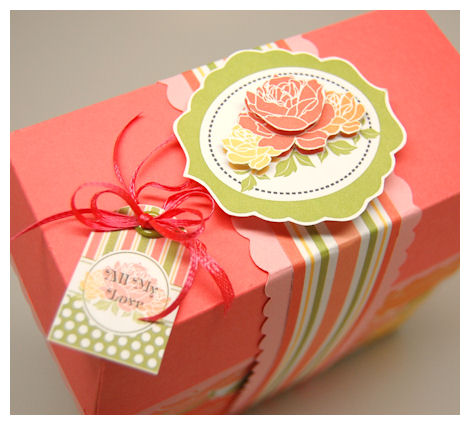
The hanging tag was also created using the Well Rounded © set, and was cut using the Well Rounded Tag © cut file. I think it is just an additional touch that adds to the overall box design.

With this template you can package up items for every occasion! Some great ideas include: making it a three dimensional house, monogram or homemade cards/stationary set, home baked treats, knitting /embroidery supplies, arts & crafts, candles, bath & beauty products, handmade items: hat, gloves, scarves or mittens, a snowman kit, lollipops, candy, chocolate dipped pretzels, candy apple kit, two cupcakes, dolls/stuffed animals, baking products/mixes for breads, dips, cakes, cookies, or even soup!
The list just goes on and on!
Come back tomorrow as we celebrate our release and share even more amazing ideas using our latest products.

Sizzlin’ Summer Ideas
May 1, 2013Welcome back!
As you may have noticed this is a SHORT month for our Release.
hat doesn’t mean it isn’t still packed with amazing packaging ideas. Please be sure to visit the design team to see if YOU were picked as the random lucky winner for a gift certificate for one of our Pretty Packaging Templates!
The winner of Pretty Packaging Template from my bog submissions was # 35
We are cookin’ up some sizzlin hot ideas for gifts this summer!
- Lauren Meader
- Dawn Barwick
- Debbie Marcinkiewicz
- Jackie Randolph
- Karien vab der Westhuizen
- Kimberly Morrow
- Lisa Kind
- Lori Hairston
- Lori Kalus
- Pattie Goldman
- Romaine Rancier
- Tracy Holmes
- Wendy McGaffey
My sweet lil’ project uses out NEW! Tiny Tucker Tab.
If you get invited out you may need to whip up a quicl little thank you gift, or maybe some favors for your guests.

This super cute tuck-in-tabbed one piece box will never tucker you out because it goes together in a snap! You will want to tuck all sorts of fun treats and favors in here. Makes great wedding, shower, or party favors, or just the perfect little gift box for something special.

I made the tag using the Fine Finish Cut File, Round Off Stamp Set, Spring is Here Stamp Set, colored to match my NEW! Summer Paper collection. It will package up about 4-8 Truffles!
I used the NEW! Summer Paper collection for my box design. I just printed the gingham pattern on the bottom portion, and the pretty petite flower pattern onto the lid portion.
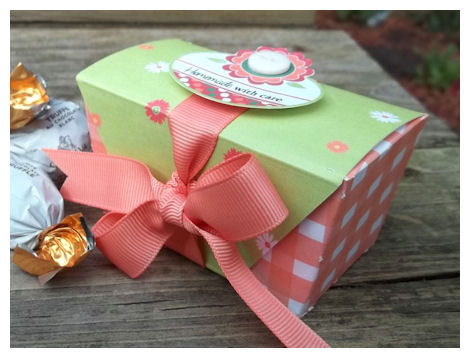
This is a Summer fun collection of 5 coordinating patterned papers that will help “set” the mood for the perfect backyard BBQ, or picnic. The patterns and colors will allow you create a simply fun, cheerful projects, especially when paired with any of our Pretty Packaging Templates, but are also great for anything you want to create.
Thanks for stopping by!
Please view our Gallery for project samples, and alternative ways to use all our amazing coordinating products!
Also if you haven’t already, you can follow us on Pinterest, as we have over 16 pinboards full of ideas.
We are also on Facebook-so LIKE US there, as we have a daily project that gets posted there now, and lastly-follow us on Twitter!
May Release! Gifts for the Guy
Apr 30, 2013It’s May 1st and that means it is time for our Release!
We have an amazing collection of coordinating items this month with Summer BBQ, and Grillin’ in mind.
So here is what we have that is NEW for MAY:
We have released:
1 NEW! Pretty Packaging Template
1 NEW! Pretty Impressions Stamp Set
1 NEW! Pretty Printable Digital Paper Collection
Also be sure you check out our Pretty Package Collection, where you will always save 25%!
My company focuses on the “complete package”. We work hard to offer coordinating products that are easily interchangeable with previously released products. We really enjoy being able to share the ideas and versatility each product holds.
Now come see what’s new for May!
- Lauren Meader
- Dawn Barwick
- Debbie Marcinkiewicz
- Jackie Randolph
- Karien vab der Westhuizen
- Kimberly Morrow
- Lisa Kind
- Lori Hairston
- Lori Kalus
- Pattie Goldman
- Romaine Rancier
- Tracy Holmes
- Wendy McGaffey
Did you play along with our Sneak Peeks? If you did then let’s see if YOU guessed it right.
(winners will be announced tomorrow)
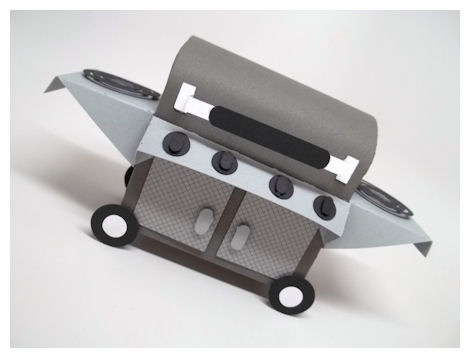
Available in PDF, SVG, GSD, DXF, WPC
Completed Project Size:
2 1/2 Inches Wide
4 Inches Tall
4 1/4 Inches Long
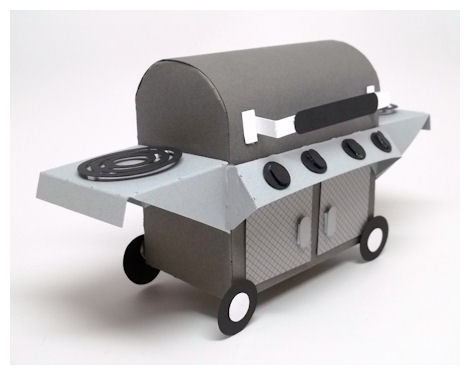
Lookin’ for that special gift box for the greatst guy, that’s smokin’ hot? Well here you go! Great Grillin’ is the perfect gift holder for the guy that LOVES to BBQ!
The best part, it is EASY to assemble!
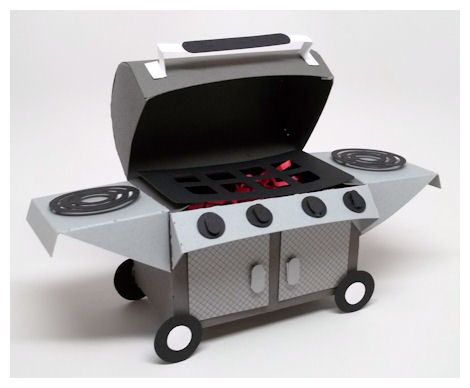
Open the lid, and fill’er up with some red confetti/bag filler and it looks just like a burning flame.
I just created my Great Grillin’ template with various shades of gray, but you could use any fun combination of colors and patterned papers.
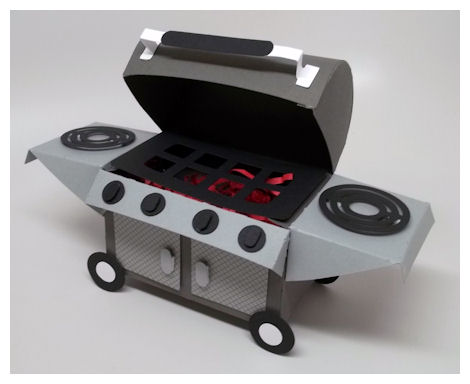
Complete with the grill rack you can use this from so many amazing gifts!
Check out the details!
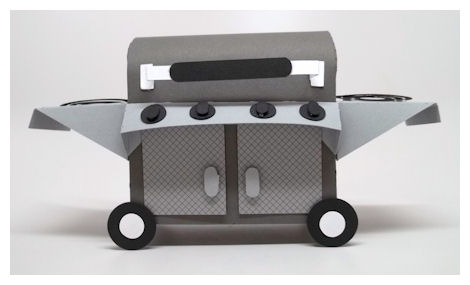
Complete with all the grillin’ bells and whistles this makes the cutest package just in time for Father’s Day or that Summer BBQ!
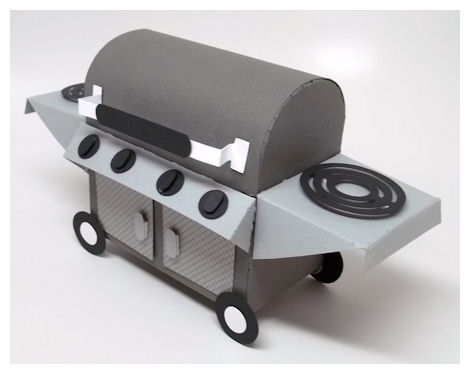
Also makes the perfect party favor for that Summer event, backyard party, or your great get together. Put some meat rub mix in here, savory sauce packets, a gift card to a meat house, or favorite BBQ place, maybe put some fun treats, homemade beef jerky…you get the idea. Whatever you package up, you will be servin’ it up in style.
If you choose to leave this plain it can become an outstanding lunch box, tackle box or handbag.
We also have a coordinating stamp set, so check it out- It’s Grilling Season!
You can see ALL our new products HERE!
Come back tomorrow because we will announce the randmon winners for our sneak peek guessing game!
Sneak Peek Giveaway!
Apr 29, 2013It’s the last day of April, so don’t be a fool! Here is a peek at a project, that is sure to make you drool. Tell me what do you think, what could it be? Leave me a guess, and you may win a template for FREE!
Here are the details:
What could it be?
Can you guess?!
My Time Made Easy ™ LLC is having their monthly release of new products tomorrow on May 1st.
Check out all the amazing Pretty Packaging Templates My Time Made Easy ™ LLC has to offer HERE! There are OVER 100 to choose from. They offer templates in PDF (printer friendly) SVG, GSD, DXF, and WPC.
- Lauren Meader
- Dawn Barwick
- Debbie Marcinkiewicz
- Jackie Randolph
- Karien vab der Westhuizen
- Kimberly Morrow
- Lisa Kind
- Lori Hairston
- Lori Kalus
- Mary Vogel
- Pattie Goldman
- Romaine Rancier
- Tracy Holmes
- Wendy McGaffey
So take a look at all the project peeks each design team member has to share today, and leave a comment with each one of them. Every time you leave a comment at a blog it is another chance to win.
ONE person from EACH blog will be chosen randomly to win a FREE template of their choice!
Winners will be announced on May 2nd.
Gifts Galore!
Apr 3, 2013Welcome back to my blog.
As we wrap up our April Release at My Time Made Eaay ™ LLC we typically offer a Year in Review. This month we released SO MANY amazing products that we are going to share another day of fun new projects so you can have as many ideas as possible with our products for April! Remember Mother’s Day is fast approaching, and it is always nice to do something special for her, or if you don’t have your mom around any more, and you have ANY woman/girl in your life whom you feel is special, then use these new items to create gifts that celebrate them!
Today you will want to visit:
I decided to use my day to share a birthday gift for one of my friends!
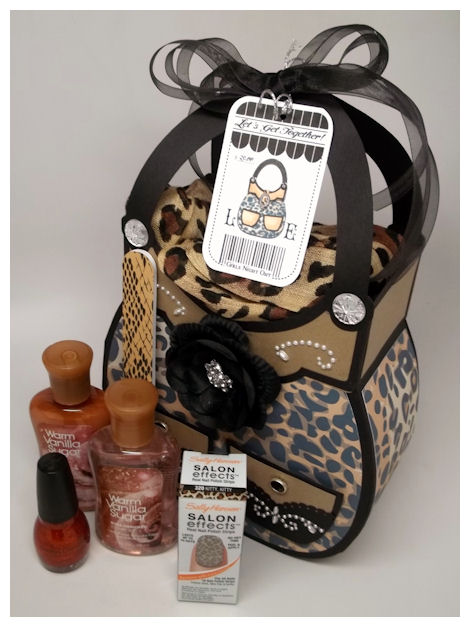
She loves handbags, pearls, shopping, black, leopard, bling and wearing flowers in her hair!
So I combined all those loves into one great gift bag! I included a scarf, nail effects, nail polish, file, and some bath & body stuff she loves.
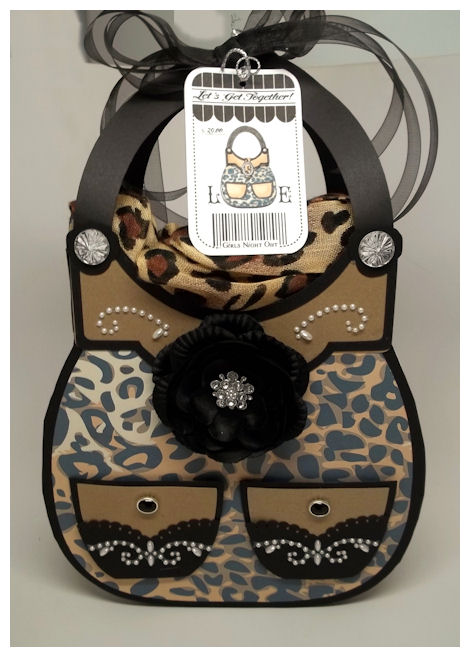
I created the Handbag template from a black cardstock, and layered on the leopard print from the Purse Patterns paper collection.
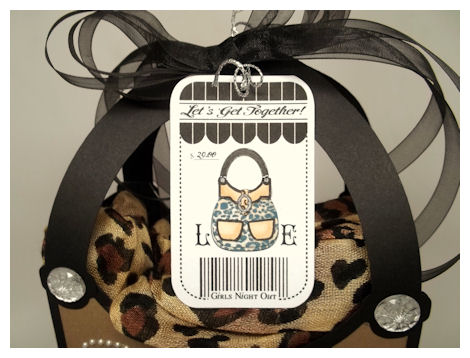
The tag that is on the bag was created using the Timed Write © set. It was fun and easy to do, and really MAKES the project complete.
The handbag image was designed after the Handbag template, and is from the Shop Til’ You Drop set.
I colored it to match the Handbag template I made.
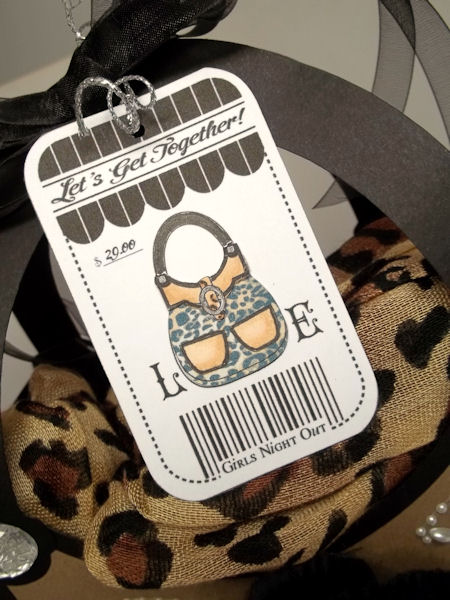
I shrunk down the leopard print and clipped it onto the bag image. The L & E initials come from the Merriest Monograms © set. You could use that set to write out their name or whatever else you choose. The monograms in that set are simply stunning.
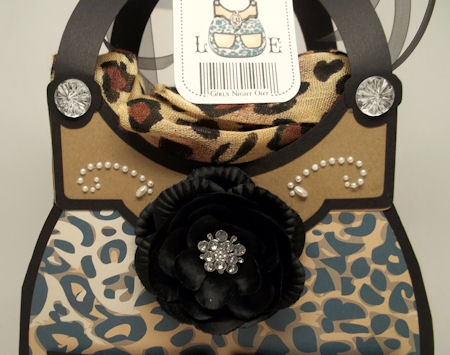
The flower on the handbag is removable.
I added some bling to the handles, and pearl details on the upper panel.

The pockets-those were so fun! I just cut a decorative layer and used a large scallop punch to add some pretty detail to the pockets.
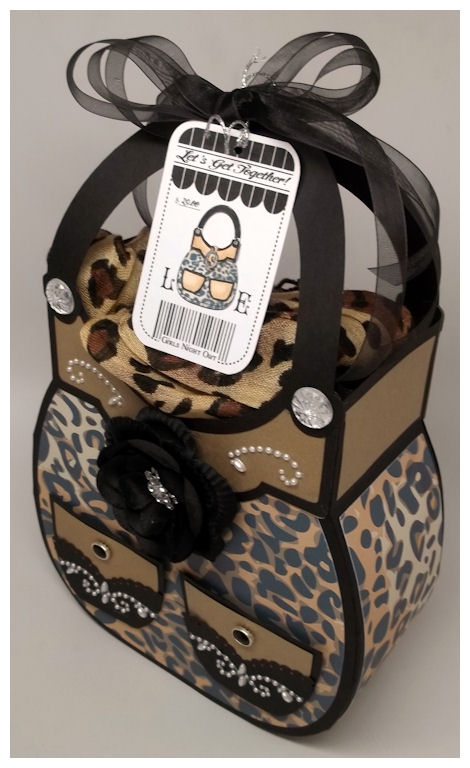
I filled the bag with the gifts, and the scarf is acting as my “tissue” paper.

I love how it turned out, and I am certain she will too. I have to wait till May to give it to her, so let’s hope she isn’t reading!
As you can see making your own gifts allows you to TOTALLY customize your gifts to suit the people you are giving them too. You would be SO limited by what was in store if you tried to go out and BUY a gift/gift bag like this. The template becomes its own gift within itself.
How many people actually take the time to make you something? Now if they did wouldn’t you feel that much more special? I know I would. Plus you end up looking like a creative genius!
So there you have it! A plethora of gift ideas that should last you many occasions to come.
Return with us next month for another inspiring release.
In the meantime I wish you many days of creativity!
Paper or Plastic?
Apr 2, 2013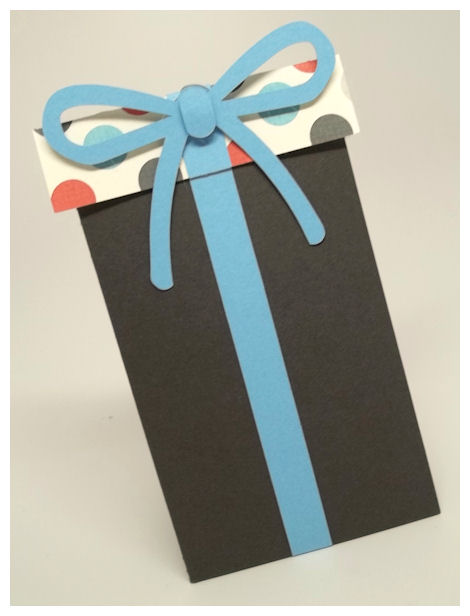
Looks like a gift, holds a gift card, hence the name.
I used the polka dot pattern from Country Cakes ©the collection.
Available in PDF, SVG, GSD, DXF, WPC
Completed Project Size:
6 Inches Tall
3 1/4 Inch Wide
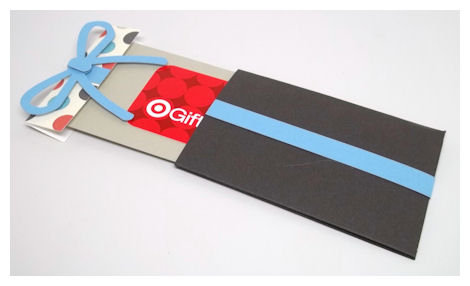
This simply sweet gift box themed is the perfect way to give your favorite gift card, wrapped to perfection! The gift top slides into the gift box bottom envelope. To reveal the true “gift” just pull the gift box top up!
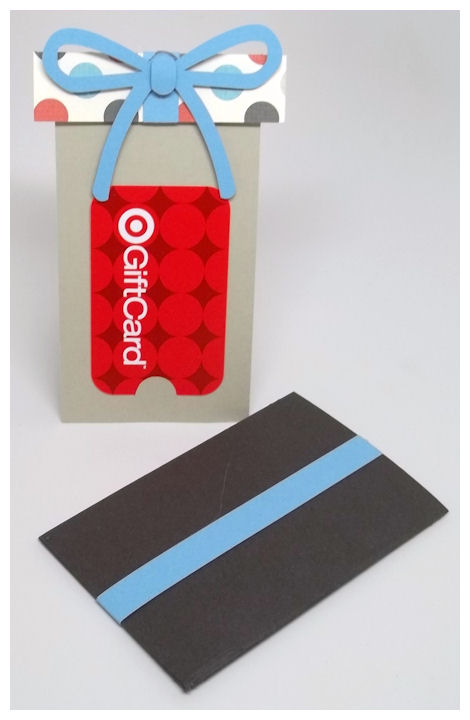
Cute, fun, functional and easy.
Now how about one more?
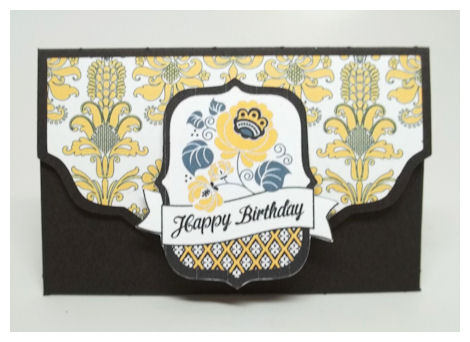
This is anything BUT pricey, depending how much you put on the gift card inside!
Available in PDF, SVG, GSD, DXF, WPC
Completed Project Size:
4 1/4 Inch Wide
2 3/4 Inch Tall
You can never have too many ways to dress up the perfect gift-the gift of choice!
When you give a gift card it allows the receiver the get the “perfect” gift for themselves! The only thing pricey about this gift card pocket is the amount you decide to put on the gift card it will hold! This is sure to delight anyone who gets it.
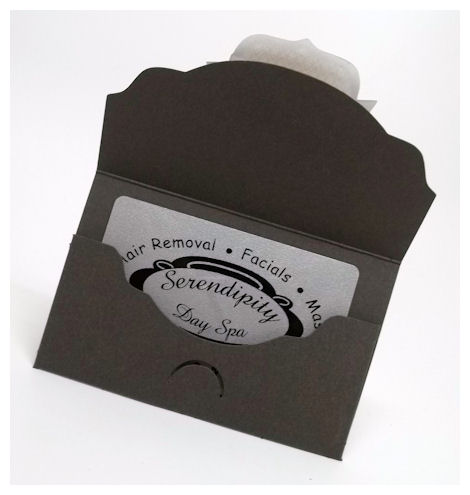
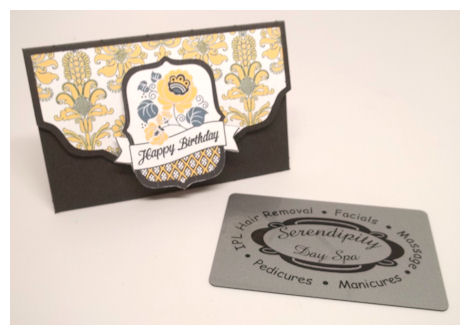 This is a gift to the spa!
Now we are talking AMAZING gift idea. Spend the money on the CARD not the HOLDER!

Another simple design. I used the Spring Abound © paper collection and made my tag using the Fine Finish © set which I had actually created for another project, but since it is a digital set I was able to SAVE it, and then pull it up again for this project in a matter of seconds! LOVE IT!
You will really love using these gift card holders because they are so simple to assemble, and cost only pennies to make.
Come on back tomorrow because we have a group post from the entire team 😀
You won’t want to miss all the ideas.
Ca-Ching!
Apr 1, 2013I want to show you a quick but great gift idea for any occasion.
You see you really CANNOT have enough ways to gift the gift that gives the biggest smile and is NEVER, EVER returned!
Available in PDF, SVG, GSD, DXF, WPC
Completed Project Size:
6 1/2 Inches Long
2 3/4 Inch Tall
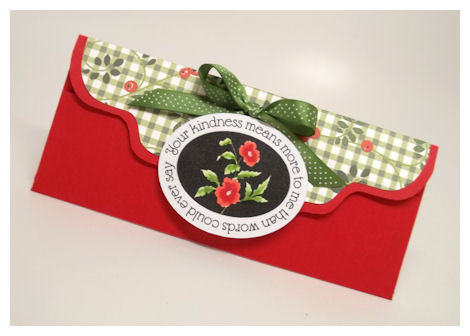
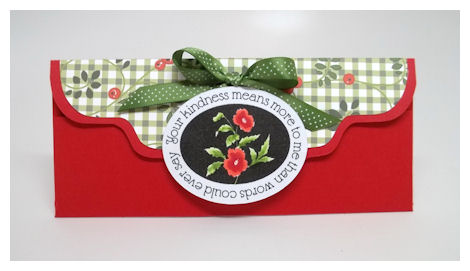
I created this from a vibrant red cardstock, and used the Farmhouse Fresh © collection for my decorative layer.
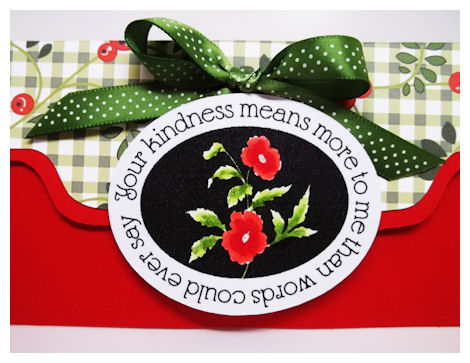
My sentiment is from the Sentimentally Yours © set. I hand-colored the flowers. I love the combination here, and I resized it to fit this cut file perfectly.
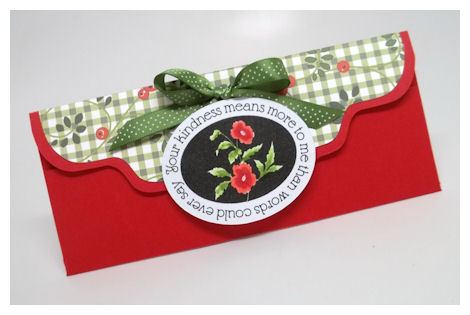
Sometimes you need a fun or fancy way to give someone the only “bill” they like to receive.
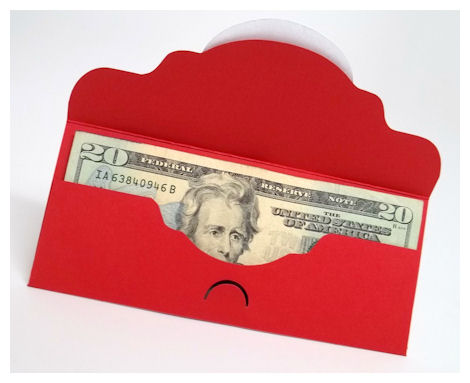
No, not the electric bill-the all mighty dollar bill. This envelope folds together perfectly to hold a “bill” of any denomination, and is sure to be a pleasant surprise for any occasion.
This really is the PERFECT holder, and it doesn’t look like your typical money card!
It is quick and easy and a great way to wrap up that cash.
Tune in tomorrow for 2 more great gift ideas that you can whip together in a snap.
See you then!
April Release is HERE!
Mar 31, 2013April is here and there is no foolin’ that the release is fantastic!
We have released:
4 NEW! Pretty Packaging Templates
2 NEW! Pretty Impressions Stamp Sets
2 NEW! Pretty Printable Digital Paper Collections
3 NEW! Pretty Pieces Cut Files
Also be sure you check out our Pretty Package Collection, where you will always save 25%!
We’d like to introduce you to our 3 NEW Design Team members today who each have projects for you!
After a warm welcome, please hop around and visit:
Now it is my turn to share some more GREAT ideas that we have this release.
There is a template I am quite excited about!!
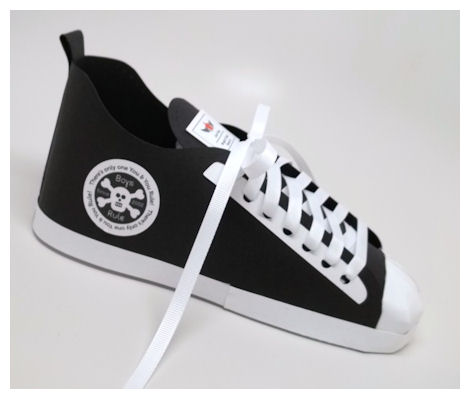
I designed this specifically for my 13 year old daughter Alexa
Available in PDF, SVG, GSD, DXF, WPC
Completed Project Size:
2 3/4 Inch Wide
3 1/3 Inch Tall
8 1/2 Inches Long
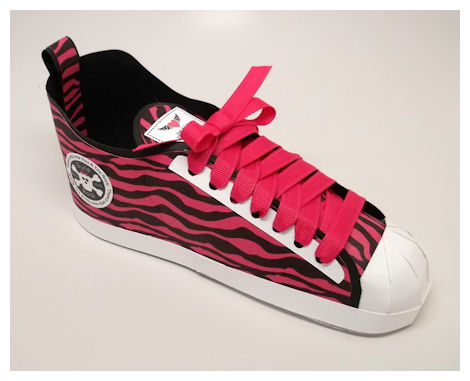
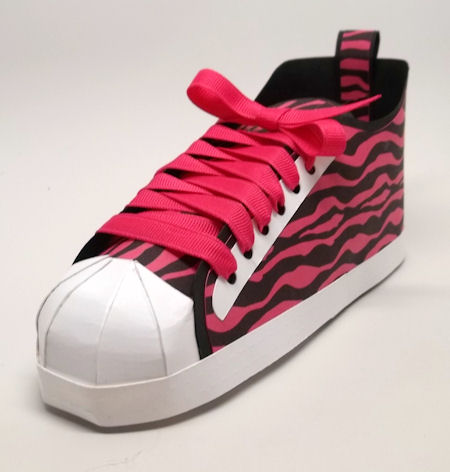
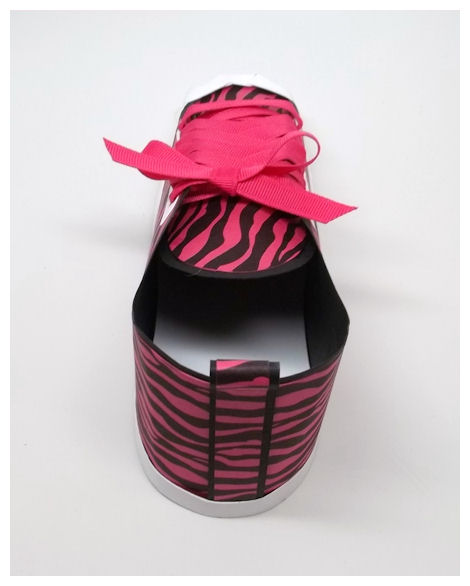
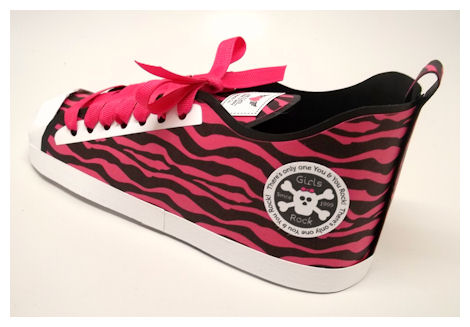
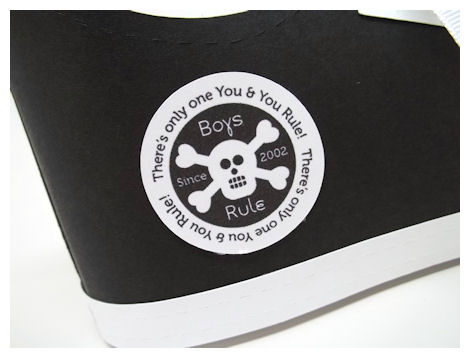
Looking for a Sole-Mate? Then this is the perfect “sole” for you! Designed for my oldest daughter Alexa, this is a super fun and funky shoe that has endless design possibilities! Make it like your favorite classic sneaker, design it for the girls or the boys! A great gift box, or party favor, it is sure to be a perfect fit for any occasion!
Now if you really want to “step it up” a bit, you can make this sneaker and gift it in our amazing Shoe Box template! Be sure you check out our amazing set of images Sole-Mates, that coordinates perfectly with this template, as well as our inspiring collection of patterned papers that will really dress up this shoe, with very little effort!
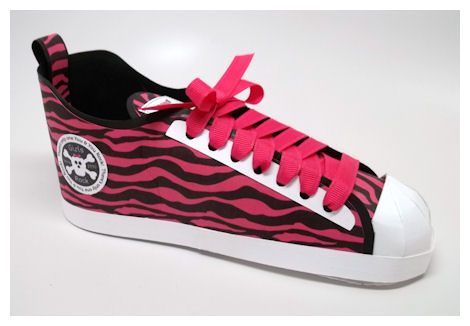 I used the zebra print from the NEW Purse Patterns paper collection, printed on fuchsia cardstock.
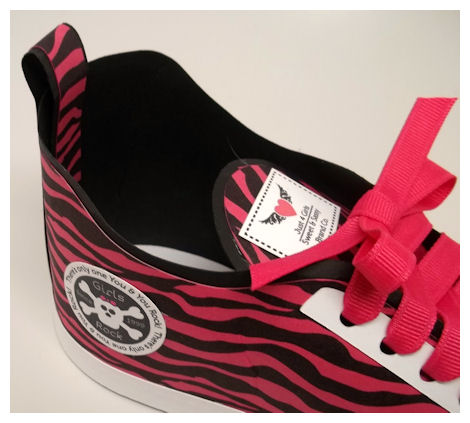
I made a set with every “rocker” girl/boy in mind called Sole-Mates!
I think we can all agree this set is sure to put the fun into any project and convey the perfect message with “sole”!
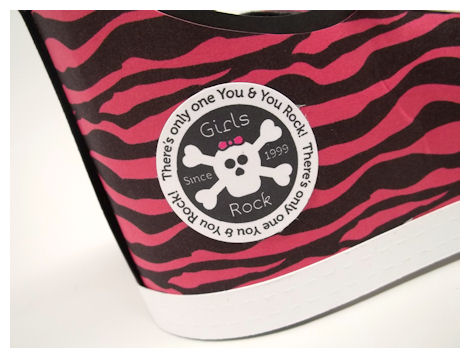
The Sole-Mate is perfectly detailed, and sure to be a huge hit at any party.
 Pretty HOT girl version don’t you think?
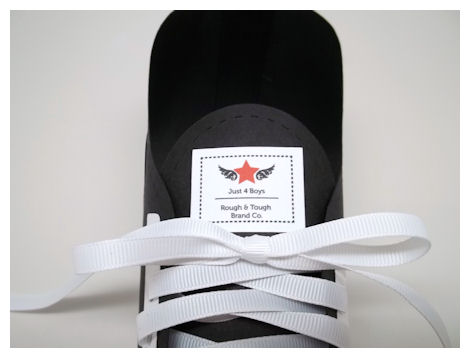
Now I will share the BOY version, as it is super easy to switch it up!

Made from just a textured black cardstock, and white accents this was definitely a jaw dropper at Noah’s friends birthday party!
It is so fun and actually easy to make.
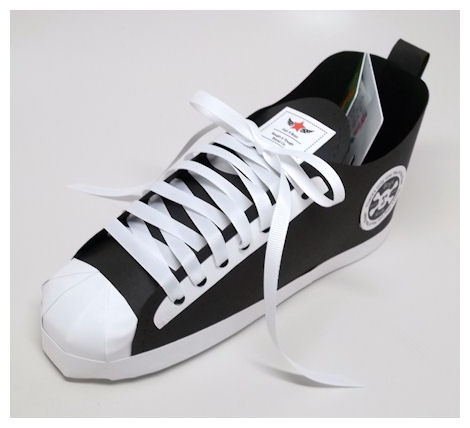
I stuffed the sole full of candy and added a gift card to Toys R’ Us (always a great gift to have on hand too)

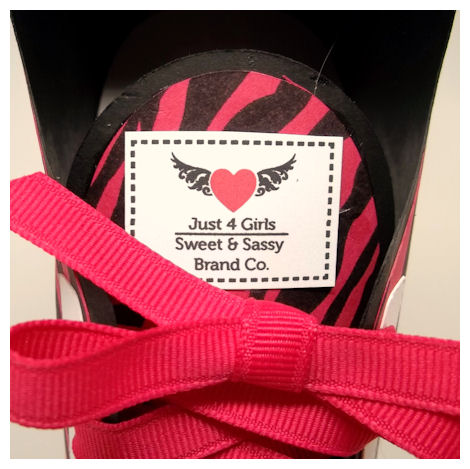
There are many tag options so I created mine to suit my needs.

What do you think? Pretty fun!!
A great one for the teens too.
Please view our Gallery for project samples, and alternative ways to use all our amazing coordinating products!
Also if you haven’t already, you can follow us on Pinterest, as we have over 16 pinboards full of ideas, we are also on Facebook-so LIKE US there, and follow us on Twitter!
We will return tomorrow for more great gift ideas previewing our latest products.
See you then.
April Release Preview: 2
Mar 30, 2013Happy Easter!
I hope you are able to celebrate with those you love most today.
To celebrate I’d like to share a quick poem
Easter Joy
Jesus came to earth,
To show us how to live,
How to put others first,
How to love and how to give.
Then He set about His work,
That God sent Him to do;
He took our punishment on Himself;
He made us clean and new.
He could have saved Himself,
Calling angels from above,
But He chose to pay our price for sin;
He paid it out of love.
Our Lord died on Good Friday,
But the cross did not destroy
His resurrection on Easter morn
That fills our hearts with joy.
Now we know our earthly death,
Like His, is just a rest.
We’ll be forever with Him
In heaven, where life is best.
So we live our lives for Jesus,
Think of Him in all we do.
Thank you Savior; Thank you Lord.
Help us love like you!
By Joanna Fuchs
Thank you to each of you who stop in month after month and visit us to see what is next. I know MANY of you have followed me and my family for many years, and the constant support has been life changing, so thank you!
Without further delay let me share with you who to visit:
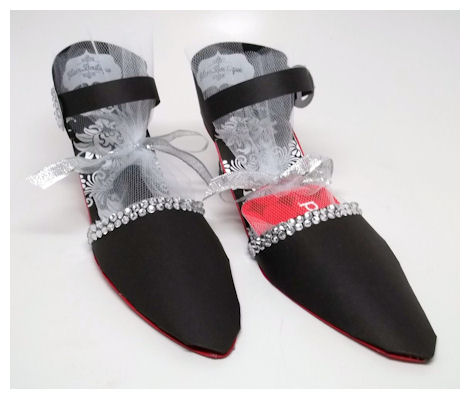
Sexy Soles
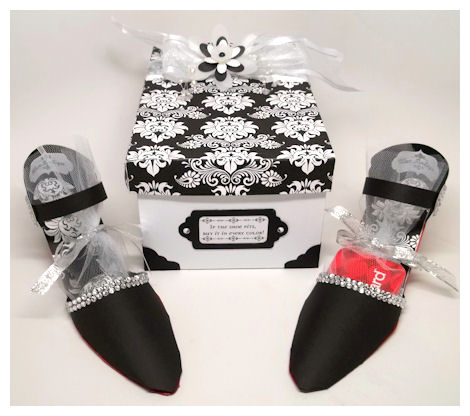
Shoe Box
Sexy Soles
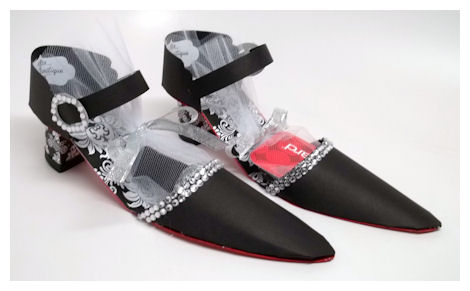
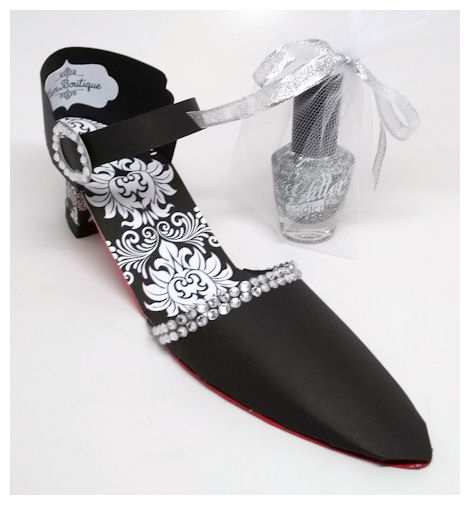
I have had these heels done and ready to go for SO LONG, it is fun that the time is now here.
Fashioned after a pair I own and love, I think you will love them too!
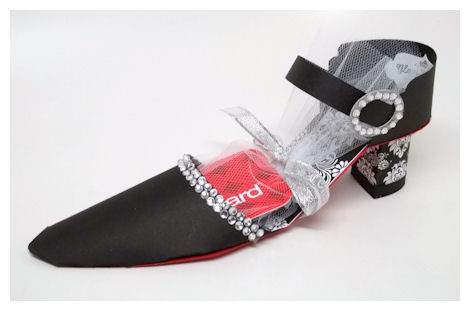
Available in PDF, SVG, GSD, DXF, WPC
Completed Project Size:
2 3/4 Inch Wide
3 1/4 Inch Tall
8 1/2 Inches Long
Sometimes you need a little something sexy, to slip a little something special into. Make this for any girlfriend, teenager, bride, or bride to be…this high heeled shoe is sure to dazzle them!
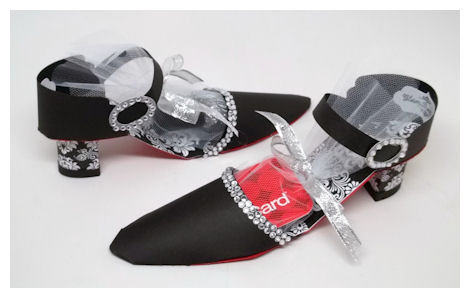
I packed up a gift card to Target in one, and some pretty silver nail polish in another, for a few gift or favor ideas.
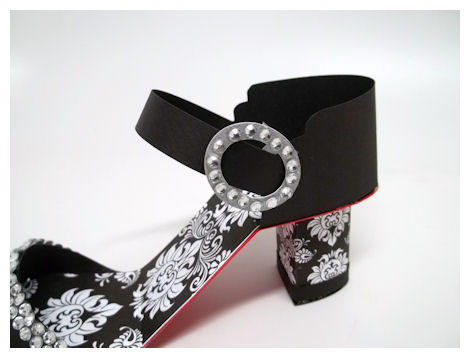
I made these from black cardstock, trimmed with some dazzling BLING! The bottom has a red sole to mimic that famous shoe designer we all know and love, but most likely cannot afford, so now we can create our own and live vicariously!
The sole insert, and heel was cut from the Dainty Damask © pattern, recolored black.
I added some bling to the buckle of the shoe as well.
The back of the shoe has a tag from our NEW! Shop Til’ You Drop set, which was cut from the Fabulous Frames © cut file.

This makes the perfect gift holder or party favor for any occasion! Use this to hold a gift card, money, make-up, nail polish, mini liquor bottles, sexy underwear, chocolate/candy, or details for a invitation to a party!

Now if you really want to “step it up” a bit, you can make this high heel shoe and gift it in our amazing Shoe Box template! Be sure you check out our amazing set of images Shop Til’ You Drop, that coordinates perfectly with this template, as well as our inspiring collection of patterned papers that will really dress up this shoe, with very little effort!
Need something less “sexy”….try our Sole-Mate template! It’s a super fun sneaker 😀
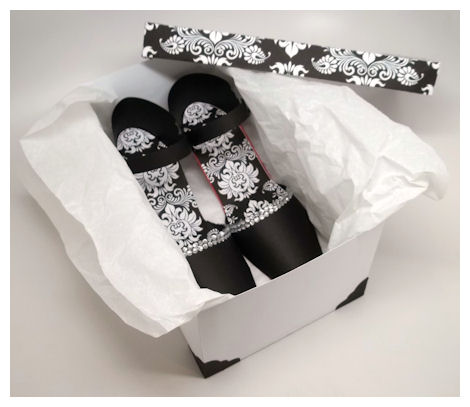
Now as you have seen, NO pair of shoes is complete without a box for them to fit into….
Available in PDF, SVG, GSD, DXF, WPC
Completed Project Size:
4 Inches Tall
5 1/2 Inches Wide
9 Inches Long

Well it doesn’t get much simpler than this…here was have our own version of your standard shoe box! Sometimes you just need a great sized box, that is simple, but fashionable, and can fit so many great gifts.
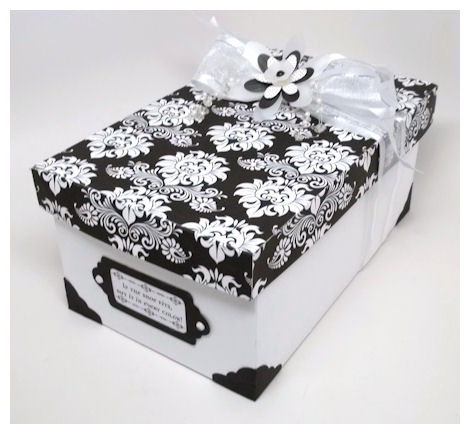
If that is what you WANT, then this is what you NEED!
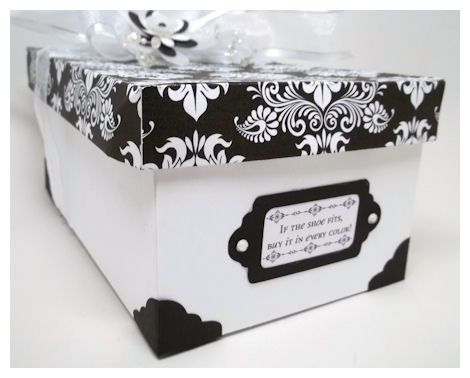
You can fit cards in here as well.
The box tag sentiment comes from the NEW! Shop Til’ You Drop set.
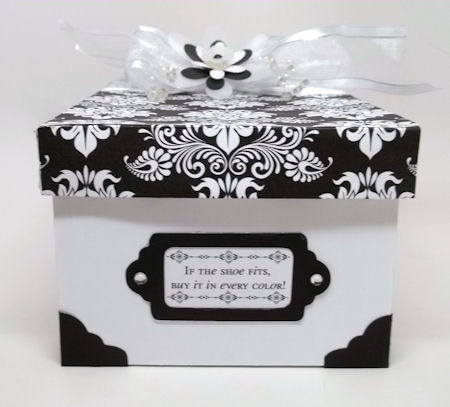
You can make the Shoe Box label read whatever you want it to!
That makes it so much more fun.
I love the bottom corner tabs on the ends as well. Sometimes it is the SIMPLEST of details
Think of all the great uses of your typical shoe box, then add to the fact that you can now create and customize your own for a plethora of amazing gifts.
This gift set was created to be given with the Handbag you saw from me in yesterday’s post.
If you feel excited and inspired then wait until tomorrow when we release all our NEW PRODUCTS!
You won’t want to miss them!
April Release Preview:1
Mar 29, 2013Happy Spring!
While I wish I could report sunny skies and warm weather that has yet to happen in New Hampshire.
I am certainly looking forward to nicer weather. As April approaches I am just in awe at just how fast time flies by. My children are growing quickly and I find that my life is ever changing from one season to the next.
It has been a while since I posted some family photos here, so here you go!

Doesn’t seem real to me that my kids are now 13-Alexa, 10 Noah, and 8-Amber.
I’m wishing I could just freeze time and enjoy every moment I am given with my children, husband and family.
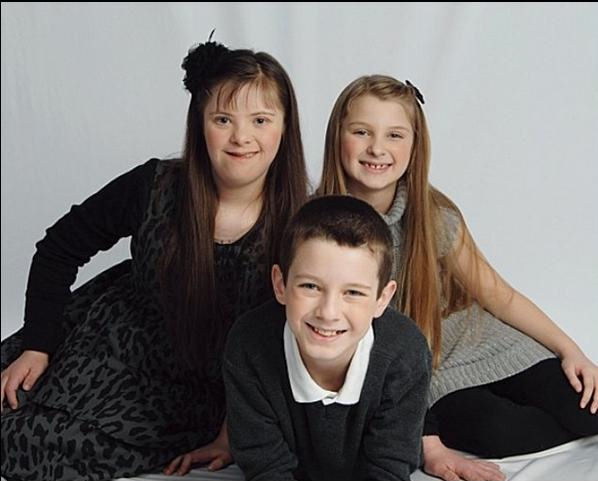
The cute little faces I am use to looking at are changing, and my children don’t look like babies any more, more like little adults.
3 Pieces of my Heart
I am always thankful to God for each and every day that passes.
I’m thankful for health and well being of my family. I feel blessed beyond words. Every day IS a GIFT.
I wish you all the same as we enter into a new season, and get ready to celebrate Easter.
With that being said the design team at My Time Made Easy ™ LLC would like to share some projects in celebration of our release on April 1st.
Here is WHO you can visit for a sneak peek at what it to come:
- Lauren Meader <—you are here!
- Jackie Randolph
Sole Mate
So without further delay let me get ready to share my project with you all.
This month we have a FABULOUS release for all the lovely ladies who like girly things 😀
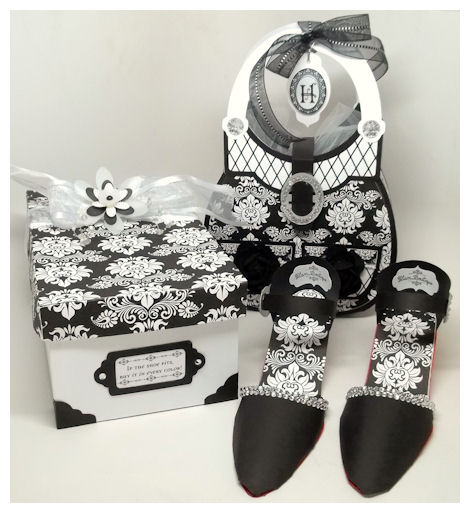
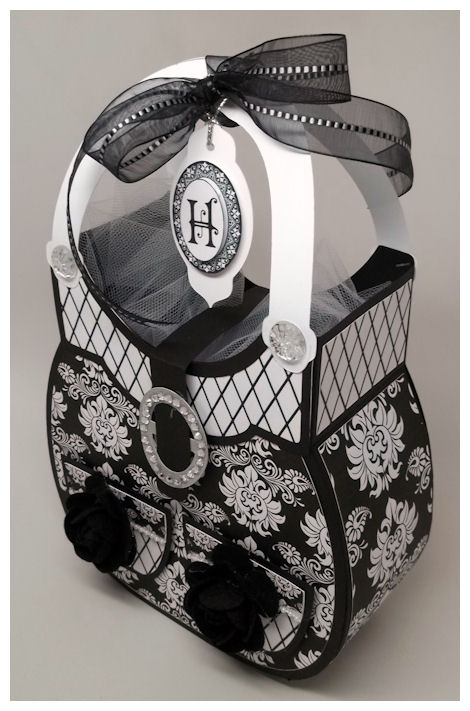
H is for Handbag
Available in PDF, SVG, GSD, DXF, WPC
Completed Project Size:
3 Inches Wide
7 Inches Long
10 1/2 Inches Tall
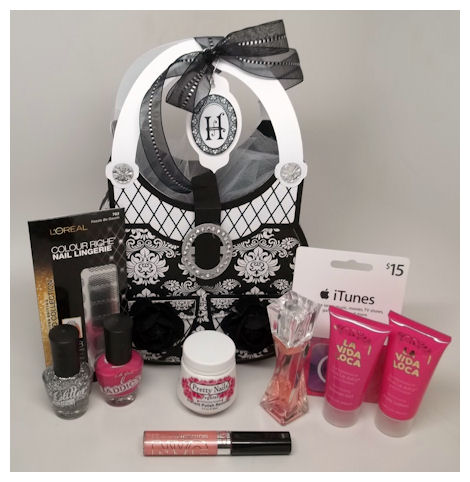
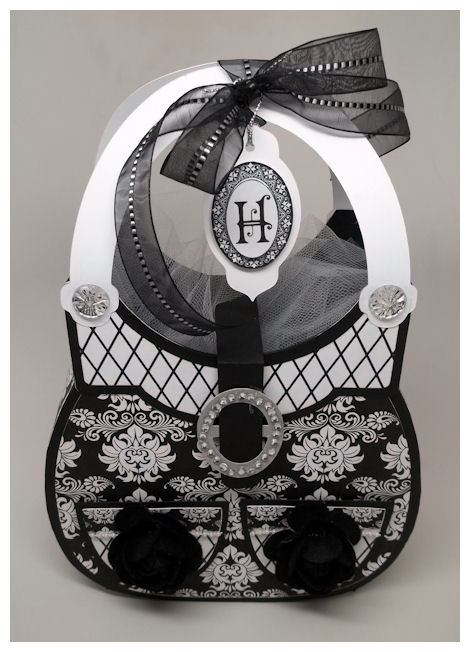 I made this for my sister-in-law Heather for her birthday, and as you can see in the above photo, I loaded it up with all sorts of goodies!

Let this take the place of that all occasion, “typical” gift bag we give to our very best “girl” friend.
We have stepped it up with this super girly version of a “handbag”, that is the perfect gift instead! It is a gift within itself.

Fashioned after one of my personal favorite handbags, this template is large enough, and is just the perfect size for so many gifts! You can package up a new wallet, gift cards to a favorite shoppe, a collection of beauty, hair, or bath products, cosmetics, jewelry, a clothing item such as a shirt, scarf, gloves, nightie, socks, slippers or something homemade…to get just a few of the many ideas going!
Makes the perfect template for any occasion such as birthdays, holidays, bridal gifts, bachelorette parties, or party favors for any event!
Now for the personal touches I added to this gift

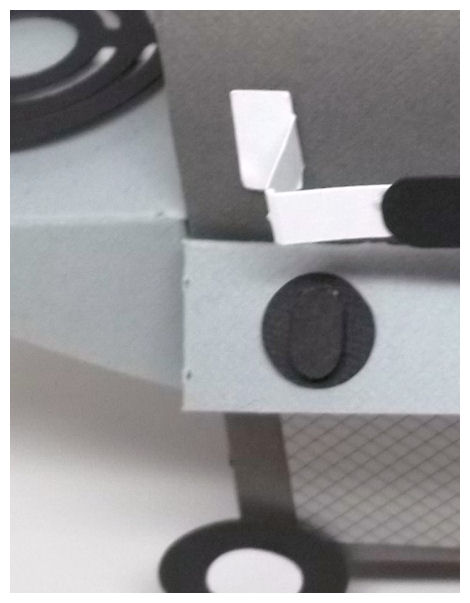
The Handbag was created from black cardstock, as was the decorative “trim” pieces. The handle was cut from white cardstock. The decorative layers were made using the Dainty Damask © collection, recolored to black, and the diamond pattern is from the Flutters and Flowers ©.
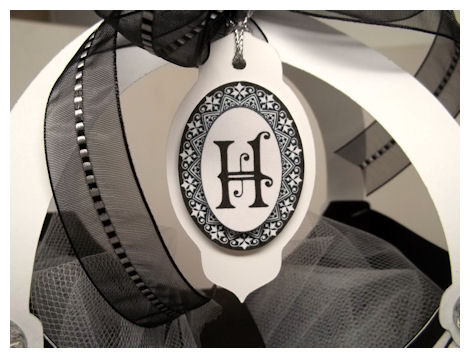 I made a monogram tag using the frame & letter H from the Merriest Monograms © . It is such a stunning set, and it really made this gift a WOW! The tag was cut using the Fabulous Frames © cut file.
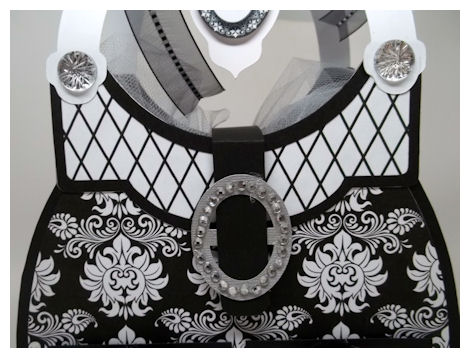
A girl can NEVER have too much BLING! I added some bling stickers around my buckle which was cut from a silver cardstock, and added bling to the handles as well.
 On the pockets I lined them with a string of pearls, and some pretty felt roses that can be removed and added to your shoes, or a headband!
This template has an amazing collection of Pretty Printable Paper called Purse Patterns that is sure to help you create a simply stunning handbag with little effort! We are also releasing the Go Shopping collection too, so don’t miss that!
Want to “step it up” another notch? Pair it with the Sexy Soles template!! Nothing goes better with a great handbag, than an even sexier pair of shoes!
Just endless possibilities for packaging up some amazing gifts for any girl in your life!
Now if you LIKED that you will LOVE everything else we have to release this month, so please stay tuned, and return tomorrow for MORE!
My Etsy

Who I Designed For
Blogroll
- Alicia
- Alli Miles
- Ally Blankenship
- Amber
- Andi @ crafts on a whim
- Angel R
- Angie Z
- Anne Kranitz
- Becky O
- Bee
- Beth Silaka
- Bethany Paull
- Beverly Nash
- Bobbie
- Cambria
- Cammie
- Card of the Week
- Card Positioning System (CPS)
- Cards for Cancer
- Catherine Doucette
- Charmaine
- Cheryl Sims
- Chriss Rollins
- Christina
- Christine Ewing
- Christine Wooden
- Colleen Schaan
- Craft Critique
- Craft Gossip
- Crystal
- Dawn Easton
- Emily Giovanni
- Geny
- Holly
- Igne Groot
- Inspirational Craft Blogs
- Irene
- Jami Sibley
- Jeanne Streiff
- Jen del Muro
- Jeni Bond
- JenMarie
- Jenn Balcer
- Jenn Diercks
- Jenn O
- Jennifer E
- Jennifer Mick
- Jennifer Pereda
- Jennifer-Sweet Treat
- Joanne Basile
- Jodi Collins
- Julia Stainton
- Julie Masse
- Karen
- Kathryn Berthiaume
- Katie Cotton
- Kelley Holland
- Kendra
- Kim Scholfield
- Kris’s Color Stripes! Get inspired here
- Kristen Dubosque
- Kristin Eberline
- Kristine
- Laura @ Sunshine Stamper
- Laura Turnmire
- Laurie Schmidlin
- Lesa Rapp
- Linda Duke
- Linda-LSN
- Lindsey Botkin
- Lisa (lakind scs)
- Lisa Kind
- Lori Craig
- Maggie
- Mara Campbell
- Maria
- Maria Levine
- Mary
- MaryJo
- Melanie M
- Monique Hansen
- Moxie Fab World
- Pam Imholz
- PaperCrafts Connection
- Peppers and Pollywogs Kids party site
- Rebecca Grohall
- Rita
- Robyn
- Rose Ann
- Sarah Vrolyk
- Sharon Harnist
- Sharon Johnson
- Sharon Rivera (a chemisrty with paper)
- Sherrie
- Sophia Landry
- Storage Units, Ink, & More Blog
- Sue Berker
- Susan (Rainy)
- Tangii Crane
- Tracy
- Tricia Traxler
- Trudee
- Velta
- VivLyn
- Zena
MTME Pretty Palette Color Team
MTME Pretty Patterns Sketch Team
My Time Made Easy TM LLC
Shop till you drop!
Lauren Meader
About Me
Copyrighted material
Subscribe To My Blog
Pages
- About me
- Alexa’s Story!
- My Crafty Corner!
- My Time Made Easy™ LLC
- Our Make A Wish Trip to Disney!
- Resume/Publication List
Calendar
| M | T | W | T | F | S | S |
|---|---|---|---|---|---|---|
| 1 | 2 | 3 | 4 | 5 | 6 | 7 |
| 8 | 9 | 10 | 11 | 12 | 13 | 14 |
| 15 | 16 | 17 | 18 | 19 | 20 | 21 |
| 22 | 23 | 24 | 25 | 26 | 27 | 28 |
| 29 | 30 | |||||
Archives
- August 2013
- July 2013
- June 2013
- May 2013
- April 2013
- March 2013
- February 2013
- January 2013
- December 2012
- November 2012
- October 2012
- September 2012
- August 2012
- July 2012
- June 2012
- May 2012
- April 2012
- March 2012
- February 2012
- January 2012
- December 2011
- November 2011
- October 2011
- September 2011
- August 2011
- July 2011
- June 2011
- May 2011
- April 2011
- March 2011
- February 2011
- January 2011
- December 2010
- November 2010
- October 2010
- September 2010
- August 2010
- July 2010
- June 2010
- May 2010
- April 2010
- March 2010
- February 2010
- January 2010
- December 2009
- November 2009
- October 2009
- September 2009
- August 2009
- July 2009
- June 2009
- May 2009
- April 2009
- March 2009
- February 2009
- January 2009
- December 2008
- November 2008
- October 2008
- September 2008
- August 2008
- July 2008
- June 2008
- May 2008
- April 2008
- March 2008
- February 2008
- January 2008
- December 2007
- November 2007
- October 2007
- September 2007
- August 2007
- July 2007
- June 2007
- May 2007
- April 2007
- March 2007
- January 2007
Categories
- About Me
- All That Scraps
- blogger challenge
- camera/photo play
- Cards
- Contests
- family stuff
- FOR SALE
- Home decor/3-D items
- How to FAKE it!
- Introduction
- JUGS Challenge
- JustRite Stampers
- Lizzie Anne Designs
- My family stuff
- My Stamping Space
- My Time Made Easy
- My Time To Color Challenge
- My Time to Create Challenge
- My Timeless Template Challenge
- My Timeless Templates
- Mytime Mail
- MYTIME MOVIE/VIDEOs
- Papertrey Newsletter
- Pink Cat Studio
- Pretty Palette Challenge
- Pretty Patterns Sketch
- Product Opinions and Must haves
- Recipe's
- Saturday Sketch
- Smilebox Creations
- Stampavie
- Tutorials
- Uncategorized
- videos
Most Popular
- Create your own Onesie Card Tutorial-and important NOTE! PLEASE READ (2529)
- Saturday Sketch-Boxed bag holder (2333)
- Going GREEN! Fancy Flower Flourish-Closure Video (1478)
- Fabulous Favorite - Giveaway! (1336)
- a Prayer Request (1232)
- QUICK-Easter Baskets from Nestabilities-PTI style-and blog challenge (1063)
- Teaser Sketch (999)
- February Release Giveway! (and a little peek) (996)
- Group Post and Rambling Rose Video Tutorial (985)
- GIVEAWAY! Who wants it all?! (895)
Recent Comments (RSS)
- 첫충사이트: 완전히 흥미로운 블로그 게시입니다. 저는
- sarah: Wow, Lauren, what a stunning
- hedie: خرید راهبند
- 야동: Love to read it,Waiting For
- 야동: This seller is in a
- 바카라사이트: 여기 처음 왔어요. 나는이 게시판을
- 야동티비: I was surfing the Internet
- 바카라사이트: 비슷한 주제에 대한 흥미로운 정보를
- 바카라사이트: "여기에 제공해 주신 귀중한 정보와
- 온라인홀덤: 유익한 웹 사이트를 게시하는 데
Copyright © 2007 - My Time, My Creations, My Stampendence - is proudly powered by WordPress
This blog has been Tweaked and Designed by Sara Williams