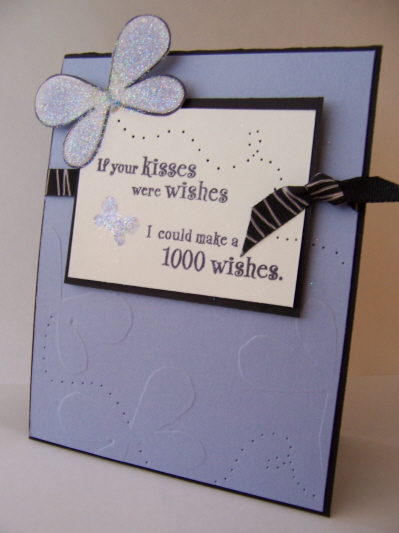
DO you love my card? I was SO happy with it. I love purple and butterflies so, this is SO me! This card was done using the folllowing tutorial. I dry embossed the butterflies, and used embossing paste on the butterfly image in the upper left corner! The image was done on shimmery white cardstock. I had fun piercing the flutter track of the butterflies. The sentiment (by CTMH The gift of love)was perfect for this due to the stamp set name “Butterfly Kisses”. Ribbon is by American Craft.
Well its no secret that I *LOVE* the NEW! Butterfly Kisses stamp set by Papertrey Ink. I finally got to play, and haven’t been able to put it down! More samples to be posted, so stay tuned.
During “playtime”, while exploring my new set I really wanted to try something “different”. Well at my recent stamp clubs I taught them how to use embossing paste. They went CRAZY! I posted this card called Bodacious Embossing paste in my gallery at SCS. That is the card that I used for our technique, and since that posting, I have gotten MANY requests to do a tutorial on that.
Soooooo, that leads me to this extra special tutorial!
I wanted to try this out with my new Butterfly Kisses stamp set. Problem-no brass stencil.
Well, now problem solved. I made my own! Now keep in mind the possibilities for this are ENDLESS, so use your imagination, and if you try it, link your template here!
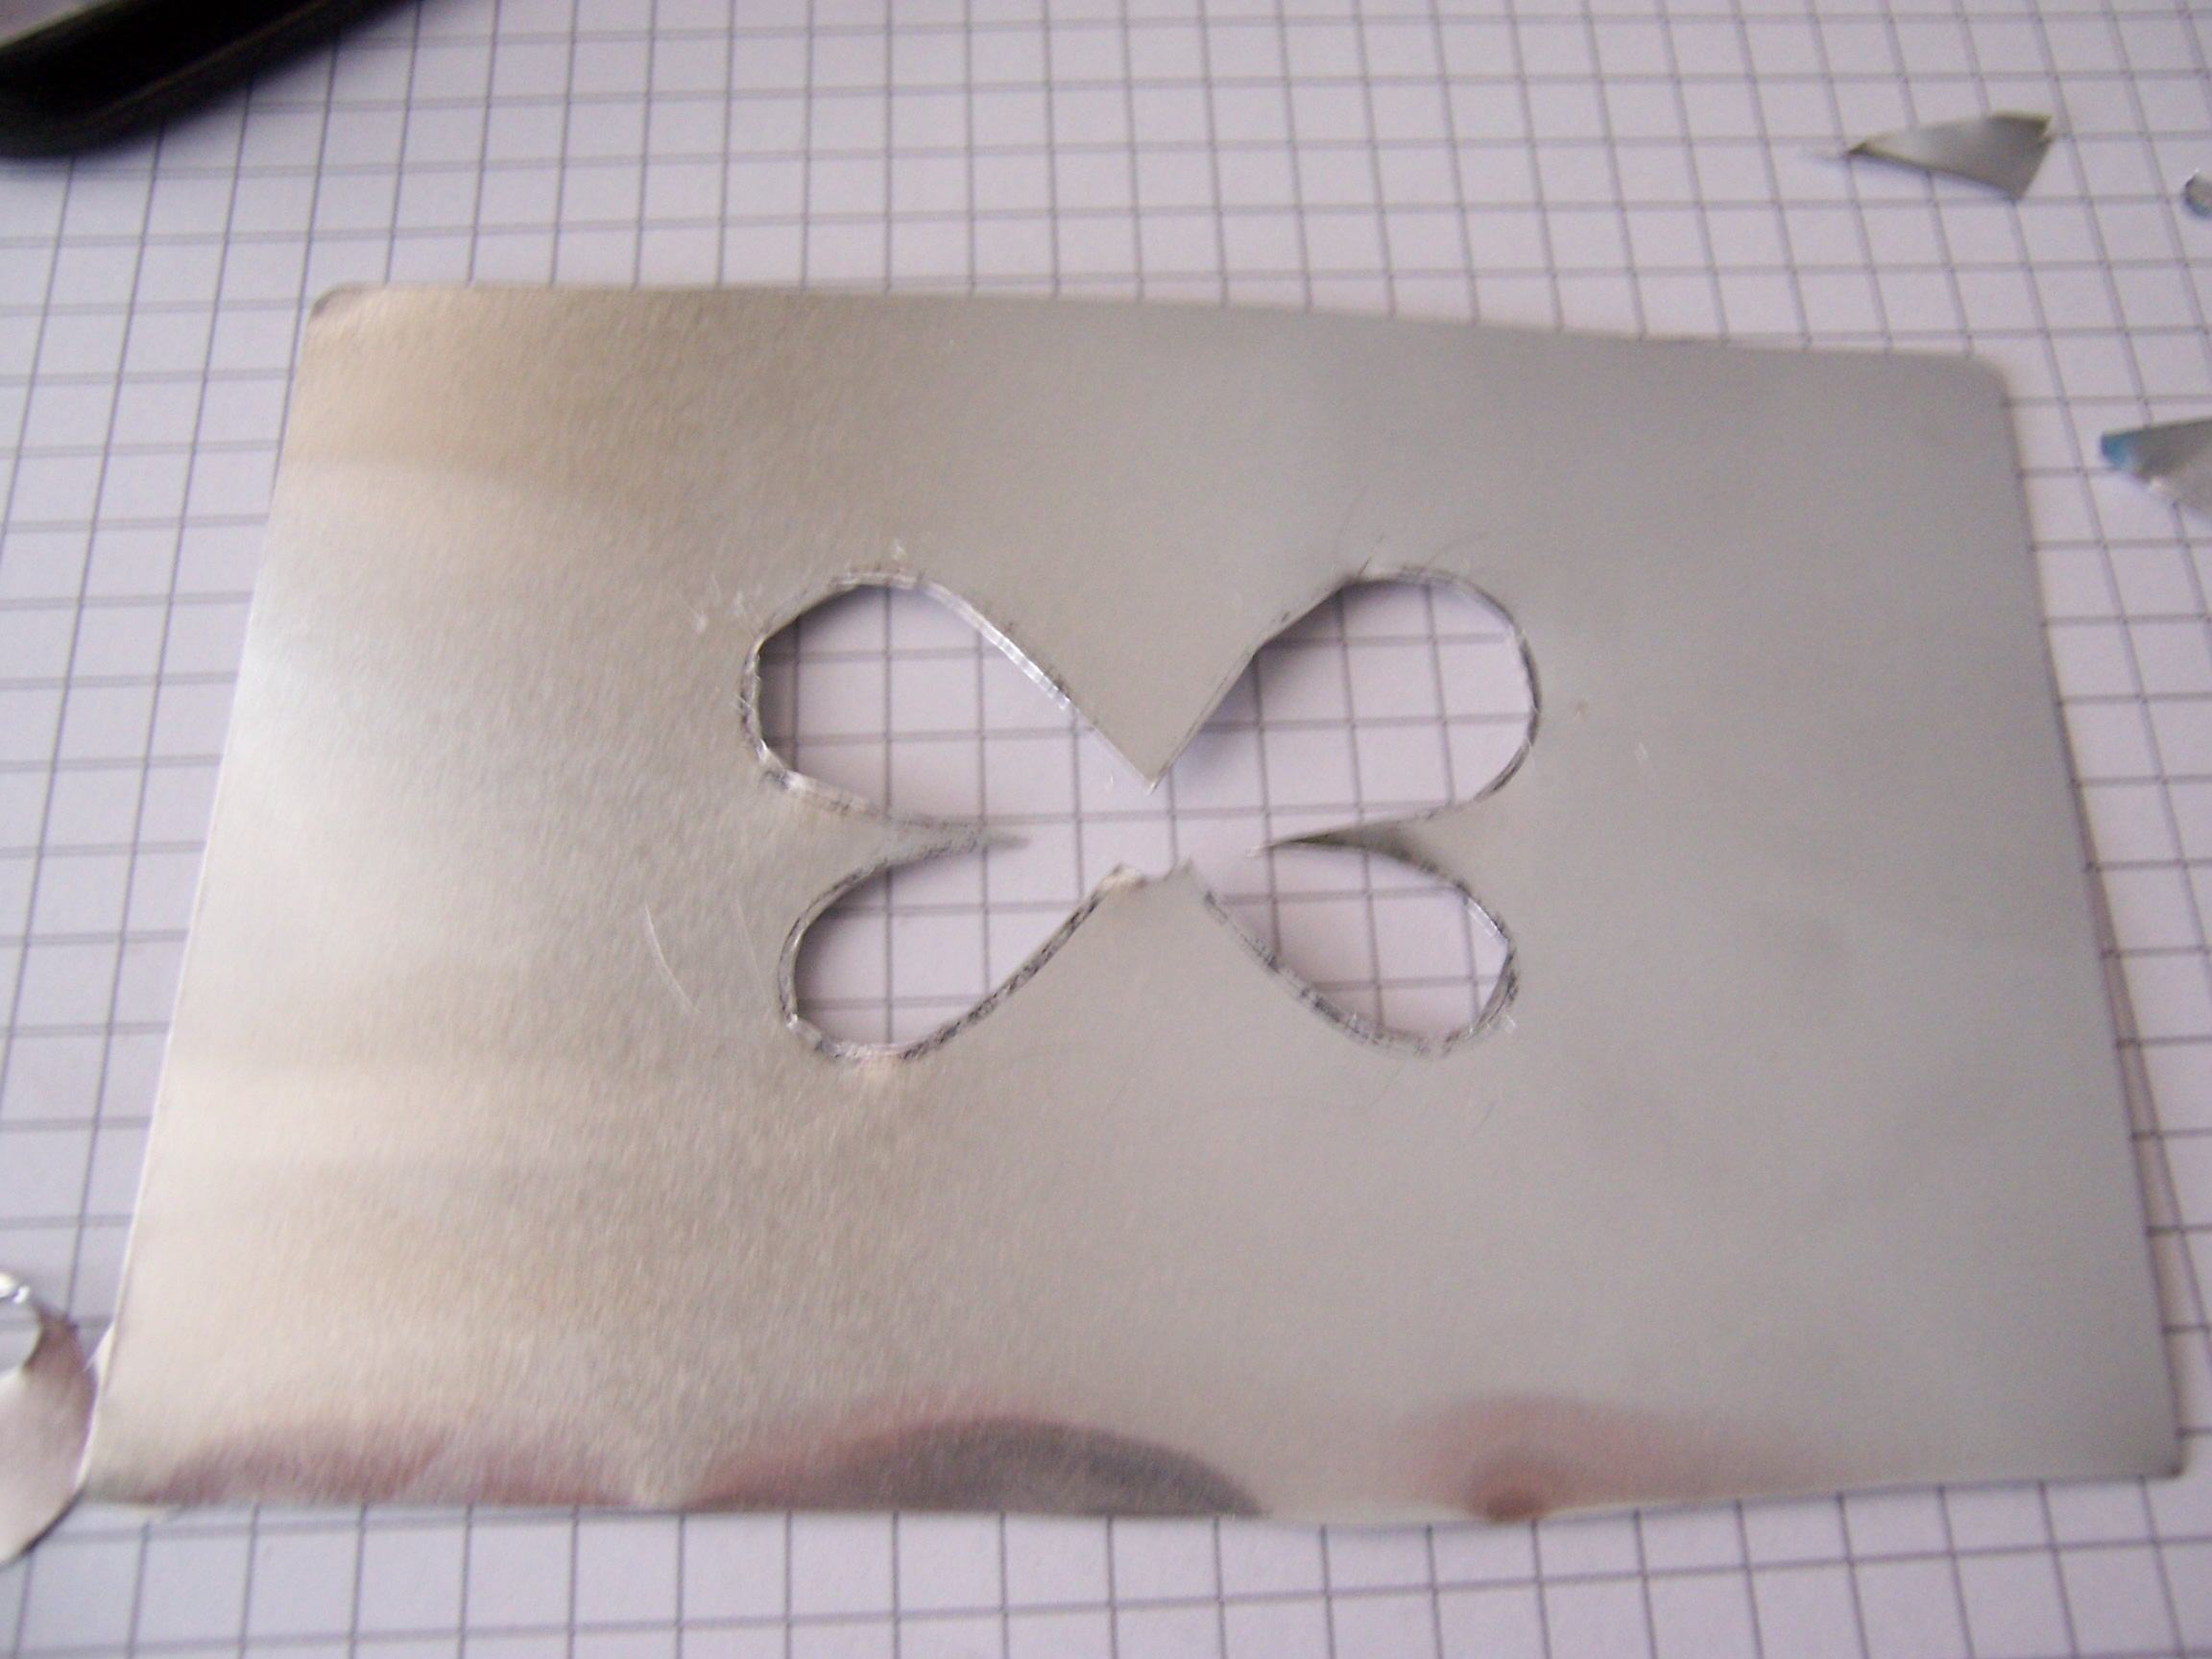
To make Your own metal embossing stencil
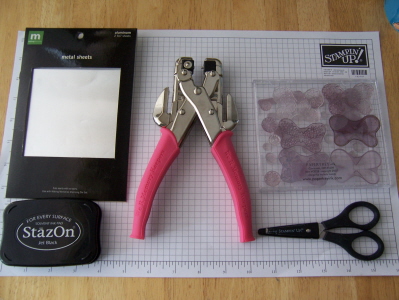
Metal sheet, StazOn ink, crop-a-dile, sharp scissors or tin snips, and of course a open line image.
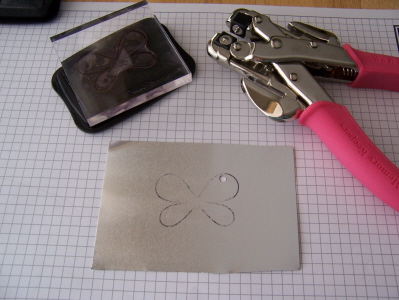
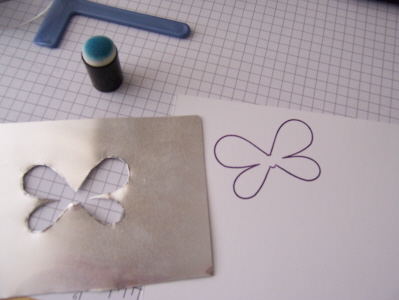
Step 1- Stamp your image on tin sheet, using StazOn.
Step 2- Use a crop-a-dile to punch a hole in the image. This allows you to get your scissors in the center without bending the soft metal. A Crop-a-dile is good cause it can punch through the metal unlike most punches.
Step 3-Cut out the center of the image. Once done you have a nice metal stencil that will allow you to dry emboss OR use embossing paste!
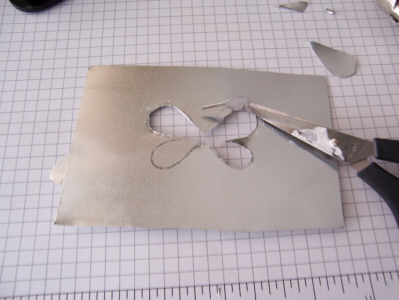
Pretty cool huh?
Now onto the embossing paste fun!
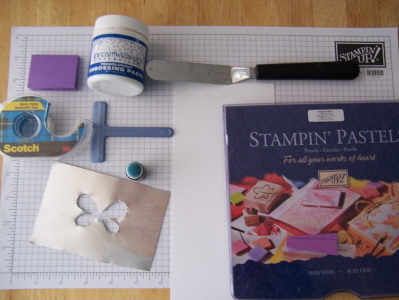
Here is what you need-
Your handmade metal stencil (or other embossing stencil)
Dreamweaver TRANSULCENT emossing paste (if you don’t get the clear your colors won’t show through when dry!)
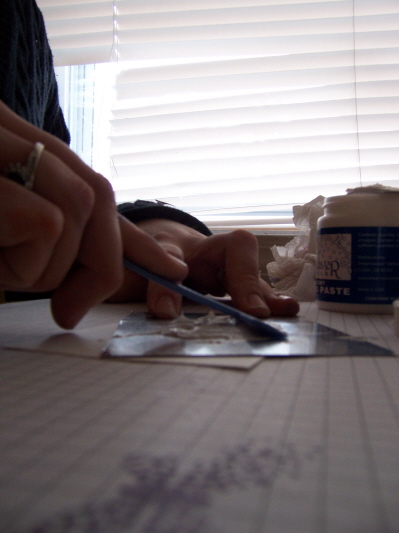
Scraper thingy (the blue scrapper you see in the photo)
Spreader (mine is a Pampered Chef one,and spreader will do)
3M removabletape (mainly for anchoring the stencil to the paper/surface)
Post-it notes (mainly used when using template with other images. You cover the ones you don’t want used, so the paste doesn’t get in)
Pastels with applicator
Step 1-Use removable tape to adhere paper to working surface. You don’t want it to slide around-trust me on this!
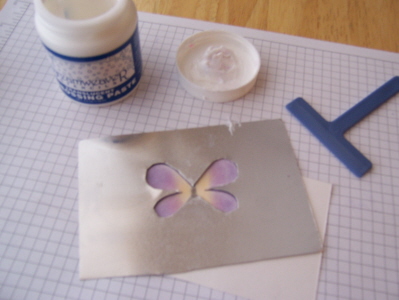
Step 2- Stamp outline image (optional). Then position stencil where desired. Tape down to card-stock. Cover any images not being used so they don’t get paste on them. If you made your own template this may not be necessary (see my photo)
Step 3- Use applicator or stipple brush to apply chalk to image. (Do not use ink as it will run unless its a waterproof ink, pastels absorb into the paste)
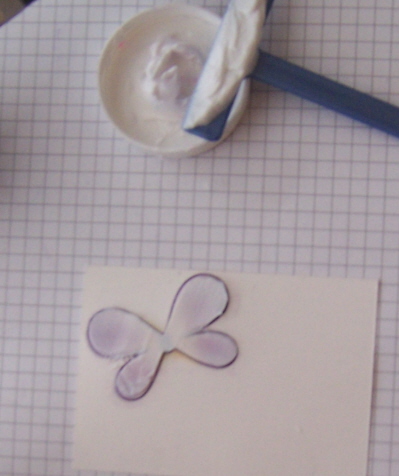
Step 4- Apply a thick layer of paste over enitre image on stencil, using spreader.

Step 5) Use scrapper, and go across image with a smooth even motion, in ONE direction. Toward you is best. Don’t scrap too much off.
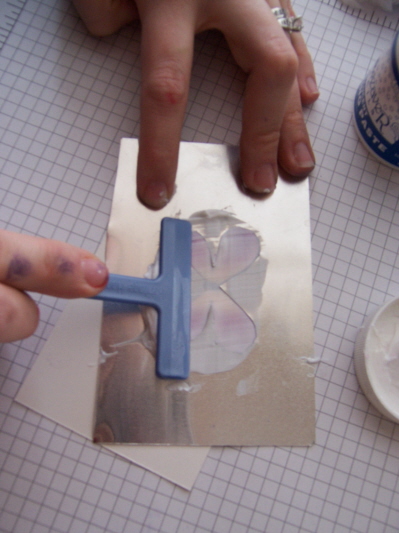
Step 6- Remove post it notes, and removable tape. CAREFULLY Lift off stencil in an upward motion.
Step 7- Sprinkle dazzling diamonds over image for some extra “bling”
NOTE- it takes about an hour to dry. Don’t freak when you cannot see the color immediately! Bright colors do work best.
Now go have fun!

Expieriencing technical difficulties!
Mar 24, 2007PLEASE stand by! LOL!
I want to thank everyone who has notified me of my website problems, and your comments. Especially for checking in regularly.
I am going to throw this computer out the window!
I cannot tell you how many emails I have received from all you amazing people, telling me that this site is having issue’s posting your comments!
I’m so sorry for your frustration. TRUST ME I’m going nuts!
Paulette is my go to girl-I call her and ask her to “test” this site for me when I get overloaded with emails that a number of people are having issues.
I am SO new to this and its driving me nuts that you all have to endure these “glitches”
Please bear with me as I try to fix them
The SCS guys are workin on it.
Sorry-
Subscribe to my blog!
Mar 24, 2007I have gotten alot of requests to add a “subscribe” feature to my blog.
Wow! How exciting that so many of you want updates when I add a post. Guess I’m not as boring as I thought 😀
AmyR gave me some advice (thanks girl), and now I’m happy to say I can offer that feature!
So, you are just a click away from being a subscriber.
I have had so much fun so far, and gotten such positive feedback its amazing. Thanks for all the support with my new venture!
I also added the top 50 stamping website. It will be fun to watch the number change. I’m WAY up there. Now I need a counter. Or, NOT! I don’t really want to obsess about the “numbers”. Just like a scale you know what I mean. Go by the clothes, not the numbers. I feel I should maybe adapt the same attitude towards my blog, as I do the scale.
My goal with this is to have fun, teach, and learn.
I also hope this helps me accomplish all my stamping goals. I’m happy you all are here to enjoy them with me.
Now I must go stamp!
I just left the new and improved stamping/scrapping section at our local Target, and now have like $14 in my account! LOL!
I wish that were a joke! Thank GOD Jason wasn’t standing there when I checked out. He would have had a stroke.
They have all sorts of new goodies. Prima’s, alterables, papers, templates, tools, accessories-you name it! Oh and the clearance section…..
I guess my point of this detour is, be on the watch for some new samples! Better yet, subscribe!
Have a fun weekend!
Dirty story of fame & shame!
Mar 23, 2007Well my fellow dirty girls said I should share this incident on my blog with all of you, so here goes.
I was at my local craft store a few days ago.
The isle was full of women, and I was shopping with my 4 yo son, Noah.
While browsing the isle, a woman who works there stops me and says “Oh my God! You’re that dirty girl on line.”
All the women in the isle quickly turn and stare at me. The clerk had no idea how her comment actually sounded.
I start blushing and quickly explain “Um, shes talking about a stamping website, and I’m on a design team the called The Dirty Dozen. Its not like it sounded. No one seemed convinced of my “story” nor were they impressed!
So we keep shopping and Noah keeps asking me “Why are you a dirty girl? You tooka shower today!” She called you dirty, are you a dirty girl?” And on and on it went till we finally left!
I wish I remembered her name, if you were one of the people in the isle or the clerk post back here!
Who would have thought being “recognized” could ever be so embarrassing!
Beautiful Butterflies
Mar 23, 2007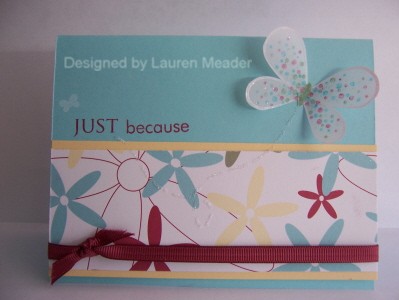
Oh its official! I’m in LOVE with this set by Papertrey Ink-called Butterfly Kisses!
This is an acrylic set. Many people complain about the images when its an acrylic stamp. All I do is stamp on a old mouse-pad and have NO PROBLEMS with ANY brand of acrylic. NEVER, no matter what kind of ink. These cards used classic ink by Stampin Up! unless specified otherwise.
I so wanted to use it more but had a rough day with the kids! So this was it.
The top Just Because card was made just for that reason, because! I wanted to use this paper again by Piggy Tales. The butterfly was colored with markers, and then stamped on vellum card stock.
Shimmery White ink was used for the solid border image. My quickie glue pen by Sakura made a super flying swirl easy. Glitter is by Prism. Not alot going on with this but I like its simplicity. Card-stock is by Bazzil. This card will forever remind me that this little butterfly in the left corner was the last time I will ever see it. Its lost and gone forever now, and I am bummed!
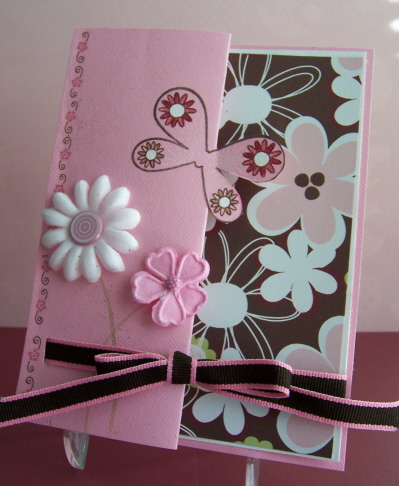
Now this card is my kind of card! Pink and brown-LOVE IT! I didn’t really like it at first but my upline Paulette stopped by ( to take my mail to the PO! How sweet) and thought it was great (but she always says that) so it grew on me!
Paper is 3 bugs in a rug-love it! Flowers are Bazzil, and Prima Sprites. Brads are by Queen & co.
Ribbon is from Jody’s lollipop ribbon share.
I folded back the open flap, and cut the butterfly wing, where it was scored. The ribbon keeps it tied shut.
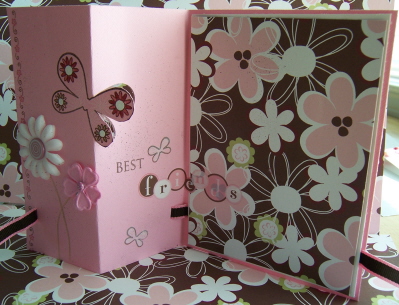
This was my very first time in 3 years of stamping ever using RUB ONS! I don’t know that I ever will again either. I prefer the stamping. It gave my hand a cramp rubbing like crazy to make sure they were “on”. The rub ons are by Marcella by K. The border on the front, and the friends greeting is the rub on part.
Thanks for looking.
Aren’t these Dino-Mite?
Mar 23, 2007OK something you should know about me. I am a flower image addict. If its a flower or a butterfly I NEED it! LOL! So, having that “problem”, when I have gone to stamp boy/masculine cards you can guess what happens. I have NO boy images!
I swore to myself if I was going to spend any $$ I would also increase my boy/masculine stamp collection. Well when I saw Kims Dino-Mite set I knew I had to have it!! It makes the CUTEST boy cards EVER!
If you need this set you can go to my shoppping list, and click on My Favorite Things . Don’t blame me if you put more than this set in your cart! LOL!
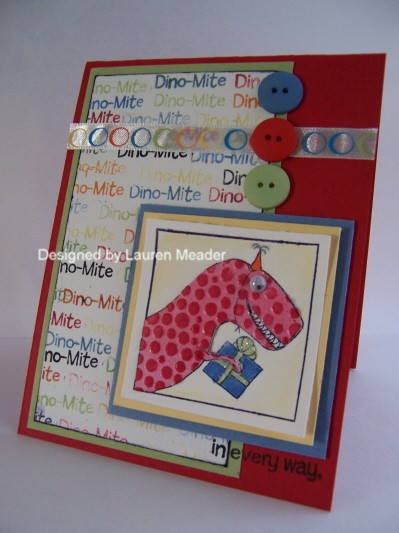
For both dino’s I used glossy cardstock. I stamped the images twice. Once on glossy, anotheron whisper white. I daubered color on the glossy card-stock, then ran it through my cuttlebug.
Cut out the dino, then rubbed it directly in the ink. Attached over image in whisper white. These dino’s look real, I swear! LOL! Plus they “feel” cool. The top dino, I stamped the dino-mite like a million times in different colors. Since this is a clear acrylic set you can see where its going! It actually didn’t take too long. The ribbon is a sticky ribbon I got at Joann’s for a buck! See I can cut corners! LOL!
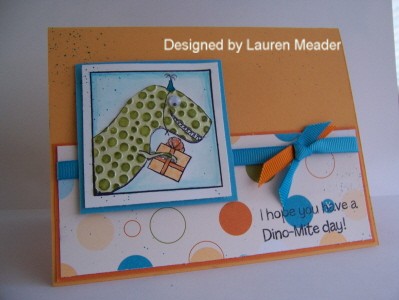
Now This one uses just the cupcake from the set, and the happy birthday sentiment. You can’t ell by the photo but certain circles are highlighted with glitter for a little WOW factor. Sweet & simple is sometimes the best. Especially for kids. I spent HOURS making a card for a friends daughter only to watch in horror as she picked off all the raised letters that spelled out her name! Lesson learned!

So not Easter images
Mar 23, 2007So the owner of All that scraps has desinged her own stamps!! Check them out as they are oooozing cuteness! The next 3 cards use ALL my goodies from there, and she’s getting in the new cuttlebug stuff soon. www.allthatscraps.com Tell her Lauren sent ya!
Anyway-I like using images ALL year, so I took her Easter images and made them all year friendly (I think). All my cardstock for these posts is Bazzil as well. My very first time using it! I have to say, I can definitely see why people go nutts for it!
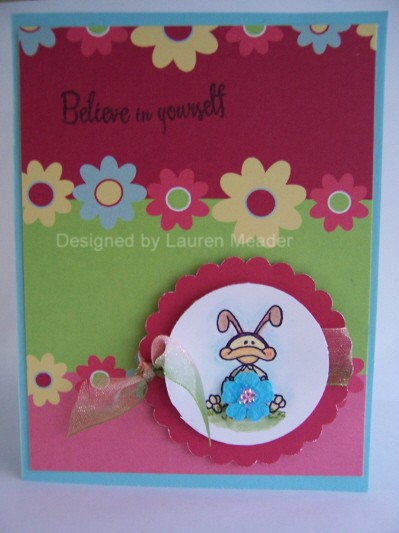
I LOVE this one. Its a little duck, dressed as a bunny,holding 2 Easter Eggs. I covered the eggs and made her hold a Prima instead! LOL! I loved the sentiment “Believe in yourself” for this cause the duck is trying to a bunny, and should just be happy to be a cute duck.
OK too deep for a cute image but that was my though process. The senitment is by CTMH and is called “faith hop & charity”.
The paper is super cool, and its by 3 Bugs in a rug The Blossom collection. Of course the Mega circle scalloped punch, and the delicious May Arts sheer ribbon which is to die for! She also sells the little plastic thingys to wrap your ribbon around. Not to mention cool storage by CK.
Next we have a cute bunny!
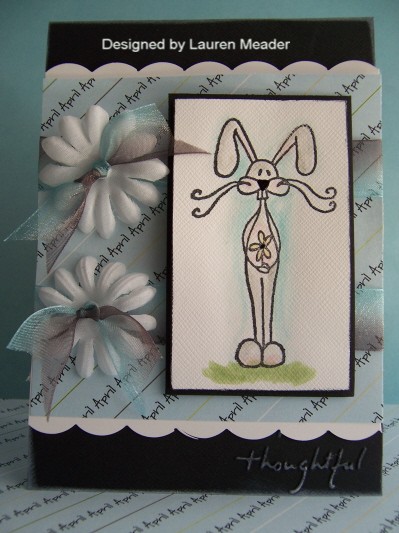
Where to start….
Well I got this patterned paper by Sweetwater. It is the month by month one. Basically they have DP for every month. Pretty cool, espcially for those who scrap! Well since April is coming, figured I’d use the April paper. Plus I loved the colors.
The thoughtful is a cuttlebug embossing folder-I just rubbed craft white over it so you could read the “thoughtful”. I love these flowers by Bazzil. They are so sweet. The ribbon is also May Arts!
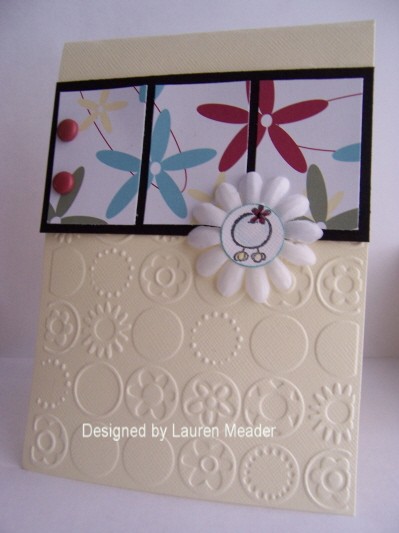
Last but not least. Jenn posted a challenge today to a card that was non gender baby, and well I think this could certainly qualify for a pregnancy don’t you? See the sweet little egg in the flower center? You could put “Congratulations on you eggciting news!” The paper is like my favorite. Love the colors. Its by Piggy Tales, and is the Little Red Riding Hood collection. They ahve the most cute new line-seriously! Hope you likey!
Dont you just wanna go grab a holiday specific stamp and use if for everyday? C’mon give it a try.
Recipe Set- Bake off!
Mar 23, 2007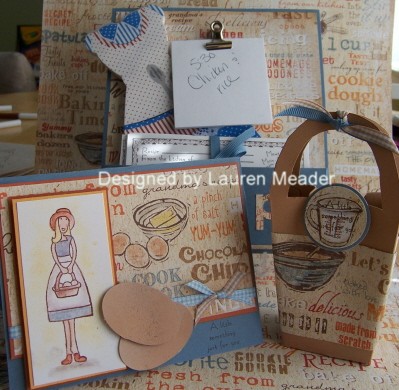
So I just got some new goodies in from All That Scraps. This paper is so cute! Its called Bake off and its put out by Flair designs. I used it for Emily’s CC116 Really Rust Marigold Morning and Brocade Blue.
First I made the card

Its a new stamp made by the owner Christine. Isn’t she sweet. I made my own “eggs” by using my coluzzle, and creamy caramel card-stock. I sponged the “eggs” with craft white, then speckled them with my color spritzer and choc. chip marker. She is actually primarily an Easter image, but I knew I could transformher! LOL! This paper was perfect. Once I got started the ideas were flowin.
Next came the basket
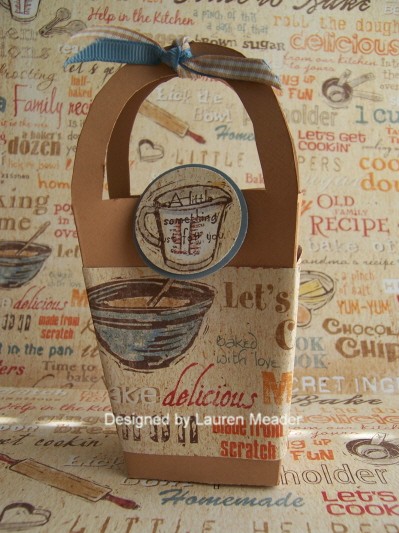
This basket is a stamp from Inky Antics. You stamp it twice, cut, score and adhere! Cute huh? I figured some little goodies could go inside with the set. Maybe some sort of mix for baking?

Then the big idea hit! This is a magnetic recipe/note holder! It goes on the fridge! I used the Whats for Dinner set by SU to make recipe cards (you could of course fill them out before giving away). I used a large memo cube and took a portion for the dinner note. Remember last year at the Target Dollar spot there were some cute little notepads that looked like aprons? Well, here it is! I knew I was hoarding it for a reason! I found it while I was searching for the memo notes. Perfect match don’t you think?
Only problem was when I was using my cuttlebug to do the “recipe” word I found out I am missing a die!!! Can you believe that? I called provocraft and they are sending my plate. Of course you can guess it was the E! LOL! Figures.
Lesson learned-check your cuttlebug alphas when you first open them.
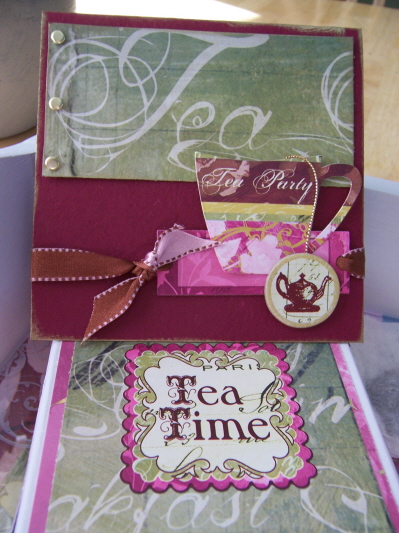
Time for Tea gift set
Mar 22, 2007
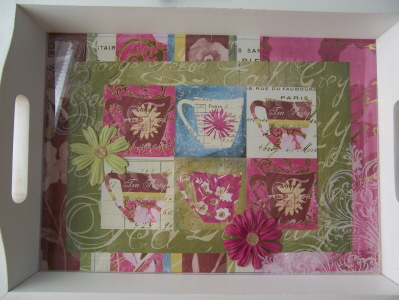
I LOVE coffee/tea themed items! When I saw this paper by Chrisitne Adolf at www.creativeimaginations.com I knew I had to have it!
I had NO idea what I would do with the set, but the colors just drew me in. Then it hit me-HELLO serving tray! So I ran to Michaels where I got this white tray on sale for $7! The best part is it has a plastic tray cover, so your artwork underneath is protected! Another plus, I didn’t adhere it, so I can change the “mat” to suit any occasion!
I stamped the plastic tray with a gorgeous flourish image by Fancy Pants called Pollen Dust. I hope you can see how gorgeous it is in the photos. Find it at Jacksonbelle’s ebay store-link on my sidebar!
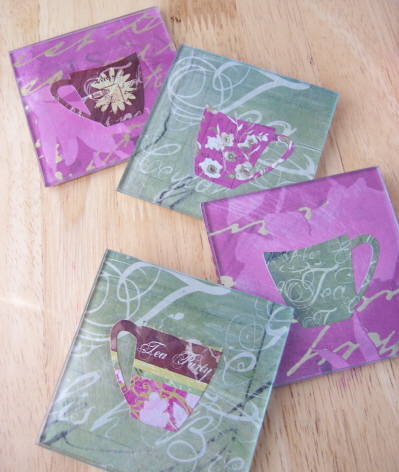
The next thing I did was use the tea cup patterned paper to inspire my glass coasters from the Bare Elements line at Creative Imaginations as well. You get a set of 4 Greg Glass coasters and a cute white box. Its cheap too! Like $6.99. I cut the PP size to fit, attached the coordinating stickers, then ran them through my Xyron 900 face down.
Making sure there were NO fingerprints I placed them onto my glass tiles. The rubber brayer made them stick, and evened out the adhesive so you cannot see it.
Next project was the box to hold the coasters, and of course the Tea party invitation!
My card-stock is from www.prismpaper.com
I LOVE that Razzleberry dk color.
I used all stickers, and patterned paper. Don’t you just want to go to a tea party now?
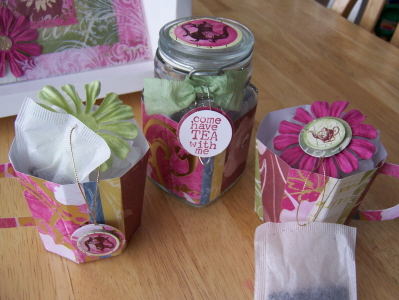
Now NO tea party is complete with out your tea cups, and tea right? So I went to Michael’s and got this air tight jar for $1!!! Decorated it to match. The sentiment is a stamp from Inkadoo. Perfect isn’t it?
I used a tea cup template (source unknown) to make the teacups from patterned paper. The lables on my tea bags were also made by me using chipboard embellishments! Love it!
Thanks for looking!
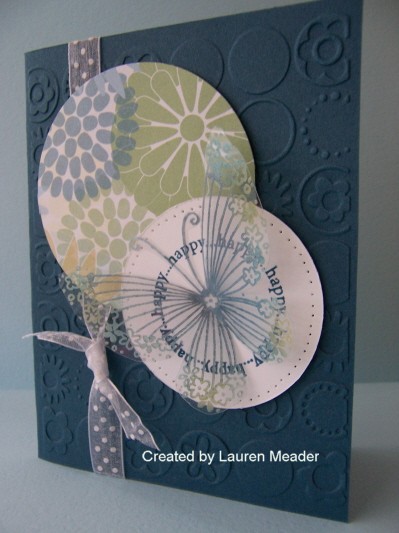
My Marvelous Poppin Acetate
Mar 21, 2007
This butterfly is the Flowerfly image by Stampendous. Check out Eclectic Paperie-Oh My WORD!!! Thats all Im sayin! Anyway this is my technique on a window card. If it has a butterfly its mine! On the 2 cards I used the scraps from card 1 (above) to make card 2. Paper is from a gorgeous pack of Shangri-La Palette by DMD. Primas are from Jody’s daisy crazy Prima share. Gotta use my color spritzer on everything! LOL!
On card 2 I cuttlebugged it, to kind continue the circle theme. The butterfly is cut out. Happy sentiment on the circle is by CTMH Solo H set. They are the bomb!!! Love those sets. Polkadot ribbon is May arts of course.
OK so on to the HOW TO DO…..(me in my best commercial voice)
Don’t you wish you had StazOn in like every color? Well I do. While “playing” I found that by stamping white stazon, on a acetate sheet you can actually apply pastels while its still wet, kinda like poppin pastels, only they colors shows up on the acetate sheet. I LOVE pearlescent chalks for this technique cause they look so pretty from both sides. (pretty funny eh?)
Here is how I do it.
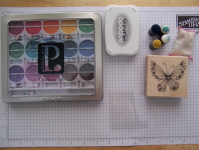
Assemble your supplies, You will need to work fast, so have everything open and ready to go!
You need acetate sheet (make sure there are no finger prints),very moist white stazon, pearlescent pastels, sponge daubers, and an embossing buddy.
Step 1-rub embossing buddy over acetate sheet
Step 2- Stamp image in whate stazon
Step 3- Quickly dauber pearlescent pastels over image
Step 4- Remove excess powder using embossing buddy. Tap of excess powder from acetate sheet.
DONE!
Now you have a easy WOW!!! So, are you gonna try it?
My Etsy

Who I Designed For
Blogroll
- Alicia
- Alli Miles
- Ally Blankenship
- Amber
- Andi @ crafts on a whim
- Angel R
- Angie Z
- Anne Kranitz
- Becky O
- Bee
- Beth Silaka
- Bethany Paull
- Beverly Nash
- Bobbie
- Cambria
- Cammie
- Card of the Week
- Card Positioning System (CPS)
- Cards for Cancer
- Catherine Doucette
- Charmaine
- Cheryl Sims
- Chriss Rollins
- Christina
- Christine Ewing
- Christine Wooden
- Colleen Schaan
- Craft Critique
- Craft Gossip
- Crystal
- Dawn Easton
- Emily Giovanni
- Geny
- Holly
- Igne Groot
- Inspirational Craft Blogs
- Irene
- Jami Sibley
- Jeanne Streiff
- Jen del Muro
- Jeni Bond
- JenMarie
- Jenn Balcer
- Jenn Diercks
- Jenn O
- Jennifer E
- Jennifer Mick
- Jennifer Pereda
- Jennifer-Sweet Treat
- Joanne Basile
- Jodi Collins
- Julia Stainton
- Julie Masse
- Karen
- Kathryn Berthiaume
- Katie Cotton
- Kelley Holland
- Kendra
- Kim Scholfield
- Kris’s Color Stripes! Get inspired here
- Kristen Dubosque
- Kristin Eberline
- Kristine
- Laura @ Sunshine Stamper
- Laura Turnmire
- Laurie Schmidlin
- Lesa Rapp
- Linda Duke
- Linda-LSN
- Lindsey Botkin
- Lisa (lakind scs)
- Lisa Kind
- Lori Craig
- Maggie
- Mara Campbell
- Maria
- Maria Levine
- Mary
- MaryJo
- Melanie M
- Monique Hansen
- Moxie Fab World
- Pam Imholz
- PaperCrafts Connection
- Peppers and Pollywogs Kids party site
- Rebecca Grohall
- Rita
- Robyn
- Rose Ann
- Sarah Vrolyk
- Sharon Harnist
- Sharon Johnson
- Sharon Rivera (a chemisrty with paper)
- Sherrie
- Sophia Landry
- Storage Units, Ink, & More Blog
- Sue Berker
- Susan (Rainy)
- Tangii Crane
- Tracy
- Tricia Traxler
- Trudee
- Velta
- VivLyn
- Zena
MTME Pretty Palette Color Team
MTME Pretty Patterns Sketch Team
My Time Made Easy TM LLC
Shop till you drop!
Lauren Meader
About Me
Copyrighted material
Subscribe To My Blog
Pages
- About me
- Alexa’s Story!
- My Crafty Corner!
- My Time Made Easy™ LLC
- Our Make A Wish Trip to Disney!
- Resume/Publication List
Calendar
| M | T | W | T | F | S | S |
|---|---|---|---|---|---|---|
| 1 | 2 | 3 | 4 | 5 | 6 | 7 |
| 8 | 9 | 10 | 11 | 12 | 13 | 14 |
| 15 | 16 | 17 | 18 | 19 | 20 | 21 |
| 22 | 23 | 24 | 25 | 26 | 27 | 28 |
| 29 | 30 | |||||
Archives
- August 2013
- July 2013
- June 2013
- May 2013
- April 2013
- March 2013
- February 2013
- January 2013
- December 2012
- November 2012
- October 2012
- September 2012
- August 2012
- July 2012
- June 2012
- May 2012
- April 2012
- March 2012
- February 2012
- January 2012
- December 2011
- November 2011
- October 2011
- September 2011
- August 2011
- July 2011
- June 2011
- May 2011
- April 2011
- March 2011
- February 2011
- January 2011
- December 2010
- November 2010
- October 2010
- September 2010
- August 2010
- July 2010
- June 2010
- May 2010
- April 2010
- March 2010
- February 2010
- January 2010
- December 2009
- November 2009
- October 2009
- September 2009
- August 2009
- July 2009
- June 2009
- May 2009
- April 2009
- March 2009
- February 2009
- January 2009
- December 2008
- November 2008
- October 2008
- September 2008
- August 2008
- July 2008
- June 2008
- May 2008
- April 2008
- March 2008
- February 2008
- January 2008
- December 2007
- November 2007
- October 2007
- September 2007
- August 2007
- July 2007
- June 2007
- May 2007
- April 2007
- March 2007
- January 2007
Categories
- About Me
- All That Scraps
- blogger challenge
- camera/photo play
- Cards
- Contests
- family stuff
- FOR SALE
- Home decor/3-D items
- How to FAKE it!
- Introduction
- JUGS Challenge
- JustRite Stampers
- Lizzie Anne Designs
- My family stuff
- My Stamping Space
- My Time Made Easy
- My Time To Color Challenge
- My Time to Create Challenge
- My Timeless Template Challenge
- My Timeless Templates
- Mytime Mail
- MYTIME MOVIE/VIDEOs
- Papertrey Newsletter
- Pink Cat Studio
- Pretty Palette Challenge
- Pretty Patterns Sketch
- Product Opinions and Must haves
- Recipe's
- Saturday Sketch
- Smilebox Creations
- Stampavie
- Tutorials
- Uncategorized
- videos
Most Popular
- Create your own Onesie Card Tutorial-and important NOTE! PLEASE READ (2529)
- Saturday Sketch-Boxed bag holder (2333)
- Going GREEN! Fancy Flower Flourish-Closure Video (1478)
- Fabulous Favorite - Giveaway! (1336)
- a Prayer Request (1232)
- QUICK-Easter Baskets from Nestabilities-PTI style-and blog challenge (1063)
- Teaser Sketch (999)
- February Release Giveway! (and a little peek) (996)
- Group Post and Rambling Rose Video Tutorial (985)
- GIVEAWAY! Who wants it all?! (895)
Recent Comments (RSS)
- 첫충사이트: 완전히 흥미로운 블로그 게시입니다. 저는
- sarah: Wow, Lauren, what a stunning
- hedie: خرید راهبند
- 야동: Love to read it,Waiting For
- 야동: This seller is in a
- 바카라사이트: 여기 처음 왔어요. 나는이 게시판을
- 야동티비: I was surfing the Internet
- 바카라사이트: 비슷한 주제에 대한 흥미로운 정보를
- 바카라사이트: "여기에 제공해 주신 귀중한 정보와
- 온라인홀덤: 유익한 웹 사이트를 게시하는 데
Copyright © 2007 - My Time, My Creations, My Stampendence - is proudly powered by WordPress
This blog has been Tweaked and Designed by Sara Williams