Archive for the ‘Tutorials’ Category
Do you know how to fake it?
Sep 15, 2007 Author: mytime | Filed under: How to FAKE it!, My family stuff, TutorialsSomething every woman needs to know!
Now get that dirty mind of your’s out of the gutter.
I’m talkin fake it,like you have spent the day stamping, but by the time your hubby comes home it looks like you spent it cleaning, and possibly even cooking!
I dont really cook much, but if I want to seem like I SLAVED I do a croc pot meal! Just throw some meat, sauce or whatever, and frozen veggies-cooks on low all day – hubby arrives-DONE!
Im am going to share my very best tips for “faking it” with you!
FIRST let me say, if your house generally looks like something exploded in it then this will NOT work for you! LOL!
Your house should in general-be in “order” as in not 8 piles of dishes, clothes everywhere, and so on.
Now I started cleaning and having a little OCD since 3 years old! My mom always made me clean. She would start me young on her “tips to looking like you have a clean house” since I can remember!
She owns her own cleaning company now, and is quite successful, so Im am so proud that she has taken something she does so well, and made a living for herself doing so. And NO she doesn’t FAKE it! lol! Shes a super cleaner!
You should clean well once a week! You only need max-2 hours if you plan on dusting, and staying on top of it will keep it cleaner looking, and the faking it part much easier! Plus, after the kids go to bed, do things that cut the chaos in the am down-like put away/fold laundry, put away dishes, layout clothes, pack lunches, have notes done, coffee ready to go-blah blah blah.
It really does help you start the day fresh and gets you ready to create!
OK so here it goes. All you need is about a 1/2 hour! We can all spare that now can’t we? So start 40 minutes before he comes home. Just in case……
You will do the “clean sweep”. Now, what this is, you go from door he will arrive through-then work your way from there through the house. This ensures that at least the begining will be ok for sure!
Now the clean sweep is when you pick up and move any items that do not belong, and put them where they do, as you go along! If neccessary take a basket! This will allow you to carry and deposit the items where they belong as you go. The idea to to work from ONE room to the other! Use your time effiecently! Not running room to room and back again.
Carry the windex and paper towels with you, and remove obvious fingerprints from mirrors, or glass surfaces! Clorox wipes or baby wipes are fabulous too!
KIDS-this is the hardest part! LOL! Ages 2 and up! Not YOU cleaning!
Ok if you have them-set a timer (for 20 minutes) and have them start cleaning up 45 min. before Dad gets home! Have them throw toys in their toy box or baskets. If you have multiple kids have each one take a room that their toys are messing up. DONT WORRY ABOUT THE UPSTAIRS! Only daddys immediate view!
REWARD with lollipops or other fun sugar filled snack before dinner! This works when you are desperate! TRUST ME! Tell them it has to be done before the timer goes off so there is time for the treat before dinner!
(TOLD YOU ONLY DESPERTE TIMES)
Hall 3 min
If you have one, make sure shoes are away or whatever funky thing you may have going on! If he wont be in your hall or see it then skip it!
Kitchen 10 min (if you have to wash the dishes)
If there are dishes-and you have a dishwasher HIDE them in there! If not you may have to take 5 min and wash them! Fill the sink, then RUN!
Take care there are no fingerprints on the stoves, and the counters are quickly wiped down.
Go do the dishes LAST!
Bathroom- 5 min tops
pull shower curtain closed, empty barrel, clean mirror,sink, and sink top. flush tiolet-throw in some AJAX-quick brush clean-flush again.
LAUNDRY-LEAVE it in the dryer! He wont even know its in there!
Living room 3 min
-straighten cushions, windex glass tables and tv screen.
QUICK vaccuum! I mean quick-just suck up anything visible! If neccessary Swiffer your kitchen and hall floor. Makes a huge difference! 5 min
RUN through the house spraying with that lovely smelling Febreeze!
DONE! This is also great for last minute guests!
Now you cant do this everyday! Just once a week or so!
AGAIN we arent being super picking. We want the clean look FAST! MOST guys dont notice when we miss a “spot”. They are just thankful to be done work.
Time yourself and try it! I swear it works 😀

Ok so Im trying to organize my creations, posts, and thoughts.
So for this one we are using High Hellos. Im in love with the rocket image! Its just too cute. It can be for a BOY card, a shoot for your dreams, 4th of July, You did it-just about anything. Its cute, cute, cute.
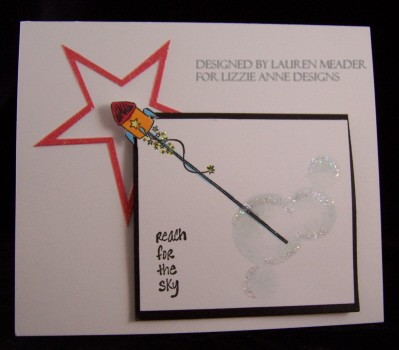 Shoot for the Stars
I felt I NEEDED clouds, or puffs of smoke-to signify flight-or take off! LOL! Yestrday on my kite card-it was for just that-clouds!
In the past I have made my own templates much like this, and have explained it. Alot of you are visual people, cause you always ask HOW. OR I get asked “Where did you get a stamp like that!”
So Im going to show you my “cloud” template! Click it to see a larger view.
 Simple huh? I just use various hole punches, to create a cloud mask. You can do this for just about any size image! Just vary the size punches you use. I like to stamp the image on scrap first to make sure my clouds are PERFECT size 😀
When your template is done-lightly sponges the edges and you got yourself a cool cloud mask. I have also explained I did this with my scallop ovals, and word window punches to make that shadow under things. That way you dont NEED a stamp to do it. I hope it now makes sense.
Stamp sets- Lizzie Anne High Hellos & Sketched Sentiments
Cardstock-White by Paper Trey Ink, basic black, red glitter stakc by DCWV, Turq.
Pattern Paper by K & co.
Ribbon by Martha Stewart.
Colored with Copic Markers. Circle punches/sponge, dazzling diamonds, MS glue pen. Cuttlebug star die cut.
Check in tomorrow. I have some more cool things to share 😀
ALL 3 kids will be in school! So I will post their First Day of School photos. Too cute. AFTER I have a mini party for myself here! LOL!
Cant wait to have some quiet time here for a few hours. Whats a girl to do? I bet you can guess.
Window Box/Make you own envelope Tutorial!
Aug 17, 2007 Author: mytime | Filed under: Home decor/3-D items, Tutorials, UncategorizedHAPPY FRIDAY! YEAH!!!
Should be a good weekend here. A few things to share today-
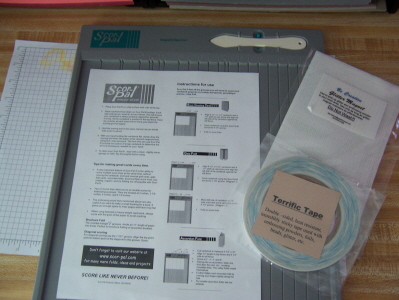
I am very excited to be a part of the Scor-Pal Team! I now have have 2 tutorials you can find there!
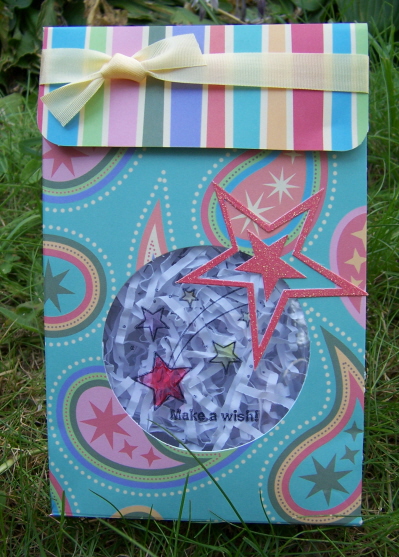
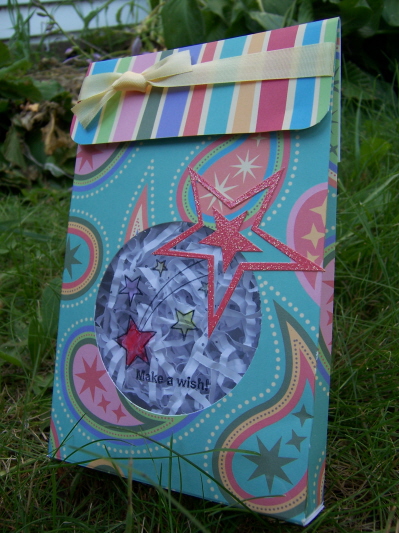
I was quite proud of this project. It uses the Make A Wish set by Gina K. $7 from the sale of EVERY set goes to the Make A Wish Foundation! A great way to give a dream to a sick child 😀
SUPPLIES: Obviously the Score-Pal. The paper is a stack by K & co. Ribbon is Martha Stewart (of course), and the Make a Wish was colored with Copic Markers. The star is a cuttlebug die cut, and the paper is DCWV Glitter stack. My magnetic closures are by Basic Grey. Go take a looksie.
This Window Box is a gusset box with a closeable flap that can easily house 4 cards (A2 size) and envelopes, as well as perfect use for whatever else you decide to fit in there! I love that you can peek at what is inside.
Read the tutorial linked above, for more info.
My next project features a perfect formula so you can quickly make your OWN envelopes in any size you want! Just use the formula. Once you get it down, you will whip up your own envelopes in minutes.
Make your own envelope formula
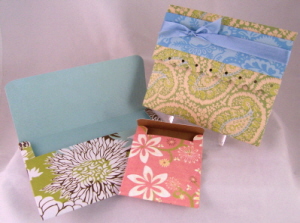 Here are a couple different sizes made using my formula.
I would love to get any feedback on the tutorials! That includes tutorial’s you’d love to see put on the site, or any other comments/questions you may have. I will answer any questions here on my blog for all to read, if there are any.
I hope you try them out. If so, send me the link 😀
Thanks for looking.
EDITED FOR QUESTIONS
Julie asked:
These projects look SO GOOD! I have a question about the scor-pal: It looks like it would be easy for me to ’swerve’ off of the scoring lines and mess up my project since there is no flat edge to run against. Do you ever have any problem with this?
Julie thats a great question. Have you used the Scor Pal yet? I ask because you mentioned it “looks like it would swerve off”. If not RUN! Go try it! LOL!
The grooves are deep, so that when you start scoring, your tool stays in the groove. I have had no problems with mine at all. I found it super easy to use. Let us know if you try it out and what you think.
Stampin Up! goes un-mounted
Jul 19, 2007 Author: mytime | Filed under: Tutorials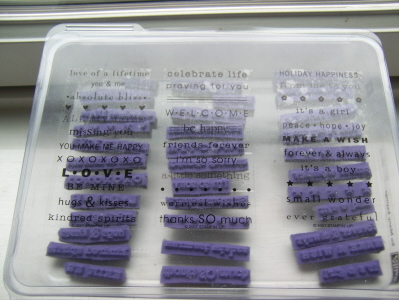 Well I think pretty much every person who has seen the AMAZING Level 1 Hostess set- So Many Saying set, their inital thought was “How can I cut this up!” LOL! Not sure if anyone actually DID, but that was my thought too.
Then, I did!
I LOVE my un-mounted sets these days. Plus I wanted to use the sentiments separately NO STAMP-A-MA-JIG. So while using my Lizzie Anne sets I thought HMMMM, this is a rubber image, with foam, and a weird plastic that clings to acrylic blocks. There has to be a way!
LIGHTBULB moment people.
So, I ran to my Paper Salon Tailored Tins. I remember getting them and having to put this static cling layer on the bottom of the tin to make their cling mounts stick to the tin bottom.
So I got out a set, and peeled off the cling. Why did I really need it there anyway right?
PHOTO here
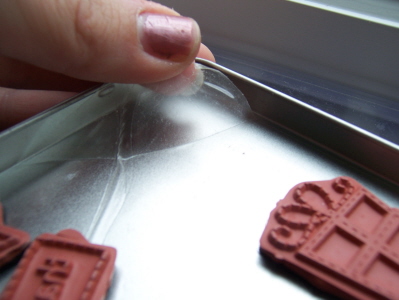
Once it was off, I pulled the paper backing off my SU! set and placed the sticky side onto the non sticky side of the clear plastic I pulled form the tin.
I then trimmed my stamps as usual
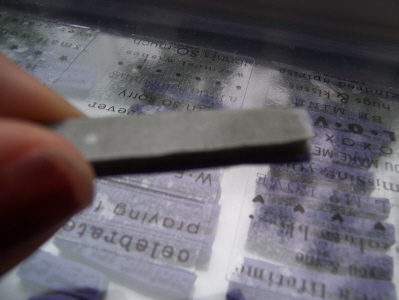 See the shiny clingy stuff stuck to it? I have no IDEA if there is a place to buy the cling stuff that Lizzie Anne, Paper Salon and other companies use, but I hope to find out.
(In other words-Meridith or Trisha if you read this feel free to respond :D)
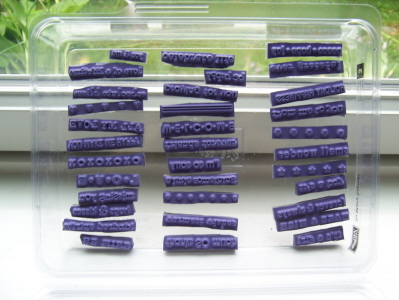
Now here they are sticking to the inside of my SU! container
Back of stamps in container

Front view
As you notice from the top photo I just stuck the stickers to the top of my storage box. That way I know for quick reference what the sentiments are.
I hope this helps you get the courage to GO FOR IT! I’d love to hear from you if you tried it, or have any other cool ideas.
Enjoy!
Have you seen the cool Ribbon Carnival over at Craft Critique?
LOTS of cool ideas for your ribbon are posted there.
Here is my ribbon tutorial and storage ideas-just in case you missed it.

Well, I HEARD it could be done! But, I didn’t believe it, till now!
I recently received some AMAZING ribbon from Strano Designs. You must see it, and feel it, to believe it! LOL! If you are a true ribbon addict then THIS is the place for you 😀
They sell a product called Ribbon Stiff, which you must read about! It is amazing what this product combined with their ribbon, can actually do!
SUPPLIES:
I used the 1.5″ Hazel Ribbon (flowers), and 3/8″ Gidget from Strano Designs, for my design today.
Stamps-Holy Tomoli (little bee image) and Card Greetings (sentiment retired by Green Grass Stamps)
Cuttlebug 2×2 flower #1 die cut, Bloom Dots Cuttlebug folder, Scalloped Giga Square punch, layered Circle Punches by SU!
Piercing template, Copic Markers, misc buttons (from my friend Barb!)
So, upon hearing that their ribbon can be cut with the cuttlebug I HAD to try it myself!
The PROBLEM
I didnt get any ribbon stiff! :C
Upon our Dirty Girl chatter, I asked JulieHRR about die cutting the ribbon. She said that yes, the Strano Ribbon could be die cut, and given the fact I had NO Ribbon Stiff, she believed it could be done if it was run through the Xyron machine first to give it some stiffness. She also suggested Aileen’s Fabric stiffener may work as well.
So, I ran to my machine and tried it! And it actually worked.
Here is what you do!
Supplies-Strano Ribbon, Xyron 150.
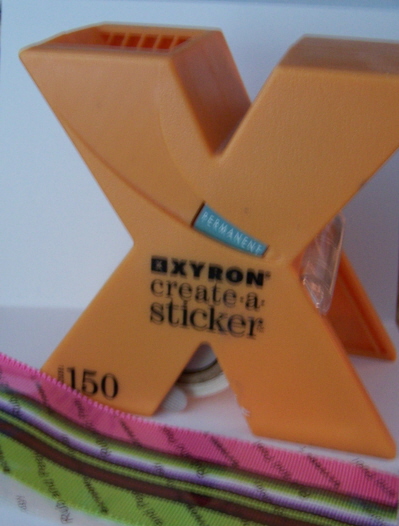
1)I used my Strano ribbon, and ran it through my Xyron 150.

2) With the paperbacked adhesive still on, picked my die cuts, and layered them over my ribbon (as seen above). Run through your die cutting machine.
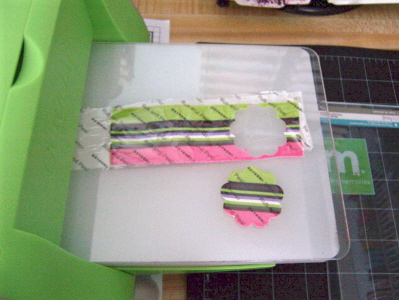
3) Remove die cut image. As you can see it cut like a DREAM!
4) Remove adhesive backing and plastic layer. Attach to card.
DONE! Isn’t that amazing?!
I hope you try it out. It was cool to know I can do this without the ribbon stiff, but I still think I will have to buy some to do the other cool techniques mentioned on the site.
I hope you get some ribbon and try this out! I’d LOVE to see the results.
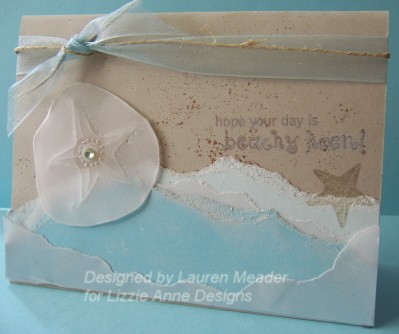
Faux Sand Dollar-Beachy Keen
I absolutely LOVE Shore Thoughts by Lizzie Anne Designs. I think its the prettiest shell set I have ever seen-seriously! I have made several cards using it, and will design another hopefully this week for a Wedding I have on Saturday (provided my room is all set then). I am MOVING IN, but that is a huge process. Just moving my stamp alone makes me never want to sell our house! I also realize I have way too much stuff! Is that possible? HMMMM, maybe till I move it all in, then Ill be ready to get more! LOL! 😀
I designed this card for Lizzie Anne Designs, and it is the featured here, for the July Card of the Month! When I saw the open line starfish it reminded me of a sand dollar!
Im glad I made this a while ago and can share with you now cause I obviously havent inked a stamp in a week or so, and Im going through with-drawls.
Here is the info. Hope you enjoy and try it on your own!
Stamps: Little Bits™ Shore Thoughts
Other Supplies:
Paper: Vellum, Cool Caribbean, Sky Blue, and Kraft Cardstock- Stampin’ Up!
Inks: Sahara Sand – Stampin’ Up!, White StazOn
The Essential Glue Pad – Tsukineko
Brown Glitter – Martha Stewart Crafts
Vellum adhesive
Pop up glue dots
Blue organdy ribbon
Hemp twine
Paper piercer
Embossing stylus
Mouse pad
Green jewel
Directions:
Making the faux “Sand Dollar”
1) Using large starfish image, stamp onto vellum cardstock using white StazOn.
2) Make sure it is dry, then turn image over to back. Place on mouse pad or piercing mat.
3) Use embossing stylus, trace stamped image.
4) Use paper piercer and pierce the circle in the star center.
5) Trim out star image with paper snips-not in a perfect circle.
6) Sponges edges and star image with white stazon
7) Apply jewel in center
Set aside.
Steps for card base:
1) Make card base from Kraft cardstock (size 4 1/4 x 5 1/2)
2) Rip the top of a layer of sky blue and sponge edges in white StazOn. Adhere to bottom of card.
3) Rip the top of a layer in Caribbean blue cardstock, making sure it is smaller than Sky blue, then sponge edges with white stazon. Adhere to bottom of card.
4) Repeat above instructions for vellum layer. Attach with vellum dots adhesive (so you cannot see it).
5) Using speckled sand image, randomly stamp across top of card using the Glue Pad.
6) Sprinkle brown glitter over card. It will stick to the “sand”.
7) Tie on organdy ribbon and hemp. Cut excess ribbon.
8) Using Sahara Sand ink, stamp solid starfish onto card 1/2 in “water”.
9) Stamp sentiment twice (if you want dimension to the sentiment) using first white StazOn (let dry) then in Sahara Sand ink. A stamp-a-ma-jig would be helpful doing this.
10) Attach sand dollar to card with a glue dot
I am participating in a ATC swap. Those are so fun to do. You’d be amazed at the things people can do with a tiny canvas. There are some BIG TALENT in this swap (so intimidating) so I want mine to be up to snuff.
I joined for 2 groups. I wanted to do something fun yet ORIGINAL! Not always easy.
Since I am so in love with Chinese Paper Lanterns I figured a fun way to make my very own-stamp style of course! LOL!
For this particular ATC
Asian Lantern
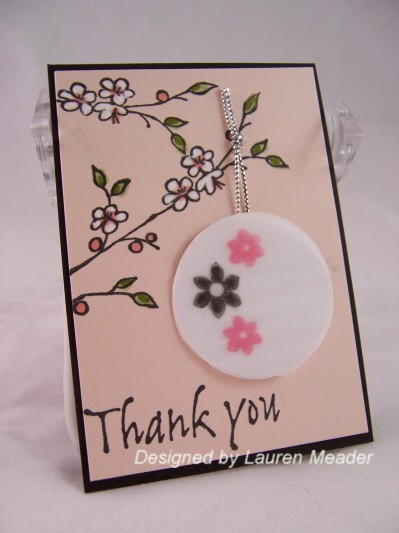
1) I stamped my vellum cardstock with the flowers first. Let dry.
2) I ran cardstock through my paper crimper. (Not easily captured in this photo)
3) Punched out with desired punch. You can make is with the Key Tag punch (really cool and my favorite), oval, and the circle punches (as shown here)
4) I layered the back with white cardstock (glue dots are on flower centers to adhere vellum without being able to see them). This allows you to make you “lantern” any color-pink, black whatever! I chose white so it would contrast with the bkgd. This also allows you to “hang” it without viewing the silver cord.
Cool huh?
Stamps set was by SU! Artfully Asian and Fancy Pants Pollen Dust. Colored with my white Singlo gel pen and markers by Prism.
Onto the next ATC
Butterfly of happiness
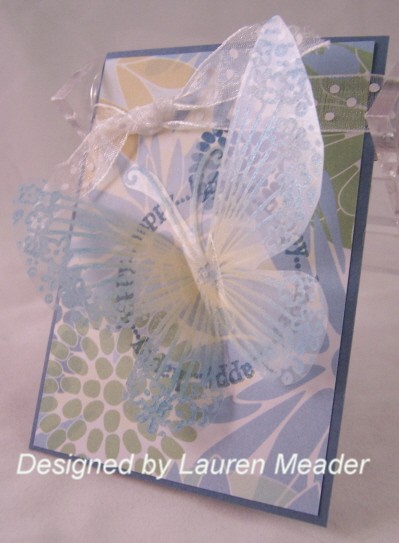
Well time was running out and sticking with original ideas, since I LOVE my Poppin Acetate technique and card figured I’d replicate that in smaller form! Hope they like it!
Stamp and paper is listed in the tutorial.
Thanks for looking.
CHALLENGE
I would love to challenge you to make an ATC (card measuring 3/12 x 2 1/2) based on a larger card you or someone else may have done. Its a fun starting point.
I’ve got some HOT STUFF! My Favortie Things is HERE!
Jun 1, 2007 Author: mytime | Filed under: Cards, Home decor/3-D items, TutorialsWAHOOOOO! Hot Stuff is NOW FOR SALE!!! This is a mini set by My Favorite Things Stamps. It retails for only $9.00!! Now that is cool.
You can buy it from Kim @ MFT (above), or All That Scraps, and eP.
So ready to get enabled?
Here we go!
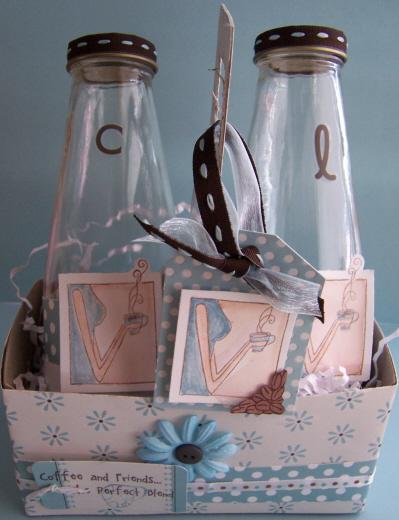
On the Run- This is my Latte set To Go! Not an original idea, but I am proud that I made this cart all my my lonesome! I created my very own template, as I went along. Pretty cute eh?
I used my cardboard from the back of a 12 x 12 paper pack! Scored, cut and I was off. I then just covered it with my SEI Granny’s Kitchen patterned paper.
Cut cardboard 9 x 12
Scored at 3-6-9 (short side)
Then again at 3 – 9- 12.
Trim the edges so it folds in like a cardboard box. Sorry no visuals. Wasn’t planning on a tutorial!
Then wrap with paper of choice. I use my Xyron 900.
For the insert (handle)
Measure 3 inches by (however tall you decide). Score 1 inch from the bottom, then cut in half at bottom to fold.
This will allow you to adhere one flap to the left, and one to the right. This keeps it from falling to one side and keeps it stable.
Cover with Paper. Rounder corners at top, and use Key Tag punch for handle.
Its really EASY! I hope you try it.
Here is another view of it empty.
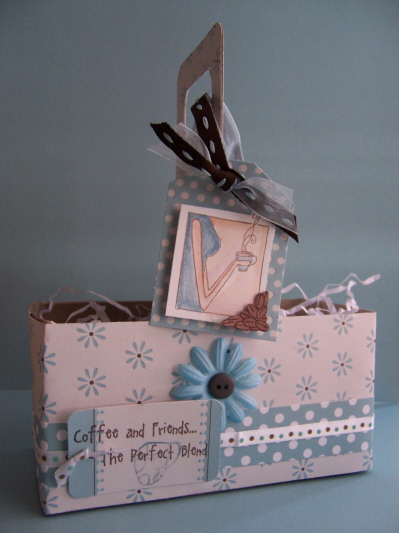
I used elements from the paper pack, and coordinating ribbon. The flower is by Bazzill.
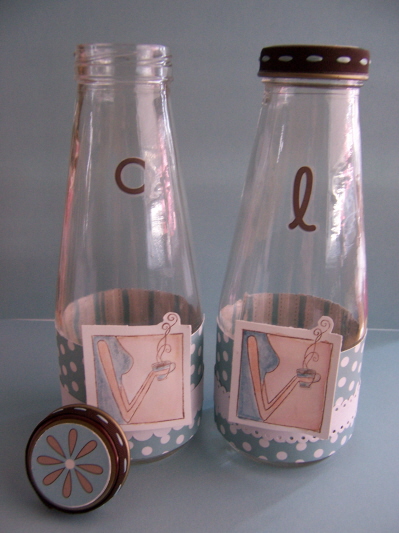
For the Glasses
I just rinsed out some Starbucks coffee drinks.
Made a wrap for them, and decorated to tops.
The stickers are for the friends initals so you know who’s drink is who. For this one I used
L-for Latte
and C-for Coffee.
You can include a coffee mix packet in the set, or just fill with drink of choice! You can alos fill with candy or whatever else you choose!
Let me know what you think!
On the my FAVORITE card with this set
Krafty Blend
OMW! I love this card! Why? Because its not your typical colors for a coffee set. And I love my ingenious name for it! LOL! I have to say my layout is fabulous! I love it. I love all the elements in this. I’m just bouncin over it.
I used the Birdie Collection by Crate paper. Isnt it AMAZING? Im lovin it. I dont use my Kraft cardstock enough.
The flowers are by Prima, the Bubble Blue collection! LOVE them!
The ribbon is (you guessed it) Martha Stewart!
Now for my next favorite!
Monochromatic Latte
Colors-Blush Blosson, Pretty In Pink, and Bravo Burgundy. HELLO! I love it!
I thought it was a cool combo for this set. I started using MFT stamps Behind The Scenes (sold at all the listed retailers above and a MUST have) for the dotted bkgd (which uses a pink versamagic ink) and the flower design (done in a chocolate versafine ink). I colored the images with my Prismacolor markers. I used my friend Tracey’sidea for the liquid pearls in the centers of my Prima’s and the flower bkgd image!
I used this ribbon by www.ribbonsandbowsohmy.com .
Isn’t it great?
Now for the next one-
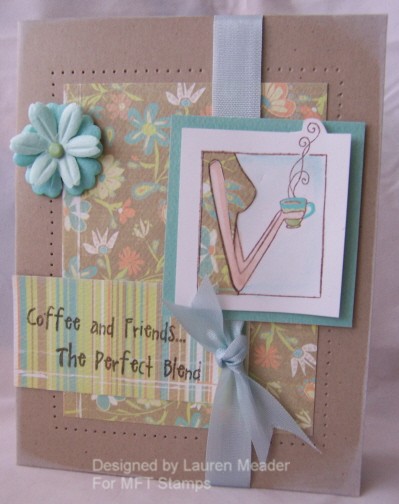
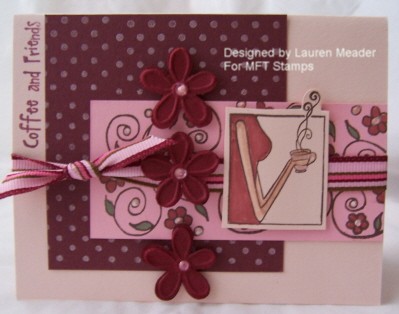
Coffee and Friends
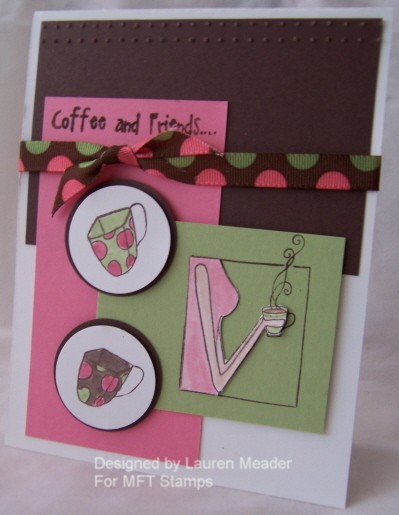
This is like a favorite color combo of mine-regal rose, chocolate chip, certain celery, and white.
My Ribbon is my American Crafts. I was SOOOOO pleased with this layout! I love the coffee cups so much. I also love using circles on my designs. No idea why I just do!
The Girl is pieced onto the celery cardstock.
Announcement inspired-
I was one of the lucky people chosen by Rubber Stamping Fun to be on TEST panel and review their products. Well they recently sent a digital announcement out to everyone for the birth of their new baby girl. Sorry I will not attach it, as I feel it is personal to their family, but that is what inspired my layout for this design! The second I saw it I thought WOW! That could make a cool card!
I had to add the Cuttlebug folder spots & dots to complete the design
So there you have it! I colored my brads with a sharpie so they would be “chocolate” colored! LOL!
The 2 panels (rose-celery) have the circle punched in each 1/2. The Coffee Cup is on a punched out circle piece and on a dimensional. Cool huh?
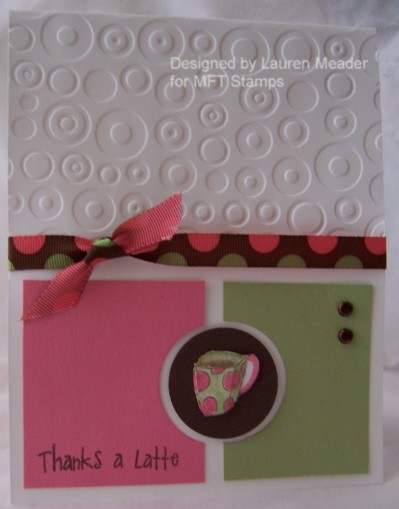
Got 8 minutes?
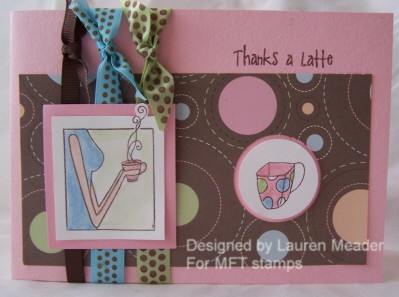
Against my better judgement I am sharing this one. I would normally have trashed it! LOL!
BUT to show you that not all things are great I decided to share. Definitely NO saving the best for last with this one! Oh, well. Not even sharing the creative process. Just know it took about 8 minutes, and it was my first of the set. So I guess you could call it a warm up card, or a waste of pretty ribbon and patterned paper! LOL!
Dont get me wrong its OK, it just doesnt do the set justice!
Thanks for looking. Let me know what you think. I hope you get some HOT STUFF!
Stay tuned tomorrow-SKETCH CHALLENGE!
Well, it seems like you all want to know the big “secret” I have for coloring with my Versamagic inks, and Fantastix brushes. So as asked here goes.
I started doing this technique BEFORE I found the Fantastix tips. I use to use SU! Craft ink, and would “donate” a blender pen for the use of this technique. So given that info you can use any craft ink, or chalk ink for this as well. The Brilliance ink is to DIE for when this technique is used. I like using these inks for coloring cause they are nice and thick , so they give good coverage, and the colors stay brilliant, and make shadowing easier.
I really like this technique with embossed images, but used both embossed and non embossed for this card.
So, here are the supplies I gathered.
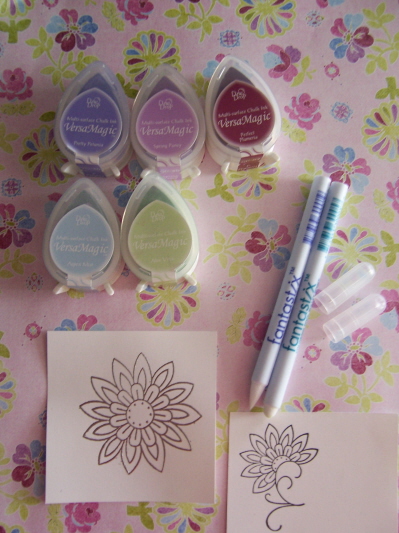
Alot of people ask which tips I like best brush (left), or bullet (right). I prefer the brush tip. I like it because I can get in all the little grooves of images, and give me more control!
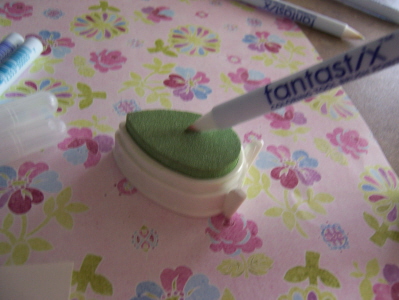
So here is all you do-Stick the tip of the brush lightly in the ink. These are thick so you dont want to saturate the tip and get too much in the tip. You can always add more!
Then just take the tip, and like a marker – color. If you want to shadow color over image in area again.
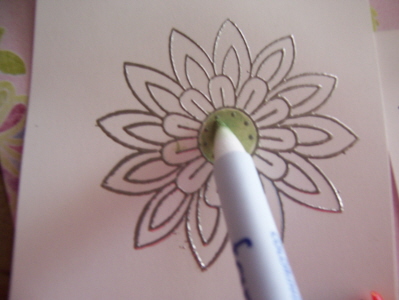
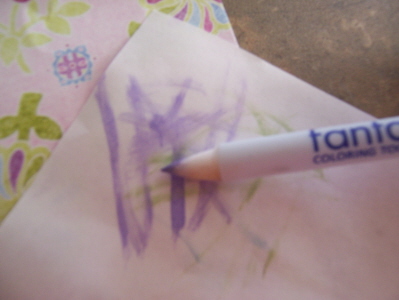
Now to switch colors, just keep coloring on scrap till it colors clear, or use a fresh one. You can rinse these under warm water and let dry.
So after coloring both images, here is the completed card.
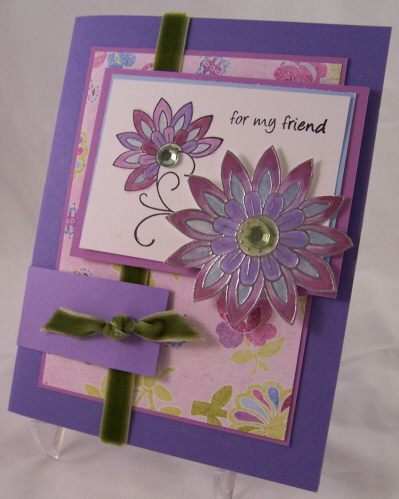
It is along the lines of the Saturday Sketch for this past week. I have to say I LOVE all the shades of purple used. The stamps used in this set are by Lizzie Anne Designs. I used Jolies Fleurs (my favorite) and Simple Sentiments!
Let me know if you try this and feel free to link your card here.
My Etsy

Who I Designed For
Blogroll
- Alicia
- Alli Miles
- Ally Blankenship
- Amber
- Andi @ crafts on a whim
- Angel R
- Angie Z
- Anne Kranitz
- Becky O
- Bee
- Beth Silaka
- Bethany Paull
- Beverly Nash
- Bobbie
- Cambria
- Cammie
- Card of the Week
- Card Positioning System (CPS)
- Cards for Cancer
- Catherine Doucette
- Charmaine
- Cheryl Sims
- Chriss Rollins
- Christina
- Christine Ewing
- Christine Wooden
- Colleen Schaan
- Craft Critique
- Craft Gossip
- Crystal
- Dawn Easton
- Emily Giovanni
- Geny
- Holly
- Igne Groot
- Inspirational Craft Blogs
- Irene
- Jami Sibley
- Jeanne Streiff
- Jen del Muro
- Jeni Bond
- JenMarie
- Jenn Balcer
- Jenn Diercks
- Jenn O
- Jennifer E
- Jennifer Mick
- Jennifer Pereda
- Jennifer-Sweet Treat
- Joanne Basile
- Jodi Collins
- Julia Stainton
- Julie Masse
- Karen
- Kathryn Berthiaume
- Katie Cotton
- Kelley Holland
- Kendra
- Kim Scholfield
- Kris’s Color Stripes! Get inspired here
- Kristen Dubosque
- Kristin Eberline
- Kristine
- Laura @ Sunshine Stamper
- Laura Turnmire
- Laurie Schmidlin
- Lesa Rapp
- Linda Duke
- Linda-LSN
- Lindsey Botkin
- Lisa (lakind scs)
- Lisa Kind
- Lori Craig
- Maggie
- Mara Campbell
- Maria
- Maria Levine
- Mary
- MaryJo
- Melanie M
- Monique Hansen
- Moxie Fab World
- Pam Imholz
- PaperCrafts Connection
- Peppers and Pollywogs Kids party site
- Rebecca Grohall
- Rita
- Robyn
- Rose Ann
- Sarah Vrolyk
- Sharon Harnist
- Sharon Johnson
- Sharon Rivera (a chemisrty with paper)
- Sherrie
- Sophia Landry
- Storage Units, Ink, & More Blog
- Sue Berker
- Susan (Rainy)
- Tangii Crane
- Tracy
- Tricia Traxler
- Trudee
- Velta
- VivLyn
- Zena
MTME Pretty Palette Color Team
MTME Pretty Patterns Sketch Team
My Time Made Easy TM LLC
Shop till you drop!
Lauren Meader
About Me
Copyrighted material
Subscribe To My Blog
Pages
- About me
- Alexa’s Story!
- My Crafty Corner!
- My Time Made Easy™ LLC
- Our Make A Wish Trip to Disney!
- Resume/Publication List
Calendar
| M | T | W | T | F | S | S |
|---|---|---|---|---|---|---|
| 1 | 2 | 3 | 4 | 5 | 6 | 7 |
| 8 | 9 | 10 | 11 | 12 | 13 | 14 |
| 15 | 16 | 17 | 18 | 19 | 20 | 21 |
| 22 | 23 | 24 | 25 | 26 | 27 | 28 |
| 29 | 30 | |||||
Archives
- August 2013
- July 2013
- June 2013
- May 2013
- April 2013
- March 2013
- February 2013
- January 2013
- December 2012
- November 2012
- October 2012
- September 2012
- August 2012
- July 2012
- June 2012
- May 2012
- April 2012
- March 2012
- February 2012
- January 2012
- December 2011
- November 2011
- October 2011
- September 2011
- August 2011
- July 2011
- June 2011
- May 2011
- April 2011
- March 2011
- February 2011
- January 2011
- December 2010
- November 2010
- October 2010
- September 2010
- August 2010
- July 2010
- June 2010
- May 2010
- April 2010
- March 2010
- February 2010
- January 2010
- December 2009
- November 2009
- October 2009
- September 2009
- August 2009
- July 2009
- June 2009
- May 2009
- April 2009
- March 2009
- February 2009
- January 2009
- December 2008
- November 2008
- October 2008
- September 2008
- August 2008
- July 2008
- June 2008
- May 2008
- April 2008
- March 2008
- February 2008
- January 2008
- December 2007
- November 2007
- October 2007
- September 2007
- August 2007
- July 2007
- June 2007
- May 2007
- April 2007
- March 2007
- January 2007
Categories
- About Me
- All That Scraps
- blogger challenge
- camera/photo play
- Cards
- Contests
- family stuff
- FOR SALE
- Home decor/3-D items
- How to FAKE it!
- Introduction
- JUGS Challenge
- JustRite Stampers
- Lizzie Anne Designs
- My family stuff
- My Stamping Space
- My Time Made Easy
- My Time To Color Challenge
- My Time to Create Challenge
- My Timeless Template Challenge
- My Timeless Templates
- Mytime Mail
- MYTIME MOVIE/VIDEOs
- Papertrey Newsletter
- Pink Cat Studio
- Pretty Palette Challenge
- Pretty Patterns Sketch
- Product Opinions and Must haves
- Recipe's
- Saturday Sketch
- Smilebox Creations
- Stampavie
- Tutorials
- Uncategorized
- videos
Most Popular
- Create your own Onesie Card Tutorial-and important NOTE! PLEASE READ (2529)
- Saturday Sketch-Boxed bag holder (2333)
- Going GREEN! Fancy Flower Flourish-Closure Video (1478)
- Fabulous Favorite - Giveaway! (1336)
- a Prayer Request (1231)
- QUICK-Easter Baskets from Nestabilities-PTI style-and blog challenge (1063)
- Teaser Sketch (999)
- February Release Giveway! (and a little peek) (996)
- Group Post and Rambling Rose Video Tutorial (985)
- GIVEAWAY! Who wants it all?! (895)
Recent Comments (RSS)
- 야동: Love to read it,Waiting For
- 야동: This seller is in a
- 바카라사이트: 여기 처음 왔어요. 나는이 게시판을
- 야동티비: I was surfing the Internet
- 바카라사이트: 비슷한 주제에 대한 흥미로운 정보를
- 바카라사이트: "여기에 제공해 주신 귀중한 정보와
- 온라인홀덤: 유익한 웹 사이트를 게시하는 데
- 홀덤나라: 나는 당신의 블로그를 정말 좋아합니다.
- lisa: Technology, too, has left an
- 주소모음: 흠 !! 이 블로그는 정말
Copyright © 2007 - My Time, My Creations, My Stampendence - is proudly powered by WordPress
This blog has been Tweaked and Designed by Sara Williams