Archive for the ‘Tutorials’ Category
Not just a Stamp-a-ma-jig…………cool new use.
Jan 3, 2008 Author: mytime | Filed under: Cards, Product Opinions and Must haves, TutorialsGood morning (or night), depending when you pop on here. Either way, thanks for visiting me here 😀
Its absolutely FREEZING here in New Hampshire. We have gotten slammed with snow the last few weeks. Could that be why I’m so in a SPRING mode?
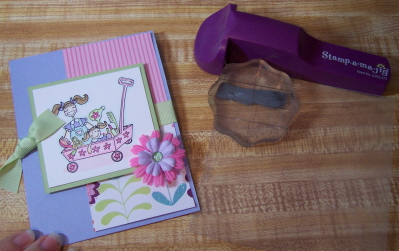
Anyway, I made the following card for my friend’s daughter. It was her birthday the other day. She just turned 4! I think she looks like this image 😀

This image is Miniwagonbella . I bought her at my LSS—>HERE.
It had to be VERY girly, so I used my favorite colors, and SEI paper Ally’s Wonderland. My dilemma came when it was time for WHERE to put the sentiment. Read on.
Yes, my card is going to be LATE! Big shock right? I’m over getting upset about sending a card too late. Its much better than not at all right? Besides, Amber has been ill , so I have not left the house. It will go postal Saturday when Jay is home, along with a few little Target Treats 😀 I’m sure Shannon won’t mind.
I wanted to share something with you that “I” find extremely helpful to use/do when I stamp.
I like to get alot of mileage out of my products, and this is one I’m sure most of you HAVE, but DON’T ever USE!
Its called a Stamp-a-ma-jig.
Now when I type, for some reason I always think people KNOW what I’m talking about. I tend to forget that some of you are new! I realize this when I get questions about the products. Please don’t EVER hesitate to ask me anything-OK! No questions is a bad/stupid question. How else do you learn? So ask away if you need too.
If you clicked the link (I just Googled one for a photo), it describes that it is a stamp positioner, and yadayadayada. I find it very helpful to line up images when I stamp-especially 2-step stamping. I am pretty OK with doing it on my own, but I do have some blocks that are mounted crooked or the image is really to tiny to figure where it lies on the block, and so on. Plus with the rise in acrylic images, you may not find you use yours much anymore.
Well I am going to change that! Here comes MY cool new use for it! It will save many cards for you I’m sure. Or it will save the after thought of “Oh I shoulda………”
Do you ever wonder if a card NEEDS something more? Or if a particular sentiment will fit in a certain spot? If it does, how will it look? Will it ruin it, orclutter the card all together? Will it be better in another spot? And the thinking goes on and on, right?
NOW here is the solution that helps me! After MANY ruined cards, I FINALLY figured it out (a while ago).
Not only will it show you HOW it will look, but it can help you place it, and get it right! It can also help you decide to NOT use it, before your masterpiece is ruined.
Click the following thumbnails for a larger view!
I use my stamp-a-ma-jig, line it up, and stamp my image/sentiment, on the plastic layer that comes with it.
You may also use a window sheet for this. DONT use StazOn!!!!
I then take the layer, with my image, and place in in different places on my card.
 place 1
 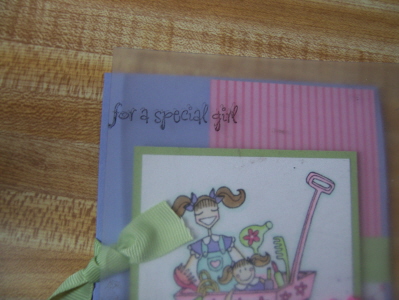 place 2
 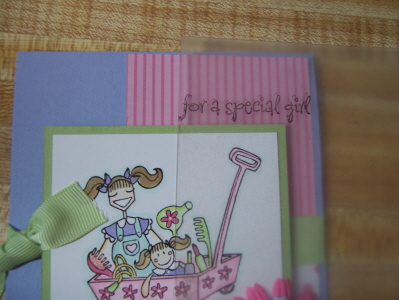 place 3-a winner!
This helps me see if it will look good where I THOUGHT I wanted it, which was originally place 1, or better elsewhere.
Sometimes I change what I originally thought, and go with something else-or nothing at all.
Now by lining it up on the Stamp-a-ma-jig, I can ensure that my image will end up exactly where I want. In this case, with the “girl” word at the edge of the corner.
So as you can see by my finished card above, it is exactly as I wanted it, but not where it was suppose to go. My card was saved, and all is good.
I hope you found this helpful and use it in the future! You can even do it with colored ink if you are undecided what may be better! So go for it!
Till tomorrow.
I have some Papertrey samples, MFT sneak peek’s, Lizzie Anne and more Bella’s to come! Not to mention our Saturday Sketch!
Time has just flown by. I so wanted to get this done earlier, but that doesn’t always work out that way.
Life here has been CRAZY. We had Amber’s Christmas Show-which was over the top CUTE!!! OMWord-proud mom here-wait till I get the Smilebox done! I hope the video thing loads properly. It was just too precious! PRECIOUS I tell you.
We then had a visit from THE Santa himself! I got lots of photos for that! I even began to wish he was real! He was awesome!! I’ll go into that on more when I do that post. AMAZING.
I finally got some stamping done!! YEAH!!! Dog training is hard work people! My little Daisy Doodle is quite the cuddlebug.
I was having such a wave of inspiration, but it was quickly squished with kids and dog training. To be frank-I’m wiped out. Its all worth it though. The kids have been acting in a way the guarantee’s the NAUGHTY list today-so that did NOT help either.
Well I PROMISED you all a tutorial, on how to make a card “in motion”. It is along the idea of a “spinner” card, but it doesn’t spin-it slides along a track. Think of like a train. It has 2 tracks that keep it from sliding off. Along the same idea.
After I posted THIS card, I got OVER 100 personal email messages, asking for a tutorial. WOW, you love me! OK maybe not me, but thanks for the awesome feedback. I cannot tell you how much I appreciate it. Its so rewarding to know that people like this stuff or find it helpful, when you put so much of yourself (and time) into it.
So, now is the time 😀
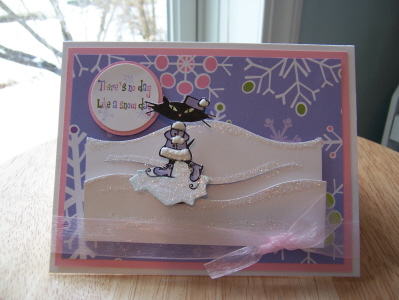
I didn’t want to re-do the exact SAME card, so I decided to show you how versatile it can be 😀 In keeping with the WINTER theme of December, I decided to do Skating scene instead.
Keep an open mind-anything could be done.
I am including step by step instructions. Please click the photos for a larger view. Post your questions here, if any, and I will answer it in the comments section.
Please be aware-it sound difficult, but seriously is easy. Also goes pretty fast 😀 Just try it! If you do send me a link so I can see it.
Here is what you will need
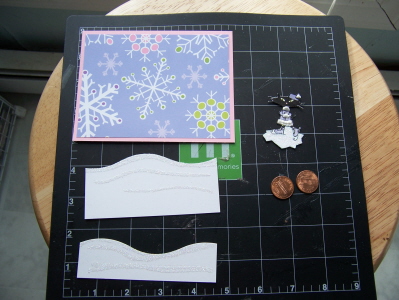
Your main layer (snowflakes here).
A “hill” or land panels. This adds to the “look” that your image is doing something or going somewhere.
A hobby blade/mat
2 Pennies
lots of dimensionals
a little imagination ;D
Step 1-CARD DETAILS- the prep before the “technique”.
I made my card base from white cardstock.
I then cut/matted my snowflake patterned paper (from DCWV).
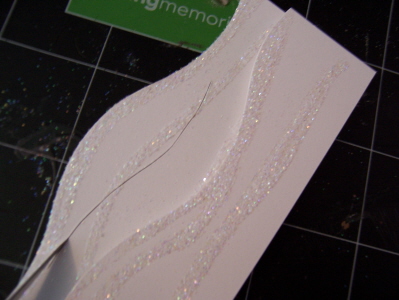
I cut 2 “hills” in different sizes (using my CM Wavy cutter). Added Dazzling diamonds.
The IMAGE- its important to make sure your image allows you to HIDE the pennies. So make sure you check that prior to going all gangbuster’s then getting sad it doesn’t look right!
I stamped my desired image (cat from The Cat’s Pajama’s-Kitty Christmas). I cut her so she was on her own lil ICE patch! Sentiment was done using SU! markers, and is from Wintertime Fun. Colored with Copic’s and added liquid applique (with dazzling diamonds while wet-then heat set) to the fur lining of the outfit.
Step 2
 Layer the snowhills, using dimensionals
Step 3
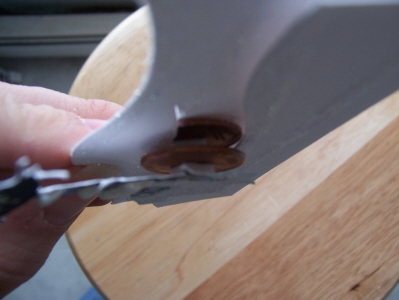
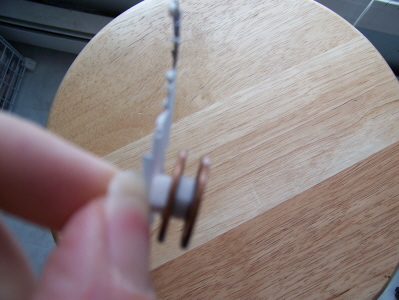 Layer- dimensional, penny, dimensional, penny. In the MIDDLE of the 2 penny “sandwich” is your track, I am referring to.
Step 4
 Place the image on the “track” with cardstock between 2 pennies.
This gives you an idea of where you will need to make a cut for the other end of the pennies to slide into. Don’t make your slice too far apart. Get a little close to the track. Like 1/4 inch along the edge is about right, for a good fit. You can use a pencil and Layer Ease first if you like, and it has to be PERFECT 😀
Use hobby blade, and follow the lines of the bottom track, as seen in photo.
Step 5
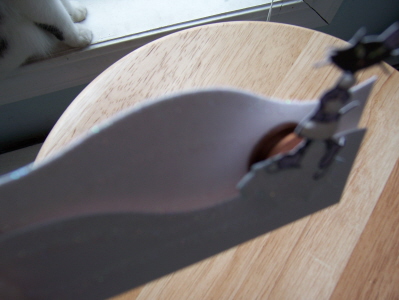
 POP the pennies into place.
Put one penny in front of bottom layer. Pop the back penny into cut layer.
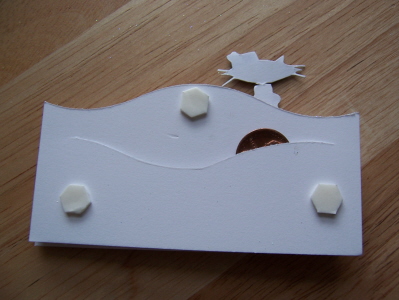 This is how the back may look. Adhere with dimensionals to card base. Careful not to place dimensionals in a spot that will inhibit movement. Area above track will need to double up on dimensionals (in other words apply 2 in the same spot).
This allows the penny to freely flow along the track when pushed/pulled.
 click for larger view
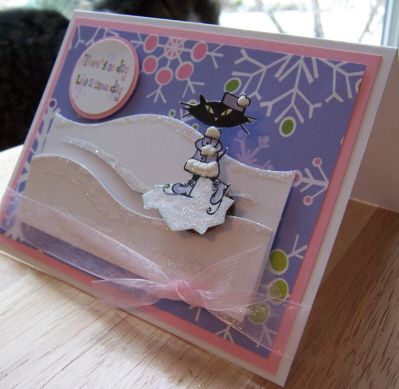 Here is the side view. You simply push her along the hills so she “skates” across the card!
Pretty cool huh?
Now its YOUR turn.
Hope you enjoyed!
Till tomorrow
Pretty Papertrey Patterned Paper-Gift Ideas
Dec 6, 2007 Author: mytime | Filed under: Cards, Home decor/3-D items, Tutorials
So WHO jumped on the Cigar Box wagon with me? Or the Spiral Bouquet Wagon? Or the stationery kits, and monograms?
Then you don’t need ME to tell you they are AWESOME!!!
I haven’t made my won patterned paper in EON’s (a word my mom uses frequently, and now that I’m getting old I find myself turning into her)! It means a LONG time. It was fun to do that again.
I found it really easy to do using the new PTI set. The possibilities are just endless. Do I sound like an info-mercial? I’m not trying too, seriously!
So I am going to share a few samples with you doing just that-making my own patterned paper with Spiral Bouquet!
I also have another gift idea/template! YEAH!!!
All the items/stamps used are already linked in the above paragraph 😀 Unless noted.
OK FIRST up!
The Cigar Box
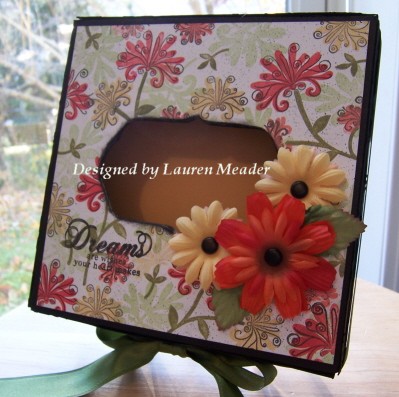 Autum Bouquet
I think this is very fall. I have to try to remember that SOME women just don’t do pinks, and purples-SHOCK!!! LOL! I will say I am in LOVE with these colors! It’s good to step outside my normal range one in a while eh?
They are- celery, olive, banana, saffron, coral, and guava-with a splash of balck that really makes this POP!!!
The ink was all versamagic ink-but I listed the compared SU colors for you to understand 😀
The sides of the box are in black cardstock, and were run through my Cuttlebug with the Stylized Flowers embossing folder. I tied around a large Olive Satin ribbon from May Arts. The flower’s are by Making Memories, and Bazzil as are the black brads.
I sponged all the edges in black, and then spritzed with my color spritzer. This is the box to house a yet to be created Monogram note-card set. I’ve been out of commission-so thats is my excuse for not having a view a of it first. But I didn’t think you wanted to wait to see it!
I adhered this stuff using myATG Gun.
Next up-G is for Grateful.
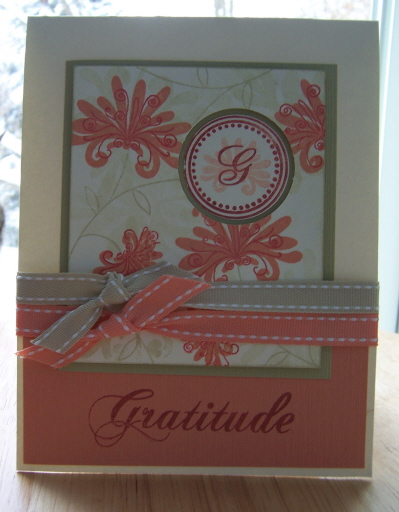
You don’t have to use the monogram’s sets, JUST for monogram’s ya know 😀
I love making sets like this. If the person’s first/last initial happens to match then that is pure GENIUS!!! Unfortunately for me-this is not the case. But I think 6 of these as a set is a great gift for those Yankee swaps and whatnot. Especially when they have a $5 value. If its more then I do more. People usually fight over my sets when Jason brings them in 😀 That makes me all warm and fuzzy. I am always told they re-gift it, but I am taking that as a compliment! Try to keep it SIMPLE.
So this set, is another with earthy colors. I so LOVE the color River Rock. Its really beautiful. Funny because I thought it was HIDEOUS when I saw it in the catalog! LOL! Now lookie who loves it!
These colors are river rock, wasabi, guava, and ruby red. SURPRISINGLY Pretty aren’t they?
What I love is the fact that the circle cut out reveals the under layer, and the inner circle is on dimensionals. A new thing I have been doing, and I just love the look. In person its very striking.
Now what you may have been waiting for!
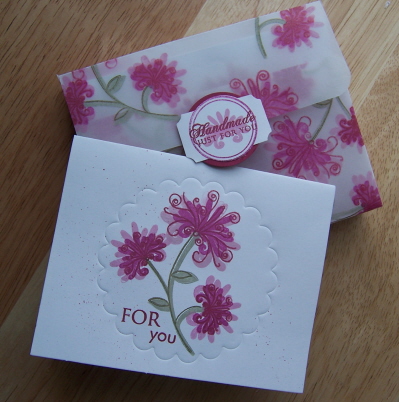 Notes- For you.
Quick and simple note card set! The “For you” is PTI-Paper Tray set.
I bought these little notecards/envelopes at Walmart- $1.89 for a set of 8.
I decided to make a quick set of these, with a vellum cardstock holder. Vellum gives it an elegant touch I think. I certainly could GLAM it up, but chose SIMPLE. I asked Amber’s teacher what her favorite color was. She said pink and purple!
YEAH!!! So this is Lilac, Peony, and Merlot ink. Its all colorbox chalkink for this one. GORGEOUS colors in person-I swear.
I just took mylarge scallop nestabilitiy, and made my scallop frame. It steps this simple card up form plain Jane, to a WOW I think! Again for a splash of color I spritzed it with my color spritzer. I did 8 of these in a 1/2 hour. Due to the framing, and 3 step stamping.
I then decided to create a holder.
Now you need to note my holder is for cards that are sized 4 3/4 X 3 3/4.
Click to view larger image
So there you have my latest Paper Trey stuff!
I hope to do more. We shall see 😀
Hope you enjoyed.
Ghirardelli Gift Wrapper !
Nov 28, 2007 Author: mytime | Filed under: Home decor/3-D items, Tutorials, UncategorizedOk let me be straight with ya!
I LOVE making my own boxes, and giftlets (thats my lil word for them).
So if you visit me here-especially like the past month-you will see I have made alot of different styles of gifts, and boxes or bags. I TRULY believe it makes the simplest things WOW people. It also shows how much time and effort went into the easiest gifts.
I know BLAH BLAH BLAH-but to me its SO true.
I also figure I have saved quite the penny on designing the holder’s that I do. Plus I have FUN doing it. People are SHOCKED when they find you not only MADE it all, but designed the box as well. Sometimes the gift doesn’t live up to the packaging right! LOL!
Today I am sharing a FAVORITE of mine. Rather a lightbulb moment.
I LOVE chocolate! What woman doesn’t right? If you don’t, don’t admit it here! We chocolate lover’s DONT GET IT! NEVER will.
Anyway, alot of people seem to like the Ghirardelli Chocolate squares (as do I – raspberry filled being my personal fave, GODIVA Raspberry Starfish-Oh HEAVEN!!!!), as they come in quite the little assortment now! So I got several assortments.
I bought some-on sale $2.33, for a good sized bag. I thought how YUMMY they would be for my mail woman or Jason’s co-workers. I don’t know how about ANYONE that breathe’s. Just a great little gift PERIOD. Any occasion.
I also thought-I can’t just leave them in this bag. I wish I had a cute lil box-AH HA! Thats when it hit me.
MAKE ONE!!!
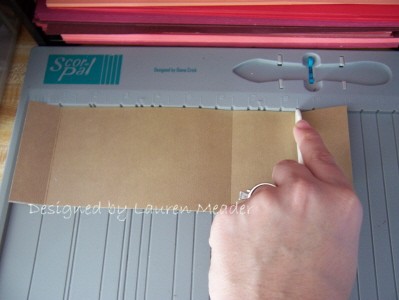
So I did. I got out my Scor-Pal (yes I use it THAT much), and away I went scoring like a fiend.
I wanted it to house 10 little squares. Obviously the box can be altered for more or less, but 10 was good for me.
So I did all the necessary measuring, and came out with THIS (PS the ribbon really does match in person)
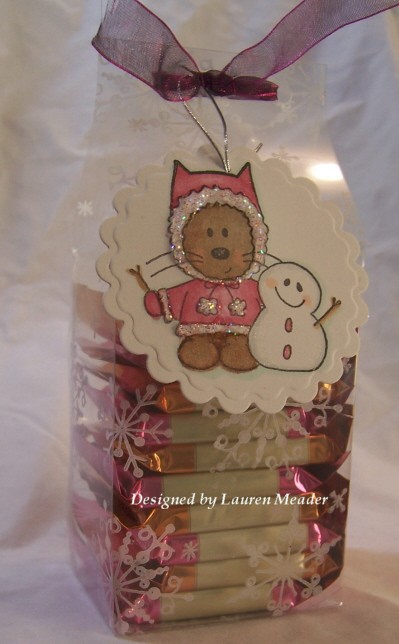 LuLu LOVE’S Chocolate.
This box uses a stamp set that is NEW from C.C. Designs. The New! Little Bits Kits that sell for ONLY $11!!! This set will be on sale the 7th. Oh and wait till you see them. WAY too cute. I have more coming with them, so stay tuned. I’ve truly fallen in love with Lucky and LuLu!!!
I HAD to use my NEW! Large scallopnestability. You can see that it really makes any single layer SPECIAL.
I used the raspberry wrapper to draw my color combo from. Inside this are 5 raspberry, and 5 caramel squares.
Colored with myCopic markers (of course, what else right!! Hey I get my monies worth), and added strawberry ice stickles to the trim of the coat. You can’t see by the photo, but I also used my Atyou Glitter Pen, to make it all glittery.
HINT-honestly you don’t NEED all the coolors of the glitter pens! Just get the CLEAR one! It doesn;t change the color you put it over-just gives it a perfect touch of BLING. So, save your money for the ACTUAL Copic’s!!!
I stamped the window sheet with Snowflake Serenade by Papertrey Ink, in white Stazon. I filled in the bare area’s with the little snowflakes that come in the Little Bits set.
Here is the template-click for larger view. WAY TOO EASY.
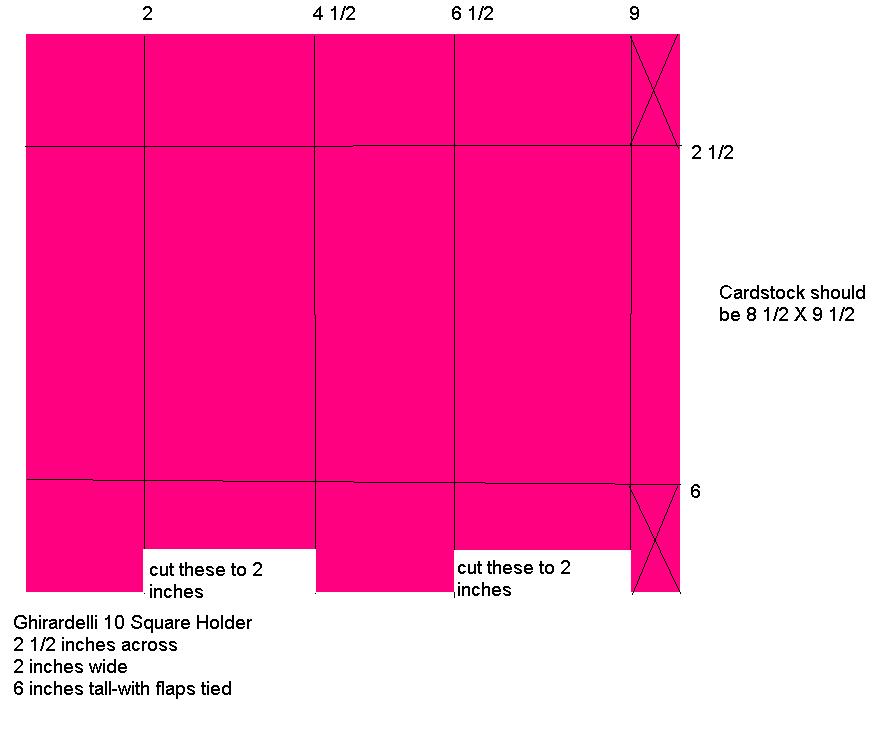
Score per the guidelines.
On the bottom you will cut down the 2 flaps as shown, so the box will fold together perfectly.
Not for the top. the 2 side panels fold down (I secured them with my tape), and the front and back flaps are tied together. EASY PEASY!!
Any questions, let me know. And send me the link HERE if you try it out.
Now here is what Ilike to think of the same idea-only ALL occasion!
 Spiral Blooming square holder
Isn’t this so pretty?
I used ALL the same elements as above. I just made it EVERYDAY themed. This was done using the Papertrey Ink set Spiral Bouquet (LOVE IT)!!!
I stamped the flowers on the box and used my Poppin Acetate technique—–>HERE, for the design. My Pebbles Pearlescent pastels were PEFECT for the extra shimmer on the box. I also outlined the flowers with my atyou glitter pen, but didn’t capture it well in the photo. Oh well.
OK another rambling post.
Maybe this will be JUST what you needed for an idea for that “someone”.
Enjoy the day. The week is HALF over.
Stay tuned tomorrow-MORE ideas 😀 FUN FUN
WOW! I never knew how many people LOVE my step by step instructions for things, until I DONT post them! LOL!
I figured most people don’t care.
Sometimes I don’t even get many comments.
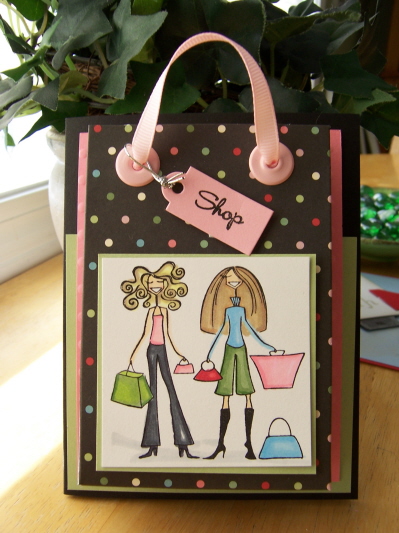
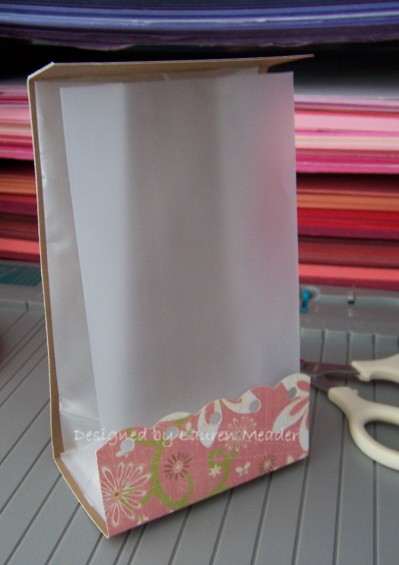
BUT-I cannot even count how many have emailed, and asked for the measurements for the shopping bags-on the cardfront!
So rather than reply to every single one of you, Ill reply here.
Post for card is below this one is below—->HERE.

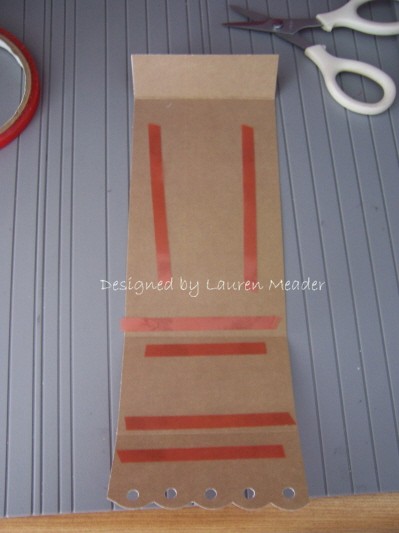
INSTRUCTIONS:
Cut cardstock 6 X 6
Score at 1/2 inch, 1 inch, 1 1/2 inches, 4 1/2 , 5, 5 1/2.
Then score on other side at 1/2 and 1 1/2
Your adhesive will go on the 3 ends (2 sides, and bottom-it has no back, as the sides will adhere to cardfront) that are scored 1/2 inch. The two other 1/2 inch scores make the sides of the bag.
Have fun!
I’m not getting into all the step by step because you will “see it” as the measurements are scored, just how it all comes together. I am also not posting the photos and whatnot, as Diana (at Scor-Pal) has asked me to leave it for a future tutorial.
Hope this helps 😀
Saturday Sketch-Boxed bag holder
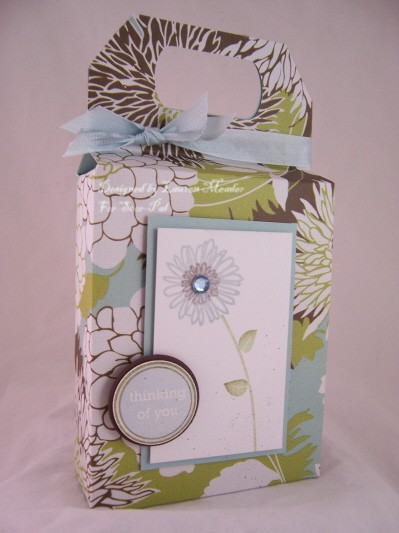
Nov 10, 2007 Author: mytime | Filed under: Home decor/3-D items, Tutorials Click image for larger view please.
So this week I decided to MIX IT UP! I wanted you to make a 3-D item instead! This will also help you have a Boxed Bag Holder for someone special, to house their Christmas gift! OR a party favor for a kids party-whatever really.
I created this box template a few weeks ago! But since then have made 2 more!
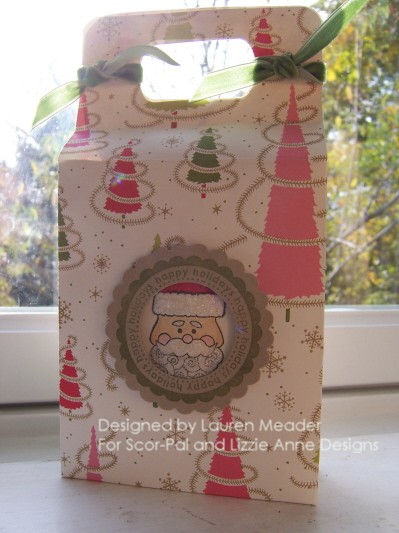 Santa Sends Sweets!
I used the Lizzie Anne set called Holiday Cheer, and the Santa (simply singles). Is it NOT the cutest thing ever? Inside this box are 2 large-delicious- gourmet-chocolate/peanutbutter covered rice crispie treat sticks, from Archer Farms (found at Target. No that isn’t my special find)!
What a great gift for that someone who you just want to “acknowledge” this holiday, yet can’t afford to go spending a fortune! The treats were $3.99 for a package of 10!! Thats only .39 cents a piece! That gives you a thoughtful GOURMET gift for a whopping 0.80 CENTS!!!! NO COOKING REQUIRED!
HELLO mailman, and Mr. Brown, co-workers……………….you get the point!
Please don’t think I’m about being CHEAP! I’m not! I’m just saying we all have so many important people to think about during the holidays, its hard not to go into debt! AND isnt this WHY we stamp? To make gifts with thoughtfulness? That is the spirit.
Plus its a gift that if someone didn’t acknowledge you, or couldn’t, they wouldn’t feel completely awful about it. I am keeping some of these ON HAND for just that situation! LOL!
So, I have to say I truly LOVE it!!! Fits all sorts of great goodies. AND, it only takes a couple of minutes to make! Seriously like 5 minutes! BEFORE decorating. After you do the first one-you will whip these up in no time flat.
I have to say that I use myScor-Pal, so it makes it easy since I don’t have to move my paper.
Don’t worry if you don’t have one (YET), you can still make it.
Click thumbnails for closer view
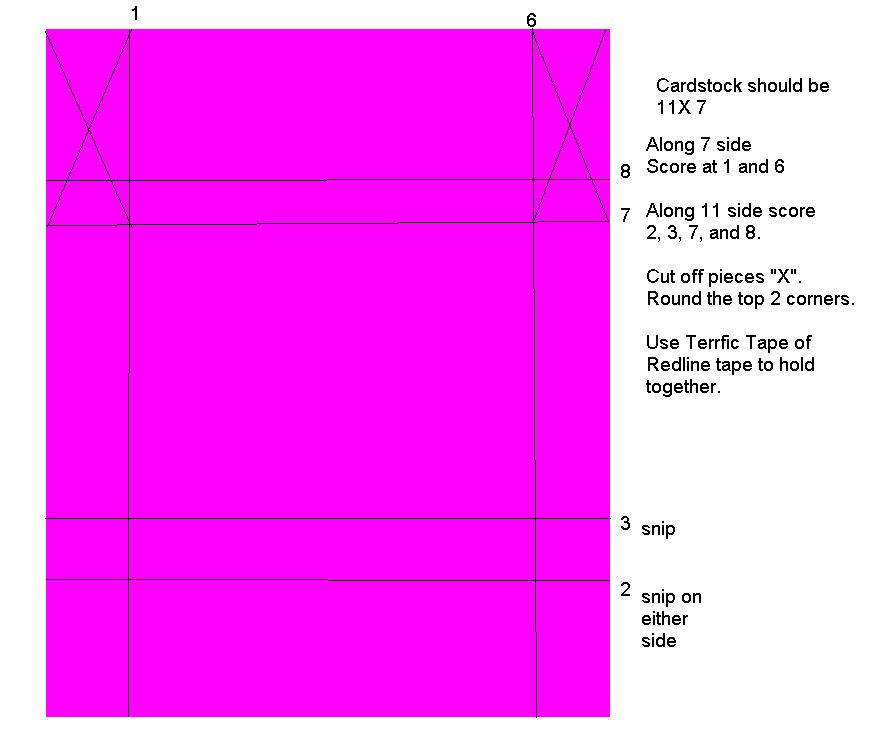
You will need-
Scor-Pal (or other scoring device)
Heavy patterned paper, or cardstock.
Paper Snips
Heavy Adhesive
Key tag punch (or other handle punch)
Corner rounder (optional)
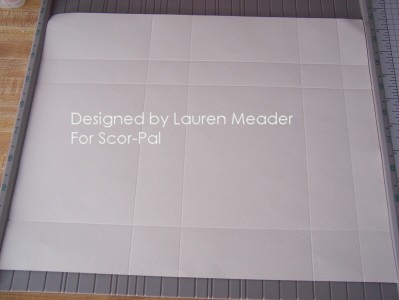
Cut cardstock 9 X 12.
Score along the 12 inch side at 4 – 5 1/2 – 9 1/2 – 11
Score at 9 inch side at 2 – 3 – 8
See diagram-of finished scores.
Snip/trim away excess and flaps-see diagram for example of what to snip, and what to clip!
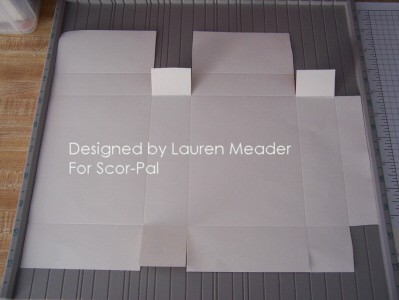
Round top panel coners. Then punch hole’s for handle’s

Apply adhesive to small flap on far right, and bottom panel.
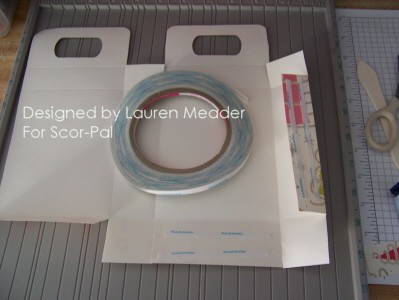
Next -assemble!
 See side view
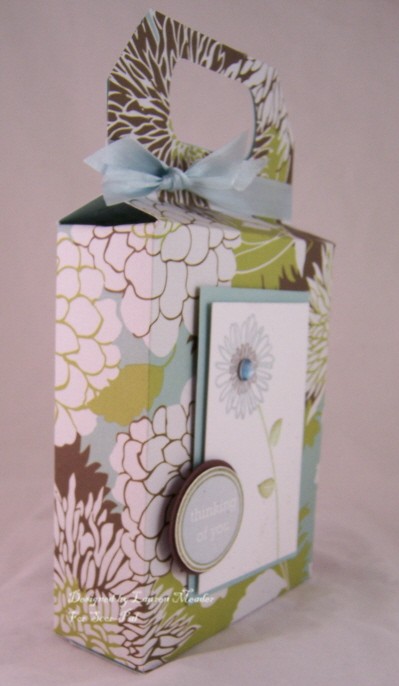
 Bloomin Box Bag
See it doesn’t have to be ONLY Christmas-y KWIM? This would be a great Boxed Bag for a re-gift!!!
And that my friends, is all I have for you today!
Let me know what you think of my Christmas ideas, and PLEASE let me know if you make the Boxed Bag!
Include a link in the comments section, so we can all see your creation 😀
OR if you have questions-let me know.
I’m having Noah’s 5th Birthday part today! WOW! Time flies. I hope to have a super cute Smilebox for Monday!
Till tomorrow!
Being SUPER mom-Hauntingly easy!
Oct 31, 2007 Author: mytime | Filed under: Home decor/3-D items, Tutorials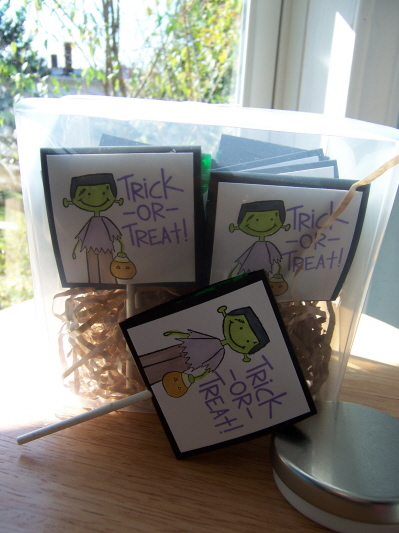 Franken Folder’s for Noah’s class
Frankenstein Stamp by C.C. Designs-Donald as Frankenstein, Trick or Treat sentiment by Lizzie Anne Designs-Spooked
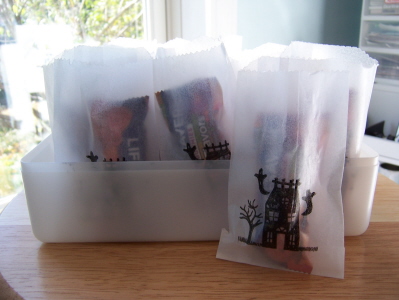 Haunting House bags for Alexa’s class
Stamps by Lizzie Anne Designs-Spooked, Glassine bags by Paper Trey Ink
Happy Halloween!
My children have morphed into Princesses-Cinderella, and Sleeping Beauty. We also have a BLUE Power Ranger.
“I” have decided to morph myself into SUPER MOM!!! AGAIN! Who else is with me?
Why do we all have this pedistal , that we feel we must stay up on, when we are crafty? I hope I’m not alone in this venture.
MY mom always made holidays the BEST! All our traditions, and just every little thing was always perfect. I remember EVERY SINGLE ONE! Some of these traditions I pass on in my family-such as buying each person, in our home, a special ornament every year. I love that one!
I guess because of that, I put myself on this mission to do the same, while trying NOT to kill myself doing it in the process. I think I feel my kids will base their entire childhood on these “events” in life. Maybe because they impacted mine.
I *really* felt the pressure to do something for the kids classes for Halloween. I then fought the stress of it, saying “Hey, we can’t do it all Lauren. Deal with it!” . Yesterday (Tuesday morning – day before Halloween)Noah says “So mom what did you make for my class for my Halloween party?”. “Something cool like Alexa’s parties?”
” Noah, I didn’t make anything for Alexa’s class. What are you talking about?”
Noah-“You know all the stuff you always make”
He was right! I always made all these cute things for Alexa’s class parties/holidays. BUT I only had ONE kid in school. Now I have 3!!! That means LOTS more work.
Amber was set cause we made sugar cookies, and picked out “special” candy for the kids to decorate the cookies.
OK, So HOW can you say “Oh no honey you get nothing. I was planning on sitting this holiday out.”
I then said “Well, if you really want me to do something then I better get working”
So, I got the kids off to school, ran to Michaels, then to Target for candy.
WHIPPED up things for Noah’s class, and Alexa’s.
WHEW! Super Mom to the rescue!
When I was done, I showed Noah his little “Franken Folder” lollipop holder, and he was SO EXCITED!
He asked if we could bring them to school that minute! He wanted to show his teacher, and make sure it didn’t get ruined on the bus! He thought all the kids would like seeing them as they come into class. He better marry a crafty woman! LOL!
My heart melted!!! I never felt so proud. To see my son be so appreciative of his mommies hand made items 😀 He carried the box of them into school and each person he saw along the was said “Look at the pops for my class”
I guess this is why we do what we do right?
As mother’s we will do just about anything for our children. Heck, I would give my LIFE for my children, the least I could do was wrap some lollipops right?
I also wanted him to know, I love him every bit, as much as his sister.
I think that was a little message he was conveying-Like “Hey!!! I need love too!” When you have a sick child that requires so much, I think its easy to not always remember its the littlest things that help the other ones know they are just as important. On the day to day, how is a healthy kid suppose to compete with one puking in a bucket?
So I felt good! Mission accomplished!
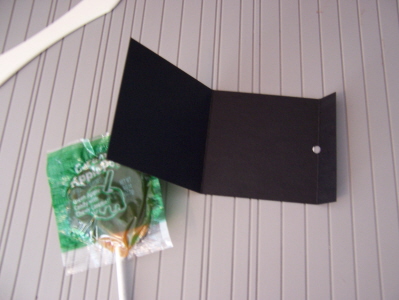
So here is the DIRECTIONS for the Franken Folders (as I like to call them).
All they are is a lollipop wrapper. I didn’t invent the idea.
I didn’t check out HOW to make one-I just came up with my own fast way.
 Click for larger view
I used apple lollipops-wrapped with caramel. YUMMY!!!
Measured the wrapper 2 1/5 X 2 1/5.
Cut cardstock 2 1/2 X 5 1/2. You get 6 per sheet of 8 1/2 X 11 cardstock.
Used myScor-Pal, and scored at 2 1/2 and 5 inches.
Punched a hole with my Crop-a-dile in the middle of the score line, at the 1/2 inch mark.
Creased the score lines, and applied adhesive to the 1/2 inch flap.
Stuck the stick through the hole, and attached that adhesive!
DONE!
These went fairly quick. As, they were a breeze to make! The coloring took a little bit-but I did ONE color at a time, and went form image to image. Assembly line!
I resisted the urge to further embellish!! Reminding my self that its all getting tossed-so don’t go that one step extra. Like glitter on the pumpkin, adding a layer of cardstock behind the main image, ribbon……………..you get the idea. SIMPLE!!!
The bags for Alexa were obviously super fast! I made 25 in 10 minutes. Just stamp the house on the glassine bags with Brilliance ink-then fill!! Filling took the longest- LOL! I think it was a great quick touch for something handmade. SOLID images! Gotta LOVE them!
So I would LOVE to hear what your kids are for Halloween, or what your all time favorite costume was a kid.
Anything like that you want to share 😀
I have some SUPER cool samples to share tomorrow with the NEW! MFT Stamps :D. Wait till you see what I did.
Till tomorrow
Blogger Challenge: Patterned Paper, and Nestabilities- some answered ?’s
Oct 26, 2007 Author: mytime | Filed under: blogger challenge, Cards, Home decor/3-D items, TutorialsThat mean’s it is Blogger’s Challenge time! This week is Patterned Paper as the main focus. So, in this post I will share that, and answer some questions you all had from yesterday’s post. I will show you how I did the double frames using the nestabilities. How about turning the rectangles, onto squares? READ ON.
What a LONG week this was for me! We got Jason’s labs back, and they were all normal. We are awaiting a bigger test result. Sorry Im so vague. Its hard to share without exposing HIM to the open world of cyber space. While it helps me, I dont want to put him out there. Not without his “OK”. He appreciates all the prayers though, and I want to thank-you for the kind words as well.
We should have the test result today??? Then know where to proceed.
Amber has a fever and has been sick for several weeks. I sound like a bad parent, but seriously, its that prolonged cold thing with occasional cough, icky nose. Yeah, well now its a fever, bad cough-no icky nose, but you get the idea. So off to the doctor’s I go. I swear I could get there with my eye’s closed! LOL!
Between Alexa’s Oncologist, and my Pediatrician, they seriously recognize my voice on the phone! That is SICK!
OK anyway….here are my challenge pieces. Click on thumbnails please for closer view.
Pretty Pastry Party Box Set
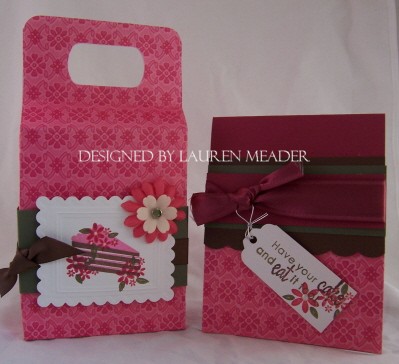 So what do you think? I love this set. I know, I know, I said it before. But I do. This set uses Eat Cake. I loved hearing all your favorite kinds-got me hungry, and wanting to try some new versions too. There are desserts I’ve never had-GASP! I shiver at the thought! lol!
I will be doing a tutorial for this gift box I made-using my NEW! Scor-Pal! Stay tuned 😀
That’s right, the NEW! Scor-Pal is for sale!!
Let me tell you, it is amazing. LOVE all the new score marks. As well as the markers going down each side. I was bouncing out of my skin when it arrived yesterday. You can see my previous review of the Scor-Pal–> HERE IF you were on the fence. Makes a great Christmas gift too. So put in on that list.
Diana ROCKS!!! She really listen’s to her customers, and I am so pleased to be a part of her AMAZING team.
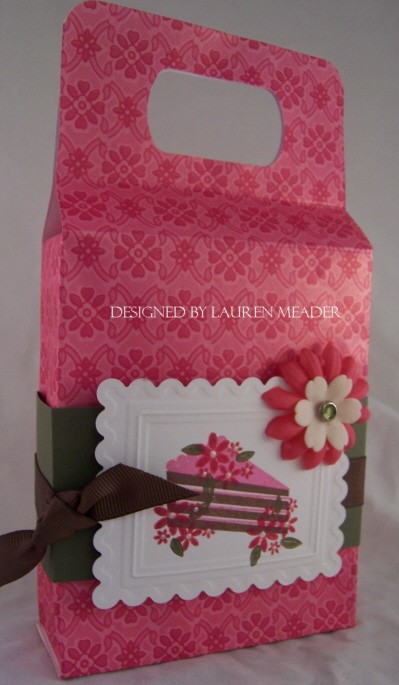 Pretty Pastry box-click for larger view, please.
I have to say I LOVE the different colors for this set. To me, they aren’t your typical “cake” colors.
OK, so the patterned paper is by K & co. LOVE IT!!!
Its a shimmery pink pattern. Obviously, it inspired my items. While that paper is gorgeous, and has a monochromatic pattern-it is BUSY, so you have to take care, not to “over-do” it. I think it kept it simple enough.
NOTICE :the double scalloped, and embossed frame-again? 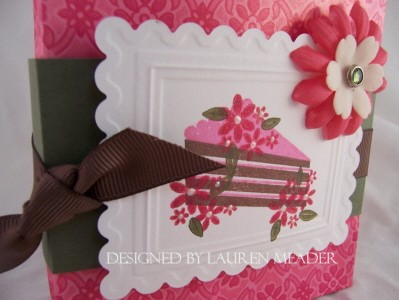 Click for closer view.
Well, as asked yesterday- here is how you achieve that. VERY EASY!!! And it looks PHENOMENAL!
1) You run your cardstock through your Cuttlebug, using the scallop nestability. You will cut the piece FIRST.
That means A Plate, C plate, die face up, cardstock, B Plate.
NOTE: Let me be honest. I have a hard time doing it that way cause I can’t see my paper. So “I” use my sandwhich like this- A plate, C Plate, cardstock, die face down (so I can see it), and B plate.
2) Now you need to do the “emossing” part. So, remove excess-cut cardstock. Take a smaller straight edge die, and layer it into the center. You will need a “sandwich”. Here is mine
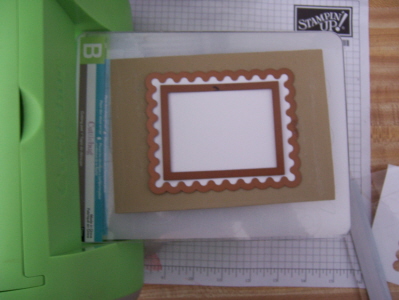
A plate, B plate, Wizard adapter mats (AKA 2 tan mats) my scallop die with straight die in center FACE DOWN on the mats, then B plate. Run though-VIOLA!!!
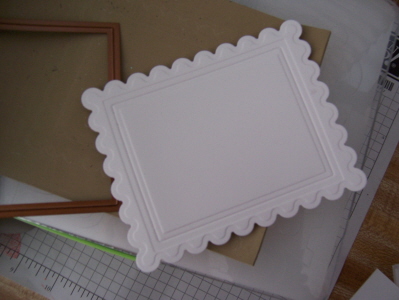 Here is the complete look of the double embossed frames! Stamp away!
Now you want to make it a SQUARE?
Well, that is easy too.
First pick your size. Cut, rectangle. AND if you want to emboss it, do that step as well!
Now take the cut/embossed piece, and move to down in the die cut. See photo
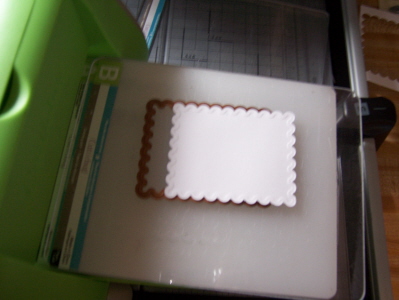 Now CUT the image with the correct sandwich. Then, if you embossed, do the embossing sandwich again.
Here is the finished square
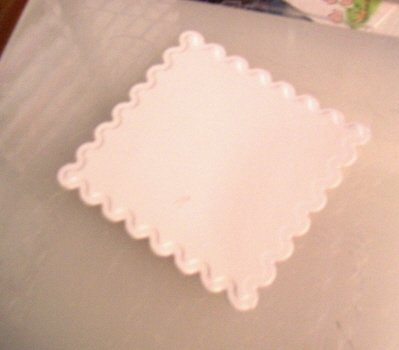 Cool huh? Granted you wont get the larger sizes you would if you buy the actual Squares set, but it can tie you over till you can afford to! Which is where I am at. With Noah’s Birthday coming and Christmas (not to mention new releases from my favorite companies) I cannot afford it all this time of year! AND if I could I may splurge for a Circle set instead. BUT I can’t.
Sounds complicated but it gets quick the more you get use to it-I PROMISE! I also like doing things face down so I can see where my die is on the cardstock.
As for the Fiskars plates-I’ll save that for another day, since you are in overload Im sure!
Now time for my SIMPLE card-click for larger view
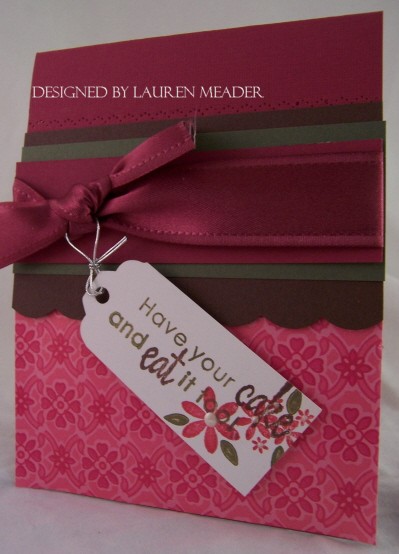 Pretty Pastry Paper
 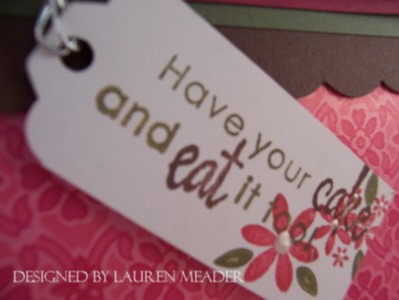 tag close up
So, I had to show you the tag, cause I think its so pretty! I used my Giga Scallop Tag by Marvy, but cut off the edge on either side! Made it smaller in width.
Gotta love Nichole’s way of making the sentiments seperate so you can EASILY change the color of your sentiment with ease.
I had to continue the scallop design in my card, again without over-doing it, so I did a scallop border, and some scalloped piercing at the top, using my Onare template. Subtle-yet pretty. That Stampin’ Up! satin ribbon can make any project look more elegant. I am loving it.
So that’s the scoop for today! Come back tomorrow for my Saturday Sketch!! Its a good one! Its with Eat Cake-AGAIN! But I also have a Bella card, and a cool gift idea for friends who stamp 😀 Debbi (StampinCPA)-dont read tomorrow’s post till you get your mail! LOL!
I hope you check in on the other blog challenge participants.
Till tomorrow.
I’m So blue……………..
Oct 16, 2007 Author: mytime | Filed under: Cards, Home decor/3-D items, TutorialsEver hear that song by Veggie Tales in Madame Blueberry??? Alexa LOVES Veggie Tales-always has.
When I saw my title made me think of that song! LOL! I LOVE it. Its called Im SO Blue. About a blueberry who has everything but always wants MORE! Im sure at times we can all relate to that!
Anyone know how to link songs to click “play” here? Its really a cute song.
So Im in a blue mood these days-
Seems to be a color I pull out alot as of late. Maybe cause its soothing? I need soothing.
I dont know! But what I do know is these are a few ideas all with soothing schemes of blue.
I hope you get inspired somehow! Im not in a chatty mood-tired and stressed. “I” want to stamp but my body say’s “NO! Not today” I dont want to agree, but if the mojo needs to rest, then you gotta let it.
I feel like I have ALOT on my plate. I get SLAMMED this time of year with TO DO’s that I put alot of pressure on my self to be Miss Martha Stewart for! WHY? I dont know. Maybe cause my mom always did? Its an inherited thing like her OCD, and cleaning obsessions.
Amber’s birthday was August-Alexas was end of September, Jason’s 30th was 2 days after in which I trying to pull his plans together for. We are doing a last minute (hopeful) gathering THIS weekend.
Noahs b-day is Nov 13th, and lets not forget Halloween projects, and Christmas. AND a baby shower for a close friend-which I have a cool idea for-just need to implement it!
I cant even think that far ahead-I need to go ONE day at a time. I am stoked I got Noahs birthday invites done! Now I need to just get them out. His party is planned and taken care of. Will post that on Friday!
Got the kids Christmas photos done and am so stressed about our family card! Im leaning towards no stamping but think of the HORROR!!! See theres that self pressure.
UGH!! OK who really came hear to see that? I dont know, but I feel better already!
So for now-I promised to share a super cool idea-new to me 😀
 Flocked Flowers
I have to say I LOVE this bag! It is the tin tie bag from Paper Trey Ink. I always chop off the tie part! LOL!
1)I ran some cardstock through my Xyron machine (adhesive).
2) I then punched the 2 flower shapes with my Martha Stewart flower punch.
3) Removed my backing, and put into my Fun Flock.
4) Brayer-ed over it to smoosh it in permanently.
CHEAP Velvet Flowers in any size punch you own! That can be shaped to pull forward or whatever.
Now for the stems I used this super cool tape (from Scor-Pal) directly on the bag-then added my flock.
You know I LOVE my butterflies, and so I had to add this one from Card Greetings II.
NOTE: BTW Little Monsters set is on SALE! Till Halloween 😀
Here is a quick card I did for the sale-click for larger view. Its pretty cute. Details HERE
Here is a sample I made with the MFT set Meet me at the Cafe. Sentiment was Fancy Flexible Phrases by SU!
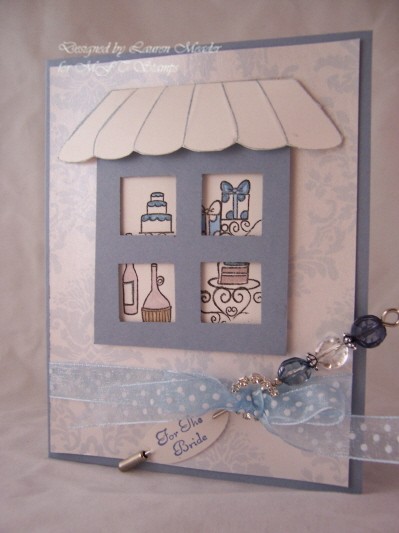 Bridal Boutique
I kept thinking about those windows you go by, and there is a wedding display with cakes, and gifts, and wines. Like a boutique. So I set me window scene. Not too overdone-simple.
I had gotten this pale baby blue toile type of printed paper at a LSS (more scrap), and found it to be perfect!
It has a hint of shimmer, so I used shimmery white cardstock.
I kept thinking blues for something old, something new……….you get the idea. A nice bridal shower card I think.
Then onto a bag of treasures

This was a quick idea-cutting down a lunch bag.
I used Ooh La La by Lizzie Anne Designs for the Eiffle Tower. I loved the whimsical style it has. Its stamp[ed on shimmer white-punched with SU! Scallop circle-which is so pretty!
This is clean and simple. Great for a need to whip a gift package together in 3 minutes! LITERALLY!! LOL!
The layer of patterned paper is actually a card (from Target $1 spot!!) cut in half-so its like a small card mounted to the front of the bag, so you can put your message right there. I get my white lunch bags from Walmart! Wicked cheap too.
I could have dressed it up, but was playing with the idea. I liked it simple.
OK Im off. Tomorrow Ill be posting a card using Alexa‘s set!
Reindeer food/treat baglets
Oct 8, 2007 Author: mytime | Filed under: Home decor/3-D items, Tutorials
When I saw Christine’s Reindeer Games (Kissy) set my first thought was Reindeer food packages! I dont own a single reindeer stamp! So was so excited to get this set.
I always make these little packets for the children in my kid’s classroom. Its a little something they can sprinkle on the ground outside, for the reindeer to eat when Santa arrives!
The paper for this bag is by Crate-the Twirl collection found here
All you put in the package is a little oatmeal (buy a big thing of the cheap stuff) then add sprinkles! You can also add glitter but that isnt “healthy” for the reindeer! Plus if an animal eats it, it wont get sick. Plus it adds color (and flavor) for the reindeer!
In this packet I put in a mix for Oatmeal Reindeer cookies! Just the dry ingredients of course! Mixed it up, and then Ill add directions to back of tag for baking 😀
EDITED TO ADD THAT THE BAGS ARE FROM PAPERTREY INK.
Instructions: Reindeer Treat Baglet
Step 1) Cut down bag to 5 1/2 inches
Step 2) Cut cardstock cover 3 1/2 x 10
Step 3) Using Scor-Pal, score at 1″, 6 1/2, and 8 1/2.
Step 4) Using Scor-tool, crease score lines

Step 5) Apply red line tape to inside baglet
6) Fill and decorate as desired.
Here is a sample of how different they can be! Perfect for any occasion 😀

My Etsy

Who I Designed For
Blogroll
- Alicia
- Alli Miles
- Ally Blankenship
- Amber
- Andi @ crafts on a whim
- Angel R
- Angie Z
- Anne Kranitz
- Becky O
- Bee
- Beth Silaka
- Bethany Paull
- Beverly Nash
- Bobbie
- Cambria
- Cammie
- Card of the Week
- Card Positioning System (CPS)
- Cards for Cancer
- Catherine Doucette
- Charmaine
- Cheryl Sims
- Chriss Rollins
- Christina
- Christine Ewing
- Christine Wooden
- Colleen Schaan
- Craft Critique
- Craft Gossip
- Crystal
- Dawn Easton
- Emily Giovanni
- Geny
- Holly
- Igne Groot
- Inspirational Craft Blogs
- Irene
- Jami Sibley
- Jeanne Streiff
- Jen del Muro
- Jeni Bond
- JenMarie
- Jenn Balcer
- Jenn Diercks
- Jenn O
- Jennifer E
- Jennifer Mick
- Jennifer Pereda
- Jennifer-Sweet Treat
- Joanne Basile
- Jodi Collins
- Julia Stainton
- Julie Masse
- Karen
- Kathryn Berthiaume
- Katie Cotton
- Kelley Holland
- Kendra
- Kim Scholfield
- Kris’s Color Stripes! Get inspired here
- Kristen Dubosque
- Kristin Eberline
- Kristine
- Laura @ Sunshine Stamper
- Laura Turnmire
- Laurie Schmidlin
- Lesa Rapp
- Linda Duke
- Linda-LSN
- Lindsey Botkin
- Lisa (lakind scs)
- Lisa Kind
- Lori Craig
- Maggie
- Mara Campbell
- Maria
- Maria Levine
- Mary
- MaryJo
- Melanie M
- Monique Hansen
- Moxie Fab World
- Pam Imholz
- PaperCrafts Connection
- Peppers and Pollywogs Kids party site
- Rebecca Grohall
- Rita
- Robyn
- Rose Ann
- Sarah Vrolyk
- Sharon Harnist
- Sharon Johnson
- Sharon Rivera (a chemisrty with paper)
- Sherrie
- Sophia Landry
- Storage Units, Ink, & More Blog
- Sue Berker
- Susan (Rainy)
- Tangii Crane
- Tracy
- Tricia Traxler
- Trudee
- Velta
- VivLyn
- Zena
MTME Pretty Palette Color Team
MTME Pretty Patterns Sketch Team
My Time Made Easy TM LLC
Shop till you drop!
Lauren Meader
About Me
Copyrighted material
Subscribe To My Blog
Pages
- About me
- Alexa’s Story!
- My Crafty Corner!
- My Time Made Easy™ LLC
- Our Make A Wish Trip to Disney!
- Resume/Publication List
Calendar
| M | T | W | T | F | S | S |
|---|---|---|---|---|---|---|
| 1 | 2 | 3 | 4 | 5 | 6 | 7 |
| 8 | 9 | 10 | 11 | 12 | 13 | 14 |
| 15 | 16 | 17 | 18 | 19 | 20 | 21 |
| 22 | 23 | 24 | 25 | 26 | 27 | 28 |
| 29 | 30 | |||||
Archives
- August 2013
- July 2013
- June 2013
- May 2013
- April 2013
- March 2013
- February 2013
- January 2013
- December 2012
- November 2012
- October 2012
- September 2012
- August 2012
- July 2012
- June 2012
- May 2012
- April 2012
- March 2012
- February 2012
- January 2012
- December 2011
- November 2011
- October 2011
- September 2011
- August 2011
- July 2011
- June 2011
- May 2011
- April 2011
- March 2011
- February 2011
- January 2011
- December 2010
- November 2010
- October 2010
- September 2010
- August 2010
- July 2010
- June 2010
- May 2010
- April 2010
- March 2010
- February 2010
- January 2010
- December 2009
- November 2009
- October 2009
- September 2009
- August 2009
- July 2009
- June 2009
- May 2009
- April 2009
- March 2009
- February 2009
- January 2009
- December 2008
- November 2008
- October 2008
- September 2008
- August 2008
- July 2008
- June 2008
- May 2008
- April 2008
- March 2008
- February 2008
- January 2008
- December 2007
- November 2007
- October 2007
- September 2007
- August 2007
- July 2007
- June 2007
- May 2007
- April 2007
- March 2007
- January 2007
Categories
- About Me
- All That Scraps
- blogger challenge
- camera/photo play
- Cards
- Contests
- family stuff
- FOR SALE
- Home decor/3-D items
- How to FAKE it!
- Introduction
- JUGS Challenge
- JustRite Stampers
- Lizzie Anne Designs
- My family stuff
- My Stamping Space
- My Time Made Easy
- My Time To Color Challenge
- My Time to Create Challenge
- My Timeless Template Challenge
- My Timeless Templates
- Mytime Mail
- MYTIME MOVIE/VIDEOs
- Papertrey Newsletter
- Pink Cat Studio
- Pretty Palette Challenge
- Pretty Patterns Sketch
- Product Opinions and Must haves
- Recipe's
- Saturday Sketch
- Smilebox Creations
- Stampavie
- Tutorials
- Uncategorized
- videos
Most Popular
- Create your own Onesie Card Tutorial-and important NOTE! PLEASE READ (2529)
- Saturday Sketch-Boxed bag holder (2333)
- Going GREEN! Fancy Flower Flourish-Closure Video (1478)
- Fabulous Favorite - Giveaway! (1336)
- a Prayer Request (1231)
- QUICK-Easter Baskets from Nestabilities-PTI style-and blog challenge (1063)
- Teaser Sketch (999)
- February Release Giveway! (and a little peek) (996)
- Group Post and Rambling Rose Video Tutorial (985)
- GIVEAWAY! Who wants it all?! (895)
Recent Comments (RSS)
- 야동: Love to read it,Waiting For
- 야동: This seller is in a
- 바카라사이트: 여기 처음 왔어요. 나는이 게시판을
- 야동티비: I was surfing the Internet
- 바카라사이트: 비슷한 주제에 대한 흥미로운 정보를
- 바카라사이트: "여기에 제공해 주신 귀중한 정보와
- 온라인홀덤: 유익한 웹 사이트를 게시하는 데
- 홀덤나라: 나는 당신의 블로그를 정말 좋아합니다.
- lisa: Technology, too, has left an
- 주소모음: 흠 !! 이 블로그는 정말
Copyright © 2007 - My Time, My Creations, My Stampendence - is proudly powered by WordPress
This blog has been Tweaked and Designed by Sara Williams