Archive for the ‘Tutorials’ Category
Jack of all trades C.C. Designs peek #3
Mar 31, 2008 Author: mytime | Filed under: Cards, Home decor/3-D items, TutorialsOOPS! I posted this early by mistake! OH WELL!
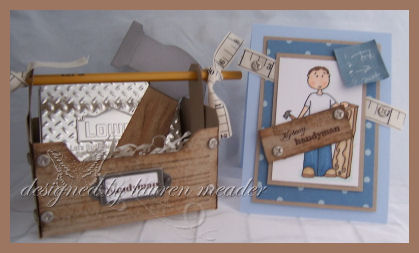 My Handyman!
Now is this set not adorable??? I believe he is called Jack of all trades! He is being released by C.C. Designs on the 4th.
I so needed another cool guy set! I LOVE cutesy. You can’t have a cutesy handyman without a tool box right? I love making boxes and gift items-with cards to match. I had SO MUCH FUN making this tool box 😀 It was perfect with my handmade hammer accessory, and my cool Lowe’s gift card holder tin. I almost altered that, but liked it as is.
Here is a close up
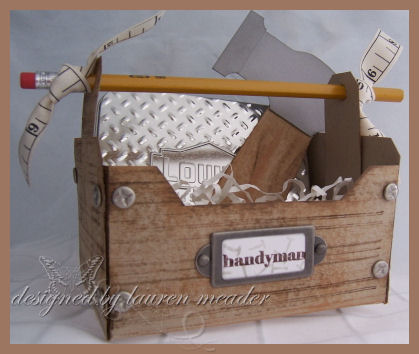 Handyman tool box
How cute would it be for your kids to decorate one for their dad? They can make/buy what they think should go inside of it?
There is also a lined background coming out with this release and I used it on my toolbox. Can you see it? I stamped it in Walnut ink. I also used my Tim Holtz distress inks (my faves are linen, tea dye and walnut), and randomly rubbed them side to side on this for a woodgrain look. Added some screw style brads for that added “look” of a real tool box. I liked the pencil handle for a more handyman feel. The measuring tape ribbon was another cute touch.
I created the hammer just for FUN, as another thing to add to the box. It’s good size. Made with some punches. No biggie.
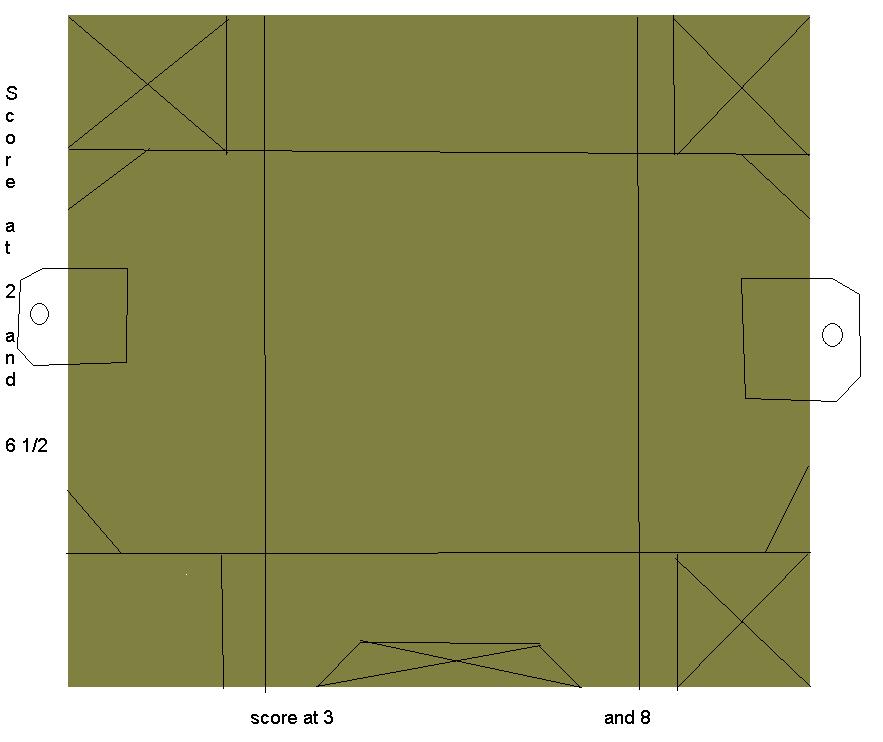
I made the tool box using a 8 1/2 X 11 sheet of Kraft cardstock.
Here is the template below-CLICK IT TO ENLARGE. Keep in mind Im NOT a pro making this-is just a little guideline to help you a bit, if you need a more visual idea. NOT a print and cut template!
Im no Paint Shop wizard. I recommend making any template with copy paper FIRST, that way you can work out any kink’s or question’s you may have. If you get it perfect first time, then you have a real template to reference in the future 😀
THIS IS FOR PERSONAL USE ONLY PLEASE 😀 No contest or publication submissions.
Directions:
1)Along the 11 inch side – score at 3 and 8. This will be the SIDE panels of your toolbox and will be LONGER than the front/back piece.
2) Along the 8 1/2 side – score at 2 and 6 1/2. This becomes the front of you tool box.
3) Trim along scored edges to center. In photo you will see a little extra left on either side of the 3 and 8 mark. That is so you have excess on your panels that adhere the ends together. Cut away the X’s-that is excess cardstock
4) Use tag corner punch on tool box sides. I also cut 2 pieces of cardstock 1 1/2 wide by 3 inches long. Use tag corner on those as well. Punch 2 holes large enough to fit a pencil through. Adhere to inner side panels-as seen in photo.
5) For front of box cut away from panel as you see fit. I just used my ruler and hobby blade for an even look.
Decorate as desired!
Now for the card 😀
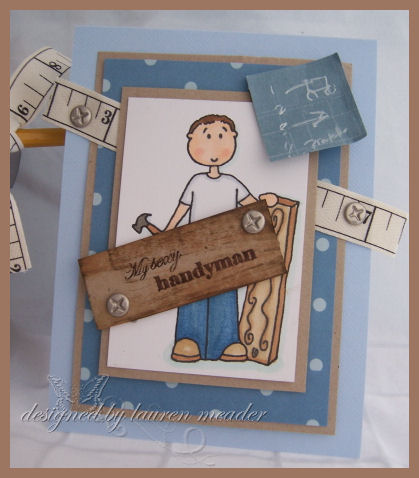 My Sexy Handyman
The little square at the top is suppose to be like blueprints. I stamped the bkgd going across, then up and down for a grid paper appearance. I then scribbled 1 2 3 4-for like steps in the project. Scribbled a picture too.
Just a fun card.
Well I hope you likey!
Thanks for checkin in with me here.
Till tomorrow.
Lauren
Let’s CREATE!!! Pretty Paper Flowers
Mar 23, 2008 Author: mytime | Filed under: Cards, Home decor/3-D items, Tutorials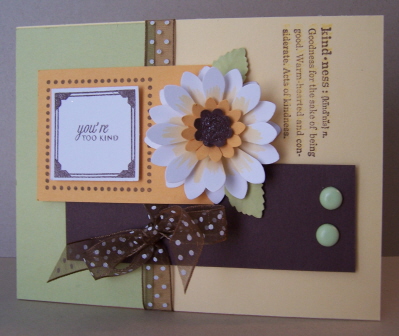
Happy Easter everyone!
Hope you have a wonderful day with family and friends, or doing whatever else it may be that you have planned.
I don’t have an Easter card! GASP!! But, I do have a tutorial that I have been asked to do, in it’s place.
Before we begin don’t miss your chance to enter the MYTIME MAIL—>HERE<—!! I will now draw the winner Tuesday.
Many of you contacted me, in response to my Pretty Paper Flower Favor, asking HOW did I make my paper flowers.
Well I am SO happy you enjoyed it, and are wanting to make your very own. It was VERY easy!
So here we go!
For the SMALL photo’s click to enlarge! Sorry but I only get so much room to post with :C.
Now I know this is going to most likely sound “info-mercial-ish”, but I assure you, its my HONEST opinon and I’m not getting paid! LOL! I just LOVED this book. I would recommend it to anyone.
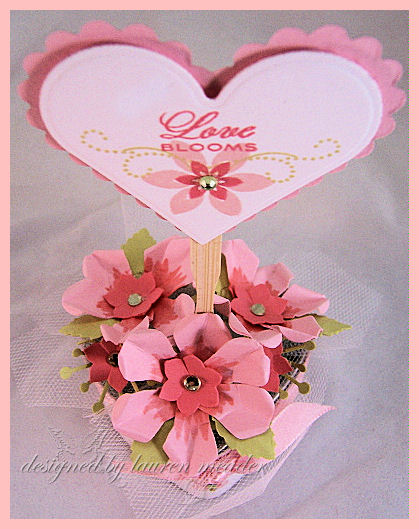
 Pretty Paper Flower Favor
I bought this amazing book-well more of a magazine with step-by-step directions on HOW to use different shaped punches and shapes, to create paper flowers!
You can use them on cards, boxes, bags, frames, and all sorts of gifts.
I wanted to do a paper flower favor for myPapertrey Ink project’s when I came across this book!
The Paper Garden Summer Blooms collection by Susan Tierney Cockburn
I got my book from —->HERE
I LOVE creating paper flowers, and own MANY punches. This was SOOOOO up my alley!
The directions are clear, and very easy to follow. Each step includes a photo as well, so I truly believe ALL skill levels can create these flower bouquet’s, with this book.
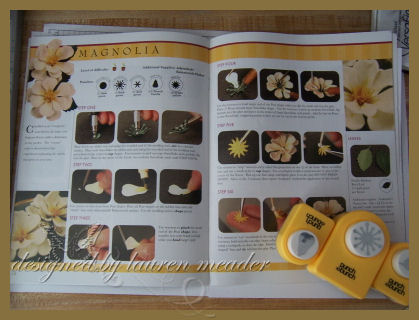 Here is a photo of the page I used to create my Papertrey Paper Flower favor. I adapted my flower to suit my needs, and match my project.
I say feel free to take creative liberty!
You can see it clearly shows you the punches you need, as well as supplies. Each step has a photo so you know you are doing it correctly.
The neat thing is if you purchased some of the recommended punches, like I did, they are used in numerous flower’s through the book! So that is really cool too. You would be surprised at what you can do with some of the shapes.
It cost $15.25, and to me was well worth every penny. There are several series, each feature different types of flowers. So make sure you get one that YOU feel you will most likely use.
My book here features directions on how to make the following flowers:
Buddlegja* Dahlia* Daisy* Geranium* Hydrangea* Lily* Magnolia* Nasturtium* Rose* Sunflower
These are some of my favorite’s, and upon viewing the book, you can certainly adapt a lot of the ideas 😀
Now for HOW I made my flowers!
I used the following punches
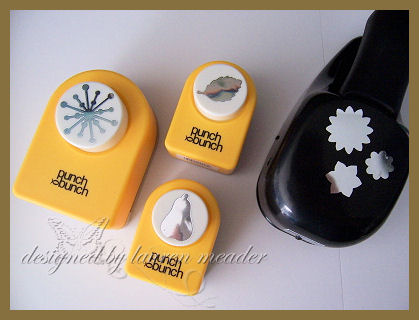 A star-burst, A Pear, and a leaf punch. I then added my SU! punch.
I then looked at my stamped flower from Boxes, Bags & Tags, and created the same number of petals.
I used Berry Sorbet, Sweet Blush & Spring Moss-cardstock & ink for this collection
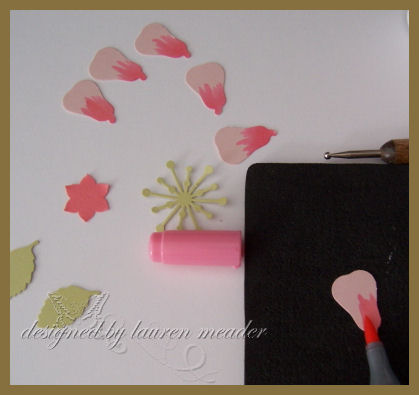 PUNCHED-6 petals, 2 leaf’s, 1 star burst, and one mini SU! flower.
1-You color the bottoms of the “pear shaped” petals.
2-Then you take your embossing stylus, and press the bottom of the petal in. This makes it pop up at the petal top.
3-Use your paper craft tweezer’s to curl the petal tops back.
4-Use a clear pop up glue dot. Lay on starburst shape. Then layer on your petals.
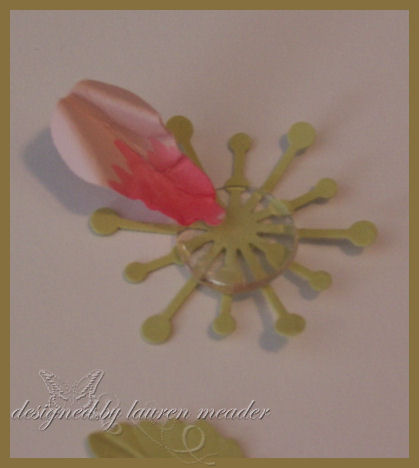

5-Next your place your smaller flower in the center-and push it down with your embossing stylus. This makes it all curl up, like natural flower. I added a adhesive rhinestone to my center, but you could use a variety of other things, like liquid pearls.
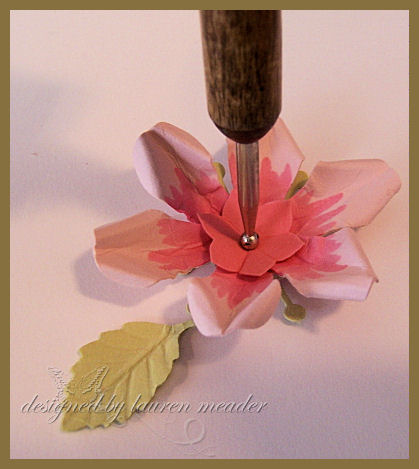
6-For the leaf, you simply take your embossing stylus and draw the spine!!! Attach where needed!
Here is a top view from my favor
Now here is a card using that same flower idea
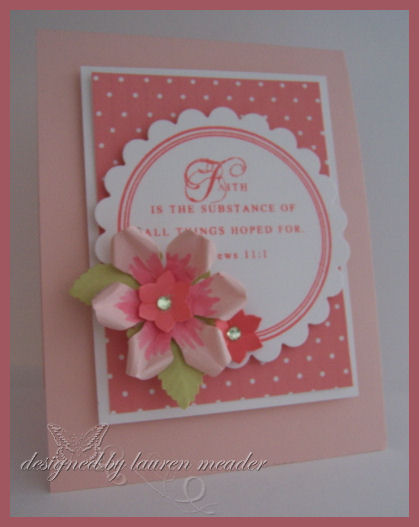 Faith-
I used Everyday Blessings and Circle Borders & Corners on this card, as well as the Pink Patterns paper.
Now here is a close up view of the flower for the card sample at the top of this post. I used the book as a guide to create my own flower. It also shows you how to trim up some punches and get a whole new variety of looks!! REALLY EASY & FAST
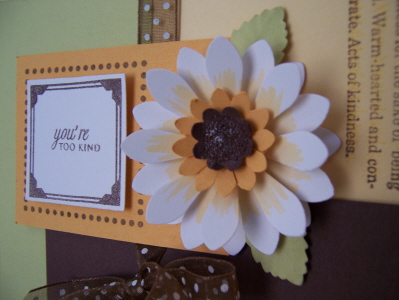
On this card I used:
Define your life by SU!, Borders & Corners-square set, and Mixed Messages.
For punches I used a Marvy flower-layered 3 x’s, and My SU! flower punch (same as above), and the same leaf punch. DIMENSIONALS are crucial to this technique! The more volume you have the BETTER!!! IMO!
In the center of this flower I used Mirco beads.
So that is that! I hope you enjoyed it.
I still have a few tutorials left to put together, and I want to share my Daisy thank-you tomorrow. I MAY have time to get the kids room’s into a Smilebox for Tuesday-we shall see.
Anyway-thanks for reading! Let me know what you think of the tutorial, and if you try it on your own-or buy the book!
Happy Easter!

Happy Blog-aversary to me! GIVEAWAY!Sketch, and a tutorial! WOW
Mar 15, 2008 Author: mytime | Filed under: Cards, Mytime Mail, Saturday Sketch, TutorialsWOW! It is so hard to believe I have been blogging a year! TIME FLEW BY!
I never thought “I” would have a blog, let alone one people would actually VISIT!!!
I have come to get to know SO MANY of you, and you have read my babble on who knows what, for however long. You share with me and make me laugh and sometimes cry. Its just an amazing craft to be a part of, and stamper’s are the most amazing and giving/friendly people. You are all also so very supportive-so I thank you!
I want to celebrate my time here with you by giving back. Why? Because of of you totally make my day by checking in and even sometimes commenting, and sharing 😀
That means MYTIME MAIL!!!!!

In this package the Random.org winner will be drawn on Monday. Its a value of over $50!
This will make Monday a happy day for someone ( I hate Monday’s). I put together a package of some of my favorite things.
The winner will receive the following-
My Papertrey Party Pocket set filled with 6 different Studio G stamp sets.
Current issue of Paper Crafts April/May 08. I have a project using Beautiful Blooms on page 68!!!
A acrylic set by Inkadinkadoo-has sentiments, flourishes and butterflies!!! SO ME!!!
A Stampin’Up! Accent’s and Elements kit
AND an SEI complete card kit! (I love SEI!!!)
All you have to do is leave me a comment. Tell me why you visit ME here. What you like or take away, if anything. OR what you want me to do in the future! Make it a better place to come to visit.
If you do the sketch that lets you enter AGAIN!!!!!
Remember you have till Monday!
——————————————————————————————————–
Now it’s Saturday Sketch time-and a tutorial! WOW! A lot in ONE day huh?
What did you think of the PTI release? WOW! Huh?
Did you check out all the gallery of amazing ideas put together by the Design Team? Check in the March 08 Release!
In case you missed this one:
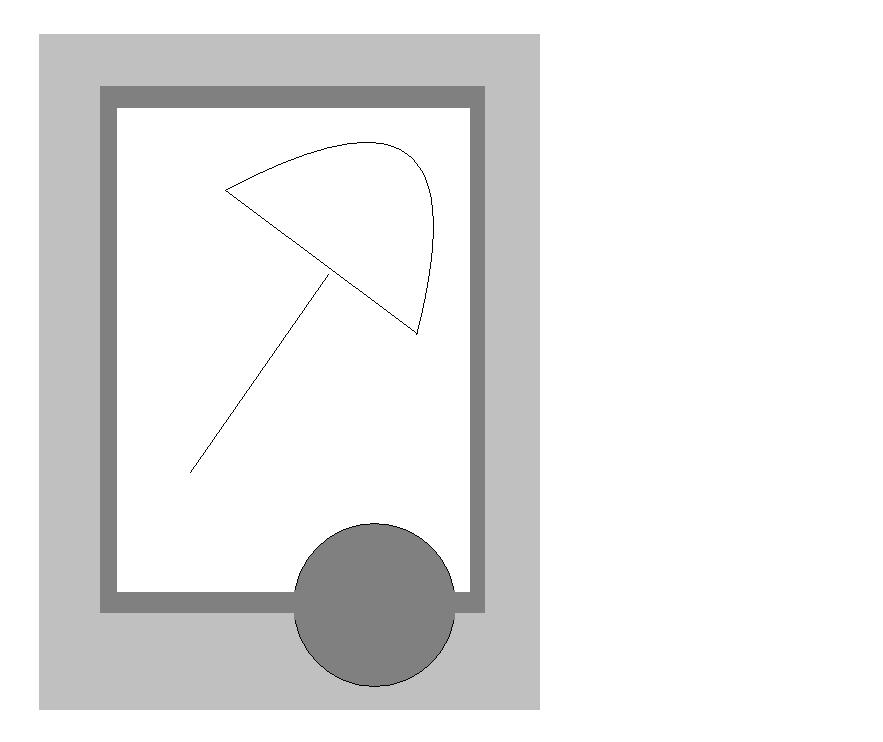
Here is the Sketch-Since Im doing a tutorial on the umbrella-it would be really cool if you could try it. If not just use the sketch. It still qualifies for ANOTHER entry, if done by Monday morning
If you try it please leave another link in the comments section.
I wanted to share with you how I made this card, for the Papertrey Ink release today!
NOTE: I will share a different project each day till they are done, along with whatever else I have to share.
 Shower of LOVE
I was inspired to create this by the sentiment, and the top decoration of the label! Plus I LOVED that patterned paper, and needed to showcase how nice it is!
SUPPLIES:
This is a cute shower card or invitation for baby or bride, using our pretty patterned paper as your umbrella!Stamps- Boxes, Bags & Tags, Favor It Weddingscardstock- PTI select white, Berry Sorbet, Sweet Blush
Patterned Paper-Pink Pattern Collection
Ink-PTI Palette in Berry Sorbet, Sweet Blush
Ribbon-PTI blush twill
other- wire, oval coluzzel, sm. oval punch, 1 3/8 circle punch, scallop punch, swiss dots embossing folder by provocraft
DIRECTIONS! Click to enlarge photos
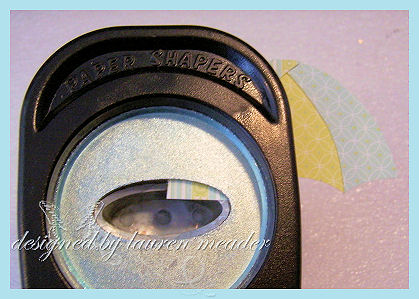
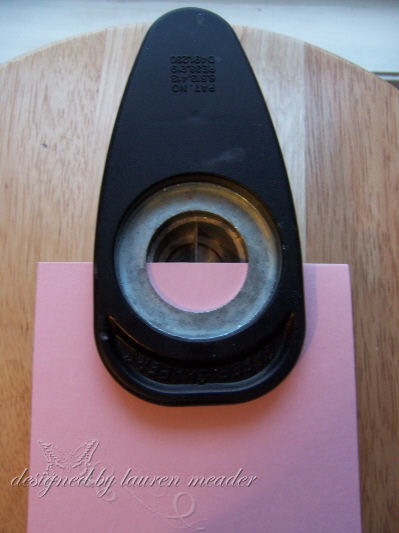
You want to choose your paper first. Then decide if you want to use a round cutting template, or an oval. Either will work. The sample card at the top uses the circle, the sample card at the bottom uses the oval. I used a Coluzzel cutting template for these.
Follow same directions for either shape.
1) Cut three 1/2 circles or ovals
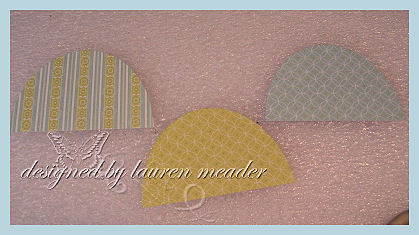
2) Take the 2 paper’s which will be your sides, and place them patterns facing together. You have to trim them together so the side panels of the umbrella will be EVEN!
Trim into a crescent shape, leaving points in the middle
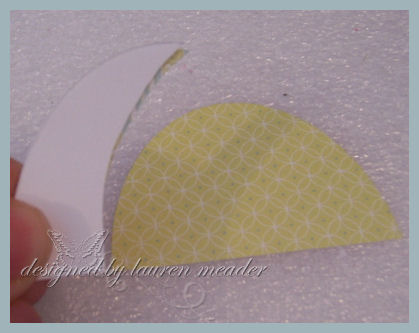
3) Adhere the panels to the main umbrella base. Now use your SMALL oval punch, and slide bottom middle into punch.
You will hardly see the end corner’s of the side pieces. PUNCH.

4) Now the edge pieces. Put your side in. You will put the piece in until you see the corner of the center piece. PUNCH.
Do this for both sides
This is what it will look like-after punching

Now here is the finished card!
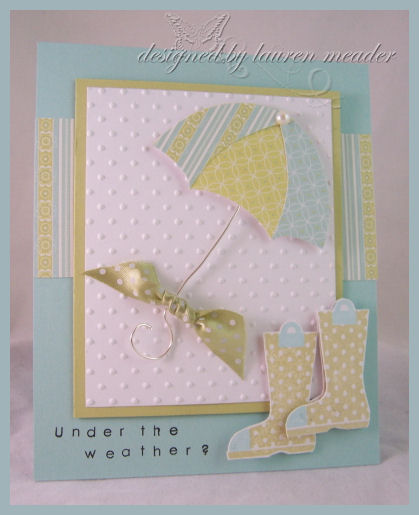
I used the new Simple Alphabet to create my sentiment.
This used Papertrey Ink Green Thumb, Simple alphabet, Everyday Blessings Patterned paper, Polka Dot ribbon in Spring Moss, PTI Select white, Spring Moss & Aquamist ink/cardstock, Polka Dot embossing folder, wire, coluzzel.
Well that is ALL!! I hope you enjoyed the tutorial and find time to give it a try.
I still have my guest designer stuff to show you-I SWEAR that will be tomorrow!!! I want to give it the proper attention!!!
It’s been a insane week here. I have so much still to do. I forgot this week is EASTER party stuff for the kids!! Now I gotta get cracking on some deadlines and get that stuff done too!
WHERE is March going? WOW! Time is whipping past me.
Once again, thank you so much for the support and checking in here.
Till tomorrow!
3-Papertrey Party Package PEEK!
Mar 12, 2008 Author: mytime | Filed under: Cards, Home decor/3-D items, TutorialsAre you enjoying the peeks of the upcoming Papertrey Ink Release?
I cannot tell you how excited I am to be able to share in Day 3 of the PARTY!!!
As you may have read, this month is a Celebration theme for the release. What better way to celebrate than an all occasion party themed card and matching gift bag!
You know how much I love co-ordinating cards/gifts. I especially love one’s that can be easily created.
Papertrey Party Package

When I saw the set’s to be released this month I was absolutely ecstatic! (OK I know that is every month, but seriously!)
I fell in love with It’s a Celebration by Candice Agulair.
The adorable pennants just screamed PERSONALIZE ME!
Then, when I saw the Simple Alphabet- I screeched! YEAH! This is just perfect. I have been dying for a quality mini clear alphabet set. This has upper & lower case letter’s, as well as number’s and punctuations. It will retail for only $15! A MUST have. It stamps like a DREAM! No squishy unclear letters. FINALLY!
Throw in the New! Color’s Sweet Blush & Berry Sorbet, and I can’t get any happier! Well I can ,once I saw the patterned paper………………..:D
OK enough rambling! Let’s get to the details!
Party Pocket
Now this one is FUN!!
Supplies for Pocket
Scor-Pal, 8 1/2 X 11 piece of Spring Moss card-stock, ruler, hobby blade, redline tape, and Berry Sorbet grosgrain.
Directions for Pocket-click photos to enlarge
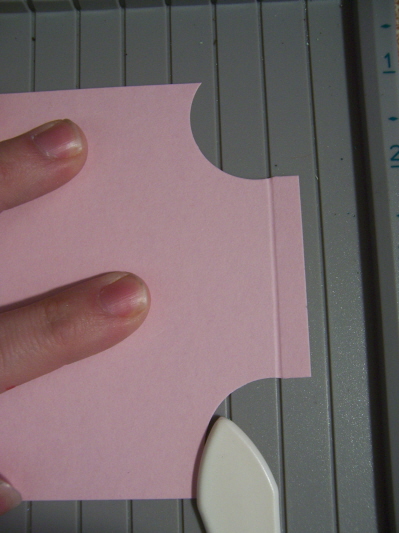
1) Take Spring Moss card-stock, and along the 11 inch side-score at 5, and 6 inches.

2) Turn paper to 8 1/2 inch side, and put top corner at the 8 1/2 inc mark, while bottom corner is at an angle, against the edge of the Scor-Pal (or 101/2 inch mark if you don’t have a Scor-Pal). Score at 7 1/2, 8 1/2, then 9 to the center score line for bottom. Turn card-stock and repeat step for all 4 corners.
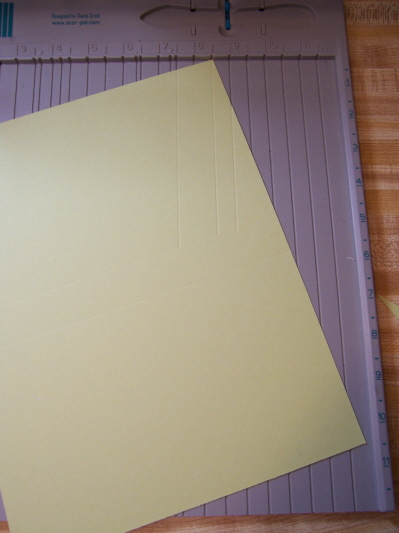
3) Cut excess cardstock away. Score bag edges. The wide end, folds in, and the little fold, folds out. Trim excess at bottom panel as well.
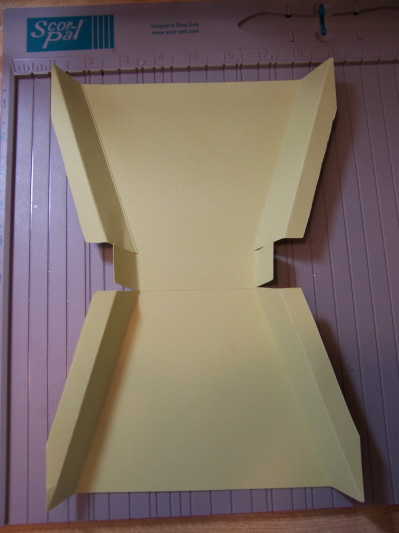
NOTE: PrintableTemplate below for quick reference-click and print.
 If you are unsure what to cut off get rid of the dark gray!
4) Fold the ends, into the center. Take a ruler, and hobby blade. Trim excess card-stock. This is so you get even sides.
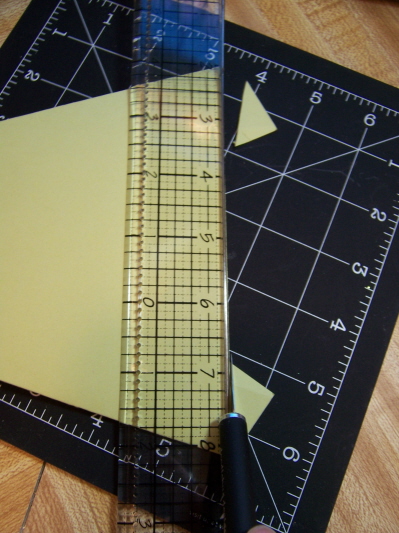
5) Apply adhesive to sides. Tuck in bottom folds first. Then fold pocket in half to adhere end pieces evenly.


6) Cut 2 even pieces of wide Berry Sorbet Grosgrain, and apply red-line tape to bottoms. Adhere inside bag. Then attach your pennant to the front.
Supplies for Pennant
Banner stamp in plain and stripped, ink of choice (spring moss, berry sorbet, sweet blush, old olive, and black), 1/16 hole punch or paper piecer, Needle, silver cord (or color of choice)and glue dots.
Directions for Pennant-click to enlarge
Figure out how many pennants you want for your banner. Choose your colors/and or word to be spelled.
1) Stamp the MIDDLE pennant FIRST! Then work your way from there out. This will ensure an even banner.
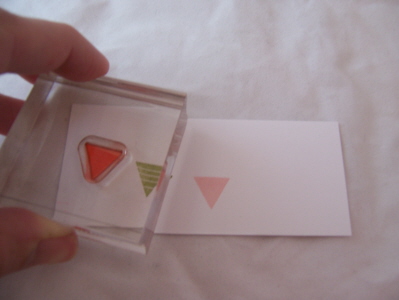
2) Use your Simple Alphabet, then stamp desired word. In our case P A R T Y.
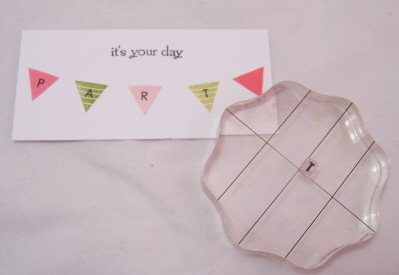
3) Use a 1/16 hole punch, and punch holes on either side on the pennant corners. You may also use a paper piercer. You want your holes to remain small, so it appears that your pennants are hanging from the cord!
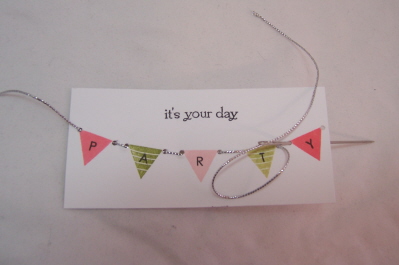
4) Thread your cord through the holes. Adhere to back.
5) Tie 2 separate bows using silver cord, then adhere to banner ends with glue dots.
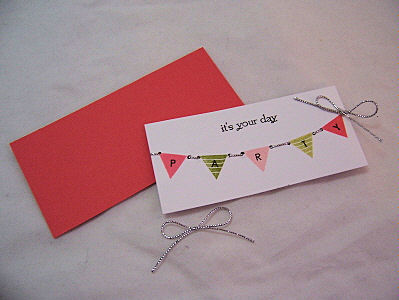
6) Layer onto Berry Sorbet card-stock with dimensionals, then attach to the bag! DONE!
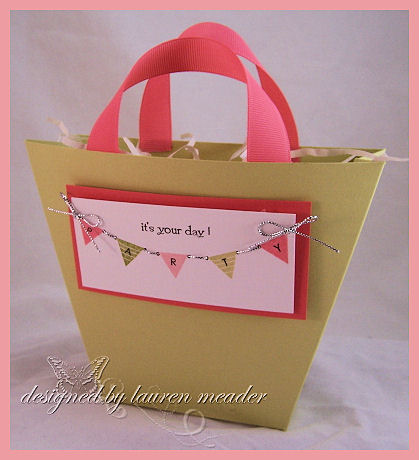
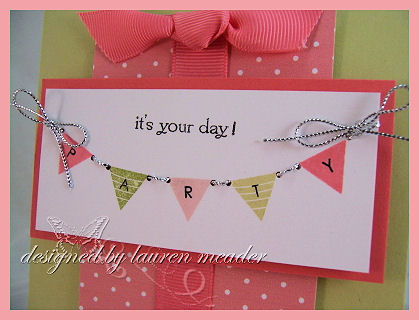
For the card!
Finished size- 4 1/2 X 5 1/2. Card base made with Spring Moss card-stock.
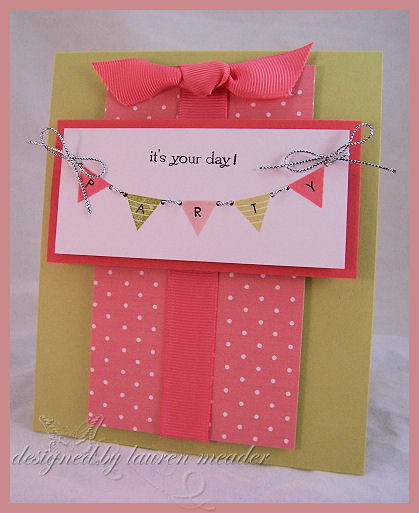
I followed the directions above, and created the exact same banner for this card.
I used the Pretty Pink Polka Dots, from the Pink Patterns Collection. I thought it made the perfect “gift”, tied nicely with my Berry Sorbet grosgrain.
The patterned paper is YUMMY!!! You know how much I LOVE pink!!
Once the reveal hits, you will be able to see just how much I enjoyed using it. FYI-MORE tutorial’s to follow too!
I LOVE the color’s and assortment of design’s offered in the set. I especially LOVE the option of buying 6×6 or the 12 x 12. As you can see by the photo, the paper is a Perfect Match (HE!HE!HE!) to the ribbon and ink.
One question I have been asked is how does the Berry Sorbet’s paper/ink/ribbon compare to Stampin’ Up! Groovy Guava-since that was not a color compared on Nichole’s original post.
Here is a photo:
Top Layer on Left is Papertrey Ink Berry Sorbet.
Bottom Layer on Right is Stampin Up! Groovy Guava

As you can see they are VERY different. Guava being more orange in tone.
Well that is it for me! I am so honored to have been able to take part in this today! I really hope you enjoyed my part of the peek!
Make sure you check Nichole’s blog each day till the release! There will be sneak peeks, as well as an additional daily sample, provided by an assigned Senior Design Team member!
Lisa’s stamped twill-HERE
and
Pine’s scrap page-HERE
Till tomorrow!
QUICK-Easter Baskets from Nestabilities-PTI style-and blog challenge
Feb 15, 2008 Author: mytime | Filed under: blogger challenge, Cards, Home decor/3-D items, TutorialsYEAH! The weekend is just about here. I am very excited about that.
So for the weekend-I KNOW Valentine’s day *just* ended, but in this industry, you have to be ready to move on to the next thing, and fast. Trust me, I have been in Easter mode for a month now, due to stamp releases! LOL! I felt like the stores had to catch up with us, for once.
Publications are currently taking Halloween ideas! EEEKKK! Needless to say “I” will not be submitting for that 😀
OK so moving on-lets think Easter! I am going to share my basket’s and Blogger’s Challenge
 Purple Posie’s-in the PTI gallery
Women of Life, and Just Hatched were used on all of these samples. Flowers are popped out using the Cuttlebug Flowers #1 die. Not an exact match, but I still love the look
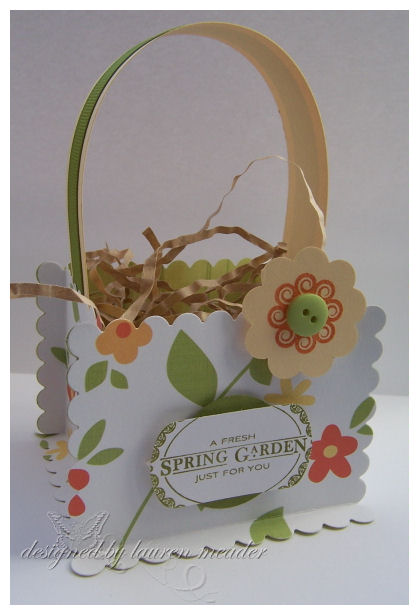 Spring Garden-using patterned paper by Scenic Route.
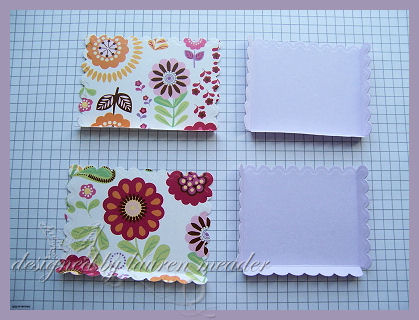
I made these QUICK and cute Easter Baskets JUST from my large rectangle nestability dies!
You can stamp your basket’s, or use patterned paper. If mass producing-obviously EMBOSSING the edges takes MORE time-so you don’t have to do that.
You could alter this design by using squares as well.
The tutorial/idea would be the same, just your measurement’s may change 😀
For the purpose of this tutorial I a making my basket in a pattern, and a solid, so you get the visual idea. It also did come very cool.
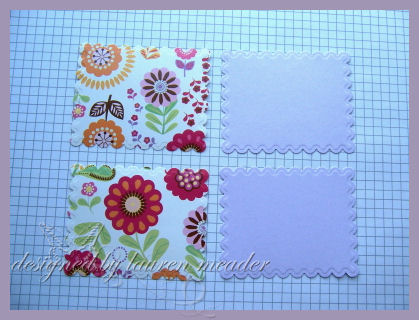
DIRECTIONS: Click thumbnails to enlarge
Step 1
Die cut your desired cardstock/paper. You will need 4. Two for the front/back, then two for the sides.
Step 2
I used my Scor-Pal, and scored in between the last scallop-edge to edge. See photo.
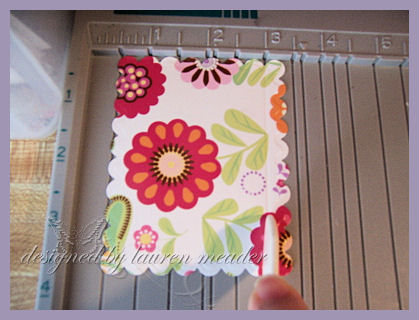
On the front/back piece ONLY score bottom. On side pieces score both side AND bottom.
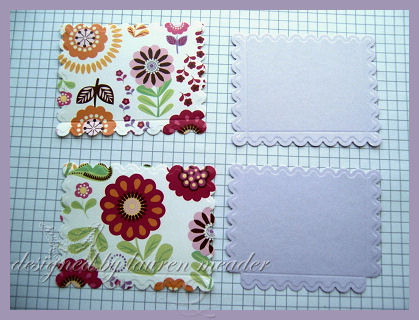 -On the side pieces snip the corner (triangle off)
Step 3
Bend all scored edges FORWARD. Apply adhesive to all bent edges.
Step 4
When putting together-line up the tops scallop to scallop.
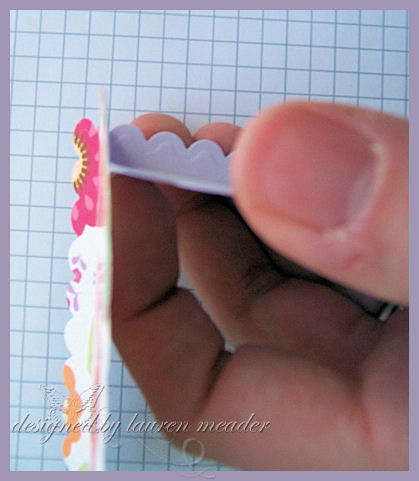
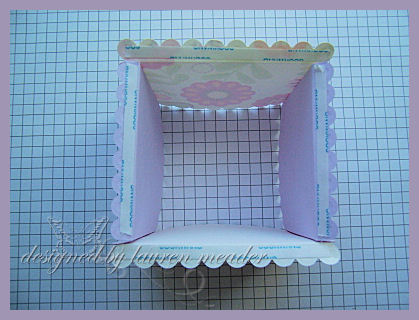 Photo of basket sides together, bottom of basket.
 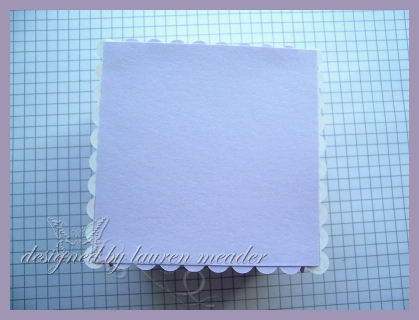 Bottom attached.
Using the LARGEST scallop rectangle, it turns out to be 3 1/2 inches squared, for your bottom piece. It becomes a square due to the way the sides were scored.
Step 5
Add a handle! Just cut about 1 1/4 inches wide by 11 inches long-end will fit perfect. Just put ends on the inside! They will also keep the sides from buckling in ![]()
Here is our finished basket!
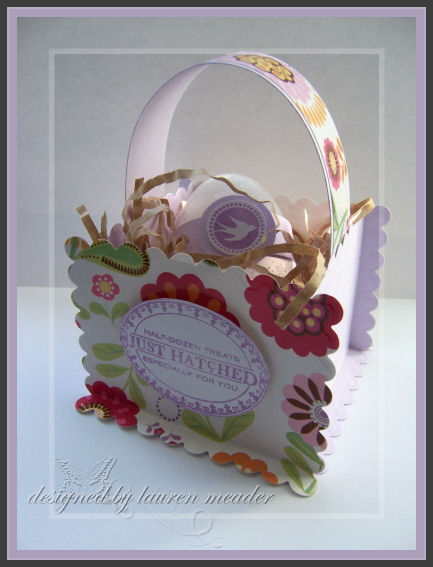 Flowering Treats Basket
Now here is a close-up of my CLEAR-glitter egg! I found it an our local $1 spot! 12 for a $1.
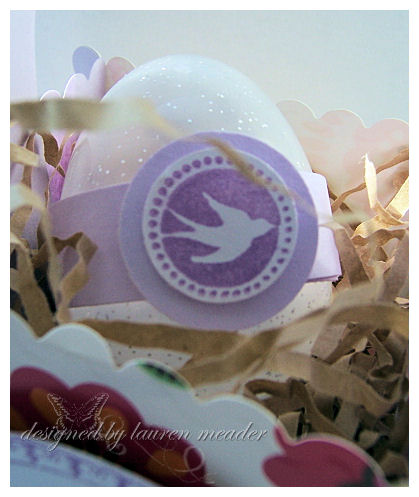
I added a band to it, and used the bird from Just Hatched. Its the perfect thing for hiding the closure, and easily slides on and off. That means REUSABLE!
Please ask any ?’s you may have here, and I will edit to answer.
If you give them a try-well send us a link here so we can all view YOUR version.
I am making these for ALL my kids classmates-which turns out to be 36 baskets! I am also giving myself plenty of time, since Easter is ABOUT 4 weeks away. That is only 9 baskets a week. I could do 3 every other day. Very workable.
NOW onto mu blogger’s challenge! WHEW! Are you still with me???
We had to use a layout on page 42 in the SU! Catalog for our card.
Well, while using this paper I decided a card to match my basket would be PERFECT!
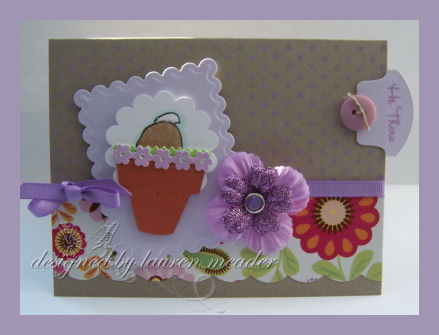
So, I used the bunny image from the New! Eggstra Special Easter, and stamped him-upside -down. I also used Essential Sentiments for the sentiment, and the Behind the Scenes bkgds as well.
I used my Sizzix flower pot die, and created a flower pot for his butt to pop out of. I got this concept after seeing some Whipper Snapper images at a store. I wanted the stamp-but figured I was better off making my own, with my already owned, cute set.
The bunny is flocked. So looks all soft and fuzzy in person.
I used some Doodlebug Paper frills for the pot flowers.
Added some Prima’s and DONE!
Well that is all for today! WOW! What a LONG post. I hope you enjoyed it though.
I would like for you to try out the baskets as PART of my Saturday Sketch.
Speaking of which I better get working on that 😀
Till tomorrow!
Dove Chocolate Boxes :D Template and a Recipe
Feb 13, 2008 Author: mytime | Filed under: Home decor/3-D items, Tutorials, Uncategorized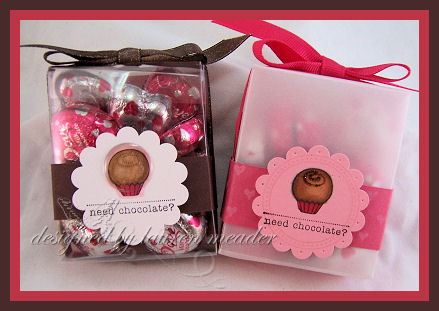
This is a DELICIOUS post! LOL! Read to the end for my recipe for you all to try.
It’s ALMOST Valentine’s day, and I am working (last minute of course), on some sweet treat’s for the kid’s teachers!
I saw this image from Lizzie Anne Design’s set Petite Phrases, and also used Celebration Frames (on right), and thought it would be PERFECT for the job!
I LOVE Dove Chocolate’s, and thought that packaging up some would be so SWEET! Since I LOVE making boxes, I had fun doing these.
So I grabbed my trusty Scor-Pal, and I made this candy box holder just PERFECT for 12 Dove Chocolates 😀
WAIT TILL YOU SEE WHAT I HAVE UP MY SLEEVE FOR EASTER!!!! WOW!
Anyway-
I made 2 boxes here-one with Acetate, and the other with Vellum cardstock. I wanted to show the versatility in the design. I think these look so scrumptious, and make giving such a SIMPLE and in expensive gift (works out to be $1 each!!! There are 3 servings per bag :D) look so special.
You will need to cut your cardstock
5 1/2 X 8
Score along the 5 inch side at 1-4-and 5
Score along the 8 inch side at 1- 3 1/2- 4 1/2- then 7
See diagram for where to cut!
Finished size- 3 inches high- 2 1/2 across, 1 inch wide
NOTE: Ribbon around box keeps lid flap closed nicely

These are DONE in 5 minutes EASY! After you make one of course.
So I hope you get to test one out. I’d LOVE to see it.
Thanks for all the kind and caring messages/emails/ and even phone calls! I don’t think you are a stalker-I feel so loved! 😀
I really appreciate the fabulous recipe’s you all shared! I am now signed up for Kraft Foods email’s too.
I honestly have NOT tried any yet-we need to go to the food store :C, but we do have a list of items to try them out.
Now I am going to share my FAVORITE recipe-quick, easy and sure to please!
Olive Garden Style Fettuccine Alfredo Sauce
Sauce-
8 ounces Cream cheese — cut in bits
3/4 cup Parmesan cheese — grated
1/2 cup Butter or margarine
1/2 cup Milk
Black Pepper, and oregano to taste
8 ounces Fettuccine; cook — drain | In large saucepan combine cream cheese, Parmesan, butter and
milk, stirring constantly until smooth. Toss pasta lightly with
sauce, coating well. Leftovers freeze well.
PS you can double everything to get MORE sauce (you don’t have to double the cream cheese though)
Make it with Chicken and Broccoli-
While the noodles Boil-
I just throw in some frozen breaded chicken tenders in the oven-Like 450 degrees for 20-25 min
I also throw frozen broccoli in the microwave while it all cooks-
Now you have Chicken & Broccoli Fettuccine!
I aslo ALWAYS throw a garlic bread in the oven with the last 10 minutes that the tenders cook!
YUMMY!!!
Now tomorrow Not only is it the PTI release (YEAH!!!!) I will share a COOL tip-in regards to a Papertrey Product (yes I got Nichole’s permission first :D), and my V-day card for Jason, as well as COOL activity for those of you with children, that will allow YOU more TIME to stamp!!! It will also help them explore their own creative side without driving mommy INSANE.
So come back then!
Till tomorrow.
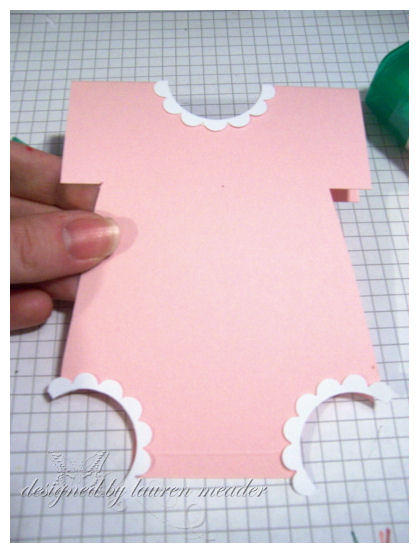
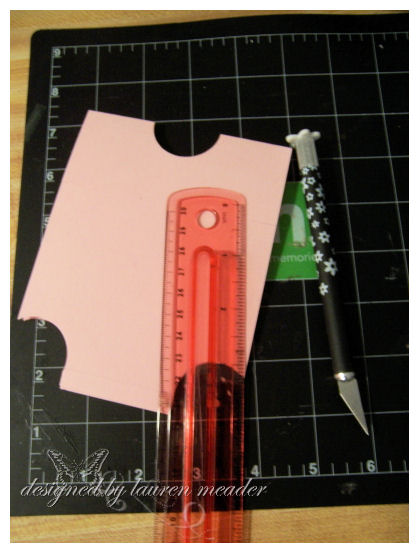
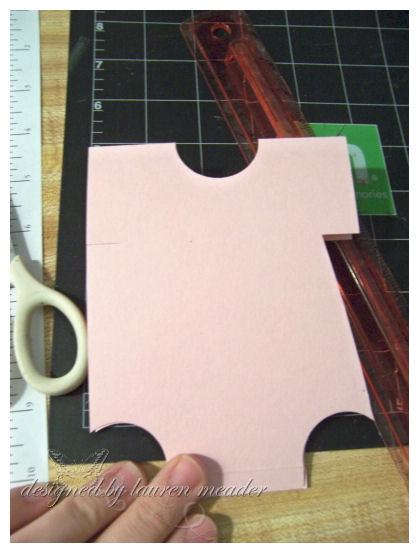
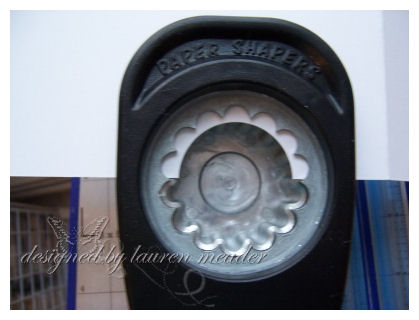
Create your own Onesie Card Tutorial-and important NOTE! PLEASE READ
Feb 5, 2008 Author: mytime | Filed under: Cards, Tutorials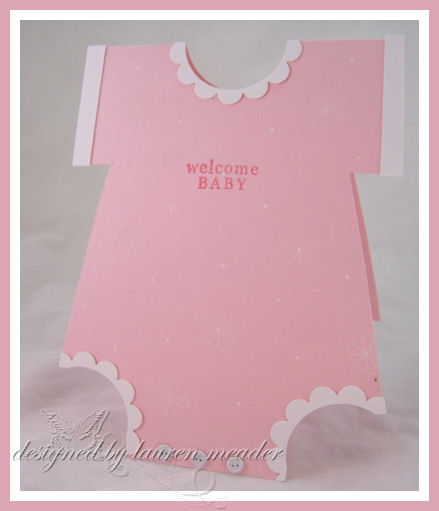
WOW! Can I tell you that I am OVERWHELMED by the number of you requesting a tutorial for my onesie card found —->HERE. THANKS FOR LOVING IT!
This is an update: I removed the tutorial as I created files for this card which are available HERE!
The files are formated for EASY use and are available in PDF, SVG, GSD, DXF, WPC.
If you aren’t sure what file type is best for you, please view the ABOUT PAGE <—CLICK IT for details on each file.
You can see my latest samples HERE!
HERE COMES THE IMPORTANT NOTE:
Please use this for your OWN personal use. Do not submit this template for publication. I was recently alerted by and editor-who reads my blog (INSERT SHOCKED FACE HERE), the the day after my idea was presented here, they got a submission for it-using my directions-copy/pasted from right here.
Had she not read my blog-it would have gotten picked up, and that person would be paid.
THAT is NOT cool.
Please don’t ruin the fun for everyone else. I share my items with you because “I” enjoy it. I do not care if you use sketches from here to create your own unique version for a publication, and whatnot, but please don’t use my words, templates, and CASE my ideas for profit.
Anything else-go for it!!!
You can add snaps or buttons-( I used Making Memories button brads)whatever you want. Embellish it as you please. It can be as simple or complex as YOU need it to be.
I stamped mine in this photo with the Limitless Labels. I used the sentiment, and tiny flower (stamped in white, then added dots with white gel pen) for this card.
I used colored cardstock for this one, whereas my first ones where white. Patterned cardstock is also a great option.
Makes a great announcement, or Welcome to the world card.
Thanks to everyone again for the love, encouragement and support. I appreciate each one of you, immensely. I am not going to let ONE person kill the joy I get from sharing with everyone.
I hope this helps you now that you can SEE it!
Till tomorrow-
for a ROCKIN do-it-yourself tutorial!
WOW! After I posted my goody package, from my Secret Friend, I received over 200 emails, asking about WHERE you can buy that pkg, of full glitter Prima’s.
Well, considering I have NO IDEA “who” sent it to me I couldn’t answer that question. I myself had never seen a pack like that. There was an obvious NEED for people to have these immediately!
Ask and you shall receive 😀
SOLUTION!!! Make them yourself!
Now I KNOW the possibilities for this are ENDLESS! Think of all the UGLY color Prima’s you have, that came in the bottle with the colors you love! LOL!
Now think-punched flowers as well!
Any shape-any size-you name it! You can now GLITTERFY it! (That is a Lauren word so not correcting me OK!) You ahve the color of glitter, then you can have a Prima or other option in that exact color.
Here is what you need-
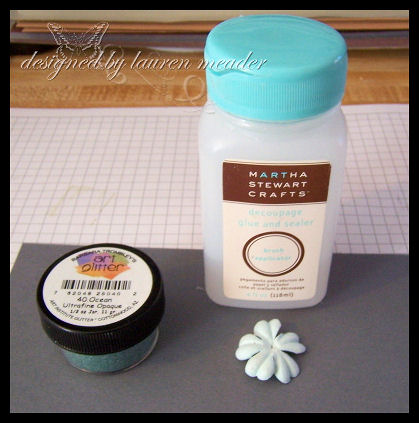
Decoupage glue-with brush * Glitter * item to be glitterfied * tweezer’s-it gets messy!
Brush glue onto object-like so
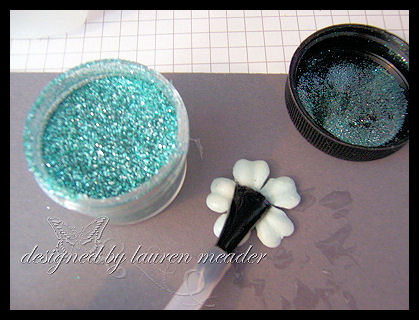
Dip item into glitter
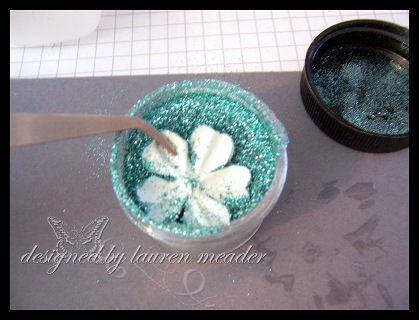
Tap off excess, let dry.
Add to card, ot project of choice.
The glue really holds the glitter on there NO PROBLEM! You can even “sculpt” your Prima to dry in whatever position you want, because when it dries it hardens right up.
Here is a sample using the flower I made.
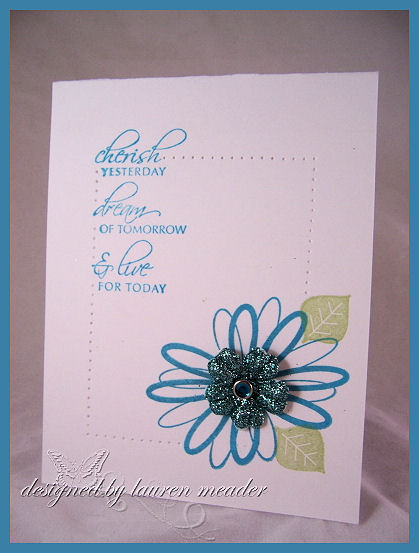 Cherish everything
Flower-Fun to Be Floral
Leaf-In the Treetop
Sentiment-Say it in Script (LOVE THIS SET)
Kept this very clean and simple, as to show you the impact of the glitter flower!
I just used my Matt Pack and pierced a border for added interest! It takes a simple, single layer card from an Oh, to an OOOHHHH!!! AAAAHHHHHH!!!!!! LOL!
Hope you like my mini tutorial! It was alot of fun, and very easy to do!
Till tomorrow.
In with the New, and using the old.
Jan 22, 2008 Author: mytime | Filed under: Product Opinions and Must haves, TutorialsOK by my title you are probably thinking “WHAT on earth is Lauren blabbering about now?”
I am stepping out of the box a little (for me), trying a new technique, and doing a different style of card.
Just so you know, I AM capable of transforming my style into whatever I want, its just not often that I feel the need to mix it up! But today I mixed away.
Well, I have a NEW product to share with you all. New to me anyway.
I “showcased” the product by making my card all old, distressed, and collagey, with a REAL OLD set-Garden Collage. There is the ” old” part.
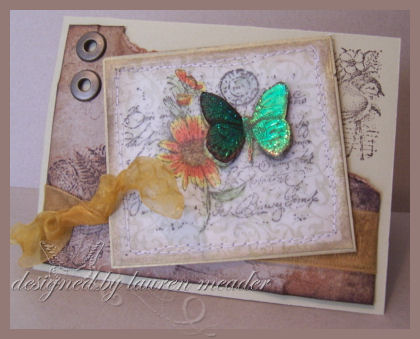 Beautiful Butterfly Collage
This was a SU! Sell-A-Bration set at least 2 years ago. So ANCIENT to me! LOL! I got it not long after I started stamping. It had a butterfly so I fell in love with it.
I heated my gold ribbon, to make it curl. I stamped the main image in vellum, and layered onto patterned paper by Prima. I used my sewing machine to stitch around the edges. I sponged the edges, and added some gold cardstock as well.
It picks up the gold in the butterfly.
Notice my GORGEOUS-POP OFF THE PAGE-GLIMMERY-3D butterfly of beauty?
How could you not right? The butterfly is popped off the page.
But what makes it have that special look?
Well I made the butterfly using a product called Fantasy Film.
It’s the coolest thing ever.
It was bought in place of what my friend thought was Bling paper. Can’t blame them, its very close looking.
After getting it I found I didn’t have the correct things to use it :C BUMMER! So off to the store I went, to get what I needed.
Here is what you need to do to use Fantasy Film
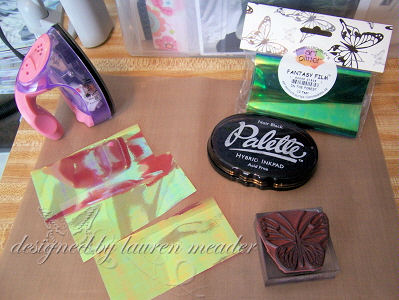
A stamp 😀
You need the Fantasy Film-DUH! It cost $7.00 for the roll you see here. Comes in several colors like clear iridescent white, pinkish, greenish—-and thats all they had. May come in other colors-not sure.
NOTE: You need to cut and layer the film over the stamped image, 3 times. (see the 3 pieces)
A permanent ink such as StazOn or Pallette ink.
A Iron. I use Heidi Swapp’s ribbon iron-works like a charm 😀
Most importantly, a nonstick layer! I got the non stick craft mat-shown in photo. It was $10. has many uses, especially if you use your heat gun frequently.
Here is what you do:
1) Ink your stamp with permanent ink. Place stamp ink side up.
2) Cut/layer film over stamped image 3-4 times.
3) Place non stick parchment paper or Craft mat over film that covers stamp.
4) Place iron on mat, and rub in circles for about 30+ seconds. Depending on your iron.
5) Take iron off image, remove mat, and now you have your inked/melted fantasy film image!
6) Trim out image, and design card as desired.
COOL huh?
The process is actually very fast-after you get it down.
The more solid the lines the image has the better the look you get.
I have a butterfly from a set, (not used yet) and it looks great.
AND I tested it on Acrylic stamps! Oh I was petrified!!!! But it worked. I am not saying I endorse YOU doing it, nor am I going to claim responsibility if it doesn’t work for you, but I personally had no problem using it with a Papertrey Ink set. You will see that sample soon.
Also the film mets, and morphs into a variety of colors. The more it mels the more it morph’s. Pretty cool look!
I hope you give me your feedback on this product if you get a chance!
Till tomorrow.
Interesting EMAIL! Did YOU know……..
Jan 4, 2008 Author: mytime | Filed under: TutorialsI get some of the BEST emails! So many of you are so sweet to take the time and share things with me. From comments, to photos, exciting news in your life, prayers, art,friendship-all of it! I am so blessed by it ALL!
Sometimes, I wish you would post it here for other’s to enjoy!
THIS particular email I received from Ann Williams-a book binder, was pretty amazing in my opinion. She also sent me a copy of the book she and her friend wrote, in honor of their Mother’s called A Celebration of Motherhood.
Its a collection of Poem’s from the Victorian era. Really beautiful book. Thank you so much Anne. I need your address, so I can send you a Thank You!
I felt her knowledge was not only useful to us as papercrafter’s but should be shared with many!
Read it, and ENJOY! I was quite grateful to learn something NEW!
This email was copy/pasted, with Ann’s permission. Nothing was changed.
Hi Lauren,
I subscribe to your blog and was reading your article about the scor-pal. when you were talking about your paper cracking when you folded it without scoring I was wondering if you are familiar with paper grain. I am a bookbinder and paper grain is very important. I am surprised to know how many people don’t realize that paper has a grain like fabric.
If you take a small piece of paper and fold it one way you will see a very different look than when you fold it the other way. One fold will be clean and the other fold will be cracked and wide.
To check for paper grain place the edge of a piece of paper (preferably a 12 X 12 piece of cardstock) on the table and place the palm of your hand on the opposite edge of the paper. Create an arc with the paper by gently bending it and doing a soft bounce. Try to hold the bounce in your mind. Then turn the paper one rotation to have the edge rest on the table and then repeat the bounce. One of the bounces will be a softer bounce with less resistance to your hand. The softer bounce will be the grain of the paper and also the fold line. I know it is difficult to explain this in words and I wish I could demonstrate it in person. It will change your life. I still believe the score pal is a wonderful tool and I am going to get one myself, but believe me putting the paper on the score tool with the grain along the lines to be scored will still improve the look of your fold.
I will give you another tip. I only buy 12 X 12 paper of any kind. If you find the paper grain on an 8 1/2 piece of paper it generally isn’t big enough to fold it on grain for a regular size card.
It might help you to do a demo on a piece of scrap paper. Just take a mister spray bottle and lightly mist a piece of cardstock. It will curl with the grain. When we make books it is so important that the grains of the bookboards and the papers match. If one goes one way and the other goes the other way it will warp. they fight each other and each it trying to win..
Blessings
Ann
Thank you so much Ann, for writing, and agreeing in sharing this with the world!
Hope you found it informative, and get to test it out 😀
Now a side note-when speaking of the cracking, it wasn’t when I used the scor-pal it was before I used it, and would fold my paper on my own.
I really hope to try this out soon.
My Etsy

Who I Designed For
Blogroll
- Alicia
- Alli Miles
- Ally Blankenship
- Amber
- Andi @ crafts on a whim
- Angel R
- Angie Z
- Anne Kranitz
- Becky O
- Bee
- Beth Silaka
- Bethany Paull
- Beverly Nash
- Bobbie
- Cambria
- Cammie
- Card of the Week
- Card Positioning System (CPS)
- Cards for Cancer
- Catherine Doucette
- Charmaine
- Cheryl Sims
- Chriss Rollins
- Christina
- Christine Ewing
- Christine Wooden
- Colleen Schaan
- Craft Critique
- Craft Gossip
- Crystal
- Dawn Easton
- Emily Giovanni
- Geny
- Holly
- Igne Groot
- Inspirational Craft Blogs
- Irene
- Jami Sibley
- Jeanne Streiff
- Jen del Muro
- Jeni Bond
- JenMarie
- Jenn Balcer
- Jenn Diercks
- Jenn O
- Jennifer E
- Jennifer Mick
- Jennifer Pereda
- Jennifer-Sweet Treat
- Joanne Basile
- Jodi Collins
- Julia Stainton
- Julie Masse
- Karen
- Kathryn Berthiaume
- Katie Cotton
- Kelley Holland
- Kendra
- Kim Scholfield
- Kris’s Color Stripes! Get inspired here
- Kristen Dubosque
- Kristin Eberline
- Kristine
- Laura @ Sunshine Stamper
- Laura Turnmire
- Laurie Schmidlin
- Lesa Rapp
- Linda Duke
- Linda-LSN
- Lindsey Botkin
- Lisa (lakind scs)
- Lisa Kind
- Lori Craig
- Maggie
- Mara Campbell
- Maria
- Maria Levine
- Mary
- MaryJo
- Melanie M
- Monique Hansen
- Moxie Fab World
- Pam Imholz
- PaperCrafts Connection
- Peppers and Pollywogs Kids party site
- Rebecca Grohall
- Rita
- Robyn
- Rose Ann
- Sarah Vrolyk
- Sharon Harnist
- Sharon Johnson
- Sharon Rivera (a chemisrty with paper)
- Sherrie
- Sophia Landry
- Storage Units, Ink, & More Blog
- Sue Berker
- Susan (Rainy)
- Tangii Crane
- Tracy
- Tricia Traxler
- Trudee
- Velta
- VivLyn
- Zena
MTME Pretty Palette Color Team
MTME Pretty Patterns Sketch Team
My Time Made Easy TM LLC
Shop till you drop!
Lauren Meader
About Me
Copyrighted material
Subscribe To My Blog
Pages
- About me
- Alexa’s Story!
- My Crafty Corner!
- My Time Made Easy™ LLC
- Our Make A Wish Trip to Disney!
- Resume/Publication List
Calendar
| M | T | W | T | F | S | S |
|---|---|---|---|---|---|---|
| 1 | 2 | 3 | 4 | 5 | 6 | 7 |
| 8 | 9 | 10 | 11 | 12 | 13 | 14 |
| 15 | 16 | 17 | 18 | 19 | 20 | 21 |
| 22 | 23 | 24 | 25 | 26 | 27 | 28 |
| 29 | 30 | |||||
Archives
- August 2013
- July 2013
- June 2013
- May 2013
- April 2013
- March 2013
- February 2013
- January 2013
- December 2012
- November 2012
- October 2012
- September 2012
- August 2012
- July 2012
- June 2012
- May 2012
- April 2012
- March 2012
- February 2012
- January 2012
- December 2011
- November 2011
- October 2011
- September 2011
- August 2011
- July 2011
- June 2011
- May 2011
- April 2011
- March 2011
- February 2011
- January 2011
- December 2010
- November 2010
- October 2010
- September 2010
- August 2010
- July 2010
- June 2010
- May 2010
- April 2010
- March 2010
- February 2010
- January 2010
- December 2009
- November 2009
- October 2009
- September 2009
- August 2009
- July 2009
- June 2009
- May 2009
- April 2009
- March 2009
- February 2009
- January 2009
- December 2008
- November 2008
- October 2008
- September 2008
- August 2008
- July 2008
- June 2008
- May 2008
- April 2008
- March 2008
- February 2008
- January 2008
- December 2007
- November 2007
- October 2007
- September 2007
- August 2007
- July 2007
- June 2007
- May 2007
- April 2007
- March 2007
- January 2007
Categories
- About Me
- All That Scraps
- blogger challenge
- camera/photo play
- Cards
- Contests
- family stuff
- FOR SALE
- Home decor/3-D items
- How to FAKE it!
- Introduction
- JUGS Challenge
- JustRite Stampers
- Lizzie Anne Designs
- My family stuff
- My Stamping Space
- My Time Made Easy
- My Time To Color Challenge
- My Time to Create Challenge
- My Timeless Template Challenge
- My Timeless Templates
- Mytime Mail
- MYTIME MOVIE/VIDEOs
- Papertrey Newsletter
- Pink Cat Studio
- Pretty Palette Challenge
- Pretty Patterns Sketch
- Product Opinions and Must haves
- Recipe's
- Saturday Sketch
- Smilebox Creations
- Stampavie
- Tutorials
- Uncategorized
- videos
Most Popular
- Create your own Onesie Card Tutorial-and important NOTE! PLEASE READ (2529)
- Saturday Sketch-Boxed bag holder (2333)
- Going GREEN! Fancy Flower Flourish-Closure Video (1478)
- Fabulous Favorite - Giveaway! (1336)
- a Prayer Request (1231)
- QUICK-Easter Baskets from Nestabilities-PTI style-and blog challenge (1063)
- Teaser Sketch (999)
- February Release Giveway! (and a little peek) (996)
- Group Post and Rambling Rose Video Tutorial (985)
- GIVEAWAY! Who wants it all?! (895)
Recent Comments (RSS)
- 바카라사이트: 비슷한 주제에 대한 흥미로운 정보를
- 바카라사이트: "여기에 제공해 주신 귀중한 정보와
- 온라인홀덤: 유익한 웹 사이트를 게시하는 데
- 홀덤나라: 나는 당신의 블로그를 정말 좋아합니다.
- lisa: Technology, too, has left an
- 주소모음: 흠 !! 이 블로그는 정말
- FutureGen Apps: Thank You For Sharing fantastic
- 웹툰사이트: 터키에서 온라인 스포츠 베팅을 할
- 툰코: It is a really very
- 온라인홀덤: I’ll be sure to come
Copyright © 2007 - My Time, My Creations, My Stampendence - is proudly powered by WordPress
This blog has been Tweaked and Designed by Sara Williams