Archive for the ‘Tutorials’ Category
Video: Saturday Sketch Start to Finish
Mar 2, 2009 Author: mytime | Filed under: Cards, MYTIME MOVIE/VIDEOs, Saturday Sketch, TutorialsWell its Monday!
That means its time for another Monday’s with My Time Video!
If you use a Google reader or other program you will have to watch it here, on my blog. SORRY! Not sure HOW that all works.
All I can say is due the vacation and sickness, then my new video editing (which I was UNABLE to use :C GRR!) I had one heck of a time making this one today! I’ll spare you the details, but I think the end result was worth it, and hope you do too.
My goal for today is to help you learn some photo software so you can create your own sketches and such. That is something I get asked about a lot.
I was leery about continuing videos, but I will move forward since so many asked I don’t quit! I have my disclaimer-that I will include with every post!!
NOTE: If you click ON the thumbnails AFTER the video it takes you to the Veoh site. Some of the content there I am told is “R” rated and you may not want to do that around young children. So if you just watch the video here on my blog, and avoid the thumnails you should be OK. Not sure WHY they don’t have ONLY stamp related videos pop up, but I guess some aren’t.
Bottom line: Click at your own risk!
I am not responsible for content that links to the videos from the Veoh site.
Thank you 😀
[veoh v17882157wGFngpTj]
I hope you enjoy today’s video!
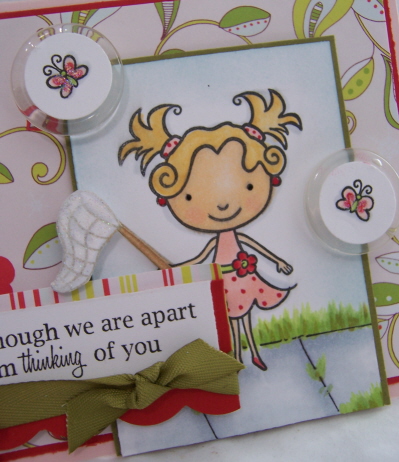
This is the Sketch that I will show you how to make from the beginning drawing (and the inspiration source), to creating it on my computer, to the making of the actual sample, as seen here!

No Lion, you are the best!
This is card I will create on the video, utilizing the sketch above.
This card uses Life’s a Jungle by CTMH.I got mine HERE. I think its SOOOO adorable. I needed MORE boy stuff. I got rid of most of it, then when its time to MAKE a boy card I cringe! LOL! Granted it can be used for ANY theme with the sentiments.
I also do MORE Copic coloring, and use Fun Flock in the video.
I decided to make yet ANOTHER boy card (for my stash!) for all of you out there who beg for more BOY themed ideas 😀 This is an area I promise to work on more!
Genuine Boy
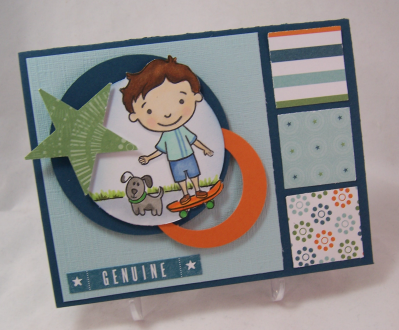
I love Dress Up Billy for Boy stuff! The dog is from the Lily & Billy accessories set (a must have!).
I think he looks so cute, skateboarding off the card!
Used MORE Stampin’ Up! patterned paper. Feels good to actual SUE what I have instead of BUYING more stuff I really DON’T need (right?).
I had fun with the layering of it all.
I hope you get to try the sketch OR if you can make your own!
Should be fun! The entire video is PACKED with info.
Well that’s all fore me now. I talk enough on the video to last a lifetime 😀
I love to hear your feedback.
Thanks for visiting me here.
Till tomorrow.
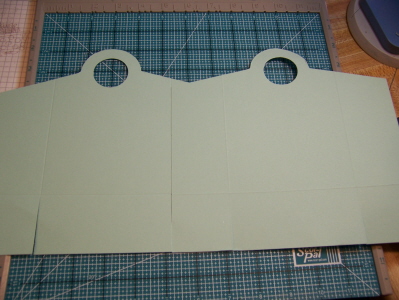
Video-Versatility Box
Feb 16, 2009 Author: mytime | Filed under: Home decor/3-D items, MYTIME MOVIE/VIDEOs, Tutorials, UncategorizedI hope you all enjoy today’s video.
NOTE: If you click ON the thumbnails AFTER the video it takes you to the Veoh site. Some of the content there I am told is “R” rated and you may not want to do that around young children. So if you just watch the video here on my blog, and avoid the thumnails you should be OK. Not sure WHY they don’t have ONLY stamp related videos pop up, but I guess some aren’t.
You won’t want to miss this one, let me tell you 😀
I had SO much fun making this box. I’m definitely getting the hang of this I think 😀 I’m so excited that the editing process is getting so much easier!
You’ll have to let me know what you think. I work really hard to get these done, so I hope they are helpful. All in all they are still time consuming, but I have enjoyed it.
I’m also wide open to things you want to see in the future 😀
NOTE: This is the type of project you need to SEE, so you get HOW it goes together. Too hard to “explain”, so I am not providing instructions here. They are all on the video. Write down the steps/measurements. The hard work has already been done for you-the design part!
I have been REALLY busy with my family, so thank you for understanding, and I hope the video provides you with all you need to make this. It’s nice to be busy for a “good” reason. Not due to illness. My brother and I have grown closer as we grow older and the birth of his daughter has made us closer than ever. I feel so blessed to have him in my life and his little addition. Valerie has been an amazing mom too. She’s a natural. Gabriella is a REALLY good baby so far too. I would love to just take her home with me and keep her for myself 😀 Guess this is the next best thing! LOL!
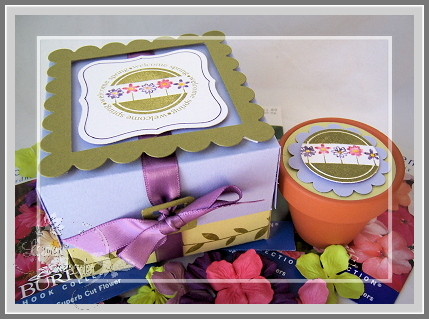
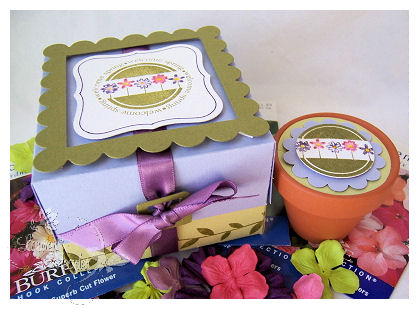
Versatility Box
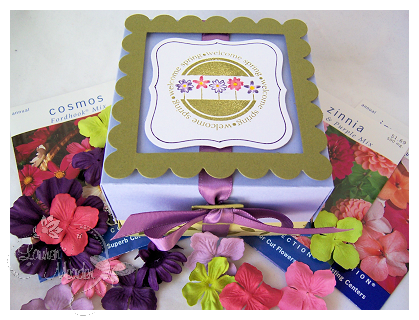
I was very excited by this one 😀 The finished size is 3 1/2 squared by 2 1/2 inches tall.

I call it the versatility box due to the opening you can create to fit a variety if items!
This one will hold a little $1 flower pot!
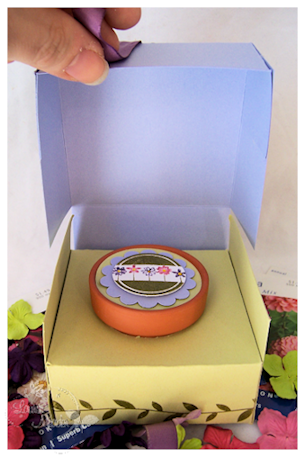
Did you think a little gift could be so cute?
Here is a closer view of the little pot!
Many would like to think of it as a “cupcake” style box. I develop my own idea of this style and shared it via video just for you.
I HOPE you give it try!
SUPPLIES:
Welcome Spring Flower Pot Box-label close up
Supplies:From Papertrey Ink
Stamps : Tags for Spring, Beyond Basic Borders
Cardstock : Almost Amethyst, Ripe avocado, white
Ink- Various markers, Ripe avocado, eggplant marker
Ribbon-Plum pudding satin
Other-nestabilities lable 1, square nestability, buckle punch, coluzzle, 2 inch circle punch, scallop circle punch
INFO!
The following info is being provided for you due to the MANY comments and emails I have received. I am not affiliated with this company AT ALL (in other words I get nothing for promoting them! LOL! Although I wish I did get some adhesive) but I love their prices and SPEEDY service!! Seriously top notch. The shipping is a bit high, but I try to order as much as I can afford up front to make it worth it.
SOOOOOO FYI-the large tape runner you see in my videos is called an ATG Gun. I have the Red 714.
I purchase mine HERE for ONLY $41.69 (Don’t choke! Its SOOOO worth the $ you save on adhesive, and that is the cheapest place ever found.)
I used the GOLD 1/4 inch adhesive with my gun found HERE! Its photo safe. You get 36yds of tape for ONLY $3.49! You can’t beat that.
So that is all for today.
I hope to get back into the swing of things after this release.
Thank you ALL so much for the kind words, comments and support here and for my Timeless Template line. You all make every minute I spend doing ALL of this so worth my while! Just knowing you can inspire ONE person is amazing!
SO SMOOCHES to you all!
My Copic Coloring Tutorial Video’s
Jan 26, 2009 Author: mytime | Filed under: Cards, MYTIME MOVIE/VIDEOs, TutorialsOK! Kurtis is a genius! He fixed me up-so now everyone should be able to see the tutorials from Veoh on my site!
Let me know what you think! Especially those from other countries, unable to view others.
I’m going to embed the other videos, into my older posts.
Part one
[veoh v173265089DCzTwe7 ]
Part two
[veoh v17326532NzewxWm7 ]
Be sure to read the post below for information, and the completed card project!
Thanks again!
VIDEO-Monday’s with Mytime-Copic Coloring Tutorial
Jan 26, 2009 Author: mytime | Filed under: Cards, MYTIME MOVIE/VIDEOs, Product Opinions and Must haves, TutorialsQuite honestly this video has got to be the MOST intimidating thing I have had to do-to date!
That, and the fact I considered (for a very brief moment) sharing a video of me in my “before” jeans and “after” jeans! LOL! To hopefully motivate you all some more. That will not be happening! LOL! Just like a commercial-I could so be on with my clothing-too funny. The good thing is bathing suit shopping won’t be pure torture this year. I just can’t stand spending $40 on a suit. They are insanely pricey.
OK back to the subject.
So for today’s video’s I did the much asked for Copic Coloring Tutorial.
I am not a coloring expert. Nor do I claim to be. I honestly don’t even feel qualified, but you all wanted to see how I color, and some asked about making my scenery-so its my “job” to share it all with you! LOL! So be gentle! I do hope you gain something from it-even if its pure amusement.
This is the finished image I have colored to create my sample here
I used my Saturday Sketch #21-mytimess21
Now for the videos:
EDITING TO ADD! My videos are ON my site in the post above!
Kurtis DID enable them so we are all set, from here on out!
The rest of my babble below was my frustration with the video situation, but now its all smooth sailing!
—————————————————————–
GOOD NEWS!! My plug-ins will be enabled soon. I tried to do it myself, and only got a black box to work. That is huge progress.What that means is in the future you can ALL watch it here, on my blog-without going to Veoh! Just like the YouTube one’s I am able to feature.
Again I did post on Veoh. There are MANY reasons I like Veoh more.
Easy to upload, better video quality. No time restrictions, and the list goes on. I tried to do 2 parts so that I could post to YouTube. Obviously-of course, I went over! After MUCH editing too! So Im no longer breaking it up into segments, after this. Im uploading to ONE place, ONE video. It is too much more of my time to try to keep editing down, and then to split it up, save and load 2 or three segments. Stresses me out just reliving it in blog land! LOL! This is the part of the process that causes me the most duress-TIME! So I’m done with it.
I offer these videos for a fresh approach, and something fun. I won’t want to do them if I have to keep doing so much just to keep everyone happy. (Not that I dont want you to be happy )
I know YouTube is more “popular” but I don’t need to be popular, or use the most popular place. I want to use what site can best accommodate me, and right now that isn’t YouTube. I’m actually in PURE awe at the girls who can whip up an under 10 video. My personality and chatty nature just can’t handle it-sadly. I’m a talker, and a visual person. so I feel its all relevant
We are women-Its impossible for us to ALL be happy ALL the time! LOL!
I apologize if you cannot view it where you are from :C I do not know how you could view it otherwise. Once my plugin gets working everyone should be able to view it right here, no matter what Country you are from-so YEAH! Let’s cross our fingers shall we.
Now onto the details:
What better image to use than my Dress Up Lily Amber set from Pink Cat Studio? (remember you can personalize those! So I got Amber stamps!!) In this video I show you step by step (OK so severely edited steps in some parts) how to get Lily colored, and in this scenery!
She is so cute, I think.
My colors are Sweet Blush, Pure Poppy, Ripe Avocado, white, and some paper I got at Target a year ago! LOL!
The sentiment is from Papertrey Ink- Mailbox Greetings. That set has some rockin sentiments.
OK I hope you enjoy the video’s. You know I love hearing your thoughts on them. I think I improve a little each time.
Please don’t be harsh in judgement on my coloring-since I seriously have no claim to be a “professional”. Just a regular, self taught stamper, trying to show you some of what I do while playing around 😀
Thats the best way to learn-hands on.
OK I do enough blabbering in the video’s, so I’ll hush up now.
OK I need a nap. I have been up all weekend with the kids being sick so I need to take advantage of the quiet. I’m wiped out.
Enjoy!
And as always thanks for stopping by with a hello, the kind words and support 😀
Oh, and thanks for watching.
PS Yes I know I look exhausted in the video too-I was.
Well its the 10th! That means its day 1 of the preview samples for Papertrey Ink!
Tomorrow begins my peeks at my 2 newest templates too!! I have so many amazing things planned for those, so I hope you will check in again ![]()
Today’s post I am sharing a NEW! stamp set by Candice called Forest Friends. It is SOOO cute, and is releasing on the 15th. Let me tell you its really just so ADORABLE! I had a hard time trying to decide just what to share from it for my countdown post with you! I had too much fun with it. I will say it was very hard to make the switch from Christmas to Valentines Day for me this month, as I am working feverishly to complete gift sets for everyone. Crazy times.
OK enough blabbering.
I figured I would share yet ANOTHER treat holder made using the Nestabilities and this fun set.
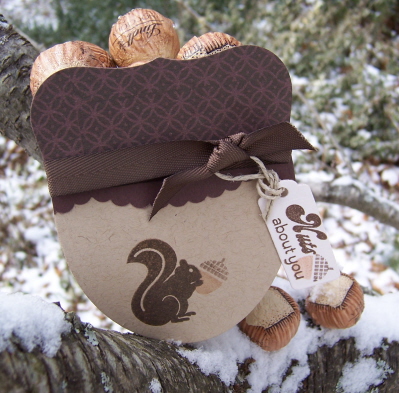
Nuts for you Acorn Holder
Is this not the CUTEST thing ever?!
I was inspired by these little “nut” wrapped Lindt chocolates that Noah got with his birthday gifts (I quickly claimed them as my own! LOL! But promised to give them back after my creative venture was over. Thankfully Noah gets it, and didn’t mind letting me borrow some). They are just so cute and perfect to present to anyone.
So seeing these, and this little squirrel I had to try a way to make my own acorn holder. Then this idea was born. I love it. Its great for the guy’s too.
This project took like 20 minutes to make. It could go faster, but I had no idea WHAT or HOW I was going to do what was in my head.
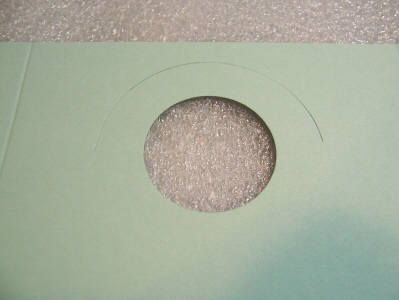
Now when you begin just align the Labels die with the oval die to ensure a compatible topper. You don’t one one that is too big or small. I believe I used the 2nd from the largest of the large set for both die sets on this project.
We are decorating BOTH sides of this box. A completed look on both sides makes it not only more professional looking, but appealing as well.
Lets begin.
Using Kraft cardstock die cut 2 large ovals.
These become the acorn bottom. You will cut down the top, so that your oval measures 3 inches. See photo below.
Now for our acorn toppers!
I stamped my circular pattern from Limitless Labels in dark chocolate ink, on dark chocolate cardstock to mimic the texture of an acorn top. I then used the labels one nestability to cut 2 acorn toppers.
This is what you are going to have for pieces.
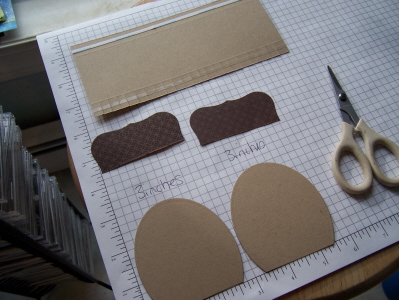
See acorn toppers cut down.
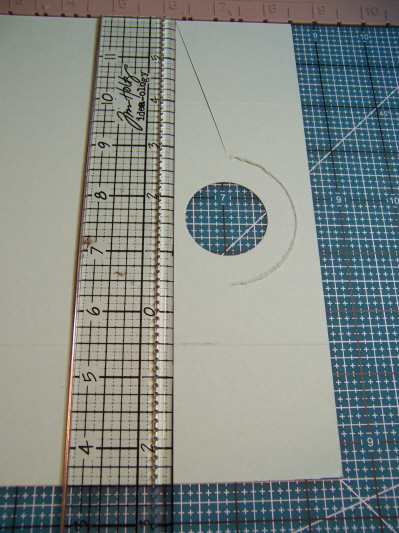
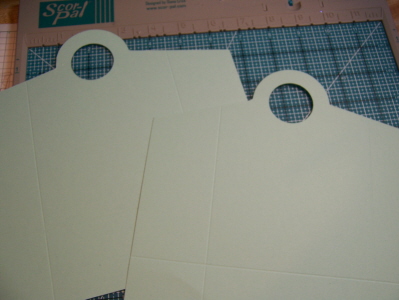
Then you want to cut a box bottom/connector piece size 3 X 7.
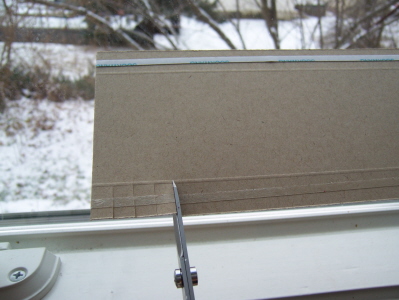
Score that piece at 1/2, then 2 1/2.
Apply score tape and remove backing, before you cut! Otherwise you are removing tiny snippets of paper backing from the project, wasting precious time. Can you tell I HAVE done that before?
Snip edges to score line all the way across on both sides.
This will allow you to easily bend, and apply the box piece to the curved oval acorn.

You slowly adhere it, and curve it as you go, to your acorn back. The box edge go to edge of front and back panel.
Soon it will be adhered all the way around.
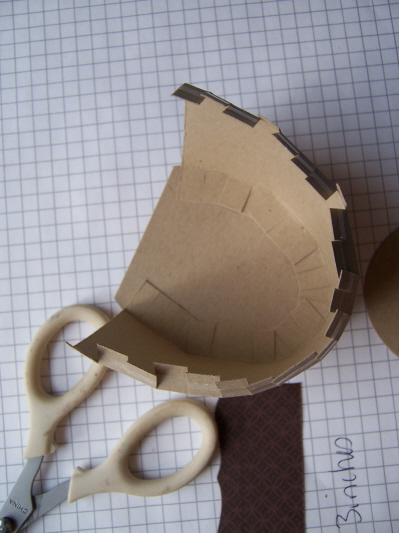
Now before you put your front panel on you need to stamp it!!
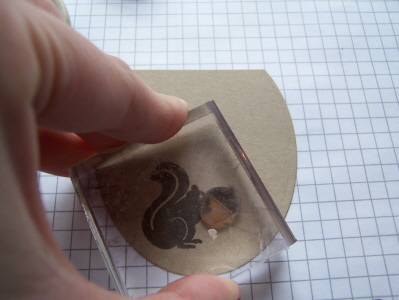
I LOVE acrylic stamps for this purpose alone! Easy peasy.
I stamped my squirrel image with dark chocolate ink. I then colored my acorn image (also from limitless labels) with markers, and stamped it into the squirrels hands.
Now adhere the front panel.
This is the box with the front panel on.
Last but not least we add the topper!

I just used a scalloped border punch from Martha Stewart, to first to make a nice finished edge. Layered it on, then trimmed the excess. You can omit the scallop border portion and its still super cute. This was a last minute detail I wanted.
For my final acorn topper, I tied on some dark chocolate twill, with my tag ready to go!
(You would adhere this as is if omitting the scallop layer)
I just die cut my tag, and added the same acorn as in the squirrels hands. Then attached it through my ribbon.

Put it on the acorn box, and VOILA!!
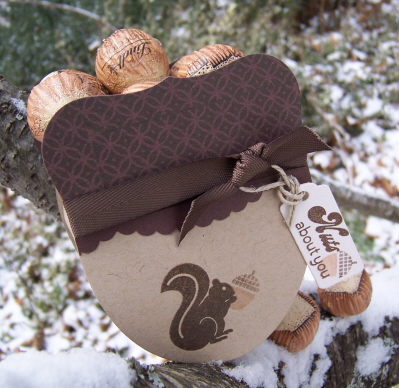
DONE!
Thats all there is to it 😀 And yes I did crawl out my window again!
There was an actual squirrel by this tree collecting the nuts the kids piled up for him at the bottom. I spent an HOUR trying to get him in my photo!! Wouldn’t that have totally rocked!! It was a no go though :C Apparently Im not furry and friendly enough to be trusted my a squirrel, as I invade his personal space to get get my photo op. I did have some crazy stray orange cat though, that would NOT go away! He kept climbing up the tree next to my box, and making it fall over. How annoying that was. The stories I could tell from my stamp room, I swear. I think my neighbors in the back must think I’m totally mad!
Well thats it, for here anyway.
Be sure you check out Nichole and Lisa’s blog as well for more peeks!
I can’t even wait for tomorrow 😀 Lots of eye candy to come. You are going to love this months templates ( I HOPE!)
Today Alexa has a post chemo check up, so wish us well! AND Amber has a Christmas recital at the nursing home this afternoon. Busy day.
Thanks for checking in and reading 😀
Till tomorrow
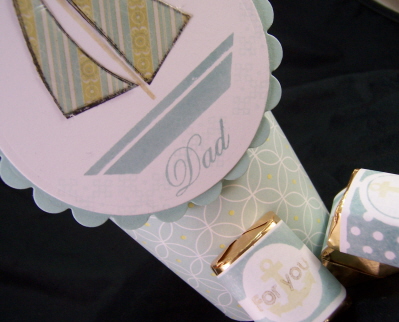
#1 Men of Life-Stained Glass Dixie Cup Cover
Nov 9, 2008 Author: mytime | Filed under: Papertrey Newsletter, TutorialsToday is the 10th. That means its my mother-in-law’s birthday (Happy Birthday Mom!) and its Day #1 of thePapertrey Ink peeks!
(Tomorrow we will start peeks for My Timeless Templates© too-so check back in OK!)
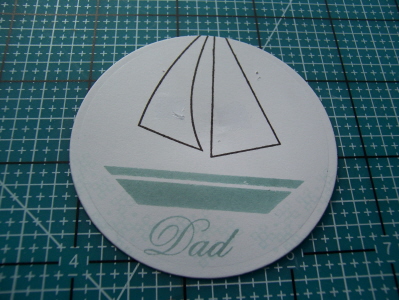
My peek today uses Men of Life, designed by Melissa Bickford. It will be released on the 15th.
I love this set, and all the different images for the sails of the boat. When coming up with what I should share with you, I figured a technique would be fun. Its one of my favorites for open line images and it is called Stained Glass. I hope something I share today is new to you.
I wanted to use the sailboat image, and wrap up some Toffee Hershey nuggets for my dad. Having no more nugget tins (which I neer use for nuggets! LOL!) I figured a little altered Dixie Cup favor would be a cute variation to share too.
So here we go!
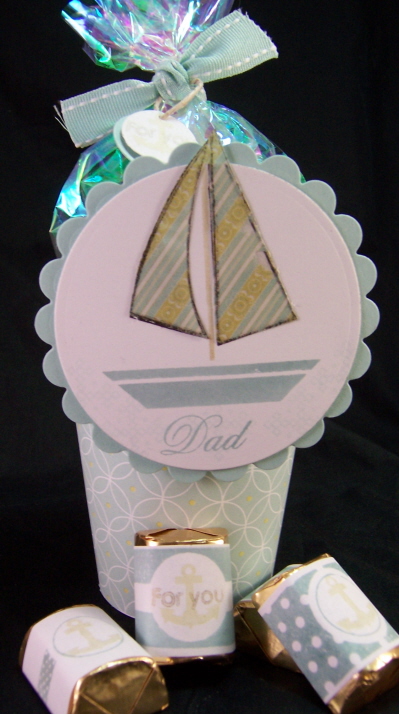
With the holidays approaching and 3 kids, I strive for crafts that they can do themselves, and are fast, fun & easy 😀 I remember making these in 5th grade, so I thought it would be fun to revisit in my adult years. Its not only a kid friendly activity, but its pretty cheap too 😀
I hope you like it.
HONESTLY think how cute these would be for a BABY SHOWER ! Add a little ribbon handle! Oh so cute. LOL! Make it baby colors…………oh boy!
Dixie Cup Cover
Make a template for your dixie cup cover. To do this just cut apart one cup as a sample.
Then trace, leaving a little extra for a seam allowance
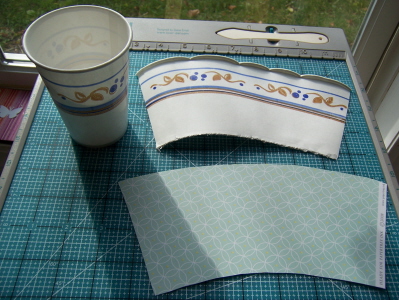
Cut out from patterned paper. I used Everyday Blessing for my creation here.
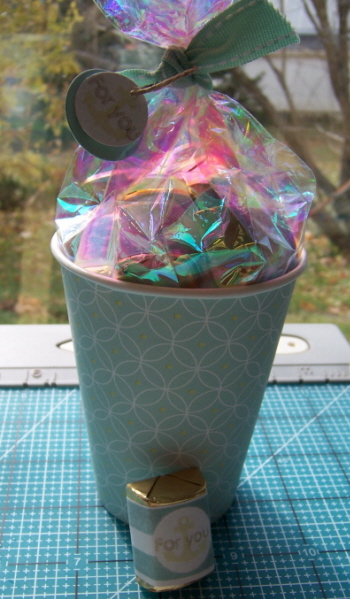
Then wrap the cup!
I decided to line to top portion with some pretty cellophane, that I attached at the inner top of my cup using redline tape.
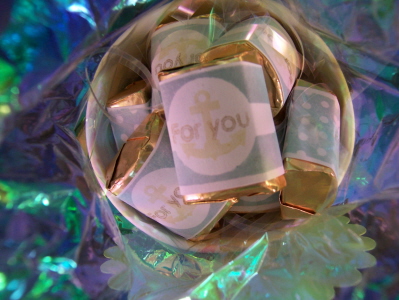
I then put in some pretty filler, and added my stamped nuggets, to match!
(I used the anchor image and sentiment from the Men of Life set, and Limitless Labels and Holiday Treats, for my candy labels) I also used Spring Moss, Aqua Mist & Ocean Breeze and Encore gold ink.
View of inside, from top of Dixie Cup.
I then tied it closed, with a little tag.
Now all I need to do is make my sailboat designer label.
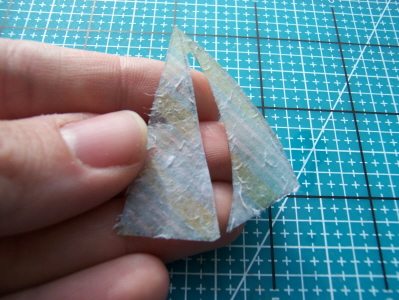
Stained Glass Technique-
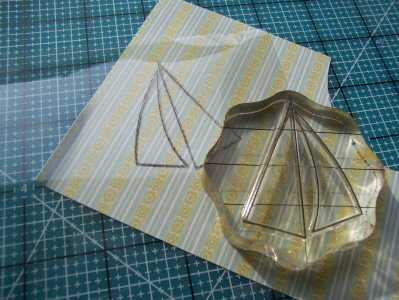
Stamp open line sail image onto acetate, using Pallette black ink. Heat set carefully.
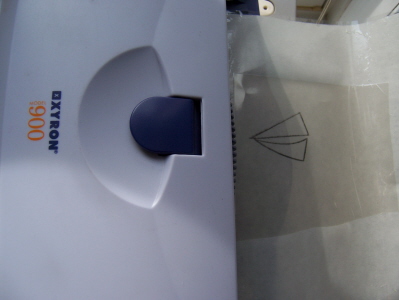
Run acetate sheet through Xyron sticker machine.
Peel off paper backing
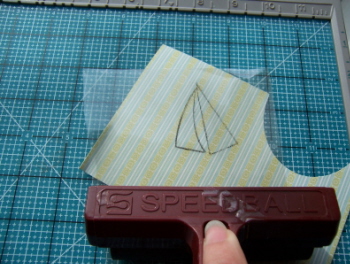
Place where desired on patterned paper. Use a rubber brayer to ensure a good stick.
Trim out sails
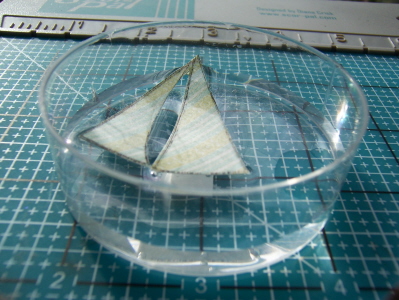
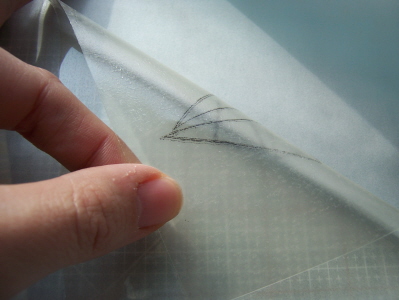
Soak image in water for several minutes.

Remove from water, then GENTLY rub off the paper backing. Don’t rub off too much!
Be sure you still have a light paper coating on the acetate when done. This layer will get re-sticky! Now you have a SHEER pattern that appears on the front of your acetate sails!
Let dry.
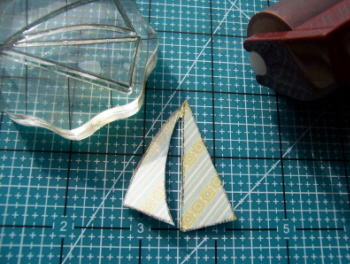
Now layer onto stamped main layer image-apply a little bit of adhesive for extra stick.
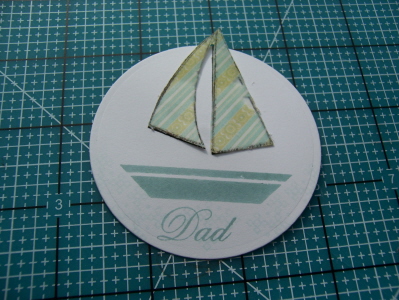
I wanted my sails to pop out over the circle, so I die cut mine to be a bit smaller. I then layered onto a scallop circle.
DONE!
This will then get adhered to my Dixie Cup front!
Can you see the lightly stamped “water” on my label? A subtle touch.
There you have it! A super cute and easy favor or little treatlet idea for any occasion!
Be sure to check Nichole’s blog for more peeks, and stop in tomorrow for the start of My Timeless Template© peeks!! It’s going to be a BUSY, and AMAZING next couple of days here! Each post will be jam packed with creative ideas, just in time for the holidays, using my newest release of templates!!
Let me know what you think 😀 and ALWAYS thanks for checking in with me 😀 You all make my day.
Till tomorrow.
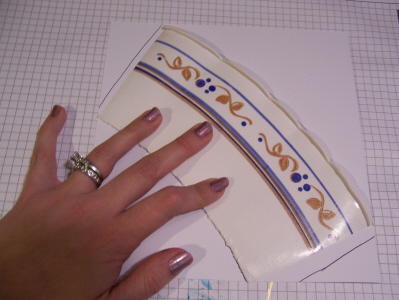
Papertrey: Etched Glass Canister
Sep 11, 2008 Author: mytime | Filed under: Home decor/3-D items, Papertrey Newsletter, Tutorials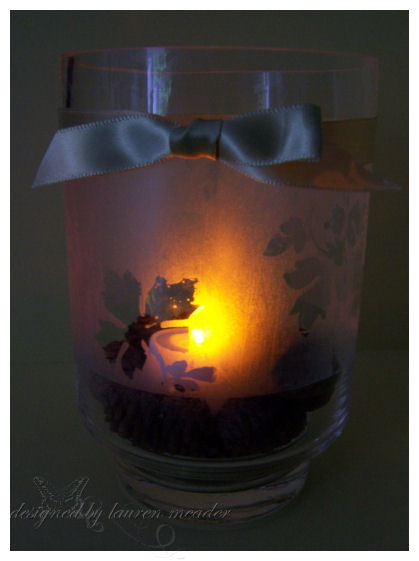
This is a gorgeous technique, that is SUPER easy to do : Etched Glass -using stamps!
Over the months I have received many emails asking for a how to, on this technique. Today I will show you just how simple it really is, with step by step instruction/ photos.
To start, this was a simple, round candle canister. I bought this for $4.99, and turned it into a pretty candle holder that would look fabulous anywhere in the house! If you purchased an etched glass canister it would cost triple that! Now you can make your own. With the holidays coming up, these would make fabulous inexpensive gifts for family, friends and teachers.
The possibilities for the items you can alter with this technique is limitless. So I hope you enjoy learning.
Supplies:
Stamp of choice-First Fruits, Glass container of choice (or mirror!), versmark ink, clear embossing powder, embossing buddy, heat tool, Armour Etch cream, sponge brush, Eclipse Tape (optional)
EDITED TO ADD: Etching cream can be found at Michaels in the section near the soap/candle isle. It took me an hour to find it because I did not think it was in that isle 😀

Before we get started there some things you should consider:
If you are heating glass, make sure is it a heat safe glass. Many times glass will crack or even explode when exposed to extreme heat!
Do not hold glass while heating. It gets very hot, and you could burn yourself.
Use a heat safe surface when heating your item. You don’t want to burn your work area.
IMAGES:
Carefully examine the images you want to use. You don’t want to choose too finely detailed of an image because it can be hard to define what the image was. You need a nice balance of bold, and detailed. Consider the overall look of the completed project.
Step 1)
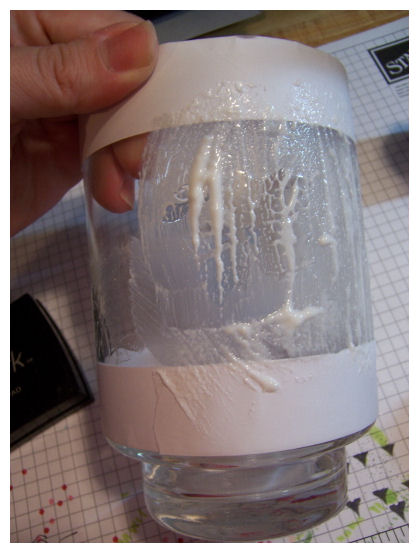
Clean glass with windex, and dry well! You don’t want ANY finger prints anywhere. They will show up!
Step 2) OPTIONAL
If necessary you may want to mask the glass. I use Eclipse Tape. It is sticky enough, and leaves no residue when removed.

Step 3)
Rub embossing buddy all over glass. This prevents embossing powder from sticking to unwanted areas, and ruining your etching. It will also show you if you do have finger prints on your glass, and need to re-clean it.

Step 4)
Carefully stamp the image in versamark ink. Because Papertrey Ink uses clear acrylic images you can see the image pressing into the glass! Since they are acrylic, they are also easier to stamp onto round surfaces.
Sometimes this take PRACTICE! Glass is slippery. So take your TIME stamping the image.
(NO photo for this step since it is hard enough stamping, let along photographing too! LOL!)
Step 5)
Apply a generous amount of embossing powder.
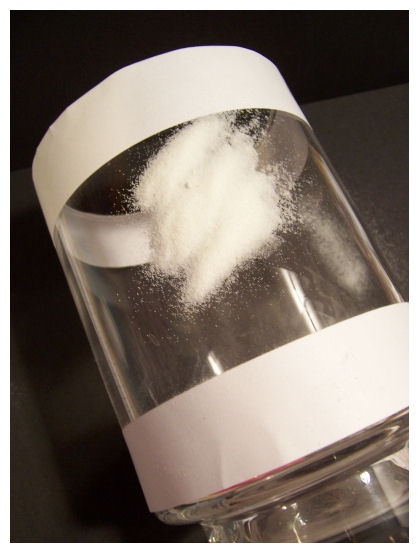
Tap of excess.
Step 6)
Heat set the image.

You will need to heat it until the powder turns SMOOTH-just like the glass.

CAUTION: Glass will get very hot! Don’t handle while heat setting, it is best to heat it on a heat safe surface.
NOTE: Also when doing more than one image on a surface, it is easier to heat set each one as you go. Keep in mind that the glass stays hot, and the melted powder remains warm, so you want to avoid smudging it, and avoid squishing it onto the table or getting more embossing powder on it, until the glass is cooled. Just be careful.
Step 7)
Once glass is COOLED-then apply a nice thick layer of etching cream.

Make sure you coat it thick and evenly!
The directions say leave on for 5 minutes. DON’T LISTEN TO THAT! LOL!
It really takes at LEAST 20 minutes to get a nice etched coating. If you don’t let it sit long enough it will hardly looked etched.
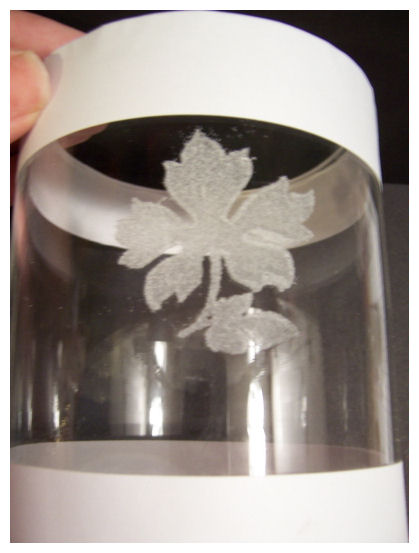
Step 8)
After you let it sit, go rinse the cream off under cold water. Take your fingernail, and scrap off the clear embossing powder. It will peel off.
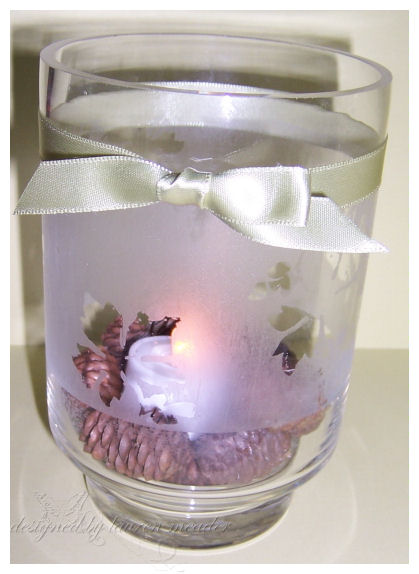 Here is the finished glass.
Sorry for the photo. I wanted you to see the detail, and it is very difficult to get a nice picture of something like this so you see the detail.
I tied a Spring Moss satin ribbon around the top, then filled the bottom with pine cones and bought a battery tea light to put inside. No flame to worry about.
Now here it is lit up from the top view
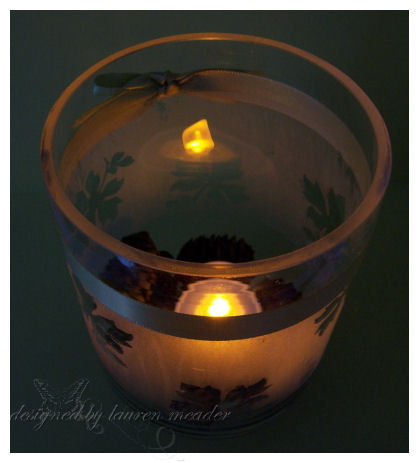
Isn’t that so pretty?
Now it is your turn! Send me a link here if you decide to try it.
I hope you enjoyed learning all about etching cream here. I’d love to hear your thoughts.
As always, thank you for reading, and I hope you are inspired in some way to get an early start on those holiday gifts.
You know SOMEBODY had to do it! Why not me?
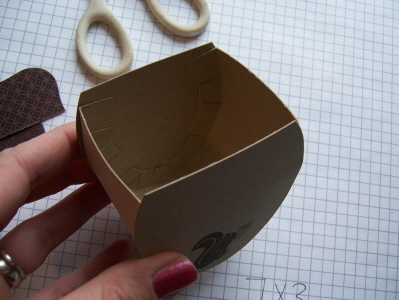
Aug 31, 2008 Author: mytime | Filed under: Home decor/3-D items, Tutorials, UncategorizedTHANK YOU for your patience as I got this together today. I actually created it the other day, but had family things to do, and camera batteries to charge.
I am excited to share another template with you all today.
Here it is!
Diamonds are a girls best friend- Bloomin Basket Tutorial 😀 This was totally Tiffany & Co. inspired.
OK I have to say that Stampin Up! has released some MUST have items for me. One being their new Big Shot Baskets & Blooms Bigz XL die that retails for $39.95 US. You can find it on page 29 of the SU! Holiday mini catalog. REALLY CUTE!
“My” problem was, I really didn’t want to buy the die because I am not a huge fan of the round design. I also wanted to be able to make it BIGGER, or smaller. I love versatility and things that actually hold a descent amount of “something”. I am a very visual person, so by just looking at this the light-bulb went off.
I took a look at it and thought “That would be SO EASY to do.” So I did 😀 My design is obviously NOT round, but was definitely inspired by that uber cute die cut.
I hope you all enjoy my little tutorial I have here to share 😀 AND maybe it may save you some $$!! I know I have a good wishlist of items, and limited amount of money. I would like to spend it on consumables 😀
You can make this larger or smaller by changing your starting size and how much you score it! Just remember the sides, and bottom should be the same 😀
Here we go!
My finished Bloomin Basket is about 5 inches tall, 3 inches across, and 2 inches wide.
Supplies I chose
I used Women of Life, Its a Celebration Aqua Mist cardstock, Dark Chocolate ink, Dark Chocolate Satin ribbon, spellbinders tags, coluzzle,scor-pal, score mat,Tim Holtz ruler, Hobby blade, Doodlebug factory Bling (thanks Tracey!), 1 1/4 circle punch, redline tape.
You will need:
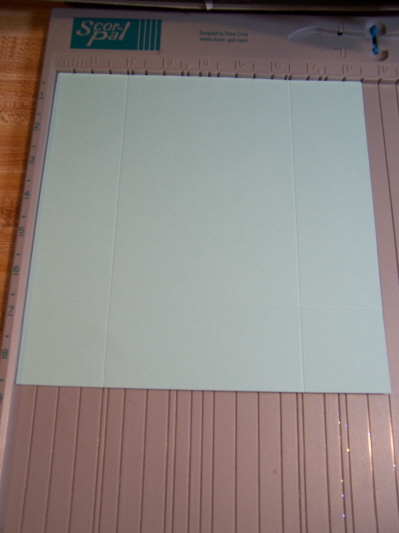
2 pieces of cardstock cut to a square. I chose 8 1/2 X 8 1/2 (if using 12 X 12 you can get a much larger version :D)
A scoring tool, ruler, hobby blade, redline tape, circle tool, circle punch.
Directions
On both squares (8 1/2 shown here)- Score at 2 inches, then again at 6 1/2 inches
Turn cardstock, and score at 2 inches (to create the bottom)
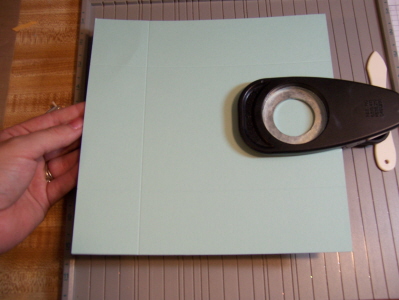
Layer the 2 pieces together, making sure they are the same, and the bottom is to the left, then punch your 1 1/4 circle.
Now you have to pieces that match exactly
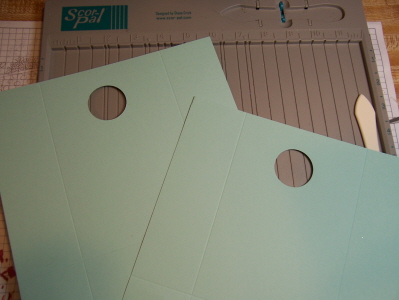
Take your coluzzle (or other circle template) and cut a 1/2 circle.
For this I aligned the hole with one of the cirles, and cut 2 up, on both pieces.
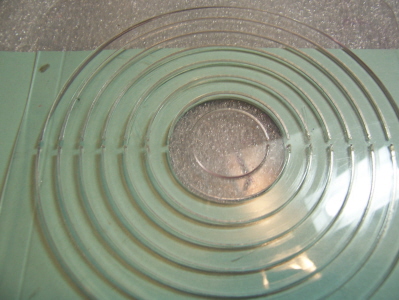
Here is the cut 1/2 circle, when finished
Now comes the cutting angles! I put my cut piece into my scor-pal. Then I just took my ruler to the edge of the 1/2 circle handle, and angled it. I aligned it on my Scor-Pal, with my mat, at about 3 inches, then used a hobby blade to cut.
Now this next step is to make sure your angels are EVEN!!
I put my ruler with the edge where my angle ended. I then used my hobby blade to make a tiny mark, to ensure I would be cutting at that same angle. This is just quicker and easy!
Repeated the step above.
This is the finished cut

Now when doing your 2nd piece, if you remember that angled measurement you should be golden. BUT to make it SUPER easy, take the scrap from the first piece, and lay it over the 2nd one! This will ensure PERFECTION on both sides of your box!
Those are my 2 finished pieces.
Now we put it together!
If you WANT to stamp it. NOW is the best time :D, then continue on to assembling.
Just line up the scored edges, and the bottom score marks.
Make sure you cut the bottom panels (as seen in photo)
It then just folds together!
Simple as that! This box takes seriously a whopping 5 minutes to make after your first time. That excludes stamping.
AND the best part is that now you can make it larger or smaller!!
Thanks for reading. I hope you have time to give it a try 😀
Come back tomorrow for our Papertrey Ink Design Team Challenge!!
1-Papertrey Ink Countdown : First Fruits Custom Candle
Aug 9, 2008 Author: mytime | Filed under: Home decor/3-D items, Papertrey Newsletter, TutorialsI am excited to share this peek with you using First Fruits from Papertrey Ink.
It will be released on the 15th.
Nichole & Becky really put their brilliant minds together to come up with a fabulous set.
I have absolutely fallen in love with it while creating for this release. It is such a classy and elegant set, with that perfect Papertrey Ink flair that we all love, because making a gorgeous card or gift is SIMPLE and EASY!
Now keeping with that Papertrey Ink style of simple elegance, I will take you back to the basics! We are going to creating a simple gift, in just minutes, that will make the receiver say WOW!
This is one of the very first non-card items I ever learned to create! From then on, I was hooked. I hope you have time to give it a try as we visit the “How To” of customizing a candle! We will add a twist, with a tag topper!
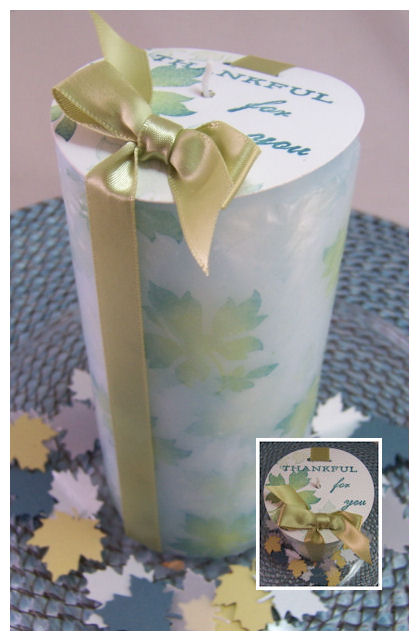
If you have never done this before it really is a WOW creation. You can take your stamps and turn a simple $1 candle, into one that you would spend several dollars for in the store. Best part is, it is done in minutes.
I save all my tissue paper from my Papertrey Ink orders! They are perfect for this project.
All you need is:
Stamp set of choice (First Fruits)* ink of choice * any size candle * tissue paper (even colored paper if you like) * a heat gun * Safe surface to work on ( I love my Tim Holtz non stick craft mat)
OPTIONAL
Cardstock cut in the size/shape of your candle top. Hole punch, slit punch, and ribbon.
Now for my project!
I decided to go with non-traditional colors, despite my maple leaf design. I wanted it to be different. I chose green, and shades of blue for my color scheme. My candle is also a pale blue with a fresh linen scent.
1) Choose candle. Measure how tall the candle is, and how wide around. Cut your tissue paper, leaving a little extra to ensure full coverage.
2) Ink your stamp.
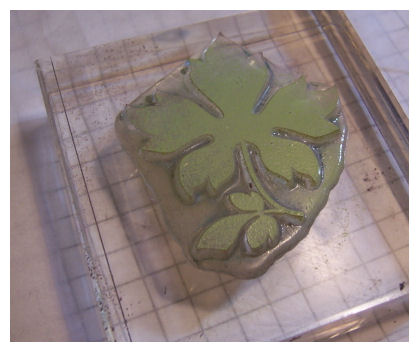
Now when using multiple colors of ink on one image, start with the lighter color first, then add your darker colors. This prevents your light colors of ink from getting “muddy”.
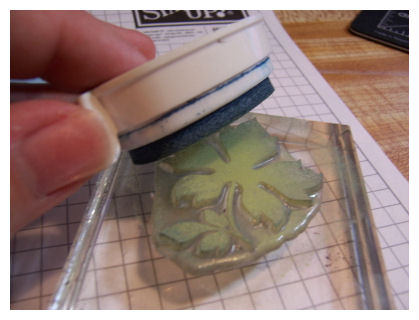
I stamped green in my leaf center, then dabbed the edges in a light blue, then again in a darker blue.
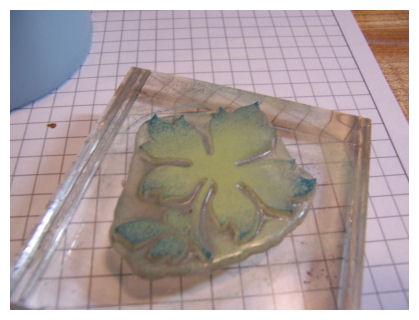 Isn’t it pretty?!
3) Stamp your image on your tissue paper
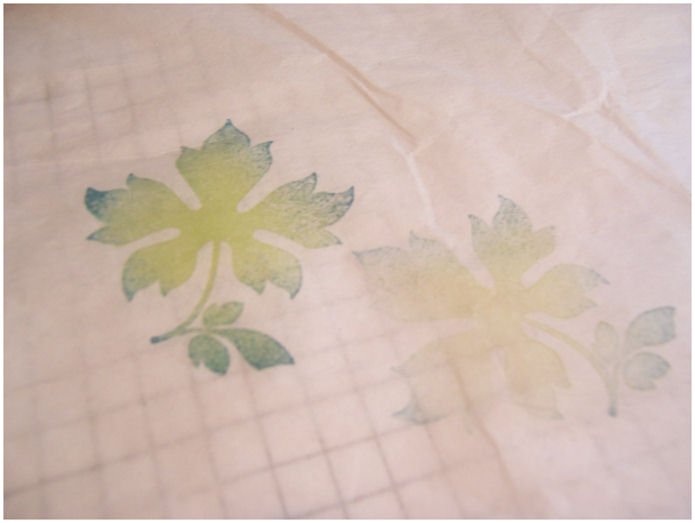 click to enlarge. Then without re-inking, stamp again. This will give the effect of layers of leaves within the candle when you are done, and adds a nice sense of dimension.
 Finished paper
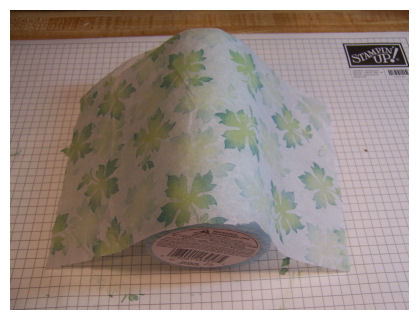
4) Now wrap your tissue paper around your candle. Put it on a safe, heat resistant work surface. Oh and one that you don’t care about getting melted wax on, as it can be messy!
6) Use heat tool to heat set. You will see the wax underneath come through and coat the tissue paper.
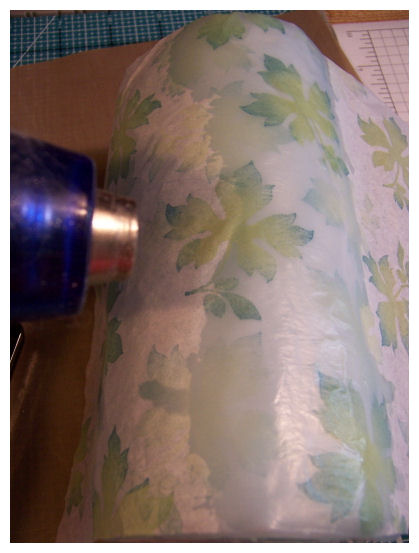
DO NOT over heat. You will get uneven melted portions of the candle, and lots of dripping. Just heat in smooth even strokes, back & forth. Do this until entire candle is done.
7) OPTIONAL : I like to wrap my candle in my craft mat, and roll it out (like dough) so that the light texture of my mat transfers into my warm wax candle!! It also helps hide any un-even areas 😀
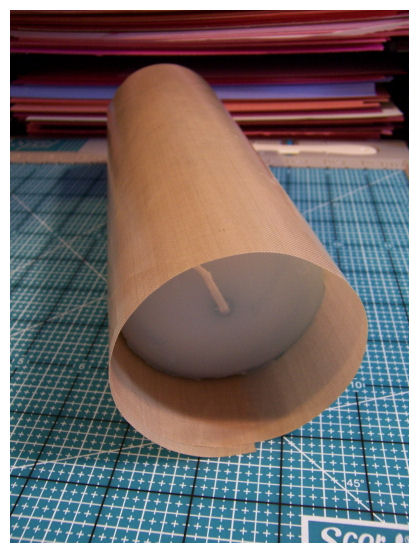 NOW ROLL! Back and forth.
Now it is done!
 Can’t see the texutre in the photo but it IS there, I promise.
OK not totally done!! You can’t leave it like that!
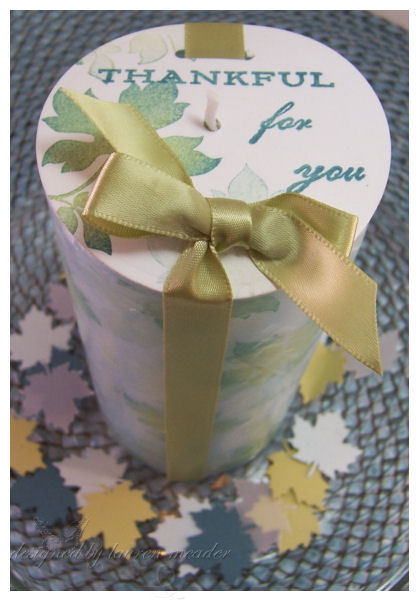
I decided a topper for the top of my candle would really complete this gift! So lets make a topper shall we?
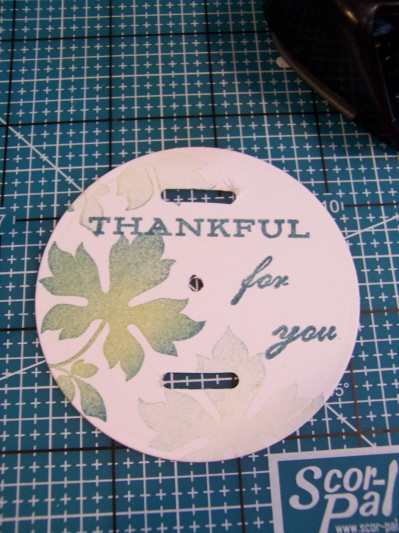
This is a quick and simple touch that really completes your candle.
1) I measured my candle top, and found a circle nestabilty that was the perfect fit!
2) Stamped the top with the same design as on my candle, and added a sentiment.
3) Punched a hole in the center of the circle topper for my wick to go through.
4) Added 2 slots for my ribbon to tie on the tag topper.
5) Measured my ribbon, and cut. I then punched a hole in the ribbon, so the wick can go through the ribbon and tag topper.
6) Wrapped my ribbon around the tag topper, and tied on.
DONE!
Thank you for stopping by! I hope you enjoyed the “oldie but goodie” reminder of this fun and easy gift.
If you get the time to try it out I’d love to see your creation! Send us a link here!
Don’t forget to check Nichole’s blog daily for the peek’s and the list of who is also counting down the release with samples! Oh and today Becky had a special post too!!! Don’t miss it.
Also Lisa AND Heather (aka Pine) have set coming out this month so check out their peeks each day till the countdown too!
Later!
Halloween Treats!
Jul 31, 2008 Author: mytime | Filed under: Cards, Papertrey Newsletter, Recipe's, TutorialsThis is post 1 of 3 for today! Please SCROLL down so you see all three!!! PLEASE READ THEM! LOL! I think I developed carpal tunnel typing them all up 😀
It’s the first of August! Can you believe that? WOW! Time is flying by. Before you know it, it WILL be Halloween. I am always looking for cool and fun things to do with my kids and/or for their classmates. Maybe this time I will be ahead of the dash (yeah right! LOL!)
Nichole has challenged the team to come up with some fun Halloween treats.
You can see what everyone else has done here:
I decided to share a cool recipe that is fun, and you can let this kids help with. Hope you like it, and give it a try!
Here goes…………….I would like to share with you my Little Pumpkin Pop-In ©
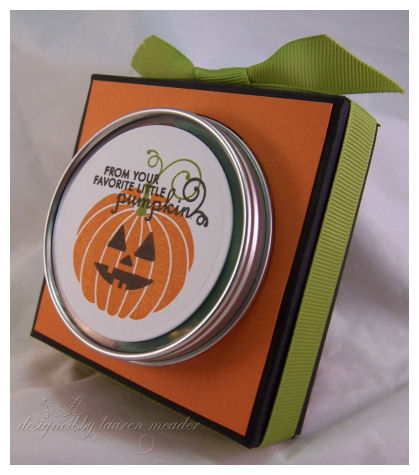
This is a little container cover I made to “pop-in” the super cute 2.5 oz. clear top round tins. Buy them now people! LOL!
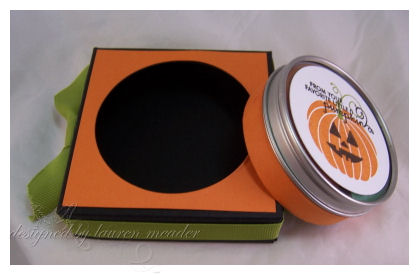 Tin out of the Pop-In ©
I love how it dresses this little tin up. Rather than just having a wrap around the bottom, it really gives you an entirely new gift option.
Please don’t ask me for directions. This is a teaser of more to come!! I am so excited, I can hardly stand it, but that is all I’m saying for now (BHWAHAHAHAHAHA insert my evil little happy laugh). Let’s just say I have been busy, busy, busy.
OK moving on.
I used the Spooky Sweets set for my lid.
I wanted my lids to be super quick and easy to mass produce-think 3 kids……. X’s however many students they have in their classes……………so about 40 kids minimum. SIMPLE.
By now you are saying OK so how is this sharing a fun & cute Halloween treat?
Well its what’s inside that is the FUN part!
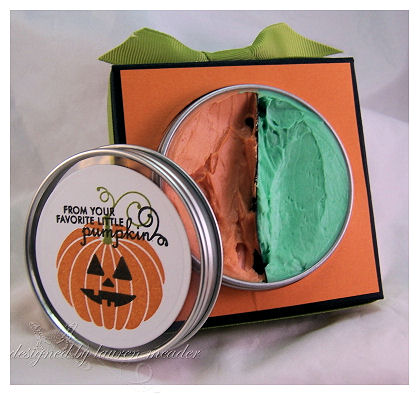
Monster Mash Make-up!
2 TBS solid shortening (AKA Crisco)
1 TBS cornstarch
4-5 drops of food coloring
Make-Up sponges
1) Mix shortening and cornstarch together in a small bowl, until smooth.
2) Add in food coloring. Mix till well blended.
READY TO GO!!
When you are done just rinse off with warm soap & water.
You can whip this up at home in minutes! The kids will love it.
OK I know you are saying EW! But the kids are saying YEAH!!!
Trust me me-Kid tested!! MOM Approved 😀
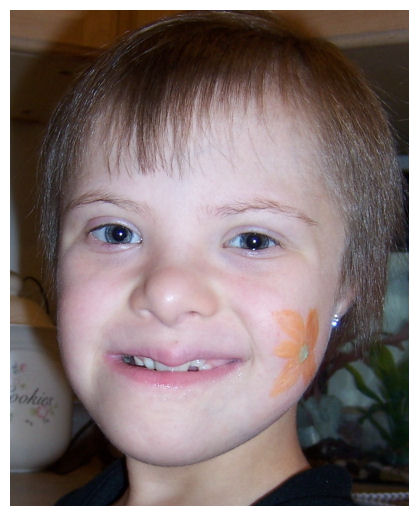
My Little Pumpkin Amber

OK I never claimed to be an artist! This is as good as it gets. Amber saw the tin and wanted her face to be painted like the pumpkin stamp. I have to admit I was nervous that her face would be stained orange by the food coloring, but it came right off and NO perma-pumpkin face! LOL!
Next up is Alexa-my flower child. She was not wanting her face painted! She said she just want a little flower on her cheek. UGH! That meant I had to “draw/paint”. YIKES!
Now we have Noah-who wanted to be half “The Hulk”, and half boy.
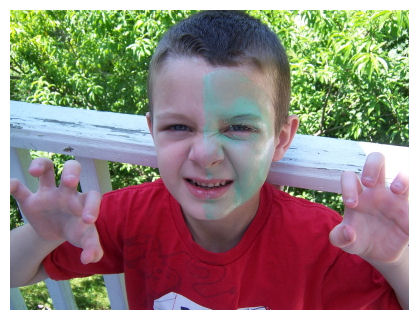
Unfortunately he was “itchy” and scratched it off while I got the camera. It’s one of those things-when you know you can’t touch something you have too! That is his mean face. Still looks cute to me!
All in all it was a super fun & easy afternoon craft and would make great “make-up” for girls or obviously face painting. No expensive paint kits to buy.
I love the idea of making several colors and giving these to the kids classmates. It really whips up quick, just add to the recipe to suit the number of people. The batch above fits perfectly into the tins, if that is any indication. SO each color batch makes a 1/2 of the tin.
So that’s it for me. I hope you like my idea of a fun Halloween treat! Afterall they get PLENTY of candy right?
Thank you again for checking in with me.
My Etsy

Who I Designed For
Blogroll
- Alicia
- Alli Miles
- Ally Blankenship
- Amber
- Andi @ crafts on a whim
- Angel R
- Angie Z
- Anne Kranitz
- Becky O
- Bee
- Beth Silaka
- Bethany Paull
- Beverly Nash
- Bobbie
- Cambria
- Cammie
- Card of the Week
- Card Positioning System (CPS)
- Cards for Cancer
- Catherine Doucette
- Charmaine
- Cheryl Sims
- Chriss Rollins
- Christina
- Christine Ewing
- Christine Wooden
- Colleen Schaan
- Craft Critique
- Craft Gossip
- Crystal
- Dawn Easton
- Emily Giovanni
- Geny
- Holly
- Igne Groot
- Inspirational Craft Blogs
- Irene
- Jami Sibley
- Jeanne Streiff
- Jen del Muro
- Jeni Bond
- JenMarie
- Jenn Balcer
- Jenn Diercks
- Jenn O
- Jennifer E
- Jennifer Mick
- Jennifer Pereda
- Jennifer-Sweet Treat
- Joanne Basile
- Jodi Collins
- Julia Stainton
- Julie Masse
- Karen
- Kathryn Berthiaume
- Katie Cotton
- Kelley Holland
- Kendra
- Kim Scholfield
- Kris’s Color Stripes! Get inspired here
- Kristen Dubosque
- Kristin Eberline
- Kristine
- Laura @ Sunshine Stamper
- Laura Turnmire
- Laurie Schmidlin
- Lesa Rapp
- Linda Duke
- Linda-LSN
- Lindsey Botkin
- Lisa (lakind scs)
- Lisa Kind
- Lori Craig
- Maggie
- Mara Campbell
- Maria
- Maria Levine
- Mary
- MaryJo
- Melanie M
- Monique Hansen
- Moxie Fab World
- Pam Imholz
- PaperCrafts Connection
- Peppers and Pollywogs Kids party site
- Rebecca Grohall
- Rita
- Robyn
- Rose Ann
- Sarah Vrolyk
- Sharon Harnist
- Sharon Johnson
- Sharon Rivera (a chemisrty with paper)
- Sherrie
- Sophia Landry
- Storage Units, Ink, & More Blog
- Sue Berker
- Susan (Rainy)
- Tangii Crane
- Tracy
- Tricia Traxler
- Trudee
- Velta
- VivLyn
- Zena
MTME Pretty Palette Color Team
MTME Pretty Patterns Sketch Team
My Time Made Easy TM LLC
Shop till you drop!
Lauren Meader
About Me
Copyrighted material
Subscribe To My Blog
Pages
- About me
- Alexa’s Story!
- My Crafty Corner!
- My Time Made Easy™ LLC
- Our Make A Wish Trip to Disney!
- Resume/Publication List
Calendar
| M | T | W | T | F | S | S |
|---|---|---|---|---|---|---|
| 1 | 2 | 3 | 4 | 5 | 6 | 7 |
| 8 | 9 | 10 | 11 | 12 | 13 | 14 |
| 15 | 16 | 17 | 18 | 19 | 20 | 21 |
| 22 | 23 | 24 | 25 | 26 | 27 | 28 |
| 29 | 30 | |||||
Archives
- August 2013
- July 2013
- June 2013
- May 2013
- April 2013
- March 2013
- February 2013
- January 2013
- December 2012
- November 2012
- October 2012
- September 2012
- August 2012
- July 2012
- June 2012
- May 2012
- April 2012
- March 2012
- February 2012
- January 2012
- December 2011
- November 2011
- October 2011
- September 2011
- August 2011
- July 2011
- June 2011
- May 2011
- April 2011
- March 2011
- February 2011
- January 2011
- December 2010
- November 2010
- October 2010
- September 2010
- August 2010
- July 2010
- June 2010
- May 2010
- April 2010
- March 2010
- February 2010
- January 2010
- December 2009
- November 2009
- October 2009
- September 2009
- August 2009
- July 2009
- June 2009
- May 2009
- April 2009
- March 2009
- February 2009
- January 2009
- December 2008
- November 2008
- October 2008
- September 2008
- August 2008
- July 2008
- June 2008
- May 2008
- April 2008
- March 2008
- February 2008
- January 2008
- December 2007
- November 2007
- October 2007
- September 2007
- August 2007
- July 2007
- June 2007
- May 2007
- April 2007
- March 2007
- January 2007
Categories
- About Me
- All That Scraps
- blogger challenge
- camera/photo play
- Cards
- Contests
- family stuff
- FOR SALE
- Home decor/3-D items
- How to FAKE it!
- Introduction
- JUGS Challenge
- JustRite Stampers
- Lizzie Anne Designs
- My family stuff
- My Stamping Space
- My Time Made Easy
- My Time To Color Challenge
- My Time to Create Challenge
- My Timeless Template Challenge
- My Timeless Templates
- Mytime Mail
- MYTIME MOVIE/VIDEOs
- Papertrey Newsletter
- Pink Cat Studio
- Pretty Palette Challenge
- Pretty Patterns Sketch
- Product Opinions and Must haves
- Recipe's
- Saturday Sketch
- Smilebox Creations
- Stampavie
- Tutorials
- Uncategorized
- videos
Most Popular
- Create your own Onesie Card Tutorial-and important NOTE! PLEASE READ (2529)
- Saturday Sketch-Boxed bag holder (2333)
- Going GREEN! Fancy Flower Flourish-Closure Video (1478)
- Fabulous Favorite - Giveaway! (1336)
- a Prayer Request (1232)
- QUICK-Easter Baskets from Nestabilities-PTI style-and blog challenge (1063)
- Teaser Sketch (999)
- February Release Giveway! (and a little peek) (996)
- Group Post and Rambling Rose Video Tutorial (985)
- GIVEAWAY! Who wants it all?! (895)
Recent Comments (RSS)
- hedie: خرید راهبند
- 야동: Love to read it,Waiting For
- 야동: This seller is in a
- 바카라사이트: 여기 처음 왔어요. 나는이 게시판을
- 야동티비: I was surfing the Internet
- 바카라사이트: 비슷한 주제에 대한 흥미로운 정보를
- 바카라사이트: "여기에 제공해 주신 귀중한 정보와
- 온라인홀덤: 유익한 웹 사이트를 게시하는 데
- 홀덤나라: 나는 당신의 블로그를 정말 좋아합니다.
- lisa: Technology, too, has left an
Copyright © 2007 - My Time, My Creations, My Stampendence - is proudly powered by WordPress
This blog has been Tweaked and Designed by Sara Williams