Archive for the ‘Tutorials’ Category
VIDEO:Three Dimensional Elements Made Easy
Sep 17, 2009 Author: mytime | Filed under: Cards, MYTIME MOVIE/VIDEOs, Papertrey Newsletter, Tutorials
Hot Air Balloon Ride
I love three dimensional cards. There are just so interesting!
As a little girl I was often in awe of the many three dimensional gift items, favors, table decor and card designs I’d see at the card & gift shop my mother would take me to. Most children would be begging to leave! Not me! I’d sit there and look at each one, trying to figure out HOW they made it. I was in complete awe.
Sometimes a little dimensional POP can make a world of difference! Flat, stamped images just come to life, and bring a smile to any face.
This three dimensional technique can be used to create SO MANY various images !
Come watch the short video I have, to show you how!
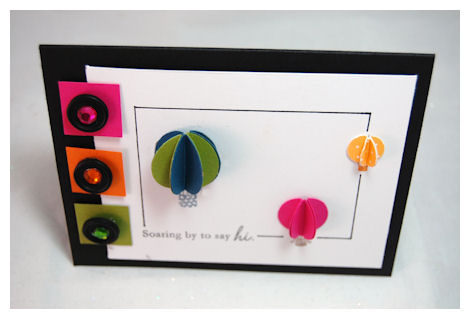
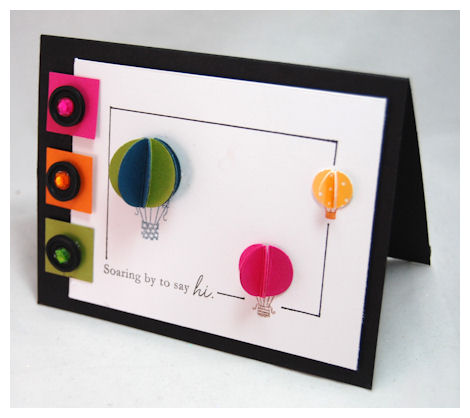
Now you can view some more photos of the completed project, shown in the video
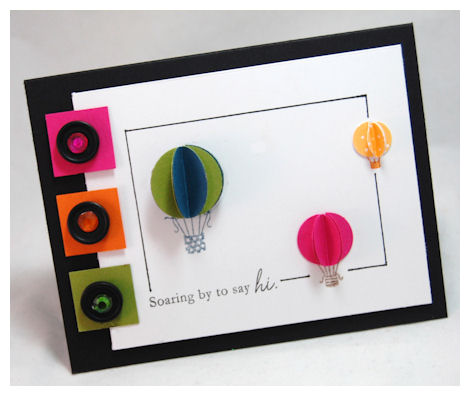
As you can see, these hot air balloons appear to be in flight.
The design is so simple, but it doesn’t need anything more. Actually this could easily be a SINGLE layer card!
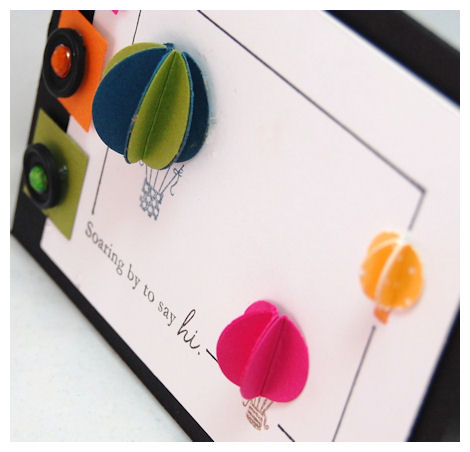
The top view- You just want to touch them!
You can alter the designs by using various patterned papers, stamping them, alternating your punched pieces…….you name it!
You can use this same technique to make Christmas ornaments, regular balloon’s, Chinese lanterns, various fruits like orange’s, apples, cherries, sliced watermelon, grapes and pumpkins!
Use various shapes and you can have 3 dimensional snowflakes, flowers, leaves, and trees too!
ENDLESS possibilities!
Supplies:
Stamps: Everyday Button Bit
Cardstock: Basic Black, White, Ripe Avocado, Enchanted Evening, Raspberry Fizz
Patterned Paper: Bitty Dot Basics 2009
Ink: Black, Black marker, Enchanted Evening, Orange Zest, Dark chocolate
Vintage buttons, adhesive rhinestones
Punches: 1″ circle, 3/4 ” circle, 1/2 ” circle
NOTE:
You CAN mail these dimensional cards! I package mine up in the Clearly Creative Card boxes, tape shut with clear labels that arrive in package, and put a mailing label on! Granted, they cost a little more to send, but I’m sure as it passes through the post office, it will make MANY people smile, as well as the receiver when they see the piece of ART in their mailbox!
There is of course, the traditional method of hand delivering too!
Thanks for stopping by.
If you give a try, send us a link here 😀
#1 Papertrey Ink Peek-My Timeless Template & Peaceful Poinsettia -VIDEO
Sep 9, 2009 Author: mytime | Filed under: Cards, Home decor/3-D items, My Timeless Templates, MYTIME MOVIE/VIDEOs, Papertrey Newsletter, TutorialsIt’s the 10th!! I think by now you know what that means here on my blog!
The FIRST of MANY peeks and ideas for the Papertrey Ink Release Countdown 😀 and peeks of my 2 newest My Timeless Templates ©
I cannot tell you how excited I get every month. Granted the first week of the month I’m working like a MAD woman, HOPING to inspire you with some great ideas to get you jump started. It’s ALWAYS nerve wracking as I try to top my last months projects. Fingers crossed 😀
I will say you all help me strive to better my best 😀 I LOVE a challenge, and thrive on being busy. I feel like the busier I am, the more creative I get. It’s weird. I don’t know what to do when I’m NOT running around. I can’t handle QUIET. Thank goodness because my life has always been full of everything BUT that!
OK I know you are TOTALLY over my blabbering on, so I’m going to just get to it OK!
PLEASE NOTE: Release of stamp set and My Timeless Template is September 15th!
Supplies listed/linked at post bottom 😀
I’m happy to share that my design with this template is a peek of a New! stamp set Peaceful Poinsettia by
Melissa Bickford . Check her BLOG for more samples with this set.
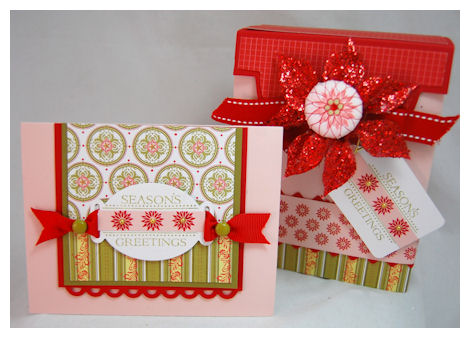
Season’s Greetings Set
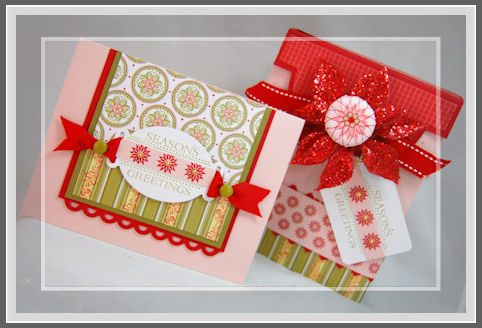
I love matchy matchy gift sets, and this one is so prefect for the holidays!
I love Sweet Blush, Pure Poppy, Spring Moss, and Ripe Avocado for holiday gifts!
This set is just so pretty, and the best part-EASY to work with!!!! I just adore Melissa’s sets to pieces. and her style is so ME! Oh, and I’m sure so YOU too!
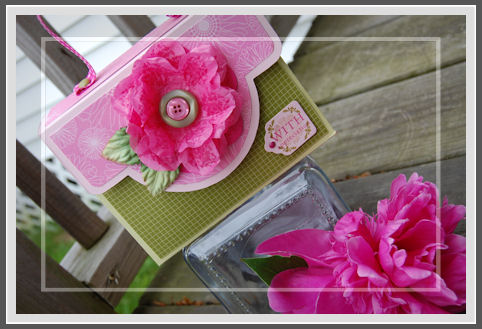
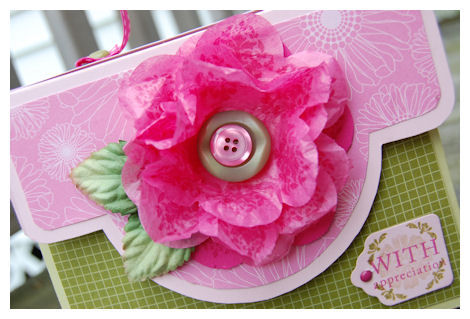
Here is the card

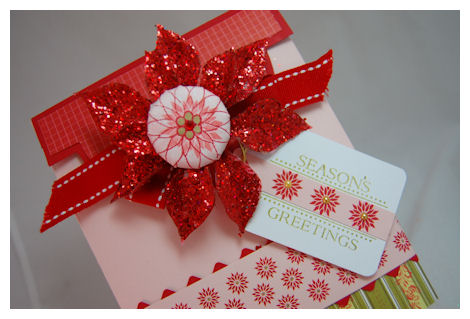
I used the tag image from the set to create 2 different tags-one on my card, the other on the box.
While using the tag I stamped my sentiment in Ripe Avocado, and then the poinsettias (they are a separate stamp trio :D)in pure poppy ink, on my sweet blush strip, adding gold adhesive pearls to their centers! A very easy way to add to the POP of the tag .
I also used the border image along my template, in which I dotted my border flowers centers with a gold pen.
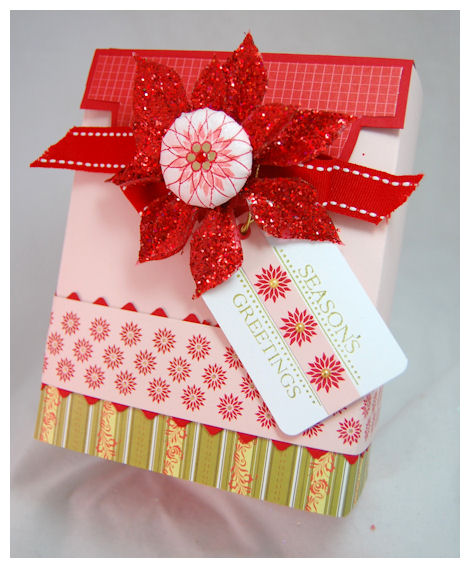
The large layering poinsettia flower was used to make my very own brad embellishment for the center of my Poinsettia flower on my gift box!
More on that…keep reading!
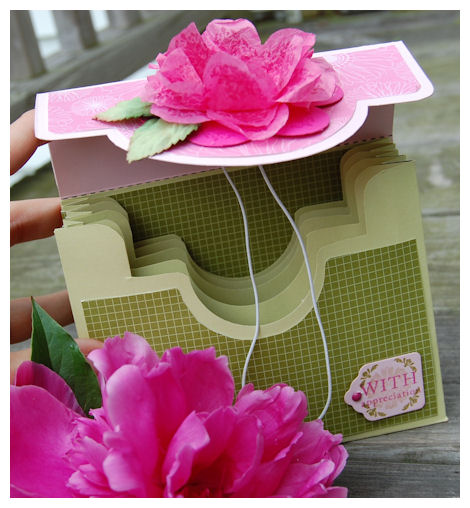
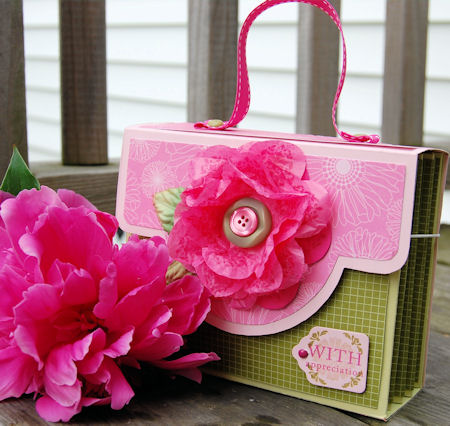
So this month’s My Timeless Template is named: Keeping Tabs ©
We have the standard size, and will also offer the Pretty Petite version as well!!
Today’s peek shares the standard size version.
About Keeping Tabs ©
I am always looking for really neat ways to “un-wrap” or reveal what is inside a gift I package. When it does reveal your gift in a fun way, it makes it so much fun!
This amazing box is held closed on the side, by inserting 2 tabs into the back. You cannot even see them! They just tuck right in there, effortlessly!
(That is how this template received its name)
Now to add even more detail, it is tied closed (that is of course optional) with some of that stunning ribbon, we all tend to hoard! Making this so pretty couldn’t get any easier.
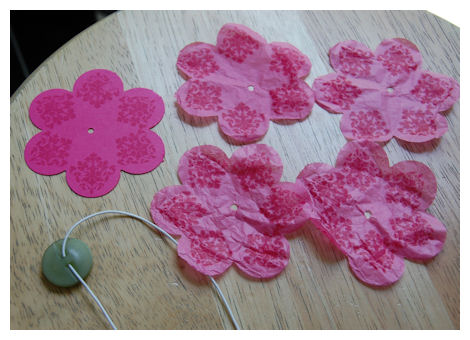
Now I am SURE you want to know HOW I made that stunning brad in the center of my sparkly poinsettia flower, so here is a Video on that
Isn’t that the COOLEST tool ever?
I love the I Top! You can find it –> HERE!
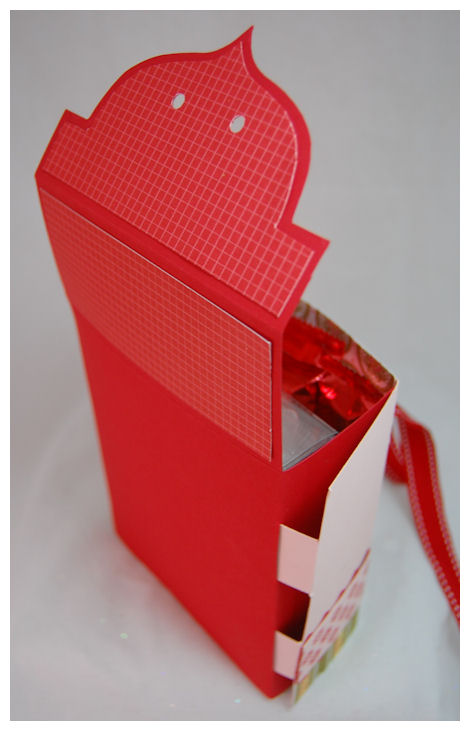
Now opening our template……
Untie the ribbon
Lift the lid
and…….
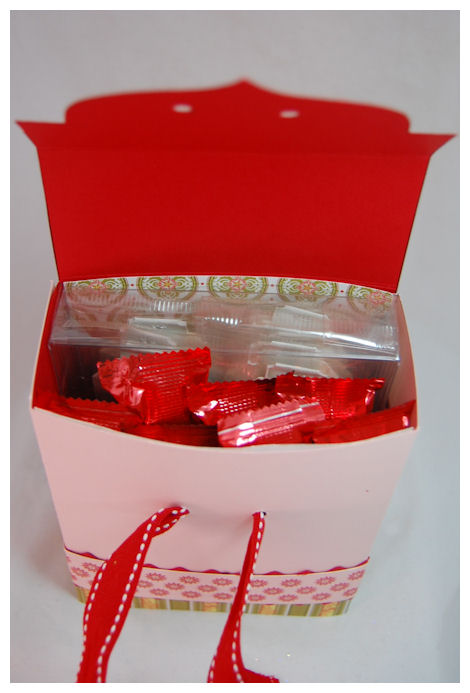
Look how much this can hold!!
Its FULL of fun, and yum!
Once unfolded. the template has 2 pretty pockets, that are a very nice size.
The front flap design, as well as the 2 pockets inside, have killer curves, that once again add to the WOW! factor.
One other GREAT detail-you cannot see any of this “messy” stuff when this box is complete.
Like all the My Timeless Templates ©, this one was made so you can EASILY assemble it!
As a card maker, we can never have too many ways to package our precious paper masterpieces! I am happy to announce that this is another great take on card packaging!!
The standard Keeping Tabs © template can hold your standard A2 cards and envelopes. It is also perfect for MANY other gift ideas!
The Pretty Petite version is perfect for our 3×3 envelopes and cards/tags, or many other fun size treats! More on that to come 😀
Now don’t get stuck thinking it is ONLY good for cards! You can package so many different items in here. This template will leave you wondering what you can Keep Tabs on next.
So to show you something besides card packaging I thought I’d make a nice gift set for a Party Hostess or someone special! Maybe even a Yankee Swap?
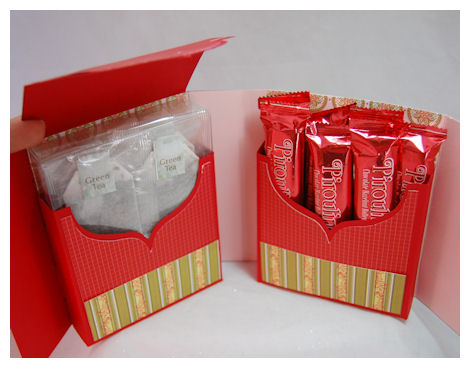
So, all opened up…..
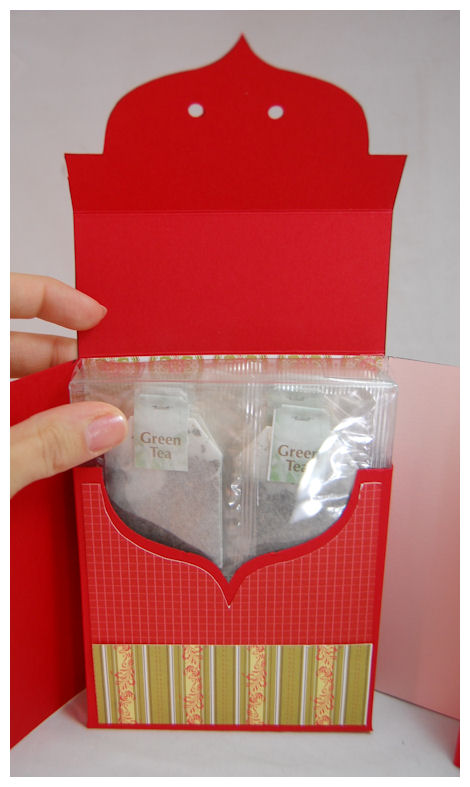
We have tea!
Yes! You are seeing correctly.
Our Clearly Creative Card Boxes fit IN this one ![]() Can you imagine the FAB wraps you can now make JUST using the pockets of this template, for your card boxes, or other items you like to stuff in them…..like my packages of Green Tea
Can you imagine the FAB wraps you can now make JUST using the pockets of this template, for your card boxes, or other items you like to stuff in them…..like my packages of Green Tea ![]()
Our decorative mat layer helps you make a perfect and professional cut, every time!
Now in the other pocket (on the right), one of my FAVE treats
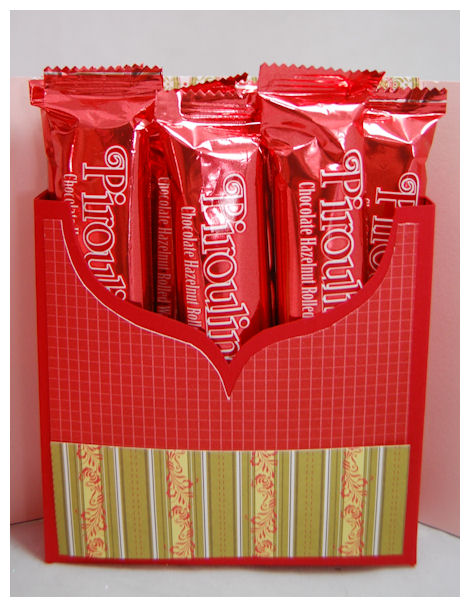
Pirouline Cookie Duo Packs! Each package has 2 cookie stix at 100 calories total 😀 YUM!!
So once your template is filled, you just wrap it all up, and you are off and running!
Its a great holder for SOOOOO many things.
Well, what do you think? I would love to hear your feedback 😀
Supplies:
My Timeless Template © Keeping Tabs
Stamps: Peaceful Poinsettia
Cardstock: White, Sweet Blush, Pure Poppy, Ripe Avocado
Patterned paper: Holiday Vintage Prints, Bitty Box Basics
Ink: Sweet Blush. Berry Sorbet,Pure Poppy, Ripe Avocado
Ribbon: Pure Poppy stitched & twill
Tools: I Topp tool, brads, punch, tag punch by Marvy
Nestability: Ribbon Tags Trio Two
Apron border punch, pinking border by EK Success
Other: Glittery poinsettia from Michaels, Brads by SEi, Adhesive Pearls by Hero Arts, Clearly Creative Card box
I hope you like what I had to share so far! There is so much more to come 😀 I have had ideas flowing like crazy!!
Now if you want to see more with this template hop over to Kelly Lunceford- Template Team
Don’t miss Nicholes samples today!! She always WOWS us! Oh! and Beth Silaika releases her FIRST set with Papertrey Ink this month! Also hop over Dawn McVey’s blog, as she peeks her set too!
So that is all for today. Tomorrow I will share an AMAZING sample with my other My Timeless Template © got this month, so stay tuned.
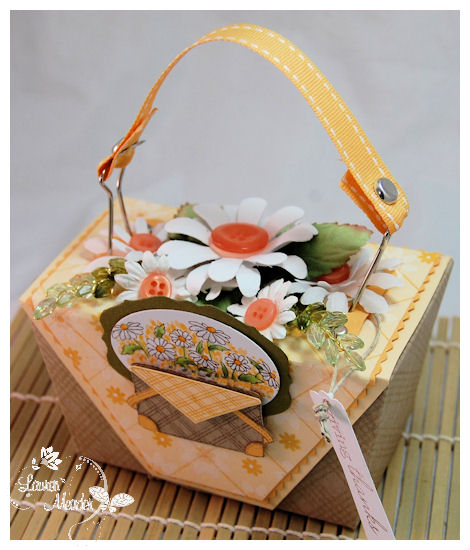
Video: How to make a handle using a binder clip
Aug 13, 2009 Author: mytime | Filed under: Home decor/3-D items, My Timeless Templates, MYTIME MOVIE/VIDEOs, Papertrey Newsletter, Product Opinions and Must haves, Tutorials, videos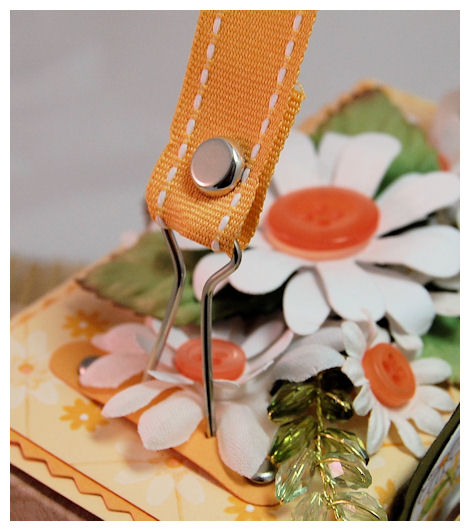
I love using all the My Timeless Templates ©. I am often looking for new ways to dress them up, and make each one more fun and different than the last! It really is ALL about the details.
Today, in a video, I am going to show you how ONE little binder clip, can make the cutest, inexpensive handle, for just about ANY My Timeless Template © you wish to put it on!
Now you have seen how easy it really is to make these handles, I’ll share some details about the project I designed.
Basket of Thanks
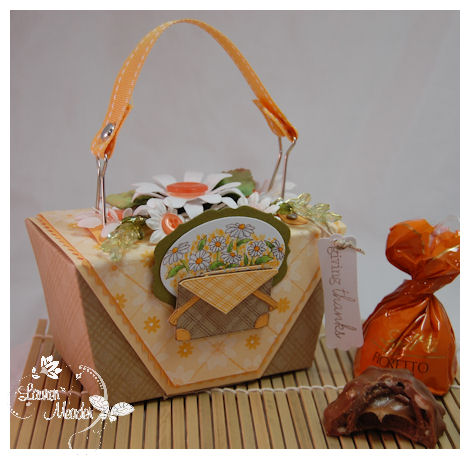
Today’s project, I utilized the NEWEST! My Timeless Template © Tucked Away.
This is the large version of the template.
I designed my box to look like a basket, with the fabric napkin overhanging, and flowers inside-*just* like the colored image from Vintage Picnic (a MUST have set-in my opinion!)
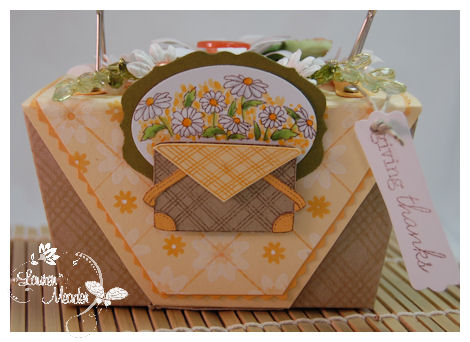
I stamped the Kraft bottom of Tucked Away © , to look similar to a basket weave by using the Tea Dye Duo ink, with Background Basics: Retro image.
I also created the “pattern” on my “napkin” (aka the template lid – mat layer), using Guidelines grid, and the flowers from Around and About, in white craft ink, and Summer Sunrise!
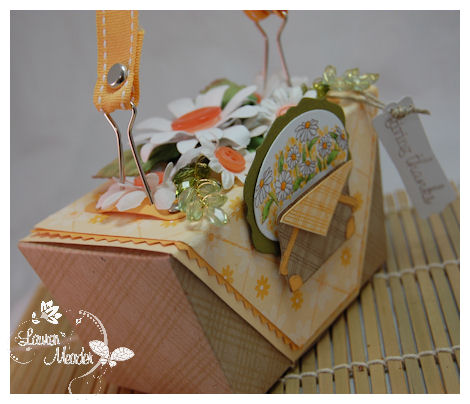
For the additional mat layer, I just adhered a layer of Summer Sunrise, to my stamped layer, then used my pinking edge scissors, to easily cut my decorative layer-perfectly.
Then, for the top-I used various punched flowers to create my “paper garden”.
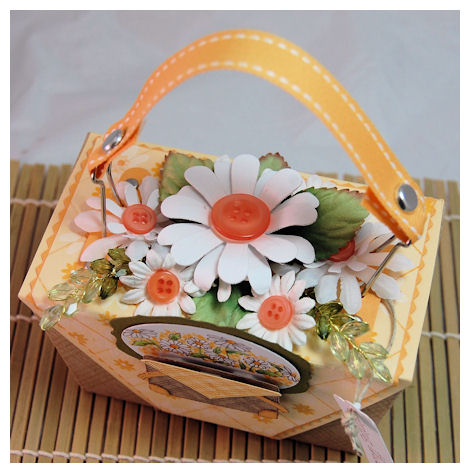
I added some beaded leaves, as well as Prima paper leaves to complete the “look”.
This made my basket look like it was filled with flowers! Just like the stamped basket image from Vintage Picnic.
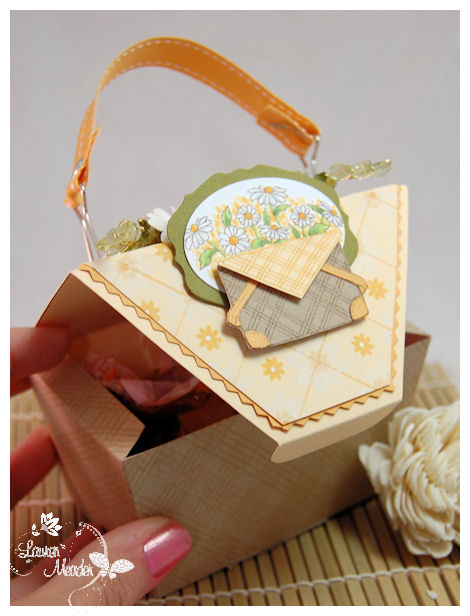
Once you “un-tuck” the top, inside there are 4 large, Lindt Chocolate Caramel Clusters inside!

Totally YUMMY!
As you can see the binder clip ribbon handle really adds a nice detail to the overall design! Now because this template “tucks” closed, you can use your handle to present such a pretty “basket” of thanks!
This project took less than a 1/2 hour total-and that was design concept included, and the MAKING of my own patterned papers! You now have a design idea, you could whip up numerous “baskets” in no time!
Supplies:
My Timeless Template © Tucked Away
Stamps:Vintage Picnic, Retro Bkgd, Guidelines, Around and About Sentiments
Cardstock: White, Kraft, Summer Sunrise, Lemon Tart, Ripe Avocado
Ink: Tea Dye Ink Duo, Dark Chocolate, Summer Sunrise, White
Ribbon: Stitched Grosgrain in Summer Sunrise
Buttons: Melon Berry
OTHER: Leaves by Prima, Brads by SU! ,Word Window Punch by SU! Pinking scissors, Various Flower punches by Marvy, Labels die by SU, Oval punch by SU! tag punch by SU! Singlo Gel pen, Beadded leaf cluster from Michaels Craft Store
Well that is all for me today! I hope you enjoyed today’s project/tutorial.
Tonight is the Papertrey Ink Release! I hope to see you on the forum 😀
In the meantime be sure to check out Nichole’s Blog for more samples & creative clicks, as well as Debbie’s post today (she is filling in for Becky :D) as she shares the last of the countdown peeks!
Till tomorrow
#1- Template Peek: Fold N Go Gift for a New Home and a Giveaway!
Aug 9, 2009 Author: mytime | Filed under: Home decor/3-D items, My Timeless Templates, Papertrey Newsletter, TutorialsHi everyone!!!
I’m beyond excited to get the Papertrey Ink countdown started!
Now please note that most items featured in today’s post are NEW! (to be released) items from Papertrey Ink. Items will be released August 15th!
It’s the 10th so that means the samples begin, and I get to start sharing peeks of my NEWEST! My Timeless Templates © (releasing the 15th as well)
We have 2 great and practical templates this month! Each one has a standard template size, and the Pretty Petite version, also included in ONE download, for only $5! Remember you not only get unlimited use of the printable template, but the Idea Booklet, which includes 5 exclusive project ideas ONLY published for the download 😀 The idea book comes with a complete set of supplies and step by step instructions, for completing the samples in the book! Download also includes step by step photos/instructions for assembling your template. EASY PEASY!!
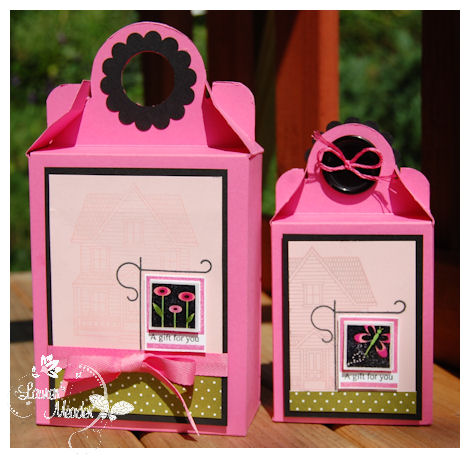
I have the honor of peeking one of Melissa Bickford’s new stamp sets called Sign Language😀 The minute I saw it the ideas just flooded my brain! One idea that stuck out the MOST though, was the idea to combine it with the lastest My Timeless Template © Fold n’ Go!
Now before I share my first peek, let me tell you about the first template being revealed!
Sometimes you just want a box with a fun closure! One where the top requires no fancy ribbon or anything else to hold it closed (unless you WANT to add it!), and opens with ease. I have always LOVED Gable style boxes, so I decided to gain some inspiration from that, to make another variation, that is funktified and modernized with a sleeker, less bulky look, and a cool handle. Now to package up a gift, all you have to do is Fold n’ Go!
Now, you may recall I gave you a little (early) peek at this template—> HERE! This project was inspired by a VERY early creation I made called a Boxed Bag Holder—> HERE! My Boxed Bag holder which was done almost 3 years ago! LOL!
This really is a fun template, that can hold so many amazing and fun gifts for ANYONE, which I will share over the next few days.
Now, on to the sample 😀
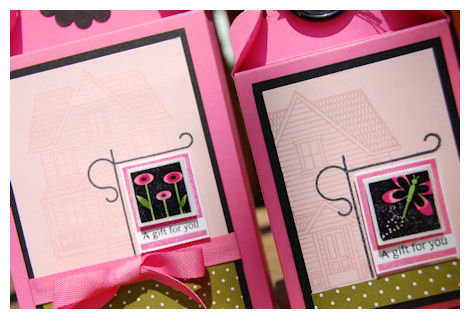
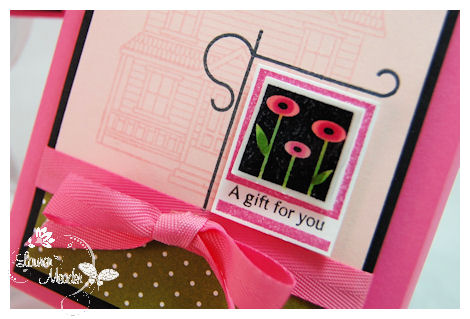
A gift for your New Home
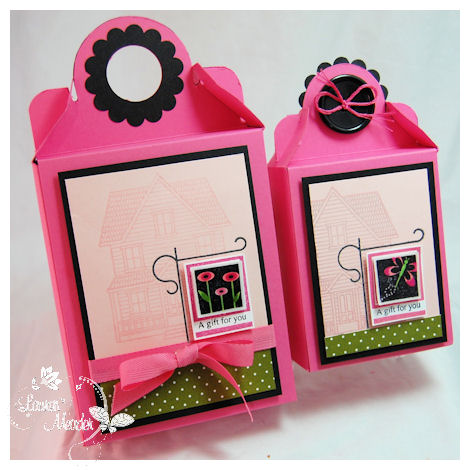
The idea for this particular gift, was for to hand deliver, OR hang on the door of our friends, who just moved to their very first NEW home!
I thought that using the Sign Language set, with house image from Boards & Beams was obviously perfection-since the sign is just like some of the yard signs in our neighborhood!
I wanted the SIGN itself to be the MAIN focus, so I stamped the house image in the new formula of Sweet Blush ink (its awesome!), onto sweet blush cardstock. The flag itself usess a fun technique that I’ll share further down this post.
I adore the ability to mix and match all the “flags” with sentiments for EVERY holiday! There are SO many cute ones too.
I of course chose to use my 2 favorite images for my “yard signs” to convey the message for these house warming gift packages.

I made similar designs-one using the standard template size, and the other using the Pretty Petite version! This just shows you have versatile everything can be, and weather you decide to decorate a standard Fold n’ Go! template or the Pretty Petite version, both are FAB!
Now you may be wondering WHAT I put inside these gift boxes!
I didn’t get to get photos, as I was stopping off to pick up the gifts ON MY WAY to their house warming party, but in the Large version is a Door Knocker that is engraved with their last name, and in the other we put in a gift card to Lowe’s Home Improvement store! Owning a home you will need lots of stops to the home improvement store! LOL!
Now onto the details of my flags…………….
I always enjoy the look of the Epoxy like sticker embellishments you can buy in stores. Problem, they don’t generally suit my project, or MATCH what I want to do!
So I made my own
This is a VERY simple embellishment you can make, that packs a big punch!
1) Stamp your image in a permanent ink.
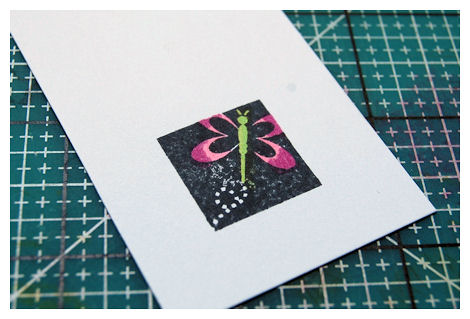
Color if needed or desired (Use a smudge-proof marker-like Copic’s)
2) Apply a liberal amount of Crystal Effects
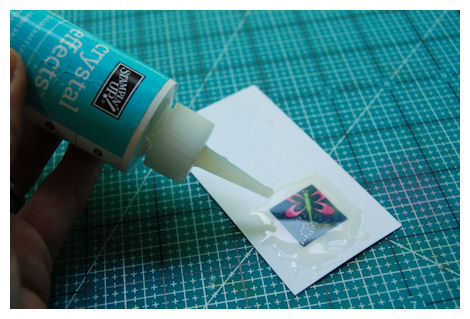
3) Allow sufficient time to dry. (My project was dry within an hour)
4) Use a punch or die cut that fits your image
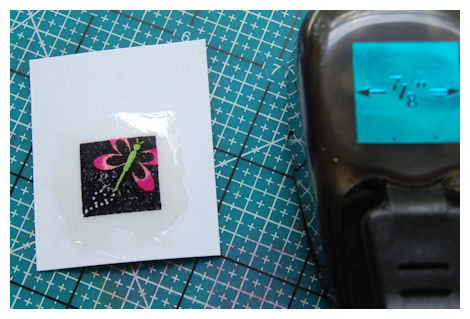
and punch out
NOTE: The 7/8 square punch fits the flag images from Sign Language perfectly! It even gives you a perfect little border too!
5) Once image is cut-layer onto project

In this case, it is the hanging part of my sign, in which I stamped the border in Hibiscus Burst ink, and my sentiment in black ink, then trimmed out.
Then I added both of the Epoxy embellishments I made, to my completed projects
They really make a simple sign POP!
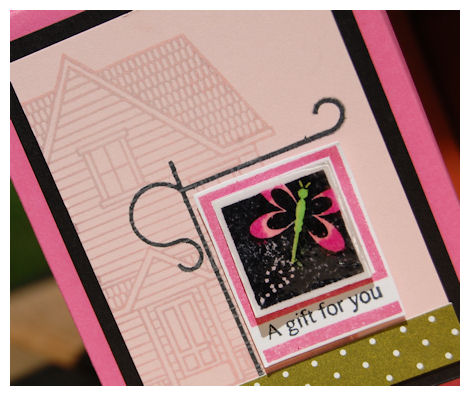
This is the butterfly on the Pretty Petite version of the Fold n’ Go! template
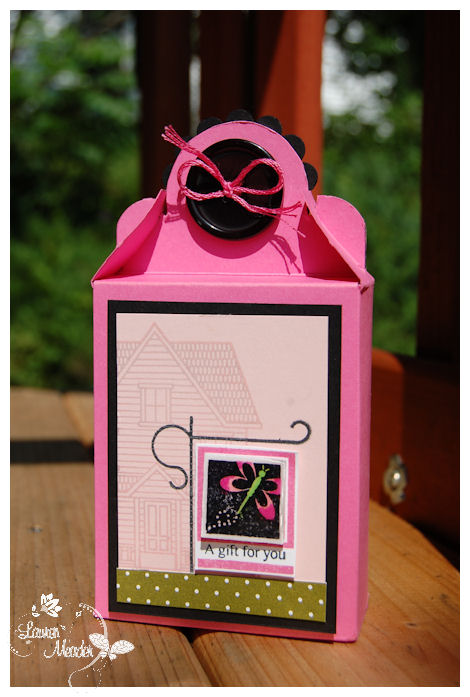
Now we have the flower flag image on the completed standard version of the Fold n’ Go! template
Together they make a real WOW! presentation for the perfect gift for those NEW! Home owners.
Now there is NO limit to the size of the epoxy like embellishments you can make! You are also saving so much money too 😀 Those sticker sheets can cost upwards of $3 for only a couple of images, that aren’t tailored to YOUR project!
Another option would be taking a page pebble, and add it over your image! Only “problem” would be that you are limited to the shape & size of your page pebble, and it does cost more to use them.
This is just a fun and easy way to really add another WOW! element to your completed template or card projects!
Well that is it for me. I’m excited to hear your thoughts about today’s projects!
Giveaway: Just leave me a comment here, and enter to win the Fold n’ Go template on Release night!
Winner will be posted on the 13th (my daughter Amber’s birthday!)
Lots more countdown peeks going on, so visit Nichole for more ideas and creative clicks! I also believe Melissa, Heather, Dawn and Tiffany(her first stamp set debut for PTI!) will have some eye candy as well! (I hope I’m not forgetting anyone :C)
Kelly has a *peek* at her project using Fold n’Go! today, as does this months My Timeless Template Guest Designer-Mona, so be sure to pay them a visit too!
More to come tomorrow as I reveal my next template for the month of August! Oh and have a giveaway for that one as well!
Supplies:
My Timeless Template: Fold N’ Go!
Stamps: Sign Language, Boards and Beams
Cardstoock: Hibiscus Burst, Sweet Blush, White, Black
Patterned Paper: Bitty Dots 2008
Ink: Black , Hibiscus Burst and Copic Markers
Ribbon: Hibiscus Burst
Vintage Buttons: Black
other: corner rounder, 7/8 square, crystal effects, scallop punch, 1 1/4 circle punch
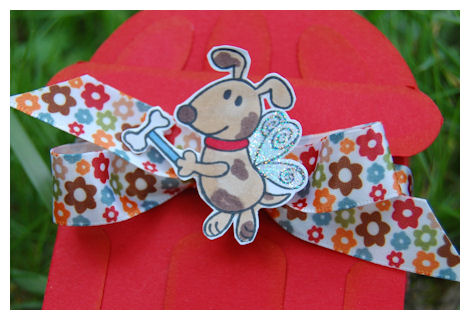
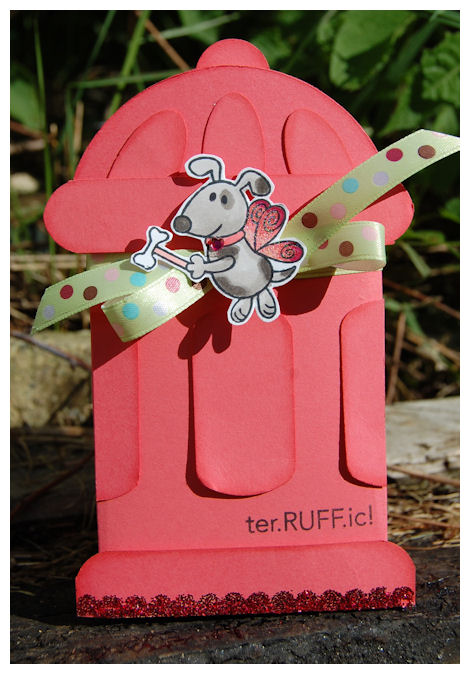
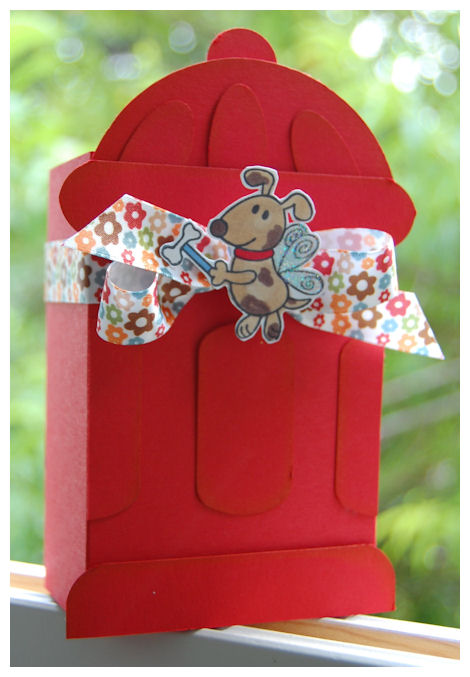
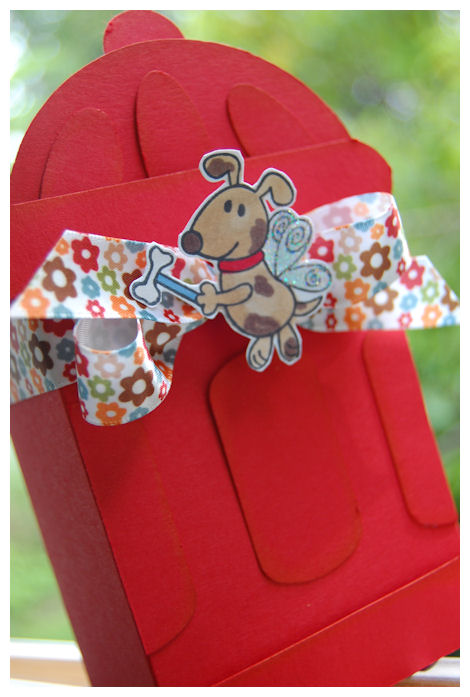
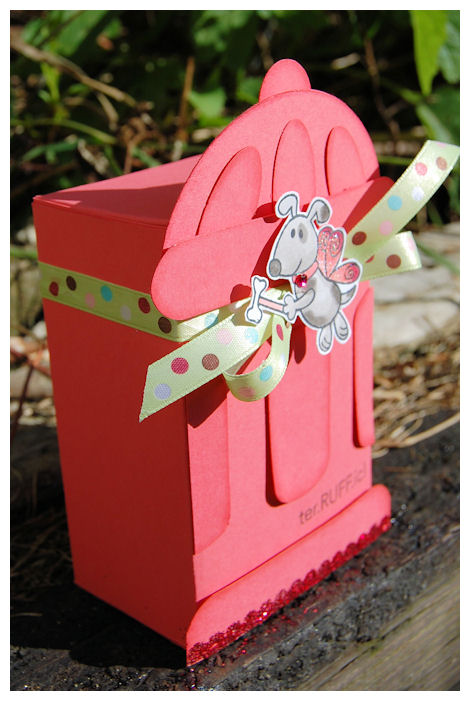
Video: Fire Hydrant Gift Box & PCS Fairy Friends Release
Aug 6, 2009 Author: mytime | Filed under: Home decor/3-D items, My Timeless Templates, MYTIME MOVIE/VIDEOs, Pink Cat Studio, Tutorials, videosI have a project, just for you 😀
What a fun filled day I have here.
Today is the release for Pink Cat Studio-Fairy Friends
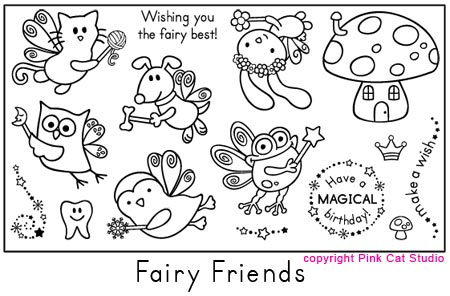
Isn’t it SO cute?!!
I had a blast using it.
I THINK I saved the best for last with this one!!
What I am really excited about are the 2 projects I created using it, and the fact that I ACTUALLY got a video done for you! (I know its been a while! But they are quite time consuming)
I did my best to keep it short and sweet, so that I could post it on YouTube! You all know how LONG winded I can be, so staying UNDER 10 minutes is a NIGHTMARE for me! :C But I got it done, and *just* under 10 minutes-WHEW! I had to cut out my banter that I often put as the intro to the video, to get it done. I know, you don’t need to see me blabbering on and on anyhow, so I’ll type some of what I said instead.
So let me tell you what is in store for ya!
A few weeks ago, I asked for any feedback you wanted to offer on My Timeless Templates ©. Well, all you animal lovers asked for PET specific templates, to package up stuff for our furry friends, OR furry friend lovers!
Now sure exactly WHAT type of market is out there for PET/Animal theme stuff, but I did have an idea to hold you over till I have the AH! HA! moment 😀 (which I am totally NOT promising will ever even happen :C)
The Dog Fairy was PERFECTION for executing this idea too.
I used The Perfect Match © Box template, to create an ADORABLE Hydrant themed gift box! This box was designed, based on a card I did —> HERE!
(OK while searching my blog I also found a cute 3D photo card I made of my own dog —->HERE! LOL!)
So here we go 😀
See how amazingly versatile the My Timeless Templates can be?!
Now here are some photos of the projects (those who are peeking in from work! LOL!) to hold you over until you view the video!
Now I did two of the same design-one girly and the other more boyish. I will post photos of each so you can see how easy it can be changed up.
Girly Ter*RUFF*ic front
Boyish Front
Girly Side View

Boyish Side View
Side 2
Now this is what I have packaged up-inside
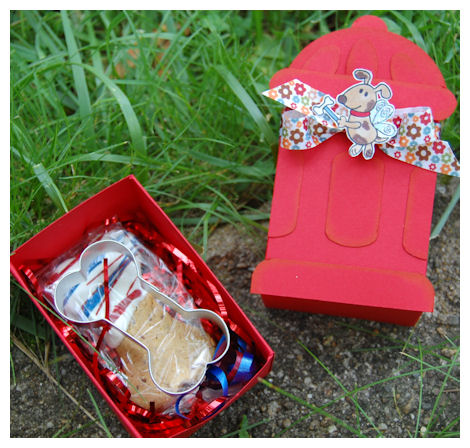
I put a homemade dog cookie, with the dog bone shaped cookie cutter, in this gift box 😀
You could also package up just the mix, and let the person make the cookies them-self!
You could put a personalized dog tag in there, for the new puppy owner……..or have a dog themed kids party (like Clifford or some other dog like Bolt!) and make these the “doggy bags” filled with “doggy treats”!
No matter what you do for this, its seriously, way cute! (Or at least I think it is :D)
Well that is it for me today! Im working feverishly on NEW! Templates for the PTI release! YIPEE!
See ya tomorrow.
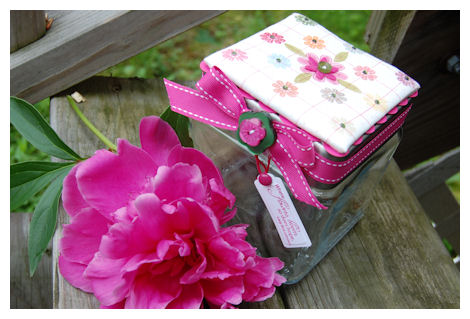
Fun with Fabric
Jun 30, 2009 Author: mytime | Filed under: Home decor/3-D items, Papertrey Newsletter, TutorialsWell today is our Papertrey Ink Senior Design Team Challenge.
Nichole wanted us to utilize fabric by stamping on it, then using it in our project!
OH! MY! WORD! To me, that was a HUGE challenge-HUGE! I just sat there, not knowing WHERE to start. I use to be a quilter, but the day I began papercrafting my love affair with a sewing machine and fabric was O-V-E-R! I realized I *ONLY* liked sewing because I so enjoyed mixing and matching the fabric! I had more fun SHOPPING than I ever did sewing. Papercrafting was my niche!
Now my fabric is only used for my STAMPING projects, and my sewing machine for PAPER! (even those occasions are RARE!)
All that being said, my idea for fabric today is far from revolutionary-sadly! I wished I had some fantastic project to share, but this is sweet and simple.
I just decided I would view my FABRIC, as cardstock, and like making my own patterned paper (something I LOVE to do!).
I had purchased this glass jar because I just loved it! I have a “thing” for containers (in case that isn’t obvious! LOL!!) I don’t like them to be PLAIN JANE though, so I HAD to dress it up.
This challenge became PERFECT!
My jar was a whopping $3 at Walmart.
I decided to make a Memory Jar. Inspired by the idea my friend Alicia had, for a memory journal.
I made this so that it is something that looks pretty, and matches my home, that I can keep out, in plain view, so I can remember to fill it with memories, or funny things my kids say. Be it daily, or weekly. As the events fit.
I can later pull out all the written notes to remember these great times or funny moments. As a mom to 3 small children, there are a LOT!
Sentiment reads: Where the flowers bloom, so does hope-Lady Bird Johnson
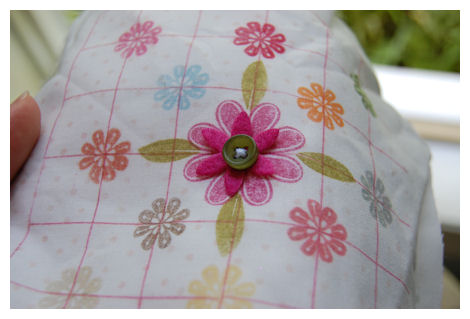
Here is my fabric, after it was stamped.
I stamped my fabric with polka dot basics, in sweet blush. I then added Guidelines in Raspberry Fizz
I chose the little flowers from Honey Bees , stamped in various inks, onto the Guidelines image.
I chose a large flower from Garden of Life as my centerpiece.
Once my fabric was stamped, I added the batting to the back.
I then decided to sew on a felt flower
and, add a button too!
Add the chipboard to the back of the layers, using ZipDry, for a sturdy base
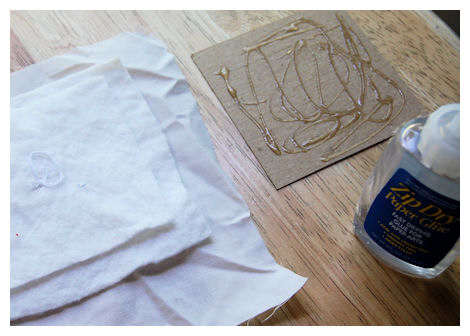
Applied lots of adhesive, then wrap the fabric around the chipboard.
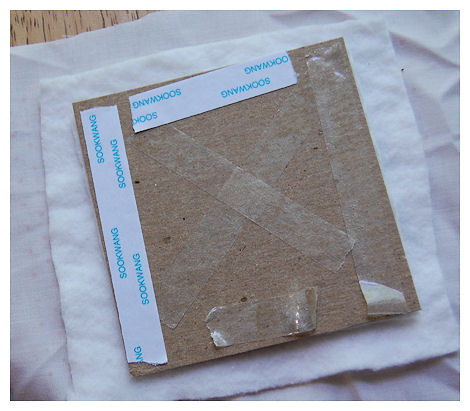
It is then added to a die cut large scallop square, created from Raspberry Fizz cardstock, and secured to my Memory Jar lid.
Here is the top view of my memory jar
I added some adhesive rhinestones to the top.
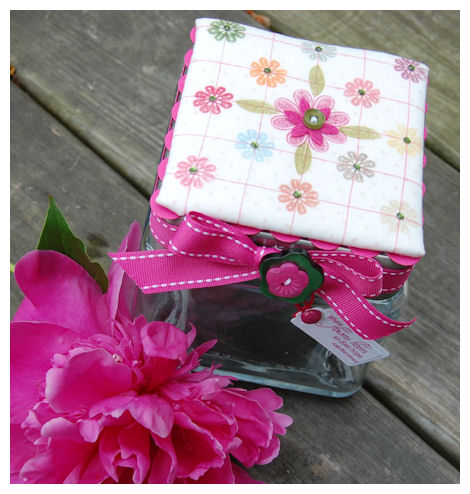
Then, of course some ribbon to the edge of the lid. Ties with a pretty bow, and flower shaped buttons.
Very quick and easy! Looks SO much prettier than your standard “jar” sitting on a counter.
Supplies:
Jar from Walmart
Fabric quarter
Quilters batting
chipboard
Zip Dry
Stamps: Guidelines, Garden of Life, Honey Bees, Flower Garden Sentiments
Cardstock: White
Ink: all Papertrey Pallette ink
Vintage Buttons: in Raspberry Fizz & New Leaf
Nestabilities: Square, and tags
Adhesive rhinestones.
Check out Nichole’s Blog, as well as the Senior Design Team for more Fun with Fabric ideas!
and the PTI Guest Designer: Wendy Sue
That is all for me!
Thank you for stopping by!
Going GREEN! Fancy Flower Flourish-Closure Video
Jun 25, 2009 Author: mytime | Filed under: Home decor/3-D items, My Timeless Templates, MYTIME MOVIE/VIDEOs, Papertrey Newsletter, Product Opinions and Must haves, Tutorials, Uncategorized, videos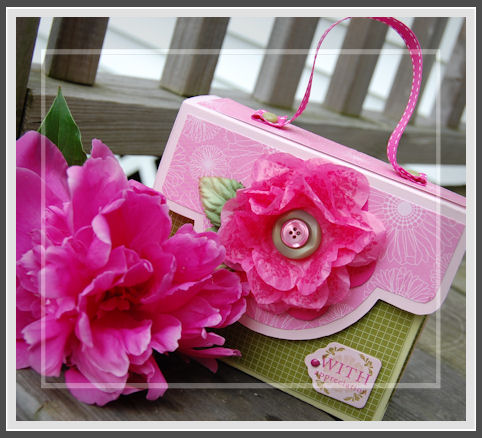
I am very excited about today’s project!
Keeping up with the trends, Going Green is very HOT right now! Reusing items that we already have is not only great for our environment, but FUN!
I find, as a papercrafter, I save a LOT of things! Always with the HOPE of finding a great new use for it! One of them being the tissue paper that comes with many gifts we receive. It is so pretty and comes in a large variety of colors! I have always wanted to find a fabulous way to recycle it, and now I have!
I call it a Fancy Flower Flourish Closure
This idea came to me after a childhood memory. I remember going to the carnival and ALWAYS wanting one of those LARGE tissue paper flowers, on a stick! So expensive back then. I was never able to get one :C But, now I am grown so I can make my own mini version.
I decided to play around, and make this childhood memory a reality, but also with a little more FANCY FLAIR!
I wanted one of these flowers to be part of an elastic closure for my newest My Timeless Templates: Card Couture. I knew it would beautiful, and look so elegant, as the main focus of the template! I have to say it makes you say WOW! when you have it in hand!
I began my quest by punching some tissue paper with my Giga Flower Punch by Marvy. While I was getting the EFFECT I wanted, I knew I wanted it to be a little more fancy, and stamp related!
I wanted to put a pattern on my flowers. Something elegant. Not just polka dots, or scripty writing. More like a pattern on EACH flower petal. I then pulled out Damask Designs! The small flourish fit PERFECTLY on EACH petal of a very elegant looking flower! I was over the moon when I figured this out!
Now let me show you how it works!
Making Fancy Flower Flourish
1) Stamp one cardstock flower base, and at least 4 tissue paper flowers, using Damask Designs.
You wil want to use ink that is a similar shade or darker than choice of tissue paper/cardstock.
2) Punch holes in centers
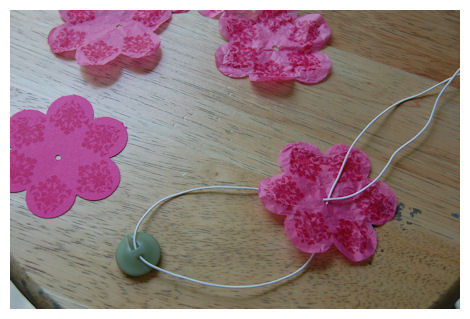
3) Using elastic cording, string on button, them put through the tissue paper flowers first.
4) Now put trhough the cardstock flower, and pull though
This is the close up
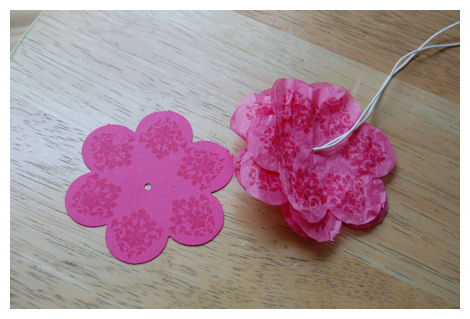
5) Pull petals up, each laer separately, and scrunch together!
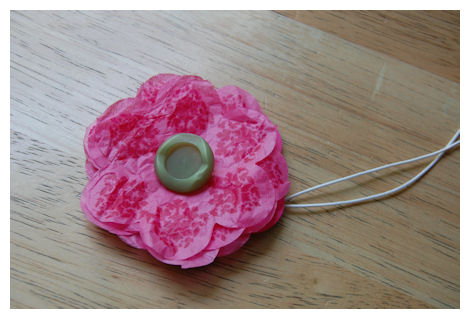
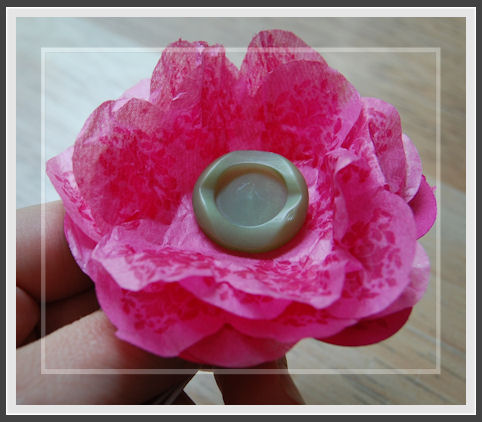
NOTE: I added another button to the button center of my creation.
6) Optional: Adhere punched, stamped, or Prima Leaves to flower cardstock base.
For Attachment to Card Couture:
1) Punch hole in the lid of template.
2) Insert large eyelet.
3) Pull strings from Fancy Flower Flourish through the hole.
4) Close lid, and tie elastic closure, tightly around template. Knot elastic cording.
Now you have a beautiful, elastic closure for your Card Couture Template, or to use to embellish ANY project!
Supplies:
My Timeless Template: Card Couture ©
Stamps: Damask Designs, Mega Mixed Messages, Guidelines 2
Cardstock: Spring Moss, Raspberry Fizz, Sweet Blush, Hibiscus Burst
Patterned Paper: Friends Til the End, Bitty Box Basics
Ink: sweet blush, ripe avocado, raspberry fizz
Vintage Buttons, Raspberry Fizz stitched grosgrain
Recycled tissue paper, Crop a Dile, Giga Flower Punch, Elastic Cording, Large Olive eyelet by SU!, eyelet by SEI, Tag die cut by nestabilities
So there you have it!
I hope you enjoyed my tutorial today!
#1 Pack Me a Cupcake Picnic-Template Peek! Announcement :D
Jun 9, 2009 Author: mytime | Filed under: Home decor/3-D items, My Timeless Templates, Papertrey Newsletter, TutorialsOh my gosh! It’s THAT time of the month! YIPPEE!!
The 10th is becoming my favorite day of the month! Then of course everyday from then till the 15th! LOL!
When its the 10th that means it’s my turn to share a Papertrey Ink Countdown Peek, AND share one of my NEWEST My Timeless Templates © with you!
This month I have a UBER cute stamp set designed by Nichole Heady called Cupcake Collection!
Its a super adorable set of “build-a-cupcake” type elements! I’m in LOVE!!! SO much so that the stamp set inspired my gift idea and perfect packaging to match!!!
So I used my Pack a Picnic for today’s project! This template will be available for purchase on June 15th —>HERE
There is post about the original design —–>HERE! That way if you are seeing this you aren’t asking “How is that a “Pack a Picnic” type of template?!
This is by far my fave to date.
Now for my project
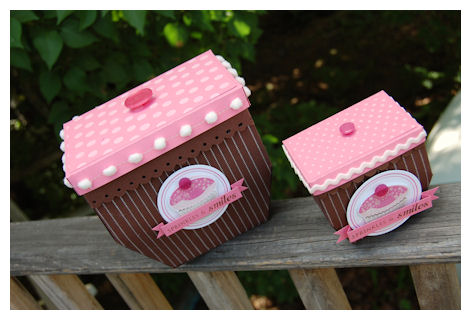
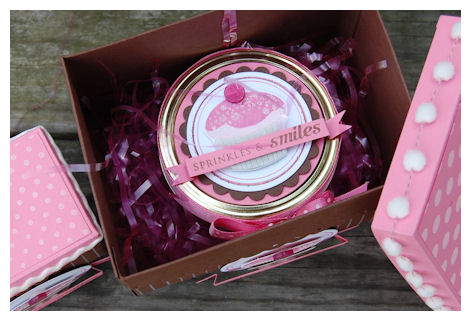
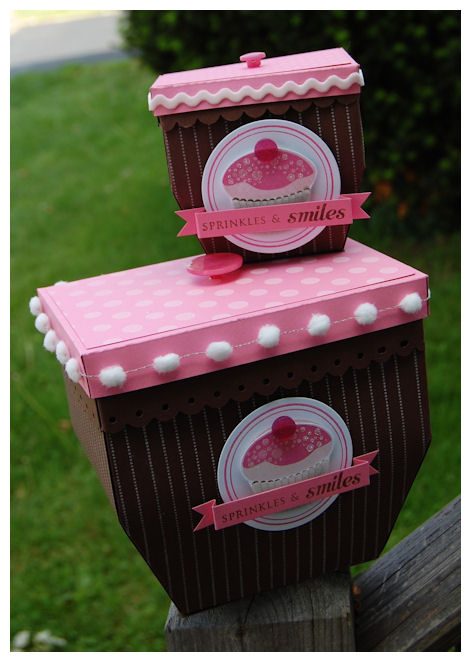
Cupcake Pack a Picnic Duo-
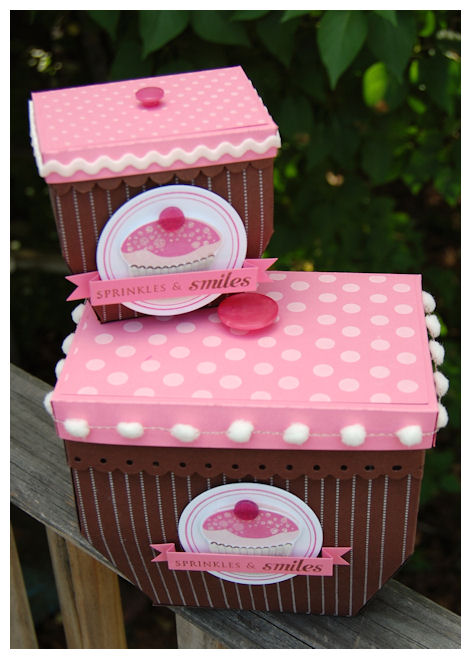
I decorated my Pack a Picnic templates (yes template”s”), to LOOK like cupcakes!
I think they are super CUTE!! Now think what adorable things you can make, having a large and small version of the same template!
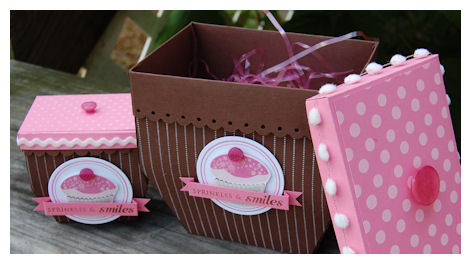
This holds my gift of a Cupcake in a Jar! Keep reading for more on that
Close up of the box detail
Now I mentioned yesterday that I had a special announcement about this template!
In case you missed the BIG news in my description-
The Pack a Picnic template will also feature a MINI Pack a Picnic template for you!!!
This is a close up photo of the 50% smaller template: Pack a Picnic mini

ALL the files for a large and small version of the template, for ONE great price–> $5!!!
Here is another size comparison
It is 50% smaller than the original template
I think its uber adorable!!
COST EFFECTIVE!
Now I decided I would share how INEXPENSIVE it is to MAKE the boxes using My Timeless Templates!
Given the fact you can use them UNLIMITED, they pay for themselves with ONE gift 😀 (In my opinion-this box set would cost WAY more to BUY!)
When you buy your cardstock in the 50 pack it comes to 0.18 CENTS a sheet.
The large template used 3 sheets of cardstock-2 Chocolate, and one Hibiscus Burst
so it cost ONLY 0.54 CENTS for the cardstock! (You can feel free to add a few more cents for the decorative pieces-but Im certain we ALL have PLENTY of scraps!)
The mini used 1 1/2 sheets of cardstock-costing ONLY 0.27 CENTS!
EVEN well embellished- you can do the math, WAY most cost effective (and FUN!)
OK-back to the project!
I just stamped my template base with Just Journaling Lines, in white craft ink, for the cupcake bottoms.
My “cupcake frosting” lids use polka dot basics. Buttons for the “cherry”.
The large lid has a pom pom border, and the smaller lid has ric rac ribbon in white for added “cupcake decor”.
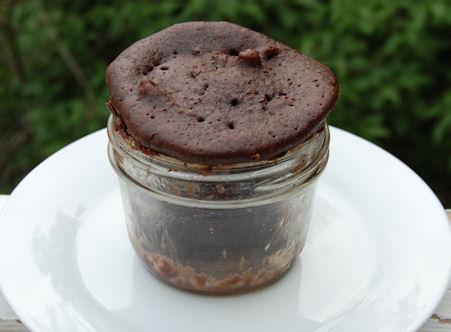
Cupcake in a Jar-
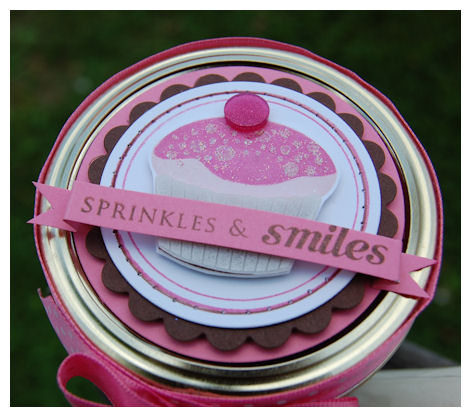
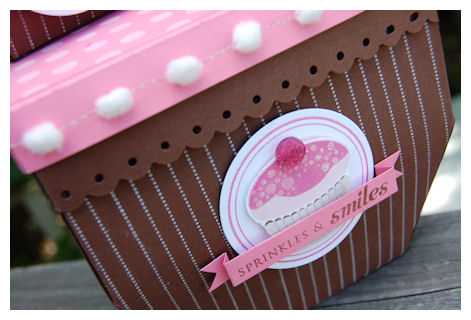
About the cupcake image:
The center cupcake design is the same on all my boxes.
I used borders & corners circle set for my border, then die cut it. I also pierced the edge on the design for the jar-only.
The bottom is stamped in chocolate ink. The top in Sweet Blush, then the “frosting layer” in Hibiscus Burst. I used White craft ink and glitter for my “sprinkles”. Added a Hibiscus Burst flat button for the “cherry”.
I stamped a solid cupcake base, in white craft ink, onto vellum cardstock, to make my cupcake bottom! Cut it out, and layered it on. So easy and CUTE!
Side view of the jar
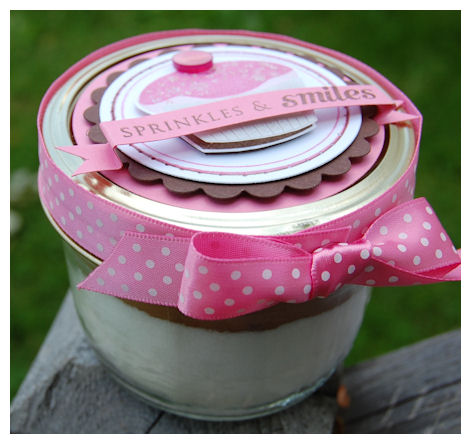
This was complete with homemade frosting in disposable decorator bag
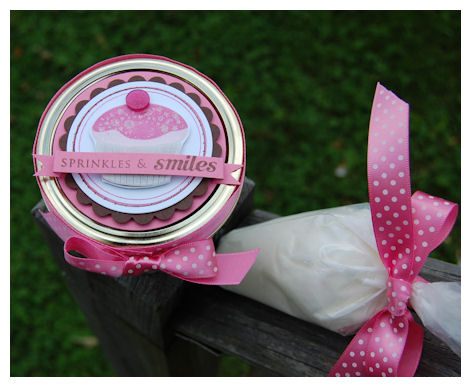
This is the side view of the cupcake in a jar mix, all layered!

Isn’t it just SOOOOO pretty?
Now you can FILL your Pack a Picnic
You can put the mini pack a picnic-filled with sprinkles and the frosting bag inside the larger one

OR You can put the little Cupcake in a Jar mix in the box-with room to spare :D)
Now onto the FUN!!!
This is the mix when you open the jar
I’m sure you ALL want to know HOW to make these for family, friends and teachers! (its not too late! My kids get out of school on the 19th! WHEW!)
The idea for this Cupcake in a Jar came to me after purchasing some DELICIOUS cupcakes from Bangerang Bakeshop Cupcakes in a Jar!
You have to try the Pinch Me Cupcake! MY FAVE!
They come in a 8 oz Ball glass jar-which is what I used in my project.
Now I was just going to order a few cupcakes (I know! BAD LAUREN!) when someone emailed me about making Teacher Mug Cakes! She was looking to find a template to package her mugs to give as gifts. We got to “chatting” and I asked her about using her mix on my blog for an upcoming project! She said yes.
Next thing you know one idea, turned into another-and this project was made!
I want to thank Tracy Burtt for sharing this with me, and giving me permission to use it here :D)
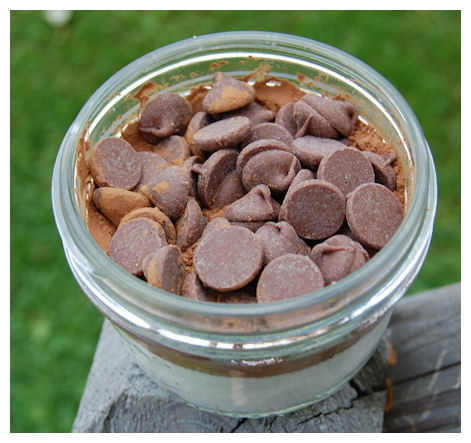
5 MINUTE Cup Cake in a Jar !!
4 tablespoons flour
4 tablespoons sugar
2 tablespoons cocoa
1 egg
3 tablespoons milk
3 tablespoons oil
3 tablespoons chocolate chips (optional)
A small splash of vanilla extract
1 80z. Ball Glass jar
Add dry ingredients to your jar and mix well.
Add the egg and mix thoroughly.
Pour in the milk and oil and mix well.
Add the chocolate chips (if using), vanilla extract, then mix again.
Put your mug in the microwave and cook for 3 minutes at 1000 watts (high).The cake will rise over the top of the mug, but don’t be alarmed!
Allow to cool a little, and tip out onto a plate if desired.
———————————————————————————–
NOTE: Now I layered my DRY ingredients, and would then print a tag with the instructions and remainder of ingredients needed for the recipient to make the Cupcake in a jar.
When I made mine, I dumped the dry mix OUT of the jar, mixed it, then poured it back in.
HONESTLY-Me being the NON baker, that I am-I would just buy some cupcakes in a jar (from Bangerang Bake Shop! LOL!)and package it in my Pack a Picnic Cupcake box!!! You can MAKE the boxes while you wait for your order to arrive! LOL! But this is definitely more COST EFFECTIVE.
That is how “I” do things 😀 I call it the busy mom recipe. I’d rather work on the packaging (wink), than the BAKING stuff
Now here is my baked in a jar goodie
Cupcake in the jar-mixed
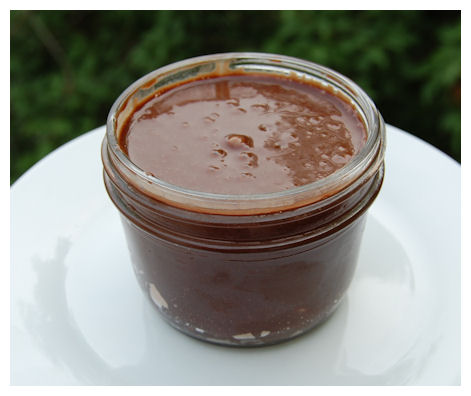
Cupcake in the jar, all cooked
This is the cupcake all decorated
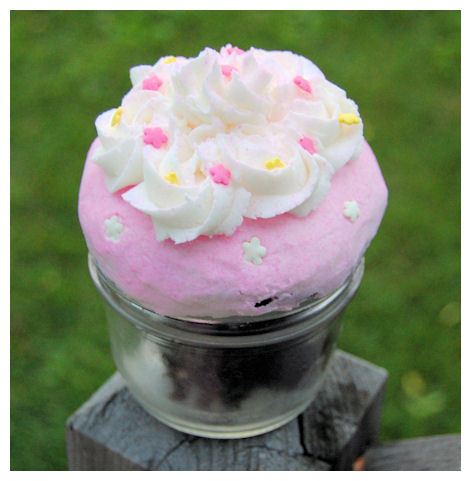
I took it OUT of the jar, and cleaned it! It looked too messy! LOL!
Then I put it back into the jar to decorate with homemade buttercream frosting!
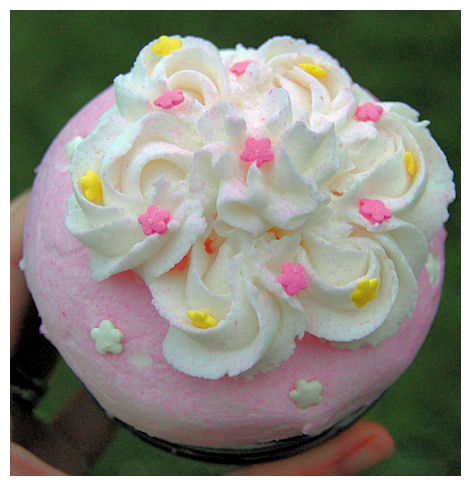
Yes! I actually cooked and frosted a cupcake! LOL! Who’d of thunk it.
(PS Yes I strategically placed each sprinkle too)
My husband was in shock! The cool thing is you can even out the volcano top with the frosting!
YUM!!!!!!!!!!!!!!
Granted my frosting skills are RUSTY!
Now seriously, who wouldn’t DIE over this gift set?! I love it!
Supplies:
My Timeless Template: Pack a Picnic
Stamps: Cupcake Collection, Just Journaling Line, Borders & Corners Circle
Cardstock: Dark Chocolate, Hibiscus Burst, White, Vellum cardstock
Ink: Dark Chocolate, Hibiscus Burst, Sweet Blush, Snow White Craft ink
Ribbon and Vintage Buttons: Hibiscus Burst Collection
Ric Rac and Pom Poms in white
Glitter
Nestabilities, SU! Scallop border punch for lip
8 oz. jar
I’m putting this up in my Esty Shop! (sometime today-fingers crossed) So SOMEONE can use it 😀 Complete with cupcake in a jar mix! No frosting though-I think that has to be refrigerated.
(I made the cupcake in another jar, and saved the one for my project!)
So that is my template/countdown peek today! I SOOOOO hope you liked it. I put a lot of time and thought into it!! If it helps or inspired just ONE of you, it was worth it.
Now for MORE template peeks:
Be sure to stop by this months My Timeless Template Guest designers blog Leigh Ann Baird
Also Kelly has a peek too!
Then don’t forget to hop on over to Nichole’s Blog (I know! Like you need a reminder), Lisa and Candice also have sets this month too.
Come back tomorrow-I have my 2nd template to peek for you!
Thanks for stopping by, and sharing my excitement every month! You are the best. I kow I say that all the time, but I mean it. You make all the hard work worth it, and your comments and completed projects just put me in complete AWE!
THANK YOU!
Embellish It
May 31, 2009 Author: mytime | Filed under: Home decor/3-D items, Papertrey Newsletter, TutorialsIts the first! So this post is all about facing a Challenge! Keep reading.
Before I begin I have NO IDEA what is up with my photos running into the sidebar. I resized a few times with little success. I honestly don’t have time to resize each one for the 5th time, then reload! GRR This post ended up taking several hours because of it, and I am over it. I hope you get the general details of it all. SORRY!
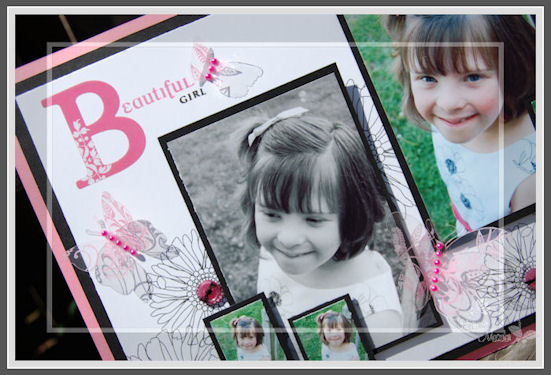
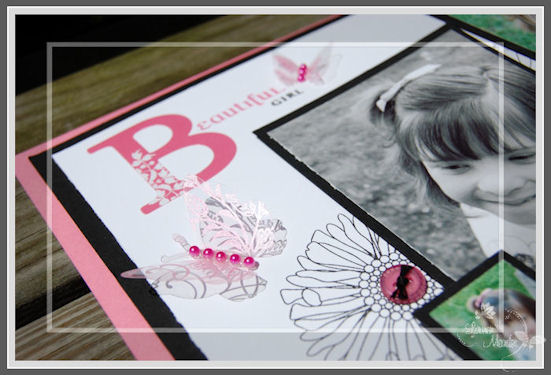
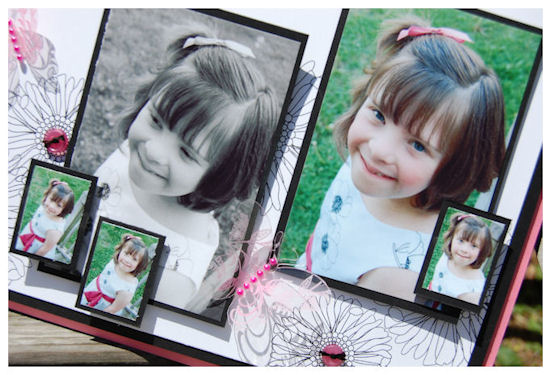
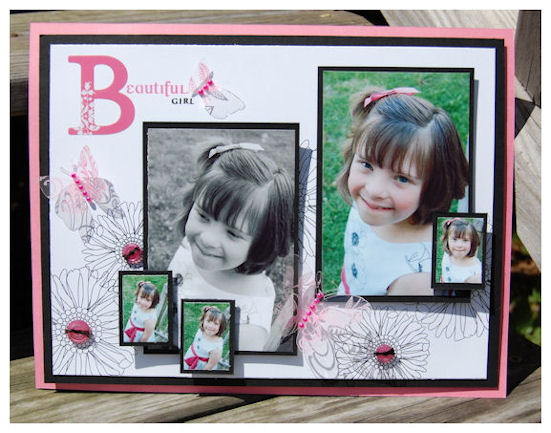
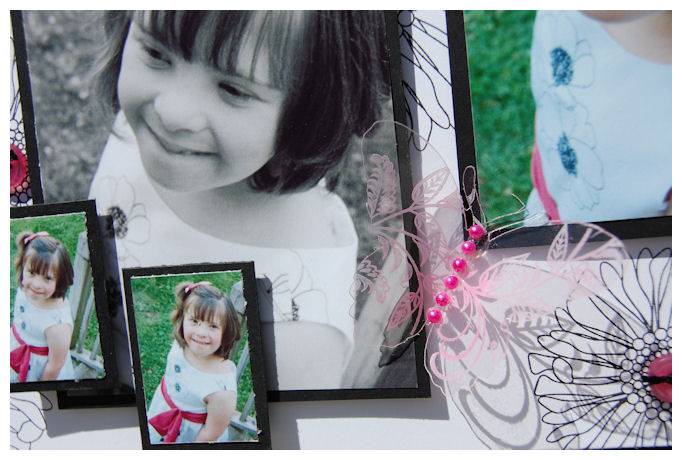
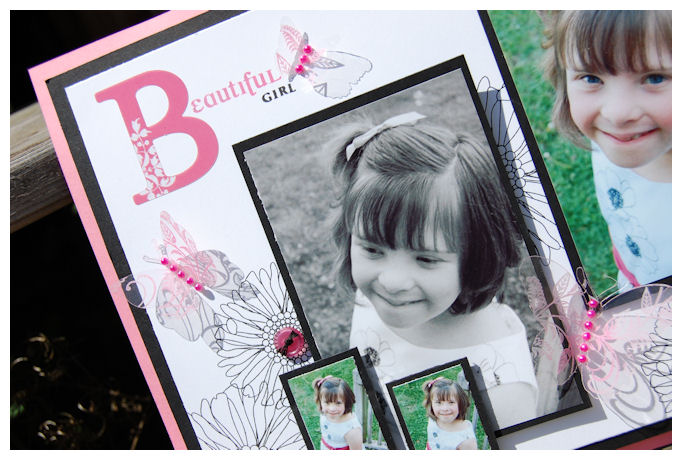
Alexa-Beautiful Girl

It is NOT often I do a “scrapbook page”.
I have to be REALLY inspired by something to even THINK of it. I had a particularly inspiring “photo shoot” with my daughter Alexa. She is ALMOST 10!
She was in a Spring Concert at School a week or so ago. She looked ADORABLE in her new dress that she picked out. We curled her hair, and got her ready- all pretty, so we had a photo session outside before the Concert.
To me, these are some of the BEST photos I have ever gotten of her! She was SOOOO “Alexa” when she is NOT in front of the camera. She usually can’t pose or makes funny faces, when you tell her to smile. She just contorts her face so unnaturally! LOL! So I just tried to let her be natural, herself. Cracking jokes while I took photos. THAT actually worked!!
I KNEW I wanted to capture them in a special way-forever!
This page just FLOWED out of me so easily. I’m beyond proud of it-especially my SUBJECT-Alexa :D)
She, to me, is like a butterfly. Hence my page. It is more than just a pretty page to me. It is capturing my thoughts, feelings and journey with my little girl, who has changed so much over the last few years.
This seemingly fragile human being, that started with so many odds against her, and despite it all, has morphed from the caterpillar (who avoided getting eaten by the “birds”-aka all her life obstacles) into a BEAUTIFUL butterfly. Spreading her wings, and taking flight. Never did I think I would have such a blessing in my life 10 years ago. Many times I thought I would lose her sweet little life. I always cry when I type these posts about her. I hate that!
I could go on and on, but will end it there. I get very emotional when I think of Alexa and her journey through life. I already know I will ALWAYS be so proud of her and where she will be in life. I am now! And Im so thankful for our journey. ALL OF IT. Thankful that God chose me, off all the people in the world to take her journey with her. What a blessing she is.
Now I switch my emotional gears to the project challenge.
That then lead me to the challenge that Nichole posed for her design team.
We were to create our own embellishments, inspired by some embellishments on the market, that you could purchase. Our goal was to share how much more affordable-and even how EASY, it is to create your own.
I was inspired by Heidi Swapp Butterfly Ghost Shapes, that I had for like a year, and couldn’t bare to use up, since you only get 6 in a package for $3.99 and UP! That is INSANE.
See photo:
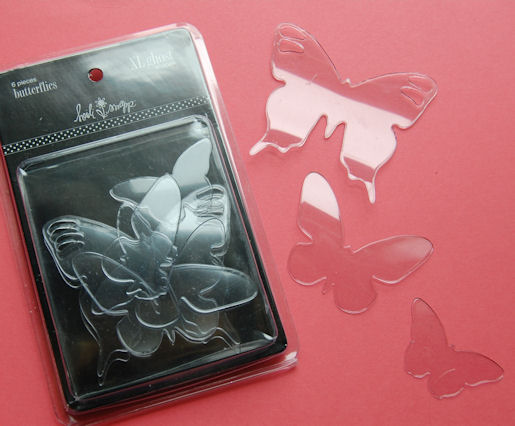
This is what comes in the package -these are the 3 shapes
You receive : 2 large, 2 medium and 2 small acetate butterflies as shown.
So I figured I could EASILY make my own, for FAR LESS! Maybe even BETTER 😀
I began my venture with Papertrey Ink’s Clearly Creative Cardstock
You get 10 sheets for $6.00. That means MY cost per sheet is 0.60 CENTS!

THIS receipt is the breakdown of the cost for making my OWN!!
Its actually CHEAPER than that! LOL! Read on.
So I used my Cuttlebug butterfly die for my largest butterflies.
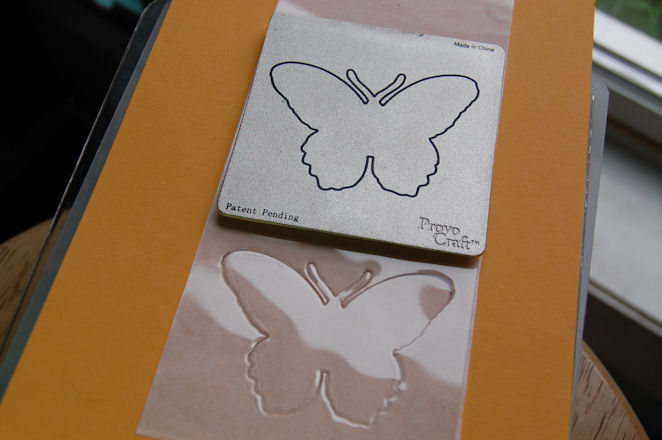
You can get 15 of the LARGE butterflies from ONE sheet costing ONLY 0.60 cents. You’d have to buy 7 or 8 packages of the Ghost Shapes to get that many of the largest butterfly shapes-costing upwards of $28-$32! What a savings!!
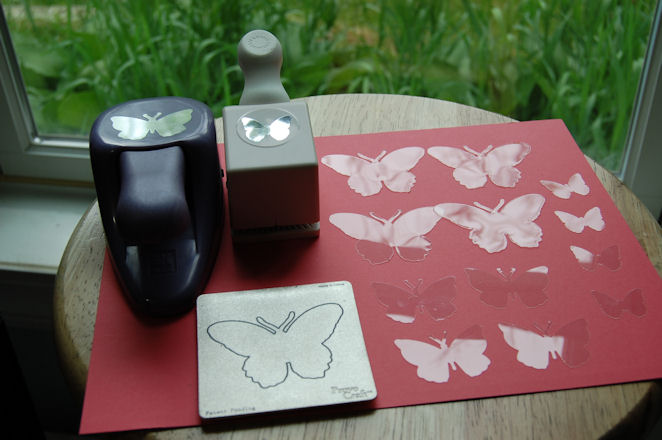
For my Med. size I used a Whale Butterfly punch by EK Success

I always keep the paper backing on till I’m done so I don’t LOSE anything I punch/die cut!
Now I can get 16 medium butterflies from one HALF sheet-or 32 per full sheet of acetate.
I the used a Martha Stewart Butterfly punch for my smallest butterflies.
I got 28 per half sheet of acetate, or 56 per full sheet!!!
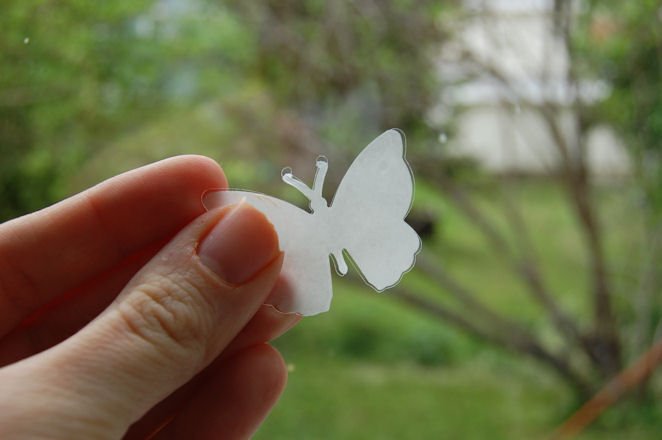
Here are a few of the shapes I got from ONE piece of acetate-and I could have gotten even more!
I just figured getting even 4 each per sheet is WAY more for your money ( UNDER 0.60 cents) as oppose to the $3.99 and up for ONLY 6 shapes that are store purchased.
That is where the recipt total came in
I then recycled the package that the Heidi Swapp Ghost Shapes came in, and put MY own butterflies inside!
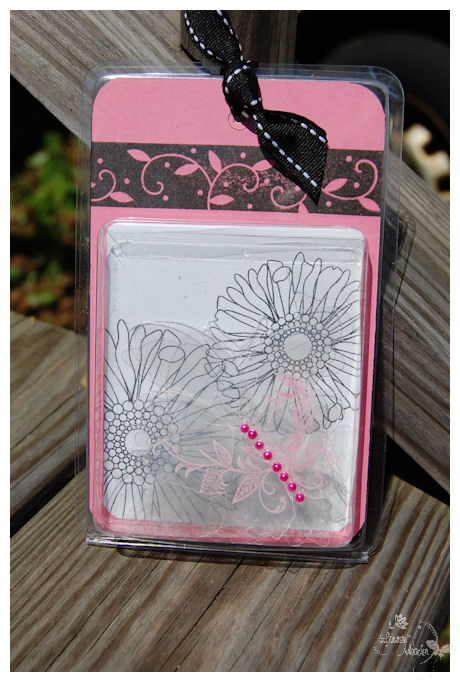
This is actually FULL of various shaped butterflies for a FRACTION of the cost!!!
I used one butterfly that I decorated for embellishing the front.
This is the product with my finished scrapbook page, that utilizes my embellishments: one of each size butterfly ON my page

Here is how I designed my own embellishment further by getting inspired by ANOTHER product
Notice my “B”.
Now here is what inspired my butterfly design
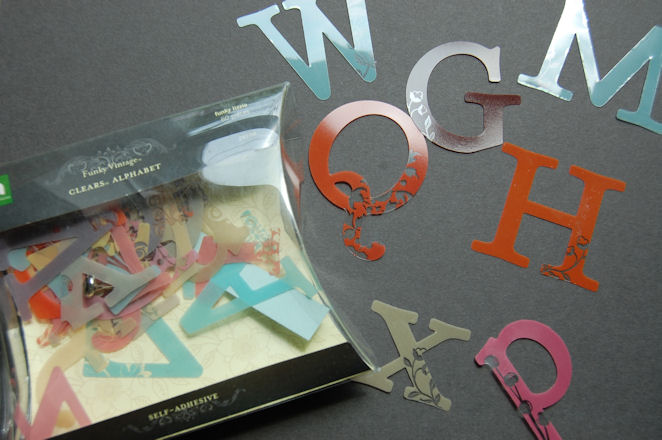
These are self adhesive acetate letters by Making Memories that sell for about $6 each
I used the “B” on my page. I loved the addition of the COLOR and FLOURISH on each letter, so I used that to further inspire yet another embellishment option for my plain acetate butterflies 😀
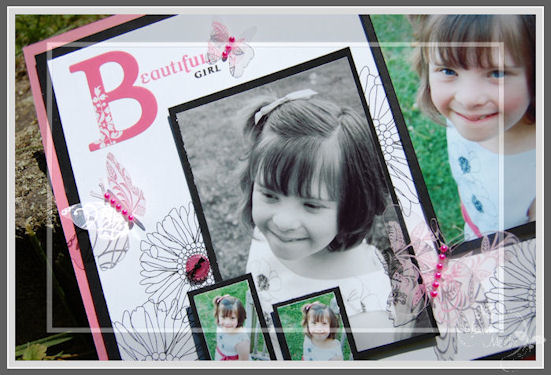
Here is a bit of a closer look at the B and the dimension my butterflies gave to my project.
Here is what I did:
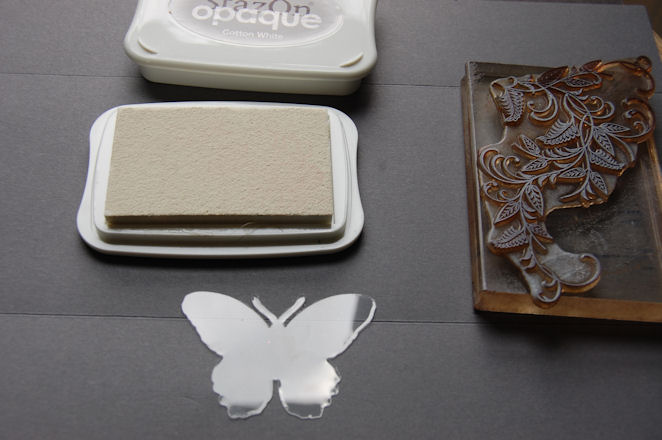
I just stamped my acetate butterflies using the flourish from With Sympathy, and White StazOn
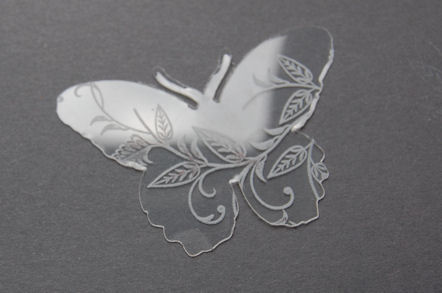
I added my color by using my own technique-Poppin Acetate with Jewel Tones Pastels
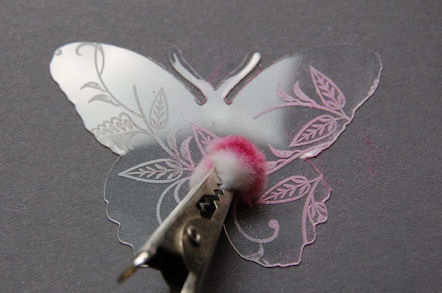
In SECONDS-a gorgeous butterfly embellishment!
I added some adhesive pearls to my butterfly centers, and was DONE!!

one more photo
So there you have it!
Now I can make SO many various embellishments JUST like these to suit ANY project!
I can die cut or punch ANY shape from the acetate I want or need, and I can embellish it without worry if I ruin one!
Supplies:
Stamps: With Sympathy (Flourish on butterflies), Friends til the End (flowers on white layer), Beautiful Blooms (sentiment)
Cardstock: Clearly Creative, White, True Black, Hibiscus Burst
Ink:True Black, Hibiscus Burst, White StazOn
Pebbles Pearlescent Pastels
Vintage Buttons , adhesive pearls, Making Memories Adhesive letter B
Cuttlebug butterfly die, EK Success butterfly punch, Martha Stewart punch
Now be sure to check out the design team!
Im sure this will get you making your own embellishments in no time, while saving yourself some money and using what you have! WIN! WIN!!
I hope you enjoyed my project 😀
Thanks for stopping by. I’d love to hear your thoughts, or if you give this a try too.
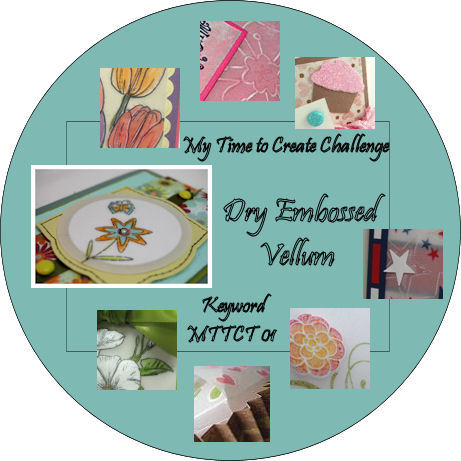
My Time to Create Technique Challenge
May 30, 2009 Author: mytime | Filed under: Cards, My Time to Create Challenge, Tutorials, videosWell today is the 5th weekend in the month.
I generally have 4 scheduled challenges a month for My Time To Create Challenge Team.
I let them opt to take a break this week! I should have taken one myself! LOL!
Anyway-I decided to do a technique challenge instead. I hope you find it fun and inspiring 😀
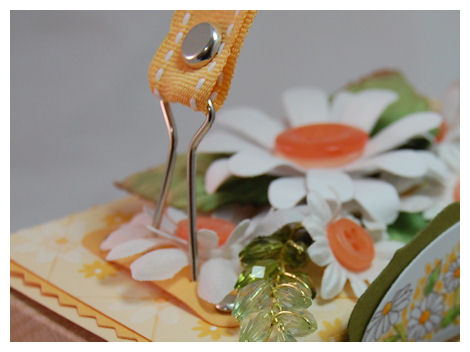
Dry Embossed Vellum
I LOVE using Vellum Cardstock. Today’s challenge is to DRY EMBOSS it!
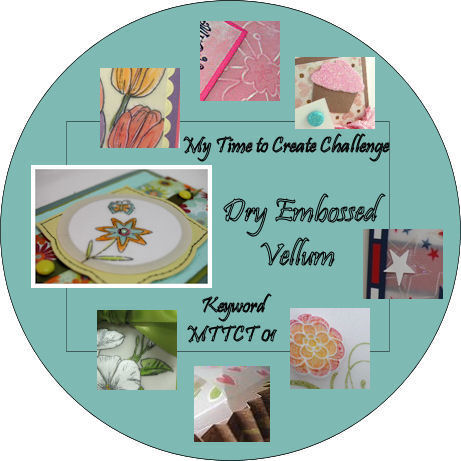
If you play link your creation HERE
Here is who is playing:
Me
Here is a quick video to give you the HOW TO! My card for this technique uses a stamp set from My Favorite Things Presents: Sara Williams Spring Sprouts.Bloomin vellum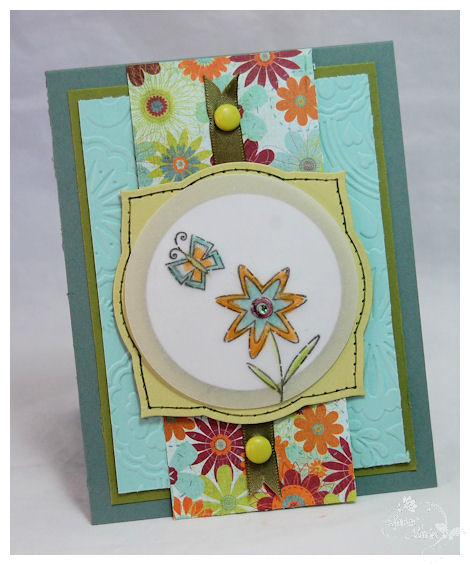
I had just picked up this fun and funky patterned paper. I felt that the flower and butterfly from this set not only MATCHED my paper, but showcased how fun and EASY this technique can be!
The open lines of the flower and butterfly are raised up. So cute in person.
All you need is:
An OPEN line image
Permanent ink
Vellum Carstock
Embossing Stylus with mouse pad/embossing/piercing pad
Copic or other markers
Close up dry embossed vellum detail
Obviously it is very difficult for you to get a visual of the actual effect this has on your creation, but trust me, its that little extra POP that makes it a WOW! The detail is raised up and pops out at you!
A fun and easy technique.
Just stamp you image in permanent ink.
Turn over
Dry emboss area/areas of choice (don’t press too hard!)
Flip over to front, and gently color!
Use glue dots to adhere to layer of choice-
and DONE!
Now its YOUR turn.
So have fun with it.
I cannot wait to see what YOU come up with.
My Etsy

Who I Designed For
Blogroll
- Alicia
- Alli Miles
- Ally Blankenship
- Amber
- Andi @ crafts on a whim
- Angel R
- Angie Z
- Anne Kranitz
- Becky O
- Bee
- Beth Silaka
- Bethany Paull
- Beverly Nash
- Bobbie
- Cambria
- Cammie
- Card of the Week
- Card Positioning System (CPS)
- Cards for Cancer
- Catherine Doucette
- Charmaine
- Cheryl Sims
- Chriss Rollins
- Christina
- Christine Ewing
- Christine Wooden
- Colleen Schaan
- Craft Critique
- Craft Gossip
- Crystal
- Dawn Easton
- Emily Giovanni
- Geny
- Holly
- Igne Groot
- Inspirational Craft Blogs
- Irene
- Jami Sibley
- Jeanne Streiff
- Jen del Muro
- Jeni Bond
- JenMarie
- Jenn Balcer
- Jenn Diercks
- Jenn O
- Jennifer E
- Jennifer Mick
- Jennifer Pereda
- Jennifer-Sweet Treat
- Joanne Basile
- Jodi Collins
- Julia Stainton
- Julie Masse
- Karen
- Kathryn Berthiaume
- Katie Cotton
- Kelley Holland
- Kendra
- Kim Scholfield
- Kris’s Color Stripes! Get inspired here
- Kristen Dubosque
- Kristin Eberline
- Kristine
- Laura @ Sunshine Stamper
- Laura Turnmire
- Laurie Schmidlin
- Lesa Rapp
- Linda Duke
- Linda-LSN
- Lindsey Botkin
- Lisa (lakind scs)
- Lisa Kind
- Lori Craig
- Maggie
- Mara Campbell
- Maria
- Maria Levine
- Mary
- MaryJo
- Melanie M
- Monique Hansen
- Moxie Fab World
- Pam Imholz
- PaperCrafts Connection
- Peppers and Pollywogs Kids party site
- Rebecca Grohall
- Rita
- Robyn
- Rose Ann
- Sarah Vrolyk
- Sharon Harnist
- Sharon Johnson
- Sharon Rivera (a chemisrty with paper)
- Sherrie
- Sophia Landry
- Storage Units, Ink, & More Blog
- Sue Berker
- Susan (Rainy)
- Tangii Crane
- Tracy
- Tricia Traxler
- Trudee
- Velta
- VivLyn
- Zena
MTME Pretty Palette Color Team
MTME Pretty Patterns Sketch Team
My Time Made Easy TM LLC
Shop till you drop!
Lauren Meader
About Me
Copyrighted material
Subscribe To My Blog
Pages
- About me
- Alexa’s Story!
- My Crafty Corner!
- My Time Made Easy™ LLC
- Our Make A Wish Trip to Disney!
- Resume/Publication List
Calendar
| M | T | W | T | F | S | S |
|---|---|---|---|---|---|---|
| 1 | 2 | 3 | 4 | 5 | 6 | 7 |
| 8 | 9 | 10 | 11 | 12 | 13 | 14 |
| 15 | 16 | 17 | 18 | 19 | 20 | 21 |
| 22 | 23 | 24 | 25 | 26 | 27 | 28 |
| 29 | 30 | |||||
Archives
- August 2013
- July 2013
- June 2013
- May 2013
- April 2013
- March 2013
- February 2013
- January 2013
- December 2012
- November 2012
- October 2012
- September 2012
- August 2012
- July 2012
- June 2012
- May 2012
- April 2012
- March 2012
- February 2012
- January 2012
- December 2011
- November 2011
- October 2011
- September 2011
- August 2011
- July 2011
- June 2011
- May 2011
- April 2011
- March 2011
- February 2011
- January 2011
- December 2010
- November 2010
- October 2010
- September 2010
- August 2010
- July 2010
- June 2010
- May 2010
- April 2010
- March 2010
- February 2010
- January 2010
- December 2009
- November 2009
- October 2009
- September 2009
- August 2009
- July 2009
- June 2009
- May 2009
- April 2009
- March 2009
- February 2009
- January 2009
- December 2008
- November 2008
- October 2008
- September 2008
- August 2008
- July 2008
- June 2008
- May 2008
- April 2008
- March 2008
- February 2008
- January 2008
- December 2007
- November 2007
- October 2007
- September 2007
- August 2007
- July 2007
- June 2007
- May 2007
- April 2007
- March 2007
- January 2007
Categories
- About Me
- All That Scraps
- blogger challenge
- camera/photo play
- Cards
- Contests
- family stuff
- FOR SALE
- Home decor/3-D items
- How to FAKE it!
- Introduction
- JUGS Challenge
- JustRite Stampers
- Lizzie Anne Designs
- My family stuff
- My Stamping Space
- My Time Made Easy
- My Time To Color Challenge
- My Time to Create Challenge
- My Timeless Template Challenge
- My Timeless Templates
- Mytime Mail
- MYTIME MOVIE/VIDEOs
- Papertrey Newsletter
- Pink Cat Studio
- Pretty Palette Challenge
- Pretty Patterns Sketch
- Product Opinions and Must haves
- Recipe's
- Saturday Sketch
- Smilebox Creations
- Stampavie
- Tutorials
- Uncategorized
- videos
Most Popular
- Create your own Onesie Card Tutorial-and important NOTE! PLEASE READ (2529)
- Saturday Sketch-Boxed bag holder (2333)
- Going GREEN! Fancy Flower Flourish-Closure Video (1478)
- Fabulous Favorite - Giveaway! (1336)
- a Prayer Request (1232)
- QUICK-Easter Baskets from Nestabilities-PTI style-and blog challenge (1063)
- Teaser Sketch (999)
- February Release Giveway! (and a little peek) (996)
- Group Post and Rambling Rose Video Tutorial (985)
- GIVEAWAY! Who wants it all?! (895)
Recent Comments (RSS)
- 첫충사이트: 완전히 흥미로운 블로그 게시입니다. 저는
- sarah: Wow, Lauren, what a stunning
- hedie: خرید راهبند
- 야동: Love to read it,Waiting For
- 야동: This seller is in a
- 바카라사이트: 여기 처음 왔어요. 나는이 게시판을
- 야동티비: I was surfing the Internet
- 바카라사이트: 비슷한 주제에 대한 흥미로운 정보를
- 바카라사이트: "여기에 제공해 주신 귀중한 정보와
- 온라인홀덤: 유익한 웹 사이트를 게시하는 데
Copyright © 2007 - My Time, My Creations, My Stampendence - is proudly powered by WordPress
This blog has been Tweaked and Designed by Sara Williams