Archive for the ‘Tutorials’ Category
Holly Jolly Preview Day 1
Sep 28, 2012 Author: mytime | Filed under: Home decor/3-D items, My Time Made Easy, TutorialsFirst let me say a BIG Happy 13th Birthday to my daughter Alexa ♥
I now have a teenager!
It seems like only yesterday I was watching the ultrasound screen, and seeing your little heart beating within me.
For those of you who follow Alexa’s Story, I updated her page!! <–Click it and scroll to bottom for update!
As October quickly approaches the holidays are just around the corner! Whether you are starting to think about Halloween gifts, fall ensembles, or Christmas & Hannukah gifts, My Time Made Easy ™ LLC is sure to have something wonderful to help you make gift giving simple, affordable and AMAZING!
Today the team has created some holiday gift items for you to enjoy, and kick start those crafty projects, if you are a begfinner or an experienced crafter!
Please note that our *NEW* products will not be made available for purchase until October 1st!
Wreath of Wishes
Gifted
Candy Wrapper
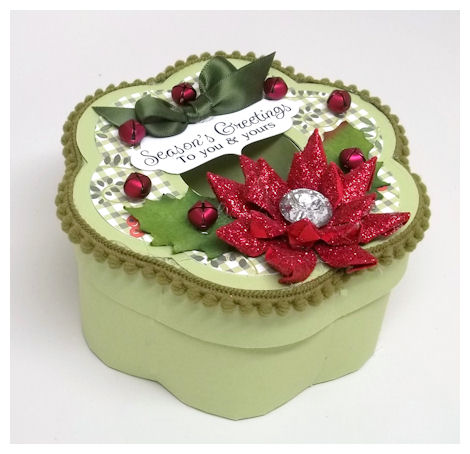
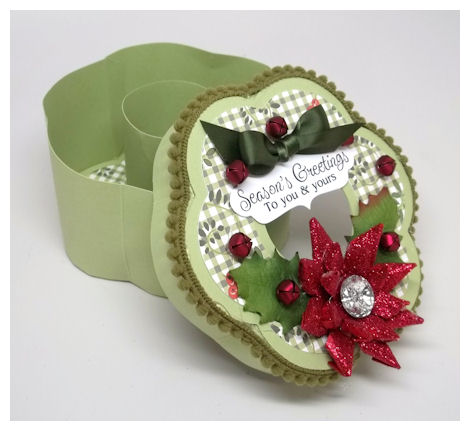
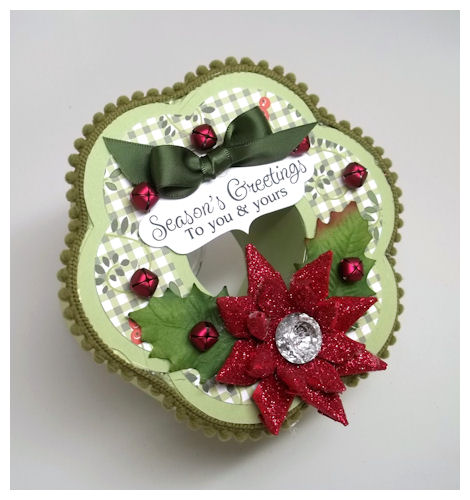
So today I am able to share a FUN new template with you called the Wreath of Wishes! This box was actually created LAST season, but we were releasing so many other fun items, we held onto it. The idea of the “wreath” actually came from one of our Design Team members, Debbie Marcinkiewicz ! I loved the idea, and especially loved that such a boc could be used ALL YEAR LONG!
Given our holiday them though I did use this amazing *NEW* template to create a Christmas gift box, as I will be needing to make as many holiday gifts as possible!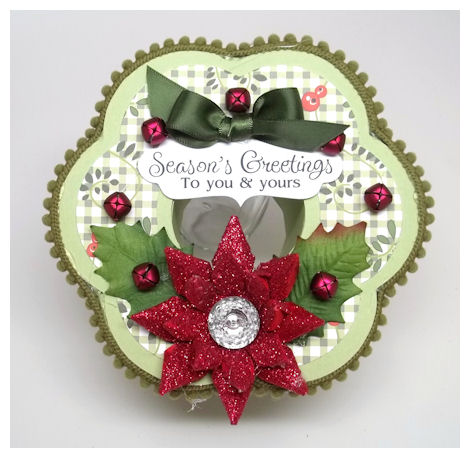
Available in PDF, SVG, GSD, DXF, WPC
Completed Project Size:
3 Inches Tall
5 Inches Around
Think of a simply stunning wreath hanging upon a door. It is simply the first impression a person gets before entering your home! A wreath is inviting, and brings on the feelings of love, the spirit of the holidays, the warmth of a season or simply a welcome feeling. Now we have created a template that allows you to GIVE that same feeling, in the form of a gift box!
We have taken all the elements of a wreath, no matter what the season, or occasion and made it simple for you to create a gift for anyone, all year long. Design the wreath to suit any holiday or occasion. We have a variety of Pretty Printable Paper’s, Pretty Pieces Cut Files or Pretty Impression images to help you quickly and easily accent your creation.
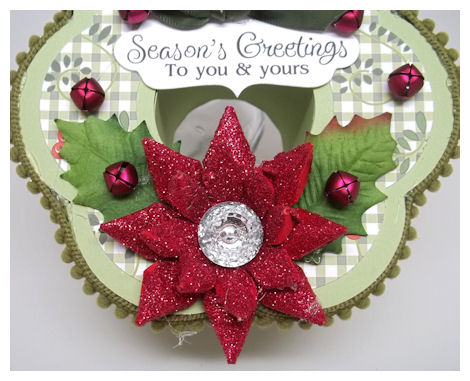
The scalloped shaped box has a circle center cut out that can be easily omitted to allow you further gift giving possibilities as well. Whatever you “wish” for the receiver this wreath like box is sure to welcome in feelings of warmth and love.
My wreath here was SUPER SIMPLE to create, I promise!

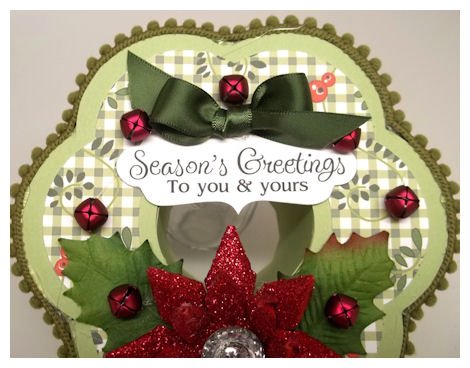
I used the Farmhouse Fresh © digital paper collection because I like the green gingham pattern, and the “berries”. I felt it gave a quick holiday feel with minimal work 😀 I’m all about little work but big WOW!

Available in PDF, SVG, GSD, DXF, WPC
Group Post: Holiday Year in Review
Oct 3, 2011 Author: mytime | Filed under: Home decor/3-D items, My Time Made Easy, TutorialsWelcome back everyone!
It’s our favorite time of the month, and that is A Year In Review, the Holiday version!
The team and myself are going to be sharing our Year in Review projects, when we give you a fresh take on some older product releases!
Your virtual stocking with be stuffed with more fun ideas today!
You won’t want to miss one single project today:
So speaking of stuffing your stocking…here is my first project!
Santa was here
That was always my first sign as a child that Santa had visited our house! I’d see my stocking on our staircased filled to overflowing. I always loved the stocking stuffers the most as a kid. Still do.
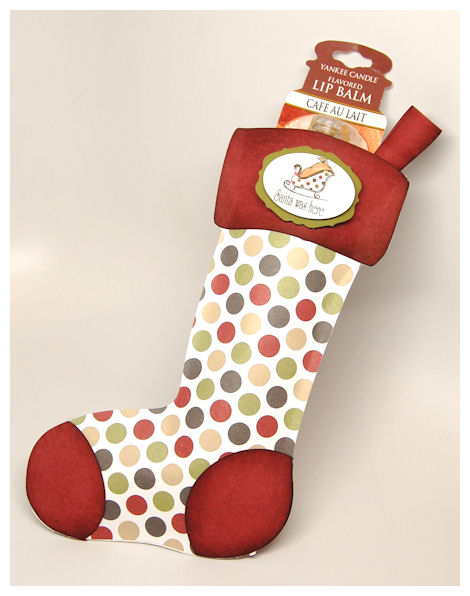
I have taken the NEW! The Stockings Were Hung Cut File, and made it into a three dimensional stocking from cardstock, that you can actually stuff!
You may want to try using this template with actual fabric of felt!
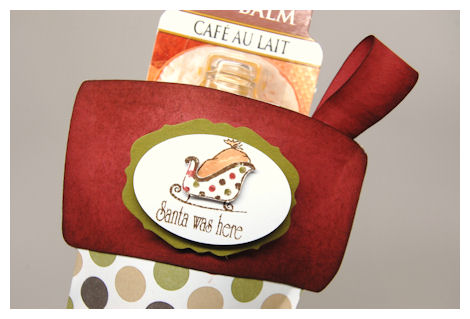
I chose to use the”old” Secret Santa © 32 Images to adorn my stocking. It was perfect!
To make this go from a simple cut file, which is perfect for dressing up any mantle, tree, card, or gift, to a three dimensional stocking. I simply printed two sheet of the “old” Timeless Tradition © polkadot patterned paper, then cut it out using the NEW! The Stocking Were Hung Cut File. The decorative pieces were cut from a cherry cardstock, and were sponged with a distressing ink.
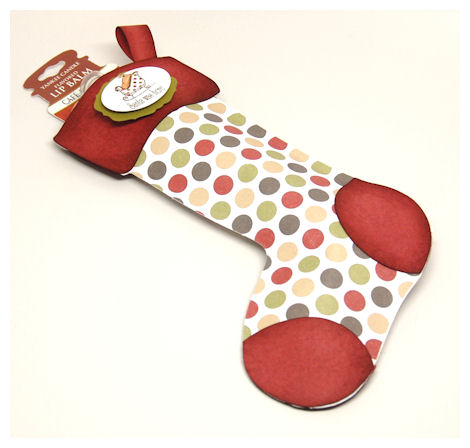
This is the back
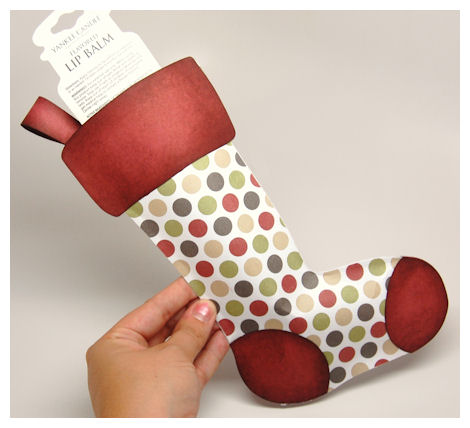
I ALWAYS say to make sure your project is complete and details in all angles! This is no different.
Be sure you mirror the template before cutting the pattern, so that the patterned sides of the paper fit together, as you can see here.
Then use a really good adhesive-I actually used ZipDry, to adhere all around the edges-leaving the top open.
I was actually able to stuff this with a bunch of fun stuff. In here I have lip balm, travel size hand sanitizer, lotion and some cocoa packets!
What a fun and inexpensive project!
Even the kids can do it.
Supplies from My Time Made Easy ™ LLC
Secret Santa
Pretty Printable Digital Paper:
Timeless Tradition
The Stockings Were Hung
Now using the same idea that we used for the NEW! The Stocking Were Hung Cut File, I used for the NEW! Frost Bitten Cut File!
Frost Bitten
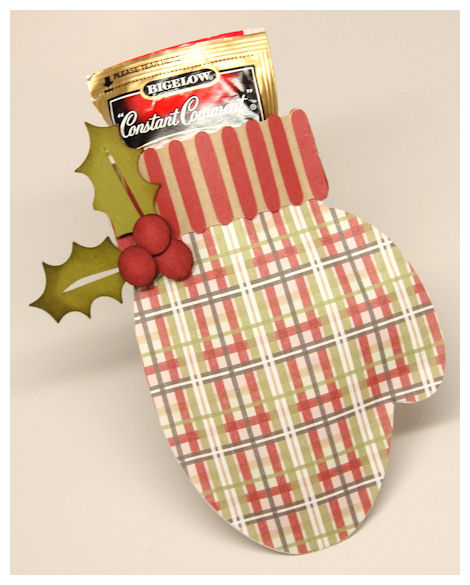
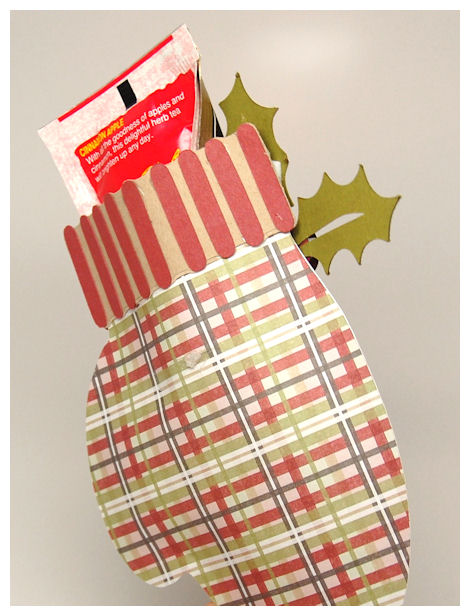
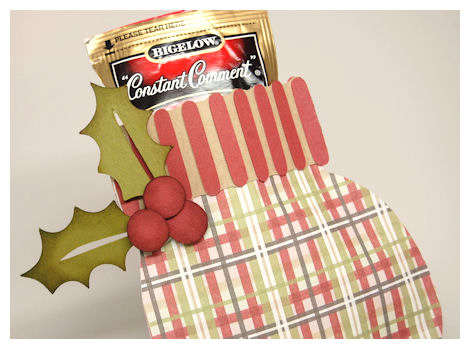
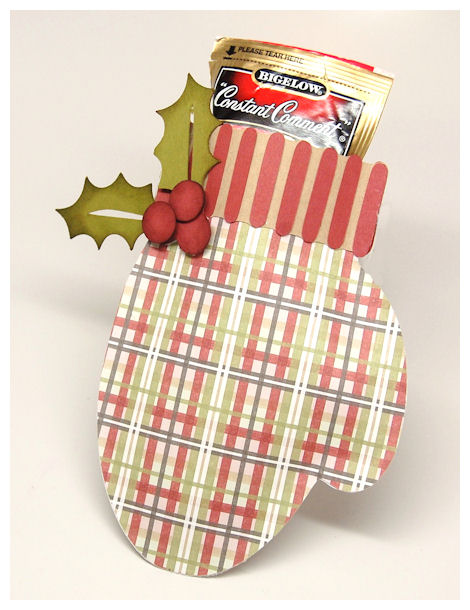
This is a super cute cut file that can be the perfect pennant, hung on a door, on a tree, placed atop a gift, or like here, made into a fun three dimensional pocket to hold something to warm the heart.
You can use this cut file with cardstock, fabric, or felt! Imagine the possibilities.
I used the holly berry from the Frost Bitten Cut File to adorn my mitten. I love how the holly leaf turned out. It alone can be used on a variety of other projects.

I stuffed in some tea packets, to help that someone special keep warn. This is a gift that costs pennies,takes only minutes to make, but has an amazing impact!
Supplies from My Time Made Easy ™ LLC
Pretty Printable Digital Paper:
Timeless Tradition
Frost Bitten
So there you have it! Some more great gift ideas to help you package up some affordable & simple gifts as inexpensively as possible.
I hope you’ll check out what the team has shared and try some of the ideas for yourself! Its great to experience the joy of giving something handmade.
See you back here soon.
September: A Year in Review (video tutorial)
Sep 4, 2011 Author: mytime | Filed under: Cards, Home decor/3-D items, My Time Made Easy, MYTIME MOVIE/VIDEOs, TutorialsToday is one of everyone’s favorite posting subjects!
The team and myself are going to be sharing our Year in Review projects, when we give you a fresh take on some older product releases!
Be sure you scroll down to see my two video tutorials today too!
You won’t want to miss one single project today:
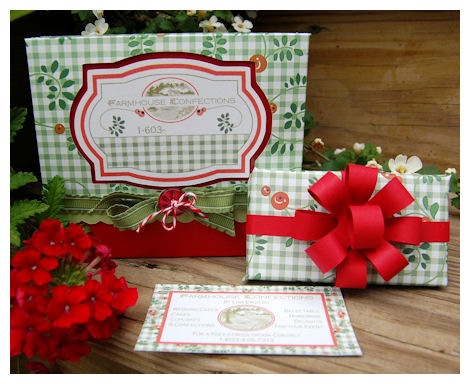
My project was designed for a friend of mine a few months ago for her birthday. She is getting started in her own home based business, where she makes custom cakes for all occasions. I blurred out some of her personal info, so if things look “off ” you now know WHY 😀
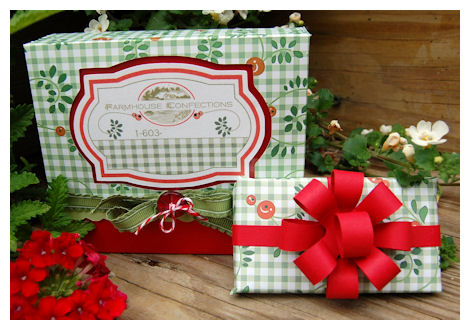
Beginning Buisness Kit for Farmhouse Confections
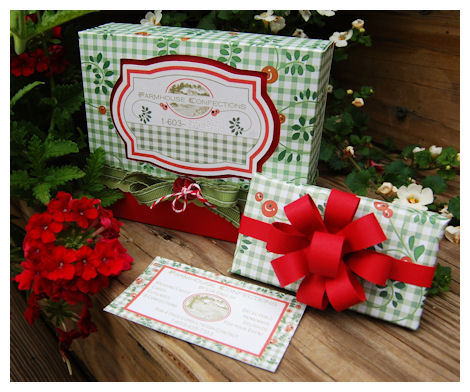
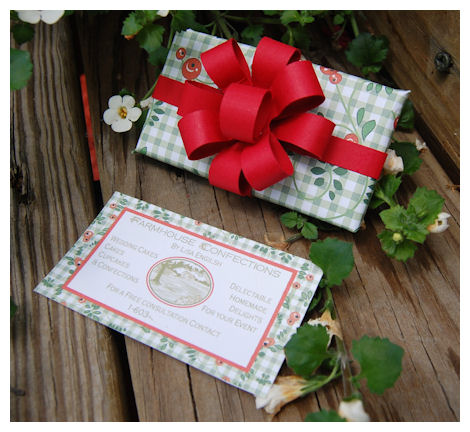
Based on some of what I heard her mention wanting for her buisness name/logo/theme, I designed her a custom set of business cards, with a coordinating box using the For Keeps © template.
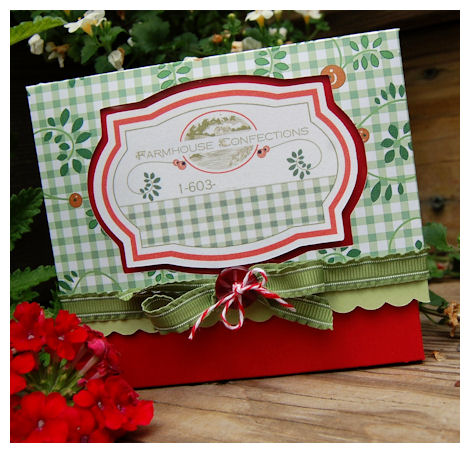
I created the label on the box using the Be Dazzled © set, and some elements I designed just for her, and cut them out using the Be Dazzled © Cut File. She can slo use the label I created to print onto adhesive labels, then adhere atop her cake boxes!!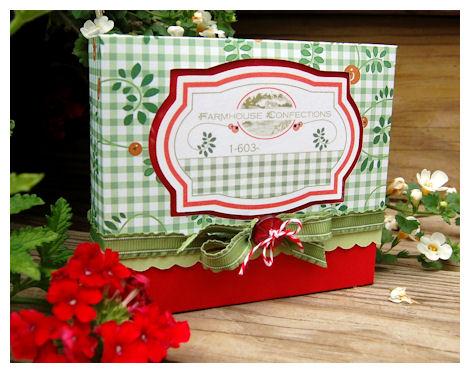
I also designed the paper that I used for this For Keeps © box, specially for her. I figured the For Keeps © box would be perfect for not just presenting her new business cards, but holding her special recipies, or photos of her work past creations, if she does a consulatation.
The package with the bow is actually the paper I created, printed out onto my regular computer paper to serve as my WRAPPING PAPER, to wrap up her business cards!
Did you even consider trying that with our collection of Pretty Printable Digital Papers?
Check out our video here for how you can assemble the Abra-Bow-Dabra ©
and make your own wrapping paper:
[youtube]https://www.youtube.com/watch?v=QXL09xlnGk4[/youtube]
AMAZING! Now you can even have coordinating/customizable wrapping paper 😀

Just add the Abra-Bow-Dabra © and it’s perfection!
If you haven’t tried the Abra-Bow-Dabra © yet, you should give it try 😀
This is the 2nd version of using the bow:
[youtube]https://www.youtube.com/watch?v=K3u2fUSfKb0[/youtube]
It really is THAT easy!
Supplies from My Time Made Easy ™ LLC
Pretty Packaging Templates: For Keeps
Pretty Impressions Stamp Set: Be Dazzled
Pretty Printable Digital Paper: Custom Made
Pretty Pieces Cut File: Be Dazzled, Abra-Bow-Dabra, Border Builders Open Scallop Dot (around bottom of box lid)
Well thank you again for joining us for another successful release here at My Time Made Easy ™ LLC!
We hope you enjoyed all the fun creations we have shared with you, and that you give them a try yourself.
Until next time 😀
Tote-ally Stunning!
Sep 3, 2011 Author: mytime | Filed under: Cards, Home decor/3-D items, My Time Made Easy, TutorialsWe are back again to share some more ideas with you all!
Today you will want to check out:
I get busy during the month, but really do enjoy sharing what I get to create, when I get the time. These first week of the month releases really keep me grounded, and allow me to share what I truly love doing with you all. I love getting creative, but its all the “design” stuff in between, that I need to do in order to keep bringing you all more products each month. I’d love to make a 100 different projects with each template, but time if often a huge factor, and I need to move on. That being said
I really enjoy going “back” and taking our older products and mixing them with some of our newer products so show you that you can use ANY older products with our newer ones! New or old, they all work well together. You can really re-new your projects by using different products each time you create a Pretty Packaging Template!
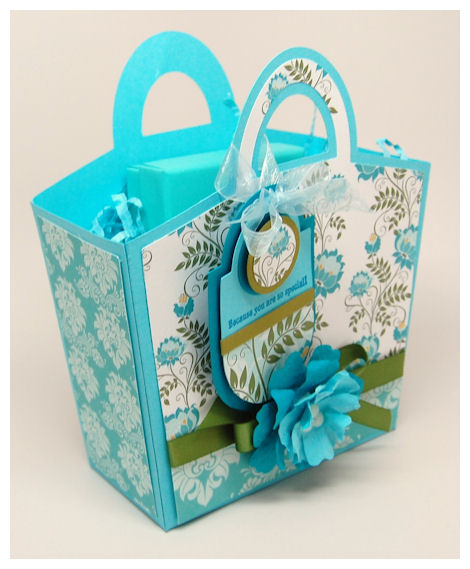
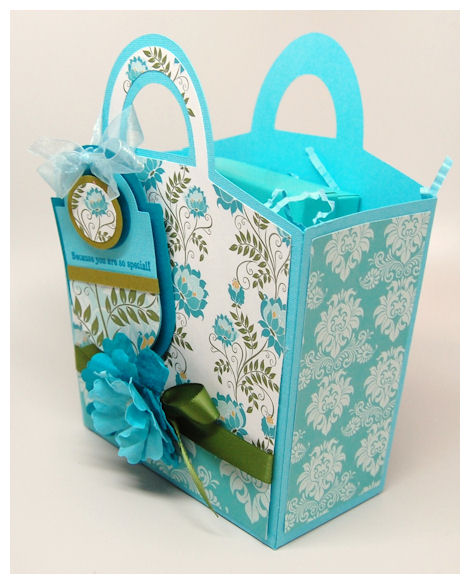
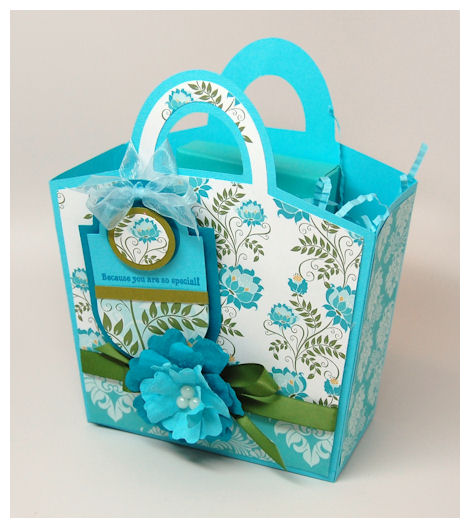
The NEW! Tricky Treat Tote © is great for all occasions. I can’t even begin to fathom all the possible uses. It it the perfect boxy/bag for all year round! That is why I chose to use it again today.
Let me tell you, some pretty patterned paper is all this tote needs to create a real WOW! factor, quickly and easily! This is the perfect Pretty Packaging Template for all sorts of gifts, or when you are very short on time!
I chose the stunning patterns from the Blooming with Elegance © collection, and the coodinating pattern from the Crawling Vine Silhouettes © collection for my WOW factor on this template today!
Inside this bag is a charm from Tiffany. That was my reason for going with the pretty sky blue color 😀
The tag really adds to this design. I love the Round Up Tag © which has some cool coordinating images: Round Up © 18 Images – Digital which make this tag really unique, but the pieces in the Round Up Tag © , can be used all on their own too!
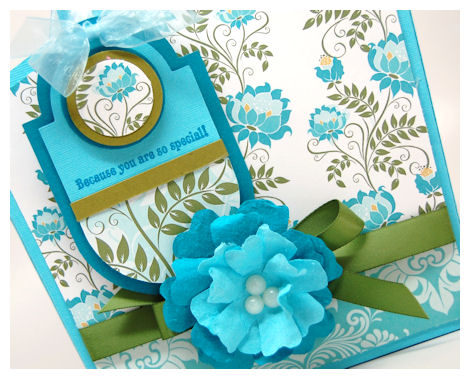
So obviously, I used the Round Up Tag © to create the design/layers of my tag on this project. Just layering some coordinating cardstock, and patterned paper, mixed with a sentiment from a Secret Surprise © set, which was perfection!
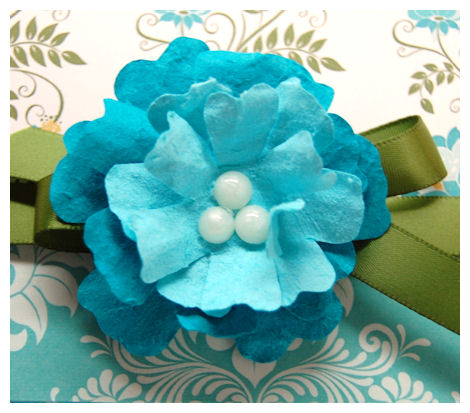
Tricky Treat Tote
Pretty Printable Digital Paper:
Tomorrow we all share a group post: A Year in Review! That is where we use older products and share some NEW! ideas with you! So please come back then for some truly inspiring gift ideas.
Pretty Preview: It’s in the Bag!
Jul 30, 2011 Author: mytime | Filed under: Cards, My Time Made Easy, Tutorials, videosWelcome back to the first Preview of our August 1st Release!!
The items will be available for purchase August 1st 😀
The team and I are sharing some AMAZING projects just in time for “Back to School”.
We are all using the newest products to jump start some ideas for amazing projects you can create on your own, with all our coordinating products.
Check out the team for all the previews, and amazing ideas!
Now let me share my project and some product details with you.
You may recall seeing my lil’ peek at this project below, a few months ago when I posted this video:
[youtube]https://www.youtube.com/watch?v=zTXP3QUgLZs&feature=channel_video_title[/youtube]
Now for the details on my project featured in that video.
Amber goes Back to School!
What better way to send your children back to school, or welcome a new teacher, than with a fun gift set?!
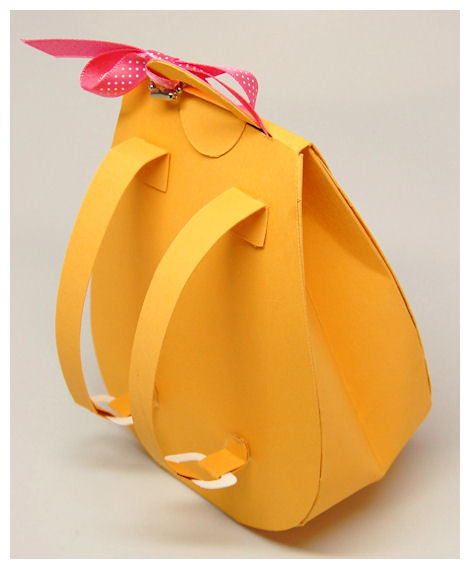
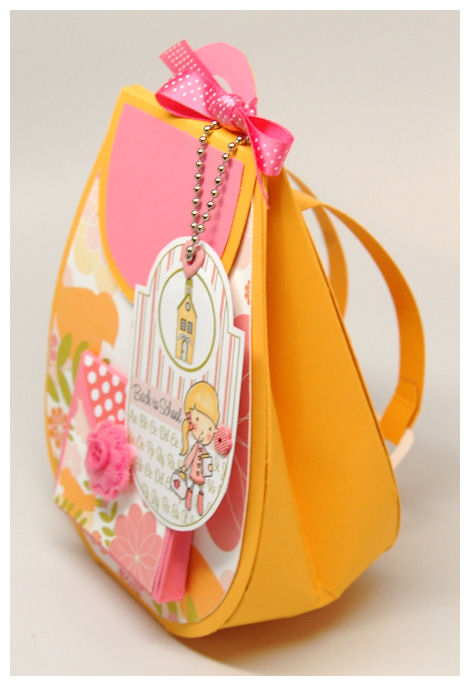
This is a 3 D version of a back pack! Complete with all the little details that make it over the top AMAZING 😀
I made a ” back to school” gift set for each of my 3 children, which you will see as the week progresses, ensuring to tailor each to their personalities. That is the best part about creating your own cards, tags and gifts! You have the creative liberty to tailor your gifts to every person you make it for.
The 3 different children featured in the NEW! Back to School set were designed with my own children in mind 😀
Let me share the details of this set!
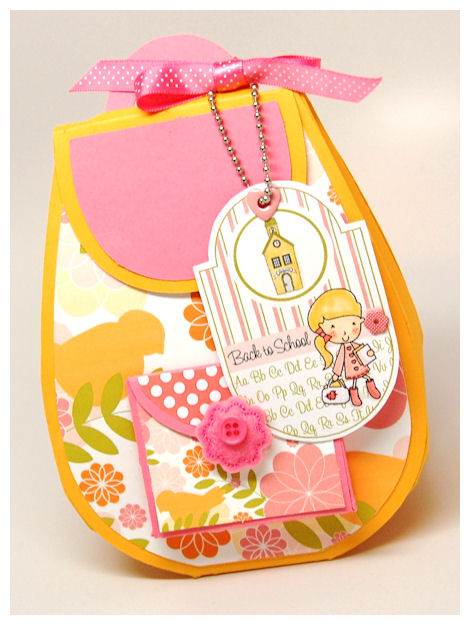
Available in PDF, SVG, GSD, DXF, WPC
Completed Project Size:
4 1/2 Inches Wide
5 1/2 Inches Tall
2 1/2 Inches Deep
Gift giving for teachers and students is now in the bag!
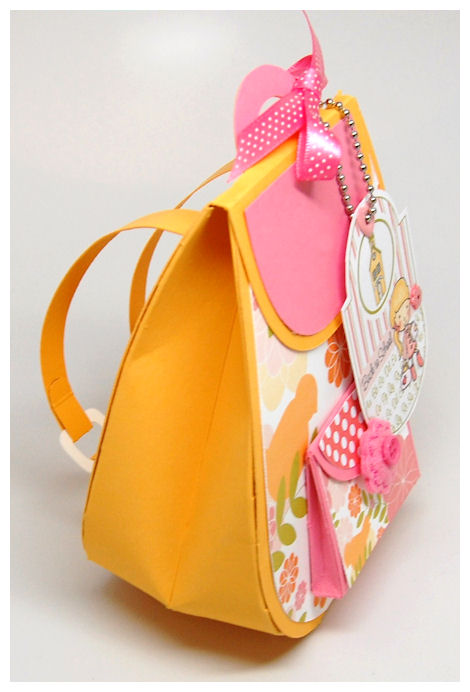
LITERALLY!
What better way to celebrate your favorite student or teacher by creating a paper version of a backpack?! This will truly brighten someones day, and amaze them all at the same time.
The details, like the front pocket, rounded bottom, flap closure, with hanging top tab are so much like the real thing, but what is really fun is the back!
Check out the “straps”! This is a truly complete template, and all the decorative layers come with it too! You can use patterned paper on the front, back, sides, flap closure, hanging tag, and there is even the front lil’ pocket too!
Whether the occasion be back to school, congrats, great job, you can do it, teacher appreciation, camping, hiking, sleepover, or just a little thinking of you, or pick me up, this is THE template for you!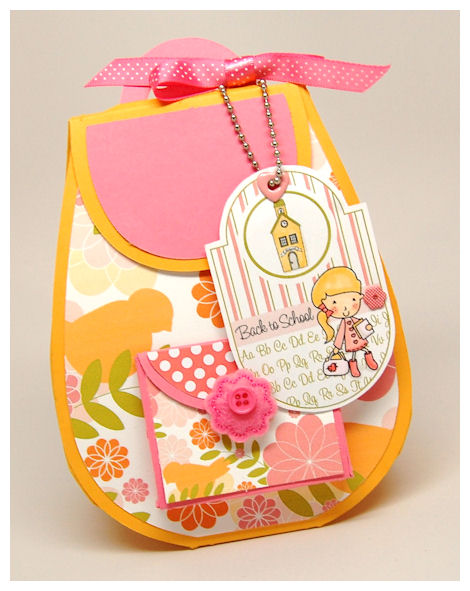
Packaging Ideas:
Cards
School Supplies
Snacks/Treats
Chocolate
Candles
Hand Sanitizer
Gift Cards to book store, coffee shoppe or office supply
Get Well Gifts-tissues, cough drops, hand cleaner, tea etc.
There are no limits to what you can do. Just think about that special someone, and pack them a bag full of thoughtfulness.
You will definitely want to check out the Back to School Pretty Impressions Stamp Set, as it was designed to coordinate with this fun template! We also have the Lunch Box Love Notes & Additions Pretty Impressions Stamp Sets, with the Boxed Lunch Pretty Packaging Template. These will all really help you create some amazing gifts for teachers and/or students!
Now for the decorative details:
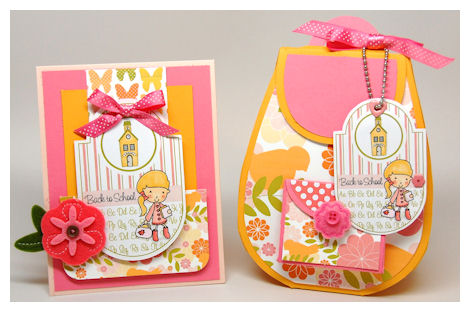
My color scheme came from my Spring is Here © Pretty Printable Digital Paper. I paired it with the Darling Dots collection©.
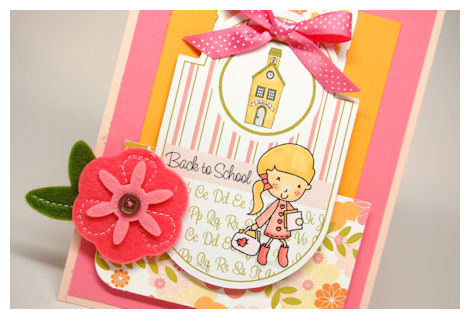
I used the NEW! Back to School set, combined with the NEW! Round Up set for my hanging tag, which was cut using the Round Up Tag Pretty Pieces Cut File.
As you can see the hanging tag on the It’s in the Bag template is different in size than that on the coordinating card. See the above video for instruction on using Cut Files with Digital Images 😀
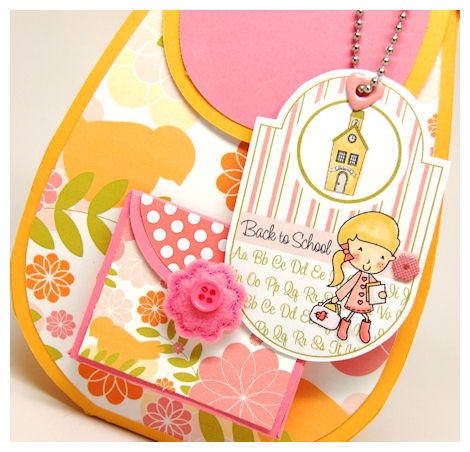
I digitally created/layered the tag, and digitally colored all the details, except “Amber”. I wanted to hand color her! It was SO FUN! I love coloring, but I like knowing I don’t HAVE to. I also love being able to resize my digital images, and cut files for so much versatility. This tag was designed using a combination of both the NEW! Back to School set, and the NEW! Round Up set.
Here are the set details
Back to School Set of 27 Digital
Images $12
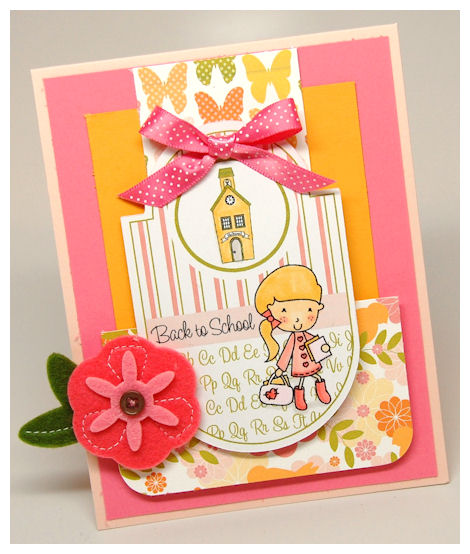
Back to school time! How about any time?
This is an amazing set of images perfect for teacher and student! This set is just what you need for the student who deserves a little pick me up, or a pat on the back, going back to school, teacher appreciation or end of year gifts for faculty. This set of images with coordinating sentiments will help you make amazing cards, gifts, pretty packaging, altered items, photo frames, scrapbook pages, and more, year after year.
Images in this set include:
3 students: One boy, and 2 girls.
A backpack
Star
Butterfly
A school house
Note book
Pencil
Ruler
Stack of books
Apple
Practice lines
Sentiments Include:
ABC border
You Made the Grade
Practice makes perfect
For my teacher
This bag belongs to:
My Notes
All Star
Super
My Notes
Dream a little dream
Back to school
There is no measure for my appreciation
You Rock
The best teachers
teach from the heart,
not from the book.
You have brains in your head.
You have feet in your shoes.
You can steer yourself
in any direction you choose.
You’re on your own.
And you know what you know.
You are the one
who’ll decide where to go. Dr. Seuss
You will definitely want to check out the It’s in the Bag and the Boxed Lunch Pretty Packaging Templates, as they will really help you create some amazing gifts for teachers and/or students! We also have the Lunch Box Love Notes & Additions Pretty Impressions Stamp Sets, as well as the Lunch Box Love Notes Cut File!
Round Up Set of 18 Digital Images $12
We can always use more gift tag options, and this one is really fabulous!
I’ve designed a fun set that was designed to Coordinate with the Round Up Tag Pretty Pieces Cut File. Now you can create many amazing patterned tags using the designer elements in the set that allow you to create a new tag and pattern each time you get crafting!
This is a tag building set that gives you numerous tag pattern options. Mix and match this set with any other sets in your collection for an amazing arrangement of possibilities.
Available in PDF, SVG, GSD, DXF, WPC
You will fall in love with this latest addition to our Pretty Pieces Cut File Collections!
This tag was designed to coordinate with the Round Up Pretty Impressions Stamp Set
The round up tag is a unique shaped tag, with layering options, which is the perfect tag to adorn all your paper crafting projects, from cards, scrapbook pages, and Pretty Packaging Templates! You can easily design this to suit any project!
Whatever you add this to, it is sure to round up some compliments!
Speaking of compliments, this is just the beginning of AMAZING products we have for you this month! Be sure you check out our official release tomorrow, and stay tuned all week for ideas from myself and my team of amazingly talented designers. You can never have too much inspiration 😀
See you tomorrow
Video:Using Digital Images with Your Personal Cutting System
May 21, 2011 Author: mytime | Filed under: My Time Made Easy, Tutorials, videosHi world
I have a special video to share with you all today 😀
As the June (can you believe it?) Release is fast approaching, I wanted to share a special video I did using some soon to be released digital images, and a coordinating cut file.
The purpose of this video is to show you how you can use our Pretty Pieces Cut Files with your Pretty Impressions Digital Stamp Images and your personal cutting system!
I have received MANY inquiries if this is even possible, and if so, how to go about doing it.
Well as you will see it is easier than ever!
Give it a try 😀
[youtube]https://www.youtube.com/watch?v=zTXP3QUgLZs&feature=channel_video_title[/youtube]
(Items you previewed in this video will be available for purchase August 1st)
Can you imagine all the possibilities with being able to resize BOTH your images and cut files?! Simply amazing. This makes every penny you spend on My Time Made Easy ™ LLC products, stretch even further. I love versatiltiy and knowing I am getting the most from my crafting $.In this economy we need it 😀
Let me know how you like this 😀
Also be sure you check out our other video tutorials on our website–>CLICK HERE!
See you next time 😀
Kids wear!
Apr 18, 2011 Author: mytime | Filed under: Cards, family stuff, Home decor/3-D items, My Time Made Easy, TutorialsHi everyone!
Today I’m back to share with you some more project ideas!
I love getting as much use out of my crafty products as possible. Any time I can involve my children and save some $$ it is even more of a bonus for me (and my hubby is happier too!)
Did you realize you can utilize the Pretty Impressions Digital Stamps to create you own customized items?
Let me further explain exactly what I mean 😀
For example, my son Noah is 8, and he is a tough critic when it comes to his clothing. It has to have some sort of picture on it that he likes. That usually means the shirts are ore pricey and once he is over that character, he won’t wear it anymore.
Since the release of the SK8R Boy © Digital Stamp Set Noah has been after me to make something just for him.
So with that being said, I used the SK8R Boy © Digital Stamp Set along with some iron on transfers (which you can buy at any craft store, Staples, and even Target!) to create some cheap customized shirts!
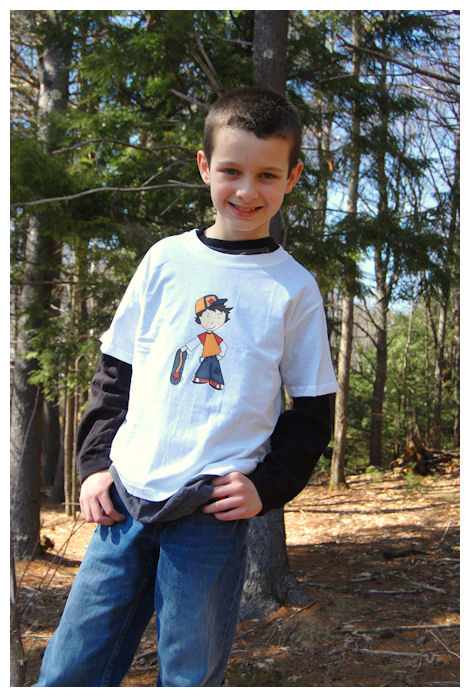
Isn’t this so cute?
He LOVES his new shirt!!
I was able to digitally color my image (see our video here!) and then I was ready to go. Once you get to using the digital stamps you will find so many fun uses, they really maximize your $ worth!
I purchased a 5 pack of cotton tee’s for real cheap 😀 You can get shirts of all types of quality for much less when they are PLAIN. Plus you hit a SALE and BINGO! Awesome start to something fabulous.
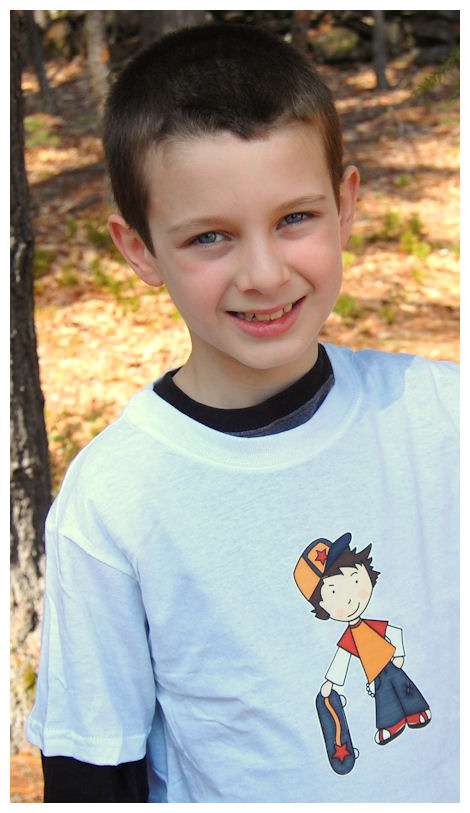
Just read the directions on your iron on transers before you print. Some call for you to mirror the image (keep in mind if you use WORDS) and others don’t. Some are for light fabric, and others for dark!
I personally think you can get more use fromthe dark color transfers because you can put them any dark color, but also use them on white and light colors too, they feel more sturdy, and print more vibrantly than the light color transfers. That is just my opinion of course.
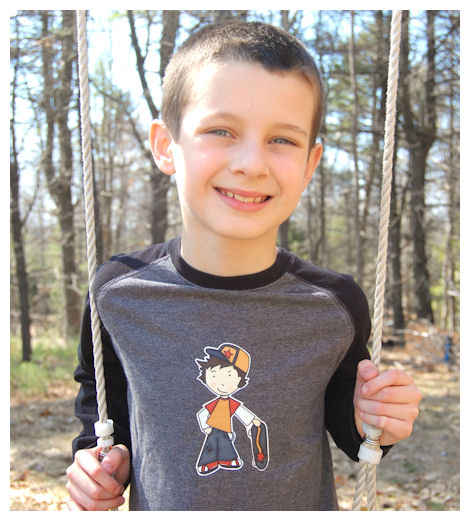
Here is the same image layered onto a black shirt Noah owned but would never wear!
This time I flipped the direction of the image.
He didn’t want any wording, so that was easy!

Seriously can it get any easier?
It doesn’t have to end at just SHIRTS!
You can use the images as coloring pages, put them on tote bags, shirts, onesies, diaper bags, lunch bags, hats, backpacks, fabric covered frames or photo albums, comforters, curtains, pillows, jackets, canvases…you get the idea!
These projects make inexpensive and amazing personalized gifts for everyone!
This would make a AWESOME party project or favor.
This is just another way you can use your Pretty Impressions Digital Stamps to create you own customized items.
Well that does it for me. I’ll be back with more tomorrow 😀
Perfect Peek Day 1: Aviary Amazement
Feb 25, 2011 Author: mytime | Filed under: Cards, family stuff, Home decor/3-D items, My Time Made Easy, TutorialsI’m BAAAACCCCKKK!!! Did you miss me?
(Get ready to brace yourselves with your favorite beverage! I have tons to share, including a tutorial! You won’t want to miss a thing-I swear)
WOW! It’s been so long since I’ve posted. Trust me I’ve been BUSY! It will all be worth it.
Family life is insane as my mom continues her Chemo & Radiation treatments, with an impending surgery. I have had to work nights to keep her commercial cleaning company going (exhausting after spending my days in the hospital with her), then there has been some custody drama regarding my 2 year old niece (long story), school meetings,doctors visits, and a bug that has gone around the house twice :C NOT FUN! Despite all that I’ve been squeezing in what I can for the business, and my sanity!!
So that being said let me kick off the first day of peeks for our AMAZING March Release!!
With aviary themes being so popular, I think and HOPE you all will be excited about this next release. I’ve made something seemingly IMPOSSIBLE, now possible for ALL skill levels.
So without further delay let me get sharing.
Today you will want to stop by and visit several members of our talent design team, as they share NEW! projects with you.
OK now it’s my turn! What you are about to see is 100% made from paper!!!!!!!! If you love aviary themes then this is sure to knock you out of our seat 😀
I made this template SO LONG ago. Almost a year now. I have been waiting for the perfect moment to release it, and with Spring on the horizon, it is now time.
Introducing our NEWEST Template: Caged
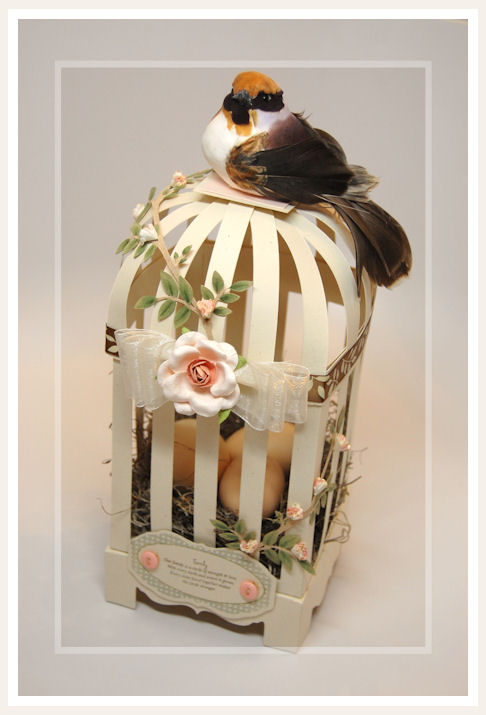
Can you believe how amazing this is? Talk about a WOW! gift holder, or table centerpiece.
It is really large too. I think we all had a hard time properly photographing it because it is such a wonderfully large template.
The bird on the top was purchased at Michael’s Craft Store. The bird itself is about 3 inches tall, and with the tail almost 5 inches long.
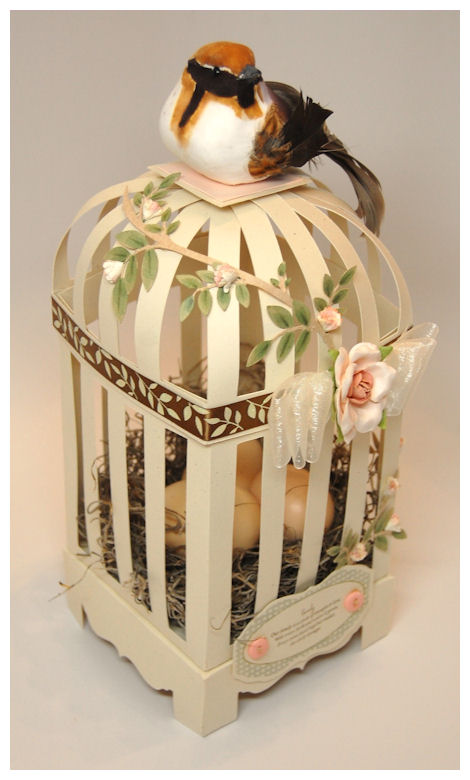
Here are some template details:
Available in PDF, SVG, GSD, DXF, WPC
Completed Project Size
4 1/2 Inches Deep
10 Inches Tall
Have you ever longed to create and customize your own “Bird Cage”from cardstock and/or patterned paper? Well we now have the PERFECT “bird cage” template. This is the epitome of unique and stunning! This is the perfect packaging for display. Use for a table setting, centerpiece, or as a creative and unique gift holder. Makes the perfect wedding centerpiece, or party favor too.
No detail was spared in the creation of this, and it was made FOOL PROOF! I love the detailed base the cage sits on as well. Stunning detail.
You can fill this with a variety of gifts such as bird themed items, floral arrangements: real or artificial, candles (especially battery operated), homemade/handcrafted treats of all kinds, bath & body products, stuffed animals, drink mixes…endless possibilities.
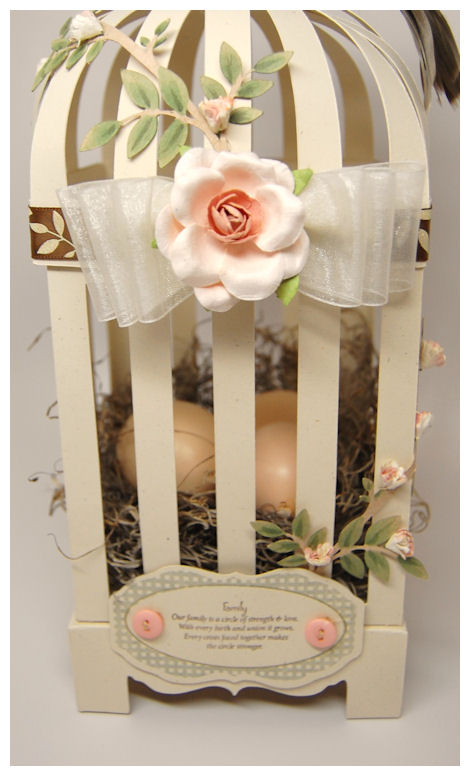
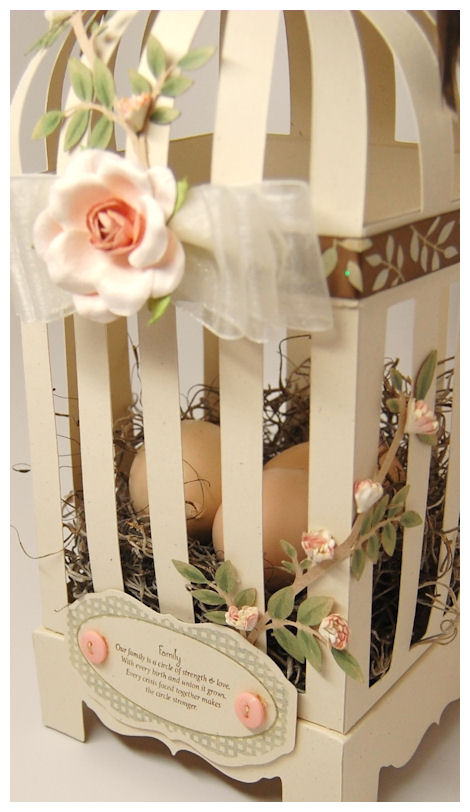
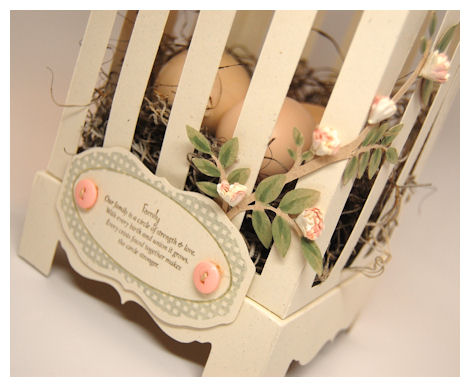
Inside my cage here, since it is a centerpiece I put some floral moss (in the floral section of Michael’s Craft Store) in the bottom, and create a “nest”. Inside I added some plastic eggs (also from Michael’s Craft Store).
Note: You can weave through cardstock pieces and create a unique “basket” as well! You will see more of that another day! VERY COOL!! I can’t wait to share.
No matter what gets “caged” up in here, the packaging itself is sure to be used and displayed long after the gift is gone.
The top is separate, so you can take it off to retrieve the gift you wish to package inside.
This template coordinates with the Singing Silhouette Pretty Impressions Stamp Set, as well as the Branching Out, and the A Little Birdie Pretty Pieces Cut File.
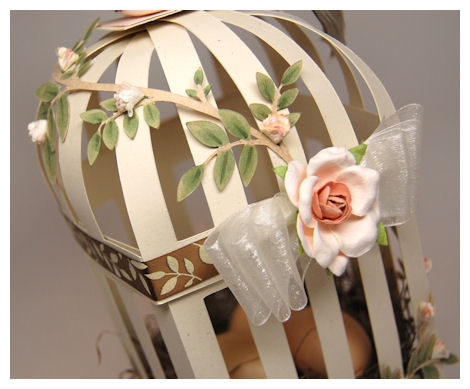
Here you can see there is a leaf/branch applied to the cage. That is from our Branching Out Cut File! I think you will find it AMAZING to add to any card, tag, template or project! I just used glue dots to adhere it to my template. Very simple!
I cut my Branching Out Cut File in Kraft cardstock. Once cut out I used my Copic markers to color the leaves in 😀 You could also re-cut the file, in whatever leaf color you chose, and cut just the leaves off, adding them to the base. I would fold them in half for added dimension 😀 Just a tip
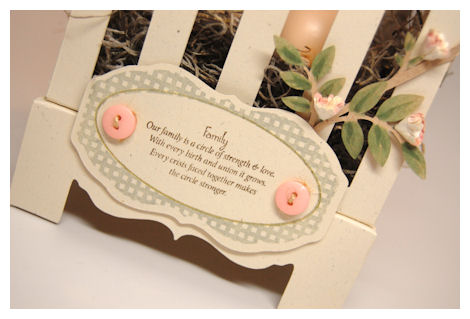
For my sentiment I used the So Sentimental set.
It reads:
Family
Our family is a circle of strength & love. With every birth and union it grows. Every crisis faced together makes the circle stronger.
I felt it went perfectly for the message I wanted the centerpiece to have, given our recent trials, and the fact we had our bird with her little nest. The label and cut file are an early peek at what is to come next month 😀 Sorry I couldn’t resist adding it!
Now the little flowers…I made those too 😀 Read more on that further down, once you get to the card!!
This was made specially for my mother, to use as a centerpiece on her dining table. I asked her specifically what she wanted for colors, and I went to it. She hasn’t seen the final product yet, but I will present it to her within the next week or so.
Now for her card …and a peek at the new stamps and paper!
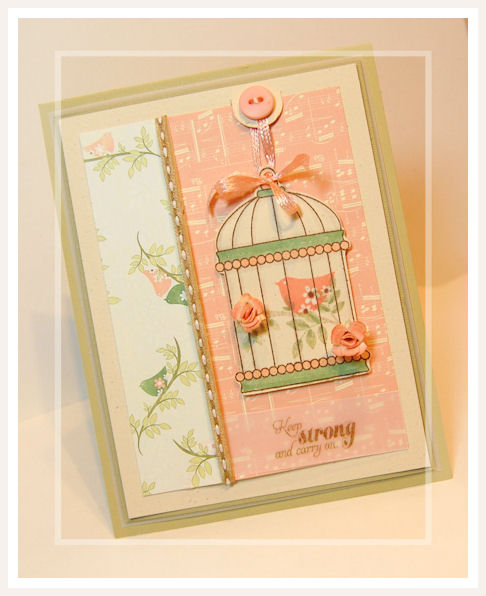
Keep strong and carry on.
I love this card, that I made to coordinate with the bird cage. There will be a tutorial below on how I made those little roses 😀
The cage, branch, and bird are from an upcoming set called: Singing Silhouette. More details on that set tomorrow. Obviously it will have a bird theme to it 😀
The cage image was cut using the Caged Cut File. This cut file was designed to allow you to have a cut out of the cage/cage door image (not shown) from the Singing Silhouette stamp set. I added some additional color to the leaves using a marker, once stamped.
The paper is from our latest collection called Whistful Wonder & Whistful Music Magic.
This sentiment is of particular significance at this point in my mom’s life. It feels great to have the ability to create such meaningful gifts for such a time in one’s life.
The sentiment is from a new set called Keep Strong.The set was a collaboration of sentiments, between Catherine Doucette and I. We will release it in March, as March 8th is International Women’s Day , for awareness on domestic violence against women.
More details on that set will also follow soon.
Since my mother was almost murdered by her husband(now almost a year ago-this April) I wanted to create something in honor of her!!! She continues the court battle to help prosecute her husband (who is in jail) for the brutal attack on her. He is fighting for 50% of all their assets, and for her to PAY HIM alimony once he is released from jail! Lord, if there is a justice system in the world, please help my mother with this uphill battle, that is so draining on her.
OK now how about we get the the tutorial part?
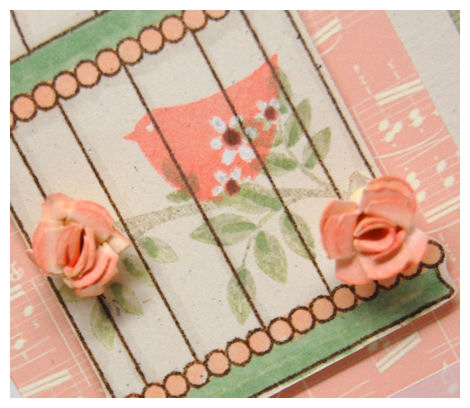
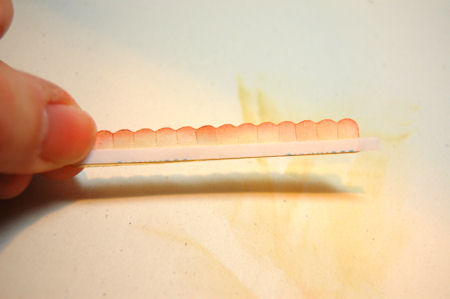
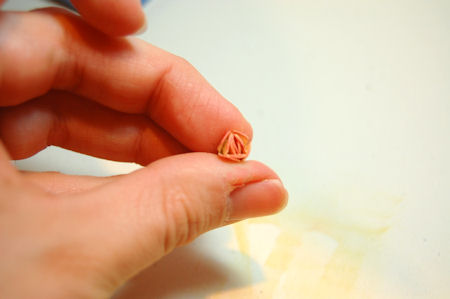
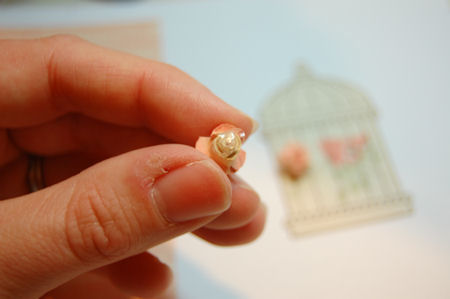
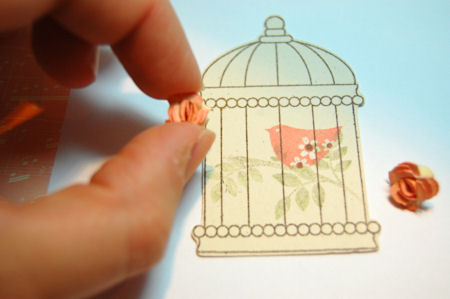
Check out these AMAZING mini roses, and the flowers that are on the template in this post. I made them in under 2 minutes!!
Want to know how?
I used the or you could use the Border Builders Open Scallop Cut file (the plain scalloped one) for this project. Or you could use the Rosey Posey Rosettes too.
Directions:
1) Resize the plain scallop border to 1/2 inch wide (select maintain proportions prior to resizing)
Use a THIN cardstock, or even printer paper!
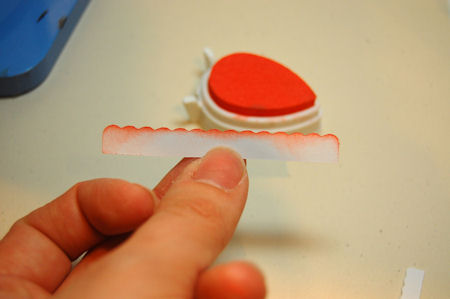
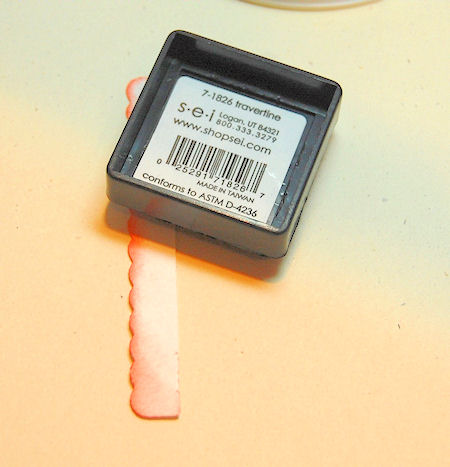
2) I then sponged on my color. A darker pigment ink on the scallops.
A lighter ink on the bottom.
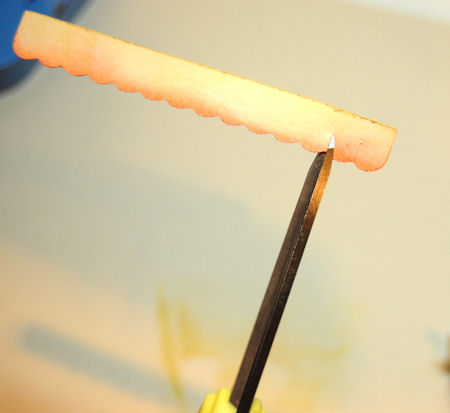
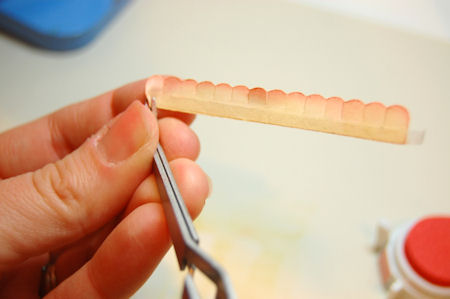
3) I then use my scissors, and snip between each scallop.
4) Add a THIN strip of double sided adhesive.
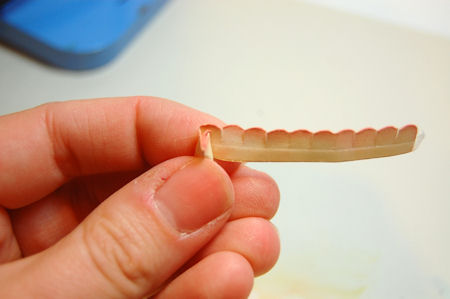
5) Take my craft pliers to begin to roll the scallop strip.
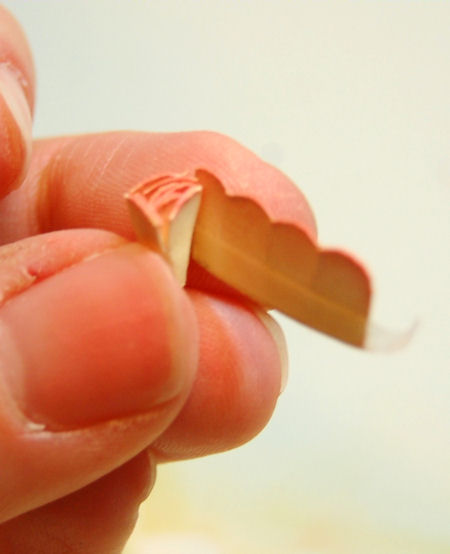
6) Carefully roll the strip, ensuring you pinch the bottom tightly.
7) Keep carefully rolling…
8) Done rolling!
Once it is all rolled, because you used the sticky adhesive it will be all set 😀
9) You then want to take your fingers, and pull back/roll down the snipped petals. You can then pinch some of just leave them alone!
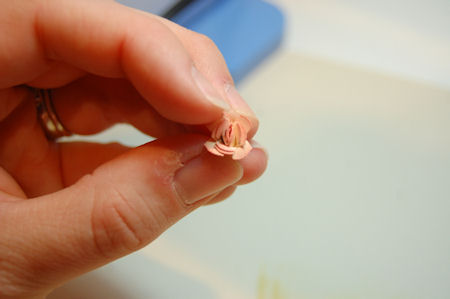
10) To adhere to a project, apply a large clear glue dot to the bottom.
The bottom is flat so it sits nicely on any project!
Now the possibilities truly are endless, and in NO TIME at all!

TIP: For the first template sample I used copy paper, and didn’t really fold the petals back! A whole new look!
Supplies from My Time Made Easy ™ LLC
Pretty Packaging Templates: Caged
Pretty Impressions Stamp Set: Singing Silhouette, Keep Strong
Pretty Printable Digital Paper: Wistful Wonder, Wistful Music Magic
Pretty Pieces Cut File: Branching Out, Caged Cut File, Border Builders Open Scallop Border
Well I think that is all I can cram into one day. I hope you are as excited as I am about this next release!
There is SO MUCH more to share, so come back tomorrow OK!
Video: How to use Simply Sensational Shoppe Digital Paper
Sep 7, 2010 Author: mytime | Filed under: Cards, Home decor/3-D items, My Time Made Easy, MYTIME MOVIE/VIDEOs, Tutorials, videosI am hoping you all get some creative time in today 😀
I’ve been quite busy here.
As promised I have a video tutorial for you today, so I can show you how easy it really is to utilize the Simply Sensational Shoppe Digital Paper. This collection was created specifically to be used with our NEW! Shop Around & Accessories Mega Template. The paper package features 10 different complete Shoppe designs in both a PNG and JPEG format.
You will want to grab a cup of your favorite beverage, and really take the time to view the video I have to share today, and read the post.
Kristin Bueter has a card to share today!
Also your newest design team member: Lisa Kind has her first solo Release project to share today too!
Here is what she says about her peek today
“A teacher I work with just got married in August and our team wanted to get her a gift card, and we needed something to present the gift in. I decided to make a wedding/bakery shoppe using the Shop Around Mega Template in her wedding colors. She wore an ivory gown with a pretty blue sash, so I went with those colors.”
—
Onto the videos!
This crazy 2 part series took almost 4 days between creating, attempting to download, then having to retake the videos, so I could create 2 separate NEW videos. Anyway, if it helps or inspires you I’d love to know that it was worth the effort. I feel like I never want to do another video again at this point! LOL!
Video Part 1
Video Part 2
In this video I will have showed you how to use this amazing Simply Sensational Shoppe Digital Paper, and I will answer some popular questions about the paper pack in my video.
This video will explain:
* the difference between a PNG and JPEG format, and how each is used.
* Why there are dual colors in the paper images, and how to change them.
* How to use your digital image in coordination with your digital stamp images and/or other patterned papers!
* How to cover/remove unwanted pieces
* How to use your favorite patterned papers to add those same colors to your design Simply Sensational Shoppe Digital Paper
There *may* be an additional tip or two I am forgetting to mention, but you will know everything after watching the video.
Now how about sharing my samples?!
There are so many amazing possibilities when you purchase this pack! I will show you just some ideas for how it can be used, so if you
You can mix and match Shoppe elements, digitally color them in, and save for future use, OR use them in black and white, so you can hand color! (a great project for the kids) You can even use our Digital version of our Pretty Impressions images to further add some designs to this paper collection. OR use the Digital versions to make you own.
This template & digital paper combination is sure to allow you to QUICKLY and EASILY make these stunning themed Gift Shoppe for any occasion, all year long!
We are happy to say we are going to offer even more Shoppe themes in the way of stamps and digital papers, as the holidays come around, and may even add a few must have “accessories” to the NEW! Shop Around & Accessories Mega Template! So stay tuned.
So that lead me to the projects featured in my video!
Aren’t these the CUTEST Pet Shoppe boxes ever?
Amber’s friend got a BAD case of poison ivy, and she bought her this little dog to cheer her up! Of course we had to create a home for it, so we made these. (I had to make two because Amber then got mad her friend was getting one, and she wasn’t :C)
SO this is the lil’ pup that her friend will receive. If I were a child getting this I would have been over the moon!!
As you can see each Shoppe theme comes with 4 decorative panels for all 4 sides of your Shoppe to be designed.
As seen in the video, I customized mine even further! Added a dog house with the dog, on this side.
Paw print on the door here. Flowers in my flower-box!
All around this is simply cute!
Now I took this same design, and layered it over the Custom Construction Materials instead.
On this one I made the top of my awning 3D
This is the back/other side
ALL the same design, just layered onto a different background! It makes it look like a whole NEW! house!
Now I should share the card that inspired my Pet Shoppe themed gift!
Paws-itively the best!
The dog image is from the On Display 1 set, and was stamped in a shimmery beige ink. I then stamped the grass from Home Improvement. The addition of the heart on the dog bottom is from Bringing Home Baby.
I made my own patterned paper using the paw prints are from the Sign It Set, and the heart/argyle pattern I created using the Argyle Amazement set! SUPER SIMPLE, and SUPER CUTE huh?
I love the little dog in this set. It was actually designed after the lil dog shaped colorful purse my daughter Amber carried around!
I loved the silhouette so much that I drew this one for me to have in stamp format 😀
As you can see I stamped colored and cut the ear, and put it on a dimensional. I added a googlie eye too. The dog nose was stamped using the dot image from the Argyle Amazement set!
I love the little paw prints I stamped at the bottom adding the little heart that is also on the dog 😀 This ribbon actually inspired this entire creation.
Supplies from My Time Made Easy ™ LLC
Pretty Packaging Templates: Shop Around & Accessories Mega Template
Pretty Impressions Stamp Set: Digital version of Sign It, On Display 1, Home Improvement Stamp version: On Display 1, Argyle Amazement, Bringing Home Baby, Home Improvement
Pretty Printable Digital Paper: Simply Sensational Shoppe, Custom Construction Materials, Cute Critters: Multi Hearts (color changed)
I hope this video was helpful and the projects inspired you to try your own! Don’t be afraid to try something NEW! It can be so fun and rewarding!!!!
I’ll be back tomorrow with even more projects and ideas as the team and I share a group post!
August Relase Perfect Peek Day #1
Jul 28, 2010 Author: mytime | Filed under: Cards, Home decor/3-D items, My Time Made Easy, TutorialsYes, I am FINALLY back!
I am a mom first, so my family has kept me really busy 😀 It is summer, so I like to get together with my friends and their children for frequent day trips with the kids. On top of that the dentist has kept us busy, and Amber recently go glasses! It’s been really crazy (as I expected since every summer is nowadays), and I’m taking whatever time I can to enjoy my family 😀 I will post photos after this release, I promise.
Sorry for my longer than expected absence, but there has been much to do for the August release, and even more for September! I’m very excited about the line up of sets and templates I have for the next few months! Things just get better and better!!! My brain is on overload now that I’m warming up back into crafting mode since our vacation earlier this month. I have to be honest the mojo was SLOW to return.
Now lets get to the long awaited eye-candy!
So get your coffee, tea, water, soda…or whatever beverage you fancy, because I have MUCH to share today.
It’s that time again! Project Peeks for the My Time Made Easy ™ LLC August 1st release are here! Note most products shown will not be available until that date.
At this point, I really feel like ANYTIME I make and share ANYTHING new its like Christmas for me!!! I can’t believe I’m able to share what I love with the world every month!
We are releasing a bunch of new stuff this month so be sure you stop by each day for the next 10 days!
TODAY if you want to see even more, you will definitely want to stop by and visit:
I am over the moon to bring you my first release peek using a NEW! template: Tote-All Package, and of course ad NEW! stamp set: Money Well Spent!! Details about both are within this post and of course will be on the website on August 1st.
Today is all about the SHOPPING! One of my favorite things to do 😀
So here is my sampling of new products.
Tote-ally Priceless Gift Set
Tote-All Package $5
Completed Project Size
6 1/2 Inches Wide
6 Inches Tall
1 3/4 Inches Deep
Available in PDF, SVG, WPC. DXF, and GSD
NOTE: Template is for the large tote. Mini tote was created using the original template, resized to be smaller using cutting machine software.
You can “tote” just anything you want in here! Plus it will be so stylish and FUN! This template truly is the Tote-All Package!
Designed after some of my favorite fabric purse totes, I thought we could have a fun “gift bag” with some unique options! There is a sweet angled/tucked bottom that allows you some space for all sort of gifts! Let’s face it, sometimes you just need a awesome gift tote/bag. This is definitely “it”.
The tote base is wonderful on its own-just add some sweet ribbon handles!
This is the standard version:
I love how this turned out. I used the Pretty Printable Digital Paper :Purse Patterns for my tote “fabric”. For the decorative stip I stamped the flower from Sensational Stems, with the circle image from the Just For You set to make my own pattern for the front of this.
I think this look *just* like a fancy fabric bag you would purchase! Can you say…….H*E*A*V*E*N*!!!!!!
Again this is styled after some of my favorite tote bags. Take a look–>here.
This is the mini version, close up.
I used the border image from Paper Pattern Pieces to create my decorative strip. I wanted the design to be similar to the large one and this was a perfect option!
I resized my template (and all of it’s pieces) to be at 55% the original size. Its SO cute!!!! Now it is about 3 1/2 inches tall and 3 3/4 inches wide (at widest point).
I wanted to take this basic tote template idea, and step it up a little by adding a fun flap closure (which is included and optional for use-I will show you ways many ways to use this template in the days to follow).
Here you can see both of my tote bags, open.
Because I used a knotted ribbon handle the tote lid is adhered up a little higher. This allows for easier closing and less bulk at the flap seam 😀 I do offer other tying options which you will soon see. I also include instructions for tying your ribbon handle with the template purchase. Wait until you see my super tying tip in there! Makes everything so much easier!
I also decided to add a optional pocket, which can be used to hold a tag, or mini card. It also fits a gift card in there perfectly!
Here is the back of the gift set:
Here you can tuck a tag, gift card, or mini card (as I said above), or even some cash!
While the pocket is totally optional it is also totally CUTE! (even if you do leave it empty! LOL!)
I used the same stamps as on the front of each tote, to create the pocket decoration on each.
This is the close up view of the large pocket:
As I did on the front, I used the circle image from the Just For You set, and the flowers from the Sensational Stems set to create this pattern.
Now for my mini tote:
I put the hanging tag inside the pocket on this one. Super cute.
This is the close up of the pocket on my mini tote:
I used the border image from Paper Pattern Pieces to create this smaller version
Whatever you fill this with it is sure to be “Tote-ally” fantastic!
If you like shopping the Money Well Spent © set makes the perfect addition to this template!
Now if you are wondering what this template looked like before all the fun stuff was added…..
Here is what this set looked like BEFORE decorating
I think it is important that as much of a project is as complete and as detailed as possible! It really makes all the difference in the world to a professional looking project.
See the tucked in angles at the bottom? Just like a REAL tote.
I think this template is perfect for using our Pretty Printable Digital Paper to create your OWN dual sided papers!! You can easily mix and match your own, as I did here.
The outside of my tote used the Pretty Printable Digital Paper :Purse Patterns from our August Release.
This (above) is the paper sample of the front and back, prior to assembly.
Here is the INSIDE of the tote, using the Pretty Printable Digital Paper: Botanical Beauties: Candied Applejack (from the July Release).
See mixing and matching is an AWESOME thing!
I love being able to pick and choose WHAT patterns I want to use together, rather than having purchased dual sided patterned paper, with patterns already mixed together. I find I’m more apt to hoard papers that I love, till I no longer even like them, which leads to a huge waste of $$!! We have some AMAZING patterns so be sure to check them out —>HERE!
View my tutorials HERE! There is one on using the digital paper, in case you have questions. We also have some FREE items on our site so you can try our products RISK FREE 😀
Now let me share with you the HOW TO, on making the cool stitched flap!
I used my Cricut (and Sure Cuts A Lot software) to cut my lid out from the sweetheart cardstock. I then wanted an additional layer in brown color, so I set up my cricut to cut out that layer, and made sure to add the flower cut out from Fanciful Flowers (which I resized to my liking).
BEFORE I CUT:I made sure to SHRINK my chocolate lid layer to 95%. I then went ahead and created my stitching layer (from white cardstock) by resizing another lid to be at 90%.
Once that was done I layered the tracing template, onto my tote lid, and used removable adhesive to keep everything together!
I then took a white singlo gel pen, and traced the lid outline, just like the photo above.
After tracing the lid with the singlo gel pen, I use a paper piercer to poke holes along the edge, giving me a truly realistic stitched look, that is not only perfect but SUPER easy!
Now once that was done, it is then layered to my main lid piece, where the pink base shows through to create he pink flower center.
Isn’t that just so simply, yet so SWEET! I just embellished with buttons for my flower center and was done!
Now lets get on to some of the details about the amazing images what were also used to create this set!
(don’t worry-we do have some masculine images in the set as well!)
Money Well Spent Set of 19 Images $20
*Also available in digital format* $12
This set has 3 coordinating cut files based on images within the set:
(you will learn more about these soon!)
Now to further your creativity in gift card giving I have several Pretty Packaging Templates and Cut Files that you can use to “dress up” those gift cards even further!
I am one of those people who gives a lot of gift cards! They are the perfect gift for any occasion. My problem: never having the perfect stamp set to gift them. I also want the receiver to know that I still put a lot of time, thought and heart into their gift, even though they are doing the actual shopping.
Well now the problem is solved! I have created a set of sentiments with coordinating images, that are perfect for every gift card giving occasion!
Whether it is for a birthday, friend, shopping spree, home improvement, or a gamer, you will find the perfect sentiment to suit your needs! Combine this set with other images you may have and the possibilities are endless!
One of the best features is that all of the letter “S”, are dollar signs 😀 I totally love that about this set.
There is a large label in the set. This has a few benefits!
1) It actually covers an actual gift card.
2) It fits perfectly on top of the metal hinge top tins.
Note: Metal Hinge Top Tin can be found here: https://www.sks-bottle.com/340c/fin7b.html
3) When the images are stamped within the label they can look just like a credit card!
4) Great for ANY age.
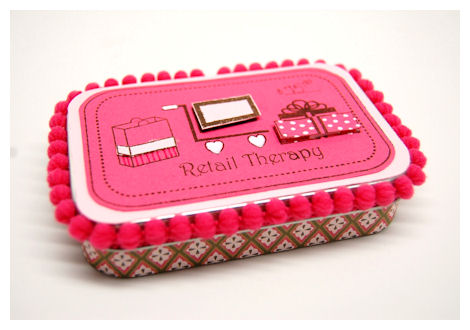
Here is the super sweet gift card tin just to show you what I mean:
Retail Therapy!
Who doesn’t want, need and love a little of that?
I so wanted even MORE ways to dress up the gift of shopping for everyone. Especially with the holidays fast around the corner (I know! I said “it”! Hate me all you want, but it is SO true, the holidays are going to come faster than you think!), this is a great set for such gifts ALL YEAR LONG!
As you can see the label is the perfect fit for the tin, as well as the perfect cover of a gift card.
I have to say I love all the little shopping elements. I had a hard time finalizing WHICH ONE’S would go on here! I LOVE the dollar symbol so you can add an amount if you like too.
I obviously love haing things MATCHY MATCHY! That is what got me paper-crafting in the first place! My need to coordinating gifts/cards/tags.
This is the gift card inside the tin:
Seriously how super sassy, and cute, and totally re-giftable!!
Sentiments include:
Money Well $pent
Retail Therapy
$ALE!
Just a little something
$______
You’re Pricele$$
Guilt Free $hopping $pree
A Gift For You
Game On
Thought this may come in handy
For a FAB Purse-on
$hopper-tunity
===================================
Now that is what I call HAPPY SHOPPING and gift giving!
As you can see I took advantage of all the possibilities when I created my gift set today.
Here is the mini tote again:
I used the purse in the set for a tag I made myself just by cutting a rectangle, and using my hole punch to snip the sides 😀
I added the shopping sentiments to the top, then added the “sale” sentiment. Easy peasy and oh so cute.
This is the tag ( on the larger tote) I made for the Tote-All Package set
As you can see I used the same tag like I made above, and this time I used the shopping cart image from the Money Well Spent set, and with a little masking-I added the present to the inside!! I think the possibilities for that are definitely endless!
Now using the same “gift boxes” I made this…..
Using ALL the same elements as in the Tote-All Package set I made this tag using the Tag You’re It © Cut File.
For this I used the same technique as above on my tote lid, for my tag.
I think the gift packages are so cute and perfect for any celebration where a gift is in order 😀
The bottom present is stamped, and cut out, then adhered with a dimensional for some 3D POP!
I stamped the ” Just a little something ” sentiment from the Just For You set at the top. I love how it perfectly fits my tag!
========================================
Supplies from My Time Made Easy ™ LLC
Pretty Packaging Templates: Tote-All Package
Pretty Impressions Stamp Set: Money Well Spent, Sensational Stems, Paper Pattern Pieces, Just For You
Pretty Printable Digital Paper: Purse Patterns, Botanical Beauties: Candied Applejack
Cardstock by Couture Cardstock: Ganache, Sweetheart, Blessings
Ink: Sei, SU, and Momento
Pretty Pieces Cut File: Fanciful Flowers (for flower cut out on tote flap), Tag You’re It ©
Other: Buttons/ Brads by SU, Ribbon by May Arts, embroidery floss
Well that is all for today! I still have much to share and so much to do, so I really hope you stop by and visit tomorrow to see what we have “in store” for you next!
I appreciate you all for stopping by and if you have time letting me know your thoughts. Summer can be crazy busy and I have be AWOL so I appreciate you all for hanging in there with me as I battle the hazy crazy days of summer with my family and balancing a buisness 😀
Enjoy your day.
Until tomorrow.
My Etsy
My Time Made Easy © LLC
Who I Designed For
Blogroll
- Alicia
- Alli Miles
- Ally Blankenship
- Amber
- Andi @ crafts on a whim
- Angel R
- Angie Z
- Anne Kranitz
- Becky O
- Bee
- Beth Silaka
- Bethany Paull
- Beverly Nash
- Bobbie
- Cambria
- Cammie
- Card of the Week
- Card Positioning System (CPS)
- Cards for Cancer
- Catherine Doucette
- Charmaine
- Cheryl Sims
- Chriss Rollins
- Christina
- Christine Ewing
- Christine Wooden
- Colleen Schaan
- Craft Critique
- Craft Gossip
- Crystal
- Dawn Easton
- Emily Giovanni
- Geny
- Holly
- Igne Groot
- Inspirational Craft Blogs
- Irene
- Jami Sibley
- Jeanne Streiff
- Jen del Muro
- Jeni Bond
- JenMarie
- Jenn Balcer
- Jenn Diercks
- Jenn O
- Jennifer E
- Jennifer Mick
- Jennifer Pereda
- Jennifer-Sweet Treat
- Joanne Basile
- Jodi Collins
- Julia Stainton
- Julie Masse
- Karen
- Kathryn Berthiaume
- Katie Cotton
- Kelley Holland
- Kendra
- Kim Scholfield
- Kris’s Color Stripes! Get inspired here
- Kristen Dubosque
- Kristin Eberline
- Kristine
- Laura @ Sunshine Stamper
- Laura Turnmire
- Laurie Schmidlin
- Lesa Rapp
- Linda Duke
- Linda-LSN
- Lindsey Botkin
- Lisa (lakind scs)
- Lisa Kind
- Lori Craig
- Maggie
- Mara Campbell
- Maria
- Maria Levine
- Mary
- MaryJo
- Melanie M
- Monique Hansen
- Moxie Fab World
- Pam Imholz
- PaperCrafts Connection
- Peppers and Pollywogs Kids party site
- Rebecca Grohall
- Rita
- Robyn
- Rose Ann
- Sarah Vrolyk
- Sharon Harnist
- Sharon Johnson
- Sharon Rivera (a chemisrty with paper)
- Sherrie
- Sophia Landry
- Storage Units, Ink, & More Blog
- Sue Berker
- Susan (Rainy)
- Tangii Crane
- Tracy
- Tricia Traxler
- Trudee
- Velta
- VivLyn
- Zena
MTME Pretty Palette Color Team
MTME Pretty Patterns Sketch Team
My Time Made Easy TM LLC
Shop till you drop!
Lauren Meader
About Me
Copyrighted material
Subscribe To My Blog
Pages
- About me
- Alexa’s Story!
- My Crafty Corner!
- My Time Made Easy™ LLC
- Our Make A Wish Trip to Disney!
- Resume/Publication List
Calendar
| M | T | W | T | F | S | S |
|---|---|---|---|---|---|---|
| 1 | 2 | 3 | 4 | 5 | 6 | 7 |
| 8 | 9 | 10 | 11 | 12 | 13 | 14 |
| 15 | 16 | 17 | 18 | 19 | 20 | 21 |
| 22 | 23 | 24 | 25 | 26 | 27 | 28 |
| 29 | 30 | |||||
Archives
- August 2013
- July 2013
- June 2013
- May 2013
- April 2013
- March 2013
- February 2013
- January 2013
- December 2012
- November 2012
- October 2012
- September 2012
- August 2012
- July 2012
- June 2012
- May 2012
- April 2012
- March 2012
- February 2012
- January 2012
- December 2011
- November 2011
- October 2011
- September 2011
- August 2011
- July 2011
- June 2011
- May 2011
- April 2011
- March 2011
- February 2011
- January 2011
- December 2010
- November 2010
- October 2010
- September 2010
- August 2010
- July 2010
- June 2010
- May 2010
- April 2010
- March 2010
- February 2010
- January 2010
- December 2009
- November 2009
- October 2009
- September 2009
- August 2009
- July 2009
- June 2009
- May 2009
- April 2009
- March 2009
- February 2009
- January 2009
- December 2008
- November 2008
- October 2008
- September 2008
- August 2008
- July 2008
- June 2008
- May 2008
- April 2008
- March 2008
- February 2008
- January 2008
- December 2007
- November 2007
- October 2007
- September 2007
- August 2007
- July 2007
- June 2007
- May 2007
- April 2007
- March 2007
- January 2007
Categories
- About Me
- All That Scraps
- blogger challenge
- camera/photo play
- Cards
- Contests
- family stuff
- FOR SALE
- Home decor/3-D items
- How to FAKE it!
- Introduction
- JUGS Challenge
- JustRite Stampers
- Lizzie Anne Designs
- My family stuff
- My Stamping Space
- My Time Made Easy
- My Time To Color Challenge
- My Time to Create Challenge
- My Timeless Template Challenge
- My Timeless Templates
- Mytime Mail
- MYTIME MOVIE/VIDEOs
- Papertrey Newsletter
- Pink Cat Studio
- Pretty Palette Challenge
- Pretty Patterns Sketch
- Product Opinions and Must haves
- Recipe's
- Saturday Sketch
- Smilebox Creations
- Stampavie
- Tutorials
- Uncategorized
- videos
Most Popular
- Create your own Onesie Card Tutorial-and important NOTE! PLEASE READ (2529)
- Saturday Sketch-Boxed bag holder (2333)
- Going GREEN! Fancy Flower Flourish-Closure Video (1478)
- Fabulous Favorite - Giveaway! (1336)
- a Prayer Request (1232)
- QUICK-Easter Baskets from Nestabilities-PTI style-and blog challenge (1063)
- Teaser Sketch (999)
- February Release Giveway! (and a little peek) (996)
- Group Post and Rambling Rose Video Tutorial (985)
- GIVEAWAY! Who wants it all?! (895)
Recent Comments (RSS)
- 첫충사이트: 완전히 흥미로운 블로그 게시입니다. 저는
- sarah: Wow, Lauren, what a stunning
- hedie: خرید راهبند
- 야동: Love to read it,Waiting For
- 야동: This seller is in a
- 바카라사이트: 여기 처음 왔어요. 나는이 게시판을
- 야동티비: I was surfing the Internet
- 바카라사이트: 비슷한 주제에 대한 흥미로운 정보를
- 바카라사이트: "여기에 제공해 주신 귀중한 정보와
- 온라인홀덤: 유익한 웹 사이트를 게시하는 데

