Archive for the ‘Papertrey Newsletter’ Category
Scented Summer Set
Jun 13, 2009 Author: mytime | Filed under: Home decor/3-D items, My Timeless Templates, Papertrey Newsletter, UncategorizedWell I am working feverishly to finish up my projects, teacher gifts, and preparing for the big Papertrey Ink Release tonight!
Im VERY excited about this months release, and the 2 newest My Timeless Templates 😀 I really enjoyed each peek day more & more. Your feedback really keeps me going too.
I have another peek for you using my Pack a Picnic template! I was straight out busy yesterday, and I have 2 cookouts to go to today, so I’m really hoping to get my other sample using Card Couture done before the release! LOL! Ill post that later today if all goes well.
In the mean time I hope this ties you over.
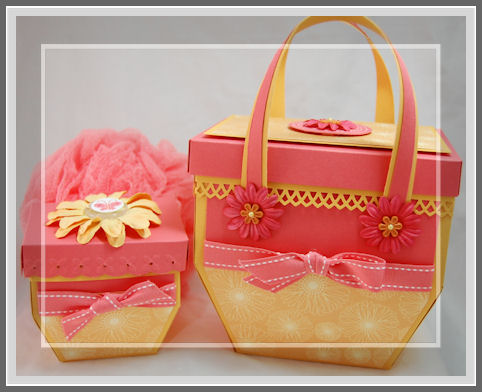
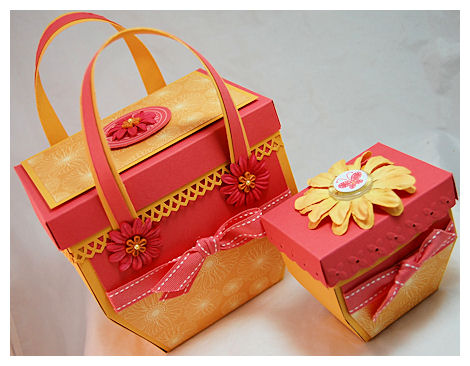
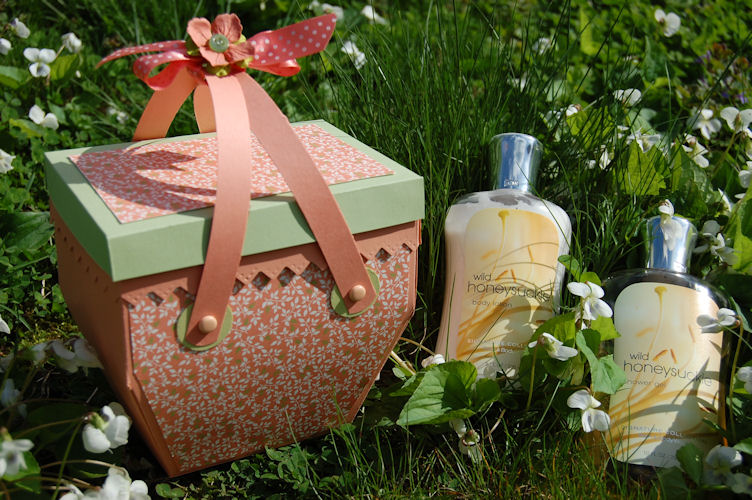
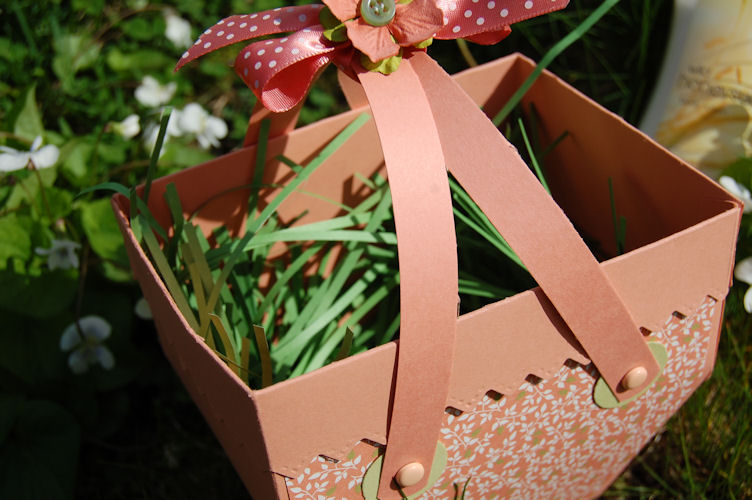
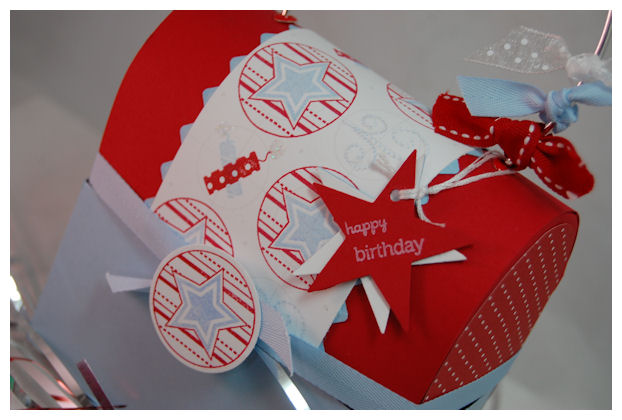
Scented Summer Gift set
This is for Alexa’s one to one aid who I LOVE to death! She has been my saving grace being in the classroom with Alexa.
I cannot say enough nice things about this woman! Seriously, I could go on and on! But I will spare you.
I am having SOOOO much fun using the large and small versions of this template to make “sets”. This is another one!
We will do this again with future templates, where we see fit. Not ALL the templates make good large/small versions. In this case-DEFINITELY YES!!!
I love the SUMMER “sorbet” sort of colors this has! Summer Sunset & Berry Sorbet
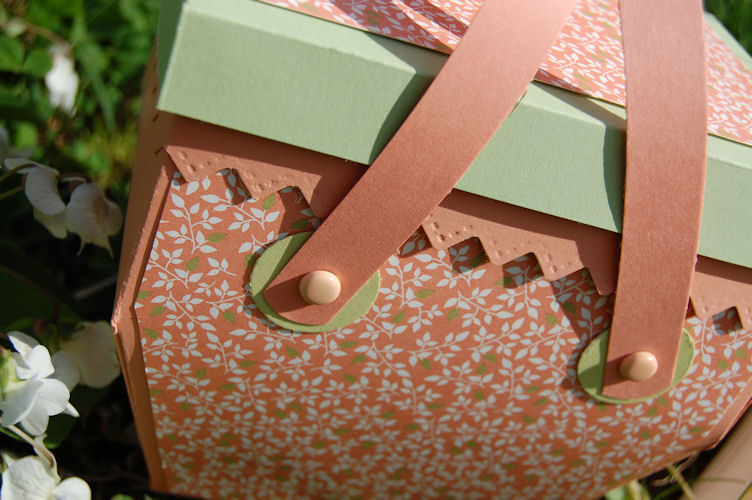
I adore the handles being put on this way too, as oppose to over the top of the template.

I was inspired to make this because of what my gift was: Bath & Body Works Butterfly Flower bath set!

I went all out and got her the large sizes of a loofa, body lotion, body spray, lavender bath stuff, some hand cream, foot cream and a pedicure set. Not all shown in photo!
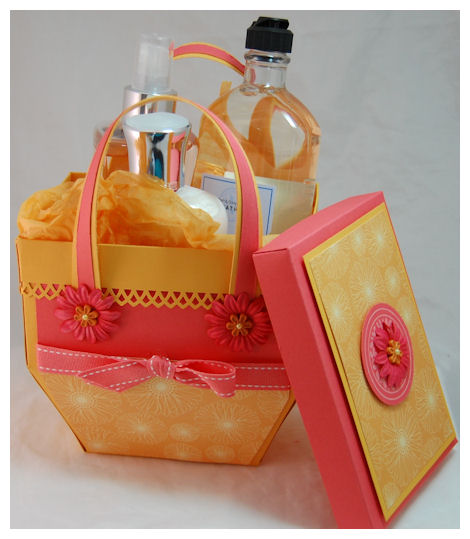
This is the Body Lotion, and the Body Spray.
I also included some Lavender Bath stuff. This went into a large bag all together.
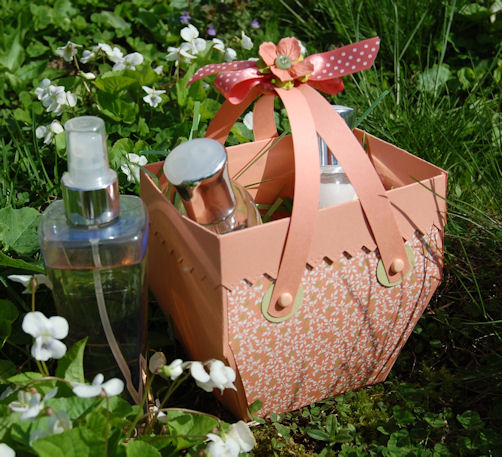
In the mini basket will go some Orange Marmalade!
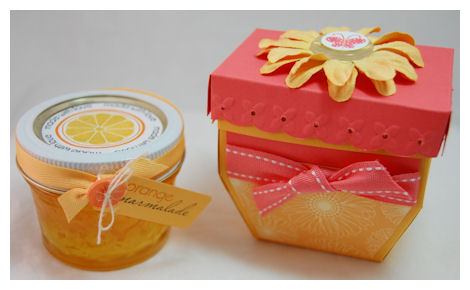
(used Fruitful (new release) for the jam jar :D)
Its the perfect size for the mini Pack a Picnic basket!
I think this is a very pretty summer fun gift basket set, to hold all sorts of bath & beauty products! I hope her aid likes it.
Supplies:
My Timeless Template: Pack a Picnic
Stamps: Spring tags 2008, Fruitful
Cardstock: Summer Sunset, Berry Sorbet, white, friends til the end paper
Ink: White, berry sorbet, black
Ribbon: Saddle stitched grosgrain in berry sorbet
Prima Flowers, flower brads, adhesive pearls, Martha Stewart border punches
Well that does it today for me!
There is one day left of peeks! So be sure to hop on over to Nichole’s, Lisa, and Becky’s blog for more!
Thanks for stopping by. Hopefully Ill be back later
Vintage Picnic Possibilities
Jun 12, 2009 Author: mytime | Filed under: My Timeless Templates, Papertrey Newsletter, Recipe's, UncategorizedHold onto your seats everyone! I have a LOT to share, and as usual am also long winded!
Sorry, but when I get excited I “talk” a lot. Imagine me in person! LOL! I don’t shut up :D) I can admit it.
For today’s post, I’m very excited, as we have a group project, using the NEW! stamp set inspired my Mish, called Vintage Picnic.
I cannot say enough about this set. I fell in LOVE with it when I saw it! So much so that I ran down to my craft room, to design one of this months releases Pack a Picnic!
I can’t begin to tell you just how much I LOVE Vintage Picnic set. Especially used WITH my Pack a Picnic template. I found there to be SO many possibilities with this set, that I actually had to put the stamp set away so I could get my other projects done!
I kid you not!! I will be using this a TON in the future 😀
So I did 2 projects for today’s post-each using my newest template releases Pack a Picnic, and Card Couture. I also think it would ROCK using Basket Basics 😀
I hope you like them :D) I fashioned them both to be alike/similar.
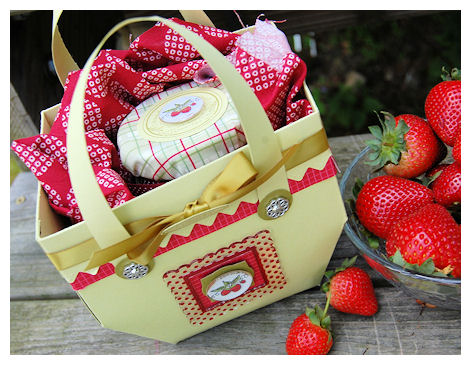
Strawberry Jam Basket
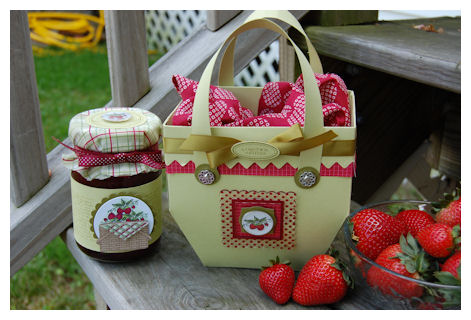
What better way to give a simple gift of jam, than to really dress it up, in my Pack a Picnic Basket?
When I saw this stamp set I was SO taken with the tiny strawberry image in the set, that I had to use it as my design focus.
I then commissioned the mother of my BFF Paulette, to make me some Strawberry Jam, to package as teacher gifts this year.( No! I don’t make my own jam! I’d rather buy it! LOL!-But its STILL homemade :D)
OH! BOY! I opened a jar for me, and I have been eatting it like crazy! NOT a good thing! Boy is it yummy.
Anyway I don’t need 16 jars, so they are being given as gifts.
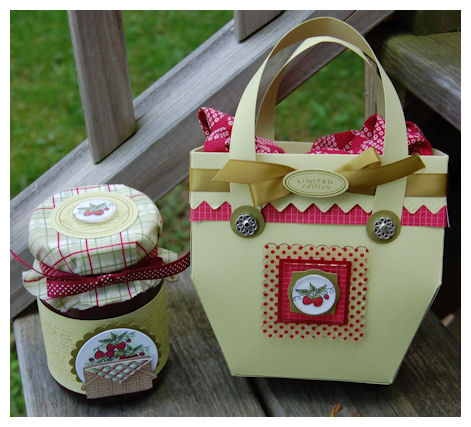
Here is a better view of the basket front.
I used an acrylic frame from Making Memories, on the front of my basket.
I used the Trademarks stamp set from the new release as my center on the basket top!
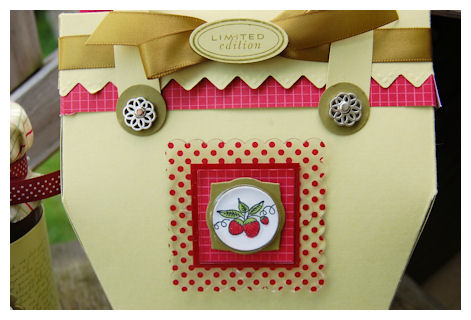
Aren’t the strawberries from the set just so cute? All alone-perfect!
I added a making memories page pebble over the image as well for more WOW!
I think it looks really cool.
I also love the basket handle holders! They are SU! brads. I think they are a nice touch.
The paper round the edge is from the NEW! Release too. Really loving it.
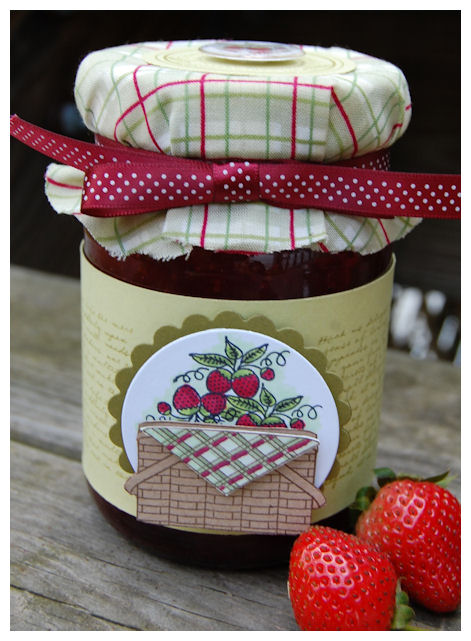
Now we go onto the jar of jam
Here I used the strawberry image, stamped 3 X’s to fill my basket with strawberries!
The basket is simply stamped on Kraft cardstock, cut out, and on dimensionals.
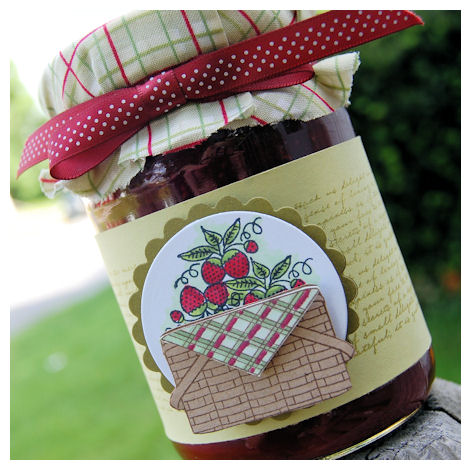
I then stamped, colored and cut the napkin image from the set, and layered it onto my basket. The coloring was inspired by my fabric cover, which is tied with Scarlet ribbon.

I had some fabric leftover from my sewing days 😀 It was PERFECT for my jam jar, and actually inspired the entire project! I love how you start with ONE thing, and it has a domino effect!
The wrap was stamped with Text Style bkgd. It had a nice Americana kind of country feel to it. Just that little something extra!
Now for my jar top! I LOVE this idea
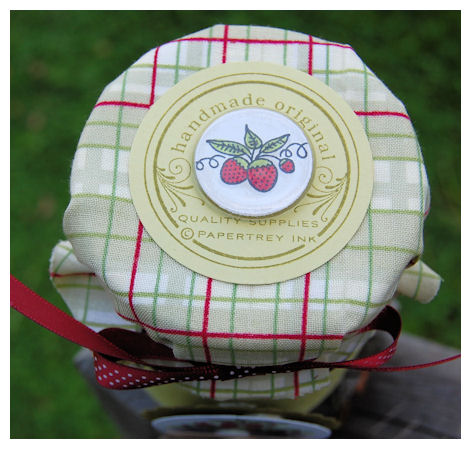
I used ANOTHER image from the Trademarks set, and placed it on the jar lid 😀 Im totally loving these possibilities for this set with ANY/ALL My Timeless Templates!!!
Added the strawberry image, with the making memories page pebble.
This project went to the Principal of our school (I heard he went to bat for me at a meeting-so he is on my good side 😀 where Alexa is concerned!) I also included a package of Pound Cake from Tastefully Simple.
Jam in basket
The Principal was in shock that I remembered to give him and end of year gift! This was his first year as our Principal and I have to say he is doing a great job 😀 Hopefully he remembers this next time I have a problem with the school! LOL! Which I am HOPING not too!
Supplies:
My Timeless Template: Pack a Picnic
Stamps: Vintage Picnic, Trademarks, Text Style bkgs
Cardstock: Spring Moss, Ripe Avocado, White
Ink:Ripe Avocado, Black & Copic markers
Ribbon: Satin avocado, Bitty Dot Scarlet
Other: Making Memories page pebbles & Acrylic Frame, SU! Brads, nestabilities, fabric, Strawberry Jam
Next up! My other project using Card Couture ©
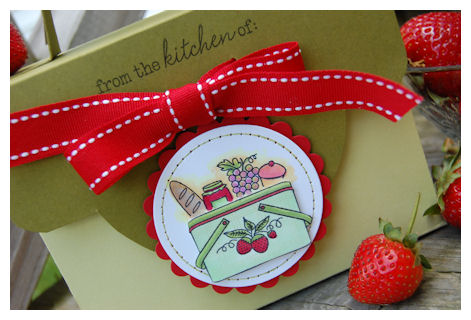
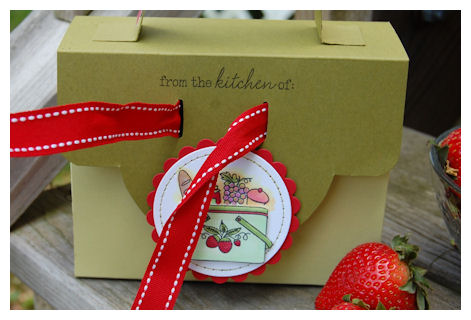
From the Kitchen of:
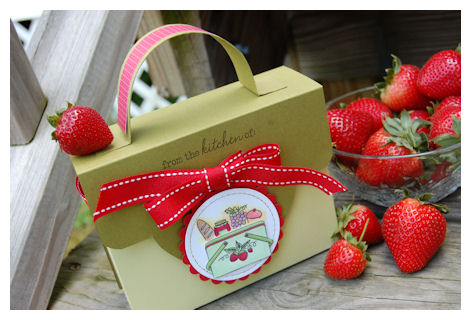
Well as you may have guessed it, this template is PERFECT for recipe’s!!!!
How can you not LOVE the idea of this? It is like the PERFECT presentation for a recipe card holder!
Plus its pretty simple! Love that when making a ton of gifts.
YOUR COST to make : $1.90! Includes cost of recipe cards!
Now for this one, I stamped my food border (which I totally LOVE all the border ideas :D) onto the white cardstock.
I stamped the PLAIN Vintage Picnic basket onto scrap paper.
Then stamped the same mini strawberry image (told you I LOVE it) in the basket center.
I colored my basket with my marker, THEN…………(sadly you cannot SEE it well) I stamped the plaid basket over the colored image in spring moss cardstock, so it has a faint pattern on it!
Then I cut it out, and layered it on the food circle, using a dimensional.
Seriously-LOVE this set. AND the basket takes NO time to cut out either. I don’t enjoy lots of intricate cutting. so Im over the moon about that.
Here is my side view-I used the same patterned paper as my set above, for the side panels
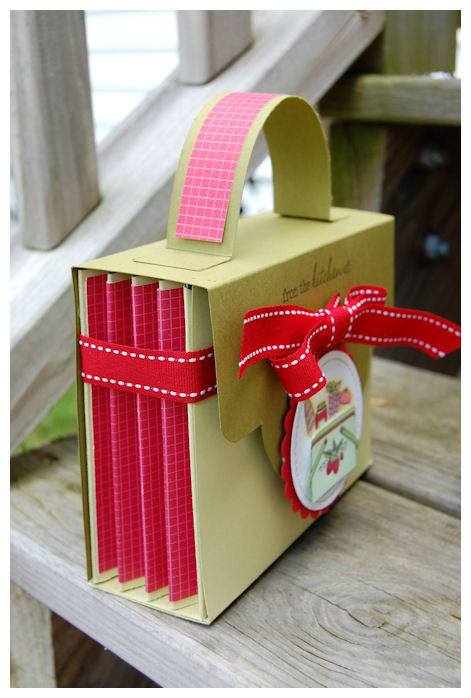
Now I put my ribbon around my template prior to adhering my template flap closure.
In the flap I hammered 2 slots for my ribbon to insert into!
You just untie it, and then Voila…….
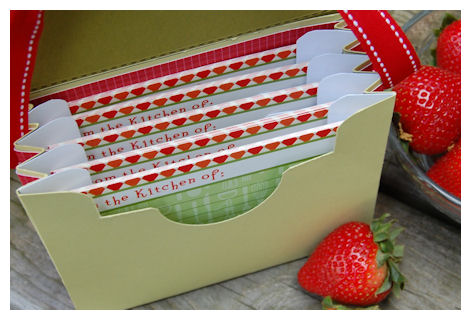
It opens to reveal a box full of recipe cards! 30 cards total-6 in each partition
I love that you can easily see and grab each item in my design.
This template is seriously so fun, and PURTY 😀 (my word for pretty).
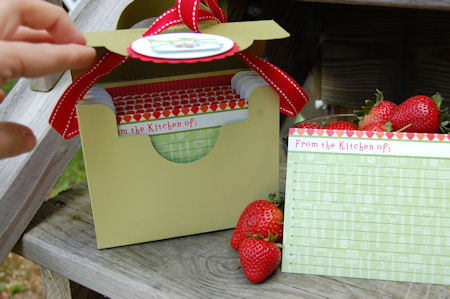
I got these at Michaels the $1 spot. Trimmed them down a bit (I wanted to cut off the nasty looking tomato in the lower rigth corner ANYWAY!) and was done. They match perfectly!
This was given to Alexa’s 2nd Grade Teacher, who I just LOVED this year, and will miss greatly. She loved Alexa (actually requested to have her!) and truly made a huge difference for her this year. Alexa has grown in leaps and bounds this year, especially socially!
Supplies:
My Timeless Template: Card Couture
Stamps: Vintage Picnic
Cardstock: White, Ripe Avocado, Spring Moss, Pure Poppy
Ink: Black, ripe avocado, Copic markers
Ribbon: Saddle stitched grosgrain in pure poppy
recipe cards, nestabilties, making memories slot tool
So there you have 2 templates, both using same stamp set, and colors, and both are super gift ideas! Gotta love that.
I could have made so many variations with these 2 templates and ONE stamp set! I’m just in LOVE!!!!
Make sure you hop around to see just what the other team members have done using Vintage Picnic too!
Thanks again for stopping by! Oh and ALL your super duper sweet comment over my templates 😀
PLEASE Check out Kristen’s Blog for the Saturday Challenge!
Here is a peek at what the girls are all doing-Ill try to play this week.
She will be taking my place as Hostess this week! The end of school and the release has really kept me over the top busy!! SORRY! I just couldn’t squeeze out ONE more thing!
I WILL be posting my Coffee House Cookie Recipe-most likely tomorrow. I have a bit to finish first, and it didn’t really FIT in with my UBER long post! LOL!!!!
Coffee or Tea?
Jun 11, 2009 Author: mytime | Filed under: Home decor/3-D items, My Timeless Templates, Papertrey NewsletterNo matter which is your favorite, I think I have something you *might* like!
If you can’t tell I’m totally having a blast with the templates 😀 My mind is just RACING with idea, after idea. I LIVE for making boxes/gift items. I love personalizing things and making it all matchy matchy!
I just delivered Amber’s end of the year teacher gifts, (they are featured in the exclusive Idea Book-for the Pack a Picnic ©-if you are wondering WHAT I gave them :d) and they could not believe I MADE them from paper! They were in awe. It was SOOOOO nice to see them so appreciated. I told them they can re-gift them and they looked at me like I had 12 heads! They said NO WAY! We are keeping this for ourselves. YEAH! Mission accomplished.
That is *just* the best feeling in the world.
Now I have another set of gifts here that I hope get the SAME response!
Today’s post shares samples from my NEW! My Timeless Template Release-Pack a Picnic © & Card Couture ©
They are being released on the 15th
As I said, be it coffee or tea, I think these 2 ideas are going to be a HUGE hit.
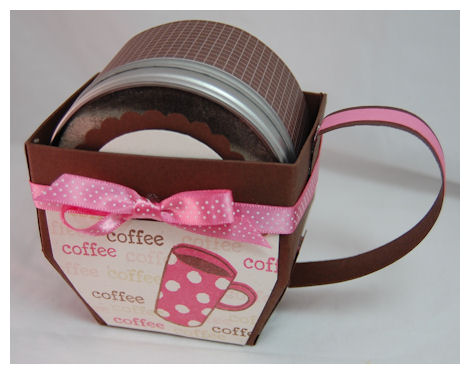
Pack a Picnic © goes Coffee Cups
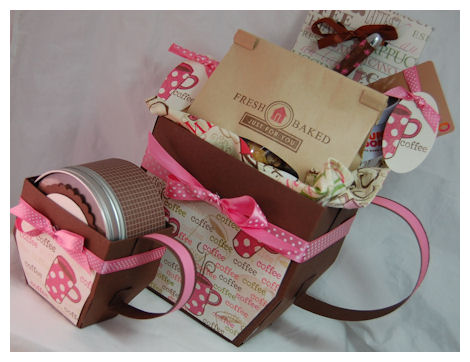
Seriously?! Does it get ANY cuter, AND easier? I think not :D)
I LOVE the large and small variation of the template. TOO CUTE.
I was so over the moon with this sample! It was *almost* in the exclusive idea book, but I HAD to share it instead. I’m seriously in LOVE!
I made my own patterned paper using Heather’s Warm Happiness set. I stamped the various mags, and “coffee” sentiment all over! It was inspired by the coffee themed fabric napkin/supplies I purchased at Joann’s Craft Store.
I used my handle template to make coffee mug handles instead 😀
Large cuppa

This is the close up view of the large coffee cup. Its filled with treats for one of the aides in Alexa’s classroom who LOVES coffee.
Coffee House Cookies

This is a bag filled with my Coffee House Style cookies. My favorite recipe.
YES! I baked these! They are SCRUM*DID*DILLY*UMPTIOUS!
I have 8 in the Coffee Bag, that I stamped with Holiday Treats.
They have chocolate chunks, white chocolate, butterscotch, AND peanut butter chips too!
They are SOFT-and probably 1,000 calories easy. They are very big-Like you can only eat one :D)
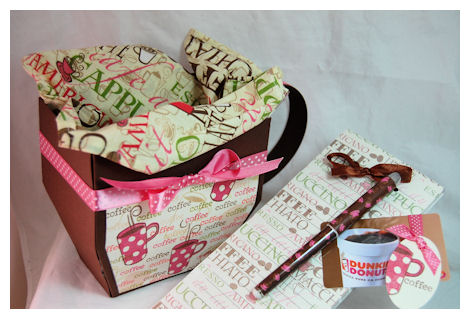
I also included a matching magnetic notepad, and a gift card to Dunkin Donuts.
She always has a XL coffee, everyday!
Now in the mini coffee cup
This is one of the large round tins, filled with the Cappuccino mix that I LOVE adding to my coffee 😀

Here it is in the tin.
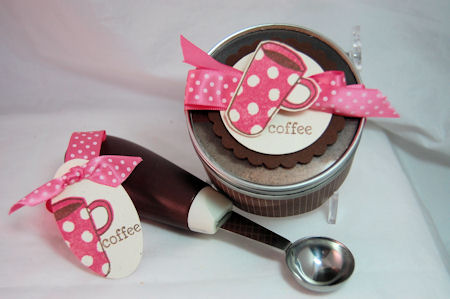
I bought the coffee scoop at Joann’s as well. Just 3 scoops to 80z of coffee, and YUM!!!
I made my tags to make it all matchy!
ME also being a coffee lover, am going to have a VERY hard time parting with this set.
I think she will like it :D) If she doesn’t she can give it back! LOL!
SUPPLIES:
My Timeless Template: Pack a Picnic ©
Stamps: Warm Happiness, Holiday Treats
Cardstock: Dark Chocolate, Vintage Cream
Ink:Dark chocolate, hibiscus burst, spring moss, blush blossom
Ribbon: Hibiscus burst collection
Clear top tin, coffee bag, scooper, notepad, gift card
Now let’s move onto the TEA project!
Tea for you

I THINK you will really like this idea (OK- I HOPE you will :D)
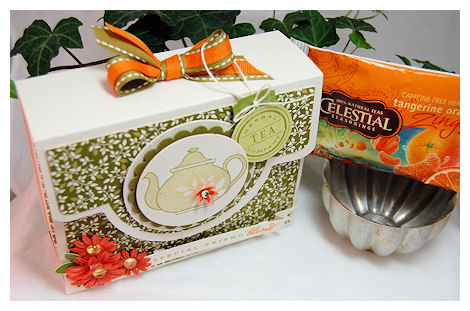
Obviously I love the pairing of Tea for Two and Green Tea Leaves paper!
This particular tea pot is my fave! Most likely because I LOVE Beautiful blooms-its like my MOST used set.
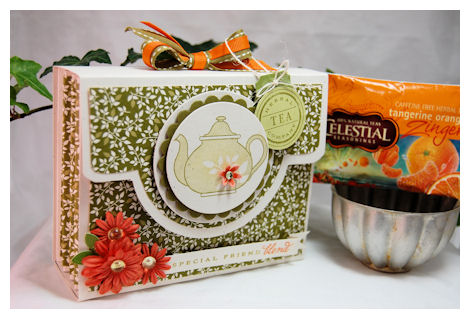
Sentiment reads: Special Friend Blend
Now this gift uses my Card Couture template. This gift today is meant to be a tea sampler!
You just purchase the box of assorted teas, from Celestial Seasonings, and you can put each one in each pocket!
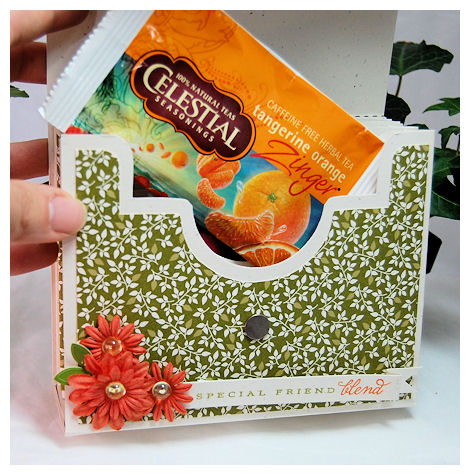
(I only had two left! have to buy some more-sorry)
They fit perfectly! What a delicious gift, to help sooth someone each night before bed. They are individually wrapped, so they will stay FRESH. These are caffeine FREE!
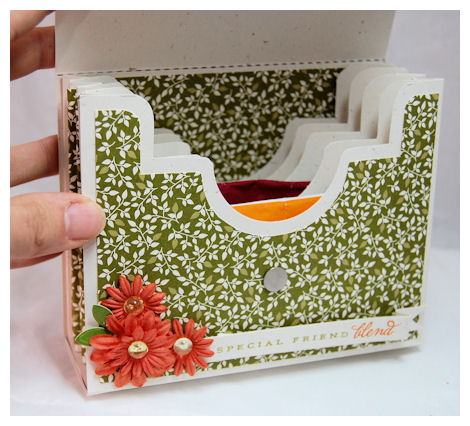
Just a nice way to keep them out on the counter, or where ever. When they are DONE with the tea, they can refill it, or use it for something else.
You TRULY will love how many things you can gift in this.
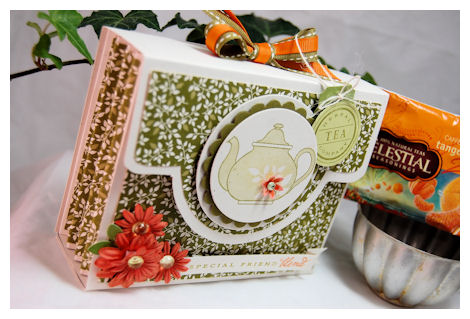
I LOVE adding a layer of designer paper to the side panels
TIP: I do the scoring BEFORE I layer on the patterned paper. I then do my folding after I layer my paper on. Because the main layer is pre-scored, it folds in and out nicely. Hardly no work to get this gift done.

I know I’d buy MORE tea if it was all packaged like that, JUST for the box!
Here are the front details.
I love the herbal tea tag too! Cute touch.
SUPPLIES
Stamps: Tea for Two
Cardstock/patterned paper: Vintage cream, Ripe avocado, Spring Moss, Green Tea Leaves
Ink: Spring Moss, Ripe Avocado
Ribbon: Ripe Avocado stitched-other pumpkin grosgrain, cream twill
other: Prima flowers, dew drops, bling, magnetic closure, tea
So that does it for me today.
Amber is graduating Pre-School today! My, my, my. Where does the time go? Feels like they just placed her in my arms in the hospital, now she will be going to BIG school, 5 days a week. Oh, how I will miss her when she is gone. She is my little sidekick. Getting SO big.
Well I hope you enjoyed the peeks.
Dont forget to check: Nichole’s Blog as well as Lisa! Lots more ideas to spark your creativity 😀
Thanks for stopping by
Template Peek : Card Couture
Jun 10, 2009 Author: mytime | Filed under: Cards, Home decor/3-D items, My Timeless Templates, Papertrey Newsletter, Recipe'sIts time to share a NEW! My Timeless Template peek with you all.
I want to say THANK YOU.
I love reading your feedback on the ideas I share here during the countdown. Lots of hours, and many late nights go into all of it, and knowing you are excited, and can’t wait to try your own, is a true DREAM for me 😀 Thanks for sharing your excitment with me 😀 And always being so supportive of my creative efforts. I so appreciate that.
If you have emailed me in the last few days I have a email JAM, and I haven’t been home AT ALL! My kids have tons going on, so that is where I am at. Ill work on returning emails this weekend sometime (crossing fingers!) Plus lots of stuff has been getting stuck in my SPAM folder-GRR!
Without further delay-
Introducing ……… Card Couture
Merci

This will be released on the 15th.
There is nothing better than organization that is decorative, and beautiful! We don’t all want to shove everything into a closet or cabinet-and even then, we want it to somehow be pretty, don’t we? Well keeping up with the trends is very important, as is keeping things together. This is not only the PERFECT organizer, but make a fabulous couture presentation. I love giving a variety of cards as a gift. Often the receiver has no idea how to store them until used. Maybe they have begun collecting various occasion cards, and need something to help them stay organized! Well problem solved. We now have a very fashionable organizer that you can make for those special people in your life, or make it for yourself to keep organized!Talk about a fashionable way to store, sort and organize your card creations! Now remember this couture case isn’t *JUST* for cards-you can use it for your children’s notes, your own receipts or coupons, photos, inspirational items, sketches, a birthday organizer, meal planner, …….you name it.
All I know is WHATEVER you decide to use this for, you will certainly be the most fashionable.
So this was my concept project for the template-I made the Couture Holder, without the CARDS! LOL! Oh! WELL! You get the idea right?
It can easily hold standard A2 size cards (4 1/4 X 5 1/2) with envelopes, only in a much more FANCY way.
Close up of the closure:
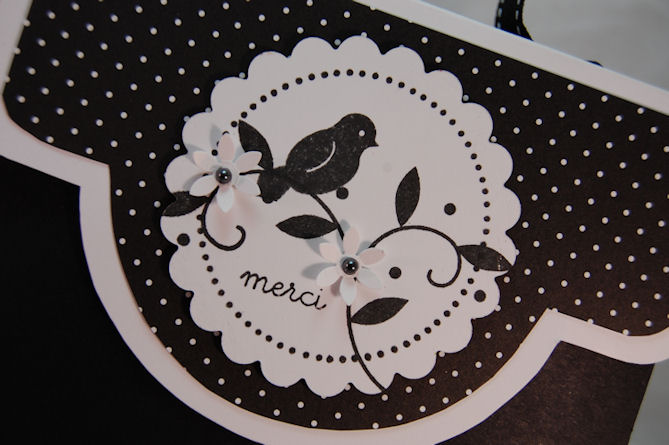
I love the curves, and mat layers.
Now for the side view:
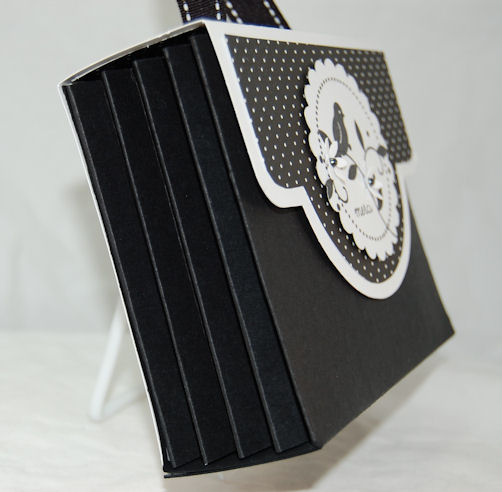
See the fan folding?
Now you would think this is difficult to put together, but after MUCH work and tweaking, it all folds together easily!
Now the MOD/Couture part is the very pretty curvy details of the lid, decorative layers, and the inserts
INSIDE VIEW
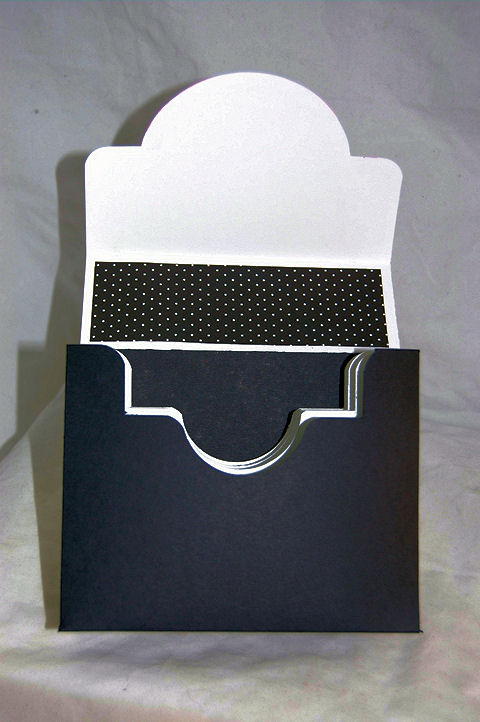
EEK! Bad photo. It was a late night when I designed this one-SORRY
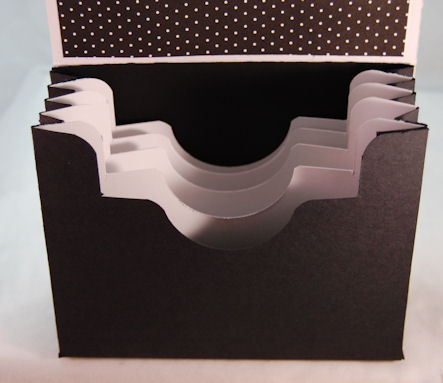
Now you get the idea. You can make the inserts POP! Or make them blend. Up to you.
Supplies:
Stamps: Beyond Basic Borders, Bird Watching, Mega Mixed Messages, Borders & Corners circle
Cardstock: Black, white, Bitty Dots 2008
Ink: True Black
Ribbon: Saddle Stitch black
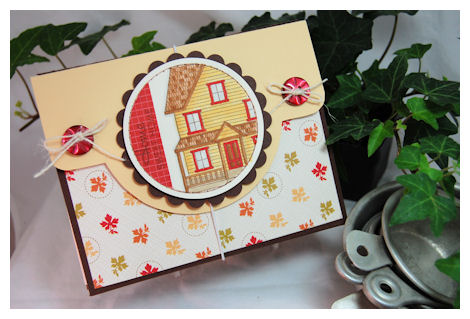
Here is a sample of another idea use Card Couture
Home Sweet Home- Rolodex
Now-Who doesn’t need a way to keep phone numbers/addresses organized AND handy?
Better yet, have an attractive way to keep then on display, while in reach?!
I know I do!
This idea would make the perfect TEACHER gift, and or a NEW! Home, Bridal shower……any time really! Oh! or new business! All you Demo’s out there , for home based companies-perfect!
Top view:
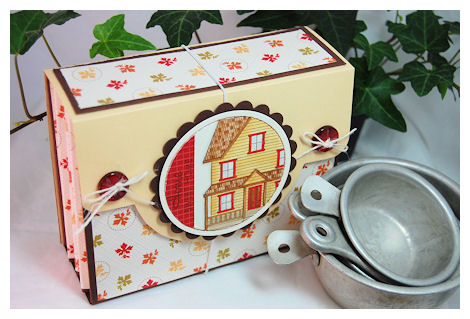
This has an elastic closure.
I got some elastic white ribbon at Joann’s. It is just perfect for this!
I used some pretty paper First Fruits-for this design. The leaf paper lines my fanned side panels, and top/front decorative layers as well.
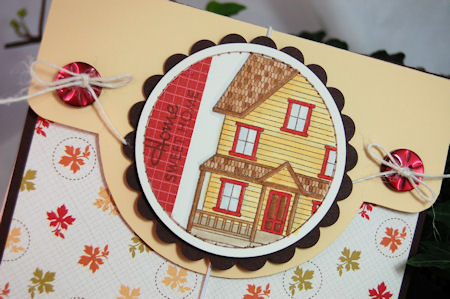
I LOVE the house image from Boards & Beams
I used masking to get only a portion of it in my paper pierced circle. Love the look pf the partial image. Plus it’s a big house to color! LOL!
Loving the twine too .
OK how about an inside view?
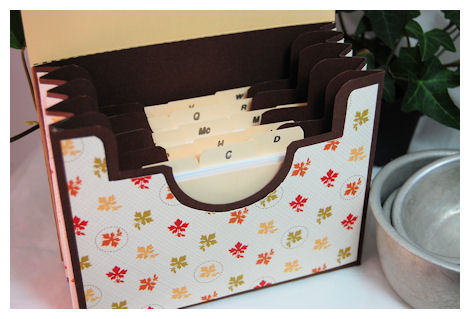
Now what I LOVE is the fun curves the holder has! Each insert is so cute!
It also makes it easier to see what is in each section, and easy to pull particular items from the pockets out.
I bought the inserts at Staples! They fit perfectly!! I added some lined index cards too! VERY inexpensive.
Most pre-made Rolodex systems are $10 and UP! Mine was made for just a few dollars (like $3), and I was able to PERSONALIZE it.
Use your stamps and you don’t even have to buy inserts! (Sorry! I’m too lazy for that these days! LOL!) It is more cost effective, and you can make a bunch for gifts at once.
Supplies:
Stamps:Boards & Beams
Cardstock: Chocolate, Rustic Cream, Holiday Vintage Prints, saffron
Ink: Dark Chocolate, asst Copic Markers
Rustic Twine in Cream
Vintage Buttons in Scarlet
Nestabilities, Rolodex inserts, index cards
So what do you think? Pretty cute, functional and fun huh? Oh and you can’t pass up ORGANIZATION, right? :D) Can you tell I have OCD?! LOL!
I know most of you are cramming for Teacher gifts right now! Hopefully with the INSTANT download, you will have time to put the ideas to use 😀
Let’s not forget the IDEA book, that you get with 5 exclusive ideas, with each template purchase 😀
OK Im so tired I may not even be making sense, so I’m signing off. Thank you for taking time out of your own busy life to visit me 😀
In the mean time…….go see more ideas : Nichole’s Blog , Lisa, and Heather
More TEMPLATE peeks from My Timeless Template Guest designers blog Leigh Ann Baird
Also Kelly has another peek.
Thanks for stopping by!
Till tomorrow-MORE fun projects.
#1 Pack Me a Cupcake Picnic-Template Peek! Announcement :D
Jun 9, 2009 Author: mytime | Filed under: Home decor/3-D items, My Timeless Templates, Papertrey Newsletter, TutorialsOh my gosh! It’s THAT time of the month! YIPPEE!!
The 10th is becoming my favorite day of the month! Then of course everyday from then till the 15th! LOL!
When its the 10th that means it’s my turn to share a Papertrey Ink Countdown Peek, AND share one of my NEWEST My Timeless Templates © with you!
This month I have a UBER cute stamp set designed by Nichole Heady called Cupcake Collection!
Its a super adorable set of “build-a-cupcake” type elements! I’m in LOVE!!! SO much so that the stamp set inspired my gift idea and perfect packaging to match!!!
So I used my Pack a Picnic for today’s project! This template will be available for purchase on June 15th —>HERE
There is post about the original design —–>HERE! That way if you are seeing this you aren’t asking “How is that a “Pack a Picnic” type of template?!
This is by far my fave to date.
Now for my project
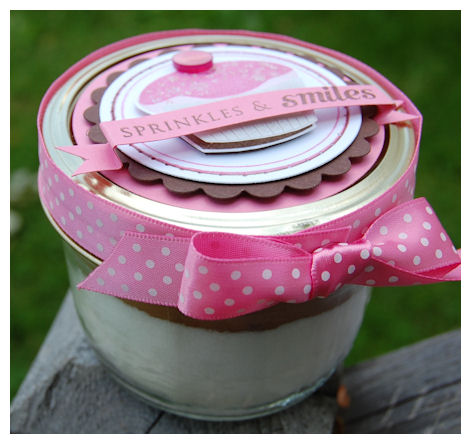
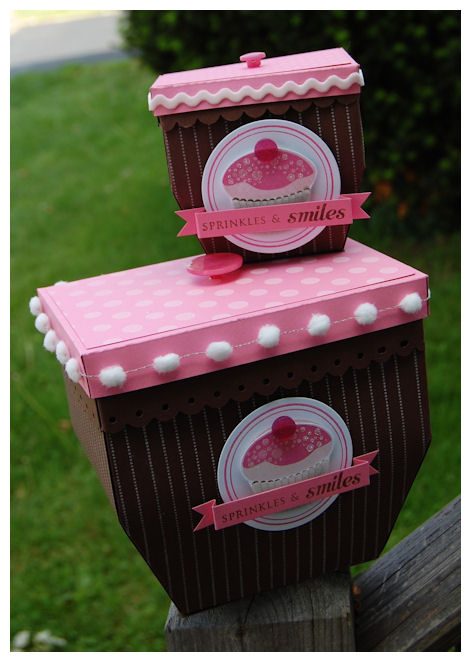
Cupcake Pack a Picnic Duo-
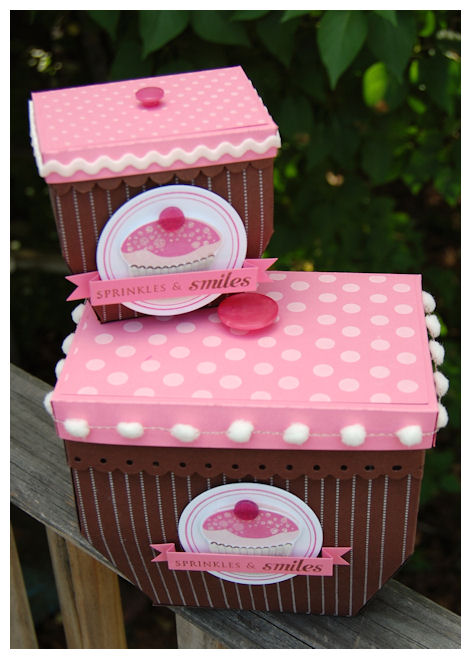
I decorated my Pack a Picnic templates (yes template”s”), to LOOK like cupcakes!
I think they are super CUTE!! Now think what adorable things you can make, having a large and small version of the same template!
This holds my gift of a Cupcake in a Jar! Keep reading for more on that
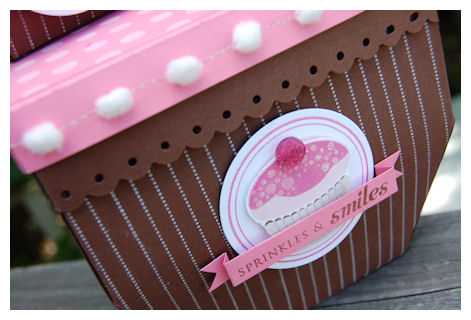
Close up of the box detail
Now I mentioned yesterday that I had a special announcement about this template!
In case you missed the BIG news in my description-
The Pack a Picnic template will also feature a MINI Pack a Picnic template for you!!!
This is a close up photo of the 50% smaller template: Pack a Picnic mini

ALL the files for a large and small version of the template, for ONE great price–> $5!!!
Here is another size comparison
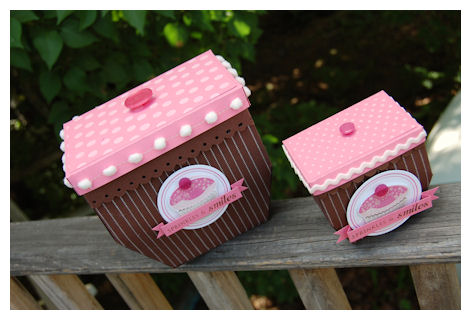
It is 50% smaller than the original template
I think its uber adorable!!
COST EFFECTIVE!
Now I decided I would share how INEXPENSIVE it is to MAKE the boxes using My Timeless Templates!
Given the fact you can use them UNLIMITED, they pay for themselves with ONE gift 😀 (In my opinion-this box set would cost WAY more to BUY!)
When you buy your cardstock in the 50 pack it comes to 0.18 CENTS a sheet.
The large template used 3 sheets of cardstock-2 Chocolate, and one Hibiscus Burst
so it cost ONLY 0.54 CENTS for the cardstock! (You can feel free to add a few more cents for the decorative pieces-but Im certain we ALL have PLENTY of scraps!)
The mini used 1 1/2 sheets of cardstock-costing ONLY 0.27 CENTS!
EVEN well embellished- you can do the math, WAY most cost effective (and FUN!)
OK-back to the project!
I just stamped my template base with Just Journaling Lines, in white craft ink, for the cupcake bottoms.
My “cupcake frosting” lids use polka dot basics. Buttons for the “cherry”.
The large lid has a pom pom border, and the smaller lid has ric rac ribbon in white for added “cupcake decor”.
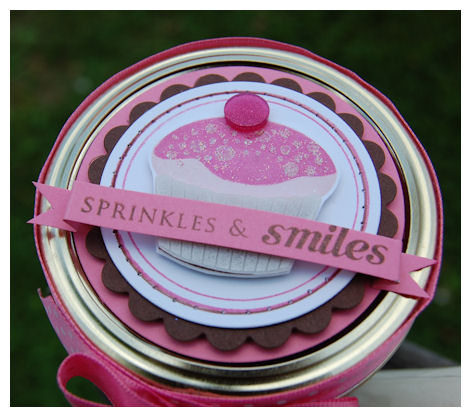
Cupcake in a Jar-
About the cupcake image:
The center cupcake design is the same on all my boxes.
I used borders & corners circle set for my border, then die cut it. I also pierced the edge on the design for the jar-only.
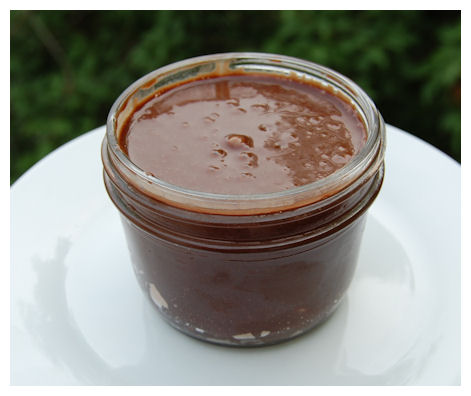
The bottom is stamped in chocolate ink. The top in Sweet Blush, then the “frosting layer” in Hibiscus Burst. I used White craft ink and glitter for my “sprinkles”. Added a Hibiscus Burst flat button for the “cherry”.
I stamped a solid cupcake base, in white craft ink, onto vellum cardstock, to make my cupcake bottom! Cut it out, and layered it on. So easy and CUTE!
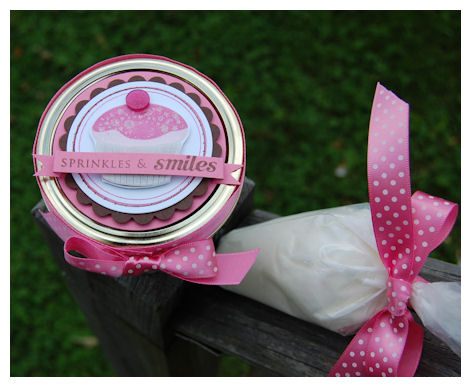
Side view of the jar
This was complete with homemade frosting in disposable decorator bag
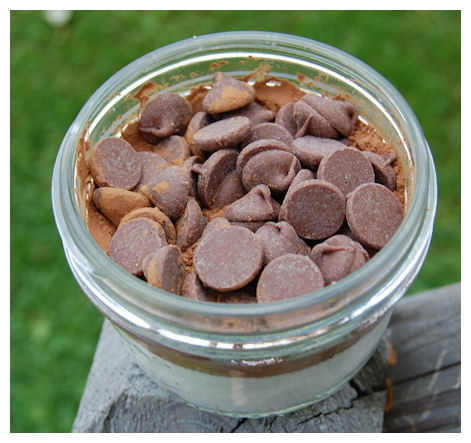
This is the side view of the cupcake in a jar mix, all layered!

Isn’t it just SOOOOO pretty?
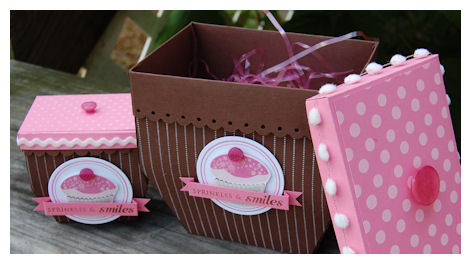
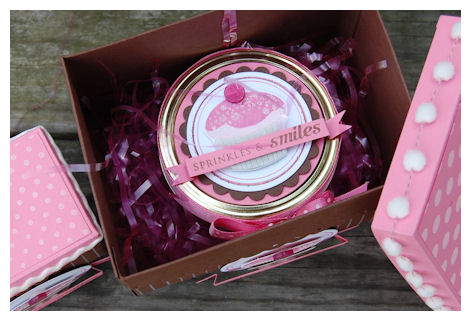
Now you can FILL your Pack a Picnic
You can put the mini pack a picnic-filled with sprinkles and the frosting bag inside the larger one

OR You can put the little Cupcake in a Jar mix in the box-with room to spare :D)
Now onto the FUN!!!
This is the mix when you open the jar
I’m sure you ALL want to know HOW to make these for family, friends and teachers! (its not too late! My kids get out of school on the 19th! WHEW!)
The idea for this Cupcake in a Jar came to me after purchasing some DELICIOUS cupcakes from Bangerang Bakeshop Cupcakes in a Jar!
You have to try the Pinch Me Cupcake! MY FAVE!
They come in a 8 oz Ball glass jar-which is what I used in my project.
Now I was just going to order a few cupcakes (I know! BAD LAUREN!) when someone emailed me about making Teacher Mug Cakes! She was looking to find a template to package her mugs to give as gifts. We got to “chatting” and I asked her about using her mix on my blog for an upcoming project! She said yes.
Next thing you know one idea, turned into another-and this project was made!
I want to thank Tracy Burtt for sharing this with me, and giving me permission to use it here :D)
5 MINUTE Cup Cake in a Jar !!
4 tablespoons flour
4 tablespoons sugar
2 tablespoons cocoa
1 egg
3 tablespoons milk
3 tablespoons oil
3 tablespoons chocolate chips (optional)
A small splash of vanilla extract
1 80z. Ball Glass jar
Add dry ingredients to your jar and mix well.
Add the egg and mix thoroughly.
Pour in the milk and oil and mix well.
Add the chocolate chips (if using), vanilla extract, then mix again.
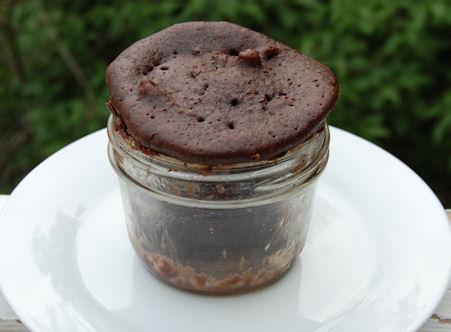
Put your mug in the microwave and cook for 3 minutes at 1000 watts (high).The cake will rise over the top of the mug, but don’t be alarmed!
Allow to cool a little, and tip out onto a plate if desired.
———————————————————————————–
NOTE: Now I layered my DRY ingredients, and would then print a tag with the instructions and remainder of ingredients needed for the recipient to make the Cupcake in a jar.
When I made mine, I dumped the dry mix OUT of the jar, mixed it, then poured it back in.
HONESTLY-Me being the NON baker, that I am-I would just buy some cupcakes in a jar (from Bangerang Bake Shop! LOL!)and package it in my Pack a Picnic Cupcake box!!! You can MAKE the boxes while you wait for your order to arrive! LOL! But this is definitely more COST EFFECTIVE.
That is how “I” do things 😀 I call it the busy mom recipe. I’d rather work on the packaging (wink), than the BAKING stuff
Now here is my baked in a jar goodie
Cupcake in the jar-mixed
Cupcake in the jar, all cooked
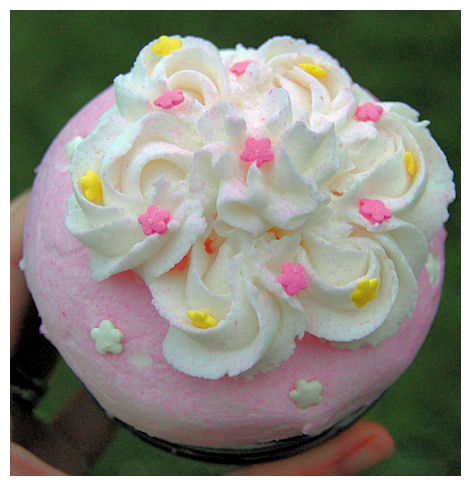
This is the cupcake all decorated
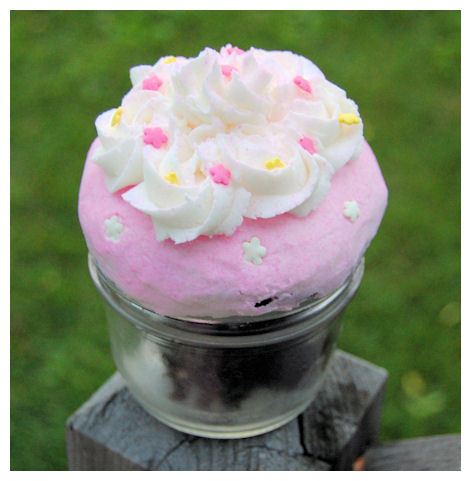
I took it OUT of the jar, and cleaned it! It looked too messy! LOL!
Then I put it back into the jar to decorate with homemade buttercream frosting!
Yes! I actually cooked and frosted a cupcake! LOL! Who’d of thunk it.
(PS Yes I strategically placed each sprinkle too)
My husband was in shock! The cool thing is you can even out the volcano top with the frosting!
YUM!!!!!!!!!!!!!!
Granted my frosting skills are RUSTY!
Now seriously, who wouldn’t DIE over this gift set?! I love it!
Supplies:
My Timeless Template: Pack a Picnic
Stamps: Cupcake Collection, Just Journaling Line, Borders & Corners Circle
Cardstock: Dark Chocolate, Hibiscus Burst, White, Vellum cardstock
Ink: Dark Chocolate, Hibiscus Burst, Sweet Blush, Snow White Craft ink
Ribbon and Vintage Buttons: Hibiscus Burst Collection
Ric Rac and Pom Poms in white
Glitter
Nestabilities, SU! Scallop border punch for lip
8 oz. jar
I’m putting this up in my Esty Shop! (sometime today-fingers crossed) So SOMEONE can use it 😀 Complete with cupcake in a jar mix! No frosting though-I think that has to be refrigerated.
(I made the cupcake in another jar, and saved the one for my project!)
So that is my template/countdown peek today! I SOOOOO hope you liked it. I put a lot of time and thought into it!! If it helps or inspired just ONE of you, it was worth it.
Now for MORE template peeks:
Be sure to stop by this months My Timeless Template Guest designers blog Leigh Ann Baird
Also Kelly has a peek too!
Then don’t forget to hop on over to Nichole’s Blog (I know! Like you need a reminder), Lisa and Candice also have sets this month too.
Come back tomorrow-I have my 2nd template to peek for you!
Thanks for stopping by, and sharing my excitement every month! You are the best. I kow I say that all the time, but I mean it. You make all the hard work worth it, and your comments and completed projects just put me in complete AWE!
THANK YOU!
Introducing Pack a Picnic-Template PEEK! EARLY
Jun 9, 2009 Author: mytime | Filed under: Home decor/3-D items, My Timeless Templates, Papertrey Newsletter, Product Opinions and Must havesI got permission to post this template peek for Papertrey Ink a little early!!
YIPPEE!! Thanks Nichole
Tonight’s peek is my favorite template to date!
I know, I say that every month, and I swear every time I MEAN it! I think, as papercrafters/stampers you all GET what I mean right?! Every month is the best!
But, THIS one is right up Summer’s Alley! Oh and perfect for the release too!
Now you know we have so MANY templates, just waiting for their turn for a release. We bumped the original for this month up one, because of a last minute addition :D)
This month, after seeing this peek of an upcoming set release:
I was VERY inspired to take the idea, and make a fun, modern twist on a classic design!
After almost 7 hours of work (yes! Those smooth angles are a KILLER!) The Pack a Picnic © was designed!
This was my concept template for the release.
I don’t put too much into these, so its not my top notch work, just a sampler of what is to come.
Just used Melon Berry , and Spring Moss cardstock , paired with some Green Tea Leaves paper-DONE!
Punch for basket border is a EK Success slim
Template is being released June 15th.
Pack a Picnic description:
Who doesn’t LOVE a Picnic? Did you ever think what an adorable gift packaging a oldie, but goodie, everyday item could make? This “basket” was inspired by the style of the old-fashioned 1950’s Picnic basket, but kicked up a notch, to a modernized Picnic basket of the Millennium! I love the size, and the fun curvy shape this has to it. It is almost hard to believe its made form *just* cardstock! Now we are adding a MINI version too which make this even MORE fun, with over the top options for all sorts of gifts, be them BIG or small. The punched border option that is ONE piece gives you a beautiful clean and professional look as well! You can really take along a great variety of items in this template. This box would look perfect sitting out ANYWHERE in someone’s home, office, or classroom. OR use the smaller version for Wedding/Shower favors. party favors or treats like candy, or little jar’s of jam, or home made yummies. The handles are not only adorable and fit a pretty design, but are functional as well! I LOVE the option of the lid, or no lid at all. Opens a world of possibilities, and an entirely new look.
Whatever you decide to pack in your Picnic basket, it is sure to be a great “present”-ation.
Here is the side view

These are LARGE bottles of Bath & Body Works Lotion & Body Wash!
There is still room in there for another one!
This basket is a fabulous size!
I think lid on or off, its just beautiful!!!!! Oh and FUN!!!
Now the details
This basket has a unique one piece lip, so that you punch your border, and fold it over, for a finished look, and this easy to achieve! No extra layering and gluing!
See nice lip to the basket! Goes together so easy too! All the hours were well worth it!!
You get the decorative mat layers as well :D)
Im just SOOOOOOO excited about the possibilities this template has!
I hope you are too!
I have some AMAZING projects to share over the next few days (OH! and lets not forget yet ANOTHER template!) so stay tuned!!
I’m over the moon to hear what YOU think so far!
Thanks for letting me share my excitment with you all! I know you GET IT!
Embellish It
May 31, 2009 Author: mytime | Filed under: Home decor/3-D items, Papertrey Newsletter, TutorialsIts the first! So this post is all about facing a Challenge! Keep reading.
Before I begin I have NO IDEA what is up with my photos running into the sidebar. I resized a few times with little success. I honestly don’t have time to resize each one for the 5th time, then reload! GRR This post ended up taking several hours because of it, and I am over it. I hope you get the general details of it all. SORRY!
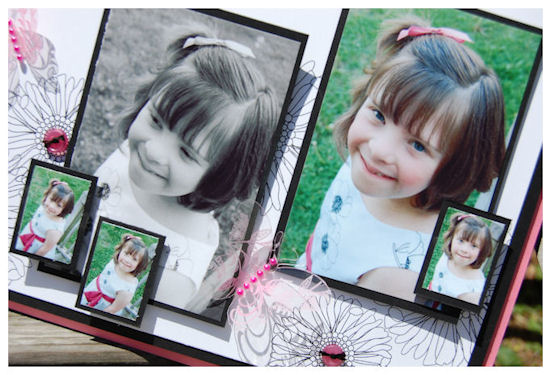
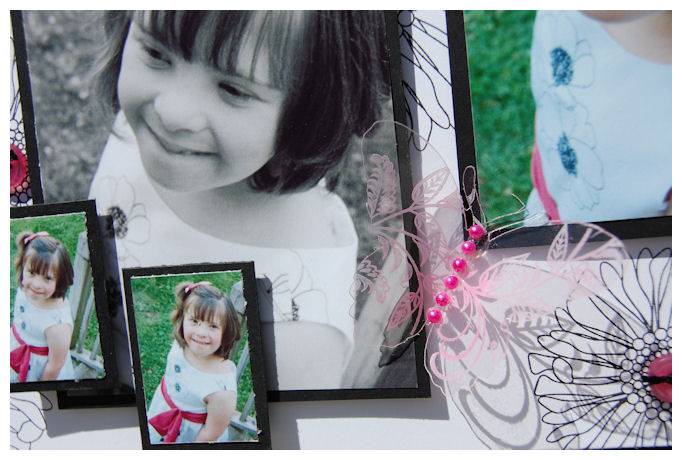
Alexa-Beautiful Girl

It is NOT often I do a “scrapbook page”.
I have to be REALLY inspired by something to even THINK of it. I had a particularly inspiring “photo shoot” with my daughter Alexa. She is ALMOST 10!
She was in a Spring Concert at School a week or so ago. She looked ADORABLE in her new dress that she picked out. We curled her hair, and got her ready- all pretty, so we had a photo session outside before the Concert.
To me, these are some of the BEST photos I have ever gotten of her! She was SOOOO “Alexa” when she is NOT in front of the camera. She usually can’t pose or makes funny faces, when you tell her to smile. She just contorts her face so unnaturally! LOL! So I just tried to let her be natural, herself. Cracking jokes while I took photos. THAT actually worked!!
I KNEW I wanted to capture them in a special way-forever!
This page just FLOWED out of me so easily. I’m beyond proud of it-especially my SUBJECT-Alexa :D)
She, to me, is like a butterfly. Hence my page. It is more than just a pretty page to me. It is capturing my thoughts, feelings and journey with my little girl, who has changed so much over the last few years.
This seemingly fragile human being, that started with so many odds against her, and despite it all, has morphed from the caterpillar (who avoided getting eaten by the “birds”-aka all her life obstacles) into a BEAUTIFUL butterfly. Spreading her wings, and taking flight. Never did I think I would have such a blessing in my life 10 years ago. Many times I thought I would lose her sweet little life. I always cry when I type these posts about her. I hate that!
I could go on and on, but will end it there. I get very emotional when I think of Alexa and her journey through life. I already know I will ALWAYS be so proud of her and where she will be in life. I am now! And Im so thankful for our journey. ALL OF IT. Thankful that God chose me, off all the people in the world to take her journey with her. What a blessing she is.
Now I switch my emotional gears to the project challenge.
That then lead me to the challenge that Nichole posed for her design team.
We were to create our own embellishments, inspired by some embellishments on the market, that you could purchase. Our goal was to share how much more affordable-and even how EASY, it is to create your own.
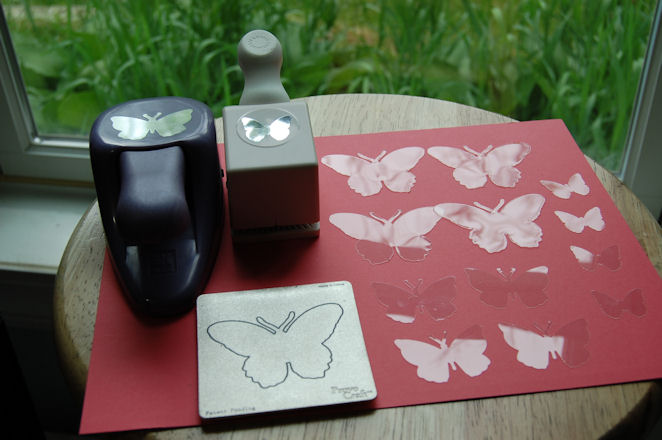
I was inspired by Heidi Swapp Butterfly Ghost Shapes, that I had for like a year, and couldn’t bare to use up, since you only get 6 in a package for $3.99 and UP! That is INSANE.
See photo:
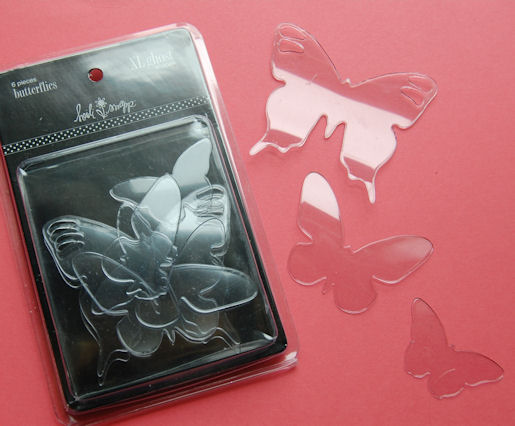
This is what comes in the package -these are the 3 shapes
You receive : 2 large, 2 medium and 2 small acetate butterflies as shown.
So I figured I could EASILY make my own, for FAR LESS! Maybe even BETTER 😀
I began my venture with Papertrey Ink’s Clearly Creative Cardstock
You get 10 sheets for $6.00. That means MY cost per sheet is 0.60 CENTS!

THIS receipt is the breakdown of the cost for making my OWN!!
Its actually CHEAPER than that! LOL! Read on.
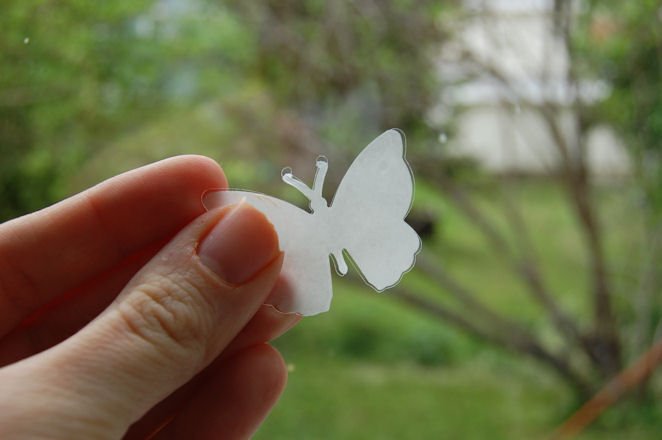
So I used my Cuttlebug butterfly die for my largest butterflies.
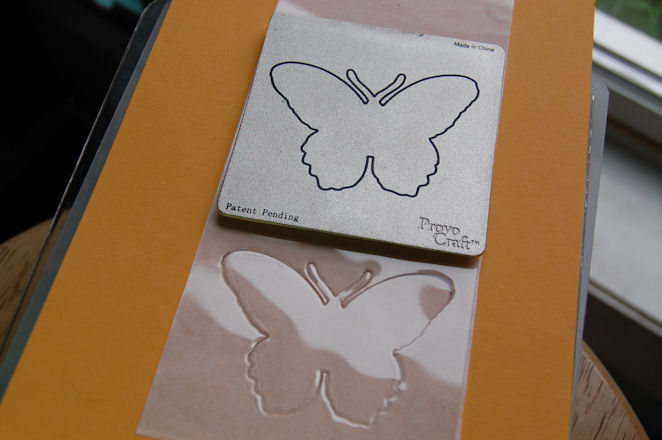
You can get 15 of the LARGE butterflies from ONE sheet costing ONLY 0.60 cents. You’d have to buy 7 or 8 packages of the Ghost Shapes to get that many of the largest butterfly shapes-costing upwards of $28-$32! What a savings!!
For my Med. size I used a Whale Butterfly punch by EK Success

I always keep the paper backing on till I’m done so I don’t LOSE anything I punch/die cut!
Now I can get 16 medium butterflies from one HALF sheet-or 32 per full sheet of acetate.
I the used a Martha Stewart Butterfly punch for my smallest butterflies.
I got 28 per half sheet of acetate, or 56 per full sheet!!!
Here are a few of the shapes I got from ONE piece of acetate-and I could have gotten even more!
I just figured getting even 4 each per sheet is WAY more for your money ( UNDER 0.60 cents) as oppose to the $3.99 and up for ONLY 6 shapes that are store purchased.
That is where the recipt total came in
I then recycled the package that the Heidi Swapp Ghost Shapes came in, and put MY own butterflies inside!
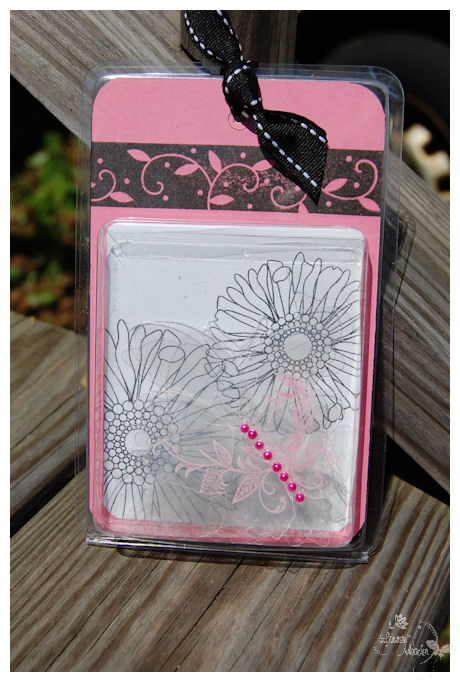
This is actually FULL of various shaped butterflies for a FRACTION of the cost!!!
I used one butterfly that I decorated for embellishing the front.
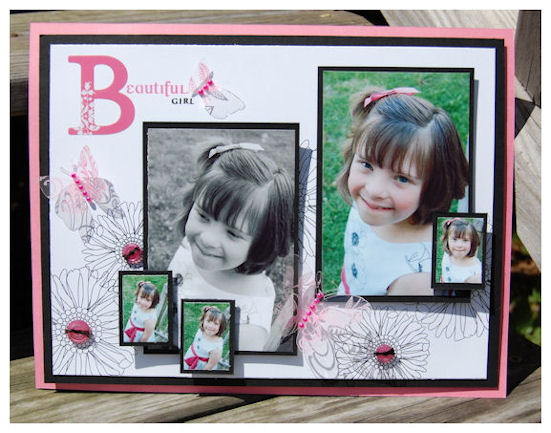
This is the product with my finished scrapbook page, that utilizes my embellishments: one of each size butterfly ON my page

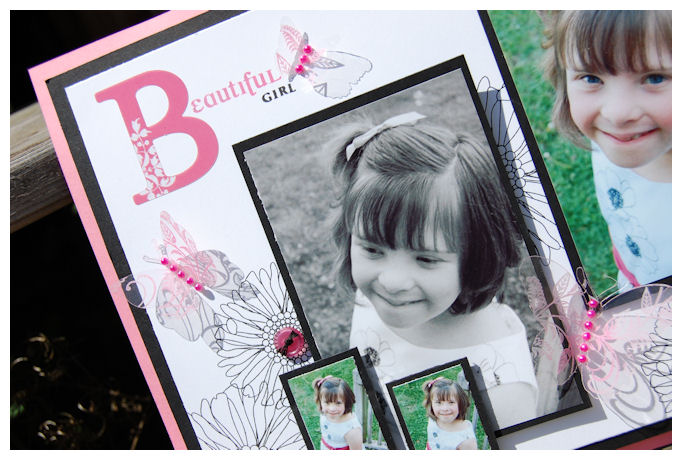
Here is how I designed my own embellishment further by getting inspired by ANOTHER product
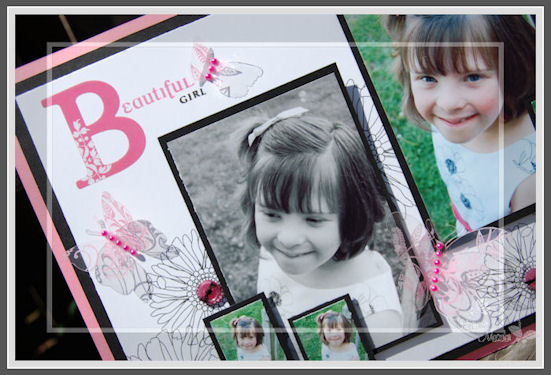
Notice my “B”.
Now here is what inspired my butterfly design
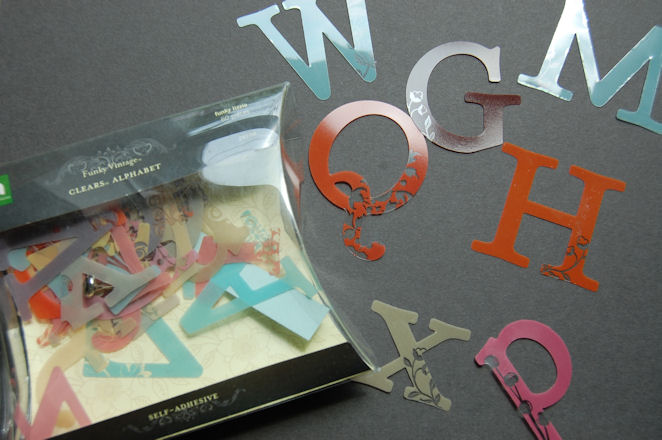
These are self adhesive acetate letters by Making Memories that sell for about $6 each
I used the “B” on my page. I loved the addition of the COLOR and FLOURISH on each letter, so I used that to further inspire yet another embellishment option for my plain acetate butterflies 😀
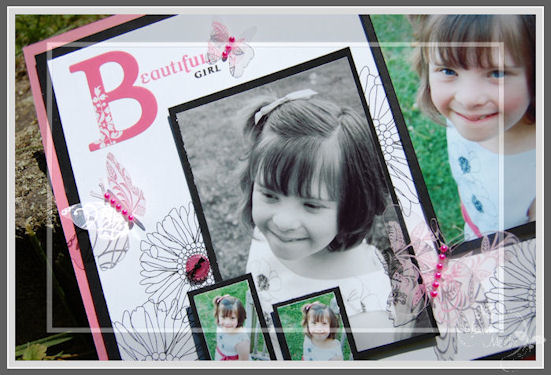
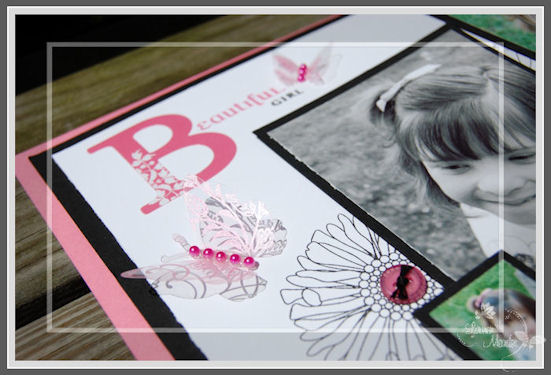
Here is a bit of a closer look at the B and the dimension my butterflies gave to my project.
Here is what I did:
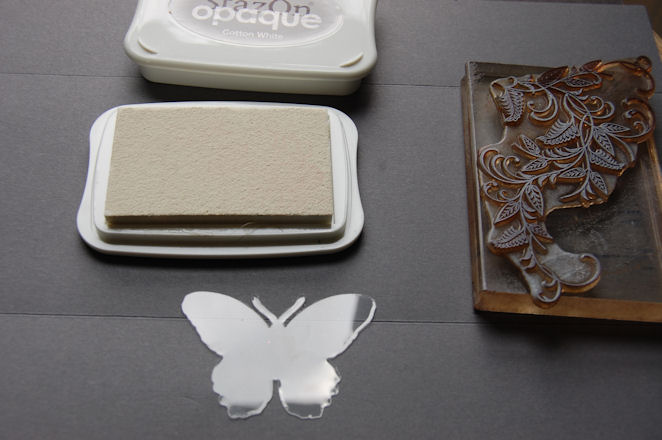
I just stamped my acetate butterflies using the flourish from With Sympathy, and White StazOn
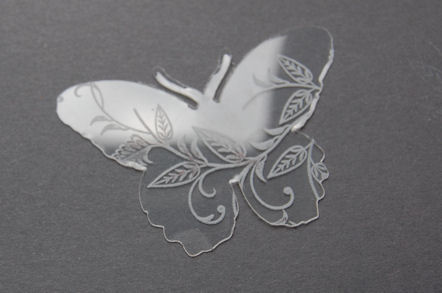
I added my color by using my own technique-Poppin Acetate with Jewel Tones Pastels
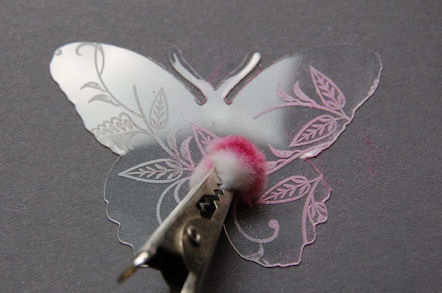
In SECONDS-a gorgeous butterfly embellishment!
I added some adhesive pearls to my butterfly centers, and was DONE!!

one more photo
So there you have it!
Now I can make SO many various embellishments JUST like these to suit ANY project!
I can die cut or punch ANY shape from the acetate I want or need, and I can embellish it without worry if I ruin one!
Supplies:
Stamps: With Sympathy (Flourish on butterflies), Friends til the End (flowers on white layer), Beautiful Blooms (sentiment)
Cardstock: Clearly Creative, White, True Black, Hibiscus Burst
Ink:True Black, Hibiscus Burst, White StazOn
Pebbles Pearlescent Pastels
Vintage Buttons , adhesive pearls, Making Memories Adhesive letter B
Cuttlebug butterfly die, EK Success butterfly punch, Martha Stewart punch
Now be sure to check out the design team!
Im sure this will get you making your own embellishments in no time, while saving yourself some money and using what you have! WIN! WIN!!
I hope you enjoyed my project 😀
Thanks for stopping by. I’d love to hear your thoughts, or if you give this a try too.
An Apple for Teacher-and Stamp Out Alzheimers!
May 22, 2009 Author: mytime | Filed under: Home decor/3-D items, Papertrey NewsletterTeacher gifts can be so hard sometimes. The point is to let them know we appreciate them!
I mean seriously, I have hard enough time doing HOMEWORK with my kids, let alone HOME SCHOOLING! Teaching is a very tough job and takes a very special person! If YOU are a teacher I personally want to say THANK YOU! I truly don’t know how you do it. Oh and if you do home school I think you are a saint! LOL!
I had to “home-school” Alexa with the help of her aid a few hours a day when she was home sick for a year, and let me tell you….. I was CLUELESS, and still remain so. I can’t even do most of Alexa’s 2nd grade math homework! I actually ran into a local town mom who home schools her kids, and does a fab job. She was a teacher for man years before staying home with her own. We talked about Alexa and her math issues, and she offered to tutor her! I need to see what is in my budget, but figure since I won’t be paying for Amber to go to school next year, that frees up some money. She also uses a better Math program that focuses on repetition, which is what Alexa THRIVES on, as oppose to the Everyday Math program they currently use in school which bounces around from money, to fractions, then graphs. You don’t get a handle on one concept then you are pushed into the next, then back to the other. We have adapted the math as much as possible but I still think its ridiculous!!! This one is very confusing (to me anyway! LOL!) So I really hope I can afford her. She didn’t know what she charges yet. Fingers crossed. We need ALL the help we can get, and honestly I don’t know HOW to approach it all.
Anywho-point being I admire teachers greatly, and am thankful for all they do!
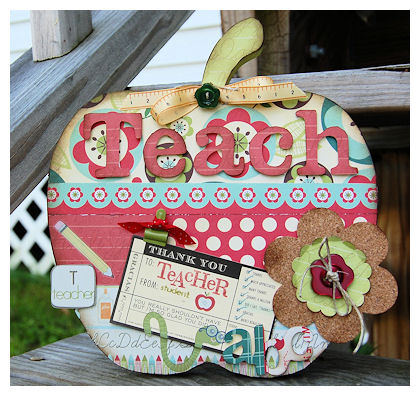
That being said Thank you Teacher wall decor
This is at my Etsy Shop!
I have to say I had a BLAST altering thisMDF Apple shape I got at Say it with Letters. I had the shape for over a month and FINALLY got around to altering it.
I spent quite some time on it, but it was a LOT of fun for me. I think the end result shows how much I enjoyed it 😀
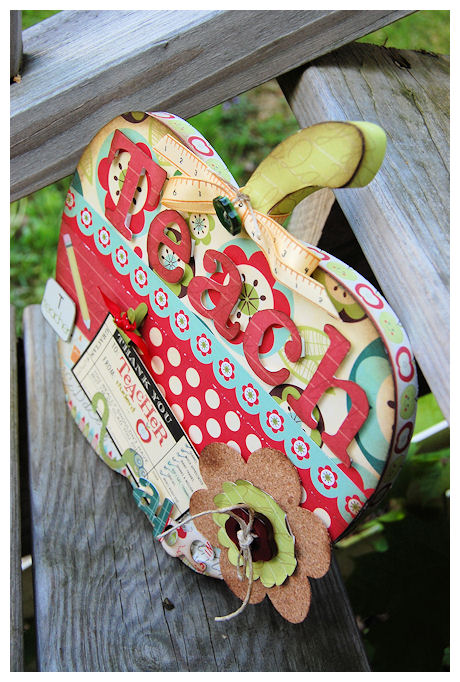
I think this is ONE apple themed gift that I Teacher won’t want to toss or loathe!
I layered lots of patterns for this using Cosmo Cricket-Early Bird collection, and paired it with Imaginesce Teacher’s Pet(A MUST HAVE!). I used the worm and pencil rub-on from the set, and the ribbon is from that Teachers Pet collection too 😀 HAPPY DAYS!

I FINALLY used my Slice, with the newest cartridge I picked up-Fall/ School cartridge to make my T E A C H letters, as well as the “abc” in the lower right corner.
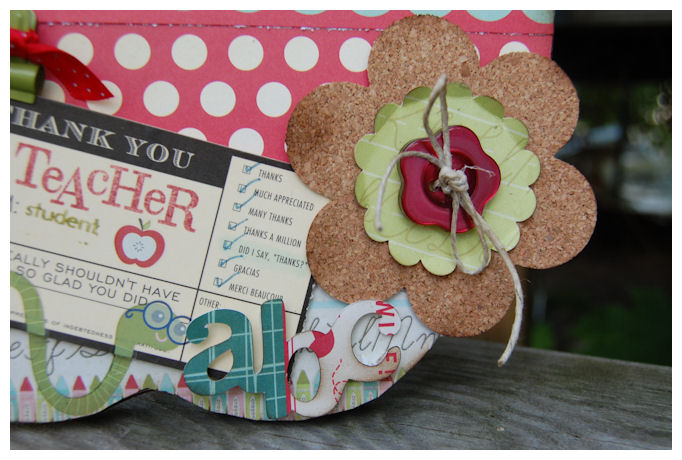
I used a thin cork sheet to punch my flower with the GIGA flower punch. I layered the scallop punched from patterned paper, with a flower shaped button that I just LOVE!!!!!!!!!!!!!! I think its a nice touch 😀
My thank you tag is from 7 gypsies
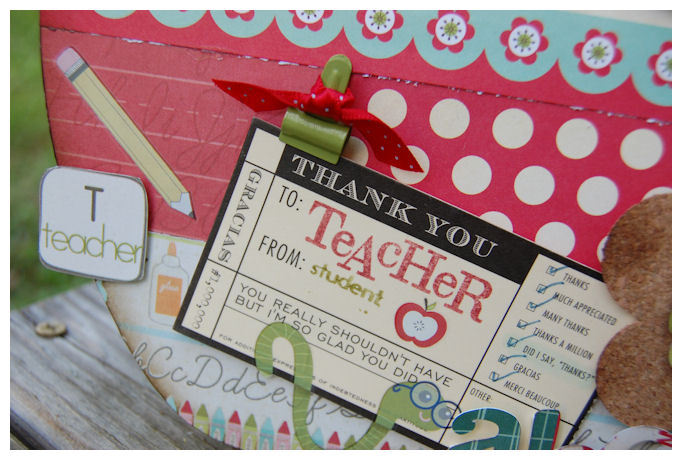
I used the stamp set Teacher’s Apple for this, and love the result! Ink is Pure Poppy, and Ripe Avocado.
Last photo:
Supplies:
Stamps: Teachers Apple
Paper: Cosmo Cricket Early Bird, Imaginesce Teachers Pet-with rub-ons
Ink, Tim Holtz distress ink, sponge Ripe Avocado, Pure Poppy
MDF Apple: Say it with Letters
Slice: Fall/School cartridge
Tag: 7 Gypsies
cork, buttons, hemp, Zip Dry
My friend is a teacher and she says she get overwhelmed with APPLE stuff-unless its food, then NO APPLES! I showed her this and she said she would love to have something like it for her classroom, or home 😀 Mission accomplished.
Now, another note! More serious-
My friend Jen Tapleris co-hosting BIG event for a cause! Stamp Out Alzheimer’s! You can view her post here!
What is SOA you might ask?
SOA is an exciting “pay to play” virtual papercrafting event to benefit the Alzheimer’s Association.
Jason just lost one of his grandmothers due to Alzheimer’s. It is a terrible progressive disease. I worked in an Alzheimer’s/ Dementia unit for 3 years while I was a nurse and saw the debilitating effects it had on the people and families it affected. His grandmother suffered for over 4 years before losing her battle.
A large group of generous sponsors and challenge hostesses (myself included), have teamed up to create a temporary online community where members can take part in a variety of challenges, contests, classes and workshops, and download several free products (a special digital kit, a printable 3-d template, tutorials, etc) in different papercrafting categories (stamping, cardmaking, paperscrapbooking, digi scrapping, hybrid, etc). All this for a suggested donation of $5. 100% of these funds will be donated to the Alzheimer’s Association to help with their efforts to provide and enhance care and support for all those affected by this heartbreaking disease.
I have donated some money, and personally donated 4 My Timeless Template downloads of winners choice, the stamp set Handwritten Notes, and a $25 gift certificate to Papertrey Ink.
I am hoping to host a challenge as well.
I hope you will join us in raising money for the cause, and having fun at the same time! Its a WIN! WIN!!!!
Thanks for stopping by! Let me know if you are joining in the fun!! I think its important to support one another 😀
My take on my challenge
May 19, 2009 Author: mytime | Filed under: Home decor/3-D items, JustRite Stampers, My Timeless Templates, Papertrey NewsletterYES! I really did have a project for My Timeless Template Challenge <—–click there to see challenge details. My team totally ROCKED out the templates! I’m in awe.
Another short and sweet post since I feel like the WALKING DEAD, and I have that field trip to go one. Its a LONG nature hike-GOOD TIMES! (NOT!)
For my project today I used my newest template Ready, Set, Wrap! I really love that one. Gets a great gift wrap done in a jiffy 😀
I was just seriously delayed in photographing and editing it 😀 SO I apologize for that. Sometimes LIFE gets in the way.
Anywho……
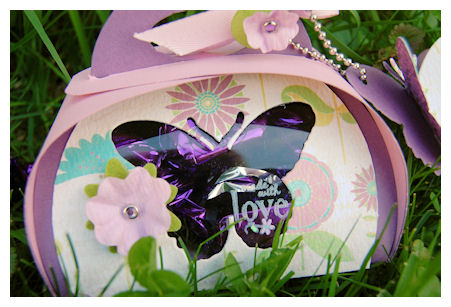
Here is my gift item:
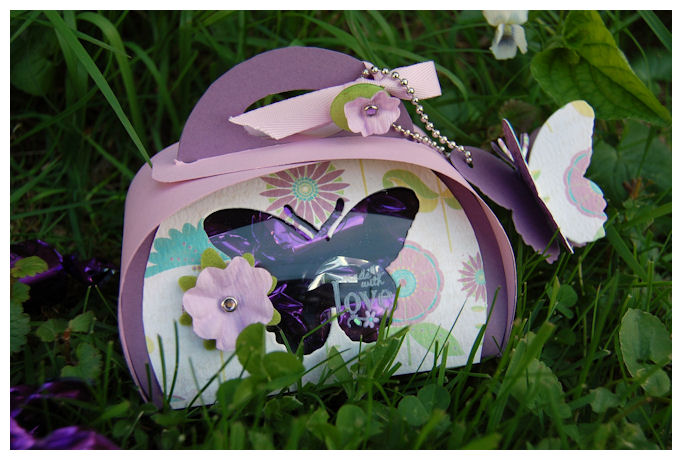
Made with love
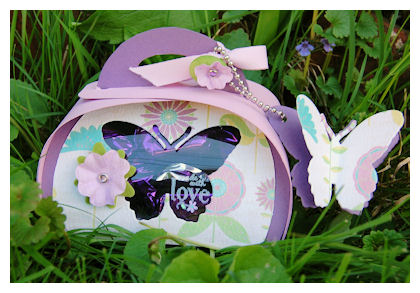
This is a large cuttlebug die. It has 3 or 4 matching embossing folders with it. I NEVER use it (insert shocked face here!) but now is the perfect time! I love how I was able to make a window in my Ready, Set, Wrap box!
I love purple AND butterflies so this was EASY PEASY for me. Once I saw that paper I KNEW that it was perfect.
So there was NO waste here either. I used the die cut pieces-that were left over from creating my window butterfly, and layered them together to use as a keytag! I love that 😀
Here is the closer view of the stamped window.
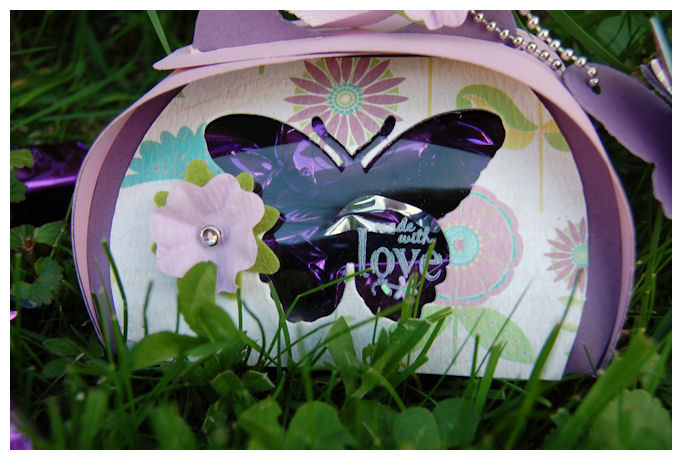
It reads: Made with love, and has a flower that I colored using my Singlo Opaque pens.
I used the JustRite Stampers set: Tiny words & Borders in white StazOn to make it. Its so sweet and subtle! You can also get them here
Inside are some Raspberry chocolates from Seattle something. All I knew was they matched my project, so I was happy. Can you tell Im sick! Im totally brain dead these days! YIKES! Can’t remember ANYTHING. Oh and too lazy to go find the info! LOL! SORRY :C
The paper is PTI pale plum, and Lavender moon, and the patterned paper NEW! to me. NO IDEA who makes that-sorry. I chopped it all up :D) Feels good to not HOARD it. Sorta!
The flowers are by American Crafts. I think they are a nice touch.
Well that is it for me.
Wish me luck on the field trip 😀
I have been uber busy creating so I hope to share LOTS more soon!
Thanks for stopping by, and I hope you play along with the challenge!
Day late and a $1 short
May 18, 2009 Author: mytime | Filed under: Cards, My Timeless Templates, Papertrey NewsletterOK maybe more like 3 days late!
This will be chatty! You can tell I haven’t blogged in a few days. Its like I was cut off from the world!
PS I do have my own template challenge DONE-I just need to photograph it!
I am SO late posting my Papertrey Ink release stuff! Having the newsletter in there and then my weekend festivities, really threw me off there. Plus now I sick! I like scratch sore throat, sinus infection sick! BLECH!
I always use these little sayings like above
A day late and a $1 short
Robbing Peter to Pay Paul
Called him on the carpet
things like that, and it drives my husband INSANE! He’s never heard most of the sayings I use, and I think thye are universal. He things I’m the weird one, but I think HE has been living under a rock.
SO help me win the argument and tell me you heard these, and please share others YOU use!! Maybe they are some I use and he can see Im not crazy 😀 AND by YOU volunteering them he will know you aren’t just agreeing with me :D! LOL! Plus I’d love to learn some new ones to make him more crazy 😀
OK moving on-CKC was fun! I think I like hanging with my girls more than the shopping 😀 OK maybe its the us shopping and enabling together?! LOL! NO! I didn’t bring my camera. How would I shop with my big hinkin camera hanging on my neck?
I went with my best girls Paulette, MollyB, Traceyand her MOM, who I like to call mom, cause I love her to death! She is just the sweetest person ever. AND I think she is more of a private person so I won’t go giving out her address and stuff! LOL! JK! Some of our other friends from last year were missing :C But maybe next year! Yes I go every year!
There weren’t a lot of “sales/deals” KWIM? I figured with the economy there would be.
I got some of the PRETTIEST paper. I swear I go there just to spend ALL my $$ on paper! Good grief! I alway promise myself I WON’T do it. Actually me and my friends had a pact to NOT buy so much paper. Before you know it we are making each other get paper from here, there and everywhere! Good friend we are. Just a bunch of enablers. How are we suppose to resist the PULL of some of the prettiest patterned paper all in ONE place, at out fingertips, ready to go home with us? Obviously we can’t! I will say we did help each other if one said do I really need X, usually one of us was strong enough to say NO! you don! WALK AWAY!!!!!!!!!!!!!!
I will say I spent WAY less than usual. I honestly don’t have the $$ to go all out KWIM? I brought CASH and told myself I would NOT use my card-once the cash was gone-it was gone, and you know what-I had money left over! GO LAUREN!! I was pretty reserved 😀
We got some nestabilities that were on SALE for like $18!! All of them! Now that was the TRUE test. It was hard not to go wild. I want SO many.
I did also get some cool alterable stuff which I’m just bouncing over because you KNOW how I am with alterable and gift making-its my favorite thing, got some SUPER buttons and brads OH! and 2 stamp sets that I didn’t need but they had butterflies, so I had to get it, along with stamp singles. I also got a SLICE cartridge for my SLICE machine-Ill share more about that later 😀 YES! I have a SLICE. YES! I have played with it-NO! Haven’t actually USED it in a project-YET! But its cool. It was suppose to hold me over from getting the Cricut Expression-and so far its workin because I haven’t hardly used it, so I had no business getting that till I get my $$ worth from my SLICE! The cartridges were on SALE-which at M’s you can’t use a coupon so that justified that.
While shopping I was stopped my lots of my blog readers who were also shopping and stopped to say HI! I think that is so sweet to get to meet people who come visit me everyday!! SO HI!!
OK now moving on to the PTI release 😀 You got to see some of the peeks through the week-so scroll down to older posts, for more ideas 😀
I have to be honest before I share-I have a VERY hard time-switching from template mode to card making mode! I don’t know what it is, but I get into the ZONE with templates so working with a flat surface gets to be challenging. I have SO MANY templates designed its INSANE-and I still have about 16 ideas sketched out on my desk that Im totally ITCHING to make into reality! Its crazy. OK who cares! I know!!
So that being said this month we released 2 templates: Let’s Do Lunch, and Ready, Set Wrap! I had (and am still having FUN with those!)
More sample to come 😀
OK ALL supplies from Papertrey Ink—>Click here<—-to see whats NEW!
Background Basics-Text Style
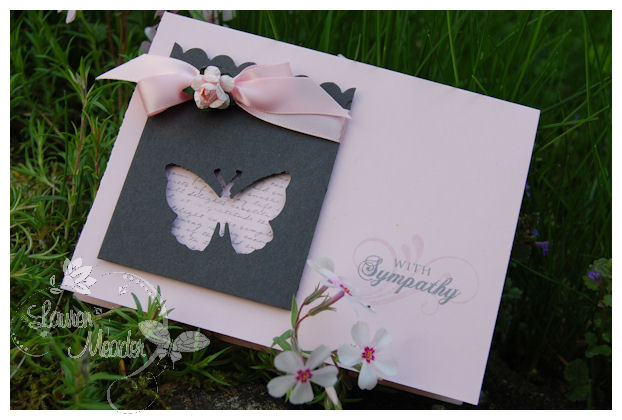
With Sympathy
Stamps: Fancy Flourishes, Background Basics :Text Style, Mega Mixed Messages
Cardstock: Sweet Blush, Smokey Shadow
Ink:Sweet Blush, Smokey Shadow
Satin sweet blush ribbon
Adhesive flower by Prima
Butterfly punch by ek success, scallop punch
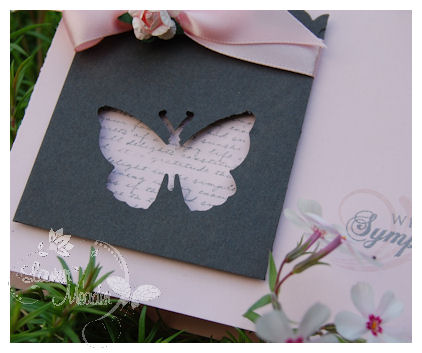
I can’t even begin to tell you how much I ADORE this background! HOLY MOLY! Its beautiful. Oh and Fancy Flourishes-must have!! I love how the swirl makes a flutter trail and just looks elegant under the sympathy sentiment. I find these cards the toughest to create. I think I need to make an entire set with this design to keep on hand.
I stamped the sentiment on my card base, then punched the layer with my butterfly, and laid it over it, with dimensionals
Can you tell Im loving the flowers that are on my lawn? I was going to KILL Jason when he ran over them with the lawnmower yesterday! GRR!! What am I going to do now for NO FUSS photo props?! MEN! They just don’t get it sometimes :D)
I needed a sympathy card for my friend, who’s grandmother died the same day as Jay’s-creepy huh?!
I ALWAYS have to include a butterfly in my sympathy cards. Its just this thing I have. I think the Smokey Shadow with Sweet Blush was a great combo for it too.
Reach for the Stars
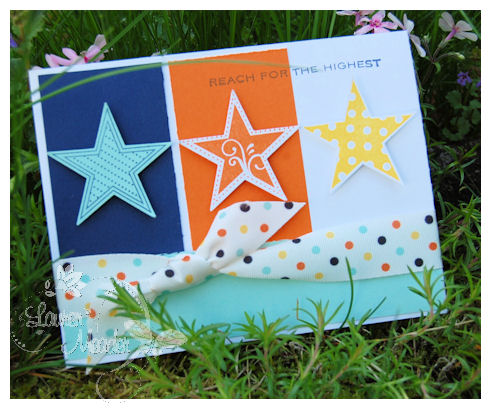
Reach for the Stars
Stamps: Star Prints
Cardstock: White, Aqua Mist, Navy, Pumpkin
Ink: Aqua Mist, Navy, Pumpkin, Lemon Tart
Ribbon from American Crafts
Star Punch XL Fiskars
OK I love Star Prints! I so would have done more if I had time-so plan on seeing this more in the future. The sentiments ROCK! I just loved this clean and simple design 😀
This next one used Day at the Beach

A totally fabulous set that I did NO justice to, because of my card funk! SORRY!! Trust me Ill be using it more once my mojo for cards returns. Im still in template mode
Supplies: Bottoms Up
Stamps: Day at the beach
Cardstock: White, raspberry Fizz, summer sun, tempting turq.
Ink: gray,raspberry Fizz, summer sun, tempting turq, lemon tart, celery
ribbon from American Crafts
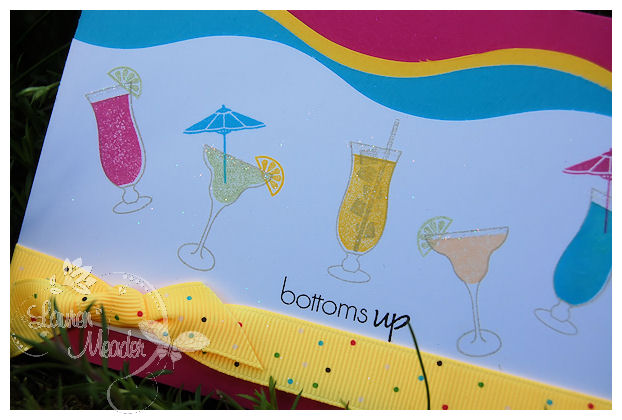
You can’t tell by my horrific photo-that all the glass rims have “salted” or AKA glittered rims 😀
I love the set and how the cocktails gasses can be EASILY layered. WAY CUTE!! The whole set is fabulous.
Next up is Lisa’s set-Let Freedom Ring
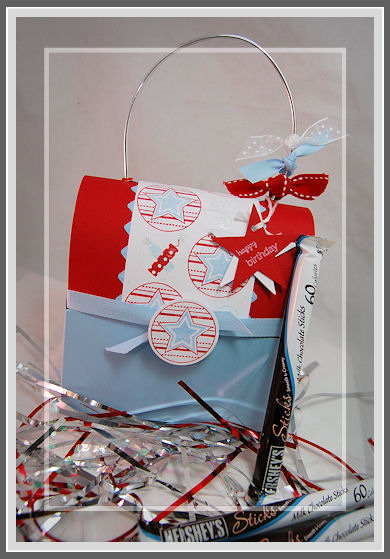
Supplies:
My Timeless Template: Let’s Do Lunch
Stamps: Let Freedom Ring
Cardstock: white, pure poppy, spring rain
ink:pure poppy, spring rain, snow white
ribbon: Spring Rain grosgrain, white bitty dot, poppy stiched grosgrain
Punch: Fiskars XL Twinkle punch, circle punch, EK Success pinking shears border punch
Other-purse handle
Inside are Hershey Chocolate Stix!
I used my Let’s Do Lunch template. I can’t tell you how much fun I have had putting that one together!
Anywho-I filled this one with Hershey Milk Chocolate Stix! They are the perfect fit! YUMMY and not too high in the calorie department 😀
Here is a top view
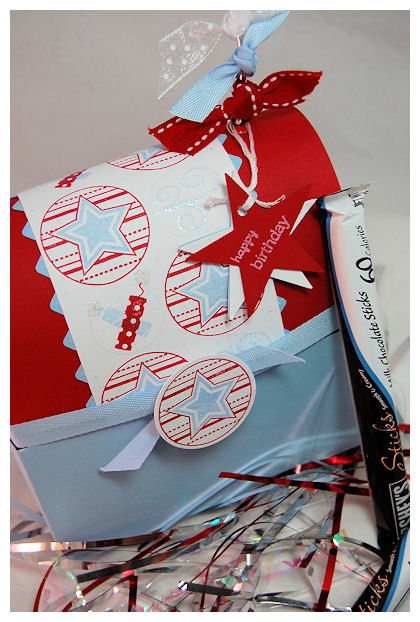
My handles are purse handles I found at Michaels for $2! LOVE them!!
Detail photo
I made my own patterned paper using Lisa’s set. I love how you can make the border circle and the star 2 separate colors-easlily! I went with the red, white and blue for a festive 4th of July gift giving idea.
I think its cute 😀 Plus a great BOY option!! Change the colors and its a GIRLY option.
Lisa featured ALL our designs on her blog—> HERE! Seeing them all grouped together is really cool, I think.
OK that is all I got for ya today! I’m finishing up some designs and gifty stuff to go into my Etsy shop! This lunch box will be going there too. Im excited about everything, so I hope YOU will be too. (I’ll be updating it later-Ill keep ya posted) On another note: ALL recent orders have been shipped 😀
Have a great day! And as always thanks for stopping by
My Etsy

Who I Designed For
Blogroll
- Alicia
- Alli Miles
- Ally Blankenship
- Amber
- Andi @ crafts on a whim
- Angel R
- Angie Z
- Anne Kranitz
- Becky O
- Bee
- Beth Silaka
- Bethany Paull
- Beverly Nash
- Bobbie
- Cambria
- Cammie
- Card of the Week
- Card Positioning System (CPS)
- Cards for Cancer
- Catherine Doucette
- Charmaine
- Cheryl Sims
- Chriss Rollins
- Christina
- Christine Ewing
- Christine Wooden
- Colleen Schaan
- Craft Critique
- Craft Gossip
- Crystal
- Dawn Easton
- Emily Giovanni
- Geny
- Holly
- Igne Groot
- Inspirational Craft Blogs
- Irene
- Jami Sibley
- Jeanne Streiff
- Jen del Muro
- Jeni Bond
- JenMarie
- Jenn Balcer
- Jenn Diercks
- Jenn O
- Jennifer E
- Jennifer Mick
- Jennifer Pereda
- Jennifer-Sweet Treat
- Joanne Basile
- Jodi Collins
- Julia Stainton
- Julie Masse
- Karen
- Kathryn Berthiaume
- Katie Cotton
- Kelley Holland
- Kendra
- Kim Scholfield
- Kris’s Color Stripes! Get inspired here
- Kristen Dubosque
- Kristin Eberline
- Kristine
- Laura @ Sunshine Stamper
- Laura Turnmire
- Laurie Schmidlin
- Lesa Rapp
- Linda Duke
- Linda-LSN
- Lindsey Botkin
- Lisa (lakind scs)
- Lisa Kind
- Lori Craig
- Maggie
- Mara Campbell
- Maria
- Maria Levine
- Mary
- MaryJo
- Melanie M
- Monique Hansen
- Moxie Fab World
- Pam Imholz
- PaperCrafts Connection
- Peppers and Pollywogs Kids party site
- Rebecca Grohall
- Rita
- Robyn
- Rose Ann
- Sarah Vrolyk
- Sharon Harnist
- Sharon Johnson
- Sharon Rivera (a chemisrty with paper)
- Sherrie
- Sophia Landry
- Storage Units, Ink, & More Blog
- Sue Berker
- Susan (Rainy)
- Tangii Crane
- Tracy
- Tricia Traxler
- Trudee
- Velta
- VivLyn
- Zena
MTME Pretty Palette Color Team
MTME Pretty Patterns Sketch Team
My Time Made Easy TM LLC
Shop till you drop!
Lauren Meader
About Me
Copyrighted material
Subscribe To My Blog
Pages
- About me
- Alexa’s Story!
- My Crafty Corner!
- My Time Made Easy™ LLC
- Our Make A Wish Trip to Disney!
- Resume/Publication List
Calendar
| M | T | W | T | F | S | S |
|---|---|---|---|---|---|---|
| 1 | 2 | 3 | 4 | 5 | 6 | 7 |
| 8 | 9 | 10 | 11 | 12 | 13 | 14 |
| 15 | 16 | 17 | 18 | 19 | 20 | 21 |
| 22 | 23 | 24 | 25 | 26 | 27 | 28 |
| 29 | 30 | |||||
Archives
- August 2013
- July 2013
- June 2013
- May 2013
- April 2013
- March 2013
- February 2013
- January 2013
- December 2012
- November 2012
- October 2012
- September 2012
- August 2012
- July 2012
- June 2012
- May 2012
- April 2012
- March 2012
- February 2012
- January 2012
- December 2011
- November 2011
- October 2011
- September 2011
- August 2011
- July 2011
- June 2011
- May 2011
- April 2011
- March 2011
- February 2011
- January 2011
- December 2010
- November 2010
- October 2010
- September 2010
- August 2010
- July 2010
- June 2010
- May 2010
- April 2010
- March 2010
- February 2010
- January 2010
- December 2009
- November 2009
- October 2009
- September 2009
- August 2009
- July 2009
- June 2009
- May 2009
- April 2009
- March 2009
- February 2009
- January 2009
- December 2008
- November 2008
- October 2008
- September 2008
- August 2008
- July 2008
- June 2008
- May 2008
- April 2008
- March 2008
- February 2008
- January 2008
- December 2007
- November 2007
- October 2007
- September 2007
- August 2007
- July 2007
- June 2007
- May 2007
- April 2007
- March 2007
- January 2007
Categories
- About Me
- All That Scraps
- blogger challenge
- camera/photo play
- Cards
- Contests
- family stuff
- FOR SALE
- Home decor/3-D items
- How to FAKE it!
- Introduction
- JUGS Challenge
- JustRite Stampers
- Lizzie Anne Designs
- My family stuff
- My Stamping Space
- My Time Made Easy
- My Time To Color Challenge
- My Time to Create Challenge
- My Timeless Template Challenge
- My Timeless Templates
- Mytime Mail
- MYTIME MOVIE/VIDEOs
- Papertrey Newsletter
- Pink Cat Studio
- Pretty Palette Challenge
- Pretty Patterns Sketch
- Product Opinions and Must haves
- Recipe's
- Saturday Sketch
- Smilebox Creations
- Stampavie
- Tutorials
- Uncategorized
- videos
Most Popular
- Create your own Onesie Card Tutorial-and important NOTE! PLEASE READ (2529)
- Saturday Sketch-Boxed bag holder (2333)
- Going GREEN! Fancy Flower Flourish-Closure Video (1478)
- Fabulous Favorite - Giveaway! (1336)
- a Prayer Request (1231)
- QUICK-Easter Baskets from Nestabilities-PTI style-and blog challenge (1063)
- Teaser Sketch (999)
- February Release Giveway! (and a little peek) (996)
- Group Post and Rambling Rose Video Tutorial (985)
- GIVEAWAY! Who wants it all?! (895)
Recent Comments (RSS)
- 야동: Love to read it,Waiting For
- 야동: This seller is in a
- 바카라사이트: 여기 처음 왔어요. 나는이 게시판을
- 야동티비: I was surfing the Internet
- 바카라사이트: 비슷한 주제에 대한 흥미로운 정보를
- 바카라사이트: "여기에 제공해 주신 귀중한 정보와
- 온라인홀덤: 유익한 웹 사이트를 게시하는 데
- 홀덤나라: 나는 당신의 블로그를 정말 좋아합니다.
- lisa: Technology, too, has left an
- 주소모음: 흠 !! 이 블로그는 정말
Copyright © 2007 - My Time, My Creations, My Stampendence - is proudly powered by WordPress
This blog has been Tweaked and Designed by Sara Williams