Archive for the ‘Papertrey Newsletter’ Category
Projects with pop
Jul 13, 2009 Author: mytime | Filed under: Home decor/3-D items, My Timeless Templates, Papertrey Newsletter, Product Opinions and Must havesTonight is the release night at Papertrey Ink!
I hope you are just as excited as I am. I’m just dying to see what you all do with the new goodies 😀
Also a HUGE thank you! I am so excited about all the amazing comments reguarding My Timeless Templates ©! I appreciate the emails I get with samples too! You all are rocking them out! You are all truly amazing, and your words really and truly brightened my day.
I have a crazy week coming and needed the lift 😀 Jay is having his back surgery on Thursday (he is starting to FREAK out) and will be there overnight, my grandfather (who has always been like a father to me growing up) is suddenly seriously ill, Alexa has her post Chemo check up Wednesday (which ALWAYS freaks me out!) and I have some other “worries” going on that are just weighing me down. So I want to thank you for lifting me up with your sweet words! Oh and if you can throw in a prayer for my family please! I’m really just stressed about the weeks events.
I will be announcing a winner for the 2 My Timeless Templates ©later today. As I post this, its too early! LOL!
As I promised yesterday, I have my Pretty Petal Pocket © template in the standard and Pretty Petite version! I hope you like seeing the same design, just different sizes,side by side.
I will answer questions about the templates in my contest winner post! I have to scroll through and see what people are interested in knowing! I know dimensions was one question!
Please note ALL our templates give the finished sizes on the website when you click to view the actual template 😀
In the mean time……here we go!
Pretty Poppy Pockets Duo

I think Poppy and True Black have an amazing POP together! A bright color combination that I just adore together!
I wanted a dramatic, and elegant look, so that is exactly what I feel I got here!
View from the top

I also lined the inside, side panel! I love the finished look taking that extra step has 😀
Pretty Poppy Pocket

This is the larger template, decorated.
I used a large chipboard shape that is from Maya Road. I just covered it with my Green Tea Leaves paper.

For a more dramatic appeal, I covered the back of the chipboard with Pure Poppy cardstock, amking it a bit larger than the chipboard layer. I then distressed the layered edge for a cool look! I never did that before and I really enjoy the way it appears in real life 😀
I also did lots of flower layering, by using some paper punched flowers, felt flowers from American Crafts, and Prima flowers!
The leaves are a Cuttlebug long die, that I felt was PERFECT for this project!
Pretty Petite Poppy Pocket
This is the smaller pocket. It may be smaller but is just as cute, and still holds a great number of ideas for gifts!
I made my own chipboard flowers using the same flowers cuttlebig die.
The sentiment flag was stamped with Text Style bkgd, in gray ink, then the sentiment from the NEW! Everyday Button Bits was stamped in black ink. I did some faux stitches as well to add to the look!
I think they are a very cute set!
I love making the matchy match stuff, and making my own chipboard embellishments was a fun challenge for me today! I get bored with the same ole, same ole, and I have to say my mojo is in FULL gear! I love when that happens!
Supplies:
My Timeless Template: Pretty Petal Pocket ©
Stamps:Everyday Button bits, Text Style bkgd
cardstock: Pure Poppy, Spring Moss
Patterned Paper: Green Tea Leaves, Bitty Box Basics
Ink: Smokey Shadow, Black
Ribbon: Saddle Stitched black, May arts satin
Chipboard: Maya Road
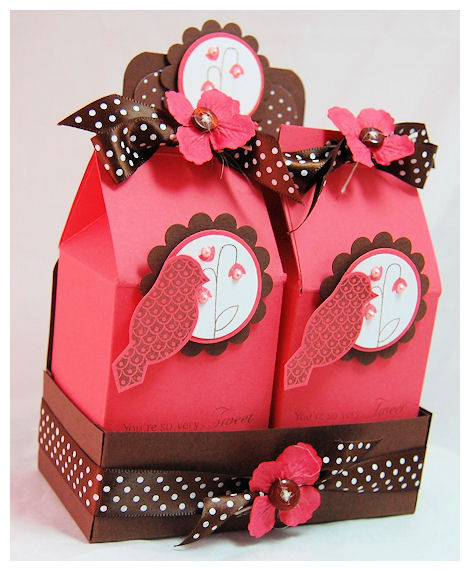
Now for another WOW! Where a color duo takes center stage……dark chocolate & berry sorbet (YUM!)
You’re so very Tweet (using Milk Made ©)
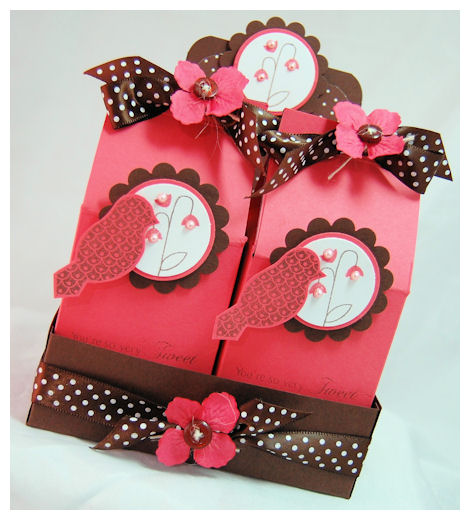
Can this get any sweeter?
This was made to hold 2 bags of Dove Chocolates! Isn’t it PERFECT for that?! I LOVE Dove Chocolate!
I’m in love!
I love the little flower image from Bird Watching, and SO wanted to use it since it’s release. I finally got the opportunity this time 😀
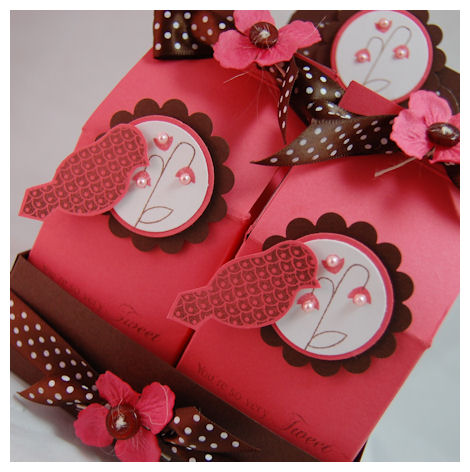
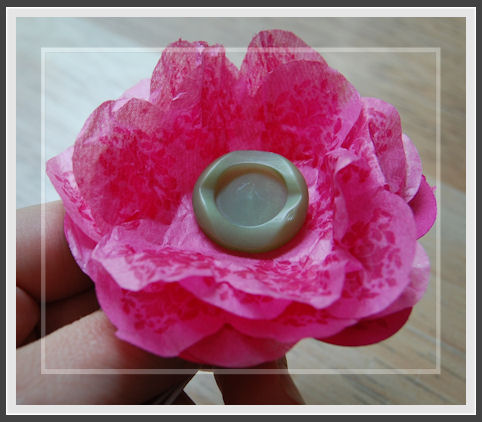
I just added some adhesive pearls to the lil tulip like flower centers. such a EASY addition, that packs a big WOW! factor.
One last side photo

Now we can move on to the very SIMPLE Milk Made © Crate.
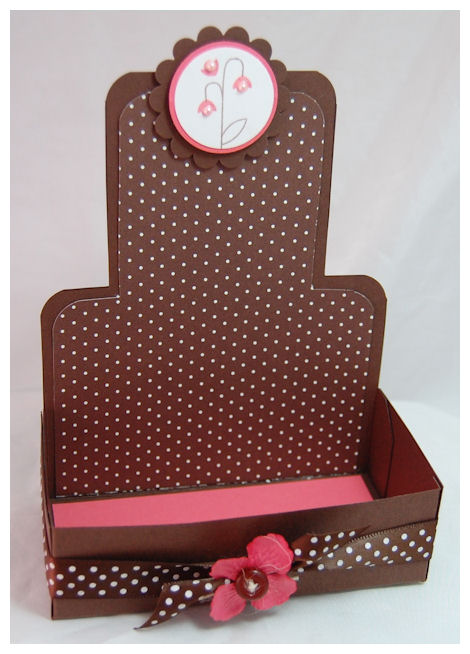
This template ALONE can be used to house a wide variety of items, in itself! Its just SOOOOOO cute.
Add dividers, and sort your desk stuff……as I did the other day put note cards or flower pots……recipe cards………altered chocolate bars 😀 YUM! Smores mix carrier! OH! That sounds yum-o!
As you can see I also lined the bottom of the Milk Made © Crate. Sometimes its that LITTLE extra step that completes a project 😀
Obviously kept this one UBER simple, and I think that adds to the beauty.
Supplies:
My Timeless Template: Milk Made ©
Stamps: Bird Watching
Cardstock: White Dark chocolate, Berry sorbet
Patterned paper: Bitty dots 2008
Ink Dark Chocolate, berry sorbet
Ribbon dark chocolate polka dot ribbon & twine
vintage buttons
adhesive pearls, circle punches
Well, it is very late, and I have things to wrap up, so I’m keeping it short and sweet! ( I know! When am I ever short and sweet! LOL! SORRY!)
Today is Becky’s day to share a peek with you! Also be sure to check in on Nichole’s blog , Dawn and Lisa, as they share even MORE amazing samples too!
I will return with some questions answered and a template winner! YEAH!
Thank you again for taking the time to stop by and/or comment. Makes all the hours I put into my pure LOVE for this hobby worth while.
Be back soon!
Gardening Apron, a Petal in Bloom and a Template Duo Giveaway!
Jul 12, 2009 Author: mytime | Filed under: Home decor/3-D items, My Timeless Templates, Papertrey Newsletter, Product Opinions and Must havesA new day! That means MORE NEW samples! WOOT! WOOT!
It also means its time for a Giveaway! All you have to do is leave me a comment! You can make a template suggestion, ask a question, list your fave project or template, tell me what you think about the template samples I’ve shared so far…whatever you decide to share!
Winner to be drawn tomorrow (July 14th) with my newest template peek post!
I love hearing your feedback! I will draw one winner, and they will get BOTH the templates being released this month: Milk Made © and Pretty Petal Pocket ©!
I had some MORE AH!HA! Moments while creating 😀 So I hope they get YOUR creative ideas using the newest templates flowing 😀 OH! and wait till you see the idea book! WOW!
NOTE: Templates shared today release July 15th! They are linked to main template page for future blog viewers 😀
Well I don’ know if you recall, but last month we had “smaller versions” of the templates we featured! I like to call them Pretty Petites. I have had numerous emails this month asking if we will have that same option with this months release and the answer is……
YES!!!! I really hope to hear what you think about the typical size templates as well as the inclusion of the Pretty Petites! I try my best to make all My Timeless Templates © as large as possible!!! I personally love some of them being offered in a Petite version because 1) They are CUTE! 2) If you have a lot to make they take a little less time 3) They are less expensive to FILL 😀
So let me share the Template, with a matching Pretty Petite version!
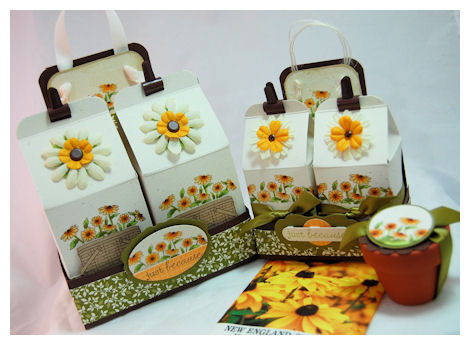
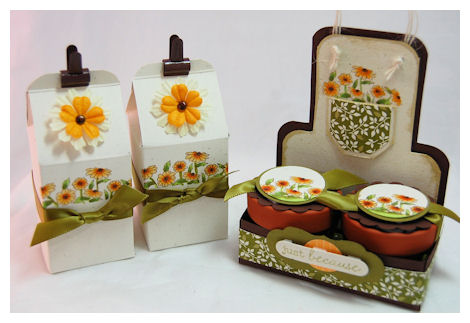
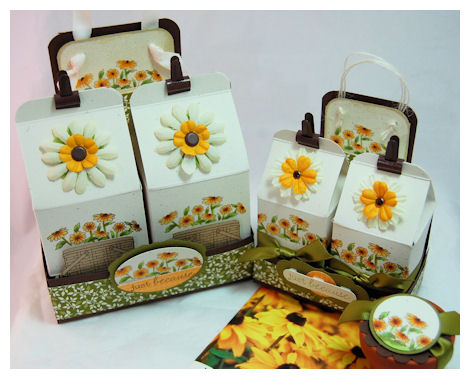
Gardening Apron Set
I decided it would be nice to show you both versions, side by side, and design them exactly (for the most part) the same! This gives you an idea of how large and small they are! Even the Pretty Petite version is a FAB size!
So, if you are wondering, that means that you not only get the LARGE/Standard template versions, but the Pretty Petite versions too!! ALL for ONE price $5!
Here is the side by side Milk Made © Carton comparison
Cute eh?
Again stamped the same! Decorated a bit differently. I think they are both adorable!
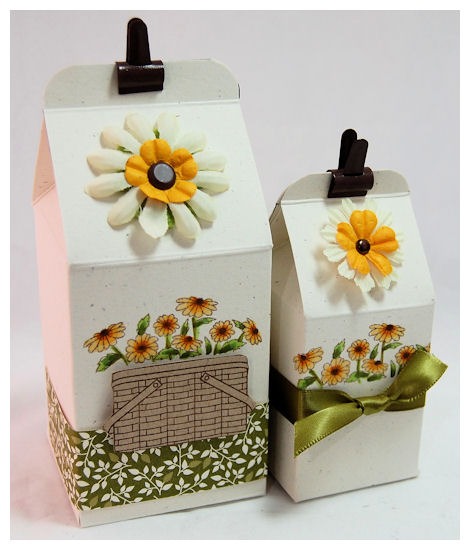
Large Milk Made © Gardener
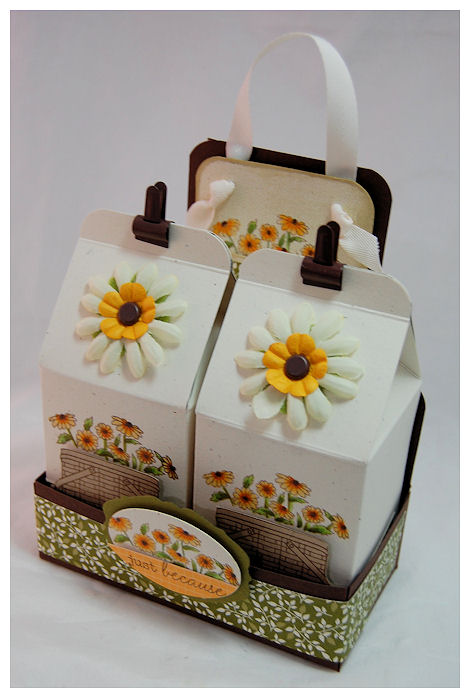
This is the standard My Timeless Template Milk Made ©
You can put so many various items in these! I used clips on the top! Just un-clip to open! Easy peasy.
Front view large
I love this project!
Inside the large cartons hold these seed packets
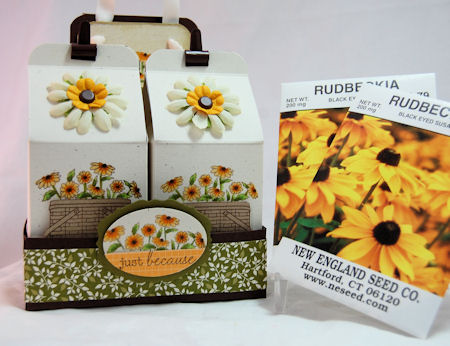
Which also inspired my design!
Now for my BIG AH! HA! moment 😀
I used the Milk Made © Crate as a Gardening “Apron”

When looking at the template it just looked like an apron to me! So I ran with the idea.
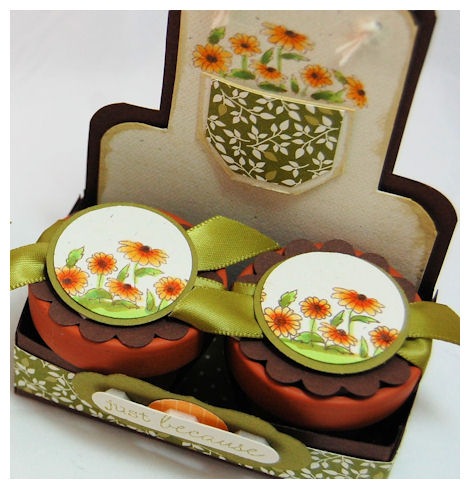
View from the top

I think adding some sort of patterned paper to the Milk Made © Crate bottom is a nice finishing touch 😀
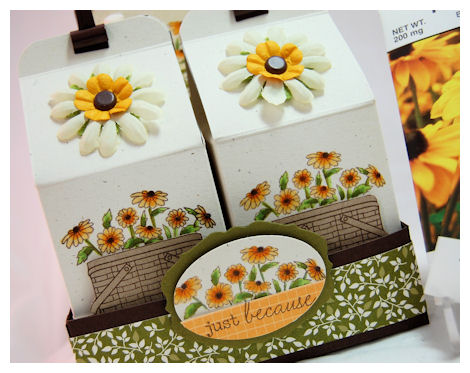
Here is the “pocket detail”
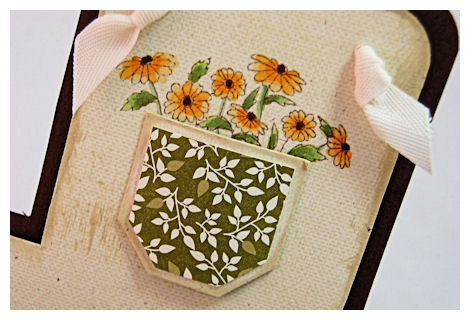
I used my large and small Tag punch from Stampin Up! to create the “pocket” in my apron box! The flowers are just peeking out of the top! I used a Linen bkgd stamp to add a textured look to my apron, and the Tea Dye ink duo to “dirty” up my gardening apron!
Now for the Pretty Petite version
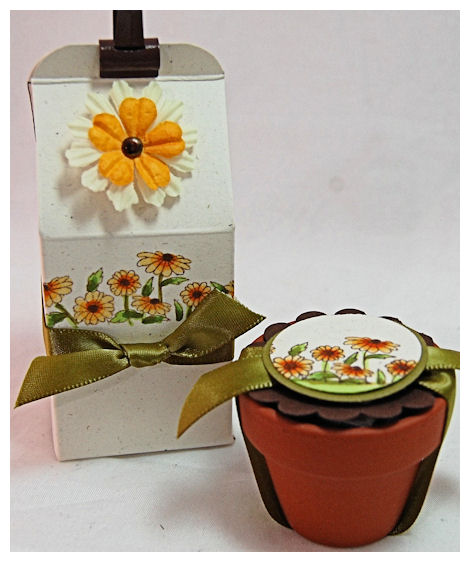
Just as cute!
I purchased these mini flower pots (which have herbs in them) at the Target $1 spot over a year ago! LOL!
They fit nice and snug into the Petite version of the Milk Made © Carton

How cute is this set, seriously?!!
I used Vintage Twine for my Apron stings on the smaller version.
You could buy little flower pots and make party favors!
Fill with potpourri, or seed mix.
You could make “mud” cups for a kids party-just use Chocolate Pudding, gummy worms, and crushed Oreo cookies!
Now those would be the talk of the town!
You can even put the little post in the Milk Made © Crate template!
Seriously, how cute is that?
I love this gift set to pieces!
Now you could use larger pots for the standard Milk Made template too, if you like!
Pretty fancy 😀
Supplies:
My Timeless Template: Milk Made © large and small template
Stamps: Vintage Picnic, and a linen bkgd from SU!
Cardstock: Dark Chocolate, Ripe Avocado, Rustic White
Ink: Tea Dye duo, dark chocolate ,ripe avocado, Copic Markers
Patterned Paper: Green Tea Leaves
Ribbon: Vintage cream twill, rustic twine
punches: corner rounder, scallop/layering circles, labels, word window, layering tag, 3/4 circle all by SU!
Prima flowers
brads, seed packets, mini flower pots
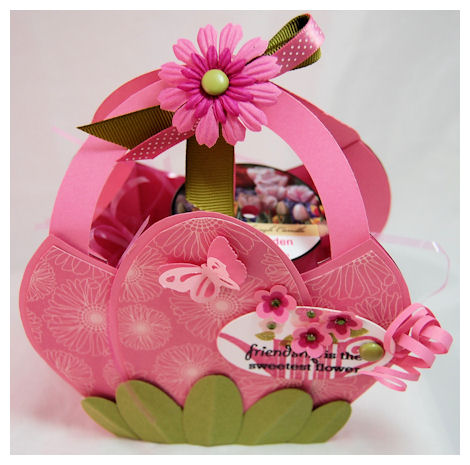
Now we well go on to Pretty Petal Pocket ©
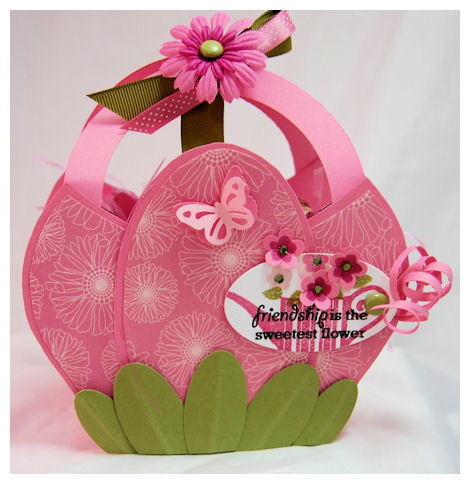
Given its name I designed this version to look similar to that of a blooming flower!
The Friends Til the End patterned paper was perfect!
For the greenery I just used my SU! large and small oval punch, scored down the center, for the leafy greens!
Inside there is a scented glass candle! Its called Spring Garden.
A sweet presentation to a simple gift. I was very happy with it. Its ALMOST like the Lily pad flowers, now that I stare at it! LOL!
I loved the little tag. It used the watering can image from Green Thumb.
The 3D flowers make the gift tag just POP! Along with the “curled” cardstock pieces. So fun.
This was ANOTHER done in under 15 minutes project, I am proud to say!
This template goes together so easy! Also the way it folds the handles are very secure, and you dont’ see any seams! I love CLEAN LINES!
Supplies:
My Timeless Template : Pretty Petal Pocket
Stamps: Green Thumb
Cardstock: Hibiscus Burst, Ripe Avocado, white
Ink: spring moss, ripe avocado, hibiscus burst, raspberry fizz
Patterned paper: friends till the end
ribbon Ripe Avocado grosgrain, bitty dots hibiscus
oval punches, nestabilities tag die, prima flowers, brads, flower punch, adhesive rhinestones, butterfly punch
I will have a large and Pretty Petite version for this template tomorrow 😀 or maybe later today! Depends how my day goes.
I will SOON be updating my Etsy Shop to put all my release peek items up for sale 😀 Sorry, deadlines have to come first 😀 I know some of you are waiting on certain items 😀
I can’t wait to hear your feedback 😀 Thank you for taking the time to visit me here. I enjoy every minute of my time creating and sharing with you all!
Today is Mish’s day to share a peek with you! Also be sure to check in on Nichole’s blog , Dawn and Lisa, as they share even MORE amazing samples too!
Till tomorrow…….
Pretty Petal …..Pretty Amazing
Jul 11, 2009 Author: mytime | Filed under: Home decor/3-D items, My Timeless Templates, Papertrey NewsletterAnother fun day of peeks for you! I hope you are ready for me! LOL!
I’m excited to continue the countdown and share some MORE template ideas with you!
Milk Made © has had its share in the spotlight the last 2 days, so today I am going to focus on my other template called Pretty Petal Pocket ©! I seriously LOVE this one (I know I always say that, but I always mean it! LOL)
If you missed the details on that template, you can check out this post —>HERE! I have to say the purse I made totally rocked! LOL!
I am HOPING you will think that my next 2 project do too!
Now this idea is SO perfect for a cheer up gift, Bridal/Baby shower, or showering someone with love, thoughts, prayers…..you get the idea!
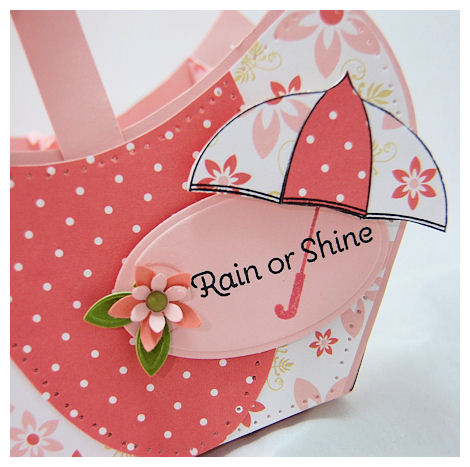
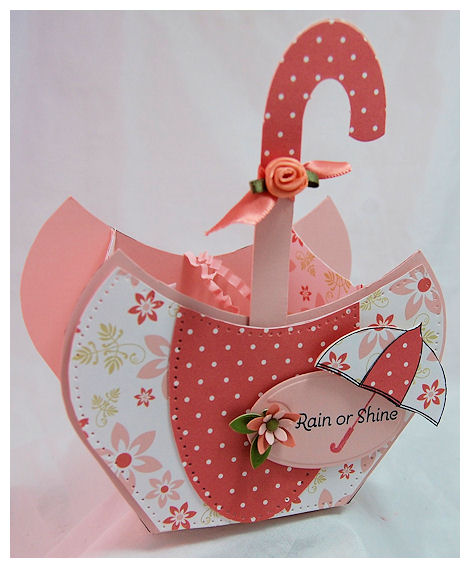
Rain or Shine Umbrella
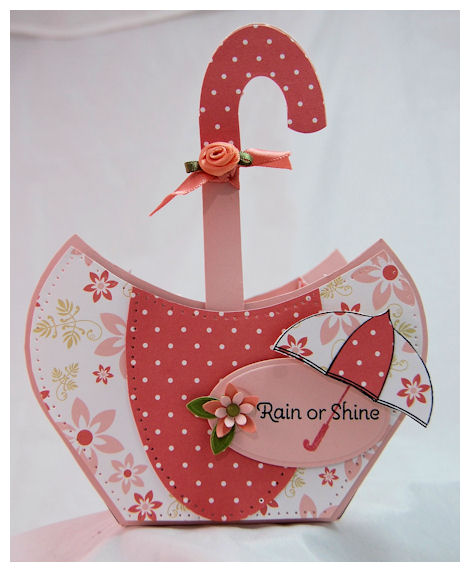
This was one of those AH! HA! moments!!
I suddenly realized this was the PERFECT up-side-down umbrella!!
What do you think?
I’m seriously over the moon for this.
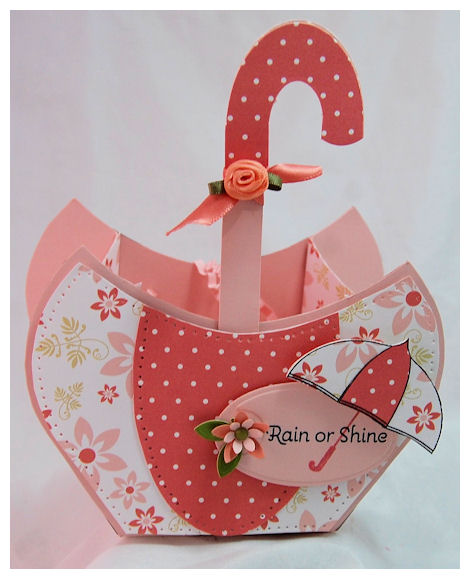
Rather than use the rounded handles for the template, I cut my own umbrella handle! I adhered it to the Pretty Petal Pocket © front prior to adding my decorative layers.
DESIGN NOTE: I did also use a flat Popsicle style stick to the back of the umbrella handle, for more support!
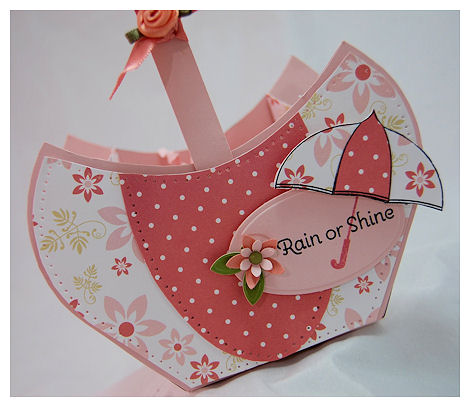
What I did was used the decorative mat layer (included with the template) and made my umbrella pattern from the flower paper. I then used the Largest Petal layer (there is a large petal and smaller mat layer to the petal of the template) and cut my middle “umbrella” panel. I layered it onto the template, and trimmed off the excess petal. I then paper pierced around the edges.
Doesn’t it look so cute?
I then paper pieced the umbrella image from Scattered Showers set to look *just* like my large “umbrella”. I adhered it with a dimensional, onto my die cut tag! LOVE it.
Another view
Also, prior to assembling (and also to hide any printer lines if you decide to print direct on cardstock) I added some pretty patterned paper to match! Makes it look SO fancy! AND covers up the lines 😀
Rain or Shine this is SURE to brighten up someones day!
Supplies:
My Timeless Template: Pretty Petal Pocket
Stamps: Scattered Showers
Cardstock: Sweet blush
Paper: Pink Patterns
Ink Black, Berry Sorbet
Ribbon:Berry sorbet ribbon
Other: flower punches,Bridal confetti flower, tag die, brad
mini satin flower
Next up!
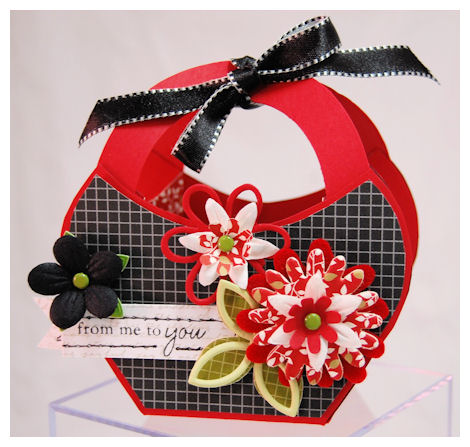
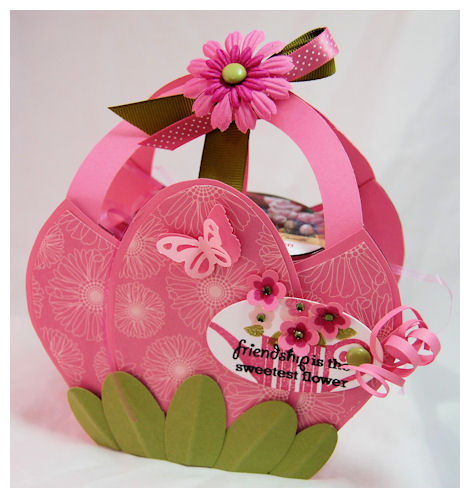
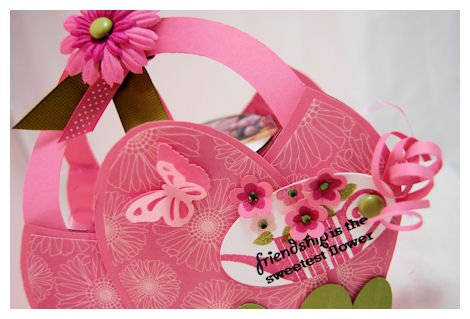
You know I LOVE making my templates into some sort of FRUIT! LOL! This one, also using Pretty Petal Pocket © was ALSO perfect for a Strawberry!!!
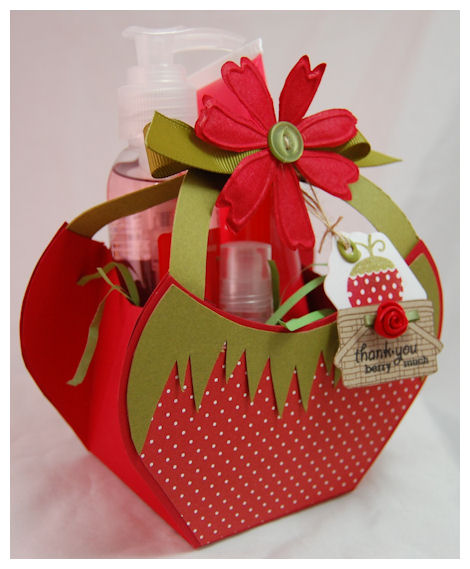
Isn’ this SWEET?!
Gotta LOVE the versatility in ALL the My Timeless Templates ©! Each release I get waves of SO many ideas, but only have so much time to get things done and share, before it is time to move along 😀
Best part about this one-I seriously whipped it up in like under 15 minutes! Kid you not 😀
I just cut my greenery from Ripe Avocado cardstock, free hand, with scissors, using the red polka dot base and my guide for the greenery fitting! Easy Peasy!
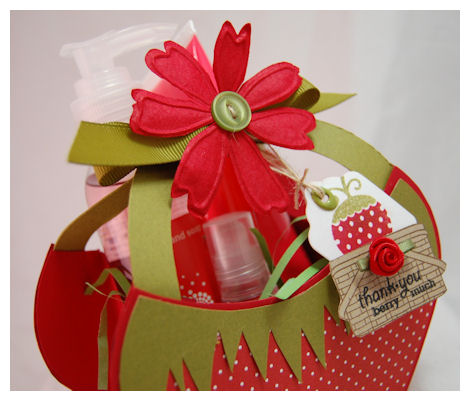
Inside here are strawberry scented bath wash, body spray, body lotion and lip gloss! All regular size, tucked away perfectly!
I totally LOVE this. Just tied the handles together with my ribbon and flower 😀
Now my tag was UBER quick. Another tag die cut 😀

Just stamped the tag with the large strawberry from Green Thumb, then stamped my basket image from Vintage Picnic, onto kraft cardstock, then cut out, and layered! DONE!
I just thought this was one of those SIMPLY MADE, yet SUPER adorable creations, that are FAB for mass production!
Speaking fo which, people ALWAYS ask about using the My Timeless Templates © in classes. YES! You can use them!
Please read our terms and conditions section —-> HERE <—- #6 lists terms for class use!
Now that hard work is done! Just print and go! I wish I had these when I was a SU! Demo years ago!
Now as for use in classes- I use to make my customers go through the hassle of measuring and scoring everything! I always loved boxes, so we did MANY!! When you have NEW stampers (especially) or a large class setting, then you know how hard it can be to keep everyone on the same step and NOT get confused! Now you can say-Cut your template out on the solid lines, score on the dotted lines, then we will decorate 😀 Gotta love that! It shows them that ANYONE can make gift packaging and stamping can be made EASY!
Our idea catalog also comes with 5 exclusive ideas, with full color photos, supply list and detailed instructions! YEAH!!
Supplies:
My Timeless Template: Pretty Petal Pocket ©
Stamps: Green Thumb, Vintage Picnic
Cardstock: White, Pure Poppy, Ripe Avocado
Patterned Paper: Bitty Dots 2008
Ink: black, pure poppy, ripe avocado
Buttons: Ripe avocado
Ribbon: Ripe Avocado Grosgrain, twine
nestability tag die, olive eyelet, prima flower, satin flower
OK that is all for me today!
Check out more peeks using Pretty Petal Pocket © at Kelly’s blog, as well as a fab peek from our Guest Template Designer: Catherine! Also be sure to check in on Nichole’s blog Dawn and Lisa, as they share even MORE with you!
Hope today;s project inspired you!
Thank you for all the wonderful feedback and comments! Makes my day.
Tomorrow I have some fun news and samples to share! So come back now, ya hear! LOL!
Till tomorrow…..
Everyday Button Bits
Jul 10, 2009 Author: mytime | Filed under: Home decor/3-D items, My Timeless Templates, Papertrey NewsletterHi everyone!
2 posts today! Don’t miss —> this one <— Peeks my other template this month!!
This is always my favorite time of the month!
Im so happy you all loved yesterday’s post using my newest (to be released July 15th template Milk Made ©) The idea for that one came to me some time ago, after making Cocoa to Go, which later lead to my Candy Carton Carrier :D, all mixed together to get a fun version I like to call Milk Made © THAT Candy Carton Carrier project lead to my use for the sample again today!
SO with that being said, let me move along!
Today we are all sharing a group post for the Papertrey Ink countdown, using a FUN new set called Everyday Button Bits!! This set has SO many crazy possibilities! I am over the moon for it!
The “idea” of the set is genius. All these little stamp pieces are meant to FINALLY get you to USE those buttons that you covet so much, IN your projects! They are taking the MAIN STAGE!!
I LOVE this set like CRAZY!
I decided I would use the ADORABLE little bird image for my project today! It just jumped out at me when I saw all the amazing images 😀
I wanted to package some home-made honey granola I whipped up the other day, in a fun way! I love snacking on this during the day. Its delicious, and better than a candy bar! LOL! If you want some chocolate, as some chocolate chips to the recipe 😀
Just a little something
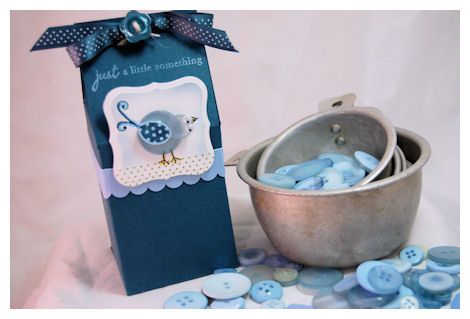
I would use my newest template (Release is July 15th!) Milk Made © for my project. It was PERFECT!! This template can totally be use on it’s own! As you are seeing here! Especially when you have a bajillion gifts to make! Perfect size, and goes together with ease 😀
Given the fact that I wanted my granola to be packaged in a bag for freshness, I wanted it to be easily accessible to the recipient, while keeping the adorable topper in tact 😀 The idea of someone ripping out the bow KILLED ME! LOL!
So I made the package so the topper can come off!

Seriously how cute is that?
Now here is my bag of granola inside! Easy to access, and this is totally re-giftable! You can fit so many great items in here now without worry about ruining your overall packaging design! Great for KID parties too!! They can decorate them themselves as a party activity too! This stamp set would be PERFECT too! Kids LOVE crafting, and using buttons or BLING pieces 😀
Now before I get flooded with requests for the recipe:
Fruit n Honey Granola
- 4 cups quick cooking oats
- 1 cup chopped toasted almonds
- 1/4 cup toasted wheat germ
- 1/4 cup sunflower seeds
- 1/4 cup ground flax seeds
- 1 teaspoon cinnamon
- 1/2 teaspoon ground nutmeg
- 1/3 cup canola oil
- 2/3 cup honey
- 1/2 cup raisins
- 1/2 cup sweetened dried cranberries
- NOTE: add 1/2 cut of choc. chips if you want some in there
DIRECTIONS
- Preheat oven to 300 degrees F (150 degrees C). Line a large baking sheet with parchment paper.
- In a large bowl, mix the oats, almonds, wheat germ, sunflower seeds, flax seeds, cinnamon, nutmeg, canola oil, and honey. Spread evenly over the prepared baking sheet, pressing down lightly with the back of a spoon.
- Bake 20 minutes in the preheated oven, or until lightly browned. Allow to cool completely.
- In a large bowl, break the cooled granola into large chunks. Mix in the raisins, and sweetened dried cranberries (and choc. chips if you decide). Store in an airtight container.
Here is the close-up of the Button Bird
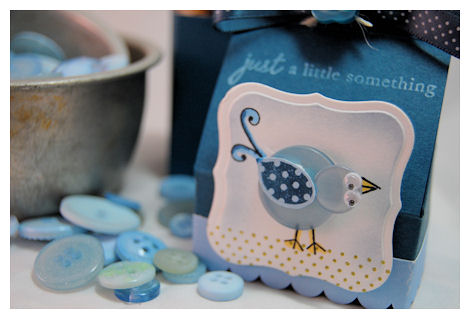
Button Bird-close up
I wanted a pretty little label on my Milk Made © Carton,so I stamped my bird image in black ink. The tail, beak and legs are ONE image. There is a large and small bird in the set, I went with the largest bird. I then colored the beak/tail with Copic markers.
I used Polka Dot Basics II (new set :D) for my “grass”. I then die cut it with Labels 1 nestability and sponged my bordering sky!
I used 2 Spring Rain buttons. I knew I wanted to have a “bluebird”. I also wanted a body and a head! I chose 2 buttons that were very similar in color, and had a bit of a shimmer to them, with the same sheerness.
The large button made up the body. I stamped the polka dot wing in Enchanted Evening ink, onto spring rain cardstock, then cut out. Adhered it with a dimensional to the button. This “hid” the button holes.
For the “head” I had a little button with 2 mini holes to the side. I was going to use the button holes as NATURAL eyes, but decided that the Googlie eyes would be WAY cute, so I went with it!
My buttons are adhered to each-other, and my cardstock using mini glue dots! These are strong and virtually undetectable! LOL!
Now prior to assembling my Milk Made © Carton, I cut an inch below the score mark, of my Milk Made © Carton top.
I then assembled my bottom, as I normally would, had the top been on.
I then stamped my sentiment on the carton top. and assembled that separately, completing as if it were ON my bottom.
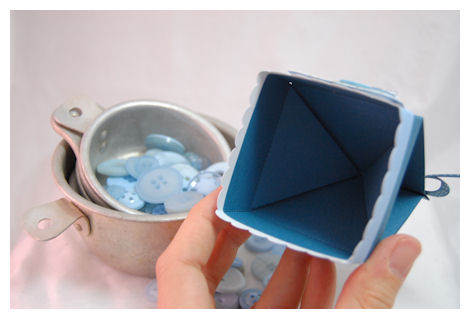
Now the KEY to making this become a topper that STAYS IN PLACE: add a border around the topper lid!
See the inside of my topper?
By having a border overlap the topper edge, it gives that base something to slip into!
Easy on, easy off!
This tip will be included in the Exclusive Milk Made © TemplateIdea Catalog, that you receive when you purchase the template. The idea catalog has 5 exclusive projects, that are ONLY featured in the idea catalog! All the catalog designers put lots of time, effort and details into this catalog to ensure you have some super ideas! You get detailed step by step instructions, as well as a full list of supplies!!
Supplies:
My Timeless Template : Milk Made © Carton/ Crate
Stamps: Everyday Button Bits, Polka Dot Basics II
Ink:Snow White, Enchanted evening, Black, Copic Markers
Cardstock: White, Enchanted Evening, Spring Rain
Ribbon: Enchanted evening bitty dots ribbon
Vintage buttons: Spring Rain
Googlies eyes, Scallop border punch, labels nestability 1
*Be sure to check out Nichole’s blog for all the designer’s peeks and links to their projects!*
Thanks for stopping by!
NEW! Template Peek and a My Time to Create Color Challenge
Jul 10, 2009 Author: mytime | Filed under: Home decor/3-D items, My Time To Color Challenge, My Timeless Templates, Papertrey NewsletterOK are you ready for some MORE peeks!! I’m so excited!
I’m running so behind this week! Spent the day with the kids at Story Land yesterday. 3 hour drive due to traffic! YIKES! I thought the kids would make me crazy but it turned out to be my hubby complaining about the drive! LOL! Anyway, it was a gorgeous day! PERFECT! We had a blast!
OK down to buisness!
Some time ago (back in March) I posted this project—>Baby Bunny Basket
WOWZERS! Was I ever swamped with emails about HOW to make it!! Little did you know, I already had it planned for a template 😀 I did most of my templates about a year ago now!! I have sat on SO many of them for so long now!! It is SO hard! Every now and again I sneak a version in my regular posting 😀
I have over 2 more years worth done, so it can be hard to WAIT, and I often forget what I made! LOL!!! I do have a sample file, but every-time we decide what comes next, I am always surprised!! LOL!
Well, now I’d like to formally introduce you to Pretty Petal Pocket ©
About Pretty Petal Pocket ©:
You will love this “pocket” style template creation! Sweet and simple, but it looks so complicated with all the angles and curves! With the template you will be whipping up gifts in NO TIME! You can make it closed, leave it open, handle on, handle off! Its the perfect size. Petal center on, or leave it off. Many choices!
This pretty “pocket” was inspired by my very favorite flower, the tulip! That is how it received the name. I wanted to recreate the delicate and pretty layers! Like all the My Timeless Templates ©, the possibilities are endless! It doesn’t have to be all girly! Leave off the additional “petal” layer, and it becomes the sweetest “basket” or as I like to say here, “pocket” template! It can hold so many fabulous things! Weather use make it a “petal” or a “simple basket” style the receiver will be dying to pick this pocket!
I love the angles/curves it has, and the ability to transform the design every time!
This one was the “concept sample” since I design just the templates first, then I later make my actual “sample”. These are “quickies” that the design team get to see so that they know what the finished project looks like 😀
For this one I printed my template in pure poppy, then make the “tulip petal” from black and white basics, then colored it with my copic markers to match my project!
Shows you just how fast and easy it can be!
Supplies:
My Timeless Template: Pretty Petal Pocket
Stamps: NONE!
Cardstock:Pure poppy, Spring moss
Patterned Paper: B& W basics
ink: NONE! Just Copic markers
other: silver brad to hold closed 😀
Now comes the My Time to Create Color Challenge and another SAMPLE!!!
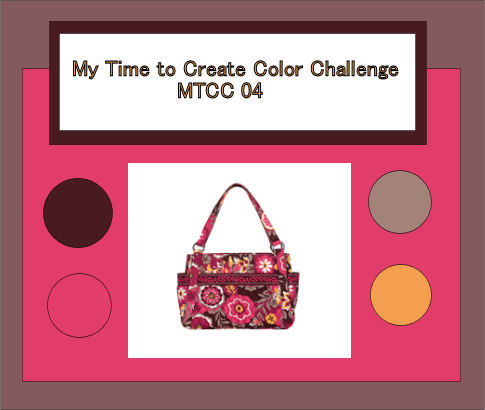
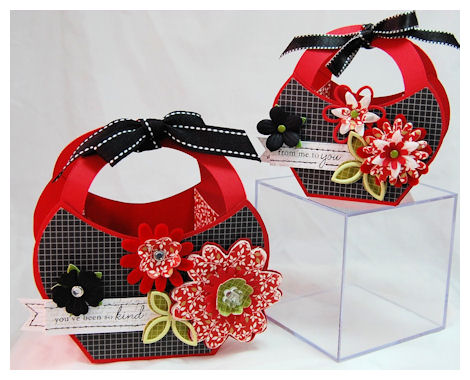
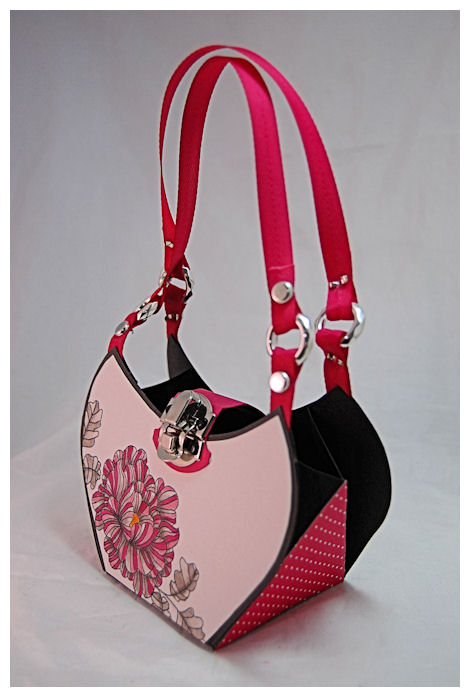
I *just got –>this<– Vera Bradley Bag! It is the Stephanie style, in the Carnable Collection! LOVE IT!
I hope you get a chance to join in the color challenge!
Post your creations HERE
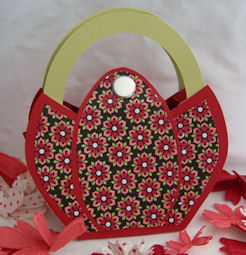
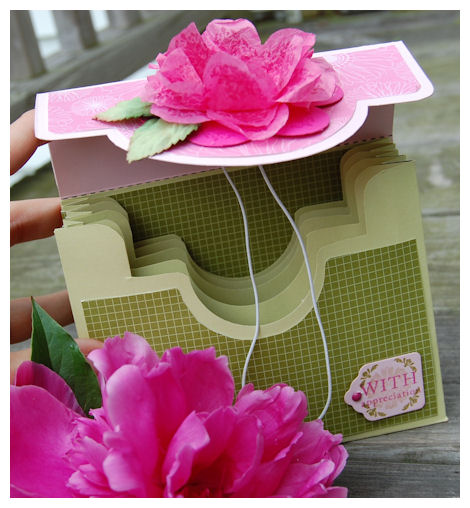
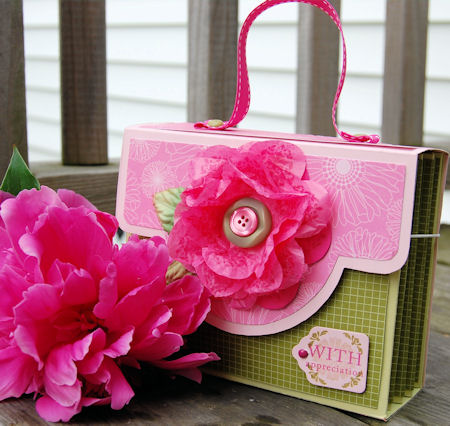
It was so inspiring to me, that I had to make my newest Pretty Petal Pocket © template look *just* like it 😀
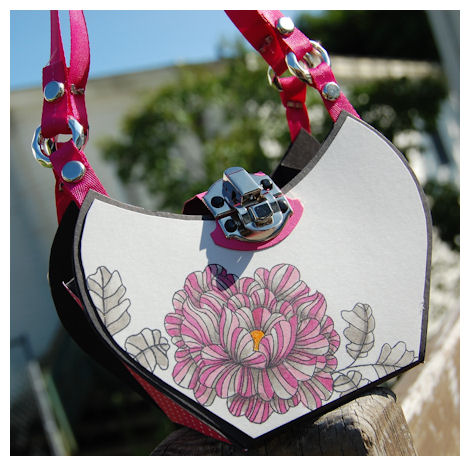
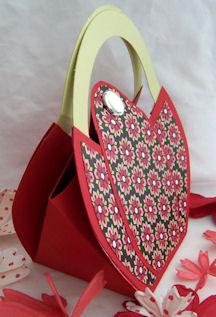
OK not JUST like it, but my fun and funky version! I have to say I am in HEAVEN with this “handbag”. You’d never think CARDSTOCK would you?
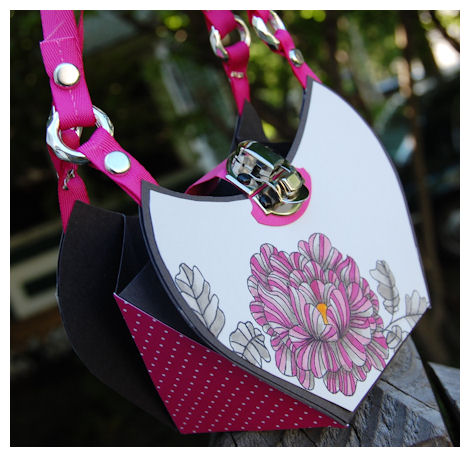
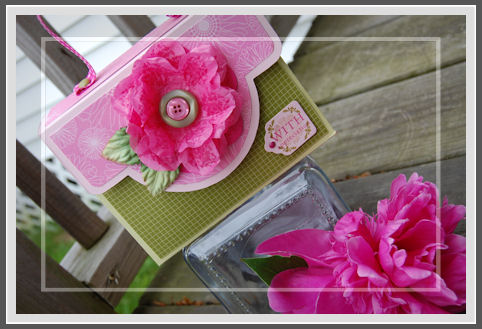
Look at the cool decor on the fun side panel! I could scream!
Check it out girls! REAL hardware to boot!
LOVE IT!
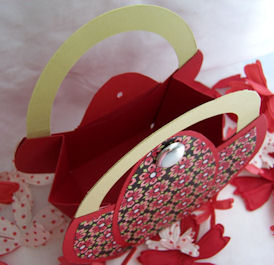
I feel like I’m cheating on my template because for this sample,I just used ribbon as my handles, and metal pieces I purchased at the craft store! Jewelry rings for the handbag rings, and an actual purse latch! HELLO! Love that!
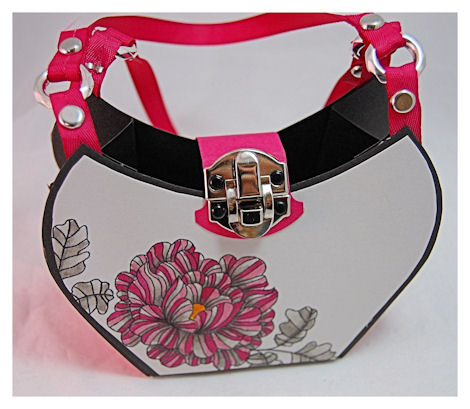
ALL attached with cardstock! So cool.
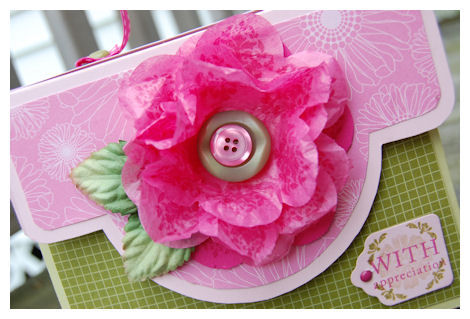
My countdown post using In Bloom was a total TOSS UP!! I was going to post BOTH projects together, but didn’t want to overwhelm you! I LOVE this new stamp set! LOVE!

Close up-love the bling! I also love the colors!!! LOVE!
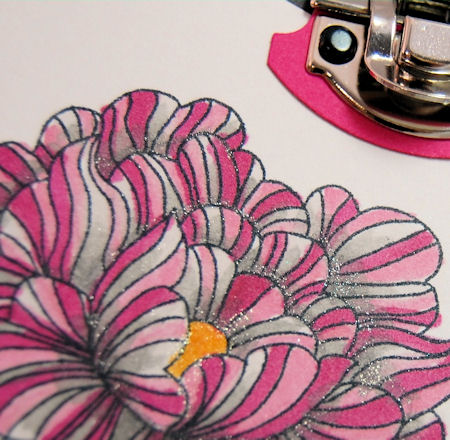
This used black Atyou glitter pen. Subtle yet stunning!
So I guess I KIND of strayed a little with my color-not too bad! LOL!
Another view
It’s just delicious
Here is my Amber holding the template handbag!!

(playing around with my camera! and Photoshop!)
Here is one un-touched!
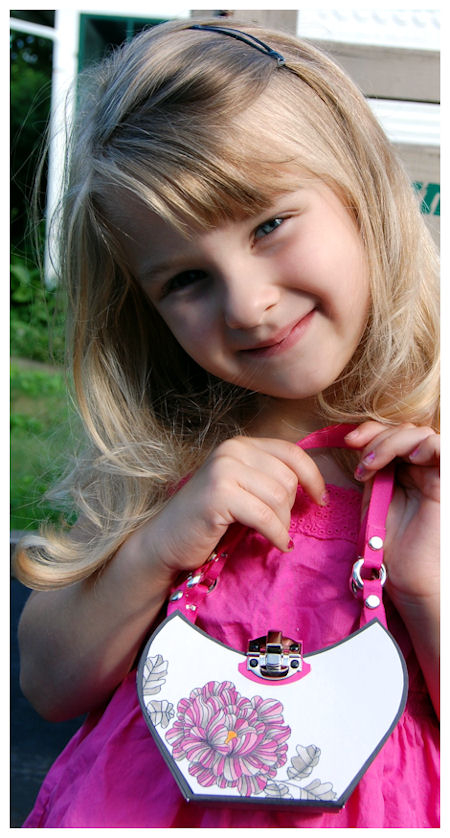
Isn’t she so cute?! She LOVED this template! I had to hide it from her! LOL!
Will go up in my Etsy Shop SOON!
Supplies:
My Timeless Template: Pretty Petal Pocket
Stamps: In Bloom (release July 15th)
Cardstock: smokey shadow, soft stone, bitty dots 2008 paper
Ink:pallette black, and copic markers
ribbon: Raspberry twill
hardware-brads, latch, ring circles
Now go take a lookie at what the team did using the color challenge! They get better and better!!
As always, thank YOU for stopping by!
Also be sure to check in on Nichole’s blog Dawn and Lisa, also have stamp sets this month-So Im sure they have EXTRA samples to check out.
I am excited to hear what you think of this new template! I’m a totally in LOVE with it, and have SO much more to share regarding design ideas over the next couple of days!! JUST WAIT!! YIPPEE!!
#1 Papertrey Ink Peek- In Bloom card set for Milk Made template
Jul 9, 2009 Author: mytime | Filed under: Cards, Home decor/3-D items, My Timeless Templates, Papertrey NewsletterWell today is the 10th!
That means I get to FINALLY give you a peek at a NEW! Stamp set from Papertrey Ink called In Bloom! It is over the top FABULOUS!! I love flower sets and this one is to DIE FOR! I was so excited when I saw it, and I think you will fall in complete LOVE with it too.
I used this NEW! In Bloom stamp set to create a FABULOUS gift! Of course that gift was made using one of my NEWEST My Timeless Templates: called Milk Made ©
I am seriously over the moon for the projects I have to share over the next few days! ALL of the My Timeless Templates © really do make your gift giving easier, more creative, affordable, and FUN!
NOTE! These items peeked will not be released until July 15th! Links are provided for those browsing in the future 😀
This template is just fabulous!
About Milk Made ©
I always love little containers! The traditional cardboard “Milk Carton” is included in the fun gift box idea! Many types of candy is packaged in the “milk carton” style boxes nowadays, but they are very unattractive! While I liked the idea, I didn’t like the packaging. So I designed my own! I loved the name “Milk Made”, since it was inspired by the traditional Milk carton! Now these little treat boxes are easier than ever! The Milk Made carton is perfect to present on its own. But, good things come in multiples, right?
Now, what could make it MORE fun, than my own little Milk Crate to carry them in?!
Included in this template you will also receive the template for the cutest “milk crate”. Complete with matching decorative layer.
You can make 2 “milk crates” and adhere them back to back! Then you have 4 milk cartons, all presented in an even more adorable Milk Crate!
Now seriously, who would have thought that a MILK carton could be MADE so cute?
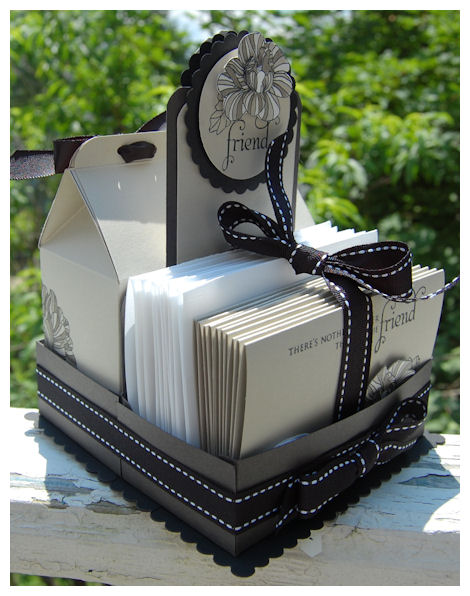
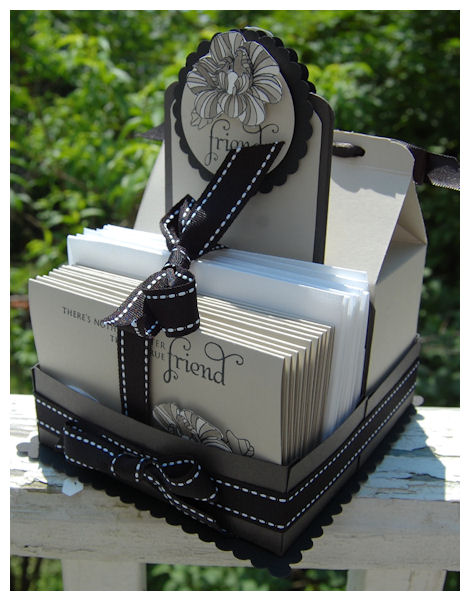
So today what you are going to see the the Milk Made © Carton (2 created), with the Milk Made © Crate(adhered back to back) to create a fabulous gift set of 2 Cartons (to fill with whatever you heart desires), a set of 10 custom designed cards, and 10 envelope slip-covers-that fit PERFECTLY into the Milk Made © Crate!
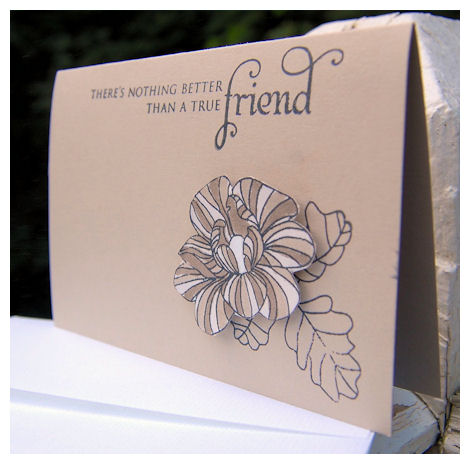
True Friend Crate Card Set

Here is my completed project!
Here you can see the 2 Cartons in one side.
Then on the other side……I custom designed this card set to fit PERFECTLY into the Milk Made © My Timeless Template!
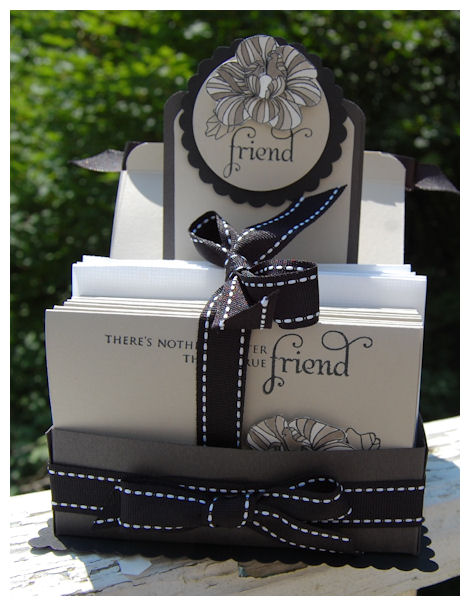
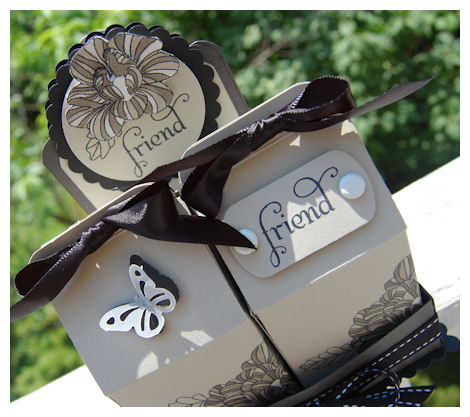
I went with a monochromatic color scheme for an easy, and elegant look, that just makes you say WOW!
The flowers/leaves are truly stunning, so I wanted to make them POP!
My colors are : Soft Stone, Sahara Sand (From SU!), Smokey Shadow, and True Black-with a small pop of white!
Now let me share the HOW TO!
Set of 10 Cards and Vellum Slip-cover envelopes/label tabs
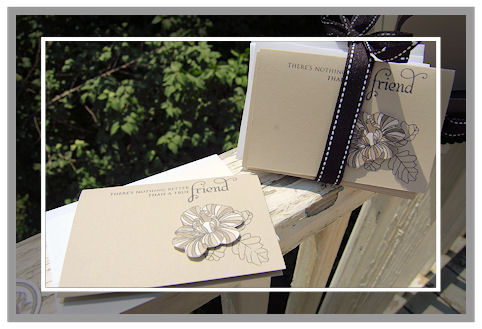
To create the note cards that fit into Milk Made ©
Finished Card size 3 X 4 1/2
Cut 5 sheets of cardstock to 6 X 9
Along 6 inch side -score at 3 inches
Along 9 inch side – cut in half at 4 1/2 to get your 2 pre-scored cards!
NOTE: You will then have a set of 10 cards
Stamping:
Stamp Flower image onto Soft Stone card-stock in black ink
NOTE: Stamp as many as you will want to create-for this exact project 14
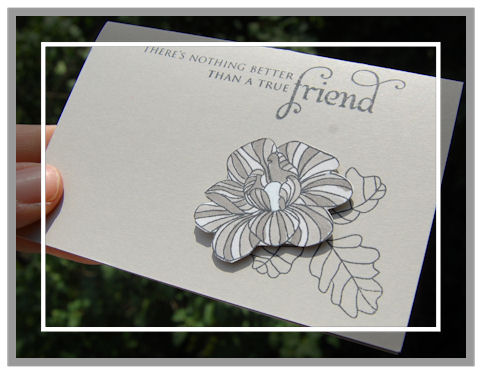
10 for the cards, 2 for the Milk Made © centerpiece images, then 2 more to layer on a dimensional center for the main images
Color images with Copic Markers. I used the T4 and T6 colors.
Color flower center with white gel pen.
NOTE: Since I stamped it on the Stone color I didn’t have to use another marker.
Cut out images, and apply dimensionals.
Simply stamp leaf image, in black ink into lower right corner of cards.
Stamp sentiment at top.
Layer on 3D flower
DONE!
Vellum Slip-Cover Envelope & Label Tags
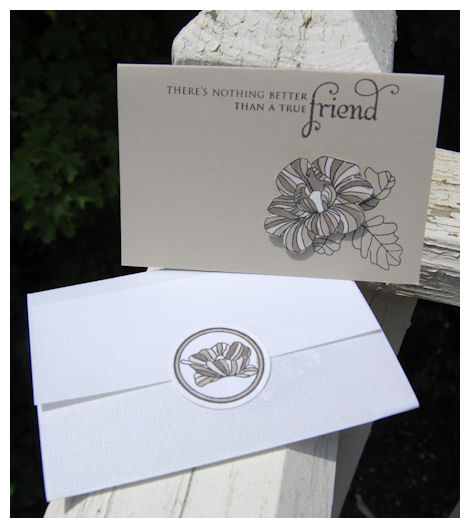
Simple Slip-Cover Envelope
You will need 5 sheets of Lined vellum cardstock.
Cut the 5 pieces of lined vellum cardstock to 8 1/2 X 9 1/2
Along the 8 1/2 inch side-Score at 3, then 6 1/2.
Cut along the 9 1/2 inch side, in the middle at 4 3/4.
NOTE: This gives you 2 envelope slip covers per piece of cardstock.
Fold on score lines.
Now you will have 10 envelope slip-covers!
Labels
Stamp circle from Borders & Corners Circle set, in black ink.
Stamp smallest flower into center.
Color with markers listed above.
Punch out with 1 3/8 circle punch!
Tie card/slip cover envelope set with a pretty black Saddle Stitched Ribbon!
Done ![]()

Now it fits all nicely into the Milk Made © Crate template!
Now on the other side we have 2 of the Milk Made © Cartons
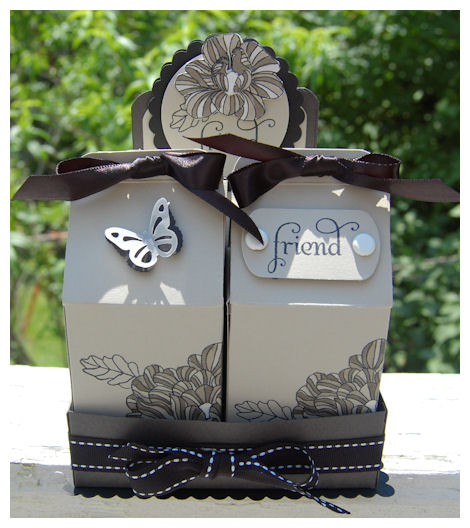
You can put the label stickers you made in here, along with stamps, address labels, paper clips, buttons, ribbon….. whatever!!
They are a great size, so the sky is the limit!

Here is one carton out.
You can see the pretty curves that back panel the Crate has, complete with decorative panel!
Carton Duo

I printed the Milk Made ©Cartons onto the Soft Stone cardstock.

I stamped my In Bloom image, onto the corner of template prior to assembly.
The flowers are SO easy and FUN to color! Obviously I had a BLAST making this 😀
I used the largest flower in the set, then colored the image just like the other flowers, only direct ON the template.
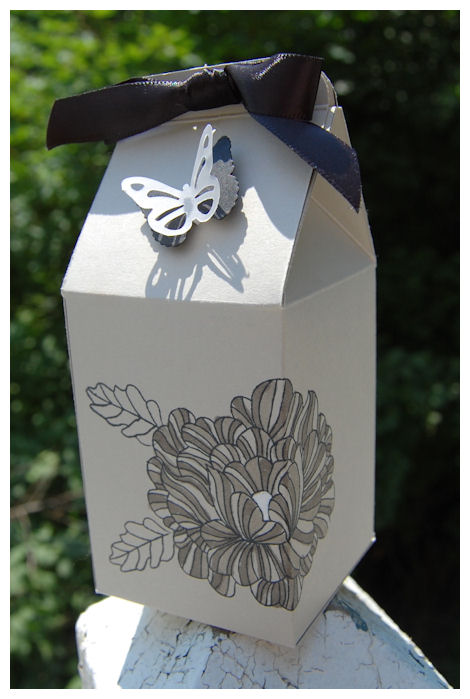
I then assembled the template, as directed.
They both look so pretty in here.
Can’t you see this sitting on desks all across the country?! I know I can 😀
This is the side view of the 2 Milk Made © Crates together
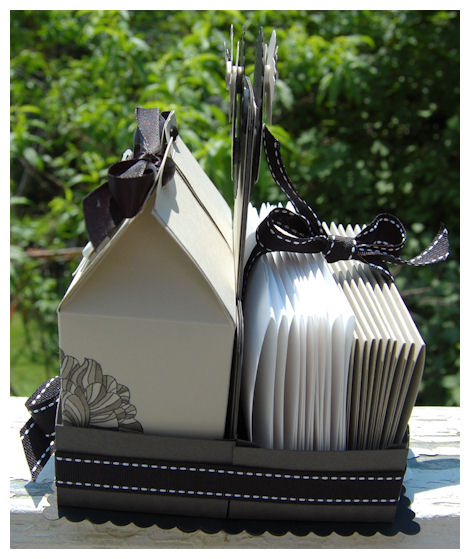
Milk Made Crate:
My Milk Made ©Crate was printed (2 X’s) onto Smokey Shadow Card-stock, then assembled.
Both Crates were adhered back to back!
They have a very prety rounded style/design on the back panel.
I just created the 2 base templates, and adhered them together.
I then tied around my ribbon.
I created a scallop bottom for another pretty detail for my carton, and to continue the Sahara, Stone, Smokey Shadow and Black color combination.
I also made the same center piece for both sides, of the top of my carrier! It’s ALL about the details, and ALL sides looking clean, and professional!
Center piece is stamped/colored/cut. I also added an additional center layer for additional POP!
I think it looks so elegant!
SUPPLIES:
My Timeless Template: Milk Made ©
Stamps: NEW! In Bloom, Borders & Corners Circle
Cardstock: Smokey Shadow, Soft Stone, True Black, Lined Vellum, Adhesive Labels
other: Sahara Sand
Ink: True Black
Copic Markers: T4, T6
Ribbon: Saddle Stitch Grosgrain and Satin in True Black
Nestabilities-Tall/Long Rectangle (largest) die cut X3 for scalloped bottom on template base 😀
Punches:2 inch circle, Mega (pink)Scallop by Marvy, Key Tag punch, X2 butterfly punches by Martha Stewart
White brads
So now comes the question I’m dying to know the answer to-
What do you think?! Do you like it?!
I HOPE so! I really can’t wait to share more with you!
Let’s not forget I have ANOTHER template to share too!! But that has to wait for now 😀
In the meantime check out Catherine at The Dancing Pear, this month’s Template Guesat Designer!!
Nichole’s blog(I know you already know this! LOL!), Dawn and Lisa, also have stamp sets this month-So check it out.
That’s all for today! More to come tomorrow 😀
Fun with Fabric
Jun 30, 2009 Author: mytime | Filed under: Home decor/3-D items, Papertrey Newsletter, TutorialsWell today is our Papertrey Ink Senior Design Team Challenge.
Nichole wanted us to utilize fabric by stamping on it, then using it in our project!
OH! MY! WORD! To me, that was a HUGE challenge-HUGE! I just sat there, not knowing WHERE to start. I use to be a quilter, but the day I began papercrafting my love affair with a sewing machine and fabric was O-V-E-R! I realized I *ONLY* liked sewing because I so enjoyed mixing and matching the fabric! I had more fun SHOPPING than I ever did sewing. Papercrafting was my niche!
Now my fabric is only used for my STAMPING projects, and my sewing machine for PAPER! (even those occasions are RARE!)
All that being said, my idea for fabric today is far from revolutionary-sadly! I wished I had some fantastic project to share, but this is sweet and simple.
I just decided I would view my FABRIC, as cardstock, and like making my own patterned paper (something I LOVE to do!).
I had purchased this glass jar because I just loved it! I have a “thing” for containers (in case that isn’t obvious! LOL!!) I don’t like them to be PLAIN JANE though, so I HAD to dress it up.
This challenge became PERFECT!
My jar was a whopping $3 at Walmart.
I decided to make a Memory Jar. Inspired by the idea my friend Alicia had, for a memory journal.
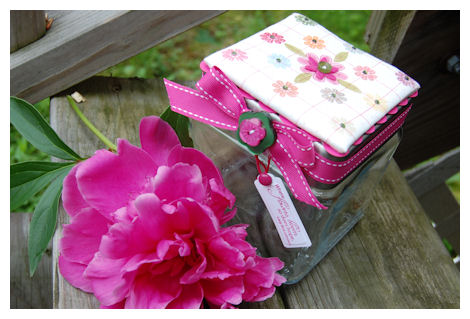
I made this so that it is something that looks pretty, and matches my home, that I can keep out, in plain view, so I can remember to fill it with memories, or funny things my kids say. Be it daily, or weekly. As the events fit.
I can later pull out all the written notes to remember these great times or funny moments. As a mom to 3 small children, there are a LOT!
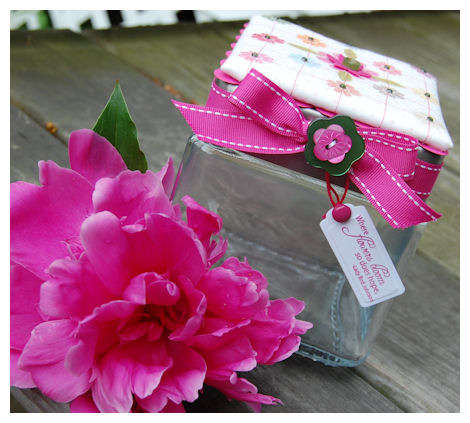
Sentiment reads: Where the flowers bloom, so does hope-Lady Bird Johnson
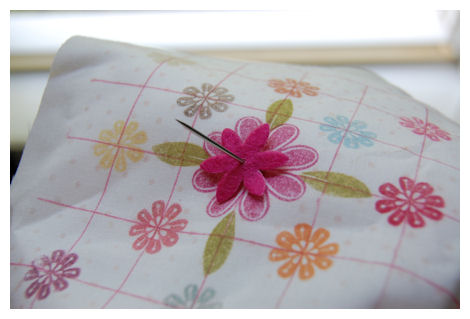
Here is my fabric, after it was stamped.
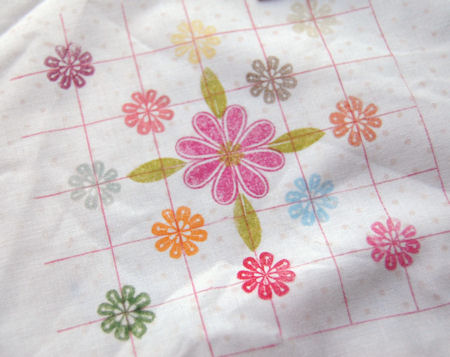
I stamped my fabric with polka dot basics, in sweet blush. I then added Guidelines in Raspberry Fizz
I chose the little flowers from Honey Bees , stamped in various inks, onto the Guidelines image.
I chose a large flower from Garden of Life as my centerpiece.
Once my fabric was stamped, I added the batting to the back.
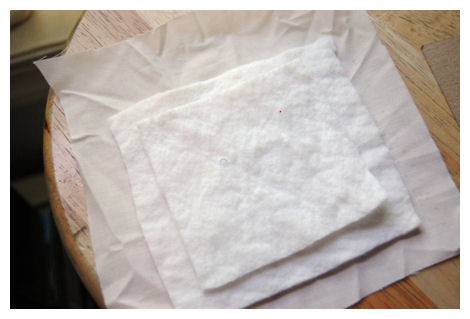
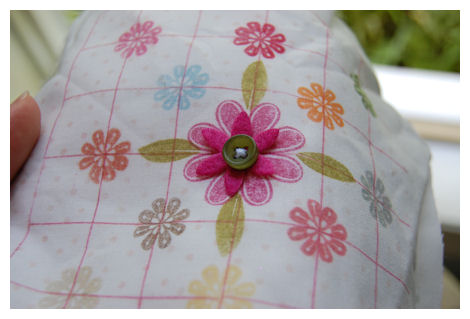
I then decided to sew on a felt flower
and, add a button too!
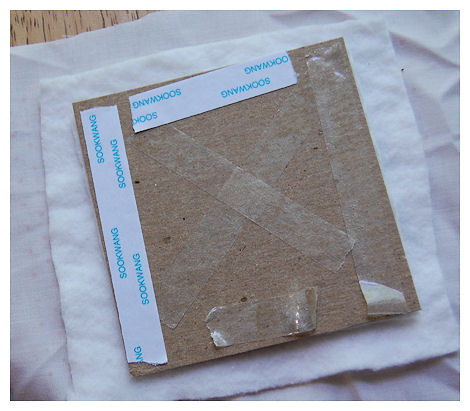
Add the chipboard to the back of the layers, using ZipDry, for a sturdy base
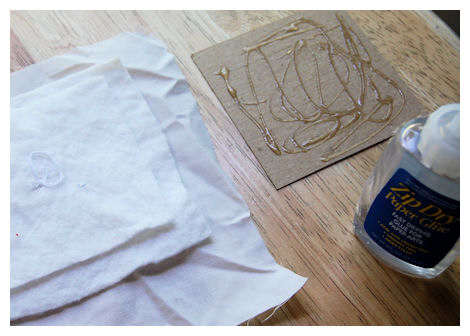
Applied lots of adhesive, then wrap the fabric around the chipboard.
It is then added to a die cut large scallop square, created from Raspberry Fizz cardstock, and secured to my Memory Jar lid.
Here is the top view of my memory jar
I added some adhesive rhinestones to the top.
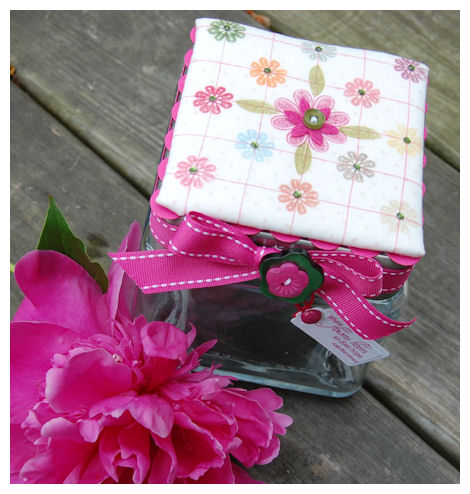
Then, of course some ribbon to the edge of the lid. Ties with a pretty bow, and flower shaped buttons.
Very quick and easy! Looks SO much prettier than your standard “jar” sitting on a counter.
Supplies:
Jar from Walmart
Fabric quarter
Quilters batting
chipboard
Zip Dry
Stamps: Guidelines, Garden of Life, Honey Bees, Flower Garden Sentiments
Cardstock: White
Ink: all Papertrey Pallette ink
Vintage Buttons: in Raspberry Fizz & New Leaf
Nestabilities: Square, and tags
Adhesive rhinestones.
Check out Nichole’s Blog, as well as the Senior Design Team for more Fun with Fabric ideas!
and the PTI Guest Designer: Wendy Sue
That is all for me!
Thank you for stopping by!
Going GREEN! Fancy Flower Flourish-Closure Video
Jun 25, 2009 Author: mytime | Filed under: Home decor/3-D items, My Timeless Templates, MYTIME MOVIE/VIDEOs, Papertrey Newsletter, Product Opinions and Must haves, Tutorials, Uncategorized, videos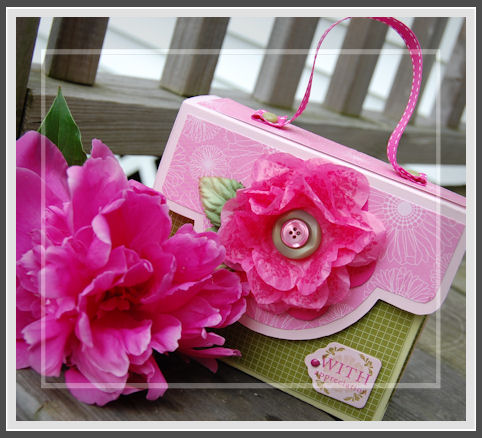
I am very excited about today’s project!
Keeping up with the trends, Going Green is very HOT right now! Reusing items that we already have is not only great for our environment, but FUN!
I find, as a papercrafter, I save a LOT of things! Always with the HOPE of finding a great new use for it! One of them being the tissue paper that comes with many gifts we receive. It is so pretty and comes in a large variety of colors! I have always wanted to find a fabulous way to recycle it, and now I have!
I call it a Fancy Flower Flourish Closure
This idea came to me after a childhood memory. I remember going to the carnival and ALWAYS wanting one of those LARGE tissue paper flowers, on a stick! So expensive back then. I was never able to get one :C But, now I am grown so I can make my own mini version.
I decided to play around, and make this childhood memory a reality, but also with a little more FANCY FLAIR!
I wanted one of these flowers to be part of an elastic closure for my newest My Timeless Templates: Card Couture. I knew it would beautiful, and look so elegant, as the main focus of the template! I have to say it makes you say WOW! when you have it in hand!
I began my quest by punching some tissue paper with my Giga Flower Punch by Marvy. While I was getting the EFFECT I wanted, I knew I wanted it to be a little more fancy, and stamp related!
I wanted to put a pattern on my flowers. Something elegant. Not just polka dots, or scripty writing. More like a pattern on EACH flower petal. I then pulled out Damask Designs! The small flourish fit PERFECTLY on EACH petal of a very elegant looking flower! I was over the moon when I figured this out!
Now let me show you how it works!
Making Fancy Flower Flourish
1) Stamp one cardstock flower base, and at least 4 tissue paper flowers, using Damask Designs.
You wil want to use ink that is a similar shade or darker than choice of tissue paper/cardstock.
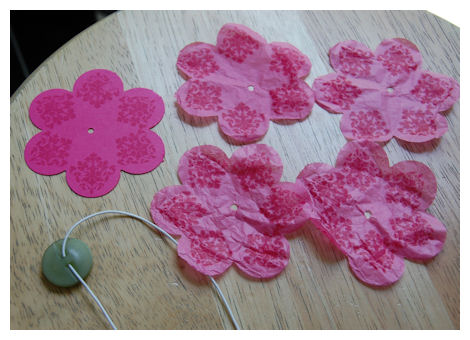
2) Punch holes in centers
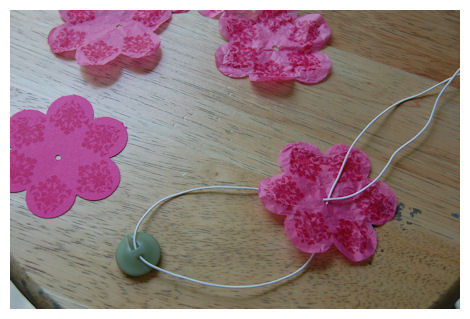
3) Using elastic cording, string on button, them put through the tissue paper flowers first.
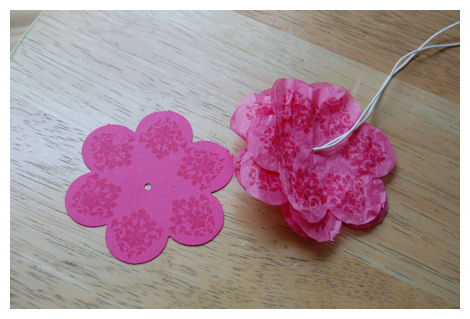
4) Now put trhough the cardstock flower, and pull though
This is the close up
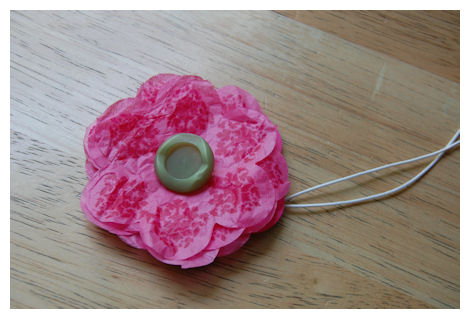
5) Pull petals up, each laer separately, and scrunch together!
NOTE: I added another button to the button center of my creation.
6) Optional: Adhere punched, stamped, or Prima Leaves to flower cardstock base.
For Attachment to Card Couture:
1) Punch hole in the lid of template.
2) Insert large eyelet.
3) Pull strings from Fancy Flower Flourish through the hole.
4) Close lid, and tie elastic closure, tightly around template. Knot elastic cording.
Now you have a beautiful, elastic closure for your Card Couture Template, or to use to embellish ANY project!
Supplies:
My Timeless Template: Card Couture ©
Stamps: Damask Designs, Mega Mixed Messages, Guidelines 2
Cardstock: Spring Moss, Raspberry Fizz, Sweet Blush, Hibiscus Burst
Patterned Paper: Friends Til the End, Bitty Box Basics
Ink: sweet blush, ripe avocado, raspberry fizz
Vintage Buttons, Raspberry Fizz stitched grosgrain
Recycled tissue paper, Crop a Dile, Giga Flower Punch, Elastic Cording, Large Olive eyelet by SU!, eyelet by SEI, Tag die cut by nestabilities
So there you have it!
I hope you enjoyed my tutorial today!
Love you rain or shine
Jun 18, 2009 Author: mytime | Filed under: Home decor/3-D items, Papertrey Newsletter, Product Opinions and Must havesThe end of the week is near and I HAVE to finish teacher gifts!
PLUS I am updating my Etsy Shop today! As soon as this is typed! (YES! This item will be posted as well!)
I just got the last of my Strawberry Jam (Thanks to Paulette’s mom!), so I’ll be decorating the jars, and printing off MORE Pack a Picnic templates 😀 I’ve also already started on my next month’s samples 😀 So my “behind the scenes” life is crazy.
I have had a hard/emotional week after the loss of little Ethan Weiman. Alicia’s Caring Bridge update helped me through yesterday.
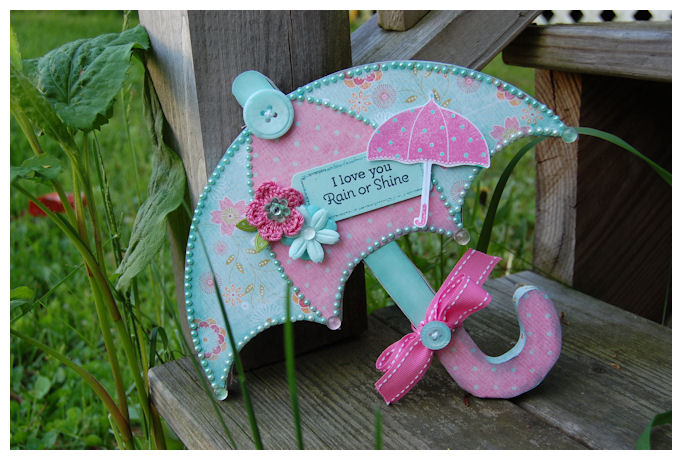
So I poured ALL my emotions into this little umbrella. It was great therapy.
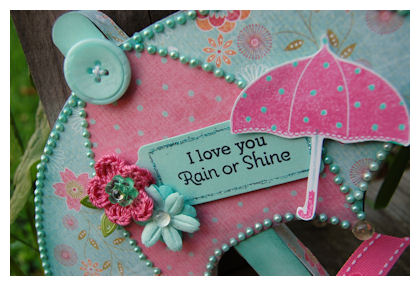
I love you Rain or Shine
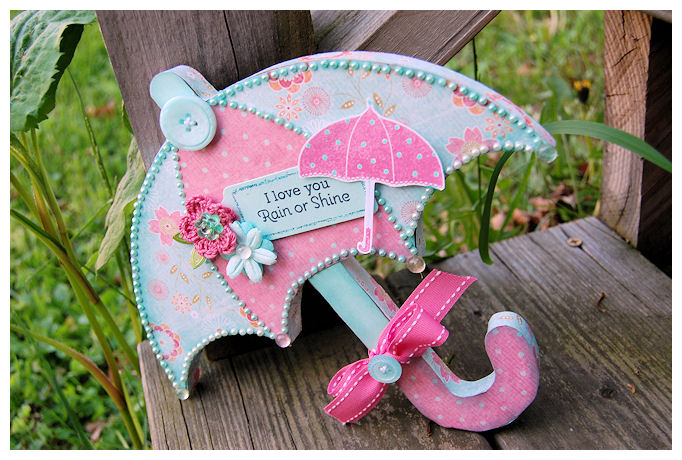
I love this shape, and think it would be so cute hanging on a door, or in a girls room! I hangs at an angle. Adding the tag and little umbrella, I think makes it totally perfect-o!
I also decorated the edges with the patterned paper. You NEED to make sure ALL sides of your projects are clean and finished!
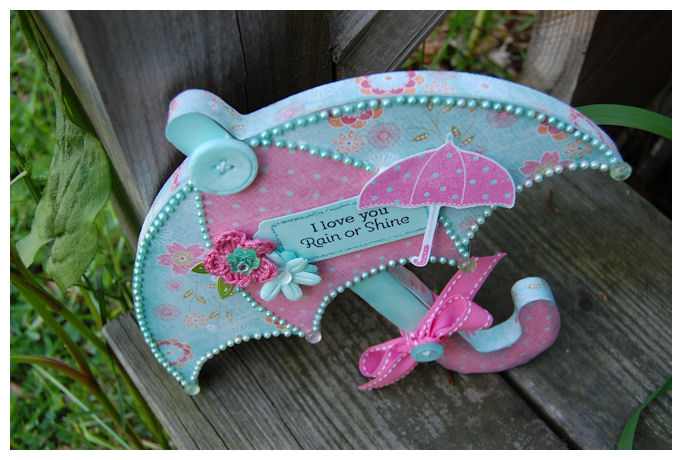
I then added ALL those adhesive pearls! OH MY! I don’t think I’ll ever try that again! LOL! BUT it’s all about the details, and end results! A true labor of love! I think this took me 3 hours! LOL! But, I took my time, and just kept my mind busy.
Love the details and I think it was well worth it.
I adored the MDF shapes I bought a few months ago at Say It With Letters!Now Im NOT affiliated with them, I have just had a blast using them. I was introduced to them byJulie Masse, when we went to Stamp New England!
NOTE: There is a Stamp New England happening in Conneticut on July 10th & 11th—>READ MORE HERE! Sign up by June 23rd! While I have received SO MANY emails, asking if I were teaching there, sadly no I am not. But they do have some amazing people teaching, so check out their site! I had a blast at the one I attended.
Supplies:
Stamps: Scattered Showers
Cardstock: White, Aqua Mist
Ink: Hibiscus Burst, Aqua Mist
Patterned paper: OOPS! I have NO IDEA! Ill go look it up later (if I still have any left :C) Sorry!
Ribbon: Stitched Hibiscus Burst
Button: Aqua Mist
MDF Umbrella- Say it with letters
Crochet flower made by AmyR! (she sent me some for my birthday :D)
Prima Flowers, Adhesive Pearls, Dew Drops
Thanks for stopping by! Cross your fingers I get EVERYTHING I need to—> done 😀
Only ONE MORE SLEEP until the kids are on vacation! (UH OH! LOL!)
Papertrey Ink June Release
Jun 15, 2009 Author: mytime | Filed under: Cards, Home decor/3-D items, Papertrey NewsletterHave you seen the Papertrey Ink Homepage? I think it looks great!
Now my 2 NEWEST My Timeless Templates are available!!
Card Couture © & Pack a Picnic ©
I think it was obvious I had a BLAST!! My head is still spinning with ideas. Plus, I know I am STILL making teacher gifts! I have several to complete, and I will share them when I am done 😀 I should get them completed this week in no time.
I had 22 teachers to get gifts for between Alexa, Noah and Amber! I had to get all the therapists and whatnot in there too. They are a VITAL part of our lives. Some have a couple that work with Alexa-don’t want to leave any out. Plus I also give the bus driver something too. You know she has NEVER even said thank you! She sees me everyday! I think that’s weird.
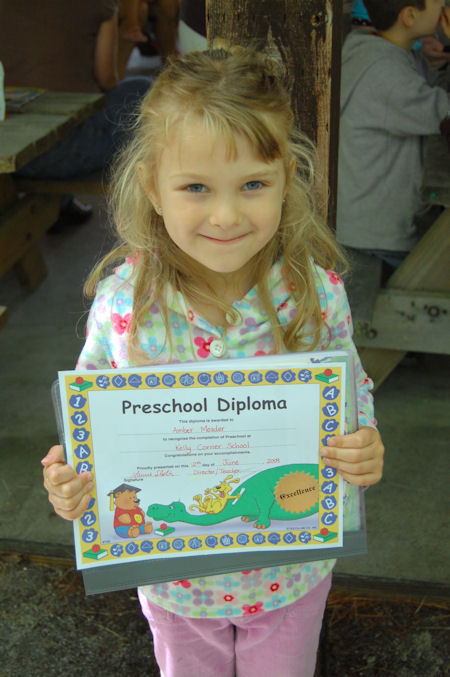
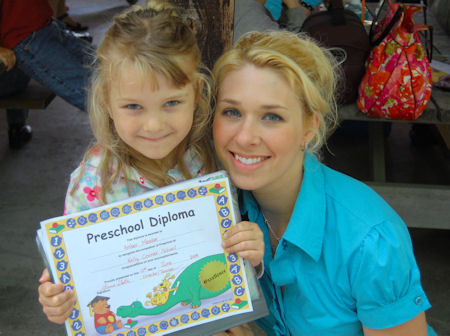
Amber had her last day of Pre-school. I was the ONLY parent who balled! I was shocked at how emotional it was for me.
How can MY BABY be going to school 5 days a week next year?!
You’d THINK I’d be jumping for JOY, but I’m actually very sad over the whole thing.
Amber is just growing so fast! (they ALL are!)
Here she is with her diploma! They also worked hard and made a REALLY nice book for each child with photos through the year, and info on each child in her class. The kids put their hand prints AND signed their name in every book! So sweet! I will cherish it forever!
It was at a park on a VERY rainy, then turned MUGGY day-So excuse my FRIZZED out, horrifying do.
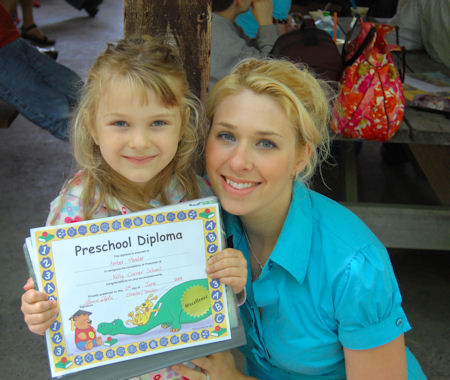
Amber & I (thank goodness I had no makeup all over my face! I was a mess I tell you!)

Amber & Daddy
Daddy was too embarrassed by mommy crying to even THINK about getting emotional! LOL!
Now a quick family photo (Oh gosh I can’t believe my hair did that in public. It needed a time out!)
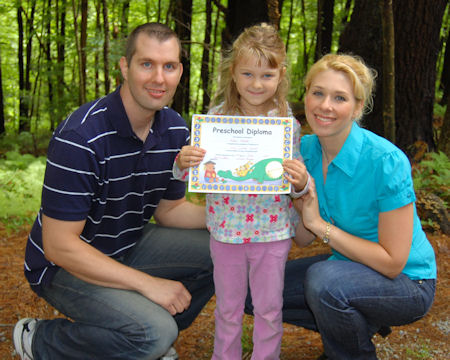
Sometimes those lunging exercises come in handy! We were squatting for a while. Normally Id be on my butt!
OH! How did I go from a BABY to kindergarten? How did I get an ALMOST 10 year old? I don’t feel OLD enough!! Jeepers.
Yesterday she asked me if I would have another baby! But one that wouldn’t grow up! LOL! (Um, NO! All done Amber)
I told her she was my baby, and would always be. She then said Mommy! I’m almost 5! I’m not your baby anymore. I’m a big girl!
OH! man! Why do they grow so fast? She is also an OLD 4. I think our family situation with Alexa made her more mature. Plus she absorbs everything around her. We are always teaching Alexa SOMETHING. She always wanted to learn too. OK I can see I’m going WAY off course here-sorry. Just emotional today.
OK this does tie into the PTI release! I swear!!
So I made EVERYONE my Pack a Picnic basket, OR The Card Couture template in some way, shape or form! I shared most of my peeks during the countdown.
I LOVE Vintage Picnic to pieces. You will see lots more here with that.
The Cupcake collection-ADORABLE!
I have to say I was totally inspired by Candice’s Fruitful set! I actually LOVE it. Weather or not you make jam, if you like fruit images, you will adore this one! I really LOVE the Fruitful sentiments too!
My favorite project was put into the Exclusive Idea Book for My Timeless Template: Pack a Picnic-so I hope you get to check it out!
So I packaged Strawberry Jams for everyone, and for Amber & Noah’s teachers also included a Strawberry Plant! (Alexa went with a Rose bush and another flowering plant for her teachers! Leave it to her to decide on something totally different! LOL!)
Fruitful & Fruitful Sentiments
I made about 12 planter sticks for all the plants in about 10 minutes! Seriously NOTHING over the top and fancy. I need QUICK!
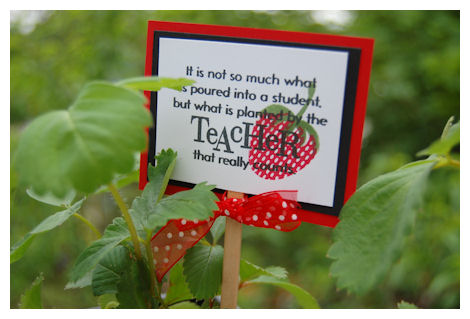
I thought that the sentiment from Teachers Apple was PERFECTION for a plant gift!
Sentiment reads: Its not so much what is poured into a student, but what is planted by the teacher the really counts.
I used the strawberry image from Fruitful in the corner, then layered it onto a stick, and stuck it in the plant
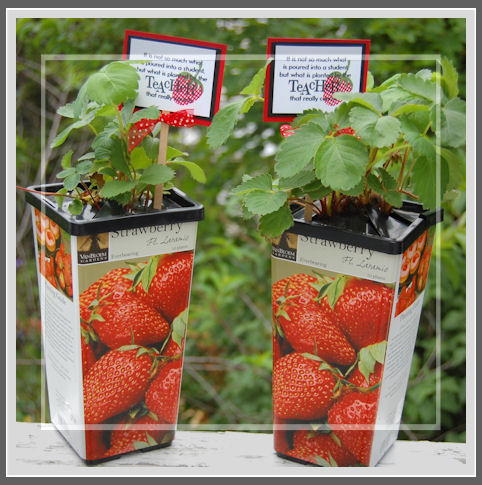
The backs were signed by the kids.
These are the ones Amber did for Mrs. Slater & Mrs. Bartlett
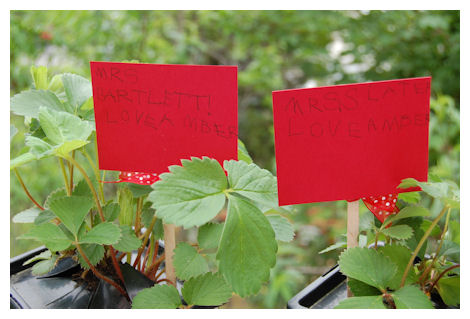
I think it was cute. I wanted to cover the bottom, but didn’t want to ruin the instructions-so I let it be. Plus it gave me an excuse to do ONE LESS thing! LOL!
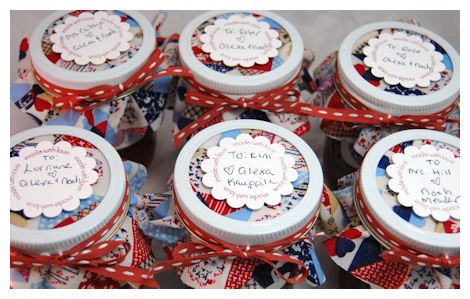
Now onto the Strawberry Jam!
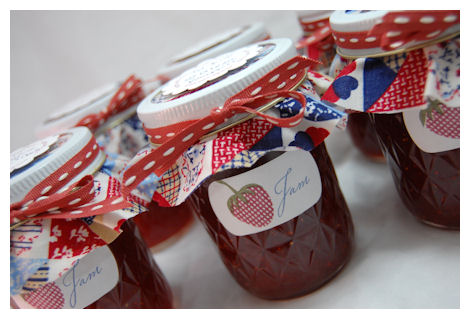
Holy easy peasy! LOL!
I had my BFF Paulette’s mom MAKE me jam :D) Oh! boy is it ever YUMMY!
I then stamped some of the PTI adhesive/label sheets, and punched out my label, stuck it onto the front!
I had some fabric laying around, so I cut it up, and put it under the ring.
I then stamped the Made with love border, and punched out scallops.
Addressed it to whomever was on the list-and done in 20 minutes!
(minus the cutting fabric! and I had 22 jars to do-I only shot 6 here)
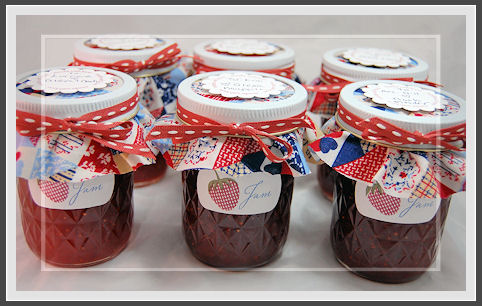
I think they are cute!
They can also be re-gifted easily if someone isn’t a JAM fan. Its the thought that counts!
So you don’t have to take TONS of time to give nice gifts. I love the clean and simple stuff (in case you haven’t caught on to that yet!).
OK moving on………
Heavenly Medley
Now we have Lisa’s set. I was SO inspired my her corner decor, that I used it for my focus.
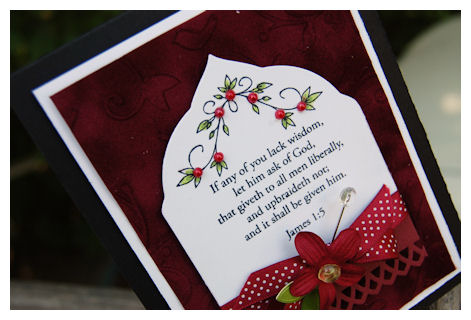
I felt like this looked similar to a church window!
The bkgd paper is a velvet paper by SEI. I ran it through my cuttlebug to emboss it! WOWZERS is it ever LUSCIOUS!
I used the side of the Labels 4 nestability to create my own cool shaped layer! Punched the bottom layer, and I love it!
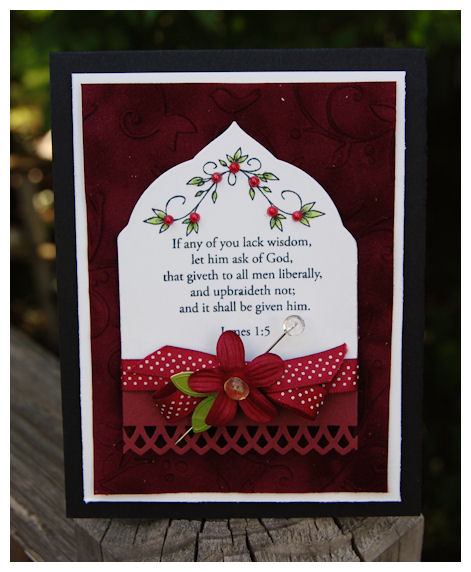
Scarlet Red is just gorgeous!!! I’m happy PTI is delving into rich tones now too.
I added adhesive pearls to be like berries.
I think its such a pretty card.
Well that is all for this post. I have much to do today.
You are JUST getting excited about this release and we are already on to the next one! LOL! Funny how that works.
Enjoy the day, and remember to STOP and hug your children! Amber asked me to color with her, so after I get one more thing done, I cleared my “to – dos” to do that with her. Before you know it, she won’t want me to “bother” her at all.
I also appreciate all the support and excitement you all share with me with each release, and daily here!
THANK YOU!
My Etsy

Who I Designed For
Blogroll
- Alicia
- Alli Miles
- Ally Blankenship
- Amber
- Andi @ crafts on a whim
- Angel R
- Angie Z
- Anne Kranitz
- Becky O
- Bee
- Beth Silaka
- Bethany Paull
- Beverly Nash
- Bobbie
- Cambria
- Cammie
- Card of the Week
- Card Positioning System (CPS)
- Cards for Cancer
- Catherine Doucette
- Charmaine
- Cheryl Sims
- Chriss Rollins
- Christina
- Christine Ewing
- Christine Wooden
- Colleen Schaan
- Craft Critique
- Craft Gossip
- Crystal
- Dawn Easton
- Emily Giovanni
- Geny
- Holly
- Igne Groot
- Inspirational Craft Blogs
- Irene
- Jami Sibley
- Jeanne Streiff
- Jen del Muro
- Jeni Bond
- JenMarie
- Jenn Balcer
- Jenn Diercks
- Jenn O
- Jennifer E
- Jennifer Mick
- Jennifer Pereda
- Jennifer-Sweet Treat
- Joanne Basile
- Jodi Collins
- Julia Stainton
- Julie Masse
- Karen
- Kathryn Berthiaume
- Katie Cotton
- Kelley Holland
- Kendra
- Kim Scholfield
- Kris’s Color Stripes! Get inspired here
- Kristen Dubosque
- Kristin Eberline
- Kristine
- Laura @ Sunshine Stamper
- Laura Turnmire
- Laurie Schmidlin
- Lesa Rapp
- Linda Duke
- Linda-LSN
- Lindsey Botkin
- Lisa (lakind scs)
- Lisa Kind
- Lori Craig
- Maggie
- Mara Campbell
- Maria
- Maria Levine
- Mary
- MaryJo
- Melanie M
- Monique Hansen
- Moxie Fab World
- Pam Imholz
- PaperCrafts Connection
- Peppers and Pollywogs Kids party site
- Rebecca Grohall
- Rita
- Robyn
- Rose Ann
- Sarah Vrolyk
- Sharon Harnist
- Sharon Johnson
- Sharon Rivera (a chemisrty with paper)
- Sherrie
- Sophia Landry
- Storage Units, Ink, & More Blog
- Sue Berker
- Susan (Rainy)
- Tangii Crane
- Tracy
- Tricia Traxler
- Trudee
- Velta
- VivLyn
- Zena
MTME Pretty Palette Color Team
MTME Pretty Patterns Sketch Team
My Time Made Easy TM LLC
Shop till you drop!
Lauren Meader
About Me
Copyrighted material
Subscribe To My Blog
Pages
- About me
- Alexa’s Story!
- My Crafty Corner!
- My Time Made Easy™ LLC
- Our Make A Wish Trip to Disney!
- Resume/Publication List
Calendar
| M | T | W | T | F | S | S |
|---|---|---|---|---|---|---|
| 1 | 2 | 3 | 4 | 5 | 6 | 7 |
| 8 | 9 | 10 | 11 | 12 | 13 | 14 |
| 15 | 16 | 17 | 18 | 19 | 20 | 21 |
| 22 | 23 | 24 | 25 | 26 | 27 | 28 |
| 29 | 30 | |||||
Archives
- August 2013
- July 2013
- June 2013
- May 2013
- April 2013
- March 2013
- February 2013
- January 2013
- December 2012
- November 2012
- October 2012
- September 2012
- August 2012
- July 2012
- June 2012
- May 2012
- April 2012
- March 2012
- February 2012
- January 2012
- December 2011
- November 2011
- October 2011
- September 2011
- August 2011
- July 2011
- June 2011
- May 2011
- April 2011
- March 2011
- February 2011
- January 2011
- December 2010
- November 2010
- October 2010
- September 2010
- August 2010
- July 2010
- June 2010
- May 2010
- April 2010
- March 2010
- February 2010
- January 2010
- December 2009
- November 2009
- October 2009
- September 2009
- August 2009
- July 2009
- June 2009
- May 2009
- April 2009
- March 2009
- February 2009
- January 2009
- December 2008
- November 2008
- October 2008
- September 2008
- August 2008
- July 2008
- June 2008
- May 2008
- April 2008
- March 2008
- February 2008
- January 2008
- December 2007
- November 2007
- October 2007
- September 2007
- August 2007
- July 2007
- June 2007
- May 2007
- April 2007
- March 2007
- January 2007
Categories
- About Me
- All That Scraps
- blogger challenge
- camera/photo play
- Cards
- Contests
- family stuff
- FOR SALE
- Home decor/3-D items
- How to FAKE it!
- Introduction
- JUGS Challenge
- JustRite Stampers
- Lizzie Anne Designs
- My family stuff
- My Stamping Space
- My Time Made Easy
- My Time To Color Challenge
- My Time to Create Challenge
- My Timeless Template Challenge
- My Timeless Templates
- Mytime Mail
- MYTIME MOVIE/VIDEOs
- Papertrey Newsletter
- Pink Cat Studio
- Pretty Palette Challenge
- Pretty Patterns Sketch
- Product Opinions and Must haves
- Recipe's
- Saturday Sketch
- Smilebox Creations
- Stampavie
- Tutorials
- Uncategorized
- videos
Most Popular
- Create your own Onesie Card Tutorial-and important NOTE! PLEASE READ (2529)
- Saturday Sketch-Boxed bag holder (2333)
- Going GREEN! Fancy Flower Flourish-Closure Video (1478)
- Fabulous Favorite - Giveaway! (1336)
- a Prayer Request (1231)
- QUICK-Easter Baskets from Nestabilities-PTI style-and blog challenge (1063)
- Teaser Sketch (999)
- February Release Giveway! (and a little peek) (996)
- Group Post and Rambling Rose Video Tutorial (985)
- GIVEAWAY! Who wants it all?! (895)
Recent Comments (RSS)
- 야동: Love to read it,Waiting For
- 야동: This seller is in a
- 바카라사이트: 여기 처음 왔어요. 나는이 게시판을
- 야동티비: I was surfing the Internet
- 바카라사이트: 비슷한 주제에 대한 흥미로운 정보를
- 바카라사이트: "여기에 제공해 주신 귀중한 정보와
- 온라인홀덤: 유익한 웹 사이트를 게시하는 데
- 홀덤나라: 나는 당신의 블로그를 정말 좋아합니다.
- lisa: Technology, too, has left an
- 주소모음: 흠 !! 이 블로그는 정말
Copyright © 2007 - My Time, My Creations, My Stampendence - is proudly powered by WordPress
This blog has been Tweaked and Designed by Sara Williams