Archive for the ‘Papertrey Newsletter’ Category
2009 Holiday Card Making 101
Oct 13, 2009 Author: mytime | Filed under: Cards, Home decor/3-D items, My Timeless Templates, Papertrey NewsletterTonight is the release at Papertrey Ink! Are you excited? I know I am.
On the 15th you can now get all the new releases, as well as download my 2 NEWEST templates: Around Town Tote & the Cash or Charge Trio.
(they will appear on the site after midnight!)
Just in time for the big day, our entire team at Papertrey Inkhas come together to create various holiday cards. This was a very popular assignment last year, and we hope you enjoy it just as much this year. I know I had a total blast (despite my loathing mass production! LOL!) creating my version of a holiday card this year.
This should definitely spark the holiday mood, and get you ready to pull out the supplies 😀
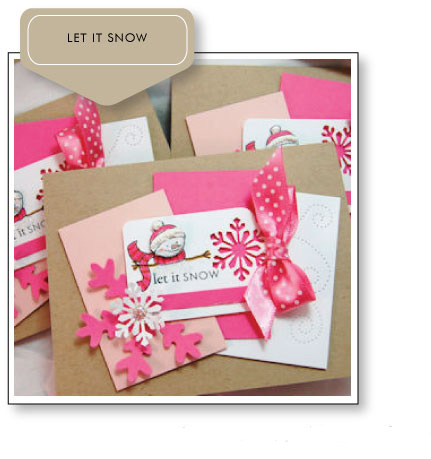
I fell in love with the snowman from 2009 Holiday Button Bits (and I’m sure I won’t be alone (wink), and just *had* to use it for my holiday cards!
Sweet as Snow

I personally love fun colors, and layers on my creations, so I hope you like my take on the holiday card challenge.
While my card is detailed, it didn’t take long to get these 5 done (thankfully)!
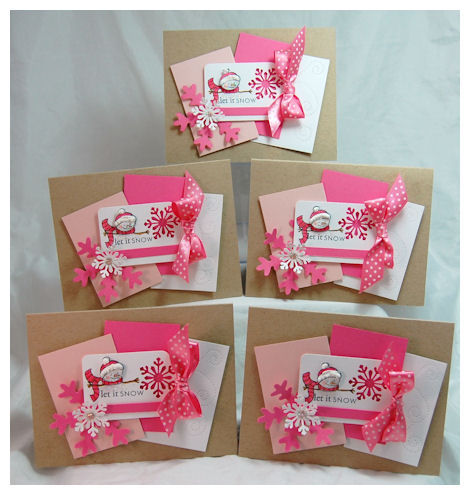
Here are my five cards, assembled like a holiday tree!
If you decide you want to use my layout for your own cards, Nichole made each of us a file for everything you need to recreate 25 cards!
Complete with supplies and step by step instruction!
Here is the download info —> Lauren Let it Snow PDF
Thank you to Nichole for doing that for everyone 😀
Here is a bit of a closer look
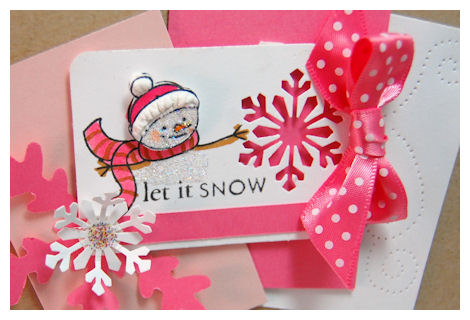
The snowman doesn’t NEED a button to be totally cute! I felt like her arms stretched out, just said “let it snow!”!! So I went with that! I won’t go into a ton of detail because you can just get that from the download 😀
Now I thought I would take this SAME layout, and make some gift packaging for my Sweet as Snow set!
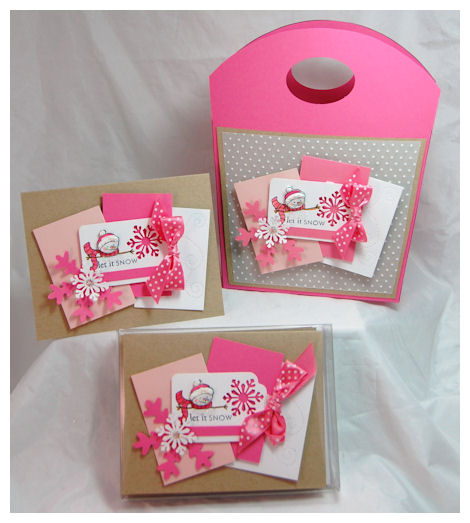
Here it is!
For those of you who THINK you cannot easily create 3 dimensional items, this is the PERFECT example that you can!
I knew I would want to create a package of some sort, to present these cards in….so using the SAME supplies, same size, and layout…..instead of making another card, I just put the trio layer onto the front of my large Around Town Tote! YEAH! Yet, another FAB way to present card sets 😀
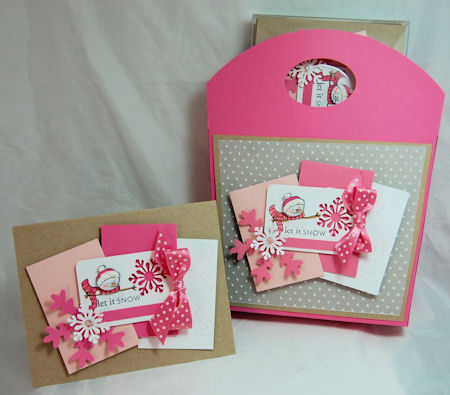
I just slid them into a clear card case, with 5 envelopes, and they were ready to go!
(there is a lot of filler in there, so they stick out the top!!)
You could of course ALSO use my card box template : Captured Card Case too!!
Supplies:
My Timeless Template: Around Town Tote
Stamps: Holiday Button Bits, 2009 Holiday Tag (sentiment)
Cardstock:kraft, white, hibiscus burst, sweet blush, vellum
Ink:black, copic
hibiscus polka dot ribbon
Liquid applique, 2 way glue pen, paper piercer, glitter
Marvy snowflake& tag punch, Martha Stewart punch , swiss dots folder
Now make sure you hop on over to Nichole’s Blog for ALL the amazing idea’s from the designer’s !!
I hope you like my holiday version 😀 It was really fun for me.
I have MORE to share tomorrow, so I hope to see you back here then.
Thank you for stopping by!
Take Note Inspirations
Oct 12, 2009 Author: mytime | Filed under: Home decor/3-D items, My Timeless Templates, Papertrey Newsletter, Product Opinions and Must havesToday I have THREE posts! So be sure to check them ALL out!
I have been busy as a bee, and *maybe* you can see a very SMALL tid bit of why I haven’t been blogging as much as I normally do! Quality is better than quantity right?? LOL!
Today & tomorrow the team Papertrey Ink all have a group post! These are SURE to get you inspired 😀
Now Nichole and Mish put their talent and brains together to come up with a FAB new product, and of course coordinating stamp set called Take Note!
So, our job was to create one, and share it with you.
Oh my love!!! I am just in love with the size and color choice for these notepads!!I decided to make a gift for myself 😀 I am forever jotting down my ideas on scraps of paper, and losing them, or having to pile them up in a folder. Sometimes while I’m out shopping, an idea hits, and I’m scrambling for a receipt so I can jot down my ideas as they come! LOL! This set is just what I needed to get myself organized, and with style! Come check out how I created my tri fold notepad!
Here is the “me & my BIG bright ideas” note book I designed using Take Note
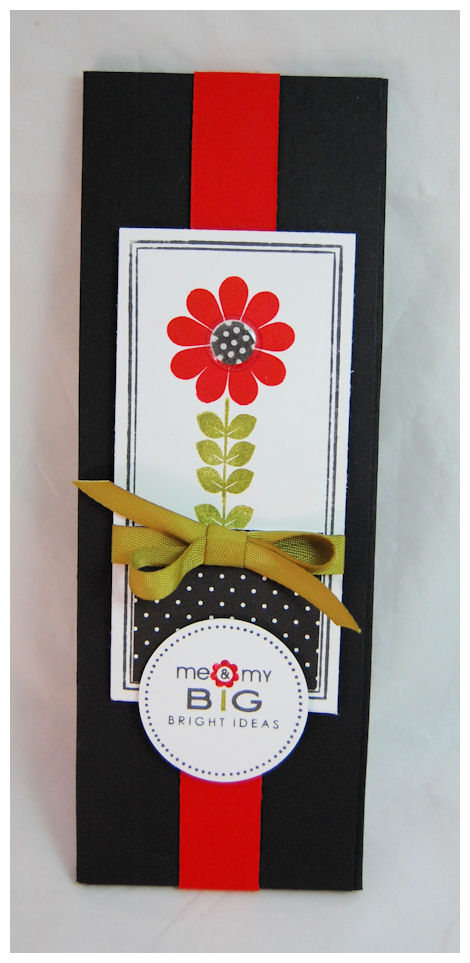
I have to say that was my FAVE sentiment for the set. It just called out to me.
I’m sorry but I LOVE Pure Poppy, Ripe Avocado, True Black with Polka Dots! Its such a FAB combo!!
The colors just screamed for me when I sat down to create (told you I am using a lot of black this release :D)
I LOVE Beautiful Blooms, and I felt it mimic the flower in the sentiment I chose, along with the polka dot center.
The note book is 2.5 X 8. I used the white with gray lines for my project.
I decided I would create a belly band to go around my notebook cover-which is a tri-fold design. I wanted to keep it SIMPLE 😀
You just slid the band off, and you then reveal your notebooks!
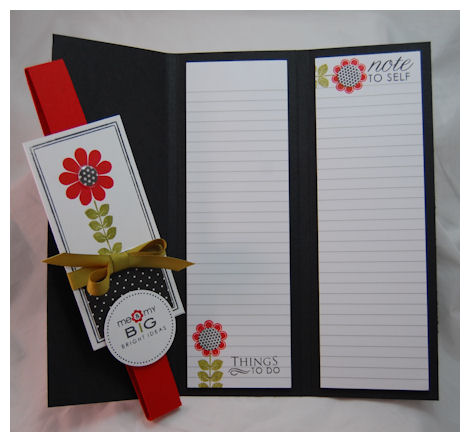
As you can see I used 2 for my project. I always have lots to keep track of, then wanted to jot down my ideas.
Directions for Tri Fold holder
My cardstock was 8 1/2 inches tall by 9 1/2 inches across
I just created the tri fold holder by scoring along the 9 1/2 inch side at
3 then 3 1/4
6 1/4, then again at 6 1/2!
Made my belly band using 2 strips of cardstock!
1- 8 1/2 X 1 1/4 (that is the back piece)
Then the front of the band- is 11 X 1 1/4
Scored the 11 inch long strip at 1 then 1 1/4, then again at 9 3/4 and 10. Adhered it to the 8 1/2 X 1 1/4 inch piece and had my belly band.
As you can see I then stamped my notebook pages to reflect what I want to use them for!

I was SO inspired by the notebook, that I created an entire gift ensemble!
(I know! My brain just often takes off in a million directions! Trust me my BODY often can’t keep up with it, because if it did, 24 hours in a day would NOT be enough time to get it all done! Hence my use/need for the notebook :D)
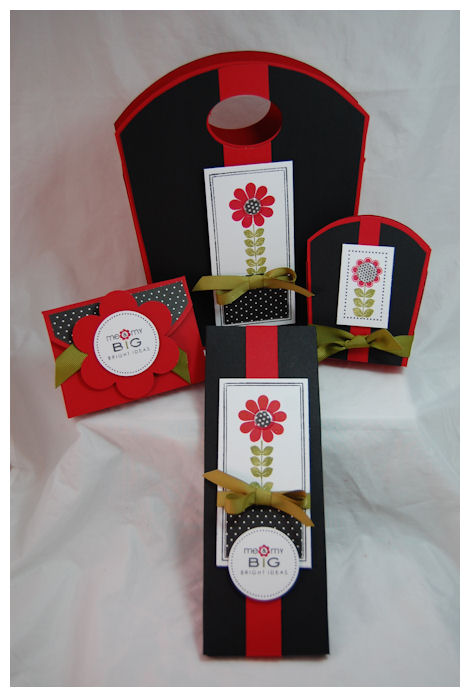
I LOVE matchy matchy stuff, and as I said before, love using the same elements on various projects. I think you can really see here how this set can translate into other gifts and projects!
I used the Around Town Tote as part of my set
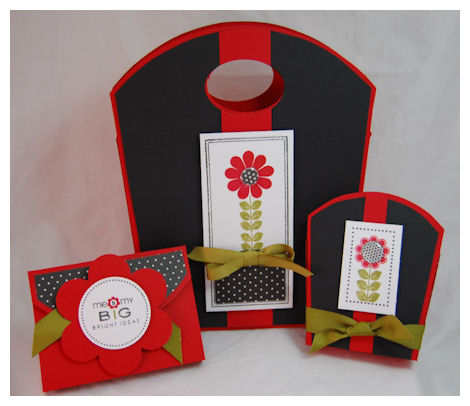
As you can see I used the Standard size, and the Pretty Petite size. Love them BOTH!
I then figured that I could also use the Cash or Charge #1 as an idea clipping holder, OR to hold my coupons in when I go shopping 😀
Here is the Cash or Charge #1 wallet close up
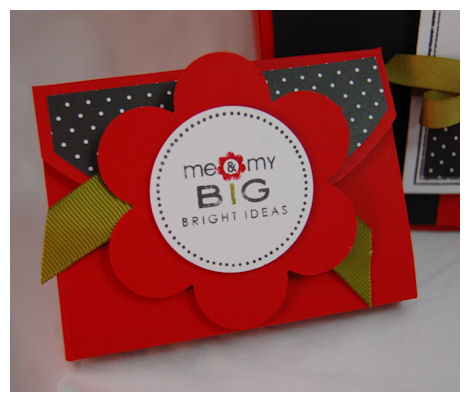
I used the GIGA Marvy flower punch for this, and then some wide ripe avocado ribbon to tie it closed, and appear like the leaves.
Easy peasy, and OH SO CUTE!!
Supplies:
Note Book X2
Scor-Pal
My Timeless Template: Around Town Tote, Cash or Charge #1
Stamps: Take Note, Beautiful Blooms, Borders and Corners rectangle, Wise Owl, Floral Frenzy
Cardstock: White, Pure Poppy, Black
Patterned Paper: Bitty Dot Basics
Ink: Ripe Avocado, Pure Poppy, Black
Ribbon: Ripe avocado twill & grosgrain
Circle punch, Marvy Giga Flower punch
Well that does it for me today. I hope you like my take on the NEW! notebooks.
Make sure you check out all the girls posts:
See you back here again tomorrow for much more 😀
What is my FAVORITE thing?
Oct 12, 2009 Author: mytime | Filed under: Home decor/3-D items, My Timeless Templates, Papertrey NewsletterOK if you said butterflies, you are correct!
What is my SECOND favorite thing?
YES! Coffee!! These are 2 “things” that I am all about! I love them.
NOTE: this is also my 2nd post for today, so don’t miss post #1 and post #3! I have worked hard to pull it all together today. It’s a good thing my passion for this craft burns so deep, because sometimes it is also a lot of “work”. I think people can tell I LOVE my job! I love when I’m INSANELY busy! Its a challenge for me. In fact when I’m not challenged or busy I hit a HUGE brick wall. I don’t know what to do with myself 😀
OK back to the post……
My favorite thing to use the My Timeless Templatesfor is of course all SORTS of coffee, tea, or cocoa type’s of beverage gifts. I think I have incorporated that into EVERY single template release to date! Actually I may have to look back because I’m so sure I have! LOL!
I KNOW I’m not alone in LOVING to find fun, new, and cool ways to package up such a WONDERFUL and SIMPLE treats for people. OK at least I don’t think you are sick of those ideas yet, are you?
Well it wouldn’t be ANOTHER fab template release (IMHO) without finding yet ANOTHER template to use to package up my fave treat!
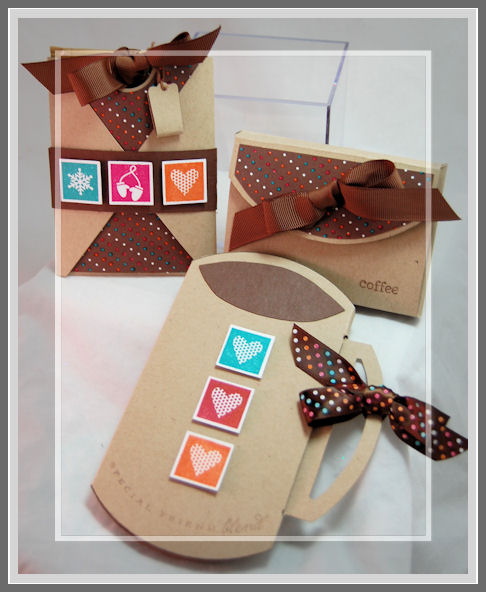
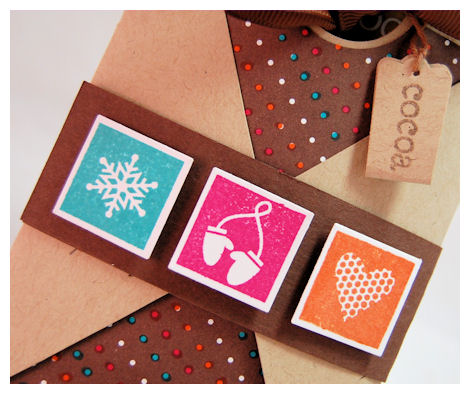
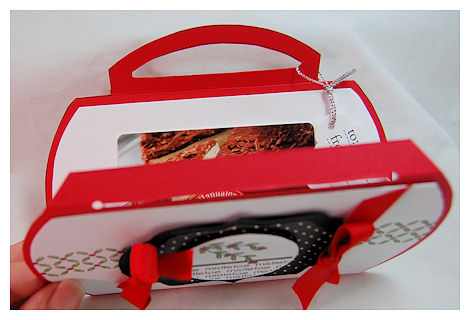
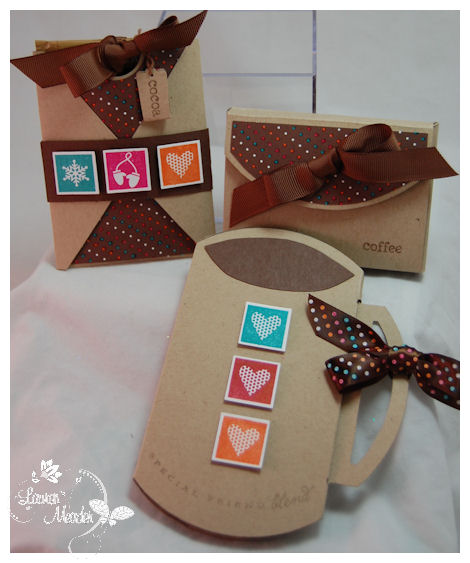
SO today I am sharing my 3 versions of the Cash or Charge Trio template (releasing the 15th!), for my super sweet coffee treats 😀
AHHHH! Is that not delicious?
I don’t think I can ever give these away! LOL!!!!
Here I used ALL three of the templates that come in the Cash or Charge Trio.
So….I used my chocolate bitty dots paper, and COLORED it, to match my projects! I also colored my polka dot ribbon to match too 😀 I am officially in LOVE with Sign Language too 😀 It made the perfect addition to my creations.
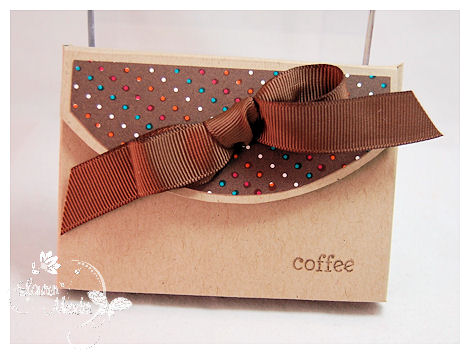
This is the front of the template. Sweet and simple. I LOVE the paper 😀 I am all about customizing paper like this to match your needs. Its fun , easy and stretches the possibilities for you.
I just used the front flap template for this. You can have a template wrap as well. Lots of ways to create this.
This is the back of the “wallet” style. You can really dress it up there too!
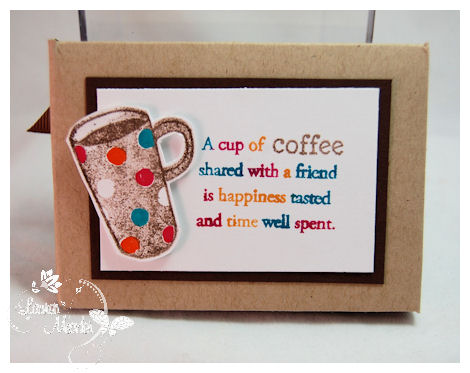
I just colored the words each a different color. Stamped, colored and cut my mug. I LOVE adding 3D elements.
Inside is a gift card to my fave coffee shop (Yes! I am keeping it for me 😀 I worked hard this past month and deserve it, don’t I?!)
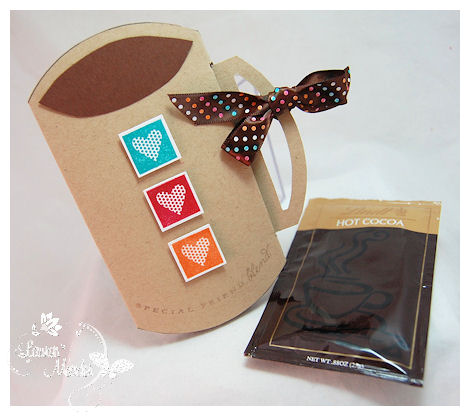
Next up we have Cash or Charge #2
How cute is this?
My favorite project for this release 😀 Sweet and simple and yet a WOW! This particular template is just so versatile.
Did you notice that this template, when turned, could also be a mug of coffee? I about DIED when I had this epiphany! I cut down the embossing mat that comes with this template to create the “coffee” part of the mug!
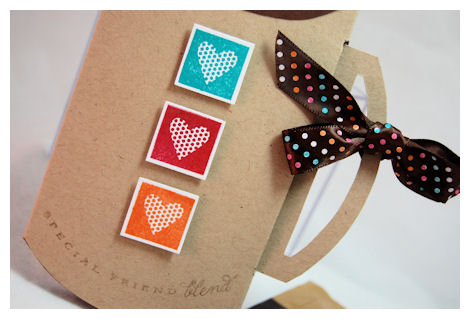
I just made sure the flap was placed on the backside
I bent the sentiment from Tea for Two, to go along with my template bottom. I was in PURE heaven!!
Now inside this template is NOT a gift card, NOT cash……but , the YUM-A-LICIOUS packet of GOURMET hot cocoa from Lindt. Perfect fit! Just adhere inside so it doesn’t slip out.
Talk about amazing. You will be hooked on this stuff if you get some. Word to the wise-Do NOT drink it. Just package it up for friends in family and don’t ever try it! You will save yourself a lot of naughty, high calorie, creamy, chocolate-y, heaven in a cup, sinfulness—-> if you just LET IT GO!
Now speaking of this cocoa…lets move along (and wipe the drool) to the next template in the trio
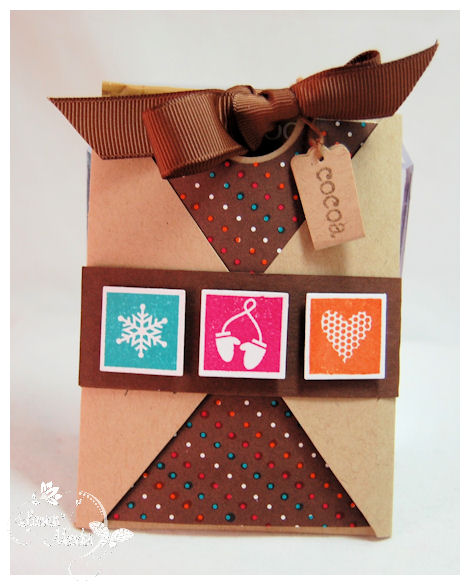
This template is holding that SAME packet of cocoa in the pocket!
Isn’t it the cutest cocoa pocket?
You can also use this pocket idea to put in dip/seasoning mixes from Tastefully Simple, other drink mixes, face masks, trail size bath and beauty packets, tea, tickets to a game or concert…..oh man, I could just go on forever 😀
Just pull on the ribbon and the cocoa comes out. Easy peasy!
ALL of the ideas here today were done in NO TIME! So if any of this stuff is on your gift giving list these templates will dress them up in a pinch.
Supplies:
My Timeless Template: Cash or Charge Trio
Stamps: Sign Language, Tea for Two, warm happiness
Cardstock: Kraft, Dark Chocolate, White
Patterned paper: Bitty Dot basics
Ribbon:Dark Chocolate polka dot, dark chocolate grosgrain
square punch, Tag punch
Ink: Dark Chocolate, Raspberry Fizz, Orange Zest, teal
Now if you didn’t know:
All the templates are an INSTANT download! No shipping! Straight to YOUR computer, anywhere in the world 😀
You get UNLIMITED use of them, along with 5 EXCLUSIVE ideas, with full color photos, supply list and step by step directions to re-create the 5 projects featured. A fab value for ONLY $5.
So that is all for me.
Of course if you have ANY questions, please email me directly, so I can help!
I hope you like all my projects today!
Thanks for stopping by 😀
3-Pretty in Pink Template Set
Oct 11, 2009 Author: mytime | Filed under: Home decor/3-D items, My Timeless Templates, Papertrey NewsletterPost #2 for today! So scroll down! if you missed visiting over the weekend you won’t want to miss what has been shared 😀
Another EXCITING day here! I have so many amazing things going on, I’m just plain grateful and ecstatic! October is a good month!
I think I am going to have to apologize for my use of black this countdown! I basically paired everything with it this month, for some odd reason! I was just FEELING black with a pop of X color! You will see what I mean! LOL!
Today I am using BOTH of the NEWEST My Timeless Templates: Around Town Tote © & Cash or Charge Trio ©
The FUN part to today’s post is the focus on VERSATILITY! Now we are using (like all my posts this countdown) all the same colors and elements on each project and getting a cool NEW look each time! This goes to show how versatile it all really is! You don’t need ton’s of supplies or even ideas to get MANY MANY various, amazing projects!! Also I LOATHE mass producing. This allows me to use the same products and elements but on DIFFERENT projects so I’m not recreating the same’ol BORING thing 😀
So without further delay…….
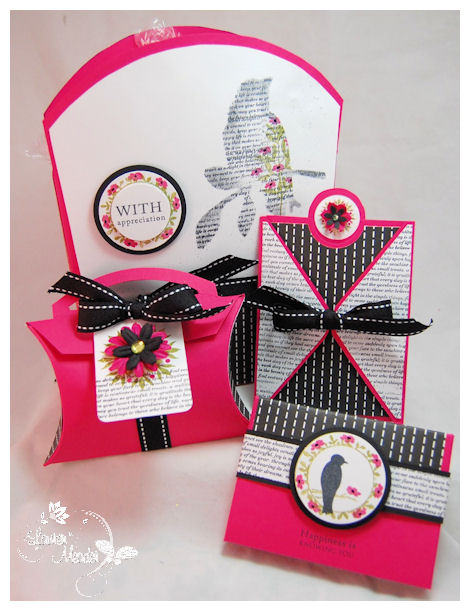
Pretty in Pink gift set
Now ALL these projects can fit inside the standard version of the Around Town Tote ©!
Can you see how each has the same elements, but each a fab look? (all supplies listed/linked at end of post)
Wouldn’t you just die if someone gave you stuff in all of this? I’d feel pretty special 😀
First we will see Around Town Tote ©
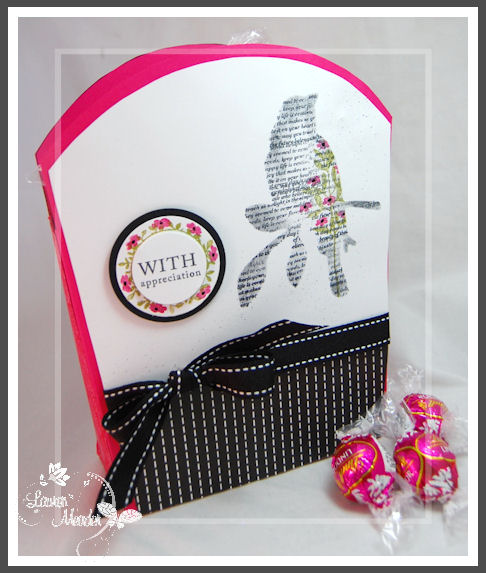
I LOVE this!
I used my Slice cartridge to create the bird “mask” in which I stamped in my text, then flowers from the Life set. It’s just such a stunning and SIMPLE way to make this bag a real WOW! The tag I used the leaf image from 2009 Autumn tags and added the flowers from Life to it! A whole new look don’t you think?
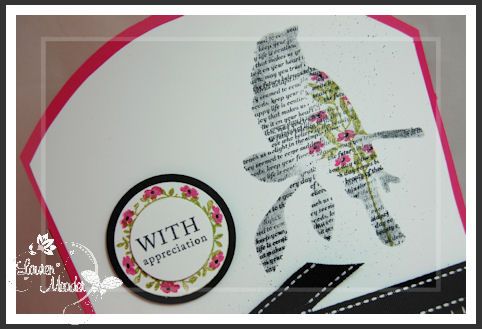
Clean, simple and easy!!
Now here are my side details
I used the In Bloom paper on my side panels. Another simple decorative element that shows the attention that is needed to the SIMPLEST of details!

I LOVE packaging up Lindt chocolates-so get use to seeing them this season! LOL! Its my GO TO gift idea 😀
As you can see I opted for NO handles on this one. I liked the look for this one without it.
Now we move on to Cash or Charge Trio © samples
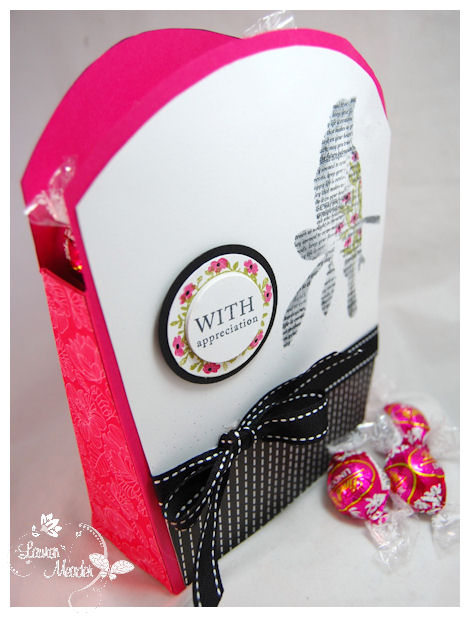
Cash or Charge © #1 Wonderful Wallet
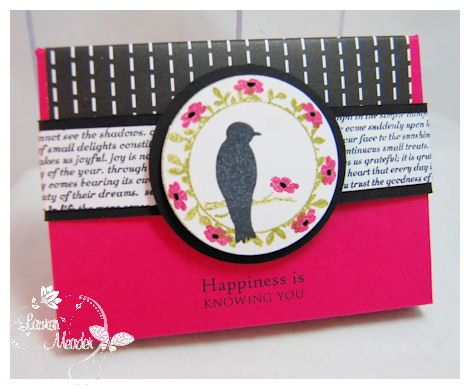
Going with the bird theme……I used the SAME tag idea, and used Birds of a Feather in the center. I love it!
Now this template flap generally ties closed! But I made a belly band for it instead.
Slide off the band……
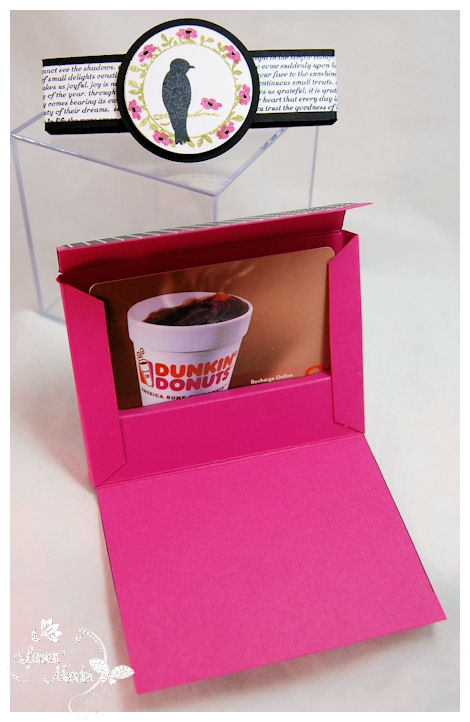
and you have your gift card reveal! My FAVE! Dunkin’s coffee 😀 As you can see NO score lines on this one 😀 There is a slit that gift cards fit into perfectly (or cash!) you will REALLY love this one! I swear 😀
Now we will go onto Cash or Charge #2
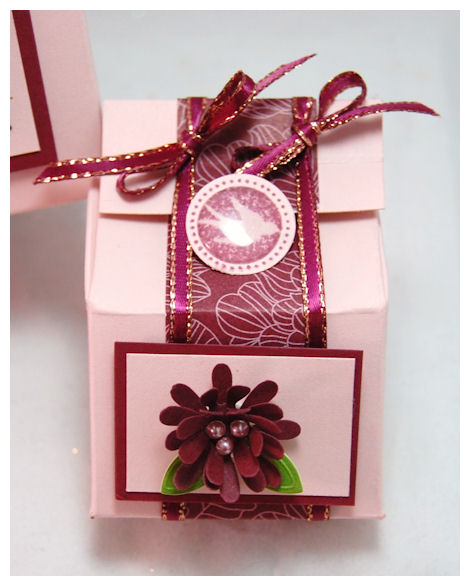
Pretty in Pink Pillow Pocket
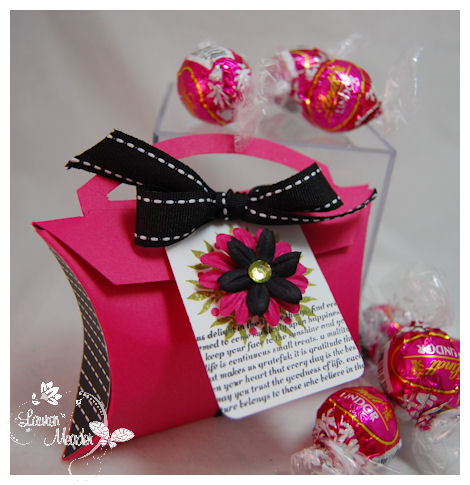
OH MY WORD! Is this not STUNNING?
Just a pretty simple pink box with a fab tag!
This is the SAME flat pocketbook style template! There is a embossing template that comes with this, so you can create these side panels, and make this template a PILLOW style box-with a ultra cool handle!!
Now on this I used that same embossing template to make my decorative side panels for my box outside! I told you, you will LOVE this particular template in the trio! I’m just over the moon with it.
The tag used the NEW! Giga Guideline, and NEW! Background Basics Text Style II!! You will LOVE it!
Now using the SAME elements once again…last but certainly NOT least……
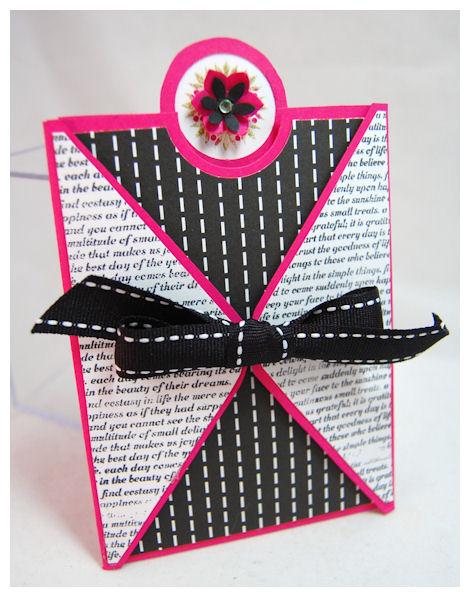
Now pretty is this when you use ALL of the layering templates it comes with?
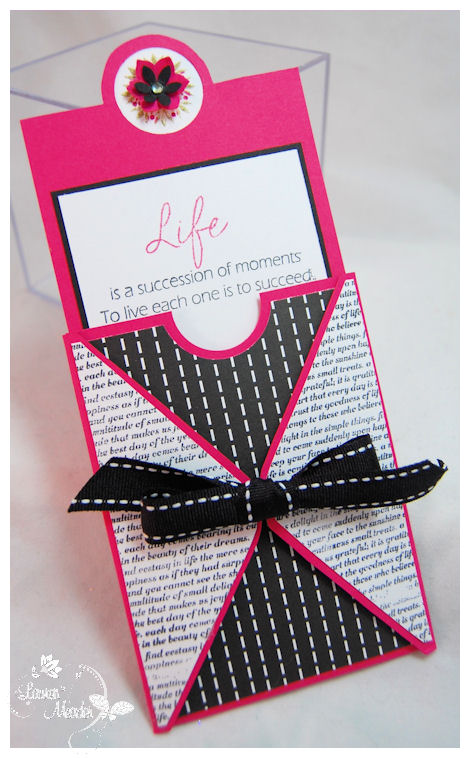
Now did you realize that this can be not ONLY a FAB gift card/cash holder, but a rockin card too?
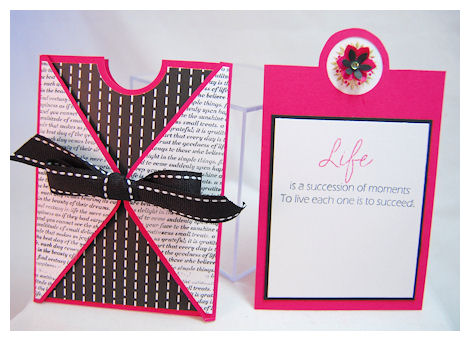
This is the insert pulled out. Its so simply pretty! I love that.
So here we uses ALL the same elements and got several FRESH looks.
What do you think? Are you seeing lots of gift card holders in your future, and fancy schmancy gift totes?? I know I am 😀
Supplies:
My Timeless Template: Cash or Charge Trio ©, Around Town Tote ©
Stamps:Background Basics: Text Style II, Giga Guidelines, Life, 2009 Spring & Autumn Tags
Cardstock: Raspberry Fizz, White
Patterned Paper: Black & White Basics, In bloom
Ink: Black: Ripe Avocado, Raspberry Fizz
Ribbon Saddle Stitch Black
Prima Flowers, adhesive Rhinestone
Marvy Tag punch, Slice Back to School Cartridge
——————————————————
Tomorrow we have a ULTRA cool group post! So check in again!!!
I’m happy to share that I am taking part in sponsoring some HUGE blog candy for a cause!! Check it out —> HERE! Only a few days left! I am giving away 2 My Timeless Templates, and YOUR choice of a Papertrey Ink stamp set 😀
In the meantime there is MORE eye candy for you: be sure to check out more fab stuff from Nichole!
Lisa is also sharing her project using Giga Guidelines 😀
More stuff coming from Dawn, and Heather who all who have releases this month.
Thanks once again for stopping by.
I hope you are inspired to try making gifts using ALL the same elements-without getting bored 😀
2- Around Town Tote
Oct 10, 2009 Author: mytime | Filed under: Home decor/3-D items, My Timeless Templates, Papertrey NewsletterI can’t tell you how excited I get to reveal another template! I often forget what I created until we get to the next release! LOL! We have so much stuff done ahead of time that it is all a BLUR! Once I get that template the ideas just flow all over again, as they did the day the project was designed. Its REALLY cool to see something you created used by so many!
In a recent publication of PaperCrafts Magazine I saw 2 of the My Timeless Templates used in there! Of course I scrambled to find my copy while writing this, and my hubby said he thinks he trashed it! (That is another story!! LOL!) So I can’t say what mag or the pages (sadly), but be on the lookout!
I can’t tell you how cool it is to see others designs with the template’s, out in the world! Better yet the emails I receive from the reaction people get from those who receive their creations using them 😀 UNBELIEVABLE!
Well I hope you enjoyed yesterdays peeks at the Holiday Tags 2009, and the NEWEST My Timeless Template : Cash or Charge Trio! As I said in my previous post the templates/stamps are NOT released until the 15th 😀 I have SO many FAB ideas to share this week with ALL of those, so make sure you check in tomorrow for MORE 😀
Today I have my next peek to share, using our second template this month called : Around Town Tote!
I also snuck in the NEW! Holiday Button Bits too 😀
You will really love this one for sure! It has the large standard size, as well as the Pretty Petite version.
Here is the concept project (usually a quickie sample so that there is a general idea of what all those cut and score lines look like assembled!)

About the template: Around Town Tote
Let’s be honest, sometimes we just need a gift bag! But, just because it’s a “bag” doesn’t mean it doesn’t have to be fabulous! Remember gift packaging is the FIRST impression to the gift you are giving! You wouldn’t go to a job interview in your PJ’s would you? Why not make the packaging a gift in itself? This rounded top style is so pretty, and not only is it sure to please, but people won’t believe you actually made it yourself! Just add any decorative paper to the side panels, and you have a terrific trendy bag, designed by you, for any occasion. ONE store bought gift bag, like these, can easily cost you the price you pay for a one time purchase of unlimited use of this template! The gift bag you only get to use ONCE! The template, both sizes, one price, unlimited possibilities!
As you can clearly see…it has a rounded top, and angled sides.
The template has a FULL rounded top decorative layer (I chose to cut mine down here), and of course the decorative side panels, which lend a world of design options!
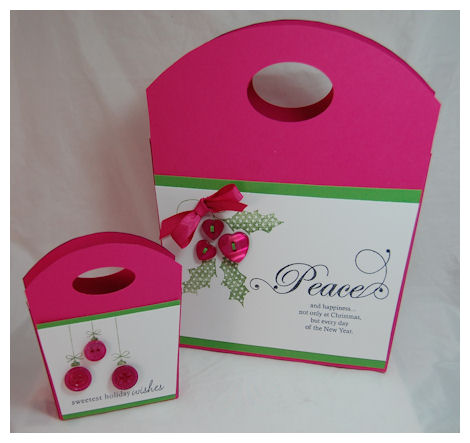
Here is my project: Holly Jolly Tote Set
Talk about Raspberry Fizz being a FAB replacement for the traditional red & green!!
This the the set, using Around Town Tote, I designed for today’s sample.
The standard tote is 8 1/4 inches TALL, 5 1/2 inches WIDE (at the smallest point at bottom) to 6 3/4 inches WIDE (at largest point) and 2 inches DEEP (at bottom)
The Pretty Petite version is 4 inches TALL, 2 3/4 inches WIDE (at smallest point at bottom), to 3 1/2 inches WIDE (at largest point) and 1 1/4 inches DEEP (at bottom)
So both are really FAB sizes for MANY gift giving ideas!!
Here is the standard:
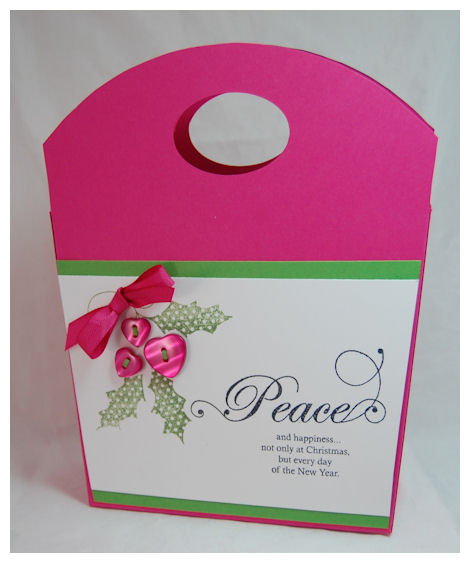
The is the larger version of the tote. I used the Holly Leaf image from Holiday Button Bits and my heart buttons in Raspberry fizz. I have to say I LOVE the look. I always feel like I do “detailed” projects for my countdown stuff. I really wanted to show you how you can SIMPLIFY and still get that WOW! Let’s be honest, when creating holiday gift packaging, time is NOT generally on our side! So I think that while this is SIMPLE, its still amazing 😀 This project (standard size only) took under 10 minutes to make (includes template assembly!). Now I LOVE that 😀
I added the sentiment from Snowflake Serenade. It was just perfect-o!
Now for my Petite version

This may be smaller but is JUST as fab!
I used the ornament hangers from the Everyday Button Bits set, and again some buttons! I wanted them to be SIMILAR.
The buttons on this ROCK! One looks like a snowflake (to me) the other has tinsel, and then glitter! Can’t go wrong.
You can make someone a gift set of punched tags (using the 2009 holiday tags :D) and put them inside or make MINI note-cards for people, and put them in the mini version. Its sure to be a hit 😀 We all need and LOVE pretty tags! They are also easy to mass produce. I’d pick a plain color wrapping paper, then design a group of tags to match and give that to someone BEFORE the holiday 😀 Or for a hostess 😀
Wait till you see the EXCLUSIVE design ideas that come with the Template purchase! AMAZING!
OK another COOL presentation for this is to tie the Pretty Petite version, to the standard version!
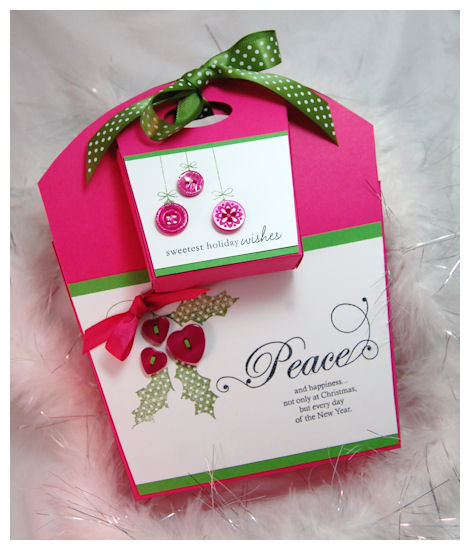
Isn’ that just SO pretty! I think I’d be more excited about what may be in the little one! Now this can also fit a gift card too 😀 But I see all sorts of candies or something YUM like that. Its just so darn purty.
I have to say Raspberry Fizz, New Leaf and a pop of black are calling to me this season 😀
OH one more view since I couldn’t decide what photo was better! LOL!
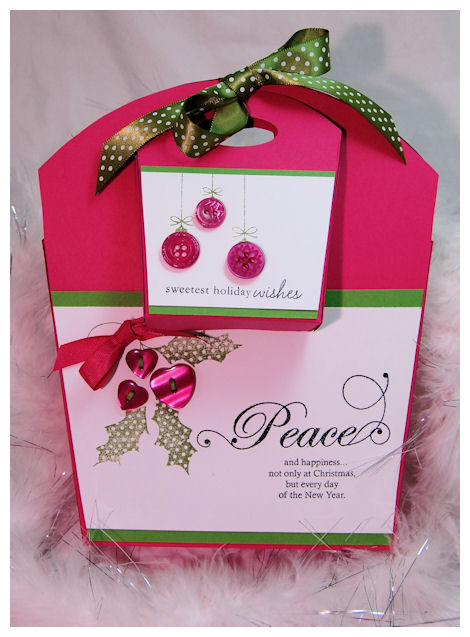
Are you not LOVING the heart buttons as my holly berries? So cute.
I just love this SIMPLE set!
Supplies:
My Timeless Template: Around Town Tote
Stamps: Holiday Button Bits, Snowflake Serenade
Cardstock: White, New Leaf, Raspberry Fizz
Ink: black, Raspberry Fizz, New Leaf
Ribbon: New Leaf polka dot, Raspberry Fizz twill
Buttons in Raspberry Fizz
Handles: oval punches by Stampin Up!
—————————————————–
Well I hope you like MY version of what I gift bag should be 😀
In the meantime there is MORE eye candy for you:
Kelly and Laurel have some peeks using the NEW templates too ![]() So check’em out!!
So check’em out!!
Then be sure to check out more fab stuff from Nichole!
More stuff coming from Dawn, and Heather who all who have releases this month.
That is all for me today. Tomorrow I have even more FAB gift idea, just in time for the holidays! So put on that fave Christmas CD for another post full of fun.
Thanks for stopping by.
#1 2009 Holiday Tags – My Timeless Template Money Holders!
Oct 9, 2009 Author: mytime | Filed under: Cards, My Timeless Templates, Papertrey NewsletterI can’t believe it’s the 10th ALREADY!! Can I get WAHOO!!
My favorite time of the month is this week 😀
The Papertrey Ink Design Team has been hard at work this month! Wait until you see all the yumminess Nichole has lined up for you this week. You will be ready to go shopping, get your Christmas cards done, and put up your tree!
I’m VERY excited to share my peeks with you this week.
Today I am featuring a stamp set additon, to what has become a POPULAR tradition to Papertrey Ink-the 2009 Holiday Tags set!
OH! Wait until you see all the great tags in this set. I honestly didn’t know WHERE to start! Since I MAKE all my own gift packaging this set was SCREAMING out to me 😀
After MUCH debate, I finalized that I would use my favorite tag, and use it with my NEWEST My Timeless Template ©. Now, I will be using the SAME tag, colors, and elements, create my different gift packaging! You will see first hand you don’t need TONS of supplies or ideas to get so much use from ONE general idea. Plus I don’t want to spoil ALL the fun!
Now here is a close up of my favorite tag in the set-Designed by Melissa Bickford
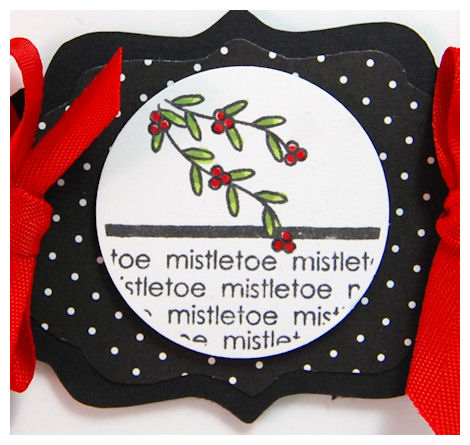
Mistletoe
I just loved that it was SIMPLE, yet I could quickly add some color-for that POP! I used a clear glaze pen to make my berries 3 D.
I LOVE Red, Avocado and Black together. LOVE. So I went with that for this post.
With the holidays coming we are ALL always thinking about GIFTS! What to give this one, or that one.
One of the most POPULAR gifts, is the gift of SHOPPING! Be it CASH or GIFT CARDS, it is by far one of the best gifts to give and receive. Who doesn’t love being able to shop at their FAVE place for FREE?! LOL!
One of the biggest “problems” in giving the gift of $ has been versatile, and neat ways to PRESENT them.
I have today the latest peek at the NEWEST My Timeless Template: Cash or Charge ©
NOTE: Stamp set and templates are not being released until Octber 15th!!
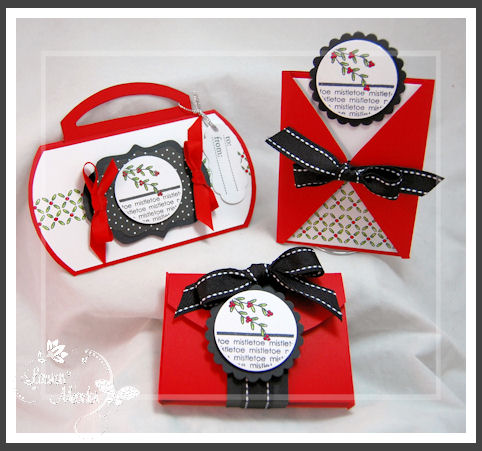
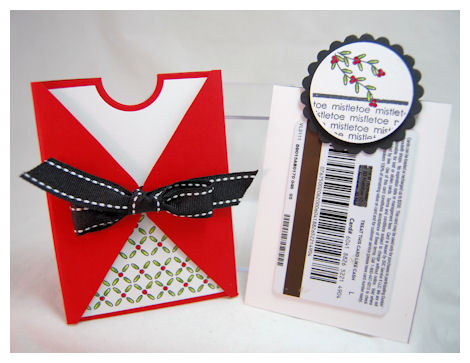
Here is my gift trio using the My Timeless Template : Cash or Charge ©
Introducing a FAB template TRIO!!
Yes I said TRIO! Meaning – THREE for the price of ONE!!
This is a set of three templates , ALL designed with the idea of packaging up those gifts of CASH or plastic gift cards! A gift we ALL love to give and receive. Generally there aren’t too many amazing ways to present these gifts, so we hope to change that for you now! These FAB gifts deserve their own fun packaging, other than being stuffed in a envelope. Each template is fun, easy and sure to make them say WOW!
I will share with you, over the next few days how these templates are not only AWESOME cash or gift card holders, but can be so much more 😀
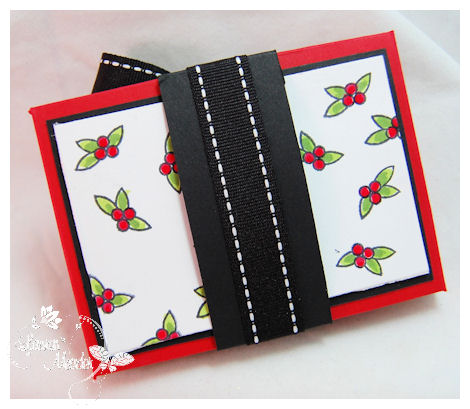
Cash or Charge #1
Write Up
This is the perfect holder for……you guessed it! Cash or Gift Cards! This is a no fuss, perfect holder. Now you don’t have to throw it in a card or envelope that it comes with. There aren’t enough ways to dress up those super easy, great for everyone on the list-cash or gift cards, but now you have one. Perfect template for any and every time you want to give such a gift! This looks like a box from the sides, but it’s front design looks like a wallet. Totally adaptable to anyone you give it to.

This template is a “wallet” style.
This leaves a whole world of decorative opportunities too.
There is a decorative layer for JUST the front flap, or for the front flap-which is carried around to the back. You will see more of that later.
For this one I just stamped a panel to match on the back.
We have 2 options for this one-1) with minimal score lines 2) NO score lines! Either way super WOW! made SIMPLE!
It has a flap closure, which when unfolded, reveals a slot for your gift card or cash to insert into!
The template has 2 holes placed so that you can use ribbon to “tie” it closed.
On this sample I decided I would create a belly band instead.
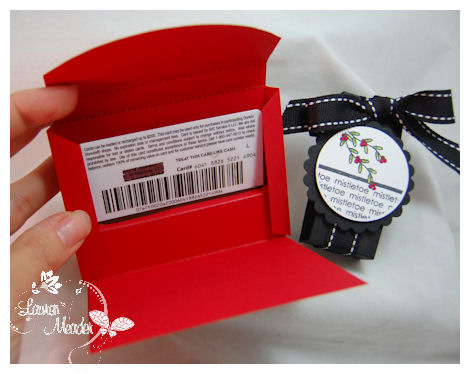
Once band is taken off you can see it reveals my card, which fits PERFECTLY into the slot 😀 Nice and snug too.
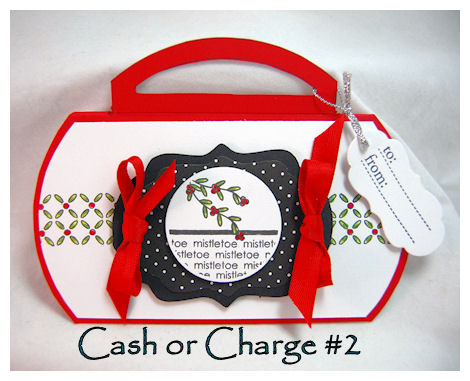
Cash or Charge #2
Write Up
Just when you thought you’d seen it all! We have the perfect Purse Style wrap for those gift cards or cash! The way this gift card holder opens is definitely fun, and sure to WOW the receiver. Gift cards and cash never looked so good! If you are tired of the typical ways to present such gifts, then this is the template for you! It also makes a super cute and cool birthday invitation! Dry emboss the side panels and you have a 3D Pillow Purse gift box! Endless Purse-abilities!
Using the same design elements we have another variation.
These are SO fun.
This particular template in the TRIO is SO versatile, as you will see over the next couple of days! We won’t *just* use them as gift card holders(wink)
As you can see, it looks just like a shopping bag, when designed as you see here!
The COOL part to this is the handle tucks into the slot, and holds this closed.
Again so many possibilities!
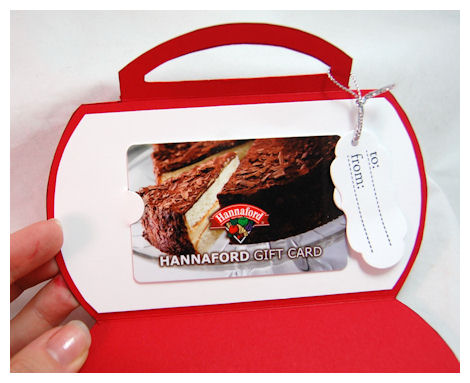
This is the open view.
(PS SORRY! All I had for GC was a Hannaford one! LOL!)
Once open (you can use the decorative mat layer as an added layer) you can put in slits to hold your gift card (as I did here), or you can just adhere it inside.
Here comes the FUN part…..
You will also see (really soon!) that when you use the scoring side panels that come with it, it can become a pillow box with a handle, OR by tucking in the handle it can become *just* a pillow box! I have so much up my sleeve for these gift card holders over the next few days, your head will begin to SPIN with ideas, trust me!
Cash or Charge #3
Write Up
Are you looking for the perfect way to package up that cash or gift card? Look no further! This pocket is perfect! Just pull the tab, and the perfect gift-the gift that keeps on giving, is revealed.
The front panels can tie together.
Punch a hole through the top tab and it appears to be just like a fancy shopping bag.
You can also use the template as a fun way to create a card.
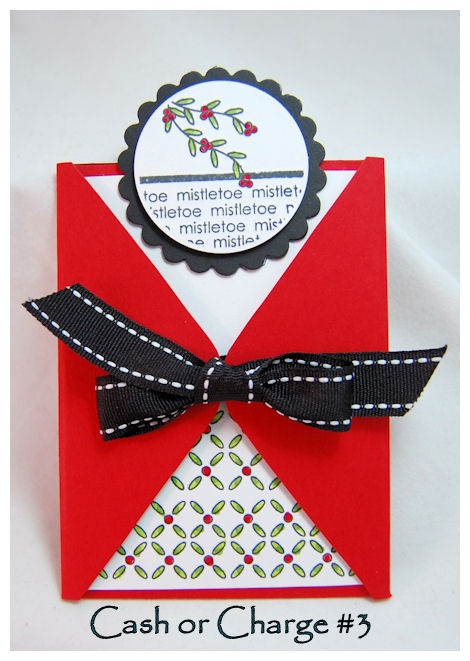
This is a pull out pocket style.
Super cute for gift cards or cash but ALSO a fun card style too.
I love the way the two front folds meet together!! You can tie them closed, use buttons, brads….or just use an image-like a circle over the center. SO many possibilities.
This has a perfect decorative panel for the middle as well as the 2 “wings”, leaving you so many styles to create.
Now all you do is pull up on the tab……
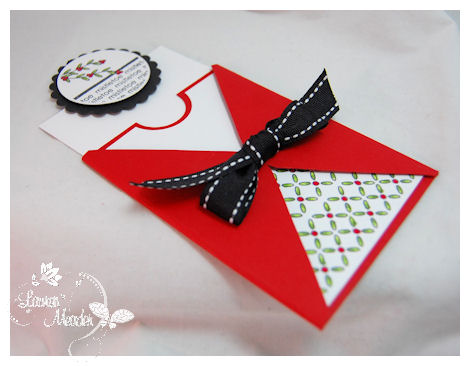
and it will reveal your treatlet!!
Now you can also use the 2009 Holiday Tag set “To: and From:” as I did here to fill out your info!
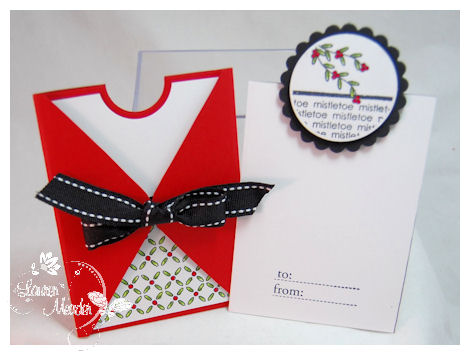
Isn’t the insert so cute too?
As I said endless possibilities!
Supplies:
My Timeless Template: Cash or Charge ©
Stamps: 2009 Holiday Tag Collection, Background Basics Retro, Believe
Cardstock: White, Pure Poppy, Basic Black
Patterned Paper: Bitty Dot Basics
Ink:Black, Copic Markers
Ribbon: stitched black, pure poppy twill
clear gel pen, circle punches, scallop nestability, label from Slice Fa La La La cartridge
Well I hope you are excited for this template and the October Release!
I’m dying to hear what you think about the template trio 😀 Which one sparked your interest most so far?
Just wait, as there is MUCH more to come 😀
We have LOTS more to show you, so be sure you come back tomorrow. You will get to see our 2nd template for the month. It has a standard and Pretty Petite version too 😀
In the meantime there is MORE eye candy for you:
Kelly and Laurel have some peeks using the NEW templates too 😀
Then be sure to check out more fab stuff from Nichole!
More stuff coming from Dawn, and Heather who all who have releases this month.
Till tomorrow 😀
Stir, Sip & Enjoy
Sep 30, 2009 Author: mytime | Filed under: Home decor/3-D items, My Timeless Templates, Papertrey Newsletter2 posts today!
Before I start – THANK YOU for all the b-day wishes for Alexa 😀 She sat here and read them all (I THINK! LOL!)
ALSO today is my hubby Jay’s 32nd Birthday! Big birthday wishes to him. We are all caked out (thanks to Alexa and Amber’s b-day stuff) so I’m HOPING today to try my hand at making his favorite (at least I think its his fave) dessert from childhood-Steamed Pudding. Wish me luck on that! I want to surprise him but is HAS to be edible!! ROTFLMBO!!! I’ll let you know how it goes. I never tried it so I don’t even know HOW it tastes. Sounds gross! (to be honest) but he always raves over his BF’s grandmothers recipe. Oh boy! Never a dull moment here is there?
OK moving on….
I’m excited about today’s Papertrey Ink Senior Design Team Challenge!
Stir, Sip & Enjoy
As you can tell by my title, it has to do with beverages!! I LOVE Coffee, and all that fun stuff. I have to say packaging them is even MORE fun for me 😀 Since it is a simple, inexpensive gift, but so enjoyable too. There are SOOOOOO many ways to package it up, its endless.
SO that being said Nichole asked us to get creative and package up a hot treat! That is SO up my alley of fun. I really enjoy gift packaging.
Now given the fact the the weather has taken a frosty turn here, I’m so ready for a nice warm cup of YUM!!
So how about this?
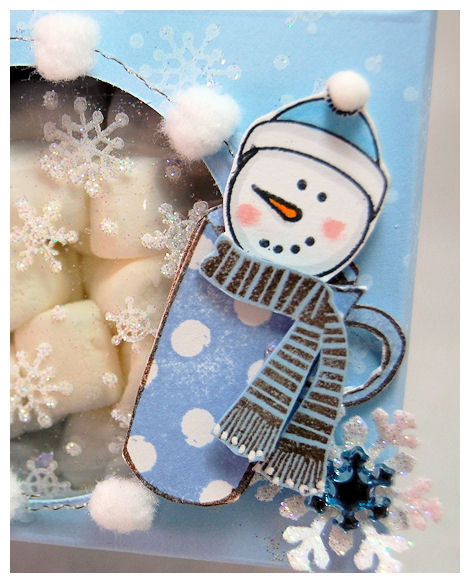
One of the best gifts to give during the blistery ,cold, winter months, is of course Snowman Soup.I took that play on words, and created a fun little package for everyones favorite warm up treat!
You will suddenly be dunking your snowman into a mug before you know it!
Now how cute is he?
As I said before-you are going to get sick of seeing me use the My Timeless Template © Its on the House, but I couldn’t resist ONE MORE sample 😀 There really is a great variety of templates going on, so you can give almost anything in a fun, and EASY package 😀
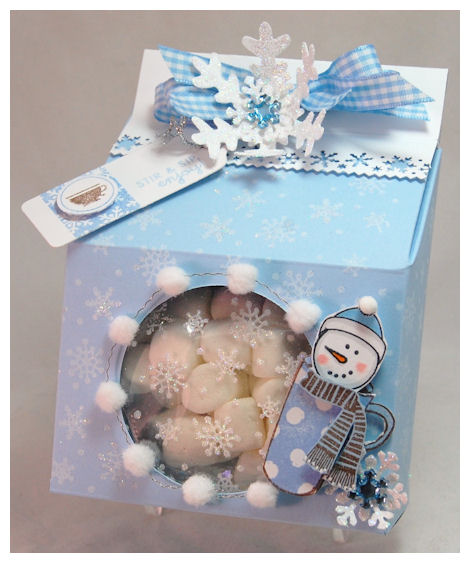
I decided I would package my hot cocoa, marshmallows, and peppermints in the template. I wanted to decorate it to be CUTE and FUN! This is one of the easiest templates to make a WOW out of.
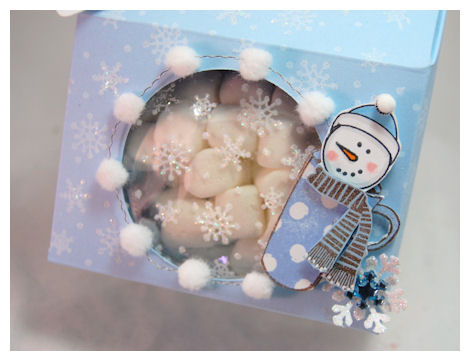
The snowman is from Made of Snow. The cup is from Warm Happiness. I LOVE mixing and matching various stamp sets.
When I thought of snowman soup, all I could imagine was him IN the cup! I loved the idea, and lo and behold, not only did it work, but its pretty darn cute 😀
The box front was printed on Spring Rain, and the back onto Snow White cardstock.
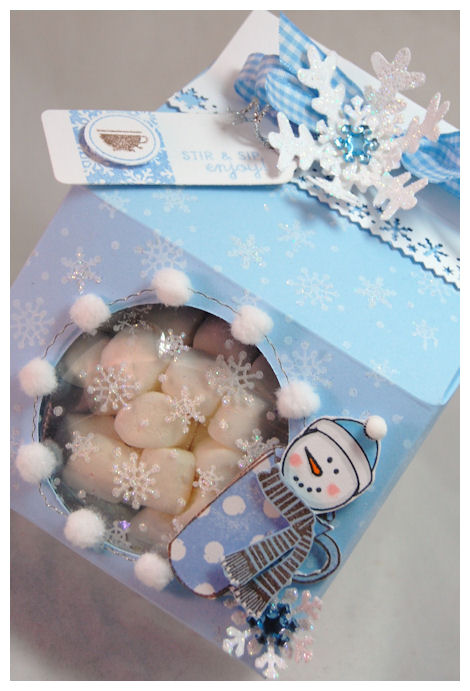
I stamped my box, and acetate with Rustic Snowflakes, in white stazon. I then added some glitter while the ink was wet. I had some pom pom ribbon stuff, that I adhered around the window-it went along with the snowball theme I had here! I also made sure that the bag of marshmallows (aka snowballs) ended up being in the window.
Speaking of mixing stamp sets…..
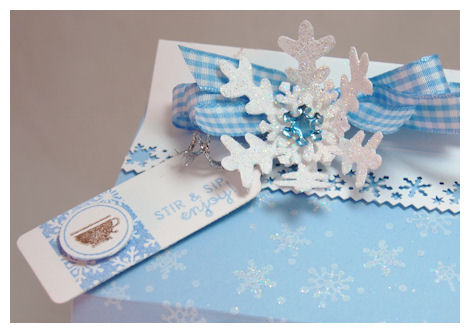
For my tag, I used Holiday Treats( HUGE fave of mine :D), to incorporate the cup o cocoa and the THEME of the challenge 😀
My large snowflakes are from the Snowflake Punch, which I punched from white cardstock, then covered with glue and glitter 😀
I have to say I truly loved this project, and challenge 😀 This is proving to be such a fun all around gift giving template for me.
Now that is all for me, but be sure to see what all the girls did
I really hope you enjoyed today’s challenge project as much I enjoyed creating it 😀
Be back tomorrow with many more samples 😀
My Timeless Template Challenge: Bloomin wonderful
Sep 26, 2009 Author: mytime | Filed under: Home decor/3-D items, My Timeless Template Challenge, My Timeless Templates, Papertrey NewsletterLet me start today off by saying-SORRY this is so late! I have been beyond busy. I know we are ALL busy! So busy I haven’t hardly been home the last week. I STILL have my top faves to pick too-YIKES! Time is just passing me by.
I have some deadlines and stuff I HAD to get done and the computer/blog stuff HAD to be last on the list! Life gets crazy from Sept. on for me- doctors appointments, soccer, parties, practices, open house, PTO, and the stamp industry is heavy into HOLIDAY stuff. Add all that to my plate, in a fury one day-and a NEED for change-I chopped my hair to *just* below my shoulders! EEK! What was I thinking? Seriously though it doesn’t look bad! Ill have to post a photo. Its much more healthy-and EASY!
OK I’m going to be quick cause Jay and I have a HOT date 😀 YIPPEE! Dinner with a group of friends-should be a blast.
OK I know, you don’t need to hear me ramble or complain…….it is Saturday so that means time for a Challenge!
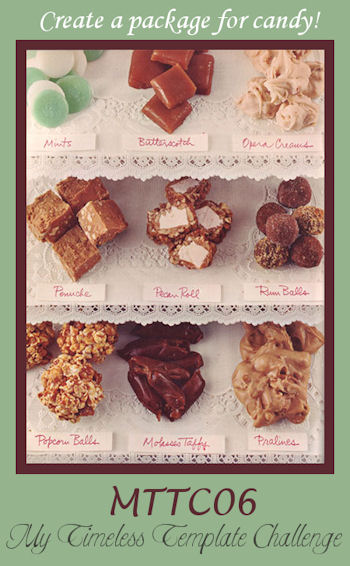
This weeks challenge is to use ANY My Timeless Template and PACKAGE candy of some sort OR get inspired by your candy wrapper! With Halloween around the corner, and holidays this is the PERFECT time to get some gifts done.:D
Post your creation HERE:
MY inspiration came from Ghirardelli—–> CLICK HERE to view the bag of Raspberry Chocolates 😀
Then lookie here!
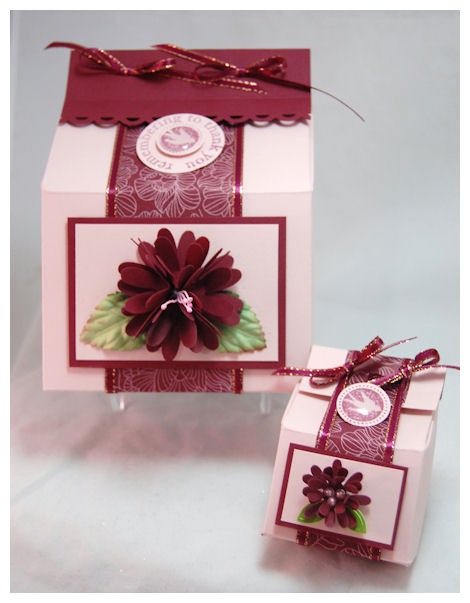
I think this came out so pretty!
I used my 3D idea found—>HERE to create these FAB paper punched flowers 😀 I added stamens to the centers for that extra touch. Virtually NO stamping (EEK!)
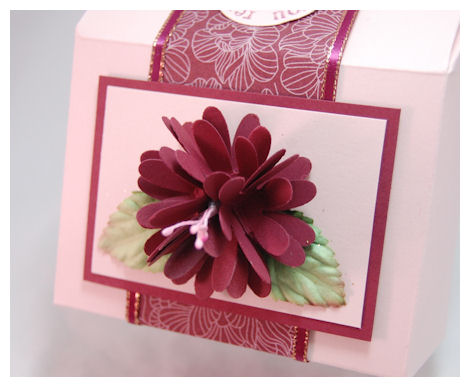
Then I added some Prima leaves to the sides. I LOVE this flower! Really adds that MUCH loved dimension and POPS out at you-literally.
I use the template Its on the House (the standard AND Pretty Petite version (my first project using the small one)
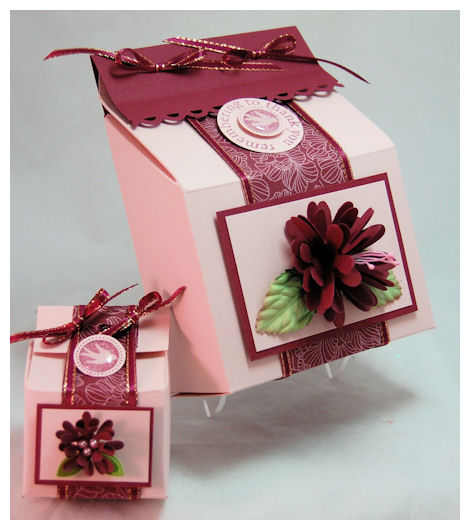
My colors are Sweet Blush and the Scarlet Jewel. Very striking combo. Paper is In Bloom.
This is the side view of the large template
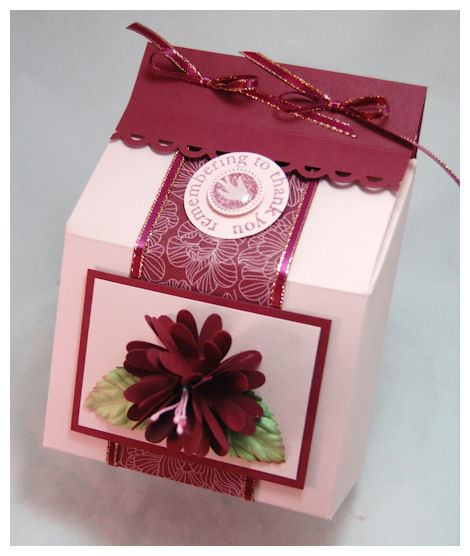
The stamped portion used the bird from Just Hatched and the sentiment is from Remember.
After I made this project I BROKE my apron border punch-GRR!!
This is the small version of the template-close up
Now as you can see I decorated the large and small the SAME! Just used a smaller punch for my flower! EASY PEASY!
Large or small I think they look GREAT! This is a gift for a special friend-who I NEED to send a special TY to!
Well that does it for me!
You can see what my team of girls has done for this challenge-Just click their name:
As ALWAYS thanks for stopping by! I hope you get inspired 😀
VIDEO:Three Dimensional Elements Made Easy
Sep 17, 2009 Author: mytime | Filed under: Cards, MYTIME MOVIE/VIDEOs, Papertrey Newsletter, Tutorials
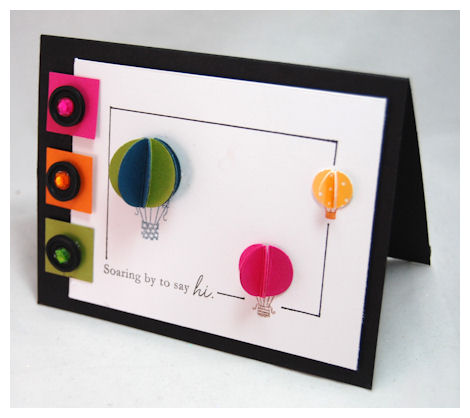
Hot Air Balloon Ride
I love three dimensional cards. There are just so interesting!
As a little girl I was often in awe of the many three dimensional gift items, favors, table decor and card designs I’d see at the card & gift shop my mother would take me to. Most children would be begging to leave! Not me! I’d sit there and look at each one, trying to figure out HOW they made it. I was in complete awe.
Sometimes a little dimensional POP can make a world of difference! Flat, stamped images just come to life, and bring a smile to any face.
This three dimensional technique can be used to create SO MANY various images !
Come watch the short video I have, to show you how!
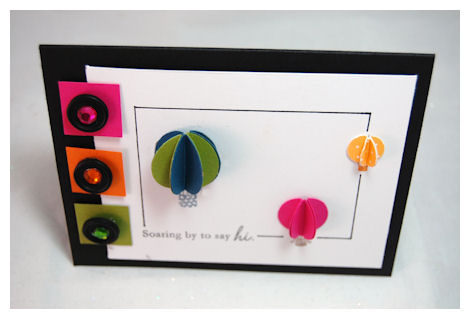
Now you can view some more photos of the completed project, shown in the video
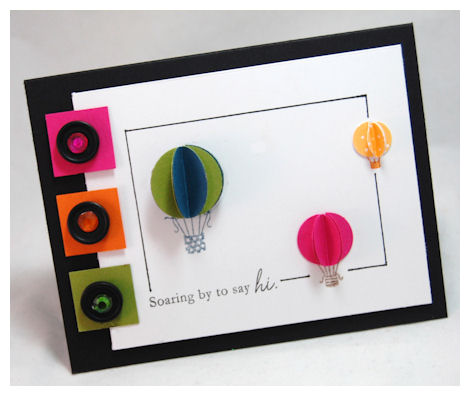
As you can see, these hot air balloons appear to be in flight.
The design is so simple, but it doesn’t need anything more. Actually this could easily be a SINGLE layer card!
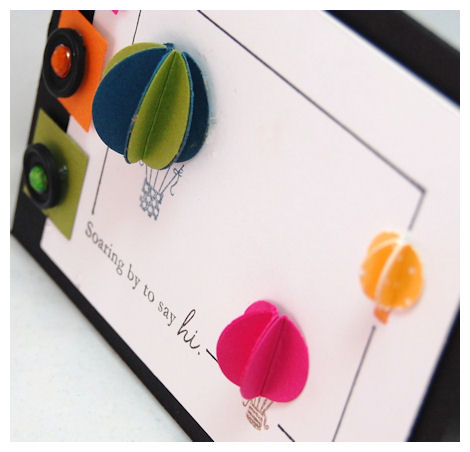
The top view- You just want to touch them!
You can alter the designs by using various patterned papers, stamping them, alternating your punched pieces…….you name it!
You can use this same technique to make Christmas ornaments, regular balloon’s, Chinese lanterns, various fruits like orange’s, apples, cherries, sliced watermelon, grapes and pumpkins!
Use various shapes and you can have 3 dimensional snowflakes, flowers, leaves, and trees too!
ENDLESS possibilities!
Supplies:
Stamps: Everyday Button Bit
Cardstock: Basic Black, White, Ripe Avocado, Enchanted Evening, Raspberry Fizz
Patterned Paper: Bitty Dot Basics 2009
Ink: Black, Black marker, Enchanted Evening, Orange Zest, Dark chocolate
Vintage buttons, adhesive rhinestones
Punches: 1″ circle, 3/4 ” circle, 1/2 ” circle
NOTE:
You CAN mail these dimensional cards! I package mine up in the Clearly Creative Card boxes, tape shut with clear labels that arrive in package, and put a mailing label on! Granted, they cost a little more to send, but I’m sure as it passes through the post office, it will make MANY people smile, as well as the receiver when they see the piece of ART in their mailbox!
There is of course, the traditional method of hand delivering too!
Thanks for stopping by.
If you give a try, send us a link here 😀
Papertrey Ink September Release
Sep 14, 2009 Author: mytime | Filed under: Cards, Papertrey NewsletterWell now it the time!
The Papertrey Ink September release has arrived! Now all the items you have seen over the last couple days can be yours 😀 I just released 2 NEW! My Timeless Templates: Keeping Tabs and It’s on the House. I do have a few other samples to share using My Timeless Templates, but they will be spread out over the next few days or so.
I have been pretty busy here, as you can imagine.
Let me share the 2 items that you hadn’t seen peeked during the countdown-
Deck the Halls
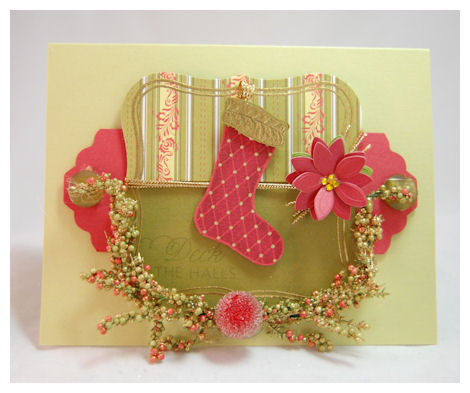
This has to be my most favorite card in quite some time!
I love all the embellishments. This is clean but definitely detailed. A card you would keep on the mantle for sure.
The frames was gold embossed. Really makes this feel more elegant.
I love the garland touches too!
I love the Stocking Prints stamp set. I can definitely see myself reaching for it ALL holiday season long.
I gold embossed the stocking cuff, and added gold dots to the argyle pattern on the stocking.
I don’t know, I just loved it.
Supplies:
Stamps: Stocking Prints, Vintage Labels
Cardstock:Spring Moss, Ripe Avocado, and a Ruby Red
Patterned Paper Holiday Vintage Prints
Ink:Ruby Red, Versamark, Ripe Avocado
Gold ribbon
Vintage buttons, twine
Gold Embossing Powder, Heat tool
Labels one nestability
Tag punch by marvy
Adhesive gold pearls
Gold Cord, Bridal confetti in red and olive, red bead/garland from Michael’s Craft Store, gold marker
Then last but not least……
Snow Ornament
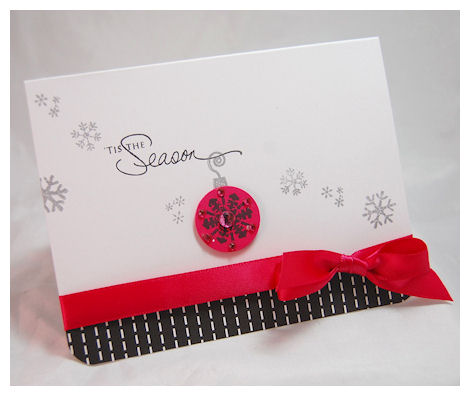
Talk about a simple card!
I love the ornament hanging off the greeting and the vibrant retro color combo of raspberry, black, white, and silver! The solid snowflake was stamped on the raspberry layer, then punched out. Added some bling and called it day! Easy Peasy
Supplies:
Stamps: Winter Swirls, Signature Christmas
Cardstock: White, Raspberry Fizz
Patterned paper: Black & White Basics
Ink: Silver by Encore, Black
Ribbon: Satin in Raspberry Fizz
1/2 inch circle punch, adhesive rhinestones
Thanks for sharing the excitement of the countdown with me. I can’t wait to see what you all do with your new goodies!
My Etsy

Who I Designed For
Blogroll
- Alicia
- Alli Miles
- Ally Blankenship
- Amber
- Andi @ crafts on a whim
- Angel R
- Angie Z
- Anne Kranitz
- Becky O
- Bee
- Beth Silaka
- Bethany Paull
- Beverly Nash
- Bobbie
- Cambria
- Cammie
- Card of the Week
- Card Positioning System (CPS)
- Cards for Cancer
- Catherine Doucette
- Charmaine
- Cheryl Sims
- Chriss Rollins
- Christina
- Christine Ewing
- Christine Wooden
- Colleen Schaan
- Craft Critique
- Craft Gossip
- Crystal
- Dawn Easton
- Emily Giovanni
- Geny
- Holly
- Igne Groot
- Inspirational Craft Blogs
- Irene
- Jami Sibley
- Jeanne Streiff
- Jen del Muro
- Jeni Bond
- JenMarie
- Jenn Balcer
- Jenn Diercks
- Jenn O
- Jennifer E
- Jennifer Mick
- Jennifer Pereda
- Jennifer-Sweet Treat
- Joanne Basile
- Jodi Collins
- Julia Stainton
- Julie Masse
- Karen
- Kathryn Berthiaume
- Katie Cotton
- Kelley Holland
- Kendra
- Kim Scholfield
- Kris’s Color Stripes! Get inspired here
- Kristen Dubosque
- Kristin Eberline
- Kristine
- Laura @ Sunshine Stamper
- Laura Turnmire
- Laurie Schmidlin
- Lesa Rapp
- Linda Duke
- Linda-LSN
- Lindsey Botkin
- Lisa (lakind scs)
- Lisa Kind
- Lori Craig
- Maggie
- Mara Campbell
- Maria
- Maria Levine
- Mary
- MaryJo
- Melanie M
- Monique Hansen
- Moxie Fab World
- Pam Imholz
- PaperCrafts Connection
- Peppers and Pollywogs Kids party site
- Rebecca Grohall
- Rita
- Robyn
- Rose Ann
- Sarah Vrolyk
- Sharon Harnist
- Sharon Johnson
- Sharon Rivera (a chemisrty with paper)
- Sherrie
- Sophia Landry
- Storage Units, Ink, & More Blog
- Sue Berker
- Susan (Rainy)
- Tangii Crane
- Tracy
- Tricia Traxler
- Trudee
- Velta
- VivLyn
- Zena
MTME Pretty Palette Color Team
MTME Pretty Patterns Sketch Team
My Time Made Easy TM LLC
Shop till you drop!
Lauren Meader
About Me
Copyrighted material
Subscribe To My Blog
Pages
- About me
- Alexa’s Story!
- My Crafty Corner!
- My Time Made Easy™ LLC
- Our Make A Wish Trip to Disney!
- Resume/Publication List
Calendar
| M | T | W | T | F | S | S |
|---|---|---|---|---|---|---|
| 1 | 2 | 3 | 4 | 5 | 6 | 7 |
| 8 | 9 | 10 | 11 | 12 | 13 | 14 |
| 15 | 16 | 17 | 18 | 19 | 20 | 21 |
| 22 | 23 | 24 | 25 | 26 | 27 | 28 |
| 29 | 30 | |||||
Archives
- August 2013
- July 2013
- June 2013
- May 2013
- April 2013
- March 2013
- February 2013
- January 2013
- December 2012
- November 2012
- October 2012
- September 2012
- August 2012
- July 2012
- June 2012
- May 2012
- April 2012
- March 2012
- February 2012
- January 2012
- December 2011
- November 2011
- October 2011
- September 2011
- August 2011
- July 2011
- June 2011
- May 2011
- April 2011
- March 2011
- February 2011
- January 2011
- December 2010
- November 2010
- October 2010
- September 2010
- August 2010
- July 2010
- June 2010
- May 2010
- April 2010
- March 2010
- February 2010
- January 2010
- December 2009
- November 2009
- October 2009
- September 2009
- August 2009
- July 2009
- June 2009
- May 2009
- April 2009
- March 2009
- February 2009
- January 2009
- December 2008
- November 2008
- October 2008
- September 2008
- August 2008
- July 2008
- June 2008
- May 2008
- April 2008
- March 2008
- February 2008
- January 2008
- December 2007
- November 2007
- October 2007
- September 2007
- August 2007
- July 2007
- June 2007
- May 2007
- April 2007
- March 2007
- January 2007
Categories
- About Me
- All That Scraps
- blogger challenge
- camera/photo play
- Cards
- Contests
- family stuff
- FOR SALE
- Home decor/3-D items
- How to FAKE it!
- Introduction
- JUGS Challenge
- JustRite Stampers
- Lizzie Anne Designs
- My family stuff
- My Stamping Space
- My Time Made Easy
- My Time To Color Challenge
- My Time to Create Challenge
- My Timeless Template Challenge
- My Timeless Templates
- Mytime Mail
- MYTIME MOVIE/VIDEOs
- Papertrey Newsletter
- Pink Cat Studio
- Pretty Palette Challenge
- Pretty Patterns Sketch
- Product Opinions and Must haves
- Recipe's
- Saturday Sketch
- Smilebox Creations
- Stampavie
- Tutorials
- Uncategorized
- videos
Most Popular
- Create your own Onesie Card Tutorial-and important NOTE! PLEASE READ (2529)
- Saturday Sketch-Boxed bag holder (2333)
- Going GREEN! Fancy Flower Flourish-Closure Video (1478)
- Fabulous Favorite - Giveaway! (1336)
- a Prayer Request (1231)
- QUICK-Easter Baskets from Nestabilities-PTI style-and blog challenge (1063)
- Teaser Sketch (999)
- February Release Giveway! (and a little peek) (996)
- Group Post and Rambling Rose Video Tutorial (985)
- GIVEAWAY! Who wants it all?! (895)
Recent Comments (RSS)
- 바카라사이트: 비슷한 주제에 대한 흥미로운 정보를
- 바카라사이트: "여기에 제공해 주신 귀중한 정보와
- 온라인홀덤: 유익한 웹 사이트를 게시하는 데
- 홀덤나라: 나는 당신의 블로그를 정말 좋아합니다.
- lisa: Technology, too, has left an
- 주소모음: 흠 !! 이 블로그는 정말
- FutureGen Apps: Thank You For Sharing fantastic
- 웹툰사이트: 터키에서 온라인 스포츠 베팅을 할
- 툰코: It is a really very
- 온라인홀덤: I’ll be sure to come
Copyright © 2007 - My Time, My Creations, My Stampendence - is proudly powered by WordPress
This blog has been Tweaked and Designed by Sara Williams