Archive for the ‘Papertrey Newsletter’ Category
Papertrey Ink Release Time!
Aug 14, 2008 Author: mytime | Filed under: Cards, Home decor/3-D items, Papertrey NewsletterDid you all have fun at thePapertrey Ink party??
I always have a blast with each release. It’s so exciting sharing our projects for the first time. Every month I usually have a top favorite for my projects, but this month it’s a hard pick for me. There is something I love about each one, that the other doesn’t have.
I always love hearing your feedback on what is your favorite and why.
I promise I won’t be as long winded as yesterday! I think some of you just glanced at the length of the post, and quit there! LOL! SORRY!! I don’t blame you, I was just in a chatty mood 😀
Before I start I also want to thank you all for the love & support you give when you visit 😀 It always makes my day.
NOTE: ALL SUPPLIES CAN BE FOUND IN MY GALLERY HERE
ALL SUPPLIES FOUND-www.papertreyink.com
Remember
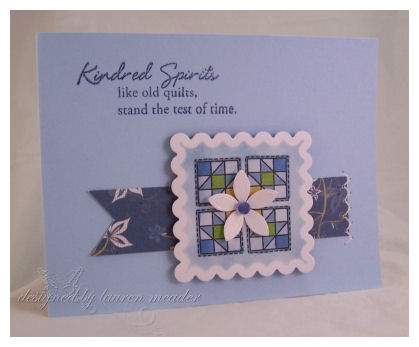
This set is just stunning!! It was designed by Lisa Johnson, and I’m sure you will agree she did a fabulous job making the elements of it very versatile. I had no idea there were so many varieties of Poppy’s! I wish I had seen her tips before I got creating!
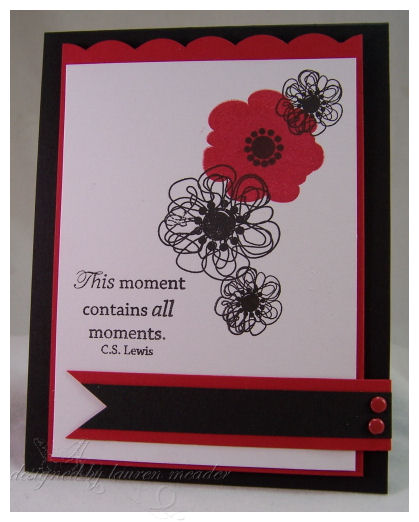 Pop of Red
Would you believe I designed this card after seeing Barbra Walter’s on 20/20? She had on a simple white blouse, and a bright red flower, pinned at her upper shoulder. I was so inspired I jumped off the couch and created this!!
I am just in love with the clean and simple look, with little details-like the scallop top, the flag, and the brads.
Stamps- Remember
Cardstock-basic black, red, PTI select white
Ink-Pallete black, Poppy Red
accessories- red brads, scallop punch
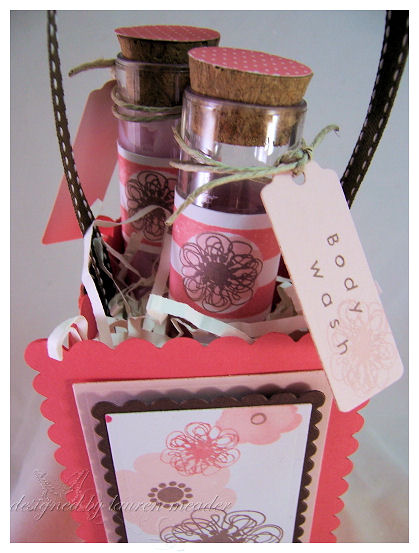
Bath Scents Box -a- Bag
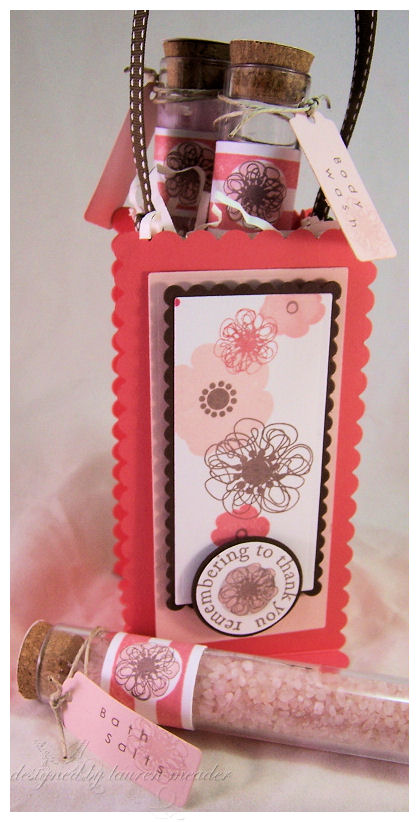
OK this one was so much fun!!! I used my new Tall rectangle nestabilities to create this tall box -a- bag. I LOVE it!
I used my tag nestabilities for the labels, and spelled out what was contained in each using Simple Alphabet
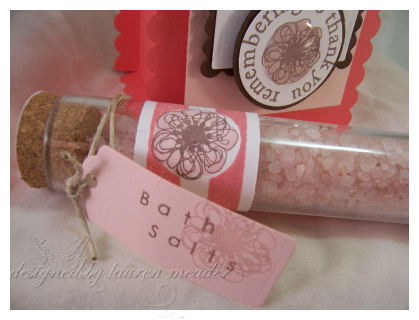
The best part is that it was PERFECT for the tall test tube containers I got at Michaels, that are by Martha Stewart! I got a pkg of 8 for $7.99! Not bad (use a coupon and you are golden!!). I purchased some $1 bath items at Target, and simply put then in the tube as a nicer way to present the bath salts, body wash, and foot scrub. The loofah is in the bottom of the box -a- bag.
I created a matching designer band using the Limitless labels set with the Remember set!
Lots of dimension on this too! The girls who take my classes know you NEED to bring lots off dimensionals when you take my classes!!! LOL!
One more photo, just because
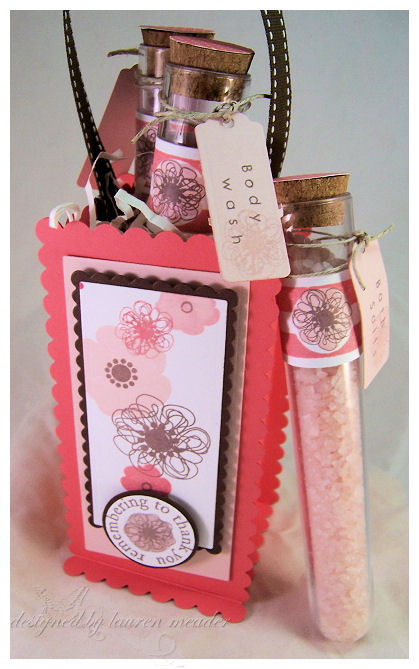
Stamps- Remember, simple alphabet, limitless labels
ink-sweet blush, chocolate, berry sorbet
cardstock-sweet blush, chocolate, berry sorbet, white
other-stitched ribbon, Spellbinders tag dies, flower brads by Making Memories, page pebble by Making Memories, circle punches, tubes by Martha Stewart, bath products from Target $1 spot, hemp
First Fruits/ Warm Hospitality set
As you all know Becky collaborated with Nichole to get her designs into acrylic!! I really fell in love with this set. I have never owned anything like it, and can see pulling it out time and time again.
We all will be sharing a special project with this set tomorrow!! So check in again.
Now I was quite happy with my project for this set. It is a card, and matching gift box. I LOVE the way the top is rounded on my design in both the card and the gift box. I am quite happy wih this one too 😀
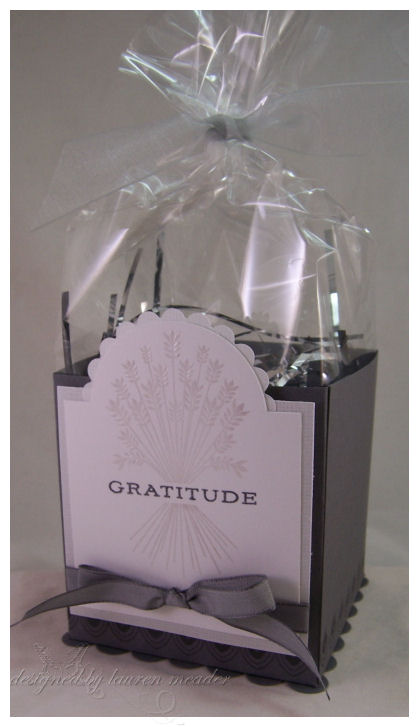 Box of Gratitude
I love all the scallops, and the repeated scallop in the stamped border and bottom of the box!
I stamped the image in versamark, then used clear embossing powder. Now it looks like a expensive, dry embossed set with that bit of shimmer!! The words were stamped in place of the tie 😀
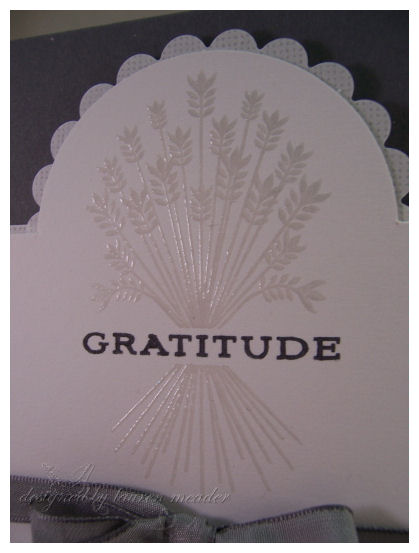
Doesn’t it look similar to the expensive invites you may buy for a wedding or some other very special occasion?
Stamps-First Fruits
Cardstock-PTI select White, Linen vellum, Gray
Ink-versamark, gray ink
ribbon SU! gray, silver organdy
other-scallop square & circle nestabilities, coluzzle, clear embossing powder, heat tool, scor-pal, cellophane roll by EK success
Now we have the matching card-
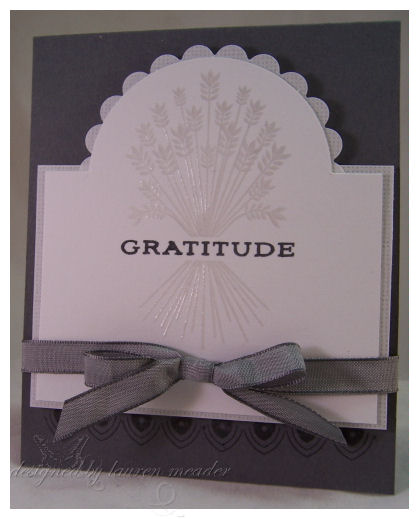
The white and gray are so pretty together. The linen vellum is my FAVORITE thing right now! I am in LOVE!!!!!!
Stamps-First Fruits
Cardstock-PTI select White, Linen vellum, Gray
Ink-versamark, gray ink
ribbon SU! gray, silver organdy
other-scallop square & circle nestabilities, coluzzle, clear embossing powder, heat tool, scor-pal, cellophane roll by EK success
Don’t forget the Candle I created for the countdown. You can view that HERE
Now we have Rustic Branches
This is Heathers First set. I was dying to see what her style would be like. I love the clean lines and simplicity of it. With NO effort, you can get some really beautiful creations.
Here is my favorite of mine.
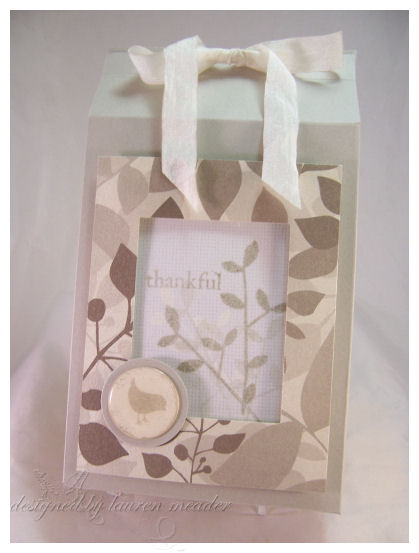 Thankful Branch Box
This is a card box I created. I am so happy with it because its not like anything else that has been done with it. I LOVED layering the solid leaf in various colors in the linen vellum window of the box. I also had to use the super adorable birdie from the Birds of a Feather set! So soft.I also love the dimension it all has.
I used unknown paper for my box ( I know that is awful).
Sorry.
Here is a closer view for the little details
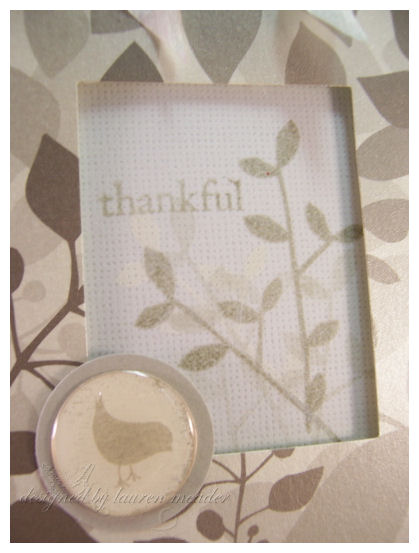
Stamps- Rustic Branches, birds of a feather
Cardstock-vintage cream, Sahara sand, lined vellum cardstock
shimmery paper unknown
ink-Sahara sand, colorbox vanilla
ribbon by May Arts
other-making memories page pebble, nestability rectangle
Now for my uber simple Christmas wreath
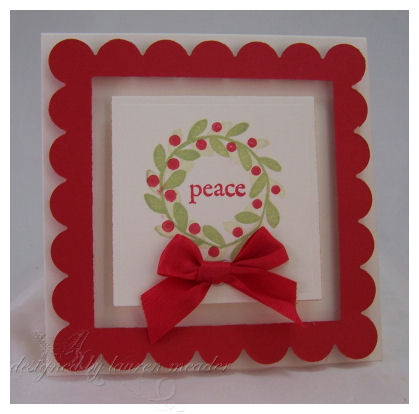 Wreath of Peace
This one was so fun & simple. I just stamped the leaf ring, then without re-inking, move it, and stamped it again. See the light leaves? Too fun. Isn’t this a super cute Christmas design for mass producing? The middle frame is up on dimensionals, as is th border. I LOVE doing that.
Stamps-rustic branches
cardstock-vintage cream, red
ink-poppy, spring moss
other-scallop/straight nestability square, ribbon by May arts
Now onto the Spooky Sweets II set
I kept my card super duper simple, bit I think the little string the spider hangs from is a simple and cute touch.

stamps-Spooky Sweets II
cardstock-lemon tart, black, pti select white
ink-black pallette ink, white craft ink
other-circle punches, silver cord
Now don’t forget about my Halloween treat of Edible Eyeballs!
Well I hope you enjoyed the reveal. I’m dying to know what everyone’s favorite sets are products are!! Share if you have time.
Tomorrow is another special post, and don’t forget the Saturday Sketch!! I hope you can play along.
I am also teaching 3 classes tomorrow!! Should be fun.
Later.
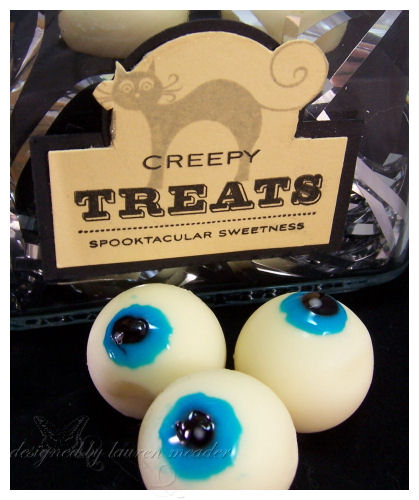
CREEPY Treats! Edible Eyeball potion
Aug 12, 2008 Author: mytime | Filed under: Home decor/3-D items, Papertrey Newsletter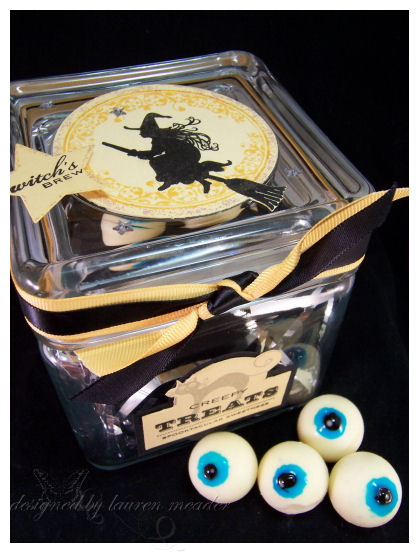
Nichole’s newest set Spooky Sweets II is just fabulous!!!!!!!!!!!!! If you liked the first one you will FLIP over the newest edition. SO many cleaver labels. Some can be used ALL year.
Nichole challenged the team to come up with some fun & simple Halloween recipe’s using this set .
Well if I can get away with NOT cooking I try to! I think every busy mom would be able to appreciate my recipe. Read on.
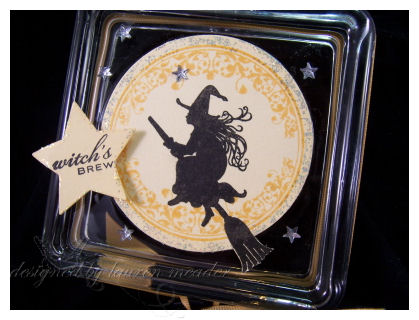
I saw the witch and knew I had to use her. I stamped her on Lemon Tart, and stamped the round label in summer sunset for my moon. I then added stickles around it.
I also used the sentiment Witch’s Brew. Now I know it’s not a liquid of any sorts, so think POTION INGREDIENTS!! Lots of creepy jars, filled with creepy treats for her icky potions! Well that is what I was going for.
How fun would this jar look on a desk?
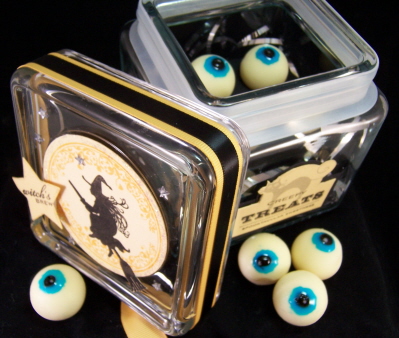
Just take off the lid-isn’t it pretty?
Open it up, and this LITERALLY peeks out at you!
 Edible Eyeballs!!!
Here is the front of the glass canister. Can’t have a witch without her creepy cat!
I love it!!
I just made an insert to go in my jar for the eyeballs to sit nicely on 😀
EW!!!! EW!!! EW!!! Noah was dying for me to finish photographing so he could eat them. Amber, not a chance! LOL!
I guarantee they are the yummiest eyeballs ever eaten.
Here is the recipe
Lindt white chocolate truffles (used in this recipe) OR aBag of “Hershey’s Cookies ‘n’ Crème Bites” (this is really good and inexpensive for the KIDS!!)
1 Egg White
2 Cups Sifted Powder Sugar
Decorating Icing
In a medium bowl, whip 1 egg white with a beater for approximately 3 minutes or until
fluffy white. Gradually mix in 2 cups sifted powder sugar until thoroughly mixed.
Using icing coloring, make small batches of green, blue, brown and black icing. ( I just used blue)
Using a paint brush, or frosting bag, paint colored circle on end of candy for the iris of the eye.
Use black icing to paint in pupil.
Use end of paintbrush to dab on a white spot in the pupil.
Repeat until you have desired number of eyeballs. Place in fridge to set frosting for 1 hour.
Serve as desired.
See, no cooking involved, and its very simple. Gotta love that!!!
EDITED TO ADD:
Some valid concern was raised over the egg whites in the frosting mix. You can use the tubes of frosting you buy, and even the gel frosting (which I used for my eye centers) just be careful with packaging them since they don’t dry as well as the other mix. I would suggest making an insert like I did to keep them from smacking into each other! LOL!
Also Tiffaney Ekstrom emailed me to share this alternative (Thank you!)
Instead of egg whites you can use Meringue powder (2 tsp. powder + 2 Tbsp. water = 1 egg white). The powder is easy to find at Michael’s in the cake decorating section.
So that is all there is too it.
I hope you enjoyed my peek as much as I did creating it. I’m not a big Halloween person but have to say this set is pretty cute.
Make sure you check out Nichole’s post and all the team players blogs!
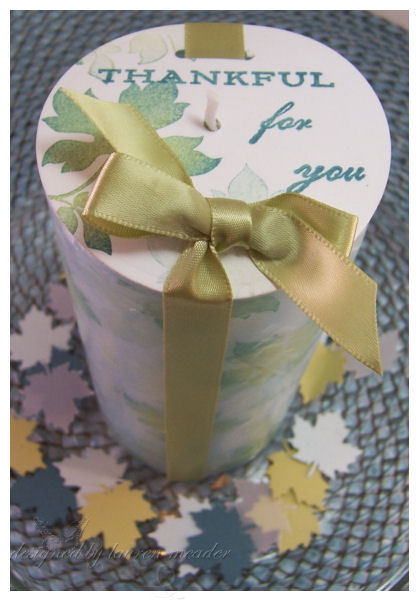
1-Papertrey Ink Countdown : First Fruits Custom Candle
Aug 9, 2008 Author: mytime | Filed under: Home decor/3-D items, Papertrey Newsletter, TutorialsI am excited to share this peek with you using First Fruits from Papertrey Ink.
It will be released on the 15th.
Nichole & Becky really put their brilliant minds together to come up with a fabulous set.
I have absolutely fallen in love with it while creating for this release. It is such a classy and elegant set, with that perfect Papertrey Ink flair that we all love, because making a gorgeous card or gift is SIMPLE and EASY!
Now keeping with that Papertrey Ink style of simple elegance, I will take you back to the basics! We are going to creating a simple gift, in just minutes, that will make the receiver say WOW!
This is one of the very first non-card items I ever learned to create! From then on, I was hooked. I hope you have time to give it a try as we visit the “How To” of customizing a candle! We will add a twist, with a tag topper!
If you have never done this before it really is a WOW creation. You can take your stamps and turn a simple $1 candle, into one that you would spend several dollars for in the store. Best part is, it is done in minutes.
I save all my tissue paper from my Papertrey Ink orders! They are perfect for this project.
All you need is:
Stamp set of choice (First Fruits)* ink of choice * any size candle * tissue paper (even colored paper if you like) * a heat gun * Safe surface to work on ( I love my Tim Holtz non stick craft mat)
OPTIONAL
Cardstock cut in the size/shape of your candle top. Hole punch, slit punch, and ribbon.
Now for my project!
I decided to go with non-traditional colors, despite my maple leaf design. I wanted it to be different. I chose green, and shades of blue for my color scheme. My candle is also a pale blue with a fresh linen scent.
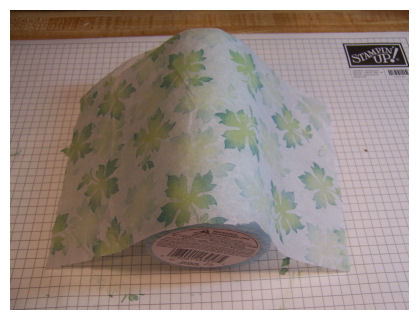
1) Choose candle. Measure how tall the candle is, and how wide around. Cut your tissue paper, leaving a little extra to ensure full coverage.
2) Ink your stamp.
Now when using multiple colors of ink on one image, start with the lighter color first, then add your darker colors. This prevents your light colors of ink from getting “muddy”.
I stamped green in my leaf center, then dabbed the edges in a light blue, then again in a darker blue.
 Isn’t it pretty?!
3) Stamp your image on your tissue paper
 click to enlarge. Then without re-inking, stamp again. This will give the effect of layers of leaves within the candle when you are done, and adds a nice sense of dimension.
 Finished paper
4) Now wrap your tissue paper around your candle. Put it on a safe, heat resistant work surface. Oh and one that you don’t care about getting melted wax on, as it can be messy!
6) Use heat tool to heat set. You will see the wax underneath come through and coat the tissue paper.
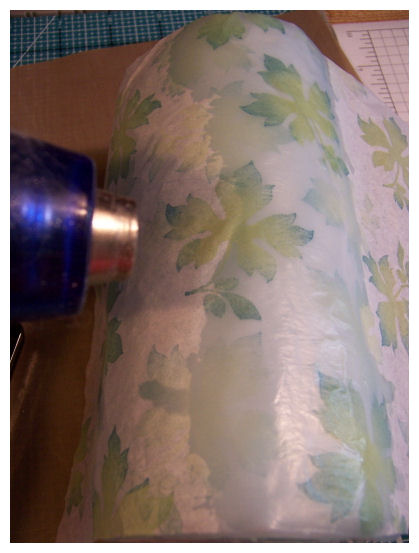
DO NOT over heat. You will get uneven melted portions of the candle, and lots of dripping. Just heat in smooth even strokes, back & forth. Do this until entire candle is done.
7) OPTIONAL : I like to wrap my candle in my craft mat, and roll it out (like dough) so that the light texture of my mat transfers into my warm wax candle!! It also helps hide any un-even areas 😀
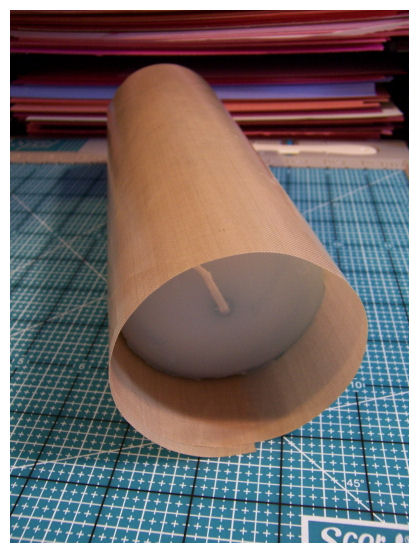 NOW ROLL! Back and forth.
Now it is done!
 Can’t see the texutre in the photo but it IS there, I promise.
OK not totally done!! You can’t leave it like that!
I decided a topper for the top of my candle would really complete this gift! So lets make a topper shall we?
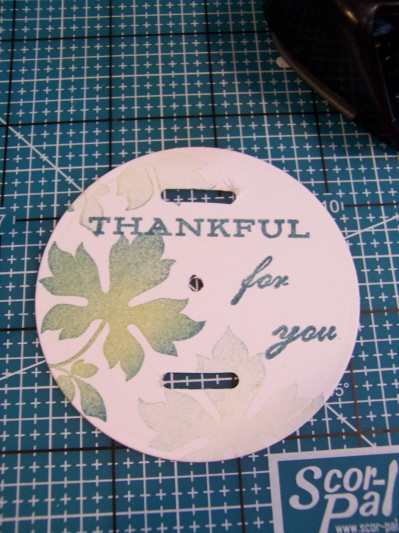
This is a quick and simple touch that really completes your candle.
1) I measured my candle top, and found a circle nestabilty that was the perfect fit!
2) Stamped the top with the same design as on my candle, and added a sentiment.
3) Punched a hole in the center of the circle topper for my wick to go through.
4) Added 2 slots for my ribbon to tie on the tag topper.
5) Measured my ribbon, and cut. I then punched a hole in the ribbon, so the wick can go through the ribbon and tag topper.
6) Wrapped my ribbon around the tag topper, and tied on.
DONE!
Thank you for stopping by! I hope you enjoyed the “oldie but goodie” reminder of this fun and easy gift.
If you get the time to try it out I’d love to see your creation! Send us a link here!
Don’t forget to check Nichole’s blog daily for the peek’s and the list of who is also counting down the release with samples! Oh and today Becky had a special post too!!! Don’t miss it.
Also Lisa AND Heather (aka Pine) have set coming out this month so check out their peeks each day till the countdown too!
Later!
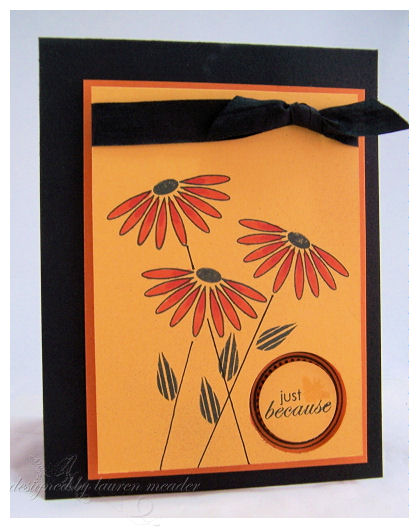
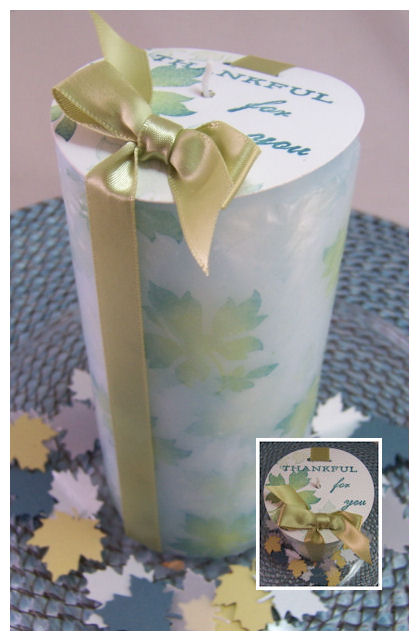
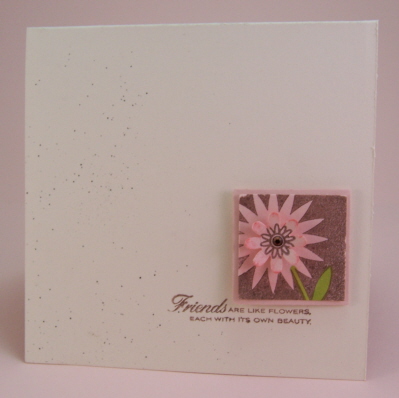
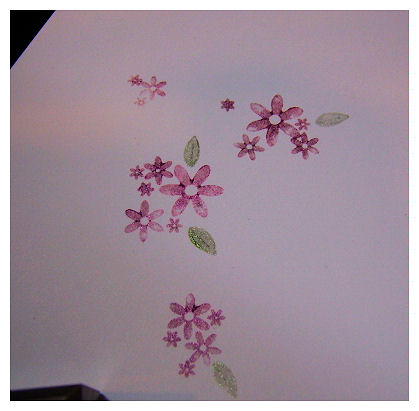
Sunset Daisy
I love this set. I mean really love. This is Floral Frenzy (as is he just because). I like the solid and open image combo, and the pattern in the leaves. Just so pretty, and to me, versatile.
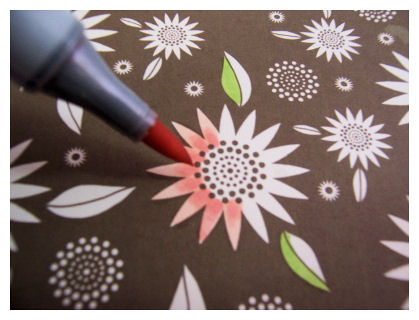
I colored the petals with my Copic markers. I drew my stems with a ruler and marker tip. Pretty HOT!! I LOVE circles-and making my sentiment POP out of one. I used borders & corners circle set (a must have for me), stamped on the base layer (pumpkin pie)-which peek through the top layer (summer sunset). Little bitty bee is from the Honey Bees set.
I was thinking summer sunset, on a HOT day, when creating this.
I wanted to make a card with a COLOR pop, and anytime you use black, it really does help achieve that. I also chose NO WHITE! Don’t get me wrong I LOVE white, but it’s nice to NOT use white sometimes. FULL ON COLOR!
I hope YOU try a non white card soon too.
Thank you for checking in 😀
Halloween Treats!
Jul 31, 2008 Author: mytime | Filed under: Cards, Papertrey Newsletter, Recipe's, TutorialsThis is post 1 of 3 for today! Please SCROLL down so you see all three!!! PLEASE READ THEM! LOL! I think I developed carpal tunnel typing them all up 😀
It’s the first of August! Can you believe that? WOW! Time is flying by. Before you know it, it WILL be Halloween. I am always looking for cool and fun things to do with my kids and/or for their classmates. Maybe this time I will be ahead of the dash (yeah right! LOL!)
Nichole has challenged the team to come up with some fun Halloween treats.
You can see what everyone else has done here:
I decided to share a cool recipe that is fun, and you can let this kids help with. Hope you like it, and give it a try!
Here goes…………….I would like to share with you my Little Pumpkin Pop-In ©
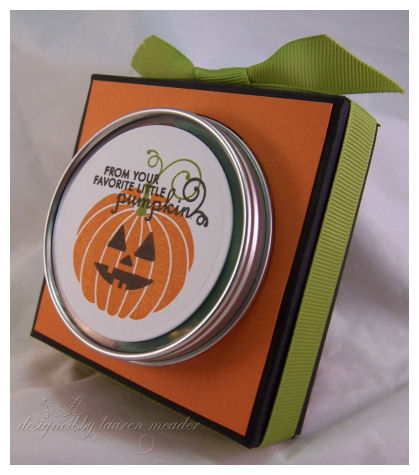
This is a little container cover I made to “pop-in” the super cute 2.5 oz. clear top round tins. Buy them now people! LOL!
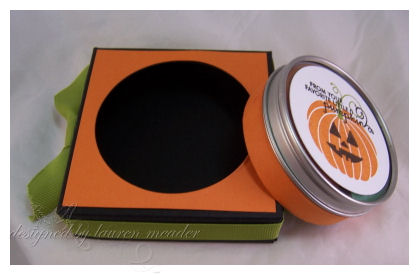 Tin out of the Pop-In ©
I love how it dresses this little tin up. Rather than just having a wrap around the bottom, it really gives you an entirely new gift option.
Please don’t ask me for directions. This is a teaser of more to come!! I am so excited, I can hardly stand it, but that is all I’m saying for now (BHWAHAHAHAHAHA insert my evil little happy laugh). Let’s just say I have been busy, busy, busy.
OK moving on.
I used the Spooky Sweets set for my lid.
I wanted my lids to be super quick and easy to mass produce-think 3 kids……. X’s however many students they have in their classes……………so about 40 kids minimum. SIMPLE.
By now you are saying OK so how is this sharing a fun & cute Halloween treat?
Well its what’s inside that is the FUN part!
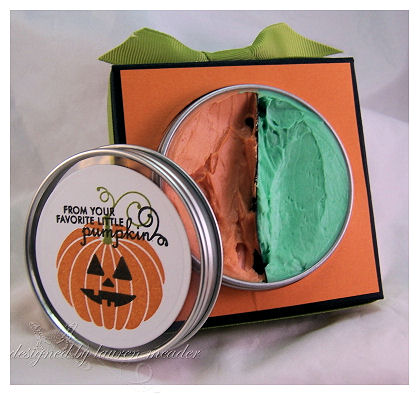
Monster Mash Make-up!
2 TBS solid shortening (AKA Crisco)
1 TBS cornstarch
4-5 drops of food coloring
Make-Up sponges
1) Mix shortening and cornstarch together in a small bowl, until smooth.
2) Add in food coloring. Mix till well blended.
READY TO GO!!
When you are done just rinse off with warm soap & water.
You can whip this up at home in minutes! The kids will love it.
OK I know you are saying EW! But the kids are saying YEAH!!!
Trust me me-Kid tested!! MOM Approved 😀
My Little Pumpkin Amber
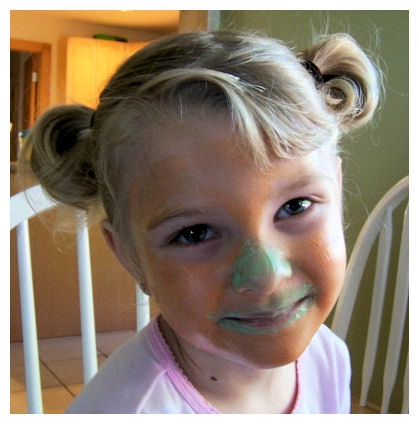
OK I never claimed to be an artist! This is as good as it gets. Amber saw the tin and wanted her face to be painted like the pumpkin stamp. I have to admit I was nervous that her face would be stained orange by the food coloring, but it came right off and NO perma-pumpkin face! LOL!
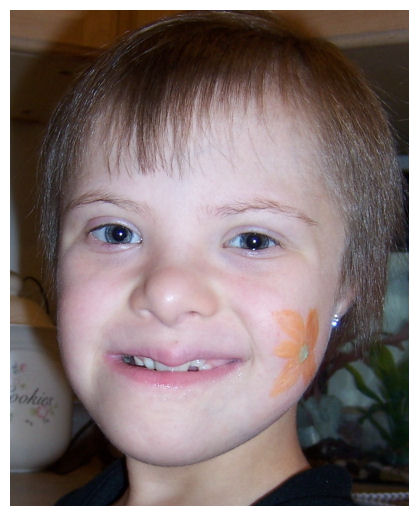
Next up is Alexa-my flower child. She was not wanting her face painted! She said she just want a little flower on her cheek. UGH! That meant I had to “draw/paint”. YIKES!
Now we have Noah-who wanted to be half “The Hulk”, and half boy.
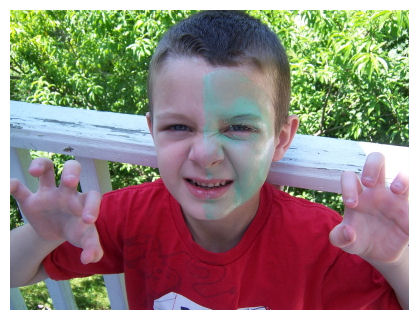
Unfortunately he was “itchy” and scratched it off while I got the camera. It’s one of those things-when you know you can’t touch something you have too! That is his mean face. Still looks cute to me!
All in all it was a super fun & easy afternoon craft and would make great “make-up” for girls or obviously face painting. No expensive paint kits to buy.
I love the idea of making several colors and giving these to the kids classmates. It really whips up quick, just add to the recipe to suit the number of people. The batch above fits perfectly into the tins, if that is any indication. SO each color batch makes a 1/2 of the tin.
So that’s it for me. I hope you like my idea of a fun Halloween treat! Afterall they get PLENTY of candy right?
Thank you again for checking in with me.
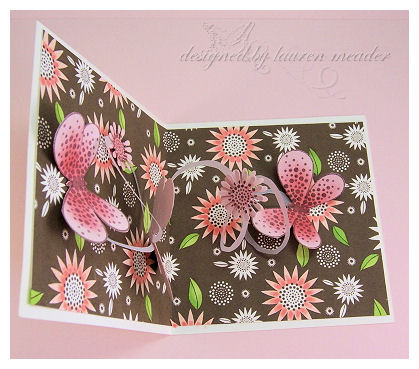
Paper Garden Spring Out Card
Jul 31, 2008 Author: mytime | Filed under: Cards, Papertrey Newsletter, Tutorials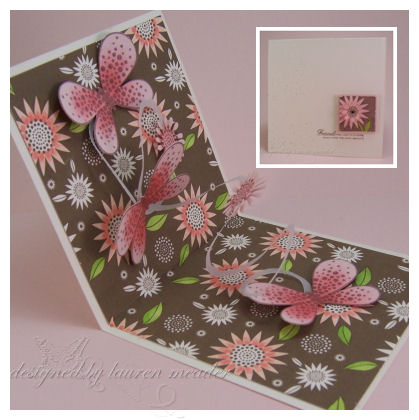
There is nothing better than getting a handmade card in the mail of from someone special, unless that card is interactive! The best surprise is when the unexpected happens! The receiver opens this creation to find a beautiful arrangement of butterflies and flowers, spring out, as it opens. You are sending a virtual paper garden! This style can open so many amazing possibilities.
Let me share how fun and easy this card really is! Then challenge YOU to give it a try!
The idea came to me after Jason and I took a trip to Maine. In one of the stores they had some really elaborate cards, and there was a card that had this swirly piece of paper with butterflies all over it. I told my husband when we get back I would try to re-create this. So I did.
Now I am not sure what the actual name of this style of card is, but I liked Spring Out, due to the way in which it was created.
First let me share my list of supplies. You should have most of these tools on hand.
SUPPLIES:
Stamps:Texted Boxed, Sentiment on card from Just Hatched, Butterflies stamped/cut from Butterfly Kisses
Patterned Paper: Chocolate Remix
Cardstock: Sweet Blush, Vintage Cream, Vellum Cardstock
ink: dark chocolate, berry sorbet
Other: Copic Markers, scissors, circle punch, glue dots, flower punch
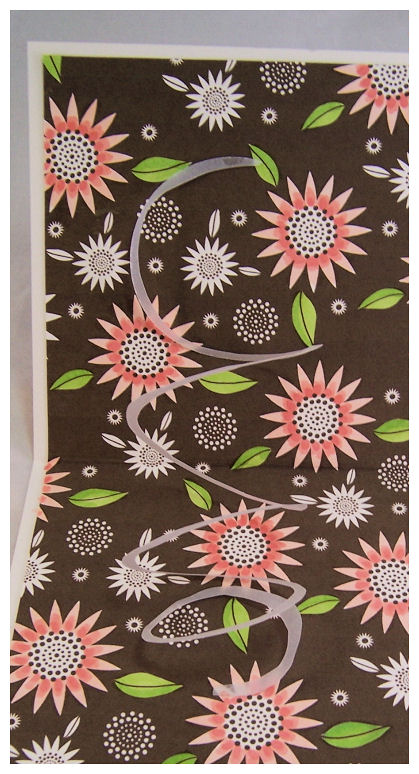
 Paper Garden
This card measures 4 1/4 squared. This is the front of my Paper Garden card.
I used vintage cream cardstock as my base. Sentiment stamped in dark chocolate ink.
I then stamped the flower from the Texted Boxed set, in dark chocolate ink, onto sweet blush cardstock. I used my 1 1/4 square punch, and punched out portion I wanted. I colored the stem, and punched a flower (stamping a smaller flower from Butterfly Kisses ), to layer in the center. Then layered entire piece onto 1 3/8 square punched from sweet blush cardstock. Used my color spritzer for a splash of color. Perfectly simple, which is what you want for the COVER! This inside is detailed enough.
Now for directions on the Spring Out
Step 1) I
decided to add some color to my chocolate patterned paper, so I chose my colors and away I went. I decided to only color the large flowers and leaves for some POP, and to keep it from getting too busy. I then layered it into my card base.
For my butterflies I stamped them in chocolate, on sweet blush, and then sponged the center’s with Berry Sorbet ink. Then cut them out.
Step 2)
NOTE: This next step I used chocolate cardstock for my demonstration so you can easily see the steps. In my actual creation I used vellum cardstock.
 A
A 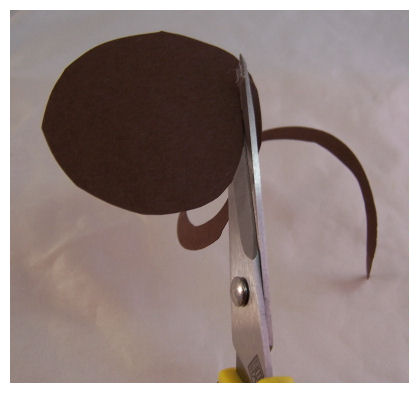 B
B 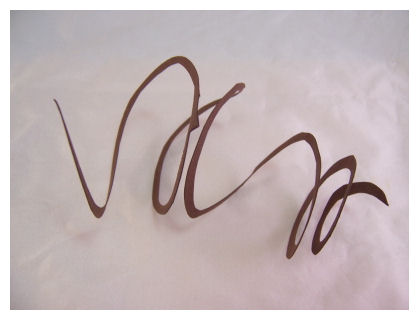 C
C
Choose the size of the circle spiral you want, and cut out circle (photo a). Next trim out the circle, into the center (photo B) to create a curly spring like circle (photo C) you can cut out some of the center so you don’t have too long of a curly spring. The larger the circle the more curls you have.

Step 3)
Collect the layers, and lay cut circle flat. Pick location in card where you want the spiral to be. Attach a glue dot on the back of the LARGEST tail end. This allows it to stick to the top of the card.
Then place a glue dot on the front of the smallest tale. Now close the card.
Step 4)
When you open the card, the spring will now be stuck to the bottom on the card, allowing you to have a spring that easily opens and closes FLAT when card needs to close. You don’t want the spring bending!!
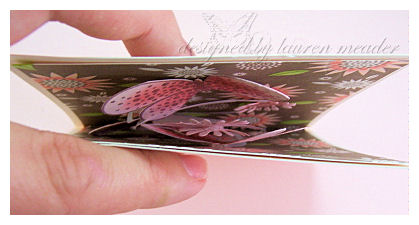
See closed photo
Step 5)
Now comes the FUN part. Adding your 3D elements. You will want to cover the glue dot’s with an item, and the rest is pure creative liberty!!
Imagine opening this up? Who wouldn’t have a HUGE smile? It is like the butterflies are fluttering over the paper garden!
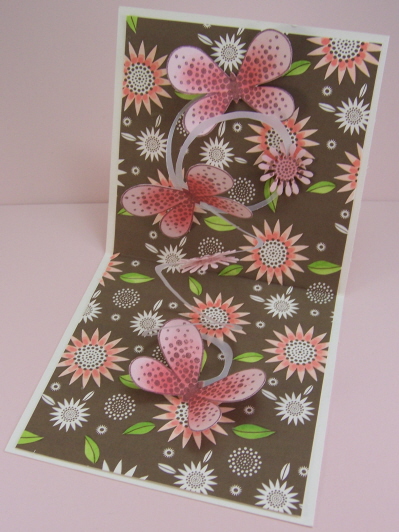
TIP: When using small images put them on both the front and back of the paper spring (see my layered punched flowers?). You don’t want the glue dots sticking to the layers or objects within the card. It would be ruined.
Here is the view from the top!
So that is all there is to it! I hope you enjoyed today’s newsletter project, and that you try to find the time to create your own! If you do, send me a link here.
I know many are going to say how do you mail it?
Well it does close, and lay relatively flat. The pieces may need to be lifted if you do mail it. I always recommend mailing them in out Papertrey Ink Clear Card boxes! It costs a little more to mail, but they are mail-able and it ensures your creation arrive more nicely-rather than SQUISHED! OR hand deliver 😀 Then you can see the reaction!
Papertrey Ink July 08 Release
Jul 15, 2008 Author: mytime | Filed under: Cards, Papertrey NewsletterDon’t you all LOVE the 15th of every month now?!
Grab your coffee cause I am long winded today.
I cannot tell you how exciting it is for all of us up to the reveal. It is so hard to wait to share stuff. I feel like I am always WAITING! LOL! I do so much at once and no one can know or see it. Let alone my daily samples. Your feedback really keeps me going and the wheels in my head just turning 😀 So THANK YOU!! You all inspire me to do better.
Today I am sharing my samples for the PTI release here with you. Believe it or not there are MANY more! LOL! I just could not stop this month. I will spread the rest out though through the month.
As always I LOVE to hear what your favorite was. Im always amazed at what “I” like, and what “YOU” like is so different! LOL! I have a couple favorites and will share my thoughts on the projects as I go along.
NOTE: All stamps are by Papertrey Ink.
Wise Owl and Wise Owl Bellies
OK I have to say how GENIUS is the fact that this is a BUILD an OWL set?! OMG! I almost DIED from cuteness overload when I saw this set. BIG HUG to Alli for this set. I can’t even gush enough over it. I am so in love with it-LOVE! The possibilities are endless with the various eye’s and bellies. Then you can add wings, or not! Just way too adorable. I am in owl heaven let me tell you. Like finger prints…..no two owls will be the same! LOL!
My favorite from this release is this card.
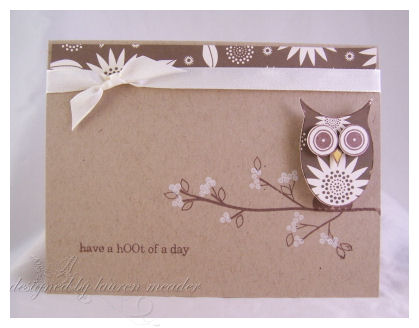
Patched Owl
OK I know this is VERY simple but I can’t help but LOVE it. I used the new patterned paper to piece the owl. Since the set is CLEAR, I could easily align it to where I wanted the pattern from the paper to be-like the flower for the belly! I also love the touch of paper at the top. CUTE!
The eyes punch perfectly from the 1/2 circle punch! YEAH!! I also LOVE Out on a Limb, so that adds to my LOVE for this card. this is another great one for mass production, if that is your thing.
Stamps: Wise Owl, Out on a Limb
Inks: Burnt Umber, CTMH craft white
Cardstock: PTI Basic Kraft, Vintage Cream
Patterned Paper: PTI Chocolate Remix 12 X 12 in Green Thumb print
Accessories SU! circle punch
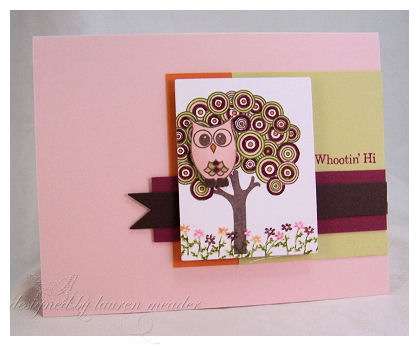
Hootin Hi
How cute are the mini owls in this set? She sits perfectly in this tree from Father Knows Best!
This card was so fun to do! I just combined images from several PTI sets to create my “scene”. I used the little owl from the set, stamped, colored and cut, then put her in the tree. She fits PERFECTLY up there. So retro and so cute. Then the flower border from mailbox greetings was the perfect ground cover!!
I love it!
I have to say I LOVE this layout! I am big on cool layouts, if you haven’t noticed. It was another sketch created from the swimming lessons. It came out better than I envisioned it to. Who wouldn’t smile if this ended up their mailbox?
Stamps: Wise Owl, Father Knows Best, Mailbox Greetings
Inks: Burnt Umber, SU! Markers Copic markers
Cardstock: Sweet blush, spring moss, chocolate, pumpkin pie

One flower One moment
Don’t miss out on the CUTENESS of the little flower images in the set. They make their own fabulous cards! I could not help myself from using just the little flower as the main focus.
The bud to this little flower fits perfect in a punch. I love having it in 3 D. This set has great images and sentiments to go with the owls or are perfect alone! I am lovin the color combo too.
Stamps: Wise Owl
Inks: white stazon, olive, pomegranate, copic markers
Cardstock: sweet blush, spring moss, pumpkin, pomegranate, acetate
Patterned Paper: ? Scenic route
Accessories: Fabric tag, circle punch
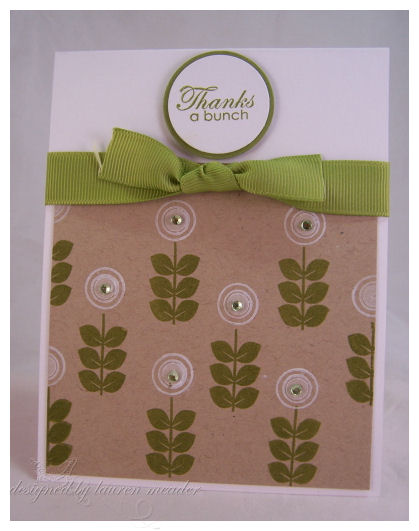
Thanks a bunch of blooms
Some of the images in this set create the funnest patterned paper !
The little images in this set created some of the cutest flowers. I used one of the eyes for this one. You’d never know! With the bellies to mix it up there are so many patterned paper possibilities. I was just loving the new Kraft cardstock with my projects this month.
Thanks a Bunch of Blooms
Stamps:Wise Owl, Floral Frenzy (sentiment)
Inks: CTMH craft white, olive
Cardstock: PTI select white, Kraft, olive
Patterned Paper: MADE MY OWN!
Quilter’s Sampler & Quilter’s Sampler sentiments
Don’t miss my sample & tutorial Lauren’s Lovely Lid Frame
I bet you didn’t know I use to quilt? I think I had more fun SHOPPING for the fabric, and mixing the pattern’s than the actual making of the quilt. I always wanted to hurry up and just get it DONE! I made MANY quilts in my day, but now haven’t sewn a stitch since finding my true love-STAMPING!!!! I knew that my sewing would pay off someday. I really need to get photos of some of the quilts I made.
My first one was for Noah. I cross-stitched a giraffe to put in the center, then wanted to put it in the center of a quilt. It came out really cute. I bet you didn’t know I use to cross stitch either. My grandmother taught me one summer when I was about 9. I think I made like 4 pillow cases that summer. One I think my mom still uses! LOL!)
Anyway, this set brought me back to my quilting days……………….

Quilters Tube Gift Set
This is a great way to present some pretty fabric’s as a gift, to the quilter in your life!
This acetate tube is a perfect presentation of your gift. It allows your receiver to see a sample of each fabric quarter in the bundle! It also protects them from getting dirty before given, and from wrinkling 😀
With a card to match you cannot go wrong.
Now upon my trip the the fabric store, I read through some books and magazines. I loved the way many of them featured their fabric.
If you are not familiar with fabric and they way it is sold, well here is a little info. You can pick your fabric and have it cut for you. Many quilter’s don’t need more that a quarter yard to make their blocks. A nice gift would be several fabric quarter’s that go together.
You can also buy pre-gathered bundles. Often a bit more pricey, but those for those who may be pattern challenged, or overwhelmed by the selection, a great way to go for a gift!
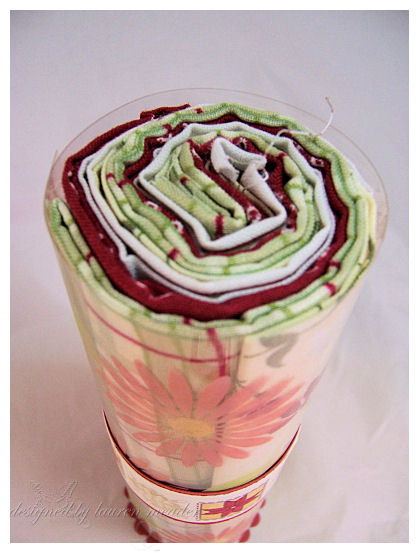
So upon looking I saw that they folded fabric quarter’s, and stack them up, layering them a bit. Then they ROLLED them up, so you could get a view of what is in the stack, then tied them up with ribbon. SO PRETTY!
Much better than the way they normally come-each quarter stacked and tied with ribbon, so you can only get a good view of the top & bottom fabric if you were to buy the pre-bundled quarters that way.
I felt I wanted to step it up a bit, but keep the appeal of the rolled quarter’s, seeing every fabric quarter. So I simply make a TUBE!
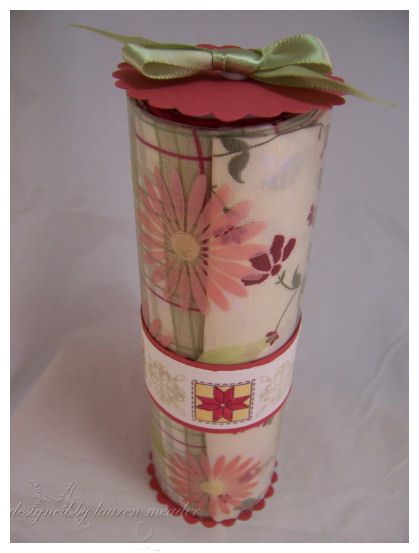
I just stamped the flowers/centers/leaves on the acetate with white StazOn. I then quickly brushed on Pebble pearlescent chalks for color.
I put my rolled fabric in the center, then wrapped the acetate around it. I adhered the tube ends using redline tape.
I then die cut a scallop circles using my nestabilties. Adhered to top & bottom of fabric roll with dimensional glue dots. Tied on a satin ribbon to complete the top.
I made the band around the fabric tube to match the card.
Done in just a few minutes!!
Now you can still see each quater, but have a much more fun (and stamp friendly) way to present it!
When you take the scallop topper off, you can see all the fabric rolled up.
Quilt of Friendship Supplies
Stamps: Quilters Sampler & Quilter’s Sampler sentiments, Floral Frenzy, Guide Lines, and Borders & Corners Square set
Inks: Burnt Umber, Spring Moss, white Stazon, Copic Markers
Cardstock: Vintage Cream, Ruby Red, Spring Moss and acetate
Accessories: Fabric Quater’s, Stitched Spring Moss ribbon, Spring Moss stain ribbon, paper piecer/template, Pearlescent pastels by Pebbles Inc. Circle nestabilties, Making Memories stick pin, twine, and redline tape.
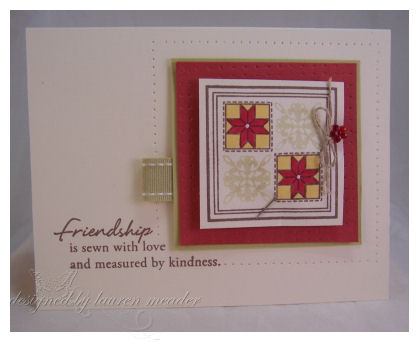
Kindred Quilt
Just a simple assembly of some stamped quilt blocks and some masking and you have a quick and easy quilt like card!
I just stamped my 4 blocks, rotating the block pattern, then colored. I die cut the blocks using my nestabilites, and used the die border as a mask to sponge on some blue ink! Added a flower to my center, and the quilt was done!
Stamps: Quilters Sampler & Quilters Sampler Sentiments
Inks: Pallette black, Copic Markers, bashful blue, night of navy
Cardstock: PTI select white, bashful blue
Patterned Paper: Chatterbox
Accessories scallop square nestabilities, bridal confetti, paper piercer, sponge dauber, Bella Dots, white singlo gel pen

Qulited Bugz Buzzin
I had fun making these fun “bugz” from the quilted pattern blocks! I had 2 leftover scraps that were shaped like C> that. They were from punching my 1/2 circles from the corners of a onesie card I did. I simply stamped the quit square onto the scrap, colored, then cut down the middle! Layered it onto a chocolate circle, attached with brad, then separated the ends. Now it looks almost like a funky lady bug!! Piercing the circles, added fun touch.
I LOVE versatility and finding a new fun way to use an image. Mission accomplished. This is another favorite from the release for me.
The sentiment set was a perfect match!
Stamps: Honey Bee Sentiments, Quilters Sampler
Inks: Burnt Umber by Pallette, Copic Markers
Cardstock: Sweet Blush, Berry Sorbet, Chocolate by Prism
Accessories: plastic circle template, paper piercer, CTMH brads, circle punches, Michaels bridal confetti, adhesive rhinestones
Floral Frenzy
Well it is NO surprise that I LOVE flower sets. What’s not to love? I truly believe you can never have enough of them. Each time I see a new set my heart leaps with excitement. I too love Daisy’s (I even named my dog Daisy!). I think Melissa’s take on this set is just awesome. This will definitely be another that I take out, over and over again.
The key to this set was pops of color this month.
This is my other FAVORITE card for the release:
 Colorful thoughts
I LOVE the use of colors against the black. Oh and who can forget my vellum Martha Stewart butterfly? I think I find a use for that with every release! Its like my little signature thing almost! LOL! Lauren + Butterflies = MYTIME style 😀 Just a subtle butterfly is all you need.
I just colored the petal with my SU! Markers in a dark version iof a color, then a light version. Can you say FUN! I love the look.
I have been using my color spritzer (from SU!) a lot lately. Lovin it again.
 Simple Summer flowers set
This is a quickie card with a matching gift tote!
It is perfect for that little something special, and great for mass producing! I love the summer color combo. I saw an ad on TV that made me think of these colors together.
Simple Summer Flowers
Stamps: Floral Frenzy, Out on a limb
Inks: night of navy, celery, pumpkin, lemon tart
Cardstock: PTI select white. celery, navy
Accessories: Lemon tart grosgrain ribbon

Quick, clean and simple.
Color-blocking takes this simple card to a quick WOW! I just love the simplicity of it. Nothin fancy. You don’t always need to go over the top to present a nice thoughtful card.
Daisy Note
Stamps: Floral Frenzy
Inks: Ruby Red, Lemon tart, Spring Moss
Cardstock: Ruby Red, Lemon tart, Spring Moss
Accessories: Lemon tart satin ribbon, circle punches
Daisy Framed Friend
OK this one I was just playing around. It is actually my LEAST favorite from this release and ALMOST got scrapped! People think I show everything I make, well this one I almost didn’t. Since I liked the CONCEPT of the card, and it wasn’t entirely hideous, I shared it.
On a positive note-I love the layout. The open frame highlighting the tilted image. I will definitely try this again.
Stamps: Floral Frenzy
Inks: pallette black, CTMH craft white, olive
Cardstock: white, kraft, lemon tart, black
Accessories: black brads, nestabilities
So that is it. I hope you get inspired in some way today.
I am at a play place with the kids today. Should be fun.
Alexa has her post-cancer check up tomorrow. I always hold my breath. I don’t think that will ever change. She is really doing so amazing. A whole new energy level too. I am so thankful God saw us through that storm. She is also becoming more personable and talkative to others. That is great.
Thursday Jay and I are off for our time 😀 Don’t worry! I do have post’s pre set to go! You won’t miss any eye candy 😀 However, I won’t be around to answer emails till Monday.
Whatever you are up to enjoy the day! Thanks for visiting 😀
1. Countdown Faux Quitled Heart – Lauren’s Lovely Lid Frame
Jul 9, 2008 Author: mytime | Filed under: Home decor/3-D items, Papertrey Newsletter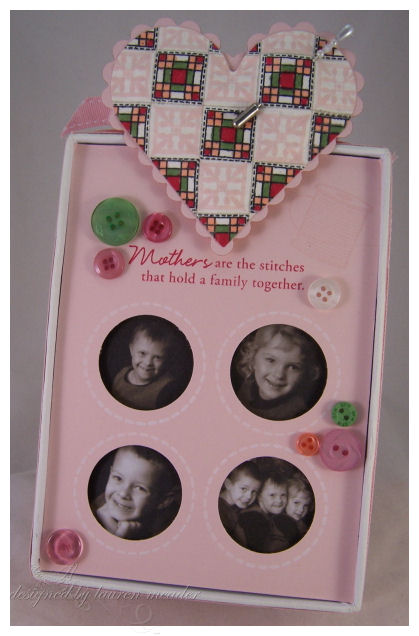
Well today I am very excited to be able to share with you a peek at a new set called Quilter’s Sampler, a cool technique, and a super fun use I found for Papertrey Ink’s exclusive Just Hatched Egg Boxes. I like to call it Lauren’s Lovely Lid Frame. I know, not too original.
Christmas is JUST around the corner, and these would make great gifts for the grandparents, or other people in your life that you have the PERFECT photo’s to showcase for them!! I recommend getting your Holiday photos done EARLY. Then you beat the rush. Oh, and get gifts done sooner 😀 These are great to mail to far away family members instead of that traditional Christmas card, that they are most likely going to trash :C These are photos of my children last year at Christmas. Make the photos black & white and it doesn’t matter what color they wore, or what color you are doing for your frames. They will match everything!
So grab your coffee because you all know how long winded I can get, especially when I am excited to share something new and fun 😀
This idea came about because I have SEVERAL of these boxes in my craft room. The “issue” is that I have been using them to store my craft items, because they are the PERFECT size for a lot of my storage needs. I know! They are suppose to be decorated! But I can’t help it, I love them for everything. Now since I am using the box BOTTOM, I have many TOPS & Egg holder pieces left over.
I don’t know about you, but I can’t throw a good thing away, so I had to find a USE for it.
That is how Lauren’s Lovely Lid Frame came to be.
This project is recycling at its best 😀
So let’s get started!
Step 1
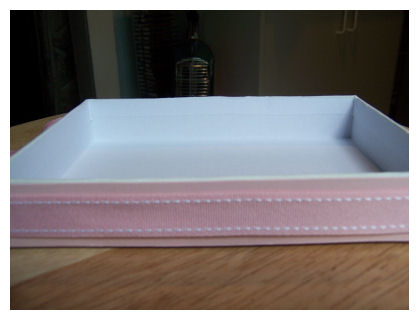
Cover the sides of your Just Hatched lid with cardstock. Tie around ribbon.
Step 2
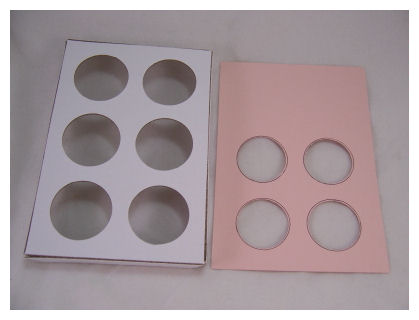
Make your template for you photos. Simply measure, and cut your cardstock the same size as your Just Hatched egg insert. Turn over, and trace 4 of the 6 holes. Punch out holes from cardstock. The SU! 1 3/8 circle punch is perfect for this step.
Step 3

Stamp cover as desired. I LOVE this sentiment in the set. So perfect, so true.
For this I used Sweet Blush Cardstock, Sweet Blush Saddle Stitch ribbon, the NEW! Quilter’s Sampler and Borders & Corners Circle set, Sweet blush ink, CTMH craft white, and SU! Regal Rose. Then adhere to Just Hatched insert. I used red-line tape for this.
Step 4

Then place desired photos behind the insert, careful to center them, and adhere them into place.
I use red-line tape, along the sides to hold insert in the lid.
I also finished my design with some Foo Fa La buttons.
Now we come to the Faux Quilted Heart “pin cushion” detail.

Here is what you need to do to achieve that FAUX flannel/suede/brushed cotton/fabric look.
A paper crimper,and for this Vintage Cream cardstock
Step 1
Cut your paper a bit larger than you need for the project. Then run it through your paper crimper. Do this numerous times.
Step 2
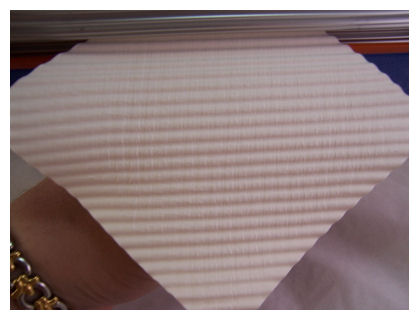
Run your paper through your crimper in another direction, numerous times. This is breaking down the fibers in the cardstock, and it eventually allows the layers to be separated.
Step 3
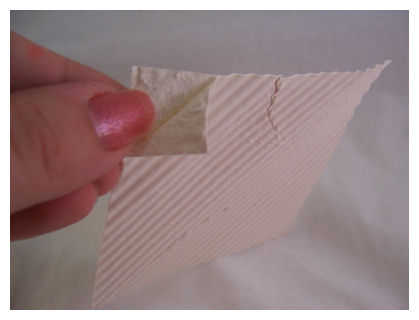

You will see the edges separate a bit, or have a bit or curl to them. Get in between the layers, and GENTLY pull apart. You will have 2 pieces to use.
Now you are ready!
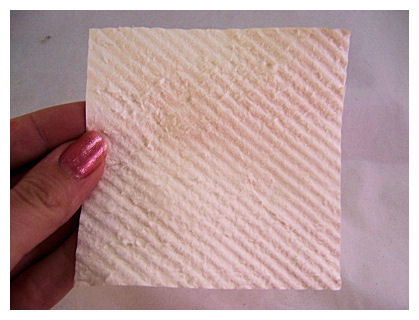
I like to take my bone folder, and rub back and forth over the finished piece. to remove any obvious crimper lines.
Now we stamp!!!
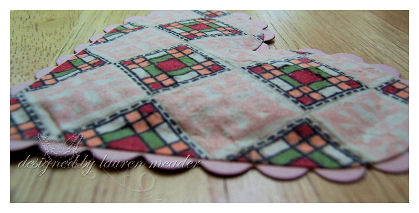
For this project I used the ever popular Guide Lines to help me create my “quilted” look for my project.
I found it best to stamp your guide lines in a lighter color, but one that is visible enough for you to see while you attempt to align your images. Once the grid is filled in you will not notice the guide lines.

I stamped my guide in Sahara Sand, on the TEXTURED side of my cardstock. I then took my desired image from Quilter’s Sampler, and stamped it in black, in every other square. I colored the pattern using my Copic Marker’s. I colored to corners (in pink) to look like hearts 😀 I used somewhat of a traditional country color scheme for this “quilt”.
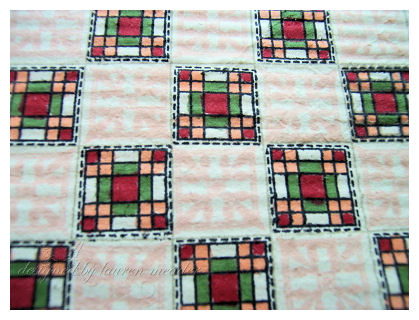 See you BARELY notice the guide lines 😀
I then stamped an image from Guide Line’s (since the two come together like MAGIC via Nichole Heady’s brilliant mind), in sweet blush ink, to break it up. It also appears to be like a patterned fabric square.
NOTE: Due to the broken and soft fibers/texture this has, don’t fully color in each block as some of the ink may over-run a little. They will fill in by themselves a bit.
Now for the die cutting-
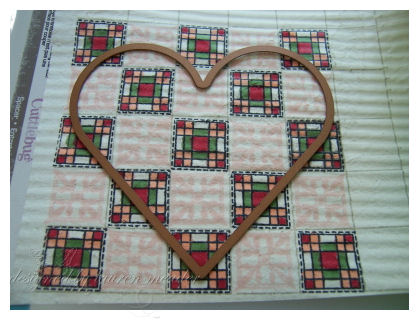
I put my die cut heart where I thought I would have the best finished design. Then die cut the image.
I used a size larger, scallop die cut for the back layer.
I then used a smaller heart die, to cut my quilter’s batting. Then layered it onto the scallop heart layer. I applied adhesive around the entire back, outside edge of my stamped heart image. Then adhered it all together!
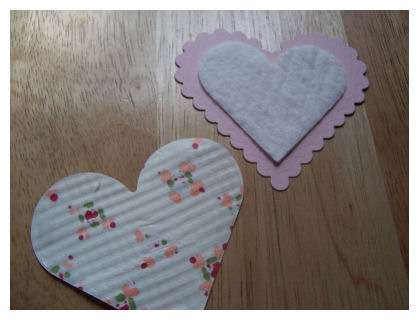
This gives the LOOK of a quilted heart 😀 See the close-up.
Now because of the batting layer, you can also use a stick pin in the heart as well, which again reinforces the LOOK of a quilted fabric heart, with not a stitch of sewing! It’s all ink and cardstock. Pretty fun huh?

Now to complete this frame-I just cut some cardstock 2 1/2 X 6. I scored at about 1 1/2 inches, to create a “stand”. A very simple solution so it stands up at my desk.

That is IT! It really is a QUICK gift idea. Using Guide Lines makes it really go fast!
This is a perfect gift especially if you have some of these tops/inserts going un-used! These boxes are just PERFECT for all year, not just EASTER!! It’s literally thinking outside the “box” here.
Well let me know what you think! I hope you enjoyed my long winded tutorial! I had fun trying to come up with something you would like and find useful-especially for the holidays.
I’m sure you have already checked Nichole’s blog for her peek!! Don’t miss the countdown there, and each day a different Senior Design team member will have a peek as well.
Thank you all for reading and the love & support each of you offer’s.
Till tomorrow.
Simple Shimmer Card Wrap Set
Jul 3, 2008 Author: mytime | Filed under: Cards, Home decor/3-D items, Papertrey Newsletter, Tutorials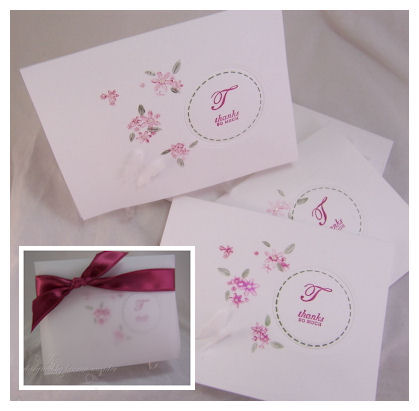
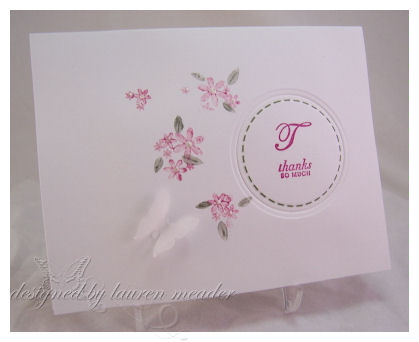
Simple Shimmer Card Wrap Set
I can think of so many occasions where a gift of Thank You notes would be the perfect gift. Maybe even elegant wedding favors. I will share a simple technique, that takes the “plain Jane” single layer set, and makes it a real “WOW”! The simple vellum card wrap will only add to the beauty, and give you a easy perfect package for you to present your set.
You will be amazed at how fast this set can come together. Another great idea for those who need to mass produce an elegant gift set.
Monogram sets are the hottest thing right now. Sometimes you aren’t sure “which” initial to use for your monogram, or WHO you are going to give the set to. Feel free to get creative, and use a sentiment in place of the initial.
What makes this set so beautiful is that by using the Pearlescent watercolors, you are adding a soft and subtle shimmer, that isn’t messy, and wont rub off. It has the effect of a watercolored image. It is another use for this type of coloring medium that is often forgotten and under-used.
Then, you add that embossed circle, and it really adds some dimension and interest, without over powering the soft shimmering flowers with a layer.
First you will need to assemble your supplies.
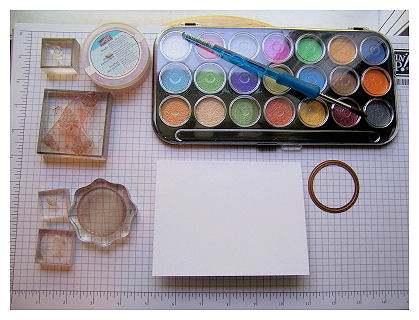
For this set I am using:
Papertrey Select White cardstock, Vellum Cardstock
The flower cluster from Piece of Cake, Borders & Corners Circle set, the “T” from Ambassador Monogram, and “thanks so much” from Mixed Messages.
Always Artichoke ink, and Purely Pomegranate ink.
Martha Stewart Butterfly Punch, glue dots.
Pearlescent Watercolors by Yasumoto, with water, and paint brush, White Opal Liquid Pearls, and the Circle Nestabilities.
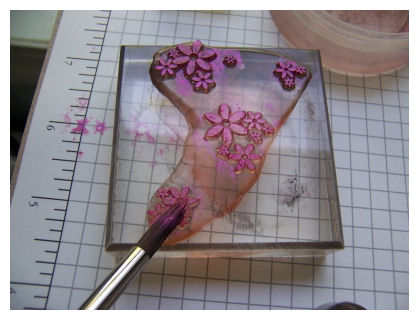
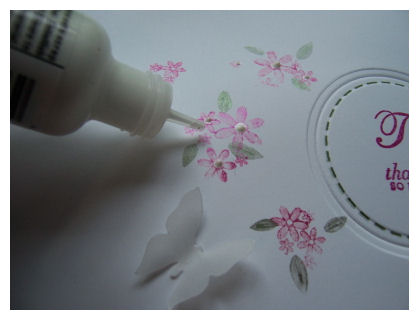
Step 1-Use only a little water, and your pink pearlescent watercolor, and create a “paste-like” mixture. Paint the pearlescent paste onto your flower cluster. Stamp onto card base
NOTE: Don’t use to much water, or your flowers will be runny, and unrecognizable.
TIP: When making a set-do each step on each card first, before advancing to the next step. This will make production of multiples of a card go much quicker. Example-do all the pink flowers on each card base, before starting the next step.
Step 2
Do the same thing for your leaves, using a green water color.

Step 3-
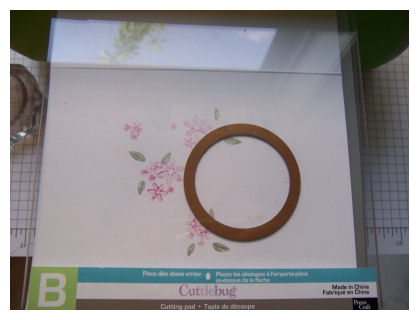
Emboss a circle into your card.
Step for this may vary depending on the machine you use. I am using my Cuttlebug.
To JUST emboss a layer I personally find this sandwich helpful for me.
A plate, B plate, black mat, tan mat, cardstock, nestability die (cutting side down), and B plate.
EDITED TO SAY: Or just 2 tan mats. I have an older mat set.
This gives me a nicely embossed circle
Step 4
Stamp the stitched circle onto the center of the embossed circle, in artichoke ink. It fits just outside the smallest embossed rim.
Then stamp the “T’ and sentiment, in pomegranate ink.
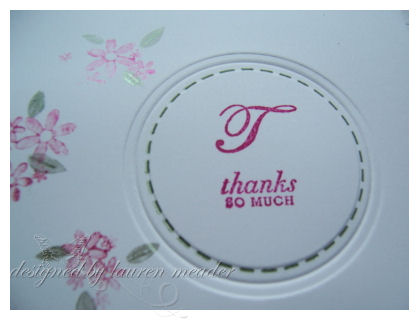
Step 5
Apply liquid pearls to the flower centers.
This gives a subtle 3D effect, and continues the subtle shimmer.
Step 6-
As you can see above, punch a butterfly out of vellum cardstock. Adhere with wings popped forward, using a clear glue dot.
Step 7-Creating the holder.
This holder is meant to house 4 cards with envelopes.
Take your vellum cardstock and cut 5 3/4 X 11
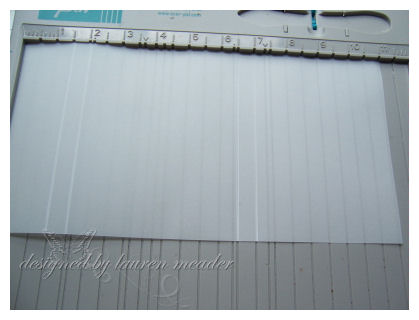
Along the 11 inches score at
1 1/2 –
2-
6 1/2-
7.
Score along lines. Put cards inside. Tie around a ribbon to hold closed.
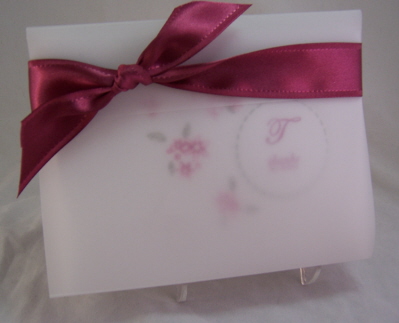
Simple as that.
Thank you for taking a peek at my little set. I hope you take the time to try it out.
I’d love to hear your thoughts. Should you decide to make your own-send us a link!
Enjoy the day
My Etsy

Who I Designed For
Blogroll
- Alicia
- Alli Miles
- Ally Blankenship
- Amber
- Andi @ crafts on a whim
- Angel R
- Angie Z
- Anne Kranitz
- Becky O
- Bee
- Beth Silaka
- Bethany Paull
- Beverly Nash
- Bobbie
- Cambria
- Cammie
- Card of the Week
- Card Positioning System (CPS)
- Cards for Cancer
- Catherine Doucette
- Charmaine
- Cheryl Sims
- Chriss Rollins
- Christina
- Christine Ewing
- Christine Wooden
- Colleen Schaan
- Craft Critique
- Craft Gossip
- Crystal
- Dawn Easton
- Emily Giovanni
- Geny
- Holly
- Igne Groot
- Inspirational Craft Blogs
- Irene
- Jami Sibley
- Jeanne Streiff
- Jen del Muro
- Jeni Bond
- JenMarie
- Jenn Balcer
- Jenn Diercks
- Jenn O
- Jennifer E
- Jennifer Mick
- Jennifer Pereda
- Jennifer-Sweet Treat
- Joanne Basile
- Jodi Collins
- Julia Stainton
- Julie Masse
- Karen
- Kathryn Berthiaume
- Katie Cotton
- Kelley Holland
- Kendra
- Kim Scholfield
- Kris’s Color Stripes! Get inspired here
- Kristen Dubosque
- Kristin Eberline
- Kristine
- Laura @ Sunshine Stamper
- Laura Turnmire
- Laurie Schmidlin
- Lesa Rapp
- Linda Duke
- Linda-LSN
- Lindsey Botkin
- Lisa (lakind scs)
- Lisa Kind
- Lori Craig
- Maggie
- Mara Campbell
- Maria
- Maria Levine
- Mary
- MaryJo
- Melanie M
- Monique Hansen
- Moxie Fab World
- Pam Imholz
- PaperCrafts Connection
- Peppers and Pollywogs Kids party site
- Rebecca Grohall
- Rita
- Robyn
- Rose Ann
- Sarah Vrolyk
- Sharon Harnist
- Sharon Johnson
- Sharon Rivera (a chemisrty with paper)
- Sherrie
- Sophia Landry
- Storage Units, Ink, & More Blog
- Sue Berker
- Susan (Rainy)
- Tangii Crane
- Tracy
- Tricia Traxler
- Trudee
- Velta
- VivLyn
- Zena
MTME Pretty Palette Color Team
MTME Pretty Patterns Sketch Team
My Time Made Easy TM LLC
Shop till you drop!
Lauren Meader
About Me
Copyrighted material
Subscribe To My Blog
Pages
- About me
- Alexa’s Story!
- My Crafty Corner!
- My Time Made Easy™ LLC
- Our Make A Wish Trip to Disney!
- Resume/Publication List
Calendar
| M | T | W | T | F | S | S |
|---|---|---|---|---|---|---|
| 1 | 2 | 3 | 4 | 5 | 6 | 7 |
| 8 | 9 | 10 | 11 | 12 | 13 | 14 |
| 15 | 16 | 17 | 18 | 19 | 20 | 21 |
| 22 | 23 | 24 | 25 | 26 | 27 | 28 |
| 29 | 30 | |||||
Archives
- August 2013
- July 2013
- June 2013
- May 2013
- April 2013
- March 2013
- February 2013
- January 2013
- December 2012
- November 2012
- October 2012
- September 2012
- August 2012
- July 2012
- June 2012
- May 2012
- April 2012
- March 2012
- February 2012
- January 2012
- December 2011
- November 2011
- October 2011
- September 2011
- August 2011
- July 2011
- June 2011
- May 2011
- April 2011
- March 2011
- February 2011
- January 2011
- December 2010
- November 2010
- October 2010
- September 2010
- August 2010
- July 2010
- June 2010
- May 2010
- April 2010
- March 2010
- February 2010
- January 2010
- December 2009
- November 2009
- October 2009
- September 2009
- August 2009
- July 2009
- June 2009
- May 2009
- April 2009
- March 2009
- February 2009
- January 2009
- December 2008
- November 2008
- October 2008
- September 2008
- August 2008
- July 2008
- June 2008
- May 2008
- April 2008
- March 2008
- February 2008
- January 2008
- December 2007
- November 2007
- October 2007
- September 2007
- August 2007
- July 2007
- June 2007
- May 2007
- April 2007
- March 2007
- January 2007
Categories
- About Me
- All That Scraps
- blogger challenge
- camera/photo play
- Cards
- Contests
- family stuff
- FOR SALE
- Home decor/3-D items
- How to FAKE it!
- Introduction
- JUGS Challenge
- JustRite Stampers
- Lizzie Anne Designs
- My family stuff
- My Stamping Space
- My Time Made Easy
- My Time To Color Challenge
- My Time to Create Challenge
- My Timeless Template Challenge
- My Timeless Templates
- Mytime Mail
- MYTIME MOVIE/VIDEOs
- Papertrey Newsletter
- Pink Cat Studio
- Pretty Palette Challenge
- Pretty Patterns Sketch
- Product Opinions and Must haves
- Recipe's
- Saturday Sketch
- Smilebox Creations
- Stampavie
- Tutorials
- Uncategorized
- videos
Most Popular
- Create your own Onesie Card Tutorial-and important NOTE! PLEASE READ (2529)
- Saturday Sketch-Boxed bag holder (2333)
- Going GREEN! Fancy Flower Flourish-Closure Video (1478)
- Fabulous Favorite - Giveaway! (1336)
- a Prayer Request (1232)
- QUICK-Easter Baskets from Nestabilities-PTI style-and blog challenge (1063)
- Teaser Sketch (999)
- February Release Giveway! (and a little peek) (996)
- Group Post and Rambling Rose Video Tutorial (985)
- GIVEAWAY! Who wants it all?! (895)
Recent Comments (RSS)
- 첫충사이트: 완전히 흥미로운 블로그 게시입니다. 저는
- sarah: Wow, Lauren, what a stunning
- hedie: خرید راهبند
- 야동: Love to read it,Waiting For
- 야동: This seller is in a
- 바카라사이트: 여기 처음 왔어요. 나는이 게시판을
- 야동티비: I was surfing the Internet
- 바카라사이트: 비슷한 주제에 대한 흥미로운 정보를
- 바카라사이트: "여기에 제공해 주신 귀중한 정보와
- 온라인홀덤: 유익한 웹 사이트를 게시하는 데
Copyright © 2007 - My Time, My Creations, My Stampendence - is proudly powered by WordPress
This blog has been Tweaked and Designed by Sara Williams