Archive for the ‘Papertrey Newsletter’ Category
All occassion holiday holder
Dec 18, 2008 Author: mytime | Filed under: Home decor/3-D items, My Timeless Templates, Papertrey Newsletter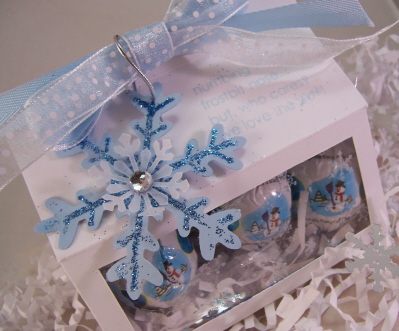
I think we are always on the hunt for the perfect package for little treats.
Do you have a long list of people you want or need to give a little something to this holiday season? Even if you don’t have a long list, you are going to love this treat idea. It is sure to make people OH! and AH! over the simplest of gifts, any time of year.
There really is such a thing as “It’s the thought that counts!”, so why not let everyone know you are thinking of them, in a way that is affordable?
I have just the quick treat holder for you!
Did you know that if you purchased the Lolli-pop Along © Template, you have an entire new use of JUST the base template? Let me show you how.
I’m certain as the years pass, the list of people in our life grows, but our finances don’t! With 3 kids now in school-and some of the extra services they get, I like to acknowledge everyone who impacts my children’s lives. Like everyone else in the world, we are on a tight budget, so this year (like the past 3 or 4) I am mainly making gifts for all our family and friends.
I love gourmet chocolate, and it can make a really nice gift. You don’t need to spend a fortune on it either.
I whipped up 16 of these gifts, and it only cost me $1.20 each!
I went the the Lindt Chocolate store and purchased 2 large bags of truffles (48 in each bag). Regular price $12. But if you purchase 2 bags they were on Sale for $10. So I purchased 2. That is 96 truffles for $20. Which means they are 0.20 cents per truffle.
My little treat holder, holds 6, so I was able to get 16 gifts, for a mere $20 purchase. That means I spent $1.20 for each gift!!
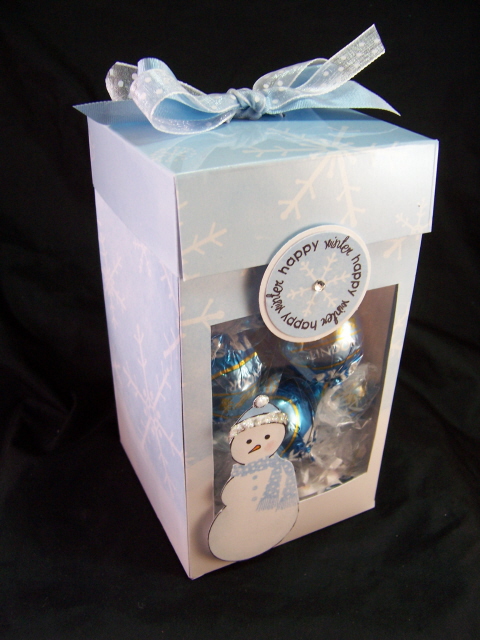
Side view-

I want people to know I appreciate all they do, but not break the bank doing it. I think I accomplished that this year, for much cheaper than I normally do, and without having to bake a thing!
Also consider that many people have “food issue’s”. Meaning people are a bit leery of food prepared from someone’s home. They have no idea how clean your kitchen is! Packaged items are always a great way to go, and if they hate these truffles a re-gift is definitely OK.
So lets get started shall we?
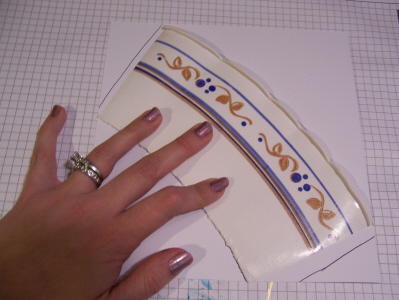
Print Lollipop Along ©base on white cardstock.
Cut and score bottom as directed.
At end panels, score at 1/2 inch from edge. (As seen in photo)
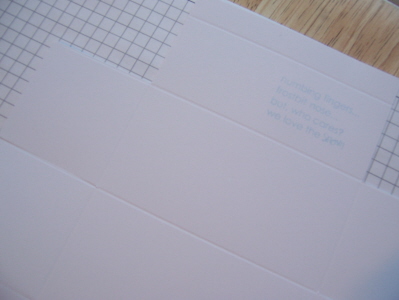
Then stamp sentiment from Snowfall Additions in right corner in Spring Rain Ink
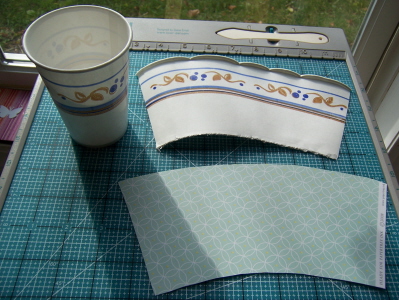
Use long rectangle nestability (or a ruler) to trace a rectangle window, on front panel.
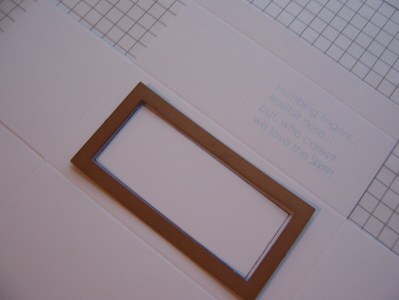
Use a hobby blade to cut out window.

Stamp a piece of acetate, in white StazOn with snowflake cluster from Snowfall set. While wet, sprinkle on glitter of choice.
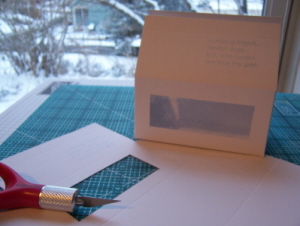
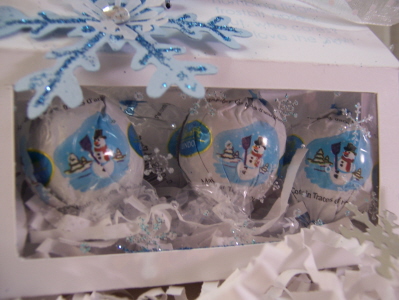
Adhere window to inside of holiday-Lollipop Along © window

Then put sides of box base together.
Photo of -Window in place, box together
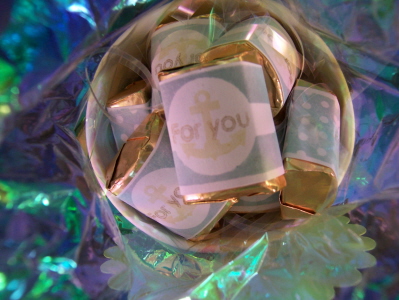
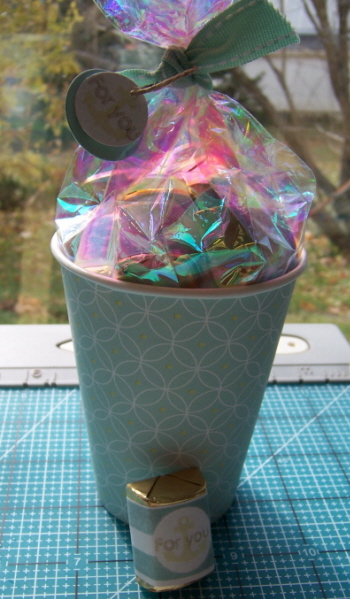
Now add a little white bag filler for “snow”. Then fill the box.
Now inside this box you can easily fit 6 Lindt Chocolate Truffles!
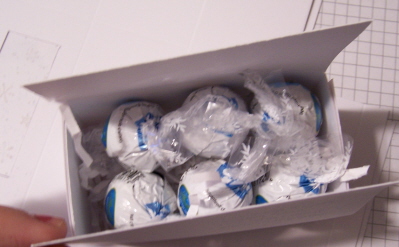
The snowman ones are milk chocolate, with white chocolate centers! YUM!
Make sure you have the snowmen turned to the front of the window.
It’s a perfect treat to let someone know you are thinking of them this winter season. Plus its easy on the wallet!
Now for the tag-
You want to use the snowflake punch , and punch a shape from Spring Rain cardstock.
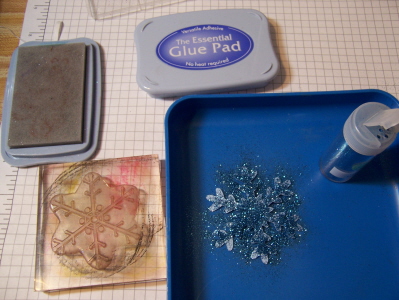
Stamp the snowflake image onto punched snowflake using the Glue Pad, then sprinkle on glitter.
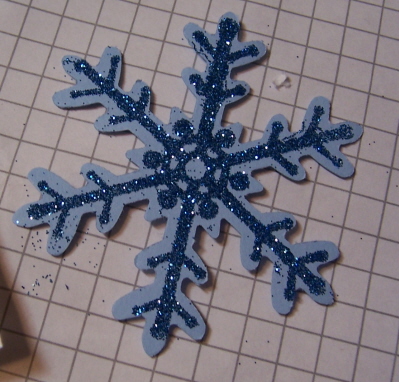
Now layer a smaller punched snowflake from vellum cardstock (mine is Martha Stewart), and add a bling sticker to the center.
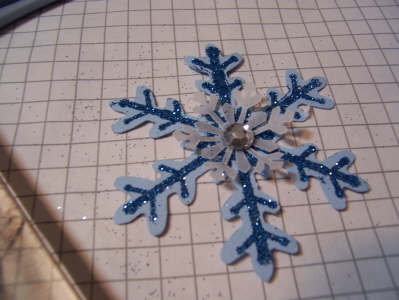
Then punch a hole in one corner of the snowflake, and string it through your tied ribbon.
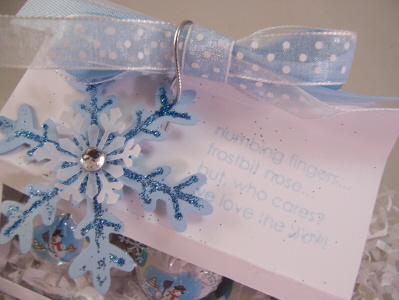
Isn’t it the perfect little tag?
Everything is better with a little bling.
So there you have another treat idea using My Timeless Templates ©! There is still time to make those last minute gifts 😀
After Christmas I plan on sharing my Valentine’s version of this idea 😀
Thank you for checking in ♥
Papertrey Ink November Release-and Saturday Sketch!
Nov 15, 2008 Author: mytime | Filed under: Cards, My Timeless Templates, Papertrey Newsletter, Saturday SketchWOW! How can it be the MIDDLE of November ALREADY? Jay’s grandmother already called with confirmation of Thanksgiving Dinner plans! CRAZY!
Tomorrow is my son Noah’s birthday party so Im going to be working like a mad woman to get his party things done today. I am NEVER a last minute type of person so this is a KILLER for my OCD! We have about 18 kids total! Should be a total blast.
I hope you all enjoyed thePapertrey Ink release with all the countdown’s and design team samples. I really hope you are also loving the latest My Timeless Templates ©. I also hope if you have not already, that you try the 2 FREE templates we have for you! There is NO EXCUSE not to TRY one! You can’t get any better than FREE 😀
I have to say a huge THANK YOU to all of you who get so excited right along with me, and enjoy this new venture of gift crafting 😀 Preparing for that each month keeps me REALLY busy. I LOVE it. I really put in a lot of time to think of great ways to present these templates to you. Now while you are all downloading the newest of templates, I am getting started on next months! LOL! I know I find these templates REALLY useful, especially with the holidays approaching, and I hope that I have helped some of you save some $, creative time, and ideas this holiday season, making home-made holiday gift giving that much easier.
Now speaking of templates, I was holding out ONE more sample for you, just for today! It is my favorite project for this release!
I would LOVE to hear YOUR feedback on what you enjoyed here, and why. Im always amazed at what I love vs what YOU love 😀
OK the projects-
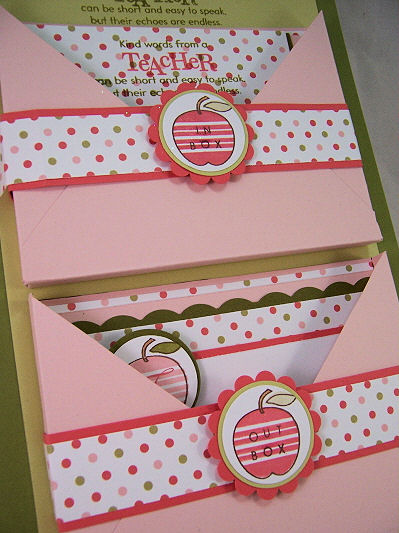
Teacher’s Apple- LOVE this set.
This uses the All Boxed Up © template in a fun and new way! It also uses Teacher’s Apple which I am TOTALLY in LOVE with! LOVE! You have no idea. For those of you wanting to mix up teacher gifts this year, you may just fall in love with this idea 😀
I mentioned before that the pretty pockets make a great base to many gifts on their own! So here is another example of that .
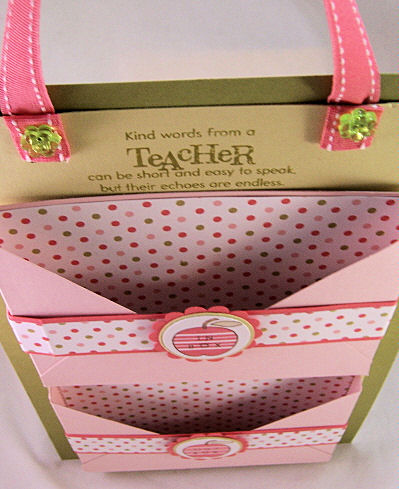
In & Out Hanging Mailbox

This holder hangs in the classroom, either by the desk, or by the door. You can even put it ON the door knob. It helps the teacher keep organized with letters IN, that need to be read, and letters OUT, that need to go home! This isn’t just stylish but its also practical.
I think its a super cute gift idea useful for ANYONE, not just teachers! Alter the design to suit receiver’s favorite colors or decor.
stamps-Teacher’s Apple, Simple Alphabet
paper-Polka Dot Parade, Olive, Spring Moss, Sweet Blush, Berry Sorbet, white
ink-Spring Moss, Sweet Blush, Berry Sorbet, Ripe Avocado
other-Spring Moss Stitched ribbon, making memories flower brads, making memories ribbon slot, circle punches, corner rounder
Now insert your Teacher appreciation card into the INBOX, and some monogram notecards, as a gift for her to send out, and place them in the OUT box.
View from the side-cards IN
View from the other side-no cards. I like to line the inside of my pockets. It makes it look a little more finished, don’t you think? It’s the littlest details that make you say WOW!
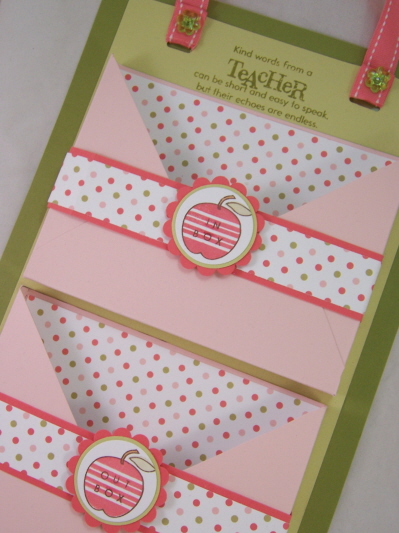
This is the view from the top
Now for the gift to go with the In & Out box
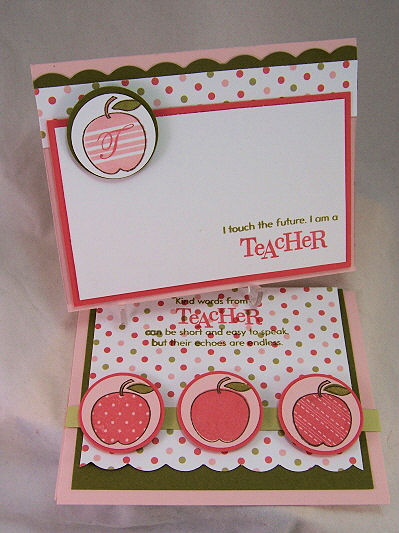
Well upon presenting this gift, I think a nice Teacher Appreciation card is in order!

This is the card that I created to write my appreciation to the teacher. I love the layout, and message it reads. I created some monogrammed note cards, to include as a gift, with a SIMILAR layout to match.

For Ms. Trefrey
This note set is for Noah’s new reading teacher! She is over the top AMAZING! I called the Principal just to tell him how much Noah has enjoyed his reading program with her. She has gotten him excited about reading in a way I could not. How can you thank someone for that? I hope this gift set will cover it 😀 Alexa is my “reader” and Noah is my Math wiz, but now I have hope 😀
I think a NICE set of monogrammed notecards would be PERFECT for the teacher! I have this simple design, PERFECT for nice notes home to parents, and I would put a set of 8 (with envy’s) in the Out Box, for the teacher to be able to send out notes 😀
Isn’t that so cute?
PS-Don’t forget when you purchase ANY of our My Timeless Templates ©, that you get an idea catalog of 5 EXCLUSIVE (full color photo) project ideas with step by step instructions, and supplies.
Before I begin the rest of the peeks, let’s share today’s Saturday Sketch, and my 2 designs for that! (using new release stuff)

Saturday Sketch
KEYWORD mytimess12
I love this sketch 😀 I interpreted it in 2 ways.
I am TRYING to spend more time getting creative with my photos. it is the part I loathe about this whole stamping thing. I think it makes a difference though. I take the time to MAKE the project, may as well make it LOOK as good on screen right? I think Santa needs to bring me a new camera! I think I could even have him write it off as a business expense 😀 Oh Santa…………if you read this, I need a new camera 😀
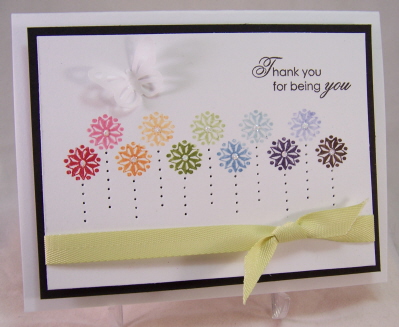
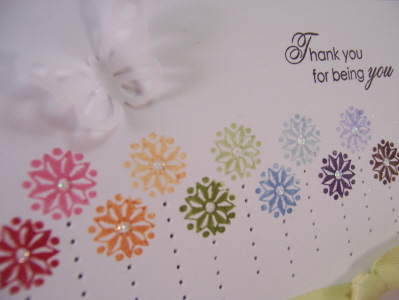
So here we have a card titled Every Happiness.
It used the New! Heartfelt Basics, and an older set-Flower Garden. I LOVE that sentiment set. I am a sentiment JUNKY, and this set is ROCKIN my world.
I love the colors, and the way the sketch worked for this design. The tag is such a cute touch. Not sure you can clearly se the vellum butterfly, but its a pretty, subtle touch.
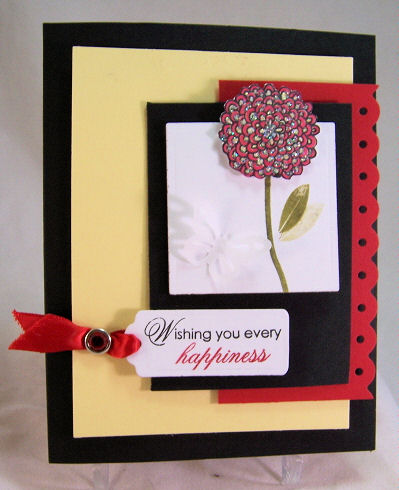
Close up of Every Happiness

Stamps- Heartfelt Basics, Flower Garden
Cardstock- lemon tart, pure poppy, black, vellum cardstock
Ink- black, ripe avocado, pure poppy, lemon tart, red marker
other- poppy satin ribbon, nestabilities square & tag punch, Martha Stewart butterfly punch, treading water punch by Fiskars
Now I have card #2 with the sketch! (I know Im over achieving this weekend! LOL!)
Ships Ahoy-
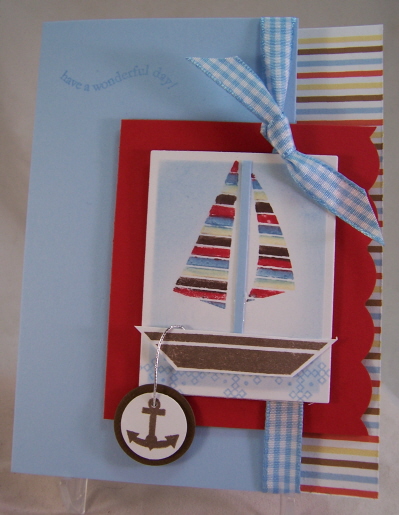
I love this little boat! Men of Life is awesome. Its great for those masculine cards, boy cards, or baby cards. I used my patterned paper as my inspiration for my sails. I didn’t follow my sketch EXACT, but this creation was certainly inspired by it. I’m loving the little anchor!
Here is yet another view of the details

The sentiment is from the Out of the Box sentiment.
Stamps- Men of Life, Out of the box (snetiment)
cardstock- white, pure poppy, dark chocolate, bashful blue, Ship to Shore stripe
Ink-markers from SU!
gingham from PTI, corner rounder, silver cord
I made the “ocean waves” use a stitched square image in the set. LOVING the colors and desings of the new patterned paper. LOVE!
Be sure to check out the Sketch Team for their samples with the Sketch!
Background Basics Stars set:
I love the bkgd set. I am a HUGE fan of Polka Dot basics, and this is another great set. I really wanted to use it as a MAIN focus on my creation here, and rather than seeing STARS, I saw posie’s!
Pretty lil posie stitched stems
I think this was my favorite card! I love the black & white, with the contrast of a rainbow of colors from my “star” flowers. The spring moss ribbon is my “grass”.This is one of those under 10 min. cards. By simply piercing the “stems” you get a whole new look.
I also see PINWHEELS! Really cute.
Stamps- Background Basics, Heartfelt Basic
Ink-black, various markers for direct coloring on stamp
cardstock- vellum, white, and black
Other- Spring moss twill ribbon, butterfly punch by martha stewart, paper piercer for stems
You know me & my butterflies! This is the latest punch from Martha Stewart. Its perfect!
I used my glue pen to add some glitter to my flower centers.
I also used Heartfelt Basics. Let me tell you that set is a MUST OWN!!!!!!!
Next up we have Lisa’s set Out of the Box.
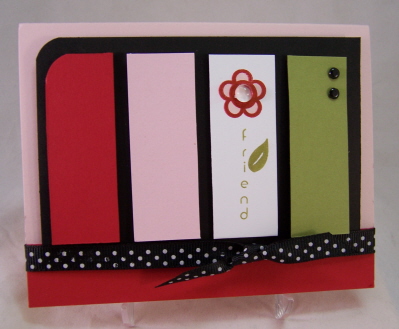
Stem of Friendship
Stamps- out of the box
Cardstock-sweet blush, pure poppy, ripe avocado, black, white
ink-sweet blush, pure poppy, ripe avocado
other-black brads, corner rounder, polka dot ribbon, clear bead
What stood out to me was the single flowers (of course) and vertical sentiments. I decided to create a simple color blocked style card, that really stuck out to me due to the colors I chose.
The little Robin’s Nest bauble was a nice little touch to the flower center.
I like making smaller images the main focus of a design. I had fun working with all the images (more to come!).
Well I am truly wiped now. I always have my Papertrey Ink “hangover” as I call it. I go into creative overload for like 3 days. This month I can’t afford that! I have Noah’s party to get things done for.
So there you have it for me.
Scroll down to the other posts through the last few days if you missed some stuff.
Thank you all again for taking time to check in! I appreciate being one of your “stops” on a busy weekend!
Enjoy.
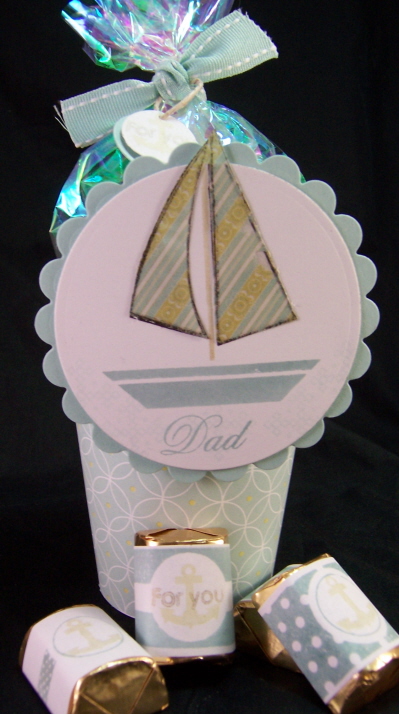
#1 Men of Life-Stained Glass Dixie Cup Cover
Nov 9, 2008 Author: mytime | Filed under: Papertrey Newsletter, TutorialsToday is the 10th. That means its my mother-in-law’s birthday (Happy Birthday Mom!) and its Day #1 of thePapertrey Ink peeks!
(Tomorrow we will start peeks for My Timeless Templates© too-so check back in OK!)
My peek today uses Men of Life, designed by Melissa Bickford. It will be released on the 15th.
I love this set, and all the different images for the sails of the boat. When coming up with what I should share with you, I figured a technique would be fun. Its one of my favorites for open line images and it is called Stained Glass. I hope something I share today is new to you.
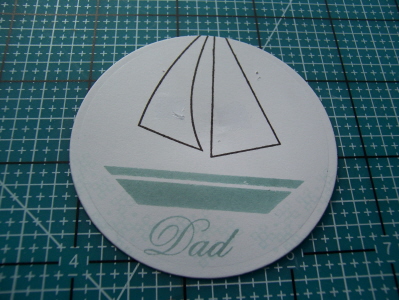
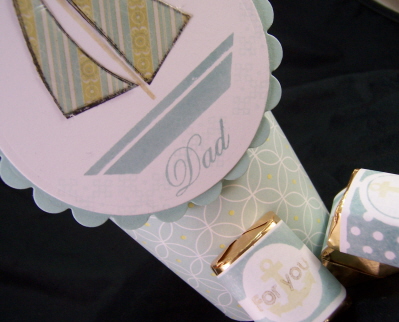
I wanted to use the sailboat image, and wrap up some Toffee Hershey nuggets for my dad. Having no more nugget tins (which I neer use for nuggets! LOL!) I figured a little altered Dixie Cup favor would be a cute variation to share too.
So here we go!
With the holidays approaching and 3 kids, I strive for crafts that they can do themselves, and are fast, fun & easy 😀 I remember making these in 5th grade, so I thought it would be fun to revisit in my adult years. Its not only a kid friendly activity, but its pretty cheap too 😀
I hope you like it.
HONESTLY think how cute these would be for a BABY SHOWER ! Add a little ribbon handle! Oh so cute. LOL! Make it baby colors…………oh boy!
Dixie Cup Cover
Make a template for your dixie cup cover. To do this just cut apart one cup as a sample.
Then trace, leaving a little extra for a seam allowance
Cut out from patterned paper. I used Everyday Blessing for my creation here.
Then wrap the cup!
I decided to line to top portion with some pretty cellophane, that I attached at the inner top of my cup using redline tape.
I then put in some pretty filler, and added my stamped nuggets, to match!
(I used the anchor image and sentiment from the Men of Life set, and Limitless Labels and Holiday Treats, for my candy labels) I also used Spring Moss, Aqua Mist & Ocean Breeze and Encore gold ink.
View of inside, from top of Dixie Cup.
I then tied it closed, with a little tag.
Now all I need to do is make my sailboat designer label.
Stained Glass Technique-
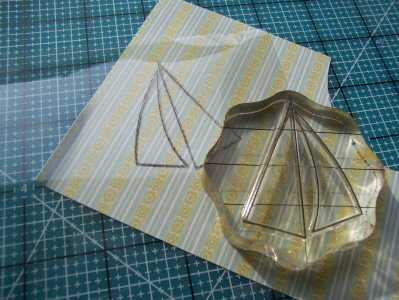
Stamp open line sail image onto acetate, using Pallette black ink. Heat set carefully.
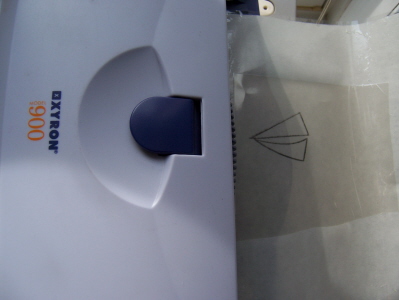
Run acetate sheet through Xyron sticker machine.
Peel off paper backing
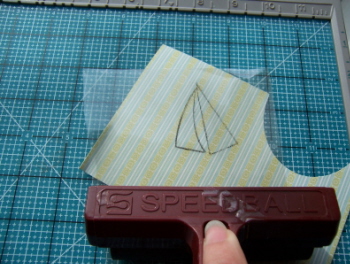
Place where desired on patterned paper. Use a rubber brayer to ensure a good stick.
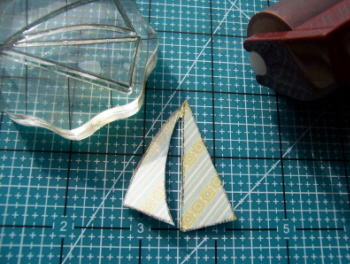
Trim out sails
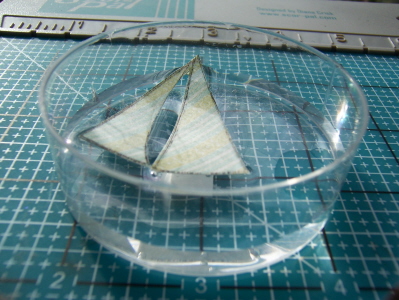
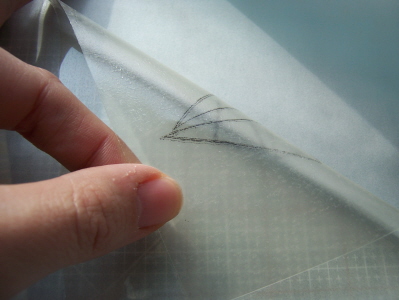
Soak image in water for several minutes.

Remove from water, then GENTLY rub off the paper backing. Don’t rub off too much!
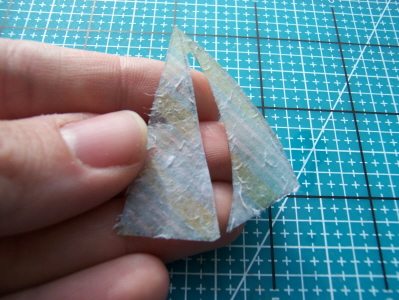
Be sure you still have a light paper coating on the acetate when done. This layer will get re-sticky! Now you have a SHEER pattern that appears on the front of your acetate sails!
Let dry.
Now layer onto stamped main layer image-apply a little bit of adhesive for extra stick.
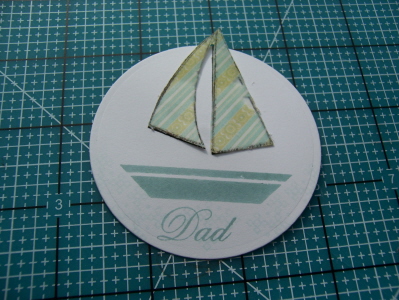
I wanted my sails to pop out over the circle, so I die cut mine to be a bit smaller. I then layered onto a scallop circle.
DONE!
This will then get adhered to my Dixie Cup front!
Can you see the lightly stamped “water” on my label? A subtle touch.
There you have it! A super cute and easy favor or little treatlet idea for any occasion!
Be sure to check Nichole’s blog for more peeks, and stop in tomorrow for the start of My Timeless Template© peeks!! It’s going to be a BUSY, and AMAZING next couple of days here! Each post will be jam packed with creative ideas, just in time for the holidays, using my newest release of templates!!
Let me know what you think 😀 and ALWAYS thanks for checking in with me 😀 You all make my day.
Till tomorrow.

Greetings from Miles Away
It’s the first of the month. That means its time for a Papertrey Ink Challenge! This month, with Thanksgiving right around the corner, Nichole asked that we share ways that we can use stamping to help bless the lives of others. I LOVE things like that. Using what we LOVE to make a difference.
I have to say I have MANY places that I send all my (non sent) card creations I do through the year. All dear to my heart. Many people asked what I do with them, and now you will know. I have posted what I do in the past, but will share again today. Always around the holidays I gather them up and either ship them, or deliver the box myself.
This year I have 3 HUGE boxes of cards, and altered items to hand over. The feeling is INCREDIBLE. People say I should sell them on Etsy, but I have to say knowing where these are going, no amount of money could ever make me feel the way donating them to these organizations does. I feel like Im getting to give something back. So much has been done for us, its the least I can do. Plus it helps me NOT feel so guilty for NOT sending as many cards as I should. I guess I could mail photos of the boxes to the would have been recipients and say Hey Look! There is a card in there that was going to be yours but is now being donated in your honor! LOL!
Having had my daughter go through Cancer was the MOST eye opening experiences of my life. In so many ways. The one thing that shocked me most was the POWER of the volunteers, and donations made to make amazing things possible for sick kids and their families.
What does a family do, when they have a really sick child, who is far from home? Well that is where my reason for this card comes in.
One of the places that is so dear to my heart is David’s House.
PLEASE read the story of how this organization was started –>David’s House
Or go to-
461 Mount Support Rd
Lebanon, NH 03766
(603) 643-2298
This is the place that opened my eyes to the amazing kindness of perfect strangers. The power of donating your time can truly have on families. It provided Alexa with a gorgeous handmade quilt (that she STILL sleeps with every night!) when she first go diagnosed with Leukemia. Someone took the time to make that, and donated it! AMAZING! I use to quilt, so I know the TIME that goes into each and every creation.
David’s House gave me a place to eat a home-cooked meal-also donated by area families, each night for dinner so I wouldn’t have to pay for yet ANOTHER meal for at least $5, easy.
It provided my husband a place to sleep, when he could come visit with the kids, close to hospital, so we didn’t have to pay for a hotel. An expense we truly could not afford while Alexa had a her LONG hospitalization.
They allowed me to go and do my laundry there, at no cost, so I didn’t have to travel all the way home to get clean clothes. I was able to remain in the hospital with Alexa the entire time she was admitted.
I was also able to just go and take a quick break from reality IF I needed it, and to socialize with other families who understood what we were going through.
This house provided my family with so much support. All run by volunteers! It truly amazing how people give so freely time, out of their own busy lives, to help families like mine. It doesn’t take a lot to make a big difference.
I vowed that I will volunteer more once my kids are in school full time.
I like to give back what I can, and for me that is some cards that the staff or families can use. I cannot tell you how often someone does something amazing for you, that you WISH you had a card handy for.
Last year when I dropped off my box, some of the families actually got teary over the prospect for giving Nurse X a thank you, or bringing a card with them for their son the next morning. Or Volunteer X helped me with this and now I can thank her.
TRULY amazing.
I only send cheery, upbeat cards to this home.
No Im sorry, or sympathy card. When your child is sick that is the LAST thing you want to stumble upon. I also like inspirational cards as well.
I decided to make a few extra for the box from our family, to thank Davids House. They can use them to send out, or give to others in the House.
This place is truly a God Send to families just like mine 😀 If you have a big stash of cards, getting dusty I encourage you to consider David’s House, or maybe a Ronald McDonald house in your area.
Other organizations I enjoy donating to are
OR your area Children’s Hospital.
OK now for my card info! I wanted to keep the mass production SIMPLE as possible.
I saw a stamp a while back of a tree with envelopes in it. I thought it was REALLY cute.
I then thought it would be SO cute to use the Father Knows Best tree image, and the envelopes from Mailbox Greetings. With a little masking it looks awesome!
I just stamped my envelopes first, masked them, them stamped my tree leaf image. I filled in the leaves with various shades of blue and green ink. I love the colors. I punched out the tree top, and layered it onto my card base. EASY PEASY!
I think its just cheery enough for the cause don’t you?
OK now don’t miss the other design team girls creations for causes :
I’d LOVE to hear your thoughts, and if there is a place that is dear to your heart too!
Thanks for reading and remember to “pass it on”.
Papertrey Ink Blog Hop-Polka Dot Parade
Oct 25, 2008 Author: mytime | Filed under: Home decor/3-D items, Papertrey Newsletter, Recipe's, UncategorizedWell today is the 25th. That means there is a PTI Blog Hop! Details HERE!
I wasn’t sure I was going to get to play, let alone upload, but I got it done! Feels so good to get stamping.
I LOVE polka dots, and the Polka Dot Parade patterned paper was a no brainer for me!
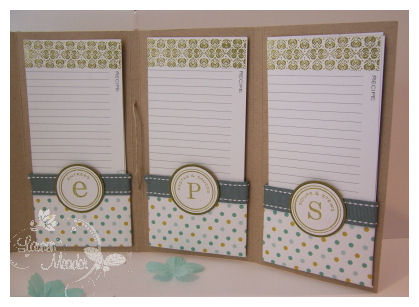
With the holidays quickly approaching I wanted to make some gifts that were thoughtful, inexpensive, well made, but not time consuming. I decided a recipe wrap-(AKA recipe card holder), would be a great gift idea, even for male recipients! I would include some great grilling recipes on the cards for the guy’s, or a favorite meal, once I decide who is getting what. In the mean time I can just get them ready!! We do lots of Yankee swaps and I think this would be a fun thing to give with a special set of seasonings 😀 Don’t you?
SO I got to work using the recipe cards, the Recipe Box set, and recipe labels
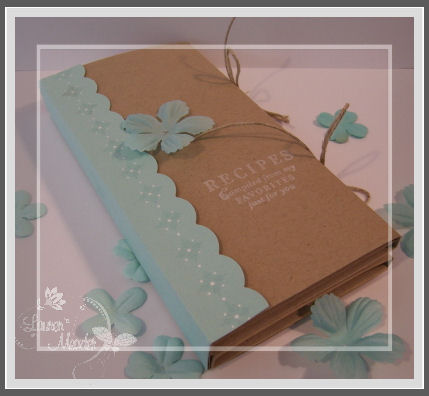
So when I made my Recipe Wrap card holder I wanted it unfold, and store easily. I also wanted it to hold a nice number of recipe’s without being too much. You know when you get overwhelmed with too much of something, you end up NOT using it. That also makes me thing of it being a great FIRST APARTMENT gift idea too!!! You could even include a shopping list with the recipes you choose! This takes up NO counter space either. Something I personally love, since I don’t like too much on mine.
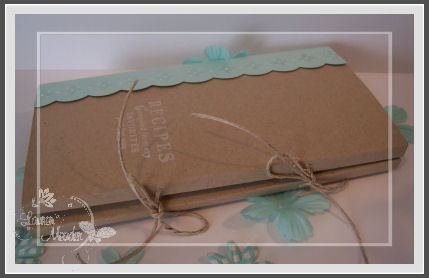
Front view, all tied closed.
I used my Kraft cardstock, and Aquamist for my mail color on the front.
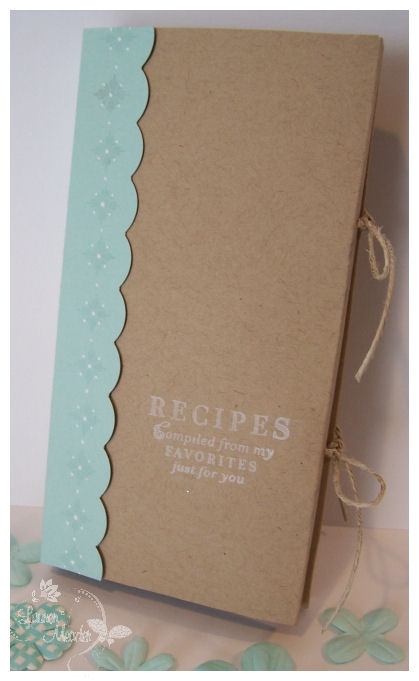
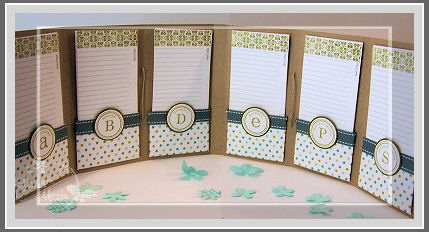
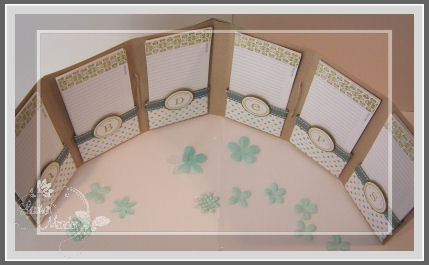
The Recipe Wrap has 6 categories. You can make more or less if that suits you. Each slot holds 5 recipe’s! I think this is a great gift. Especially if you are a consultant for Tasefully Simple, or Pampered Chef!! The list goes on 😀
Side view of Recipe holder
Untied, and open
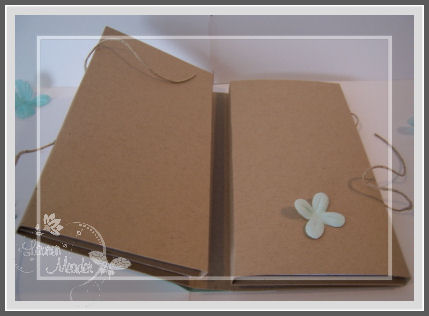
Unfolded again
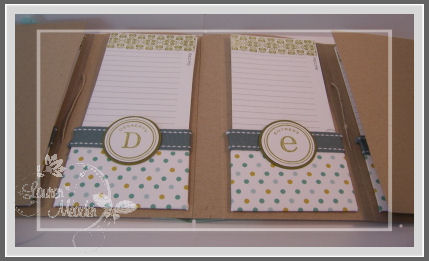
Close up of first 3 categories
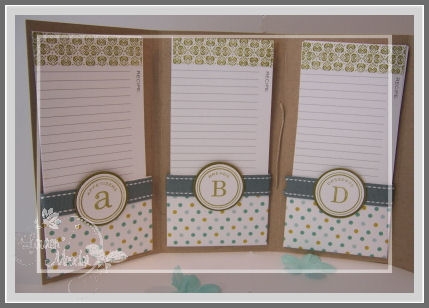
Close up of last 3 categories
Recipe-all unwrapped
View from the top
This is a close-up of the pocket that I created to hold the 5 cards per category. I wrapped some ocean tides ribbon across the top, for a nice finished look.
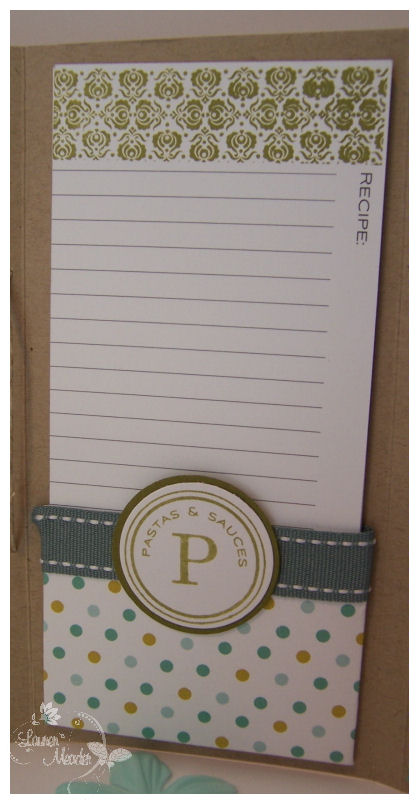
This polka dot paper makes this either masculine or for everyday, anyone. I love the colors.
I stamped the tops of my recipe cards using ripe avocado ink, and one of the card topper images from the set. I think its a nice touch.
Well what do you think? A great, simple gift for those hard to buy for on the list, or if you need a gift for someone you may not know well, or are swapping with!
Well that is all I got for you tonight.
Enjoy the blog hop 😀
Scallop Squares Wrapper
Oct 23, 2008 Author: mytime | Filed under: Papertrey Newsletter, Uncategorized
During the holidays many of us have people we would love to acknowledge during the holidays. Due to this busy time of year, gift giving can be strenuous on both your wallet, and your time. Packaging can make the simplest, and most inexpensive of gifts, show you care!
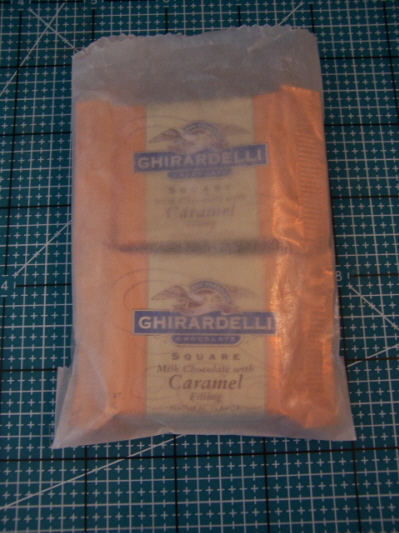
I will show you the ultimate fast wrap for those delicious Ghirardelli chocolate squares, and any other other type of yummy you may see fit for this simple Scallop Squares Wrapper.
All you need are the Largest set of long rectangle nestabilities, Shimmer white, shimmer gold cardstock, vellum cardstock, Merry & Bright, Mixed Messages, Gold sheer metaillic edge ribbn, small glassine bags, circle punches, Gold Encore ink.
Step 1
Die cut 2 long nesting rectangles from Shimmery Gold cardstock .

Step 2
Score on both ends of the 2 window rectangles as shown in photo above
Step 3
Cut 2 vellum cardstock pieces to fit over opening. Stamp snowflakes in gold encore ink, and carefully heat set. Adhere vellum pieces over window opening
Step 4
Put bottom ends together, and adhere.
Step 5
Using small glassine bag, put in 4 Ghirardelli squares
Now layer into wrapper.
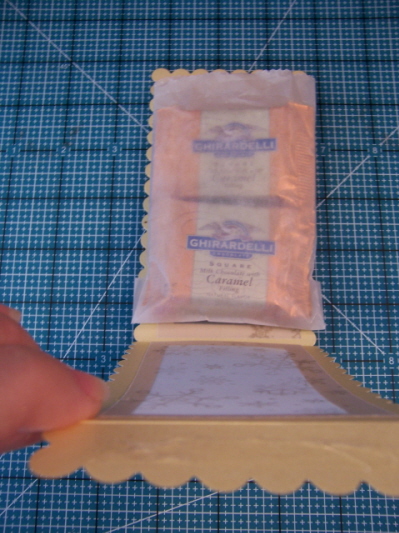
Adhere bottom of bag to bottom of scallop holder. Fold over top and staple or glue closed.
Then adhere top ends of scallop wrap. Then tie on a gold ribbon to each end.
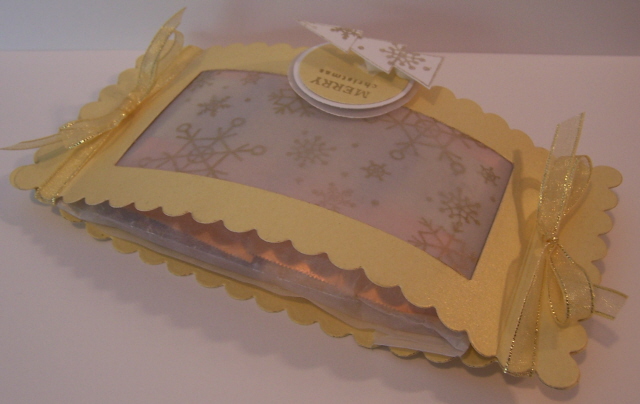
Make a tag to complete the decoration, by stamping snowflakes onto shimmery white cardstock. Stamp open tree image from Merry & Bright set. Cut out tree and layer onto gold circle that has been stamped with sentiment from Mixed messages using encore gold ink. Layer onto shimmery white circle, then a punched vellum circle.
Adhere to wrap, and you are done!
Now isn’t this a great presentation of a simple, and delicious treat.
Let me know if you give this a try!!
As always thank you for checking in.
Challenge #3: Finders Keepers
Oct 15, 2008 Author: mytime | Filed under: Home decor/3-D items, My Timeless Template Challenge, My Timeless Templates, Papertrey NewsletterI don’t even want to think how many hours I spent bloggin this week! It took me WAY longer to blog this stuff than it did to make it-I kid you not!!!! I may not even be making any sense by this point.
OK you can now pinch me! I have my very own template line! My Timeless Templates © is REAL!I have my own line, with my own sections! I have a description page, my disclaimer page (for those questions of what is, and isn’t ok), and my templates library page! Im OVER THE MOON right now with excitement!!
I am hoping that MOST of you have or planned to download the FREE template, to give it a try, and see what you are getting for you $5! I’m sure you will happy once you get creating 😀 You have NOTHING to lose!!
In the meantime scroll down because I have 3 challenges today!
I hope you use these challenges as the PUSH you need to give it a go.
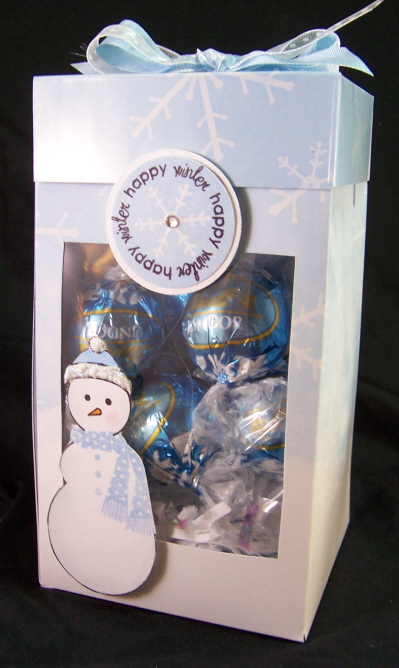
Box of snow
OK this template for the For Keep{sake} box was my very first template for the My Timeless Template © collection! Yes you read it right, the very first thing I designed. I totally love this box, and hope you will too. It was my favorite creation using the new release items! The Made from snow man is perfection.
There are so many possibilities that can come from this template, so lets see what YOU can do!
Challenge : What can YOU find to fill your For Keep{sake} box with? Will it be a fun item, or homemade gift? Maybe something edible-YUM!

Rule: *TRY* to incorporate some BLING. Anything that has a little shimmer, or glitter. Now notice I said TRY! I just want you to enjoy this one 😀
Keyword : MyTimelessTemplateFKC03 (For Keep{sake}challenge 03) Use that when uploading to an online gallery so we can all find it. When you are done creating/posting, share a link here, so we can all see your creation with the templates!
Now for my creation- I just loved this one!
This holder is so quick, simple and pretty to hold those YUMMY Lindt chocolate truffles!
I just used glossy cardstock, and the versamark resist technique to stamp my snowflakes, then brayer on some blue ink, only 1/2 way along the template, so you get the look of a snowy sky, with winter snowdrifts. I then cut out my snowman for the front of my window. CUTE!!
My Timeless Templates ©-For Keepsake
Stamps-Snowfall, snowfall additions, made of snow
cardstock-glossy, and white, acetate
ink-pallette black, bashful blue, versamark, copic
other- adhesive rhinestone, circle punches, glitter, liquid applique, polka dot ribbon, MS blue ribbon, rubber brayer
OK now its your turn to create your For Keep{sake} box! I am having so much fun with this, I really hop you are too!
I am always open to ideas and suggestions, so don’t be afraid to email me 😀
Challenge #2: Don’t CASE me!
Oct 15, 2008 Author: mytime | Filed under: Home decor/3-D items, My Timeless Template Challenge, My Timeless Templates, Papertrey Newsletter, UncategorizedOK now we have our 2nd Challenge for this months release of My Timeless Templates ©-using the Music Makeover.
This is another versatile template, so give it try.
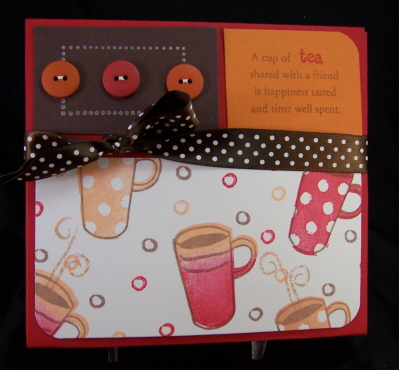
Tea Makeover
This is a really fun box to make, so I hope if you were able to purchase it (or won one :D) that you will find time to play along.
There is NO time limit! Just have fun.
Challenge: Put something cool in your Music Makeover that is NOT music!
Rule: Do NOT use a jewel case!
Over the last few days you have seen me do a few things that don’t use the jewel cases. So don’t get limited by thinking JUST music or that you HAVE to use a jewel case for this template.
Keyword : MyTimelessTemplateMMC02 (music makeover challenge 02) Use this keyworf if uploaing to a public gallery so that we can view your creation. Also send us a link here when you are all done posting! We all want lot more great ideas for these templates!
I cannot wait to see what you find to put in there 😀 I already heard many great suggestions, so let’s get some gifts for the holidays made early!
About my creation: I put in 4 different packets of tea, and designed my holder to match my tea packets!
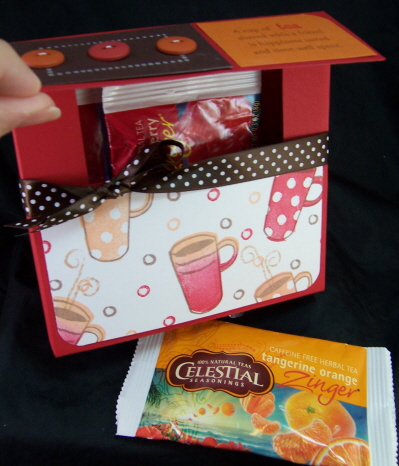
My Timeless Templates ©: Music Makeover
Stamps-Warm Happiness, borders & corners rectangle set
Cardstock- white, dark chocolate, pumpkin, pure poppy
ink-white crafts, dark chocolate, versamagic pumpkin and red ink, close to cocoa ink
Ribbon- dark chocolate polka dot
Other-buttons, white singlo gel pen, corner rounder
OK now its your turn.
Papertrey Ink October Release
Oct 14, 2008 Author: mytime | Filed under: Cards, Home decor/3-D items, My Timeless Template Challenge, Papertrey Newsletter, UncategorizedOK its time for me to fall FLAT on my exhausted face!
I wish! Alexa has her post Chemo follow up and my brother and his girlfriend are flying in today for their move in! Sooner than planned, but so is life. You know what they say, no rest for the weary!
I really want to thank everyone who has left comments, and supported me in this new venture of My TimelessTemplates © over the last few days, while introducing this product. I am really proud of the way everything has turned out, and all the hard work Nichole and the team at Papertrey Ink put into launching the product, and the AMAZING samples done with it. BIG THANKS!
I know I was most likely unbearable with my blabbering during this process and now I take a big sigh of relief. This is real! It truly happened! LOL! WOW! Now to see people use the templates….that will be so crazy!! I can’t even stand it!
I hope you enjoy the templates, and thank you all who try them out. I hope you remember to share them with me, as I am excited to see many of you venture into templates now. I’m posting my challenges in a little while, so I hope you return, as I also have a few samples too.
Now it is time to share my release projects!
I have a few projects with the new releases using my templates! Those will be listed separately as they are part of the Challenge I am posting.
Now my thoughts on the release projects. I always have a few that I really love. This month my templates are obviously a huge favorite, like my Box of snow-that uses my template was my big favorite, as was my recipe for Ice Cream Sundae party, and my Holiday cards post. I really like everything this month and had to STOP myself from going and going.
OK here we go!
The Recipe Box & Recipe box lable set is over the top amazing! My project is here! I have more to share using that set soon!! I loved it. SO many awesome uses for that one, let me tell you.
Warm Happiness- Well I LOVE my coffee, and was so happy to see PTI come out with a coffee/tea set!! Heather did a great job with this one. I so love it, and will certainly be using it more.

This little travel tea packet is the perfect little gift to leave for a friend! Just hang it on their door, so they can find it as they return home from a long day! Isn’t it cute? I just used a hobby blade to make an opening at the top of the cup! OR if you have a sick friend this is another great little thinking of you, without bugging them! LOL!
Supplies
Stamps- Warm happiness
Cardstock-Aqua Mist, white
Patterned Paper-Polka Dot Parade
Ink-aqua mist, lemon tart, sping moss, dark chocolate
Lemon Tart twill
other-scallop/straight long nestabilities, hobby blade
Snowfall/Snowfall additions-OH MY GOSH! I love this set. I can’t even explain it but if you notice through ALL my projects this release I used it the most. I actually had to STOP myself. Love it, and the fact that the punches co-ordinate! OH! My must have!
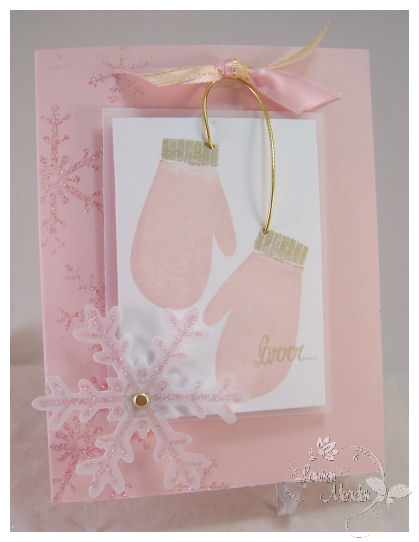
That being said sweet blush and gold are so YUMMY to me! I love them muchly! So I loved this card!
Stamps-Snowfall, snowfall additions
ink-sweet blush, gold encore, glue pad
cardstock-vellum, white, sweet blush
sweet blush satin ribbon,, gold tinsel weave ribbon
gold brads, pink glitter, gold cord
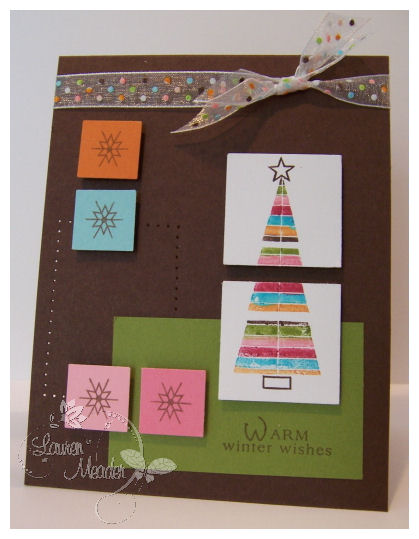
Merry & Bright Additions-OK loving the new trees Melissa added to her already fabulous collection! I had too much fun with this card!
|
|
Quilters Sampler additions-the newest quilt blocks are adorable! But, when I saw the Amish style boy and girl I knew I had to use them together! I found the heart square in there and my vision became reality!

The quilt squares are all glittery! What a cute anniversary or I love you card isn’t it? I was so happy with how this turned out.
Stitched together
Supplies:
Stamps- Quilters sampler additions, Quilters sampler
cardstock- pure poppy, sweet blush, ripe avocado
patterned paper-vintage holiday prints
ink-black pallette, copic markers
ribbon stitched ripe avocado
other-wide redline tape, iridescent ice embossing powder, heat tool
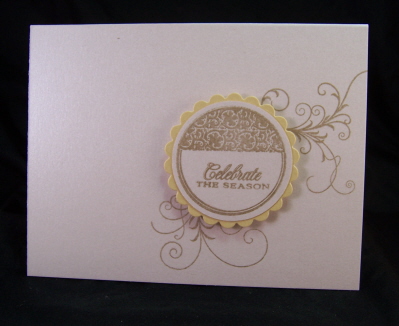
Silent Night-This set is stunning! I think the sentiments are amazing. I wanted to keep the feel simple and elegant! I love the look of a vellum card, with a underlying panel. The star is embossed, and this is pure beauty in person. THis is alos a great one to mass produce!
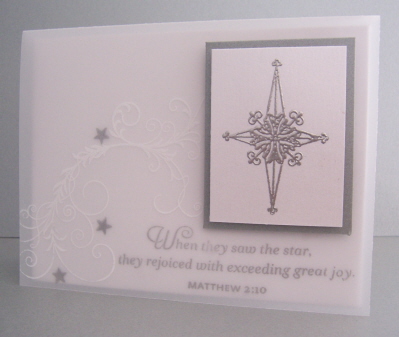
Rejoice!
Stamps-Silent Night
cardstock-shimmery white, vellum, shimmery silver
ink-versamark, encore silver, white stazon
silver embossing powder, heat tool
Silent Night Stocking Set
I really enjoy matching a card to a gift! This one kept with the clean and simple look I was going for.
The Holiday Tags are perfect for ANY holiday gift,
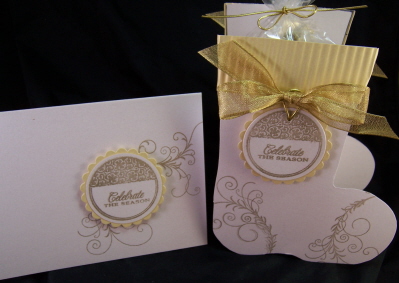
and matching card!
My Timeless Template-Stocking Stuffer
Stamps; Holiday tag collection 2008, Silent night
Ink- Gold Encore
Cardstock-Shimmery gold, shimmery white
circle scallop nestabilities
Gold sheer matalic ribbon, gold cord, paper crimper
2008 Holiday Tag Collection- This is a super tag set, that I need MORE time to work with! I can see many uses for it this holiday! This is what I have done for you-
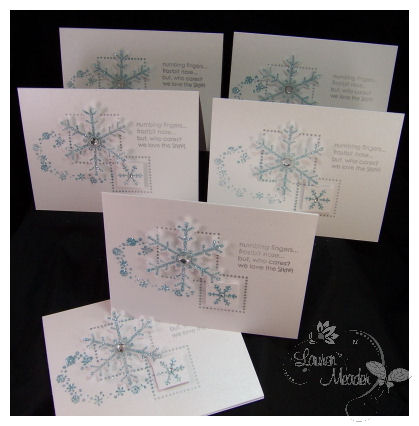
I made this box to hold the Gentle Falling Snow cards you saw in yesterdays post. The shimmer white cardstock makes what is so simple, a real WOW! The box fits the clear card boxes.
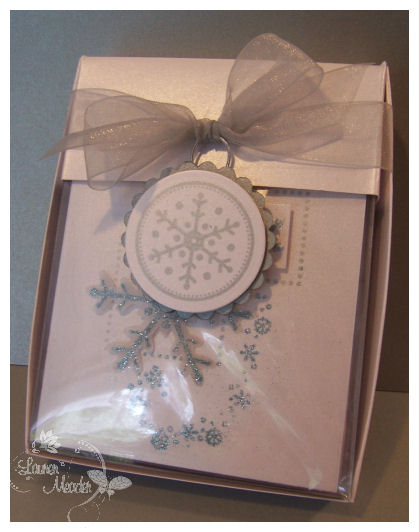
I created this set of 6 cards to share the possibilities of mass producing! I think this set is just so perfect for holiday themed cards! Makes a great gift item as well! This item was donated to a raffle for a family dealing with a child who has Cancer. I hope my little contribution helps them out 😀
Stamps: Snowfall, Snowfall additions, borders & corners square set, 2008 Holiday Tag collection
cardstock-white shimmer, vellum
ink-glue pad, encore silver
Clear card boxes
Mega snowlfake punch, circle nestabilties, silver cord, wide silver ribbon
Other-hero arts adhesive rhinestones, Art glitter, 7/8 square punch
OK that is it for me. I have a million things to do. Don’t miss the challenge posts OK!
I hope you have a super day, and get some time (like call into work) to stamp and create today!
Holiday Cards- Gently Falling Snow
Oct 13, 2008 Author: mytime | Filed under: Cards, Papertrey NewsletterToday is a very special post. This may just be what you need to jump start your family holiday card design!
DON’T miss the post below for MORE of My Timeless Template peeks!
Nichole asked our team to get some great holiday card ideas together for you! The only stipulation was they had to be able to be mass producible. Nichole has taken each of our Holiday cards and compiled a supply list, with the sketch each of us used for our creation to help you re-create any of the design teams designs SIMPLE and EASY! All the work has been done if you don’t want to think about your holiday layout, and what you need for supplies. They supplies are listed for 25 cards.
Details for my cards and supplies-on Nicholes Blog
I decided that I would use Snowfall & Snowfall additions-to be released tomorrow!
My creations are called Gently Falling Snow because that is what I am reminded of when I look at them. The shimmery white cardstock, and Ocean blue art glitter-like ice, are the perfect pair.
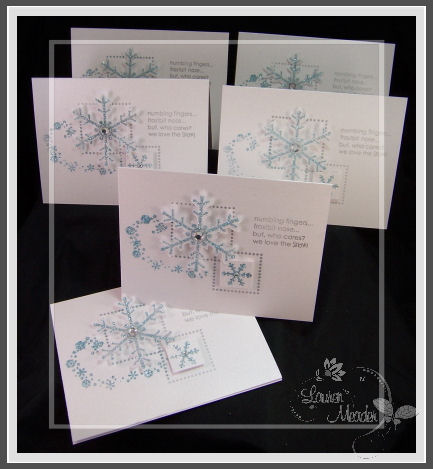
Set of 6
When designing my own holiday cards, I like to keep it as simple as possible and the less layers the better, as I have WAY over 50 to make! 😀
If it’s not fast and easy then its not for me! Mass producing is something I LOATHE. I have to say that playing with all the glitter was fun!
To me its in the little details that make the simple cards POP! I LOVE glitter, and vellum, so those were definitely going to be a part of this years design. The snowflake punch and this set are AWESOME together! I went with the shimmery white cardstock with Encore silver ink and lots of glitter!! Doesn’t is remind you of snow?
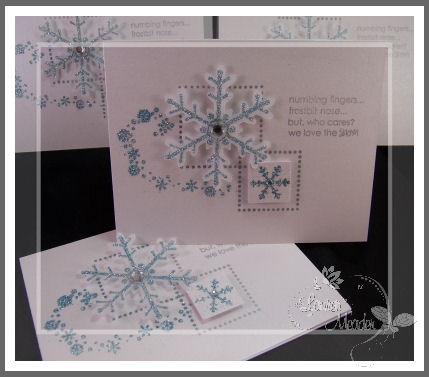
My cards were VERY easy this year! Just a couple simple steps.

Close up photo
By layering the 2 dotted square frames from Borders & Corners square set in silver ink, it gives the illusion of layers.
For some POP- I punched my vellum snowflakes, and used the glue pad to stamp the snowflake, then dusted on my glitter. Applied the large snowflake with a dimensional. I also punched a little square, and added a little snowflake to that!
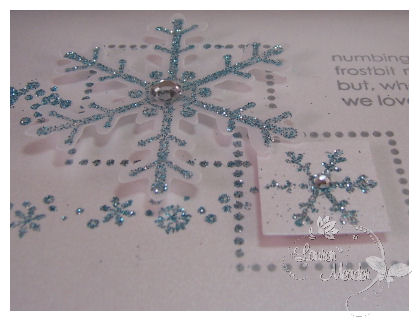
See the dimension.
By adding these 2 layers on dimensionals, my card looks like it took a lot of work when in reality they were very quick.
When these 6 were done I did package them up all nice 😀 You will see that tomorrow!
I hope you like my version of a snowy white Christmas card!
Make sure you check Nicholes blog for all the details!! The release party is TONIGHT! 9pm EST! You know I am over the moon with excitement, so I hope to chat with you then!
My Etsy

Who I Designed For
Blogroll
- Alicia
- Alli Miles
- Ally Blankenship
- Amber
- Andi @ crafts on a whim
- Angel R
- Angie Z
- Anne Kranitz
- Becky O
- Bee
- Beth Silaka
- Bethany Paull
- Beverly Nash
- Bobbie
- Cambria
- Cammie
- Card of the Week
- Card Positioning System (CPS)
- Cards for Cancer
- Catherine Doucette
- Charmaine
- Cheryl Sims
- Chriss Rollins
- Christina
- Christine Ewing
- Christine Wooden
- Colleen Schaan
- Craft Critique
- Craft Gossip
- Crystal
- Dawn Easton
- Emily Giovanni
- Geny
- Holly
- Igne Groot
- Inspirational Craft Blogs
- Irene
- Jami Sibley
- Jeanne Streiff
- Jen del Muro
- Jeni Bond
- JenMarie
- Jenn Balcer
- Jenn Diercks
- Jenn O
- Jennifer E
- Jennifer Mick
- Jennifer Pereda
- Jennifer-Sweet Treat
- Joanne Basile
- Jodi Collins
- Julia Stainton
- Julie Masse
- Karen
- Kathryn Berthiaume
- Katie Cotton
- Kelley Holland
- Kendra
- Kim Scholfield
- Kris’s Color Stripes! Get inspired here
- Kristen Dubosque
- Kristin Eberline
- Kristine
- Laura @ Sunshine Stamper
- Laura Turnmire
- Laurie Schmidlin
- Lesa Rapp
- Linda Duke
- Linda-LSN
- Lindsey Botkin
- Lisa (lakind scs)
- Lisa Kind
- Lori Craig
- Maggie
- Mara Campbell
- Maria
- Maria Levine
- Mary
- MaryJo
- Melanie M
- Monique Hansen
- Moxie Fab World
- Pam Imholz
- PaperCrafts Connection
- Peppers and Pollywogs Kids party site
- Rebecca Grohall
- Rita
- Robyn
- Rose Ann
- Sarah Vrolyk
- Sharon Harnist
- Sharon Johnson
- Sharon Rivera (a chemisrty with paper)
- Sherrie
- Sophia Landry
- Storage Units, Ink, & More Blog
- Sue Berker
- Susan (Rainy)
- Tangii Crane
- Tracy
- Tricia Traxler
- Trudee
- Velta
- VivLyn
- Zena
MTME Pretty Palette Color Team
MTME Pretty Patterns Sketch Team
My Time Made Easy TM LLC
Shop till you drop!
Lauren Meader
About Me
Copyrighted material
Subscribe To My Blog
Pages
- About me
- Alexa’s Story!
- My Crafty Corner!
- My Time Made Easy™ LLC
- Our Make A Wish Trip to Disney!
- Resume/Publication List
Calendar
| M | T | W | T | F | S | S |
|---|---|---|---|---|---|---|
| 1 | 2 | 3 | 4 | 5 | 6 | 7 |
| 8 | 9 | 10 | 11 | 12 | 13 | 14 |
| 15 | 16 | 17 | 18 | 19 | 20 | 21 |
| 22 | 23 | 24 | 25 | 26 | 27 | 28 |
| 29 | 30 | |||||
Archives
- August 2013
- July 2013
- June 2013
- May 2013
- April 2013
- March 2013
- February 2013
- January 2013
- December 2012
- November 2012
- October 2012
- September 2012
- August 2012
- July 2012
- June 2012
- May 2012
- April 2012
- March 2012
- February 2012
- January 2012
- December 2011
- November 2011
- October 2011
- September 2011
- August 2011
- July 2011
- June 2011
- May 2011
- April 2011
- March 2011
- February 2011
- January 2011
- December 2010
- November 2010
- October 2010
- September 2010
- August 2010
- July 2010
- June 2010
- May 2010
- April 2010
- March 2010
- February 2010
- January 2010
- December 2009
- November 2009
- October 2009
- September 2009
- August 2009
- July 2009
- June 2009
- May 2009
- April 2009
- March 2009
- February 2009
- January 2009
- December 2008
- November 2008
- October 2008
- September 2008
- August 2008
- July 2008
- June 2008
- May 2008
- April 2008
- March 2008
- February 2008
- January 2008
- December 2007
- November 2007
- October 2007
- September 2007
- August 2007
- July 2007
- June 2007
- May 2007
- April 2007
- March 2007
- January 2007
Categories
- About Me
- All That Scraps
- blogger challenge
- camera/photo play
- Cards
- Contests
- family stuff
- FOR SALE
- Home decor/3-D items
- How to FAKE it!
- Introduction
- JUGS Challenge
- JustRite Stampers
- Lizzie Anne Designs
- My family stuff
- My Stamping Space
- My Time Made Easy
- My Time To Color Challenge
- My Time to Create Challenge
- My Timeless Template Challenge
- My Timeless Templates
- Mytime Mail
- MYTIME MOVIE/VIDEOs
- Papertrey Newsletter
- Pink Cat Studio
- Pretty Palette Challenge
- Pretty Patterns Sketch
- Product Opinions and Must haves
- Recipe's
- Saturday Sketch
- Smilebox Creations
- Stampavie
- Tutorials
- Uncategorized
- videos
Most Popular
- Create your own Onesie Card Tutorial-and important NOTE! PLEASE READ (2529)
- Saturday Sketch-Boxed bag holder (2333)
- Going GREEN! Fancy Flower Flourish-Closure Video (1478)
- Fabulous Favorite - Giveaway! (1336)
- a Prayer Request (1232)
- QUICK-Easter Baskets from Nestabilities-PTI style-and blog challenge (1063)
- Teaser Sketch (999)
- February Release Giveway! (and a little peek) (996)
- Group Post and Rambling Rose Video Tutorial (985)
- GIVEAWAY! Who wants it all?! (895)
Recent Comments (RSS)
- 첫충사이트: 완전히 흥미로운 블로그 게시입니다. 저는
- sarah: Wow, Lauren, what a stunning
- hedie: خرید راهبند
- 야동: Love to read it,Waiting For
- 야동: This seller is in a
- 바카라사이트: 여기 처음 왔어요. 나는이 게시판을
- 야동티비: I was surfing the Internet
- 바카라사이트: 비슷한 주제에 대한 흥미로운 정보를
- 바카라사이트: "여기에 제공해 주신 귀중한 정보와
- 온라인홀덤: 유익한 웹 사이트를 게시하는 데
Copyright © 2007 - My Time, My Creations, My Stampendence - is proudly powered by WordPress
This blog has been Tweaked and Designed by Sara Williams