Archive for the ‘My Timeless Templates’ Category
Templates, Templates, Everywhere!
Apr 30, 2009 Author: mytime | Filed under: About Me, Cards, My Timeless TemplatesYOU GOTTA READ THIS!
FIRST-this is the THIRD post for today (yeah Im THAT BUSY and needing to share! LOL!) So don’t miss my VIDEO, or my Peek post!
Now I have to share some info that I am OVER the MOON about-literally!
Some of my blog readers alerted me that I WON 2 contests!!! WAHOO!!
Now the COOL thing is I never enter stamping contests or anything, but since I don’t have time to send in stuff for publication , I figured WHY NOT! So, I took some time to give it a try this time 😀 It paid off 😀
This was for the Cards & Gifts Week Challenge:
Contest One- over on The PaperCrafts Connection Blog This one you have seen. it used the My Timeless Template—>Take Along Tote!
Then I was alerted to this one!
Contest Two-The Mothers Day Gift Challenge
This was one of my most favorite projects using The Perfect Match template
But for ME the coolest thing was seeing that TWO of the winners, in other categories, used the My Timeless Templates too!!!!!!!!!!!! Is that not awesome??
Dana (who was just picked for my Challenge Team!) used Lolli-Pop Along, and the Rounded Wrap up!for her entry! Her blog post here
Dana is also giving away a My Timeless Template-HERE!
Then the other winner Julie used From the Desk of-for her entry! Here is her blog post! It came out SUPER cute!!
—————————————————————
THEN-I was sent a link to THIS POST! You must read it!
I cannot believe it!! Joan Bardee likes me! OK maybe not me, but My Timeless Templates 😀 Joan is a amazing person. Someone whose opinion I always valued. She is very blunt, straight forward (and funny/talented) crafter! She tells it like it is. Now I don’t KNOW her personally, but feel like I do through her writing.
So when I was sent this link and saw she was HONESTLY reviewing my templates-I almost got sick! LOL! I thought OH! NO!! What if she hated them? But then I read some of the sweetest words a designer could read about the product they put their blood, sweat, and tears int0!
I got teary reading it (like I do with ALL the posts or comments I see people make about them) because to hear that people really like them is amazing. A true dream come true. I’m use to gushing over other peoples stamp images or products, so when someone gushes over something “I” did, its amazing. I’m just a SAHM-to three amazing kids, with a BIG DREAM, and am stuck living in a little town, where no one knows what stamping is! LOL! So to share it all here is just crazy!
On another note: I swear I didn’t pay her! LOL! She put so much time and effort into her post for YOU to get a non-biased view from a customer / crafter.
Im just in shock. Thank you Joan for making my day!!!!!!!!!!!!!!!! TRULY! How can I say thank you?! You have a girl almost speechless!
NOW last but not least-Nicholehas had a hard time accessing the gallery and whatnot-but I swear her announcement for the Templates is coming soon! You won’t want to miss it!
WHEW!!! Glad I go the extra shot of expresso in my iced coffee today! I needed it 😀
Blog Hop! My Timeless Templates
Apr 25, 2009 Author: mytime | Filed under: My Timeless Templates, Papertrey NewsletterTime for the PaperTrey Ink Blog Hop!
YEAH! I’m totally going to be popping by everyone’s blog to see what they did! Im so excited.
This months challenge is to use My Timeless Templates! If you never tired them before, now is as good a time as any!
Being the desinger of the templates– I feel SOOOOO bad I didn’t get anything done for the Blog Hop! I know! Its TERRIBLE!!!!!!!!!!!!!!!
But I have a SUPER excuse 😀 (besdies the fact my kids were HOME on vacation and I had deadlines! LOL!)
I was busy this week designing TEN more templates 😀 Gotta keep the ideas and templates flowing, and when I get on a roll. there is NO stopping me 😀 I am dying to share with you.
So, I decided I would share a SNIPET from ONE of the templates that we are releasing in MAY!
Here it is-
P.S. There will be a SPECIAL announcement tomorrow about them too! YOU won’t want to miss it.
I’d love to hear WHAT you think is next 😀 OR better yet what YOU may wish to see-We have an amazing line up for the next 2 years 😀 but there is never enough ways to package your gifts! Maybe if I see a NEED, we will release certain things sooner rather than later 😀
Thanks for stopping by. Im off to HOP!
Ill be finalizing my design team decisions tomorrow too, and the hop will definitely help me decide 😀
Thanks for stopping by
FIRST Template Challenge! Cherry Blossom Gift Set
Apr 18, 2009 Author: mytime | Filed under: Home decor/3-D items, My Timeless Template Challenge, My Timeless Templates, Papertrey Newsletter, Product Opinions and Must havesInspiration is EVERYWHERE!!!
Its always great to start with an inspiration piece when you are creating something! So that brings me to my post tonight.
All your comments (and private emails :D) have truly inspired me to get it together!
Lots of great, fresh ideas. That is why I love you all. You totally energize me 😀
So here we go!

Truly Delicate Gift Set
All this talk about templates, and challenges, lead me to use one of my first My Timeless Template © releases called For Keep{Sake}!
I love the window cut out option! Lets you peek at what fabulousness is inside-awaiting you!
Cherry Blossom 2oz. body wash, body lotion, body spray, and loofah-fit in here perfectly
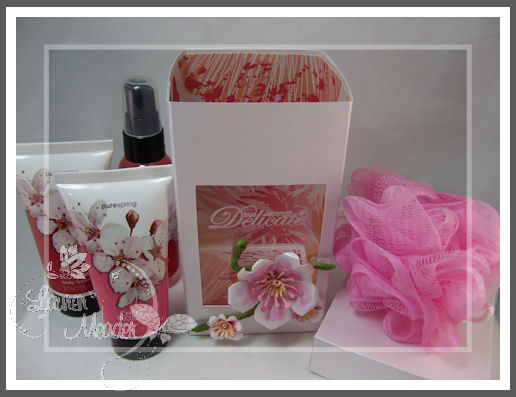
I was SO inspired by the Cherry Blossom bath set I purchased for a gift item, that I designed my packaging around it! I always say its ALL about the presentation!
Many bath and body products are just plain GORGEOUS! No need to cover them up! So let’s get inspired by them for our gift design.
This is my handmade Cherry Blossom flower-inspired by my bath set.
Soooooo many of you said you want to see template challenges so here we go! Let’s see how many of you actually want to give this a go!
Based on the comments and MANY emails I think I figured out how to SPICE it up and keep in fresh and interesting!!
Depending on participation -I think I have decided WHAT I want to do on my blog now!
One week will be a template challenge, one week will be an inspiration challenge, another week will be a color challenge, then another week sketch challenge-not in that order! LOL! So something new each week.
Here is the first template challenge:
My Timeless Template Challenge 01 (keyword MTTC01)
Use ANY template YOU like. We have 2 FREE templates-so NO excuses!! You have a week to create something.
Like I did-Design your template/package based on the label of a bath product of your choice—> FROM HERE
(unless you have your own already)
Post the link to the inspiration piece WITH the photos of your finished template
Link your creation HERE
This should be so fun to see 😀
Now onto my package details…..
My For Keep{Sake} template was made from shimmer white cardstock.
I have long since wanted to line the INSIDE of my box, so I finally did that here today. LOVE the look.
NOTE: It is easiest to line it inside BEFORE assembling!
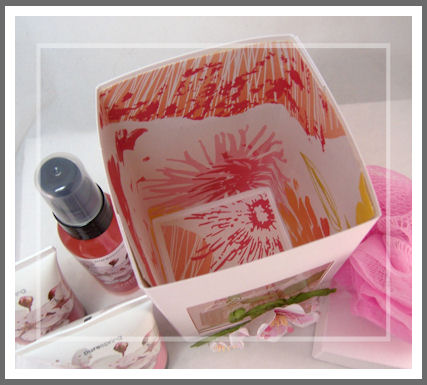
I used the Mimosa paper, which is shimmery by SEI. What a totally professional and finished look! Don’t you think? Remember its always the LITTLE details that give that WOW! factor.
You can see the little bath set in the window.
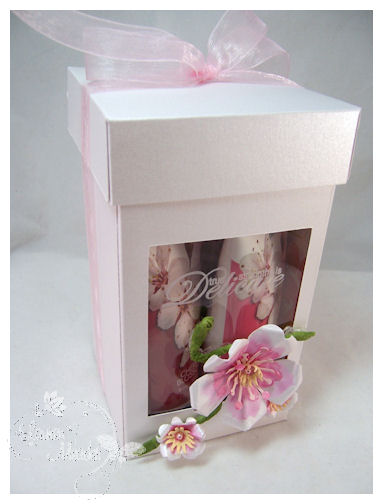
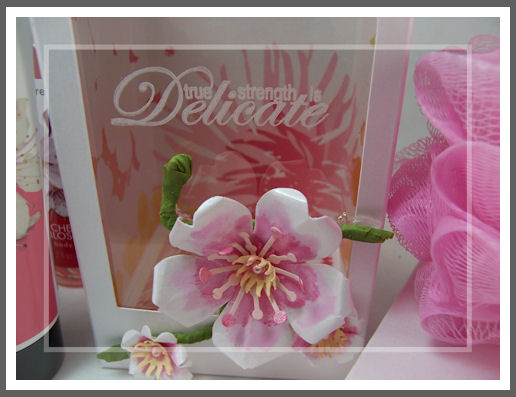
I love how the cherry blossoms came out!
My first time making them too-based on the ones on the bath bottles.

I do have a flower video planned-hopefully filming tomorrow. I just NEED a breather right now, and doing this was just plain FUN, which is definitely what I needed.
This gift set is now in my Etsy Shop!
The flowers are made by me, and painted with a Shimmerz paint! I love the look.
Think of what a FABULOUS gift JUST the BOX is, let alone the yummy smelling gift set inside!
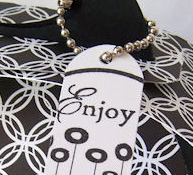
The window is a sentiment from Remember set ” True Strength is Delicate”
Just love this.
OK! Now its YOUR turn!!
I can’t wait to see what YOU do.
Thanks for all the suggestions and emails. My head is spinning 😀
Thanks A Latte Gift set!
Apr 17, 2009 Author: mytime | Filed under: Home decor/3-D items, My Timeless Templates, TutorialsI didn’t post yesterday beause I have tons to do and needed a BLOG BREAK!
The kids begin vacation today-so that means the start of little stamp time for me, since I want to go DO STUFF with them, so we don’t ALL go insane, being in the house. Especially with nice weather coming! Lots of deadlines, so that mean PRIORITIES!! So blogging wasn’t on that list yesterday.
No worries I have gotten lots done for next week-as I have so much to share! NEW RELEASES COMING!! So brace your pocketbooks people 😀
In the meantime I have a fun project to share using the NEW! Spring Release from JustRite Stampers called Demi Phrases
A fun spin on a easy gift!
Thanks a Latte Gift set peek

I so love those 1/2 circle sentiments, and the fact that they can be put into various of the JRS blocks for various looks.
Make sure you check out these 2 posts
Getting Started-this will help you know where to begin with their products
Retirement SALE!-They are making room for NEW! stuff so if you want anything-HUGE discounts!!
OK back to the post info!
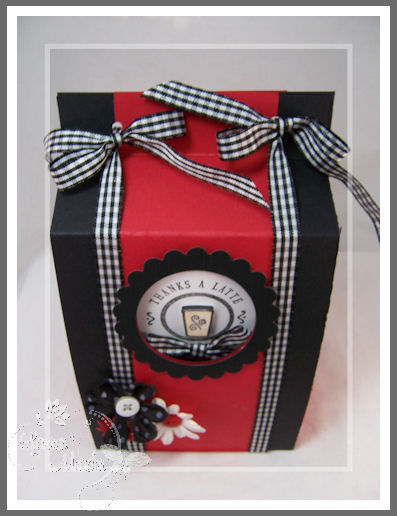
Thanks a latte-gift set
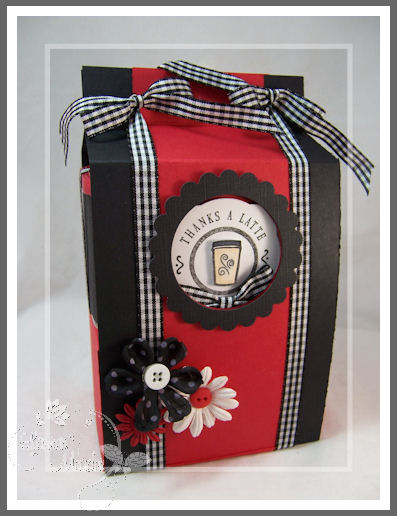
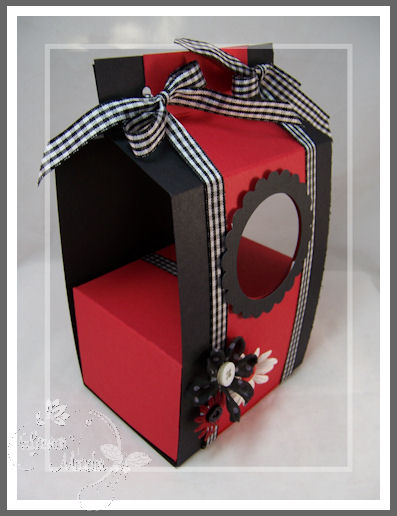
So here is my gift, packaged up all purty!
Who wouldn’t get excited by this?! I would!
Now you may wonder-WHAT is inside…….
OK I have to say I LOVE my bow! LOL! It has 4 ribbon curls. Not a good photo-but again just had to point it out.
Do you have a cocoa, coffee or tea drinker in your life? Raise your hand! LOL!
(if not you can just use the tin and package up something else that tickles your fancy!)
I am a HUGE coffee person-HUGE! So I thought this would make a fun gift.
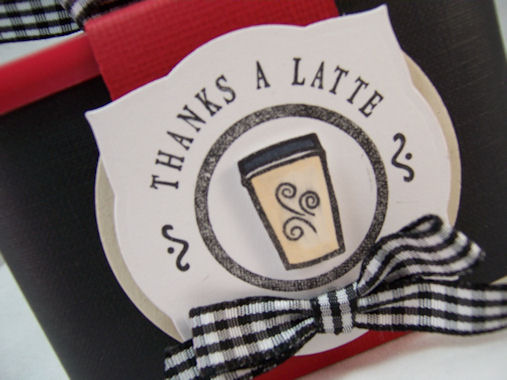
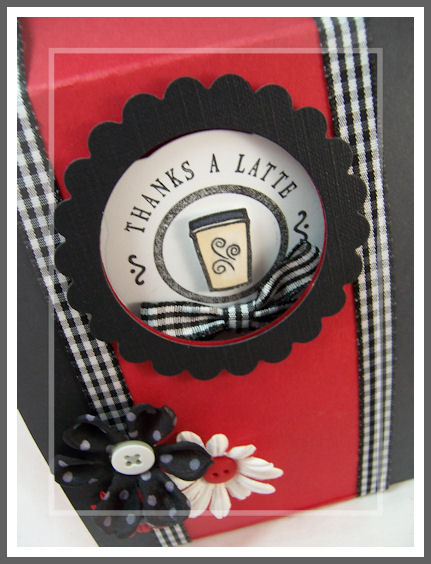
I stamped my Demi-Phrases , in black ink, on 2 pieces of white cardstock.
The coffee cup is by Gel-A-Tins(and OMW! Upon linking the site I NEED more!!! WOWZERS! Check them out!)
I found a set here Coffee Break. I stamped, colored and cut out the cup for a 3D effect.
I then used the Labels 3 die to cut out 2 labels for my coffee tin. LOVE IT!!!!
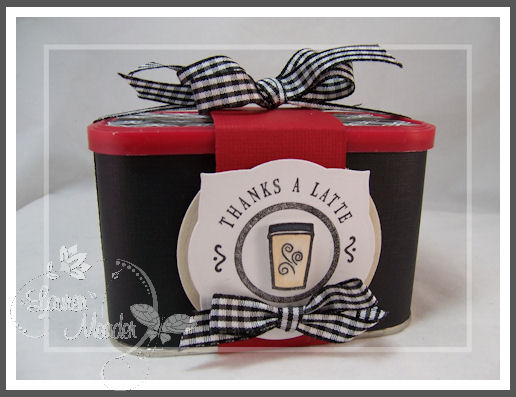
Both sides of this tin are decorated the same. I like everything to have a “finished” look. You can’t see any seams either!
I used Black & White basics for my paper, and black gingham ribbon
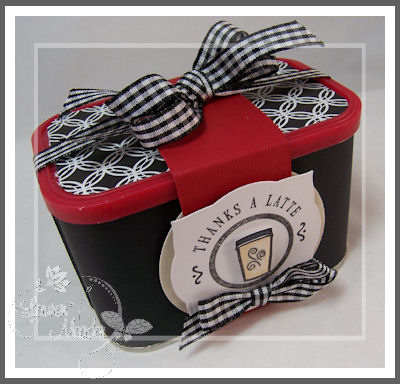
I wanted to package some French Vanilla Coffee Drink Mix from- General Foods International, since I am addicted to ADDING it to my coffee, for a nice “latte” kind of taste to it. I love the little tins too. WAY CUTE.
Now I know its a coffee drink mix-but if you try this!
I have a Keurig- s0 I put in 3 scoops of the mix in my cup, with 3 Splenda, and my fat free cream. I then brew my Dunkin Dounuts coffee into the cup, and it give a very rich, creamy awesomeness to my coffee! LOL! I like the sugar-free one-less calories 😀 But it us YUM-AZING!!! Try it!
OK off track there. Sorry!!
My colors were taken from the container colors.
I took the directions on the coffee tin, and using my computer-printed them onto a adhesive sheet , cut, and adhered it to the bottom of the can, so the recipient knows what flavor the coffee mix is, and how to mix it! Plus it looks nice too.
I wanted it to be SPECIAL though! Not just a wrapped can of coffee mix. So I went the extra step and made it a set that I LOVE!
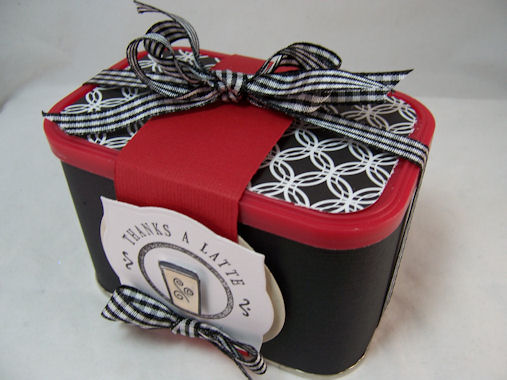
How about coffee and a treatlet? I took some pre-wrapped (4 of them) White Chunk Macadamia Nut Cookies, and inserted them into theLolli-Pop Along base, for a yummy surprise 😀 They are wrapped so it preserves freshness! Oh and I despise cooking, so its easier than home-made, but you could add your own home-baked cookies too!
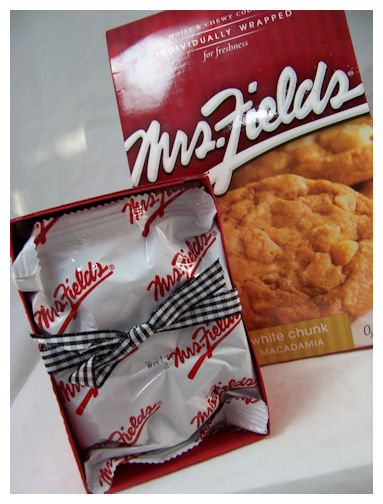
Here they are in the base. All 4 with a bit of room.
Now we slide it into the template.
NOTE: I did alter the template a bit to fit my project 😀
I made my base 3 inches deep instead of 2.
Same for insert.
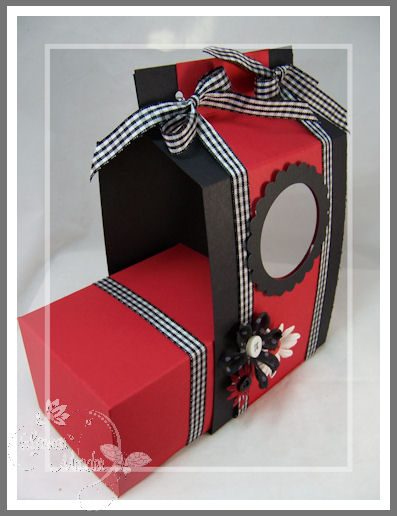
SO I turned the base of cookies-which are tied in nicely, and turned it up-side-down, so my coffee tin can sit on it.
I just slid it into myLolli-Pop Along base.
Now put the coffee tin on the top of that…

Viola! Awesome gift wrap!
This is a peek through the window on the front of gift set . I love it
I have been wanting to use it again, for a while.It turned out to be PERFECT for this gift set.
I decorated the front to look similar to a coffee bag. Mission accomplished.
Just another photo to share. I took a bajillion!
Now isn’t that s SUPER presentation, of a SIMPLE gift, that is very inexpensive?! Seriously! I love this craft!!
Can you tell?! LOL!
Funny I love packaging stuff but I LOATHE wrapping presents! I like UNWRAPPING them though 😀 I just think its strange how I love packaging but not wrapping gifts. You should see how SLOPPY something comes out if I wrap it. You can totally tell it was a LABOR of love! LOL!
I have been creating up a storm so come back to see what else I have for you! OK!!
So that is it my friends!
Till tomorrow 😀
Cross your fingers I get my videos taped too! Lots to share with ya
Thanks for stopping by
Papertrey Ink April Release
Apr 14, 2009 Author: mytime | Filed under: Home decor/3-D items, My Timeless Templates, Product Opinions and Must havesWell it is FINALLY here———> The Papertrey Ink Release!
Its crazy how much amazing stuff has gone on with the release this month 😀
My Timeless Templates ©-Get a Handle On It © , and From the Desk Of ©-are NOW available for purchase!
I am STILL working on some MORE samples 😀
As for my release projects this month-there is only ONE you haven’t seen :C YUP! One measly sample. Don’t forget I did share LOTS of eye candy over the last few days. A SAHM to 3 can only do so much ya know.
My last peek uses Tea for Two
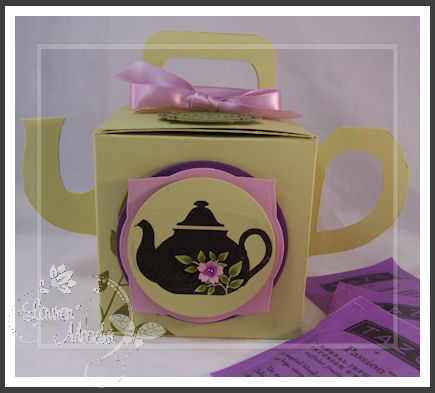
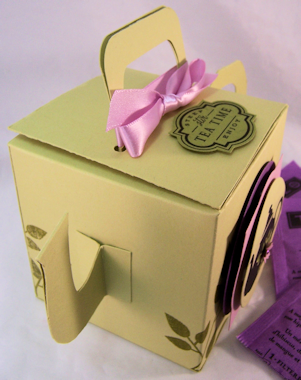
“I’m a little tea pot ” box

I seriously sang the “Im a little teapot” song while making this project, and typing this post! LOL! Its actually driving me INSANE!
This is the detail shot of my project focus. I punched and colored a mini flower, and colored in my leaves. This is my favorite tea pot image from the set. Maybe because Beautiful Blooms is my ALL TIME favorite flower set-to date! I also LOVE the layering of the nestabilities.
This is the best tea set EVER!!!! I’m beyond in love with it 😀 So many possibilities. For some reason I’m on a PURPLE kick this month! LOL! In case you didn’t notice. I think 3 of my projects used it. Maybe more. Whose counting right? As long as it all works.
OK so here is the TAH-DAH! moment…….
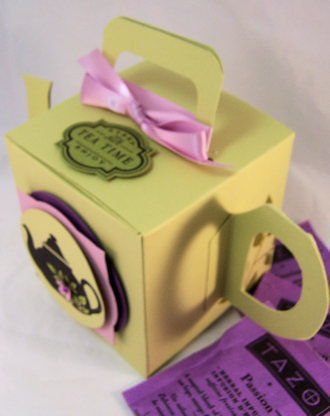
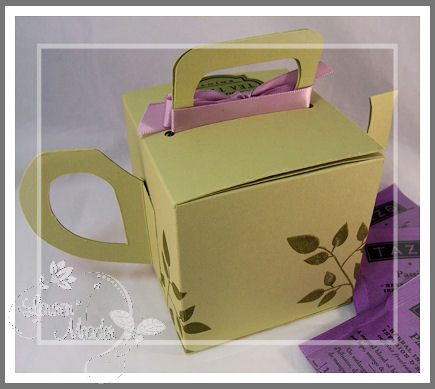
I used my Timeless Template- Get a Handle On It, to create a gift box that LOOKS like a tea pot.
Can you say LOVE IT?!!!!! (yes I am very excited over it)
How flippin cute is that?!
It was inspired by the tea pot on the box.
I am SOOOOOOO proud of it, because I free-handed the handle and spout template-which is double sided. I so stink at DRAWING-so I let my scissors be my guide.
Did you think this box could be a tea pot?
Tha handle and spout, adhere NEATLY to the box, which is the KEY!
EEK! Blurry photo ALERT! Sorry.
I did stamp the back too-can’t forget that.
I’m seriously IN LOVE! Thank goodness I had the right frame of mind to make another handle/spout “template” for myself BEFORE adhering it to my box, and attempting it again. These were perfect on the FIRST try! Not something that happens often-let me tell you.
Now here is the “label” on the box top.
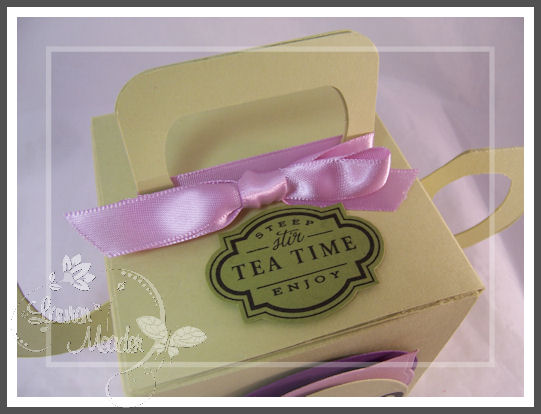
I think its just so darn purty. I used the Key Tag Punch to make my handle on the top.
Inside this Tea Pot Box-there is Passion Tea from TAZO. An entire box fits-with room on the sides.
Despite the photo-it matched my project PERFECTLY!!!
Love packaging ever-day items, into special gifts 😀 I mean really. You package “tea” in wrapping paper and its *just* tea! You put it in this box, and its SO much more. Don’t you think?
For a whopping $5 this template offers so much variety! I really love it. Well I guess thats a lame statement! LOL! I wouldn’t do anything I didn’t LOVE! LOL!
Supplies all from Papertrey Ink
My Timeless Template: From the Desk Of
Stamps: Two for Tea, Beautiful Blooms
Cardstock: Spring Moss, Ripe Avocado, Lavender Moon, and eggplant
Ink: Black and copic markers
Satin ribbon in Lavender Moon
Labels 3 & circle nestability
Flower punch, adhesive pearl
Lastly-this was the concept project for “From the Desk Of” template
For Robyn
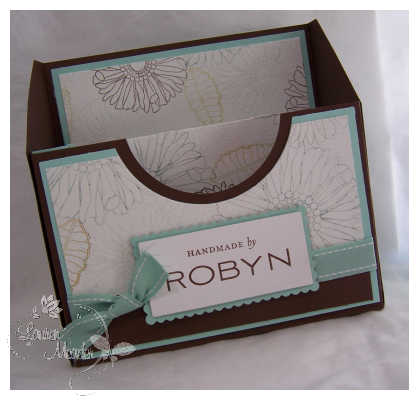
I made my own patterned paper using Friends Til the End. I also used Simply Stationery and Fresh Alpha!
We did re-enforce the “original” divider, from the original you see here, for a more STURDY box.
All the tweaking that comes after the original concept is put into production. Always lots more tweaking. Often times I just NEED to get it out onto cardstock-ASAP! Then when I know it “works” I tweak and tweak some more.
Now this box can definitely be given EMPTY and still produce a WOW!
This is a comment taken from Robyn (:D) The friend I made this for-on my blog yesterday
“Hey Lauren …. your two new creations are splendid 🙂 I hope all your ~peeps~ realize how beautiful and EASY your Templates are to print and recreate!
And I’m especially fortunate, as I am the proud owner of one of Lauren’s “From The Desk Of…” creations that she personally created for me with my name on it. I can’t tell you how many friends and family comment on it’s {{{WOW }}} factor and how stunning it is sitting on my desk :0) I’ve also have two requests to make this item already after seeing mine, from friends & family! It totally blows me away every time I see it, knowing that it’s made from paper, rubber & ink … but also because I know Lauren puts her Heart & Soul into all her creations 🙂
So make sure you download some ~*Timeless Templates*~ tonight, via PTI; you will fall in love with Lauren all over again =)”
Isn’t she sweet?! She always makes my day.
So there you have it! All my peeks are done!
I hope you enjoyed the items I shared here. I literally POUR every OUNCE of creative being I have into these projects each month-to ensure lots of creative ideas 😀 You are all so inspiring to me 😀 Your kind words and sharing YOUR creations, really keeps me going. Your my subliminal-energizer battery! LOL!
So once again-thanks for helping inspire me to better my best!
More to come tomorrow…………..
Template Duo
Apr 13, 2009 Author: mytime | Filed under: Home decor/3-D items, My Timeless Templates, Papertrey NewsletterLast peeks till the RELEASE.
JEEPERS! This week is in SLOW motion, isn’t it?! I feel like I have been creating for a month! LOL! I crammed so much into a few days, I’m not sure how time stood still.
Maybe I’m just too excited to get the show on the road! I love when we have a release. I especially love when you share YOUR creations with me 😀 Its the best mail in my IN BOX- truly!
So as you know we are releasing a TON of stuff over at Papertrey Ink. I don’t think Nichole EVER sleeps. I think she is busier than me-and trust me, I am pretty busy-everyday! LOL!
Well as you know, we are releasing two more templates this month! From the Desk Of, and Get a Handle On It! Only ONE more sleep (as my kids would say!) I really love this months release ( I guess I love every month hehehehe) but I can’t help it.
So today I thought I’d share another peek-one for each new template. I swear I could make a million things with JUST these two. I have so many ideas, my note pad page is FULL.
Lots of VIDEO ideas too. I so need to get FILMING soon 😀 My in-box was full of requests 😀 THANK YOU.
So lets move along to the eye candy shall we? I know you aren’t here for me blabbering on and on, when we have a release coming.
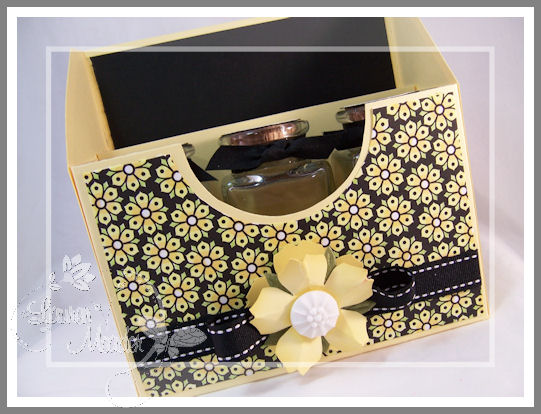
Little Black Bird- Jar Trio
I recently got an AMAZING deal on some jars at the Dollar Plus store. I really dislike the PLUS part! LOL! These were MORE than a dollar for several, but I couldn’t resist! I see things like that, and immediately a million gift ideas and packaging options FLOOD my brain! Even my KIDS find stuff and say “OH! Mom I bet you could make something pretty out of this!” Its hilarious. I love it. I like that they TOO can see outside the box, so young 😀 I’m telling you Im totally going to be “replaced” by my own children in a few years.
I really LOVE Black and Lemon Tart together.
I saw an advertisement (not sure for what-sorry!) that used these colors, so I jotted it down for future reference.
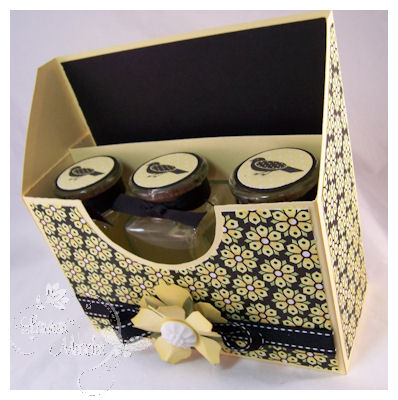
I LOVE Black & White Basics patterned paper-the floral pattern especially, since I LOVE customizing it to whatever color I want for the project. I just whip out my Copic markers, and away I go. I have colored it numerous times, and it never gets old to me 😀 Its actually quite relaxing. granted its a LITTLE time consuming, but well worth the look.
For this project I made my side panels, and front panels with the colored paper.
If you PRINT the designer panels on COPY paper, then use the copy paper as a guide you get just the right amount of colored paper for the decorative panels 😀

I wanted to make a gift that the receiver could personalize by putting whatever THEY wanted in the jars! Hence them being EMPTY!
These have a wide mouth, with a cork stopper.
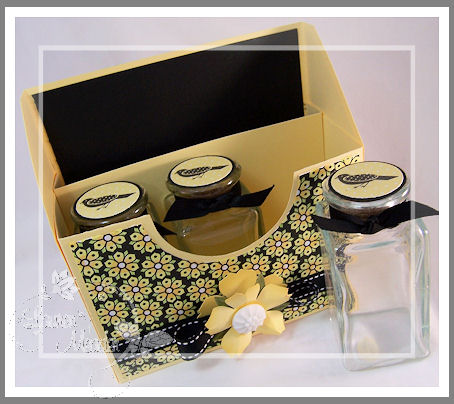
They are great for office items like tacs, paperclips, staples……..or maybe for a sewer! Buttons, thimbles, little mini thread rolls, How about the stamper? Buttons, Brads, Eyelets or Prima’s! The list goes on and on. You could even fill it with little bath products like bath wash, lotion and bath salts! Maybe a gardener! Put various seeds in each bottle?!
Anywho-I love the WOW! factor these colors offer.
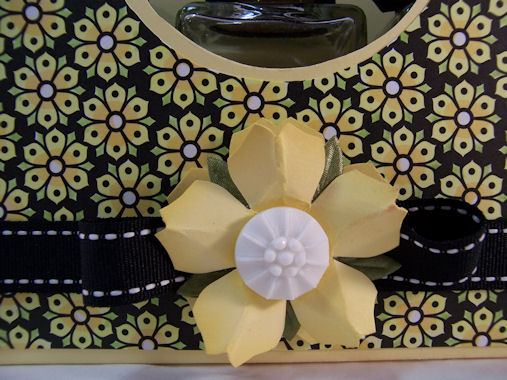
Isn’t the flower detail gorgeous??
There is a pocket in the back. That is empty. Again I wanted to let the receiver fill it with their choice of items0like a journal, address book, photo album, gardening journal, face spa packets……………..whatever ends up being their “theme”.
Who wouldn’t LOVE this?
Supplies:
My Timeless Template: From the Desk Of
Stamps: Everyday Classics
Cardstock: Lemon Tart, True Black
Patterned paper: Black & White basics-colored with copics to match, 2008 Bitty Dots collection
Ink: True Black, and Copic markers
Vintage buttons in white
Various punches
Ribbon : Stitched black grosgrain, black twill
glass jars-Dollar Plus
OK next up!
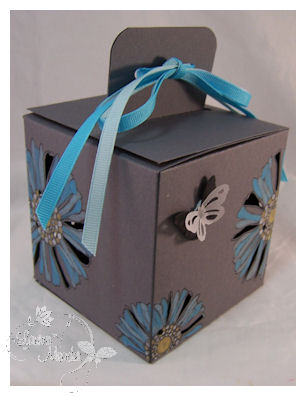
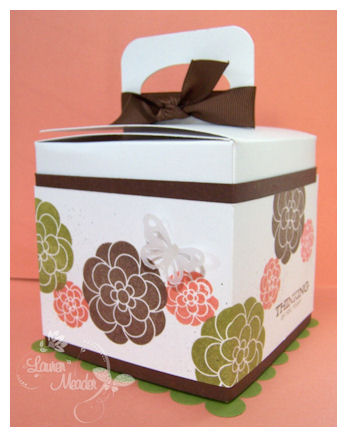
This funky box design was inspired by some fabric I saw used on a purse while shopping Etsy!
I’ll be darned if I can find it now! I knew I should have saved it to my faves 😀 I wanted to buy it 😀
If you haven’t noticed Friends Til the End is a top favorite set of mine 😀 What I really love the cutting out part of the petals! Im not sure how well it shows but various petals are cut out of the box! I LOVE the look it gives to the box.
This one will be hard to part with too.
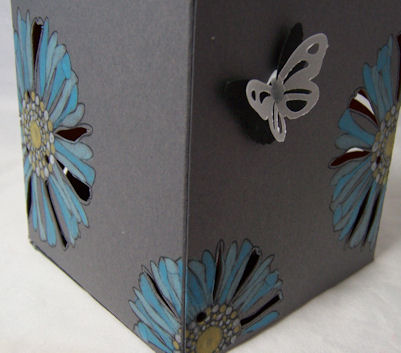
I stamped my petals on the gray cardstock box in black. I then took my hobby blade and sliced some out.
For a NICE POP of color I used my Prismacolor Pencils-they give a FAB pop of color when working on DARK cardstock bases. I’m LOVING this look.
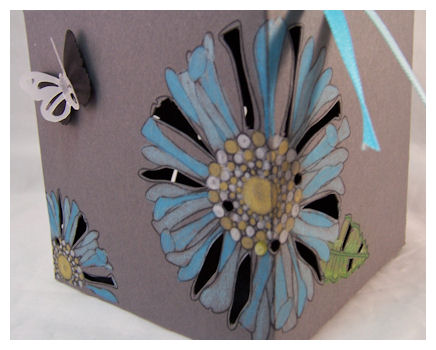
The box is decorated on all sides 😀 You always want to remember the BACK!!
Instead of punching a handle I punched two holes, and strung through some grosgrain ribbon instead.
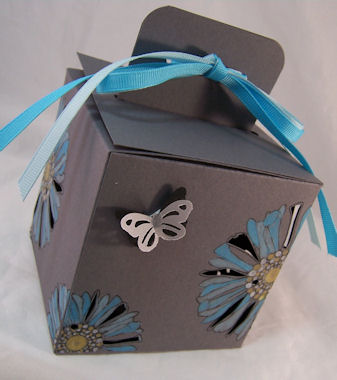
You know I HAD to add a butterfly!
I’m selling this on my Etsy shop so I left it BLANK! That way someone can use it for whatever they choose.
Supplies:
My Timeless Template-Get a Handle On It
Stamps:Friends Til the End
Cardstock: Dark Gray, vellum, true black
Ink: Black Pallette
Prismacolor pencils
Hobby blade
Martha Stewart butterfly punch
ribbon
OK so TONIGHT is the BIG release! I can’t wait. I hope you are as excited as I am! I can’t tell you how much I enjoy sharing all my ideas every month with you all. Your sweet comments make the ENDLESS hours of designing, altering and creating so worth it to me 😀
I know I say this stuff ALL the time, but I really do mean every word. I feel like you all take the time to stop by, and or comment, the LEAST I can do is tell you how much it means to me 😀 I read every single word-always!
So thank you! I hope to see you tonight on the PTI forums 😀
In the meantime……………….check in on Nichole, Becky, Dawn , Heather and Lisa,as they are all sharing samples too!
Sooooo I’ll chat with you later or see you back here tomorrow!
PS did you all notice my SUPER awesome new signature?! Don’t you love it?! Im over the moon with it. My blog girl Sara is THE BEST! I swear she feels like my sister I never had! She rocks!! She even did my Etsy Store Banner 😀 and the listing on my sdiebar. Amongst a million other things. Im shocked I’m not on her SPAM list yet! LOL!
Sara you know I LOVE YOU!!!! You are the BESTEST!
OK Im going now 😀
Doubling up on the template!
Apr 12, 2009 Author: mytime | Filed under: Home decor/3-D items, My Timeless Templates, Papertrey NewsletterWell we are still sharing sneak peeks this week for the Papertrey Ink Release!
I KNOW you are waiting for a video-but I just can’t swing it rigth today. I will have one this week though. I still need to post my Saturday Sketch stuff. The last 3/4 weeks of missing my own sketch should indicate Im not able to get everything done :C I always have SO MUCH I want to do, but can’t. KILLS ME!
As you may know, the release will take place on the 15th! Im just so beyond excited, and exhausted at the same time.
Today I am sharing a sample with the From the Desk of template.
I think this one is REALLY cool!!
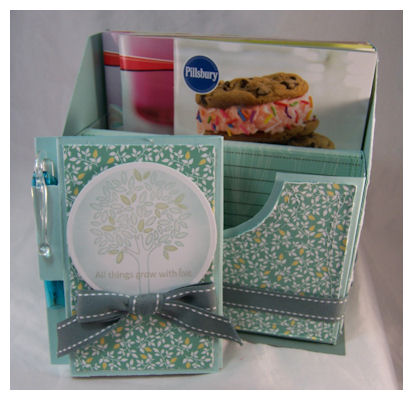
I took the template, and made 2 of the boxes. I then adhered them together, back to back, and added a bottom panel-for a finished look. Now talk about making a UBER cool-MEGA gift/Organizer 😀 WAHOO!!! Plus it looks rockin together.
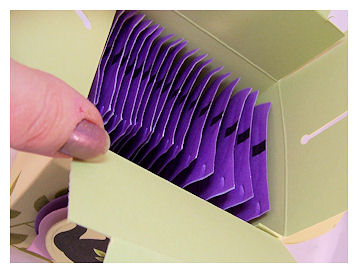
NOW for a REALLY cool- My Timeless TIP!!!!!!!!!!
For the decorative side panels: when you ADHERE the TWO finished templates together (as you will see in my project)-
You cut out your decorative panels out-but LEAVE them together in the center!
See photo-this is the print out of the decoartive panels-which would be cut into 2-writing side adhered to template.

Don’t cut the panels separately. Leave them together!
That gives you the PERFECT-solid – one piece- decorative panel cover!!
Come look at what I mean
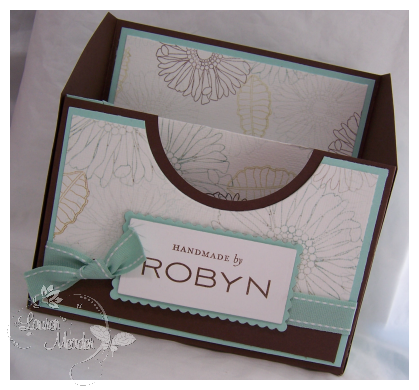
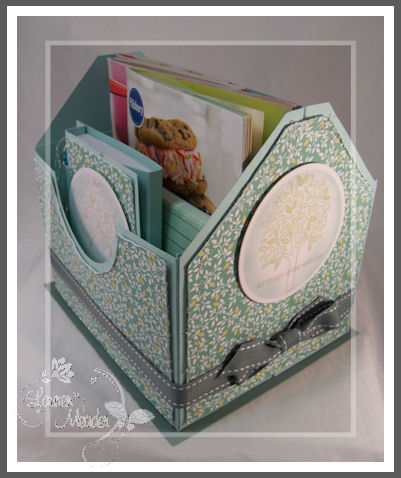
I decided it would be a Counter-top Recipe Cart! A great looking box, that fits mini recipe books, recipe cards to give to friends, a file system for your own recipe’s and a note book so that you can write down meal plans, recipes, things to buy or other ideas!!
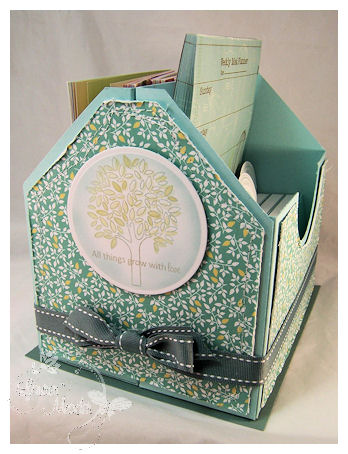
This is the side of the Recipe Box I created.
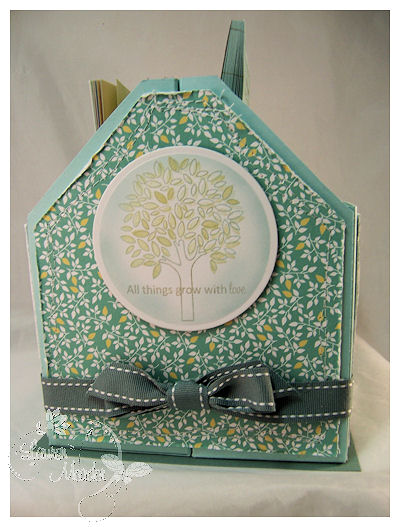
Both sides are the same. I designed this so that the sides of this box would face out.
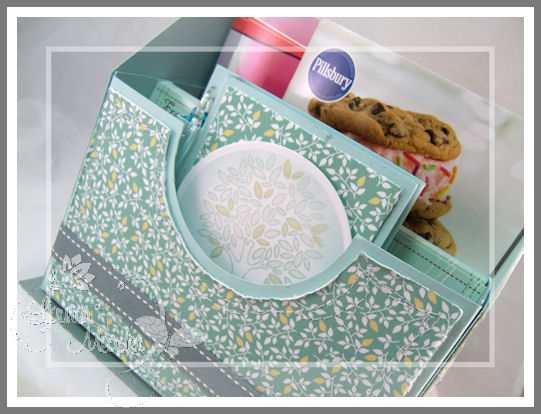
Now here is the detail of the stitching I did around all the designer paper layers.

Its a squiggle stitch to mimic the pattern of the leaves. I then distressed the edges a bit.
View of the left side of the Counter-top Recipe Cart
Now with the book out
Now in one side of the box we have the covered notebook, a set of “From the Kitchen of” recipe cards that I purchased, and 3 mini cook books!
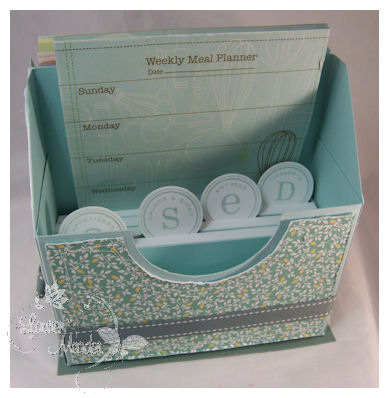
A weekly meal planner notebook that I purchased (and is magnetic)
a full set of PTI recipe cards-already tabbed off with the following categories: Appetizers, Salads & Soups, Entrees, and Desserts
They fit PERFECTLY in here 😀 LOVE IT!
Isn’t that a GREAT gift idea? Weather or not you know someone well, this is a fabulous gift.
Think of new home, new apartment, maybe a cook/baker in your life?
Even if you don’t take the idea to use recipes, its great gift box for anything wlse you may want to put in there too.
Supplies:
From the Desk of template
Stamps: Father Knows Best, Recipe Box, Garden of Life
Cardstock-White, Aqua Mist, Ocean Tides
Patterned Paper-Green Tea Leaves
Ink-Ocean Tides, Sping Moss
Ribbon-Ocean tides stitched grosgrain
Sewing machine, circle punches, circle nestabilities, notebook, PTI recipe cards, other recipe cards and mini recipe books X3
OK so while that is all for me today, check in on Nichole, Dawn , Heather and Lisa,as they are all sharing samples too!
Till tomorrow.
2nd NEW! Release Template Peek
Apr 11, 2009 Author: mytime | Filed under: Home decor/3-D items, My Timeless Templates, Papertrey NewsletterOK I know you have all been chomping at the bit here for the next peek at the 2nd NEW! Release from My Timeless Templates © from Papertrey Ink, which will become available with the next release on the 15th! WAHOO!!
First, let me say Happy Easter to everyone! I so enjoy this time of year. I am so happy because we are having my mom over for the day and some dinner. She won’t have to cook a thing. Just relax. She is usually the one always running on the holidays. We are also celebrating her birthday today too (it was the 8th). Plus I get to hoard my niece Gabriella who is getting SOOOOOO big. The kids are obviously excited for the day too, since my mom and the baby are coming 😀
We are going to have a fun egg hunt in the yard, and just a day of fun and family. I hope you have a nice day too.
OK, now let me get this done so I can do up their Easter Baskets! Its like SO late here, and Im already exhausted.
Sooooooo…………………the next template is called “From the Desk of“.
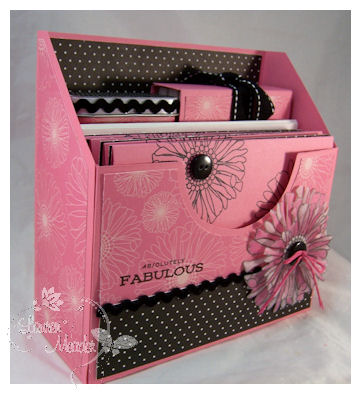
Crazy for Daisy Gift set
This is a FABULOUS template, that YES! Sits out on a desk!
The idea of the name was because I made this box for my friend Robyn (I’ll share that later). I personalized it “From the desk of” then added her name. My thought was HOW cool to make this set for everyone?! AND make it personal, hence the name.
You can fill it with cards, stationery, organize your supplies, and as you will SOON see, SO MUCH MORE (as always).
Are you able to see I was on a serious “desk” gift set kick ?
I don’t know, I just LOVE giving and receiving great cards and gift sets. I love when things are packaged all pretty. It just speaks volumes to the thought and time you put into these gifts. Especially when you take the time to MAKE cards of other items, they deserve to be represented properly!!
OK so with this $5 template purchase- you get the PRINTABLE template for the base, as well as the 2 angle cut decorative side panels, and the decorative front panel layer as well! So no fussing with the perfect decorative layers!!! You also get the option of including a center divider panel for the inside of the template. Let’s not forget the EXCLUSIVE Idea Catalog-with 5 projects, that include photos, step by step instructions, and a complete supply list-to make gift ideas even easier 😀
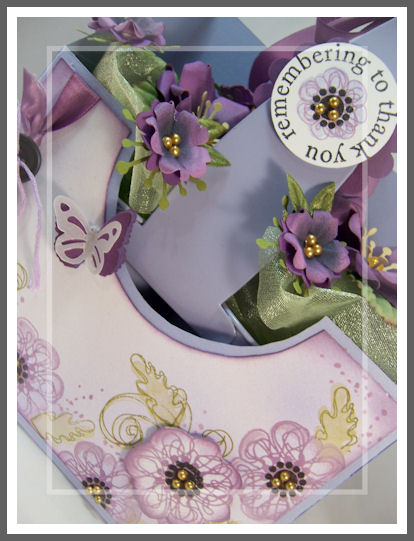
So lets see the SAMPLE!!
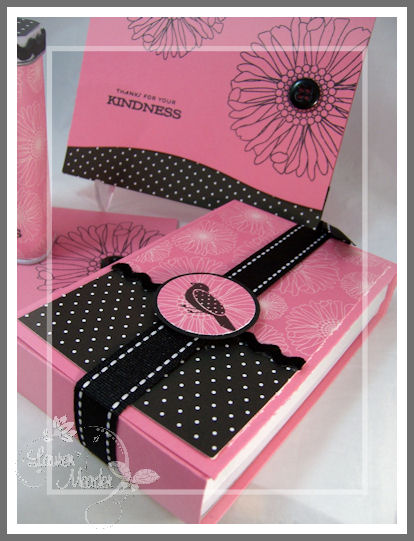
Who wouldn’t FREAK if you presented this to them?
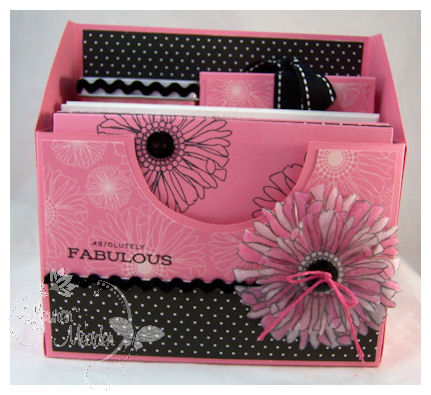
This is the photo of the front view.
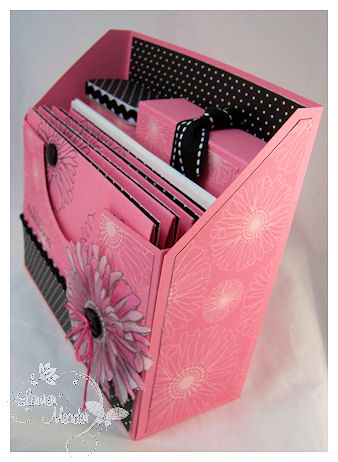
Here is the top view
Now I will show you the side panels
This is the other side.
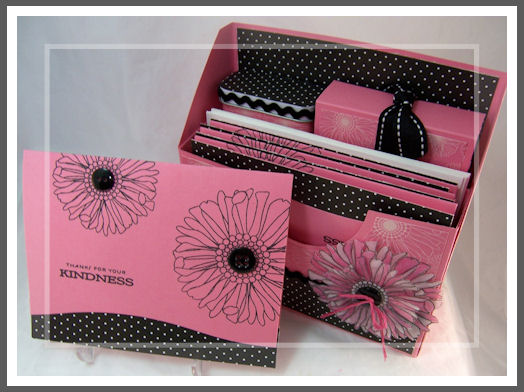
Here is the set with the card sample out
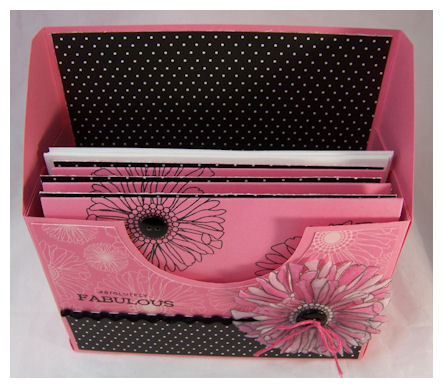
Now this desk set will easily fit your A2 size cards, and envelopes, but also, so much more 😀

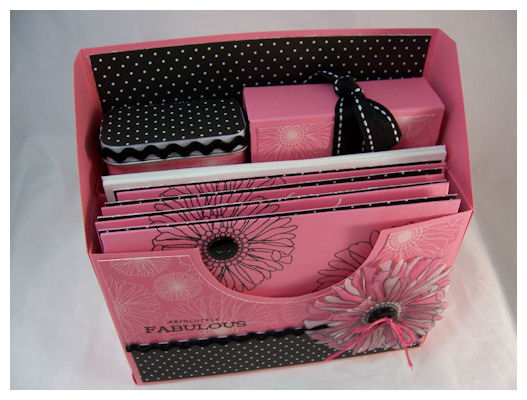
This is the collection of items featured in the desk set I made. (only 2 cards featured in photo).
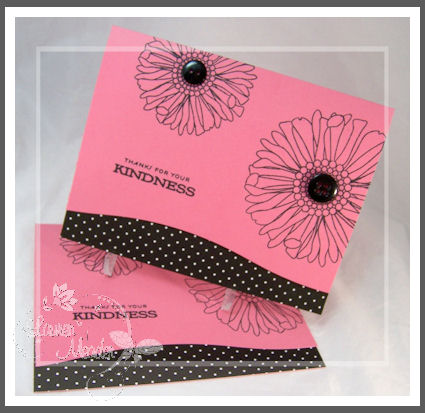
In this set I included 8 handmade cards to match-with the envelopes as well.
I love the card design. Clean and simple-yet nicely detailed.
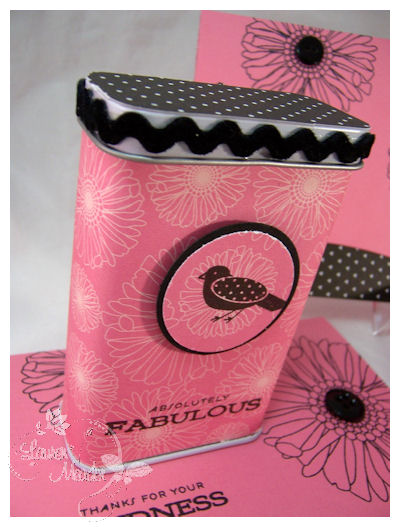
I altered a Band-Aid tin (for stamps to mail the cards or little return address labels!)
In the box I cut down a Square trendy tube so make the little tin raise up higher
I covered 3 little white notepads, so you can keep notes, or jot down addresses or events!
I think this is so pretty.
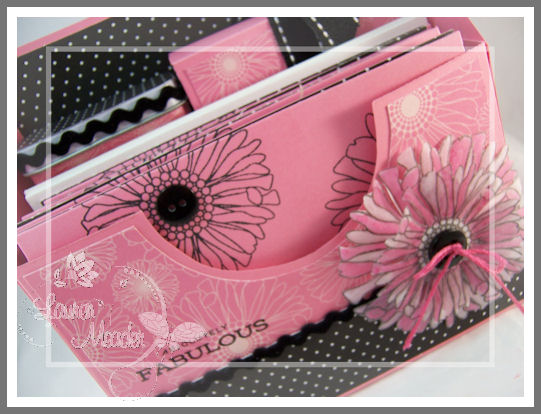
Here is the flower detail on the box
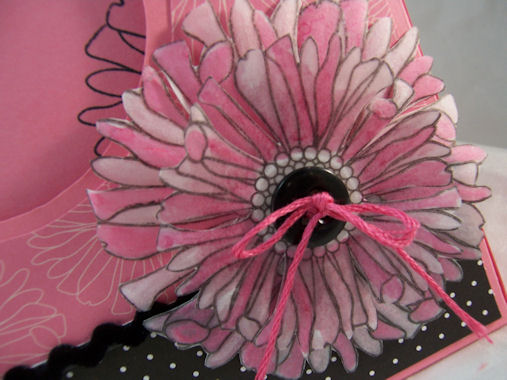
I stamped it on vellum cardstock, dry embossed from the back, then colored with varying shades of Copic markers.
I then layered the 2 flowers, and added a button center! I love this box.
Now this is a photo with the band aid tin and notebook out.
Supplies:
Stamps: Friends Till the end , Everyday Classics (unavailable for purchase-Anniversary set)
Cardstock: Hibiscus Burst, Vellum cardstock
Patterned Paper:2008 Bitty Dots, Friends til the end
Ink: Black
Buttons in true black
Trendy Tube (not shown)
Copic markers
circle punches
May Arts velvet ric rac ribbon
Band Aid tin
There is the option of adding a divider panel in the center, as I did use for this project.
So……………what do you think?
Do you like it? LOVE it? Not sure if you NEED it?
Well, then lets do another project!
This one used JUST the template base as a gift box.

Now I think THIS alone is FABULOUS.
That is what is SOOOOO great about the templates. The IDEA of WHAT kind of gift presentation is done for you. That is the hardest part. All YOU have to do is decorate it, in your own style. Personalized gifts, every time. IN MINUTES!!
Anyone who has bought a template Im certain, can say they were amazed at how fast and easy these are to put together. Its made many ONLY card makers GIFT makers! From little kids to beginner stampers, to seasoned paper crafters. You have not idea how much hearing stuff like that means to me. It means MY DREAM of helping everyone be able to make more affordable gifts, has become a reality!
Now looking at this in a GIFT BOX way, I’m sure your brain gets FLOODED with ideas. If not, no worries! Over the enxt few days I will share MANY ideas for this template that is sure to spark SOMETHING that suits your own creative ventures in gift giving.
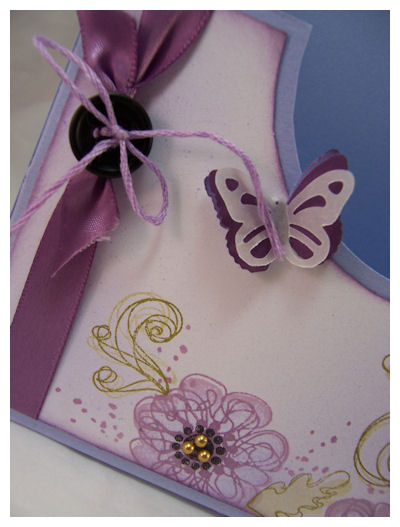
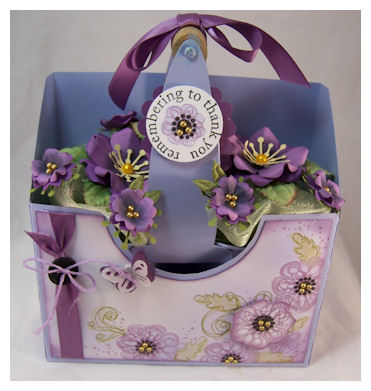
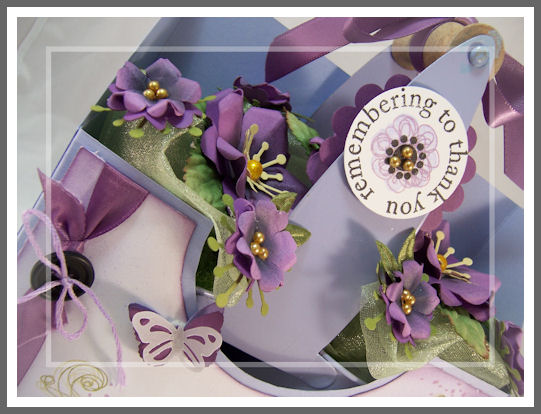
Here is the detail photo
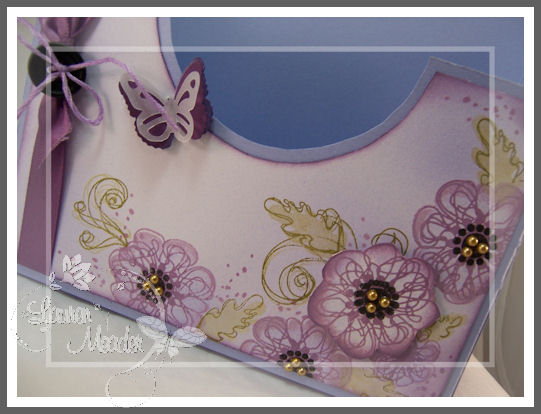
I love the cut out flowers. I airbrushed the originally white panel, so soften it, and layer onto my Amethyst box base.
Having the decorative cut out templates makes what would be the hard work, easy. No messing up and cutting 6 pieces to make it all perfect! I already did that for you! LOL!
Now what to put IN the box?!
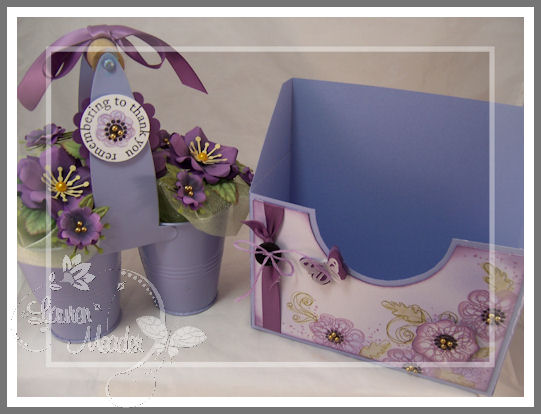
How about a dual planter, with paper flowers!
I got this mini plater at the Christmas Tree Shop! I knew I wouldn’t DIRTY it up with REAL flowers that I could kill! LOL! So I make a paper bouquet, based on a seed packet of flowers I purchased *just* for flower inspiration!
Here is the basket

I have to say I jumped up and down when this was completed.
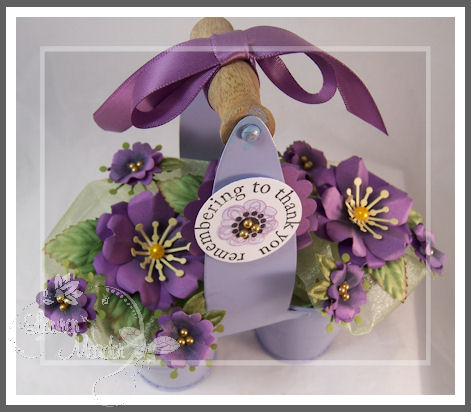
How much more pretty can paper flowers be? I mean REALLY!
What a great MAIL-ABLE, gift! No wilting, no watering.
Now you may not believe that it actually FITS in the box!
But, it does, I swear!

See!
Its just so pretty in here
And a side view so you see its not SQUISHED in there. It fits perfectly.

That hardest part to remember is to NOT pick up the handle! To carry the box base. If you pick up the handle then the flower planter, obviously comes out.
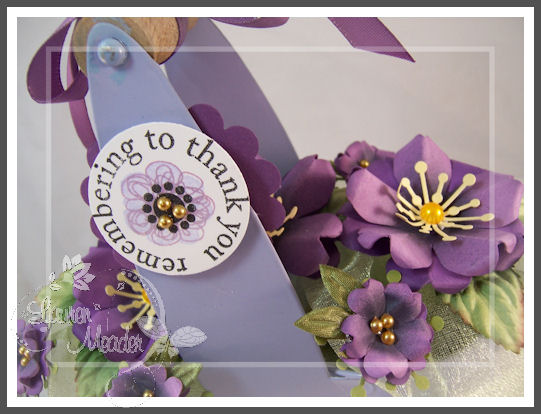
Supplies:
Stamps: Remember
Cardstock: Amethyst (non-PTI) White, Plum Pudding
Ink:True Black, amethyst, plum pudding, lavendar moon
Ribbon: Plum Pudding Satin, leaf couture ribbon
Buttons in true black
Copic markers/air gun
Adhesive pearls
Martha Stewart Butterfly punch, scallop circle punch, circle punch
planter
various punches
So there you have it! My first peeks of “From the Desk of“! One being a desk set, and the other SO NOT a desk set, but rather a gift box. A very pretty gift box at that.
The ideas for this one are ENDLESS!
Add ribbon handles, punch a handle in the back-put them together…………….OOPS! I gave away another peek idea!
More on that tomorrow 😀 and many more ideas to follow.
Now you know WHY I’m so insanely busy 😀
So PLEASE share your thoughts on this here! I love to hear what you think. Plus I busted my butt on these samples, so its nice to know if you like them 😀 I think we all like that validation at times. After the loss of mojo I had post surgery it was hard getting back into it. I’m actually still struggling a bit to get caught up, but it will happen………….. eventually!
In the meantime, check out Kelly’s blog for her peek at this template ![]()
Also check in on Nichole, Dawn , Heather and Lisa,as they are all sharing samples too!
Enjoy the holiday.
Till tomorrow…..
Calling All Sports Fans!
Apr 10, 2009 Author: mytime | Filed under: Home decor/3-D items, My Timeless Templates, Papertrey NewsletterDo you get totally stumped when it comes to Sports, or anything related to it? Like GIFT ideas?!
Well, then MAYBE today’s post will help you out with some ideas. I have to admit this really stumped me! Not be sporty and all. Despite my sporty inabilities, the set is really cool, and great for ANY sport.
My kids play soccer, basketball, baseball and dance. None of that ambition comes from me. Now DANCE is so up my alley, all the other sports, not so much. So when it comes time to highlight that Im usually just as clueless as the next valley girl!! LOL! I swear I sit there there during the games absolutely clueless. Granted I do know WHEN my kids score (hahahhaha), but that is usually it.
Nichole gave the team a challenge to take Team Spirit to a new level, and create some sort of card and gift centered around SPORTS.
This group post today features Heather’s new stamp set is called All Star Team & Additions.
I decided on making a gift for a Soccer Coach (since my hubby Jay is the kids soccer coach, and I enjoy that sport most)
I took my NEWEST template Get a Handle On It-and made a Sports Jersey themed gift box.
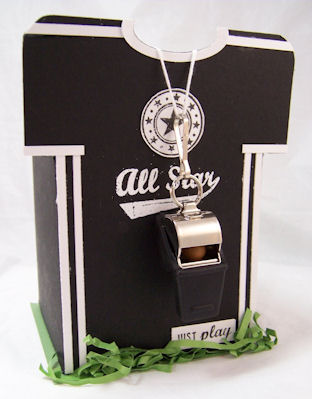
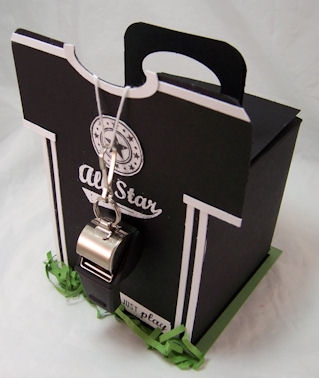
Now how cool is that?!!!!!!!! I told you this one was versatile! You can add about anything to the FRONT of the box. Like the baby onesies 😀
PS-NOW I KNOW you are DYING to see the next template-that will be posted TOMORROW! I will share a COUPLE samples with the template you have NOT seen yet. Trust me, its heaven! I’ve been bustin my hiney 😀
I just made my box, as directed, then made my Sports Jersey panel, and adhered it to the front of my box! I love it!!
Now the hanging whistle is totally cool to me too. Really makes the gift.
NOTE: I removed the original string (and put it in the box) so it would look more like it belonged on my box. Plus I could shorten it.
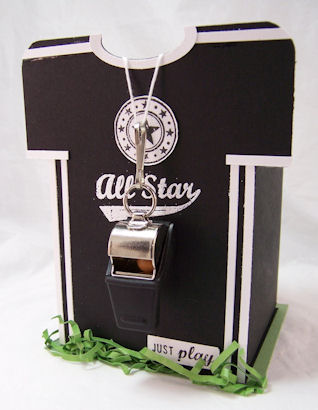
The All Star is embossed with white EP.
My BIG gift idea was to get a whistle, and have the team pitch in, to get it engraved! Things Rememberedengraves ANYTHING you want (for a price of course! LOL!). Its a great keepsake, that the entire team can give. Since the engraving isn’t THAT pricey on a small item such as this-you can put any extra 4 collected towards a gift card or other gift item, and put that IN the box 😀
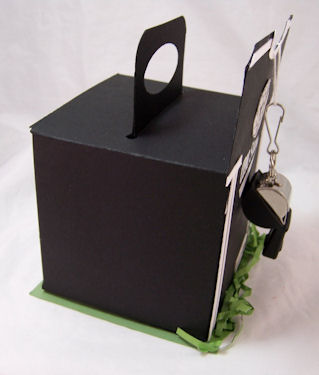
Side view
When you open the box……
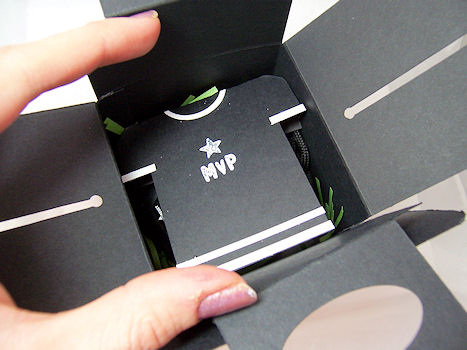
You see the mini jersey card

Inside the mini jersey card- is a gift card to a sporting goods store.

Now, also in the box is the gift of a Sports Watch/Timer.
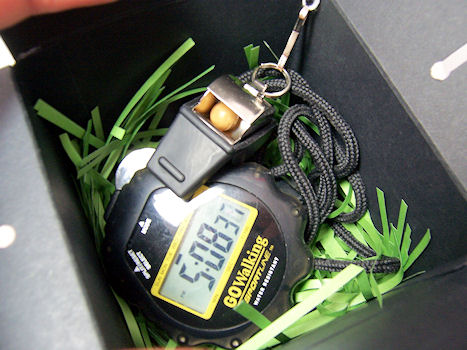
Every coach needs a good one of those.
So this is the set together-Gift box and card.
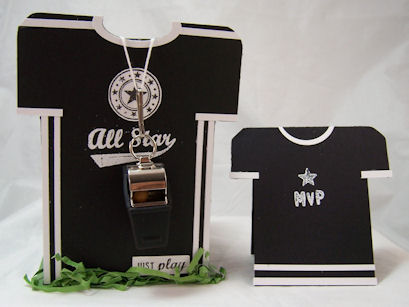
I’ll be putting the gift box/whistle up on my Etsy Store sometime soon!!
Supplies: www.papertreyink.com
Get a Handle On It Template
Stamps: All Star Team & Accessories
Cardstock: New Leaf, White, Black
Ink: Versamark, Black
Embossing Powder, string, whistle, grass filler, circle punch
————————————————————————-
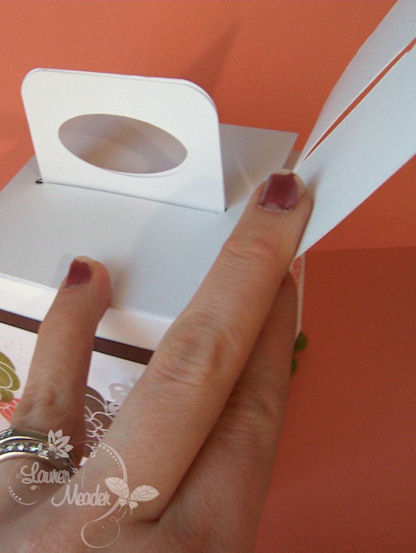
Now for the questions, answered! Many of you asked HOW this template opens! So I figured I’d share.
I made this box using the Get a Handle On It template, and the Everyday Classics (PTI anniversary set)
As I told you, the handles fold in first, then the sides fold in to hold it closed
Now this is the box, unfolded.
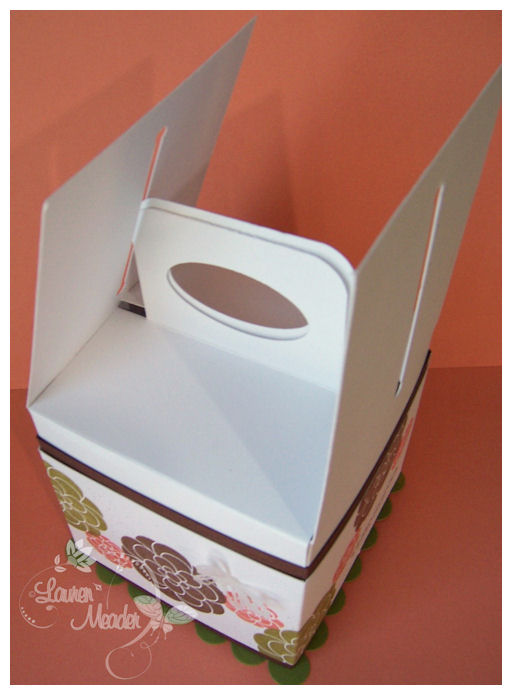
Its REALLY cute.
I LOVE that the largest Scallop Square nestability fits PERFECTLY on the bottom too 😀 Make a nice finished look if you want it, with NO FUSS.
Supplies:
Stamps: Everyday Classics
Template: Get a Handle On It
Cardstock: Ripe Avocado, Dark Chocolate, Snow White, Vellum
Ink: Ripe Avocado, Dark chocolate, Melon Berry
Punch: Martha Stewart butterfly
Ribbon-chocolate twill
Large scallop nestability
So there you have my peeks for today. I have LOADS more. OH! BOY! My head is spinning.
Make sure you check out the entire teams projects!
Till tomorrow!
#1-Video Window Treatment
Apr 9, 2009 Author: mytime | Filed under: Home decor/3-D items, My Timeless Templates, MYTIME MOVIE/VIDEOs, Papertrey NewsletterCan I get a WAHOO!!!
Im so not ready, but I’ll do my best to keep up this week. Having 2 weeks “off” from stamping, KILLED my time and assignments schedule. Oh, yeah, and my MOJO! Not too happy about that.
Its S-L-O-W-L-Y making a come back.
Every month- during this week, I feel like Tigger from Winnie the Pooh! LOL! Just bouncin with excitement! Seriously. This usually gets me motivated to kick my own butt! We shall see.
Time to share a sample using a My Timeless Template© , and of course, a new stamp set called Scattered Showers, with you all!
You have had a view of this template a few weeks ago-it is called Get a Handle On It ©
This is due for release on the 15th.
Get a Handle On It © is the perfect box for SO MANY great gift ideas-as you will SOON find out for yourself!
Its a SUPER cute box, that has fun, cut out side panels, in which the box handle pops through.
I can’t tell you enough how much I love this particular template! LOVE!
Its cute, and perfect size. I love that the largest square nestability PERFECTLY layers on the bottom of this too, for great finishing touch.

Looks can be deceiving. You may think this is a SMALL box.
Well, NO! Its actually quite a nice size-measuring 3 1/2 inches squared.
This allows you to fit some awesome stuff in there. When we used this box at Stamp New England, we were all able to fit over 38 bite size chocolate candy bars/pieces. Now that ROCKS!
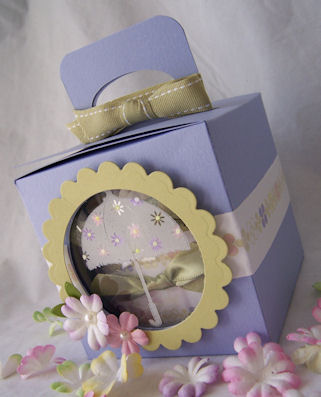
Wait till you see the box of beauty that I put in this creation! The little umbrella makes the perfect image since we are using this box/gift to brighten someone’s day. You will want to start making one for anyone you know- weather they are celebrating something, or not feeling well. Any excuse will do!! It is sure to make someone’s day-rain or shine 😀
So today I am sharing a video that shows the SIMPLE technique I used for my Get a Handle On It © project
I’m calling it the “window treatment” because it allows us to add interest, and color to the windows of our boxes, or other projects, that may use acetate. Getting a small peek at what is IN your gift is so fun! Now you can make your “window” even prettier.
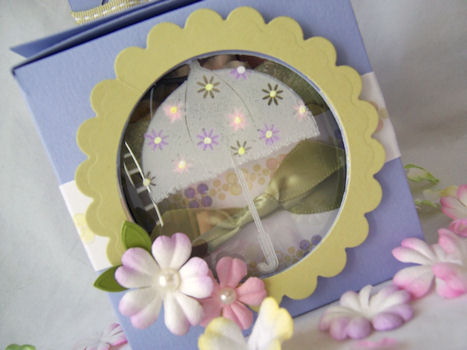
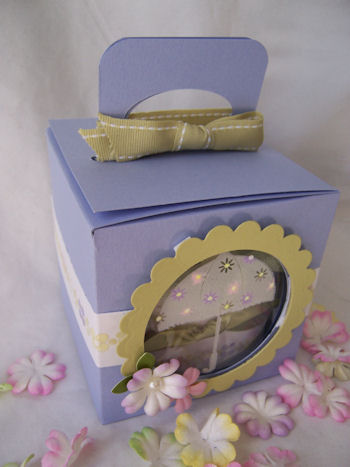
Here is the close up view of my “window treatment”.
This is where the Scattered Showers Stamp set comes in. It was PERFECT for this technique of dressing up the window of my box.
I used Papertrey Inks Clearly Creative Cardstock for my window.
You just stamp your image with White Stazon.
Then use your Souffle Gel pens, to color the acetate, from the back.
This gives you nice color on your window, and a great fresh look! Cute eh?
Now when you OPEN the box, this is the SURPRISE inside 😀
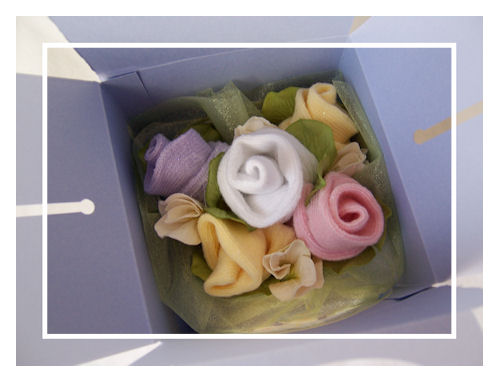
Now we take it out……..
This is what you are getting IN the box!
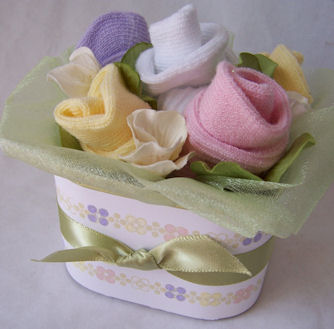
A bitty baby booty blooms box-(say that 5′x fast).
Its a nice little gift, instead of giving FRESH flowers, that wilt and die, you can give them this.
I decorated the large square tin, that I made 5 baby booty flowers for.
A sprinkle of glitter-and VIOLA! A gorgeous gift, or party favor-completely perfect in the gift box-which is a gift in itself.
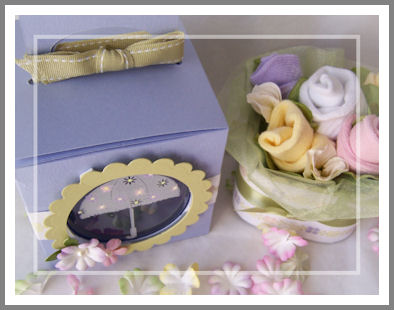
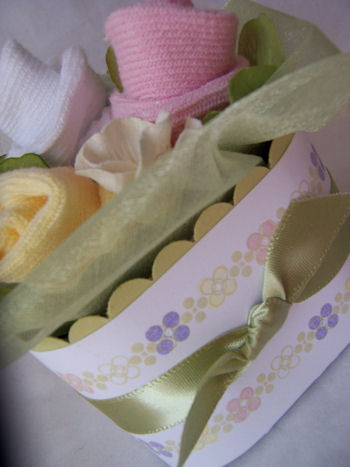
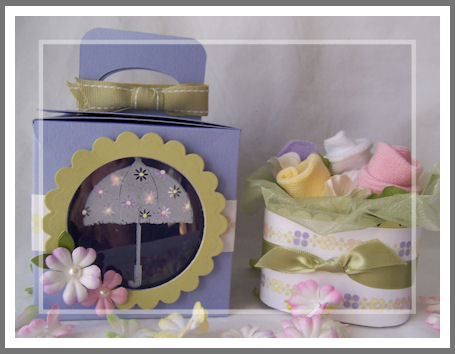
The large square tin fits perfectly into the Get a Handle On It box.
Isn’t it so pretty? Simple and elegant.
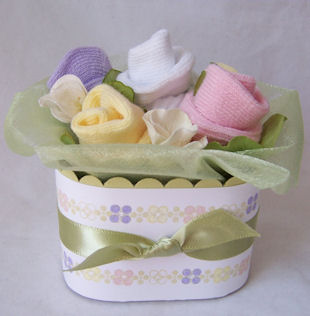
Perfect size to keep on a desk!
Did you think that something like this could fit in the box?! Well it DOES!
Here is the close up of the little booty buds I made 😀
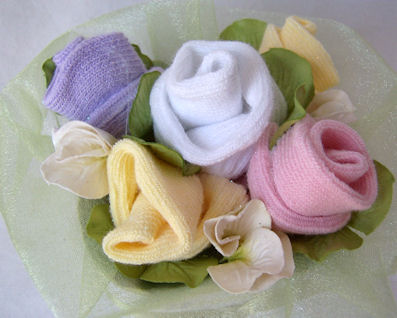
Aren’t they just adorable?
I put this up in my Etsy Shop, along with another version I created 😀 I hope someone finds it a good home 😀
Supplies used:
Get a Handle On It © template-due for release the 15th
Stamps: Scattered Showers and Background Basics Dots & Spots-also being released on the 15th
Cardstock: Clearly Creative cardstock, Spring Moss, white, amethyst
Ink: Amethyst, spring moss, sweet blush, lemon tart
Ribbon: Spring moss collection
Spellbinders circle nestabilities, Prima Flowers, Souffle Gel Pens
Tomorrow I have another great sample using this template. I will share the FIRST peeks at the other template on Sunday-the 12th. You will love it 😀
In the meantime, check out Kelly’s blog for her peek at this template 😀
Also check in on Nichole, Dawn , Heather and Lisa,as they are all sharing samples too! If this stuff doesn’t get the creative juices flowing I don’t know WHAT will 😀
As always I love to hear your thoughts-so let me know what you think!
Thanks for stopping by.
Till tomorrow……………………..
My Etsy

Who I Designed For
Blogroll
- Alicia
- Alli Miles
- Ally Blankenship
- Amber
- Andi @ crafts on a whim
- Angel R
- Angie Z
- Anne Kranitz
- Becky O
- Bee
- Beth Silaka
- Bethany Paull
- Beverly Nash
- Bobbie
- Cambria
- Cammie
- Card of the Week
- Card Positioning System (CPS)
- Cards for Cancer
- Catherine Doucette
- Charmaine
- Cheryl Sims
- Chriss Rollins
- Christina
- Christine Ewing
- Christine Wooden
- Colleen Schaan
- Craft Critique
- Craft Gossip
- Crystal
- Dawn Easton
- Emily Giovanni
- Geny
- Holly
- Igne Groot
- Inspirational Craft Blogs
- Irene
- Jami Sibley
- Jeanne Streiff
- Jen del Muro
- Jeni Bond
- JenMarie
- Jenn Balcer
- Jenn Diercks
- Jenn O
- Jennifer E
- Jennifer Mick
- Jennifer Pereda
- Jennifer-Sweet Treat
- Joanne Basile
- Jodi Collins
- Julia Stainton
- Julie Masse
- Karen
- Kathryn Berthiaume
- Katie Cotton
- Kelley Holland
- Kendra
- Kim Scholfield
- Kris’s Color Stripes! Get inspired here
- Kristen Dubosque
- Kristin Eberline
- Kristine
- Laura @ Sunshine Stamper
- Laura Turnmire
- Laurie Schmidlin
- Lesa Rapp
- Linda Duke
- Linda-LSN
- Lindsey Botkin
- Lisa (lakind scs)
- Lisa Kind
- Lori Craig
- Maggie
- Mara Campbell
- Maria
- Maria Levine
- Mary
- MaryJo
- Melanie M
- Monique Hansen
- Moxie Fab World
- Pam Imholz
- PaperCrafts Connection
- Peppers and Pollywogs Kids party site
- Rebecca Grohall
- Rita
- Robyn
- Rose Ann
- Sarah Vrolyk
- Sharon Harnist
- Sharon Johnson
- Sharon Rivera (a chemisrty with paper)
- Sherrie
- Sophia Landry
- Storage Units, Ink, & More Blog
- Sue Berker
- Susan (Rainy)
- Tangii Crane
- Tracy
- Tricia Traxler
- Trudee
- Velta
- VivLyn
- Zena
MTME Pretty Palette Color Team
MTME Pretty Patterns Sketch Team
My Time Made Easy TM LLC
Shop till you drop!
Lauren Meader
About Me
Copyrighted material
Subscribe To My Blog
Pages
- About me
- Alexa’s Story!
- My Crafty Corner!
- My Time Made Easy™ LLC
- Our Make A Wish Trip to Disney!
- Resume/Publication List
Calendar
| M | T | W | T | F | S | S |
|---|---|---|---|---|---|---|
| 1 | 2 | 3 | 4 | 5 | 6 | 7 |
| 8 | 9 | 10 | 11 | 12 | 13 | 14 |
| 15 | 16 | 17 | 18 | 19 | 20 | 21 |
| 22 | 23 | 24 | 25 | 26 | 27 | 28 |
| 29 | 30 | |||||
Archives
- August 2013
- July 2013
- June 2013
- May 2013
- April 2013
- March 2013
- February 2013
- January 2013
- December 2012
- November 2012
- October 2012
- September 2012
- August 2012
- July 2012
- June 2012
- May 2012
- April 2012
- March 2012
- February 2012
- January 2012
- December 2011
- November 2011
- October 2011
- September 2011
- August 2011
- July 2011
- June 2011
- May 2011
- April 2011
- March 2011
- February 2011
- January 2011
- December 2010
- November 2010
- October 2010
- September 2010
- August 2010
- July 2010
- June 2010
- May 2010
- April 2010
- March 2010
- February 2010
- January 2010
- December 2009
- November 2009
- October 2009
- September 2009
- August 2009
- July 2009
- June 2009
- May 2009
- April 2009
- March 2009
- February 2009
- January 2009
- December 2008
- November 2008
- October 2008
- September 2008
- August 2008
- July 2008
- June 2008
- May 2008
- April 2008
- March 2008
- February 2008
- January 2008
- December 2007
- November 2007
- October 2007
- September 2007
- August 2007
- July 2007
- June 2007
- May 2007
- April 2007
- March 2007
- January 2007
Categories
- About Me
- All That Scraps
- blogger challenge
- camera/photo play
- Cards
- Contests
- family stuff
- FOR SALE
- Home decor/3-D items
- How to FAKE it!
- Introduction
- JUGS Challenge
- JustRite Stampers
- Lizzie Anne Designs
- My family stuff
- My Stamping Space
- My Time Made Easy
- My Time To Color Challenge
- My Time to Create Challenge
- My Timeless Template Challenge
- My Timeless Templates
- Mytime Mail
- MYTIME MOVIE/VIDEOs
- Papertrey Newsletter
- Pink Cat Studio
- Pretty Palette Challenge
- Pretty Patterns Sketch
- Product Opinions and Must haves
- Recipe's
- Saturday Sketch
- Smilebox Creations
- Stampavie
- Tutorials
- Uncategorized
- videos
Most Popular
- Create your own Onesie Card Tutorial-and important NOTE! PLEASE READ (2529)
- Saturday Sketch-Boxed bag holder (2333)
- Going GREEN! Fancy Flower Flourish-Closure Video (1478)
- Fabulous Favorite - Giveaway! (1336)
- a Prayer Request (1232)
- QUICK-Easter Baskets from Nestabilities-PTI style-and blog challenge (1063)
- Teaser Sketch (999)
- February Release Giveway! (and a little peek) (996)
- Group Post and Rambling Rose Video Tutorial (985)
- GIVEAWAY! Who wants it all?! (895)
Recent Comments (RSS)
- 첫충사이트: 완전히 흥미로운 블로그 게시입니다. 저는
- sarah: Wow, Lauren, what a stunning
- hedie: خرید راهبند
- 야동: Love to read it,Waiting For
- 야동: This seller is in a
- 바카라사이트: 여기 처음 왔어요. 나는이 게시판을
- 야동티비: I was surfing the Internet
- 바카라사이트: 비슷한 주제에 대한 흥미로운 정보를
- 바카라사이트: "여기에 제공해 주신 귀중한 정보와
- 온라인홀덤: 유익한 웹 사이트를 게시하는 데
Copyright © 2007 - My Time, My Creations, My Stampendence - is proudly powered by WordPress
This blog has been Tweaked and Designed by Sara Williams