Archive for the ‘My Timeless Templates’ Category
Tubular Template ideas!
Dec 13, 2008 Author: mytime | Filed under: Home decor/3-D items, My Timeless TemplatesOK if you read my blog even some of the time, you may know how much I LOVE packaging up test tubes filled with whatever I can cram into them 😀 I just love little containers of all kinds. I always have, since I was a girl.
My templates have provided me with some amazing presentations of those ideas, and this month is no exception. I am beyond in love with my projects today! You have no idea. I truly hope you get inspired by them as well.
As a SAHM, with this economy, living on ONE fixed income, we don’t always have a lot of $$ to get gifts for people we want to. I’m endlessly thinking of ways to acknowledge people, without breaking the bank, and not making it “chincy”. Like I just threw it all together. I want people to SEE the thought I put into their gifts, and I think my templates definitely help me accomplish that, and taking not so much actual TIME to create 😀 That is what I REALLY love about my templates 😀 Fast, functional and affordable. Since you use them limitlessly, its such a huge savings. No guess work everytime you make a 3D item, priceless.
So I am over the moon with excitement to tell you that Papertrey Ink is now going to be carrying the silver cap test tubes, and that they fit PERFECTLY with My Timeless Templates!!!!!!!!!!
The silver top tubes will be sold in sets of 3, and they are also going to be carrying the square plastic tubes in sets of 3 as seen HERE!! Is that not exciting news?
Can life be any sweeter?
So let’s start with how they fit with my Lollipop Along © first. Remember this won’t be available to download until the 15th. But when it is live, you can purchase it, and get it INSTANTLY!!! You can start making gifts at 12am on the 15th!
OK I feel like the “exclaimation mark” Queen today. Can you tell I’m so excited? If you were standing in from of me, and I were talking to you, you would probably ask me to be quiet. I know I also tend to talk loudly too when I’m excited. Loud and fast. Its a Vigeant trait (my dad’s side of the family).
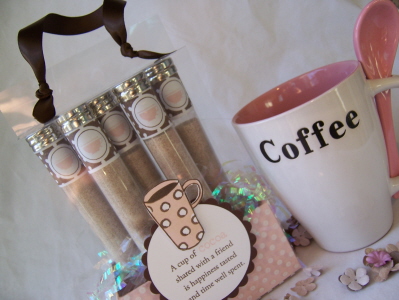
Cafe To Go! Go!
You KNOW how much I LOVE coffee. I do still drink it, but in less quantity, and now without real sugar and fat free cream. So, I had to do a coffee themed set with a new found product I love! Pink & brown are like my favorite combo-so this was a perfect set.
Now see the tubes. They are an exact fit! The lollipop along base holds 5 of the PTI tubes perfectly, so each one can be on display.
In these tube, there is 5 tsp of General Foods Inernational Sugar Free French Vanilla Coffee Mix. SUPER yummy. You technically only need 4 tsp, but I like it sweeter!! And it fills the tubes more. All you do is add 8oz of boiling water, and you are ready to go!
I found some uber cool-make your own mix recipes HERE! There is quite the variety, and they all sound YUM-A-LICIOUS!
So if you have many people, this may be the way to go. Maybe even a $5 limit Yankee swap?
I used sweet blush cardstock to print my base template. I added a cute little chocolate piece to where the tubes insert for some interest, then cut my little circles for my tubes. I used the smallest circle on my Coluzzle circle template for this package. Then I put in some fun filler!
I created my wrap using acetate. I stamped my acetate bottom with the polka dot basics stamp, in white StazOn. I purchase mine in bulk at Staples. I get like 100 sheets for $20 (I believe) Its been a while since I had to buy them. They are just window transparencies. Basically for use with classroom projectors.

For my tubes-I used Holiday Treats, as it pairs perfectly for this project with Warm Happiness. I wanted them to be a little fancy schmancy, so I stamped my labels to match, and wrapped them around the tops. This is quick and easy, and adds so much detail.
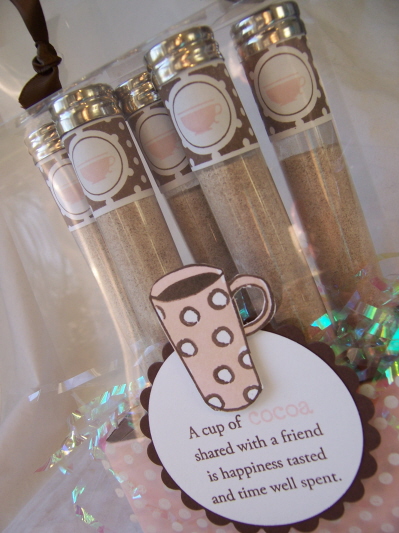
My tag is pretty straight forward. I think its a nice addition to the design. Stamped my sentiment (it technically should have said coffee, but I THOUGHT this was cocoa mix! Blond moment.)
View from the top-Just add water
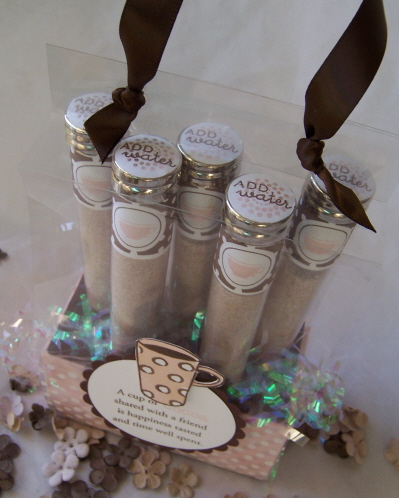
That was also done stamping the labels, then punching them out with my 3/4 inch circle punch.
That is truly all you do! Pour it in the cup-add your 8oz of boiling water, and you have super yummy coffee with friends 😀
As you can see I used ribbon for my handle. Easy peasy. Just grab the handle and go.
Who wouldn’t love that? I think its just so cute. Plus you can get the kids in on it 😀 Let them mix the ingredients up and use a funnel to pour in the mix.
OK moving on-
Now for a super way you can use the tubes with the Desk Top Stationery holder!
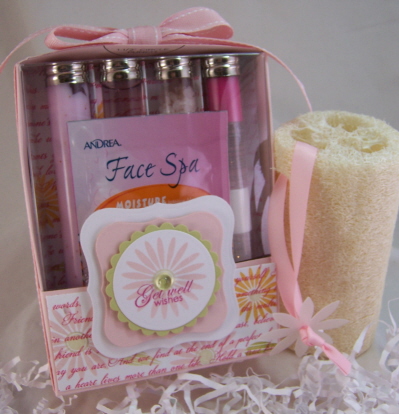
I call this Spa in a Box.
Supplies-
Desk top organizer template
Stamps- Floral Frenzy
Ink-Sweet Blush, Spring Moss, summer sunset, the dark pink – its a Pallette ink pad that is that close to Raspberry Fizz by ribbon comparison
Cardstock-Sweet Blush, spring moss, select white
Raspberry Fizz patterned paper
Ribbon-sweet blush stitched grosgrain, sweet blush twill
clear cardbox, Labels nestability, nestability circle, dew drop, test tube, May Road frosted flowers
Who doesn’t love to be pampered right? This is a gift for all ages too. I always make things I would personally love to receive. When you buy one larger product of each item, you can repackage it in many tubes, for several gifts. This gives that person a day or two of pampering.
Look how PERFECT the tubes fit in this box, which is flipped up side down. You can easily fit 4, if you want to use dividers. I also believe 5 fit snuggly.
Is this not SO pretty, and professional/store bought looking? Only YOU had fun creating it.
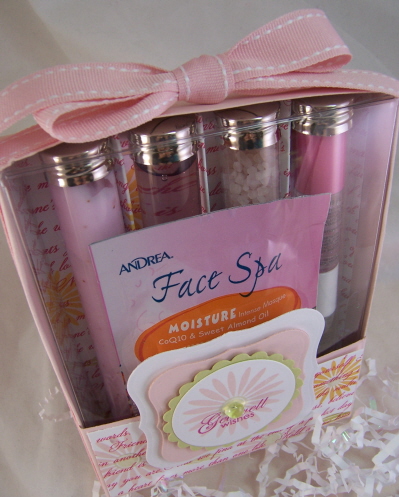
I have 4 tubes-Body lotion, body wash, bath salts, 2 lip glosses (2 fit in 1 tube), and a face spa packet! I used my label maker to mark what is in each tube (in case you are wondering how the receiver will know what is in each) The face packet inspired my color combo for this gift!
Now for the clear cover insert!

Clear cover insert:
Cut off the just the back panel of the card box.
Now cut down the card box to about 5 inches.
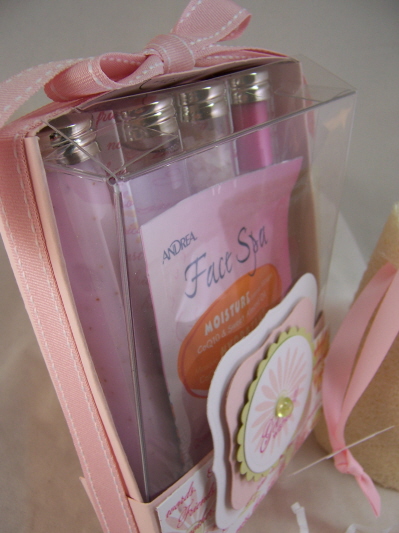
Insert box front, into box
This step is optional, as they stay in place just fine without it.
Now lets move onto the sections:
Sections close up
.
Now what I did for this set was to take my patterned piece of Raspberry Fizz paper, and stamped flowers from Floral Frenzy randomly all over, in co-ordinating colors.
For the tube insert- You will make mountain/valley folds.
Apply adhesive to back, and insert into holder.
Adhere the 2 ends to the sides of the holder.
For label-die cut 2 labels.
Large label from white cardstock, layered label onto sweet blush cardstock.
Die cut a scallop circle from spring moss cardstock. Layer on white die cut circle- stamped with flower & sentiment. Add dew drop with glue dot.
Wrap stitched grosgrain ribbon around box.
Last but not least-
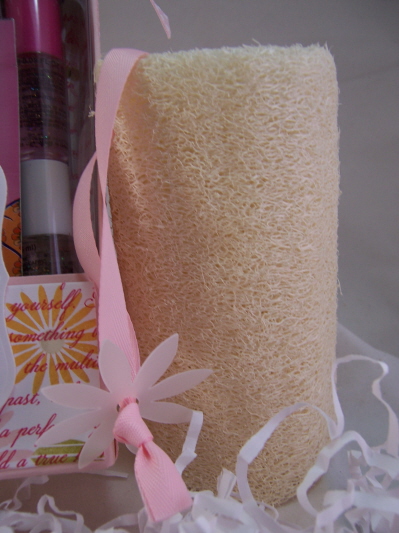
Loofa-
Remove original string from loofa
String through ribbon to match.
Insert through center of Maya Road flower, and make a knot.
Trim excess.
This was a simple addition, but really makes the set a WOW!
Its all about the details.
So there you have my projects for today. I hope you like them, as much as I do.
I’d love to hear your thoughts!!
Be sure to check out more samples on Nichole’s blog, as well as Lisa & Debbie!
Sweets for the Sweet
Dec 12, 2008 Author: mytime | Filed under: Home decor/3-D items, My Timeless TemplatesI really hope you are all enjoying the countdown, and the peeks.
Well this month as part of our countdown, Nichole asked her team to come up with a Valentine Day treat. While I LOVE all the holidays and coming up with fun ideas, by now you may know my love does not lay with any type of cooking or baking. I’m sorta the type that likes home-made containers, and prefers wrapping something store bought in a fun way! LOL! I enjoy taking the time to create the packaging, not the baking process! LOL! I’ll leave those cool cooking ideas to the rest of the girls 😀 Plus it saves me more time to stamp.
So for baking, cooking or anything like that, this is as home-made as I will get this season-
Home made chocolate flower lollipops, in my NEW! My Timeless Template -the Lollipop Along
Stop and smell the flowers

Could this skunk be any cuter? I think this is so stinkin adorable! (pun intended). This gift item uses the NEW! RELEASE-Forest Friends. I’m totally loving that set!!!
I used my lollipop along template to create a traveling chocolate lollipop garden.
When I saw this skunk I fell in LOVE! He/She is adorable. I also laughed so hard when I saw it because I don’t know what it is, but Alexa (my 9yo) has a love/hate relationship with skunks. BIG TIME! So this is for her.
The handle is made from cardstock. I punched 4 flowers from pure poppy, and secured my handle between them with brads. I think its a nice touch 😀
Now the close up details-
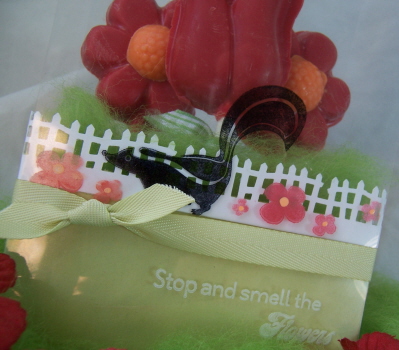
I made my base from Spring Moss. Punched my holes for the lollipop sticks. These pops are large and I wanted them well seen, so I only used 3. I then punched a fence border (a Martha Stewart punch) and wrapped it around my template.
The “grass” is what is called wool roving. A hobby I THOUGHT I would try, but never did get to. I’m happy because the wool came in handy for my grass. I love when that happens.
I made my wrap from acetate, and stamped my sentiment in white stazon. I then stamped my skunk in black pallette ink (lightly heat set), then my flowers in white stazon. I used my Poppin acetate technique with Pebbles Inc pearlescent chalks for the flower to pop out in color. I then took a Souffle gel pen for the flower centers.
Easy peasy.
This project took MAYBE 20 minutes. Really simple.
Make sure you check the other design team member blogs for their treat ideas 😀
Tomorrow’s peeks are my favorite items 😀 So I hope you are ready!
Thank you for stopping by.
Sketch time and another template peek!
Dec 12, 2008 Author: mytime | Filed under: Cards, My Timeless Templates, Saturday SketchWe interrupt this weekend of countdowns to bring you a sketch challenge! Oh and a uber cool new template peek too!
I have NO IDEA where the month is going. I’m no where near done my Christmas stuff! YIKES!
We have had no power on & off due to ice storms so sorry this is late.
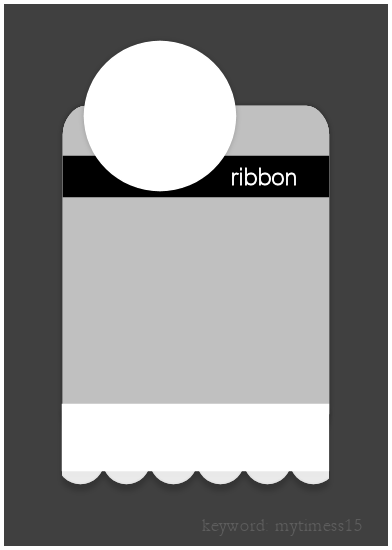
Keyword mytimess15 (thank you Dawn for making the image for me :D)
Here is my sample
I used the Out of the Box image-popped out with a circle punch. The sentiment is Heartfelt Basics (love that set). My “patterned paper” was done using the background basicis stars, colored in olive and blue. I stamped them in blue first, then colored the edges with a marker before stamping them. I used my glue pen to add some bling to the centers. I think they look like cute flowers.
Don’t miss the sketch team samples too!
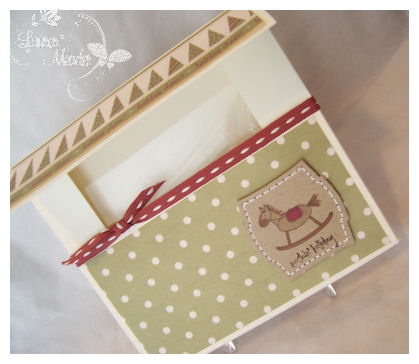
Now I’m moving on with a template peek 😀 This time using the Desk Top Stationery box. Only 2 more sleeps! Unless you stay awake for the release 😀
Now how is this for a gift presentation?
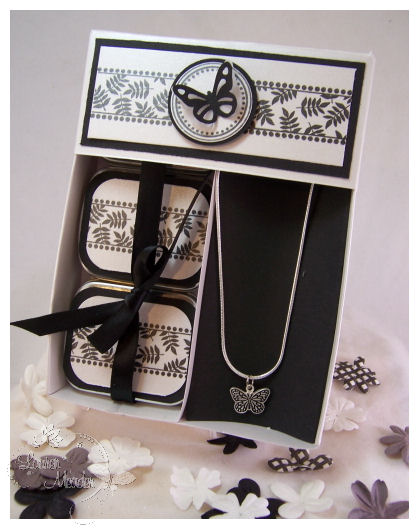
Black and shimmery white is just an elegant and stunning color combo. Perfect for any style.
I made this gift to re-package a jewlery kit. This will be for my MIL. She loves making jewelry.
I purchased a make your own photo bracelet kit. I cannot for the LIFE of me remember where! I want to say Michaels, on SALE for $3 after Christmas last year. I KNEW it would come in handy-someday.
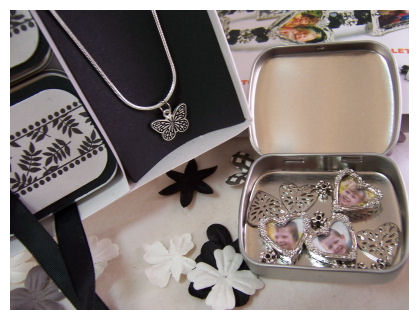
In this Desk Top Stationery holder, I have put 3 of the small hinge tins. They are a PERFECT fit. I think you can fit 6 of the tins in this template. Not positive. I covered each tin which is stamped with the leaf pattern label from Limitless labels ( I LOVE that set-and not just for candy nuggets!). I just created 2 sections for my gift. the 3 tins on one side, with my jewelery supplies, which tie in with some satin ribbon, and my necklace.
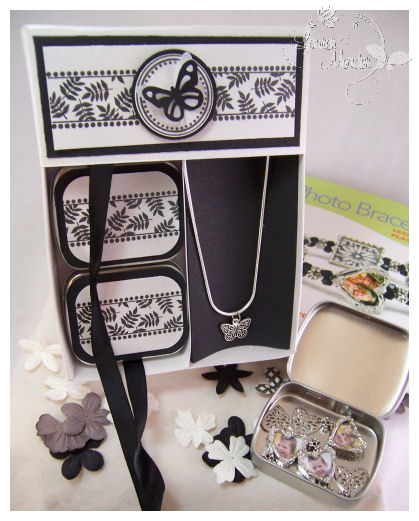
You can see the gift packaging in the background.
The bracelet kit included 3 heart shape photo holders which I put in one tin (and I already put the kids photos in there) and 3 rectangle ones, which are in the other tin (that has myself, Jay and a photo of Daisy in there).
The third tin had the string and additional beads in the kit. I whipped up the necklace myself by purchasing the butterfly charm, and necklace separately.
Another great, inexpensive gift idea ![]()
Well I hope you get inspired to try the sketch, or more uses for the templates!
I’m excited to share todays peek at our next new template! I hope you keep an open mind at the possibilities this one has to offer as well. I will, of course be filling your brain with creative ways to utilize this as the days go on (HOPEFULLY!).
You can NEVER have enough great ways to package your card creations, and sets! Its the gift that keeps on giving, and perfect to keep on hand for any occasion. I hope this template will peak your interest. I know one of the most popular, well received, handmade gift items that I personally make are my card sets. I am always trying new ways to present my sets, and this box is a keeper.
With all that being said, here is a peek at our next My Timeless Template: Desk Top Stationery!

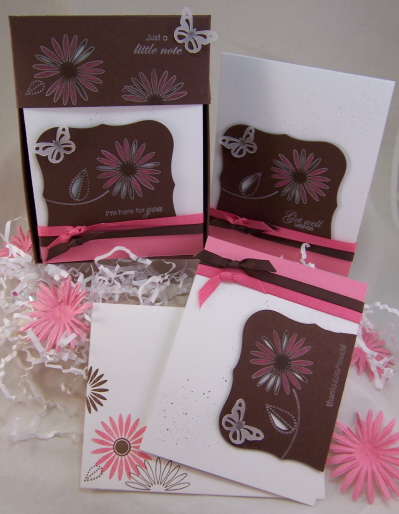
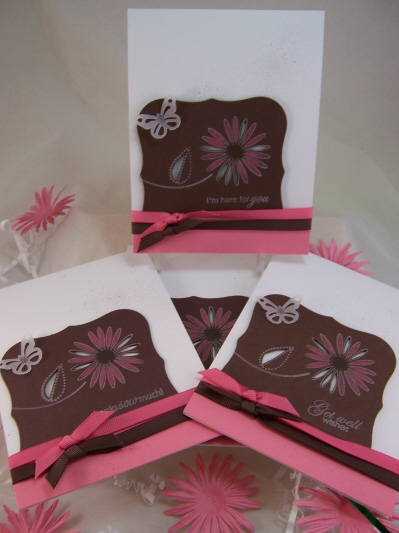
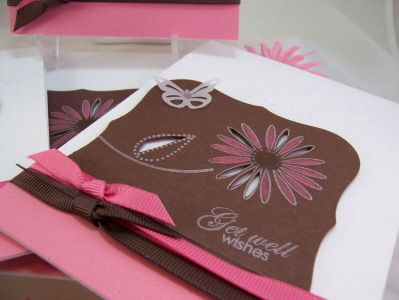
Petal Pink Set
I printed my template onto chocolate cardstock, then cut, scored, and assembled.
In this box there are 8 A2 size, well embellished cards, with stamped envelopes to match! The box was designed to match the cards that are inside, perfectly!
Now the main purpose for this template wasn’t JUST for boxing up some pretty cards. It is meant to store your cards or stationary sets, on a desk or area out in the open. We work hard to make pretty packaging, why not make it so its not stuffed in a drawer, but a functional part of the room, office or creative space of the receiver? Maybe remind them of the note they are suppose to send off.
Think of the person’s room decor, and design it to match!
This particular gift set is going to Alexa’s 1:1 aide, who I love to pieces.
Now let me share my details with you
You can see the 2 designs that are included in this box set.
Each card uses the same elements. There are 8 in a set. 2 different designs. So, 4 of each design. Envelopes stamped to match. Each card also has different sentiments from the sets Floral Frenzy, flower garden sentiments, and Butterfly Kisses

Here is set #1 Birthday Wishes, thanks sow much, Get Well Wishes, and we also have I’m here for you.

Now onto set #2
I’m not big on mass production, but these were fun! I think they are just SO pretty too. But not over the top busy.
Now, a more close up view
Each set uses the same pieces, just arranged differently. I like doing that. Keeps it balanced too.
A die cut label from dark chocolate, that is stamped with Floral Frenzy in white craft ink. The petals are colored with a Prisma Color Pencil. Gives a nice look I think. Sentiments vary, an are also stamped in white. Some of the petals on each flower, and the leaf is cut away, so the white peeks through. I am totally in LOVE with that look. Then the perfect touch, my signature-a vellum butterfly. I have to use butterflies with every release! It’s my thing 😀 Then the finished card is spritzed with some chocolate ink.
I think this set is just SO pretty! I hope you do too. You can get started on the cards while you wait for the 15th to order 😀
Now should I share what else you can use this template for?
OK! One more peek!!
How about a treat holder?
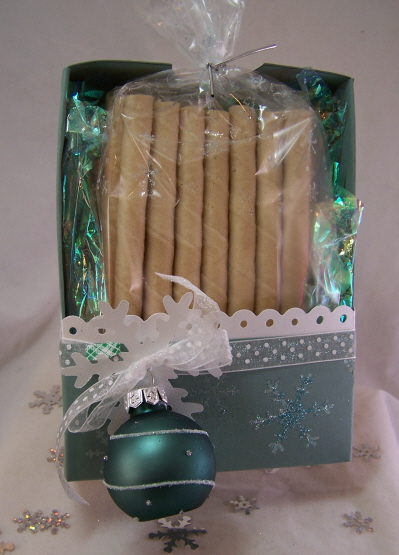
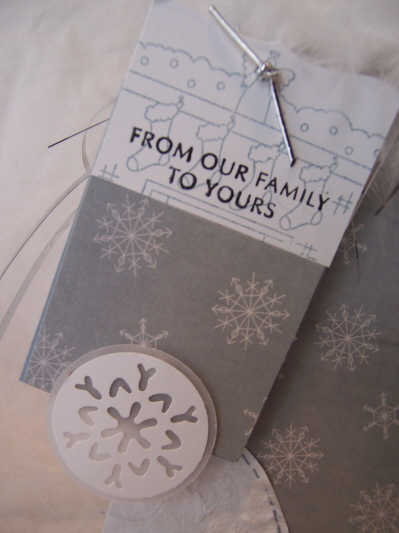
Pretty Pirouettes Package
All you have to do is flip it, and you have a super cute treat holder!
I used Snowflakes for this set.
I don’t know about you but I LOVE Pirouette Sticks. They fit perfectly in this container too.These are filled with white chocolate. It was SO hard to not eat them during this packaging venture. OMW! I used about 1/2 my container for this little treasure.
Its packaged goodies like this that make such nice “for no reason” surprise, or inexpensive gifts for the mailman, secretary, or anyone else you may want to acknowledge. Maybe you have a large group of people in an office? Sam’s Club sells these in bulk, for a pretty good deal, so I think I’m going to go get some this week for gifts 😀 Jay likes to give things out to his staff and this may just do thr trick in time for the holiday. I like that its not Christmas, entirely, in case there are other reilgious preferences in the group.
For freshness sake, I did put mine in a gusset bag (stamped with my white stazon, and glitter sprinkled onto the bag) and tied the top.
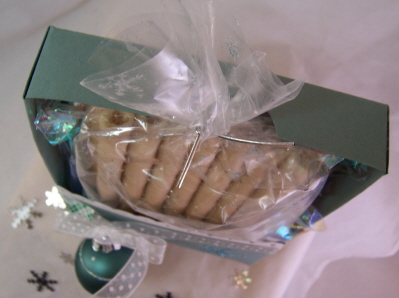
I used the optional notch cut out so that my bag doesn’t get squished.
Now for the details-

As you can see, this entire design was inspired by my little 2/$1.00 ornaments I got at Michaels last week! It makes the perfect little embellishment keepsake for an extra $0.50! It matched my Ocean Tides cardstock to perfection!! I punched a white vellum snowflake, and tied through some white polka dot ribbon. The scallop border is a Fiskars punch, and is done in shimmery white.
So there you have it! One template, 2 totally different uses! Wait until you see what else I have done with it 😀
More on that later! I have 2 projects that I could scream over 😀
Thank you, as always for taking the time to check in with me here. I so enjoy the excitement that builds, and you amazing emails and comments.
Tomorrow I have more template ideas, as the team shares a group post! So don’t miss that.
More creative ideas today on Nichole’s blog, as well as Lisas.
Till tomorrow.
My Time for a template peek!
Dec 10, 2008 Author: mytime | Filed under: Home decor/3-D items, My Timeless TemplatesTo start-Many of you always ask about Alexa (thank you!) she had a great appointment, things are good, and Amber’s Christmas recital went great too.
OK let the My Timeless Template excitement begin! I am so over the moon with this template.
PLEASE NOTE: The template shared today will not be available for download until the 15th.
If you are new to this whole template thing-read this.
Got some questions? Maybe they are answered here. Also you can email me anytime at [email protected] for any questions you may have as well.
Want to see some samples with the past templates go HERE, and don’t forget each download has an exclusive full color idea booklet with supplies/instructions.
First I really, from the bitty bottom of my heart-want to say thank you to all of you who have purchased/used my past templates! I can’t tell you how great it feels to see that, and I love hearing your feedback 😀 Because of that we are including general instructions for assembly with the templates, and (for some) if needed, photos for some of the steps, if it sounds like it is confusing.
If you missed it Julie Campbell wrote a super sweet critique on the My Timeless Template line HERE! I’m still in awe over it! I think it also helps reading reviews of “customers” not my, the creator, who of course loves what I do.
Today I will get to share my first of several peeks. Now, like ALL my templates, it starts with a concept, and a catchy title, but each template can be much more versatile than the given name! So don’t get hung up on the “name”! Just sit back and watch all that can be done with each template (outside its given title) as the days progress.
Well its about that time of year when you give homemade treats, or like to package up some goodies in a fun new way! It’s not too late to use these templates for the holidays either. Now don’t just think holidays! Think-any occasion. The friend who is sick, someone did something nice for you, someone had a baby, a birthday, surgery………you name it. Maybe there is NO reason.
I love presenting simple things in a fun, creative way. I say this repeatedly but, it really IS all about the PRESENTATION!! Oh and our time. That too is precious. My idea is based on the concept for you to maximize creative time !!
Now speaking of easy, and home made, I often make home-made chocolate lollipops (I loathe cooking so these are so up my alley) Im always stumped as to HOW I present them. I designed this template to make just a gift like that presentable, fun and functional!
Now everything being said-let me introduce you to the Lollipop Along ©!
This template totally rocks ![]() Wait until you see what I have up my sleeve over the next couple of days with this one
Wait until you see what I have up my sleeve over the next couple of days with this one ![]()
This was my template concept project. Every template design starts with an idea and actual project. Then I go on from there. Now these concpet samples are one’s that I don’t put much time and effort into these samples, as they are just a quick way to get my concept out into a tangible template!
The flowers are made using the cuttlebug #1 flowers die cut. I stamped my Beautiful Blooms flower in the center, then popped out. They are covering the flat lollipops you buy at the store. I KNOW! I said home made lollipops, but we don’t always have time for that either.
All you do is insert the sticks into the holes, and just use the handle to carry it to where ever you are going, to present it! I thought a sweet lil tag in the front would be cute. So I used honey bees & sentiments, since I wanted this to be similar to a paper garden!
Just a cute way to present one of those everyday items you may like to give out.
How cute would this be from the tooth fairy, or placed on the desks for some co-workers?
Side view.
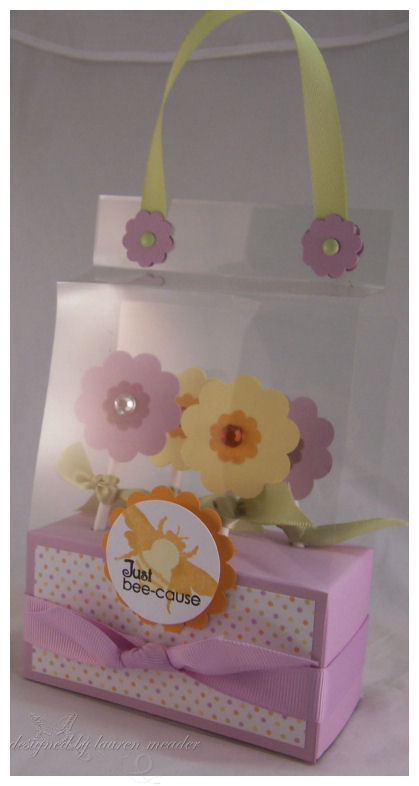
Its super cute and sturdy. You can make it hold up to 6 pops. Depending on how you want them presented.
You can reach right in the side, and grab a pop, or remove the ribbon – and the box bottom holder can slide out the side! OR undo the top closures and it can open from the top. You can adhere the bottom to the wrap base if you wish, or secure in there as I did with the ribbon. Its all about creative liberty, and depending on what you are putting inside. There is no right and wrong to the templates! Use them in a way that suits you and your creative style.
You may be wondering HOW do I print my template on acetate?
Well you don’t! You print it on your copy paper, and since you can see through it, you use it as your cutting/scoring guide for your acetate. Same thing with vellum. You can print direct on cardstock for your cover wrap if you wish.
Even if your printer doesn’t take cardstock, you can still use all my templates! Just print onto copy paper, and layer it over your patterned paper or cardstock, and use it as a guide to cut, and score where necessary. Easy peasy. I like to use removable adhesive (just like what you most likely already use-it just says removable) to keep mine perfectly together as I go along. Throw the cut/scored copy paper template in the trash when done. You aren’t double cutting or printing if you layer it over what you want to use and use it at the same time.
Many people asked me what type of printer I own that prints on cardstock:
I own a Canon Pixma IP 4000, and it does print on PTI cardstock. It works like a dream 😀
Now onto another sample.
Now so you aren’t stuck on the name “Lollipop Along” let me share more with you!
Right now you *may* be thinking “How is a lollipop holder versatile? Seriously! What am I going to do with that after the ONE time I give out some suckers?”
Well how about altering that bottom box, and making it into a bucket style holder (insteqad of a abox base) for some bath and body products? Maybe a pedicure kit. Instead of acetate, use vellum cardstock (or patterned paper/cardstock)!
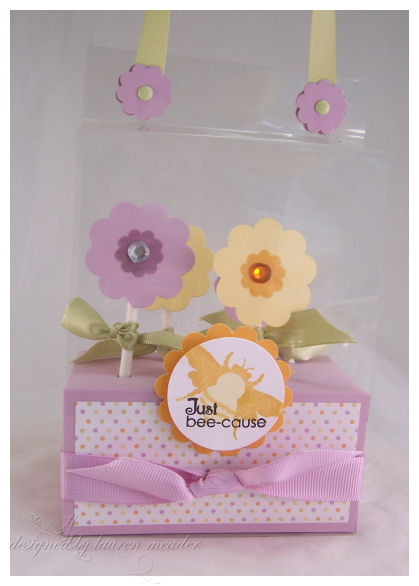
Happy Lil Target Take Along

Yes! That is a fabulous idea!!
How can you NOT feel happy looking at this?
Again I was inspired by Target 😀 for my creation
I took the bottom pattern from my template, and made it into a sturdy little box-ket (aka box/basket) to hold some super smelling foot scrub, a pumice stone, toe separators, nail files, chapstick and nailpolish from the Target $1 spot! Can you believe how cute this looks?
Here is a peek inside
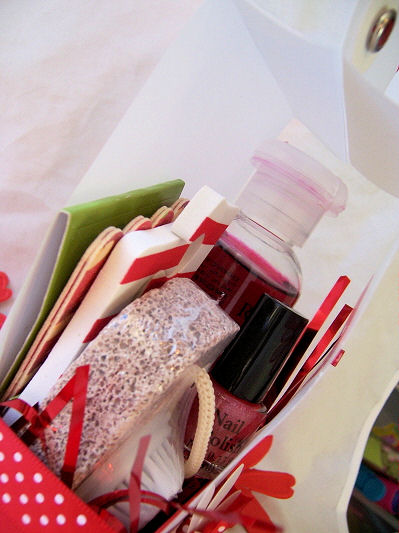
That makes these gifts SOOOOOO affordable people!
The files, toe separators and nail polish were in one kit for $1. Then the foot scrub and pumice stone were each a $1! So for $3 I packaged these contents for a FRACTION of ANY gift set you could actually buy. Given that my template cost is only $5 and you can use it forever, I didn’t put a price on the end gift-but one use pays for itself. Even for $8 (cost with template included) this is a rockin gift for anyone who loves to be pampered! That doesn’t count the fact you can use the template in many ways, over & over!!!!!!!!!!
Just personalize it to suit the person or the fragrance, and you are on your way to be the QUEEN of gift giving 😀
Now, as you can see, I used vellum cardstock on my wrap instead of acetate!

I used last months release set-Out of the box. Stamped in Pure Poppy ink, then dry embossed from the back-for some POP! Stamped “happy” in white StazOn.
I tied around a poppy polka dot ribbon, and tied it through asheeer pretty white prima blossom! A perfect match to my stamp 😀 A pretty bella bauble for the flower center
View from the top!
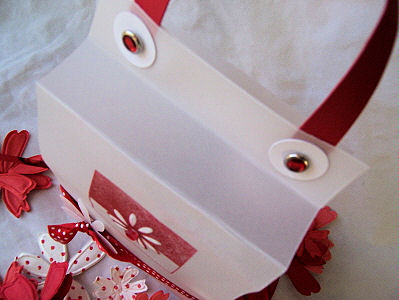
Just grab the handle and go……
AND YES! You should use a redline tape or scor-tape for these projects! The bottom holds this stuff no problem.
I like to use cardstock, or even ribbon for my handle. Depends on the weight of your items inside. I just secure it in place with brads! By adding cardstock or other accents you not only make it purty, but you hide the ugly backing of the brad!
So there you have it! That is the peek of the day.
I hope you are excited about this. I can’t wait to hear your thoughts.
Now, just wait until you see my other projects with this template! WOW! I’m letting them get better as we go! LOL!
Tomorrow I have a peek using my other template 😀 So, ya’ll come back now ya hear!
For more peeks also be sure to check Nichole, Heather & Lisa’sblog
Till tomorrow.
All this talk about templates…..
Dec 4, 2008 Author: mytime | Filed under: My Timeless Templatesgot me wanting to share some more samples 😀
Thanks everyone for the love and kind words re: my template post! You all just put the biggest smile on my face! I so needed that. It means a lot because I have so much family drama going on, that I can’t discuss (nothing to do with my kids!), but has taken quite the emotional toll on me the last few days, on top of being sick. Then on top of that mess, Amber has had an on and off fever of almost 104 since last night too, and they “think” its a virus.
Im stressing because Alexa has her Holiday Concert tonight, and I wanted us to go as a family. I needed that Holiday cheer. Now we will see how the day goes. I guess there is a lot going around right now. The important thing is to get Amber back to health and keep the rest of us that way.
AND to make matters worse, my poor moo moo (my boy cat) who has had all the urinary issues in the past, decided to eat about a 4ft string to a popped balloon (no idea where he even found that! I clean my house a bajillion times a day and missed that somewhere), and I spent hours in the animal ER, while I was sick, till about 2 am. Cost us a tad over $500-just for the check up, x-rays, IV fluids, some high fiber food and laxatives! We have to wait and watch him. We couldn’t afford the $3,100 for surgery. CRAZY!!! Just what I needed. We did find out during that visit that he has kidney disease and kidney stones :C Poor baby. Now after this string drama (God willing he survives it) we have to totally revamp his diet to a new food.
Sorry. This is such a downer post. It started happy. YIKES! I just feel very overwhelmed right now, I spent the entire day yesterday in tears. Not like me. Anyway-onto happier stuff.
This has to be brief-so here we go!
I’m going to share 3 template samples today using My Timeless Templates© and one I free handed 😀
I am also using Rockin Holiday, Holiday Script (for the sentiments) and Pretty Papers in the Winter Wonderland collection- for all the projects you see here too!
First up, a pretty little ornament box, or something to house some holiday treats (not sure what I’m doing yet) using my For Keep{Sake} template

I used vellum in the window, which I stamped my tree onto, them dry embossed from the back to make it pop forward. Rather 3D. I used various gel pens and glitter to finish off the festive tree. Rather than cut out the rectangle, for my window-like on the template, I used the nestabilities Label die to cut this shape instead 😀 I ran my gold marker along the inside edges of the frame, before I attached my vellum inside.
Top view
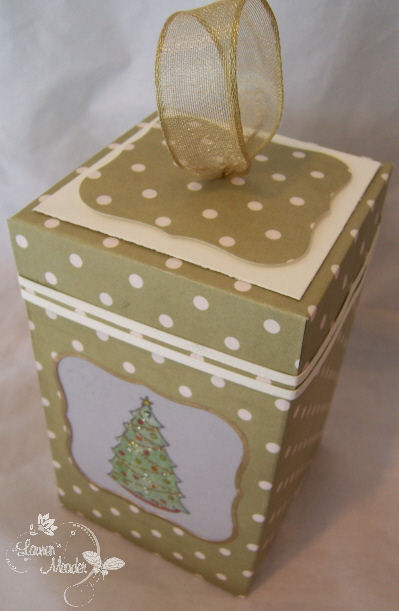
I used my scrap piece from the front window as a decorative accent on the lid! No waste here. The gold ribbon is from the Gold Couture collection!
Lid off

This template is the Music Makeover-This is a CD case cover, but can be so much more (check my sidebar for more My Timeless Template ideas!) but this time Im sticking with music.

I loved the image & sentiment from Rockin Holiday-it is perfect for this to hold Christmas Music 😀 I am making this for the kids to keep in their room with their fave Holiday songs.
I printed my template on ivory cardstock, then I added Pretty Paper Winter Wonderland collection to the front & back panels
I didn’t burn my CD yet, but here is the open view.
I just die cut the Spellbinders Lables nestabilites, and used the inner rim of the die to add holes and faux stitch it. Really quick and simple. The pretty papers really dress this up without lots of work for me. Considering this is for my kids, I won’t care if it gets ruined over time so much.
This next template is a FREE download from My Timeless Templates© called Stocking Stuffer. There are also more uses, but with the holidays here its just the cutest holder for so many things!

This uses mainly the patterned paper. I just printed on copy paper, and layered it onto my patterned paper when it was time to cut. I used a faux suede technique on the toe & heel.
Here is a close up of the tag.
I used the stockings on the fireplace image from Rockin Holiday. Snowflake is a old punch from SU!
LAST but not least (I LOVE this project) I hand cut a cute Mitten (front & back) that I made into a boxy bag!

Isn’t is so pretty?
The best part, all the squares are punched pieces of the Pretty Papers Winter Wonderland collection, all pieced together!! I little furry trim, and a simple tag-done!
I have to say the piecing took at least an hour! I wanted it to be perfectly balanced!
Its pretty good size too. I was so happy with it.
Here is the close up tag-
Well that is it for me. I don’t have much time today. I’m feeling awful, my daughter is sick too, and I have a TON of deadlines to meet, and so much else going on, I hope I can get it all done! The day just began, and already I need a nap :C
Thanks for stopping by 😀
Lauren
Craft Critique reviewed My Timeless Templates© today!
Dec 3, 2008 Author: mytime | Filed under: My Timeless TemplatesPOST 2 for today-scroll down for the MFT blog hop!
OH BOY! I am so excited when I popped over to the Craft Critique today to see the review of My Timeless Templates© . The article is by Julie Campbell who is an exclusive designer for Cornish Heritage Farms. When I saw that she gave my templates such a wonderful review my heart just leaped! I was so NERVOUS!
This was a huge leap, and I put SO much work and time into them every month, as does Nichole & the amazing PTI Design Team, so to see other people feel creative, and actually find themselves making affordable gift packaging (especially with the economy right now) is the best thing in the world to me. I love getting emails from people who were never even able to make any 3D items and now they are! It truly makes my day 😀
I hope you leave a comment if YOU have tried the templates too! No excuses! We have 2 FREE downloads for you 😀
Thanks for letting me share-and Julie YOU ROCK! Thank you for such a nice review 😀
A little gift for Cassie
Nov 25, 2008 Author: mytime | Filed under: Home decor/3-D items, My Timeless TemplatesSunday Amber had a birthday party to go to. I always have to add SOMETHING handmade when my kids go to a party it. Usually its a card, but my kids are now taking that part amongst themselves, and Amber insisted she only send along her hand drawn picture she drew of the 2 of them playing Princess.
So I decided to include with her WebKinz gift a personalized Purse-onality Clutch gift set that I made just for her.
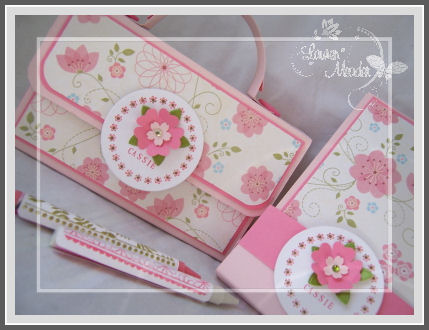
What little girl doesn’t LOVE seeing her name on stuff? I know I still do 😀 And you cannot go wrong with PINK! I love this paper byImaginisce called Fairest of them all. It totally matched my Sweet blush (PTI), and Berry Sorbet cardstock
PS- many of you emailed to ask what patterned paper I used yesterday-HERE you go!
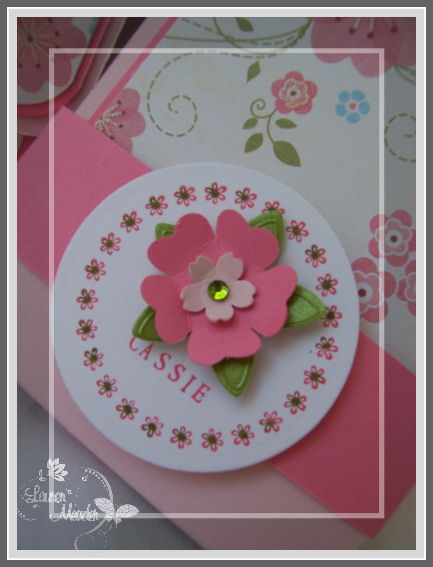
I used my flower border from the Curlz Deluxe Kit, and assembled Cassie’s name in the bottom of my circle block using the small letters set. I inked it in berry sorbet ink, then dotted my flower centers with an olive marker. Personalization complete 😀 Easy peasy. I like that there is NO hunting in a store for something with Cassie or any other name on it anymore, and being LIMITED to whatever random personalized gift I do find. I just make my own.
PS JustRite Stampers is have a HUGE SALE! Now is the time 😀 Buy one get one FREE 😀
Now for the matching flowers, I used my shimmery bridal confetti flower in green for the “leaves” (found in Michaels Stores in the bridal section-paintcan FULL for $4) a 2 flower punches from Punch Bunch. With a little bling in the center.
Now the fun part to this gift set was WHAT it really was!
ThePurse-onality Clutch was made to be a MOD GIRLY version of a Crayon Box!
Yes! You read it right. Target had these LARGE boxes of Crayons for $1. I bought 2 boxes and went to work! Yes I said I bought 2. I know they are repeat colors, but you know kids break their crayons all the time. Plus I wanted to fill the clutch.
So when I say went to work you may be thinking “Work? Work on what?”
Wrapping up my crayons!
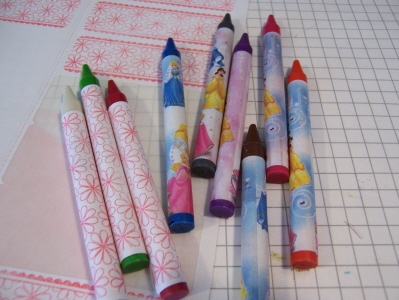
I stamped my limitless labels image onto my white mailing label sheets (32 crayons per box). Then covered each crayon! They wrap PERFECTLY!!!!!!!!!! I was over the moon, that what was in my head, was able to get done in the real world!
One box done in the floral pattern label Berry Sorbet, and the other box done in the leaf pattern in Ripe Avocado.
Now even if they don’t have the “style” you want you can still use them for anyone! These would have been fine as they are Disney Princess Crayons, but I wanted to over them all the same.
Here is the set at another angle
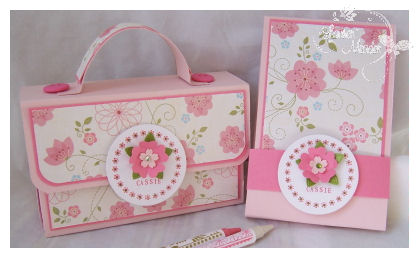
Now if you are wondering what is the gift on the right……………that is just a covered white notepad for her to be able to draw on. The top flap slides into that belly band to keep it closed. Quick, cute and simple. The clutch was a HUGE hit with all the girls! I got the notebook at Staples. I believe there were 6 in a pack for only $2. Now if you have a girly party this would be pretty inexpensive to make for favors, and you daughter could help! Amber’s class is ALMOST all girls, only 1 boy so I may make these for little Christmas Gifts! Not sure yet. Im sure I can BOY up a clutch for the occasion!
Stay tuned for that 😀
On another note: many of you emailed asking about my Kettlebell-
Wow! Am I ever sore. I did my first workout with the Kettlebell yesterday and all I can say is OUCH! A good ouch though. There is nothing like the muscle soreness from a hard workout. Makes you feel like you accomplished something.
I wasn’t sure I would like the workout. It honestly didn’t feel like a ton of work. I mean Im use to practically feeling like I am going to throw up after the Biggest Loser workout and Jillian Michaels 30 day Shred program! LOL!
I broke a sweat but thought that was it. Well today I felt exactly where it worked! My abs, calves, thighs, butt and yes my arms. Who’d of thought. The one thing I didn’t like was the DVD was INSTRUCTIONAL only. You can go online and ORDER more workouts-GRR!!! My Kettlebell was On Sale at Target for $25-I think it was usually $33 (I got the 7lb one) and I feel for that price I should get a Workout dvd WITH IT! So I basically use the menu guide and go through each workout, doing my own reps with my MP3 player on. The good thing is I am getting more use from my MP3! LOL!
I’ll keep you posted.
Another meal I thought I’d include for you are the Panini’s from Lean Cuisine! OH YUM!! You wouldn’t think a microwaved sandwich would taste very good, but WOW! They are FILLING, and great for people on the go, who work at an office (just take for your lunch) and people like me-busy moms. Just pop it in the microwave while you fix the kids their lunch, and you are GOLDEN! Really loving those this week!!
I also like Soy Joy bars. Now Im not a “soy” person but these are pretty good, give you engery and are filling. Amber LOVES them. The other kids don’t. Jason thinks they are BOGUS, so I think its a personal choice.
When I want chocolate I got to my SlimFast snack bars! Perfect little dose without so much guilt. I like the chocolate peanut butter ones. I also LOVE Special K (store brand is what I really buy) strawberry granola bars too. Only 90 cal!!!!!!!!!!
OK that enough of the “talk”.
Hope you like todays post, and have a great week. Upon the advice of EVERYONE I am off to buy those shes today. I have determined that me NOT being a shoe person, and wanting them so badly, that YES! I do deserve them, and yes I will take photos for those who want to see what got me in a frenzy. They really aren’t a big deal, but I will share.
Till tomorrow
Stuff yourself silly- Saturday Sketch
Nov 22, 2008 Author: mytime | Filed under: Home decor/3-D items, My Timeless Templates, Saturday SketchI can’t believe I got this post done EARLY! I have been so busy and slacking on the Saturday stuff!
Well its Saturday. My most LOVED day of the week 😀 Thanks for stopping by to join me in celebrating today. Well I guess technically we should really celebrate everyday we wake up, shouldn’t we? There is something good in every day. So think about what is in your own life that is good.
Hopefully my post will be one of those good things that get you inspired to get stamping 😀
Now every Saturday I host a sketch challenge here on my blog. This week I decided that we would use one of My Timeless Templates © for the sketch instead!
Today’s “sketch” will use Stocking Stuffer © Keyword will be mytimesstuffer if you upload to a online gallery.
UPDATE: I am happy to also update you and say that with all future template downloads we will include a general guide for instructions of how to put it together. We don’t want the instructions to limit you and prevent you from using creative liberty, or whatever works for you personally when assembling, just to be used as a general guide for some whom may need it :F
Many of you aren’t too into 3D projects, or are afraid to even try. This template makes everything so much easier. Just print, cut, score and go! It’s free and you have nothing to lose. You may get hooked 😀
Now this isn’t a template you have to PURCHASE, it was part of the Freebie downloads, so there are NO excuses 😀 If you have been putting off trying the templates, or already downloaded, but procrastinated making something, then KNOCK IT OFF! LOL! Procrastination is a BAD thing. Get crackin.
If you haven’t downloaded YET please read the INSTRUCTIONS!!!
You also want to make sure that your Page Scaling section when printing is set to NONE.
You may also check the Q & A section I have HERE.
Now don’t feel limited by the “stocking stuffer” name. You will receive an Idea Catalog when you download , with 5 exclusive ideas (non-holiday :D) to use this template for. So get creative. That should get the ideas flowing. You can also view all my own template creations HERE.
Now for the FUN part! My sample for this week 😀
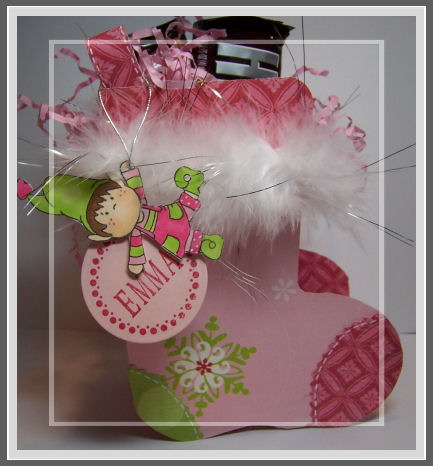
Stuffed with goodies-For Emma
Is this not adorable? When I saw the position of the lil elf in SugarPlums North Pole set I thought how cute would that be hanging from MY stocking template?! So I jotted down my idea in my creative notebook to pull out when I had more time or needed a great gift idea. You never want to forget a good idea when it hits. I have lots of that stuff jotted down in hopes to get to it, someday!
NOW is that time
I know I said to NOT get limited by a Christmas stocking but I have gifts to make for the holidays and this is doing double duty for me 😀 Maybe you too? If you have a secret sanata gift or a holiday swap ANYTHING is appealing when wrapped in the right package 😀
I loved that holiday paper by SEI. Its so pretty, and it is double sided, so perfect for my template 😀 It also inspired my colors.
Now Amber is in Ballet class, and the girls swap a gift with a classmate. It just so happens she got her little BFF Emma! (I wonder if that was rigged by the dance teacher? :D) Now the monetary limit is $5 per girl and it is important that be stuck to. Don’t want anyone feeling awkward. I don’t know about you, but gift packaging where I am ALONE can cost that! Well I decided I would make the most of it, and create an UBER cute Stocking Stuffer © package, and STUFF it to the tipity top with fun stuff from the Target $1 spot. Then how fun to personalize it too 😀 Gotta love being a stamper.
Emma Tag
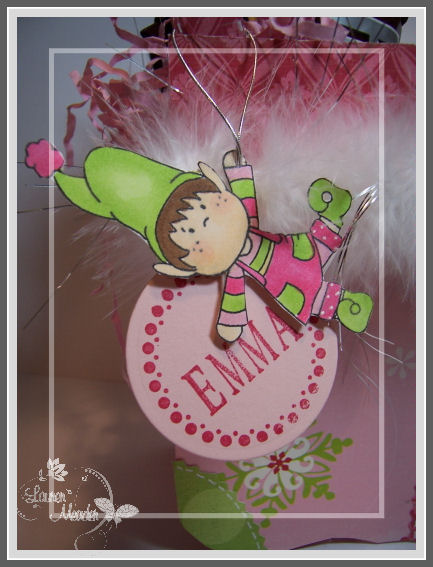
I used my JustRite Stampers circle border and alpha from the Two Monogram Stamper Kits (Normally not sold together but) I about fell over when I saw the deal…………………….
Now how cool is this-upon linking I found this:
JustRite Stampers is having a Thanksgiving Buy one Get one FREE! Sale!!! Details HERE! Sale ENDS on the 30th!
OK you so need to RUN to get in on that! OMG! If I didn’t own it all already I know I would. (Yes I have a shopping problem, I know about it already, no lecture needed)
Back to the template details- I printed my template and for the heel and toe patches I used pinking sheers to trim down the design a bit on the heel. That is what I mean by taking creative liberty. Don’t be afraid to change something up to suit your design. White gel pen used for faux stitching. I also rounded the top corners of the stocking cuff. After it was all assembled I added some furry white trim stuff I got at Michaels for that little extra holiday UMPH! Loving that stuff too.
I hope she likes it.
I know Amber was mad I put Emma’s name on it because SHE wanted to keep it for herself 😀 That made mommy feel so good. Plus getting a huge leap on these Holiday TO DO’s is always nice too. Never too early. I hate running like a mad woman close to Christmas. It takes away all the JOY of the season.
So that is all for me today. I have many more things to follow, so stay tuned.
Be sure to check in on my Sketch Team to see what they have created with the Stocking Stuffer Template.
Now it’s YOUR turn! Send us a link here, to wherever your fabulous creation is posted, so we can all check and see what you did.
Till tomorrow.
Papertrey Ink November Release-and Saturday Sketch!
Nov 15, 2008 Author: mytime | Filed under: Cards, My Timeless Templates, Papertrey Newsletter, Saturday SketchWOW! How can it be the MIDDLE of November ALREADY? Jay’s grandmother already called with confirmation of Thanksgiving Dinner plans! CRAZY!
Tomorrow is my son Noah’s birthday party so Im going to be working like a mad woman to get his party things done today. I am NEVER a last minute type of person so this is a KILLER for my OCD! We have about 18 kids total! Should be a total blast.
I hope you all enjoyed thePapertrey Ink release with all the countdown’s and design team samples. I really hope you are also loving the latest My Timeless Templates ©. I also hope if you have not already, that you try the 2 FREE templates we have for you! There is NO EXCUSE not to TRY one! You can’t get any better than FREE 😀
I have to say a huge THANK YOU to all of you who get so excited right along with me, and enjoy this new venture of gift crafting 😀 Preparing for that each month keeps me REALLY busy. I LOVE it. I really put in a lot of time to think of great ways to present these templates to you. Now while you are all downloading the newest of templates, I am getting started on next months! LOL! I know I find these templates REALLY useful, especially with the holidays approaching, and I hope that I have helped some of you save some $, creative time, and ideas this holiday season, making home-made holiday gift giving that much easier.
Now speaking of templates, I was holding out ONE more sample for you, just for today! It is my favorite project for this release!
I would LOVE to hear YOUR feedback on what you enjoyed here, and why. Im always amazed at what I love vs what YOU love 😀
OK the projects-
Teacher’s Apple- LOVE this set.
This uses the All Boxed Up © template in a fun and new way! It also uses Teacher’s Apple which I am TOTALLY in LOVE with! LOVE! You have no idea. For those of you wanting to mix up teacher gifts this year, you may just fall in love with this idea 😀
I mentioned before that the pretty pockets make a great base to many gifts on their own! So here is another example of that .
In & Out Hanging Mailbox

This holder hangs in the classroom, either by the desk, or by the door. You can even put it ON the door knob. It helps the teacher keep organized with letters IN, that need to be read, and letters OUT, that need to go home! This isn’t just stylish but its also practical.
I think its a super cute gift idea useful for ANYONE, not just teachers! Alter the design to suit receiver’s favorite colors or decor.
stamps-Teacher’s Apple, Simple Alphabet
paper-Polka Dot Parade, Olive, Spring Moss, Sweet Blush, Berry Sorbet, white
ink-Spring Moss, Sweet Blush, Berry Sorbet, Ripe Avocado
other-Spring Moss Stitched ribbon, making memories flower brads, making memories ribbon slot, circle punches, corner rounder
Now insert your Teacher appreciation card into the INBOX, and some monogram notecards, as a gift for her to send out, and place them in the OUT box.
View from the side-cards IN
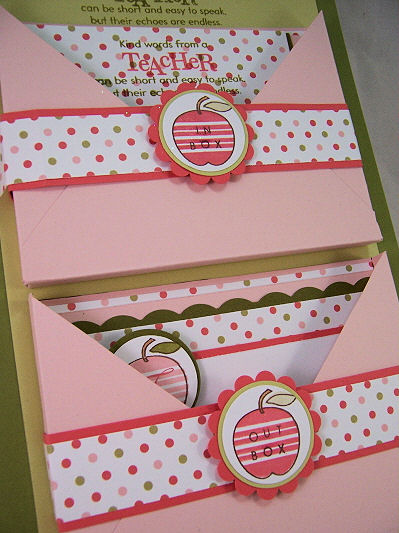
View from the other side-no cards. I like to line the inside of my pockets. It makes it look a little more finished, don’t you think? It’s the littlest details that make you say WOW!
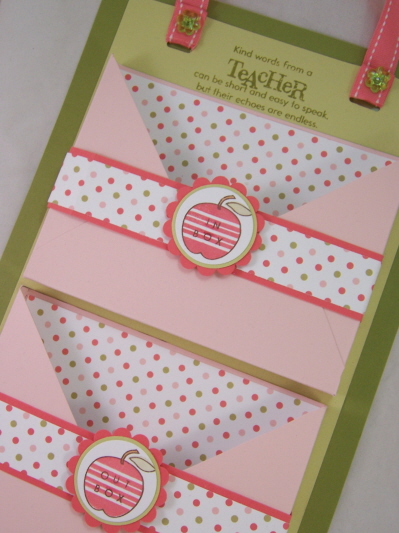
This is the view from the top
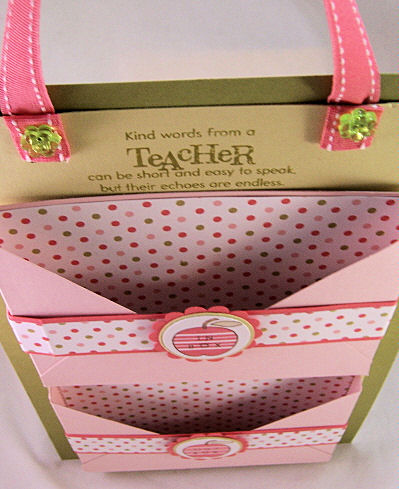
Now for the gift to go with the In & Out box
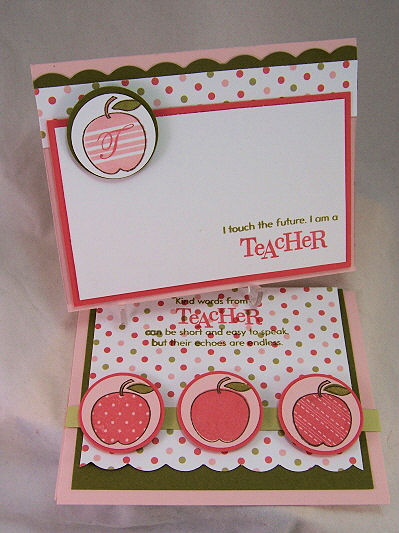
Well upon presenting this gift, I think a nice Teacher Appreciation card is in order!

This is the card that I created to write my appreciation to the teacher. I love the layout, and message it reads. I created some monogrammed note cards, to include as a gift, with a SIMILAR layout to match.

For Ms. Trefrey
This note set is for Noah’s new reading teacher! She is over the top AMAZING! I called the Principal just to tell him how much Noah has enjoyed his reading program with her. She has gotten him excited about reading in a way I could not. How can you thank someone for that? I hope this gift set will cover it 😀 Alexa is my “reader” and Noah is my Math wiz, but now I have hope 😀
I think a NICE set of monogrammed notecards would be PERFECT for the teacher! I have this simple design, PERFECT for nice notes home to parents, and I would put a set of 8 (with envy’s) in the Out Box, for the teacher to be able to send out notes 😀
Isn’t that so cute?
PS-Don’t forget when you purchase ANY of our My Timeless Templates ©, that you get an idea catalog of 5 EXCLUSIVE (full color photo) project ideas with step by step instructions, and supplies.
Before I begin the rest of the peeks, let’s share today’s Saturday Sketch, and my 2 designs for that! (using new release stuff)

Saturday Sketch
KEYWORD mytimess12
I love this sketch 😀 I interpreted it in 2 ways.
I am TRYING to spend more time getting creative with my photos. it is the part I loathe about this whole stamping thing. I think it makes a difference though. I take the time to MAKE the project, may as well make it LOOK as good on screen right? I think Santa needs to bring me a new camera! I think I could even have him write it off as a business expense 😀 Oh Santa…………if you read this, I need a new camera 😀
So here we have a card titled Every Happiness.
It used the New! Heartfelt Basics, and an older set-Flower Garden. I LOVE that sentiment set. I am a sentiment JUNKY, and this set is ROCKIN my world.
I love the colors, and the way the sketch worked for this design. The tag is such a cute touch. Not sure you can clearly se the vellum butterfly, but its a pretty, subtle touch.
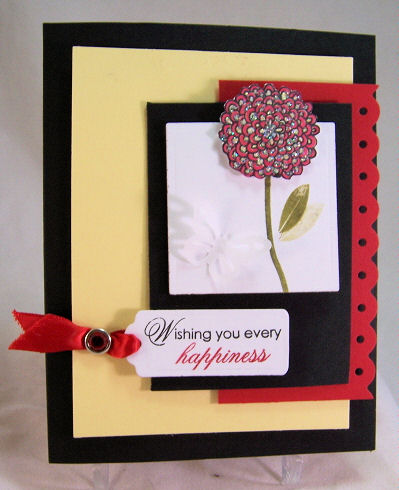
Close up of Every Happiness

Stamps- Heartfelt Basics, Flower Garden
Cardstock- lemon tart, pure poppy, black, vellum cardstock
Ink- black, ripe avocado, pure poppy, lemon tart, red marker
other- poppy satin ribbon, nestabilities square & tag punch, Martha Stewart butterfly punch, treading water punch by Fiskars
Now I have card #2 with the sketch! (I know Im over achieving this weekend! LOL!)
Ships Ahoy-
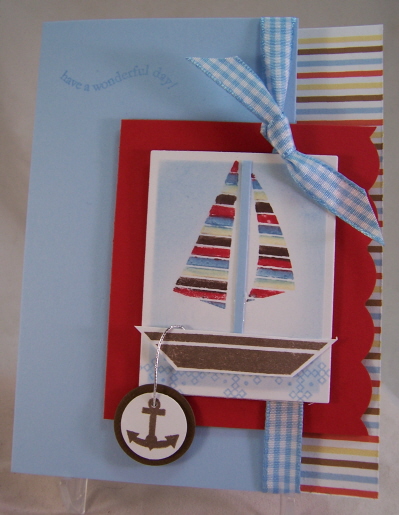
I love this little boat! Men of Life is awesome. Its great for those masculine cards, boy cards, or baby cards. I used my patterned paper as my inspiration for my sails. I didn’t follow my sketch EXACT, but this creation was certainly inspired by it. I’m loving the little anchor!
Here is yet another view of the details

The sentiment is from the Out of the Box sentiment.
Stamps- Men of Life, Out of the box (snetiment)
cardstock- white, pure poppy, dark chocolate, bashful blue, Ship to Shore stripe
Ink-markers from SU!
gingham from PTI, corner rounder, silver cord
I made the “ocean waves” use a stitched square image in the set. LOVING the colors and desings of the new patterned paper. LOVE!
Be sure to check out the Sketch Team for their samples with the Sketch!
Background Basics Stars set:
I love the bkgd set. I am a HUGE fan of Polka Dot basics, and this is another great set. I really wanted to use it as a MAIN focus on my creation here, and rather than seeing STARS, I saw posie’s!
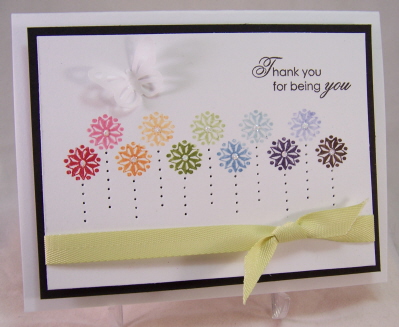
Pretty lil posie stitched stems
I think this was my favorite card! I love the black & white, with the contrast of a rainbow of colors from my “star” flowers. The spring moss ribbon is my “grass”.This is one of those under 10 min. cards. By simply piercing the “stems” you get a whole new look.
I also see PINWHEELS! Really cute.
Stamps- Background Basics, Heartfelt Basic
Ink-black, various markers for direct coloring on stamp
cardstock- vellum, white, and black
Other- Spring moss twill ribbon, butterfly punch by martha stewart, paper piercer for stems
You know me & my butterflies! This is the latest punch from Martha Stewart. Its perfect!
I used my glue pen to add some glitter to my flower centers.
I also used Heartfelt Basics. Let me tell you that set is a MUST OWN!!!!!!!
Next up we have Lisa’s set Out of the Box.
Stem of Friendship
Stamps- out of the box
Cardstock-sweet blush, pure poppy, ripe avocado, black, white
ink-sweet blush, pure poppy, ripe avocado
other-black brads, corner rounder, polka dot ribbon, clear bead
What stood out to me was the single flowers (of course) and vertical sentiments. I decided to create a simple color blocked style card, that really stuck out to me due to the colors I chose.
The little Robin’s Nest bauble was a nice little touch to the flower center.
I like making smaller images the main focus of a design. I had fun working with all the images (more to come!).
Well I am truly wiped now. I always have my Papertrey Ink “hangover” as I call it. I go into creative overload for like 3 days. This month I can’t afford that! I have Noah’s party to get things done for.
So there you have it for me.
Scroll down to the other posts through the last few days if you missed some stuff.
Thank you all again for taking time to check in! I appreciate being one of your “stops” on a busy weekend!
Enjoy.
My Etsy

Who I Designed For
Blogroll
- Alicia
- Alli Miles
- Ally Blankenship
- Amber
- Andi @ crafts on a whim
- Angel R
- Angie Z
- Anne Kranitz
- Becky O
- Bee
- Beth Silaka
- Bethany Paull
- Beverly Nash
- Bobbie
- Cambria
- Cammie
- Card of the Week
- Card Positioning System (CPS)
- Cards for Cancer
- Catherine Doucette
- Charmaine
- Cheryl Sims
- Chriss Rollins
- Christina
- Christine Ewing
- Christine Wooden
- Colleen Schaan
- Craft Critique
- Craft Gossip
- Crystal
- Dawn Easton
- Emily Giovanni
- Geny
- Holly
- Igne Groot
- Inspirational Craft Blogs
- Irene
- Jami Sibley
- Jeanne Streiff
- Jen del Muro
- Jeni Bond
- JenMarie
- Jenn Balcer
- Jenn Diercks
- Jenn O
- Jennifer E
- Jennifer Mick
- Jennifer Pereda
- Jennifer-Sweet Treat
- Joanne Basile
- Jodi Collins
- Julia Stainton
- Julie Masse
- Karen
- Kathryn Berthiaume
- Katie Cotton
- Kelley Holland
- Kendra
- Kim Scholfield
- Kris’s Color Stripes! Get inspired here
- Kristen Dubosque
- Kristin Eberline
- Kristine
- Laura @ Sunshine Stamper
- Laura Turnmire
- Laurie Schmidlin
- Lesa Rapp
- Linda Duke
- Linda-LSN
- Lindsey Botkin
- Lisa (lakind scs)
- Lisa Kind
- Lori Craig
- Maggie
- Mara Campbell
- Maria
- Maria Levine
- Mary
- MaryJo
- Melanie M
- Monique Hansen
- Moxie Fab World
- Pam Imholz
- PaperCrafts Connection
- Peppers and Pollywogs Kids party site
- Rebecca Grohall
- Rita
- Robyn
- Rose Ann
- Sarah Vrolyk
- Sharon Harnist
- Sharon Johnson
- Sharon Rivera (a chemisrty with paper)
- Sherrie
- Sophia Landry
- Storage Units, Ink, & More Blog
- Sue Berker
- Susan (Rainy)
- Tangii Crane
- Tracy
- Tricia Traxler
- Trudee
- Velta
- VivLyn
- Zena
MTME Pretty Palette Color Team
MTME Pretty Patterns Sketch Team
My Time Made Easy TM LLC
Shop till you drop!
Lauren Meader
About Me
Copyrighted material
Subscribe To My Blog
Pages
- About me
- Alexa’s Story!
- My Crafty Corner!
- My Time Made Easy™ LLC
- Our Make A Wish Trip to Disney!
- Resume/Publication List
Calendar
| M | T | W | T | F | S | S |
|---|---|---|---|---|---|---|
| 1 | 2 | 3 | 4 | 5 | 6 | 7 |
| 8 | 9 | 10 | 11 | 12 | 13 | 14 |
| 15 | 16 | 17 | 18 | 19 | 20 | 21 |
| 22 | 23 | 24 | 25 | 26 | 27 | 28 |
| 29 | 30 | |||||
Archives
- August 2013
- July 2013
- June 2013
- May 2013
- April 2013
- March 2013
- February 2013
- January 2013
- December 2012
- November 2012
- October 2012
- September 2012
- August 2012
- July 2012
- June 2012
- May 2012
- April 2012
- March 2012
- February 2012
- January 2012
- December 2011
- November 2011
- October 2011
- September 2011
- August 2011
- July 2011
- June 2011
- May 2011
- April 2011
- March 2011
- February 2011
- January 2011
- December 2010
- November 2010
- October 2010
- September 2010
- August 2010
- July 2010
- June 2010
- May 2010
- April 2010
- March 2010
- February 2010
- January 2010
- December 2009
- November 2009
- October 2009
- September 2009
- August 2009
- July 2009
- June 2009
- May 2009
- April 2009
- March 2009
- February 2009
- January 2009
- December 2008
- November 2008
- October 2008
- September 2008
- August 2008
- July 2008
- June 2008
- May 2008
- April 2008
- March 2008
- February 2008
- January 2008
- December 2007
- November 2007
- October 2007
- September 2007
- August 2007
- July 2007
- June 2007
- May 2007
- April 2007
- March 2007
- January 2007
Categories
- About Me
- All That Scraps
- blogger challenge
- camera/photo play
- Cards
- Contests
- family stuff
- FOR SALE
- Home decor/3-D items
- How to FAKE it!
- Introduction
- JUGS Challenge
- JustRite Stampers
- Lizzie Anne Designs
- My family stuff
- My Stamping Space
- My Time Made Easy
- My Time To Color Challenge
- My Time to Create Challenge
- My Timeless Template Challenge
- My Timeless Templates
- Mytime Mail
- MYTIME MOVIE/VIDEOs
- Papertrey Newsletter
- Pink Cat Studio
- Pretty Palette Challenge
- Pretty Patterns Sketch
- Product Opinions and Must haves
- Recipe's
- Saturday Sketch
- Smilebox Creations
- Stampavie
- Tutorials
- Uncategorized
- videos
Most Popular
- Create your own Onesie Card Tutorial-and important NOTE! PLEASE READ (2529)
- Saturday Sketch-Boxed bag holder (2333)
- Going GREEN! Fancy Flower Flourish-Closure Video (1478)
- Fabulous Favorite - Giveaway! (1336)
- a Prayer Request (1231)
- QUICK-Easter Baskets from Nestabilities-PTI style-and blog challenge (1063)
- Teaser Sketch (999)
- February Release Giveway! (and a little peek) (996)
- Group Post and Rambling Rose Video Tutorial (985)
- GIVEAWAY! Who wants it all?! (895)
Recent Comments (RSS)
- 야동: Love to read it,Waiting For
- 야동: This seller is in a
- 바카라사이트: 여기 처음 왔어요. 나는이 게시판을
- 야동티비: I was surfing the Internet
- 바카라사이트: 비슷한 주제에 대한 흥미로운 정보를
- 바카라사이트: "여기에 제공해 주신 귀중한 정보와
- 온라인홀덤: 유익한 웹 사이트를 게시하는 데
- 홀덤나라: 나는 당신의 블로그를 정말 좋아합니다.
- lisa: Technology, too, has left an
- 주소모음: 흠 !! 이 블로그는 정말
Copyright © 2007 - My Time, My Creations, My Stampendence - is proudly powered by WordPress
This blog has been Tweaked and Designed by Sara Williams