Archive for the ‘My Timeless Templates’ Category
Mytime to sew
Jan 13, 2009 Author: mytime | Filed under: Home decor/3-D items, My Timeless TemplatesWell it is no secret that I started my passion for “crafting” with quilting.
I loved purchasing and mixing the patterns of fabric so much more than the sewing part! LOL! That was my first sign that maybe being a quilter wasn’t for me. The second sign was me staying up ALL hours of the night trying to finish a quilt in a day! LOL!! I needed that instant gratification. I didn’t enjoy the quilting at all-just the end result. Boy am I thankful I found a craft I enjoy start to finish-with my instant joy attached.
Anyway-lots of people sew to some degree. When you are crafty you generally surround yourself with crafty people. Well I made this Sew n Go tote just for that crafty person in your life who loves to sew! It would be a fabulous gift for the beginner sewer in your life too!
Using Take Along Tote: Another My Timeless Template idea peek
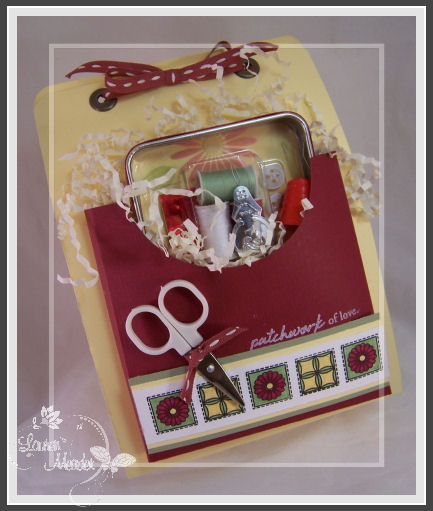
Sew n Go! Patchwork of love
How cute is that?
I just think of how great this little package could be for a newbie sewer! I know I would have done a happy dance if this was given to me! Especially when I was a girl, and would sew during the summer at my grandmothers. To have my OWN supplies would have been over the top.
Now in the front pocket- I used a round nestability to cut out a portion of the pocket (prior to adhering it to the pattern base) to give you a different look, and more visibility at what is inside
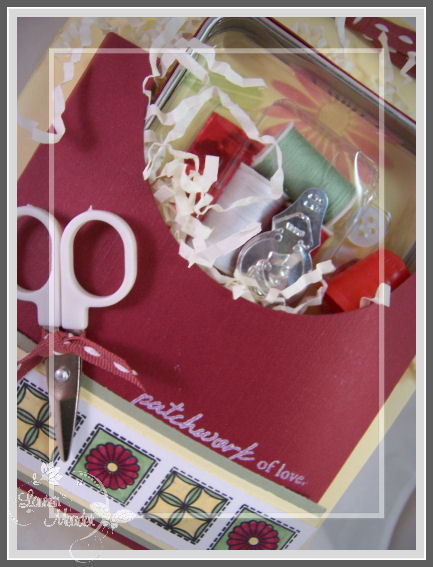
I took a travel sewing kit I got at the Target $1 spot some time ago, and repackaged it in a gift card tin I got at Michaels. Also a $1. I used the plastic insert that would normally be for a gift card, and flipped it upside down to fit all my ribbon spools etc in, and encapsulated it in the tin.
Fits in the pocket perfectly.
I used quilters sampler/sent. for my design and sentiment. My colors were inspired by my fabric selection. I had fun coloring the quilt blocks to match 😀
Side view
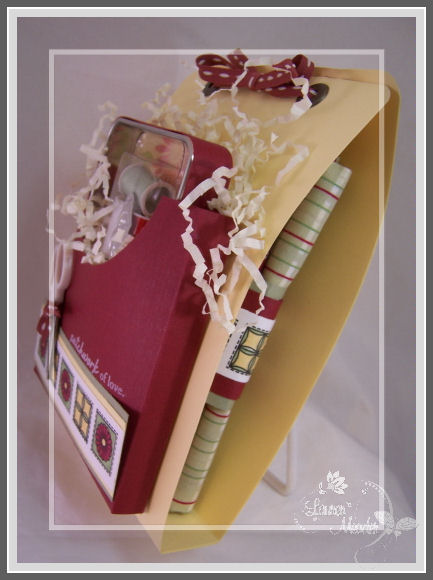
I held this tote closed with large eyelets and some cranberry crisp ribbon.
Inside there are 4 yards of fabric!
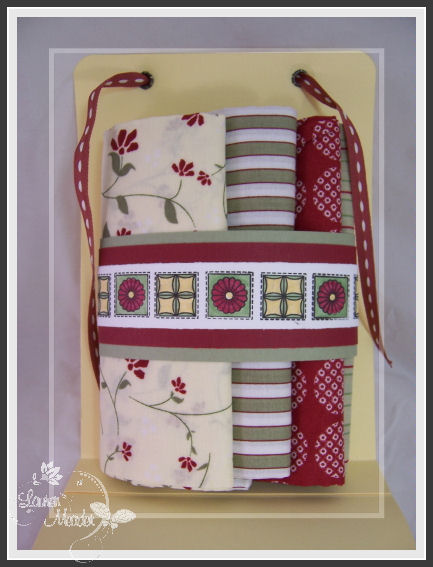
Folded nicely, and secured in place with a stamped band.
Don’t you love the colors?
Wouldn’t this make a nice gift!! I love it.
Be back soon with more peeks
Scent-sational gift idea
Jan 12, 2009 Author: mytime | Filed under: Home decor/3-D items, My Timeless TemplatesQuite honestly I’m totally in LOVE with my project today. Clean, simple, perfectly detailed.
OK by now I think you get how much I LOVE packaging ordinary, everyday things and making them extraordinary!
As a SAHM, on a fixed income (aka no allowance! LOL!) I have to rely on my stamping skills to make these inexpensive items more special. Its amazing what a little cardstock and ink can do to the littlest gifts. So I’m always trying to think of great ways to package things. For me its always been more about the packaging of things, rather than the gift inside.
I was always intrigued by cool packages, and wrapping paper as a girl. Now that love has grown out of control!!
Well I don’t know about you, but I LOVE candles! I could LIVE in Yankee candle 😀 (well until the headache from the plethora of scents hits me, then I’m out of there). I never get the huge ones, just a couple of the tea lights, or votives.
What is NOT to love? They can be pretty and they smell SO nice. Especially when you have company coming 😀 I personally love Clean Cotton (goes with my cleaning addiction! LOL!) , and Lilacs the best. We have a few lilac bushes outside our home, and the fragrance when they bloom is amazing! I wish it would last forever. Next up would probably be Apple Cinnamon. Reminds me of my mom baking during the holidays. “I” don’t typically bake, so that is the only way to get that scent in my house :D)
Have you ever seen their candle sampler set deals? You can get like 6 votives/tea-lights for X amount of $$. Supposedly saving you some $$ the more you get?
Candles make great gifts for people because its a nice “luxury” we don’t like to buy ourself, and they won’t get you fat! LOL! Plus they are a nice inexpensive gift so to speak, and EASILY re-giftable! No shame in that if you aren’t a fan of the scent.
Getting to my point here-
Every release I HAVE to do something with butterflies. I know, I know, blah blah blah, but they are “my thing”. So I am doing it again.
I always wanted a NICE way to package up some candles-without having the EXTRA expense of a candle holder. Maybe even a nice decorative way to STORE them, in full view, so I don’t have to dig though my drawers or a cabinet to find them. OR remember I have them. If I don’t see them I forget to use them.
Well, wouldn’t you know that my Perfect Match Box © template is the PERFECT box for just that!!
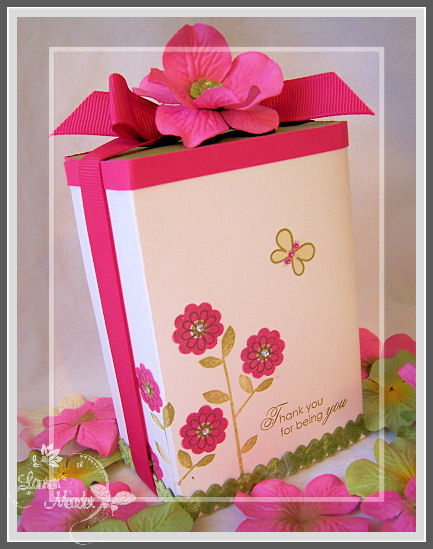
Is this not so SIMPLY elegant looking? I don’t think I could part with it.
I printed my Perfect Match base onto Ripe Avocado cardstock, and assembled. The exact meaurements will be featured when the template goes LIVE on the 15th. The Perfect Match Slider box was printed on white cardstock. I added a velvet ric rac to the bottom for “grass”. Then I felt a nice 1/4 inch band across the top would be perfect!!
I used Rustic Branches ( a set I’m really in love with) to make my own flower stamp combo when paired with the flowers from Beautiful Blooms (my favorite flower set of all time). The smaller open flower image is from Limitless Labels (another favorite I use ALL the time-especially with my templates :D) A little bling in the flower centers is a great simple touch.
Add a butterfly from Butterfly Kisses (one of my other favorite sets-ever), and lastly-(yes another favorite! LOL!) a sentiment from Heartfelt basics-and its perfection!
My dear sweet friend Diana bought me a beautiful butterfly plate, that has butterfly votive candles on it. I adore that plate, and think of her everytime I see it. Well the candles inspired me to make this holder for them 😀
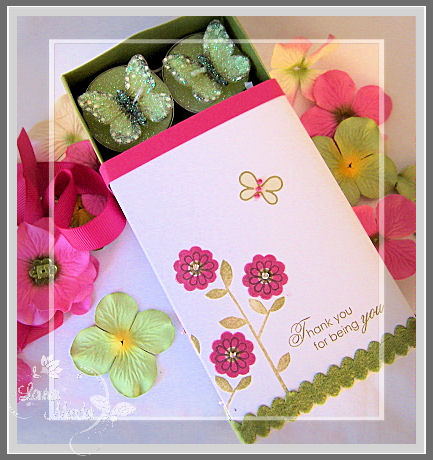
Yes! BUTTERFLY candles! The candles are glittery! The plate matched my living room perfectly, and the candles are stunning in person. Now I have a special box for them too.
Here is the set of them-out of the slider box.
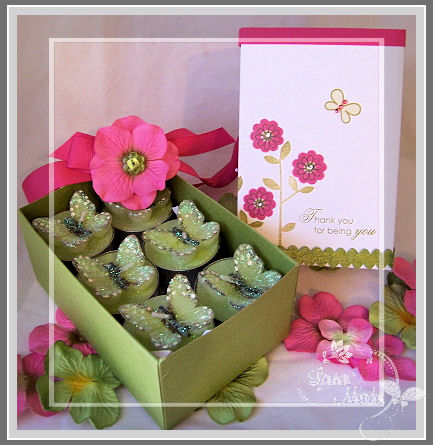
This easily fits 6 decorative tea lights. The butterflies are raised up, so they are taller than your typical tea lights. You can certainly stack 2 layers (12 total) regular tea lights.
Isn’t this a great way to present such a gift?
Im just in love. Im also on a Raspberry Fizz, and Ripe Avocado kick now ( I switched from poppy, avocado and black! LOL!).
Anyway-I just had to share my excitment for this project with you all. Only a few more sleeps until I get to see what YOU do with it! So many things can get packaged up in here.
I do have lots more to share, but my kids are sick :C so my time here is VERY limited. Gotta love their timing!
In the meantime, if you haven’t already check my post below, AND Nichole’s Blog for more peeks! It’s also Michelle’s day for a peek too!
Enjoy your day-and THANK YOU for stopping by to share my excitment 😀 Hugs to you all.
OK here we are on the Pink Cat Peeks day #2.
-Melissa will also have peeks HERE! On the offical Pink Cat Studio Blog. Also check out the forum on PCP The desing team really rocked out the sets yesterday! I can’t wait to see what today brings 😀
I have to admit that today’s peek shows you my FAVORITE of my projects of mine for this release 😀 It doesn’t get much cuter, let me tell you!!
First up-a close up of Cupid!
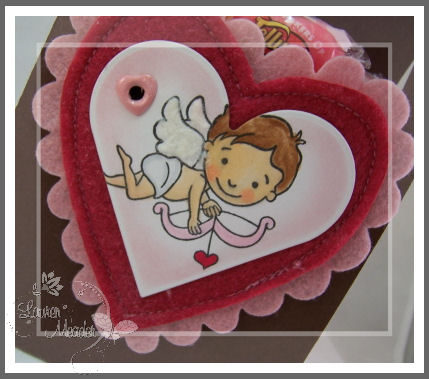
OMGosh! Does Cupid get any cuter? I think not!
That arrow of love, those rosey cheeks, and lets not forget soft/flocked wings! He is pure heaven.
I due cut him with my nestabilities, and layered him onto a felt heart embellishment I had in my stash of yummies. I was waiting for something “special” to use it on, and he definitely fits the occasion.
Now what could Cupid be bringing?
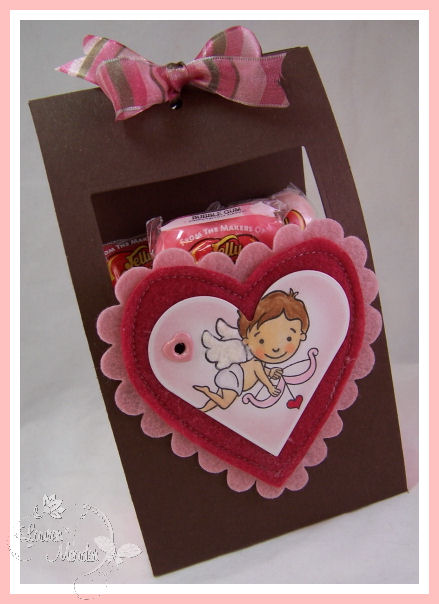
How about a box of LOVE POTION Lollipops?
Yes! That is perfect! Jelly Belly has some yummy pops, that are sure to have you in love! What better packaging than My Timeless Template-The Lollipop Along © ! I just made my cover using cardstock instead of vellum or acetate, and popped out a window with my rectangle nestability, so you can see the heart pops.

Here is another view-
I only used 3 pops in this one, since they are large. The perfect treat!
Now I’m going to share a Kiki card that I’m bonkers for!!
Jason & I got married in Hawaii, so anytime there is a hula anything I LOVE it! I always use a image of that nature for our anniversary cards, or “love you”, think of you kind of stuff, so when I saw the Hula Kiki I was bouncin!
Aloha-
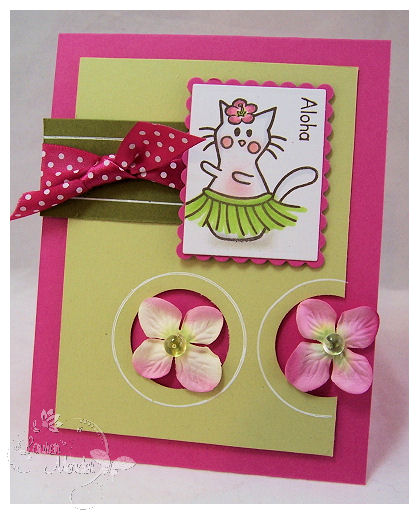
The color combo is HOT! Loving spring moss, avocado, and raspberry fizz together! Its the perfect tropical color combo 😀
I think Kiki done is white rocks! Yesterday she was purple, today she isn’t. She was also stamped in brown ink as oppose to black, for a bit softer look as well.
Details:
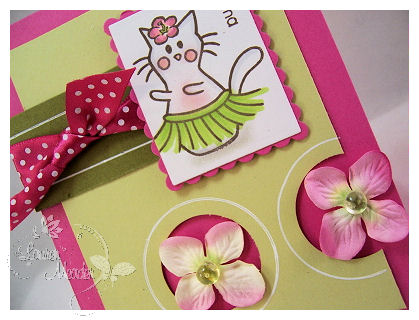
For the softer look I used pearlescent pastels. They add a soft shimmer in person.
The layout on this is really cool I think! I used my nestability circle and a white gel pen to trace those white circle, and then I used a ruler for my lines on the avocado panel. I just love it all. I have had the hydrangea flowers forever and have been itching to use them.
So there you have another peek! The release is almost here!
Be sure to check in again tomorrow 😀
later
Mytime at the Movies
Jan 11, 2009 Author: mytime | Filed under: Home decor/3-D items, My Timeless TemplatesOK I have another template sample!! The templates will be released on the 15th.
Do you ever give gift cards to the movies-or for movie rentals? I know Netflix is becoming popular, and with the economy being what it is, sometimes a movie “IN” is a much more affordable (and realistic) date night option these days. Especially if you are like me-3 kids, and NO HELP for babysitting. Let’s be realistic. If you have children getting a night out is NOT easy. AND if you wait for a date to “reconnect” and spend time with your loved one, before you know it the kids will be going off to college, and you won’t even know who you are married to anymore! LOL!
Jay and I try to have one on one time daily-even if its just an hour.
Throwing romance out the window, and making a date night at home is about as good as it can get at my house! Jason and I appreciate getting movie rental gift certificates from people, to make it that much more affordable. Even a $10 gift can get us 3 movies 😀 Upon receiving such a gift I thought about a fun way to GIVE a gift like that, and make it all the more special.

So this recent gift card (as seen here) being my inspiration point-here we go!
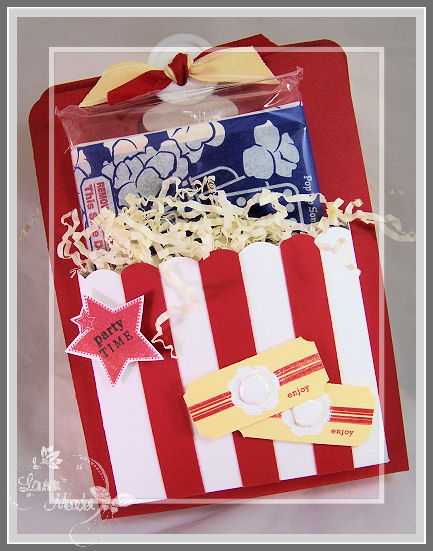
My newest Take Long Tote © template is the PERFECT presentation for a movie night at home!
Being inspired by the gift card packaging, I designed my front & back pockets to look just like a popcorn box! Of course both my pockets each hold a bag of microwave popcorn! You each need your own bag 😀 Heck they are only 110 calories, so eat up! The yellow filler adds to the design a bit.
Now to decorate my “popcorn box” pockets-I added strips of poppy cardstock, and made a scallop border.
I wanted to add to the popcorn pockets so-I did!
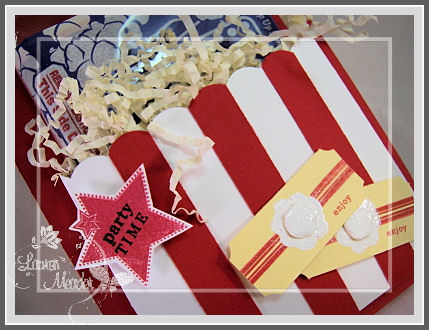
I used the stars from the 2008 Holiday Celebrations and cut them out. the “party time” is from Limitless Labels. I also used these for my candy bars (keep reading).
Now the close up-
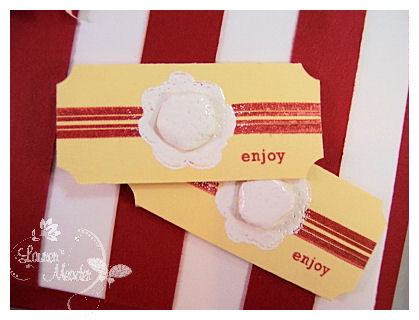
OK so I wanted to make “tickets”. I used a corner punch for that, and chose to use the Limitless Labels set for my ticket design. The “enjoy is from Mixed Messages.
I used the solid flower from the Remember set, and embossed it with white EP to make is look like a piece of popcorn! I then embossed a spare piece of cardstock, punched out a 3/4 circle, and covered a dimensional for the popcorn center-for a more realistic look! This was a proud moment for me! LOL! I was pretty happy with the outcome! From a flower to a piece of popcorn 😀
Now a view from the side :
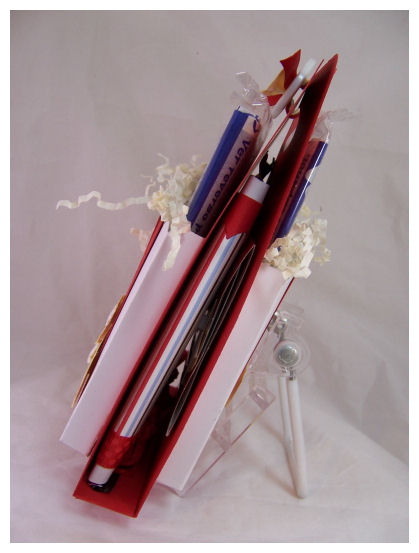
Drumroll…………opening it up-
Inside we have a gift card to the movies or video store, and 2 wrapped candy bars to match.
You can’t “go to” the movies without popcorn and candy bars right?
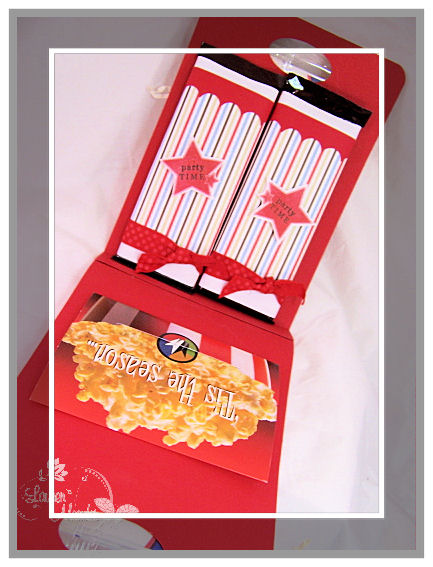
I think this is totally cute, and sure to surprise the lucky couple!
Here is a close up of my candy bars-
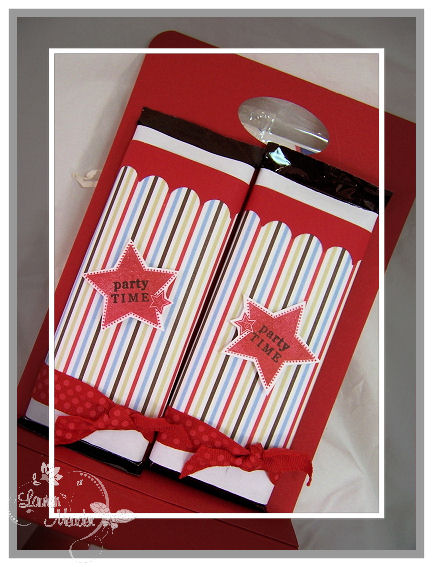
I just created a cute wrapper for them. Nothing fancy.
I think the project as a whole is really cute. Heck include babysitting and get it for the movie theater! LOL!
The point is you CAN plan a nice date night at home. It may not go uninterrupted but its the thought that counts. With Valentines Day approaching you can make this for your special someone as part of your romantic date night at HOME! LOL!
Change it up for Football season-with a FREE PASS for an uninterrupted afternoon of watching the game with friends even. It’s always the thought that counts. Who’d of thunk it? That 2 measly packages of microwave popcorn and some candy could look so cute?!
Endless possibilities for this template-even for the MEN in our lives.
Thanks for letting me share 😀
I’d love to know what you think of this project, and share ANY “dating at home” tips for those of us with kids who can’t get out too often!
The Perfect Match ©
Jan 10, 2009 Author: mytime | Filed under: Home decor/3-D items, My Timeless TemplatesThe excitement is building. Ready for another peek?
Im just so happy you liked my post yesterday! I’ll be picking a winner for tomorrow-
Im certain I sound like a broken record but you ALL seriously make my day. This wouldn’t be very exciting if I were the ONLY one who was happy about it all. YOU are what makes this all so AWESOME that words simply cannot even convey what I feel about it all. Truly.
I have to tell you that I LOVE the Take Along Tote © template! Its really a lot of fun. I have many great gift ideas for that one , that I will share over the next few days! It was one of those-woke me up at 3am ideas. I jotted down a quick idea, then in the morning went to work. It actually worked out pretty well! I have to say I am pretty happy with all the templates we have to reveal over the next 2 years, and counting!! I have recently developed a few more that I need to have approved 😀 So I LOVE hearing what YOU want to see 😀
Today I am switching gears to share a sample from my 2nd template.
It is called The Perfect Match © box!
Sometimes we need or want a slider box to hold a variety of items. This box is just amazing. Mix and match your papers and stamped designs for a really beautiful custom look. It can lay flat, or stand up. Your choice.
This is a great one for favors for birthday parties, Weddings, Bridal/Baby showers, and a million other “just because” occasions.
This box uses Beautiful Blooms. It was my template conception project. I used a soft sky and teal pigment ink for this project. The box slider base is a shimmery cardstock from WorldWin Papers. There are also adhesive rhinestones to match, in the flower centers.
I randomly stamped the slider cover to make my own patterned paper. I punched a notch in the front panel for an easy slider option. No notch need though.

The best part about this template is its like a 3 in one template!!
You can use the base and slider box together.
Use only the base.
OR use only the slider box! The slider portion has a bottom, so its perfect on its own!
I love versatility-in case you can’t tell, and most of my templates have a wide variety of uses, as well as the option to use other portions of the template in another fun way! Don’t limit your own ideas 😀
You will be shocked at what you can package in this template (again-I have so many ideas to share over the next few days!). Don’t forget the AMAZING Papertrey Ink Design Team! They contribute FABULOUS ideas that go into the exclusive idea catalog that comes with every template purchase. That alone is amazing. I’m certain anyone here who has purchased a template has discovered how great that idea catalog is.
So, as I said-like its name-you can easily mix & match your top and bottom of this slide out style box. Its a perfect size to hold many fun treats too.
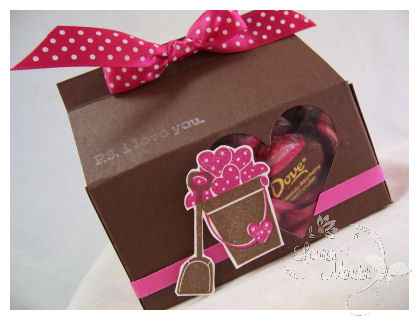
Chocolate Turtle
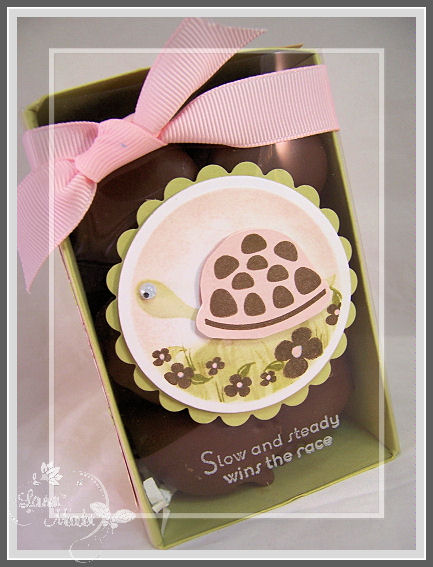
Speaking of fun treats-how about some chocolate turtles?
When packaging these, I knew the turtle from Pond Life was the PERFECT set! Pair it with Forest Friends and I was one happy girl!

I printed my template base on Spring Moss cardstock, and cut/scored/assembled.
For the slider cover template, I cut off the bottom. It was done using acetate as a clear cover so you can see, and drool over the turtles without even opening it yet 😀
Now when using acetate to replace a cardstock portion of the template, I simply print the template onto my copy paper, then use it under my acetate layer as my cutting/scoring guide. Easy peasy.

Before assembling the acetate cover, I adhered my sweet blush panels to the inside panels of the template. I also stamped my sentiment in white StazOn.
Once it was assembled I layered in my Chocolate Remix patterned paper-which I colored random flowers to match! A really pretty touch I think.
I thought the sentiment was PERFECT for this treat 😀
Don’t want to eat them all up at once, now do we? One a day is the perfect treat.

I fit 12 of these delicious chocolate turtles in this box. With room to spare! Valentines Day is approaching! Chocolate turtles are just so YUMMY!
Who could resist them in this package?
Well that is all for today. I hope you will share your thoughts on this template/project as well.
Tomorrow is going to be JAM packed with samples here! I will have a special Papertrey Ink post to share with the other design team members, along with 2 template samples (one with The Perfect Match©, and another with Take Along Tote©-IF I find the time to blog it all. ) AND if that wasn’t enough, I have peeks starting for Pink Cat Studio!
Now you understand why I’m so crazy?! LOL! Many ask how I do it. Right now I’m certainly surprising myself! LOL!
I have so much more to share, you have no idea how much my head is spinning. I always have to jot down the ideas when they hit because I get flooded with so many at once!
So, stay tuned tomorrow, and be sure to check out Nichole’s Blog, as well as Heather, who has another great set debuting this month.
Till tomorrow 😀
Template/Stationery Papertrey Peek #1-
Jan 9, 2009 Author: mytime | Filed under: Cards, My Timeless Templates, Papertrey NewsletterHi everyone!
Boy have I been scrambling to get some cool samples ready for you this week as we have ourPapertrey Ink countdown! Countdowns, for me are now busier than ever as I work hard to design my projects, as well as share some sample ideas daily, using my monthly release of My Timeless Templates. If you are new to my templates-read all about them here! AND make sure you try the 2 FREE downloads 😀
If you have tried them, thank you! I get so excited with each release, and seeing what you all do truly makes my day.
This month is another exciting one. I hope you enjoy it as much as I do.
Introducing my newest template from My Timeless Templates ©!
It is called the Take Long Tote© This template will be available for purchase on the 15th.
It is a perfect holder for all those beautiful cards we all make! With 2 pockets to hold your cards/envelopes or whatever else you can dream up, it the perfect tote for anyone. YES! This fits your standard A2 size creations.
Keep reading.
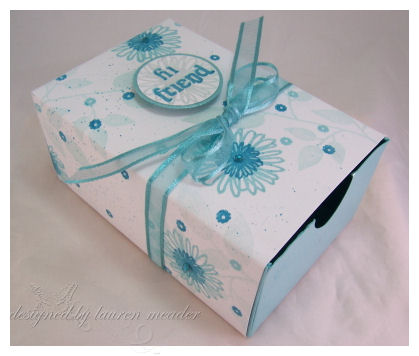
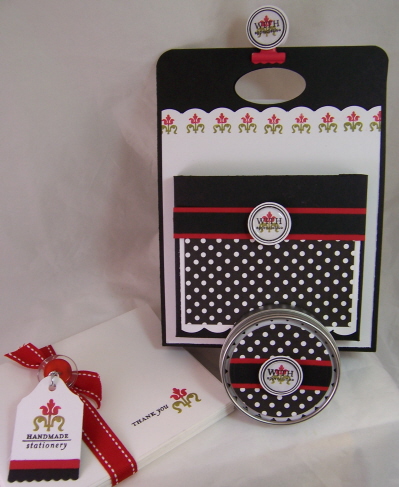
This template works perfectly for this months stamp set release, which I am so excited to be peeking today as well, called Simply Stationery. It was designed by Candice. It is a set that is so up my alley, as I adore making card/stationery sets for people. (Justa in case you didn’t notice.)
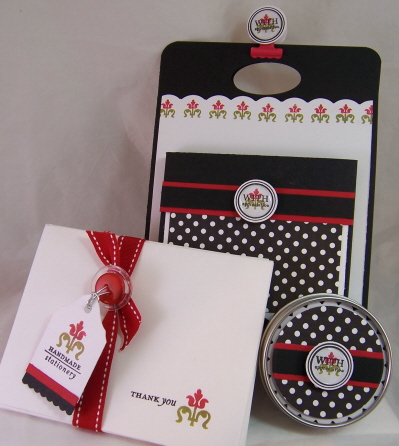
This set I made was created using the DELUXE Stationery Kit. I hope you like it.
You can never have too many card holders. As the days go on I will of course give you other ideas for this template too.
Stationery and cards are always the perfect gift, that keeps on giving. Having a perfect, easy to make package, to coordinate is a huge bonus, and really completes the package. It is so nice to have a variety of ways to present/store all your beautiful creations.
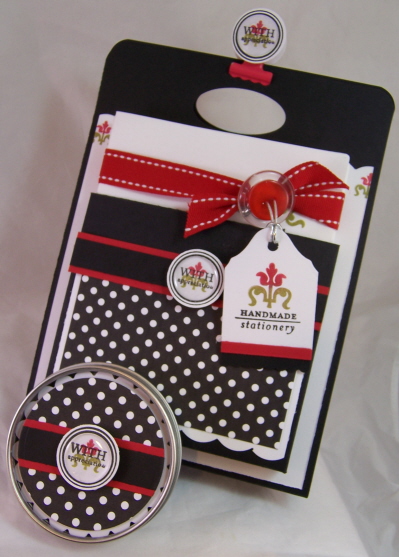
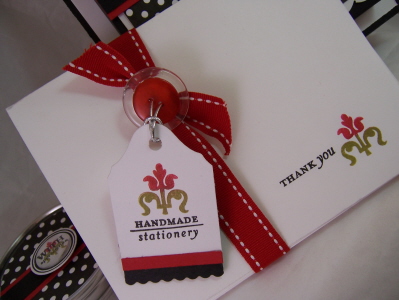
I decided use Black, Pure Poppy , Ripe Avocado, and white .
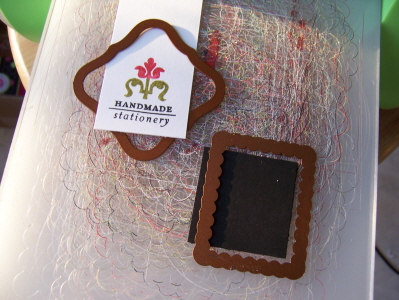
Now upon looking at this set, one of the images caught my eye. It is a flower-like flourish. To me, it was just like my favorite flower-a tulip. I had to use it as my main focus.
Close up view of the tag
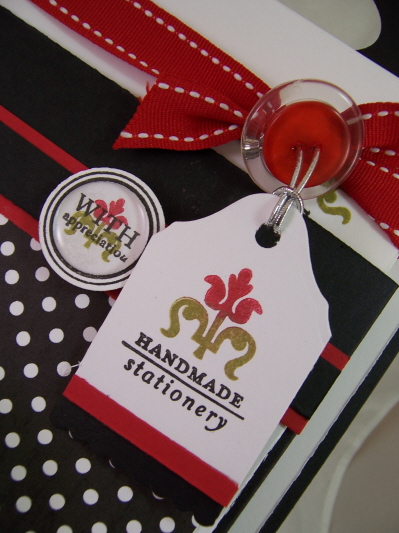
My tag uses one of the sentiments in the stationery set.
Now the “with appreciation” is from Mixed Messages. The circle border is from Borders & Corners.
I added the flower element to tie the set together. I love how it can showcase your gift set is handmade.
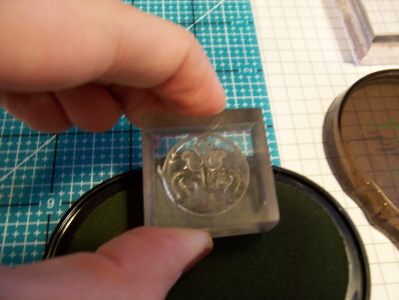
Now inking my flower with dual inks was very easy.
I inked just the stem in Ripe Avocado ink.
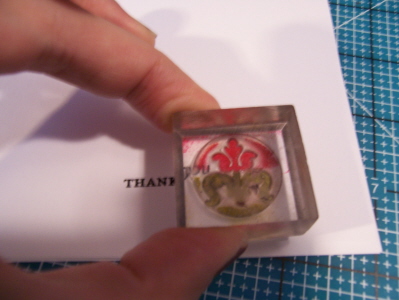
Then I used the shape of the ink pad to ink just my blossom in Pure Poppy.
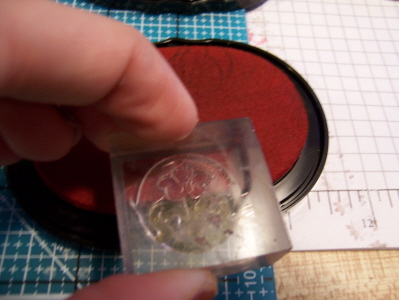
Stamped where desired. It went very quickly.
Now for the tag part.
I made my tag using the Labels 1 nestability, and a rectangle scallop border!
Here is a visual:
My white stamped tag was about 1 1/2 inches wide, then I die cut it.
Layered the tag piece, with the scallop border for the bottom. Punched a hole, and had a elegant tag for my stationery set.
Getting an elegant tag is easy peasy!
This is a side view of the Take Along Tote ©
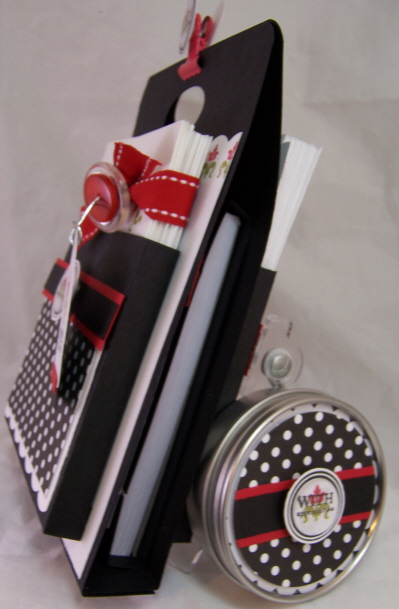
As you can see, it has 2 pockets. One on the front, and one on the back. The choice of 2 is of course optional.
The front panel holds my stationery sheets from the Deluxe Stationery Kit. I folded mine in 1/2 like a card.
Here are the cards out of the pocket-
As you may notice I did a scalloped panel. I stamped the flower along that panel for a pretty simple touch.
I TRULY love this set
Now the back panel -this holds my stamped envelopes to match.
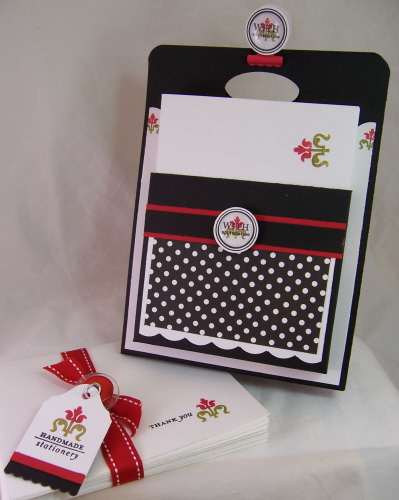
See the envelope corner?
A stamped envelope is a little touch that can really make a big difference.
Here is a closer view of the card set all tied together: simple elegance
Now un-clip the top of the tote, and inside you can hold even MORE fun items.
Note: I just added 2 punched circles, stamped to match to make my clip (by making memories-as are the page pebbles that are in the center of my “with appreciation elements) a perfect closure for my tote. You can always punch a handle in the tote, or use ribbon etc, as you will see over the next few days here.
Tote open to reveal inside storage
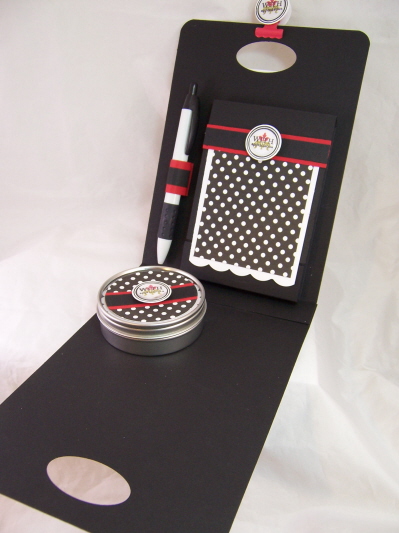
I decorated the little tin to match, to hold stamps for mailing.
Inside this one I decided I would cover a note pad (I got a set of 6 at Staples for about $2). It has a magnetic closure. Designed to match perfectly, of course!! Very easy. This will help someone jot down any important reminders and such.

I also included a pen in the set as well, with a little cardstock pen holder to match.
Isn’t that a nice surprise? Not only do you have two pockets as an option, but you can open it up for another great surprise, and more storage!
Well, that is it for me . I had so much fun making this. I hope you enjoyed my peek at the new stamp set, and md my latest template release!
Giveaway:
I love to hear your feedback. Leave a comment if you want a chance to win my completed project featured in todays post!
For more peeks make sure you check out Nichole’s blog!
Do you cookie swap?
Dec 23, 2008 Author: mytime | Filed under: Home decor/3-D items, My Timeless Templates, Recipe'sOr know someone who does?
Then this is THE post for you 😀
This is a super last minute gift idea, that I hope you find useful.
I needed to finish making teacher gifts, and Amber’s teacher is a HUGE cookie swapper. She has special parties several times a year where they swap cookies and recipe’s!
While pondering what on earth to make her (she stamps too!) I figured why not a Cookie Swap Recipe Holder?! She can bring it with her and have her recipe’s ready to go, and it’s a great holder to house the favorite one’s she receives.
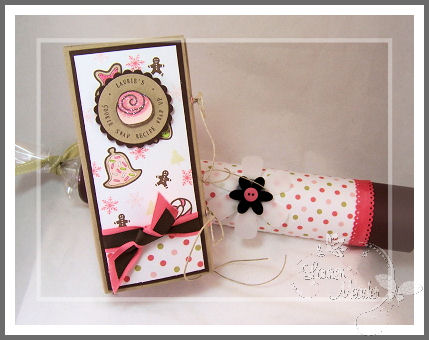
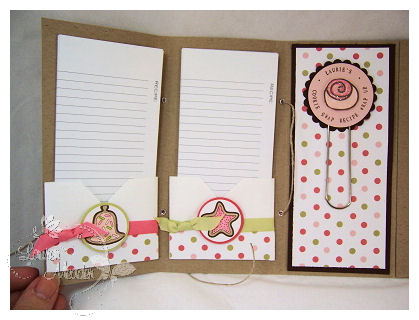
Here it is! Laurie’s Cookie Swap Recipe Wrap up
My Timeless Templates ©to the rescue. I mean it when I say my own templates saved me time this season on time, creative effort, and $$ . I have had fun sharing all these homemade treats with so many people. I keep hearing that I should open a store! LOL! Um, not sure about that.
I used my FREE template-the Recipe Wrap-Up for this gift. I have to say I have really enjoyed being able to easily personalize my gifts with my HUGE collection of JustRite Stamper Letter sets. I have several and they also saved me this year too. I use my small alpha ALL the time. Not sure how I lived without that one. As you can see it made this wrap really special and personal.
I then stamped, colored and cut a cookie for the center design.
Since she loves pink, I thought of a way to combine her favorite color for the holder, and keep it cookie related-using Kraft, dark chocolate, sweet blush, berry sorbet, and white. Ribbon is also from Papertrey Ink.
The polka dot patterned paper is from Polka Dot Parade.
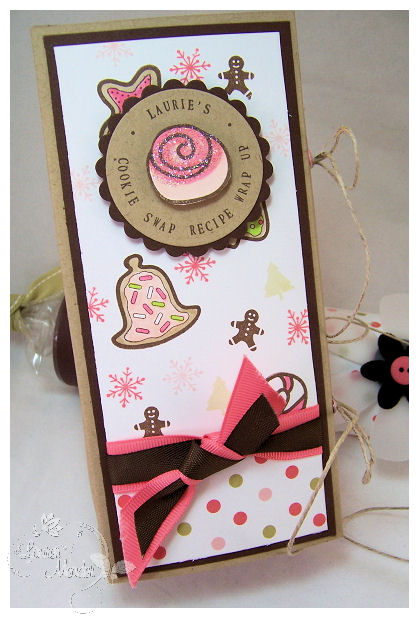
The main paper you see-with all the cookies, and snowflakes, I made myself! I’m beyond in LOVE with the way it came out. I would TOTALLY BUY IT if I saw it.
I have had this set from A Chemistry With Paper called Holiday Treats. I LOVE that set, and it was absolutely perfect for what I needed today. I also used some other small stamp elements from the Holiday Treats from Papertrey Ink.
Here is a close up view to the ties.
I decided that I would use eyelets to keep this sturdy for lots of wear and tear from tying closed, swap to swap.
All unwrapped
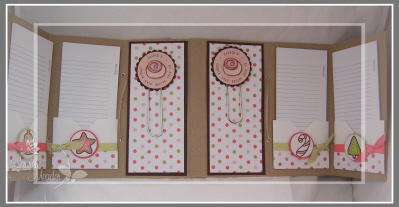
As you can see In modified this version from the original as I didn’t make 6 pockets for my recipe cards, instead I did 2 panels with a altered large paper clip to house any little notes or other things she may want to have handy!
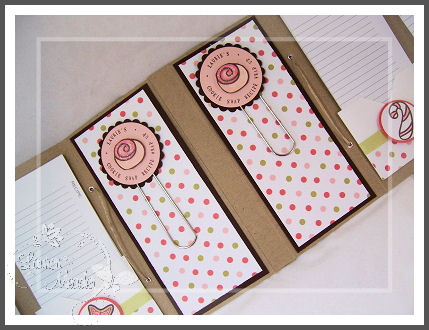
Here is a closer view of the clip-
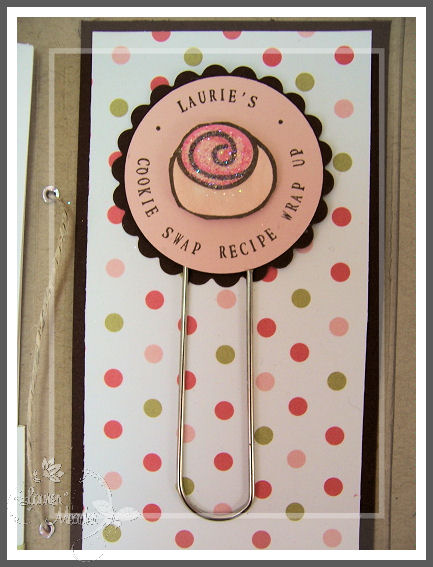
I used my same design element, as on the cover of my Wrap-Up! Stamping again my personalized info
Close up view on the pockets-left
Now do you see my pockets? I found a way to make this go even quicker! Little envelopes that usually hold 3 X 3 notecards! They are PERFECT for the Recipe Wrap Up, and the recipe cards. I just added a strip of designer paper, and some ribbon, then my cookie decoration embellishments, made to match 😀
Other view of pockets on right
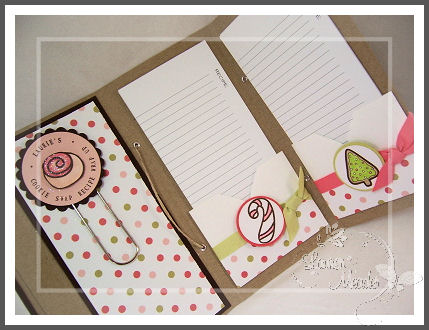
Each pocket holds 10 cards for this one. So she has 40 swap cards, blank- for her to do with what she likes.
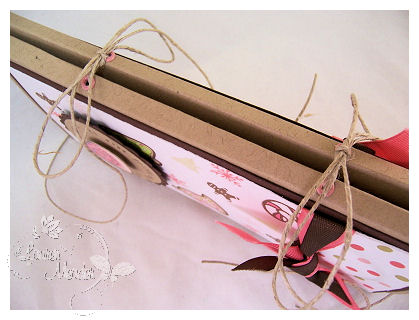
Now you may be wondering what the LONG Tube like thing is!
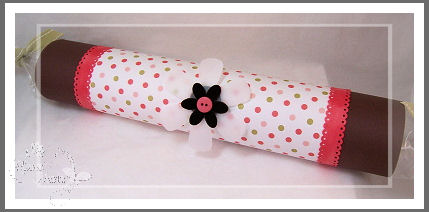
Well, I thought a great companion for her gift would be a magazine of all Gourmet Cookie Recipes, so I purchased the newest Martha Stewart Cookie magazine to give her some great recipes to try for her next swap. I honestly contemplated keeping it for me! LOL!
I didn’t want to give it in a plain ole bag, or plainly wrap it, so I made a tube from cardstock, and added cellophane to the ends. Rolled it up, and decorated. Just untie the ends, and slide out the magazine! Pretty cute huh?
I think it was a really nice co-ordinated gift 😀 Plus it was fun to make.
The dotted borders are actually Doodlebug Paper Frills-colored with my Copic’s to match 😀
PERFECTION!
Since we are talking cookies, and swapping-PLEASE share your favorite cookie recipe here if you have time!
I will share my favorite cookie-the easy way 😀
Do you likeRaspberry Linzer Cookies? They are beyond amazing! My favorite cookie-I think. I have a thing for Raspberry and Lemon stuff (like little tarts or lemon square/bars, tarts-anything! PIE!! OMG! I need to go have dinner)
Short on time? Here is my cheater way to get them done F-A-S-T!
Can you tell I loathe cooking? It totally cuts into my stamp time 😀
I just buy the pre-made Pillsbury sugar cookie dough.
Roll it out, and cut with my circle cookie cutter.
Now, make sure that exactly 1/2 of the circle cookies have a shape cut in the center.
(you can also do shapes like a heart, then do a little heart cut in the center)
FYI-You need 2 cookies for the sandwich-one has a hold in it.
Bake as directed.
Let cool.
Spread Seedless Raspberry Jam on the solid shape, and apply top cookie with cut out. Sprinkle on powdered sugar and you are DONE!!
Easy peasy, and so yummy. No one will guess how super simple that was.
On more DIVINE Raspberry treat! You can have this made in less than 15 minutes-tops! (Doesn’t count chilling time)
Its a Trifle. If you use what I tell you-really low fat and pretty low calories too-if you don’t over eat!
NOTE: I omitted the macaroons for a healthier, yet still scrumptious version
2 pkgs pound cake (Sara Lee frozen section)
1 tub of Fat Free Cool Whip (it does still taste fab)
1- 4 pk of Fat Free vanilla pudding cups (they are Handi-snacks. Then you don’t have to make the pudding-just pour it out of the containers!) (OK you MAY need 2 pks, I can’t remember :C)
1 jar of seedless raspberry jam
1 pkg of fat free/sugar free raspberry jello (make per instructions)
OK direction time
Cut pound cake into slices. Spread on raspberry jam, making pound cake/jam sandwiches.
Once sandwiches are made, cut into smaller sandwich cubes.
Layer sandwich cubes on bottom to trifle bowl.
Layer vanilla pudding, whipped cream.
Repeat steps until you are at top (DO NOT TOP WITH WHIP CREAM YET!)
Now take the prepared jello mixture, and pour it over the dessert. (TRUST ME ITS AMAZING)
Be sure to poke lots of holes so the jello does coagulate and form pockets of jello. You want the pound cake to soak up the juice (and no its NOT a soggy bread thing-that would NOT go over well with me!)
Let sit at least 4 hours in fridge.
Top with whipped cream before serving.
Scoop out & enjoy!
So that does it for me here.
I will be back tomorrow to post and wish you all a happy holiday!
Thank you for stopping by
Meet the Pretty Paper Friends- Candy, Pepper and Poppi
Dec 21, 2008 Author: mytime | Filed under: Home decor/3-D items, My Timeless TemplatesI’m not sure WHO is out there in blogland, as the busy holiday approaches, lots of awful snowy weather, and power outages to say the least-but if you are out there, and are reading, I am beyond excited to share this project with you! I wasn’t going to bother posting today since everyone is “gone”, but if you are here, I hope you enjoy it! I had a BLAST making it.
I made this little gift set for my friend Alicia’s daughter Ava. I have been trying to get a care package together (rather SLOWLY) and want to include this. My own daughter Amber helped with the idea! I also made one for Amber, as she thought the original was for her. Let me tell you- it was HOURS of cutting and coloring!!!!!!!!!!
Keep reading.
Who would have thought that the My Timeless Template Lolli-pop Along © could become a “store-like” carry case for some pretty paper dolls, and their clothes? Oh, yes!! It can. This template is so versatile-Im truly in love with it.
I am over the moon in LOVE with Stephanie Fizer & her style. The newest Isabelle Paper Dolls collection is so cute. They are retro to me and borderline the look of Wednesday from the Adams Family (remember that show??). Right amount of cute, but not too cutesy.
This project truly brought me back to summer’s at my grandmother’s when I would play with paper dolls on her sun porch! Girls these day’s don’t really play with paper dolls anymore! So sad. I hope this set revives that old pastime.
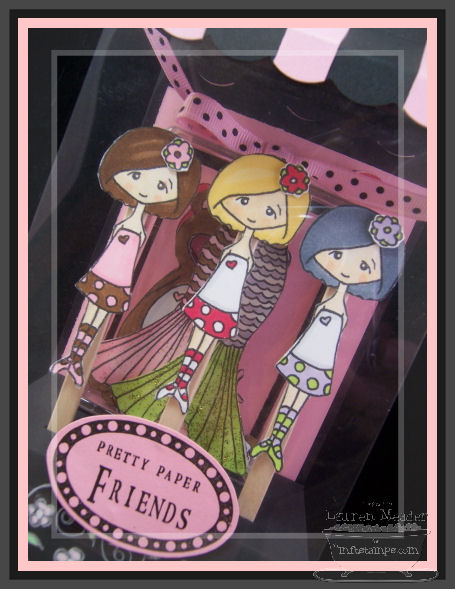
With all that being said……….it is time to introduce you to some of my Pretty Paper Friends!
In classic MFT style

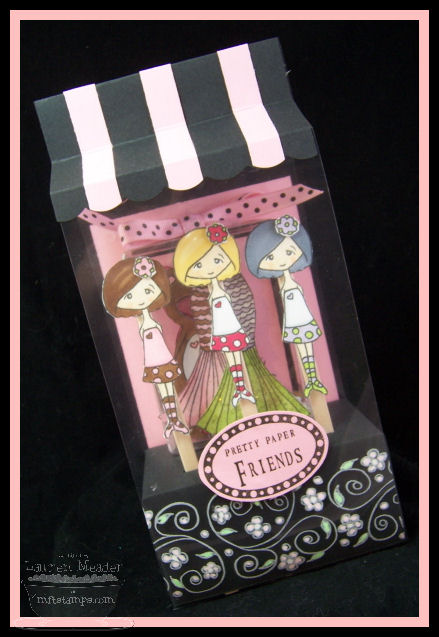
Pretty Paper Friends Pop-Along
Yes, I named them. How can you make 3 paper dolls, each with their own personality and NOT name them? I think I had more fun making these than any little will have! LOL!
Candy is in pink-think cotton candy.
Pepper is in red-like a peppermint
and then, in purple we have Poppi-like a lollipop! AKA Lolli-pop Along©
Aren’t they so cute?
I used the JustRite Stampers to create the introduction to my gift set! It’s really nice have some various size alpha’s in various font’s to make projects like this possible. I don’t know how I would have done this otherwise. Now THESE are something to ask Santa for-for sure! I love the store front with the label!
I used the New Times Roman font for my “friends” and the small alpha (which I use endlessly) for the “Pretty Paper”. The oval was from Harmony Classic Oval 1 for my dotted border. I love it.
I had this vision of them in a store front window, which was inspired by the MFT pink & black awning logo they use on all their stamps/blog/store etc. When I thought HOW to create that-the Lolli-pop Along came to mind.
So I went to work creating my holder.
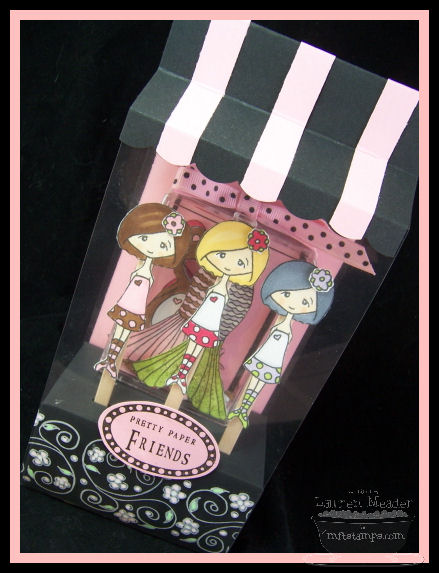
I also stamped the Behind the Scenes, flower image onto my acetate in white stazon, then colored in with Souffle gel pens! I love the look.
So here are the dolls, out of the package-each one dressed up!
I used THIN magnetic strips I got at Michaels! Its cheap, and easy, plus holds well. For 2 sets of these it only use one small strip. The entire magnetic strip had 6 or 8 for like $1.54?? Not too shabby.
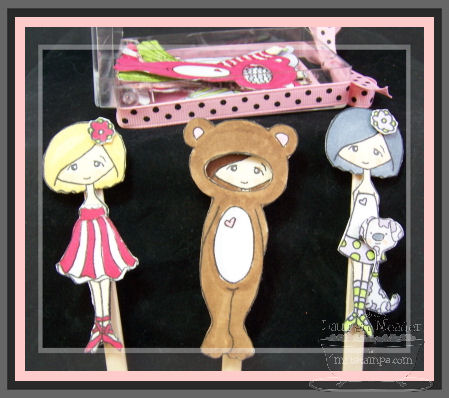
It was Amber’s idea to put them on sticks! She said it would be easier to play “paper doll puppet show” that way since they were easier to hold. She also noted that they wouldn’t get “dirty” or squished by her hands! Pretty good observation for a 4 yo. I guess that is why they have KIDS test toys before they market them huh? They should now what works! Luckily I had some thin flat craft sticks at home already!
Now its time to play dress up!

Here is Poppi in her mermaid outfit. Each girl in the set has a set of all the matching outfits supplied in the stamp set!
I put the clothing in a plastic case that large silver paperclips come in! Fits perfectly, a wardrobe for 3! They each also have a “pet” that comes in the set too. I made one for the gilrs as well.
I put some magnets in the box to keep everything “tidy”, and wrapped with some pink & black polka dot ribbon to match!
This also stays in the holder with a magnet.
Time to say bye!
I hope Ava likes her package when she FINALLY gets it-next year!
I’d love to hear a favorite toy from your childhood! I know I have so many. With the holidays approaching it will be fun to reminisce 😀 So share away.
Till tomorrow.
All occassion holiday holder
Dec 18, 2008 Author: mytime | Filed under: Home decor/3-D items, My Timeless Templates, Papertrey Newsletter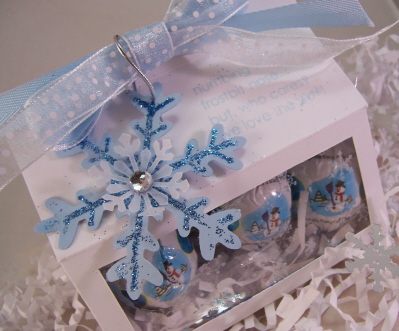
I think we are always on the hunt for the perfect package for little treats.
Do you have a long list of people you want or need to give a little something to this holiday season? Even if you don’t have a long list, you are going to love this treat idea. It is sure to make people OH! and AH! over the simplest of gifts, any time of year.
There really is such a thing as “It’s the thought that counts!”, so why not let everyone know you are thinking of them, in a way that is affordable?
I have just the quick treat holder for you!
Did you know that if you purchased the Lolli-pop Along © Template, you have an entire new use of JUST the base template? Let me show you how.
I’m certain as the years pass, the list of people in our life grows, but our finances don’t! With 3 kids now in school-and some of the extra services they get, I like to acknowledge everyone who impacts my children’s lives. Like everyone else in the world, we are on a tight budget, so this year (like the past 3 or 4) I am mainly making gifts for all our family and friends.
I love gourmet chocolate, and it can make a really nice gift. You don’t need to spend a fortune on it either.
I whipped up 16 of these gifts, and it only cost me $1.20 each!
I went the the Lindt Chocolate store and purchased 2 large bags of truffles (48 in each bag). Regular price $12. But if you purchase 2 bags they were on Sale for $10. So I purchased 2. That is 96 truffles for $20. Which means they are 0.20 cents per truffle.
My little treat holder, holds 6, so I was able to get 16 gifts, for a mere $20 purchase. That means I spent $1.20 for each gift!!
Side view-

I want people to know I appreciate all they do, but not break the bank doing it. I think I accomplished that this year, for much cheaper than I normally do, and without having to bake a thing!
Also consider that many people have “food issue’s”. Meaning people are a bit leery of food prepared from someone’s home. They have no idea how clean your kitchen is! Packaged items are always a great way to go, and if they hate these truffles a re-gift is definitely OK.
So lets get started shall we?
Print Lollipop Along ©base on white cardstock.
Cut and score bottom as directed.
At end panels, score at 1/2 inch from edge. (As seen in photo)
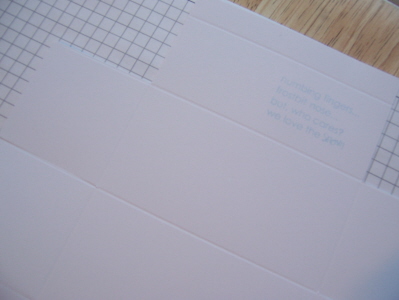
Then stamp sentiment from Snowfall Additions in right corner in Spring Rain Ink
Use long rectangle nestability (or a ruler) to trace a rectangle window, on front panel.
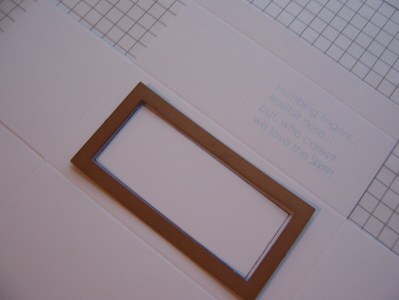
Use a hobby blade to cut out window.

Stamp a piece of acetate, in white StazOn with snowflake cluster from Snowfall set. While wet, sprinkle on glitter of choice.
Adhere window to inside of holiday-Lollipop Along © window

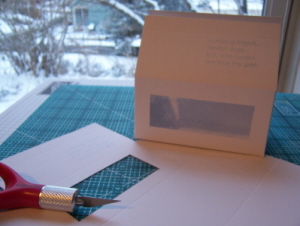
Then put sides of box base together.
Photo of -Window in place, box together
Now add a little white bag filler for “snow”. Then fill the box.
Now inside this box you can easily fit 6 Lindt Chocolate Truffles!
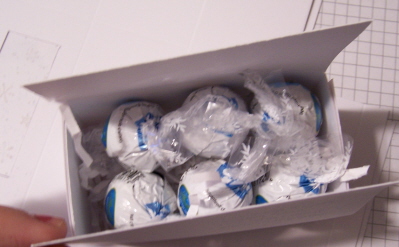
The snowman ones are milk chocolate, with white chocolate centers! YUM!
Make sure you have the snowmen turned to the front of the window.
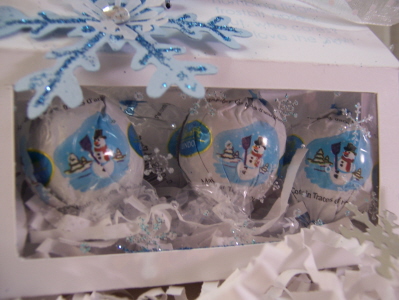
It’s a perfect treat to let someone know you are thinking of them this winter season. Plus its easy on the wallet!
Now for the tag-
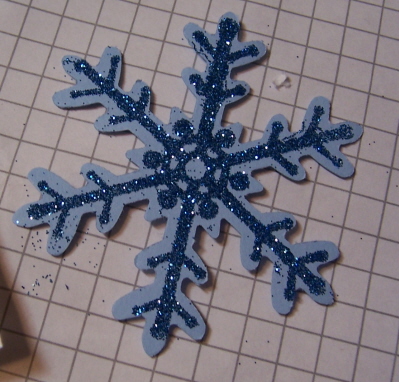
You want to use the snowflake punch , and punch a shape from Spring Rain cardstock.
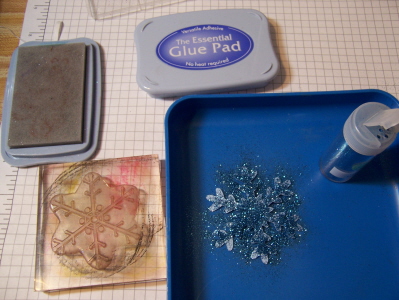
Stamp the snowflake image onto punched snowflake using the Glue Pad, then sprinkle on glitter.
Now layer a smaller punched snowflake from vellum cardstock (mine is Martha Stewart), and add a bling sticker to the center.
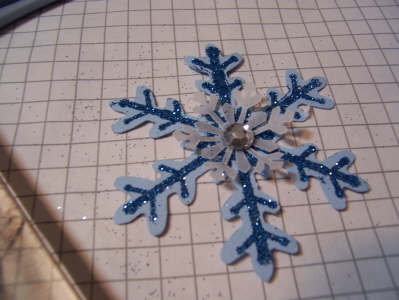
Then punch a hole in one corner of the snowflake, and string it through your tied ribbon.
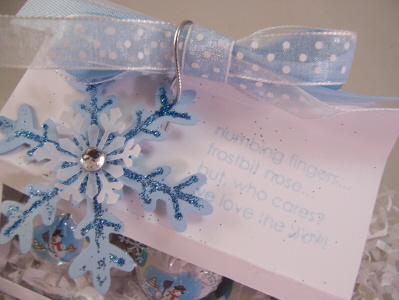
Isn’t it the perfect little tag?
Everything is better with a little bling.
So there you have another treat idea using My Timeless Templates ©! There is still time to make those last minute gifts 😀
After Christmas I plan on sharing my Valentine’s version of this idea 😀
Thank you for checking in ♥
December Papertrey Ink Release samples
Dec 15, 2008 Author: mytime | Filed under: Cards, Home decor/3-D items, My Timeless TemplatesGood grief! I can’t believe its the 15th of December!!
We have had power loss on & off here due to bad weather. That means no lights, and no hot water or heat. NO EMAIL or INTERNET. So if you have contacted me, and I have not responded-I will get to it.
What is worse is my children have all juggled the stomach bug, and I am the designated bucket holder :C I have only slept a few hours total since Wednesday night. Then all the PTI excitement, that always gets me 😀 So much to do before the holiday approaches. I also need to re-evaluate my responsibilities and goals for the New Year! Reflection is never easy. I do enjoy the fresh start the new year brings. OK before I get way off focus-lets move on.
We have a light design load this month. THANK GOODNESS! I shared MANY samples with you over the last few days (just scroll down if you missed any) and samples using My Timeless Templates. I do have ONE more to share (for now anyway! LOL!) and a few samples with the New Releases. I have so enjoyed the excitement during the countdown with my templates 😀 Thanks for all the support and kind words. I can’t wait to see what everyone does with the new templates. I have so enjoyed hearing how your holidays were made easier :D, and you got to take some time to get creative this year, saving some $!
Now to the samples.
Valentines was a VERY hard switch when you are really preparing for Christmas, but I truly love that holiday-so I had fun. Plus the sets rock, so how can you NOT be inspired?
First up I will share my card projects
Tree of love
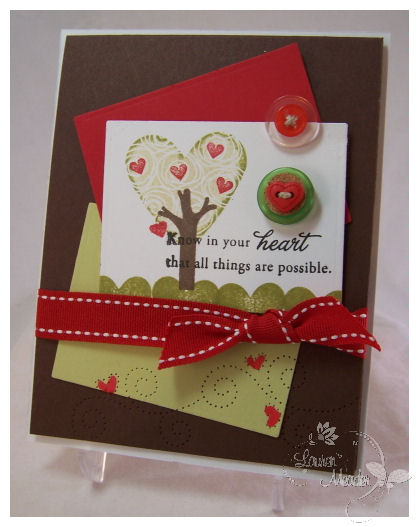
OK love the colors-and the layout.
When I saw Heart Prints I just fell in LOVE! Seriously. I have a million ideas that flooded my head, but only so much time. When I saw the swirly flower pattern, it reminded me of a tree. So I decided to go with that, and stamped it in spring moss, then rocked & rolled it in ripe avocado. There was my tree top.
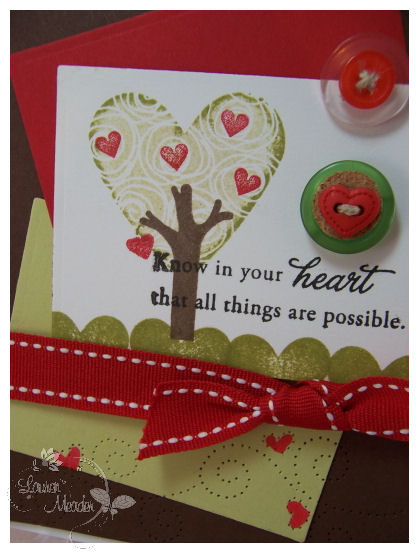
I used the solid trunk from Father Knows Best ( I really love that set!), and my tree was born. I used the little “cherry hearts” from Lisa’s set Love Songs, for my tree fruit.
Now my “grass” is the solid heart from the Heart Prints in avocado ink. I liked using all the little elements to create a cute scenery.
I used aonare piercing template for the swirly border, and free pierced the little hearts. I used a paint pen to fill in the color of the hearts. Cute touch I thought.
I also love the little buttons. I enjoy fitting buttons into my creations in fun ways.
The sentiment is from Heart Prints Sentiments. LOVING that set too!
So much so that I went on and make this card using it-
In dreams and in love-layering
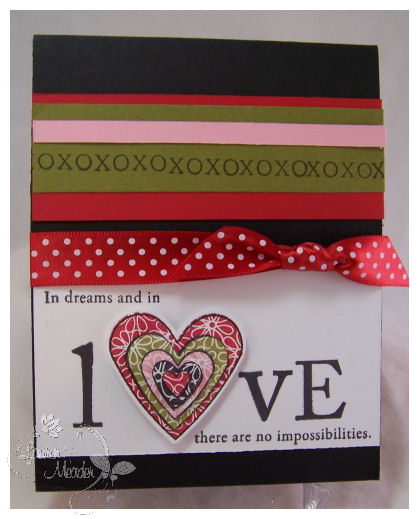
Now again this card used 3 sets! I love that.
The Heart Prints Sentiments , heart prints (the layered heart image), and Lisa’s set –Love Songs has the elements to spell out “love”. I wanted to be different in what I used from her set (trust me I made more stuff but am waiting to share :D) so I chose to use the sentiment and her words to create a different look, and show how awesome ALL PTI’s set co-ordinate together!

Now when I saw the layered heart image it reminded me of a cookie cutter! I also love the solid floral heart image, so I stamped it 5 times in poppy, avocado, berry, and black-then cut and layered them all to create a cool look! I do have the heart punches, and they ROCK! I used the largest of them here.

Now since we did share peeks through the week this is all I had to share for the release that you had not seen.
I do however have another template idea (and more to come) to share today.
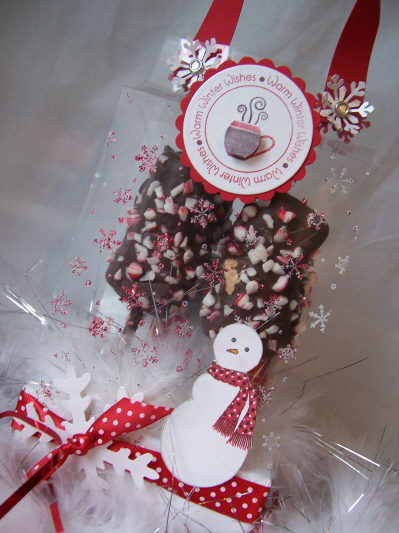
A new and improved snowman soup
How many times have you given or received Snowman Soup?
If you don’t know what that is, then I will fill you in. Its basically a packet of cocoa, and marshmallows (maybe candy cane or candy pieces of chocolate to add), packaged up for a gift.
Its a very cute and popular gift in the holiday/winter season. Well, I wanted to step up my snowman soup gift giving to a more “gourmet” style presentation!
Wouldn’t you know that my newest template-the Lolli-pop Along© is PERFECT for such a gift ![]()
SO I created my base for my lolli-pop along using shimmery white cardstock.
I punched 2 holes for my Marshmallow Melts stick stirrers. I find that the Crop-a-dile big bite is a perfect companion for this template :D. Reaches in perfectly.
I then cut a long slot (using a ruler and finger hobby blade) to fit my 2 packets of cocoa mix (behind the skewers).
This has 2 packets of Swiss Miss Cocoa. You could get more expensive cocoa, but this matched my project and I had it on hand.
I then made some gourmet chocolate covered peppermint marshmallow stick stirrers. I had only ever seen these in candy shoppes so I tried my own, and it worked.
How to make Marshmallow Melts
Get some wooden BBQ skewers (cut down a little bit to fit my project).
Put on 2 large marshmallows.
Melt some chocolate wafers (found in baking section of Michaels), and quickly drizzled all over the marshmallows. Be fast as they could REALLY melt.
Then lay the chocolate covered mallows on wax paper.
Sprinkle on crushed candy canes. YUM!!
Let them cool on wax paper, and then you are ready to go!
Now to put them in a gift set. Once they were in place I adhered some of this Marabou (? is that what thats called?! LOL!) for some faux snow! It is a nice finished detail I think.
My base is tied in with the polka dot poppy ribbon, tied through a punched snowflake.
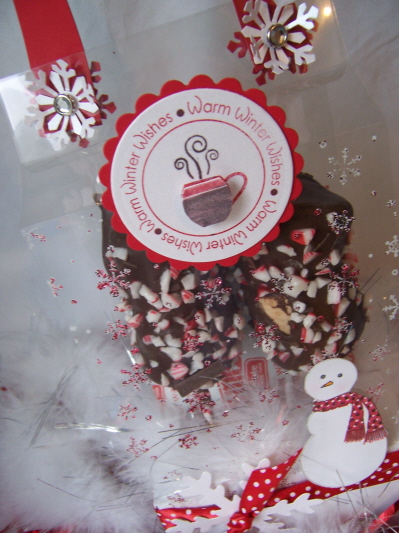
My wrap was made using acetate. I stamped my snowflakes from the Snowfall set, in white Stazon and sprinkled on some red glitter before it dried.
I used snowflakes for my top closure, with some bling brads. The handle is cardstock.
I made my tag using the 2008 Holiday Tag Collection, making my mug 3D.
The snow man was stamped, and cut out. Layered with clear glue dot.
A quick and easy, new presentation of an old favorite.
So that is it for today. I hope you enjoyed the release, and all the countdown projects. I’d love to hear what your favorite thing I shared over this last week was 😀
I hope you all have a super start to the week!
My Etsy

Who I Designed For
Blogroll
- Alicia
- Alli Miles
- Ally Blankenship
- Amber
- Andi @ crafts on a whim
- Angel R
- Angie Z
- Anne Kranitz
- Becky O
- Bee
- Beth Silaka
- Bethany Paull
- Beverly Nash
- Bobbie
- Cambria
- Cammie
- Card of the Week
- Card Positioning System (CPS)
- Cards for Cancer
- Catherine Doucette
- Charmaine
- Cheryl Sims
- Chriss Rollins
- Christina
- Christine Ewing
- Christine Wooden
- Colleen Schaan
- Craft Critique
- Craft Gossip
- Crystal
- Dawn Easton
- Emily Giovanni
- Geny
- Holly
- Igne Groot
- Inspirational Craft Blogs
- Irene
- Jami Sibley
- Jeanne Streiff
- Jen del Muro
- Jeni Bond
- JenMarie
- Jenn Balcer
- Jenn Diercks
- Jenn O
- Jennifer E
- Jennifer Mick
- Jennifer Pereda
- Jennifer-Sweet Treat
- Joanne Basile
- Jodi Collins
- Julia Stainton
- Julie Masse
- Karen
- Kathryn Berthiaume
- Katie Cotton
- Kelley Holland
- Kendra
- Kim Scholfield
- Kris’s Color Stripes! Get inspired here
- Kristen Dubosque
- Kristin Eberline
- Kristine
- Laura @ Sunshine Stamper
- Laura Turnmire
- Laurie Schmidlin
- Lesa Rapp
- Linda Duke
- Linda-LSN
- Lindsey Botkin
- Lisa (lakind scs)
- Lisa Kind
- Lori Craig
- Maggie
- Mara Campbell
- Maria
- Maria Levine
- Mary
- MaryJo
- Melanie M
- Monique Hansen
- Moxie Fab World
- Pam Imholz
- PaperCrafts Connection
- Peppers and Pollywogs Kids party site
- Rebecca Grohall
- Rita
- Robyn
- Rose Ann
- Sarah Vrolyk
- Sharon Harnist
- Sharon Johnson
- Sharon Rivera (a chemisrty with paper)
- Sherrie
- Sophia Landry
- Storage Units, Ink, & More Blog
- Sue Berker
- Susan (Rainy)
- Tangii Crane
- Tracy
- Tricia Traxler
- Trudee
- Velta
- VivLyn
- Zena
MTME Pretty Palette Color Team
MTME Pretty Patterns Sketch Team
My Time Made Easy TM LLC
Shop till you drop!
Lauren Meader
About Me
Copyrighted material
Subscribe To My Blog
Pages
- About me
- Alexa’s Story!
- My Crafty Corner!
- My Time Made Easy™ LLC
- Our Make A Wish Trip to Disney!
- Resume/Publication List
Calendar
| M | T | W | T | F | S | S |
|---|---|---|---|---|---|---|
| 1 | 2 | 3 | 4 | 5 | 6 | 7 |
| 8 | 9 | 10 | 11 | 12 | 13 | 14 |
| 15 | 16 | 17 | 18 | 19 | 20 | 21 |
| 22 | 23 | 24 | 25 | 26 | 27 | 28 |
| 29 | 30 | |||||
Archives
- August 2013
- July 2013
- June 2013
- May 2013
- April 2013
- March 2013
- February 2013
- January 2013
- December 2012
- November 2012
- October 2012
- September 2012
- August 2012
- July 2012
- June 2012
- May 2012
- April 2012
- March 2012
- February 2012
- January 2012
- December 2011
- November 2011
- October 2011
- September 2011
- August 2011
- July 2011
- June 2011
- May 2011
- April 2011
- March 2011
- February 2011
- January 2011
- December 2010
- November 2010
- October 2010
- September 2010
- August 2010
- July 2010
- June 2010
- May 2010
- April 2010
- March 2010
- February 2010
- January 2010
- December 2009
- November 2009
- October 2009
- September 2009
- August 2009
- July 2009
- June 2009
- May 2009
- April 2009
- March 2009
- February 2009
- January 2009
- December 2008
- November 2008
- October 2008
- September 2008
- August 2008
- July 2008
- June 2008
- May 2008
- April 2008
- March 2008
- February 2008
- January 2008
- December 2007
- November 2007
- October 2007
- September 2007
- August 2007
- July 2007
- June 2007
- May 2007
- April 2007
- March 2007
- January 2007
Categories
- About Me
- All That Scraps
- blogger challenge
- camera/photo play
- Cards
- Contests
- family stuff
- FOR SALE
- Home decor/3-D items
- How to FAKE it!
- Introduction
- JUGS Challenge
- JustRite Stampers
- Lizzie Anne Designs
- My family stuff
- My Stamping Space
- My Time Made Easy
- My Time To Color Challenge
- My Time to Create Challenge
- My Timeless Template Challenge
- My Timeless Templates
- Mytime Mail
- MYTIME MOVIE/VIDEOs
- Papertrey Newsletter
- Pink Cat Studio
- Pretty Palette Challenge
- Pretty Patterns Sketch
- Product Opinions and Must haves
- Recipe's
- Saturday Sketch
- Smilebox Creations
- Stampavie
- Tutorials
- Uncategorized
- videos
Most Popular
- Create your own Onesie Card Tutorial-and important NOTE! PLEASE READ (2529)
- Saturday Sketch-Boxed bag holder (2333)
- Going GREEN! Fancy Flower Flourish-Closure Video (1478)
- Fabulous Favorite - Giveaway! (1336)
- a Prayer Request (1232)
- QUICK-Easter Baskets from Nestabilities-PTI style-and blog challenge (1063)
- Teaser Sketch (999)
- February Release Giveway! (and a little peek) (996)
- Group Post and Rambling Rose Video Tutorial (985)
- GIVEAWAY! Who wants it all?! (895)
Recent Comments (RSS)
- 첫충사이트: 완전히 흥미로운 블로그 게시입니다. 저는
- sarah: Wow, Lauren, what a stunning
- hedie: خرید راهبند
- 야동: Love to read it,Waiting For
- 야동: This seller is in a
- 바카라사이트: 여기 처음 왔어요. 나는이 게시판을
- 야동티비: I was surfing the Internet
- 바카라사이트: 비슷한 주제에 대한 흥미로운 정보를
- 바카라사이트: "여기에 제공해 주신 귀중한 정보와
- 온라인홀덤: 유익한 웹 사이트를 게시하는 데
Copyright © 2007 - My Time, My Creations, My Stampendence - is proudly powered by WordPress
This blog has been Tweaked and Designed by Sara Williams