Archive for the ‘Home decor/3-D items’ Category
For the boys and girls…
Jun 1, 2012 Author: mytime | Filed under: Cards, Home decor/3-D items, My Time Made EasyWelcome back!!!
I hope you are enjoying the newest products from our June Release 😀 The team and I are here to share even more ideas using our latest products! So take a peek here:
I had posted a gender neutral turtle the other day during our June Preview

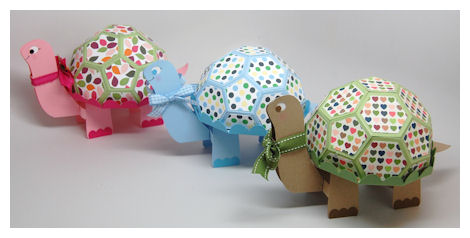
Here you can see the first turtle I share, as well as two others, designed for that special someone.
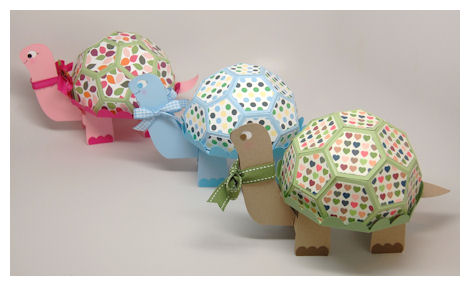
We have a girl turtle, boy turtle, and for “any” turtle.
I think you will agree that it doesn’t take much to make each one unique and they each seem to have their own “personality”! We have SO MANY Pretty Printable Paper collections that you have so many fun options that lend you endless possibilities 😀
So let’s do girls first, shall we?!
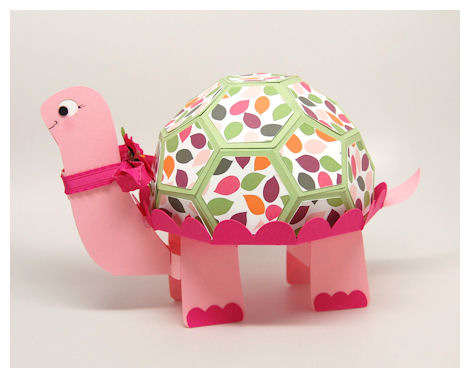
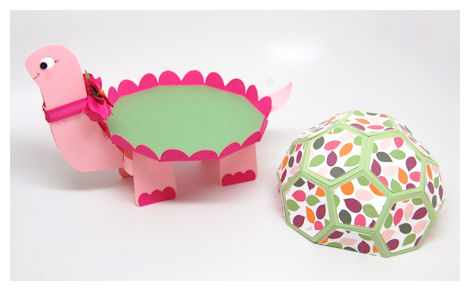
Meet Trinity
She is of course pink, and fuschia. I love the monochromatic choice of body colors.
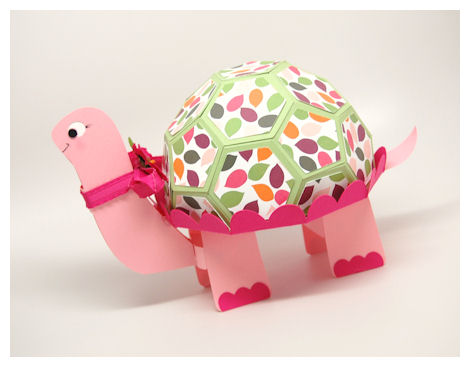
She has a sweet smile, and some eyelashes. A little pink in the cheeks and she couldn’t get sweeter!
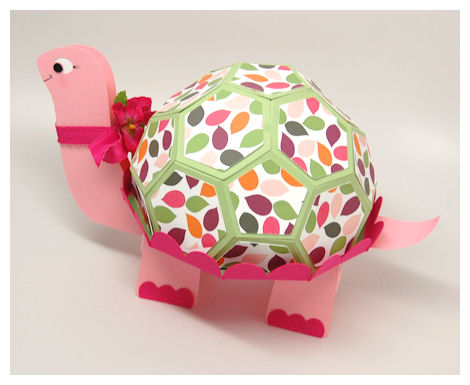
The colors in her shell are super fun, as they are from the Color Infusion paper collection.

In here I put some “turtle eggs” filled with some Chocolate Turtles. They aren’t pictured because I ate them, and had not yet gone to the store to replenish them for the bit photo shoot! LOL! That being said they DID make it to my friend who is a new mom and LOVES gourmet chocolate turtles from a Chocolatier in Manchester.
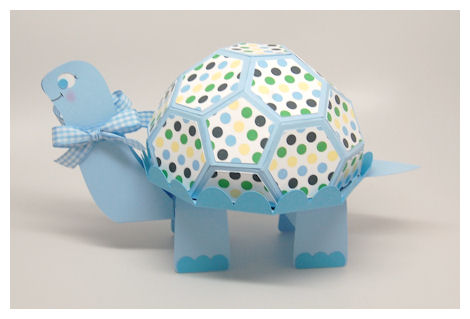
Next up we have Trent
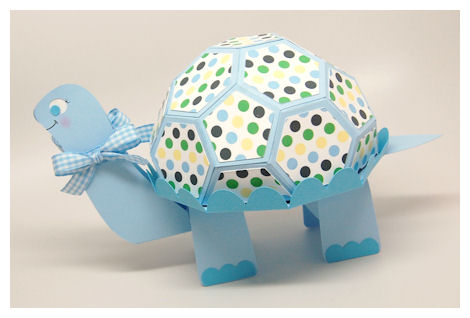
What a CUTE boy gift box! I love this one.
This was designed for my brother, as she is expecting his thrid baby in November. He has two girls, and while we welcome the idea of another, we cross our fingers for a boy!
There hasn’t been a boy born into either side of our family since my son Noah, and he is 9!
I used the polka dot pattern from the Bee Mine paper collection. Easy peasy! Polka dots is always a perfect option 😀
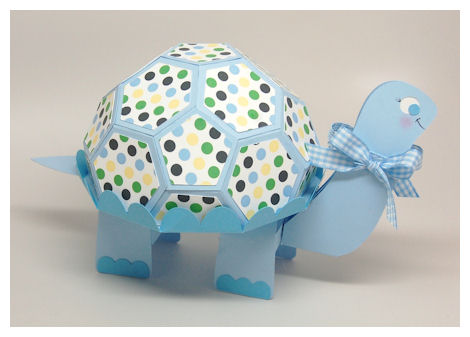
I plan on giving them this turtle for the baby with a gift card to their local photo shop with a gift certificate to get the new baby its first photo shoot!
Supplies from My Time Made Easy ™ LLC
Trendy Turtle
Pretty Printable Digital Paper:
Cute Critters, Color Infusion, Bee Mine
With the team, then my sample from the other day being gender neutral, and my two today you have a bunch of ideas for how the Trendy Turtle can be altered to suit any occasion! Check out my post tomorrow for some MORE ideas.
See you then!
June Release! A Little Bit S’more!
May 31, 2012 Author: mytime | Filed under: Home decor/3-D items, My Time Made EasyIt’s May 1st and that means all our NEW! Products are available for you to purchase, and get started on those projects for Dad (or Mom), Spring or any occasion where a gift is warranted.
The end of the school year is coming too, so Teacher Appreciation gifts are a great idea too!
Be sure you check out our NEW! Products <—HERE!
We have released:
2 NEW! Pretty Packaging Templates
3 NEW! Pretty Impressions Stamp Sets
2 NEW! Pretty Printable Digital Paper Collections
2 NEW! Pretty Pieces Cut Files
Check out our
NEW! Perfect Package Collection!
Please view our Gallery for project samples, and alternative ways to use all our amazing coordinating products!
You may also want to check out our blog for weekly challenges, and even more amazing ideas.
Today we have an amazing group post using our NEW! Products
As you may have come to know my company focuses on the “complete package”. We work hard to offer coordinating products that are easily interchanable with previously released products. We really enjoy being able to share the ideas and versatility each product holds.
That being said here is WHO you should visit today for some amazing projects:
OK super excited about this project! It was the FIRST idea I had upon designing the Happy Camper template, and then the So Much S’more set!
Happy Days and so much S’more
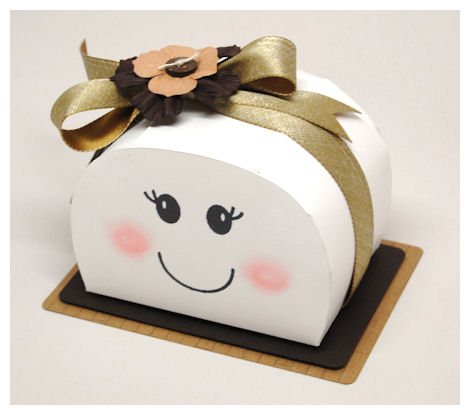
So in case you can’t tell this is the Happy Camper template, transformed into a sweet little chubby S’more marshmallow, layered onto “chocolate” and a “graham cracker!! Don’t you love it?! The pattern on the graham cracker is from the Custom Construction Materials ©. I just printed the pattern on some Kraft cardstock.

I used the face from the images in the So Much S’more set, enlarged and printed it onto my “marshmallow”. I then used Pebbles Pearlescent chalks to make my rosy cheeks.

I then made a super cute tag (using the Simple Tags Round ©) to hang off the ribbon….I love it!
Obviously this is to package up S’more for our annual Summer vacation this year 😀 I will be giving out to the kids.
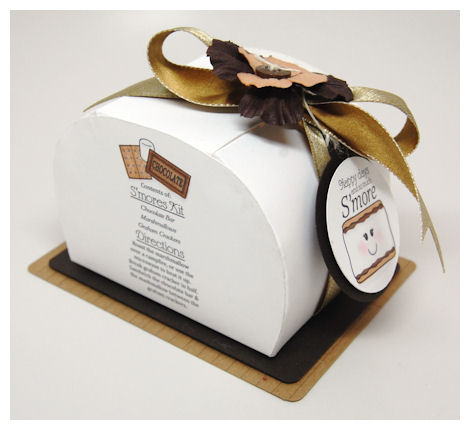
To complete my “S’more Kit” I took the S’mores Kit Directions and the S’mores content items (from the So Much S’more set) and printed it onto the back of my marshmallow!!

Now S’more’s Kits couldn’t get ANY more fun, functional and EASY!!
Supplies from My Time Made Easy ™ LLC
Happy Camper
So Much S’more
Pretty Printable Digital Paper:
Custom Construction Materials
Simple Tags Round
Well I hope you are all inspired because this is just the beginning! We still have several more days of ideas to share, so come back tomorrow and take it all in!
June Release Preview Day 2: Happy Camper
May 30, 2012 Author: mytime | Filed under: Home decor/3-D items, My Time Made EasyI’m quite excited for today’s projects because it uses a Pretty Packaging Template that I have been sitting on for well over the YEAR! It came at the request of a friends husband who lives and breaths all things VINTAGE!
Visit the team to take a peek at what we have in store for you!
Are you ready!
What do you think of when you think summer vacation? Many think camping! If that is YOUR thing, so someone else you know, then this just *may* be up your alley!
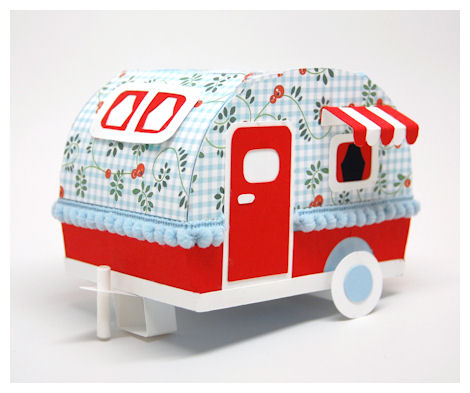
My sample was designed so easy! Just used some pretty Farmhouse Fresh © digital paper, and that was that!
Available in PDF, SVG, GSD, DXF, WPC
Completed Project Size:
4 1/2 Inches Long
4 Inches Tall
3 Inches Wide

This is sure to make someone a very “Happy Camper”! Fashioned after a Vintage Camper this three dimensional box is the perfect package for just about any occasion! Use it as any presentation for a gift for that special someone, perfect party favor, package up some S’MORES, or an invitation to a bon fire, or even a family camping outing!
NOTE: If camping is NOT your thing, stay tuned for the “other” uses this template offers 😀
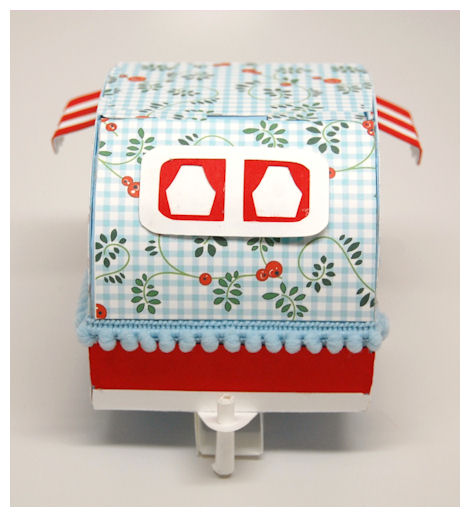
This template comes with all the details that turn a simple piece of cardstock into a Vintage paper dream! You receive the decorative layers, door and window panels, curtains, awnings, wheel layers, wheel axle, and the trailer hitch!
But that isn’t all this fabulous template can be!
Try: Vintage Pillbox Purse, Marshmallow (for S’Mores Kit), Pumpkin, Sun, Rainbow, Snail, Turtle, Snowman head, Ladybug…to name a few.
You will want to view all our amazing Pretty Impressions Stamp Sets. Especially the Happy Camping, Let’s Go Camping and the So Much S’more sets!
Supplies from My Time Made Easy ™ LLC
Happy Camper
Pretty Printable Digital Paper:
June Preview Day 1: Trendy Turtle
May 29, 2012 Author: mytime | Filed under: Home decor/3-D items, My Time Made EasyWelcome back to my blog!
We are ready with another NEW! Release! Can you believe it?
Seems like time flies between one release and the next! I get so busy before I know it is time to prepare for sneak peeks at another NEW! Release. My family keeps me busy as does all my “work” for My Time Made Easy ™ LLC. I’m not complaining, as I LOVE what I do, but admittedly juggling “work”, “family and play can be tough. I know I don’t post here as often but I am constantly working on FRESH ideas, and spending time with my family. I have not lost sight as to WHY I began this venture in the first place….share what I love by working from home,and doing so I can be there for my children, for everything. My kids will only be little so long, and I refuse to let my ambitions get in the way of my first job-being mom. I am fortunate that I can do that, and thank God daily!!
So all that being said we have an amazing design team, itching to share the first previews at some of what is to come for June 1st!
Check out the Designers Projects today:
We have some AMAZING new items for the warm weather, to celebrate my version of Summer FUN!!
Today the team and myself will be sharing a sample using the CUTEST template ever!!!
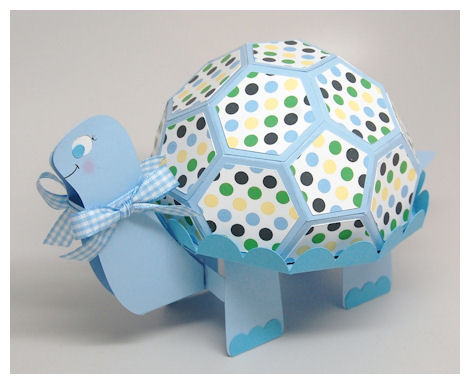
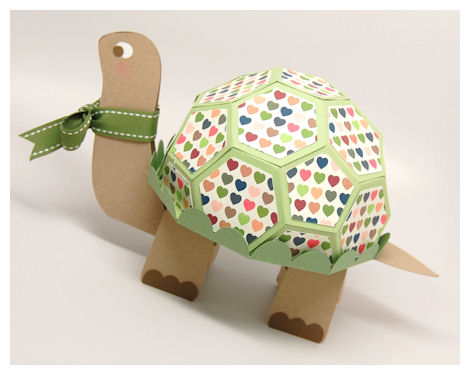
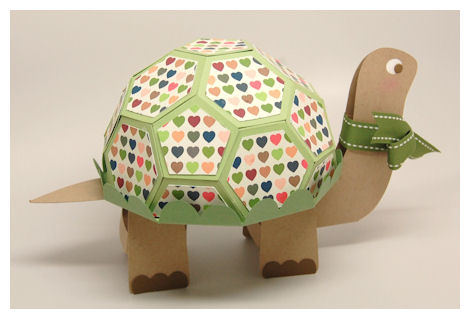
I want to introduce you to Trendy Turtle!
Trendy Turtle $5
Available in PDF, SVG, GSD, DXF, WPC
Completed Project Size:
5 1/2 Inches Tall w/Legs
Shell 3 Inches Tall
5 Inches Round
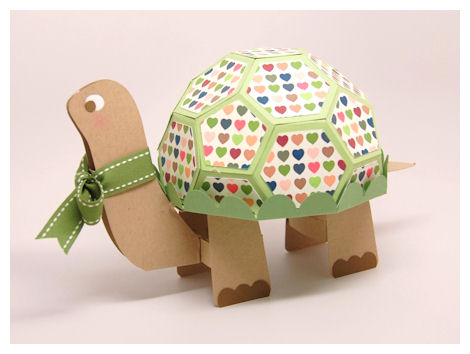
Yes!! This is a three dimensional turtle shaped gift “dome” !!
Now you can make your own turtle gift “box” for any occasion. Super cute table centerpieces, party favors, gift holder for baby, or gifts for the young and the young at heart!
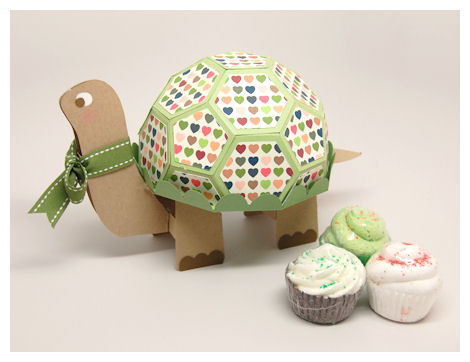
Items can be stored under the large shel, l but no one will care about what’s inside because the turtle itself is beyond amazing!
I chose some yummy scented cupcake shaped bath “balls””. Makes a super sweet gift for any little boy or girl.
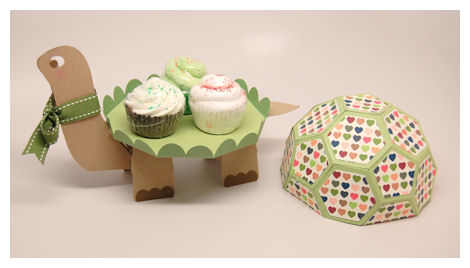
Just remove the shell and your gift is splendidly displayed in a trendy new way!
It doesn’t get much cuter or creative does it???

Look at his (or her) cute little face! Who wouldn’t smile at the sight of it?!

I love the scalloped shell detail, the feet, and toes…. and with all the decorative pieces and a little patterned paper (here I used the super cute Cute Critters © collection-recolored :D) you can really make each turtle fun and unique with little effort!! The team and I will share more ideas as we share more samples through the week 😀 So stay tuned!
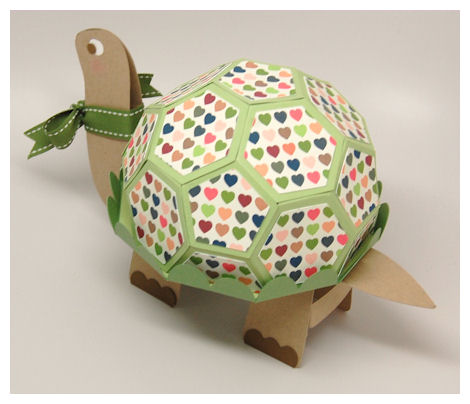
Every detail makes this turtle so precious, from head to tail!
Thanks for stopping by to see what NEW! stuff we have to share. I could go on and on, so I hope you fall in love with this one, as much as the team and I have.
There is so much more to be shared, so please come back again tomorrow for more peeks and projects 😀
May-A Year in Review
May 3, 2012 Author: mytime | Filed under: Cards, Home decor/3-D items, My Time Made EasyWell we wrap up each release with our monthly Year in Review group post.
This means NEW! ideas for you using our older products. This allows everyone to go back to older items and give them a fresh new spin. Now when you purchase something you can look forward to fresh ideas in the future. That is always a plus 😀 This will help you see older products you may have never noticed, or find new uses for the products you already have!
So check out what everyone has made:
Today I’m going to share a favorite project of mine, and that is a set of personalized cards (for myself)!
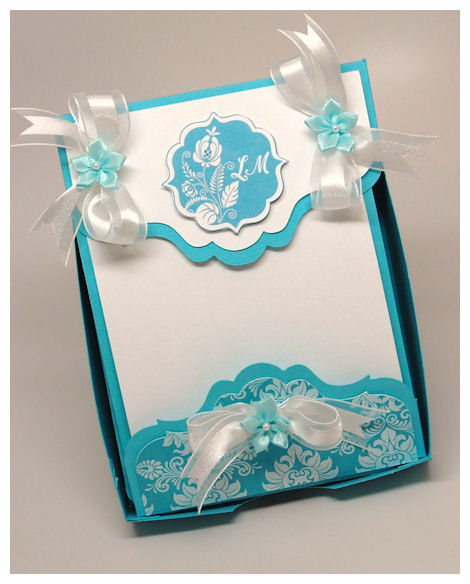
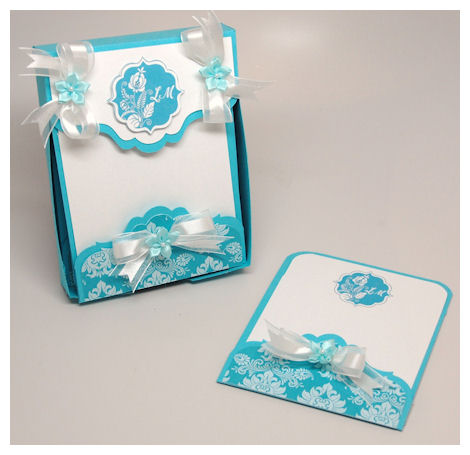
This is a boxed set of 6 monogrammed cards. Always a perfect and thoughtful gift idea for everyone!
Since it’s my birthday I thought this would be a nice little gift for myself. Now when I need to send a quick note I have something on hand, and it can be for any occasion.
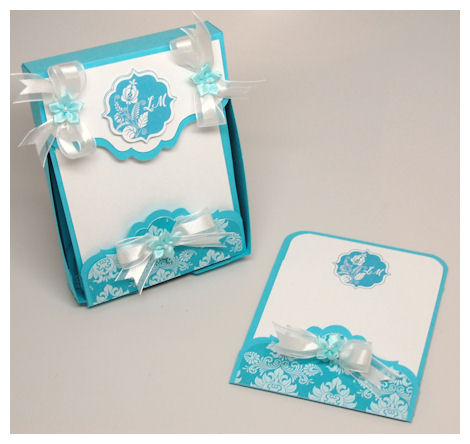
Last month we released a super fun box called Card Cover-Up ©. While it has MANY possible uses, its primary purpose was to gift and hold cards, so I used it today.

Upon designing that box I fell in love with the angle of the top, and felt that having a coordinating card cut file would be the ultimate package, so I designed the NEW! Cover-Up a Card cut file!
The card is on the right, the box of cards on the left.
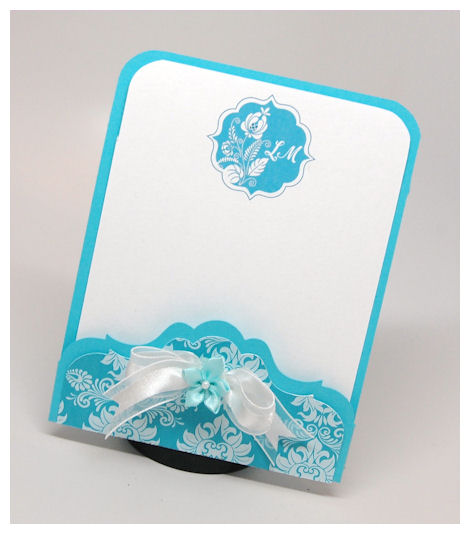
Available in PDF, SVG, GSD, DXF, WPC
Completed Project Size:
4 1/4 Inch Wide
5 1/2 Inches Tall
This cut file is a unique way to “cover up” a card! Instead of your traditional envelope you have a elegant slip in style “cover” to dress up the presentation for every occasion. This would make a gorgeous Wedding invitation, or a stunning monogram note card set!
This card/envelope combination was designed to coordinate with the Card Cover-Up Template, but can be presented in any of our amazing Pretty Packaging Templates, or used all on it’s own!
I used the label from the Fine Finish © set, to create and customize some monogram cards for myself! A great birthday gift to me 😀

You can see I digitally colored, and printed the label which I had typed my initials on, then cut the card insert layer. It looks stunning in real life.
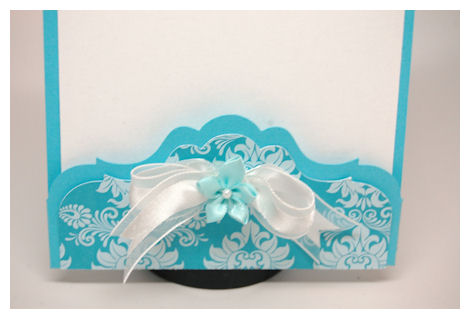
Here you can see the detailed bottm, which the white part of the card slips into, much like a fancy edged envelope. I printed out my Dainty Damask © pattern for the bottom of my slip-in envelope. I just added a bow and flower for some more dainty details 😀
So there you have it! A quick, fun and personalized set of cards, presented perfectly for an amazing gift!
The best part about working with the digital images is you design ONCE and can get so many, you can then SAVE your work, and then with a click of a button you can change the color and have a whole new set! AMAZING!!!
Supplies from My Time Made Easy ™ LLC
Card Cover-Up
Fine Finish
Pretty Printable Digital Paper:
Dainty Damask
Cover-Up a Card
Thanks for stopping by all week for our May Release. We each have enjoyed sharing a plethora of new ideas with you. I hope you have received enough encouragement to try some of the ideas you’ve seen from the team, on your own. Whether you are new to papaercrafting or a seasoned pro I think you will fall in love with all the unique ideas you can put into action for giving your own gifts to everyone!
Easy, fun, functional and affordable!
For the Boys!
May 2, 2012 Author: mytime | Filed under: Cards, Home decor/3-D items, My Time Made EasyOnce again we are back with some more great gift ideas!
You really never can have too many ideas of packaging choices. I am happy to say that My Time Made Easy ™ LLC has OVER 70 Pretty Packaging Templates in store, and MANY, MANY more templates designed and waiting for release.
Stop by and visit some of the team for MORE ideas on what to package up for that someone special:
Today my gift is perfect for the men boys in your life!
I have a son and I have to admit boy stuff is hard for me. That and my 9 year old son can be quite critical as to what “passes” for gifts for his friends! LOL! He is quick to point out something he doesn’t “agree” with. So if and when it meets his approval I know I did good! LOL!
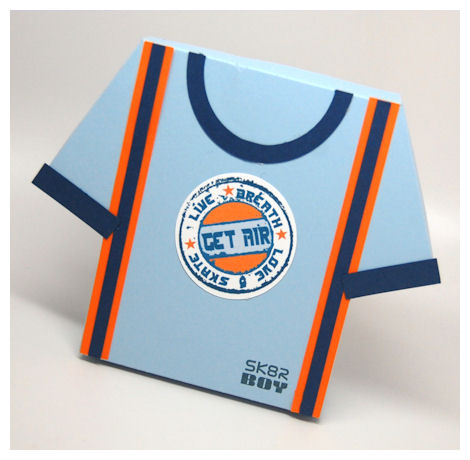
So, now that this is “Noah Approved” let me share an additional version of our NEW! Blue Collar template: Get Air
Once again this went together very quickly! I love stuff that looks hard to make but goes together simply. You end up looking so much more “crafty” than you need to be to actually put this together. My 7 year old daughter assembles many of the templates I make for her own craft projects! I have some serious competition when she grows up! LOL!

The rounded collar from the Blue Collar template makes this go from a mens dress shirt, to a t-shirt.
This was fashioned after one of Noah’s actual shirts, and used some of our products!
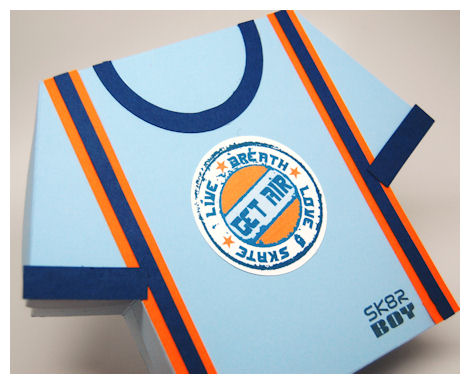
The sentiment on the shirt center and the lower right are from the SK8R Boy © set. I just digitally colored it to match my project. My Silhouette Cameo allows me to print digital images onto my template, right where I want them before cutting! I love it. Makes creating stuff and printing digital images onto them easy as pie.
Now the hardest part of giving a gift to a boy doesn’t have to be WHAT you make, it will be WHAT to give!!
Noah suggested XBox Live points, Gift Card, BeyBlades, Trading Cards, Bakugan and of course when in doubt give candy 😀
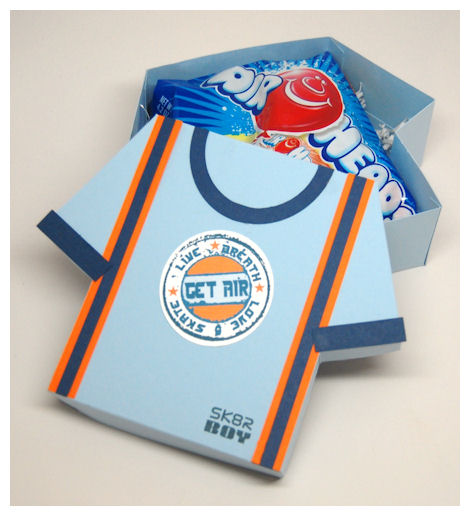
Here I have some Air Heads candy and underneath are some XBox Live points for Noah 😀 This was a surprise for Noah to let him know I love him on the day of my surgery 😀
Thanks again for stopping by.
Tomorrow we share our Year in Review, so stay tuned.
Wallet of Wishes
May 1, 2012 Author: mytime | Filed under: Cards, Home decor/3-D items, My Time Made EasyI hope you are enjoying the projects from our May Release!
We aren’t done sharing NEW! ideas yet, so please take the time to visit:
Today I’m sharing a super fun, and quick gift for dad (or anyone really :D).
If you like love giving gift cards, certificates, or money, or you know someone who loves receiving such gifts (who doesn’t right?!) then this is the Cut File for you!
Available in PDF, SVG, GSD, DXF, WPC
Completed Project Size:
4 1/4 Inch Wide
3 1/2 Inch Tall
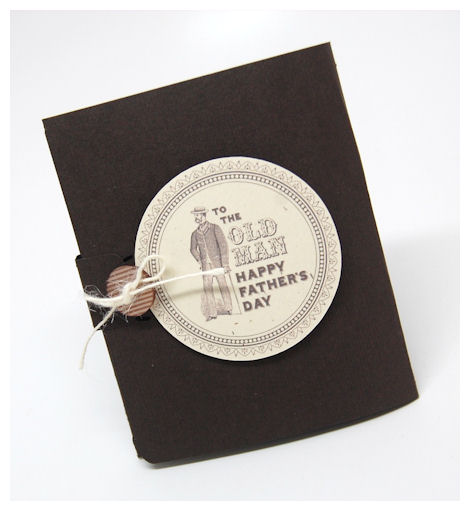
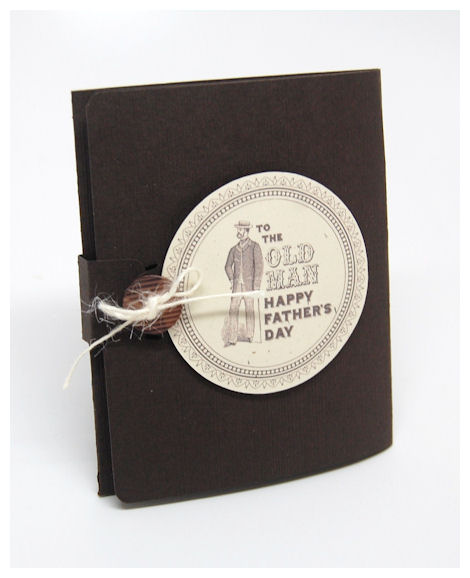
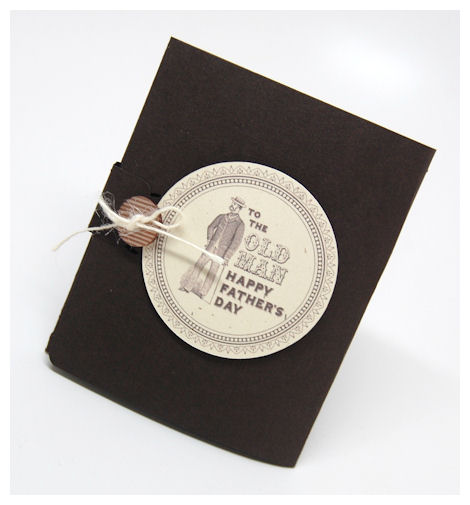
Designed for dad…I created this out of a textured chocolate cardstock and used this amazing image from the NEW! A Vintage Day for Dadto simply complete the look. This took like 6 minutes to make 😀 Love it!
This is a super fun wallet file that will perfectly wrap up some well wishes for someone special! You can wrap up cash, ccertificates, and/or gift cards as well as add a special photo and message to the receiver! Wonderful wishes of good fortune and happy times couldn’t be presented in a more fun manner!
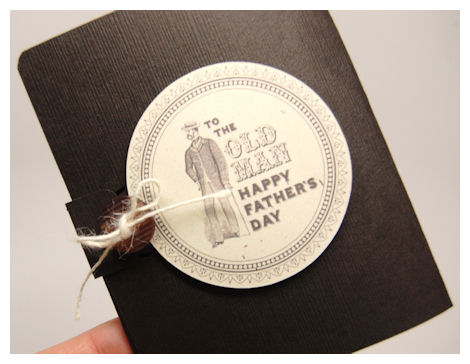
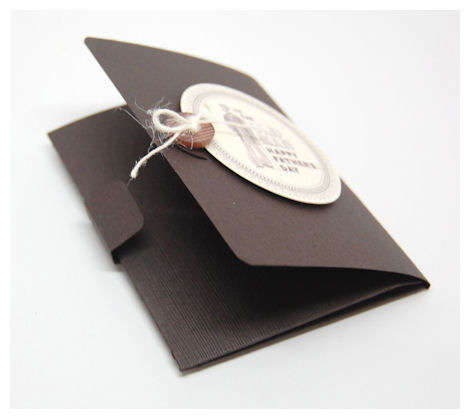
The tab fits into a slot to hold all your “loot” inside.
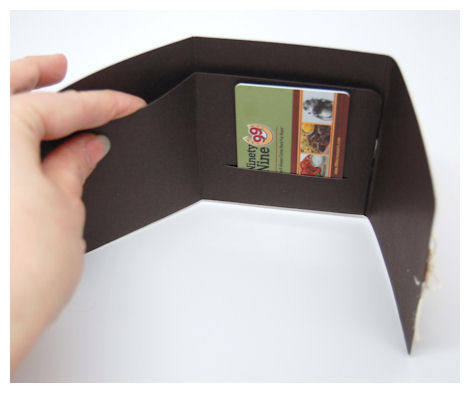
As you open it you will see it is a tri-fold wallet.
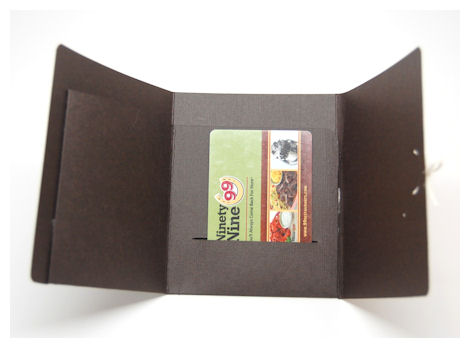
It has a optional slot that fits any gift card perfectly (or a card made gift card size)….
and it has a pocket to hold money, OR you can place your message in their as well!
It’s just that easy!
It only costs you one piece of cardstock, which generally ranges at about 0.09 cents! Now what kind of gift wrap can you buy for that?!
Supplies from My Time Made Easy ™ LLC
Vintage Day for Dad
Wallet of Wishes
Thank you for taking the time to check out all our amazing new products and see what we have to share! I hope you feel crafty after all we’ve had to share, and that you plan on returning tomorrow for more 😀 There is always MORE!
See you then.
May Release: Blooming Wonderful Ideas!
Apr 30, 2012 Author: mytime | Filed under: Home decor/3-D items, My Time Made EasyIt’s May 1st and that means all our NEW! Products are available for you to purchase, and get started on those projects for Dad (or Mom), Spring or any occasion where a gift is warranted.
The end of the school year is coming too, so Teacher Appreciation gifts are a great idea too!
Be sure you check out our NEW! Products <—HERE!
We have released:
3 NEW! Pretty Packaging Templates
4 NEW! Pretty Impressions Stamp Sets
5 NEW! Pretty Printable Digital Paper Collections
7 NEW! Pretty Pieces Cut Files
Check out our
NEW! Dad’s Day
Perfect Package Collection!
Please view our Gallery for project samples, and alternative ways to use all our amazing coordinating products!
You may also want to check out our blog for weekly challenges, and even more amazing ideas.
Today we have an amazing group post using our NEW! Products
As you may have come to know my company focuses on the “complete package”. We work hard to offer coordinating products that are easily interchanable with previously released products. We really enjoy being able to share the ideas and versatility each product holds.
That being said here is WHO you should visit today for some amazing projects:
I am quite excited about sharing this next template with you! I have a LOVE for flowers, anything girly…..and just in time for Mother’s Day too!
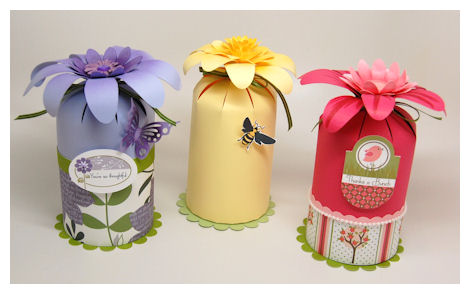
Here is the Bloomin Wonderful samples I made:
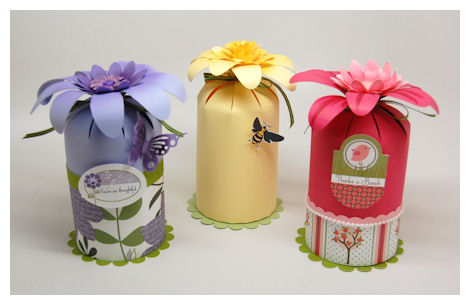
I wanted to do three colors, in different designs.
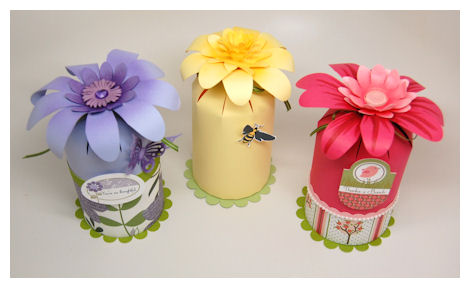
This is the top view, which really made each one fo these unique 😀
Who wouldn’t be in awe of these? You’ll be shocked at how quickly they go together too!
Available in PDF, SVG, GSD, DXF, WPC
Completed Project Size:
5 1/2 Inches Tall
3 Inches Round
Well as it is named, this package is Bloomin’ with some wonderful possibilities! Designed to allow you to have a flower topped cylindrical shaped box, this lends itself to a plethora or possibilities just waiting to bloom into a reality. This is a far better option to the real life flower bouquet that will just die in a few days. A great package for Spring, Birthday’s, Thinking of You, Get Well, With Sympathy, or Just Because.
You will want to check out many of our amazing Pretty Pieces Cut Files, as we have many that can really add to your design possibilities!
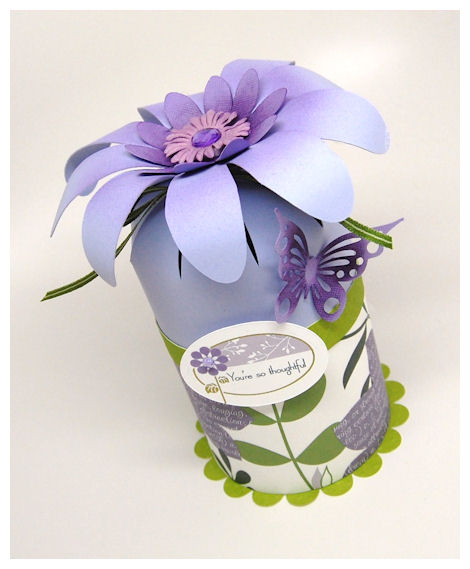
My favorite color….I was inspired by the digital paper :Fresh Cut Expressions © Collection 1 ! It is a favorite of mine these days 😀
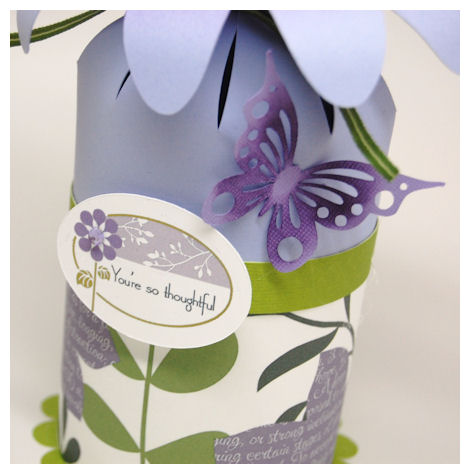
I created my tag using the Round Off © 34 Images – Digital set, with my sentiment from the Spring is Here © 31 Images – Digital. It was cut out using the Fine Finish © Cut File.

I used the butterfly from the Bloom Builders © cut file to add to the design. I just cut and sponged on some color. Butterflies are my favorite image in the world and I cannot get enough butterfly images/products!
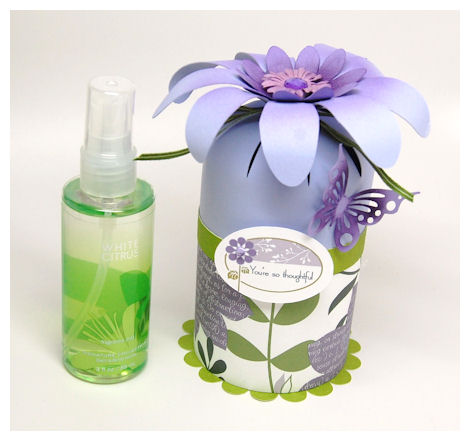
I decided to package up a “scent-staional” gift-White Citrus Body Spray! I love having these gifts on hand for those last minute gifts I need in a pinch. They are great for friends, family, and teachers! Anyone who likes to smell good 😀 Even teen/tweens who can be a nightmare to give stuff to! LOL!
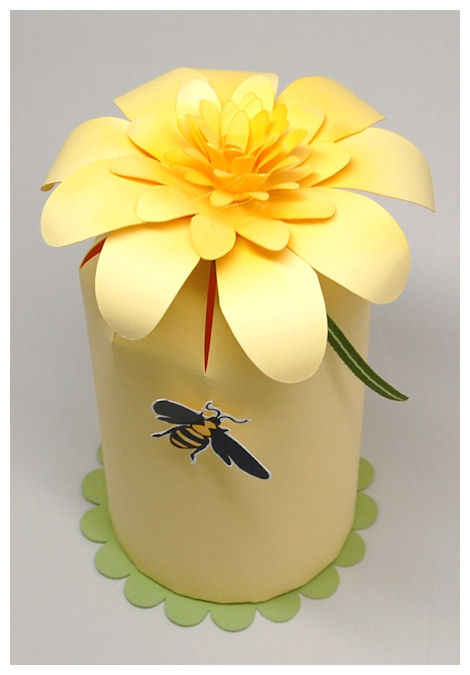
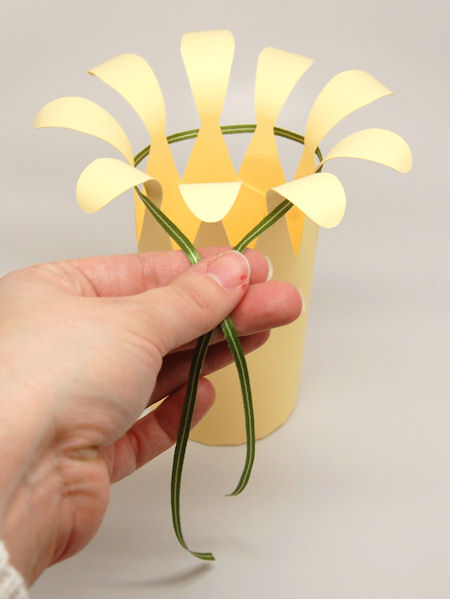
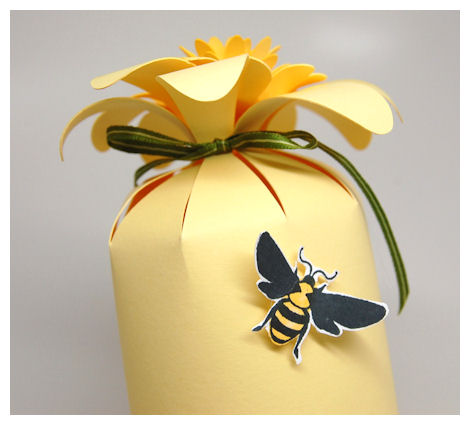
Next up…Honey Blossom
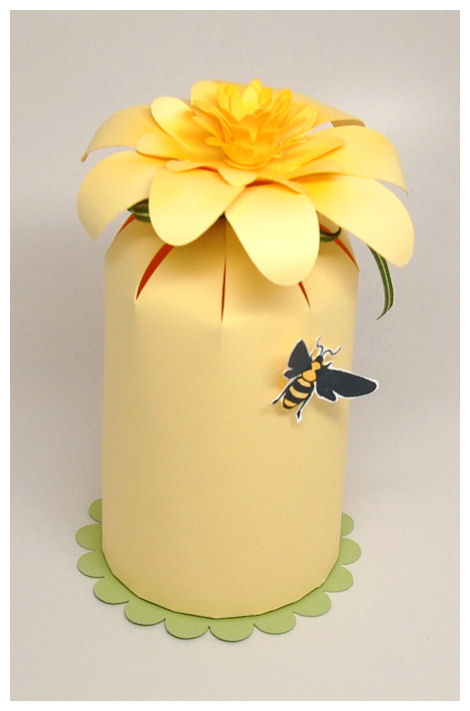
This design is the epitomy of quick and SIMPLE! When time is tight and you need to whip something spectacular up, then this is for you!
I made this from a yellow cardstock, and simply added the little honey bee from the Bee-Loved © set.
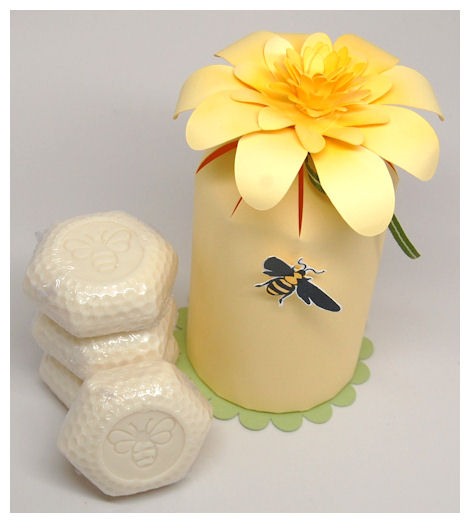
Of couse I had to package up some natural honey soap in here too, which really complimented my simple packaging.
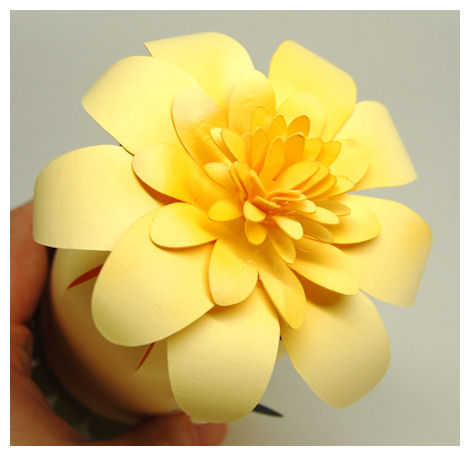
My focus was on the flower, as that really is the WOW factor here 😀
It was so easy to make too. In addition to the flower that comes with this template I used the stunning Rolled Bloom Daisy © in the center, and I used my Copic Air Brush system to spray on some additional color! So pretty!
Now we move onto the pretty pink petal sample…
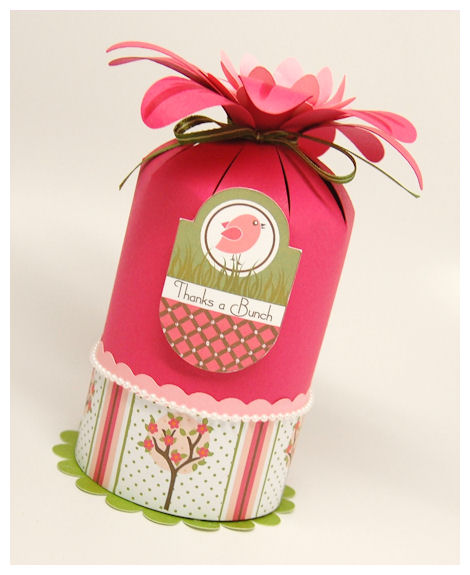
This one was the most “detailed”. I think sharing with you various samples from super simple to more detailed really shows you how you can dress this up or down but still have a huge impact!
I used the striped tree pattern paper from the Color Infusion © collection along the bottom, trimmed with pearls and the Border Builders Open Scallop © cut file.
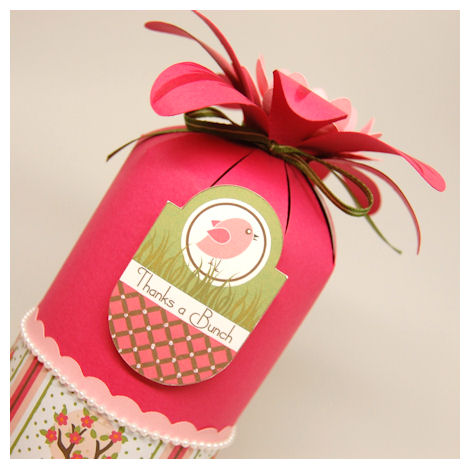
My tag was designed using a combination of images. The tag itself is from the Round Up © set. It was cut using the coordinating Round Up Tag ©. The sentiment, bird image and grass come from the Spring is Here © set! How fun that was, combining these images together!!
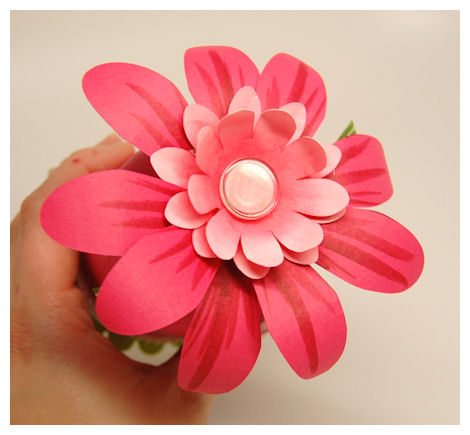
For the top I used my Copic markers to color my petals, and add some dimension. I then cut the smaller flower layers (included in the template) and curled and sponege them. Add a acrylic button for the center! Done!
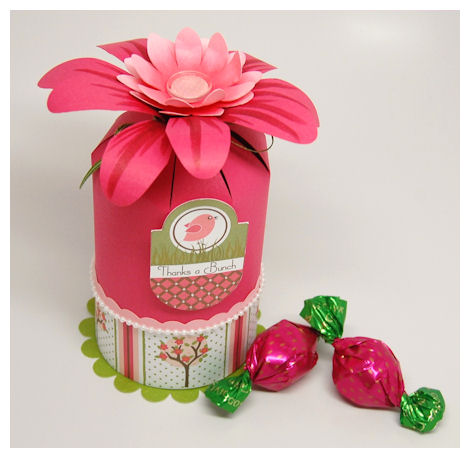
This packaged up some SWEET Godiva Truffles 😀 YUM!
So many possibilities.
Perfect for so many occasions too 😀
Bloomin Wonderful
Spring is Here, Round Off, Round Up, Bee-Loved
Pretty Printable Digital Paper:
Fresh Cut Collection 1, Color Infusion
Fine Finish, Round Up Tag, Bloom Builders, Rolled Bloom Daisy
Well we aren’t done sharing yet! We have several more days of ideas to get your Spring projects going!
See you tomorrow!
May Release Preview Day 2: Seas the Day!
Apr 29, 2012 Author: mytime | Filed under: Cards, family stuff, Home decor/3-D items, My Time Made EasyWe have some more peek projects for you today!
Everything you see today will be made available for purchase tomorrow, May 1st on our website My Time Made Easy ™ LLC!
Make sure you visit the following team members for some amazing projects using another NEW! Template called Treasured:
Now it’s time to share my sample with you!
I made this for my son Noah 😀 He is 9 and loves putting his “treasures” in boxes, and hiding them in his room where no one will find them.
Note: My sample is altered to be wider than the initial template. This template was designed to allow you to quickly and easily extend the length. Simply cut the top and bottom panels to be longer and you are good to go!
Available in PDF, SVG, GSD, DXF, WPC
Completed Project Size:
6 1/4 Inches Tall
4 X 4 Inches Wide
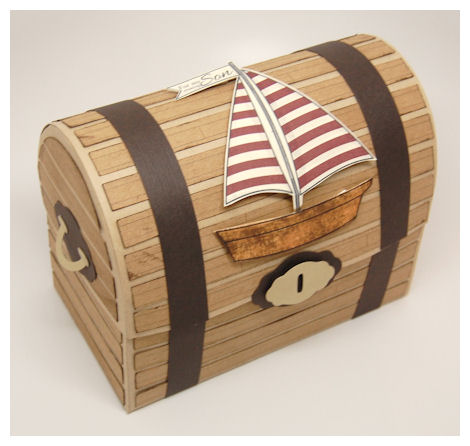
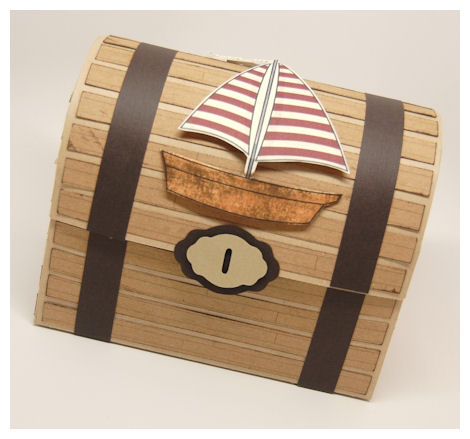
This Pretty Package is a real treasure with all the versatility it can offer! With this template you can create a plethora of gifts for all ages.
I made my box into a treasure chest by creating it in a Kraft cardstock, then cutting strips in a darker Kraft cardstock, that I had printed the woodgrain pattern from the Custom Construction Materials © paper!
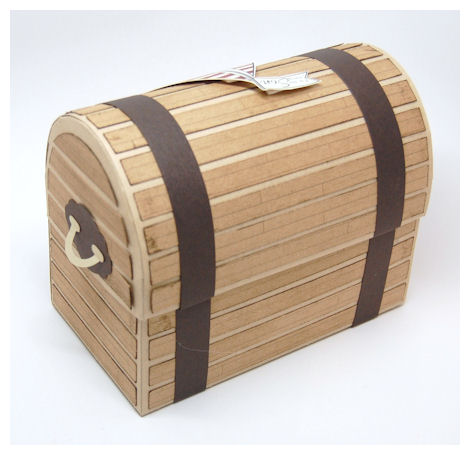
It looks amazing and realistic all the way around 😀 I really love how this turned out.
My ONLY regret was not having enough brads to make this llok more authentic. I didn’t have enough to complete the box and time was ticking. Remeber I will have just had surgery and needed to get stuff done ahead of time. Oh well! I don’t think Noah will care!
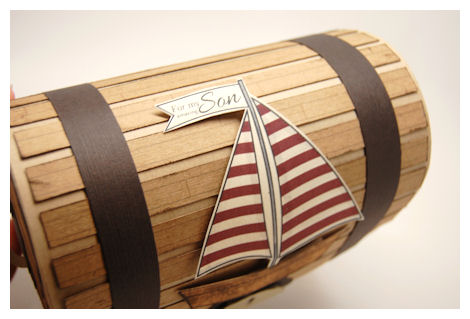
The top I chose to use the “build your own” sailboat image from the NEW! set called Seas the Day. I added the customized sentiment “For my amazing Son” to the flag from the Seas the Day Sentiments set.
Now what to put inside…..

Here I found some super cute Pirate designed Easter Eggs, so I filled them with various “treasures” and put them in here. How cute huh? This would make a great gift box or an excellent party favor, or table centerpiece!!
The top and bottom panels of this are easily alterable so you can create a longer version of this box with ease, as I did in my sample today.
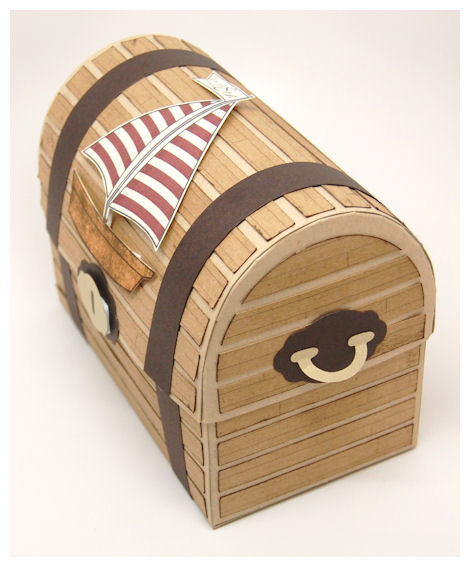
The package also comes complete with the lock, hinge and handle pieces to really make this simple box one to treasure for much time to come.
Use this package to create a treasure chest (long or stout), a stunning gift box, a mail box, tackle box, lunch box, robot box, jukebox, owl/other animal….wherever your creativity takes you!
Now how about a feminine version?
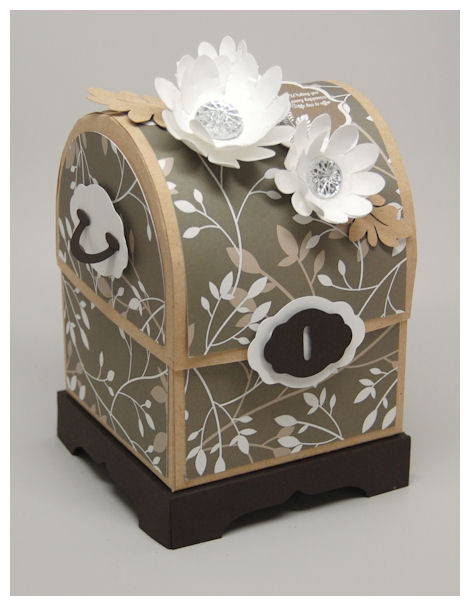
Now this is the original sample for the Treasured Template, complete with all the bells ans whistles this template comes with, such as the pretty base, handles, hinges and lock details!
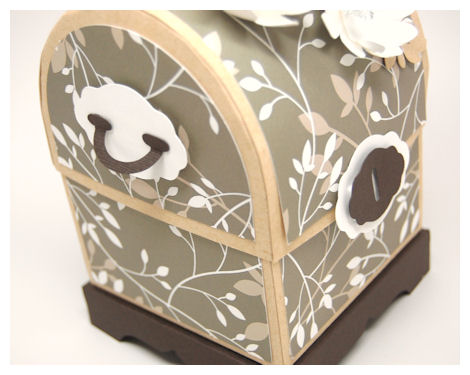
I used the stunning paper from Regal Round Up © for my box design.
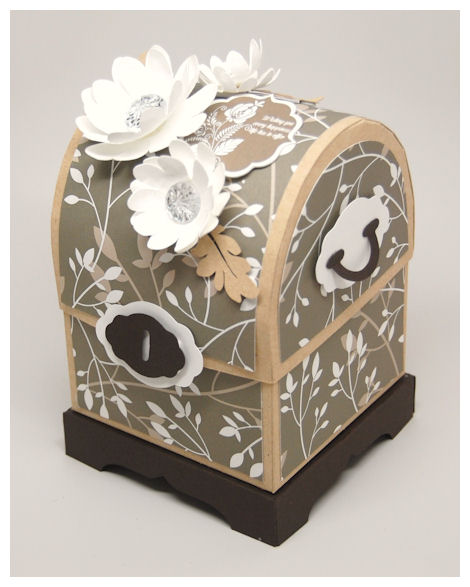
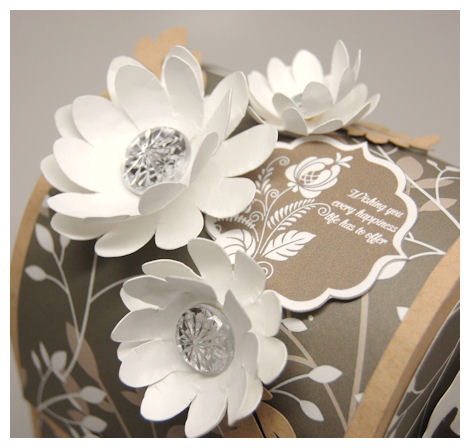
The top features flowers from the Bloom Builders © cut file. I just resized each smaller version to 75%.

The flowers really added that something special to the top and my tag, which was made using the Fine Finish ©set and cut using the Fine Finish © cut file.
Here I have packaged a large candle and stand!
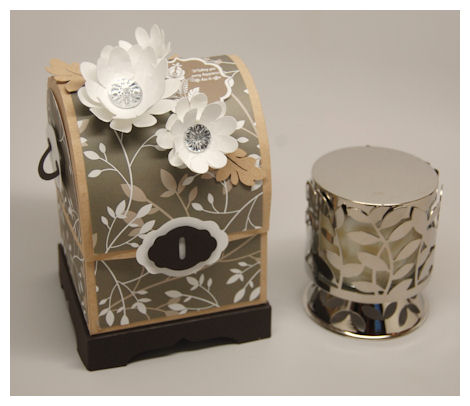
I love how the paper matches my candle holder 😀
This template just hinges open…..
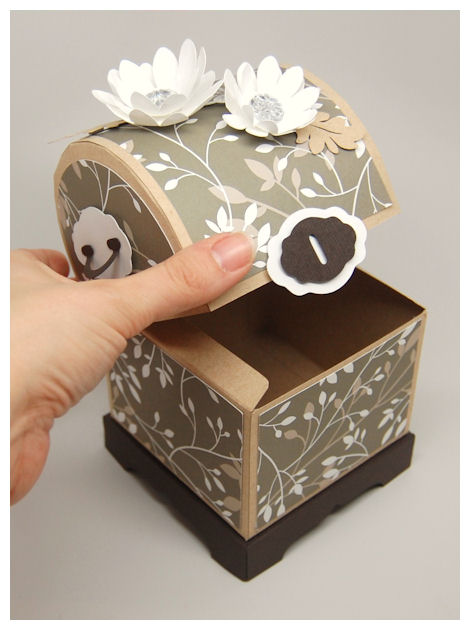
and my candle/stand fits perfectly-with room to spare!
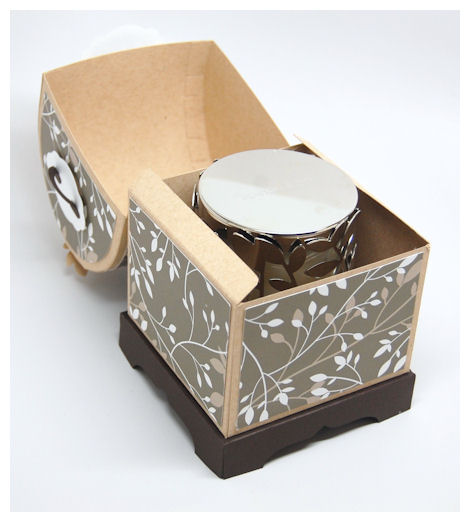
The dome top allows you to package up a variety of sizable items too. You can put much taller gifts in here as well 😀 I love that!
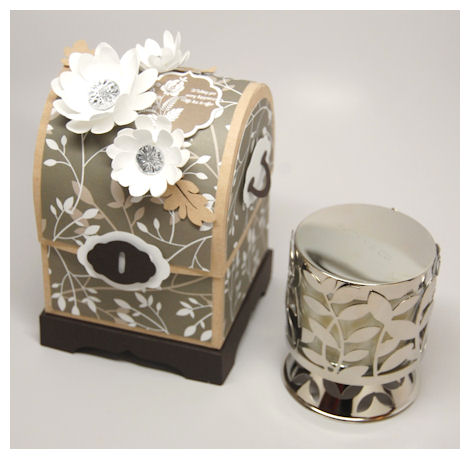
See-this can be both masculine AND feminine 😀
Supplies from My Time Made Easy ™ LLC
Treasured
Seas the Day & Seas the Day Sentiments, Fine Finish
Pretty Printable Digital Paper:
Custom Construction Materials, Regal Round Up
Fine Finish, Bloom Builders
Tomorrow is THE day, so I hope you will come back to see our amazing NEW products, which we will feature in a blog hop/group post!
See you then!
May Release Preview 1: A Day For Dad
Apr 28, 2012 Author: mytime | Filed under: Home decor/3-D items, My Time Made EasyWelcome back everyone!
As May approaches I get excited because it’s my birthday month! Yes, I said month! LOL! Since I was a little girl I always felt the month of May was all mine 😀 I celebrate all month long. It helps that Mother’s Day is in there too! LOL!
We have a release JAM PACKED with some amazing and MASCLINE items this month! All the NEW! items previewed in any of our projects will be made available for purchase May 1st!
So if you have a special guy in your life, be it your own father, grandfather, boyfriend, husband and even your son you will want to stay tuned! Even if you struggle with masculine gifts this release will sure inspire you to give it a try. Let’s also not forget our line of Pretty Packaging is quite versatile for anyone, all year round!
I’ve had a lot going on in my family/personal life, one being a very major surgery for myself. I miss having the time and energy to share everything here on my blog but time has NOT been on my side in the last 2 or 3 years! That being said I did what I could to get ahead and really didn’t get to do all I wanted for this release, but having the amazing team that I do, they will be able to fill in the “gaps” for me when they share their amazing samples!!
Today the team and I are sharing a FUN sample using a NEW! Pretty Packaging Template called Blue Collar!
Sadly my sample was done long before we completed all our amazing NEW! Pretty Impressions images or paper, so my sample uses older products. Certainly NOT a bad thing!
Available in PDF, SVG, GSD, DXF, WPC
Completed Project Size:
7 1/2 Inches Wide
5 3/4 Inches Tall
2 Inches Deep
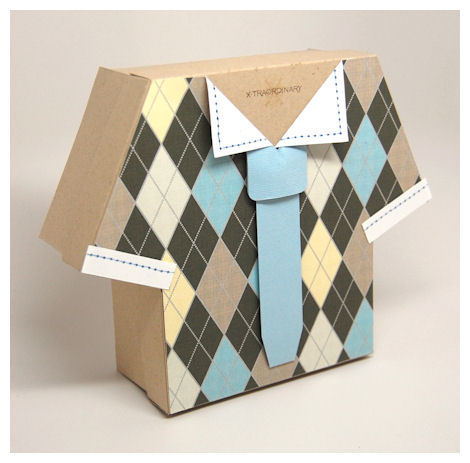
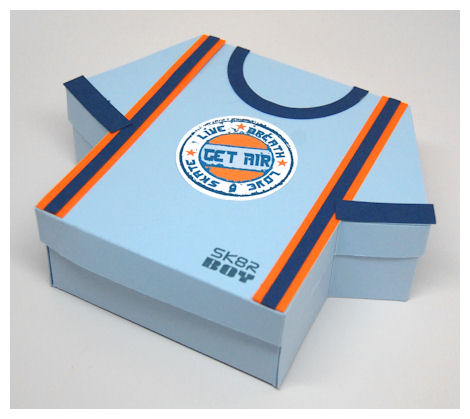
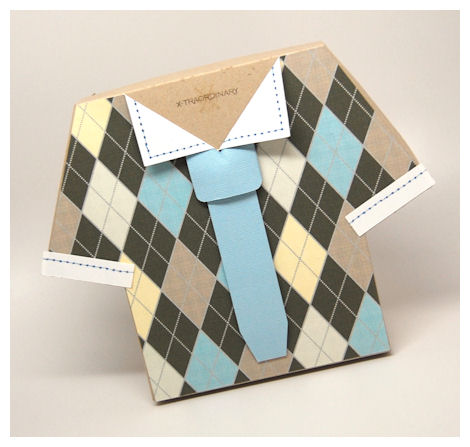
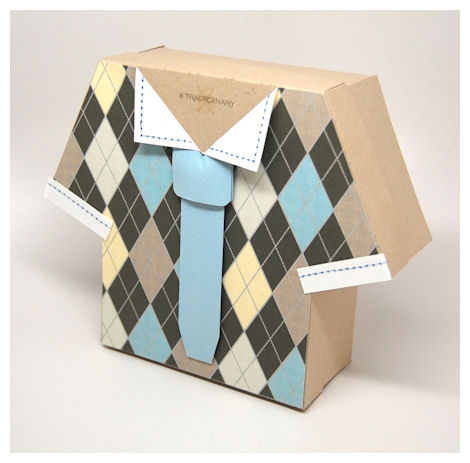
Whether you have a blue collar, white collar or t-shirt wearing kind of guy, this shirt shaped box make the perfect “present”-ation for a gift for that special guy in your life.
This box can present a variety of guy-themed gifts from snacks, to actual t-shirts whatever you put in here to sure to prove you had him in mind! Simply round the edges of the pointed collar and you have a sweet feminine shirt!
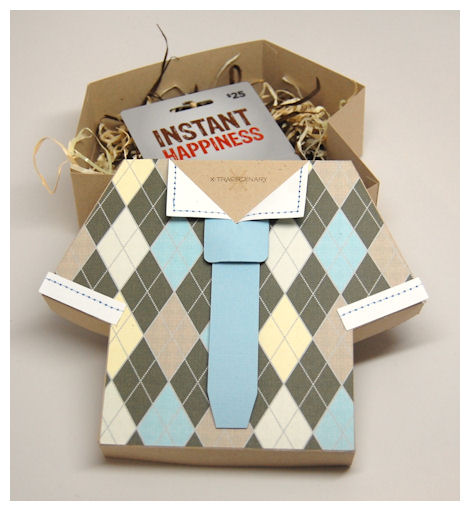
Here I packed up a gift card for my hubby to Chipotle!
Now he can treat himself to lunch at work. He is very cheap and won’t buy himself lunch, ever! He will eat cold spaghetti-o’s if there are no leftovers to take to work (which seems to be happening more often now that our 9 year old son eats like a grown man, since he is a growing boy!), leaving me feeling bad. Now I don’t have to! I keep buying him gift cards to food places 😀 Always a great gift.
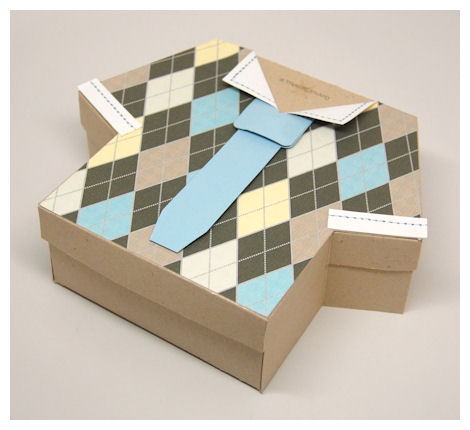
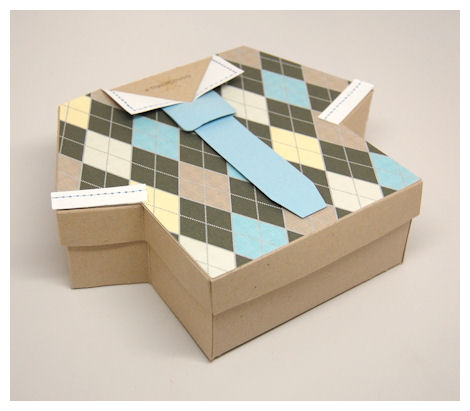
This box can also fit standard A2 sized cards ( 4 1/4 X 5 1/2 with envelopes).
Template comes with additional shirt layer with pointed collar.
A rounded collar and sleeve layer for a t-shirt look
A neck tie and pocket (not used in my sample today)
Whichever collar you choose this is definitely going to make someone feel special!
My sample here came together in like 20 minutes total! I kid you not 😀 It is easy peasy.
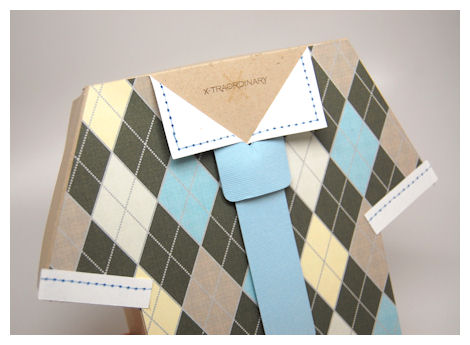
I used Kraft cardstock as the box base. My shirt layer was made using the Argyle pattern from the Cool Cooking © collection. I did some faux stitching in my collar and sleeves. For my inner “tag” I used the “X” for X*TRAORDINARY from the Monograms Defined © set. You could use someones initials or any of our NEW! Pretty Impressions Images for your gift!
You may want to check out our guy themed sets such as: Dad’s Day to Relax, A Vintage Day for Dad, For Dad, and many others!
Supplies from My Time Made Easy ™ LLC
Blue Collar
Monograms Defined
Pretty Printable Digital Paper:
Cool Cooking
Once again, thank you for checking in to see what’s to come! You will not want to miss our on what our Design Team has come up with too!
We have more previews at our May 1st Release tomorrow!!
See you then
My Etsy

Who I Designed For
Blogroll
- Alicia
- Alli Miles
- Ally Blankenship
- Amber
- Andi @ crafts on a whim
- Angel R
- Angie Z
- Anne Kranitz
- Becky O
- Bee
- Beth Silaka
- Bethany Paull
- Beverly Nash
- Bobbie
- Cambria
- Cammie
- Card of the Week
- Card Positioning System (CPS)
- Cards for Cancer
- Catherine Doucette
- Charmaine
- Cheryl Sims
- Chriss Rollins
- Christina
- Christine Ewing
- Christine Wooden
- Colleen Schaan
- Craft Critique
- Craft Gossip
- Crystal
- Dawn Easton
- Emily Giovanni
- Geny
- Holly
- Igne Groot
- Inspirational Craft Blogs
- Irene
- Jami Sibley
- Jeanne Streiff
- Jen del Muro
- Jeni Bond
- JenMarie
- Jenn Balcer
- Jenn Diercks
- Jenn O
- Jennifer E
- Jennifer Mick
- Jennifer Pereda
- Jennifer-Sweet Treat
- Joanne Basile
- Jodi Collins
- Julia Stainton
- Julie Masse
- Karen
- Kathryn Berthiaume
- Katie Cotton
- Kelley Holland
- Kendra
- Kim Scholfield
- Kris’s Color Stripes! Get inspired here
- Kristen Dubosque
- Kristin Eberline
- Kristine
- Laura @ Sunshine Stamper
- Laura Turnmire
- Laurie Schmidlin
- Lesa Rapp
- Linda Duke
- Linda-LSN
- Lindsey Botkin
- Lisa (lakind scs)
- Lisa Kind
- Lori Craig
- Maggie
- Mara Campbell
- Maria
- Maria Levine
- Mary
- MaryJo
- Melanie M
- Monique Hansen
- Moxie Fab World
- Pam Imholz
- PaperCrafts Connection
- Peppers and Pollywogs Kids party site
- Rebecca Grohall
- Rita
- Robyn
- Rose Ann
- Sarah Vrolyk
- Sharon Harnist
- Sharon Johnson
- Sharon Rivera (a chemisrty with paper)
- Sherrie
- Sophia Landry
- Storage Units, Ink, & More Blog
- Sue Berker
- Susan (Rainy)
- Tangii Crane
- Tracy
- Tricia Traxler
- Trudee
- Velta
- VivLyn
- Zena
MTME Pretty Palette Color Team
MTME Pretty Patterns Sketch Team
My Time Made Easy TM LLC
Shop till you drop!
Lauren Meader
About Me
Copyrighted material
Subscribe To My Blog
Pages
- About me
- Alexa’s Story!
- My Crafty Corner!
- My Time Made Easy™ LLC
- Our Make A Wish Trip to Disney!
- Resume/Publication List
Calendar
| M | T | W | T | F | S | S |
|---|---|---|---|---|---|---|
| 1 | 2 | 3 | 4 | 5 | 6 | 7 |
| 8 | 9 | 10 | 11 | 12 | 13 | 14 |
| 15 | 16 | 17 | 18 | 19 | 20 | 21 |
| 22 | 23 | 24 | 25 | 26 | 27 | 28 |
| 29 | 30 | |||||
Archives
- August 2013
- July 2013
- June 2013
- May 2013
- April 2013
- March 2013
- February 2013
- January 2013
- December 2012
- November 2012
- October 2012
- September 2012
- August 2012
- July 2012
- June 2012
- May 2012
- April 2012
- March 2012
- February 2012
- January 2012
- December 2011
- November 2011
- October 2011
- September 2011
- August 2011
- July 2011
- June 2011
- May 2011
- April 2011
- March 2011
- February 2011
- January 2011
- December 2010
- November 2010
- October 2010
- September 2010
- August 2010
- July 2010
- June 2010
- May 2010
- April 2010
- March 2010
- February 2010
- January 2010
- December 2009
- November 2009
- October 2009
- September 2009
- August 2009
- July 2009
- June 2009
- May 2009
- April 2009
- March 2009
- February 2009
- January 2009
- December 2008
- November 2008
- October 2008
- September 2008
- August 2008
- July 2008
- June 2008
- May 2008
- April 2008
- March 2008
- February 2008
- January 2008
- December 2007
- November 2007
- October 2007
- September 2007
- August 2007
- July 2007
- June 2007
- May 2007
- April 2007
- March 2007
- January 2007
Categories
- About Me
- All That Scraps
- blogger challenge
- camera/photo play
- Cards
- Contests
- family stuff
- FOR SALE
- Home decor/3-D items
- How to FAKE it!
- Introduction
- JUGS Challenge
- JustRite Stampers
- Lizzie Anne Designs
- My family stuff
- My Stamping Space
- My Time Made Easy
- My Time To Color Challenge
- My Time to Create Challenge
- My Timeless Template Challenge
- My Timeless Templates
- Mytime Mail
- MYTIME MOVIE/VIDEOs
- Papertrey Newsletter
- Pink Cat Studio
- Pretty Palette Challenge
- Pretty Patterns Sketch
- Product Opinions and Must haves
- Recipe's
- Saturday Sketch
- Smilebox Creations
- Stampavie
- Tutorials
- Uncategorized
- videos
Most Popular
- Create your own Onesie Card Tutorial-and important NOTE! PLEASE READ (2529)
- Saturday Sketch-Boxed bag holder (2333)
- Going GREEN! Fancy Flower Flourish-Closure Video (1478)
- Fabulous Favorite - Giveaway! (1336)
- a Prayer Request (1232)
- QUICK-Easter Baskets from Nestabilities-PTI style-and blog challenge (1063)
- Teaser Sketch (999)
- February Release Giveway! (and a little peek) (996)
- Group Post and Rambling Rose Video Tutorial (985)
- GIVEAWAY! Who wants it all?! (895)
Recent Comments (RSS)
- 첫충사이트: 완전히 흥미로운 블로그 게시입니다. 저는
- sarah: Wow, Lauren, what a stunning
- hedie: خرید راهبند
- 야동: Love to read it,Waiting For
- 야동: This seller is in a
- 바카라사이트: 여기 처음 왔어요. 나는이 게시판을
- 야동티비: I was surfing the Internet
- 바카라사이트: 비슷한 주제에 대한 흥미로운 정보를
- 바카라사이트: "여기에 제공해 주신 귀중한 정보와
- 온라인홀덤: 유익한 웹 사이트를 게시하는 데
Copyright © 2007 - My Time, My Creations, My Stampendence - is proudly powered by WordPress
This blog has been Tweaked and Designed by Sara Williams