Archive for the ‘Home decor/3-D items’ Category
Holly Jolly Preview Day 1
Sep 28, 2012 Author: mytime | Filed under: Home decor/3-D items, My Time Made Easy, TutorialsFirst let me say a BIG Happy 13th Birthday to my daughter Alexa ♥

I now have a teenager!
It seems like only yesterday I was watching the ultrasound screen, and seeing your little heart beating within me.
For those of you who follow Alexa’s Story, I updated her page!! <–Click it and scroll to bottom for update!
As October quickly approaches the holidays are just around the corner! Whether you are starting to think about Halloween gifts, fall ensembles, or Christmas & Hannukah gifts, My Time Made Easy ™ LLC is sure to have something wonderful to help you make gift giving simple, affordable and AMAZING!
Today the team has created some holiday gift items for you to enjoy, and kick start those crafty projects, if you are a begfinner or an experienced crafter!
Please note that our *NEW* products will not be made available for purchase until October 1st!
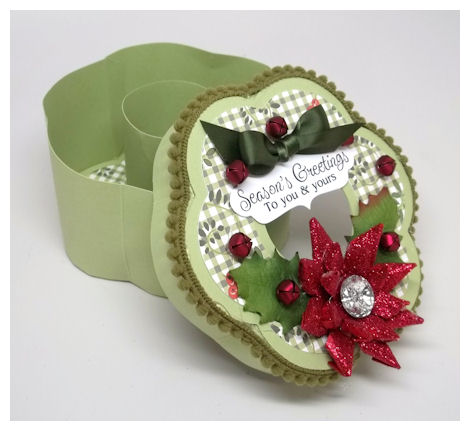
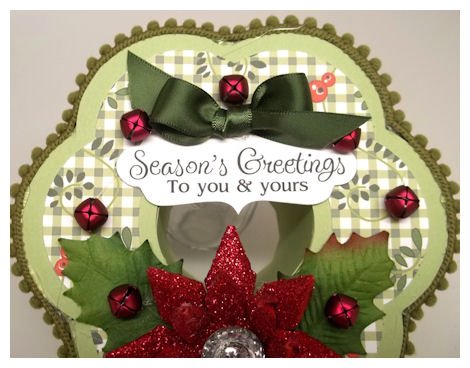
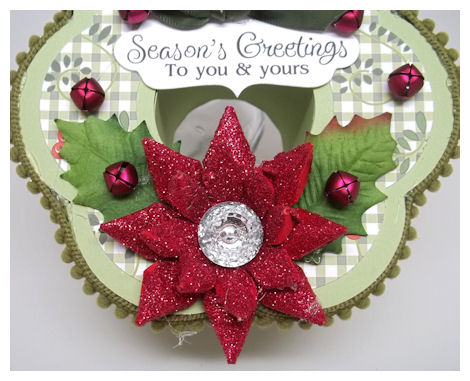
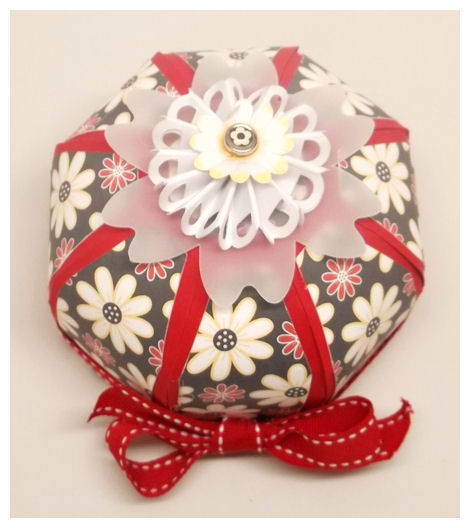
Wreath of Wishes
Gifted
Candy Wrapper
So today I am able to share a FUN new template with you called the Wreath of Wishes! This box was actually created LAST season, but we were releasing so many other fun items, we held onto it. The idea of the “wreath” actually came from one of our Design Team members, Debbie Marcinkiewicz ! I loved the idea, and especially loved that such a boc could be used ALL YEAR LONG!
Given our holiday them though I did use this amazing *NEW* template to create a Christmas gift box, as I will be needing to make as many holiday gifts as possible!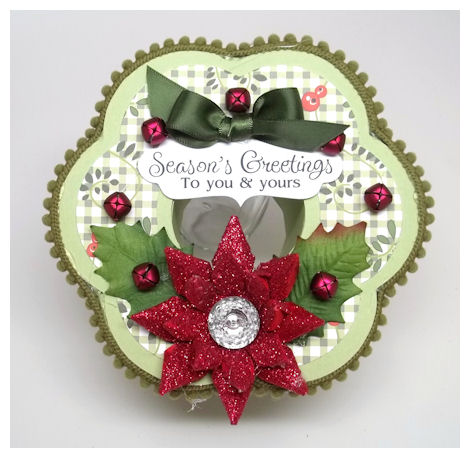
Available in PDF, SVG, GSD, DXF, WPC
Completed Project Size:
3 Inches Tall
5 Inches Around
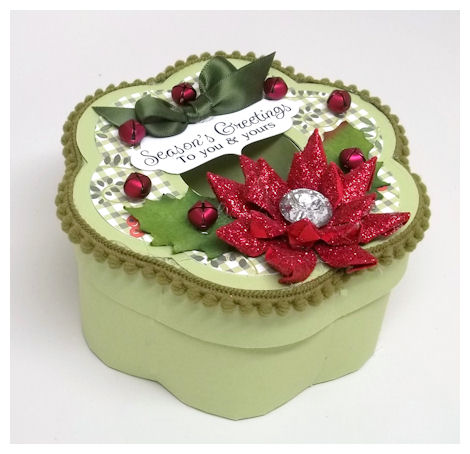
Think of a simply stunning wreath hanging upon a door. It is simply the first impression a person gets before entering your home! A wreath is inviting, and brings on the feelings of love, the spirit of the holidays, the warmth of a season or simply a welcome feeling. Now we have created a template that allows you to GIVE that same feeling, in the form of a gift box!
We have taken all the elements of a wreath, no matter what the season, or occasion and made it simple for you to create a gift for anyone, all year long. Design the wreath to suit any holiday or occasion. We have a variety of Pretty Printable Paper’s, Pretty Pieces Cut Files or Pretty Impression images to help you quickly and easily accent your creation.

The scalloped shaped box has a circle center cut out that can be easily omitted to allow you further gift giving possibilities as well. Whatever you “wish” for the receiver this wreath like box is sure to welcome in feelings of warmth and love.
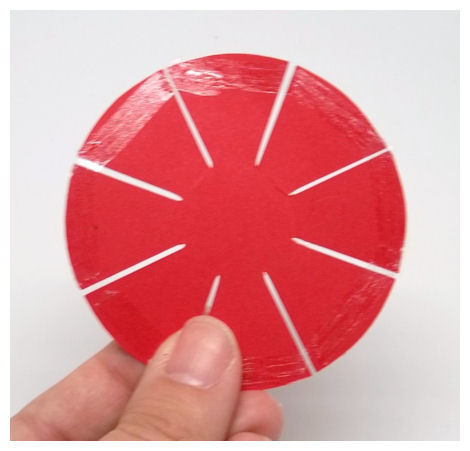
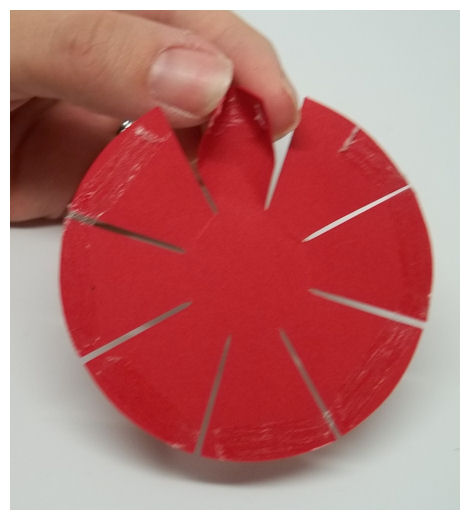
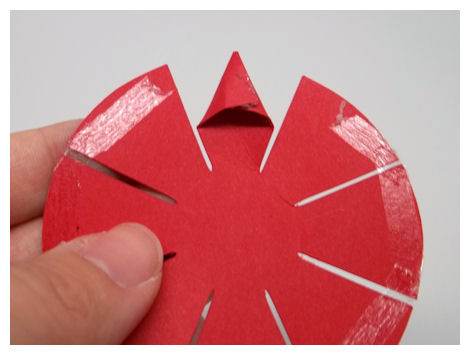
My wreath here was SUPER SIMPLE to create, I promise!
I used the Farmhouse Fresh © digital paper collection because I like the green gingham pattern, and the “berries”. I felt it gave a quick holiday feel with minimal work 😀 I’m all about little work but big WOW!


Available in PDF, SVG, GSD, DXF, WPC
9/11 We Remember
Sep 10, 2012 Author: mytime | Filed under: blogger challenge, Cards, Home decor/3-D items, My Time Made Easy9/11
Today is a day of remembrance, and a time to thank all of those who have served our country. Past and present, and future, the word thank you doesn’t seem to be enough. Many people have given so much of themselves, to work tirelessly to preserve our freedom and protect our country. Saying thank you doesn’t seem to be enough.
Today on 9/11 we take a moment to remember those at the World Trade Center NY in 2001, who lost their lives that day, and the families they left behind. We take another moment to honor all of the individuals who helped that day, and who are, or who have served our country. Today we remember.
In honor of all these individuals and their families My Time Made Easy ™ LLC and Paper Sweetieshas organized a Blog Hop with *NEW* products & projects to inspire you to create gifts for our Troops, or that special someone!
Please see what all the following designers have made using the *NEW* products:
Additional designers:
Now you are probably excited to see what was released in honor of this special occasion!
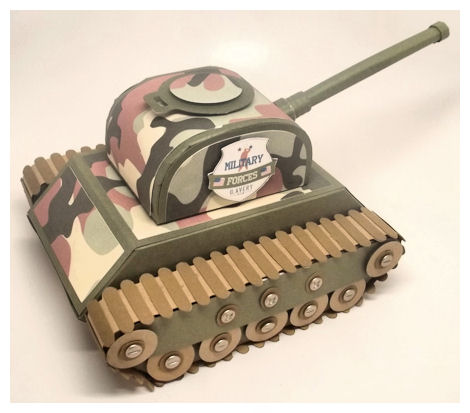
*NEW* at My Time Made Easy ™ LLC is an amazing package collection called Made in the USA!
Made in the USA Package $10
As mentioned above, this collection was created in honor of those who have, or who are currently serving our country! This package includes everything you need to create your own amazing gift package! Contents in this collection are the Tough Tank Template, a sheet of Camouflage Digital Paper, and an additional three sheets of patterned paper in red polka dots, yellow stars, and blue stripes, as well as a Set of 31 Digital Images called Made in the USA.
About: Made in the USA Digital Stamp Set: includes a Military Forces tag that can be customized, a saluting soldier silhouette, a Dog Tag, circle flag tag, alphabet for you to create your own tag, as well as a Made in the U.S.A. sentiment.
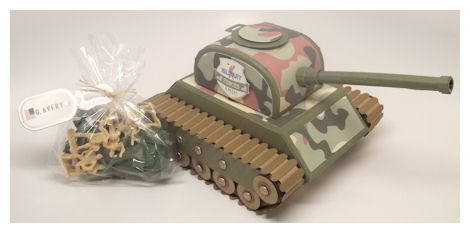
Tough Tank Pretty Packaging Template
Available in PDF, SVG, GSD, DXF, WPC
Completed Project Size:
4 3/4 Inches Tall
6 1/2 Inches Wide
7 1/2 Inches Long
This was designed at the request of, and in the honor of my brother Craig, who served many years in the U.S. Army! He wanted a realistic version of the “real deal” to honor his time spent serving our country!
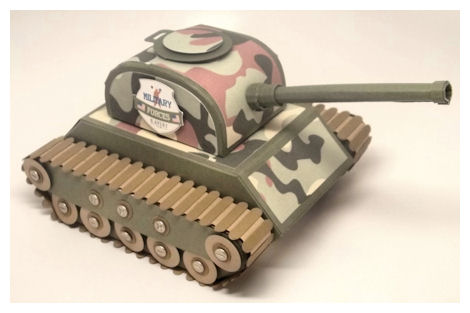
Of course I was up for the challenge, as I think it is an excellent way to honor our troops.
This truly makes the perfect personalized package 😀
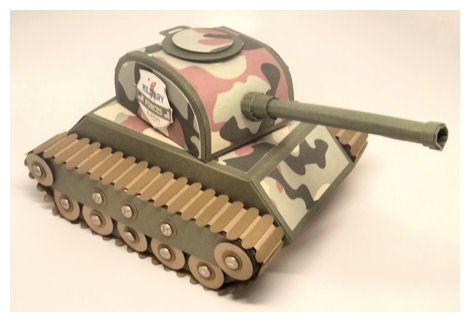
How fun is this?! Note: The top of the tank rotates 360 degrees!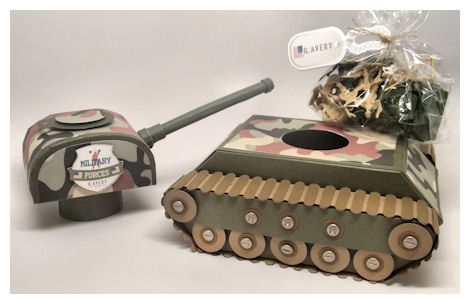
The top also comes off the tank, so you can package all sorts of gift items inside the tank.
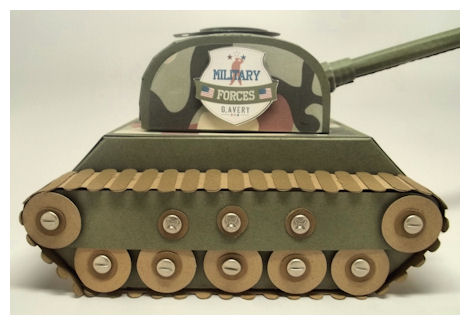
Details: I designed this collection and used the Tough Tank Template as seen here, with the Camouflage paper. I added the tag from the Made in the U.S.A. Digital Stamp Set, all included in the Made in the USA. It was customized with the name G. Avery, using the alphabet in the set. It is for my brother’s son. I actually made two, one for each of his sons.
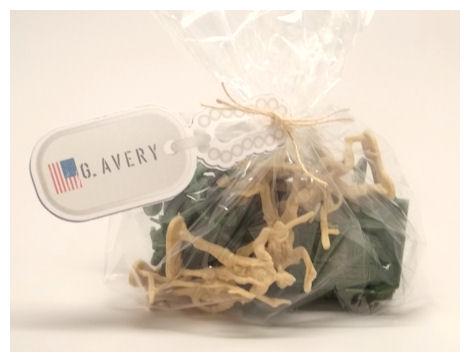
I also did the name on the Dog Tag image in the set, which I used to wrap up the Army Men I am sending his boys. They are so into them of course 😀 I am adding some water grenade balloons and of course candy 😀
Now you too can easily re-create this Tough Tank to create your own customized gift package. The perfect container to package up gifts for any of our Troops, maybe for sending a special care package, a great gift option for someone who served, or is serving in the military, or maybe that special child in your life who enjoys playing with Army men, and things of similar nature. Makes an excellent party favor or centerpiece too!
Be sure you see what all the designers have done for you, and the *NEW* goodies Debbie has created for her new company Paper Sweeties!
I hope that you take a moment to thank someone for their service to serving our country! There are SO MANY organizations that you can send cards and care packages for our troops, so I recommend you find one to support or in your area 😀
I have found this one A Million Thanks, but you can find your own, or if you know of an organization please link it here or on our Facebook Page!
September: A Year in Review
Sep 3, 2012 Author: mytime | Filed under: Home decor/3-D items, My Time Made EasyYou can never get too many ideas using older products, that is why we believe that the “Year in Review” is so beneficial, fun, and helpful. This day in age everyone is always wrapped up in the “latest, greatest & newest” of products. We rush from one release into the next. Now I agree, you can never have too many gift giving options, but I also believe in getting me most use and versatility from the products you spend your money on! So, that being said why not share NEW ideas with older products?
So check out what our designers have to share for more ideas!
I REALLY struggled with WHAT to share. I made so much that I didn’t get to post it all, and with getting the kids back to school, soccer, dance, and 50 thousand other reasons, I can’t “jam” it all into this release. With that being said, and the Jam (aka canning) season upon us, I decided to share this Pretty Packaging Template with all of you, that may have been LONG forgotten!
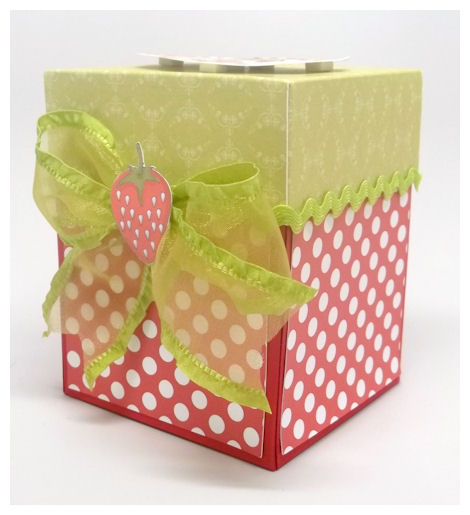
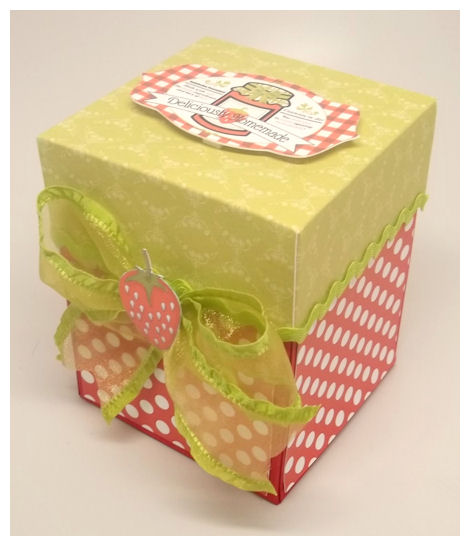
Deliciously Homemade Strawberry Jam
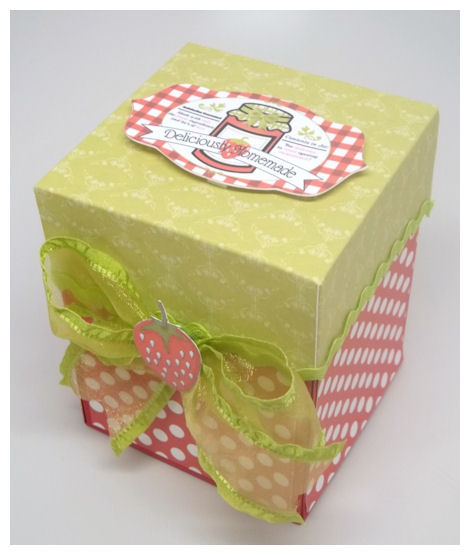
The idea of this box was to be super easy and super fun. I was packaging up some homemade strawberry jam, and thought that the Jam Packed © template would be perfect, if designed to replicate a strawberry. So that is exactly what I did!
The box top was cut from Wildflowers © paper collection, to mimic the green top to a strawberry. I even added some ric rac ribbon to the edge to further imitate the top.
So in gifting jam, I wanted to create a label (of course) to showcase my hard work.

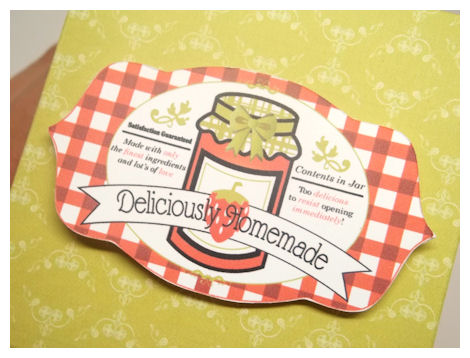
I used gingham print tag from the Apothecary Labels Set, and added several of the sentiments in the set (as seen here) to build the label to say what I wanted. I re-colored some of the text too, so certain words would stand out. To complete the design I added the flag tag with the sentiment, and then of course the jam jar & strawberry from the Well Preserved © set!
The tag was cut out using the Apothecary Labels Set.
It’s amazing how much you can do with digital images, and with little effort. I have done much of this by just playing around and layering various images. I can be pretty computer challenged, but this was a breeze 😀 I also love that I can SAVE it and use it again and again, and/or resize it to suit my projects.
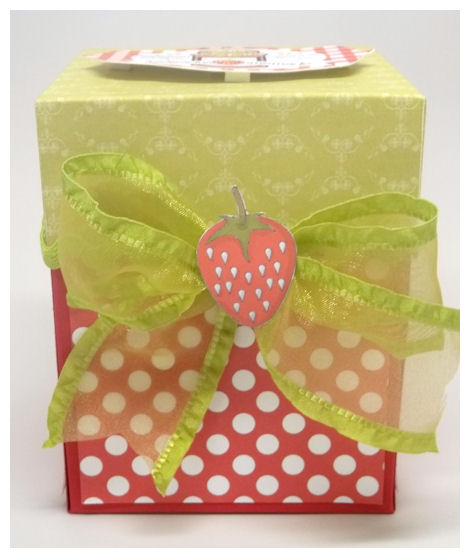
I used the plump strawberry image from the Tooty Fruity © set, to adorn the bow, which sits on the insert tab for the box closure.

Once the box is open, it reveals my jar of jam! You can alter the cut out to suit any gift/project.
NOTE: The label for that is coming soon 😀 This was a gift, and I had used a new digital stamp set, not even thinking! LOL! I already gave it away, so switching it out wasn’t an option.
So there you have it! A quick and simple gift that takes an inexpensive jar of jelly, and makes it in to a truly wonderful, heartfelt gift! PLUS the box can be used again and again by each person who receives it. That is a tremendous value in itself.
I really hope you see something you never noticed before, and get inspired to give it a try. All our products are meant to be user friendly. You don’t have to have ever put a box together before! We make it easy, hence the name: My Time Made Easy ™ LLC.
So if you DO try something out, don’t forget to try to take a few moments to write a review. You could save yourself some money on your next purchase! See details on that HERE!
Thank you for visiting, and see you next time.
A little something more…
Sep 2, 2012 Author: mytime | Filed under: Cards, Home decor/3-D items, My Time Made EasyWe are are back again and still sharing more samples, so take advantage of all the ideas, and put them to use in your own life.
Making gifts for people is so rewarding and can really dress up the simplest of gifts.
Check out the following design team members today:
I actually made a ton of stuff, andI really enjoyed this release! I need to spread out all the projects because I’d be typing ALL DAY!
My 11th anniversary was August 23rd, and I wanted to make something for my hubby to helpcelebrate the day. We always go on a mini-vacation, just he and I, and so we don’t typically buy each othera lot as that is our gift to one another, but I did get him a fee gift cards so he can enjoy lunch with the guy’s at work without “splurging”. He isn’t one to go buy lunch! He’s eat a can of cold Spaghetti O’s first! LOL! So just a little something for him to enjoy.
A little something for my “sweetie”
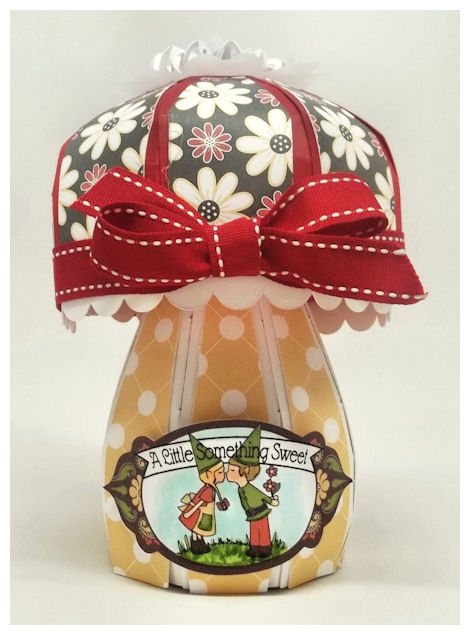
Today’s project features the Mush-Room House template. It really is super sweet, and so fun to make. It was done for my 8 year old daughter Amber, who is as of late obsessed with gnomes and mushroom house ideas. She had the idea of a template like this after painting a mushroom shaped bird house.

I absolutely LOVE the kising gnomes from the First Kiss Set! I knew I wanted to use them for my gift, so I shrunk them down and added them to one of the tags from the Apothecary Labels Set , that I customized withe flag and sentiment.

Seriously, aren’t they too cute?!
I had so much fun using the combination of colors based on my Mush-Room House top layer. The daisy pattern is from the Coffee Beans © collection. The bottom layer is from the Dotted Stripes © Collection 2 set.
On the top layer I used the Border Builders Scallop Dot © to create my rosette for the top of the Mush-Room House. I then added a sponged daisy which was cut from the Bloom Builders © cut file.
I figured this would be the perfect holder for the gift cards I wanted to give him!
I’m happy to say that YES! They were a perfect fit! As are we ♥
So thanks for letting me share! I have much more, but that will be another day.
Tomorrow wraps up our release with our Group Post!
Be sure you check it out.
I hope you have been checking in with us the last few days as we celebrate our September Release with a plethora of inspiring projects for everyone. We aren’t done yet! Check out the following designers for some more fab-u-licious ideas
EEK! I am so excited to share my samples today! I had so many ideas using the *NEW* BOO! Bag cut file that I could have filled a weeks worth if posts with *just* ideas for it. So, without further delay, let me start sharing.
Spooky Sweet Treats!

Using only the items that come with the BOO! Bag the cut file, I was able to create a jack-o-lantern, a bat, and a sweet ghost!
As a mom to three kids I wanted to design 3 different Halloween themed gift bags that I could easily assemble, and make for their classmates. With you have anywhere from 15 to 20 kids a class you need quick, easy and not so large that you break the bank filling them. The BOO! Bag really fits all those requirements!
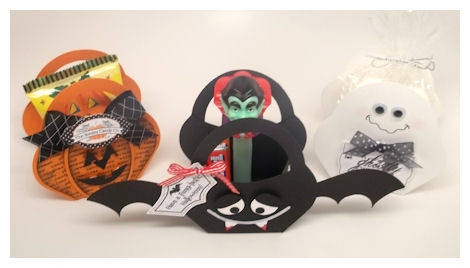
In the pumkin I have a chocolate covered pumkin marshmallow treat

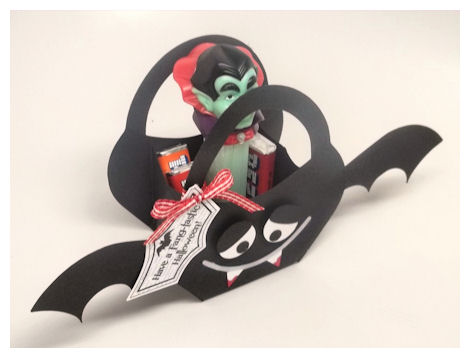
The bat has a Dracula PEZ dispenser and candy
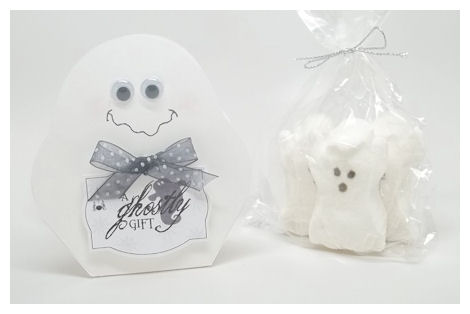
Then the ghost has some ghost marshmallow peeps (3 per box)
You CAN re-size these to become bigger, for those times you want to package up something larger, but these are really great as is.

The jack-o-lantern was cut from a orange cardstock. I printed the text pattern from the Hauntingly Homemade Paper Collection on the same colored cardstock, then just cut the decorative layers included in the file. Gave them a quick sponging, and layered them on.
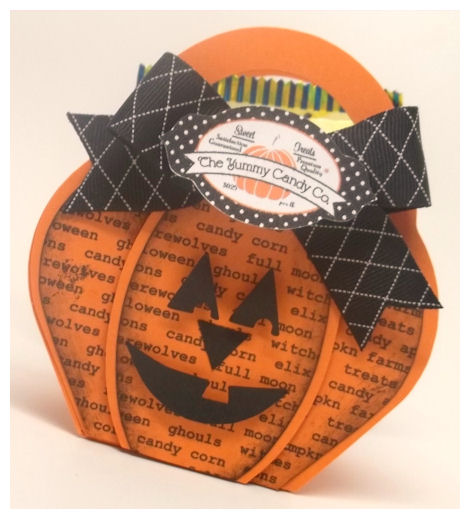
The jack-o-lantern face is included in the file! Isn’t he/she so cute??? Easy peasy!
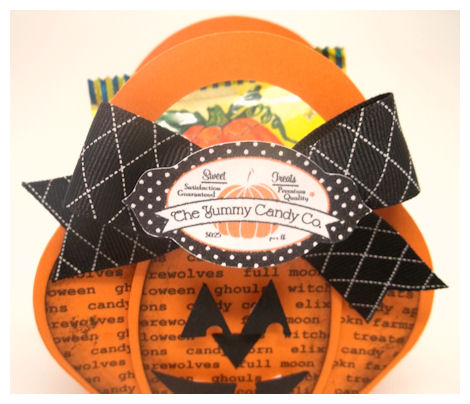
I used one of the tags from the Apothecary Labels Set, and “erased” the apothecary jar in the label, and replaced it with a colored in pumpkin (lines removed) from the A Spooky Surprise © set. The tag was cut using the Fabulous Frames cut file.You have to give major props to digital images because it makes this stuff possible!!! You can layer images, remove images, enlarge and shrink image…..endless possibilities for using and combining sets. It also allows me to make something ONCE and print it as many times as I need it to be, AND at whatever size I choose too.
Now for the bat!
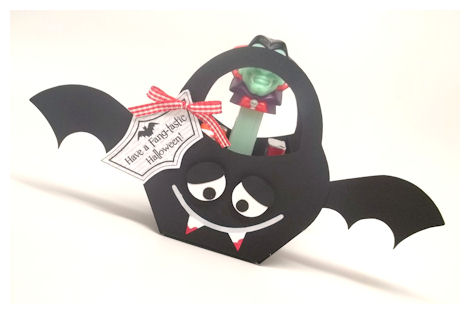
This file does come with all the pieces to create the bat.
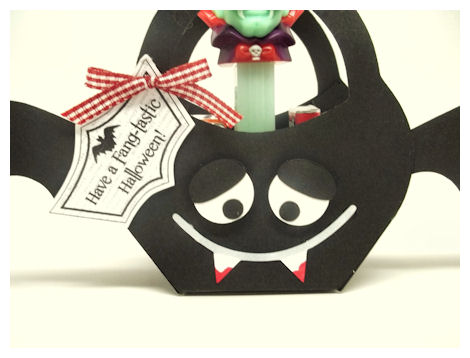
I think this bat is creepy cute! The “bloody” fangs I added makes it a little gory, but I love it.

The tag-how cute is that?! I used the tag and sentiment from the Hauntingly Homemade Set, and it was cut out using the Hauntingly Homemade Labels.
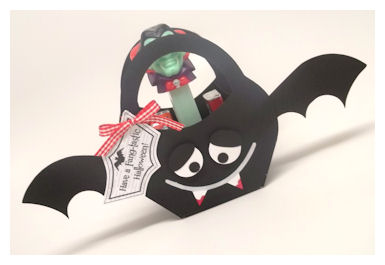
Really super simple
Speaking of simple….the ghost was by far the quickest and easiest!
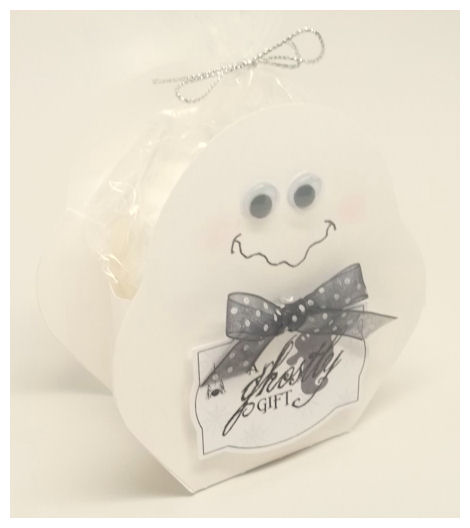
This was cut from white cardstock, omitting the handle, so you have the ghosts head!
I just added some googlie eyes, and a hand-drawn mouth.
Once again the tag and sentiment were super simple, and made using the Hauntingly Homemade Set. I also used images (the ghost & spider) from the A Spooky Surprise © set. It was cut out using the Hauntingly Homemade Labels.
Now Halloween may NOT be your thing. If not that’s OK because this is still a fabulous cut file as it can me made into other things, including a purse style box.
That being obvious I decided to try another animal for fun!
Here Kitty….
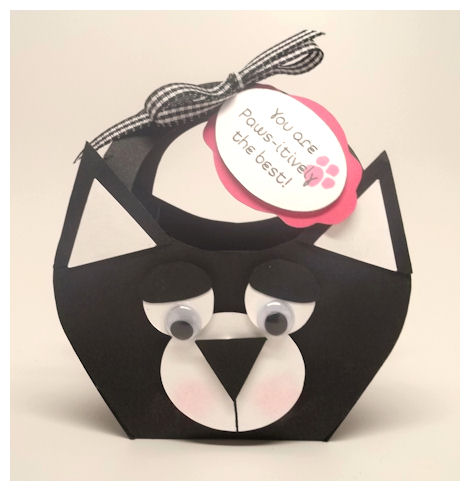
Another SIMPLE one.
Cut from black cardstock I used some of the elements to make the cat. The pumpkin eyes are the cat ears, and nose.
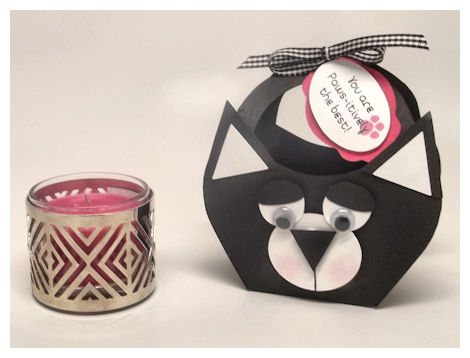
I used this to hold a scented candle, and made my tag from the Fine Finish © cut file.
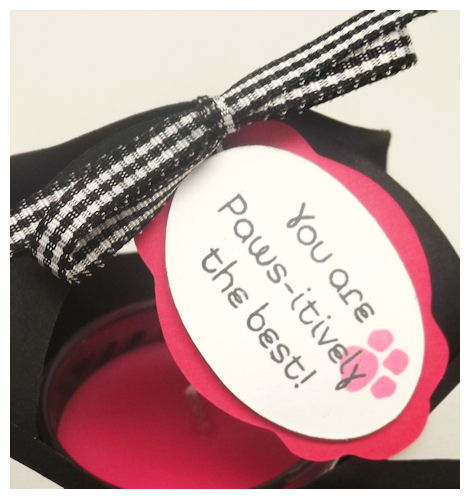
Sentiment is from the On Display 1 © set, and the paw is from the Sign It © set.
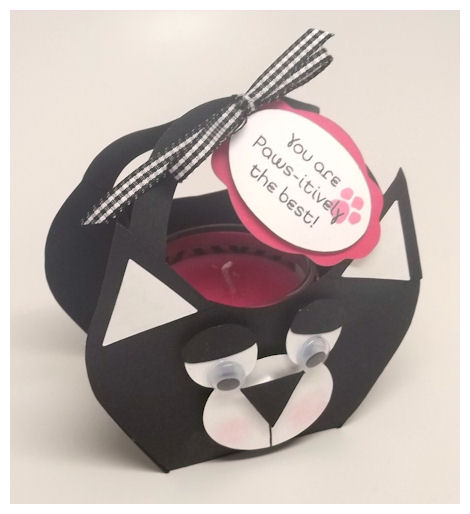
Many, many possibilities! A little imagination can go along way when you have a great starting point.
I could go on and on, but there is more to share another day! Come on back tomorrow as we have yet another day of sharing, and designs from the team.
Have a creative day!
September Release: Something Sweet
Aug 31, 2012 Author: mytime | Filed under: Home decor/3-D items, My Time Made EasyIt’s September 1st and that means all our NEW! Products are available for you to purchase! We have all had such a great time working with all the new products, and will continue to share samples through the next few days.
Be sure you check out our NEW! Products <—HERE!
We have released:
2 NEW! Pretty Packaging Templates
4 NEW! Pretty Impressions Stamp Sets and 1 NEW! Digital Single
1 NEW! Pretty Printable Digital Paper Collection
4 NEW! Pretty Pieces Cut Files
and we have an amazing variety Pretty Package Collections, where you will save 25%!
Please view our Gallery for project samples, and alternative ways to use all our amazing coordinating products!
You may also want to check out our blog for weekly challenges, and even more amazing ideas.
Today we have an amazing group post using our NEW! Products
As you may have come to know my company focuses on the “complete package”. We work hard to offer coordinating products that are easily interchanable with previously released products. We really enjoy being able to share the ideas and versatility each product holds.
So with the holidays on the horizon, our designers are sharing “Something Sweet” with each of you!
Mush-Room
Apothecary
Well, with Halloween on the horizon I decided to try some FUN using the NEW! Apothecary Jar template. I actually had MANY ideas, but thought today I would use the NEW Hauntingly Homemade set to create a SPOOKY Sweet Treat!
Witches Brew
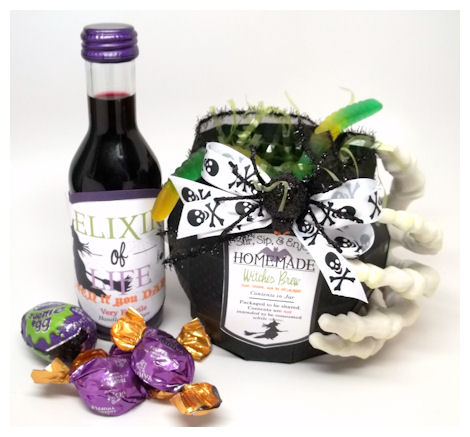
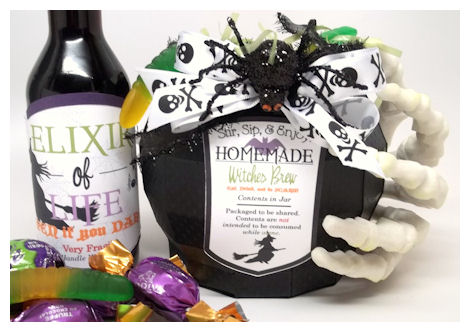
When I had designed the Apothecary Jar template all I could think of was using it as a Witches Cauldron, to hold a special “Witches Brew” with a little trickery calling it the “Elixir of Life”, so that is exactly what I did here!
I packaged up some wine & chocolate truffles (and of course completed that with gummy worms for the GROSS factor) as this could be a fun Hostess gift for a costume party, or just a girlfriend who loves the contents and Halloween ♥
I made my “cauldron” from a textured black cardstock using just the bottom of the Apothecary Jar template.
Easy peasy!!
I then created my tags for both the Elixir of Life (which is actually a bottle of wine) and the Cauldron using several digital images. I love that about the digital sets! You can EASILY combine & create some amazing customized labels in not time, and SAVE them for future use!
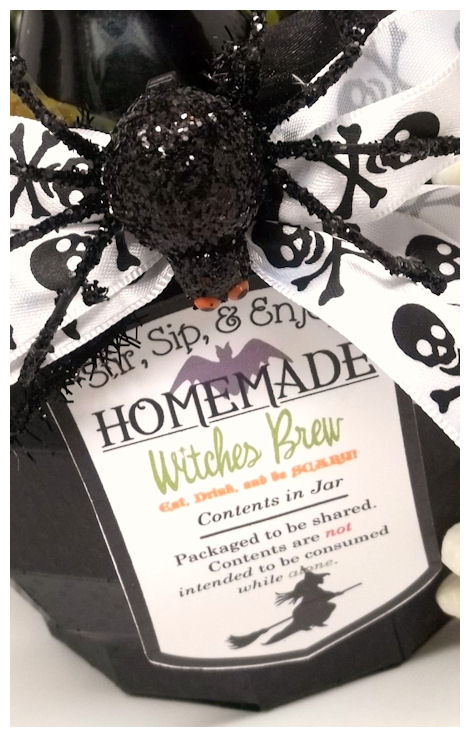
The tag itself is from the Hauntingly Homemade set, and was cut out using the Hauntingly Homemade Labels cut file. Also from that set is the bat image, the “homemade” sentiment, and the “Witches Brew” sentiment.
The Stir, Sip & Enjoy, as well as the “contents in jar” and the following sentiment are from the Apothecary Labels Set
The Eat, Drink and be SCARY is from the A Spooky Surprise ©set.
Here is the Elixir of Life details

The tag itself is from the Hauntingly Homemadeset, and was enlarged to fit my project. It was created then cut out using the Hauntingly Homemade Labels cut file.
The witch is from another tag, but was cropped, enlarged, and moved to the left corner of the web tag.
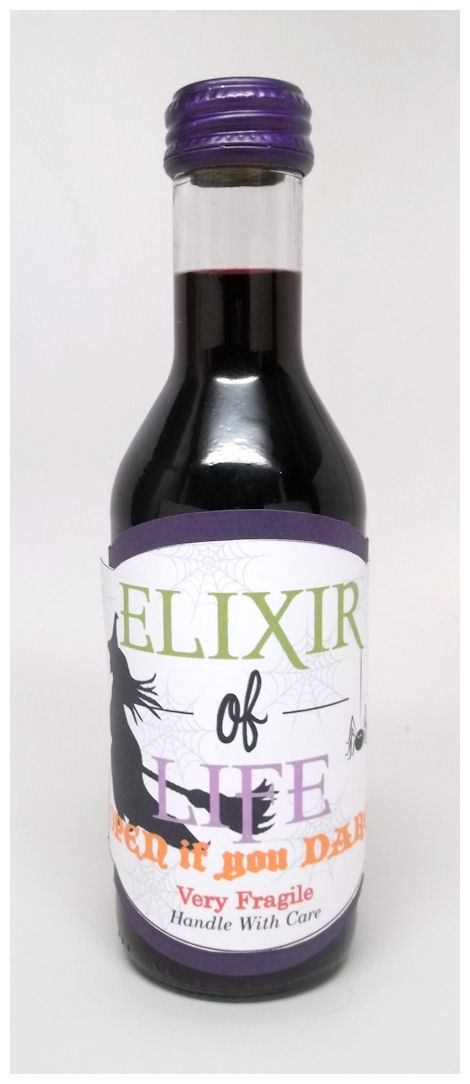
The sentiment Elixir of Life, is from is from the Hauntingly Homemade set. The Open if you DARE sentiment is from the is from the A Spooky Surprise ©set, as is the spider. Lastly the Very Fragile and Handle with Care come from the the Apothecary Labels Set .

All packaged up in my spooky sweet cauldron-Seriously fun, isn’t it?
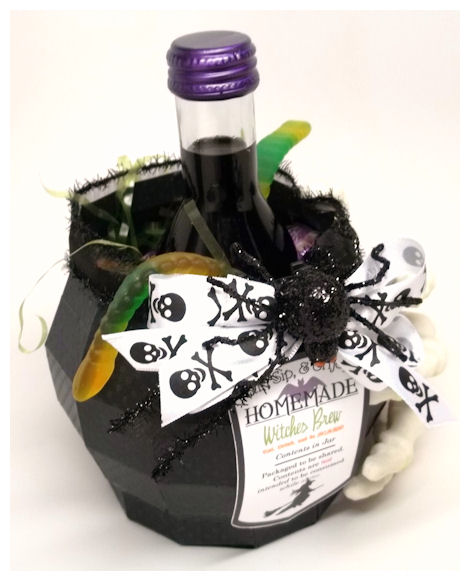
Just tie the cauldron off with some ribbon and a gorgeous glittery spider, and you have super spooky surprise!
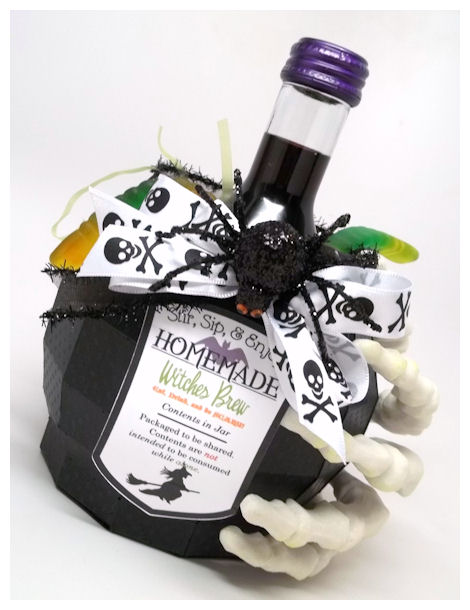
You could also use this to hold candy for your Trick of Treaters too! Mix and match your own tags and sentiments for your very own spooky treat! You can add whatever message you choose.
So use a little imagination, and some mixin and matchin, and you too can create a seriously fun treat container of your own.
I hope you’ve enjoyed the projects we have to share so far, but we aren’t done yet!! Be sure you visit our design team.
We have several more days of projects to reveal, so come back again!
See you tomorrow
Preview Day 2: There’s no place like Gnome
Aug 30, 2012 Author: mytime | Filed under: Home decor/3-D items, My Time Made EasyWelcome back for our second day of Previews before our official release on September 1st!
Today the designers and myself are featuring some more new products for you to check out and gain some inspiration from.
Let’s see what the team has done using a *NEW* template called Mush-Room House!
So without further ado….let me share with you another amazing & unique template…..

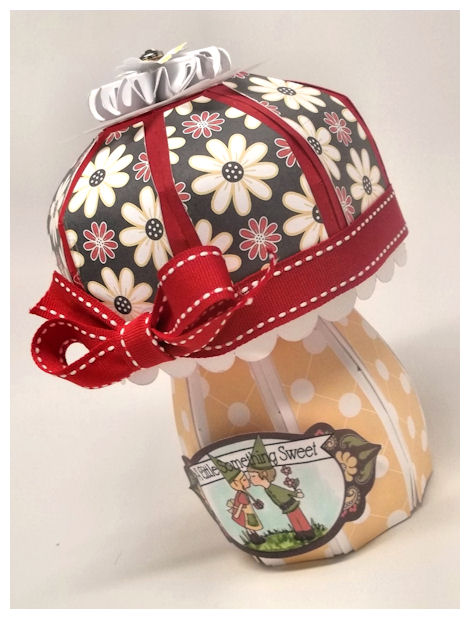
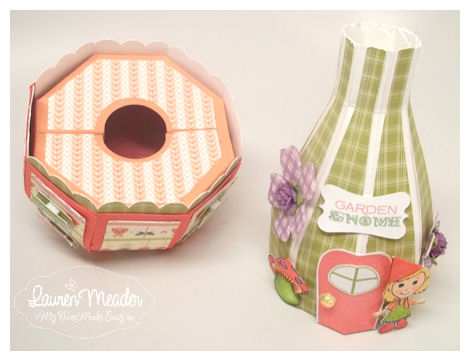
This is a whimsical three dimensional Mushroom shaped favor box! Designed at the request of my 7 year old daughter who is obsessed with the idea of making mushroom themed houses for her paper fairies, and garden gnomes!
Available in PDF, SVG, GSD, DXF, WPC
Completed Project Size:
6 Inches Tall
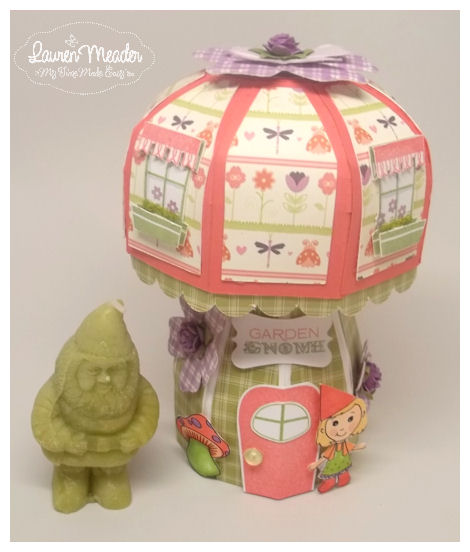
Here is has a sweet gnome candle, which will be packaged inside (yes-inside)! Keep reading!
4 Inches Around at Top
2 1/2 Inches Around at Bottom
This template can be used for a variety of reasons, all year long, especially any fun occasion like a birthday party, packaging up some candy or homemade treats, seed packets, a forest fairy/friends party, and even a garden theme party.
Use this template to make your very own Mushroom Home! This template can also be used as a lamp, or the mushroom top can turn into a fun tea cup!
So from the top down…
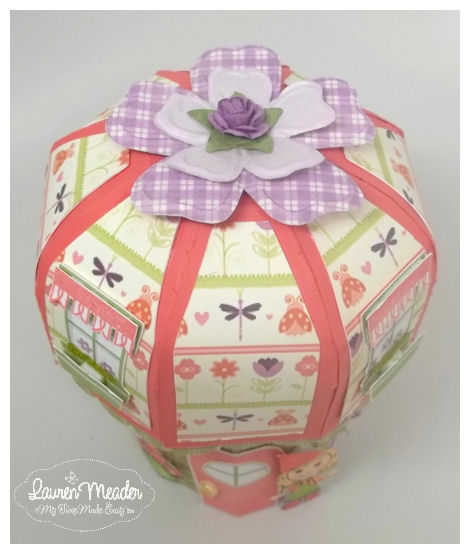
I added a couple layers of Prima Flowers to the top, which I felt coordinated nicely.
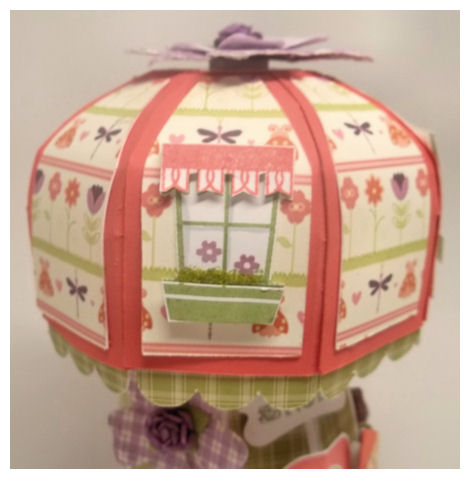
The top of my Mush-Room House was made in a berry cardstock, and layered with the flower & bug pattern from the Flower Fusion © collection. I added windows to the top of the Mush-Room House using the Home Improvement ©set. The windows were done in a green ink, and I added the flowers from the Singing Silhouette © set. In addition to that I put some “grass” in the window box using some Flower Soft. I really love little details.

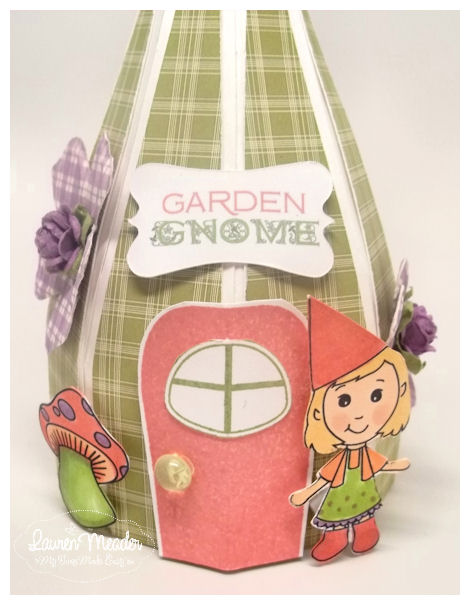
I chose to cut the bottom of the Mush-Room House from white cardstock, and layered a grid like pattern from the Trendy Forest © paper collection.
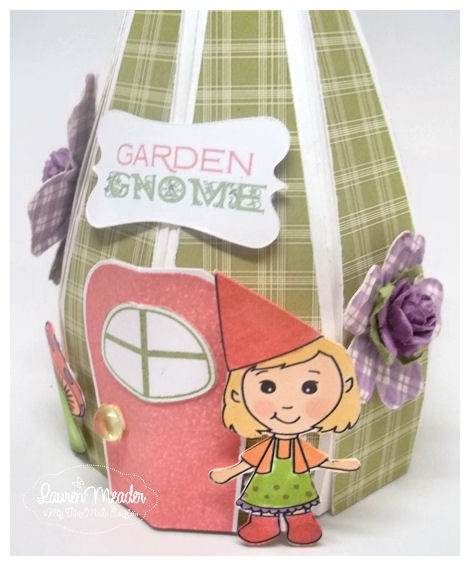
The sweet little girl – Gretchen Gnome, the Garden Gnome sentiment (cut out using the Fine Finish © tag cut file),

and the mushroom are from the *NEW* Gretchen & Gregory Gnome Set !! The door is from the Home Improvement ©set, just like the windows. There are MANY design possibilities for this fun template!
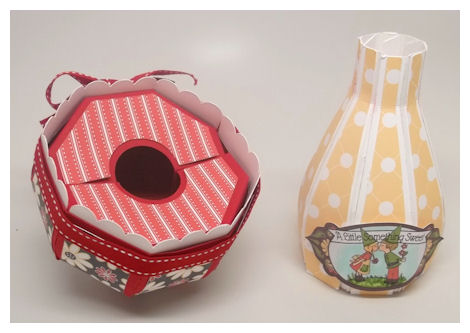
Here are the top and bottom pieces
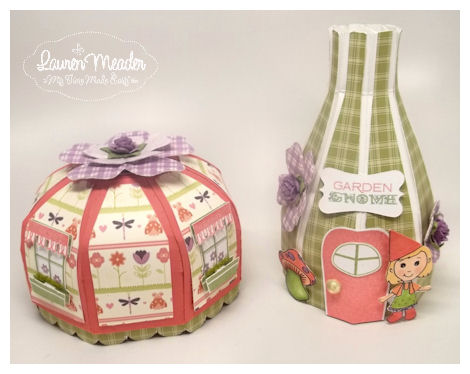
The stem of the Mush-Room House template fit into the bottom panels of the Mush-Room House
Note: the pattern paper used in the underside is from the Mini Leafy Stripes © collection! It is always important that ALL sides of a project look complete. Plus most real mushrooms have that fun segmented pattern on the underside of the top.
This is a terrific file for using a variety of patterned papers 😀
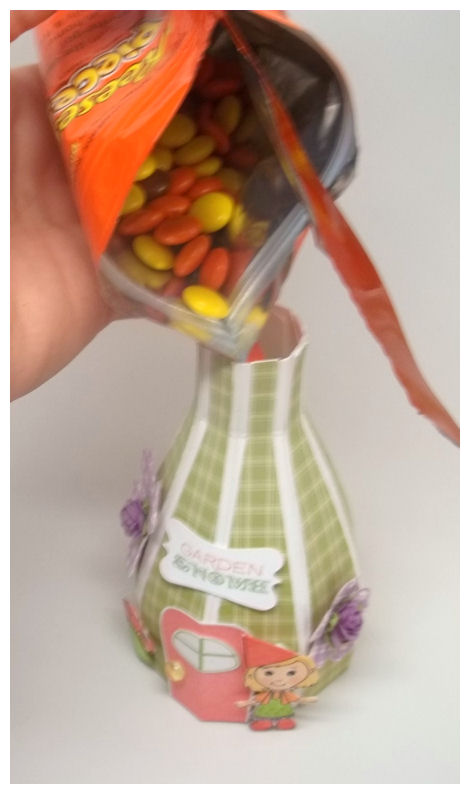
You can place candies in the stem of the Mush-Room, as seen here (sorry for the blurry photo) and a variety of items in the Mush-Room top, or both!
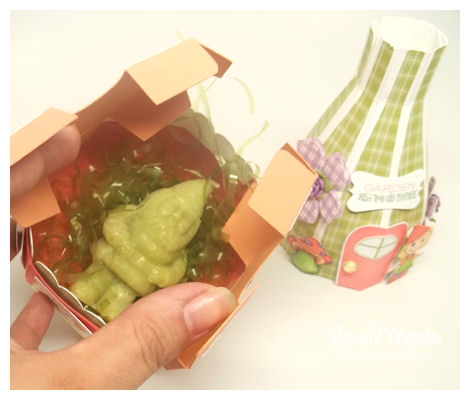
Here I fit that *uber* cute gnome candle inside the top panel! As long as the stem can insert into the bottom of the top box, you are good to go!
With the addition of the super sweet Mush-Room House template, we have a few coordinating image files that you may just fall in love with!! Here are the details of those:
Gretchen & Gregory Gnome Set of 9 Images $10 (set used in my sample today)
Gretchen & Gregory Gnome are the perfect pair! They live in a secluded area of the forest in their little modest mushroom house. They have many adventures together, and are sure to be the perfect addition to any card, tag, party favor, or gift!
Sentiments Include:
To Gnome you is to love you
From our Gnome to yours (round image)
Garden Gnome
Gnome Guardians of the Garden and all the treasure it holds (sign)
Do you Gnome how much I love you?
You may want to view our amazing collection of Pretty Packaging Templates that will allow you to make a wonderful gift for that someone special. The Mush-Room House is the perfect addition to this set!
First Kiss Set of 8 Digital Images $8
This is a simply sweet image of two Garden Gnomes, in love. They are getting ready to share love’s first kiss! This sweet image is accompanied by 6 sentiments that are sure to convey a message of love to that someone special.
Sentiments Include:
Love is a canvas furnished by nature and embroidered by imagination- Voltaire
A kiss seals two souls for a moment in time. ~Levende Waters
A kiss is a promise written upon the lips.
We can do no great things; only small things with great love- Mother Teresa
‘Twas not my lips you kissed But my soul – Judy Garland
To love someone is to be the only one to see a miracle invisible to others.- Francois Mauriac
Fiona is the sweetest Fairy! She spends her free time sitting upon her favorite mushroom in the forest.
So that is it for me today! I hope you come back tomorrow for our release day! We have a group post of amazing projects using *ALL NEW* products-
See you then!
Preview Day 1: Apothecary Possibilities
Aug 29, 2012 Author: mytime | Filed under: Cards, family stuff, Home decor/3-D items, My Time Made EasyWow! it is almost September, and the kids just went back to school yesterday.
I now have a 3rd, 4th, and 6th grader! Where has the time gone???
Here are some photos (as a proud mom I have to share :D)


They have grown so fast!
As September approaches, and I try to juggle getting back into the swing of things I have much to share with you all for our September 1st Release!! We have a truly amazing line up of products for you this month, and I hope you will get inspired to try them out for yourself at some point.
While our September Release won’t be available until September 1st, once our products are in store, they are available for instant download. If you want to know HOW to download any of our products please read instructions HERE!
Our files are formatted to fit over 18 cutting systems on the market! But you DON’T need a personal cutting system to use our products! If you have a home printer you are good to go!
All our products are designed to be user friendly and fun. Whether you are a new crafter, or a well seasoned one, I think you will enjoy our products. We have a lot of information on our ABOUT Page, loads of amazing projects using our products in OUR GALLERY, we also offer many challenges on OUR BLOG if you are looking for new ways to get creative. You may also want to check out some of our tutorials too 😀
So that all that being said….let’s see what the design team has been up to!
- Lauren Meader <—You are HERE!
- Lori Hairston
- Lori Kalus
- Mara Campbell
- Pattie Goldman
- Tangii Crain
I am quite excited by this release, and think you will be too!! We have all enjoyed using the products this month, and really have some unique items to share.
This project I have today was fashioned after something near and dear to me….the apothecary jar.
Apothecary Jar $5

How amazing to have a cardstock version of this amazing item!
Available in PDF, SVG, GSD, DXF, WPC
Completed Project Size:
6 Inches Tall
4 Inches Around
I love vintage apothecary jars, and have collected them for many years, so it is only natural for me to want to be able to replicate my favorite shaped jar in a cardstock version. I think we can all use a fun jar like template to package up the simplest of gifts! Think of all the fun items you can package in this jar like template. Design it to coordinate with any room of your home!
You can gift kitchen or bath products, baked goods, candy, flowers, seed packets, tea or coffee themed gifts, mixes and other handmade or store bought concoctions!
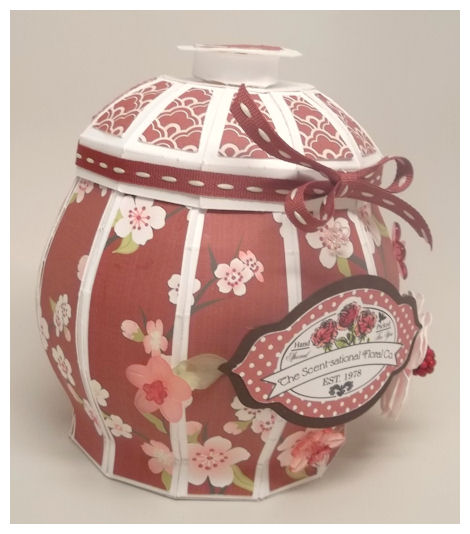
This template was so fun and easy to use (yes, EASY!). I created the template from white cardstock, and layered it with the stunning Blossoming Cherries © patterned paper collection along the bottom.
I chose a different pattern on the lid, but from the same collection. I love having the various patterns that coordinate!
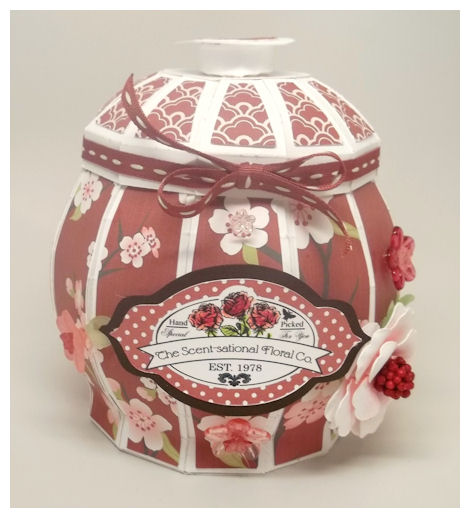
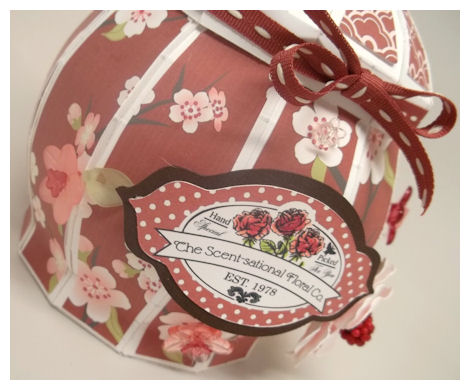
The center tag here was created using the *NEW* Apothecary Labels set, which was cut out using the Fabulous Frames Cut File. The label featured is a completed tag design within the set, that perfect accentuates the Apothecary Jar Template.
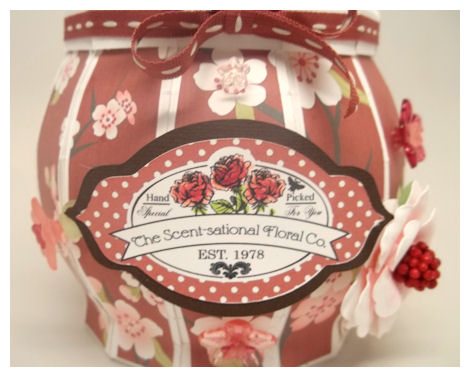
You could package up some floral scented soaps, or candles using this tag. Maybe some potpourri, tea’s, seed packets, gift card to local flower shoppe….to name a few ideas.
Here are some alternate views of the jar…..
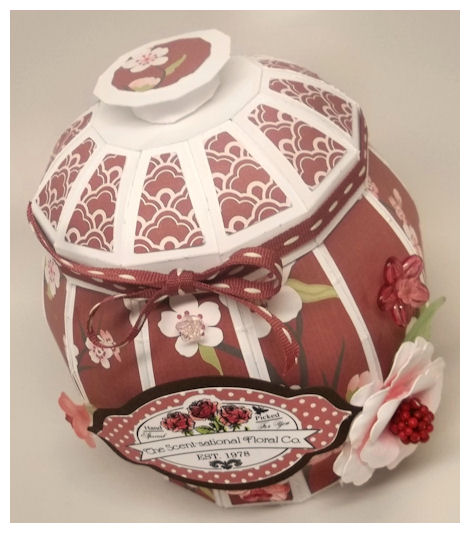
I added some acrylic flowers what I had purchased, and put them in the flower centers of the paper on the Apothecary Jar.
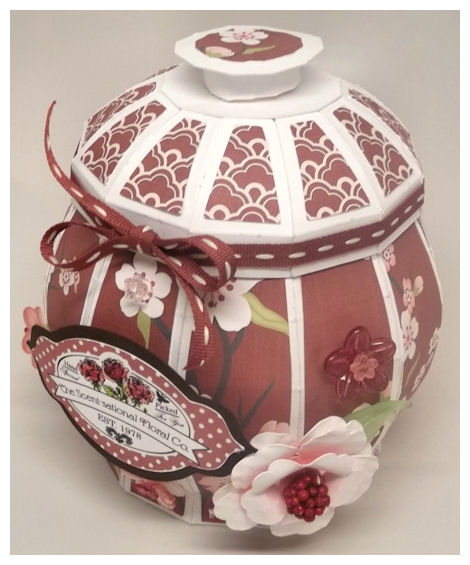
As you can see the flowers look really nice, and I of course had to add a paper one that I created using the Rambling Rose © cut file.
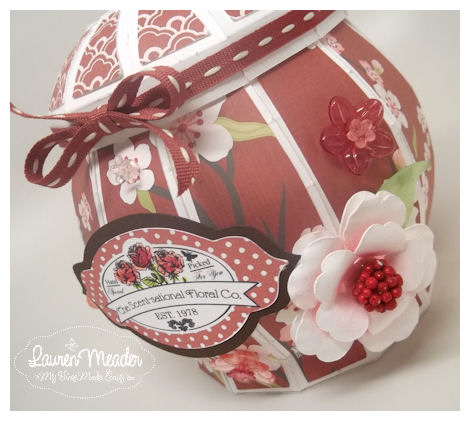
The rose is truly stunning on the side of this!
————–♥————–
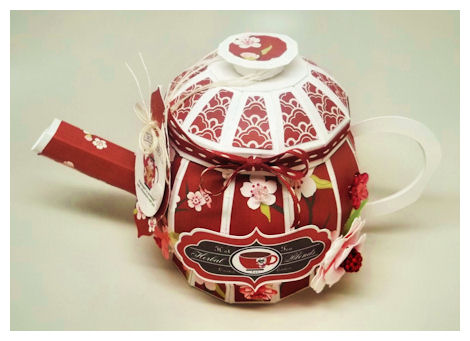
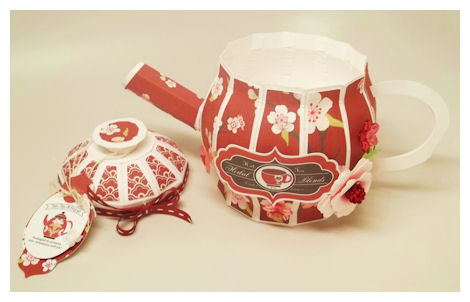
To further accent the usability
I have included a handle and spout for this template, so your jar can be easily turned into a tea pot! So many possibilities!
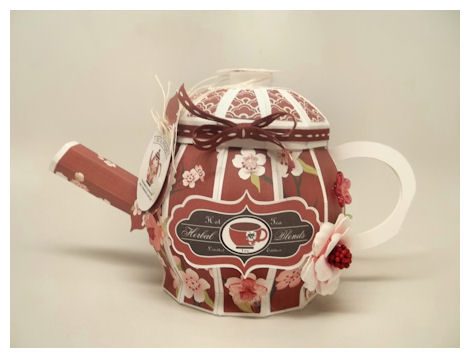
So using the SAME design, and the tea pot elements I created a teapot version using the Apothecary Jar template.
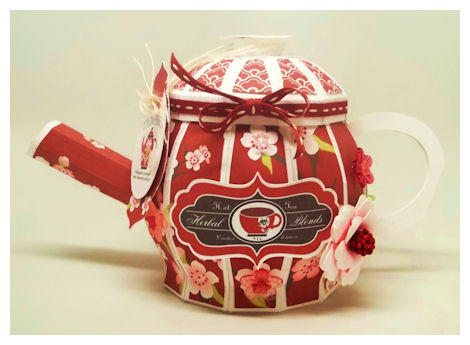
The labels are also made using the *NEW* Apothecary Labels set, which was cut out using the Fabulous Frames Cut File.
I think it is just as stunning as a teapot, as it is an apothecary jar!! This template truly has ENDLESS possibilities.
It can become a pumpkin, a apple, a gumball machine, a Witch’s Cauldron…to name a few more ideas!!
By adding the tea element and changing the tag you have a totally new look!
This is yet another tag that is included in the Apothecary Labels set. I just colored the frames to coordinate with my paper.

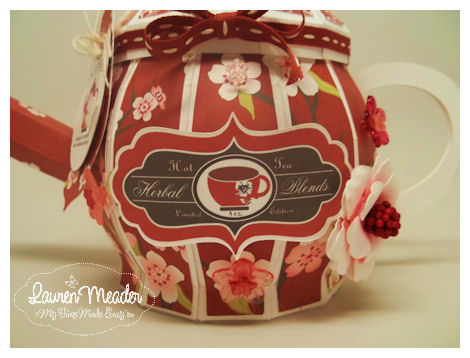
Tag reads Hot Tea-Herbal Blends-Limited Edition 8 0z, and has a tea cup! I love it. I spent MUCH time designing this set with gift-giving in mind.
I added a hanging tag to the teapot to further accentuate the design of the teapot.

This is the detail of the tea tag I made using the images from the Apothecary Labels set, which was cut out using the Fabulous Frames Cut File. I love combining several images onto one customized tag!
The flag at the top is included in the set, and I added the sentiment to it. The tea pot was created using the jar image, and the handle/spout. I layered the pot with that floral pattern, also in the set. The sentiment along the bottom speaks for itself 😀
About the Apothecary Labels Set of 20 Digital Images $12
You can never have too many options when making cards and gift for those you care about. This set of labels was created to help you accent any card, tag or Pretty Packaging Template with that little bit of creative flair, in no time flat! This set was designed to coordinate with the Apothecary Jar Template, but can be used anywhere!
This set includes 4 completed labels, and 3 ready to build labels.
Sentiments Include:
Contents in Jar
100% Satisfaction Guaranteed
Very Fragile
Handle With Care
Fresh Picked Just For You
Packaged to promote rest, relaxation and joy!
Packaged to be shared.
Contents are not intended to be consumed while alone.
Packed special with you in mind.
May this brighten your day, as you always brighten mine
Will bring you a cheerful feeling
Too delicious to resist opening immediately!
Homemade especially for you!
Please Join Us for a time of family & friendship
Made with only the finest ingredients and lot’s of love
Curved Label Sentiments:
Deliciously Homemade
You’re Invited
Made Especially For You
A Little Something Sweet
Stir, Sip, & Enjoy!
Happiest Birthday Wishes
There really is no limit to what these labels can be added to! Don’t miss out on the Fabulous Frames Cut File, as it is an amazing set of 8 labels that were designed to coordinate with this set!
WHEW! Are you still with me here?! Lot’s of information to share, and still to come even MORE products and projects!! So with that being said I hope you will return tomorrow for even more, as we get ready to celebrate the release on September 1st.
August: Year in Review
Aug 3, 2012 Author: mytime | Filed under: Cards, Home decor/3-D items, My Time Made EasyIt’s that time again! Our monthly Year in Review post.
This is when the designers find NEW uses for OLD products. Always fun and so inspiring.
Be sure you check out what the entire team has made anew.
I know it is ONLY August, and Christmas seems far away, but it really does come quick.
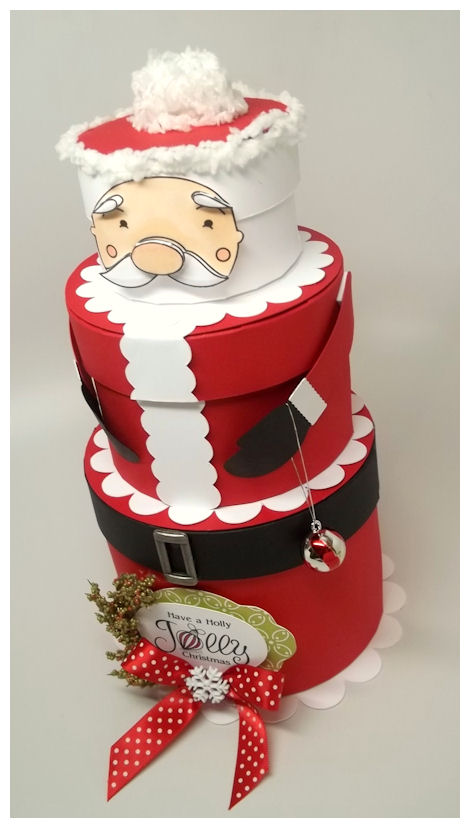
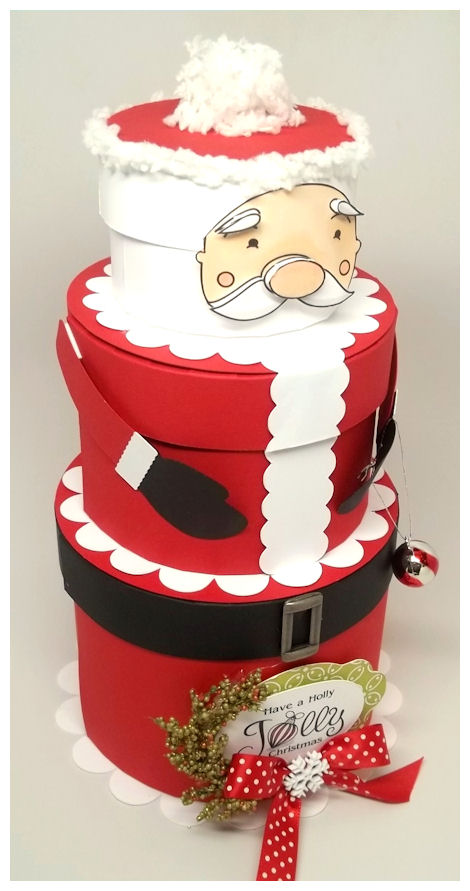
That being said, I could NOT resist taking the 3-Tier © template, and turning it into Jolly Ole’ Saint Nicholas!!
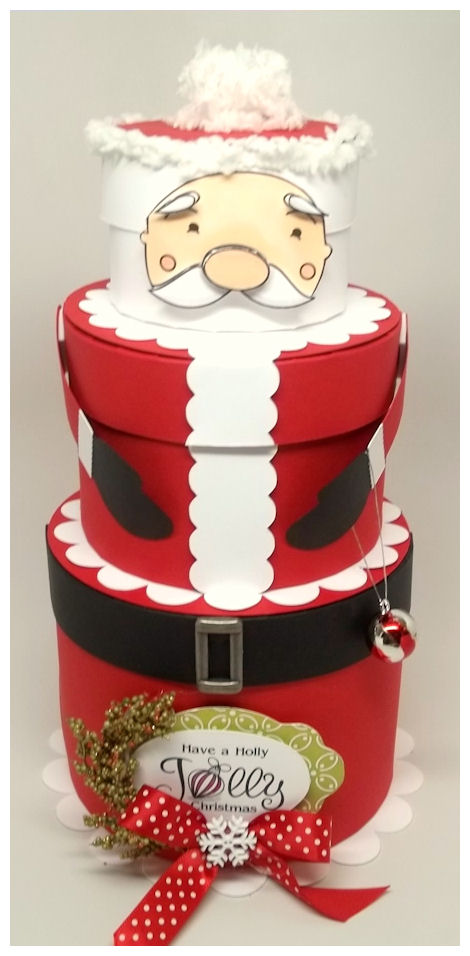
I mean what a super cute gift idea for wrapping up some homemade treats or just as some fun decor!
Now just to make replicating this EASIER for YOU I will list what I used for colors on the 3-Tier © template layers:
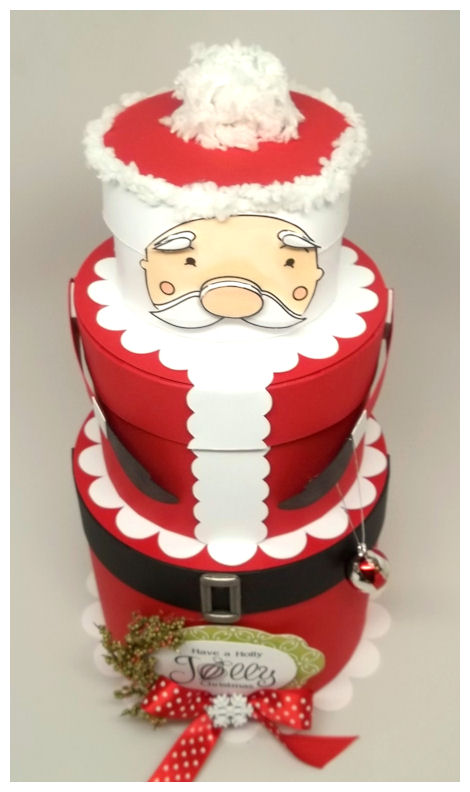
Small Lid-Red Top, White Top (bottom panel), White Sides
Small Box-White with White Scallop Layer
Medium Lid-All Red
Medium Box-All Red with White scallop layer
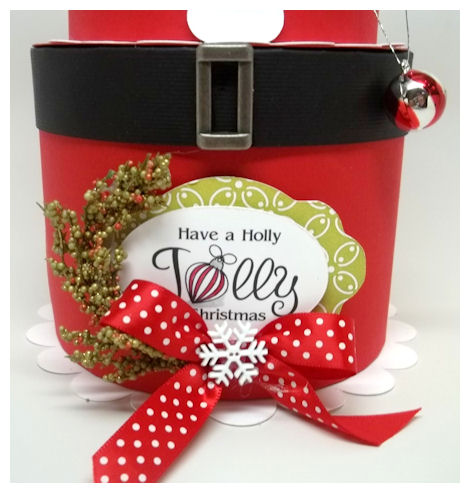
Large Lid-Red Top, Black Lid Sides
Large Box-All Red with White Scallop Bottom
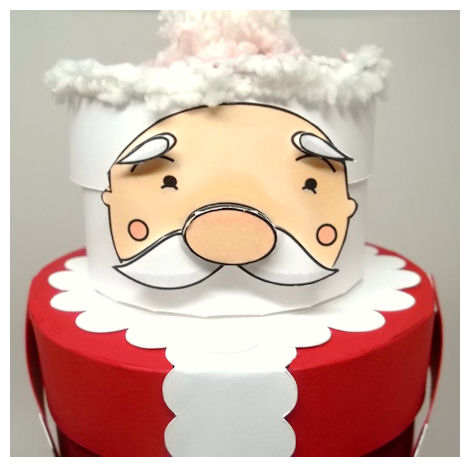
The Small Box Layer: I trimmed Santa’s hat with some yarn stuff I have had forever! I used that same yarn to make a pom pom for the top of his hat.
I then used the Mr. Claus © set for Santa’s face. I enlarged it, and printed, colored, cut, and layered it onto my box top. It looks awesome!


Welcome back everyone!
Today will wrap up the samples using our *NEW* products, but tomorrow we have another group post making new projects with older products. You won’t want to miss it!
Please stop by today and visit the following designers:
Today I have a quick and simple project to share and then I want to discuss the value in the actual products we provide. I still receive many questions, and while we have an about page on our site, sometimes it is easier to address some of the common information here, where people tend to find products and ideas.

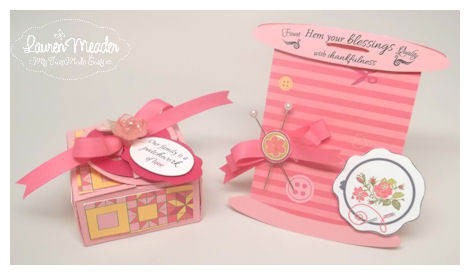
Here is a super simple project using the *NEW* Ribbon Card © cut file.
I personally have purchased several cardstock versions in the past, and they generally aren’t big enough, so I designed my own! I love that I can re-size it, and make them pretty by printing them in a patterned paper first, like I did here!
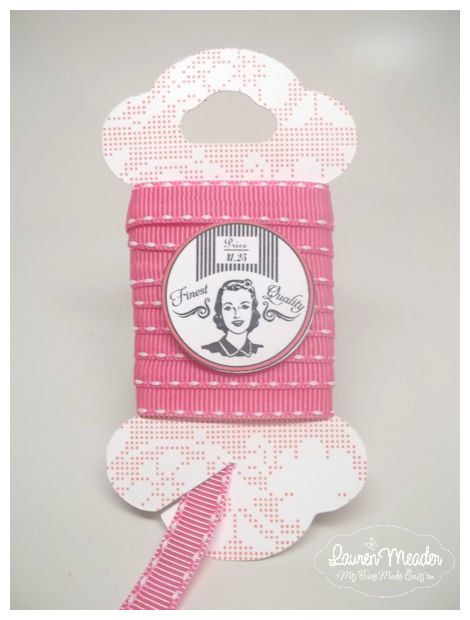
I used the lace pattern from Grammy’s Pretty Patterns © for my Ribbon Card ©, tghen wrapped my ribbon of choice around it. If you want to gift some ribbon or you sell it, this can be a great way to present it! I used some of the images from Grammy’s Sewing Kit © to simply embellish it.
ABOUT THE PRODUCTS
The best part about our products is the versatility. You can really take one product and use it over and over again, and each time it looks new! There is significant value in the fact you get unlimited use by ALL our products, and with them being a download, there is NO WAIT to receive them! You can begin creating your own projects instantly.
You don’t need much to get started. All you need is a home printer, and photo editing software. There is a link to FREE software on our website called GIMP. So no purchase neccessary!
We offer our cut files, and templates in a printer friendly version (PDF) but we also have formats that work with over 18 cutting systems on the market too! This allows you to quickly and easily resize your projects too! My personal favorite is the Silhouette Cameo. You can print your images onto your templates, and have it places exactly where you need it to be, you can cut out your digital images using your machine, and you can clip your digital papers to your projects too! SO MANY POSSIBILITES! Plus it is very user friendly 😀 Just my opinion.
There is innumerable value in our templates and cut files. For a one-time purchase you get unlimited use and endless possibilities. You can’t get a decent giftbag for that, let alone re-use it, and/or customize it!
Our Digital Images are fabulous because you can mix and match, make certain images or sentiments work together, whereas if they were acrylic they would be a fixed size! Now there are no limits! Use the dropper tool in your photo editing software and pick the colors up from your digital paper and you now have an EXACT match for your images, to your paper!
Our Digital Papers are fabulous because you can re-size them, re-color them (so they can suit any project, or occasion) and they never RUN OUT on you! I personally use to covet certain patterns for fear I would use it up! Not anymore.
If you are new to crafting or don’t feel like you have any good ideas we have a GALLERY for our store, in which you can view ideas in numerous way, including by specific products!
All our designers samples are in one place 24/7 so you don’t need to search around. This is an invaluable resource!
So please feel free to poke around
My Etsy

Who I Designed For
Blogroll
- Alicia
- Alli Miles
- Ally Blankenship
- Amber
- Andi @ crafts on a whim
- Angel R
- Angie Z
- Anne Kranitz
- Becky O
- Bee
- Beth Silaka
- Bethany Paull
- Beverly Nash
- Bobbie
- Cambria
- Cammie
- Card of the Week
- Card Positioning System (CPS)
- Cards for Cancer
- Catherine Doucette
- Charmaine
- Cheryl Sims
- Chriss Rollins
- Christina
- Christine Ewing
- Christine Wooden
- Colleen Schaan
- Craft Critique
- Craft Gossip
- Crystal
- Dawn Easton
- Emily Giovanni
- Geny
- Holly
- Igne Groot
- Inspirational Craft Blogs
- Irene
- Jami Sibley
- Jeanne Streiff
- Jen del Muro
- Jeni Bond
- JenMarie
- Jenn Balcer
- Jenn Diercks
- Jenn O
- Jennifer E
- Jennifer Mick
- Jennifer Pereda
- Jennifer-Sweet Treat
- Joanne Basile
- Jodi Collins
- Julia Stainton
- Julie Masse
- Karen
- Kathryn Berthiaume
- Katie Cotton
- Kelley Holland
- Kendra
- Kim Scholfield
- Kris’s Color Stripes! Get inspired here
- Kristen Dubosque
- Kristin Eberline
- Kristine
- Laura @ Sunshine Stamper
- Laura Turnmire
- Laurie Schmidlin
- Lesa Rapp
- Linda Duke
- Linda-LSN
- Lindsey Botkin
- Lisa (lakind scs)
- Lisa Kind
- Lori Craig
- Maggie
- Mara Campbell
- Maria
- Maria Levine
- Mary
- MaryJo
- Melanie M
- Monique Hansen
- Moxie Fab World
- Pam Imholz
- PaperCrafts Connection
- Peppers and Pollywogs Kids party site
- Rebecca Grohall
- Rita
- Robyn
- Rose Ann
- Sarah Vrolyk
- Sharon Harnist
- Sharon Johnson
- Sharon Rivera (a chemisrty with paper)
- Sherrie
- Sophia Landry
- Storage Units, Ink, & More Blog
- Sue Berker
- Susan (Rainy)
- Tangii Crane
- Tracy
- Tricia Traxler
- Trudee
- Velta
- VivLyn
- Zena
MTME Pretty Palette Color Team
MTME Pretty Patterns Sketch Team
My Time Made Easy TM LLC
Shop till you drop!
Lauren Meader
About Me
Copyrighted material
Subscribe To My Blog
Pages
- About me
- Alexa’s Story!
- My Crafty Corner!
- My Time Made Easy™ LLC
- Our Make A Wish Trip to Disney!
- Resume/Publication List
Calendar
| M | T | W | T | F | S | S |
|---|---|---|---|---|---|---|
| 1 | 2 | 3 | 4 | 5 | 6 | 7 |
| 8 | 9 | 10 | 11 | 12 | 13 | 14 |
| 15 | 16 | 17 | 18 | 19 | 20 | 21 |
| 22 | 23 | 24 | 25 | 26 | 27 | 28 |
| 29 | 30 | |||||
Archives
- August 2013
- July 2013
- June 2013
- May 2013
- April 2013
- March 2013
- February 2013
- January 2013
- December 2012
- November 2012
- October 2012
- September 2012
- August 2012
- July 2012
- June 2012
- May 2012
- April 2012
- March 2012
- February 2012
- January 2012
- December 2011
- November 2011
- October 2011
- September 2011
- August 2011
- July 2011
- June 2011
- May 2011
- April 2011
- March 2011
- February 2011
- January 2011
- December 2010
- November 2010
- October 2010
- September 2010
- August 2010
- July 2010
- June 2010
- May 2010
- April 2010
- March 2010
- February 2010
- January 2010
- December 2009
- November 2009
- October 2009
- September 2009
- August 2009
- July 2009
- June 2009
- May 2009
- April 2009
- March 2009
- February 2009
- January 2009
- December 2008
- November 2008
- October 2008
- September 2008
- August 2008
- July 2008
- June 2008
- May 2008
- April 2008
- March 2008
- February 2008
- January 2008
- December 2007
- November 2007
- October 2007
- September 2007
- August 2007
- July 2007
- June 2007
- May 2007
- April 2007
- March 2007
- January 2007
Categories
- About Me
- All That Scraps
- blogger challenge
- camera/photo play
- Cards
- Contests
- family stuff
- FOR SALE
- Home decor/3-D items
- How to FAKE it!
- Introduction
- JUGS Challenge
- JustRite Stampers
- Lizzie Anne Designs
- My family stuff
- My Stamping Space
- My Time Made Easy
- My Time To Color Challenge
- My Time to Create Challenge
- My Timeless Template Challenge
- My Timeless Templates
- Mytime Mail
- MYTIME MOVIE/VIDEOs
- Papertrey Newsletter
- Pink Cat Studio
- Pretty Palette Challenge
- Pretty Patterns Sketch
- Product Opinions and Must haves
- Recipe's
- Saturday Sketch
- Smilebox Creations
- Stampavie
- Tutorials
- Uncategorized
- videos
Most Popular
- Create your own Onesie Card Tutorial-and important NOTE! PLEASE READ (2529)
- Saturday Sketch-Boxed bag holder (2333)
- Going GREEN! Fancy Flower Flourish-Closure Video (1478)
- Fabulous Favorite - Giveaway! (1336)
- a Prayer Request (1231)
- QUICK-Easter Baskets from Nestabilities-PTI style-and blog challenge (1063)
- Teaser Sketch (999)
- February Release Giveway! (and a little peek) (996)
- Group Post and Rambling Rose Video Tutorial (985)
- GIVEAWAY! Who wants it all?! (895)
Recent Comments (RSS)
- 바카라사이트: 비슷한 주제에 대한 흥미로운 정보를
- 바카라사이트: "여기에 제공해 주신 귀중한 정보와
- 온라인홀덤: 유익한 웹 사이트를 게시하는 데
- 홀덤나라: 나는 당신의 블로그를 정말 좋아합니다.
- lisa: Technology, too, has left an
- 주소모음: 흠 !! 이 블로그는 정말
- FutureGen Apps: Thank You For Sharing fantastic
- 웹툰사이트: 터키에서 온라인 스포츠 베팅을 할
- 툰코: It is a really very
- 온라인홀덤: I’ll be sure to come
Copyright © 2007 - My Time, My Creations, My Stampendence - is proudly powered by WordPress
This blog has been Tweaked and Designed by Sara Williams