Archive for the ‘Cards’ Category
September: A Year in Review (video tutorial)
Sep 4, 2011 Author: mytime | Filed under: Cards, Home decor/3-D items, My Time Made Easy, MYTIME MOVIE/VIDEOs, TutorialsToday is one of everyone’s favorite posting subjects!
The team and myself are going to be sharing our Year in Review projects, when we give you a fresh take on some older product releases!
Be sure you scroll down to see my two video tutorials today too!
You won’t want to miss one single project today:
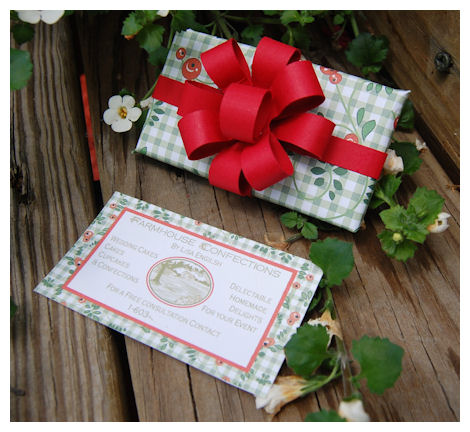
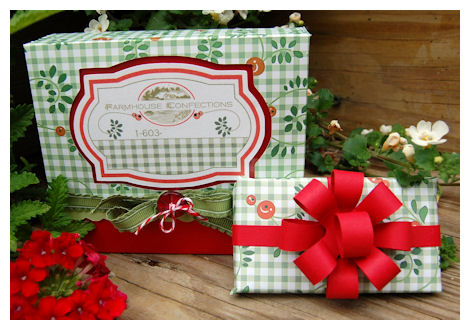
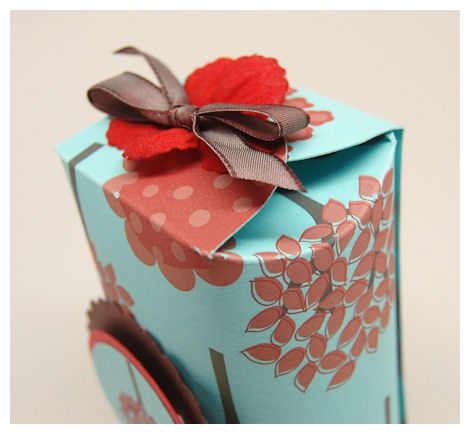
My project was designed for a friend of mine a few months ago for her birthday. She is getting started in her own home based business, where she makes custom cakes for all occasions. I blurred out some of her personal info, so if things look “off ” you now know WHY 😀
Beginning Buisness Kit for Farmhouse Confections
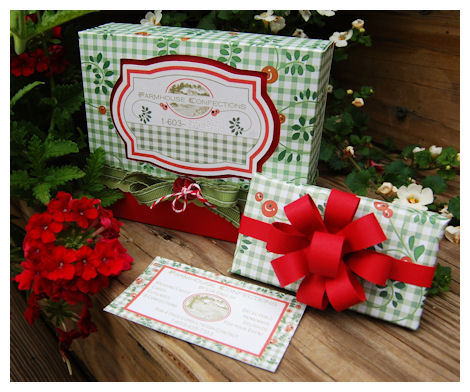
Based on some of what I heard her mention wanting for her buisness name/logo/theme, I designed her a custom set of business cards, with a coordinating box using the For Keeps © template.
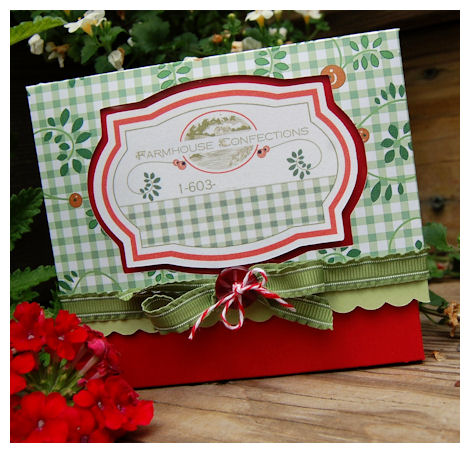
I created the label on the box using the Be Dazzled © set, and some elements I designed just for her, and cut them out using the Be Dazzled © Cut File. She can slo use the label I created to print onto adhesive labels, then adhere atop her cake boxes!!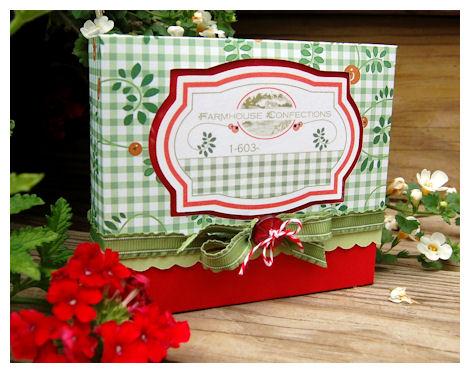
I also designed the paper that I used for this For Keeps © box, specially for her. I figured the For Keeps © box would be perfect for not just presenting her new business cards, but holding her special recipies, or photos of her work past creations, if she does a consulatation.
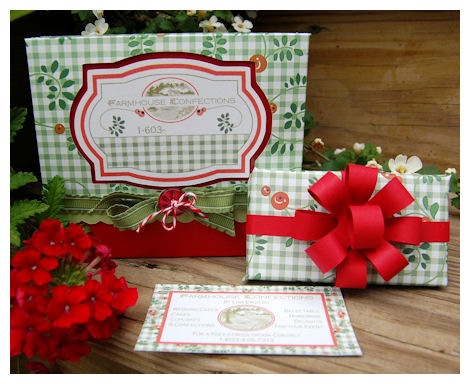
The package with the bow is actually the paper I created, printed out onto my regular computer paper to serve as my WRAPPING PAPER, to wrap up her business cards!
Did you even consider trying that with our collection of Pretty Printable Digital Papers?
Check out our video here for how you can assemble the Abra-Bow-Dabra ©
and make your own wrapping paper:
[youtube]https://www.youtube.com/watch?v=QXL09xlnGk4[/youtube]
AMAZING! Now you can even have coordinating/customizable wrapping paper 😀

Just add the Abra-Bow-Dabra © and it’s perfection!
If you haven’t tried the Abra-Bow-Dabra © yet, you should give it try 😀
This is the 2nd version of using the bow:
[youtube]https://www.youtube.com/watch?v=K3u2fUSfKb0[/youtube]
It really is THAT easy!
Supplies from My Time Made Easy ™ LLC
Pretty Packaging Templates: For Keeps
Pretty Impressions Stamp Set: Be Dazzled
Pretty Printable Digital Paper: Custom Made
Pretty Pieces Cut File: Be Dazzled, Abra-Bow-Dabra, Border Builders Open Scallop Dot (around bottom of box lid)
Well thank you again for joining us for another successful release here at My Time Made Easy ™ LLC!
We hope you enjoyed all the fun creations we have shared with you, and that you give them a try yourself.
Until next time 😀
Tote-ally Stunning!
Sep 3, 2011 Author: mytime | Filed under: Cards, Home decor/3-D items, My Time Made Easy, TutorialsWe are back again to share some more ideas with you all!
Today you will want to check out:
I get busy during the month, but really do enjoy sharing what I get to create, when I get the time. These first week of the month releases really keep me grounded, and allow me to share what I truly love doing with you all. I love getting creative, but its all the “design” stuff in between, that I need to do in order to keep bringing you all more products each month. I’d love to make a 100 different projects with each template, but time if often a huge factor, and I need to move on. That being said
I really enjoy going “back” and taking our older products and mixing them with some of our newer products so show you that you can use ANY older products with our newer ones! New or old, they all work well together. You can really re-new your projects by using different products each time you create a Pretty Packaging Template!
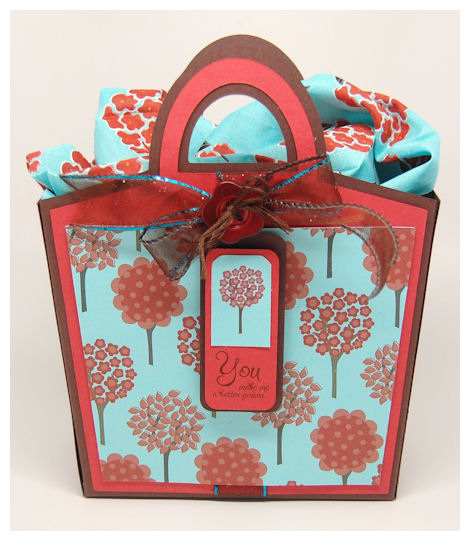
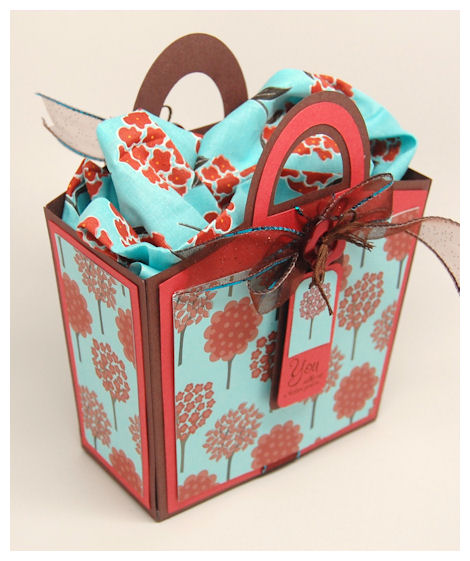
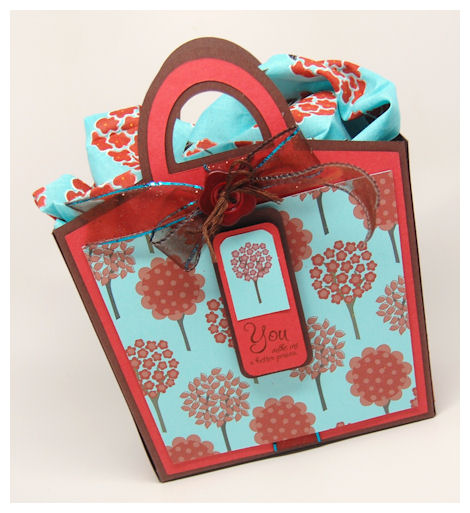
The NEW! Tricky Treat Tote © is great for all occasions. I can’t even begin to fathom all the possible uses. It it the perfect boxy/bag for all year round! That is why I chose to use it again today.

Let me tell you, some pretty patterned paper is all this tote needs to create a real WOW! factor, quickly and easily! This is the perfect Pretty Packaging Template for all sorts of gifts, or when you are very short on time!
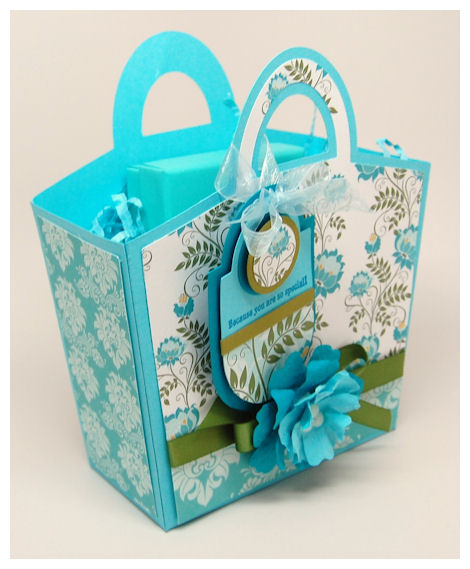
I chose the stunning patterns from the Blooming with Elegance © collection, and the coodinating pattern from the Crawling Vine Silhouettes © collection for my WOW factor on this template today!
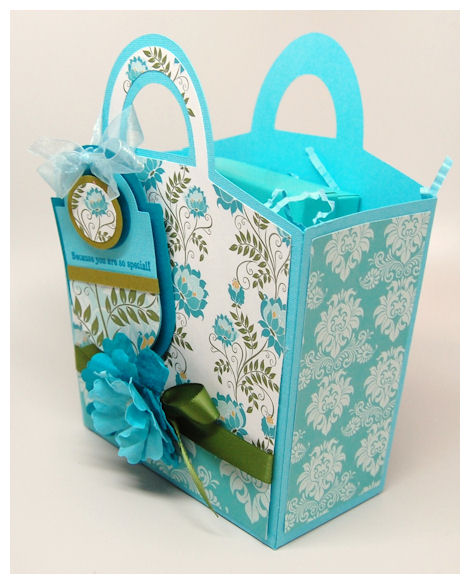
Inside this bag is a charm from Tiffany. That was my reason for going with the pretty sky blue color 😀
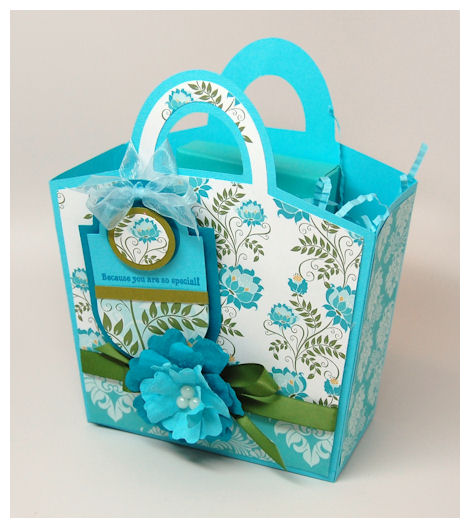
The tag really adds to this design. I love the Round Up Tag © which has some cool coordinating images: Round Up © 18 Images – Digital which make this tag really unique, but the pieces in the Round Up Tag © , can be used all on their own too!
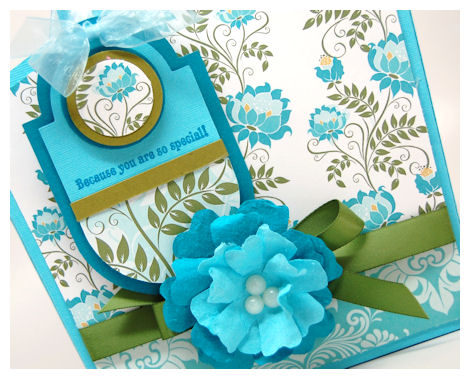
So obviously, I used the Round Up Tag © to create the design/layers of my tag on this project. Just layering some coordinating cardstock, and patterned paper, mixed with a sentiment from a Secret Surprise © set, which was perfection!
Tricky Treat Tote
Pretty Printable Digital Paper:
Tomorrow we all share a group post: A Year in Review! That is where we use older products and share some NEW! ideas with you! So please come back then for some truly inspiring gift ideas.
Welcome back!!
Is your head spinning with ideas yet?
Well if you need a little more inspiration (who can’t use more of that?) then you will want to check out
You can never have too many cards on hand, or card ideas! The design team each shared a variety of 4 cards each, on August 31st, to preview some of our NEW! Pretty Impressions Sets. I chose to share an entire gift ensemble instead that day, to give you some ideas using all our new products, so figured today would be a great day to share the 4 cards I came up with!
Forest Friends
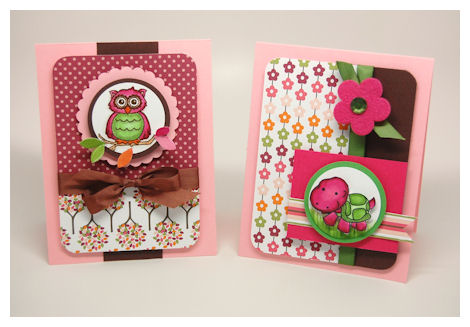
Well I have to tell you I LOVE the Wonderful Woodland Creatures © set. It’s SO beyond adorable. So I HAD to use my two favorite forest friends in the set 😀 I think you will agree they are cute and versatile for all year round 😀
HOOT!
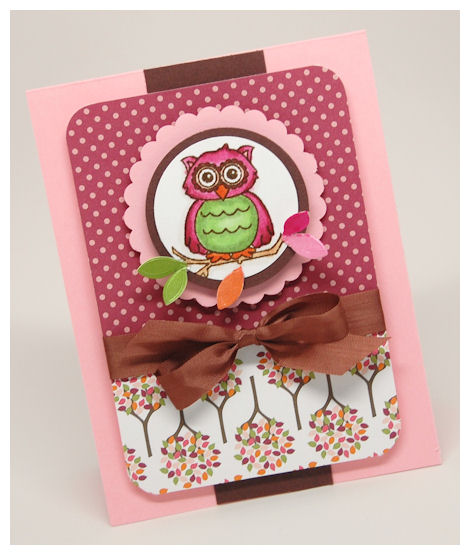
I LOVE this owl. I’m a huge owl/bird fan, so it’s not wonder it’s one of my fave. I love that he/she can be masculine, or feminine. I decided to leave this one blank. Since it uses this adorable owl there is a huge variety of punny sentiment possibilities that I can add inside here!!
I chose to use the NEW! Color Infusion © digital paper for all my cards today as I just love the various colors and patterns, espeically with the Wonderful Woodland Creatures © set.
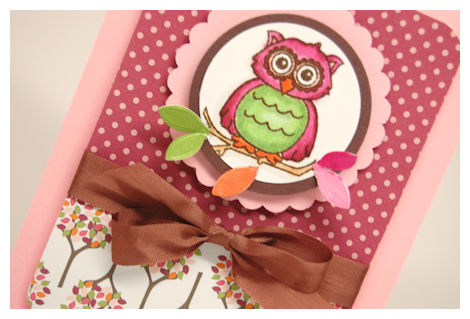
Taking the idea of the leaves from the paper, I had colored some cut apart flower petals, to match my card, and added them onto the branch that the owl is on, for a little something extra! Too cute. I love coloring stuff in unexpected colors too 😀
So that is why I colored my lil’ turtle, just like my funky lil’ owl
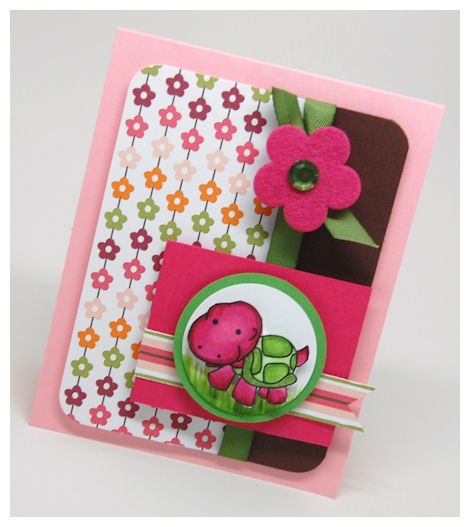
Isn’t she so cute?
I left this one blank too. It could be a cute birthday, sorry, be happy, get well, thinking of you….well any time of card I guess!

You could place a present on the back of teh turtle, a balloon on he tail, and a hat on her head, or a flower in her mouth! Love it.
Now I wanted to use the super fun and versatile set that Kristin designed this month called Happy Hallows © . It is also the images used to create our paper collections this month a well!
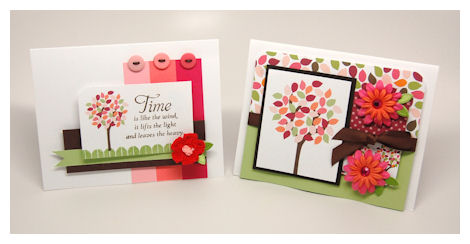
Talk about a more feminine version of a tree, when you use the colors from the Color Infusion © digital paper!!
Time
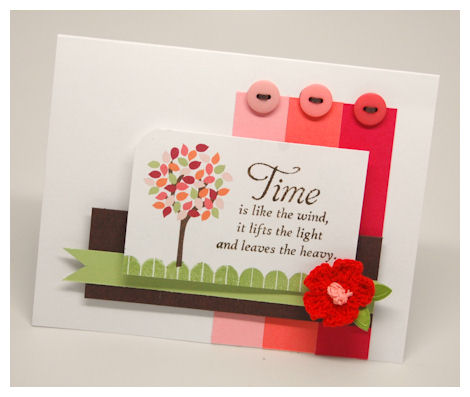
I love tree images and Kristin’s set is amazing. I love all the layering possibilities this set offers, and that it can be masculine or feminine depending on your layers and color choices. I love these fresh colors from the Color Infusion © digital paper, so when I was layering the tree for the two samples today I was inspired by the tree/leaf patterns in that paper collection, so I made my tree just like it!
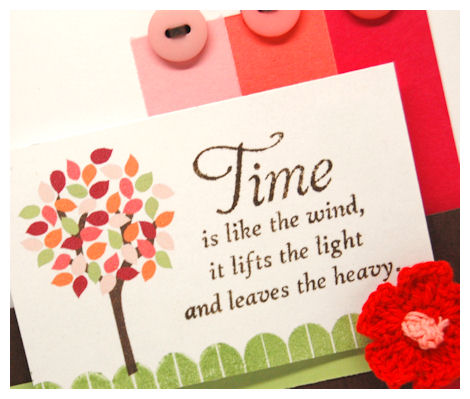
The “grass” is from the Timed Write © set, and the sentiment was from the Keep Strong © set!
Lone Tree

Now the beauty of using the Happy Hallows © digital set is once you layer and color something you can save it, and use it over and over again. You can resize it, mirror it….lots of stuff. So I used the same tree I layered/colored, and printed it a bit larger for this card.
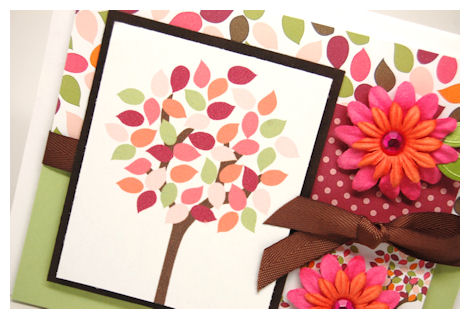
To the right I used more of the Color Infusion © digital paperto add to the design. Easy peasy! I left this one blank too, so I can just use it for whatever I need it for when the time comes. When it doubt, leave it blank!
Supplies from My Time Made Easy ™ LLC
Pretty Impressions Stamp Set: Happy Hallows, Keep Strong, Timed Write, Wonderful Woodland Creatures
Pretty Printable Digital Paper: Color Infusion
Well that is it for today 😀
Tomorrow I will have some more great samples for you, as will a few of our design team members, so come back again.
September Release: Group Preview
Aug 30, 2011 Author: mytime | Filed under: Cards, Home decor/3-D items, My Time Made EasyHi world!
I know long time, no post! Sorry about that. (BAD BLOGGER!!!)
I have lots of great excuses 😀 Summer has kept me busy, with my children, family & friends. My business and blog are always secondary to my family. I know it’s hard when you are waiting to see new stuff, but we do have a MTME blog now that is updated several times a week with fun challenges and amazing samples….so check it out, when you need a creative fix, or go view our gallery! You can look up projects for any of our amazing products.
I have been working on some business stuff too, that has had me consumed as well. Hopefully I’ll let you all know about that at some point very soon 😀
Like most, yesterday was the kids first day of school! I now have a 2nd, 3rd and 5th grader! How did I get kids who are so old?! I will share some photos of them on their first day tomorrow. They are growing and changing daily. Noah and Amber started soccer, Alexa and Amber are taking Tap/Ballet classes, and Amber continues to do her modeling and acting classes. So I think I have SOMETHING, if not several things going on daily! We also celebrated Amber’s 7th birthday, and my brother Rob (& Heather’s) baby shower, which I made all the centerpieces for, using the Bouncing Baby Buggy ©. Let’s not forget several days of no power due to hurricane Irene. Another thing that has kept me busy is some family stuff with my mom. I’ll update you all on that on another day as well. Needless to say life has been busier than ever!
Speaking of busy, today I get to share some creative stuff, finally! That is the stuff that keeps me SANE when things get a little INSANE. I’m sure you can relate.
After my almost month long blog hiatus, I was barely able to get creative this month, but actually managed to squeak out some quick, projects that are perfect for anyone who wants to get crafty, but is as busy as myself!
So let me get started in sharing the preview at some of our NEW! products from our September Release, which will be available September 1st.
The design team are sharing 4 card ideas each today!!
Stop by and visit:
This month is a fabby release!
We are releasing 2 complete Pretty Impressions Digital Stamp Sets, and 7 Pretty Impressions Digital Stamp Single Images 😀 There is something for everyone 😀 So the team had each designs a set of 4 cards using the latest images, to get the ideas started!
We are also release 2 Pretty Packaging Templates this month too!
So….I wanted to give you a sweet little preview at what is to come tomorrow with my project today!
Trendy Lil’ Treacher Tote!
Going with a retro fabulous, step above your typical “apple” theme…
I wanted to create a project to showcase some of the AMAZING goodies we are releasing this month, while at the same time, creating a gift set for my children’s new teacher’s as they go back to school, so I made this gift set!
Read it all because I share all the fun products and details that went into this coordinating gift set, that LOOKS complicated, but was oh so simple. Done in an hour! Gotta love that.
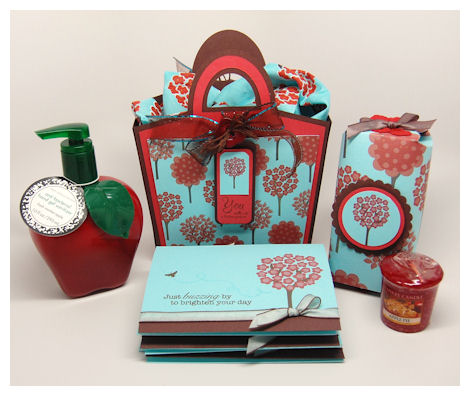
The gift bag was created using the NEW! Tricky Treat Tote ©
Tricky Treat Tote $5
Available in PDF, SVG, GSD, DXF, WPC
Completed Project Size:
7 3/4 Inches Tall
6 1/4 Inches Wide
3 Inches Deep
Looking for that perfect tote to package up those tricky treats?
Well this tote is anything but “tricky”, but it will certainly be a treat for the lucky recipient!

This is the perfect tote style bag, made from cardstock! This features a fun and functional handle that is just perfect for toting around. Make one for every occasion!
Perfect for the Trick-or-Treater, Birthdays, Christmas, Valentine’s Day, Easter, or whenever there is a time to celebrate.
This is our version above, filled with all the delicious treatlets we have made!
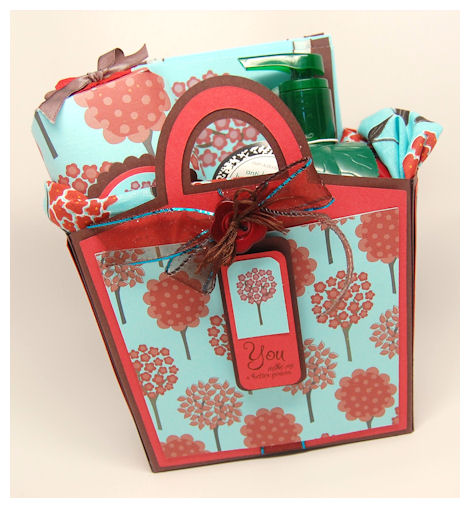
Now keep in mind, I stuffed my bottom so the items will be closer to the top, because this really is a fabulous size gift boxy bag!!
Now some more details of the finished bag!
Isn’t this so pretty?! A unique combination of colors, which was inspired by a fabric swatch I picked up at Walmart. I LOVE getting inspired by cloth, clothing, and even advertisements!!!
Check out the fabric! It was the start of this entire project. I just feel in love with it 😀
When I saw Kristin’s Trendy Forest © Pretty Printable Digital Paper, I knew that the Coral Forest pattern would look so similar if printed on a Caribbean colored cardstock, so I gave it a whirl, and it was perfection!
As stated above I simply printed my Trendy Forest © Pretty Printable Digital Paper, on a Caribbean colored cardstock for my patterned layers. The patterned paper really kicked this sample up a notch! Think of all the amazing designs you can get with combining various colors and patterns. I love it.
For the tag on my Tricky Treat Tote © I used the Simple Tags Rectangle © for my tag (we are releasing several tags this month-love them!), which I layered the trunk and flowers with center images, from the Happy Hallows © to create my own floral tree just like in the paper, and like the pattern on the fabric I found. I added a sentiment on the bottom from the Sensational Sentiments©
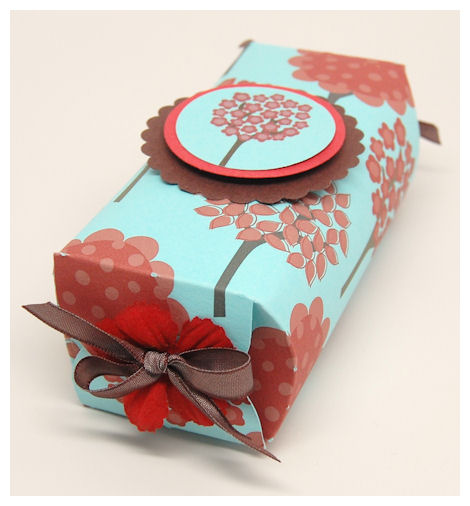
Now some more details about this gift set, and our 2nd Pretty Packaging Template for the month: Tying Up Loose Ends ©
Available in PDF, SVG, GSD, DXF, WPC
Completed Project Size:
5 1/2 Inches Long
2 1/2 Inches Wide
2 1/2 Inches Deep

More often than not we are always looking for fun and unique ways to package up even the simplest of items. Now you can have some simple packaging to do just that!
When you are short on time, have many to make, or just want something that is simple, but looks perfect in no time at all, then this is the packaging for you.
This is a fancy looking, but simple wrap that can package so many fun treats. Just “tie” up those loose ends, and you are ready to gift even the smallest tokens of love and appreciation with style.
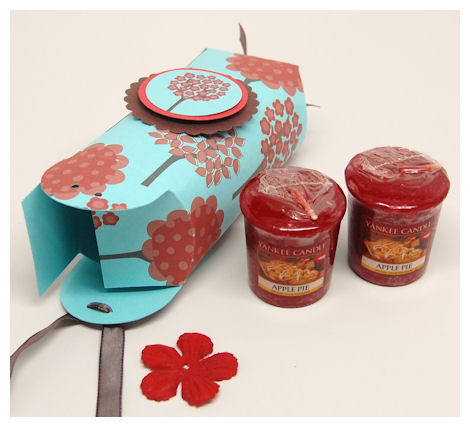 In our sample today I have included two Apple Pie scented votvies from Yankee Candle. Always a simple, but appreciated treat! You can even exchange a scent if you don’t like it. I try to go with classic scents that just about everyone loves. Who doesn’t love the smell of a fresh apple pie baking, without consuming all the calories after its cooked?! LOL!
You can easily fit two votives in here, as well as many other amazing gifts, candies, or treats.
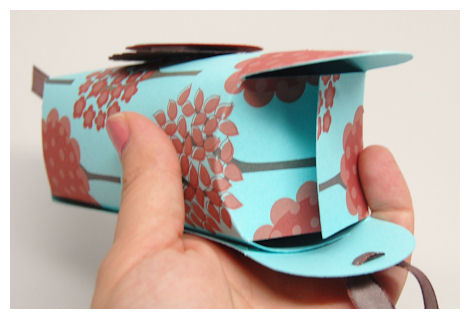
Fold in your side flaps, then tie closed!
Easy peasy done!
This is one of our fastest templates, with some simpy fun details, such as the angled ends, with pretty perfect tabs that you can easily tie closed!
In my sample here I used the same layered tree I created using the Happy Hallows © set. I obviously printed the paper I used in my previous project, to make everything simple, and coordinate.
Now, last but not least I have the card set of 6 I created.
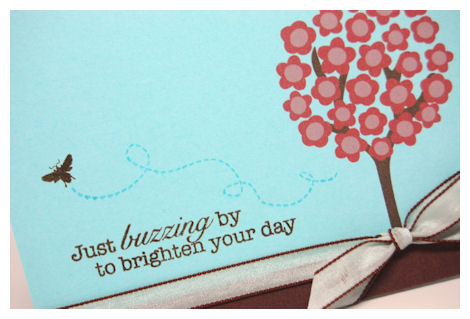
Buzzing By…
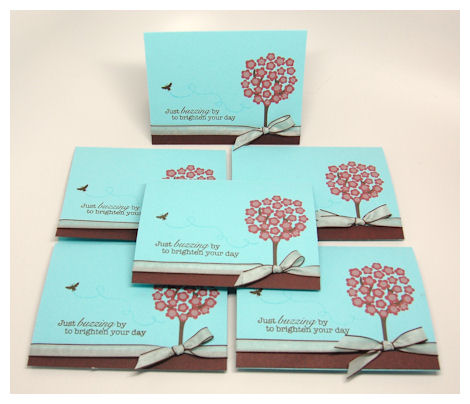
These were SO simple to make.

I used Happy Hallows © set, in addition to the Bee-Loved © & Sentiments set to create my card set today. I digitally created my tree, added the sentiment, buzzing trail and my lil’ bee.
I reccommend using a FREE photo & paper editing program: GIMP <—-CLICK HERE! This is some amazing software that will allow you to use our Pretty Impressions Digital Images, and all our Pretty Printables Digital Paper with ease!
We have numerous videos/tutorials on our website for use of our products that you may find helpful as well, along with some FREE product, so you can try our products RISK FREE 😀 We are confident that you will love working with our products, with all the versatility each offers.
Supplies from My Time Made Easy ™ LLC
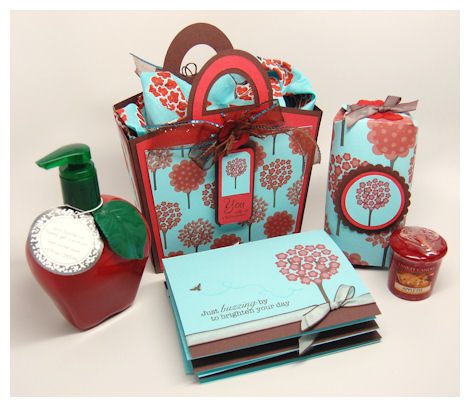
Pretty Packaging Templates: Tricky Treat Tote, Tying Up Loose Ends
Pretty Impressions Stamp Set: Happy Hallows, Keep Strong, Sensational Sentiments, Bee Loved & Sentiments
Pretty Printable Digital Paper: Trendy Forest
Pretty Pieces Cut File: Simple Tags Rectangle
Note: Large apple is hand sanitizer from Bath & Body Works.
So I hope you have all enjoyed everyone previews of just some of our amazing new products which will be available tomorrow 😀
Be back then to share even more!
See you then 😀
A Year in Review: Round Up a Gift Idea
Aug 4, 2011 Author: mytime | Filed under: Cards, Home decor/3-D items, My Time Made EasyThanks for stopping by each day this past week to view some amazing project ideas from the August Release. It’s been another great release, and we love knowing what you find inspirational.
We always like to end the week with a look at products past, and make them new to you again!
Stop by and visit our talented design team for some renewed ideas!
Today I wanted to mix the old and new and share a fun project with you all!
Puckered Pattern Round Up
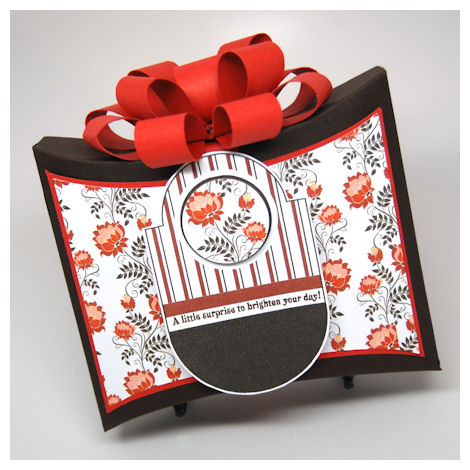
I chose to “re-new” the Pucker Up © template.
This is a fun shaped gift box, with A LOT of possibilities. I turned it on it’s side for this gift idea. Generally people thing it has to sit on it’s flat bottom, but it does sit well this way too, as you’ll see a little ways down the post 😀
You may wonder WHAT I am going to put in here.
I always love sharing some fun items to package up, and honestly hadn’t had too many brilliant unique ideas, as I always get in a Summer FUNK, but did think this was a truly sweet idea 😀
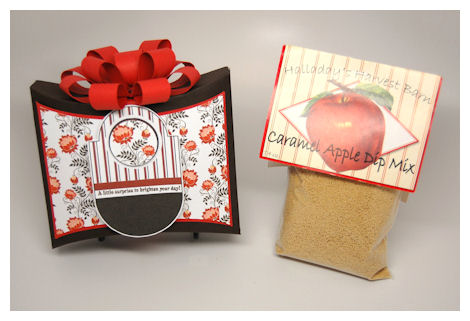
Well, we have a farm nearby and they make an AMAZING Caramel Apple Dip Mix. You just add a few simple ingredients, and YUM!
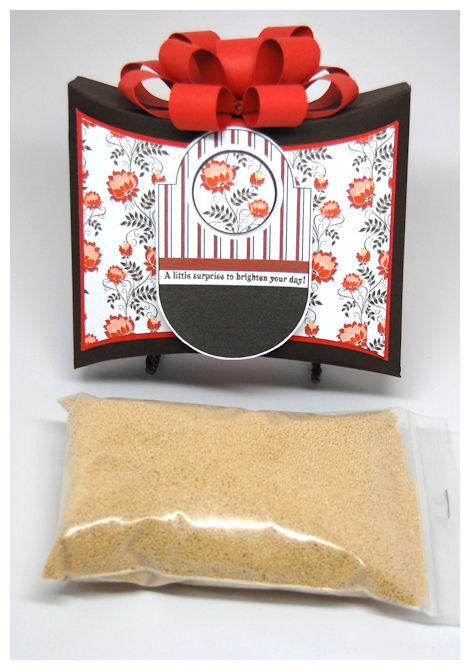
Packaged with the tag topper it doesn’t fit, so I remove the tag (which tell you how to make the dip with the mix), and slip it into the box center, and then slide in my Caramel Apple Mix as seen here. It’s simply scrumptious. I gave some of these out for end of year teacher gifts. A different “apple” version of a gift 😀 Hopefully a good thing!
The gift inspired my colors too!
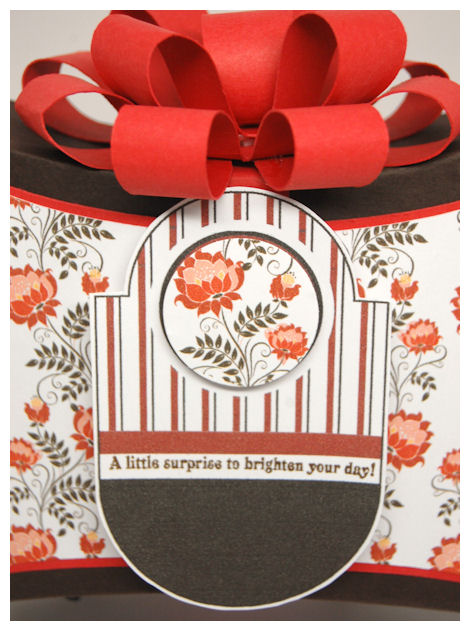
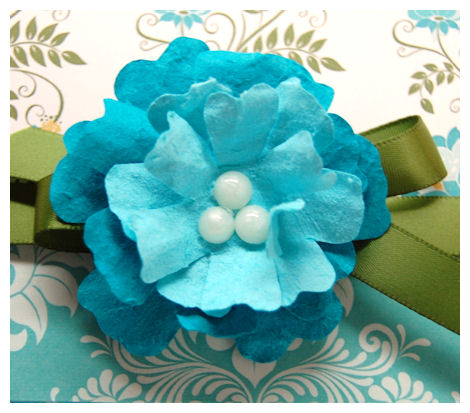
I used the NEW! Round Up set (and Round Up Tag cut file) for the main focus of my gift. I layered and colored by tag, then went ahead and “re-colored” my Blooming with Elegance © paper to match 😀 Hues of red and dark chocolatey rich colors. I punched a circle of the paper to fit my tag center.
The sentiment “A little surprise to brighten your day!” comes from the Secret Surprise © set.
While the overall design was simple, I think it has a lot of appeal with the rich colors and use of pattern.

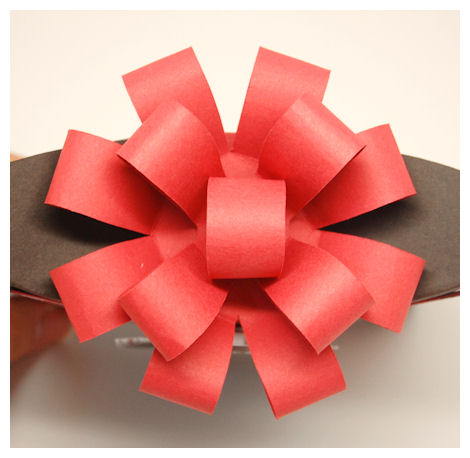
To add the the simple elegance was the AMAZING Abra-Bow-Dabra ©. Just created and plop on the top! WOW!
Isn’t this just stunning? I love it.

I decreased the file size to 70% (I think) for this one, and welded two of the bows together to create the large bottom of this bow.
Just another fun idea.
I then created the rest of the bow as it comes. It’s actually quite stunning in person, I promise!
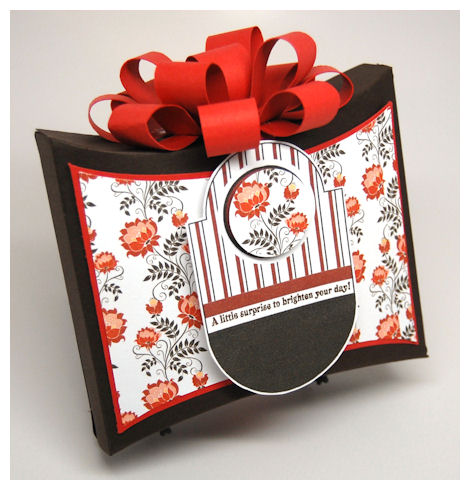
I think this will definitely brighten the day of someone!!
Well thanks for checking in today, and I really hope our latest release got you inspired to try out some of what you’ve seen or sparked a new gift idea for you to try.
I’ll be back with more before you know it.
Until then, happy creating.
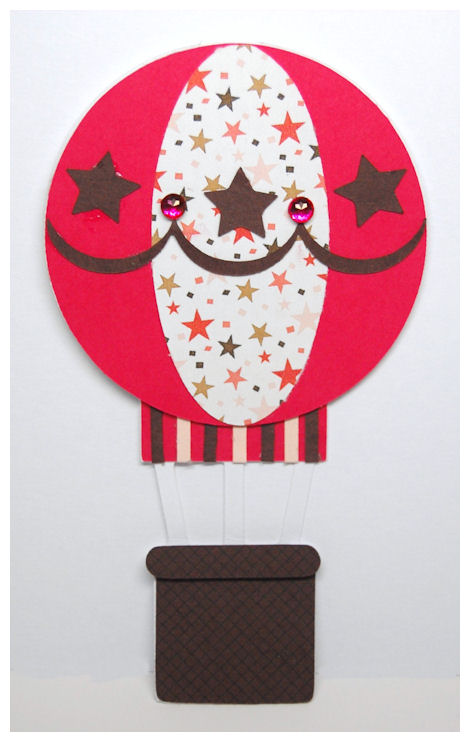
Up in the Air!!
Aug 3, 2011 Author: mytime | Filed under: Cards, Home decor/3-D items, My Time Made EasyWelcome back today!
I hope you will enjoy viewing more projects today.
Stop by and visit:
This is when life starts getting crazy for me, as we have a lot going on in our family as August rolls around. We start a string of birthdays, have lots of family events, as we try to squeeze in as many day trips before summer ends, and planning for back to school time. The Summer truly flew past me.
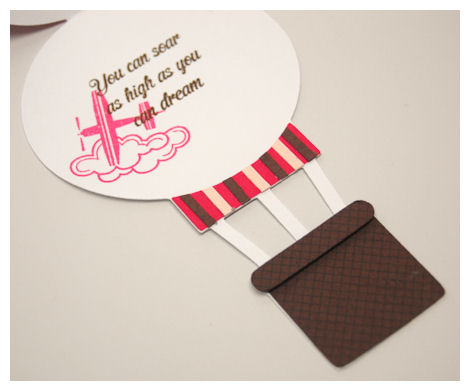
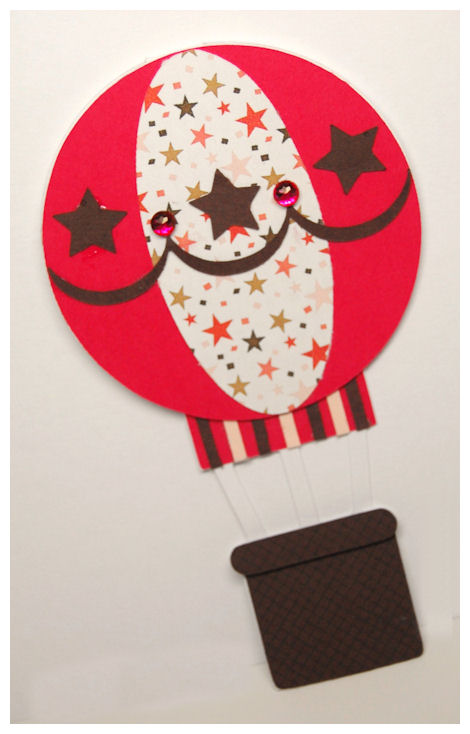
Today I am going to show you my project using out latest Pretty Pieces Cut File: Up in the Air!

Up in the Air $2.50
Available in PDF, SVG, GSD, DXF, WPC
Up!, Up!, Up! and away!!!!!
You simply cannot have enough card ideas/shapes.
This card is a fantastic addition to any collection! It of course comes complete with all the pretty decorative elements to help you easily make this card AMAZING!
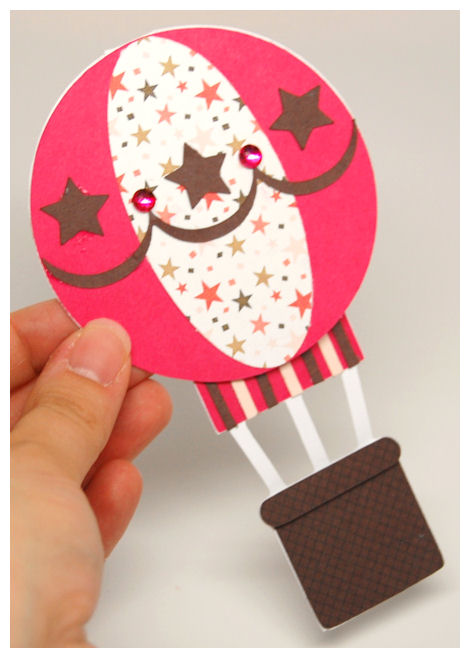
Each year we have an annual Hot Air Balloon Rally in August, so that totally inspired me to create this fun cut file card shape. Now I have invites for it should I want to make some. We always have Amber’s party the same day, so this could be a cute birthday invite too 😀
This is simply the sweetest Hot Air Balloon shaped card! Perfect for so many occasions, this hot air balloon shaped card will make the heart of those who receive it, really soar!
Speaking of soaring…here is the inside!
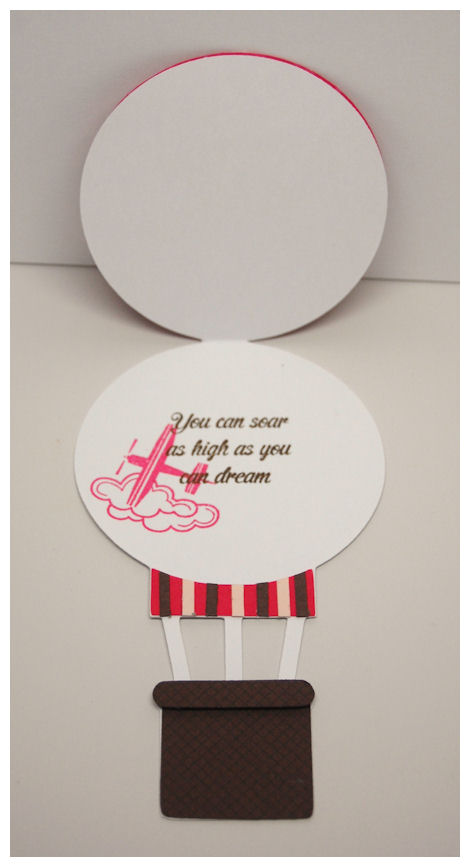
As you can see the card opens from the top, and just the balloon portion unfolds. It makes designing the completed card easier 😀 I lov
I used the airplane image and sentiment from the On Display 1 set (also available in digi). I felt the image and sentiment was perfect for this, don’t you think?
So many possibilities 😀
Speaking of possibilities…I hope you will return tomorrow because we have our Year in Review Group Post! The team and I will share some amazing NEW! ideas with OLD products 😀
See you then.
Little Bundles of Joy!
Aug 2, 2011 Author: mytime | Filed under: Cards, Home decor/3-D items, My Time Made EasyWelcome back!!
Today is going to be full of some amazing ideas, so take a moment when you are done here and visit:
Well get comfy because I have a jam packed post for you today, and let me tell you, you won’t want to miss any of it!
There is nothing like welcoming a new baby into the world!
This month is the baby shower for my brother & his girlfriend, hence my total baby mode, and “odd” additions to this month’s release! As their little bundle of joy approached delivery, I needed to create some baby themed items for the baby shower, and the birth of the baby, which is going to be a girl. After all the hard work of me creating items to use for these special events about to take place in MY family, decided I wanted to “add” to the baby theme items I had created to the store! Maybe you all can find them useful at some point in your own lives 😀
You may know that years ago, in Feb 2008, that I designed a tutorial for the onesie shaped card I had designed. I’ve been asked for YEARS to make this available in the PDF, and other Cut File formats. Well, now I finally can!
Available in PDF, SVG, GSD, DXF, WPC
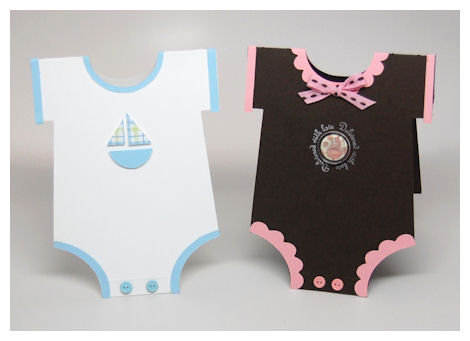
I designed this particular onesie card years and years ago! It has since become so popular, and so highly requested in these usable formats, that I had to finally give in!
This card comes complete with all the little decorative details that are sure to make this a PERFECT 10!
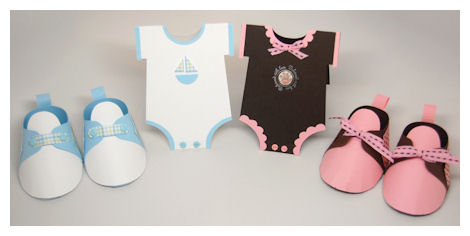
Whether it’s a bouncing baby boy…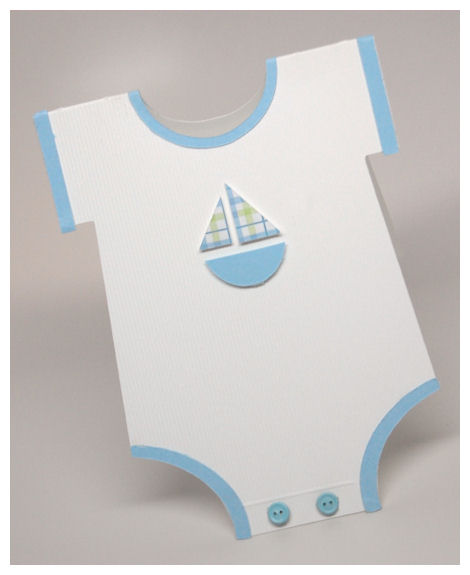
I used the straight edge details to embellish the baby boy onesie. Complete with lil’ button like brads. The sailboat was made using simple shapes.
or a heaven sent little girl…
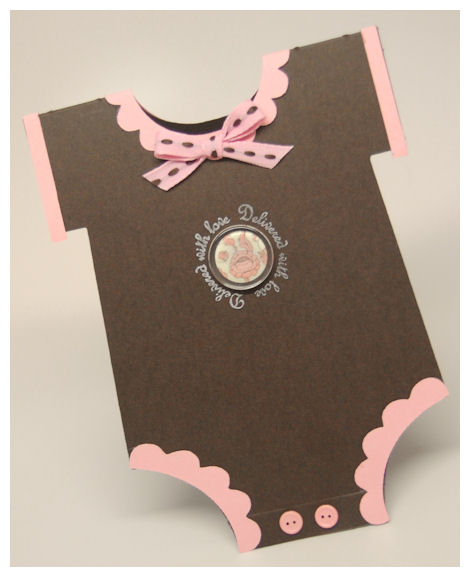
(I used the Delivered with love sentiment from Bringing Home Baby ©)
I used the scallop edge details for this one 😀
Then this is the perfect addition to your collection for the NEW! addition into your life!
This baby onesie shaped Pretty Pieces Cut File is the perfect shaped card/tag for welcoming any baby boy or girl! Make a stunning baby shower invitation, baby announcement, or set of thank you cards for a new mom!
Completed Card Size: 5 1/4 inches tall 4 inches wide (size can be altered :D)
Be sure you check out our other coordinating products that are sure to help complete your baby theme:
Baby Bootie Pretty Pieces Cut File
Pretty Impressions Stamp Set
and many of our amazing Pretty Printables Paper Collections!
So let me share my ideas with you 😀
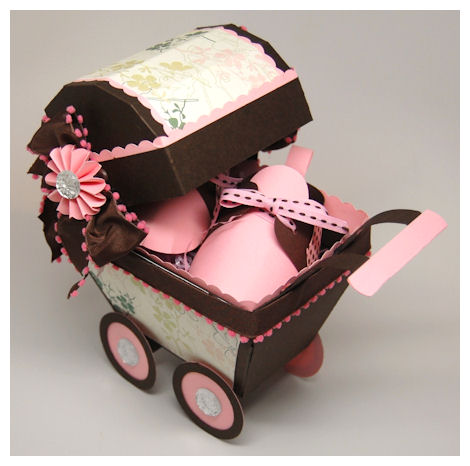
Pretty in Pink
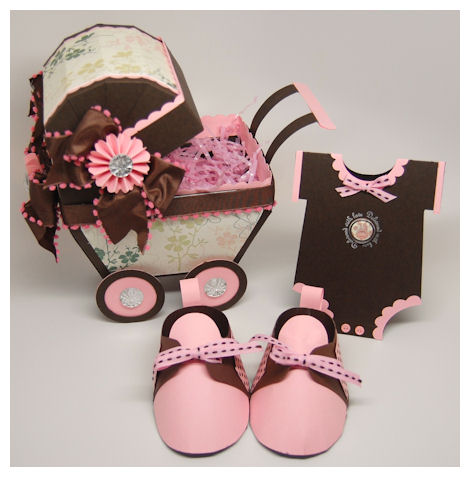
This is the gift ensemble I made for my new little niece to be.
This is the baby carriage I made using the Bouncing Baby Buggy ©
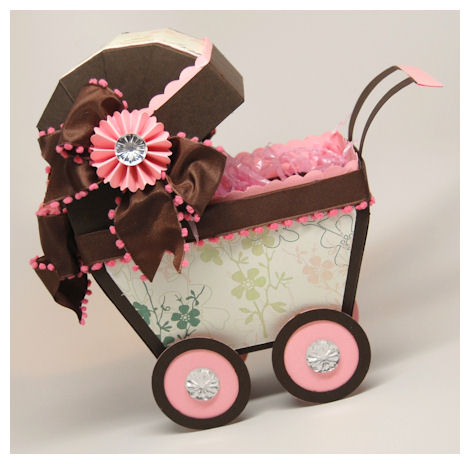
This is the most amazing template when welcoming a new baby!
Perfect for baby shower centerpieces, or presenting a gift.
The details of this are truly stunning 😀
Here is the “hood” of the buggy
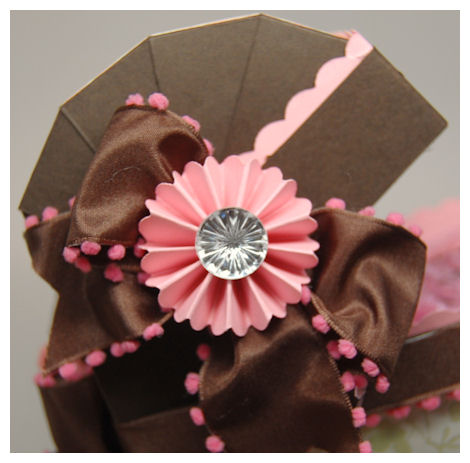
I used the amazing Rosey Posey Rosettes © for the pretty pink flower details on this, all the way around.
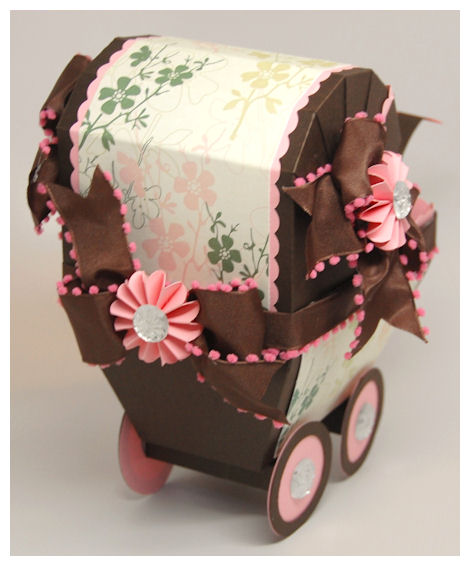
All the decorative layers are provided with the file. I chose to use the Down to Earth © patterned paper, which you’d never think of as a “baby” pattern, but it so works with this.
The way it folds together is so perfectly pretty and lends itself to many alteration ideas 😀
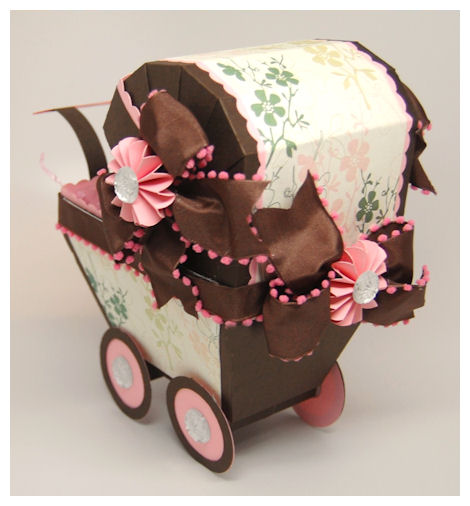
Here I added the Border Builders Open Scallop © around the hood, and trim around the buggy basket.

The wheels have some added big bling to the center.

Think of all the amazing carriage you can create with this template!
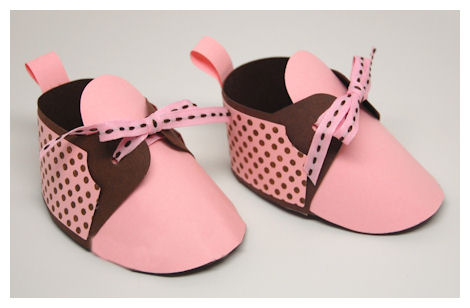
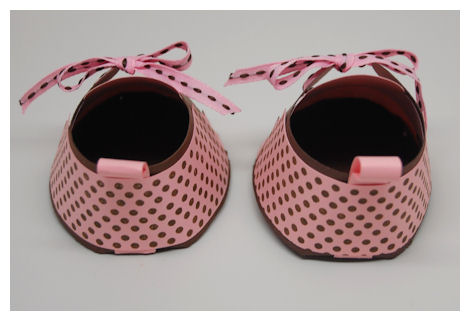
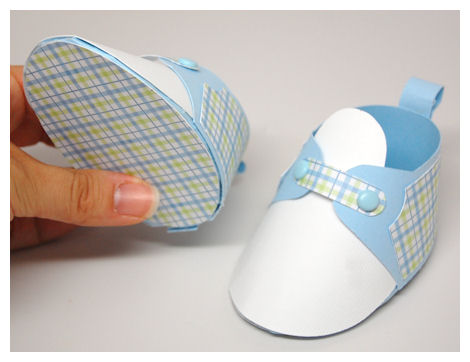
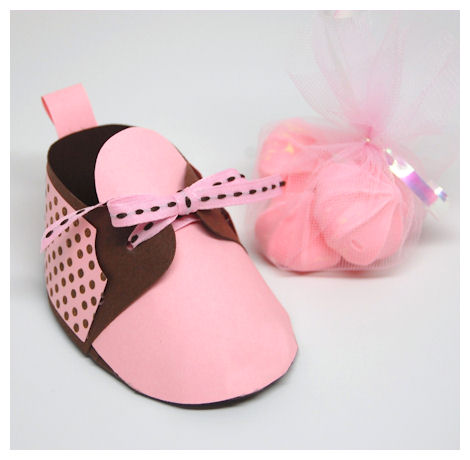
To add to my gift set I design a set of Baby Booties that make the perfect baby favor.
 Baby Bootie $2.50
Available in PDF, SVG, GSD, DXF, WPC
I’ve seen other baby booties out there, and more often than not they are Mary Jane style shoes, and are all one piece. I knew I wanted to design a fun version that was gender neutral, and offer a variety of ways to design/decorate it.
This adorable baby bootie cut file was fashioned after the old fashioned first walking baby shoe! This bootie style is perfect for both a baby boy or girl! With 2 simple pieces, and all the decorative elements you need to make an adorable, realistic baby bootie, this is sure to make everyone say AWE!
This make the perfect presentation for a sweet gift for the new mom (like jewelry), a special gift for a new baby, or of course the perfect baby shower favor! You could even use it for a 1st Birthday!!
Completed Bootie Size: 3 1/2 Inches Long, 2 1/2 Inches Wide, 1 3/4 Inches Tall
So here are the completed bootie details of both the boy & girl samples I created
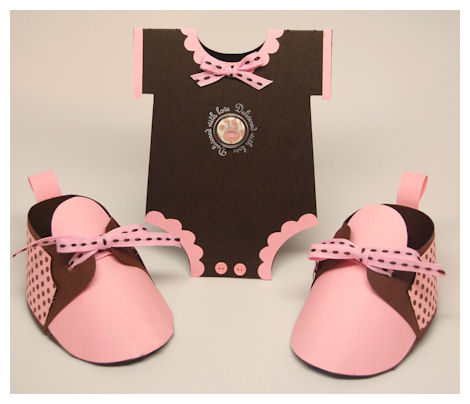
I made the back of the bootie in chocolate, and cut the front from a pink cardstock. The decorative layer was cut from the same pink as the front of the shoe. I stamped some polka dots from the Fancy a Cuppa? © onto the decorative layer.

Pretty pink & brown ribbons tie the shoes together 😀 So sweet.
Now for the boy set
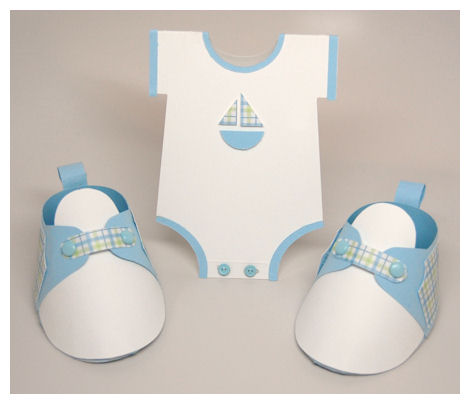
Here I made the booties boyish. I cut the front from white, and the back in blue. I used the plaid pattern from the Bee Mine © collection.
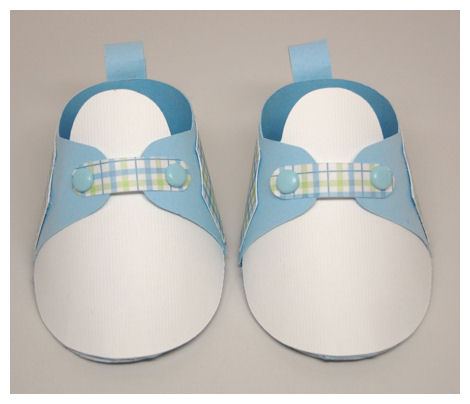
Instead of ribbon for laces, I used cut rounded strips of the patterned paper, with brads to make a strap.
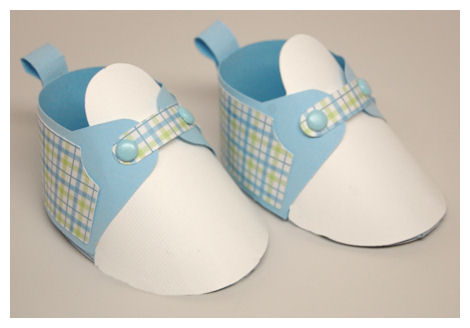


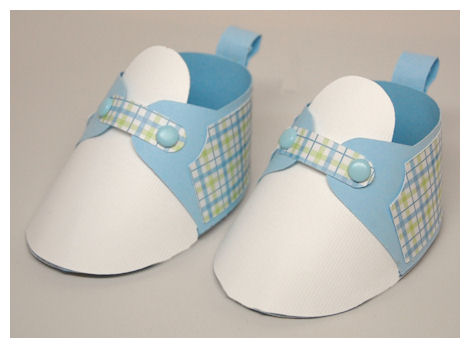
You can even add a cut lil’ sole to the bottom of the booties 😀
Stuff your booties with all sorts of fun things!
Ideas to Fill Bootie:
A Baby Charm
Bracelet
Necklace
Earrings
Chocolates
Candies
Mini Soaps
Candles
Gift Card
Baby’s First Boxes
Ornament for Tree
Small Keepsake

The girly bootie has some pink sweet sugary treats.

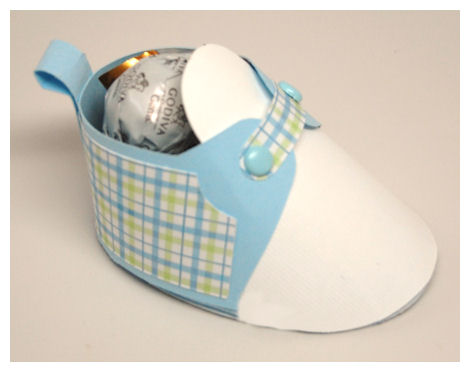
The boy bootie is filled with little white chocolate Lindt Truffles-a sweet favor for sure!
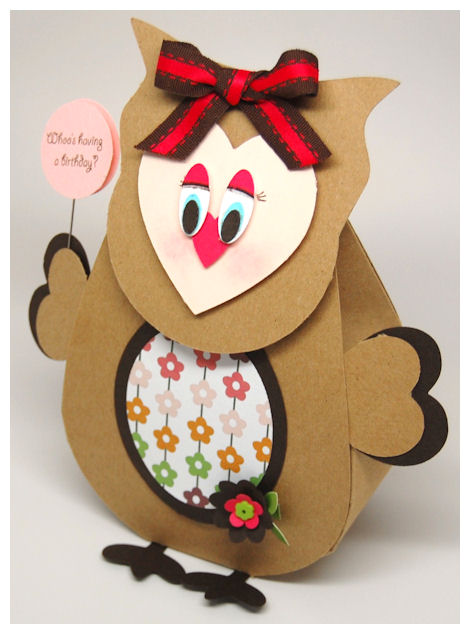
Whoo’s Bag is That?
Aug 1, 2011 Author: mytime | Filed under: Cards, Home decor/3-D items, My Time Made EasyWhoo’s ready for some more ideas today?!
You will want to visit:
Today I have a super cute project alternative to our latest template release of It’s in the Bag!
While in the process of designing my samples for the August Release at MTME, we received an invitation to our niece Nora’s 1st birthday party. The invite had a little owl on the front. Too cute! While we were away during the party, I decided to mail a gift along in our absence (I was so late in mailing this, but did actually mail it out :C), and wanted to make it special for her first birthday. So, given the invite, I knew I had to do something OWL themed!
After seeing Lisa’s Year in Review project from last month, I was inspired and I KNEW I could turn the It’s in the Bag, into a new version of Whooty-Love ©!!
So I did!
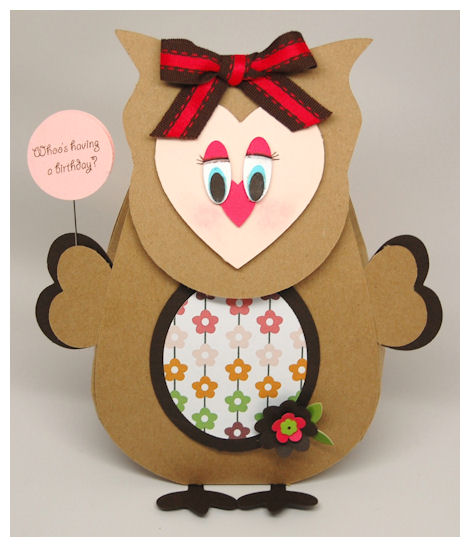
Whoo’s having a birthday?
Could you die?!
I was seriously over the moon with this alternative project idea.
I LOVE Whooty-Love © done up using the It’s in the Bag template don’t you???
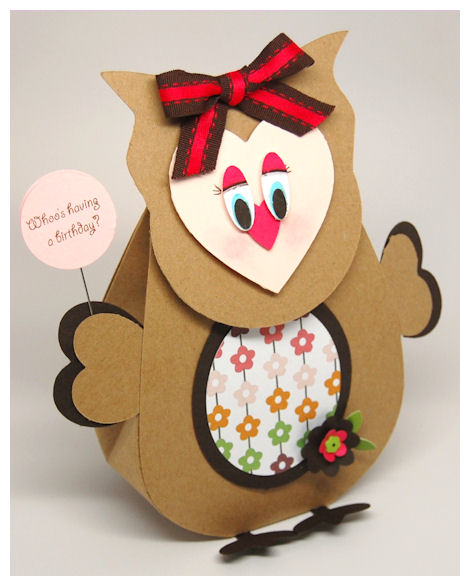
Since it was her birthday and the invite read “Whoo’s Turning 1?” , I knew I had to have Whooty-Love © holding balloon!!
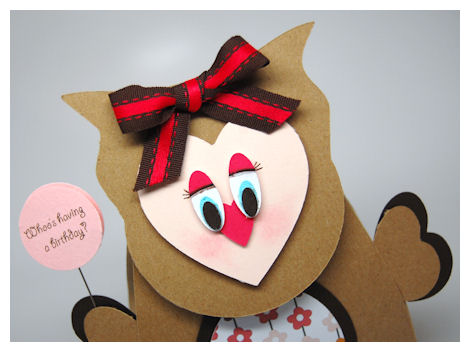
I used a stick pin, punched 2 pink circles, then stamped the sentiment from the Critters with Heart © set. It was PERFECT!
Note: I used ONLY the cutting file for this, and I did enlarge it by 10 or 20 %. EEK! Sorry I don’t recall now :C For the head piece I also “welded” and oval piece that I got from the decorative flap of the template, so that it would fit perfectly over the flap of my bag 😀 Worked like a DREAM!
Check out the back!
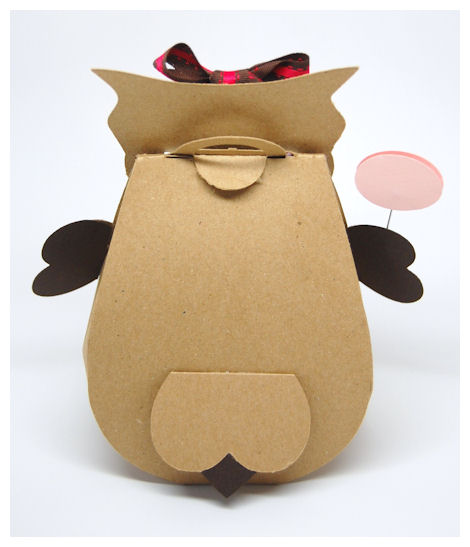
No straps used here, obviously, but I used the owl “wings” to make my owl tail 😀
This is just another way to show the the attention to the little details matters. I think it really completes the whole owl project.
I adhered the wings to the front panel prior to adhering the template sides, for a clean and finished look.
Now the feet….

those are from Cute Lil Chick ©. The size was NOT altered at all.
(note the belly…that used paper from next month called Color Infusion! LOL! Sorry about that.)
Think of all the cute animals and party favors you can make from a BACK PACK! I mean really! I made it and I can’t even believe it! LOL!
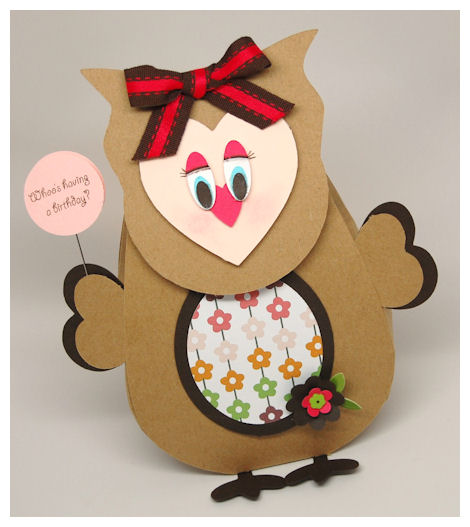
P.S. The bow does match perfectly! Not sure what happened with the photo, but trust me. I wouldn’t put in all this work and then add a mis-matched bow! I own TONS of ribbon 😀
Since we weren’t sure what she wanted, we enclosed a gift card to Target! You can get any and everything there, so I figured it would be a good place in case she needed clothing, or something besides toys (although she CAN get toys there too!)
So there you have it!
A cute alternative to the typical “back pack” you think/see when you look at the What’s in the Bag template.
Come back tomorrow for more gift deas, because we are just getting warmed up!
See you then.
August Release:Back to School
Jul 31, 2011 Author: mytime | Filed under: Cards, Home decor/3-D items, My Time Made EasyCLICK HERE TO VIEW ALL OUR NEW PRODUCTS!
It’s in the Bag
Note our templates are formatted to be used with ANY printer, and they can cut in over 15 personal cutting systems on the market!
- PDF files – for those of you with home printers
- SVG files – compatible with the following systems: Sizzix Eclipse, Silhouette Cameo, Cricut Cutting Systems, Craftwell eCraft™, Black Cat Cougar/Lynx™, BossKut Gazelle™, Pazzles Inspiration™, Silhouette SD™, USCutter™ and CraftROBO/Graphtec™ machines including Wishblade™ (Windows only).
- The cutting systems series cannot cut 3rd party shapes unless extra software is purchased. To enable the ability to cut 3rd party shapes, you must buy and install Craft Edge’s Sure Cuts A Lot (SCAL) software, or Make the Cut software. This will allow the machine to cut files in the SVG format. This software dramatically changes the utility of the use possibilities of these machines. It should be the first addition to anyone’s cutting machine!
- GSD files – compatible with Xyron Wishblade, Quickutz Shilouette, Graphtec CraftROBO (although due to size restrictions of this machine some templates may be smaller than other actual versions) other actual versions)
- Graphtec CraftROBO. This machine is also sold as the following: Xyron Wishblade and the Quickutz Silhouette. These machines natively use the GSD format but can easily import the DXF format. No additional software is required.
- DXF files – Pazzles Creative Cutter Inspiration, Klic N Kut Element , Groove and Maxx
- These machines can cut both the PDF and DXF formats. Their native format is a proprietary format called KNK
- WPC files – This format is used exclusively with the Pazzles Inspiration & Bosskut’s Gazelle.
These are an instant download, so you can start creating in minutes! For ONE low price you can make so many gifts for everyone on your list!
Our template files are priced at only $5. You get UNLIMITED use from the template download. Each file includes step by step, detailed photo instructions. There will also be a PDF download of the scoring guide included for those using personal cutting machines.
Please view our Gallery for project samples, and alternative ways to use all our amazing coordinating products! You may also want to check out our blog for weekly challenges, and even more amazing ideas.
2 NEW! Pretty Impressions Digital Stamp Sets:
Back to School
Round Up
5 NEW! Pretty Pieces Cut Files:
Lil’ One-sie
Baby Bootie
Up in the Air
On the Mark
Round Up Tag
2 NEW! Pretty Printable Paper Collection:
Academic Hodge Podge
Under the Cabana
In honor of our August Release the design team has put together a set of 4 cards using the NEW! Products
Be sure you take the time to visit each one of our talented design team members for a unique idea:
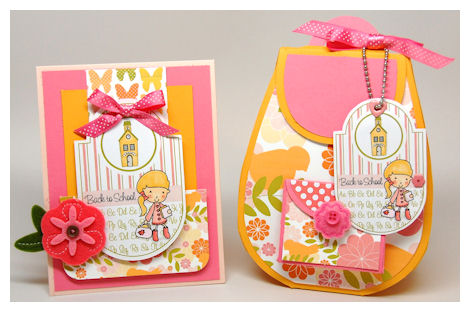
Today I won’t have 4 cards, because I will be sharing the gift sets I made for my other two children, using the images from the Back to School © set. You already got to see Amber’s gift set, now it’s time to share Noah’s and Alexa’s backpacks made using the It’s in the Bag! © template.
Boy stuff is always more of a challenge for me, so I asked Noah what he wanted, and his answer was of course, blue. All blue! So I used plaid pattern from the Academic Hodge Podge ©, and got to work!
Star Student
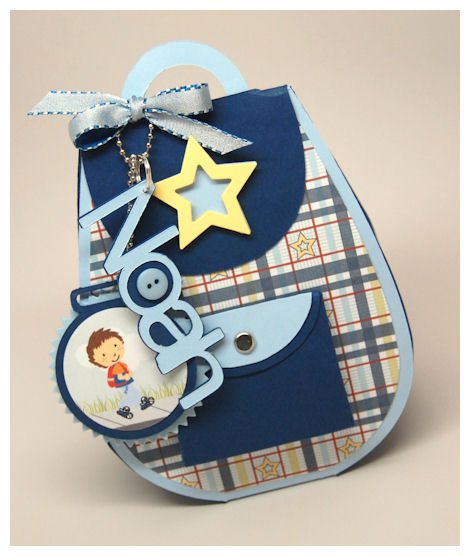
While I am challenged by boy/masculine themed gifts, I am often left happy with the outcome. I love a challenge, and while the IDEA of a boy themed backpack was challenging, it actually came together quite quickly!
Clean and simple!

The paper in the Academic Hodge Podge ©, was perfect for the design of this backpack for Noah.
I took the star pattern in the paper, and chose to use it as my accent on my backpack flap, making it three dimensional.

It’s always about the details that take a project from ordinary to extraordinary.
For Noah’s bag I used the Noah image from the Back to School © set, and created my “scene” digitally, which was then cut and layered onto the All Tied Up! © Circle.
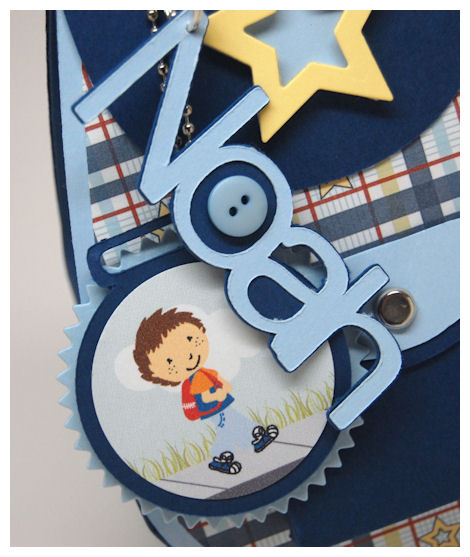
I used my Cricut to create a layered tag with Noah’s name. A SIMPLE idea, that really personalized the bag perfectly!
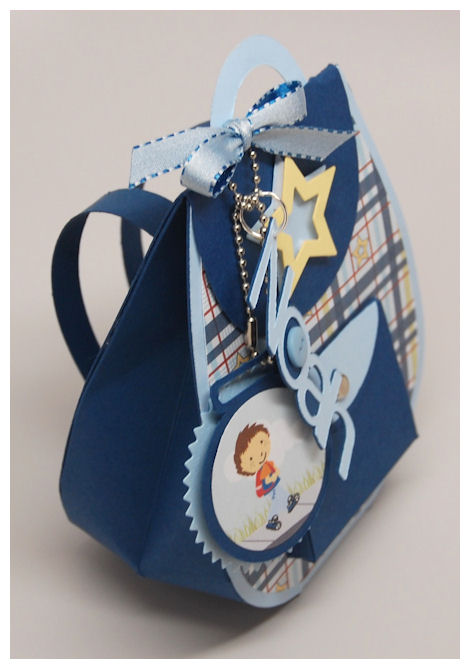
I made the back, and sides in the navy cardstock, but the front in the blue, which was layered with the patterned paper, and pocket.
More importantly…
Noah felt special and happy with his personalized “back to school” bag, which will be filled with a note and some treats on his first day of 3rd Grade!
Now a set made for Alexa!  (well actually for Alexa’s Teacher Aid-per her request, for the return to school)
She said that her aid looks so pretty in blue, so I went with that! 
I love how this turned out!
Unexpected colors with a girly feel.

This will be filled with a gift card to our local coffee & sandwich shoppe, some hand sanitizer, and some Lindt chocolates, to start the year off right.
For the It’s in the Bag! © template I went “old school” and paired the NEW! It’s in the Bag! © template, with an older stamp set, Lunch Box Love Notes © which is where the sentiment on the side tag came from, and the ADORABLE hanging tag….
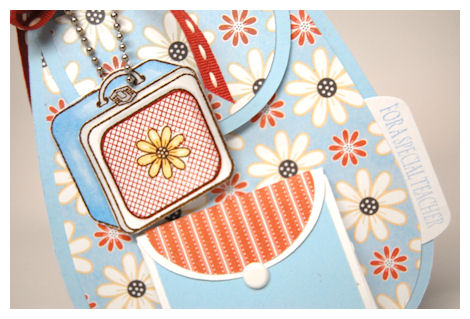
I wanted to use the lunchbox image, from the Lunch Box Love Notes © set on the tag because what goes IN the backpack daily? Your lunch box! I did some masking and I took the daisy flower, from the Fancy a Cuppa? © , and stamped it in the center, then stamped the cris-cross pattern from the Lunch Box Love Notes © set, over it.
Now you may be LOVING the paper used to decorate this uber cute It’s in the Bag! © template, and card to match!
You made the grade

I used: the Coffee Beans © collection, and re-colored the base to be blue. I paired it with the stripe pattern in the set (on the backpack pocket flap), and I also used the CUTE Alphabet Soup © – Collection 2 from last year, which I ADORE!
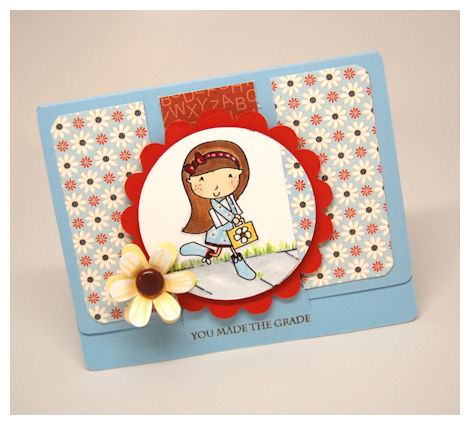
As you can see on the card, what was created using the Lunch Box Love Note ©.

I used the Alexa image from the Back to School © set, which I just printed, then hand colored, and drew in my scenery, unlike that in Noah’s gift set, which was colored digitally.
I love versatility!
Speaking of versatility, be sure you come back daily, as we celebrate our August Release of NEW! Products with some amazing samples!
You won’t want to miss a thing 😀
Pretty Preview: It’s in the Bag!
Jul 30, 2011 Author: mytime | Filed under: Cards, My Time Made Easy, Tutorials, videosWelcome back to the first Preview of our August 1st Release!!
The items will be available for purchase August 1st 😀
The team and I are sharing some AMAZING projects just in time for “Back to School”.
We are all using the newest products to jump start some ideas for amazing projects you can create on your own, with all our coordinating products.
Check out the team for all the previews, and amazing ideas!
Now let me share my project and some product details with you.
You may recall seeing my lil’ peek at this project below, a few months ago when I posted this video:
[youtube]https://www.youtube.com/watch?v=zTXP3QUgLZs&feature=channel_video_title[/youtube]
Now for the details on my project featured in that video.
Amber goes Back to School!
What better way to send your children back to school, or welcome a new teacher, than with a fun gift set?!
This is a 3 D version of a back pack! Complete with all the little details that make it over the top AMAZING 😀
I made a ” back to school” gift set for each of my 3 children, which you will see as the week progresses, ensuring to tailor each to their personalities. That is the best part about creating your own cards, tags and gifts! You have the creative liberty to tailor your gifts to every person you make it for.
The 3 different children featured in the NEW! Back to School set were designed with my own children in mind 😀
Let me share the details of this set!
Available in PDF, SVG, GSD, DXF, WPC
Completed Project Size:
4 1/2 Inches Wide
5 1/2 Inches Tall
2 1/2 Inches Deep
Gift giving for teachers and students is now in the bag!
LITERALLY!
What better way to celebrate your favorite student or teacher by creating a paper version of a backpack?! This will truly brighten someones day, and amaze them all at the same time.
The details, like the front pocket, rounded bottom, flap closure, with hanging top tab are so much like the real thing, but what is really fun is the back!
Check out the “straps”! This is a truly complete template, and all the decorative layers come with it too! You can use patterned paper on the front, back, sides, flap closure, hanging tag, and there is even the front lil’ pocket too!
Whether the occasion be back to school, congrats, great job, you can do it, teacher appreciation, camping, hiking, sleepover, or just a little thinking of you, or pick me up, this is THE template for you!
Packaging Ideas:
Cards
School Supplies
Snacks/Treats
Chocolate
Candles
Hand Sanitizer
Gift Cards to book store, coffee shoppe or office supply
Get Well Gifts-tissues, cough drops, hand cleaner, tea etc.
There are no limits to what you can do. Just think about that special someone, and pack them a bag full of thoughtfulness.
You will definitely want to check out the Back to School Pretty Impressions Stamp Set, as it was designed to coordinate with this fun template! We also have the Lunch Box Love Notes & Additions Pretty Impressions Stamp Sets, with the Boxed Lunch Pretty Packaging Template. These will all really help you create some amazing gifts for teachers and/or students!
Now for the decorative details:
My color scheme came from my Spring is Here © Pretty Printable Digital Paper. I paired it with the Darling Dots collection©.
I used the NEW! Back to School set, combined with the NEW! Round Up set for my hanging tag, which was cut using the Round Up Tag Pretty Pieces Cut File.
As you can see the hanging tag on the It’s in the Bag template is different in size than that on the coordinating card. See the above video for instruction on using Cut Files with Digital Images 😀
I digitally created/layered the tag, and digitally colored all the details, except “Amber”. I wanted to hand color her! It was SO FUN! I love coloring, but I like knowing I don’t HAVE to. I also love being able to resize my digital images, and cut files for so much versatility. This tag was designed using a combination of both the NEW! Back to School set, and the NEW! Round Up set.
Here are the set details
Back to School Set of 27 Digital
Images $12
Back to school time! How about any time?
This is an amazing set of images perfect for teacher and student! This set is just what you need for the student who deserves a little pick me up, or a pat on the back, going back to school, teacher appreciation or end of year gifts for faculty. This set of images with coordinating sentiments will help you make amazing cards, gifts, pretty packaging, altered items, photo frames, scrapbook pages, and more, year after year.
Images in this set include:
3 students: One boy, and 2 girls.
A backpack
Star
Butterfly
A school house
Note book
Pencil
Ruler
Stack of books
Apple
Practice lines
Sentiments Include:
ABC border
You Made the Grade
Practice makes perfect
For my teacher
This bag belongs to:
My Notes
All Star
Super
My Notes
Dream a little dream
Back to school
There is no measure for my appreciation
You Rock
The best teachers
teach from the heart,
not from the book.
You have brains in your head.
You have feet in your shoes.
You can steer yourself
in any direction you choose.
You’re on your own.
And you know what you know.
You are the one
who’ll decide where to go. Dr. Seuss
You will definitely want to check out the It’s in the Bag and the Boxed Lunch Pretty Packaging Templates, as they will really help you create some amazing gifts for teachers and/or students! We also have the Lunch Box Love Notes & Additions Pretty Impressions Stamp Sets, as well as the Lunch Box Love Notes Cut File!
Round Up Set of 18 Digital Images $12
We can always use more gift tag options, and this one is really fabulous!
I’ve designed a fun set that was designed to Coordinate with the Round Up Tag Pretty Pieces Cut File. Now you can create many amazing patterned tags using the designer elements in the set that allow you to create a new tag and pattern each time you get crafting!
This is a tag building set that gives you numerous tag pattern options. Mix and match this set with any other sets in your collection for an amazing arrangement of possibilities.
Available in PDF, SVG, GSD, DXF, WPC
You will fall in love with this latest addition to our Pretty Pieces Cut File Collections!
This tag was designed to coordinate with the Round Up Pretty Impressions Stamp Set
The round up tag is a unique shaped tag, with layering options, which is the perfect tag to adorn all your paper crafting projects, from cards, scrapbook pages, and Pretty Packaging Templates! You can easily design this to suit any project!
Whatever you add this to, it is sure to round up some compliments!
Speaking of compliments, this is just the beginning of AMAZING products we have for you this month! Be sure you check out our official release tomorrow, and stay tuned all week for ideas from myself and my team of amazingly talented designers. You can never have too much inspiration 😀
See you tomorrow
My Etsy

Who I Designed For
Blogroll
- Alicia
- Alli Miles
- Ally Blankenship
- Amber
- Andi @ crafts on a whim
- Angel R
- Angie Z
- Anne Kranitz
- Becky O
- Bee
- Beth Silaka
- Bethany Paull
- Beverly Nash
- Bobbie
- Cambria
- Cammie
- Card of the Week
- Card Positioning System (CPS)
- Cards for Cancer
- Catherine Doucette
- Charmaine
- Cheryl Sims
- Chriss Rollins
- Christina
- Christine Ewing
- Christine Wooden
- Colleen Schaan
- Craft Critique
- Craft Gossip
- Crystal
- Dawn Easton
- Emily Giovanni
- Geny
- Holly
- Igne Groot
- Inspirational Craft Blogs
- Irene
- Jami Sibley
- Jeanne Streiff
- Jen del Muro
- Jeni Bond
- JenMarie
- Jenn Balcer
- Jenn Diercks
- Jenn O
- Jennifer E
- Jennifer Mick
- Jennifer Pereda
- Jennifer-Sweet Treat
- Joanne Basile
- Jodi Collins
- Julia Stainton
- Julie Masse
- Karen
- Kathryn Berthiaume
- Katie Cotton
- Kelley Holland
- Kendra
- Kim Scholfield
- Kris’s Color Stripes! Get inspired here
- Kristen Dubosque
- Kristin Eberline
- Kristine
- Laura @ Sunshine Stamper
- Laura Turnmire
- Laurie Schmidlin
- Lesa Rapp
- Linda Duke
- Linda-LSN
- Lindsey Botkin
- Lisa (lakind scs)
- Lisa Kind
- Lori Craig
- Maggie
- Mara Campbell
- Maria
- Maria Levine
- Mary
- MaryJo
- Melanie M
- Monique Hansen
- Moxie Fab World
- Pam Imholz
- PaperCrafts Connection
- Peppers and Pollywogs Kids party site
- Rebecca Grohall
- Rita
- Robyn
- Rose Ann
- Sarah Vrolyk
- Sharon Harnist
- Sharon Johnson
- Sharon Rivera (a chemisrty with paper)
- Sherrie
- Sophia Landry
- Storage Units, Ink, & More Blog
- Sue Berker
- Susan (Rainy)
- Tangii Crane
- Tracy
- Tricia Traxler
- Trudee
- Velta
- VivLyn
- Zena
MTME Pretty Palette Color Team
MTME Pretty Patterns Sketch Team
My Time Made Easy TM LLC
Shop till you drop!
Lauren Meader
About Me
Copyrighted material
Subscribe To My Blog
Pages
- About me
- Alexa’s Story!
- My Crafty Corner!
- My Time Made Easy™ LLC
- Our Make A Wish Trip to Disney!
- Resume/Publication List
Calendar
| M | T | W | T | F | S | S |
|---|---|---|---|---|---|---|
| 1 | 2 | 3 | 4 | 5 | 6 | 7 |
| 8 | 9 | 10 | 11 | 12 | 13 | 14 |
| 15 | 16 | 17 | 18 | 19 | 20 | 21 |
| 22 | 23 | 24 | 25 | 26 | 27 | 28 |
| 29 | 30 | |||||
Archives
- August 2013
- July 2013
- June 2013
- May 2013
- April 2013
- March 2013
- February 2013
- January 2013
- December 2012
- November 2012
- October 2012
- September 2012
- August 2012
- July 2012
- June 2012
- May 2012
- April 2012
- March 2012
- February 2012
- January 2012
- December 2011
- November 2011
- October 2011
- September 2011
- August 2011
- July 2011
- June 2011
- May 2011
- April 2011
- March 2011
- February 2011
- January 2011
- December 2010
- November 2010
- October 2010
- September 2010
- August 2010
- July 2010
- June 2010
- May 2010
- April 2010
- March 2010
- February 2010
- January 2010
- December 2009
- November 2009
- October 2009
- September 2009
- August 2009
- July 2009
- June 2009
- May 2009
- April 2009
- March 2009
- February 2009
- January 2009
- December 2008
- November 2008
- October 2008
- September 2008
- August 2008
- July 2008
- June 2008
- May 2008
- April 2008
- March 2008
- February 2008
- January 2008
- December 2007
- November 2007
- October 2007
- September 2007
- August 2007
- July 2007
- June 2007
- May 2007
- April 2007
- March 2007
- January 2007
Categories
- About Me
- All That Scraps
- blogger challenge
- camera/photo play
- Cards
- Contests
- family stuff
- FOR SALE
- Home decor/3-D items
- How to FAKE it!
- Introduction
- JUGS Challenge
- JustRite Stampers
- Lizzie Anne Designs
- My family stuff
- My Stamping Space
- My Time Made Easy
- My Time To Color Challenge
- My Time to Create Challenge
- My Timeless Template Challenge
- My Timeless Templates
- Mytime Mail
- MYTIME MOVIE/VIDEOs
- Papertrey Newsletter
- Pink Cat Studio
- Pretty Palette Challenge
- Pretty Patterns Sketch
- Product Opinions and Must haves
- Recipe's
- Saturday Sketch
- Smilebox Creations
- Stampavie
- Tutorials
- Uncategorized
- videos
Most Popular
- Create your own Onesie Card Tutorial-and important NOTE! PLEASE READ (2529)
- Saturday Sketch-Boxed bag holder (2333)
- Going GREEN! Fancy Flower Flourish-Closure Video (1478)
- Fabulous Favorite - Giveaway! (1336)
- a Prayer Request (1232)
- QUICK-Easter Baskets from Nestabilities-PTI style-and blog challenge (1063)
- Teaser Sketch (999)
- February Release Giveway! (and a little peek) (996)
- Group Post and Rambling Rose Video Tutorial (985)
- GIVEAWAY! Who wants it all?! (895)
Recent Comments (RSS)
- 첫충사이트: 완전히 흥미로운 블로그 게시입니다. 저는
- sarah: Wow, Lauren, what a stunning
- hedie: خرید راهبند
- 야동: Love to read it,Waiting For
- 야동: This seller is in a
- 바카라사이트: 여기 처음 왔어요. 나는이 게시판을
- 야동티비: I was surfing the Internet
- 바카라사이트: 비슷한 주제에 대한 흥미로운 정보를
- 바카라사이트: "여기에 제공해 주신 귀중한 정보와
- 온라인홀덤: 유익한 웹 사이트를 게시하는 데
Copyright © 2007 - My Time, My Creations, My Stampendence - is proudly powered by WordPress
This blog has been Tweaked and Designed by Sara Williams