Archive for the ‘Cards’ Category
April Release: The Complete Package
Mar 31, 2012 Author: mytime | Filed under: Cards, Home decor/3-D items, My Time Made Easy, Pretty Patterns SketchIt’s April 1st and that means all our NEW! Producst are available for you to purchase, and get started on those projects for Mom, Spring or any occasion where a gift is warranted 😀 The end of the school year is coming too, so Teacher Appreciation gifts are a great idea too!
Be sure you check out our NEW! Products <—HERE!
We have released:
2 NEW! Pretty Packaging Templates
2 NEW! Pretty Impressions Stamp Sets
3 NEW! Pretty Printable Digital Paper Collections
6 NEW! Pretty Pieces Cut Files
Please view our Gallery for project samples, and alternative ways to use all our amazing coordinating products!
You may also want to check out our blog for weekly challenges, and even more amazing ideas.
Today we have an amazing group post using our NEW! Products
As you may have come to know my company focuses on the “complete package”. We work hard to offer coordinating products that are easily interchanable with previously released products. We really enjoy being able to share the ideas and versatility each product holds.
That being said here is WHO you should visit today for some amazing projects:
Enjoy the plethora of ideas and inspiration for your Spring projects!
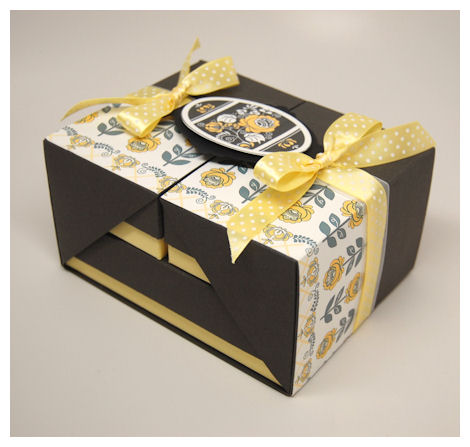
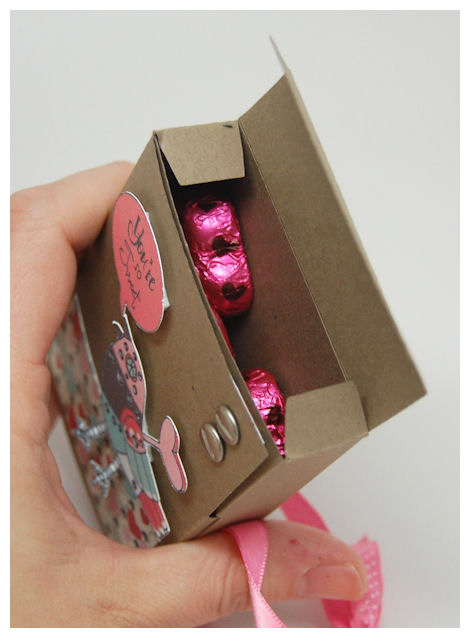
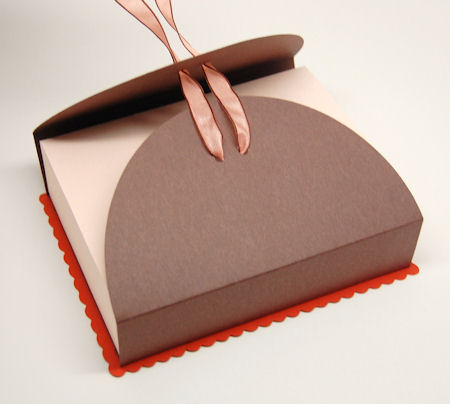
My project today is made using the NEW! Com-pleatly template
Being in LOVE with the fact that all our products are designed to coordniate, designing this made it easy peasy!
Starting with the amazing Spring Abound Digital Paper Collection I was able to quickly and easily create a coordinating get set in no time.
Look at everything I designed to fit into my Com-pleatly template.
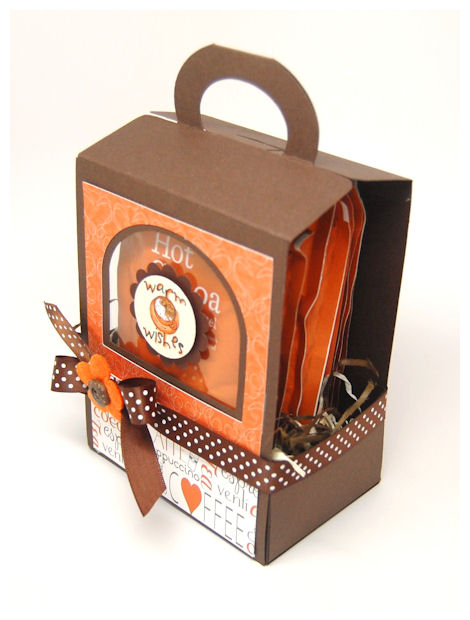
I love have a variety of ways to give simple gifts that are afforable and fun. I REALLY believe it’s all about the presentation and packaging of a gift is what really gives that first and lasting impression. The littlest details are what show you REALLY care 😀 Taking the time to package up something in a nice way speaks volumes about the feeling behind the gift no matter how large, or small it may be.
Let’s get into the details of everything shall we?

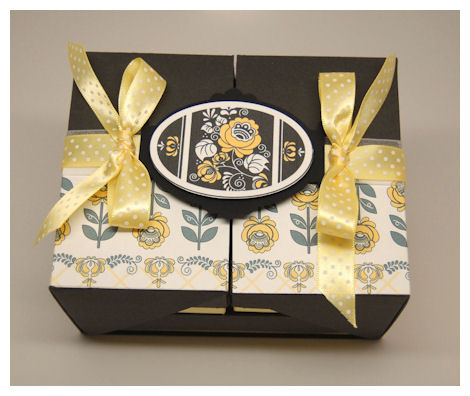
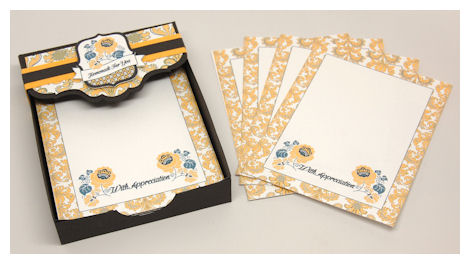
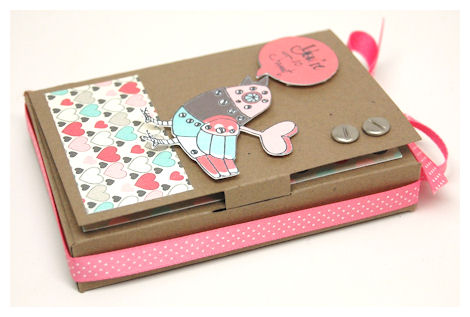
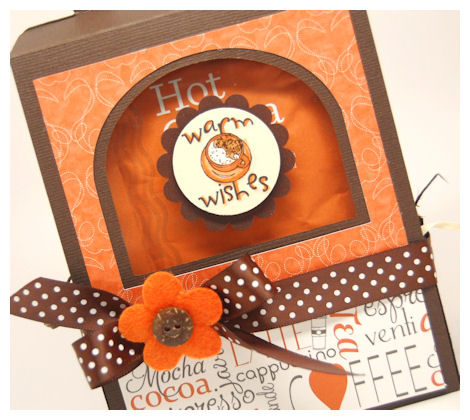
The focus of the box is the paper, but then it becomes teh coordinating label.
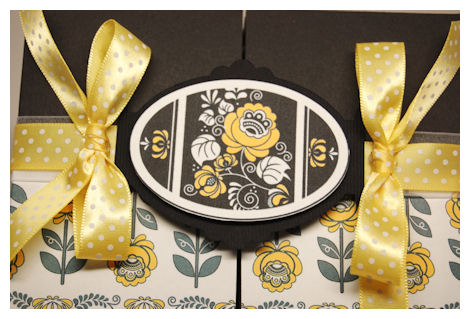
I used a label from the Fine Finish Digital Stamp set, digitally colored to match, then cut using the Fine Finish ©Tag Cut File. The label was then layered onto the All Tied Up! © Oval with the ribbon slots in either end.

I was able to tie through my pretty lemon polka dot ribbon to create a fun band that slides on and off the box.
Now to the box contents…
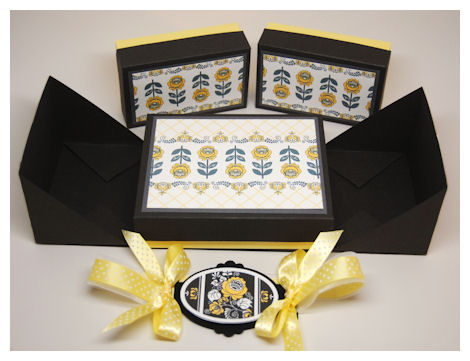
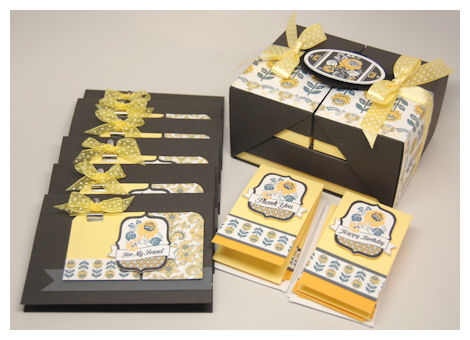
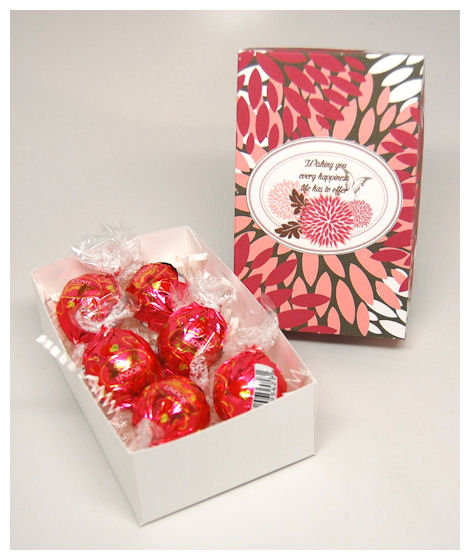
Once again I chose to use the large box and two small box combination, as I love what you can do with it!
I felt that the Spring Abound Digital Paper Collection is pretty enough the boxes themselves didn’t need any extra bells or whistles.
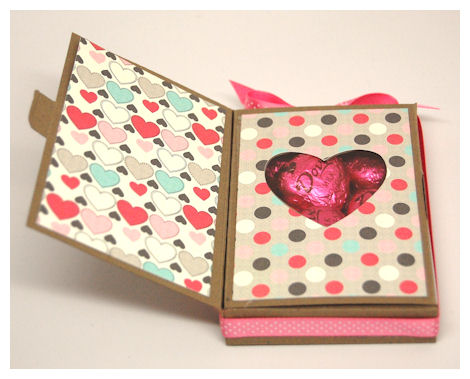
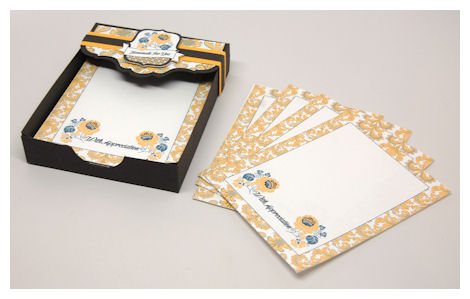
Inside one box there is a set of 6 note cards (2 1/2 X 4 1/4) for almost every occasion, complete with 6 envelopes!
I made my set of 6 cards using a label from the Fine Finish Digital Stamp set, changing out the sentiments, and printing/cutting each one. I chose to use a scaled down version of the same pattern in the Spring Abound Digital Paper Collection for my note cards.

With digital images it is quick, fun, and easy to get a great assortment of cards made in very little time at all. You can SAVE the projects, and go back later to create MORE gift sets with little time at all since you already designed an amazing project the first time around.
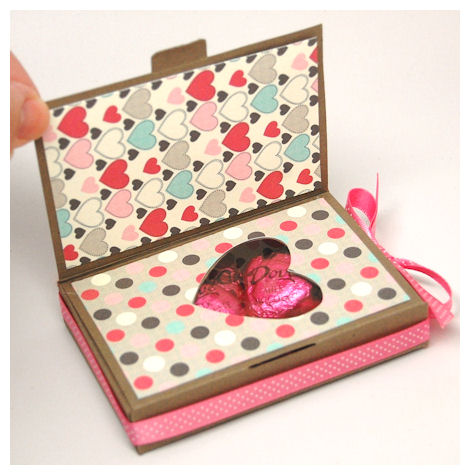
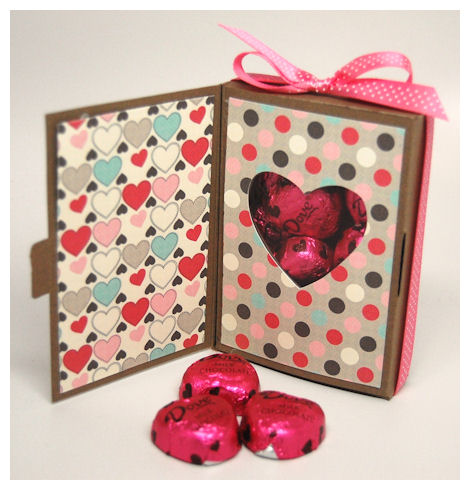
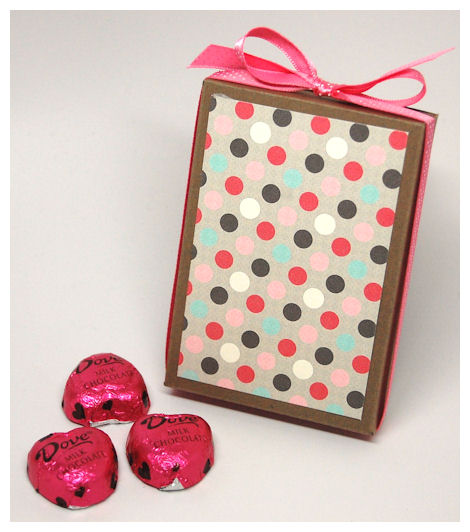
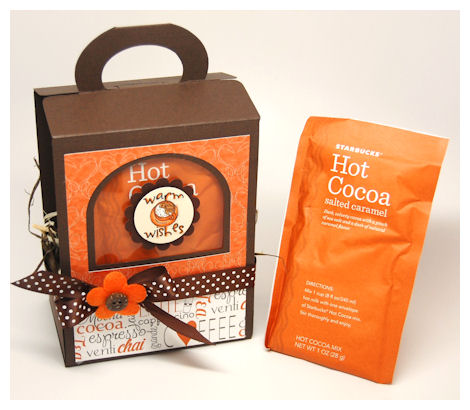
Now in my other small box I added some Godiva White Chocolate Truffles. Chocolate is always a great option or “filler” for any gift set 😀
Now for the large box contents
Here is the large box with a set of 6 standard A 2 size cards, and envelopes. They tuck away so nicely in this box, and it makes a great presentation, and later a stunning place to store the cards until they get used.

The box in itself is a great gift on its own.
Using the SAME labels I used in my smaller cards above, I just printed and cut more of the same tags for my larger cards.

Now I have a large set of card for just about every occasion too!
I love the simple design of this card.
I used the Pretty Pattern Sketch 16 for the inspiration of the card layout. Using a sketch is always a great way to get creative and make it go quicker because most our time is spent in thought and execution of a design/layout. If you get the hardest part out of the way and commit to a layout you feel would work great, that is half the battle!
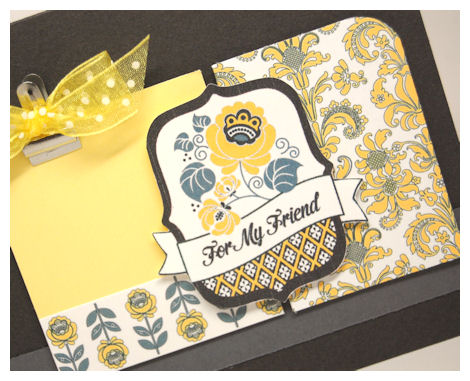
I love the label I had created using the Fine Finish Digital Stamp set, and since changing out the sentiments, and printing/cutting each one how I was able to get several cards that are all different with little work. Combining the patterns in the Spring Abound Digital Paper Collection for my note cards was fun and couldn’t have been made easier.
 Supplies from My Time Made Easy ™ LLC
Com-pleatly
Fine Finish
Pretty Printable Digital Paper:
Spring Abound
All Tied Up! Oval
Once again thanks for stopping by and visiting our store, gallery and talented designers. We have several more days of amazing projects for you to share, so come back for much more inspiration for gifts all year long 😀
April Release Preview Day 2: Com-pleatly Versatile
Mar 30, 2012 Author: mytime | Filed under: Cards, Home decor/3-D items, My Time Made EasyWelcome back to our next day of previews before our April 1st Release.
I’m so happy to have you return as I am quite excited about what the MTME team has to share today!
Make sure you take a moment to visit the following team members:
Well let me get to my sample today!
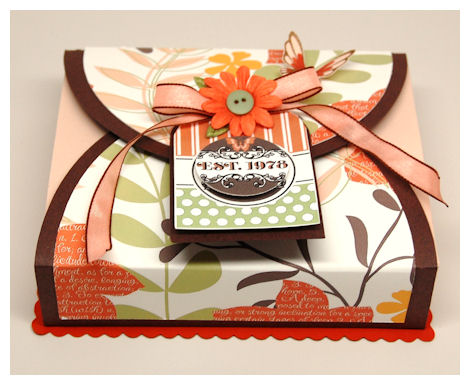
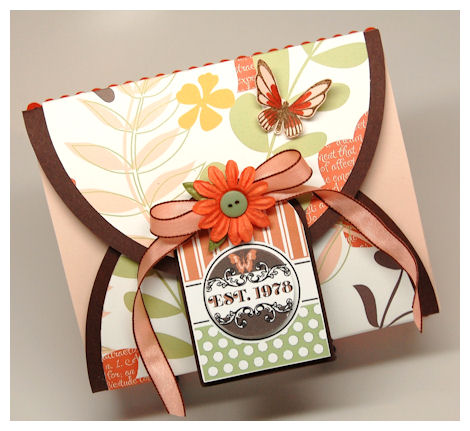
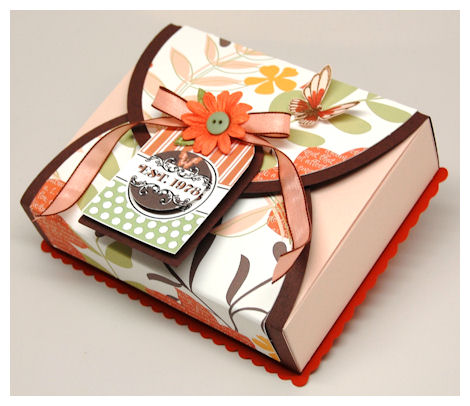
I am using our latest template called Com-pleatly.
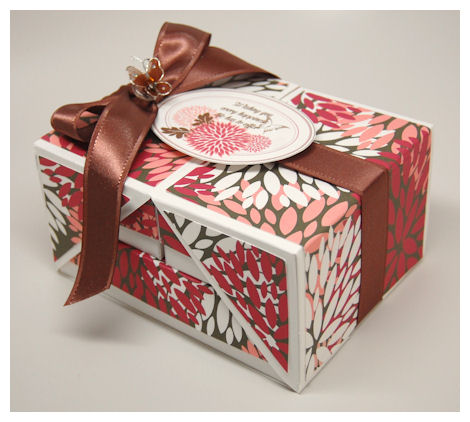
I have to say that I myself and Com-pleatly in LOVE with this one. If you’ve never gotten a Pretty Packaging Template before this is one you shouldn’t pass up!
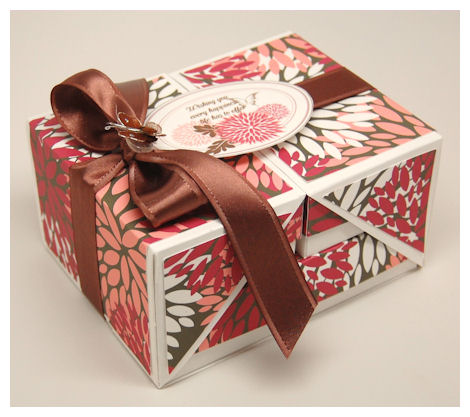
This box is sure to “Com-pleatly” (name pun intended!) blow away anyone you make one for! It is fun, unique and easy to assemble!
Simply untie your ribbon and this will unfold to reveal your dazzling gifts that await inside this amazing package.

This template comes with a large box, small box and unique “wrapper” for them to be presented in!
Available in PDF, SVG, GSD, DXF, WPC
Completed Project Size:
6 X 4 3/4 Wide
3 1/8 Tall
Large Box:
(Fits Standard A2 Size cards or 15 Truffles)
5 3/4 X 4 1/2 Wide
1 1/2 Deep
Small Box
(Fits Card Size 2 1/2 X 4 1/4 or 6 Truffles)
2 3/4 X 4 1/2 Wide
1 1/2 Deep
Box combinations:
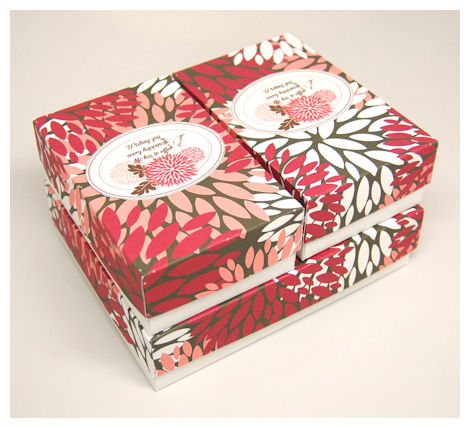
1 Large Box and 2 Small Boxes
(Box combination used in today’s sample)
OR try
2 Large Boxes
OR
4 Small Boxes
Sooooo many possibilities!
Named after the “pleats” that tuck and fold to create the fun wrapper for your choice of gift box options, you can really get creative with your ideas, and designs. There are no limits to what you can put in here.
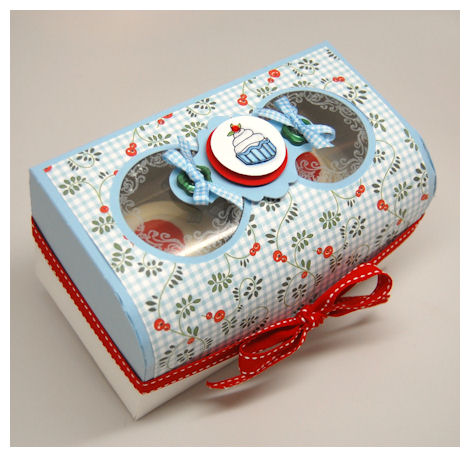
My sample today used the stunning NEW! Berry Burst Digital Paper Collection
This pack incorporates the following colors:
- Dark Chocolate
- Mambo
- Rose
- White
This collection is just bursting with color and fresh patterns that will really brighten up any project. The detail of each sheet will perfectly embellish any card, tag, or package it is used on. These patterns are pretty, and bursting with a fresh color palette that will have you using them over and over again.
It really makes the simple design on this POP!
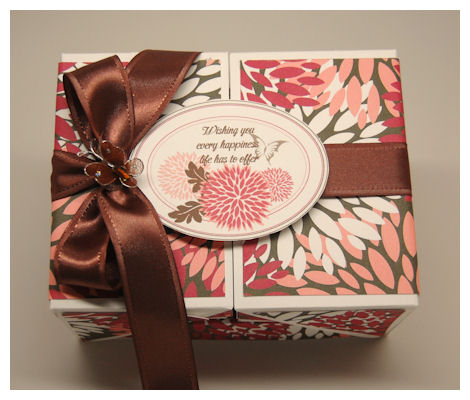
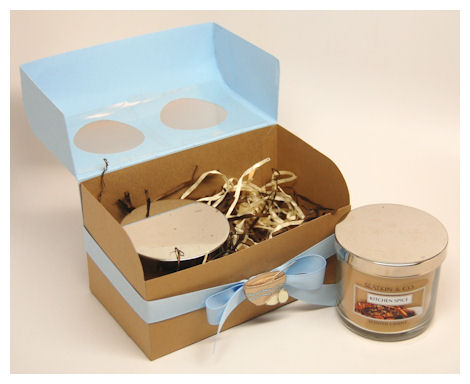
With my paper being a busy pattern, that meant I didn’t need to do too much to make this gift box a stunner! I chose to use the NEW! Spring In Bloom Set for the main focus here.
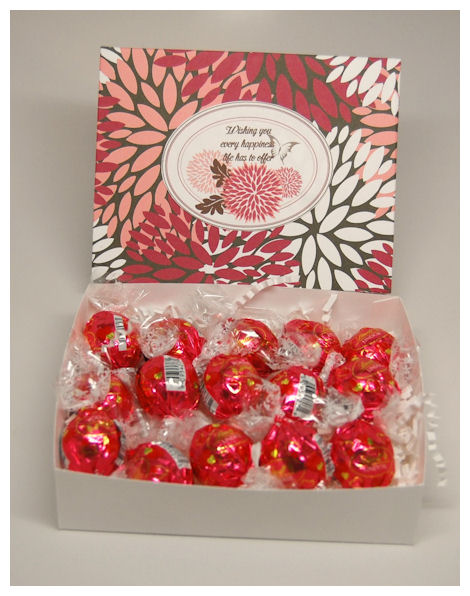
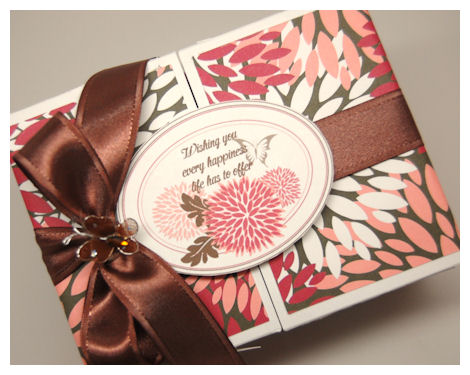
I created my label, and resized and layered the coordinating blooms in this set, with the leaves, butterfly and my sentiment of choice: Wishing you every happiness life has to offer
I tied it closed with a large satin ribbon, in a rich chocolate color.
ABOUT Spring In Bloom Set of 16 Images
As the warm Spring air arrives, we often reflect on the images of Spring. In this set we feature some Mum flowers, various whimsical blooms, a stem, some leaves, a butterfly and a large oval frame. We also acknowledge motherhood, as we celebrate Mother Nature and Mother’s Day.
Your cards, tags, packages and projects will blossom to life when you use this amazing set of images to create them!
I printed and cut the same labels for my boxes that get wrapped up in this template.
I love being able to use digital images that I can digital create, resize, re-color, layer, and SAVE! You have limitless options 😀
If time had allowed I had a plethora of ideas of what to wrap up in here, but due to my family issues, I just packaged up the Truffles you see in my samples. I think this also helps to show you the size of the boxes, and just how much each can hold. Each box in its own is an amazing gift 😀 But when you add that amazing wrapper, it takes it to a whole new level of WOW!
Supplies from My Time Made Easy ™ LLC
Com-pleatly
Spring In Bloom
Pretty Printable Digital Paper:
Berry Burst
Fine Finish Tags
This truly is the complete package as you have a fabulous set of gift boxes, large and small, which can be used as a gift on their own. It becomes “Com-pleat” (pun intended) with a stunning way to wrap them and present them to anyone with perfection!
The hardest part of creating this gift set is parting with it!
Thanks for stopping by, and I hope you will return tomorrow as we have our official April Release and have a Group Post with project ideas that are certain to have you in complete awe!
See you then.
April Release Preview Day 1: Card Cover Up
Mar 29, 2012 Author: mytime | Filed under: Cards, Home decor/3-D items, My Time Made EasyAs the end of each month approaches, the My Time Made Easy ™ LLCTeam and myself begin to start sharing samples with our latest products releasing on the 1st of each month.
So much has been going on here behind the scenes, that keeps me from posting more regularly. It can be hard keeping that healthy balance between “work”, family, fun and crafting! I do my best to keep it all together, and family is always #1 to me. I’ve been quite busy with my family as this month we lost my grandmother to Cancer. It has been very hard on all of us, as you can imagine. My grandmother is the one who got me into crafting at a very young age, and I have worked hard to pass the love of that onto my own children so they have similar memories to those I have of the time I spent crafting with my Grammy. So, add that to many other things going on within our family and I am one busy girl. Thankfully I have some amazing family and friends, and a great group of designers pulling for me and helping whenever needed.
This month we sadly say goodbye to Katie, who has been with me since the start of my company 2 1/2 years ago, but give a warm welcome to Kimberly Morrow! Katie will be missed, but I am certain you will fall in love with what Kimberly has in store to share with us all.
Today we share our first preview of samples using our NEW! Products which will be available on April 1st.
Please visit:
Today our designers are sharing samples with our latest template called Card Cover Up!
Available in PDF, SVG, GSD, DXF, WPC
Completed Project Size:
5 3/4 Inches Long
4 1/2 Inches Wide
1 1/4 Inch Deep
This is a stunning box designed to “cover-up” your gift, while displaying it in a way that makes it fun, functionaland of couse-stylish.
You can never have to many ways to give and present you card creations. I have spent countless hours designing MANY options for such packaging for this release, and for the future 😀
The top of the box has some elegant detail, and a decorative layer to help you easily accentuate it. The box itself is open, while the top. bottom and sides envelop the item inside.
This is the perfect cover/holder for any set of cards (size A2 cards and envelopes 4 1/4 X 5 1/2) or stationary.
That is exactly what I used my Card Cover Up template for!
For the box iteself, I cut my dacorative layer from the Spring Abound Digital Pattern Paper. I LOVE the colors in this paper collection!
- Sahara
- Daffodil
- White
- Black
They are rich and elegant and great for Spring.
The top label on my Card Cover Up template, I used the newest Pretty Impressions Set called: Fine Finish. I love that particular label and think it is the perfect companion to this template 😀 I chose to use the sentiment “Homemade For You” on the label. ABOUT Fine Finish
Set of 29 Digital Images
This set of 9 stunning frames which makes the finest finish on every project. The set includes an impressive variety of sentiments that will really make projects for every occasions look their finest! The sentiments are amazing on their own but really shine when mixed and matched with the elegant arrangement of frames.
Be sure you check out our coordinating tag set, the Fine Finish Tags Pretty Pieces Cut File.
This box is the perfect presentation for my gift of stationary!

Something you just can’t do with acrylic stamps…..I custom designed 15 sheets of stationary, and included envelopes as well, for the receiver to be able to write a little note of appreciation, and then either fold in half, and secure closed with a gold sticker, OR simply put into a standard A2 size envelope.
The benefit of this is you take the time to design something ONCE, then you can print as many as you want! Save it to use again later! Simply change your colors, and or sentiment (or personalize it with person’s name!) and you have a whole new gift set. I was able to enlarge the sentiment from the Fine Finish set to suit my project needs. Another thing you can’t do with acrylic sets!
I used the Spring Abound Digital Pattern Paper as the base of my design, drew my box in the center of the pattern, then digitally colored, and layered my two flowers from the Fine Finish set to match the flower from my tag, and layered them in the lower left and right corners. EASY PEASY!
You can design this to give your customized card creations in this fabulous “cover”, that will also be proudly displayed in any home or office, as it is a gift in itself.
Supplies from My Time Made Easy ™ LLC
Card Cover Up
Fine Finish
Pretty Printable Digital Paper:
Spring Abound
Fine Finish Tag
This template has so many more uses and possibilities!
Use this “cover” to package a variety of other items such as face masks, drink mixes, body products, gift certificates, photos, frames, baby items like booties, hats or onesies and more. Whatever you “cover” in this it is sure to look stunning!
Speaking of stunning…be sure you return tomorrow because we have some more product previews that will leave your jaw hanging open!
See you then!
Shabby Tea Room Challenge Sponsor!
Feb 13, 2012 Author: mytime | Filed under: Cards, Contests, Home decor/3-D items, My Time Made EasyI’m happy to share with you all that we are the sponsor this week for the Shabby Tea Room challenge!
This week the Shabby Girls have chosen the theme of ‘Hi Ho Cherry O’!

They ask that you create a card or project inspired by the above photo and FEATURE CHERRIES ON IT FOR NATIONAL CHERRY MONTH!
My Time Made Easy ™ LLC, has donated the Hey Cupcake © template, Farmhouse Fresh © digital paper, Sweet Treats © & Sweet Sentiments © digital stamp sets as the prize for our lucky Tea Room winner!
Please visit Shabby Tea Room challenge blog to link your creations by Sunday, February 19th to play along. Winner and Tea Time Terrific Top Three will be announced Monday, February 20th on the Shabby Tea Room challenge blog.
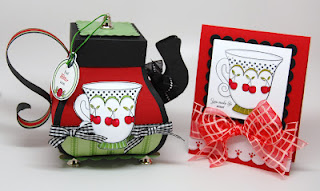
Here is on oldie but goodie project that suits this fun challenge!
Supplies from My Time Made Easy ™ LLC
Hey Cupcake, Time for Tea
Sweet Treats, Well Preserved, A Spot of Tea, Killer Curves: Fancy Frames
Pretty Printable Digital Paper:
Farmhouse Fresh
A Spot of Tea Cut File, Frame Me
Thanks for stopping by and enjoy the challenge!
A Year In Review: In Love
Feb 3, 2012 Author: mytime | Filed under: Cards, Home decor/3-D items, My Time Made EasyWelcome back for the final day of samples using the lastest products.
Before I share more on that, did you know that My Time Made Easy ™ LLC is sponsoring the Stamping Royalty Contest at PaperCrafts Magazine?!
Today we share our Year in Review projects which is a customer favorite, as we take our older products and make something new! This means you have an ongoing library of gift ideas and designs for products you may already have, or needed that extra push to allow yourself to indulge in!
Out theme this month is In Love. I asked the designers to take a favorite template and items and package a favorite gift item.
We are running a little short on designers this month as it has been a very BUSY January for us all! We do have some amazing projects still to share, so please pay a visit to our designers, and let them know how their projects may have inspired you!
Also don’t forget to apply for our Design Team! Details here: https://laurenm.splitcoaststampers.com/2012/01/30/design-team-call/
I am generally a VERY girl inspired project creator. I have been trying to NOT just make girly stuff because hey, I have a son, husband, brother and father, amongst many other MALE gift receivers to make things for! LOL! I find these designs can often be harder to achieve since I lean towards anything fun and frilly, but ANYTHING can be made masculine!
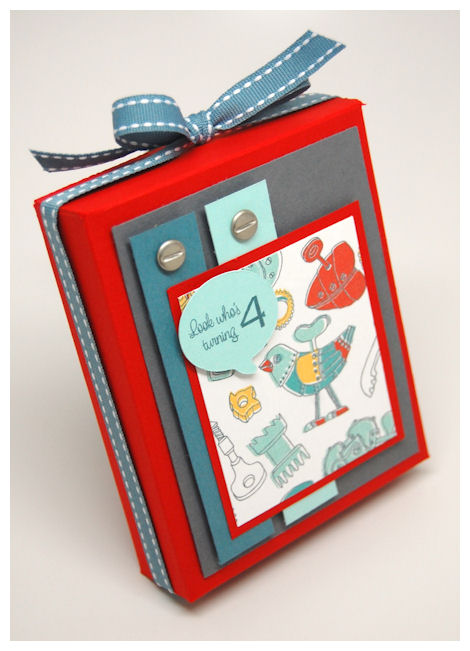
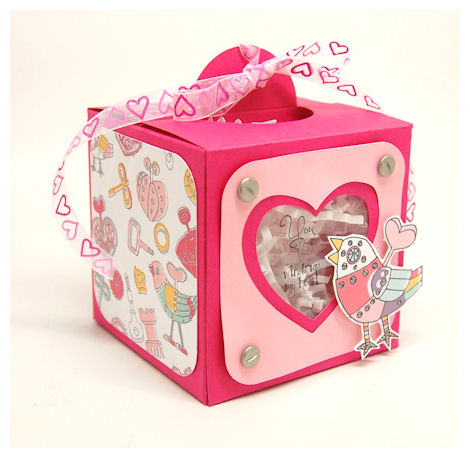
A favorite time to give gifts for me is someone’s birthday. I love making something special with that person in mind 😀 So I created a gift set with one of my favorite older templates that I’ve always wanted to make “boy” themed. I needed a gift item for Alexa’s brother Austin (from her biological father and his ex wife). He is turning 4!
This is what I came up with….
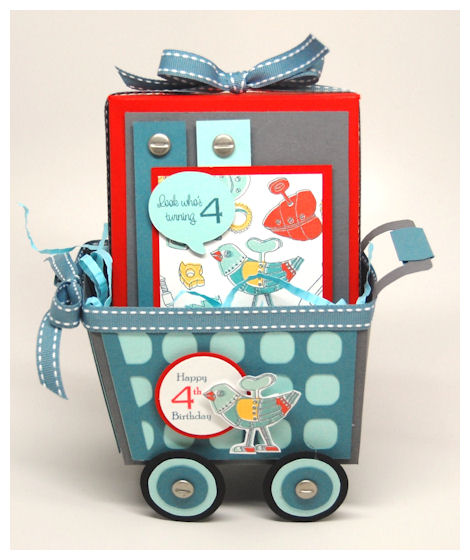
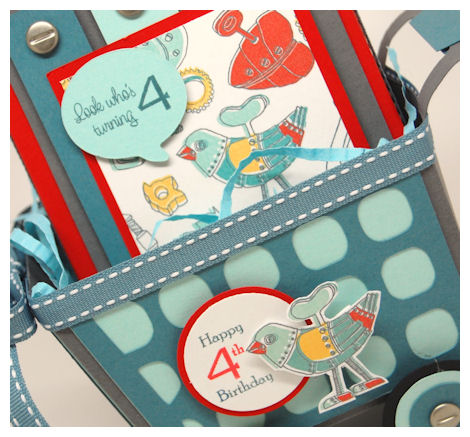
Look who’s turning 4!
Isn’t this so cute?
I chose to use the Shop Til You Drop © cart in combination with the Insert Card Here ©, decorated in boy themed colors.
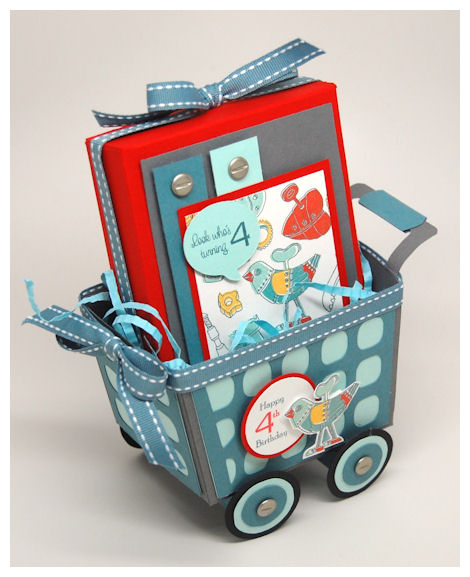
Loving that NEW! Paper Wind My Manly Gears, inspired my colors for the entire gift set.
I digitally colored my bird from the Wind Em’ Up set, and cut it out. I had printed my ” Look who’s turning 4″ and the “Happy 4th Birthday” sentiments using the Harriet Hop-Along Birthday © set.
I love pairing old and new products 😀
You may wonder WHAT I actually packaged up in this template duo.
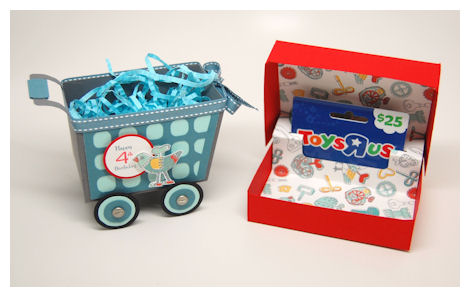
So one of the best gifts to give in my opinion is a gift card! A favorite gift to give and receive, for me, is a gift card. It is a no brainer. It becomes a guilt free shopping spree for the receiver and there is no worry if it is the right item, right fit, do they like it or not? Do they already have it….you get the idea 😀
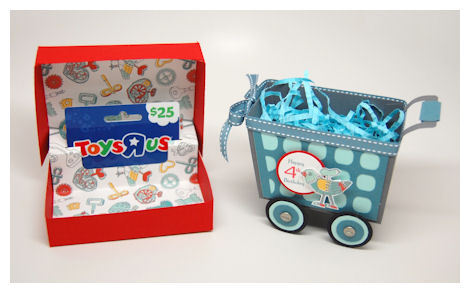
What better gift for a little boy than a shopping trip to Toys R Us. Since I don’t really know exactly what Austin likes or has….this was a perfect alternative.
About my My Shop Til You Drop © cart
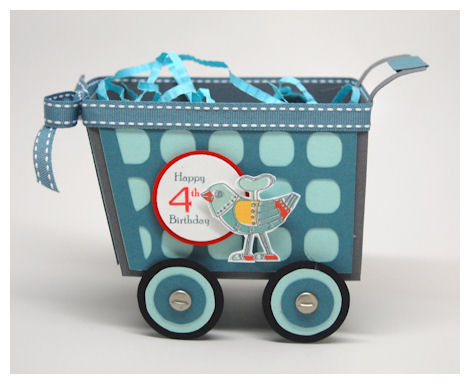
The base of the cart was cut out using a smokey gray cardstock.
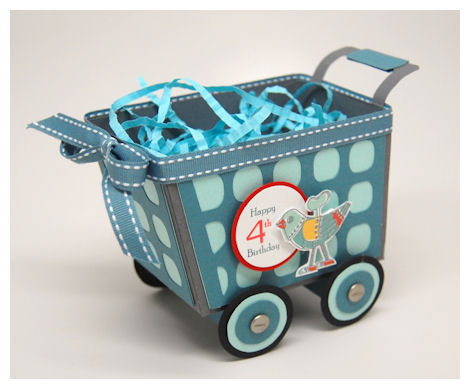
I cut the additonal layers using an aqua color for the solid layer, and the cart cut out layer using Blue Bayou.
The wheels were cut and layered using screw brads! A fun detail that matches the details of my bird image.
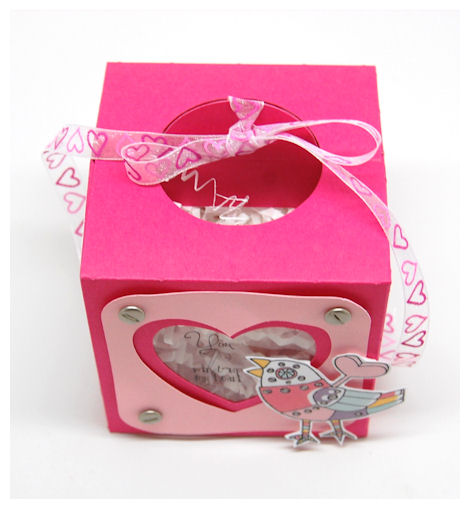
Now let’s talk about the Insert Card Here © template, that holds the actual gift card.
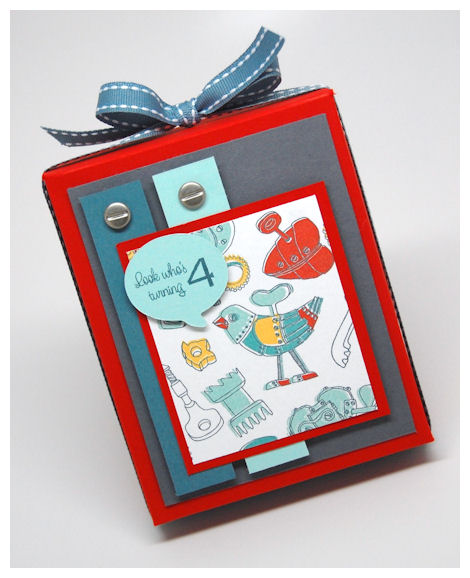
I looked at designing the top of this much like I would have designed a card. I used the Wind My Manly Gears on the main panel, strategically placing the bird where I wanted it.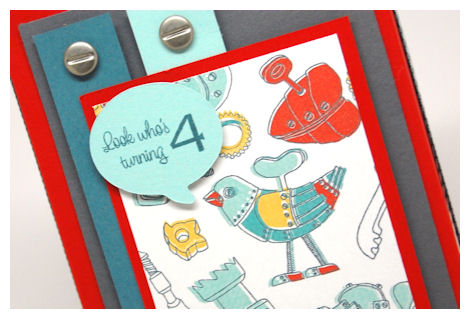
The ” Look who’s turning 4″ sentiment was cut out using the Flag Em’ Down cut file.
I added the screw brads to the color panels like on the cart.

Since the set theme has gears and screws it is a perfect detail!
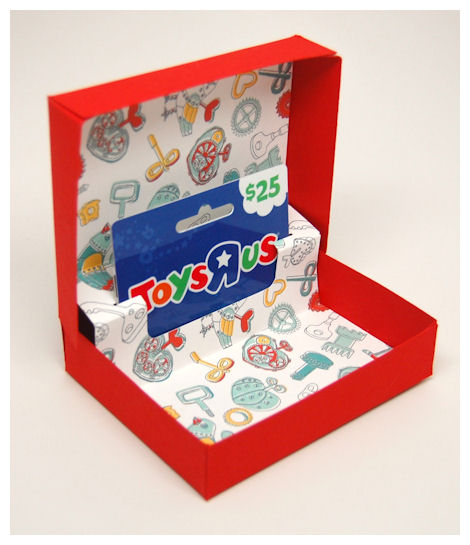
I included the paper inside the box insert to tie everything together, and insert my gift card into.
All in all both of these templates came together very quickly and stood out amongst the many other gifts at the party. Most importantly it was made with little Austin in mind, using some of his favorite colors.
Supplies from My Time Made Easy ™ LLC
Shop Til You Drop, Insert Card Here
Wind Em’ Up, Harriet Hop Along Birthday
Pretty Printable Digital Paper:
Wind My Manly Gears
Flag Em’ Down
Well that concludes the projects for our February Release.
Please view our Gallery for project samples, and alternative ways to use all our amazing coordinating products!
You may also want to check out our blog for weekly challenges, and even more amazing ideas.
See you next time!
Yummy Card Candy!
Feb 1, 2012 Author: mytime | Filed under: Cards, Home decor/3-D items, My Time Made EasyThanks for coming back!
The team and I have much more to share today.
Please pay a visit to:
They each have a fabulous sample today using our NEW! Products.
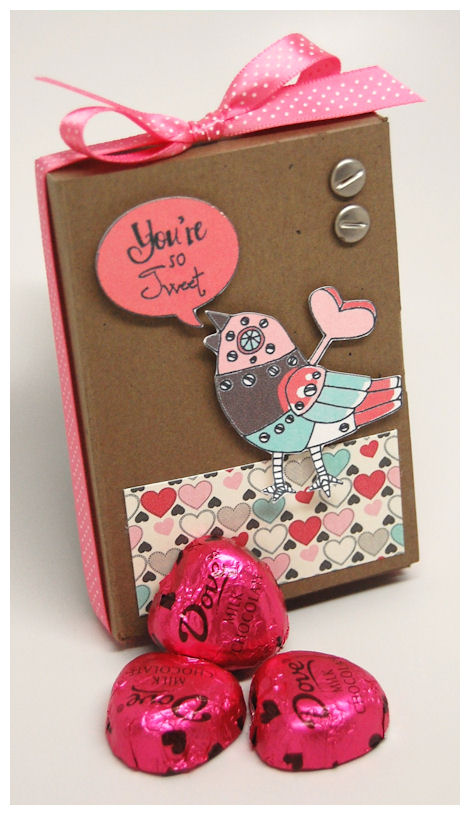
Today I want to share a FUN gift idea using one of our NEW! Pretty Pieces Cut Files called Card Candy!
When you want to have a card and gift all in ONE!
Available in PDF, SVG, GSD, DXF, WPC
Completed Size:
2 3/4 Inches Wide
4 Inches Tall
3/4 Inch Deep
This combines a two in one idea. It is a simply sweet way to create a “card” with a candy box attached! I was asked to design something like this by many customers! I’ve been sitting on it for some time now, so those of you who waited…here you go!
This is a super “sweet” idea for gifts.
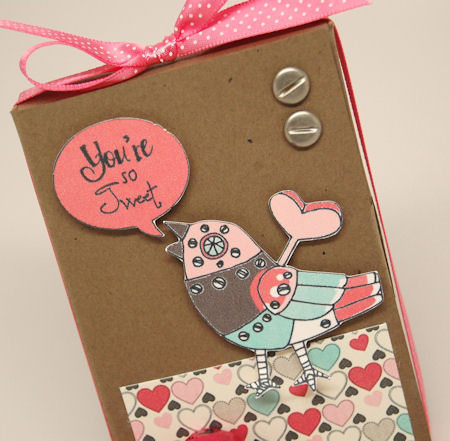
My candy box here uses the NEW! Wind Em’ Up set, with the Wound Sentiments set.
My colors for digitally coloring my bird came for the super sweet Minty Chocolate © paper collection!
I had a blast adding the screw brads to the upper corner as it fit the metal like bird style perfectly with its screws! I am really loving this new set! I could use it over and over again.
Fashioned after the treat boxes I would receive each year as a child, it became a staple for every holiday to get a “candy book”. I was always amazed at the designs, and would beg my mom to use them for my friends each Valentines Day. Now that I have my own children I figured this would be perfect for simple gift giving all year round!
This front is like your card, and it has a tab insert to keep it folded closed.
Open it up….
and you can reveal your sweetest of treats!
The box doesn’t have a window included. It is left plain so you have total creative liberty!
For the window, I once again used the Flag Em’ Down Cut File to create my window. It was just perfect!
You can use *any* of our Pretty Pieces Cut Files to create you own window, prior to assembling, or use your die cuts or punches.
Of course I packaged up my favorite, Dove Milk Chocolates! What a great and inexpensive way to spread some love to many people! I think my own children will be using this to make their Valentines for their classmates this year 😀
Now you may wonder HOW you get your treats inside…
Just open the top flap, and pour in your candy, put in some mini soaps, some tea or cocoa.. what you want to fit in here!
OH! Don’t forget to decorate your back too!
It is always just as important as the rest of it. It is always the littlest of details that separate an amateur craft creation for the professional, finely detailed ones!
I hope this sparks your creativity for the MANY gifts you can quickly package up in here in plenty of time for Valentines Day! All our NEW! products are an instant download, so there is NO wait or delivery time/charges!
Supplies from My Time Made Easy ™ LLC
Wind Em’ Up, Wound Sentiments
Pretty Printable Digital Paper:
Minty Chocolate
Card Candy, Flag Em’ Down
We all have more to share tomorrow, so please come back then!
February Release: Pull Tab Up
Jan 31, 2012 Author: mytime | Filed under: Cards, Home decor/3-D items, My Time Made EasyToday is our official February release!
Be sure you check out our NEW! Products <—HERE!
We have released:
2 NEW! Pretty Packaging Templates
2 NEW! Pretty Impressions Stamp Sets
2 NEW! Pretty Printable Digital Paper Collections
2 NEW! Pretty Pieces Cut Files
Please view our Gallery for project samples, and alternative ways to use all our amazing coordinating products! You may also want to check out our blog for weekly challenges, and even more amazing ideas.
We are also have a design team call! View details HERE! <—
Sadly this will be Monique Hansens last month with us. We will miss her and her amazing projects dearly. Please be sure you wish her well!
Today we have an amazing group post using our NEW! Products
Here is WHO you should visit today for some amazing projects:
Now it’s my turn!
I am excited to share two samples today, using each of the NEW! Templates we’ve released as well as many other NEW! products!
Now while both templates share the same tab top feature, each one on it’s own is pretty amazing and looks unique 😀
Pull Tab Up: Square $5
Available in PDF, SVG, GSD, DXF, WPC
Completed Project Size:
3 1/2 X 3 1/2 Inches Wide
3 1/2 Inches Tall
This “pull-up-tab” takes the “plain” out of what would be a typical square box!
This was designed after pulling off the tab on a tissue box, and combining that with the tab tuck in feature on some boxed candy. You will see how the inspiration inspired a pull up tab that opens up the top of this box.

This box is so fun, fresh, and easy to assemble, that it is sure to quickly become a favorite for every occasion.
My sample here was make from a fuchsia cardstock.
I then printed, cut and layered my pretty Wind My Girly Gears patterned paper on the sides and back of the box.
Using the colors from the paper, I digitally colored the bird from the Wind Em’ Up set, then cut it out.
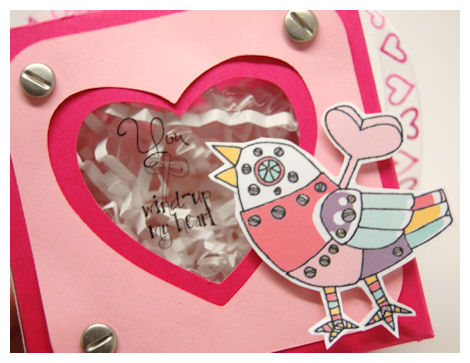
Prior to assembling the template I used the Flag’Em Down Cut File to create the window in the front of my box, and further enlarged it to cut the pink mat layer as well. I printed my sentiment “You wind-up my heart” from the Wound Sentiments set on my acetate sheet, and adhered it to the inside of the box.

This was such a FUN and SIMPLE project. Now I have something special, ready to go for a great gift 😀
Now I wanted to create a more masculine themed box, so I decided to use the Octagon template with a masculine flair!
Pull Tab Up: Octagon $5

Available in PDF, SVG, GSD, DXF, WPC
Completed Project Size:
4 1/4 X 3 1/2 Inches Wide
3 Inches Tall
This gear shaped (octagon) box is a unique take on its “sister” box, the Pull Tab Up: Square. Sometimes you want something that LOOKS more complicated than it actually is. This is a awesome shaped template for SO many occasions.

Upon assembling the Pick of the Petals box for a gift several months ago (OK maybe like a year ago! LOL!), I was inspired to take the fun pull tab design of the Pull Tab Up: Square , and designed an octagon shaped one too.

This box shape is so fun, fresh, and easy to assemble that it is sure to quickly become a favorite for every occasion.
Now how about the details on this creation!

So, to go with the bird theme I used the Trendy Forest © paper collection for my sample. It was a no brainer really. You think birds, then you think trees. I wanted something I could give to my husband this Valentines Day and I think this will be perfect.
I chose to use the colors from the paper collection to then digitally color the bird from the Wind Em’ Upset, then used my Cameo Silhouette cut it out. I love that the machine can cut out your digital images to perfection. No more handcutting for me!
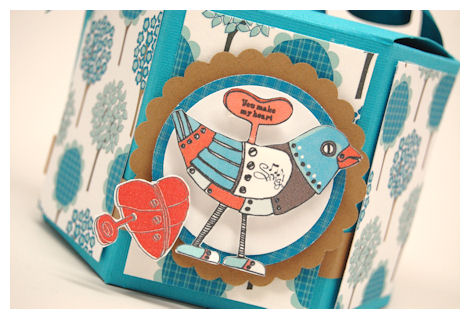
I printed my sentiment “You make my heart” from the Wound Sentiments set and put it on the heart wind up on the bird. I then took the “sing” from the sentiment and placed it on my bird’s wing. I love it. I proceeded to digitally color the heart gear from the Wind Em’ Up set as well, and add it to my box.
Supplies from My Time Made Easy ™ LLC
Pull Tab Up: Square, Pull Tab Up: Octagon
Wind Em’ Up, Wound Sentiments
Pretty Printable Digital Paper:
Wind My Girly Gears, Trendy Forest
Flag Em’ Down
So please be sure you check out all our NEW! Products as they are available for purchase TODAY!!!
I hope you are inspired to get crafting your own gift packaging, as it becomes a gift in itself. It really is all about the presentation, and when you take the time to make something from the heart is really matters to those you give it to 😀 You can affordably, and easily package up the simpliest of gifts and make them appear to be that much more special.
See you back here tomorrow!
January Release: Happy New Year Group Post
Jan 8, 2012 Author: mytime | Filed under: Cards, Home decor/3-D items, My Time Made EasyWelcome back everyone!
I really hope you are having a wonderful New Year.
I myself have been keeping super busy post holiday, planning products for the year, and embarking on several endeavors. We also added a new addition to our home recently 😀

Her name is Harper.
She is a 6 month old Cavalier/Shichon mix, otherwise known as “Teddy Bear” dog. You can read about her breed here <—check out the blue box.
Alexa picked out her name, and Amber agreed it was perfect. She is the prettiest wizard on Wizards of Waverly Place! LOL! I love that she was so excited to share her opinion on what we should name the dog, and actually had a great suggestion.
So we adjusting to the new change o this little furbaby bundle. She is adjusting so well, and is just a love.
Daisy is so happy to have a friend now!

This is Daisy at Christmas.
She is a cockapoo (a fabulous breed of dog!) and is is 4 now, and happy to share her family. When we brought Harper home, Daisy took her favorite toy Fox and dropped it in front of Harper, ready to play! They are so sweet together.
OK sorry I got a little off track. It’s been a long while since I’ve rambled! LOL! I have much more to share when the time is right, so I thank you for letting me share a little of my world again. Feels good 😀
Since we are coming back off a holiday we are keeping it light this month.
The team and I are all posting some projects today to kick start a new year of ideas.
Stop by and visit the team for a plethora of new ideas with our older products!
I would like to extend a HUGE thank you to the entire MTME team (and the product designers of course) for all their hard work this past year, and being there for me in every way. They are an amazing group of women that I am so blessed to have come to know. I extend my gratitiude to all the members on the Palette & Sketch team, which partake in weekly challenges on our blog. We all work together to share what we love and their support means the world to me.
Moving on…..
My project today will use a new template, the Sweet Treat Tote, but combined with something old and something new 😀
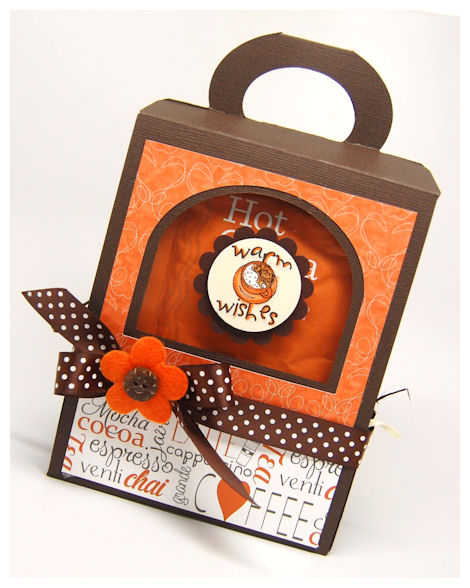
With winter comes cold days, and even chillier nights. I personally love a good cup of hot cocoa to warm me up, with some chocolate dipped biscotti. What better gift, than to share something you love with someone else?
So, I packaged up some of my favorite hot cocoa: Starbucks Salted Caramel.
It is LOVE in a cup, I swear. I find adding it to warm fat free cream gives it a RICH amazing taste, as oppose to milk, with less fat/calories.
I always use my gift item as the source of my design inspiration. In fact, that is why I began papercrafting in the first place. I love being able to package up and customize my gift packaging to coordinate with my gift.
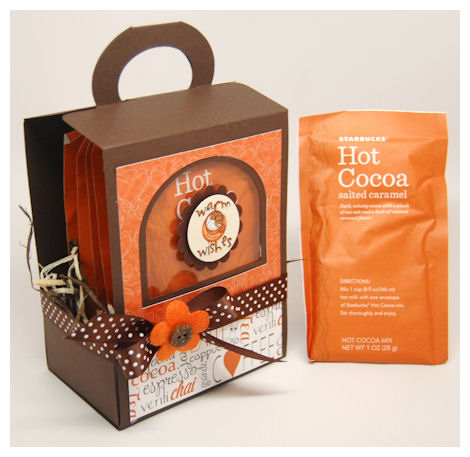
This package has a set of 8 cocoa packets! A great gift idea, year round.
My cocoa was inserted into the slide in box option, as you can see from the side view. Makes it easy to take out, and give a nice presentation.
I made my tote from chocolate cardstock. I applied an acetate sheet over the window that that I could add my main image to it! You can see that in the photo above.
I used the NEW! Sweet Sentiments for the design on my window. I printed it on vanilla cardstock, then colored it in. I love adding the white pen to the foam so it pops out at you.
My paper is from the All Steamed Up © collection, with the text print re-colored to coordinate with my steam pattern that I chose for the top part of the decorative layer.
Supplies from My Time Made Easy ™ LLC
Sweet Treat Tote
Sweet Sentiments
Pretty Printable Digital Paper:
All Steamed Up
Well thank you again for allowing me share what I love with the world! I have more to share with our new stuff and hope to return to post it really soon!
Thanks for stopping by!
Until next time.
November Release: Perfect Peek Day 1
Oct 29, 2011 Author: mytime | Filed under: Cards, Home decor/3-D items, My Time Made Easy, UncategorizedWe are previewing our NEW! Products for our November 1st Release.
I hope you are all getting ready to make those holiday gifts this year! We are making it easier and more affordable than ever, with an amazing variety of pretty packaging templates, cut files, coordinating stamps, and digital papers that are perfect for use all year round, and year after year.
You will want to get your first previews and some inspirational ideas today from:
For a few dollars you can customize your gifts for everyone on your list. By making your own packaging you are able to dress up the smallest (and even inexpensive gifts) and make them so much more presentable, personal and special.
All that being said, this month we have packed this release with some amazing NEW! products which include:
4 NEW! Pretty Packaging Templates
4 NEW! Pretty Impressions Stamp Sets
3 NEW! Pretty Printable Digital Paper Collections
4 NEW! Pretty Pieces Cut Files
So enough of the teasers, how about getting to the actual samples!
Since we have so much to share, I’ll give you a preview of a sample that uses a little of everything.
Available in PDF, SVG, GSD, DXF, WPC
Completed Project Size:
6 Inches Tall
3 3/4 Inches Wide
2 1/2 Inches Deep
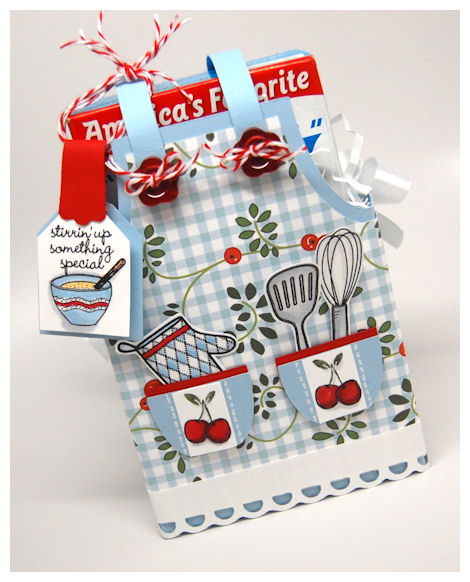
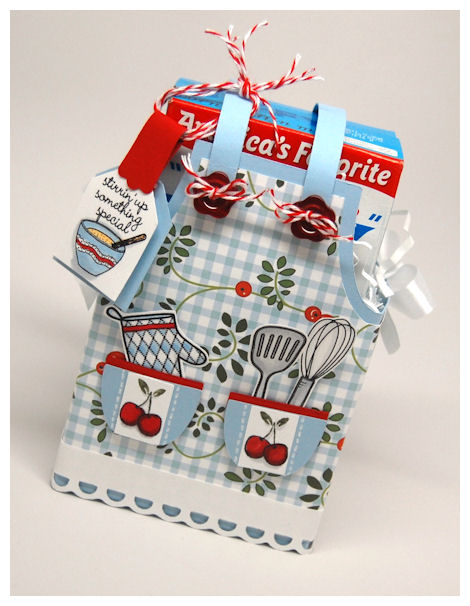
This template got its name not only from its “design” but for all the people and gifts this box can “cover” with one purchase!
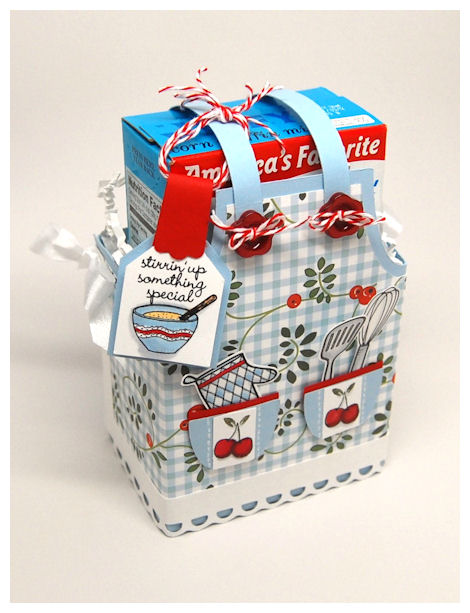
This Pretty Packaging Template can become Santa, worker elf (we have an ADORABLE set of 5 elf images releasing called Holly Jolly-wait till you see it!), or scarecrow’s overalls, overalls for both boy and girl, scarecrow body, an apron for the baker, or gardener, and it can become a handyman’s apron!
More of that to come!
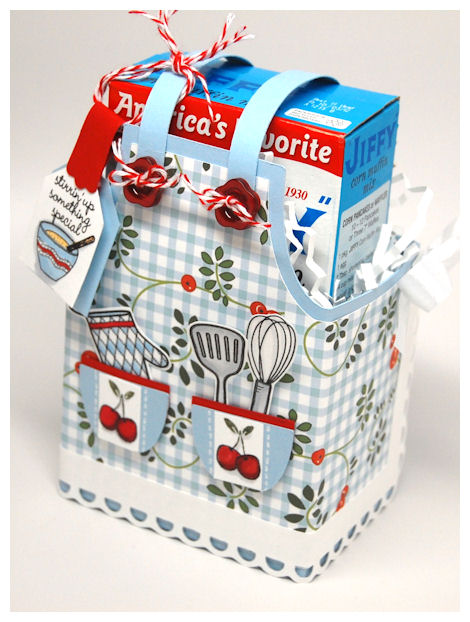
This template includes a decorative panel for easy layering, belt with buckle, two pockets and of course some snaps to keep those straps in place!
Here I used mine as a baking apron, to packaged up some VERY INEXPENSIVE Jiffy Corn Muffin Mix (I think it was 62 cents!), which is a great little gift for anyone on your list. You can package any Jiffy mix in here! This could become a great favor for a baking themed party, or to give to a child for a future “cooking” leeson! So many ideas cross my mind.
So speaking of ideas, and Jiffy mixes-Check out their website! They have many mixes and recipe ideas. You could give a mix, with a recipe card with it! Simple, easy & inexpensive. Plus I already designed this sample to inspire your design idea 😀 The Farmhouse Fresh Paper Collection is a perfect match to this classic box design!
 Here are a few idea’s:
Fill with homemade treats, mixes, breads, soup, gifts in a jar, desserts, cupcakes, candies, baking items, recipes, seed packets, gardening items, mini potted plants, items for co-coworkers/teacher, utensils, gift cards to a favorite supply store, homemade candles/soaps, as well as tool or tool themed items. Makes an adorable party favor for so many events and holidays.
So some details about my sample:
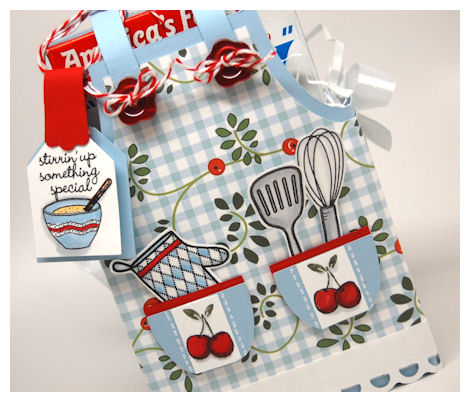
My sample here uses the NEW! Farmhouse Fresh Paper Collection for my apron “fabric”. On my pockets, I stamped some cherries from the Well Preserved © set.
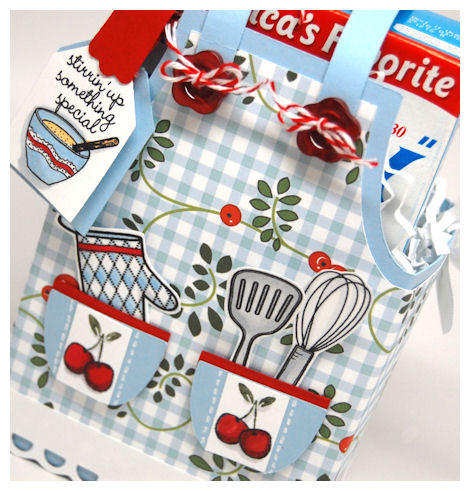
In the pockets are is an oven mitt, spatula, and whisk from the NEW! What’s Cookin’ set. The little tag was made using a fun sentiment from our NEW! Yummy Sentiments set. To literally “tie in” the baking theme I used some bakers twine to tie it to the apron.
My “trim” on the apron was created using the Border Builders Open Scallop © cut file!
There are SOOOOO many possibilities.
Here is more info about the stamps:
What’s Cookin’ Set of 18 Digital Images $12
Designed by Sara Williams
Mmmm…what ‘s cookin’?
Well whatever creation you “cook” up using this adorable set of kitchen/baking items, it is sure be be something wonderful! This set will help you really dress up any Pretty Packaging Template, especially the Cover-All template, which can be fashioned to look like an apron box!
Be sure you check out the Yummy Sentiments set, and the Baked with Love Single, as it is the perfect set of sentiments, designed to coordinate with this set. You will also want to check out the Sizzling Servings Pretty Pieces Cut File, as it was fashioned after the images in this set!

Yummy Sentiments Set of 14 Digital Images $8
Designed by Sara Williams
Have you been searching for some simply yummy sentiments to accompany your cards and gifts of the sweetest treats? Well look no further! This set has the cutest arrangement of sentiments, with a twist, that you will find perfect to use all year long.
Sentiments Include:
What’s Cookin’ ?
Stirrin’ up something special
To:
From:
ORGANIC
Merry Christmas
You’re Grate
Sugar & Spice and Everything Nice
Home Cooked Just For You
Sweet Holiday Greetings
Tis the season to eat homemade goodies
Just a little something whipped up for you
Something sweet for someone neat
a yummy treat for you to eat
Be sure you check out theWhat’s Cookin Set, and the Baked with Love Single, as they are the perfect set of images, designed to coordinate with this set.
Also note we have a fun cut file set called Sizzling Servings!
Sizzling Servings $2.50
Available in PDF, SVG, GSD, DXF, WPC
By Sara Williams
This cut file features an oven mitt, frying pan, and a cute canister/jar! This is a fun cut file in which multiple layers create these finished items that are sure to make any baking themed gift, card, tag or project just SIZZLE!
Supplies from My Time Made Easy ™ LLC
Cover-Alls
What’s Cookin’?, Yummy Sentiments, Well Preserved
Pretty Printable Digital Paper:
Farmhouse Fresh
Sizzling Servings
As you can see you can really “cover” all your bases for gift giving, all year round, year after year!
So go ahead and personalize this design this to suit the lucky recipient!
Those of you hoping for more HOLIDAY themed ideas, don’t fret! You will want to check out our amazing design team! As the days go on the team and myself have much more to share. I like to show you that while these items can be holiday specific, they can also be versatile for use year round as well. Also remember that just because it IS the holidays doesn’t mean your actual gifts HAVE to be holiday specific.
Thank you all for stopping by! This is just a little preview at what’s to come, so return tomorrow for even more samples and gift ideas.
Perfect Peek Day 2
Sep 29, 2011 Author: mytime | Filed under: Cards, Home decor/3-D items, My Time Made EasyTomorrow is the official release for our NEW! Products for October!
Two preview days isn’t nearly enough time to show you everything we have to share, so I hope you will keep checking in with myself and the team this week as we share our many project idea with you!
Today be sure to visit:
You will also want to check out our Gallery for amazing ideas and inspiration any time you need a little creative spark to get you crafting.
Feels like Fall already, as my family attends the Annual Deerfield Fair today. We always enjoy it, as it falls an Alexa’s birthday weekend each year.
Feeling the fall air inspired me to create this gift ensemble using the NEW! That’s a Wrap! template.
I began my project by using the used the Fresh Cut Expressions © Collection 2 digital paper, to inspire my colors. It has a feminine fall feel to me. The paper really showed off the fun layers, and curves this template has.
If you are always on the search for additional ways to perfectly package up those handmade cards, tags and many other gift items, then this is definitely the Pretty Packaging for you!
Available in PDF, SVG, GSD, DXF, WPC
Completed Project Size:
5 3/4 Inches Wide
4 3/4 Inches Tall
1 1/2 Inches Deep
Now this is a wrap!
This was designed to fit your standard A2 Size cards (4 1/2 X 5 1/2) and envelopes, as well as many other gift items, as versatility is always important.
Your items get placed in this stunning box, then are wrapped to perfection every time, for the perfect presentation.
The main box is usable in itself, but for that special decorative flair, we’ve added this amazing “wrapper”, and scalloped or straight edge bottom panel to make it even more fun!
The That’s a Wrap box ends up becoming a gift all in itself. Will they even notice what you put inside? Maybe not!
This is the unfinished version:
You can tie it closed, and untie it open!
Or you can use removable adhesive, snaps, brads, magnets, or velcro.
Whatever you choose to package up, someone gets to unwrap something wonderful!

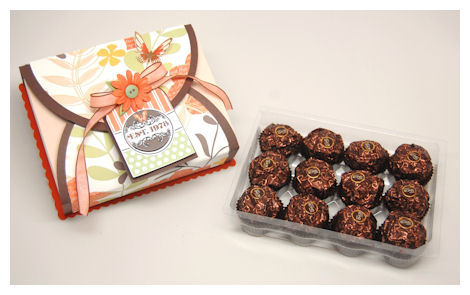
Here I placed an entire package of 12 chocolate truffles inside, that I bought for $3, but now packaged up in the That’s a Wrap template, it looks so much prettier than that plastic container they were purchased in.
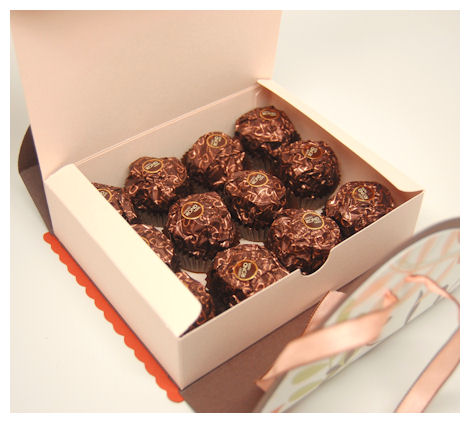
I would’ve wrapped up a set of cards, but wanted you to think outside the box-literally, when thinking about things to gift inside here.
I love how all the Pretty Packaging Templates can take something ordinary to extraordinary in no time all, and so inexpensively.
This gift packaging template is just perfect for gift giving year round.
We have many amazing Pretty Impressions images, Pretty Pieces Cut Files, and of course Pretty Printable Paper Collections, that will aid you in decorating your That’s a Wrap template!
I used some NEW! products here on my tag!!!
The tag was layered and created using the NEW! Well Rounded set. I really enjoyed making it!
The butterfly is from the Bold Botanicals © set.
Details about the Well Rounded Set of 36 Digital Images $12
This is an amazing tag building set, that was designed to coordinate with the Well Rounded Tag Cut File.
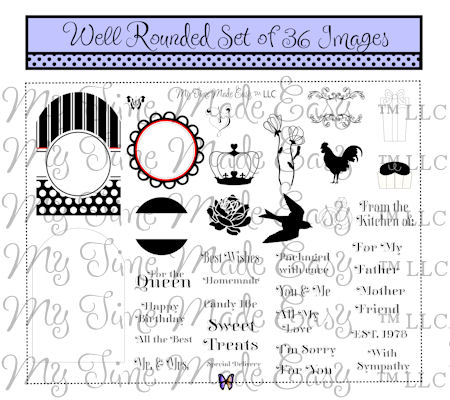
This set features many images, with coordinating sentiments that allow you to create a tag for so many beloved occasions. Mix and match this set with others in your collection for an amazing variety of possibilities for a variety of gifts.
Sentiments include:
All the best
Happy Birthday
With Sympathy
For the Queen
Homemade
Best Wishes
Sweet Treats
Special Delivery
You & Me
All My Love
I’m Sorry
For You
Packaged with care
Candy 16 ¢
Mr. & Mrs.
EST. 1978
From the Kitchen of:
For My
Father
Mother
Friend
The tag was cut using the Well Rounded Tag Cut File $2.50
This is an amazing tag building cut file, that was designed to coordinate with the Well Rounded Pretty Impressions Stamp Set. While this tag is perfect on its own, I think you will enjoy the possibilities of combining it with many of our amazing Pretty Impressions images, and of course Pretty Printable Paper Collections!
Supplies from My Time Made Easy ™ LLC
That’s a Wrap
Bold Botanicals, Well Rounded
Pretty Printable Digital Paper:
Fresh Cut Expressions 2
Well Rounded
So that is it for today!
There is so much more to share as we kick off our October Release tomorrow, so please stay tuned for that, as we have so many amazing new products you’ve yet to see, being released!
Till then…
My Etsy

Who I Designed For
Blogroll
- Alicia
- Alli Miles
- Ally Blankenship
- Amber
- Andi @ crafts on a whim
- Angel R
- Angie Z
- Anne Kranitz
- Becky O
- Bee
- Beth Silaka
- Bethany Paull
- Beverly Nash
- Bobbie
- Cambria
- Cammie
- Card of the Week
- Card Positioning System (CPS)
- Cards for Cancer
- Catherine Doucette
- Charmaine
- Cheryl Sims
- Chriss Rollins
- Christina
- Christine Ewing
- Christine Wooden
- Colleen Schaan
- Craft Critique
- Craft Gossip
- Crystal
- Dawn Easton
- Emily Giovanni
- Geny
- Holly
- Igne Groot
- Inspirational Craft Blogs
- Irene
- Jami Sibley
- Jeanne Streiff
- Jen del Muro
- Jeni Bond
- JenMarie
- Jenn Balcer
- Jenn Diercks
- Jenn O
- Jennifer E
- Jennifer Mick
- Jennifer Pereda
- Jennifer-Sweet Treat
- Joanne Basile
- Jodi Collins
- Julia Stainton
- Julie Masse
- Karen
- Kathryn Berthiaume
- Katie Cotton
- Kelley Holland
- Kendra
- Kim Scholfield
- Kris’s Color Stripes! Get inspired here
- Kristen Dubosque
- Kristin Eberline
- Kristine
- Laura @ Sunshine Stamper
- Laura Turnmire
- Laurie Schmidlin
- Lesa Rapp
- Linda Duke
- Linda-LSN
- Lindsey Botkin
- Lisa (lakind scs)
- Lisa Kind
- Lori Craig
- Maggie
- Mara Campbell
- Maria
- Maria Levine
- Mary
- MaryJo
- Melanie M
- Monique Hansen
- Moxie Fab World
- Pam Imholz
- PaperCrafts Connection
- Peppers and Pollywogs Kids party site
- Rebecca Grohall
- Rita
- Robyn
- Rose Ann
- Sarah Vrolyk
- Sharon Harnist
- Sharon Johnson
- Sharon Rivera (a chemisrty with paper)
- Sherrie
- Sophia Landry
- Storage Units, Ink, & More Blog
- Sue Berker
- Susan (Rainy)
- Tangii Crane
- Tracy
- Tricia Traxler
- Trudee
- Velta
- VivLyn
- Zena
MTME Pretty Palette Color Team
MTME Pretty Patterns Sketch Team
My Time Made Easy TM LLC
Shop till you drop!
Lauren Meader
About Me
Copyrighted material
Subscribe To My Blog
Pages
- About me
- Alexa’s Story!
- My Crafty Corner!
- My Time Made Easy™ LLC
- Our Make A Wish Trip to Disney!
- Resume/Publication List
Calendar
| M | T | W | T | F | S | S |
|---|---|---|---|---|---|---|
| 1 | 2 | 3 | 4 | 5 | 6 | 7 |
| 8 | 9 | 10 | 11 | 12 | 13 | 14 |
| 15 | 16 | 17 | 18 | 19 | 20 | 21 |
| 22 | 23 | 24 | 25 | 26 | 27 | 28 |
| 29 | 30 | |||||
Archives
- August 2013
- July 2013
- June 2013
- May 2013
- April 2013
- March 2013
- February 2013
- January 2013
- December 2012
- November 2012
- October 2012
- September 2012
- August 2012
- July 2012
- June 2012
- May 2012
- April 2012
- March 2012
- February 2012
- January 2012
- December 2011
- November 2011
- October 2011
- September 2011
- August 2011
- July 2011
- June 2011
- May 2011
- April 2011
- March 2011
- February 2011
- January 2011
- December 2010
- November 2010
- October 2010
- September 2010
- August 2010
- July 2010
- June 2010
- May 2010
- April 2010
- March 2010
- February 2010
- January 2010
- December 2009
- November 2009
- October 2009
- September 2009
- August 2009
- July 2009
- June 2009
- May 2009
- April 2009
- March 2009
- February 2009
- January 2009
- December 2008
- November 2008
- October 2008
- September 2008
- August 2008
- July 2008
- June 2008
- May 2008
- April 2008
- March 2008
- February 2008
- January 2008
- December 2007
- November 2007
- October 2007
- September 2007
- August 2007
- July 2007
- June 2007
- May 2007
- April 2007
- March 2007
- January 2007
Categories
- About Me
- All That Scraps
- blogger challenge
- camera/photo play
- Cards
- Contests
- family stuff
- FOR SALE
- Home decor/3-D items
- How to FAKE it!
- Introduction
- JUGS Challenge
- JustRite Stampers
- Lizzie Anne Designs
- My family stuff
- My Stamping Space
- My Time Made Easy
- My Time To Color Challenge
- My Time to Create Challenge
- My Timeless Template Challenge
- My Timeless Templates
- Mytime Mail
- MYTIME MOVIE/VIDEOs
- Papertrey Newsletter
- Pink Cat Studio
- Pretty Palette Challenge
- Pretty Patterns Sketch
- Product Opinions and Must haves
- Recipe's
- Saturday Sketch
- Smilebox Creations
- Stampavie
- Tutorials
- Uncategorized
- videos
Most Popular
- Create your own Onesie Card Tutorial-and important NOTE! PLEASE READ (2529)
- Saturday Sketch-Boxed bag holder (2333)
- Going GREEN! Fancy Flower Flourish-Closure Video (1478)
- Fabulous Favorite - Giveaway! (1336)
- a Prayer Request (1232)
- QUICK-Easter Baskets from Nestabilities-PTI style-and blog challenge (1063)
- Teaser Sketch (999)
- February Release Giveway! (and a little peek) (996)
- Group Post and Rambling Rose Video Tutorial (985)
- GIVEAWAY! Who wants it all?! (895)
Recent Comments (RSS)
- 첫충사이트: 완전히 흥미로운 블로그 게시입니다. 저는
- sarah: Wow, Lauren, what a stunning
- hedie: خرید راهبند
- 야동: Love to read it,Waiting For
- 야동: This seller is in a
- 바카라사이트: 여기 처음 왔어요. 나는이 게시판을
- 야동티비: I was surfing the Internet
- 바카라사이트: 비슷한 주제에 대한 흥미로운 정보를
- 바카라사이트: "여기에 제공해 주신 귀중한 정보와
- 온라인홀덤: 유익한 웹 사이트를 게시하는 데
Copyright © 2007 - My Time, My Creations, My Stampendence - is proudly powered by WordPress
This blog has been Tweaked and Designed by Sara Williams