Archive for the ‘Cards’ Category
Yes! I am here.
I’ve been with my family. My grandfather went home after his opne heart surgery on Saturday. That is ONLY 6 days after! Alexa had a terrible tummy bug until yesterday. High fevers of 104 on and off :C
All that and about a MILLION other things going on.
I know I’ve been quiet, but I have LOTS to prepare for! With the soon to be opening of my store My Time Made Easy© LLC
I have been BUSY working on finalizing ALL the details for my FIRST release (and the second one too! LOL!) of 2 Creative Gift Packaging templates, coordinating stamps, and digital Pretty Printable Paper.
I’m so excited with everything I just can’t wait to share it all.
THIS MONTH……I want to offer a FREE Creative Gift Packaging Template and Pretty Printables Digital paper pack.
I’m working like crazy to get this all posted ASAP!
I have one FREE Creative Gift Packaging template and coordinating digital Pretty Printables © paper pack that I am HOPING to make exclusive to my EMAIL subscribers ONLY! So if you haven’t yet, sign up! You can go HERE <—-CLICK IT
The 2nd Creative Gift Packaging template and digital Pretty Printables © paper pack will be on my site, available to everyone. I will keep you ALL posted when all this comes to be, hopefully in the next week OR TWO!!!
I want you all to be able to give things a try before the BIG opening 😀 That means I have to work my hiney off to prepare all that. So that means less time here, until I get that all set. Trust me its WAY more work than it appears to be, but I am making so much progress. My web girl Sara (who is the best in the buisness and I would trust NO ONE else to do anything like this for me :D) is kickin butt, as are my design team. Wait till you see!!! I have had LOTS of help (I am a very good delegator! LOL!) and have a LONG list of thank yous that I’ll have to share soon too. It is all about TEAM WORK! I am ever grateful to everyone who has helped me get this up and running.
No worries…..there will be samples………and my design team is already whipping out ideas for you all (you’ll learn more about them soon too!)
In the meantime…..I scoured my files to find SOMETHING to share with you all…….
THIS MUCH
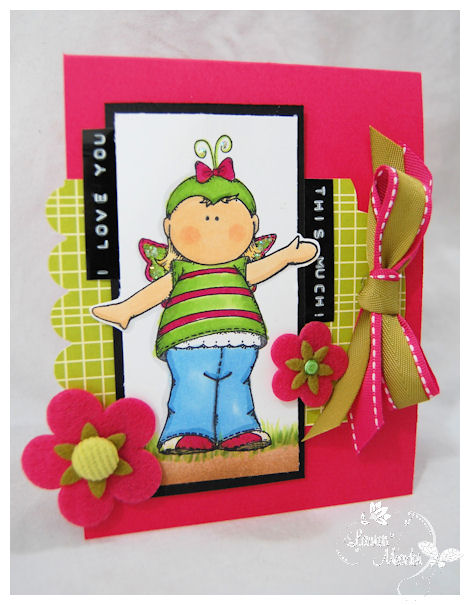
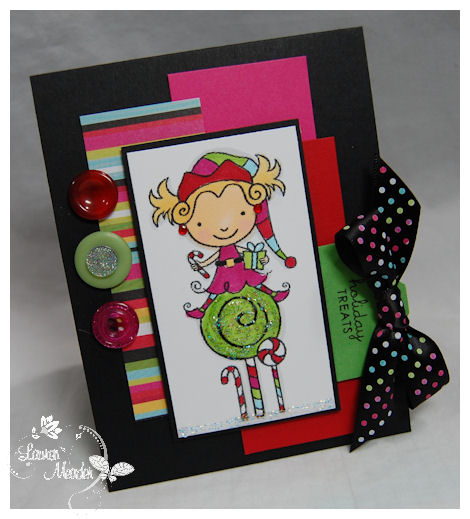
How cute is this little girl? I’m sending this to all my “helpers”.
This color combo is in honor of my friend Kristin!She doesn’t like Melon Mambo and Olive together, but I do!LOL!
I made her over a month ago! I was reminded of this creation yesterday.
This image is from Hangler and Stangler (?SP). A dear blog reader of mine sent me a HUGE luscious pack of pres-tamped images 😀 I can’t find her blog link (so if she reads this please let me know) but hope to post it if I do. She is wonderfully talented! I have long coveted this pack of images, but decided I HAD to color some 😀 Felt so good. Now I don’t know WHERE on earth you can find these images. I believe they are from the UK?? I could be wrong. I live in my craft room so I’m lucky I keep up on ANYTHING! Trust me.
I loved her little butterfly costume. I added some stickles to her wings too. I used my OLD label maker to create my sentiment. Its been SOOOOO long since I’ve done that! Oh man! t was fun though. I created my OWN tag going across the card. Too fun.
Well I must get going. Lots more to do
Check back in tomorrow as I will be participating in a Christmas Gift Blog Hop for JustRite Stampers!

Its a super cute project that even the kids could do, so come back!
November Papertrey Ink Release
Nov 16, 2009 Author: mytime | Filed under: Cards, Home decor/3-D items, My Timeless Templates, Papertrey NewsletterSORRY! I know this is late.
As you all know I’ve been sick, so I really needed a quick break to rest up. It isn’t easy when you are sick SMACK in the middle of a big release!! There is NO time to rest when you have projects to create and share.
I’m still not 100% so won’t be too chatty I fear (maybe that is a GOOD thing! LOL!)
My projects are in my Papertrey Ink Gallery but many of you have asked when I’d post HERE!
You really didn’t miss too much since most of the peeks were revealed during the countdown.
BUT, I never like to disappoint 😀 So here are my Papertrey Ink Release projects for November, starting with the newest My Timeless Template © Time for Take Out
What can I say, I LOVE this template. REALLY love! If I wasn’t sick you’d see a million variations popping up, I swear.
I have to say Terracotta Tile is STUNNING!!!!!!!! Love the color.
I decorated both sides to be the same (of course!)
I just used the NEW! Turning a New Leaf, and some more punched paper flowers. I think it turned out quite eye catching, with little work, and very little time 😀 A great mass production project 😀

Then a EASY PEASY card to match!
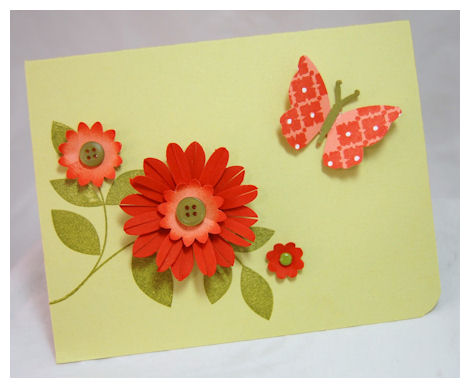
Supplies:
My Timeless Template: Time for Take Out
Stamps: Turning a New Leaf, background basics: diamonds
Cardstock: Spring Moss, Terracotta Tile, Ripe Avocado
Ink: Ripe Avocado
Ribbon: Ripe Avocado Stitched
Buttons
Flower punches, EK Success Bfly punch, adhesive rhinestones
Now the reason I have gotten SO many emails (awe! I love you all! You make my day :D)
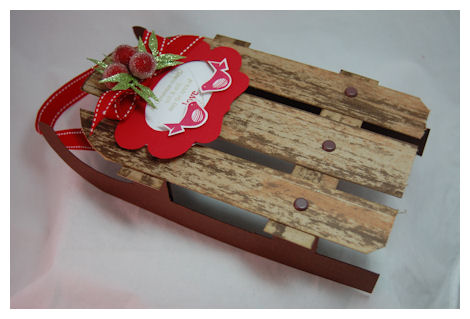
Hanging Sled of Love
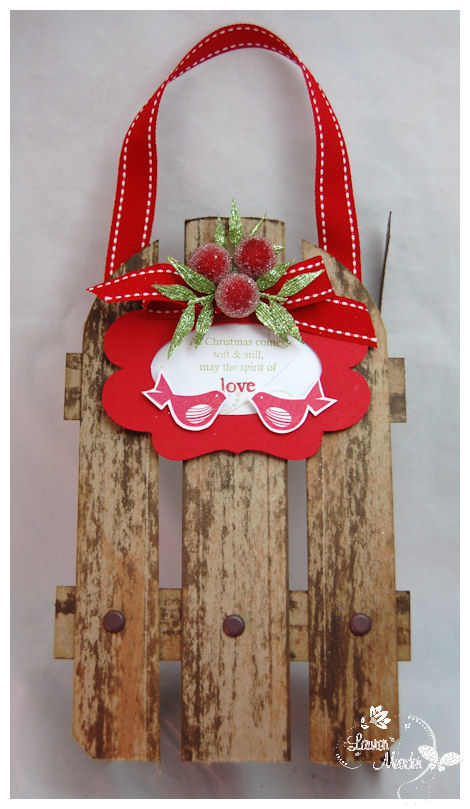
This actually hangs on a door or can be put on a table with some little gifts on top (how cute would that be?! ) A FAB centerpiece for sure. I always wanted a template like this 😀
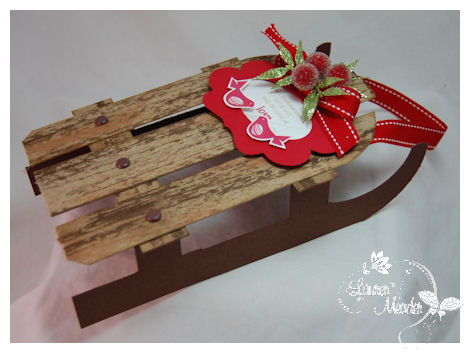
I hand made this sled (for my door this holiday!) out of chipboard that I distresses with tea dye ink! Its rather large too! About 8 inches long and 6 inches wide ( I THINK!) I made it some time ago and have had to wait to post it.
I*may* post it as a holiday freebie if I get some time this week 😀
Here is the tag detail
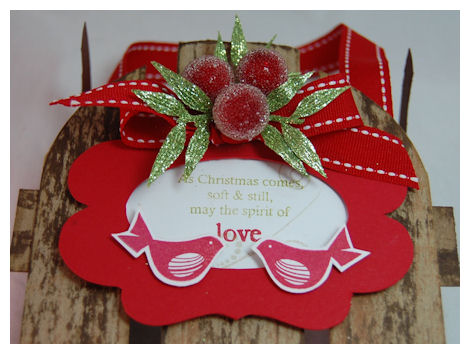
You cold even personalize it with the last name of your own family! Now that would look COOL!
Stamps: Christmas Friends, Snowflake Serenade, holiday tree
Cardstock: Kraft, dark chocolate,white, pure poppy
Ink: tea dye ink duo, spring moss, gold
Pure Poppy saddle stitched ribbon
label from Slice studio essentials cartridge, garland pieces
brown brads by SU!
Check back tomorrow morning, because I have a blog hop project for the NEW! JustRite Stampers release!
(told ya-busy! busy!)
#3 Communique Curves Inspirations and another template peek
Nov 11, 2009 Author: mytime | Filed under: Cards, Home decor/3-D items, My Timeless Templates, Papertrey NewsletterWell are you loving all the goodies this month?
I have been DROOLING reading about all your yummy treats you give around the holidays! I may have to hit some of you up for the recipes 😀 If you don’t mind 😀 The template winners will be posted tomorrow 😀
Well today we have a group post. This is the first set this year from Allie Miles. It is called Communique Curves & Sentiments. We were asked to take this set and show you two variations of the same card! So, basically create a holiday card, then an everyday type of card.
Here is my set: Happy Holidays Duo

I love how you can use the same layout, then by swapping out the images, and changing the colors, you get a totally fresh and new look! You really can get lots of mileage out of stamp sets when you have a few key layouts! Just keep re-using them, and changing different elements! This also shows you don’t need a ton of supplies to make great looking cards.
Here is Tis the Season
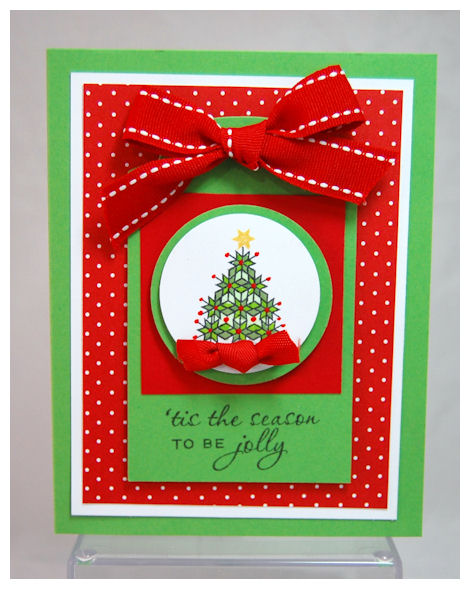
The main layer is a tag I cut. This is a very basic layout that can serve circle, heart, or rectangle image centers!
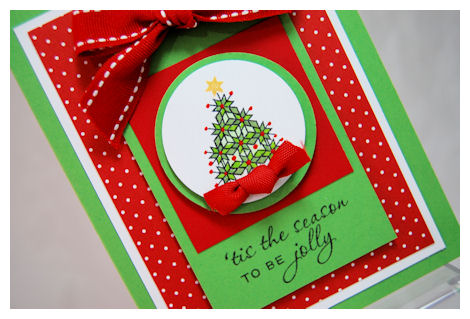
I used various copic markers in shades of green to color my snowflake style tree. Quick and cute!
Supplies:
Stamps: Communique curves & sentiments
Cardstock: New Leaf, Pure Poppy, White
Patterned Paper: Bitty Dots
Ink: Black & Copic
Ribbon: Pure Poppy twill & Saddle stitch
circle punches
Now keeping with similar elements, we move on to a birthday card.
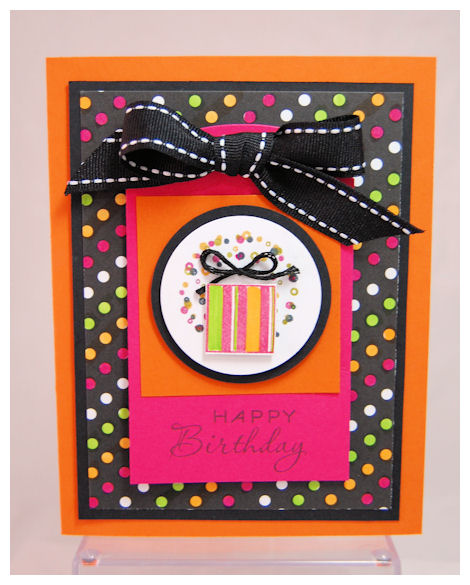
I colored my paper to match

Again dotted paper, tag center, everything exactly the same, except my image and colors.
Fun huh?
Supplies:
Stamps: Communique curves & sentiments
Cardstock: black, white, raspberry fizz, orange zest
Patterned Paper: Black & white basics
Ink: black, rspberry fizz, orange zest, avocado & copic markers
ribbon: stitched grosgrain
circle punches
Be sure to check out what the team has done:
Now I have another fun post to share!
How about another template peek?
This was a quickie. Sorry I’m going to be brief. I’ve been sick the last few days and the worst of it is really hitting me now. I feel like I have sinus infection. Not fun. OK enough about me and my drama-just note I typed this on lots of cold medicine so I apologize in advance if its a bit “all over”. I’m doing my best.
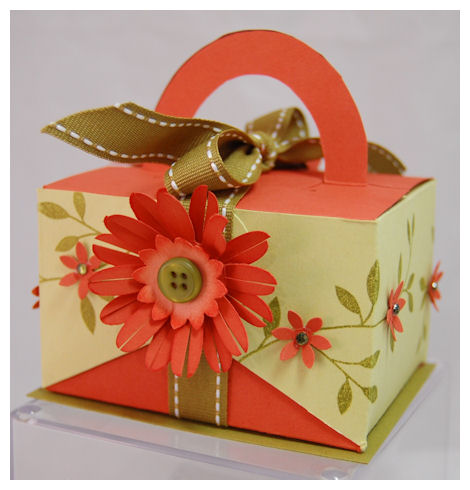
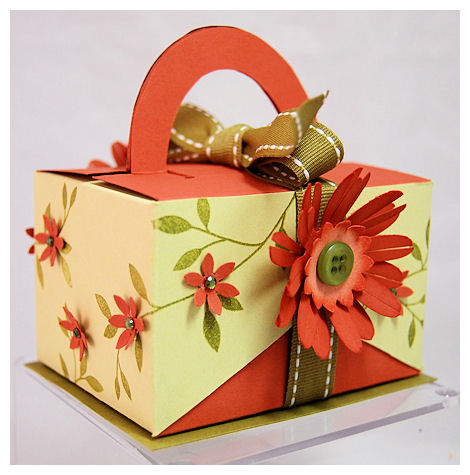
Happy Everything

Here we have another version (the standard size) with newest template (releasing on the 15th) Time for Take Out. I can’t tell you how fun this little box is! You may recall I used it for my daughter Amber’s birthday party —->HERE! I didn’t show any details yet, but I loved it and had to use it early! It can be hard sitting on some great template ideas for so long! Keep in mind I still have like 40 templates you have yet to see. So, when I need one and it fits, it can be hard not sharing what I made. I’m sure you can imagine being in a constant state of suspense. It gets exhausting! LOL!
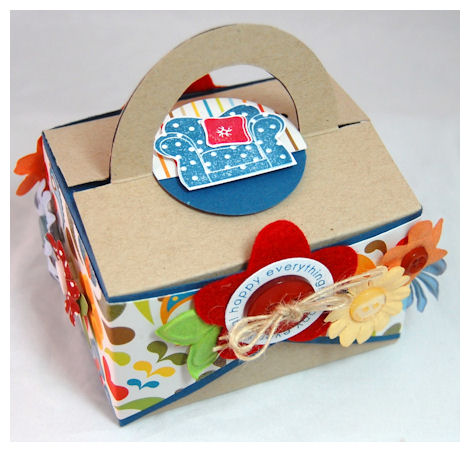
I so loved this patterned paper I had in my stash. The colors were SO cheery. So I went with that, for the sentiment “happy everything”.
I added some paper flowers, and buttons around the box. Both sides of this box are ALWAYS designed to look the same. Its just one of those templates that you should try to make pretty no matter WHAT way you turn it.
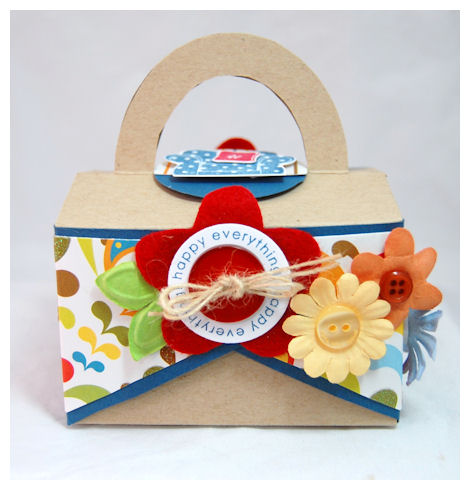
I was thinking cheer up, new apartment, everyday sort of gift box. Maybe put some treats in there, with a gift card or a gift of tea, maybe even candles, or tea lights…..warm slipper socks! I love those. Just a warm gesture of friendship.
Supplies:
My Timeless Template: Time for Takeout
Stamps: On my Couch, Around & About sent.
Cardstock: Kraft, White, Enchanted Evening
patterned paper unknown source
Ink: Enchanted evening, pure poppy
buttons
Prima flowers
Well, tomorrow is our BIG group post using the stamp/template combo Home Made © ! You won’t want to miss that. Plus the template winners will be announced.
Thank you all for stopping by and sharing my excitement. You all make every moment I spend sharing here so enjoyable. I cannot tell you how amazing it feels. I always enjoy reading your comments, emails and when you share your creations with me as well!
Thank you again!
Our Family Tree
Nov 5, 2009 Author: mytime | Filed under: Cards, family stuff, Home decor/3-D items, Papertrey Newsletter, UncategorizedToday’s project is just one example as to WHY I love this craft so much, and sharing what I love to do with the world!
If this doesn’t get you excited for the holidays then I don’t know WHAT will. I am beyond excited to share this is a super fun project that is INEXPENSIVE, and you can even let the kids make their own!! (After you do the basic assembly of supplies!) THIS is a gift worth giving every family member at some point, and it doesn’t even have to be HOLIDAY themed!!
Would you believe it if I told you that this was originally a Wire Folding Easel? <—- Seriously check it out
Family Tree
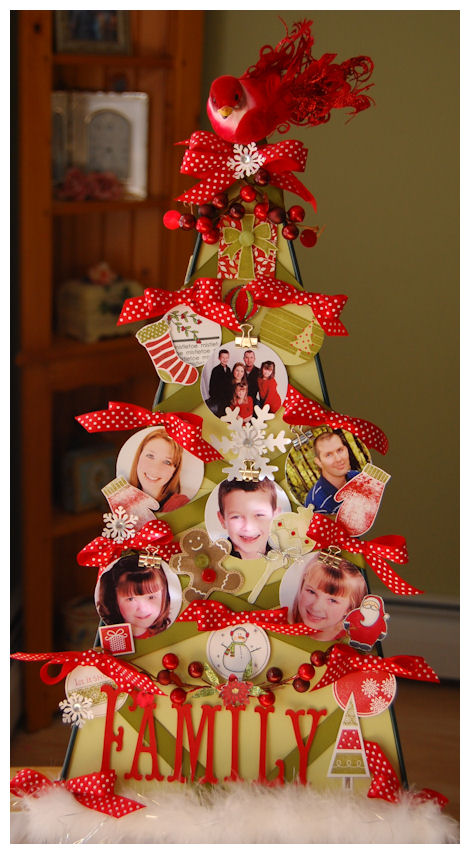
Would you believe me if I told you that I used it to designed my very own photo/card display for ONLY $2.29?
Well believe it.
I have longed to create a special photo/card holder to display during the holidays. One that I can easily switch out photos & cards for, year after year. The store bought ones aren’t generally festive, and can easily cost upwards of $20. All you need is a little imagination and some Papertrey to get your own started!
I was in the plant supply section at JoAnn’s, buying some festive elements to use in my holiday gift packaging. This is definitely the time of year I make something for everyone!! While in the aisle, my 5 yo daughter Amber said “Mommy, is that like a Christmas tree?” and she pointed to the wire easel. IMMEDIATELY my mind began SPINNING!! I said “It’s not suppose to be a tree, but you have very good eyes Amber! We are going to take it home and make a special tree for our house!” I literally forgot about everything I was there to get and about 2 hours later this project was made! Now It took 2 hours because I had NO IDEA what or HOW I was going to execute the “tree” that was in my head.
So with a little cardstock, Scor-Tape, hot glue gun, ribbon, clips, my Cricut Expression, and of course some festive holiday stamps
(—> Click here to view all the images listed in my post)……and our Family Tree was made!
Here is how: (and NO I didn’t get step by step photos, I needed my hands to keep up with my brain, and quite honestly I didn’t think this would actually work! LOL!)
I first wrapped my ribbon around the easel, being sure to secure it with glue as it wrapped around the wire frame. I laid the tree on the floor and used 2 pieces of spring moss cardstock to trace the tree. I then cut them. I used my Scor-Tape to adhere the cardstock to the BACK of the open wire easel frame.
BE SURE TO KEEP EVERYTHING NEAT! You can see the back and sides on this project! NO messy stuff OK.
Added my metal clips to the ribbon that criss crosses in ripe avocado …….then just like after you apply your lights to the tree, you decorate it!
Tippity Top of the easel tree
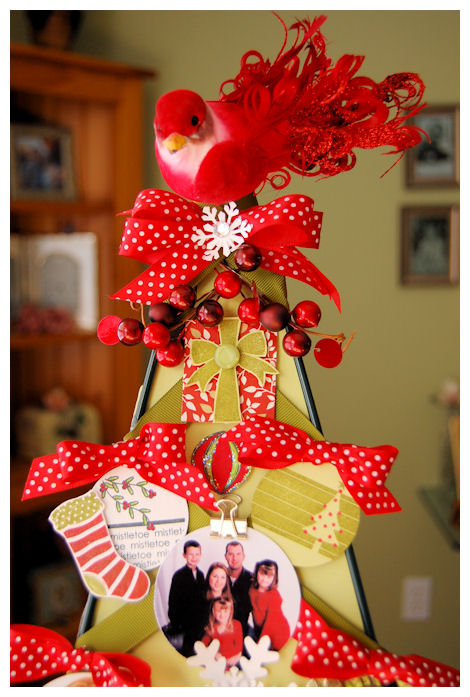
There was a little hook at the top of the easel. I used it to insert my bird. There was a clip under the bird but I removed it. Squeezed in some hot glue, then stuck it onto the hook. I got the bird at the craft store to use as my tree topper (and cover the hook!) I added some of the berries I purchased to the top as well. I used the gift from Holiday Button Bits. I also used an ornament from Vintage Ornaments.
I also used the 2009 Holiday tags, and Stocking Prints. Then our family photo at the top!
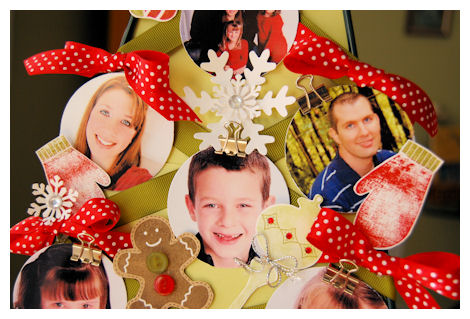
I punched some snowflakes, and added a photo of myself, Jason, and Noah in the middle. I used the mitten image from Snowfall on either side. I thought they looked cute not fully inked.
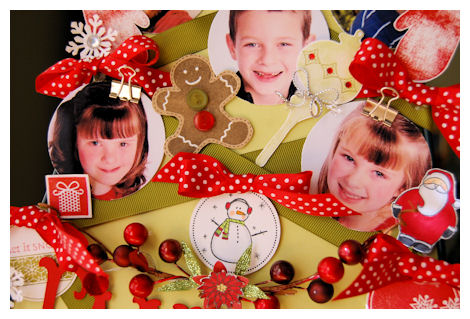
Now under Noah’s face we have the gingerbread man from Holiday Button bits, as well as Santa next to Amber! For Alexa I used a little present from Sign Language. You can also see another Vintage ornament, and the snowman tag from 2009 Holiday Tags.
Added some more berries, and the poinsettia from Peaceful Poinsettia to the center. More tags from the 2009 Holiday Tag collection!
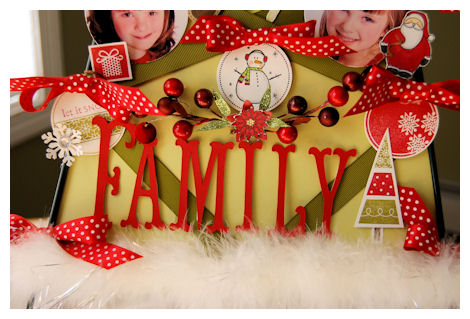
I had to design the bottom to spell out “Family” tree, then use the tree image from Merry & Bright at the end!
Now “Family” is spelled out using my Cricut Expression Story Book cartridge.
Last but not least, I added some white tinsel furry stuff (what is that called??) to look like a snowy bottom.
Once again here is the completed tree
Supplies:
Stamps: Merry & Bright, 2009 Holiday Tags, Snowfall, Holiday Button Bits, Vintage Ornaments, Sign Language, Stocking Prints
Cardstock: White, Spring Moss, Pure Poppy, Kraft
Ink: Black, Pure Poppy, Ripe Avocado, Copic Markers
Ribbon: Ripe Avocado grosgrain, Pure Poppy polka dot
Other: Easel, metal clips, Cricut Story Book, circle punch, snowflake punch, hot glue gun, Scor-Tape, bird, berries, fur, adheisve rhinestones
Now I bet you cannot wait to decorate your own!
Just pick a color scheme and get going.
Now this will be for our family photos, but you can certainly use to hold cards and other fun items too! Maybe even an ART tree for your child’s art work?! Endless possibilities!
Thank you ALL for stopping by!
I can’t tell you how fun this was. Kids have such a great eye for seeing something in other items! For example, just go cloud gazing and you will be shocked at the imagination of a child! I give my daughter Amber full credit for the idea behind this project! I never would have seen a “tree” in that isle. I would have totally overlooked that ugly easel!
Note to self: Take Amber with you on ALL trips to the craft store, from now on!
I meant to post yesterday!
If you missed it, it was the November Release for All The Scraps! Be sure to check out all the new images —> HERE! You can also see some great samples from the Design Team —> on the BLOG
I’ve been so preoccupied with my family and some really cool new ventures for me 😀 I’m really excited about everything. I have worked so hard to be able to share what I love and have really been blessed to be able to do that. Stay tuned for more on all that! This is all another post for another day. Oh and pray that my body can keep up with my brain! LOL! I’m really in overdrive and the hours are flying by. Plus I’m gearing up for another My Timeless Template © release! This one will blow the roof off the release 😀 Wait till you see.
So I have a quickie sample for today with the latest release from ATS and it is called Christmas Time
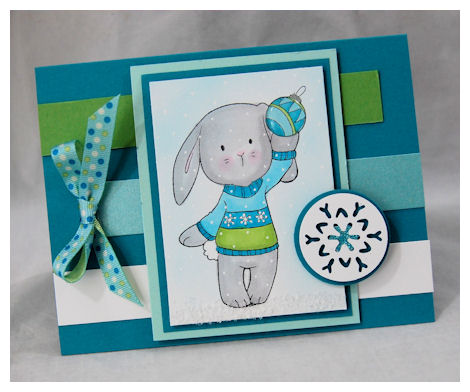
I adore this lil bunny. Loved the sweater! Just too cute. I kept up with the stripes of the sweater in the card design.
Clean and simple.
Now maybe you can see some details
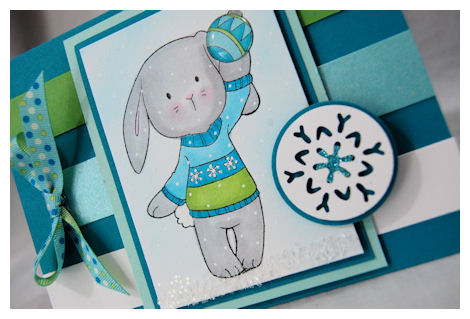
The ornament had a page pebble to make it 3D and look like a glass bulb. A lightly airbrushed sky.
There is some glittery snow, and I dotted on some falling flakes with my singlo gel pen. The aqua layer of cardstock shimmers!
Ribbon to match 😀
EASY PEASY!
Well I’m back to running around. Those of you asking how I made the Santa in my last post, it is linked to last years gift card. It is really just circles!
Thank you all for stopping by. I have some great things to share the next 2 weeks so come back soon.
2009 Photo Finish Holiday Cards
Oct 31, 2009 Author: mytime | Filed under: Cards, Home decor/3-D items, Papertrey NewsletterDo you believe that we have *only* 54 days till Christmas? THAT is insane.
I have a ton to do in preparation for the holidays, and that includes creating our family Christmas cards. Our Papertrey Ink Senior Design team Challenge is to incorporate your photos, into your holiday cards!
The holidays are the perfect time of year for sending cards and photo updates to all your family and friends. I always do some sort of photo card each year. There are SO many possibilities. I generally make several different versions, then pick one. I like to try to have our family photo taken BEFORE Halloween so I have PLENTY of time to think about my design and colors. You can see that post —>HERE! If I need to order supplies, then I should have enough time for everything to arrive, even if it goes out of stock.
Today I have three different versions of our family photo cards to share!
First one
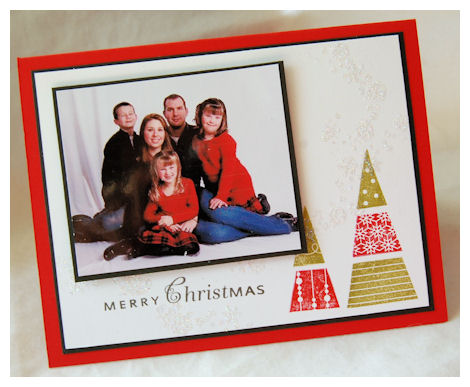
Well who doesn’t LOVE the traditional FAMILY photo? I know those are my favorite cards to receive too.
This is clean, simple, and easy to mass produce!! Obviously switch out my colors/images, for your own, to match your project.
I used the trees from Merry & Bright/Additions, and the sentiment from Silent Night. You may see some TWINKLE in this. I chose to use the snow flurry from the Snowfall set, stamped with my glue-pad, and sprinkled on some glitter! (you can find these sets –> here!) The flurry goes around my sentiment, over the trees and around to our photo.
Using the SAME images, here is yet another idea…..
Ornament Trio
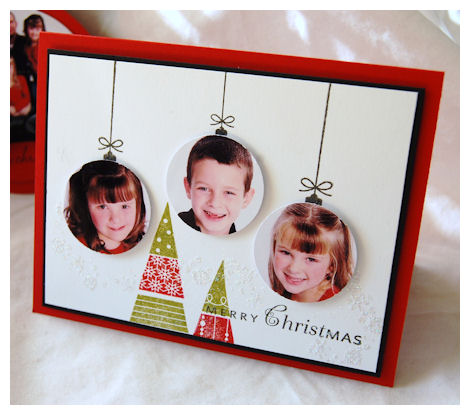
Now this idea isn’t new, but it was fun to actually execute! SOOO simple, and your non-stamping family will think you are a GENIUS.
Now you can take this super cute idea, and no matter how many people are in your family, you can feature them on your Christmas card! Remember ODD numbers look best in an overall design. It is more balanced! I luck out with 3 kids 😀 But I certainly could have altered the design to fit Jay and I in this card too. Quite honestly my kids look far cuter than we would!!
Last but not least….for a more FUN family photo card
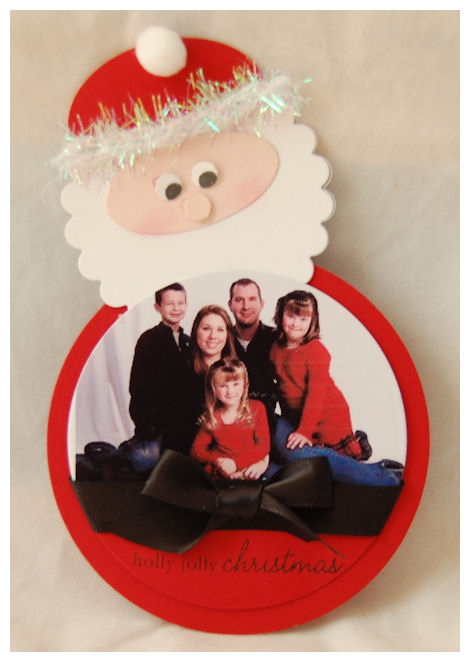
Now this could be a card, turned Christmas Tree ornament! Just put some ribbon on the back 😀
I got inspired my MYSELF last year –>CHECK IT OUT
This time I made a photo card instead.
How fun would this be to make/send this holiday?
Well there are MANY more ideas for you to use your photos in your holiday cards, so be sure to check them all out!
As always thank you for stopping by! I hope you were inspired
Limelight Sketch & Product Challenge!
Oct 29, 2009 Author: mytime | Filed under: CardsPost #2
Hey everyone!! Thanks for the comments and emails as of late 😀 You are the best!
Hope you are having a good day (whatever time it is).
Now lets get to business shall we?
Do you all know Mandy from Limelight Paper Crafts? Well she is just wonderful!
Recently she contacted me to host a sketch and a product challenge! How FUN is that? Of course I was HONORED!
I hope you get excited and play long too! Be sure to check out the BLOG<— for complete details and linking your creations!
So here is the sketch
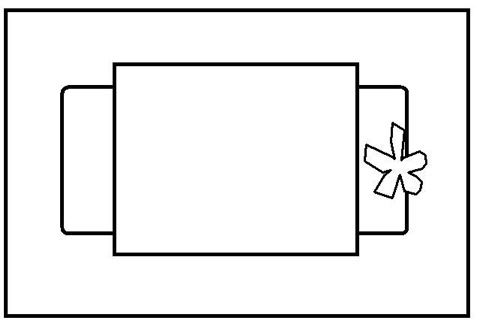
The Deets:
**Use the sketch above and try to incorporate your favorite BUTTERFLIES!!
**Key word for SCS upload is LLPC033.
**Post a comment with a link to your card right here on the challenge post by Sunday, November 1, at midnight (or before winner is drawn Monday a.m.).
**PRIZE ~ One lucky winner will receive TWO Stampendous stamps: Mod Dot Butterfly and Ruffled Butterfly!
Don’t forget to enter the code BOO in the Comments section at checkout at LimelightPapercrafts.com to receive 20% off of your entire purchase! Through Saturday only! 🙂
My sketch card
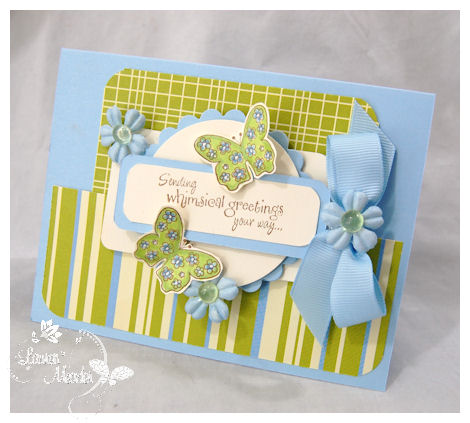
Sending Whimsical Greetings
So I took the sketch and dressed it up a bit! The point of a sketch is that starting place! I got inspired and one thing lead to another. I loved the outcome.
The butterfly stamps are by Jillibean Soup! LOVE THEM! As is the patterned paper! I couldn’t resist coloring them to match my paper 😀 The sentiment is designed by my friend Jessica-it is called Butterfly Wishes. Of course you know I LOVE IT too.
Close up
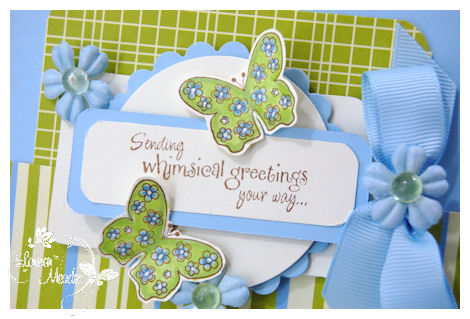
Posting this card today made me happy. Just what I needed!
I have had a lot going on, and have so many new things to come. During this time of change, to me, butterflies mean so much! They signify change, time beginning and ending, a journey, and hope (to me anyway!). I feel like this is an ever evolving theme of my life! Always a journey I will take with NO regrets! I have prayed a lot about certain things in my life as of late. I believe God has answered me too. May not be what we want to hear, but when we get to where we are going, it will all make sense. I trust him. We always have to remember that everything has a purpose. I truly believe that. The good, the bad and everything in between. Sometimes change is good. Sometimes what we think was bad, was later for the best!
I have so many BIG hopes and dreams. I am always setting new goals. I woke up with a fabulous feeling today! I am not just a dreamer, I am a do-er. Nothing is just handed to us. I work hard in everything I do. I know nothing is impossible with God, faith, hardwork, and a little confidence doesn’t hurt either! All that being said (I swear I didn’t mean to pour it all out like that!) if you are having a difficult time, are facing change or need a change…. remember that the journey of a 1,000 miles begins with a single step!
Till tomorrow
Guess who is having another Digi Release?
Pink Cat Studio You NEED to CHECK THEM OUT! Trust me when I say you WILL see the lil birds and Lilly & Billy with the cups of cocoa for SURE!
In the meantime I did make this SWEET creation
Isn’t it just YUMMY?
I loved the bright retro sort of holiday colors. Every good card needs GLITTER!
Once again I used my Copic markers to color my ribbon 😀 I like the layers on this one.
Melissa so has me on a digi kick!
Speaking of Digi’s… Noah had a bunch of birthday parties to attend this past weekend, with one more to go next weekend.
That means the DREADED boy card!! I’m not sure WHY the idea of making anything boy themed feels like a challenge, because once I get going, I’m FINE, but it just does. I definitely need to expand on the BOY selection I have going.
That being said, when pondering WHAT I would use for an image I decided that PCS Digi images-Dino Cosume would work perfect!
Roarrr
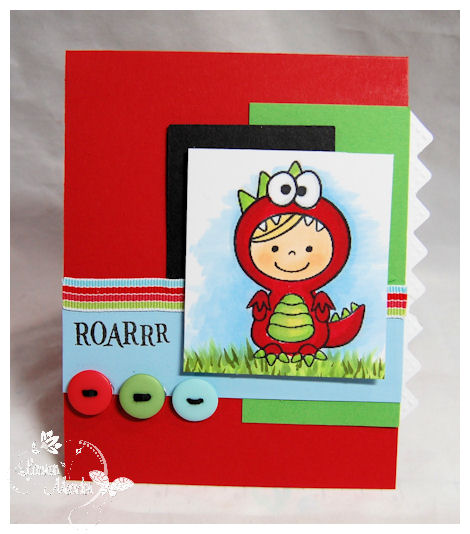
This is my fave of the 2 I designed using the dino image. I love the bright colors, and the “dino teeth” on the side of the card. I think this lil dino is just the cutest ever. I have been lacking mojo for cards these days, but given that fact I think it came out CUTE!
I used RIBBON but didn’t make a BOW! I was proud! LOL!
I’ve been on a button kick these days too. They just go on everything. Especially BOY stuff. Seems like one of the ONLY acceptable embellishments.
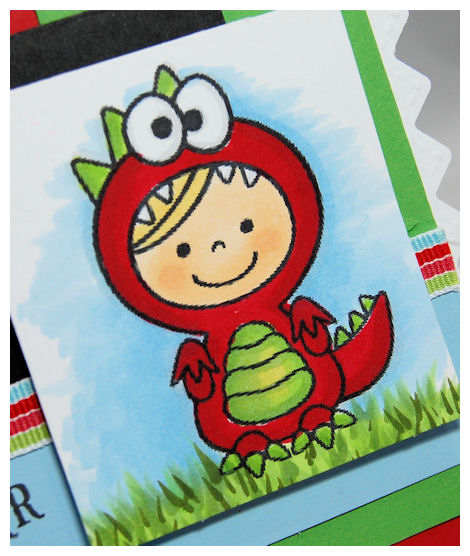
As you can see I drew in some grass, then added my sky. Easy peasy.
The sentiment is from a CTMH set that I had for quite some time now. I need more dino sentiments!!!
It’s Your Day
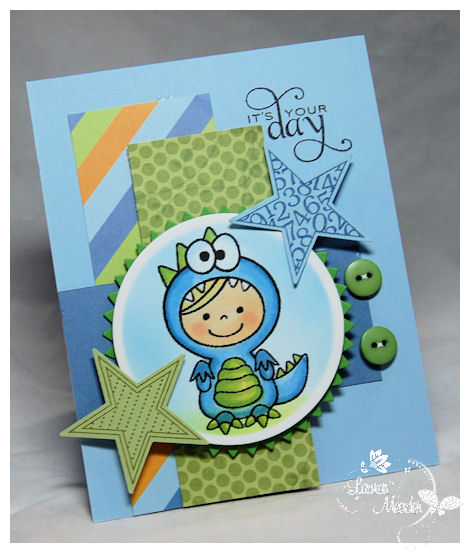
Here he is in blue. Cute as can be!!
I was a bit stumped on my paper and layout, but it came together, somehow. I SO need MORE paper! How can I have STACKS and STACKS and STILL can’t find the right one? I don’t get it.
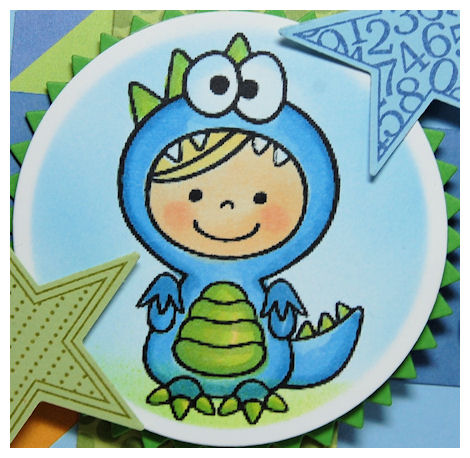
Instead of drawing my scene I airbrushed it using my Copic air gun, and makers.
I shouldn’t stress too much since it was for a 7 yo! I don’t think they even noticed the card! LOL!
The stars & sentiment are from Papertrey Ink —Star Prints. This is a must have set! Love it.
Now I have been asked NUMEROUS times about HOW to use Digi images. You can print them right off on your cardstock, and YES! you can use Copic markers too! At least that is what I do. They can also be resized, and flipped so if you wanted something facing the opposite way, you can have that option. There is a TON you can do with them. “I” am not an expert with digi stuff. I usually just get my size and print. Nothing overly fancy.
BUT if YOU are unsure and want to give a try CHECK THIS OUT<—-free image and video for you!
Then there is one for resizing—->HERE!
PCS and Squigglefly are my go to places for Digi images! Another place that has them is All That Scraps. I honestly usually just get them in rubber there! LOL! But they have a great selection too.
Now be sure to check post #2 out!
Hi everyone!
Family photo night is here! I’ll let you know how it goes. Amber is definitely not feeling 100% and I am keeping her home. She is still active, so I’m holding out hope that she just needs the day of rest and fluids, then by days end will be back to her usual self (I know! I’m overly optimistic about this!). I have been sucking down Vegetable Juice and Naked (that is the brand!) Fruit Juice to try and keep myself healthy. My kids don’t really like either so it is so hard to help booth their immunity this time of year. It’s really yummy and filling 😀 Helps me get all my fruits/veggies in.
Note to anyone who ordered from my Etsy Shop: All orders shipped via Priority yesterday morning! So you should get them tomorrow 😀 Unless you are in another Country! I’ll be updating again soon, and I will keep you posted.
Well here we are at day two of almost a week-long countdown peeks at All That Scraps! There are a total of 7 sets releasing for November 2nd. So I’m sure you can guess we have ALL been busy. Make sure you check the BLOG daily for your chance to win the set that is being shown, and for even more ideas from our Design Team!
Today we are peeking one of my favorite collections: Swiss Pixies!!
This is such a cute line of images that Christine has perfected. I love them. There are 3 this month. I was able to get 2 samples done.
I call this one BRR!
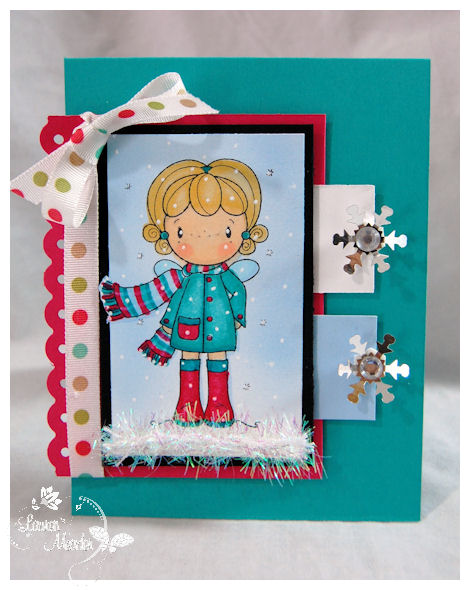
I think she is beyond cute, and I had so much fun coloring her!
These colors are FAB: Black, Melon Mambo, Bermuda Bay, Spring Rain and White. Definitely a cool wintery combo. Beats the traditional colors 😀
I airbrushed my background sky. If you are on the fence about the Copic Airbrush system-GO FOR IT! It is so fun! I would recommend getting additional air-cans as the started kit doesn’t last long at all. Especially while you play and get use to the system.
I used my singlo white gel pen to make snowflakes. I had some tinsel like ribbon that I chose to use for my SNOWY ground. Then the silver snowflakes are table confetti that I found at Target last year! Its my FAVE use of snowflakes! They are so shimmery and cool, and there is 4 sizes! Love it.
Now we have my 2nd card-much more simple.
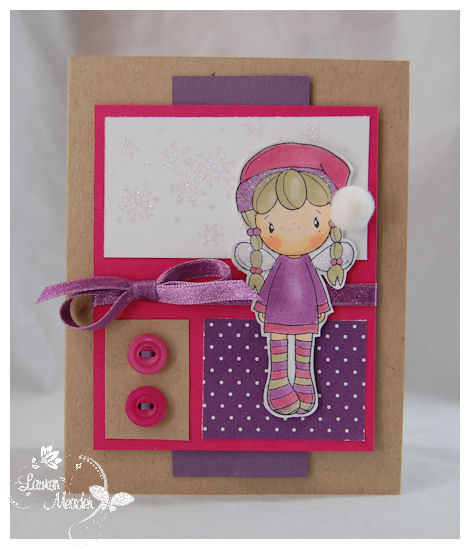
Sweet Pixie
I love this color combination: Melon Mambo, Plum Pudding, Kraft & White.
I kept this one simple. She is so cute on her own. I just colored then cut her out. Add a pompom to her hat.
I did stamp some snowflakes on the white layer and sprinkled on some pale purple/pink glitter (practically unseen here). This can now be an ANYTIME kind of card. I may stamp a sentiment inside when it is time to send this to someone. I know what you are thinking!! You all know I rarely ever even send cards! Its like the shoemakers family has no shoes! My family doesn’t get cards! Except for the holidays, because I do make all my gifts. I hope it sort of makes up for it. I get so forgetful, then when I do recall its so late! Is it bad that I make cards and gifts JUST because I enjoy it, and NOT with the intent to actually send them?! I will say I have NEVER bought a SINLE card since I began stamping 5 years ago, so that is good. I will pull one out of my stash ina hurry. but prefer to MAKE one special for each person when I DO actually send something! I like to have them in mind 😀
Well that is all the chatter for me today. I hope you are looking forward to these!
HUGE ANNOUNCEMENT!!! There is a WINTER KIT available. LIMITED TIME (Ends tomorrow) so CHECK THIS OUT!
Till tomorrow
Well I know I promised you all some BOY cards, but I completely forgot that today was the first day of peeks from the November (I KNOW! NOVEMBER ALREADY!! Can’t believe I just typed that!) release at All That Scraps! This really creeped up on me!!
The images you will see over the next few days will release on Monday November 2nd.
The first set to be shared is called Sweet Fairies. There is a set of 4. They are from a new designer at ATS.
Before I go on, I have to admit they aren’t my usual style. In fact I was a little nervous that I would make them look HORRIBLE! That can be one great thing about being on a design team. It can push you to try new things, and expand your horizons.
I have come to use MANY images that at first glance I wouldn’t think I would like, and was surprised, and then had other images I thought I’d love and found I really didn’t! LOL! Ever have that happen? You get SO excited about a set or image only to get a HUGE block when finally using it? Then you have another set you weren’t sure about and you fall in love? Overall I’m generally in love with everything, but there is that occasional SHOCK set! LOL!
Anyway, despite my nervousness I think I am happy with what I did create with this set.
The image I chose was my favorite of the 4 because she looked MOST like a butterfly to me 😀
Funky Lil Fairy
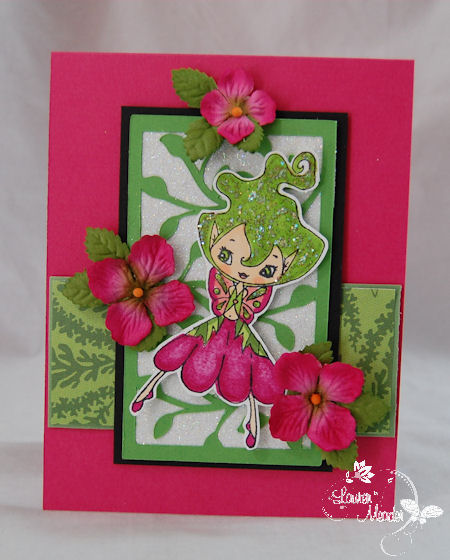
Well what do think?
She came out pretty cute, I think. Very whimsical.
I wanted a real POP of color so I used Melon Mambo (SU!), Black and New Leaf (PTI). I loved this combo, especially with this whimsical image.
I just let myself have fun coloring her! I love the green hair and eyes, with added stickles! I often get stuck in the “they have to look like real people” kind of rut, and since she is a FAIRY, she can be ANY color. Sky is the limit. So I just had fun letting go of that mindset. It’s actually fun to use different colors if hair 😀
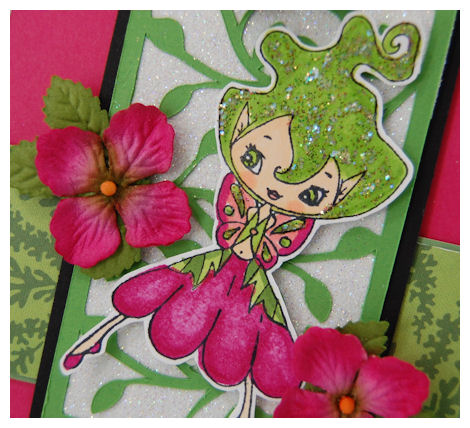
My “leaf” rectangle layer was done using my Cricut Expression: Storybook Cartridge. I layered a sheet of adhesive labels onto the back, then poured on some glitter! I LOVE the look I was able to achieve with it. Loving my Cricut Expression, for sure.
I then added some Prima Flowersfor that lil something extra! I felt like it made her appear to be fluttering between them.
Now it’s up to you to decide if this image is ALL YOU!
All That Scraps is expanding their images, and lending itself to various new styles (as you will soon see).
Now for more Sweet Fairies peeks, you need to head over the the ATS Blog <—– where you can also enter to win your OWN Sweet Fairies set.
(Note: If that post isn’t live yet, just check back in)
Thanks for stopping by.
I may have my hands full here today, as I think I spoke too soon! Amber woke up with a headache and I THINK she has a temp. I’m going to let her “wake up” and eat before I take any action. She could just be warm from being bundled up. Fingers crossed! I just sent Alexa back to school, so I hoped that was the END of germs for a bit. I really LOATH this season.
Take care
My Etsy

Who I Designed For
Blogroll
- Alicia
- Alli Miles
- Ally Blankenship
- Amber
- Andi @ crafts on a whim
- Angel R
- Angie Z
- Anne Kranitz
- Becky O
- Bee
- Beth Silaka
- Bethany Paull
- Beverly Nash
- Bobbie
- Cambria
- Cammie
- Card of the Week
- Card Positioning System (CPS)
- Cards for Cancer
- Catherine Doucette
- Charmaine
- Cheryl Sims
- Chriss Rollins
- Christina
- Christine Ewing
- Christine Wooden
- Colleen Schaan
- Craft Critique
- Craft Gossip
- Crystal
- Dawn Easton
- Emily Giovanni
- Geny
- Holly
- Igne Groot
- Inspirational Craft Blogs
- Irene
- Jami Sibley
- Jeanne Streiff
- Jen del Muro
- Jeni Bond
- JenMarie
- Jenn Balcer
- Jenn Diercks
- Jenn O
- Jennifer E
- Jennifer Mick
- Jennifer Pereda
- Jennifer-Sweet Treat
- Joanne Basile
- Jodi Collins
- Julia Stainton
- Julie Masse
- Karen
- Kathryn Berthiaume
- Katie Cotton
- Kelley Holland
- Kendra
- Kim Scholfield
- Kris’s Color Stripes! Get inspired here
- Kristen Dubosque
- Kristin Eberline
- Kristine
- Laura @ Sunshine Stamper
- Laura Turnmire
- Laurie Schmidlin
- Lesa Rapp
- Linda Duke
- Linda-LSN
- Lindsey Botkin
- Lisa (lakind scs)
- Lisa Kind
- Lori Craig
- Maggie
- Mara Campbell
- Maria
- Maria Levine
- Mary
- MaryJo
- Melanie M
- Monique Hansen
- Moxie Fab World
- Pam Imholz
- PaperCrafts Connection
- Peppers and Pollywogs Kids party site
- Rebecca Grohall
- Rita
- Robyn
- Rose Ann
- Sarah Vrolyk
- Sharon Harnist
- Sharon Johnson
- Sharon Rivera (a chemisrty with paper)
- Sherrie
- Sophia Landry
- Storage Units, Ink, & More Blog
- Sue Berker
- Susan (Rainy)
- Tangii Crane
- Tracy
- Tricia Traxler
- Trudee
- Velta
- VivLyn
- Zena
MTME Pretty Palette Color Team
MTME Pretty Patterns Sketch Team
My Time Made Easy TM LLC
Shop till you drop!
Lauren Meader
About Me
Copyrighted material
Subscribe To My Blog
Pages
- About me
- Alexa’s Story!
- My Crafty Corner!
- My Time Made Easy™ LLC
- Our Make A Wish Trip to Disney!
- Resume/Publication List
Calendar
| M | T | W | T | F | S | S |
|---|---|---|---|---|---|---|
| 1 | 2 | 3 | 4 | 5 | 6 | 7 |
| 8 | 9 | 10 | 11 | 12 | 13 | 14 |
| 15 | 16 | 17 | 18 | 19 | 20 | 21 |
| 22 | 23 | 24 | 25 | 26 | 27 | 28 |
| 29 | 30 | |||||
Archives
- August 2013
- July 2013
- June 2013
- May 2013
- April 2013
- March 2013
- February 2013
- January 2013
- December 2012
- November 2012
- October 2012
- September 2012
- August 2012
- July 2012
- June 2012
- May 2012
- April 2012
- March 2012
- February 2012
- January 2012
- December 2011
- November 2011
- October 2011
- September 2011
- August 2011
- July 2011
- June 2011
- May 2011
- April 2011
- March 2011
- February 2011
- January 2011
- December 2010
- November 2010
- October 2010
- September 2010
- August 2010
- July 2010
- June 2010
- May 2010
- April 2010
- March 2010
- February 2010
- January 2010
- December 2009
- November 2009
- October 2009
- September 2009
- August 2009
- July 2009
- June 2009
- May 2009
- April 2009
- March 2009
- February 2009
- January 2009
- December 2008
- November 2008
- October 2008
- September 2008
- August 2008
- July 2008
- June 2008
- May 2008
- April 2008
- March 2008
- February 2008
- January 2008
- December 2007
- November 2007
- October 2007
- September 2007
- August 2007
- July 2007
- June 2007
- May 2007
- April 2007
- March 2007
- January 2007
Categories
- About Me
- All That Scraps
- blogger challenge
- camera/photo play
- Cards
- Contests
- family stuff
- FOR SALE
- Home decor/3-D items
- How to FAKE it!
- Introduction
- JUGS Challenge
- JustRite Stampers
- Lizzie Anne Designs
- My family stuff
- My Stamping Space
- My Time Made Easy
- My Time To Color Challenge
- My Time to Create Challenge
- My Timeless Template Challenge
- My Timeless Templates
- Mytime Mail
- MYTIME MOVIE/VIDEOs
- Papertrey Newsletter
- Pink Cat Studio
- Pretty Palette Challenge
- Pretty Patterns Sketch
- Product Opinions and Must haves
- Recipe's
- Saturday Sketch
- Smilebox Creations
- Stampavie
- Tutorials
- Uncategorized
- videos
Most Popular
- Create your own Onesie Card Tutorial-and important NOTE! PLEASE READ (2529)
- Saturday Sketch-Boxed bag holder (2333)
- Going GREEN! Fancy Flower Flourish-Closure Video (1478)
- Fabulous Favorite - Giveaway! (1336)
- a Prayer Request (1232)
- QUICK-Easter Baskets from Nestabilities-PTI style-and blog challenge (1063)
- Teaser Sketch (999)
- February Release Giveway! (and a little peek) (996)
- Group Post and Rambling Rose Video Tutorial (985)
- GIVEAWAY! Who wants it all?! (895)
Recent Comments (RSS)
- 첫충사이트: 완전히 흥미로운 블로그 게시입니다. 저는
- sarah: Wow, Lauren, what a stunning
- hedie: خرید راهبند
- 야동: Love to read it,Waiting For
- 야동: This seller is in a
- 바카라사이트: 여기 처음 왔어요. 나는이 게시판을
- 야동티비: I was surfing the Internet
- 바카라사이트: 비슷한 주제에 대한 흥미로운 정보를
- 바카라사이트: "여기에 제공해 주신 귀중한 정보와
- 온라인홀덤: 유익한 웹 사이트를 게시하는 데
Copyright © 2007 - My Time, My Creations, My Stampendence - is proudly powered by WordPress
This blog has been Tweaked and Designed by Sara Williams