Archive for the ‘Cards’ Category
Inspiration: Patterns O’Plenty and a coupon
May 21, 2010 Author: mytime | Filed under: Cards, Home decor/3-D items, My family stuff, My Time Made EasyHi everyone!
Are you enjoying the nice weather?
I know we are.
I have LOTS to share! First some family stuff, then some fun stamping stuff!
As always I have tons going on, but cannot complain because my children are happy & healthy (I remind myself of that as they are fighting with each-other like cats and dogs these last few days!).
Alexa is celebrating her 3rd year going into remission from Leukemia! She is just growing before my very eyes into a young lady. It’s actually freaking me out a bit 😀 She is ALMOST 11 now! She got cancer shortly after turning 6. You can read her story HERE!
Any-who, I won’t get into the emotional roller-coaster that I get on this month each and every year, but I am so grateful she is alive and well 😀 Time has truly flown by.
Here is a recent photo of her, taken on Easter

I made a donation in Alexa’s honor to the Relay for Life 😀 It is the LEAST I can do to support ongoing research.
My friend Tracey is participating in the relay-if you decide to make a donation, you can view her site —> HERE!
Now I have to share a photo of the other 2 kids too, before moving on 😀
Here is Noah-
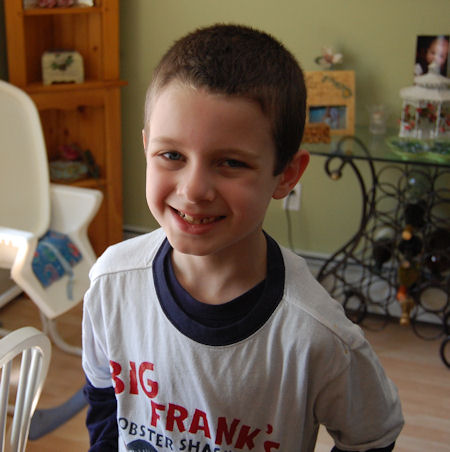
He is doing great since I shared about him last. He is SO tall. Just a couple inches shy of my shoulder (and I’m 5 ’10!).
Here is Amber (after Easter Egg hunting!-very messy)

I can’t believe she is going into first grade soon! MY BABY! How is it possible?
Now here is my 4th child Gabriella!
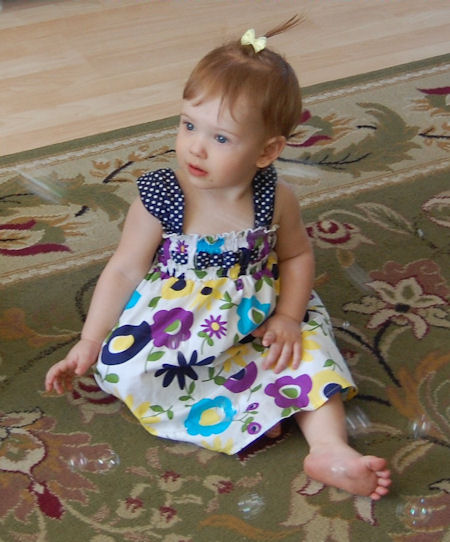
OK actually she is my niece-but since I was around her mom’s entire pregnancy (they lived with us) and I was there for her birth she feels like she is one of my own (kinda like I’m a dad! LOL!). I love her to pieces. She is now 15 months old! She is so funny, and full of energy! She just runs all over the place. I bought her a bubble machine for Easter, and she LOVES it-hence the bubbles in the photo 😀 I bought her that dress too! As I look at I’m getting inspired!
OK back to the creative reality!
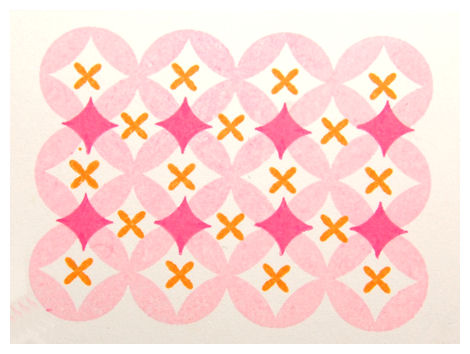
I know I’ve been MIA, and said I’d be “around” more, but I have SO much to do in time for the next release 😀 I have SEVERAL videos done, and a few more to go! (So see I invested my time away wisely :D) I think it will be helpful with what we have to come 😀 I *was* going to do a video on how quick and easy it is for you all to use the latest Puckered Up Patterns ©, but it turns out there were SO many pattern combinations that it would be a very LONG video! So I thought I’d share a few photos instead, since I already made several videos for the next release, and I’m wiped! Plus it will allow you to better VISUALIZE them completed project.
So here is the set that is the MAIN focus of inspiration…

Puckered Up Patterns is a FABULOUS set of 14 images with ENDLESS possibilities. I love that.
The set sells for only $12!
You receive this set on a 4 X 6 acetate sheet. All our images are printed on the acetate that the photopolymer stamps (clear images) are sandwiched between.
You really need to just take some fun color combinations and P-L-A-Y!!! If you mix this set with the Paper Pattern Pieces © you will have a BLAST!
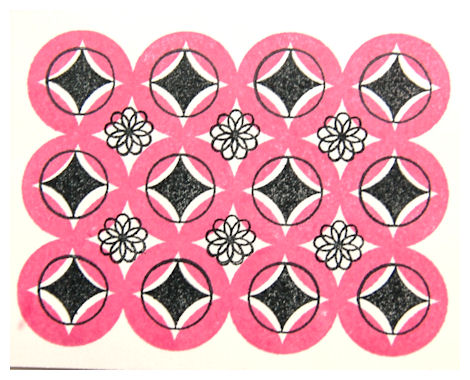
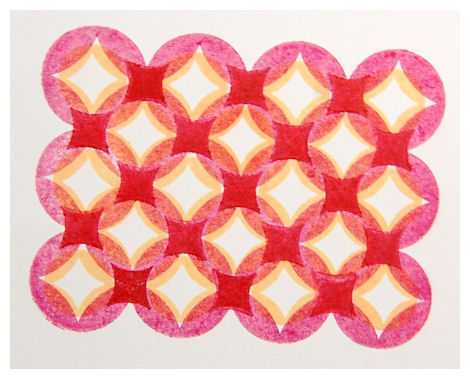
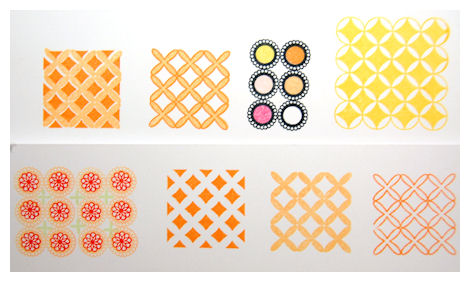
I know MOST of you are visual, and you like SEEING ideas, so I quickly stamped out a few patterns (these took like 30 minutes) to get you started! There are some more completed project samples below too-so SCROLL down!
Just some ideas for you…..
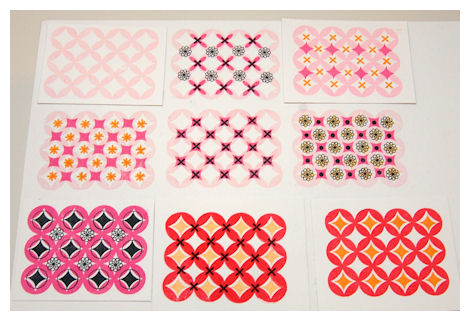
Top left is the main pattern from the set that I used to create all these combinations! There are 14 total-but I am certain YOU can think up even more! Now keep in mind that is using *just* the large pattern as my MAIN focus! There are 4 other large building “block” patterns in the set, as well as several FABULOUS accents that can also create AMAZING borders, or group patterns!
The large pucker pattern measures: 2 X 2 3/4 inches!
*Keep in mind you can also use the single pucker circle (large or small version) to make a ROW just like the grouped patterns I created in the samples to follow*
Now for some CLOSE UPS!
PS I just wanted to get the pattern ideas out-don’t mind the HORRID color choices! LOL!)
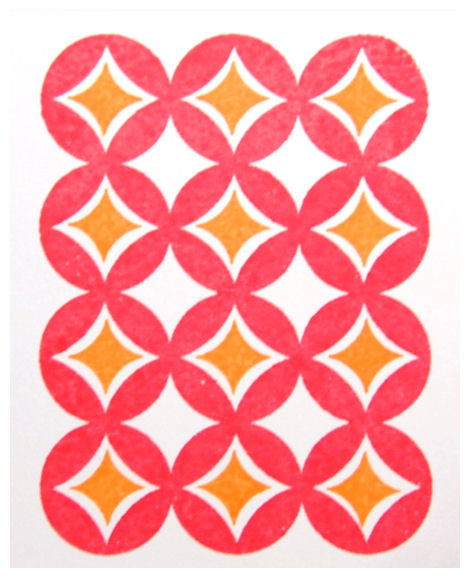
1) STUNNING pattern possibilities in a variety of colors!
Now remember you can stamp the main block several times to cover a large area 😀
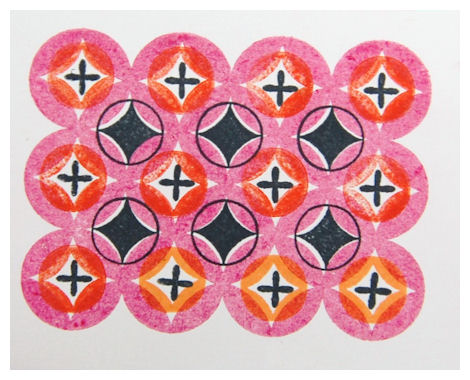
2) This design has a ton of possibilities
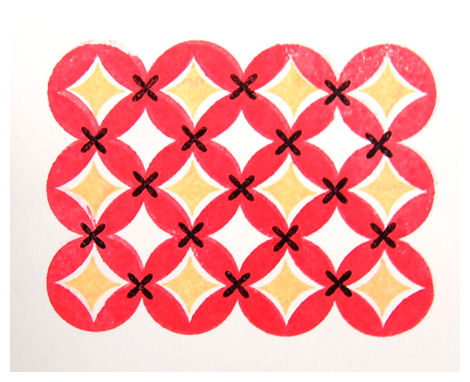
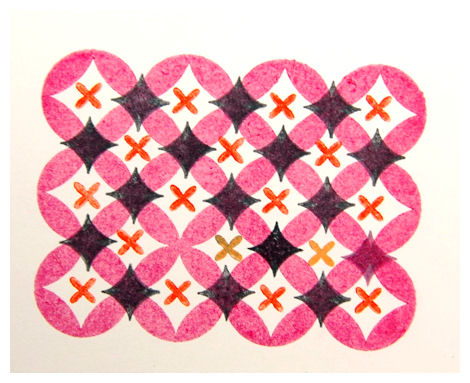
3) This one I used the X like flower/image and rotated it. I couldn’t see I THING since it was dark and rainy! OH! WELL! You get the idea! Plus it add character right?
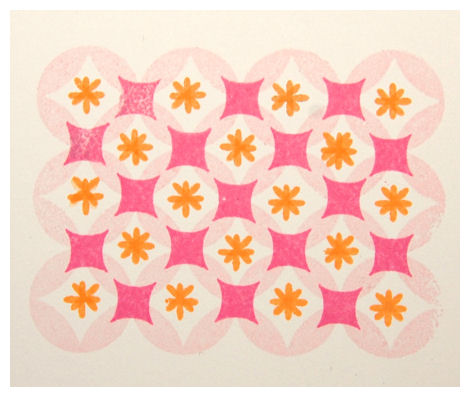
4) SO cute!! Imagine this as a backgrounder!
5) LOVE this one!
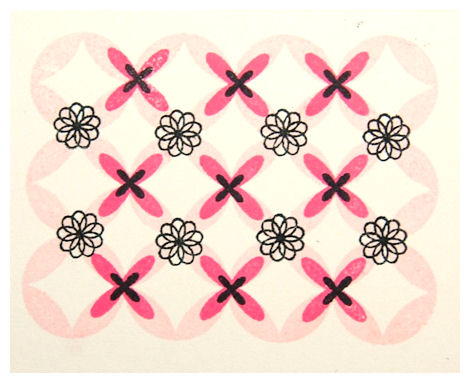
6) Another one I LOVE! (I think its the flowers 😀 -that image alone can do great things!)
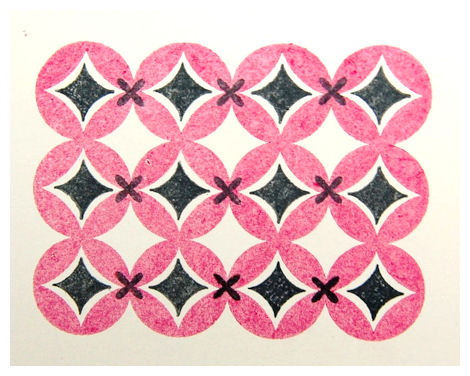
7) Check out Kristin’s Blog! She used this pattern below on her card today! I love it.
8) Simple, yet striking!
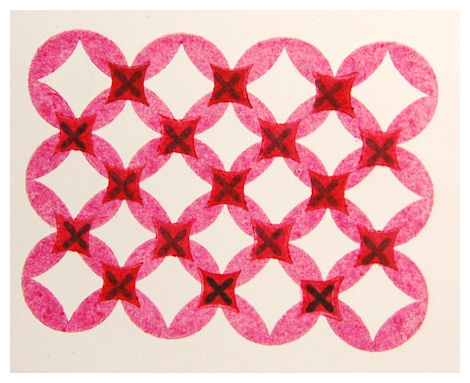
Now here we have 6 more patterns for you, using the SAME block as above!
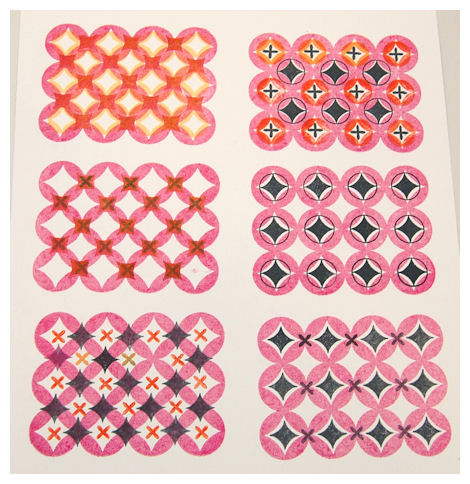
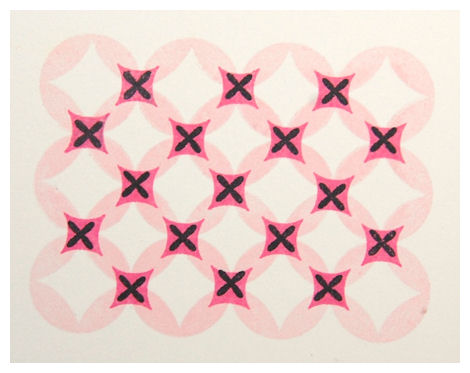
9) OK my colors are awful, and my cardstock has a smooth coating which kept resisting the ink (grr) but all that aside-very cool possibilities.
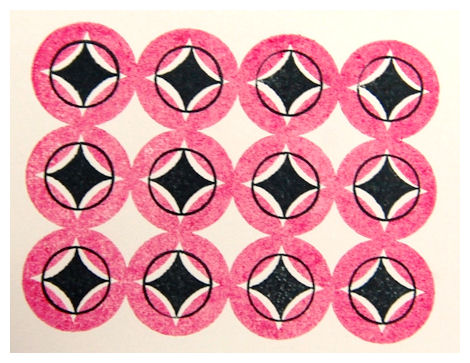
10) Again-same coated cardstock, awful colors, but you can get the idea! JUST PLAY AROUND OK!
That is what I was doing 😀
11) Think how cool this could be….
12) I so love this one
13) Another great possibility!
14) I totally loved this one most.
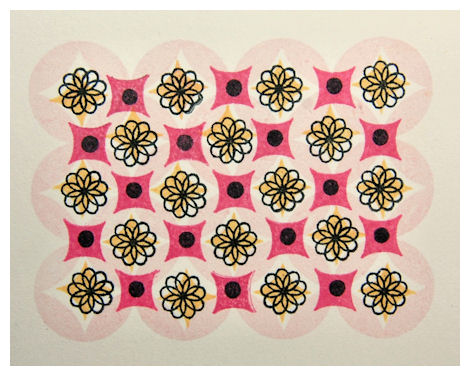
Now we move on to the other patterns which have a TON of possibilities that I didn’t even have the time to cover (but have plenty of samples further down to share)
This one shows you how the bottom 3- Lattice, Pucker Cluster Solid, and Pucker Cluster Open- can all be used to create a pattern ALONE, or layer perfectly together, as seen in the above top 2 to the left!
Now I want to share some completed samples that utilize the Puckered Up Patterns © as well as the Paper Pattern Pieces ©

Paper Pattern Pieces © is another AMAZING set that was used in conjunction with the Puckered Up Patterns to create the following samples.
You may recognize the snippets from our past release, but having them all in one place can be helpful for you to visualize the truly endless possibilities.
1)
The lattice pattern made up the “grass” and several of the flowers used elements in the Puckered Up Patterns set!
2)
Puckered Up Patterns was used to create a cool background, and a flower bud!
3)
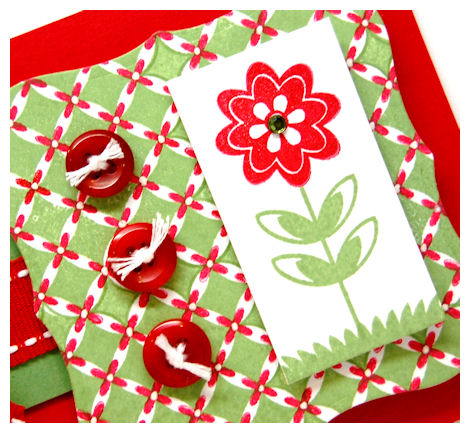
The smaller circle block on the left, from Puckered Up Patterns was used to create this stunning bkgd
4)

The open line pucker pattern makes a quick, easy & subtle bkgd!
5)

This one used *just* the Paper Pattern Pieces ©
6)
Here is an example of how just the large (or small) circle pucker can be used to make the same style patterns, but in rows!
7)
This used ONLY Paper Pattern Pieces © I love making various colored DOTS! EASY PEASY!
8)
This one used the outline, and solid pucker cluster-combined with the smaller single pucker flower to create a pretty feminine background!
Well, I do have 3 more (never before seen) cards to share using these pattern builders, but I will wait on those, so I have *something* to post about the next 3 days!!
I hope this got you inspired to try these sets out! They will become a welcome addition to your stamp collection 😀
Now I decided that I would create a special coupon in honor of BOTH these FABULOUS patterns! (Since I love using them together!)
My Time Made Easy ™ LLC is having a SUPER SALE!
DON’T WAIT! LIMITED TIME ONLY!Enter the coupon code –> PATRN2420 to get $4 OFF your purchase for BOTH the Puckered Up Patterns and Paper Pattern Pieces © .Details:
Coupon is good from NOW until MIDNIGHT (Eastern Time) May 24th .
Supplies are limited. No rain checks. Limit: one use per customer.
Coupon not valid on previous purchases, and/or the purchase of any other Pretty Impressions stamp sets. Offer does not include shipping charges.
Happy Shopping! And while you are there don’t forget to check out ALL our other amazing products 😀
I’m off to go prepare for our June Release!
Puckered Up Patterns of inspiration
May 5, 2010 Author: mytime | Filed under: Cards, family stuff, Home decor/3-D items, My Time Made EasyAh! So much to share so little time!
Today I’ll be brief since the first week of the month is generally INSANE for me. OK maybe I should say the last and first weeks of every month! While I’m busy sharing details from this release I’m also usually finalizing details of the next one, and am also working on the month after that!!! Throw in a family and you have a crazy week! I am the queen of multi-tasking I think. I generally have at least 3 major things to do daily, and several “appointments” for something during the week! LOL! Not complaining, I’m just sayin.
Now I have a couple other projects to put finishing touches on, then there is another counseling appointment for Noah and I have to go back to finish my hair straightening after that-so I’ll be brief.
(PS thanks for allowing me to share about my son. I have heard that this isn’t an uncommon problem, so that helps hearing from others too :D)
He *just* came home with a heart shaped card for me that reads:
The most important thing about my mom is
She is nice
She feeds me
She keeps me safe
She gave me a life (LOL! that cracked me up)
but the most important thing about my mom is she loves me.
Love Noah
AWE! This is the FIRST card I ever got that says nothing about Daddy! LOL! I usually get Happy Mothers Day! I love my dad. I love playing games with my dad. I love you Noah
Every book or poem he writes is about his very best friend: dad! They have an amazing relationship that I am so happy about, but it is nice to get some sort of mommy love once in a while! LOL!
OK back to the peeks!
I just got a fancy NEW! video camera for my birthday, so I can do even better videos for you, so I really hope to find some time to do one soon 😀 Maybe on backgrounds?! If there are any requests, let me know! I’m out of ideas at this point.
In the meantime to whet your creative pallet Tracey Cuccia has a peek!
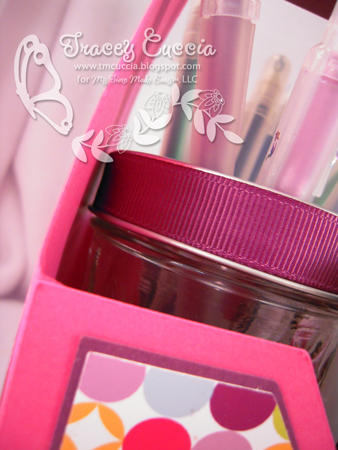
Here is what Tracey has to say about her project:
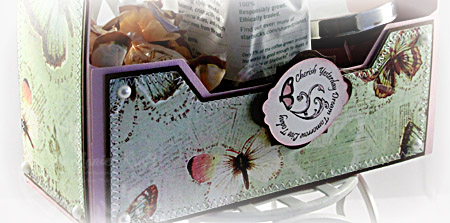
“My daughter Shannon is my crafting buddy – she loves to come and ‘play’ with Mommy. She has her favorite items she likes to use, glitter pens, glue, scissors, flowers…so I decided that I would make her her own little caddy to keep her crafting goodies together at my table. There will be NO mistake that this is for her, fun, bright, and cheery, just like Shannon…”
So be sure you stop by and visit Tracey
Now for my turn.
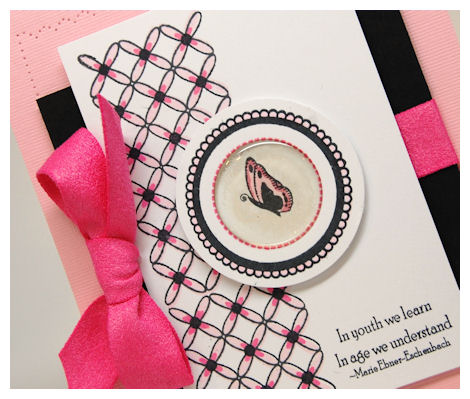
You all seem to be LOVING the NEW! Puckered Up! Patterns ©! They are simply fun and easy to use. The layering possibilities are just endless. You can make so many various patterns it is great! I designed this because I thout it to be a perfect addition to the Pucker Up template! The puckered shapes were perfect together. Plus you can never have too many background builders!
This could make some simple rockin guy stuff too!
I was recently inspired by the design on some of my most FAVORITE raspberry cookies when I made this!

When I showed this to my husband, inspiration in hand, he honestly said “What?! I don’t get it. Where do you see cookies?”
MEN! They just have no creative vision sometimes! LOL! I pointed out the cookie pattern and he STILL didn’t get it. Oh well, I got it! LOL!
Now the Pucker Up template is a great size and can hold lots of googies! I wrapped 8 of these cooloies to fit in here, not even problem! The tuck in sides allows you to easily access what you put inside too without ruining the packaging.
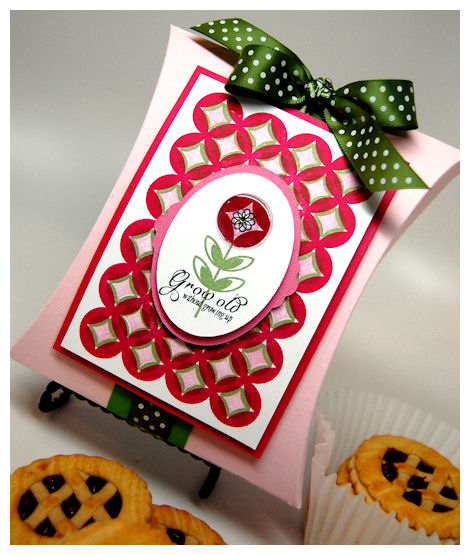
As I said, inspired by my YUM-O cookies, I stamped the largest pattern in the Puckered Up! Patterns © , stamped in a raspberry like ink from SEI (I recently bought like every color in SEI ink!). I then stamped the same style open pucker pattern in a green ink by Momento. Then, I added ONE more! The paler pink filler center! I have to admit I fell in LOVE with the look of this!
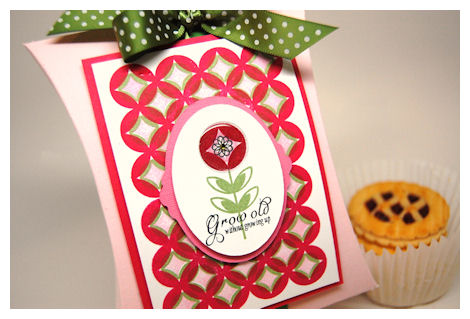
Now for my center piece!
I thought that pairing the solid pucker circle with a stem from Sensational Stems would create the PERFECT retro flower for this! I finished off the flower center using a spiral like flower from the Puckered Up Patternsset. I then added a page pebble and a lil’ bling center. Complete with a perfect sentiment from Sensational Sentiments: “Grow old without growing up”
I’m really in LOVE with all the New! All Tied Up! frame/tags/ribbon holders we just released! They fit the sentiments and images perfectly-plus you can re-size them with the click of a button. Here I used the All Tied Up! Oval. It was the PERFECT addition to this.
Supplies:Pretty Packaging © template – Pucker Up!
Pretty Impressions © Stamps- Pucker Up PatternsSensational Stems, Sensational Sentiments
Cardstock by Couture Cardstock: OSW White, Blushing, Sweet heart, Brandenburg
Ink: Momentoand SEI
Pretty Pieces Cut Files– All Tied Up! Oval
Page pebble
Well that is all for today.
Tune in tomorrow because we are not done sharing yet!
In the meantime thank you all for the kind comments, emails and support you’ve ALWAYS offered to me and my family! It is always appreciated 😀
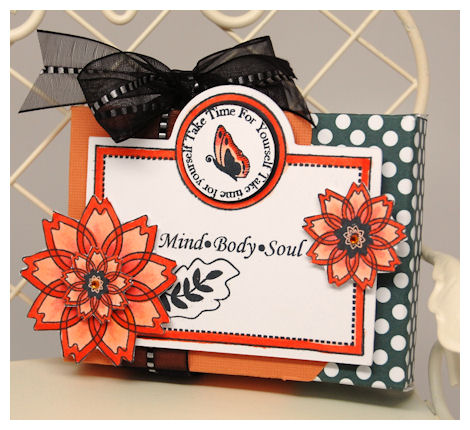
For a Super Star Son
May 4, 2010 Author: mytime | Filed under: About Me, Cards, family stuff, Home decor/3-D items, My Time Made EasyI’m excited for today’s project-once again! I hope you are all stock piling the amazing projects and gift ideas! What is there to NOT be excited about. I think we all love a dose of daily inspiration rigth?
Today’s peek is from Pam Imholz!
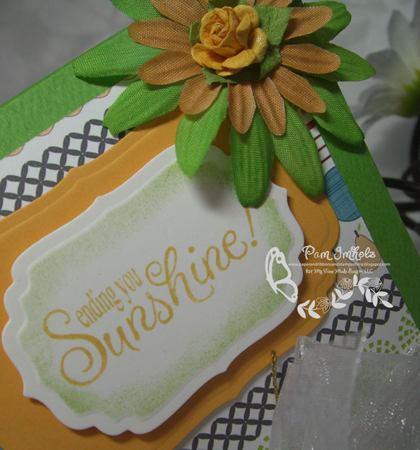
Here is what Pam had to say:
Lauren’s newest Pucker Up is one template that will quickly go on your must have list. Goes together easy-peasy, especially if you let the fabulous designer papers do part of the work for you 🙂
Be sure you stop by and see what Pam has to share!
Now it is my turn!
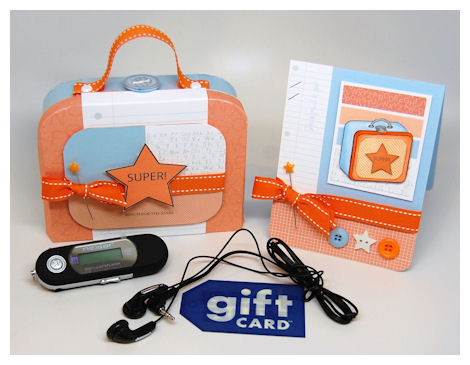
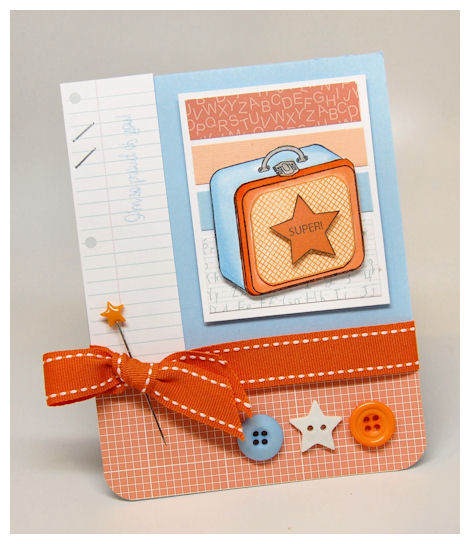
This is a very special gift for my son Noah.
(sorry I didn’t get a photo of it inside. I had I all could do for my son to let me have it long enough to photograph!)
I used the Lunch Box Love Notes & Additions © stamp set/digital set, and Boxed Lunch © template with the Lunch Box Cover © and some other Pretty Printables © digital paper!
I wanted to do something special to let him know how proud I am of him and that I think he is SUPER just the way he is!
The part in orange is WHY I am giving this to him. It is family related, so feel free to move past it if you wish to hear solely about the project.
I can tell you that my son Noah has had some medical issues the last few months. I contemplated sharing this but maybe some of you can relate! He began “ticking” around Christmas (come to find out it has been longer just not in such an obvious manner). It is anxiety/stress related. He begins blinking repeatedly. Sometimes to a point where you wonder if he can even SEE! This was very upsetting for me to witness and all I wanted to was to help Noah.
We have been working with neurologists, our pediatrician and the school to help him develope more confidence and coping straegies for any stressful situations and to build his confidence (another reason for our garden!) I honestly didn’t want to just throw him on some pills, but teach him HOW to deal with his feelings, and learn it is OK to get upset. The use of stress balls have REALLY helped!! We have also started him with s pecail counselor to help him with anxiety reducing strategies, games and confidence builders. Also ways to work out what stresses him out and why, and to help him realize “it’s OK to make mistakes”. While I’m not sure WHERE all the low confidence and need for perfection came in to play, as we are very encouraging parents, we are doing our best to help alleviate these feelings for Noah.
He has some areas where he feels he needs to be perfect, and that holds him back. He doesn’t like to make mistakes and this affects him DAILY. He like to always be the best at everything (wondering where he gets this from! LOL!). A lot for a little kid to take on. I often wonder how much our family situation with Alexa getting cancer, played into this. He had to become the “big boy” and care for his sisters. I was often SO focused on Alexa (even before the cancer) and her future that he somehow slipped through the cracks. That is a lot of guilt for another day, let me tell you! With Amber I had more time because the other 2 were in school, so she seems to excel in every aspect (see another reason I feel guilty about Noah!) I wasn’t home for like 9 months when Alexa got sick, so I missed a lot with him. AHHH! Anyway, I am doing everything I can to help Noah deal with daily feelings he has. Since he is aware of the ticking, as are his teachers it is easy for him and us to know he is getting upset and he needs to do something to help himself (or we help him work it out). He always received lots of praise and encouragement but he needs a little bit more these days. He is doing MUCH better than he was around the holidays since we figured all this out. Noah has many of the same issues myself and my mother’s side has with needing things a certain way and whatnot so I understand how he feels. It is quite possible he will outgrow this, and as I said as he get more comfortable with dealing with things, it has already significantly decreased! I hope to continue this journey “med free”. It is working so far. Granted it is “work” but that is part of being parents right 😀 He is working hard and I couldn’t be prouder of him.
Please note: I want people to know I personally have nothing against medication. I think these things vary case by case and family to family. I am just sharing what we are personally experiencing and trying. Each person needs to do what is best for thier own family. If we found that is what Noah needed to help him then we would do that. So far we are able to be helped without it.
One thing Noah LOVES is music! He is forever singing! So as a gift for all his hard work, in all aspects of his life, I bought him a MP3 Player, and we included a card to get some music for him to download! I thought this could be an additional fun way to de-stress for him too!
Now back to the gift set….
Reach for the stars
How cute is this?
I made my 3D version of Boxed Lunch © to match the stamped version of the Lunch Box Love Notes & Additions © on my card!
With the release of the Boxed Lunch ©, many of you saw my girly rainbow one, and many pondered if the Lunch Box Love Notes & Additions © stamp set and Boxed Lunch © template would favor a gift for a boy. Well I hope this gift I made opens the flood gates of possibilities and ideas! (I will have another masculine sample soon too :D)
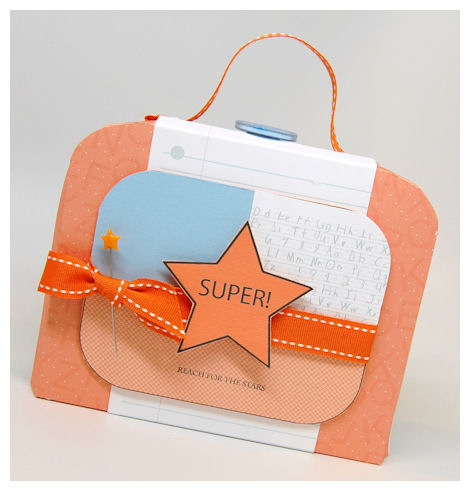
I used the heart version of the Lunch Box Covers © for my front panel! I had “cut out the heart, then layered the star on instead! I used the Lunch Box Love Notes & Additions © Digital set to make my Super! Star center image! (digitally colored too!)I was able to layer it on no problem. I printed the star twice, so I could have it be 3D! I then layered some additional papers to the panels to tie it into my card design.
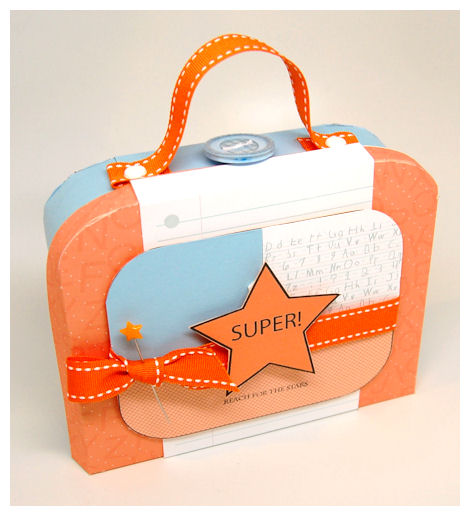
I stampes the sentiment: Reach for the stars from the Lunch Box Love Notes Additions © set.
My template base was created using Rain Drop cardstock.
For my lid I printed the Alphabet Soup Collection 1, then created the lid! I printed a notepad piece of paper for the decorative layer on the lid and another of the decorative panel too! It is SO fun and easy peasy!
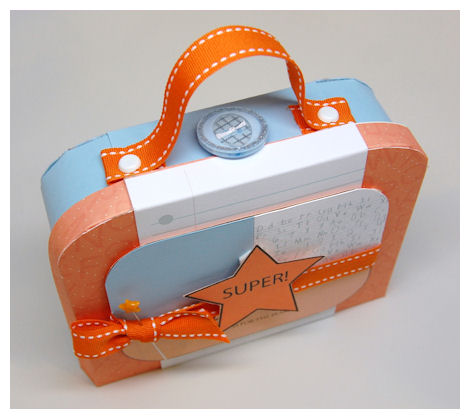
Now there are perfect cardstock handle pieces that come with this, but I wanted to share some options, so for this I just used some ribbon and brads!
The large button had a graph like pattern that is in my designer paper too! A perfect match! So I added that to appear to be my “closure”. This template stays closed on its own, but it is so fun to add stuff!
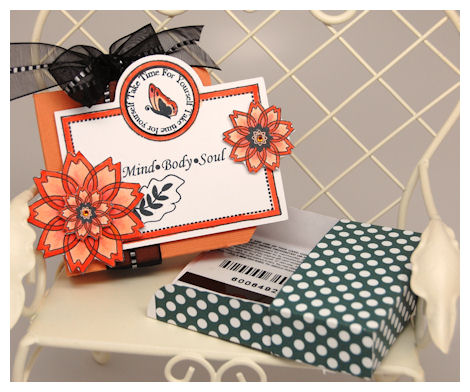
Now for the card
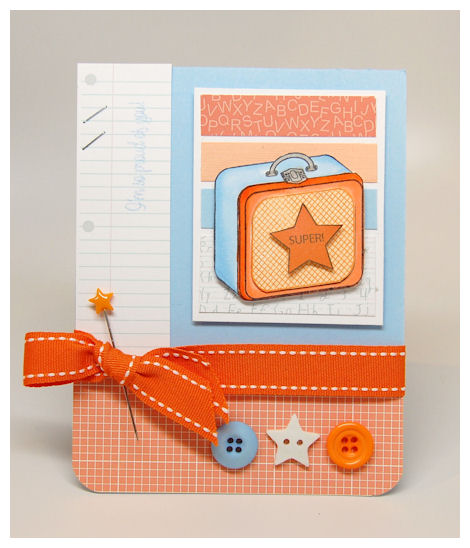
All the same papers and elements!
I used the Lunch Box Love Notes & Additions © on my card 😀 I so love this set! I layered the cut lunchbox onto the panel of cardstock strips. The cover again is the heart from the set. I stamped the star image, cut it out, and layered it over the heart! So I was able to use the pattern, but not have to use the actual heart image.
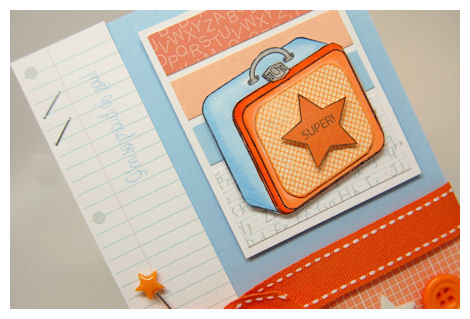
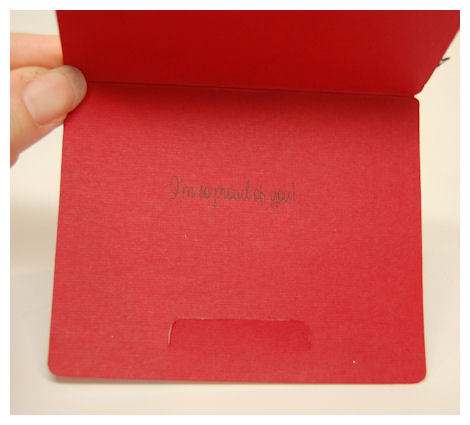
I love the notepad paper. The sentiment reads: I’m so proud of you! Sorry it got washed out by the lighting
I just love that! This is a great boy themed card/gift set.
This is a set I will turn to over and over all year long!
Supplies:
Pretty Packaging © template – Boxed Lunch
Pretty Impressions © Stamps- Lunch Box Love Notes © & Additions (scrylic & digital)
Pretty Printables © Digital Paper- Lunch Box Cover, Alphabet Soup 1 & 2, Get Graphic Collection 2, and School Ruled
Cardstock by Couture Cardstock: OSW White, Apple Cider, Acorn Squash, and Rain Drop
Ink: Momento/Sei
Buttons & stick pins by SEI, Ribbon by May Arts, Copic Markers, Stapler
Once again thank you for stopping by.
There is still more to come (I know! Can you believe it?), and you won’t want to miss anything! So come back tomorrow for even more gift/card ideas 😀
Puckering Up
May 3, 2010 Author: mytime | Filed under: Cards, Home decor/3-D items, My Time Made EasyHi everyone!
Thank you all for the birthday wishes! I had a wonderful day yesterday! Some great memories were made. The kids were so fun and excited the last few days as it seems like I had a LONG birthday celebration. Jason was amazing and pulled out all the stops!
I got my hair straightened, which I had NO idea was a several day process, but so far so good. It will be well worth it. I go back Thursday for the FINAL touch, and then NO MORE tedious straightening my hair daily.
That being said I have nothing but good things to look forward to, so long as I have my family by my side 😀 Every year I always wish for the same thing 😀
Anywho…..just because it’s my birthday doesn’t mean the world comes to a hault , although believe it or not I’ve gotten several days “off” so to speak!
I hope you are ready for even MORE ideas!
Today we have a wonderful peek from Stephanie Kraft using the Trendy Tool Tote!
Here is what she had to say:
When I first saw the tote, I thought it was really cute, but I wasn’t sure how sturdy it would be… let me tell you.. I was amazed at how well it holds up and how much it can hold! It would be so cute to make a few of these to hold some little jars of embellishments (buttons come to mind) in a craft room or even some office supplies on a teacher’s desk… the possibilities are endless!!
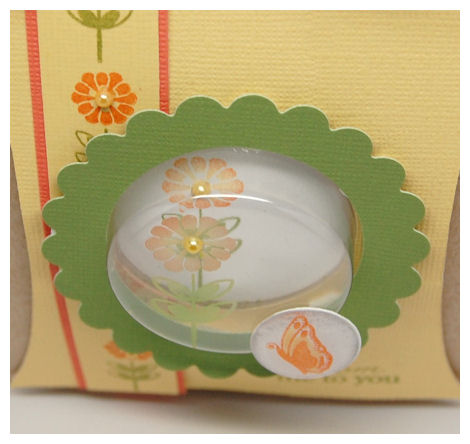
Today my sample uses the Pucker Up template!
From me to you
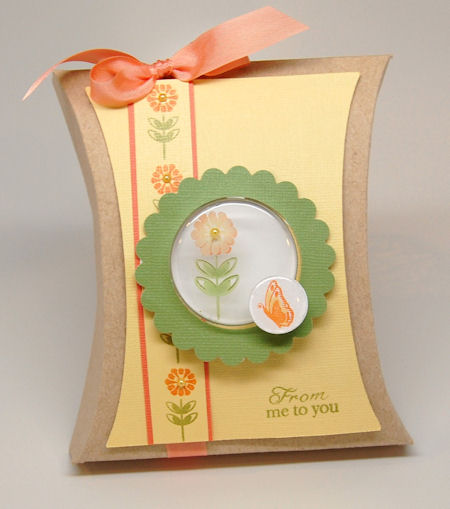
( a sentiment I’ve LONG loved and never had much of for stamp images)
I was going for a warm, summer feel to this one! I was really happy with the results, as these aren’t my “usual” colors.
I used one of the flower images from Sensational Stemsas my main focus, using the medium flower for the center image, and then the smallest version in the set to create the patterned strip along the left side. Once that was done, I layered it onto the decorative panel with the window, pre-cut out.
I really adore the “from me to you” sentiment from the Just for Youset. I also thought the butterfly from that set would be the perfect addition to the window!
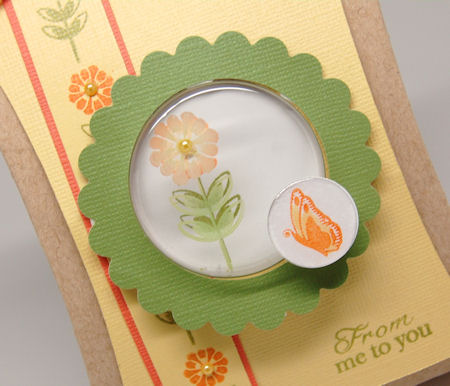
I added a page pebble over the butterfly too 😀 Just that lil’ detail, OH! and those adhesive rhinestone! LOVE THEM!
I was originally thinking of making this a full window box (which would still be CRAZY amazing), but then thought a 3D box would be even more of a WOW! if the image was dimensional enough…..
Now cool does this look? When you look straight on you cannot tell they are layered, it just POPS out at you!
So that being said I stamped my flower onto a SU! window cup thingy, in white Stazon, then brushed on my Pebble’s Pearlescent Pastels (my favorite technique :D) for the color! Once my window was in place, I added a scallop border around it.
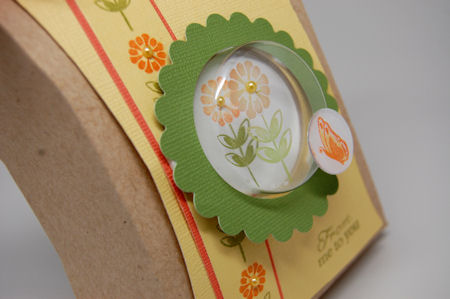
I then stamped my flower on a pices of scrap white cardstock, and layered it behind the window! It is far easier to get it PERFECT if you do the window first, scrap panel last! Then it can be manipulated to perfection, easy peasy!
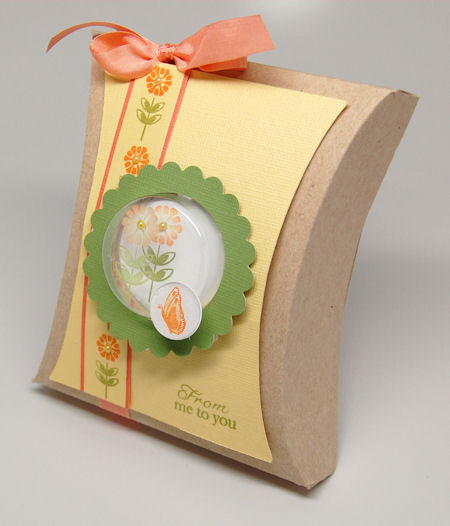
This held the travel size of the Orange Sapphire shower gel and body lotion! I gave this to one of my dearest friends 😀 I think she liked it. (No I didn’t get a photo of it-sorry! I had a deadline for this and didn’t have my bath stuff yet)
Now after this I was REALLY inspired to create a card with similar colors! After some tweaking, this is what I came up with:
Like you
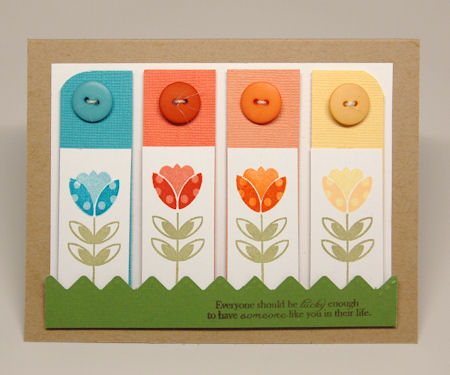
Admittedly the tulips are my most cherished image in the set! It is my favorite flower, and if it has a tulip, I love it! I LOVE whimsical flowers and this is my all time fave 😀 They are SO easy to use, and so perfectly cute (IMO) 😀
I really enjoyed using some different colors, and a new layout that showcases them too. It is even MORE fun having the “ladybug wings prints” to enable you to make them polka dot too, if you want, in a snap!
Now the sentiment is also from the Just for You set! As I said previously I LOVE combining various sets, and I am a FIRM believe in the fact that you simply cannot have enough sentiments! The one on this card is a personal favorite of mine!
I recently sent this one to one of my dearest long distance friends. I loved it so much and knew it was getting a good home 😀 Funny how hard it can be to part with our creations some times huh? I mean this one is so simple but I loved everything about it!
Supplies
Pretty Packaging © template – Pucker Up!
Pretty Impressions © Stamps- Sensational Stems, Just For You
Cardstock by Couture Cardstock: OSW White, Sunflower, Artisian Pool, Warm Apple Cider, Acorn Squash, Harvest Basket, Fallen Leaf
Ink: Momento, StazOn and SEI
Buttons by SEI, Pebbles Pearlescent Pastels, SU! Cup
Well that does it for me today!
I will be back tomorrow with much more. I told you during my short absence I was a busy girl!! Now you get to see why 😀
See you later!
Be sure you check out all our NEW! Products-released today! CLICK HERE! Each release just gets better and better!
Last month when we added the addition of the entire design team sharing their card creations with you, as a group, it was a hit. You all seemed to really enjoy having a day dedicated to how all these sets can be used for your card creations as well!
So if you all want to continue to have a day dedicated to *just* cards, then I am happy to make this part of our release projects!
Be sure you hop around to the team to see lots of card inspiration!
Now today I thought it would be a great opportunity to show you what you can do (for starters!) using the Lunch Box Love Notes & Additions, with the Lunch Box Love Notes Cut File (also available in PDF :D). I’ve talked about how this set is perfect for making little love notes to tuck away in someones lunch bag, in a briefcase, maybe a jacket pocket…..even stick them under the pillow!
We can all use a little “love note” of encouragement from time to time.
These “love notes” don’t have to be time consuming, just serve their purpose of making someone know you are thinking of them, and you love them.
So let’s start with a VERY simple set of “love notes” that you can EASILY reproduce!
Lunch Box Love Set
This used theLunch Box Love Notes & Additons
First: let me say that this note card is beyond FAB! I love it. It’s the perfect size, and the tuck tab means NO envy needed!
Second: Can you say 5 minutes? Sometimes simple is best.
YUP! All 4 (after my Cricut cut them out) done in under 5 minutes!
I first printed my Elementary patterned paper from the Sensational Staples collection, and cut them to fit my love notes.
Then I simply stamped the elements from the Lunch Box Love Notes & Additons set in black ink, onto white cardstock (already cut into circles, with black mat layers) and assembled. A little glitter and before you knew it-DONE!
Here is the Just a note to say…..
I stamped the XOXO on the paper (its another sentiment in the set)
Then on the inside I stamped
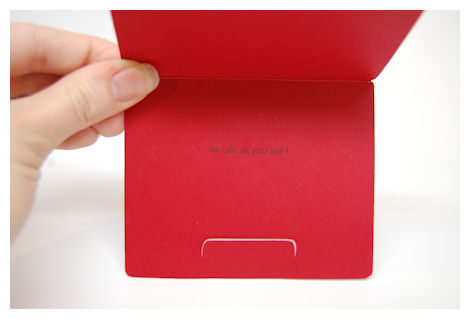
I’m so proud of you!
How super sweet and simple is that? Totally gender and age neutral!!
Now what about this one?
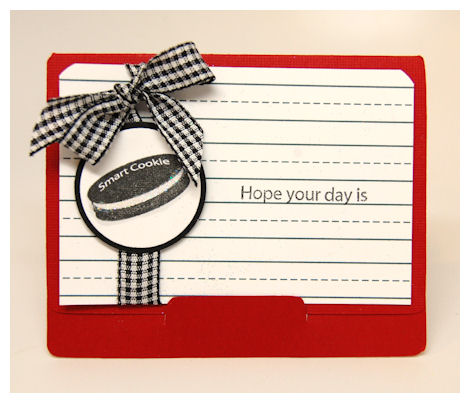
I love that the Oreo cookie says “smart cookie” right on it! I really thought it was a great addition to the set.
Now on the inside I had several options I could have chosen, given my image, but I chose
as sweet as you are!
I love it!
Inside the You’re a star one reads: you are so special
Then inside the My Lil Cupcake reads: Packed with Love (that a great one when you send a special treat (like a homemade cupcake!! for a snack)
OK now how about trying an actual card? (I have so much more to share!)
For A Special Teacher
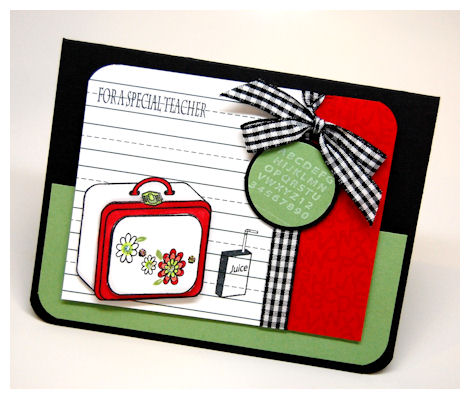
I adore this!
I LOVE red, black and green together! ESPECIALLY for school theme. I know its totally predictable, but if it ain’t broke, don’t fix it!
This card once again used the Elementary paper, and a sentiment from Lunch Box Love Notes Additions.
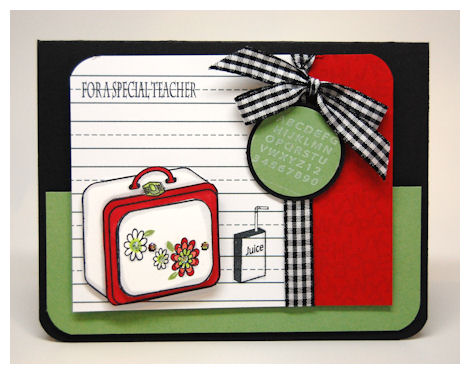
I used the alphabet lunchbox front to create a cute “old school” chalkboard looking tag!
The red panel paper is the Sensational Staples ABC’s pattern, printed on the red cardstock for a subtle detailed patterned paper.
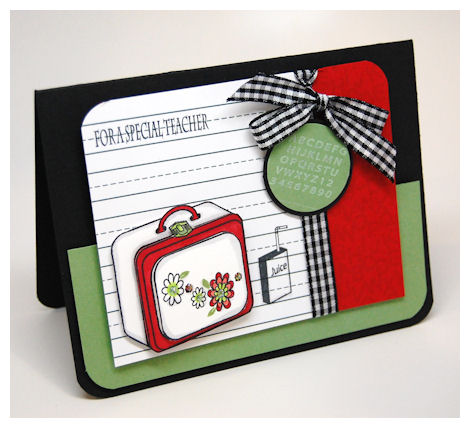
Now my LUNCHBOX!!
Sadly you cannot see that it is cut out and on dimensionals, or that it has glitter on the flowers. SUPER CUTE! I love it. I adored the little juice box stamped next to it too.
I love having the ability to interchange my lunchbox fronts to suit ANY occasion. It can also be a briefcase. You can add OTHER images that fit inside that open rectangle too! You aren’t limited by just the lunchbox fronts you see in the set! You can obviously use ANY of the single images in there too, but feel free to mix it up with some other sets! That goes for sentiments as well.
Supplies:
Pretty Impressions © Stamps- Lunch Box Love Notes © & Additions
Pretty Printables © Digital Paper- Sensational Staples
Cardstock by Couture Cardstock: OSW White, Slate, Candied Apple, Meadow
Ink: Momento
Pretty Pieces © Cut File- Lunch Box Love Note!,
Ribbon by May Arts
Copic Markers
Well I have a BUSY week, and so much more to share, but I will save more for tomorrow 😀 I’m sure between myself and the design team you are getting ton’s of samples and ideas!
So be sure you stop by and visit everyone.
Tomorrow I will return with even MORE!
So stay tuned.
Perfect Peeks Day #3 & a Giveway!
Apr 29, 2010 Author: mytime | Filed under: Cards, Home decor/3-D items, My Time Made EasyWell we are at the FINAL day of samples before theMy Time Made Easy ™ LLC Release tomorrow!!
SO you have finally get everything you’ve seen May 1st.
That just means the beginning of even more samples to follow! We have over a week of even more to share.
Today you can see more fabulous card samples using NEW! Pretty Impressions © images from
Now two of our design team members will be featuring our 3rd template for the month called Pucker Up, and a NEW! Stamp set called Sensational Stems!
Now let me share my samples with you!
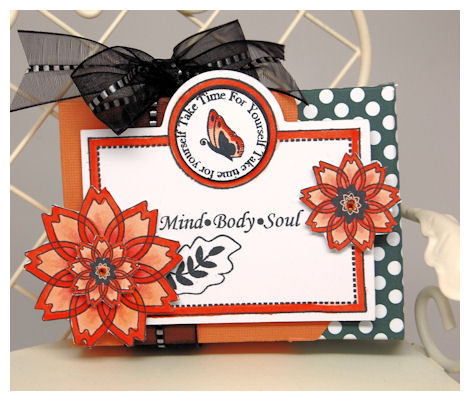
A life of purpose
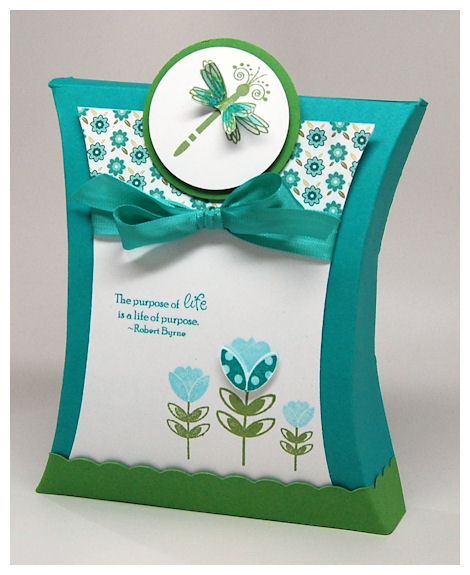
We all did this project at Stamp Around a few weeks ago! I was able to donate a set to each participant!
This sample uses the NEW! Sensational Stems, and Sensational Sentiments. Pretty Printables © paper is the Fresh Flowers Collection.
This is a great sized box for so many gifts and goes together in a snap! It is sure to be one you turn to again and again!
ABOUT: Pucker Up
Completed Project Size
5 1/2 Inches Tall
4 3/4 Inches Wide
2 Inches Deep
This template has a background set called Puckered Up Patterns ©, which make a nice addition to the template. You may also want to check out our Border Builder © Pretty Pieces Cut Files © too! The wrap around those PERFECTLY! And for a whopping $1.50 you simply CAN’T go wrong. The unique part to those is not only can you weld them together, but you can make then wider (and thinner) as well as having a solid mat layering option for each shape, which is another border in itself.

As you can see, I used the layering solid scallop from the Open Scallop Border Builder © Pretty Pieces Cut Files © for the bottom trim on my Pucker Up! Using my cutting machine I welded two of the scallops together, to create a 11 inch strip! I cut two and layered them to go all the way around the template. (All sides of you projects should always look finished!)
The is the perfect flat top/bottom gift box, with a little pucker to it!
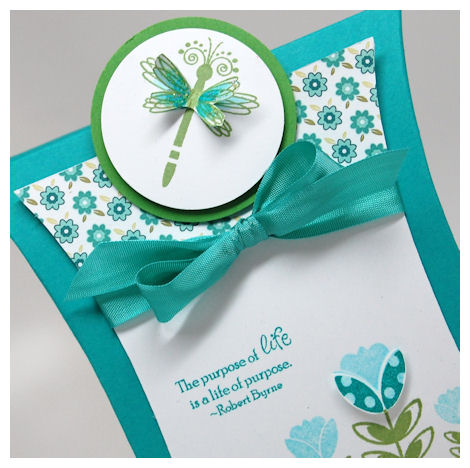
( I used the “ladybug” wing prints for my large tupil petals!)
This is a modern spin on the ever popular “pillow box”. My own personal issue with the “standard” pillow box was the inability for it to stand alone, not being able to use decorative trims around the bottom or sides (since they angles would make it crooked!) and for it to hold what I wanted due to the flat angled in side panels too! So problem solved!
(box prior to assembly)
Now another issue I had was the way the side panels folded in, but never stayed closed (unless you used adhesive!).
So, I added another FUN detail…tabs to keep the sides closed, and allow you to easily open either side to get whatever goodness is packaged up in there! NO adhesive needed.
This template comes with the front angles decorative layer, as well as the curvy side panel decorative layers!
This my have a little Pucker to it, but it is certainly the perfect template to package Up something special!
Now, about the stamp set:
Sensational Stems © Set of 27 images $12
This set is also available in a digital download called Sensational Digital Package ©
We have the perfect sentiment set to coordinate called: Sensational Sentiments ©! Wait until you start pairing these two set together!
There is a reason this set is called “sensational”!!
I think you will agree it is! Just in time for summer, this is my own personal favorite collection of images. I love fun and whimsical!
I designed a variety of flowers in various sizes, that can coordinate together with the various stems! It features my favorite flower- the tulip, a dragonfly and a “build a ladybug” image as well! The various antenna can be used on the ladybug, dragonfly or in the tulip centers! You can also use the Polka Dot Ladybug wings and add them to the large tulip flower for a fabulous pattern!
A set of 27 images for *ONLY* $12 is amazing!!
How about seeing some more samples using the Sensational Stems © ?
You Inspire Me
I have to say I LOVE this card!
I really wanted this to look like a little note I had doodled.
So, I printed the College Ruled paper from the Sensational Staples collection, printed at about 3 inches wide.
You will fall in love with the variety of flowers in this set. Having the flowers and stems with a variety of size options makes it all the more versatile! As you can see Sensational Sentiments © is the perfect pairing for this “build a flower” stamp set!
Then I stamped my flowers in the corner, and colored them in. I love the addition of the orange pencil and paper clip in the corners 😀
The sentiment is from Sensational Sentiments ©. Perfect for my DOODLE art. The sentiments have a variety of great fonts used too!
On the green layer I stamped the open line pucker block on the side panel from Puckered Up Patterns. Subtle yet perfect.
I LOVE coordinating new sets with older sets, and with this one I used the butterfly from Just For You, and the swirl from Fanciful Flourishes, stamped in a pale gray color for my flutter trail.
Too fun.
Now we got to clean and simple…..
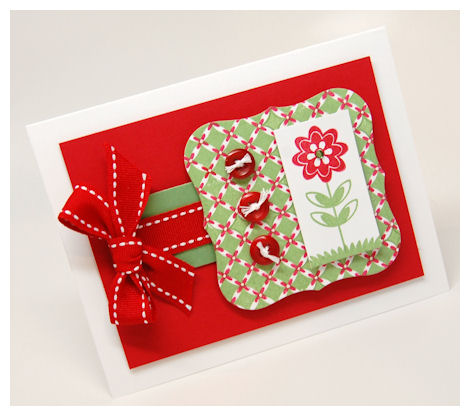
Cheer Up
To me this is definitely cheery! It would cheer me up on a bad day.
Another combination of sets! This uses the smallest tulip top, and stem from the set as my focal point. The dual color was from using markers 😀 Super easy. The “cheer up” and the ten cents symbol is from the You’ve Got Mail set. Those image blocks from that set would go well with this frame too 😀
I want to share one of the square tags from the Paper Pattern Pieces set, as well as another idea using the ribbon/lace border.
I love the buttons tied to the ribbon/lace borders. Another cute, yet simple detail.
OK one more (for today anyway)
You make me a better person
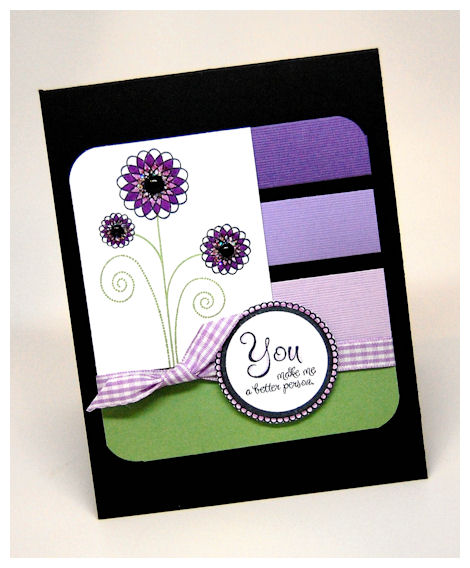
You know I needed to use purple! My favorite color.
This is a spiral like flower. I love coloring each spiral in 3 shades of the same color. I added adhesive beads and stickles to the centers. This is the other stem that is in the set. As you can see it allows you to layer the variety of petal sizes on it.
Obviously I have favor towards the circular frame 😀 MOST of the sentiments from Sensational Sentiments fit in the circle and square frame, however they all fit in the All Tied Up! cut files 😀

I’ve longed for such a sentiment as this. I think we all have someone in our life that we look up to, brings out the best in us, encourages us, or helps us strive to be the best we can be! For me, that is my husband. He brings out the best in me, and makes me strive to better my best. He is the most amazing person I have ever met! I’m so blessed to have him 😀 (now I need to use this in a masculine card for him! LOL!
Winners for the Day 1 & Day 2 wil be announced later tonight. (I’m actually presposting because its my birthday weekend and I’m spending time with friends and family all weekend, so once I get a spare moment I’ll draw names :D)
Now for today’s giveaway:
Leave a comment for your chance to win:
Pucker Up template
You choice of Border Builder cut file
Puckered Up Patterns
Sensational Stems
Winner drawn on the 1st!
Supplies:
Pretty Packaging © template – Pucker Up
Pretty Impressions © Stamps- Sensational Stems, Sensational Sentiments, Paper Pattern Pieces, Puckered Up Patterns, Just For You, You’ve Got Mail and Fanciful Flourishes
Pretty Printables © Digital Paper- Fresh Flowers
Cardstock by Couture Cardstock: OSW White, Slate, Lily Pond, Meadow, Lagoon, Carousel, Fortune Teller
Ink: Momento
Pretty Pieces © Cut File- Open Scallop Border
Buttons by SEI
Ribbon by May Arts
Copic Markers, stickles, beads
Thanks for stopping by!
I hope you return tomorrow for our release! The entire team has samples to share too.
Whoever is happy…
Apr 5, 2010 Author: mytime | Filed under: Cards, Home decor/3-D items, My Time Made Easywill make happy too!
Well today is yet another day of AMAZING samples!
There has been SO many ideas flowing, I hope you are all inspired to try something new!
Now we SOLD OUT of Take Time © & Fanciful Flourishes © – they will both be back in stock the end of the week!
Today Tracey Cuccia has a peek for you! Wait until you see it 😀
Here is what Tracey has to say
“My friend just had her FOURTH boy, and I figure she needs something SUPER girly to take over all that testosterone, lol. Here’s a little ‘pampering’ gift set just for her…”
I have had some very serious family issues to tend to, and thank you for all the prayers. I have much more to share but due to my need to tend to them I need to keep this brief. My family has to be first.
Today I decided that this Slip Cover © project would be a good one to share!
I’ve had so much going on, and I needed something “happy”.
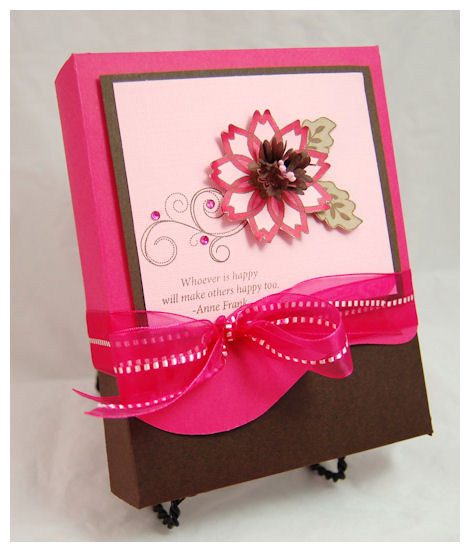
Whoever is happy will make others happy too. Anne Frank
I love that sentiment (it is from So Sentimental ©) . I really wanted to share the option of NOT making your mat layers with the curvy layer! You can easily use other layers, like rectangles and circles.
Here is a close up view
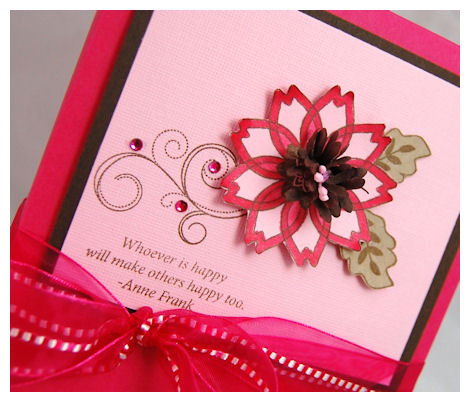
I took a prima flower and scrunched it up, and put it in the center for a cool effect!! I stamped it on pink cardstock and colored parts of it with the Copic markers. The leaves stamped in brown ink.
The flowers are from Petal Perfection ©, the swirls are from Fanciful Flourishes ©.
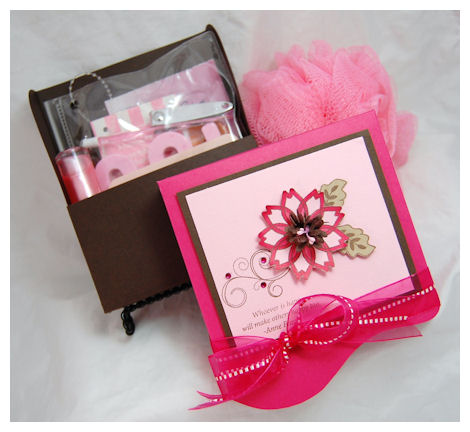
When you slip the cover off you will see a pedicure/facial kit inside (along with some lip-gloss)!
This would be the PERFECT Spa party in a box.
Supplies:
Pretty Impressions © stamps: Petal Perfection ©, So Sentimental ©, Fanciful Flourishes ©
Pretty Packaging : Slip Cover ©
Cardstock from Couture Cardstock: OSW white, blessings, Sweet heart, ganache, sunflower
Ink: Momento, Copic Markers
Ribbon: May Arts
Other: adhesive rhinestones
Thanks for stopping by!
I will be back tomorrow with more to share 😀
Happy Easter!
It is a suppose to be a gorgeous day today.
I am obviously spending time with my family today. We have a lot of plans for the kids, such as a BIG Egg Hunt and Easter activities, and also to celebrate my mom’s birthday!! We had a very upsetting family emergency with my mom yesterday. I was with her most of the day. Now I know everything will be OK, but after that we are especially thankful for today. I am constantly reminded how precious life is.
If you are the type who believes in prayer, my mom is going through a very tough time, so please send up a quick pray for her strength, and peace of mind and heart, as she overcomes some very difficult obstacles the next few months. She is strong woman and I know everything will work out. Sorry to be so vague, but I need to be. Just always remember everyday is a gift.
Today I am keeping it short and sweet.
Speaking of sweet…. Geny Cassady has her first peek with us today!!! I am excited to work with her again!
Make sure you show her some LOVE!
Here it is
This is what Geny has to say:
“Just for you isn’t merely a sentiment set, it is full of fun versatile little images. Pop on over to my blog and see how I used one to create a fun background.”
Now time for my peeks!
I decided since Geny is sharing 2 cards, that I would too!
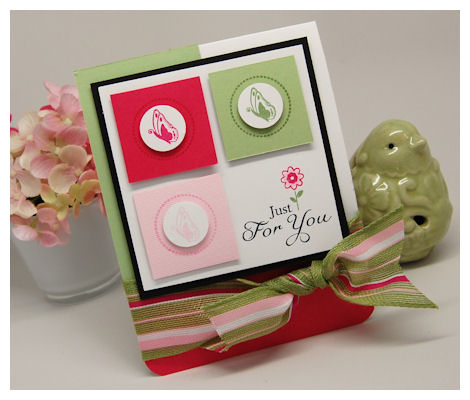
Just For You
Is this not the perfect Spring like card?
I am in total LOVE with this card! LOVE! Its so simple, bright and cheery. I will be sending this to my mom at some point this week. I think she will need a pick me up.
I used the “Just For You” sentiment from the Just For You © set. I love it! Its perfect for so many reasons. Between the sentiments and the images, the uses and versatility are limitless!
I really liked the idea of having the flower “pop” up from the sentiment. I used my markers to color the stamp itself, then colored the center pink.
The butterfly in this set is just so PRETTY! You know me and butterflies 😀 I will definitely be using the Digital version of this set to create a larger one! OR even flip it! I stamped them in the 3 colors on white, punched with a 3/4 circle, all matching the cardstock base color. Then, using the dashed circle border in the set really made it POP by stamping it on the cardstock squares. They are all on dimensionals.
Did I say I love this card?
OK, now we have one more!
When words just aren’t enough
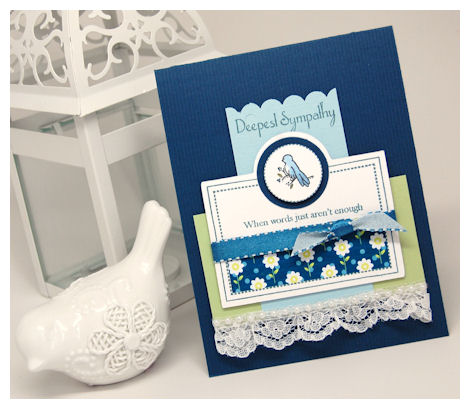
Sadly we all need a sympathy card at some point. I like to keep a few on hand, not to be pessimistic, but because when I NEED to make one, I can’t! Its too upsetting and my mojo leaves! Anyway, for me, the best time to make them is when I don’t need it.
I used the label image from the Take Time © set as my main focus of the card. I have always made “tags” that look like this, and was always bummed to never actually have one!! Now I do. This is a perfect example of how it can work for cards too!
I love the bird on a branch image from this set. Personally I think it is perfect for a sympathy card.
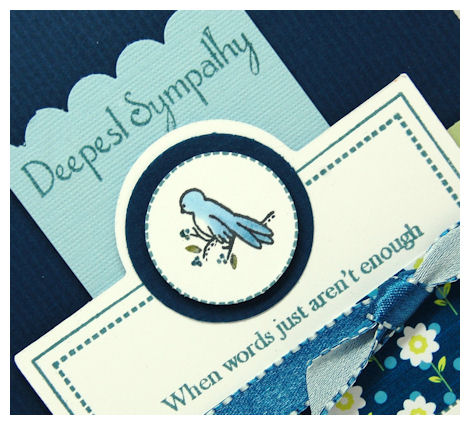
I layered the bird onto a circle for more POP. It is of course on a dimensional.
Now the “Deepest Sympathy” is from the So Sentimental © set. (there is a larger sympathy sentiment in the Just For You © set, but I didn’t want that one to be the focus of my creation this time).
I have always wanted a sentiment that says “When words just arent enough”.
You can use that to go with:
Thank You
I love you
Deepest Sympathy
Thinking of you
I’m sorry
You name it!!!
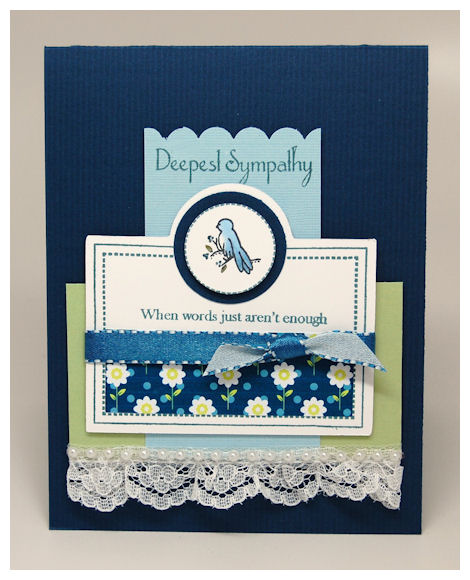
I also added a little bit of Fun Flowers © digital paper so the smaller sentiment didn’t get lost. I think it adds a lot to this card! Had I wanted the sympathy sentiment to be the main focus I could have used the one from the set.
I think it is clean, pretty simple and solemn.
Supplies:
Pretty Impressions © stamps: Just for You (acrylic), So Sentimental
Pretty Printables Digital Paper: Fun Flowers
Cardstock from Couture Cardstock: OSW white, Silent Night, Rain Drop, Cricket, blushing, sweetheart, slate
Ink: Versamagic, Momento, Copic Markers
Ribbon: May Arts
Well I really want to wish you ALL a Happy Easter! Thank you for stopping by.
If you want to see all the products we rleased this month go to the NEW PRODUCTS PAGE!
Today is our big Group Post!! In honor of the My Time Made Easy ™ LLC release day we always have the team feature some projects for you to get the wheels spinning.
Get a pen handy so you can start writing down all the ideas these creations spark for you!
All of you cardmakers out there will be bouncing for joy over this assignment! I challenged each of the design team members to create 4 cards! I thought it would be so fun and cool for you to see such a wide variety of ideas, using this months release, in one day!
As I said before, all our products are designed to coordinate! That means they are perfect for cards, tags, templates or any other project you have in mind. I really hope you enjoy what each of us has put together.
You will definitely want to visit each one of the following members:
Now for my 4 cards I decided that it would be REALLY fun to show you how awesome it can be to have BOTH the Acrylic version of the images and mix it up with the Digital version! You may be confused by what I mean, so I will show you.
I chose to use the Just For You © set to share just HOW versatile it is, and so fun to use. If there was ever a set to get in the digital version, this one is IT! This set was designed with all sorts of gifting giving and occasions in mind. I also used a similar “element” in each. That being 2 circles to the left of the main object! Each layout is different, but the ideas the same!!
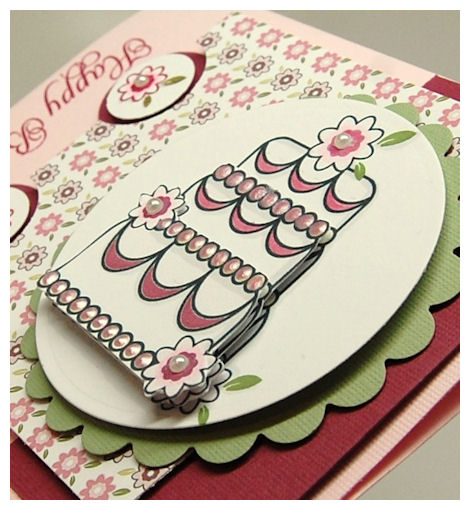
1) Happy Birthday Cake
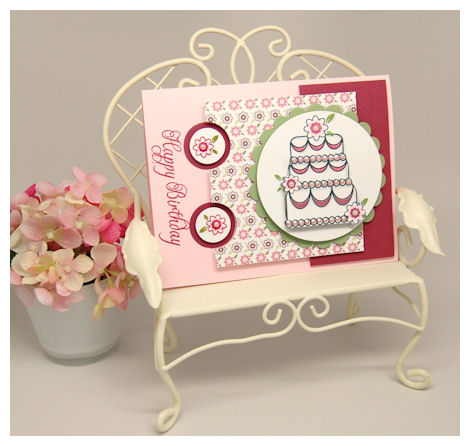
On this card I used the Digital version of the cake from the Just For You © set.
Note: ALL our digital sets come with complete step by step photo instructions on HOW to use digital stamps!
I used the acrylic version of the set for my Happy Birthday sentiment, and the little flowers in the circle. Perfect example of how fun it can be to have BOTH!
I adore the cake image in the Just For You © set! I designed it to fit within the circular sentiments that are in the set. Upon designing it I WANTED to add the flowers (that are also in the set) to it. Having it be a smaller image, I chose NOT to. I knew the details would get lost. Plus I designed it knowing that I would offer the digital version, so the options would be open! I also wanted to keep the design open to being colored for boys/men, or allow YOU to add whatever YOU want! Not everyone WANTS flowers on a cake. (shocking I know!)
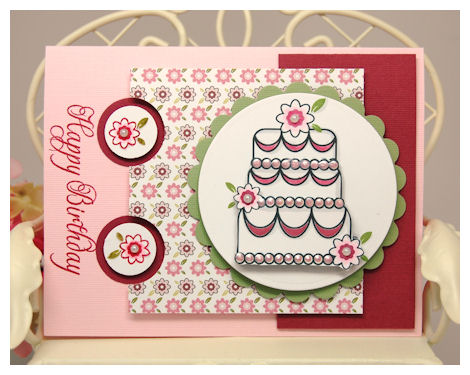
SO……using my photo editing software, I resized my cake. I then added the flowers from the set to my cake image, layering them where I want! I used the paint to color the leaves, and could have computer colored my cake, but opted for copic coloring instead! I LOVE my markers, and coloring is so therapeutic to me 😀 Reminds me of being a kid again, only I’m doing a “grown up” activity. Now if I were in a swap, or were using this image for invitations/favors I certainly would go for the computer colored version (makes mass production a BREEZE!).
OK once I have everything where I wanted it, I printed the image 3 times.
Why?
Because I knew I wanted the look of a TRULY tiered cake!

Look at that dimension! AMAZING!
I also added some liquid pearls to the border. I love the elegance this has. My mom’s birthday is next week so I made this just for her. As you may notice the flowers in the Fresh Flowers © digital paper coordinate with the images in the Just For You © set too!
Now this card doesn’t count as my set of 4! I want to share a card using the paper and colors, even the SAME image, only using the ACRYLIC version of the Just For You © set.
Mr. & Mrs.

(First let me say I SWEAR the ribbon matches my paper! LOL! Something with the lighting reflected a hue…so it looks off but I swear its not!)
Isn’t this a stunning Wedding card?
OK! Now here is the acrylic version of the set! The cake image, dashed circle, and sentiment, all stamps.
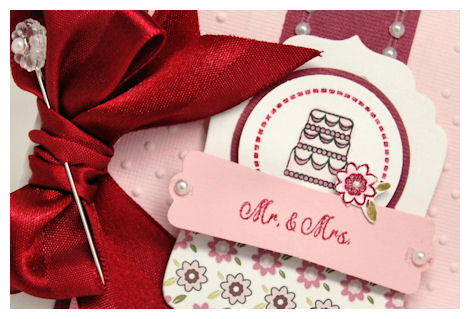
I colored my cake with my copic markers. I used the dashed circle in the set around the cake for an elegant look. I then punched it out of a circle. I used the same Fresh Flowers © digital paper, and cut a tag. My Mr. & Mrs. were stamped on a punched tag, then added to the layered label. I them stamped, colored and cut a flower for the perfect lil touch!
OK back to the 2nd of the 4 cards…….
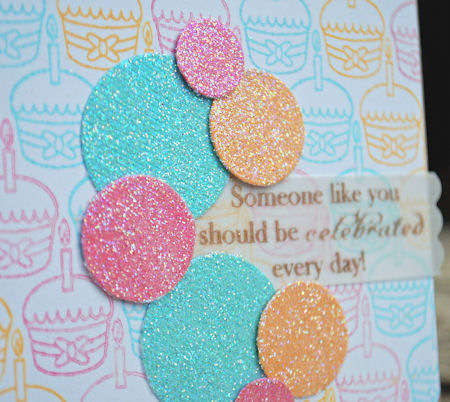
2) Celebrate You
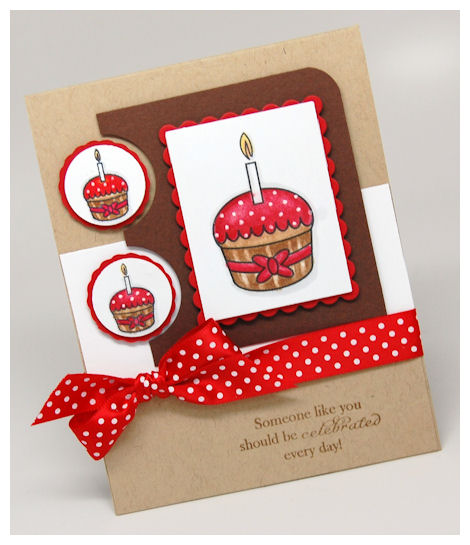
Another great example of the acrylic version of the set, combined with the stamp version.This also uses the same principal of having 2 circle images to the left of the main image.
I adore the sentiment. That is stamped on the bottom of the card. You can never have too many sentiments! When a set combines both it is a WIN! WIN! for me.
I love the little cupcakes in this set. ( we also have paper to match them in the Just Perfect © digital paper collection). Sometimes you want a BIGGER cupcake. Heck, you could make this HUGE and cut it out as a party invite or add it to a gift bag, or template! (OH! Giving myself ideas as I type :D) It was so fun to combine these too.
I colored them all the same and used my Copic markers. Easy peasy. I don’t know who will get this but I know I love red & brown together. What do you think? Cute having the same image in a various sizes right?
OK now we go on to card #3
3) A little something
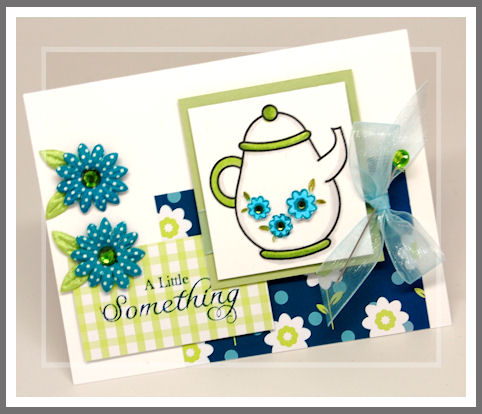
I LOVE the teapot from the Just For You © set. I knew I’d want to make it larger (yesterday I used it in actual size on a gift/tag). So, I did just that using the digital version!
I used another one of the paper collections called Fun Flowers ©, and an older set GaGa for Gingham © (I use that one a LOT!). It helped me with my colors and gave a fresh look!
I stamped my sentiment to match.
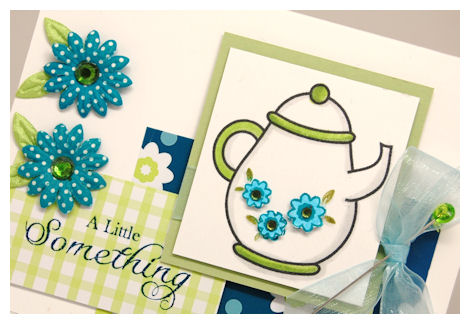
I found that the flower images from the acrylic version of the set fit perfectly into my digitally enlarged tea pot! Now I also could have used the digital flowers, like in my cake but I decided to go for stamps instead. I stamped them twice, and popped them up on dimensionals. They match my flowers too 😀
Now we have card 4
4) You mean the world to me
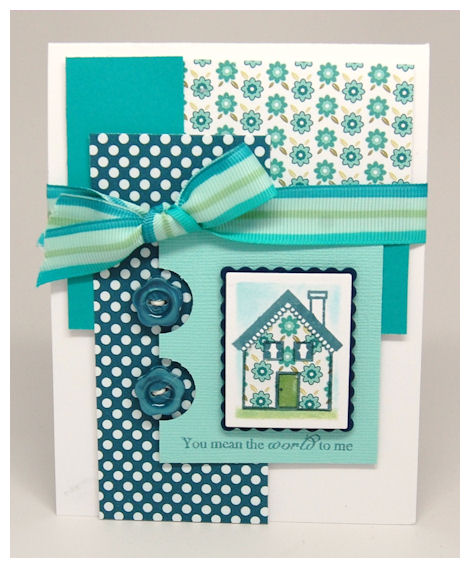
A sentiment I have LONG loved, and never had!
When I see a house image I think “home” and home to me is love, and where everything I hold dear is in reach.
OK so this one doesn’t combine ANY digital images with acrylic, but it does fit my layout of the 2 circles to the left of the main image idea, so bear with me. Would you believe me if I told you that the concept of that all happened purely by accident? I guess I was somehow mentally in that mindset, and until I edited all my photos saw this pattern! A very cool accident!
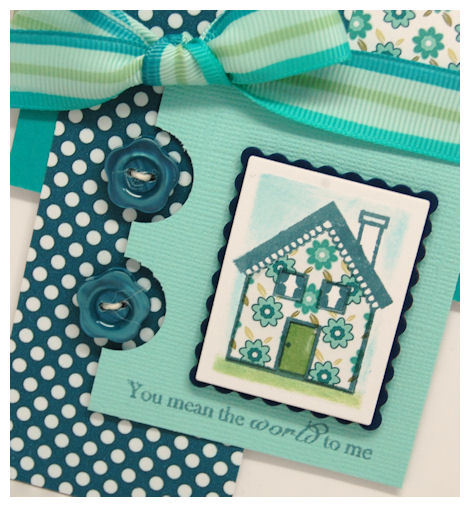
I love this quirky lil house. Its the perfect size. I stamped this onto white cardstock in a not quite navy ink. Used a nestablitly label, and sponged my grass & sky.
Now for this one I took some scrap left over from the Fresh Flowers © digital paper, stamped my house, and paper pieced it over my main image (cutting out the windows and door in the pattern so the base image pops through!). I felt the the Darling Dots © patterned matched my scallop house trim 😀
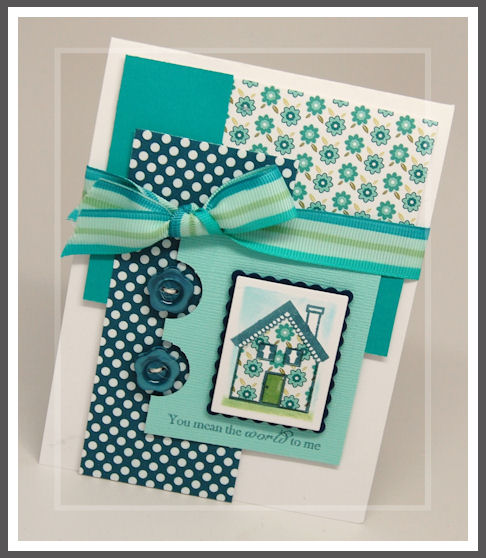
My ribbon…..well I took some white grosgrain ribbon, then colored it with my Copic markers to match! Sometimes we have to improvise!
Well there you have it! Now I do have some more card I made too, that I will share as the days pass on, so keep checking in. I hope this team post will be helpful to you all in some way.
We still have over a WEEK of daily inspiration and samples to share, so come back tomorrow!
Supplies: Happy Birthday Cake
Pretty Impressions © stamps: Just for You digital & acrylic
Pretty Printables Digital Paper: Fresh Flowers
Cardstock from Couture Cardstock: Blushing, Tuber, OSW white, Thistle Stalk
Ink: Versamagic, Copic Markers
Other: Liquid Pearls
Supplies: Mr & Mrs.
Pretty Impressions © stamps: Just for You acrylic
Pretty Printables Digital Paper: Fresh Flowers,
Cardstock from Couture Cardstock: Blushing, Tuber, OSW white
Ink: Versamagic, Momento, Copic Markers
Ribbon: May Arts
Other: adhesive pearls, Nestability label, SU! Punch
Supplies: Celebrate You
Pretty Impressions © stamps: Just for You acrylic & digital
Cardstock from Couture Cardstock: OSW white, Oat, Gancahe, Macintosh
Ink: Momento, Copic Markers
Ribbon: May Arts
Other: singlo gel pen
Supplies: A Little Something
Pretty Impressions © stamps: Just for You acrylic & digital
Pretty Printables Digital Paper: Fun Flowers, GaGa for Gingham
Cardstock from Couture Cardstock: OSW white, Cricket
Ink: Versamagic, Momento, Copic Markers
Ribbon: May Arts
Other: Prima Flowers, adhesive rhinestones
Supplies: You mean the world to me
Pretty Impressions © stamps: Just for You acrylic
Pretty Printables Digital Paper: Fresh Flowers, Darling Dots
Cardstock from Couture Cardstock: OSW white, Sprinkle, Lagoon
Ink: Versamagic, Momento, Copic Markers
Ribbon: May Arts
Other: Buttons
Well thank you for stopping by! I hope you enjoyed what you’ve seen so far, and what is to come!
See you back here tomorrow.
Hi everyone!
Did you have a good weekend? Any good plans? We didn’t do anything, but next weekend we are taking our last sledding trip of the season (praying they are even open).
We are drowning in rain and there is a lot of FLOOD WARNINGS. We live on a hill, so I am crossing my fingers. It is times like this I’m happy I don’t own the beach/water front home! Honestly I would never leave close to any body of water. By that I mean near my back yard. I’m paranoid parent when it comes to kids and bodies of water! FREAKS ME OUT!
I’m DRAGGING today given our “Spring Ahead” change of the clocks.
I don’t like when they do that at all. Even when we “gain” an hour. Why can’t we just leave the clocks alone? Getting my kids up for school was a nightmare!!! The normal 7:00 is hard, but when you factor in it is “really” 6:00 its a killer. I usually spend the week saying “Well its really X time.” That drives my hubby BONKERS! He says “NO! We changed the clocks so its really X time, get over it.” Too funny.
Tomorrow I am sharing a post about the Pretty Printables © digital paper.
Anyway, I wanted to share my sample I made that is on the MTME website using the digital Some Punny Easter © set
You are Scent-sational

This really says Spring to me.
I loved this tag in the set! It was actually the first image I made for the set. I designed it to go with the lil skunk I created –>here
Since it was a digital stamp I was able to recolor the letters in “scentsationa (flower is the “l”)” to fit my color combination. That flower was too fun to color. I used my Copic’s for that.
Now the butterfly was created using the Flutters and Flowers © cut file and the coordinating Pretty Printables © paper . The flutter trail is of course on the the flourishes in the Fanciful Flourishes ©set. So simple and easy peasy.
I’ll be honest. I’m a STAMPER. I love having the TANGIBLE images in my hands so I can create. LOVE! But often time digi images can be better because you can resize them, color them digitally and no storage. For me the bottom line is if I like it, I have to have it.
Another “perk” is the price! Let’s face it, the economy is rough, and when money is tight and you NEED (:D) something new, a digital set gets you more for the $$.
Since offering the Pretty Packaging © templates in all the various cutting machine formats I have opened myself up to a wider range of customers! Which is amazing! MANY of which LOVE digi, and digi ONLY. Many hoping I will offer ALL the sets I have in digital format. Maybe that will happen in the future (along with the acrylic sets) but for now I have begun offering select sets in this format.
Many have asked how I decide what will be digital and what won’t. Well, I choose mainly images I feel best suited for the perks of digital images. To me that is images that involve coloring and not too much 2 step layering. Since I am new to this I don’t want to purchase and hold a bunch of “stock” in “holiday” specific sets such as Easter. So digital stamps are perfect! So far that is how I base my decisions.
If you are NEW! to digital stamps and you want to give it a try, without having to make a purchase you will want to download our Water & Waverly Wiggles image! It is FREE!
You just stole my heart
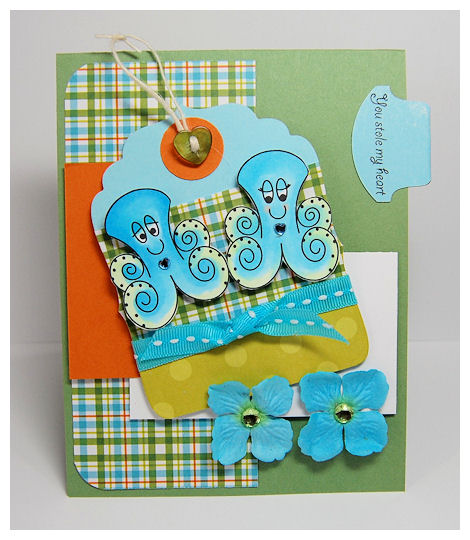
How cute are these two? My sentiment is from Critters with Heart
We currently have the following in digital download:
Water & Waverly Wiggles image FREE!
Tracey Cuccia is my digi guru and she created a wonderful step by step photo tutorial to walk you through using digital images, and all the fun things you can do with them! Those instructions come with every digital image set. So even if you are brand new to digital images you can give it a go!
It truly has everything you need to know about digital stamps!
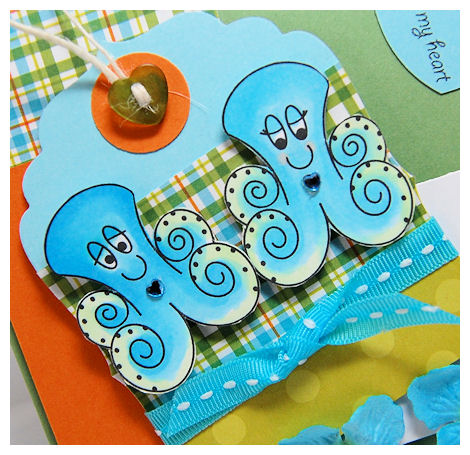
I just printed these two , cut them out and colored them with Copic’s.
They are really cute.
Anyway just thought I’d share some eye candy with you using my digital stamps. I hope you all give them a try. If you have any questions let me know.
Tomorrow I will have a post on our digital paper! FINALLY! Many of you have had some good questions about it, and I hope that the post will answer all of them!
Till tomorrow!
My Etsy

Who I Designed For
Blogroll
- Alicia
- Alli Miles
- Ally Blankenship
- Amber
- Andi @ crafts on a whim
- Angel R
- Angie Z
- Anne Kranitz
- Becky O
- Bee
- Beth Silaka
- Bethany Paull
- Beverly Nash
- Bobbie
- Cambria
- Cammie
- Card of the Week
- Card Positioning System (CPS)
- Cards for Cancer
- Catherine Doucette
- Charmaine
- Cheryl Sims
- Chriss Rollins
- Christina
- Christine Ewing
- Christine Wooden
- Colleen Schaan
- Craft Critique
- Craft Gossip
- Crystal
- Dawn Easton
- Emily Giovanni
- Geny
- Holly
- Igne Groot
- Inspirational Craft Blogs
- Irene
- Jami Sibley
- Jeanne Streiff
- Jen del Muro
- Jeni Bond
- JenMarie
- Jenn Balcer
- Jenn Diercks
- Jenn O
- Jennifer E
- Jennifer Mick
- Jennifer Pereda
- Jennifer-Sweet Treat
- Joanne Basile
- Jodi Collins
- Julia Stainton
- Julie Masse
- Karen
- Kathryn Berthiaume
- Katie Cotton
- Kelley Holland
- Kendra
- Kim Scholfield
- Kris’s Color Stripes! Get inspired here
- Kristen Dubosque
- Kristin Eberline
- Kristine
- Laura @ Sunshine Stamper
- Laura Turnmire
- Laurie Schmidlin
- Lesa Rapp
- Linda Duke
- Linda-LSN
- Lindsey Botkin
- Lisa (lakind scs)
- Lisa Kind
- Lori Craig
- Maggie
- Mara Campbell
- Maria
- Maria Levine
- Mary
- MaryJo
- Melanie M
- Monique Hansen
- Moxie Fab World
- Pam Imholz
- PaperCrafts Connection
- Peppers and Pollywogs Kids party site
- Rebecca Grohall
- Rita
- Robyn
- Rose Ann
- Sarah Vrolyk
- Sharon Harnist
- Sharon Johnson
- Sharon Rivera (a chemisrty with paper)
- Sherrie
- Sophia Landry
- Storage Units, Ink, & More Blog
- Sue Berker
- Susan (Rainy)
- Tangii Crane
- Tracy
- Tricia Traxler
- Trudee
- Velta
- VivLyn
- Zena
MTME Pretty Palette Color Team
MTME Pretty Patterns Sketch Team
My Time Made Easy TM LLC
Shop till you drop!
Lauren Meader
About Me
Copyrighted material
Subscribe To My Blog
Pages
- About me
- Alexa’s Story!
- My Crafty Corner!
- My Time Made Easy™ LLC
- Our Make A Wish Trip to Disney!
- Resume/Publication List
Calendar
| M | T | W | T | F | S | S |
|---|---|---|---|---|---|---|
| 1 | 2 | 3 | 4 | 5 | 6 | 7 |
| 8 | 9 | 10 | 11 | 12 | 13 | 14 |
| 15 | 16 | 17 | 18 | 19 | 20 | 21 |
| 22 | 23 | 24 | 25 | 26 | 27 | 28 |
| 29 | 30 | |||||
Archives
- August 2013
- July 2013
- June 2013
- May 2013
- April 2013
- March 2013
- February 2013
- January 2013
- December 2012
- November 2012
- October 2012
- September 2012
- August 2012
- July 2012
- June 2012
- May 2012
- April 2012
- March 2012
- February 2012
- January 2012
- December 2011
- November 2011
- October 2011
- September 2011
- August 2011
- July 2011
- June 2011
- May 2011
- April 2011
- March 2011
- February 2011
- January 2011
- December 2010
- November 2010
- October 2010
- September 2010
- August 2010
- July 2010
- June 2010
- May 2010
- April 2010
- March 2010
- February 2010
- January 2010
- December 2009
- November 2009
- October 2009
- September 2009
- August 2009
- July 2009
- June 2009
- May 2009
- April 2009
- March 2009
- February 2009
- January 2009
- December 2008
- November 2008
- October 2008
- September 2008
- August 2008
- July 2008
- June 2008
- May 2008
- April 2008
- March 2008
- February 2008
- January 2008
- December 2007
- November 2007
- October 2007
- September 2007
- August 2007
- July 2007
- June 2007
- May 2007
- April 2007
- March 2007
- January 2007
Categories
- About Me
- All That Scraps
- blogger challenge
- camera/photo play
- Cards
- Contests
- family stuff
- FOR SALE
- Home decor/3-D items
- How to FAKE it!
- Introduction
- JUGS Challenge
- JustRite Stampers
- Lizzie Anne Designs
- My family stuff
- My Stamping Space
- My Time Made Easy
- My Time To Color Challenge
- My Time to Create Challenge
- My Timeless Template Challenge
- My Timeless Templates
- Mytime Mail
- MYTIME MOVIE/VIDEOs
- Papertrey Newsletter
- Pink Cat Studio
- Pretty Palette Challenge
- Pretty Patterns Sketch
- Product Opinions and Must haves
- Recipe's
- Saturday Sketch
- Smilebox Creations
- Stampavie
- Tutorials
- Uncategorized
- videos
Most Popular
- Create your own Onesie Card Tutorial-and important NOTE! PLEASE READ (2529)
- Saturday Sketch-Boxed bag holder (2333)
- Going GREEN! Fancy Flower Flourish-Closure Video (1478)
- Fabulous Favorite - Giveaway! (1336)
- a Prayer Request (1231)
- QUICK-Easter Baskets from Nestabilities-PTI style-and blog challenge (1063)
- Teaser Sketch (999)
- February Release Giveway! (and a little peek) (996)
- Group Post and Rambling Rose Video Tutorial (985)
- GIVEAWAY! Who wants it all?! (895)
Recent Comments (RSS)
- 야동: Love to read it,Waiting For
- 야동: This seller is in a
- 바카라사이트: 여기 처음 왔어요. 나는이 게시판을
- 야동티비: I was surfing the Internet
- 바카라사이트: 비슷한 주제에 대한 흥미로운 정보를
- 바카라사이트: "여기에 제공해 주신 귀중한 정보와
- 온라인홀덤: 유익한 웹 사이트를 게시하는 데
- 홀덤나라: 나는 당신의 블로그를 정말 좋아합니다.
- lisa: Technology, too, has left an
- 주소모음: 흠 !! 이 블로그는 정말
Copyright © 2007 - My Time, My Creations, My Stampendence - is proudly powered by WordPress
This blog has been Tweaked and Designed by Sara Williams