Archive for July 1st, 2012
A Magical Birthday!
Jul 1, 2012 Author: mytime | Filed under: Cards, Home decor/3-D items, My Time Made EasyI hope you have been feeling those creative juices flow as the team and I have beensharing projects for our July Release. We still have several days left of inspiring gifts and ideas, so I hope you have a moment to check everyone’s projects today!
Stop by and pay a visit to:
I really enjoyed this release as many of these projects I had whipped up last minute. I had surgery some time ago and hadn’t created anything in months! Most of what you’ve seen for the last 3 months or so was designed well in advance.
It has been a very busy few months for me. I haven’t had time to keep up on my blog, sharing all my family life and happenings but trust me when I say it’s been NON-STOP!
Today’s share was a project I designed just yesterday! My first project getting back into the swing of things.
When the Magical Birthday Wishes © set was designed Sara had discussed wanting a Magician’s Hat template to go with it. I PROMISED her that I could EASILY turn the 3-Tier © template into one, in time for our release.
A Magical 8th Birthday!
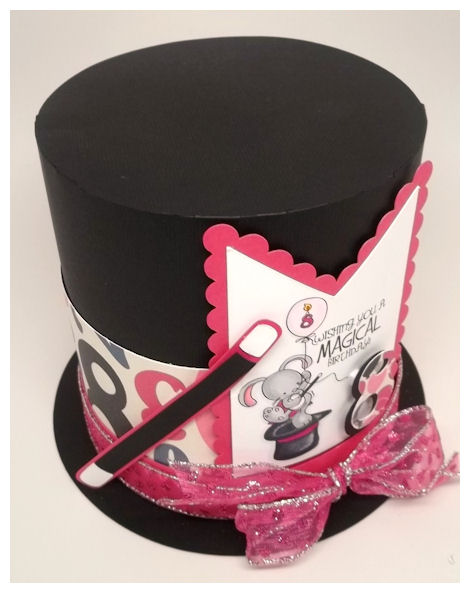
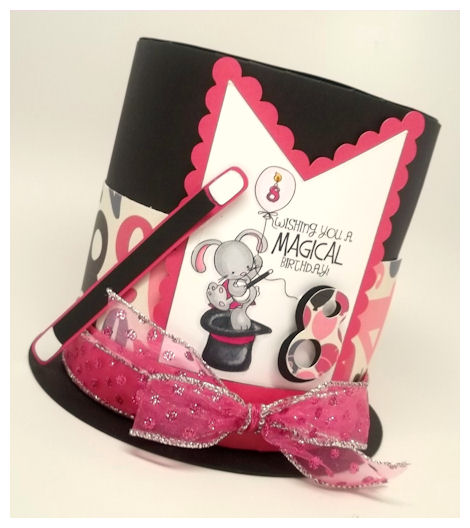
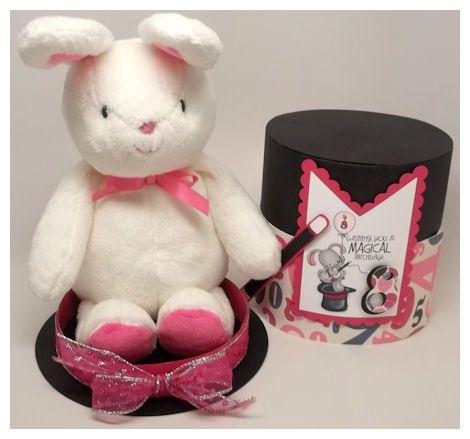
This bunny is my gift, the “hat” is the gift “box” and there is a coordinating card to match!
I have to say I was quite excited by not only the Magical Birthday Wishes © set, but the coordinating paper (I used the Birthday Bonus Paper © and the Birthday Banner ©, Magical Birthday Numbers ©, Magical Birthday Wishes © cut files too! So much so, that I incorporated ALL OF IT, into ONE project with ease!
YOu too can get it all in the Magical Party Package!
My daughter Amber is turning 8 in August and I thought this would be a fun party theme for her as she loves magic!
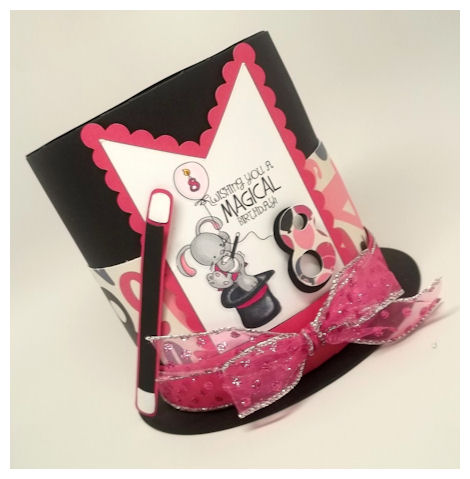
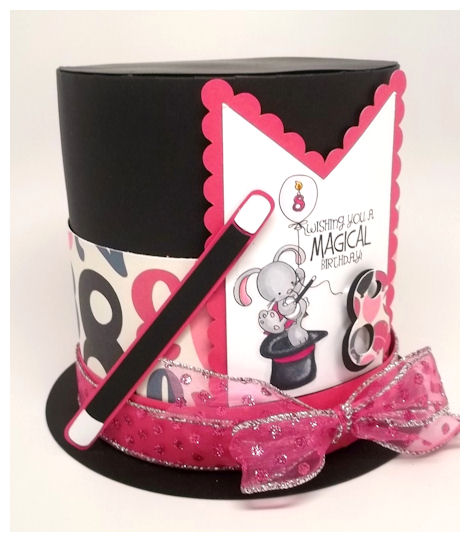
I used the “Large” box version of the 3-Tier © template to make hat. I just made the box sides taller (5 3/4 Inches High) to make it a HAT instead of a box/cake. SO the box is technically up-side-down.
Around the base of the hat I used a re-colored version of the number pattern in the Birthday Bonus © paper collection from the Magical Party Package to wrap around the hat. Imade all the number 8’s black, so they stood out. That was too fun!
I was channeling the Mad Hatter from Alice in Wonderland when I went for the hat tag, which was created using the Birthday Banner ©. I knew it would be perfect for accenting my hat.
I love the Magical Birthday Wishes © set, and all the building possibilities it offers.I printed the adorable Bunny Magician from the Magical Birthday Wishes © set, and chose to use the round balloon from him to hang from.
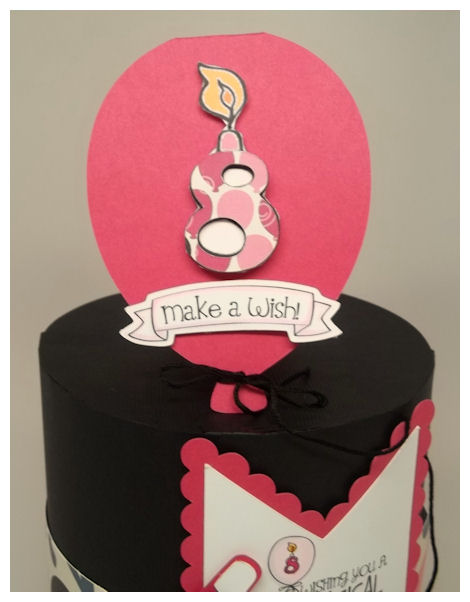
On the balloon I layered the #8 candle image, and chose my “flame” too! I then colored it all in.
I really wanted to use the sentiment and I was able to fit it ALL on my Birthday Banner © hat tag due to the beauty of digital products! Since I was using digi images, and cut files I could re-size everything to suit my needs on my project! I love that that much versatility!
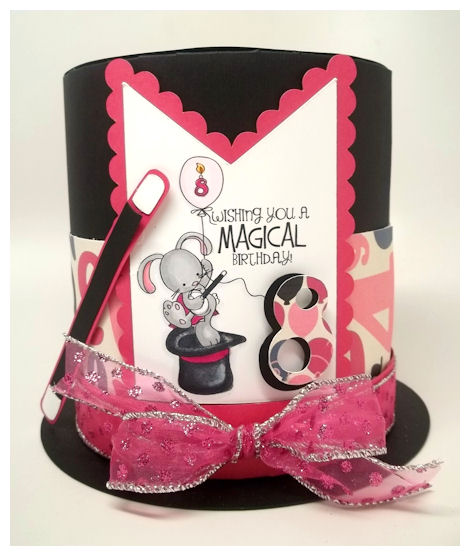
In addition to fitting all that on my tag I wanted to use the #8 from the Magical Birthday Numbers ©cut file. Again re-sizing I was able to cut the 8 from black cardstock first, then overlapping, I cut an 8 from the balloon pattern paper (re-colored) for some more color and interest. I love it.
Once my tag was added I also chose to use the Magic Wand from the Magical Birthday Wishes © cut file. It really made it a WOW!
I used the top of the box as my box bottom instead, making the hat rim fuchsia, as enlarging the box bottom to be 6 1/4 inches around. So fun and easy.
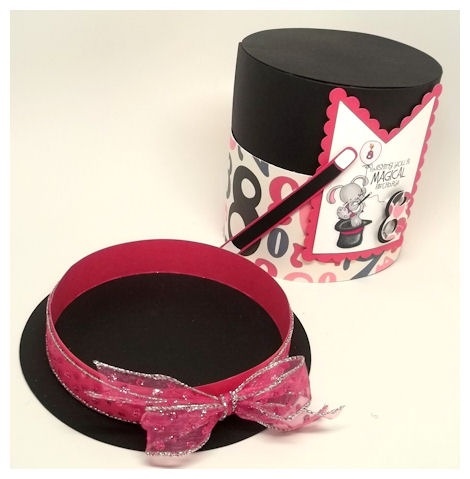
I wrapped the hat rim with a glittery polka dot ribbon.
As you can see in the photos the template makes everything looked “finished”! The bottom of the box, and even the inside of the lid is clean and nicely detailed.
My sweet little bunny folds right up and fits into my Magician Hat perfectly!
Now for the card…
Given the image, that was easy peasy!
The card was made using the Magical Birthday Wishes © cut file. I just tied some embroidery floss around the balloon bottom to make it appear to be look like the balloon in the image.
I enlarged the 8 image and cut it out to put onto my balloon. I also loved the banner and sentiment, all from the Magical Birthday Wishes © set.
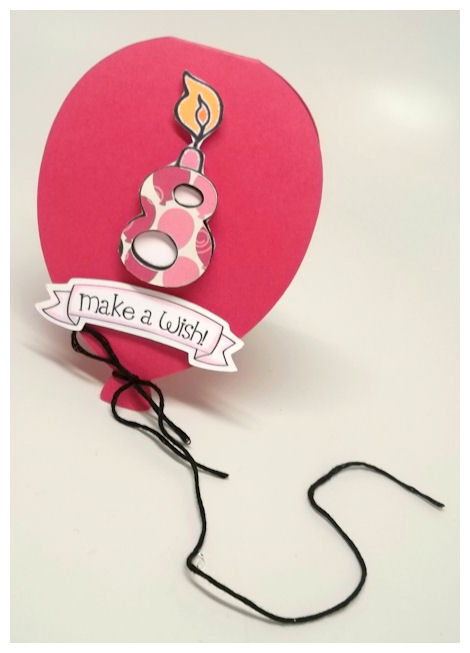
As you can see the 8 in the balloon on hat tag image, is the same image I chose to use for the card. I again used the #8 from the Magical Birthday Numbers ©cut file. Again re-sizing I was able to cut the 8 from the balloon pattern paper (re-colored) just like on my hat! I layered it over the 8 image.
You could also use this as a great invitation too!
Well as I have said before, with a little imagination and a speck of creativity you can get so much versatility from our products. I think today’s project proved that. The team and I are always here to share new ways to use our products, so if you fall short on creative ideas you can always find some inspiration from us!
Our GALLERY is full of ideas so use it as a resource if you ever get “stuck”!
Join us for more tomorrow 😀
My Etsy
My Time Made Easy © LLC
Who I Designed For
Blogroll
- Alicia
- Alli Miles
- Ally Blankenship
- Amber
- Andi @ crafts on a whim
- Angel R
- Angie Z
- Anne Kranitz
- Becky O
- Bee
- Beth Silaka
- Bethany Paull
- Beverly Nash
- Bobbie
- Cambria
- Cammie
- Card of the Week
- Card Positioning System (CPS)
- Cards for Cancer
- Catherine Doucette
- Charmaine
- Cheryl Sims
- Chriss Rollins
- Christina
- Christine Ewing
- Christine Wooden
- Colleen Schaan
- Craft Critique
- Craft Gossip
- Crystal
- Dawn Easton
- Emily Giovanni
- Geny
- Holly
- Igne Groot
- Inspirational Craft Blogs
- Irene
- Jami Sibley
- Jeanne Streiff
- Jen del Muro
- Jeni Bond
- JenMarie
- Jenn Balcer
- Jenn Diercks
- Jenn O
- Jennifer E
- Jennifer Mick
- Jennifer Pereda
- Jennifer-Sweet Treat
- Joanne Basile
- Jodi Collins
- Julia Stainton
- Julie Masse
- Karen
- Kathryn Berthiaume
- Katie Cotton
- Kelley Holland
- Kendra
- Kim Scholfield
- Kris’s Color Stripes! Get inspired here
- Kristen Dubosque
- Kristin Eberline
- Kristine
- Laura @ Sunshine Stamper
- Laura Turnmire
- Laurie Schmidlin
- Lesa Rapp
- Linda Duke
- Linda-LSN
- Lindsey Botkin
- Lisa (lakind scs)
- Lisa Kind
- Lori Craig
- Maggie
- Mara Campbell
- Maria
- Maria Levine
- Mary
- MaryJo
- Melanie M
- Monique Hansen
- Moxie Fab World
- Pam Imholz
- PaperCrafts Connection
- Peppers and Pollywogs Kids party site
- Rebecca Grohall
- Rita
- Robyn
- Rose Ann
- Sarah Vrolyk
- Sharon Harnist
- Sharon Johnson
- Sharon Rivera (a chemisrty with paper)
- Sherrie
- Sophia Landry
- Storage Units, Ink, & More Blog
- Sue Berker
- Susan (Rainy)
- Tangii Crane
- Tracy
- Tricia Traxler
- Trudee
- Velta
- VivLyn
- Zena
MTME Pretty Palette Color Team
MTME Pretty Patterns Sketch Team
My Time Made Easy TM LLC
Shop till you drop!
Lauren Meader
About Me
Copyrighted material
Subscribe To My Blog
Pages
- About me
- Alexa’s Story!
- My Crafty Corner!
- My Time Made Easy™ LLC
- Our Make A Wish Trip to Disney!
- Resume/Publication List
Calendar
Archives
- August 2013
- July 2013
- June 2013
- May 2013
- April 2013
- March 2013
- February 2013
- January 2013
- December 2012
- November 2012
- October 2012
- September 2012
- August 2012
- July 2012
- June 2012
- May 2012
- April 2012
- March 2012
- February 2012
- January 2012
- December 2011
- November 2011
- October 2011
- September 2011
- August 2011
- July 2011
- June 2011
- May 2011
- April 2011
- March 2011
- February 2011
- January 2011
- December 2010
- November 2010
- October 2010
- September 2010
- August 2010
- July 2010
- June 2010
- May 2010
- April 2010
- March 2010
- February 2010
- January 2010
- December 2009
- November 2009
- October 2009
- September 2009
- August 2009
- July 2009
- June 2009
- May 2009
- April 2009
- March 2009
- February 2009
- January 2009
- December 2008
- November 2008
- October 2008
- September 2008
- August 2008
- July 2008
- June 2008
- May 2008
- April 2008
- March 2008
- February 2008
- January 2008
- December 2007
- November 2007
- October 2007
- September 2007
- August 2007
- July 2007
- June 2007
- May 2007
- April 2007
- March 2007
- January 2007
Categories
- About Me
- All That Scraps
- blogger challenge
- camera/photo play
- Cards
- Contests
- family stuff
- FOR SALE
- Home decor/3-D items
- How to FAKE it!
- Introduction
- JUGS Challenge
- JustRite Stampers
- Lizzie Anne Designs
- My family stuff
- My Stamping Space
- My Time Made Easy
- My Time To Color Challenge
- My Time to Create Challenge
- My Timeless Template Challenge
- My Timeless Templates
- Mytime Mail
- MYTIME MOVIE/VIDEOs
- Papertrey Newsletter
- Pink Cat Studio
- Pretty Palette Challenge
- Pretty Patterns Sketch
- Product Opinions and Must haves
- Recipe's
- Saturday Sketch
- Smilebox Creations
- Stampavie
- Tutorials
- Uncategorized
- videos
Most Popular
- Create your own Onesie Card Tutorial-and important NOTE! PLEASE READ (2529)
- Saturday Sketch-Boxed bag holder (2333)
- Going GREEN! Fancy Flower Flourish-Closure Video (1478)
- Fabulous Favorite - Giveaway! (1336)
- a Prayer Request (1231)
- QUICK-Easter Baskets from Nestabilities-PTI style-and blog challenge (1063)
- Teaser Sketch (999)
- February Release Giveway! (and a little peek) (996)
- Group Post and Rambling Rose Video Tutorial (985)
- GIVEAWAY! Who wants it all?! (895)
Recent Comments (RSS)
- 야동: Love to read it,Waiting For
- 야동: This seller is in a
- 바카라사이트: 여기 처음 왔어요. 나는이 게시판을
- 야동티비: I was surfing the Internet
- 바카라사이트: 비슷한 주제에 대한 흥미로운 정보를
- 바카라사이트: "여기에 제공해 주신 귀중한 정보와
- 온라인홀덤: 유익한 웹 사이트를 게시하는 데
- 홀덤나라: 나는 당신의 블로그를 정말 좋아합니다.
- lisa: Technology, too, has left an
- 주소모음: 흠 !! 이 블로그는 정말

