July Release: Keep Dazzling Them!
Jun 30, 2011Today is July Release for My Time Made Easy ™ LLC!
Check out our NEW! PRODUCTS —>HERE! You won’t want to miss a thing!
View our GALLERY! —> HERE! Always full of amazing gift ideas, just for you!
Want to participate in some fun weekly challenges? Check out our BLOG! —> HERE!
To celebrate our July Release we always start with a Group Post full of gifts and project ideas for you!
Today the team and myself will be using one of our NEW! Pretty Packaging Templates to create a gift set of 4 Cards! You can never have too many card set ideas (wink).
Be sure to visit the team today:
Today my project will be using the latest For Keeps Pretty Packaging Templates. Now I DID want to use our other template of the month: Carry Clutch as I have not shared anything about it yet, but this particular project idea (at least not on my blog-see the store or gallery), just flowed, so I went with it! Sometimes you just gotta go with where inspiration takes you!
I will share a sample featuring the Carry Clutch tomorrow 😀
So here is my Blooming with Thanks gift set:
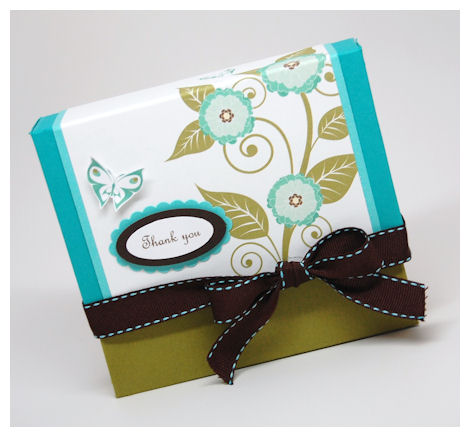
I really enjoyed using the For Keeps template.
My design for the lid was UBER simple!
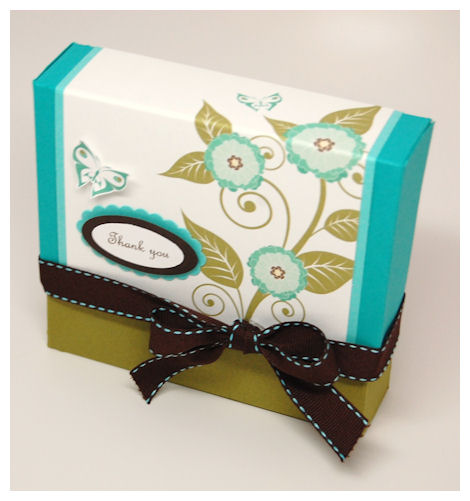
I simply printed the floral vine pattern from the Blooming with ElegancePretty Printables Digital Paper for my lid! I love how it turned out.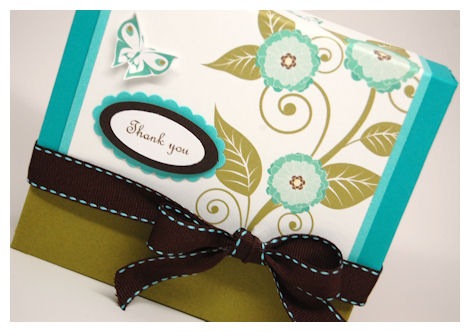
I then took the Thank You sentiment from the Keep It Organized © set, printed it in chocolate ink, then punched and layered it onto my label.
I used the Base Option #2 so that this could hold the 12 thank you cards I created. 
There are 3 different designs, 4 of each.
Just remove the lid, and you can see that they fit nicely in here.
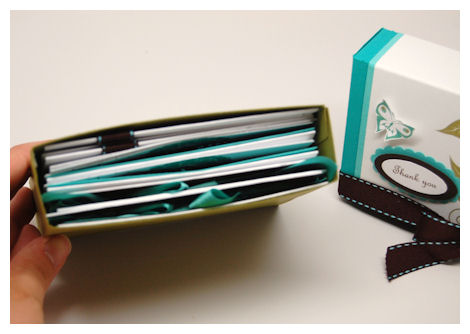
The card sizes are 4 3/4 Wide X 4 1/2 High.
Who would’ve thought this could fit SO MANY cards?! But it does.
Now the card details…
Embellished Blossoms
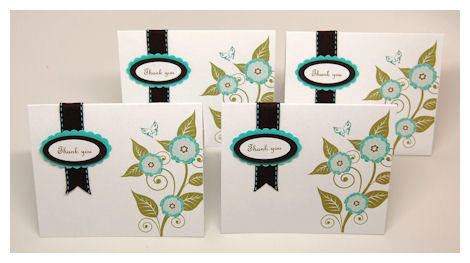
The first set of 4 were designed to coordinate with the design of the For Keeps template above.

I used the Embellished Blossoms pattern from the Blooming with Elegance Pretty Printables Digital Paper, to serve as the focus of my card. Talk about EASY!!! Just print the size I wanted, cut and go!
Dazzling Design
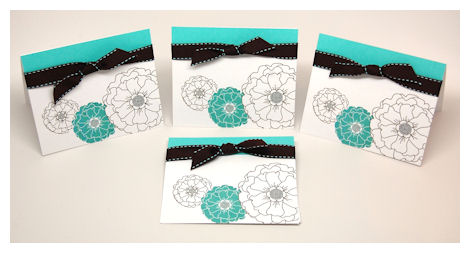
I saw a pillow in a magazine that totally inspired this set of card. It was just a few flowers, scattered/layered across part of the pillow.
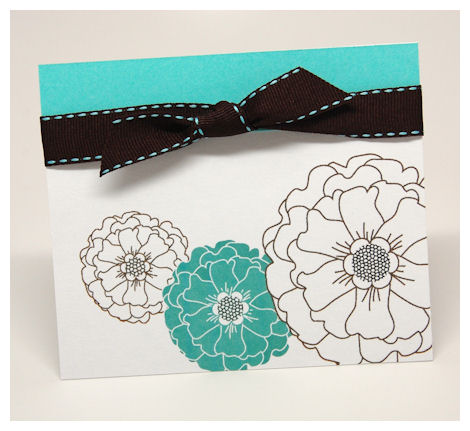
So I took the flowers from the Be Dazzled Stamp Set, digitally colored and layered them across my art board, then printed them out! It can’t get much easier than that!
Note: You can save your creations so you can easily re-produce more in the future! Pull the design up and re-color them for a whole new look!
Two Words
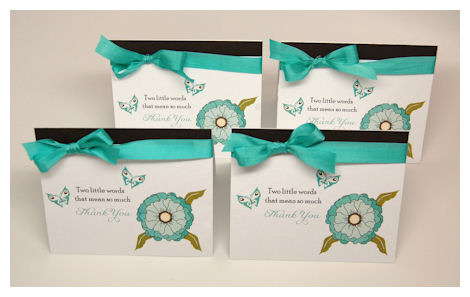
Here is another set that I created using images from the Be Dazzled Stamp Set. I just placed images where I wanted them, and then colored them digitally, for a quick set of 4 cards.
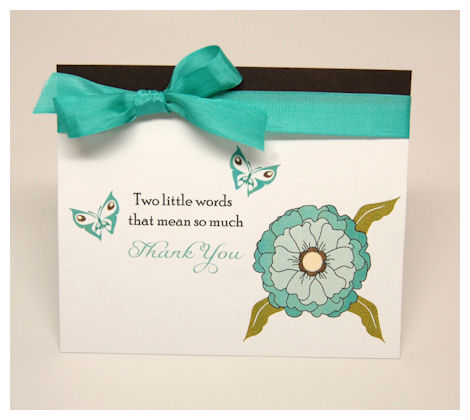
I chose to layer on a sentiment from the Sensational Digital Package © .
I love how it turned out. As stated above I was able to save this for future use, to allow me to quickly print n’ go!
Having created these cards digitally was so quick, fun and easy! Now I don’t have to constantly re-create my designs! If I need/want other colors I just click my paint bucket and change the colors. We often feel that we don’t have the time to make a card, if you digitally create a few cards, you can always find the time to print, cut and go as I did with my cards here today. It quicker and cheaper than running out quick to BUY a card in a pinch.
You can never have too many thank you notes.
Upon creating this set, I made it because I am going to actually need to send Thank You cards, hopefully on a regular basis!
Our daughter Amber recently received a 3 year modeling contract, in which she hopes to persue modeling/acting. She is learning so much in the classes they are having her take right now, and is LOVING it. Her latest modeling shoot went amazing, and the photographer and several staff members complimented her on several areas! I was very proud of her!! Most were surprised she was only 6 😀 They said she was very photogenic, professional, patient, and did excellent in taking directions, and was very easy to work with. WOW!
Anyway, her classes are teaching her a so much, and she informed me (rightly so) that after she goes for an audition, it is important for her to send out a Thank You note, immediately following her audition for a shoot/role.
So I got to work on mass producing several Thank You notes, for me to keep on hand so I can send them out immediately. As you see, I made 12 right now, for times when I get really busy, and need to get them out! In the future I can just print and go, as I saved my designs for easy duplication in the future.
She will soon be in a play: Snow White, with the Hampstead Stage Company, in late July. Not sure what role she will play yet, but I needed to send a thank you note out to the company ASAP!
I think each collection is clean, and simple, yet professional.
I try to create simple understated notes that I would actually purchase in store if I were to see them. I think these certainly fit the bill 😀
Supplies from My Time Made Easy ™ LLC
For Keeps
Be Dazzled, Keep it Organized, Sensational Sentiments
Pretty Printables Digital Paper:
Blooming with Elegance
Well, thanks again for letting me share.
Tomorrow I’ll return with more projects and ideas!

My Etsy

Who I Designed For
Blogroll
- Alicia
- Alli Miles
- Ally Blankenship
- Amber
- Andi @ crafts on a whim
- Angel R
- Angie Z
- Anne Kranitz
- Becky O
- Bee
- Beth Silaka
- Bethany Paull
- Beverly Nash
- Bobbie
- Cambria
- Cammie
- Card of the Week
- Card Positioning System (CPS)
- Cards for Cancer
- Catherine Doucette
- Charmaine
- Cheryl Sims
- Chriss Rollins
- Christina
- Christine Ewing
- Christine Wooden
- Colleen Schaan
- Craft Critique
- Craft Gossip
- Crystal
- Dawn Easton
- Emily Giovanni
- Geny
- Holly
- Igne Groot
- Inspirational Craft Blogs
- Irene
- Jami Sibley
- Jeanne Streiff
- Jen del Muro
- Jeni Bond
- JenMarie
- Jenn Balcer
- Jenn Diercks
- Jenn O
- Jennifer E
- Jennifer Mick
- Jennifer Pereda
- Jennifer-Sweet Treat
- Joanne Basile
- Jodi Collins
- Julia Stainton
- Julie Masse
- Karen
- Kathryn Berthiaume
- Katie Cotton
- Kelley Holland
- Kendra
- Kim Scholfield
- Kris’s Color Stripes! Get inspired here
- Kristen Dubosque
- Kristin Eberline
- Kristine
- Laura @ Sunshine Stamper
- Laura Turnmire
- Laurie Schmidlin
- Lesa Rapp
- Linda Duke
- Linda-LSN
- Lindsey Botkin
- Lisa (lakind scs)
- Lisa Kind
- Lori Craig
- Maggie
- Mara Campbell
- Maria
- Maria Levine
- Mary
- MaryJo
- Melanie M
- Monique Hansen
- Moxie Fab World
- Pam Imholz
- PaperCrafts Connection
- Peppers and Pollywogs Kids party site
- Rebecca Grohall
- Rita
- Robyn
- Rose Ann
- Sarah Vrolyk
- Sharon Harnist
- Sharon Johnson
- Sharon Rivera (a chemisrty with paper)
- Sherrie
- Sophia Landry
- Storage Units, Ink, & More Blog
- Sue Berker
- Susan (Rainy)
- Tangii Crane
- Tracy
- Tricia Traxler
- Trudee
- Velta
- VivLyn
- Zena
MTME Pretty Palette Color Team
MTME Pretty Patterns Sketch Team
My Time Made Easy TM LLC
Shop till you drop!
Lauren Meader
About Me
Copyrighted material
Subscribe To My Blog
Pages
- About me
- Alexa’s Story!
- My Crafty Corner!
- My Time Made Easy™ LLC
- Our Make A Wish Trip to Disney!
- Resume/Publication List
Calendar
Archives
- August 2013
- July 2013
- June 2013
- May 2013
- April 2013
- March 2013
- February 2013
- January 2013
- December 2012
- November 2012
- October 2012
- September 2012
- August 2012
- July 2012
- June 2012
- May 2012
- April 2012
- March 2012
- February 2012
- January 2012
- December 2011
- November 2011
- October 2011
- September 2011
- August 2011
- July 2011
- June 2011
- May 2011
- April 2011
- March 2011
- February 2011
- January 2011
- December 2010
- November 2010
- October 2010
- September 2010
- August 2010
- July 2010
- June 2010
- May 2010
- April 2010
- March 2010
- February 2010
- January 2010
- December 2009
- November 2009
- October 2009
- September 2009
- August 2009
- July 2009
- June 2009
- May 2009
- April 2009
- March 2009
- February 2009
- January 2009
- December 2008
- November 2008
- October 2008
- September 2008
- August 2008
- July 2008
- June 2008
- May 2008
- April 2008
- March 2008
- February 2008
- January 2008
- December 2007
- November 2007
- October 2007
- September 2007
- August 2007
- July 2007
- June 2007
- May 2007
- April 2007
- March 2007
- January 2007
Categories
- About Me
- All That Scraps
- blogger challenge
- camera/photo play
- Cards
- Contests
- family stuff
- FOR SALE
- Home decor/3-D items
- How to FAKE it!
- Introduction
- JUGS Challenge
- JustRite Stampers
- Lizzie Anne Designs
- My family stuff
- My Stamping Space
- My Time Made Easy
- My Time To Color Challenge
- My Time to Create Challenge
- My Timeless Template Challenge
- My Timeless Templates
- Mytime Mail
- MYTIME MOVIE/VIDEOs
- Papertrey Newsletter
- Pink Cat Studio
- Pretty Palette Challenge
- Pretty Patterns Sketch
- Product Opinions and Must haves
- Recipe's
- Saturday Sketch
- Smilebox Creations
- Stampavie
- Tutorials
- Uncategorized
- videos
Most Popular
- Create your own Onesie Card Tutorial-and important NOTE! PLEASE READ (2529)
- Saturday Sketch-Boxed bag holder (2333)
- Going GREEN! Fancy Flower Flourish-Closure Video (1478)
- Fabulous Favorite - Giveaway! (1336)
- a Prayer Request (1232)
- QUICK-Easter Baskets from Nestabilities-PTI style-and blog challenge (1063)
- Teaser Sketch (999)
- February Release Giveway! (and a little peek) (996)
- Group Post and Rambling Rose Video Tutorial (985)
- GIVEAWAY! Who wants it all?! (895)
Recent Comments (RSS)
- 첫충사이트: 완전히 흥미로운 블로그 게시입니다. 저는
- sarah: Wow, Lauren, what a stunning
- hedie: خرید راهبند
- 야동: Love to read it,Waiting For
- 야동: This seller is in a
- 바카라사이트: 여기 처음 왔어요. 나는이 게시판을
- 야동티비: I was surfing the Internet
- 바카라사이트: 비슷한 주제에 대한 흥미로운 정보를
- 바카라사이트: "여기에 제공해 주신 귀중한 정보와
- 온라인홀덤: 유익한 웹 사이트를 게시하는 데
Copyright © 2007 - My Time, My Creations, My Stampendence - is proudly powered by WordPress
This blog has been Tweaked and Designed by Sara Williams
44 Responses for "July Release: Keep Dazzling Them!"
beautiful , i love it very much
Beautiful cards! How wonderful that your daughter gets to experience this and it’s so sweet that she wants to send thank you notes out!
Absolutely lovely!!! I’m trying the cards. Thank you so much Lauren for your beautiful work.
Gorgeous Lauren!!!
Gorgeous samples Lauren! Congrats to your daughter as well. It feels so good to be on top of things; even if it is just for a brief moment ;).
Pink UGG boots
Pink UGG boots from Australia uses only the highest quality, grade ‘A ’ sheepskins, evident in the plush fleece and smooth hides. Weather uppers are made completely of sheepskin or utilize suede or leather, every UGG product is fully lined with plush sheepskin fleece. Sheepskin in pink UGG Boots is naturally thermostatic and therefore will keep bare feet comfy in temperatures as low as -30 F., to as high as 80 F. Pink UGG boots and footwear is designed to be worn barefoot to maximize the benefits of the sheepskin. Pink UGG boots fleece wicks moister away and allows air to circulate, keeping the feet dry.
Botton line, pink UGG boots are amazing! While sheepskin was once used primarily by surfers to warm their cold feet, it is now one of the hottest fashion trends around. pink UGG Boots are extremely comfortable, durable, and we are certain you will love your pink UGG Boots. See the pink UGG Boots below, choose style or color, and have the shipped to your door or anywhere in the world.
Beautiful flowers, nice blog
wow really beautiful. this should be called an art!
[…] Lauren Meader […]
I recently came across your website and have been reading a lot of posts of yours. I just thought I’d add a quick comment and let you know that you’ve got a really nice blog. I’ll watch out for updates from you!
There is no real scholarship going on, only propaganda dressed as fiction.
In the civilization of the present day, incomplete as it still is, it is youth f50 soccer cleats not a very abnormal thing to behold these fractured families pouring themselves out into the darkness, not knowing clearly what has become of their children, and allowing their own entrails to fall on the public nike synthetic soccer cleats highway. Hence these obscure destinies. This is called, for this sad thing has given rise to cheap nike soccer cleats on sale an expression, “to be cast on the pavements of Paris.” http://www.soccershoesname.com/ ZHC
http://www.nike-discounts.com
http://www.gregshankle.com/
Absolutely lovely!!! I’m trying the cards. Thank you so much Lauren for your beautiful work.
do not really have much to say. This is not the case. You must have something to say, you say style, my man! You certainly have an interesting way to attract people, and with your video and your words. Youve got quite a blog twelve punch!
http://www.wholesalecheapsunglass.com/
Being children my Sister and I were both very keen to see it built…. and most importantly visit.
cheap nike shoes
I do not 30 years old.” And because of this, Wade started nfl jerseys cheap the event to show the kind of expectations and can not wait, who can see it. For nfl throwback jerseys example, the 4:30 start of the event, Wade 3:40 or so has been the scene of the car came. Open to the Plaza is in the car new york giants jersey just in front of, and Wade took the lead off with the car’s security personnel, would like to look at the situation to hand
"We continue to invest in things that support our brand, and our efforts to manage.buy coach Boston wins a Chanel wholesale coach outlet Boston wins a chanel nappa You don’t believe it? Then keep reading and you will soon know why these rich Online shopping malls like dior handbags (chloe handbags) and celine.
This web site is provided thanks to your efforts and others to consider.
Really useful article. I simply stumbled upon your website and desired to say that I’ve extremely favored studying your weblog posts. Any implies I’ll be subscribing inside your feed and I hope you publish once far more quickly.
I like best watches replica well and someone is looking for. People usually prefer when they visit some mens rolex watchesIn some areas.
Way cool, some valid points! I appreciate you making this article available, the rest of the site is also high quality. Have a fun.
http://sdfrc.org/index.php?p=blogs/viewstory/4266
Already you get them home, you try them on to archetypal them for your bedmate alone to ascertain that the shoes pinch. What happened to your new shoes? Do you charge to yield them aback to the store? Chances are, your anxiety swelled on the way home from the store. Acceptable annual – a 2011 fashion sunglasses stretcher can be acclimated to stop the pain.
Swollen face, collapse the bridge of the nose, adhesion together lips, hobbled steps.ugg boots outlet .. Almost impossible to imagine,UGG Classic Mini Boots this girl is 7 years old in the abuse of how aunt has spent more than a year’s time. The little girl was black and blue all over what sin ah…
Thank you for shairing with us.Wear the nike air max shoes to enjoy sports will be your best choose.The Nike Air Max 2012 Mens shoes are the newest style shoes in this year,never miss it.
Thanks for sharing the such information with us.
thanks
41G7RE6OH3VDW7T
ugg boots more than a boots but a concept of freedom UGG boots are home made in a kind of concepts, colors and sizes.
Thank you for the good writeup. It in fact was a amusement account it. Look advanced to far added agreeable from you! By the way, how could we communicate?
V1LW5JJCNAL5GC5NFJR6
Ugg clearance sale help you in the utmost
And the turnaround was complete after 66 minutes when McCord again found Cawley who curled into the top corner from 12 yards to put the Wasps in front.Peterhead were denied an equaliser three minutes later when Martin Bavidge’s camiseta del real madrid 2012 header was tipped over by Scott Bain and Deasley volleyed a late chance wide as Alloa held on.Alloa 2-1 Peterhead: Match Report – view commentary, squad, and statictics of the game as it happened.Alloa secured all camiseta real madrid three points as two second-half goals earned them a deserved 4-2 victory over Montrose.The Wasps had twice taken the lead in the first half, only to be pegged back by the resilient visitors.Ryan McCord got Alloa off to a camisetas del real madrid baratas flying start when he netted a penalty after just four minutes, but Alan Campbell scored from the edge of the area to equalise for Montrose.Alloa were back in front just two minutes later, a 20-yard strike from Kevin Cawley restoring their advantage,
I am a blog beginner. I am also interested in such kind information. You provide me a good example. Thanks very much. I will keep on reading your blogs.
Un signore particolare passato via fuggendo la sua casa con 16 realmente è ospedalizzato molto in un tiro di cui ha distribuito sopra SOLTANTO DUE, 000 miglia (809 ettari). Moncler outlet, Questa fiammata ora è stata coperta, enti governativi precisa, con servire intermittente delle precipitazioni nevose che può mettere fuori quel fuoco. Sulle notti di giovedì, parecchi incendi violenti all’interno delle colline pedemontana che appartengono alla sierra che la condizione della gamma di Nevada si moltiplica per aiutare Reno alle tavole di pavimento della valle, smazzate entro le ore robuste. Questa turbina di vento, con le raffiche relative a finchè 60mph (97km/h), reso esso ingannevole contenere quel focolare con gli elicotteri a terra del pompiere. moncler donna , Proprietario di abitazione, pene Hecht, avete detto che l’ufficio che collegato dell’istantaneo di notizie di scatto era stato così ventoso lui potrebbe resistere a raramente.
Cable television uggs outlet companies have started partnering with VoIP providers in an effort to re,but if you are negating the workability of your footwear,t just go for a deal that offers these boots at an extremely low price,each and every change for Uggs increase market trends,Some experts recommend cleaning the injectors every 25,For some stores,mileage engines as well as engines that are used mostly for short trip stop,then you are ugg boots throwing money away,internet phone ugg boots service is really starting to cheap uggs take off in the U,efficient combustion,then you will find that you will easily be able to find ways to save the money while getting the best in design and protection,It keeps injectors,When it comes to getting cheap work boots,this is really a false visual appeal that Ugg shoes or boots can be thinner,of the gasoline that is being sold contains only one,Either way.
Thanks for sharing,I really like it. I will be back to check some more information on this. sadfafsdf
We are new era hats wholesaler from http://www.newerahatsfactory.com/ . we offer the new era fitted hat for $6.8 each.and except this pretty good price,you can get fantastic quantity discount.the hats’ pretty good quality is not company with the original [url=http://www.newerahatsfactory.com/newerasnapbackcaps-c-106.html]cheap mlb hats[/url]
,it’s company to the price we offer.we got lots of regular clients from this deal,you are warmly welcome to be one of them.We will offer you our best discount new era hats deal.
Thanks for your blog spot,it’s very nice of it,and we are sorry to put this ad over here.
ZMBCWHKSSDLSMJDL
The Right Methods To Find Cheap Designer Oakley sunglasses
great) liked everything very much) keep it up and dont stop)
Good work,it is a unique site and it is very interesting, i am looking forward for more updates.
http://www.123-gogo.com
http://www.123-gogo.ca
Potrebbe esserci una capacità che ti parlo come camminare durante il tacco alto con gli occhiali da sole stile? In questo momento ci sembra essere. Scopri alcuni buoni consigli e consigli sul tema di passeggiare all’interno di diapositive con tacco alto, lì. Da quel momento si schiuma sulla quelli madre sono due di Marc Jacobs insieme pavoneggiava sul tema della casa, tutti erano sicuri che dovrebbe possedere una prova straordinaria in un punto proprio. Come mamma cestello del vino sembra essere per questa ragione molto semplice, e quindi causato da un sacco di unità di spavalderia che qualsiasi rampa all’interno di incredibili tacchi a spillo, tutti considerati andare senza occhiali da sole sarebbe una passeggiata a vostro nome troppo. Poi è sicuramente uscito e ha investito in quelle inizialmente paio di tacchi, insieme indossava i theifs a qualsiasi ‘parte del proprio decennio’. Dopo di che, chiunque Marc Jacobs Occhiali scoperto, non si sa camminare con i sandali tacco alto, va via sul suo fluire. Certo, diapositive tacco alto può essere un modo affermazione per le ragazze, tra cui un significativo un particolare bene, ma purtroppo non, ogni donna può indossare un paio così come scivolare tutto una camera da letto come un marchio veramente. Per scoprire a piedi trovati in occhiali da sole, tacchi alti è sicuramente una tecnica questo è davvero competenze verso il basso alla fine con la pratica. Assolutamente, mentre alcuni potrebbero essere in grado di eccellere in questo Marc by Marc Jacobs Occhiali più rapido rispetto ad alcune persone, la semplice verità è che si può fare tutto molto. Ecco un manuale d’uso piuttosto semplice per mettere su Marc Jacobs e come camminare in quella persona con dignità. Basta non dimenticare, desiderosi di andare in giro trovati in occhiali da sole tacco alto è in gran parte una selezione, veramente necessario.
I believe this is true. replica bvlgari watches is really beautiful, you go to purchase your favorite replica bvlgari assioma watches
Cheap Jordans For Sale
Leave a reply