Archive for April, 2011
Last, but not least!
Apr 5, 2011 Author: mytime | Filed under: Home decor/3-D items, My Time Made EasyI’m baaaaccckkk!!
I’ve been in creative overdrive the last 2 months! I feel like if the day was extended I’d just go as many more waking hours as possible. Imagine how much I could do with more time? I think we all could use some of that don’t you? As long as they were dedicated to FUN and not longer WORK time.
Anyway, as I play the balancing game of life, I think I’m doing pretty good with it all. My mom has surgery coming up and that will take up a lot of my time, so I am doing my best to get “ahead” of that. Stress kicks me into creative mode. The ideas just go and go. It’s like my brain will do anything other than think of stuff that stresses me out! LOL!
So hopefully we can all benefit from that right?
Before I share my last project, be sure you check this project out by Kristin! WOW!
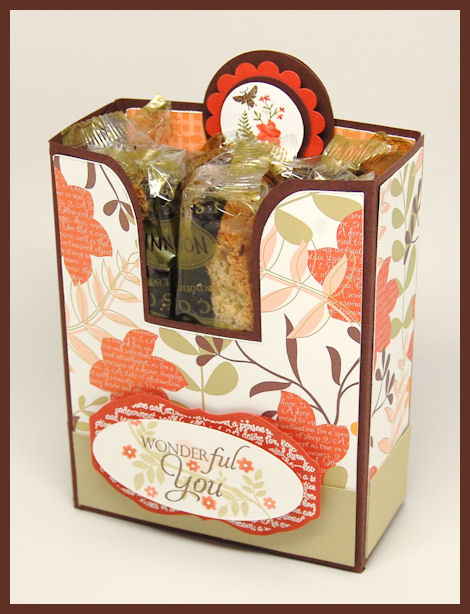
Wonderful You!
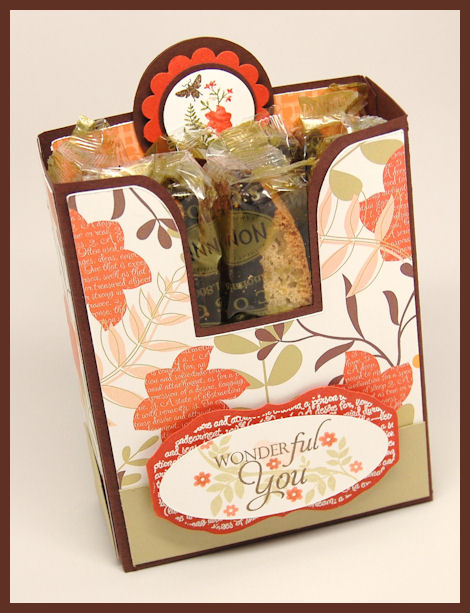
Can you say Yum?
I havethis filled with 8 individually wrapped Biscotti.
You can fit just about anything in here 😀
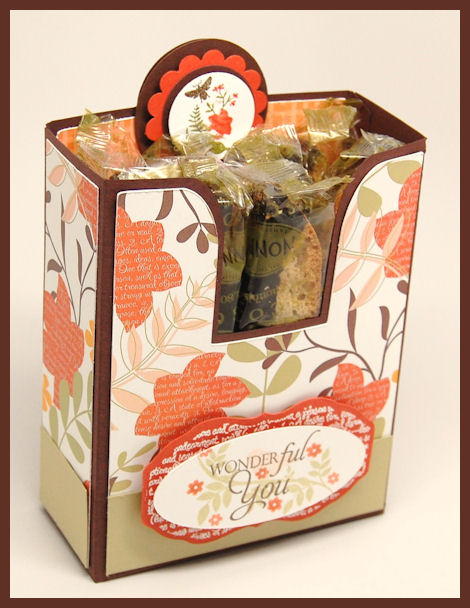
I had previously posted 2 other projects using 2 of the 3 other templates that come with the Keep It template. I used the drawer, the front pocket, and left the best for last! Now I am using the back pocket.
This one is the obvious useable template, but just in case you couldn’t tell how fabulous it looked all by it’s lonesome, here you have it!
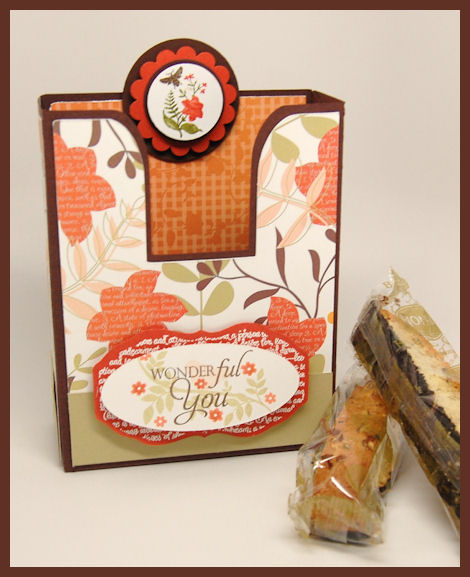
I am in love with the Fresh Cut Expressions © Collection 2 Digital Paper set.
I didn’t have to do much to make this project so pretty. There is a decorative inner panel included in the template, so I printed one of the coordinating papers to go inside..
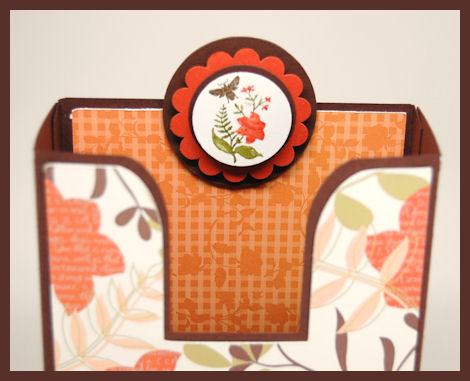
I stamped the flower silhouette from the Occasional Labels ©set, and the little bee…well that is a teaser at what is to come next month 😀
Now for the label, I have to say I’m in love!
The Occasional Label © cut file alone is a fabulous value 😀
I used the print pattern label from the Occasional Labels ©set. I had cut my label from Occasional Label © cut file, from my tangerine cardstock, and white embossed the label image, so it looked just like the pattern on my flowers.

I created my sentiment combination using the Sentimental Occasions © set. I had stamped it on the oval label from Occasional Label © cut file. Behind the sentiment I stamped the branch, flowers and bird image from Singing Silhouette © !
Supplies from My Time Made Easy ™ LLC
Pretty Packaging Templates: Keep It
Pretty Impressions Stamp Set: Occasional Sentiments, Sentimental Occasions, Singing Silhouette
Pretty Printable Digital Paper: Fresh Cut Expressions
Pretty Pieces Cut File: Occasional Label
Well that does it for me today!
Check back in on Thursday for another project using the Pretty Pattern Sketch Challenge.
April: A Year in Review
Apr 4, 2011 Author: mytime | Filed under: family stuff, Home decor/3-D items, My Time Made EasyWell here we are again!
Another month has passed, another release, and we bring you the ever popular post A Year in Review! This is when the team and I share uses for some “old” products, and make them new again!
To view all the projects from our group post today you will want to visit:
I know I cannot wait to see what the team has dreamed into “re” existence again!
For me, I have another great sample using the Keep It template, but I will share that on another day.
Today I thought I would share my daughter’s creation for the “Year in Review” instead, as it uses one of my first templates!
I’m so proud of her and all she does, I thought it would help other mom’s see that kids can be involved, and anyone of all skill levels can use our products!
I really encourage all of you out there to let your children get involved in crafts too. There are aisles and aisles of expensive projects for kids in store, but you don’t need to keep buying and restocking your kid craft cabinet with expensive projects. If you already buy my templates, you have everything you need to let your kids get crafty!
The best part about my products is you can make these projects over and over again, and for not a penny more than the inital cost of the template. If they mess up, you can cut a new one. Or iftheir favorite color changes you aren’t stuck with a pre-cut something or other in a color they now refuse to use! LOL!
You can’t be afraid to let them make a mess. How will they learn otherwise? You will have more fun than they will, I promise 😀
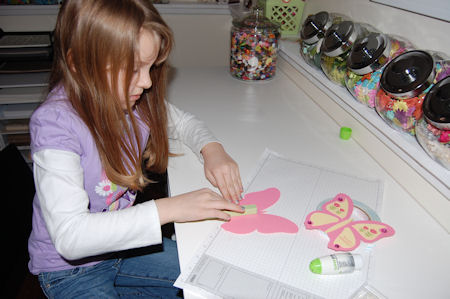
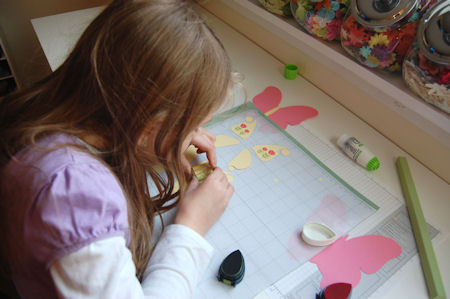
So that being said, during one of her recent after school projects, I thought I would “photo document” what Amber wanted to make. Her idea was cool, so why not?
This time it was a butterfly wand for her teacher to use on the Smart Board at school. She picked out everything she wanted to use, and away she went.
Note: During these projects I help with Cricut setup (although she can use her Cricut Create on her own) as well as the scoring and guiding where the adhesive (or panel) goes, I usually get the ink that coordinates too, and she does the rest!
Let’s get started!
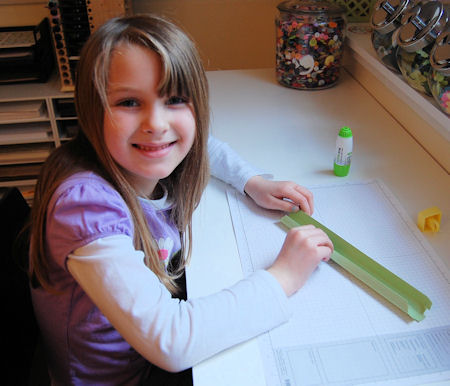
So I cut, and scored the celery cardstock for the “wand” that she wanted. 
She started to put it together.
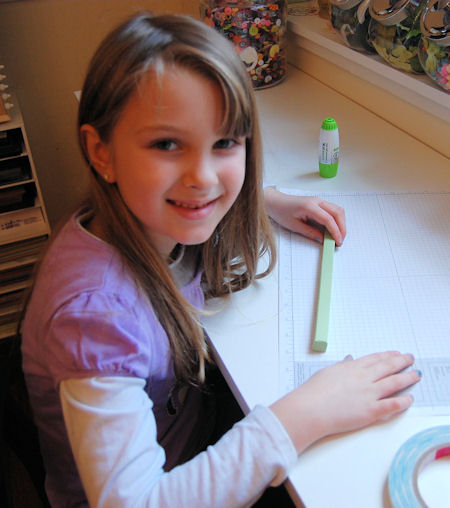
Now that part is done!
We moved on to the “butterfly” part.
She chose to use the All A Flutter © template.
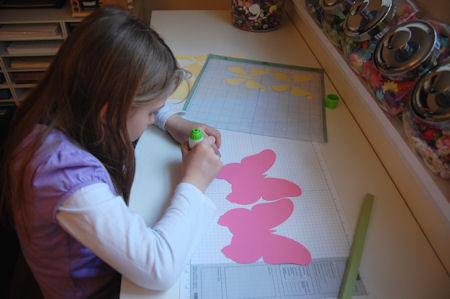
I decreased the size of the front/back/wing prints of the All A Flutter © template to 80%.
She wanted the wings in pink and the wing prints in yellow.
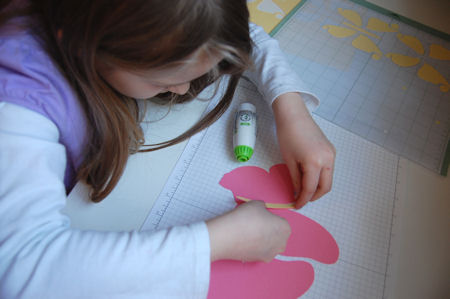
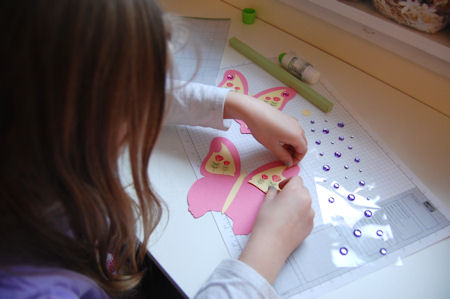
She got to work gluing and then stamping!

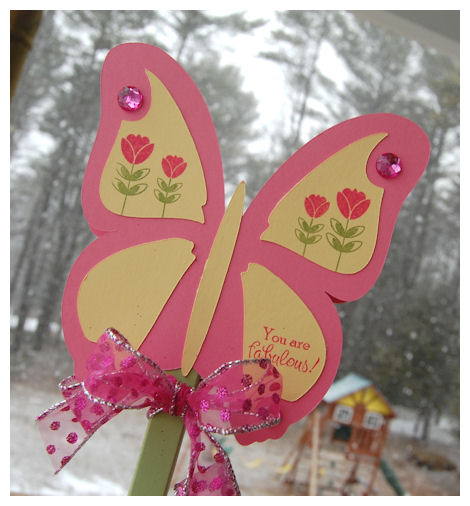
She wanted to stamp all the wing prints first (of course) so she chose Sensational Stems and Sensational Sentiments.
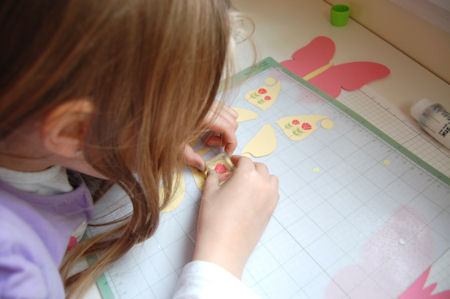
It was easier for her to stamp them on the Cricut mat.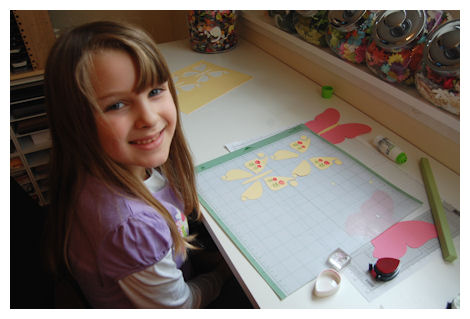 That way they don’t move when you stamp them.
Then she could see exactly how they are suppose to go on the butterfly body.
After the wings are complete, she glues the wings to the wand, I add a bow!
(note we use adhesive TAPE for this-the glue stick was for wing prints)
Fabulous Flutter Wand!
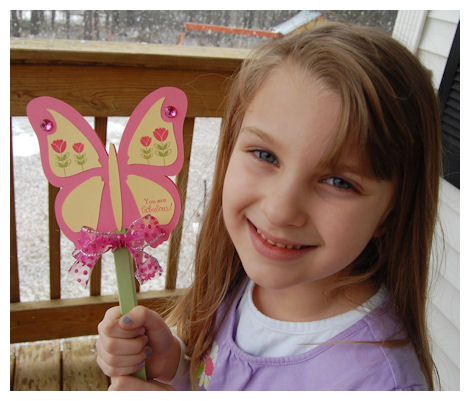
Here, it was snowing, so she waved the wand and made a wish for Spring to come!
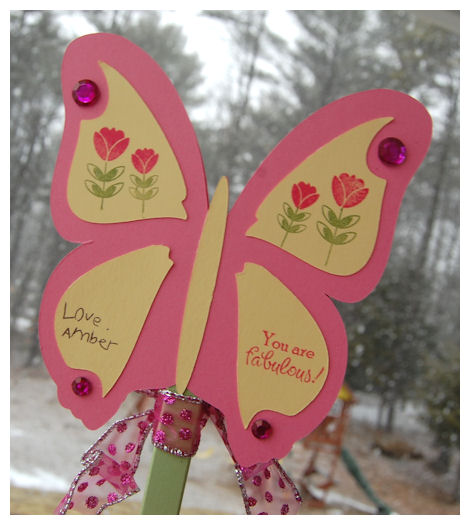
This is the back of the wand, that she had to sign her name to 😀
Amber is a perfectionist!
Great job sweetie!
Her teacher said she loved it, and actually used it right away, which made Amber SO HAPPY!
Wouldn’t this be a fabulous kid craft for a girls party? I think so.
Many people ask me how I get stuff done while balancing 3 children. There really is no big secret! I just let them craft with me. For years I’ve organized an afternoon craft with the kids, after homework is done. It would generally take up an hour, and then they would have to spend an hour entertaining themselves afterward. So I got the MOM time I needed, after spending time with the kids.
Now they are getting older, Noah doesn’t really like craft time (he complains on the school day he has art class-kills me!), and Alexa is 11. so she just wants to do her own thing (already!), so sadly now during craft time, it’s usually just Amber and I now. She often gets the craft together herself and we craft side by side.
I hope this trend continues for a lifetime to come.
Well that is all for me, for today.
I’ll be back tomorrow to share my last project from the April release, using the Keep It template.
See you then.
Welcome back for another day of great gift ideas using our latest products from the April Release!
Today we have some amazing projects from:
Be sure to pay them a visit, and prepare to be inspired!
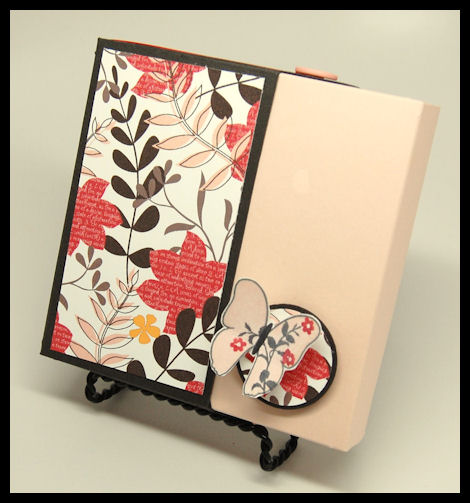
Yesterday I shared a post about “re-purposing”. Well, I am back again with another way to repurpose the Keep It template! This time I am using the front pocket file, all by it’s lonesome, to show you how it too can become a fabulous template.

I have to say I was just giddy over this one 😀
This took literally under 15 minutes to make.
I printed my NEW! Fresh Cut Expressions Pretty Printables Digital Paper for the simple side panel. I didn’t need to do much to make this project fab! The NEW! Fresh Cut Expressions Pretty Printables Digital Paper did all the hard work for me.
I stamped the All A Flutter butterfly outline in gray, on my white cardstock. I used my pale pink ink and stamped the solid butterfly image inside. I then took one of the silhouette images from Occasional Labels ©, and stamped it on my butterfly! I love the versatility of the All A Flutter set 😀 I had cut it with the Flutters and Flowers © Cut File.
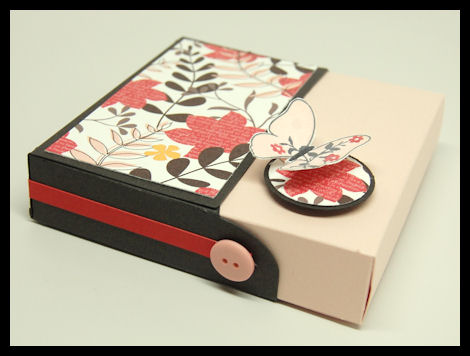
I loved decorating the rounded tab piece from the pocket, using a button, and a little strip of cardstock, all the way around the box, for some simple WOW! Factor.
So after looking at this, can you guess how this was made?
All I did was create 2 of the front pocket templates, one in smokey gray, and the other in a pale pink.

I then just slid one template into the other, like this…

See!!
So quick and easy.
Inside I packaged up 8 Ghirardelli Strawberry Chocolate Squares.
YUMMY!
Supplies from My Time Made Easy ™ LLC
Pretty Packaging Templates: Keep It
Pretty Impressions Stamp Set: All A Flutter, Occasional Label
Pretty Printable Digital Paper: Fresh Cut Expressions
Pretty Pieces Cut File: Flutters and Flowers
Well I will plan on seeing YOU back HERE tomorrow for MORE ideas as we all share in a group post!
Re-purposing
Apr 2, 2011 Author: mytime | Filed under: Cards, Home decor/3-D items, My Time Made Easy, Pretty Palette Challenge, UncategorizedHow are you all enjoying the projects so far?
Be sure to visit the MTME Blog for our latest Pretty Palette Challenge!
I know I had a blast with everything this month 😀
It’s funny how excited I feel every release. I always think THIS ONE is the best. Each new template has me head over heels and each month I get a new favorite! LOL! I think the best part is, each month when I go to link the product and I view MY STORE I think WOW! How did I ever come this far? It’s amazing really. Now I have an amazing library of gift packaging to use anytime I want to give a gift, and look amazing 😀 Seriously most people I gift these completed packages to never even care what is inside! LOL!
Today we have a lot more to share with you so pay a visit to:
Well let’s start today off with some “repurposing”!
I like to try to make everything as versatile as possible, and while not every single one CAN be, I have to say every element of the Keep It Template is useful 😀
This particular template comes with 3 “templates” which are used to create the finished product Keep It. Each one as useful as the other. So,today I thought I would share a new use for one of the three templates that come in the Keep It Template!
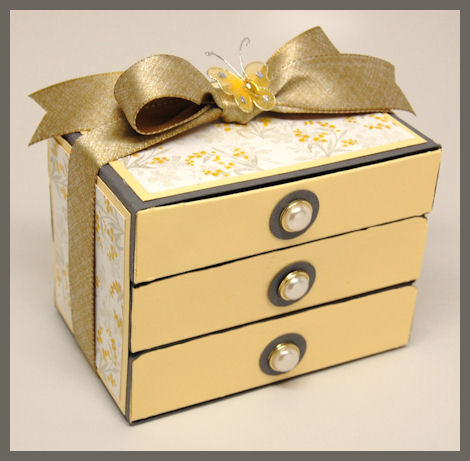
A Stack of Drawers
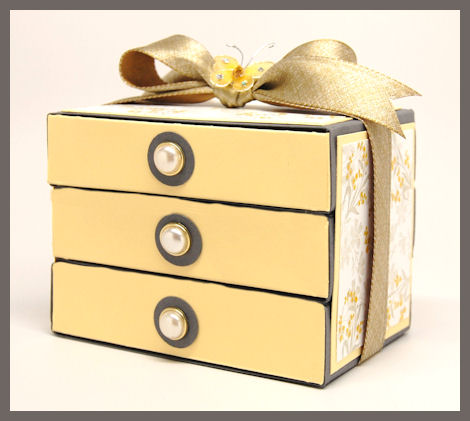
This is the drawer file, that is to be used on the bottom of the template!
A very sweet 3 drawer gift set, complete with hand stamped patterned paper, pearl drawer pulls!
Now think about the fun things you can package or sort/store in this beauty!
Mini note cards
Ghirardelli chocolate squares
A photo box 😀
Hair accessories
Jewelry (especially handmade)
craft supplies
endless possibilities!

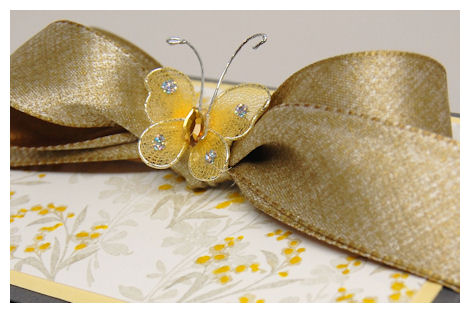
I cut the 3 drawer bases in a gray cardstock, and the actual drawers in a lemon cardstock.
I stacked the files (adhering them together) then made my decorative panels.
I love the color combination of this, and the elegance of the finished product.
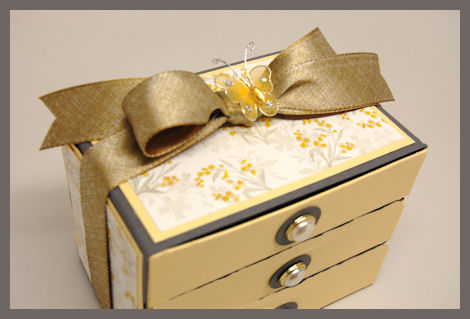
This ribbon is actually quite stunning in person.
It matches perfectly because it has the hues to yellow/gold as well as the hues of the gray/silver in there.
My wire butterfly was the perfect little addition to this but you can add a charm, monogram tag, mini bird, flower, or whatever else you want to dream up.
Now the paper!
I made it myself, by repeatedly stamping one of the flower silhouette from the Occasional Labels © set in a pale gray ink, then using my markers to color the flowers. I added a little more yellow to each bloom by using a dimensional gel pen!
I also used a larger silhouette flower from the Framed Elegance © set. That was stamped in the same gray ink, but stamped off once, then restamped for a very subtle, but stunning “filler” in a larger scal, to take up some of the white space.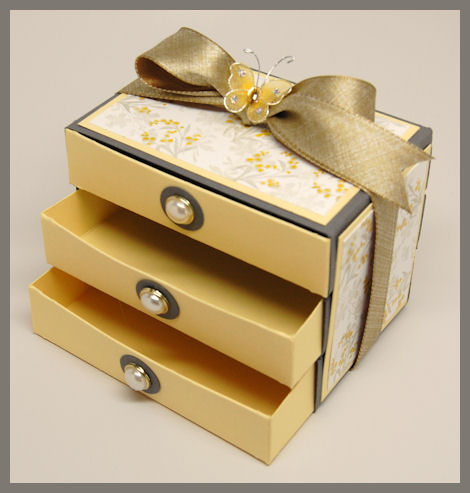
Supplies from My Time Made Easy ™ LLC
Pretty Packaging Templates: Keep It
Pretty Impressions Stamp Set: Framed Elegance, Occasional Labels
So I hope you liked my take on this template.
I have another great idea to share tomorrow, so I hope to see you then!
Pretty Palette 03!!
Apr 2, 2011 Author: mytime | Filed under: Cards, Home decor/3-D items, My Time Made Easy, Pretty Palette ChallengeHey everyone!
Get your creative ideas going because
I’m back with another Pretty Palette Challenge!!
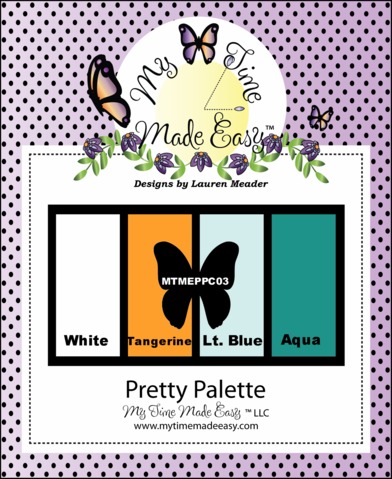
KEYWORD MTMEPPC03
CLICK HERE for challenge details and to enter your submission.
Now this was the little snippet you got on the MTME Blog 😀
It is a sneaky peek at what is to be released for the April 15th Release!!
I’m not giving you anything else, until then!
ANY guesses??
It can’t get much more fun than this 😀
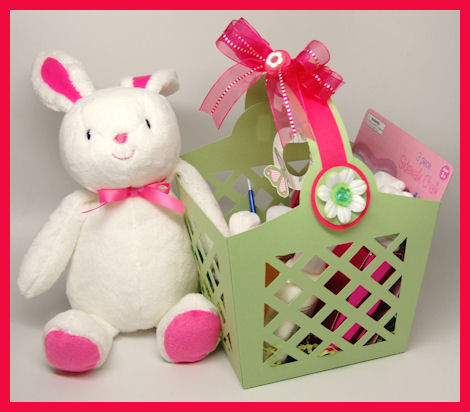
“a” Easter Surprise
Apr 1, 2011 Author: mytime | Filed under: UncategorizedWelcome back everyone!!
I have a special project to share with you today!
You will also want to visit:
My project today used the NEW! Berry Sweet Basket © template.
The idea for this template came from my little crafty sidekick Amber 😀
 She may only be 6 but she has endless ideas. You have to love the imagination of a child. I really try to see the world through her eye’s. Let me tell you, she has quite the imagination, and is always telling me what to do and how to do it. She is a lot like me, the older she gets! LOL! Her daddy agrees.
She said to me one day while out shopping (something we do often) at the craft store “Mom I have an idea! You are always spending so much money on a ton of baskets, why don’t you make your own paper one?” (she gets her thrifty nature from her father’s side for sure! She always trying to save me $! LOL!)
Sad but true. I DO spend money on baskets all the time, to then end up getting rid of them in a yard sale. Baskets are timeless, gender neutral and EASY way to gift something. This basket is pretty enough all in its lonesome! No bells and whistles needed.
Now I know I’ve done “basket style” templates before, so I wasn’t sure what I wanted to do, but promised her I’d entertain her idea. I knew I wanted it to be different than anything else as well, so I was perplexed a bit.
Amber went on to tell me “It has to be BIG, so you can fit lots of cool stuff in it!” So I said, “Amber what do you consider BIG?”. She giggled and said I don’t know, like as big as this shopping cart! Now THAT would be a cool basket. I could fits tons in it!” .
I looked at the basket and said ” Amber you are absolutely right! That WOULD be a cool basket. Look at these sides! I love that idea. You are so smart!” She replied “I know”!
So we went home and got crackin. The finished product met her approval, so I knew I was good 😀
“a” is for Amber
I put this Easter Basket together for Amber, in honor of her idea 😀 (I will definitely have to make one for the other 2 kids too! Thankfully I have time)
Amber had found this bunny at the store, and for some odd reason loved it. So I told her we would buy it for Gabby (her cousin). My real plan was to give it to her with this basket.
I cut my template from celery cardstock, and added a fuschia strip to the handle. I added some Prima flowers to the handle ends, and used a flower brad. Simply sweet!
I wanted to keep it simple, but still embellish it, so I customized the tag instead!
I decided to use a lowercase “a” for Amber. I felt the lowercase “a” was more cute, fun and whimsical. I love how it just hangs from my ribbon, and can later be used for something else she may want to add it to.
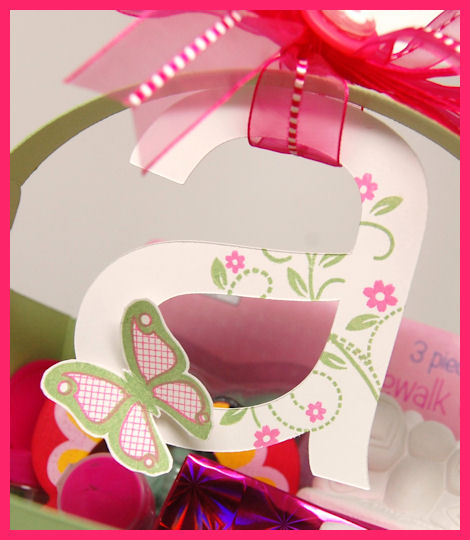
I stamped the flourish on the “a” from Fanciful Flourishes ©in a green ink , and added flowers ink fuchsia from the Singing Silhouette © set. I adore the shape of those flowers in that set!
The butterfly is from my very first set All A Flutter © ! I decided to use the cris cross pattern in the wings, since it matched the pattern in my basket. It was cut out using the Flutters and Flowers Cut File.
In the basket:
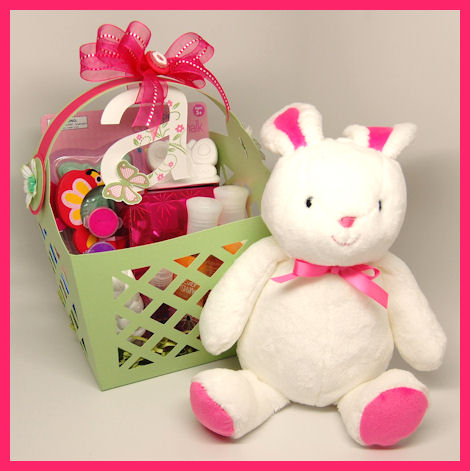
Jump Rope
2 ceramic statues with paint
bubble
2 photo bracelet kits
butterfly shaped chalk
butterfly magnifying glass
Body wash & Lotion from Bath & Body Works
lip gloss
Supplies from My Time Made Easy ™ LLC
Pretty Packaging Templates: Berry Sweet Basket
Pretty Impressions Stamp Set: Fanciful Flourishes, All A Flutter
Pretty Pieces Cut File: Flutters and Flowers
So there you have it!
I hope you will MAKE your own Easter Baskets and other crafty gifts this year! Don’t forget to try it WITH the kids too 😀
My kids LOVE paper crafting (OK well 2 out of the 3 anyway).
I’ll be back with more tomorrow.
You will also want to check in with the MTME blog tomorrow beause it is our Pretty Palette Challenge.
My Etsy

Who I Designed For
Blogroll
- Alicia
- Alli Miles
- Ally Blankenship
- Amber
- Andi @ crafts on a whim
- Angel R
- Angie Z
- Anne Kranitz
- Becky O
- Bee
- Beth Silaka
- Bethany Paull
- Beverly Nash
- Bobbie
- Cambria
- Cammie
- Card of the Week
- Card Positioning System (CPS)
- Cards for Cancer
- Catherine Doucette
- Charmaine
- Cheryl Sims
- Chriss Rollins
- Christina
- Christine Ewing
- Christine Wooden
- Colleen Schaan
- Craft Critique
- Craft Gossip
- Crystal
- Dawn Easton
- Emily Giovanni
- Geny
- Holly
- Igne Groot
- Inspirational Craft Blogs
- Irene
- Jami Sibley
- Jeanne Streiff
- Jen del Muro
- Jeni Bond
- JenMarie
- Jenn Balcer
- Jenn Diercks
- Jenn O
- Jennifer E
- Jennifer Mick
- Jennifer Pereda
- Jennifer-Sweet Treat
- Joanne Basile
- Jodi Collins
- Julia Stainton
- Julie Masse
- Karen
- Kathryn Berthiaume
- Katie Cotton
- Kelley Holland
- Kendra
- Kim Scholfield
- Kris’s Color Stripes! Get inspired here
- Kristen Dubosque
- Kristin Eberline
- Kristine
- Laura @ Sunshine Stamper
- Laura Turnmire
- Laurie Schmidlin
- Lesa Rapp
- Linda Duke
- Linda-LSN
- Lindsey Botkin
- Lisa (lakind scs)
- Lisa Kind
- Lori Craig
- Maggie
- Mara Campbell
- Maria
- Maria Levine
- Mary
- MaryJo
- Melanie M
- Monique Hansen
- Moxie Fab World
- Pam Imholz
- PaperCrafts Connection
- Peppers and Pollywogs Kids party site
- Rebecca Grohall
- Rita
- Robyn
- Rose Ann
- Sarah Vrolyk
- Sharon Harnist
- Sharon Johnson
- Sharon Rivera (a chemisrty with paper)
- Sherrie
- Sophia Landry
- Storage Units, Ink, & More Blog
- Sue Berker
- Susan (Rainy)
- Tangii Crane
- Tracy
- Tricia Traxler
- Trudee
- Velta
- VivLyn
- Zena
MTME Pretty Palette Color Team
MTME Pretty Patterns Sketch Team
My Time Made Easy TM LLC
Shop till you drop!
Lauren Meader
About Me
Copyrighted material
Subscribe To My Blog
Pages
- About me
- Alexa’s Story!
- My Crafty Corner!
- My Time Made Easy™ LLC
- Our Make A Wish Trip to Disney!
- Resume/Publication List
Calendar
Archives
- August 2013
- July 2013
- June 2013
- May 2013
- April 2013
- March 2013
- February 2013
- January 2013
- December 2012
- November 2012
- October 2012
- September 2012
- August 2012
- July 2012
- June 2012
- May 2012
- April 2012
- March 2012
- February 2012
- January 2012
- December 2011
- November 2011
- October 2011
- September 2011
- August 2011
- July 2011
- June 2011
- May 2011
- April 2011
- March 2011
- February 2011
- January 2011
- December 2010
- November 2010
- October 2010
- September 2010
- August 2010
- July 2010
- June 2010
- May 2010
- April 2010
- March 2010
- February 2010
- January 2010
- December 2009
- November 2009
- October 2009
- September 2009
- August 2009
- July 2009
- June 2009
- May 2009
- April 2009
- March 2009
- February 2009
- January 2009
- December 2008
- November 2008
- October 2008
- September 2008
- August 2008
- July 2008
- June 2008
- May 2008
- April 2008
- March 2008
- February 2008
- January 2008
- December 2007
- November 2007
- October 2007
- September 2007
- August 2007
- July 2007
- June 2007
- May 2007
- April 2007
- March 2007
- January 2007
Categories
- About Me
- All That Scraps
- blogger challenge
- camera/photo play
- Cards
- Contests
- family stuff
- FOR SALE
- Home decor/3-D items
- How to FAKE it!
- Introduction
- JUGS Challenge
- JustRite Stampers
- Lizzie Anne Designs
- My family stuff
- My Stamping Space
- My Time Made Easy
- My Time To Color Challenge
- My Time to Create Challenge
- My Timeless Template Challenge
- My Timeless Templates
- Mytime Mail
- MYTIME MOVIE/VIDEOs
- Papertrey Newsletter
- Pink Cat Studio
- Pretty Palette Challenge
- Pretty Patterns Sketch
- Product Opinions and Must haves
- Recipe's
- Saturday Sketch
- Smilebox Creations
- Stampavie
- Tutorials
- Uncategorized
- videos
Most Popular
- Create your own Onesie Card Tutorial-and important NOTE! PLEASE READ (2529)
- Saturday Sketch-Boxed bag holder (2333)
- Going GREEN! Fancy Flower Flourish-Closure Video (1478)
- Fabulous Favorite - Giveaway! (1336)
- a Prayer Request (1231)
- QUICK-Easter Baskets from Nestabilities-PTI style-and blog challenge (1063)
- Teaser Sketch (999)
- February Release Giveway! (and a little peek) (996)
- Group Post and Rambling Rose Video Tutorial (985)
- GIVEAWAY! Who wants it all?! (895)
Recent Comments (RSS)
- 야동: Love to read it,Waiting For
- 야동: This seller is in a
- 바카라사이트: 여기 처음 왔어요. 나는이 게시판을
- 야동티비: I was surfing the Internet
- 바카라사이트: 비슷한 주제에 대한 흥미로운 정보를
- 바카라사이트: "여기에 제공해 주신 귀중한 정보와
- 온라인홀덤: 유익한 웹 사이트를 게시하는 데
- 홀덤나라: 나는 당신의 블로그를 정말 좋아합니다.
- lisa: Technology, too, has left an
- 주소모음: 흠 !! 이 블로그는 정말
Copyright © 2007 - My Time, My Creations, My Stampendence - is proudly powered by WordPress
This blog has been Tweaked and Designed by Sara Williams