Archive for February 25th, 2011
Perfect Peek Day 1: Aviary Amazement
Feb 25, 2011 Author: mytime | Filed under: Cards, family stuff, Home decor/3-D items, My Time Made Easy, TutorialsI’m BAAAACCCCKKK!!! Did you miss me?
(Get ready to brace yourselves with your favorite beverage! I have tons to share, including a tutorial! You won’t want to miss a thing-I swear)
WOW! It’s been so long since I’ve posted. Trust me I’ve been BUSY! It will all be worth it.
Family life is insane as my mom continues her Chemo & Radiation treatments, with an impending surgery. I have had to work nights to keep her commercial cleaning company going (exhausting after spending my days in the hospital with her), then there has been some custody drama regarding my 2 year old niece (long story), school meetings,doctors visits, and a bug that has gone around the house twice :C NOT FUN! Despite all that I’ve been squeezing in what I can for the business, and my sanity!!
So that being said let me kick off the first day of peeks for our AMAZING March Release!!
With aviary themes being so popular, I think and HOPE you all will be excited about this next release. I’ve made something seemingly IMPOSSIBLE, now possible for ALL skill levels.
So without further delay let me get sharing.
Today you will want to stop by and visit several members of our talent design team, as they share NEW! projects with you.
OK now it’s my turn! What you are about to see is 100% made from paper!!!!!!!! If you love aviary themes then this is sure to knock you out of our seat 😀
I made this template SO LONG ago. Almost a year now. I have been waiting for the perfect moment to release it, and with Spring on the horizon, it is now time.
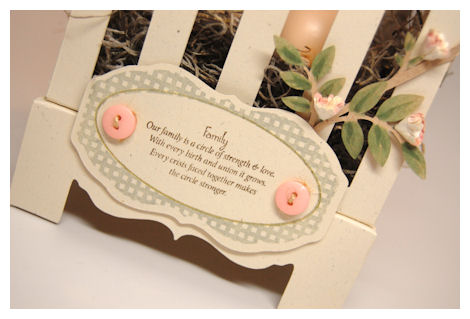
Introducing our NEWEST Template: Caged
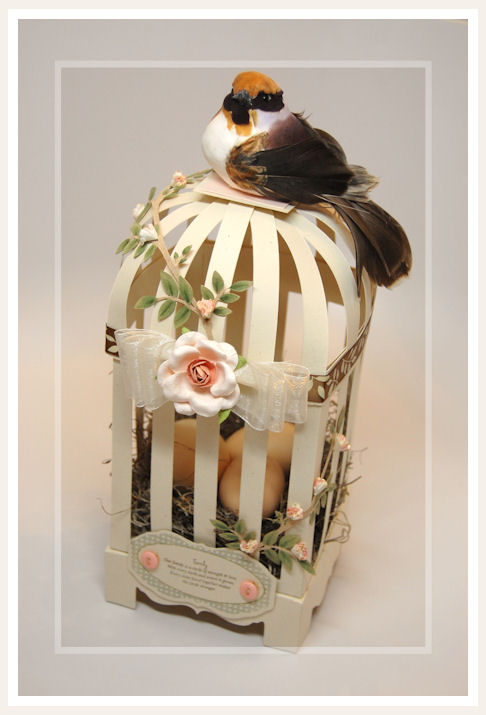
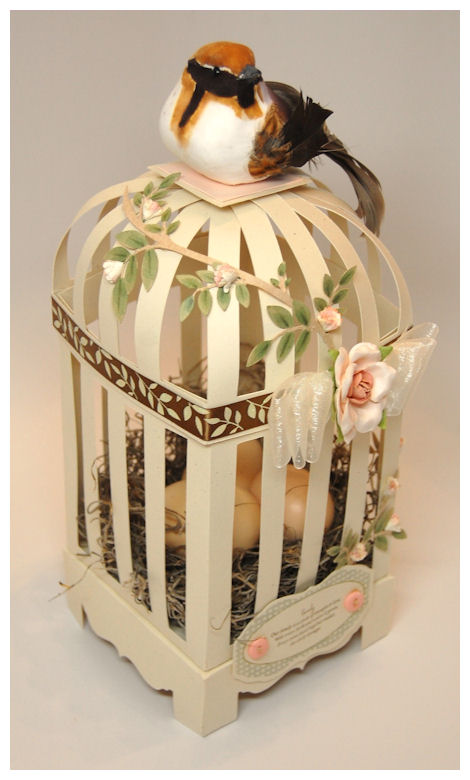
Can you believe how amazing this is? Talk about a WOW! gift holder, or table centerpiece.
It is really large too. I think we all had a hard time properly photographing it because it is such a wonderfully large template.
The bird on the top was purchased at Michael’s Craft Store. The bird itself is about 3 inches tall, and with the tail almost 5 inches long.
Here are some template details:
Available in PDF, SVG, GSD, DXF, WPC
Completed Project Size
4 1/2 Inches Deep
10 Inches Tall
Have you ever longed to create and customize your own “Bird Cage”from cardstock and/or patterned paper? Well we now have the PERFECT “bird cage” template. This is the epitome of unique and stunning! This is the perfect packaging for display. Use for a table setting, centerpiece, or as a creative and unique gift holder. Makes the perfect wedding centerpiece, or party favor too.
No detail was spared in the creation of this, and it was made FOOL PROOF! I love the detailed base the cage sits on as well. Stunning detail.
You can fill this with a variety of gifts such as bird themed items, floral arrangements: real or artificial, candles (especially battery operated), homemade/handcrafted treats of all kinds, bath & body products, stuffed animals, drink mixes…endless possibilities.
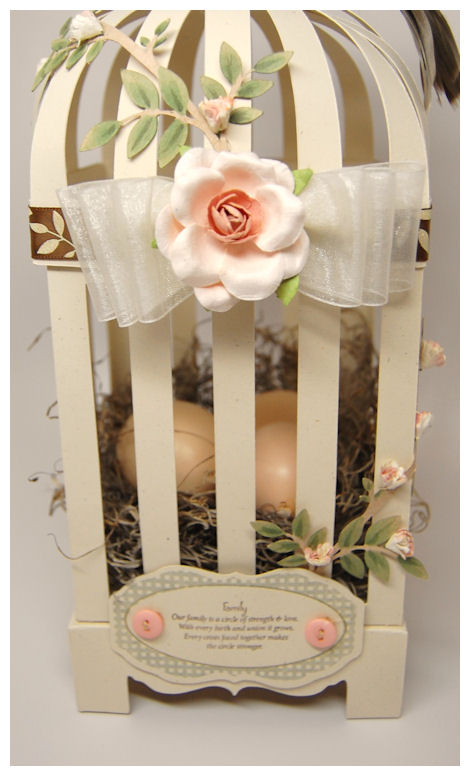
Inside my cage here, since it is a centerpiece I put some floral moss (in the floral section of Michael’s Craft Store) in the bottom, and create a “nest”. Inside I added some plastic eggs (also from Michael’s Craft Store).

Note: You can weave through cardstock pieces and create a unique “basket” as well! You will see more of that another day! VERY COOL!! I can’t wait to share.
No matter what gets “caged” up in here, the packaging itself is sure to be used and displayed long after the gift is gone.
The top is separate, so you can take it off to retrieve the gift you wish to package inside.
This template coordinates with the Singing Silhouette Pretty Impressions Stamp Set, as well as the Branching Out, and the A Little Birdie Pretty Pieces Cut File.
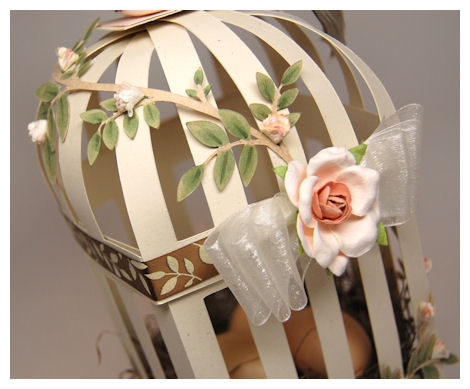
Here you can see there is a leaf/branch applied to the cage. That is from our Branching Out Cut File! I think you will find it AMAZING to add to any card, tag, template or project! I just used glue dots to adhere it to my template. Very simple!

I cut my Branching Out Cut File in Kraft cardstock. Once cut out I used my Copic markers to color the leaves in 😀 You could also re-cut the file, in whatever leaf color you chose, and cut just the leaves off, adding them to the base. I would fold them in half for added dimension 😀 Just a tip
For my sentiment I used the So Sentimental set.
It reads:
Family
Our family is a circle of strength & love. With every birth and union it grows. Every crisis faced together makes the circle stronger.
I felt it went perfectly for the message I wanted the centerpiece to have, given our recent trials, and the fact we had our bird with her little nest. The label and cut file are an early peek at what is to come next month 😀 Sorry I couldn’t resist adding it!
Now the little flowers…I made those too 😀 Read more on that further down, once you get to the card!!

This was made specially for my mother, to use as a centerpiece on her dining table. I asked her specifically what she wanted for colors, and I went to it. She hasn’t seen the final product yet, but I will present it to her within the next week or so.
Now for her card …and a peek at the new stamps and paper!

Keep strong and carry on.
I love this card, that I made to coordinate with the bird cage. There will be a tutorial below on how I made those little roses 😀
The cage, branch, and bird are from an upcoming set called: Singing Silhouette. More details on that set tomorrow. Obviously it will have a bird theme to it 😀
The cage image was cut using the Caged Cut File. This cut file was designed to allow you to have a cut out of the cage/cage door image (not shown) from the Singing Silhouette stamp set. I added some additional color to the leaves using a marker, once stamped.
The paper is from our latest collection called Whistful Wonder & Whistful Music Magic.
This sentiment is of particular significance at this point in my mom’s life. It feels great to have the ability to create such meaningful gifts for such a time in one’s life.
The sentiment is from a new set called Keep Strong.The set was a collaboration of sentiments, between Catherine Doucette and I. We will release it in March, as March 8th is International Women’s Day , for awareness on domestic violence against women.
More details on that set will also follow soon.
Since my mother was almost murdered by her husband(now almost a year ago-this April) I wanted to create something in honor of her!!! She continues the court battle to help prosecute her husband (who is in jail) for the brutal attack on her. He is fighting for 50% of all their assets, and for her to PAY HIM alimony once he is released from jail! Lord, if there is a justice system in the world, please help my mother with this uphill battle, that is so draining on her.
OK now how about we get the the tutorial part?
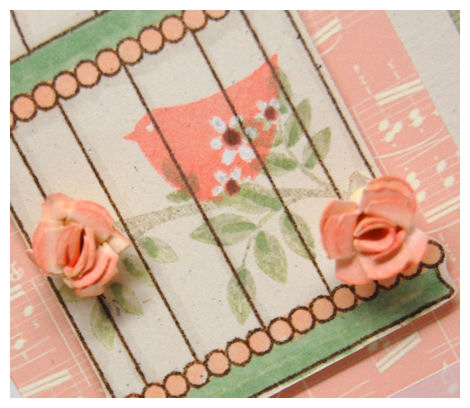
Check out these AMAZING mini roses, and the flowers that are on the template in this post. I made them in under 2 minutes!!
Want to know how?
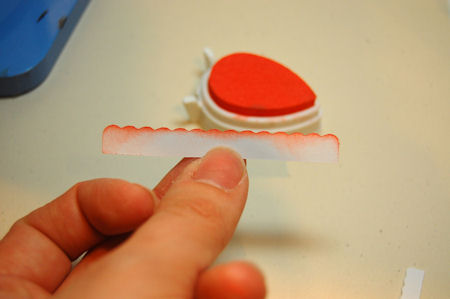
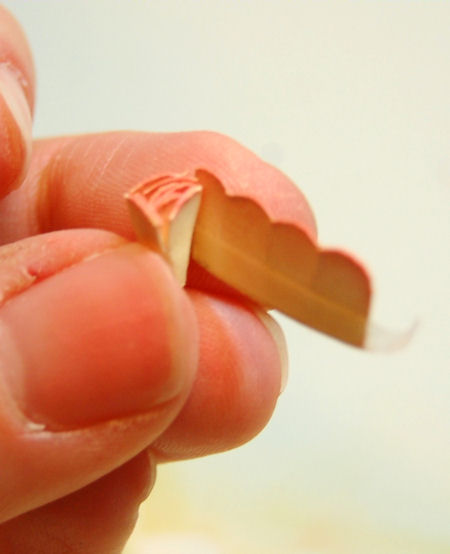
I used the or you could use the Border Builders Open Scallop Cut file (the plain scalloped one) for this project. Or you could use the Rosey Posey Rosettes too.
Directions:
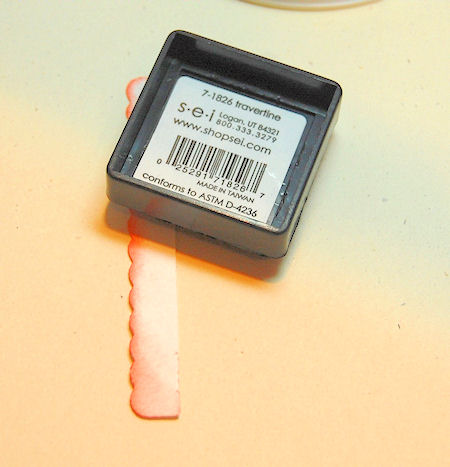
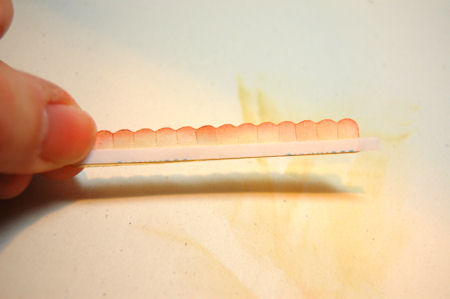
1) Resize the plain scallop border to 1/2 inch wide (select maintain proportions prior to resizing)

Use a THIN cardstock, or even printer paper!
2) I then sponged on my color. A darker pigment ink on the scallops.
A lighter ink on the bottom.
3) I then use my scissors, and snip between each scallop.
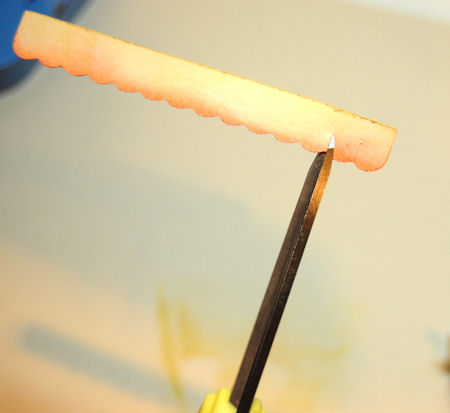
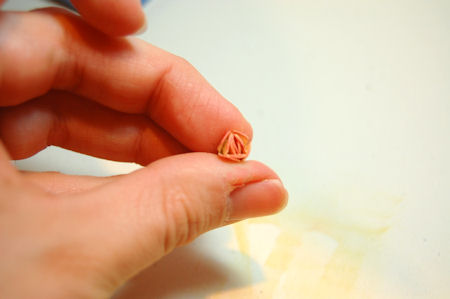
4) Add a THIN strip of double sided adhesive.
5) Take my craft pliers to begin to roll the scallop strip.
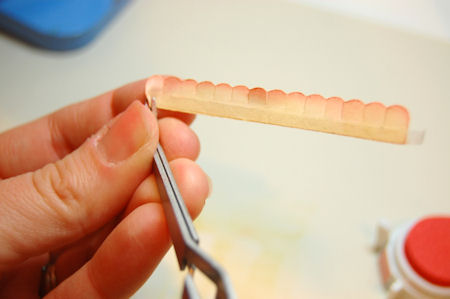
6) Carefully roll the strip, ensuring you pinch the bottom tightly.
7) Keep carefully rolling…
8) Done rolling!
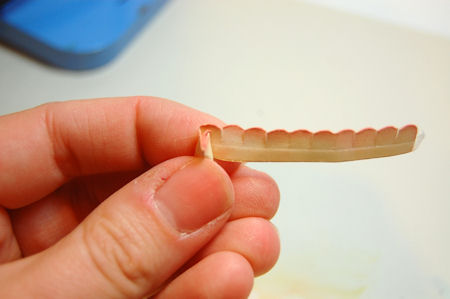
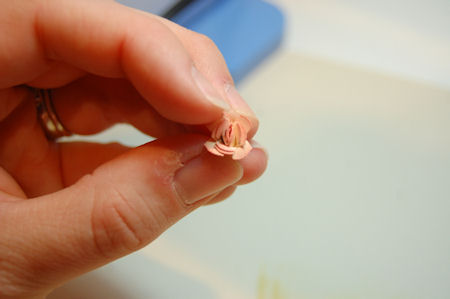
Once it is all rolled, because you used the sticky adhesive it will be all set 😀
9) You then want to take your fingers, and pull back/roll down the snipped petals. You can then pinch some of just leave them alone!
10) To adhere to a project, apply a large clear glue dot to the bottom.
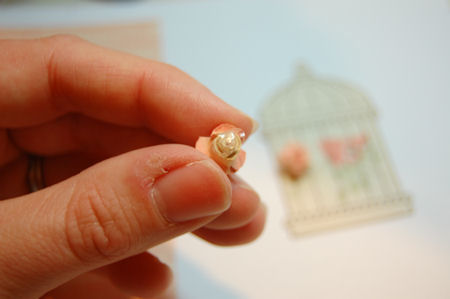
The bottom is flat so it sits nicely on any project!

Now the possibilities truly are endless, and in NO TIME at all!
TIP: For the first template sample I used copy paper, and didn’t really fold the petals back! A whole new look!
Supplies from My Time Made Easy ™ LLC
Pretty Packaging Templates: Caged
Pretty Impressions Stamp Set: Singing Silhouette, Keep Strong
Pretty Printable Digital Paper: Wistful Wonder, Wistful Music Magic
Pretty Pieces Cut File: Branching Out, Caged Cut File, Border Builders Open Scallop Border
Well I think that is all I can cram into one day. I hope you are as excited as I am about this next release!
There is SO MUCH more to share, so come back tomorrow OK!
My Etsy

Who I Designed For
Blogroll
- Alicia
- Alli Miles
- Ally Blankenship
- Amber
- Andi @ crafts on a whim
- Angel R
- Angie Z
- Anne Kranitz
- Becky O
- Bee
- Beth Silaka
- Bethany Paull
- Beverly Nash
- Bobbie
- Cambria
- Cammie
- Card of the Week
- Card Positioning System (CPS)
- Cards for Cancer
- Catherine Doucette
- Charmaine
- Cheryl Sims
- Chriss Rollins
- Christina
- Christine Ewing
- Christine Wooden
- Colleen Schaan
- Craft Critique
- Craft Gossip
- Crystal
- Dawn Easton
- Emily Giovanni
- Geny
- Holly
- Igne Groot
- Inspirational Craft Blogs
- Irene
- Jami Sibley
- Jeanne Streiff
- Jen del Muro
- Jeni Bond
- JenMarie
- Jenn Balcer
- Jenn Diercks
- Jenn O
- Jennifer E
- Jennifer Mick
- Jennifer Pereda
- Jennifer-Sweet Treat
- Joanne Basile
- Jodi Collins
- Julia Stainton
- Julie Masse
- Karen
- Kathryn Berthiaume
- Katie Cotton
- Kelley Holland
- Kendra
- Kim Scholfield
- Kris’s Color Stripes! Get inspired here
- Kristen Dubosque
- Kristin Eberline
- Kristine
- Laura @ Sunshine Stamper
- Laura Turnmire
- Laurie Schmidlin
- Lesa Rapp
- Linda Duke
- Linda-LSN
- Lindsey Botkin
- Lisa (lakind scs)
- Lisa Kind
- Lori Craig
- Maggie
- Mara Campbell
- Maria
- Maria Levine
- Mary
- MaryJo
- Melanie M
- Monique Hansen
- Moxie Fab World
- Pam Imholz
- PaperCrafts Connection
- Peppers and Pollywogs Kids party site
- Rebecca Grohall
- Rita
- Robyn
- Rose Ann
- Sarah Vrolyk
- Sharon Harnist
- Sharon Johnson
- Sharon Rivera (a chemisrty with paper)
- Sherrie
- Sophia Landry
- Storage Units, Ink, & More Blog
- Sue Berker
- Susan (Rainy)
- Tangii Crane
- Tracy
- Tricia Traxler
- Trudee
- Velta
- VivLyn
- Zena
MTME Pretty Palette Color Team
MTME Pretty Patterns Sketch Team
My Time Made Easy TM LLC
Shop till you drop!
Lauren Meader
About Me
Copyrighted material
Subscribe To My Blog
Pages
- About me
- Alexa’s Story!
- My Crafty Corner!
- My Time Made Easy™ LLC
- Our Make A Wish Trip to Disney!
- Resume/Publication List
Calendar
Archives
- August 2013
- July 2013
- June 2013
- May 2013
- April 2013
- March 2013
- February 2013
- January 2013
- December 2012
- November 2012
- October 2012
- September 2012
- August 2012
- July 2012
- June 2012
- May 2012
- April 2012
- March 2012
- February 2012
- January 2012
- December 2011
- November 2011
- October 2011
- September 2011
- August 2011
- July 2011
- June 2011
- May 2011
- April 2011
- March 2011
- February 2011
- January 2011
- December 2010
- November 2010
- October 2010
- September 2010
- August 2010
- July 2010
- June 2010
- May 2010
- April 2010
- March 2010
- February 2010
- January 2010
- December 2009
- November 2009
- October 2009
- September 2009
- August 2009
- July 2009
- June 2009
- May 2009
- April 2009
- March 2009
- February 2009
- January 2009
- December 2008
- November 2008
- October 2008
- September 2008
- August 2008
- July 2008
- June 2008
- May 2008
- April 2008
- March 2008
- February 2008
- January 2008
- December 2007
- November 2007
- October 2007
- September 2007
- August 2007
- July 2007
- June 2007
- May 2007
- April 2007
- March 2007
- January 2007
Categories
- About Me
- All That Scraps
- blogger challenge
- camera/photo play
- Cards
- Contests
- family stuff
- FOR SALE
- Home decor/3-D items
- How to FAKE it!
- Introduction
- JUGS Challenge
- JustRite Stampers
- Lizzie Anne Designs
- My family stuff
- My Stamping Space
- My Time Made Easy
- My Time To Color Challenge
- My Time to Create Challenge
- My Timeless Template Challenge
- My Timeless Templates
- Mytime Mail
- MYTIME MOVIE/VIDEOs
- Papertrey Newsletter
- Pink Cat Studio
- Pretty Palette Challenge
- Pretty Patterns Sketch
- Product Opinions and Must haves
- Recipe's
- Saturday Sketch
- Smilebox Creations
- Stampavie
- Tutorials
- Uncategorized
- videos
Most Popular
- Create your own Onesie Card Tutorial-and important NOTE! PLEASE READ (2529)
- Saturday Sketch-Boxed bag holder (2333)
- Going GREEN! Fancy Flower Flourish-Closure Video (1478)
- Fabulous Favorite - Giveaway! (1336)
- a Prayer Request (1232)
- QUICK-Easter Baskets from Nestabilities-PTI style-and blog challenge (1063)
- Teaser Sketch (999)
- February Release Giveway! (and a little peek) (996)
- Group Post and Rambling Rose Video Tutorial (985)
- GIVEAWAY! Who wants it all?! (895)
Recent Comments (RSS)
- 첫충사이트: 완전히 흥미로운 블로그 게시입니다. 저는
- sarah: Wow, Lauren, what a stunning
- hedie: خرید راهبند
- 야동: Love to read it,Waiting For
- 야동: This seller is in a
- 바카라사이트: 여기 처음 왔어요. 나는이 게시판을
- 야동티비: I was surfing the Internet
- 바카라사이트: 비슷한 주제에 대한 흥미로운 정보를
- 바카라사이트: "여기에 제공해 주신 귀중한 정보와
- 온라인홀덤: 유익한 웹 사이트를 게시하는 데
Copyright © 2007 - My Time, My Creations, My Stampendence - is proudly powered by WordPress
This blog has been Tweaked and Designed by Sara Williams