Archive for August, 2010
Summer is close to and end, which is sad, but my family and I have a very full and fun weekend coming. It our our towns annual Hot Air Balloon Rally, which we always look forward to.
In the meantime we have some more ideas to share with you. Make sure you check out: Stephanie Kraft, and Kristin Bueter for some more inspiration and ideas.
Each and every release I feel like there is so much to make and so little time. I always have ALL these crazy ideas, and a lot of times to add to the fun I want to pull out an older template, or dust off an older stamp set. More often than not I need to keep the focus on the new (so you get ideas :D) and resist the urge to go back because as a company owner I;m constantly moving forward.
Generally I show all my new release sets with all my new release templates. It can be hard to get off the NEW! focus and just go with it!
Well that is finally just what I did here.

Just for you-
I had been so drawn to wanting to use the NEW! Tote-all Package (which I could use over and over and over again) with some older papers, and older sets!
For my base, I kept it plain and simple and just used some Warm Apple Cider cardstock.
This uses the OLD Lovely Labels 1, Just For You and Tending the Garden (on the back side).
It also used the OLD Fresh Flowers and Get Graphic 2 (on back pocket) Pretty Printables Digital paper.
For the front I used the Lovely Labels 1 Cut File, stamped my Lovely Labels 1 frame. In the label I stamped my flower, and sentiment “Just for you” from the Just For You set.

I printed my Fresh Flowerspaper onto a kraft cardstock which gave my paper a totally new look! A great perk to having your own printable papers 😀 I then cut the lid for my template.
I wanted to mimic the flower in the label, on my lid/flap closure so I went ahead and used the OLD Fanciful Flowers Cut File (the middle flower on the left) to cut my flower from a thin piece of CORK!!!
Isn’t that the coolest? (thanks to Sara for the idea of a cork flower :D) My cricut cut it out no problem! Make sure you mat us super sticky though, then be careful pulling it up!! My spatula came in handy then!
I just dabbed on some pigment ink and it was perfection! I layered on a felt flower and some Primas.
Here is the tote opened.
I used some magnets for an added closure. In the instructions I give a very handy tying tip for a ribbon handle just like this one, that is perfect every time!
Not sure exactly what I will gift in here, but with the “just for you” label it is wide open to ANY occasion!!
Here is the back of the tote.
I kept with the flower them with my ribbon. As I stated above the paper is from the Get Graphic 2 collection
I believe all sides of something need to be pretty. You don’t have to use the pocket but it is a nice addition 😀
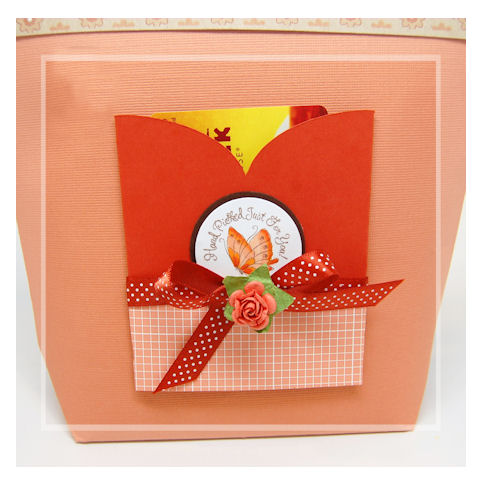
I added the butterfly (from Tending the Garden) with the hand picked sentiment (from Just for you set). I think its so pretty.
I stuck a gift card to the OUTBACK in here. See it fits gift cards perfectly!!! Also a great place to tuck in the To: and From: note-card. Sometimes you don’t want that hanging off your bag! Now you can tuck it inside there if you like.
Supplies from My Time Made Easy ™ LLCPretty Packaging Templates: Tote-All Package
Pretty Impressions Stamp Set: Lovely Lables 1, Just For You, Tending the Garden
Pretty Printable Digital Paper: Get Graphic 2, Fresh Flowers
Cardstock by Couture Cardstock: OSW White, Ganache, Warm Apple Cider, Rusty Hinge
Pretty Pieces Cut File: Fanciful FlowersWell I hope you like today’s example because we have so much more to share.
For a Fab Purse-On
Aug 3, 2010 Author: mytime | Filed under: UncategorizedOK here we are again!
Are you ready for more creative ideas and inspiration from myself and my team?
Today Pam Imholz and Geny Cassady have some samples. Make sure you pay them a visit 😀 You won’t be sorry 😀
Today I am going to share an enlarged version of the Tuck-ered Out © template.

Not only is tuck-ered out a FAB gift box and or party favor but it also makes the PERFECT purse!!
I enlarged it to 155%!
It ends up measuring 5 1/4 inches across, 3 3/4 inches tall, 3 1/2 inches deep. LOVE IT!
I was obviously in love and inspired by the awesome Shopping Shirley’s Sweetheart Paper Bag collection for my colors. You just can’t go wrong with pink and brown!!

This template comes with a handle piece (also enlarged to 155%) that I added to the top in a Ganache cardstock, with sweet little brads.
The ribbon is from May Arts 😀
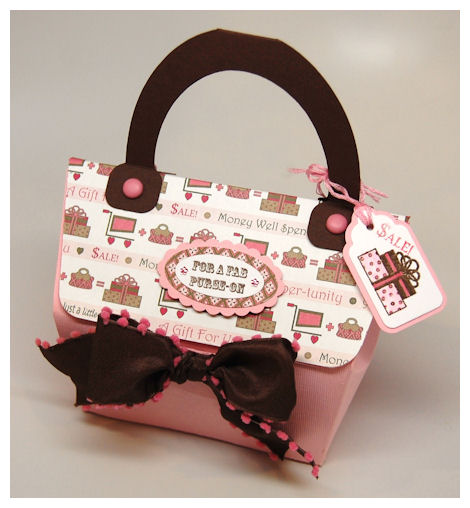
The tag was made to look like a price tag. I stamped my gift image from the Money Well Spent set in a chocolate ink and colored them in. I stamped the SALE on the tag.
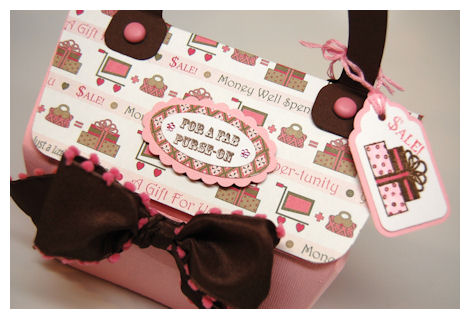
The main center image is stamped with the sentiment For A Fab Purse-On. It is layers on the Shopping Shirley’s Sweetheart Paper Bag purse pattern and a scallop oval cut with my Cricut machine (I LOVE IT!)
I made my decorative flap/back layer but cutting the template again in the patterned paper, the cuttin off the side panel –>PERFECTION!!
Now you *may* be wondering what is inside!
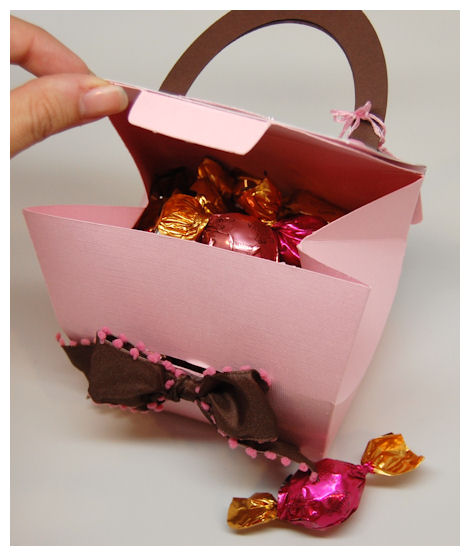
Godiva truffles! An entire 10 oz. bag of them!!
I LOVE Godiva chocolate. Raspberry Starfish are my personal FAVORITE. SO a gift like this would make me fall over with a feather.
Now keep this in its originally intended size and this would be a ultra awesome party favor or gift for the girls at the office or ANYWHERE really!
TIP: I put a magnet on the inside of the tab, and then on the inside of the front slot so this stay securely closed 😀 Gotta love that!
Supplies from My Time Made Easy ™ LLC
Pretty Packaging Templates: Tuck-ered Out
Pretty Impressions Stamp Set: Money Well Spent
Pretty Printable Digital Paper: Shopping Shirley’s Sweetheart Paper Bag
May Arts Ribbon, Basic Grey magnets, Tag and oval shapes.Well that is that for me!I have a tutorial I hope to get to ASAP for an upcoming project! I am so in love with the finished result, and once you SEE it, I think you will be too.Stay tuned because the team and I will be back with more tomorrow.
Boy:It’s in the bag!
Aug 2, 2010 Author: mytime | Filed under: Home decor/3-D items, My Time Made EasyBack again!!
I hope you all are ready for some MORE project ideas!! Stop by see what Silke Ledlow has to share today!!! I’m sure you will be BLOWN AWAY!
I have a BOY project! After-all, I DO have a son and he goes to a lot of parties. He always wants to give the same thing HE would love to receive-a gift card to the game store. Yes, he IS obsessed with video games, and YES we do have to limit them. That being said, now that he knows how to read it’s great that most of the games do require that so I don’t feel AS guilty sometimes.
OK enough of that, let me finally share some boy themed gift idea.
What would you say to bringing this combo to the next party?!
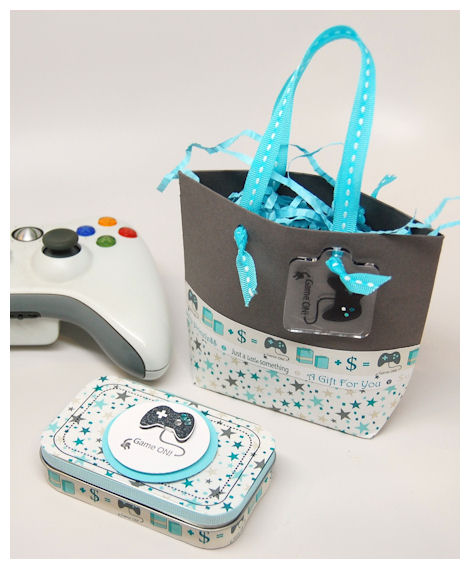
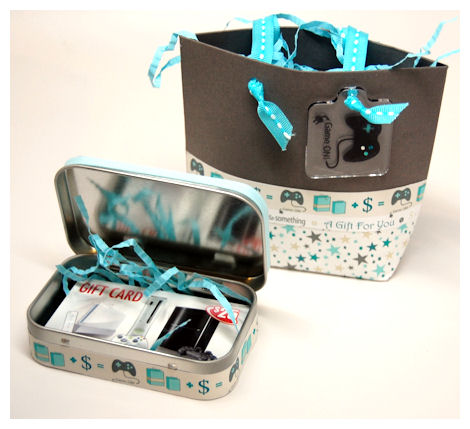
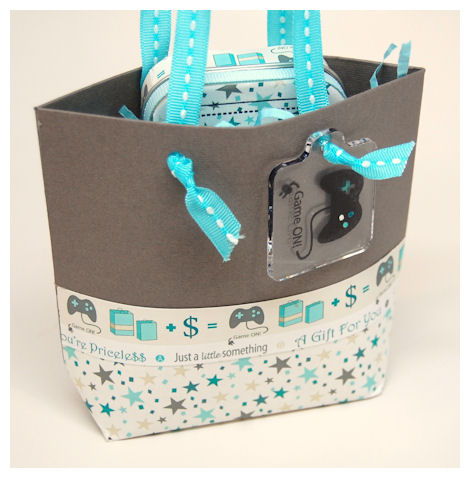
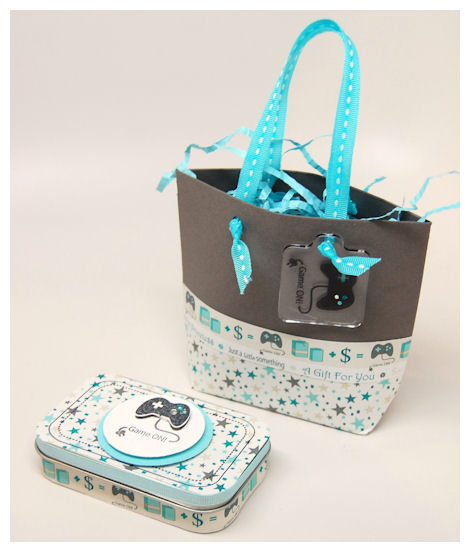
This super cute (and masculine/boyish) bag was made using the NEW! Tote-All Package and the NEW! Money Well Spent set.
Today I wanted to show you that not everything HAS to be girly!
As it says in the description of the Tote-All Package: Sometimes you just need a great gift bag! Even if you aren’t giving a large gift you can still package it up in a UBER * CUTE bag right?
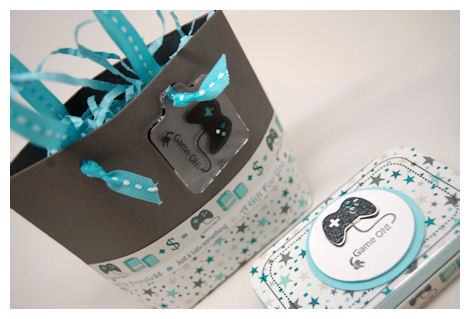
I resized the Tote-All Package to be 65%. I didn’t use the pocket, OR the cute lid, and it is STILL amazing!!
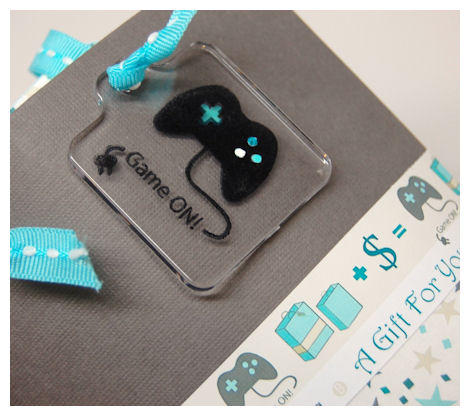
I tied the tag onto my ribbon handle. I stamped the controller image onto a acrylic tag with black StazOn. I then used a singlo gel pen for my buttons. I think its a super easy and super cute touch.
So for my gift set I used the NEW! Pretty Printables digital paper in Shopping Shirley’s: Ganache Sprinkles & Taylor’s Teeth Ganache Sprinkles!

I used a lightweight special “flyer-scrapbook-photo” paper (I get mine cheap at Target!)to keep down the bulk on my project! Just another PLUS to printing your OWN paper 😀 You can choose the paper color (I could have printed on a pale blue cardstock), weight, size, and scale you print with! No waste, and ENDLESS use of the pattern. I had NO worries about running out of my pattern! I can just print more 😀 That is more cost effective because I don’t WASTE my $ on a pattern I love, but am afraid to use for fear of running out of it forever, fear I won’t have enough for my project, or it NOT being in stock/made available again.
I love that we have various patterned paper, in coordinating colors, so mixing and matching is SO EASY!
I also love that in the Shopping Shirley’s Collection you receive the game controller and general shopping themed papers the color collection of your choice, so there is much versatility!!
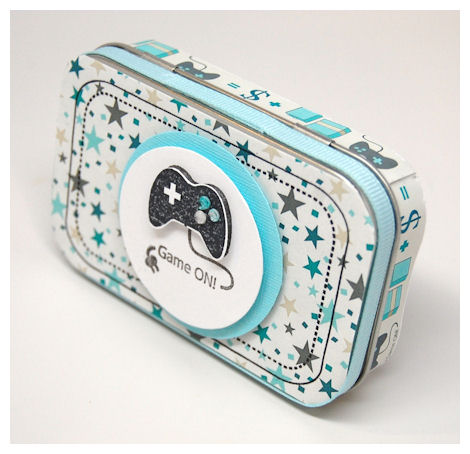
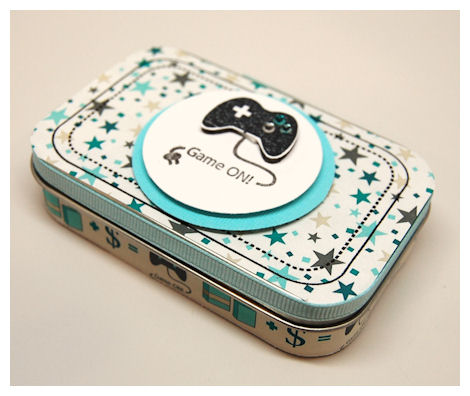
You can see the dimension I got my cutting out the controller. I added bling to the buttons for some added “star gamer” quality! NO BOW on this project per strict orders of Noah! LOL!
The little strip of cardstock going around the tin was done using the game controller patterned from the Shopping Shirley’s: Ganache Sprinkles. I did the same thing on my gift tote.
I think it is so simple but totally adds to the WOW of this SIMPLE design. You could whip up a variety of gift sets like this for ALL the holidays. OR to keep on hand when you don’t have time to run out for a gift!
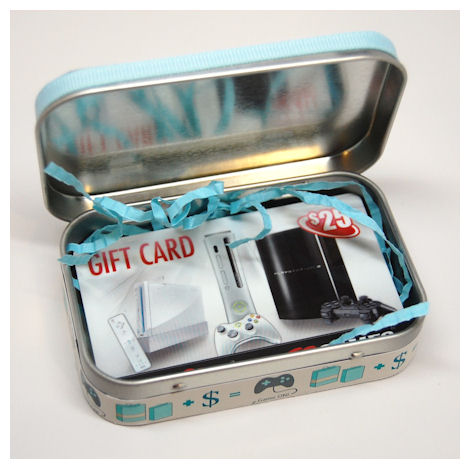
See how perfectly my gift card fits in there
Creating this little box is just that little bit of an extra touch that says you care. As I’ve said before I just LOVE coordinating items, the more the better, and seeing the tin perfectly tucked inside just makes me smile!
Supplies from My Time Made Easy ™ LLCPretty Packaging Templates: Tote-All Package
Pretty Impressions Stamp Set: Money Well Spent
Pretty Printable Digital Paper: Ganche Sprinkles in Shopping Shirley & Taylor’s Teeth
Cardstock by Couture Cardstock: Gumshoe
Thank you for stopping by yet again, in between your busy summer schedule. I’ll be back tomorrow with even MORE ideas to share!
Fairy Fabulous
Aug 1, 2010 Author: mytime | Filed under: Cards, Home decor/3-D items, My Time Made EasyWe are back with lot’s more inspiration to share!
Today you will want to stop by and see what Katie Cotton has to share with you!
Here is what Katie Cotton had to say
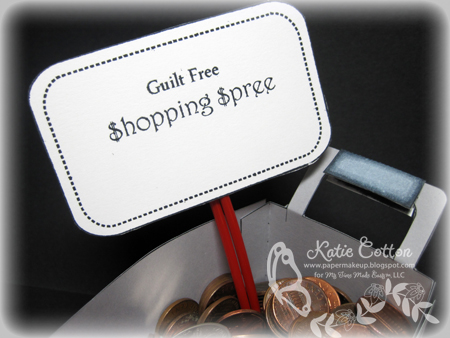
Right away when I saw the Shop Til You Drop template, I knew I wanted to create a little coin collecting basket because we always have loose change around the house! And as it turned out i was away from home more than AT home this past month, I didnt have my normal tools which meant *GASP* no cutting machine! But this template turned out super cute by just coloring IN the negative spaces! So this template is just as fabulous as a PDF version as a cutting template! Check it out for more details!Today I am focusing on gifts made using the NEW! Lost My Tooth © set. Now this set has a stunning fairy shilouette and some other images, so it is also great for cards and tags too!
I’d like to share with you some projects I made for my children. Nowadays what I do for one, I have to do for all.
Also think of how sweet this would be as a unique baby gift 😀
I have 3 kids, all in prime “tooth losing” ages, so this was a super fun project for me to complete! The boxes had to be a surprise to my kids, so I asked then (since it changes sometime) what thier current favorite color was.
Alexa is 10-favorite color pink
Noah is 7- favorite color blue
Amber is almost 6-favorite color purple
So with the I grabbed my NEW! Lost My Tooth © set and made them each something special!

An entire Tooth Fairy Gift set, complete with notes FROM the tooth fairy 😀
NOTE: We do have a little TYPO :C in the set. This sentiment will be replaced within the set, so for anyone ordering you will get the corrected version of the sentiment!
How sweet is this little ensemble?!
I made my first mini tooth fairy tin years ago when I did a craft show and they sold out within an HOUR! That was also improvising with images and stuff. If I had this set it would have been so fun and EASY! Maybe even sold better 😀 People LOVED the concept if it.
Now the Lost My Tooth © set is also available in digital download so you could even customize your labels with the child’s name too!
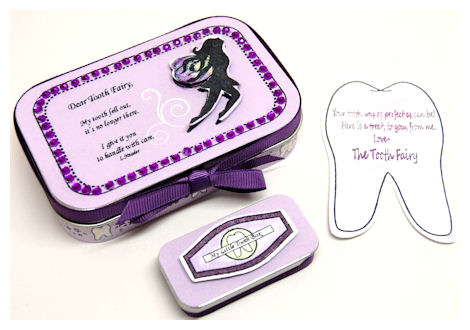
First up ….Pretty in Pink is Alexa’s set!
Alexa is “older” and so I wanted a more elegant look, so I made her less “cutesy” .
Here we have:
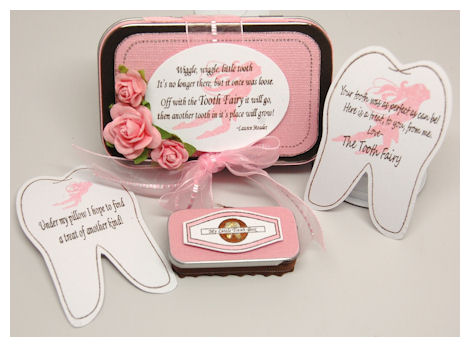
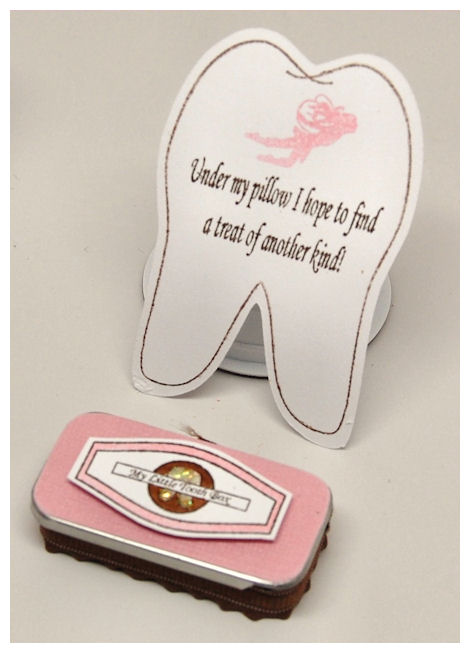
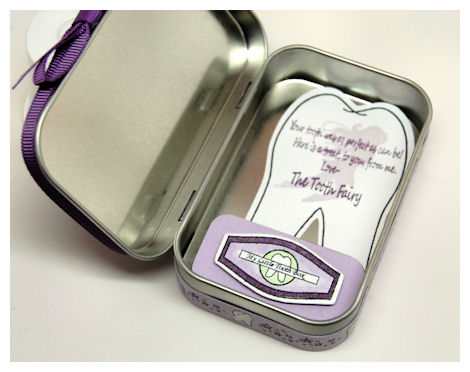
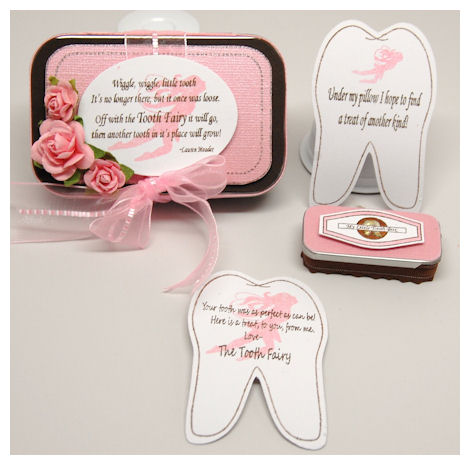
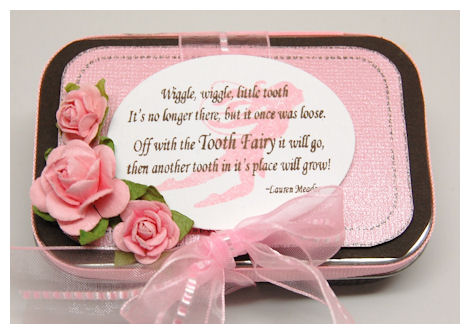
The large fairy box, that holds the actual tooth slider tin and notes to or from the tooth fairy
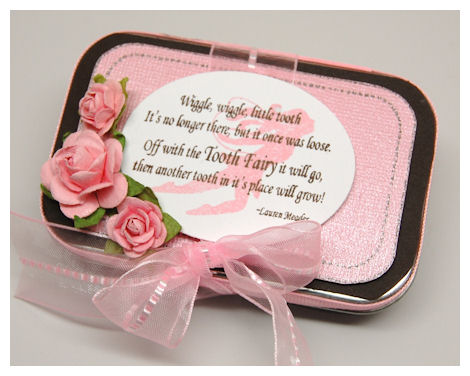
I used a large hinge top tin for this. Note: Metal Hinge Top Tin can be found here: https://www.sks-bottle.com/340c/fin7b.htmlI used a shimmery pink cardstock, and stamped the label image from Money Well Spent for the top.
I used my Circut to cut an oval for the top, where I used the Lost My Tooth © set to stamp my sweet, large fairy shilouette, then over her the poem that I made up. I love that poem!
The simple addition of some paper roses, and some ribbon and it was done! You can really whip these up!
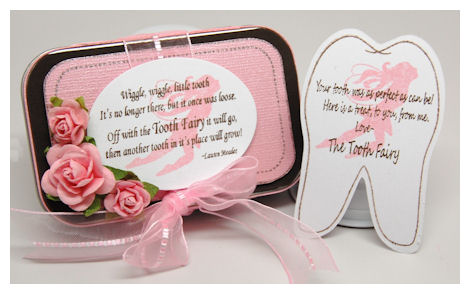
Now to go with the tin (which can fit your gift) would be a tooth shaped note FROM the tooth fairy! This was made using the Lost My Tooth © Pretty Pieces Cut File, and stamped with the large tooth image from the set.
The type looks like handwriting, and the fairy shilouette just completes it!
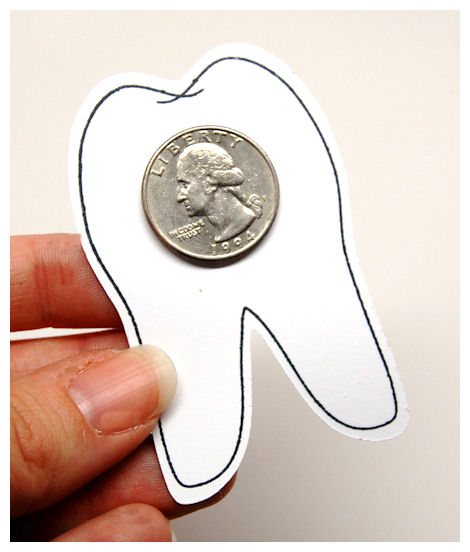
On the back of the note you can attach a coin, or even some cash. That is also why the larger gift tin comes in handy!
Now another shaped note….TO the tooth fairy!
I used the smaller fairy shilouette for this one.
The little tooth box was made using the label with the “My Little Tooth Box” sentiment. A childs tooth is sure to be secure in there!
Next we have the other girly creation: Amber’s Bling Box
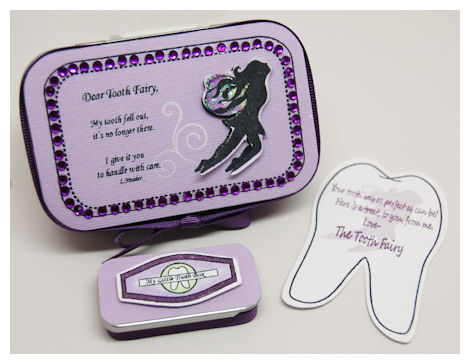
They ALL have the same elements, just in different colors and a little something different and special about each! I made sure each top was designed differently.

(this is the sentiment with the typo)
Amber is always wanting MORE sparkle and MORE bling on everything I do, so here she gets it!
I used the Lost My Tooth © Pretty Pieces Cut File for my 3D fairy. I just added some stickles to her wings. For her fluter trail I used the Fanciful Flourishes set
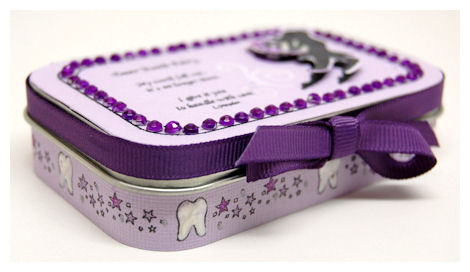
Look at how I used the star trail in the set, with the tooth image to decorate the sides of my large hinge top tin!
I used glitter pens to color the stars, then Liquid Pearls on the teeth! SUPER cute!
Here is everything tucked away nicely for the awakening after “the” night!
You have your sweet note from the tooth fairy with the money on the back! What a super sweet surprise 😀
Now for the every difficult boy. I told you this set is made to be gender neutral and I swear it is. If my 7 year old son didn’t say anything about it beign TOO girly, trust me you are good to go! LOL!
Here is Noah’s set:
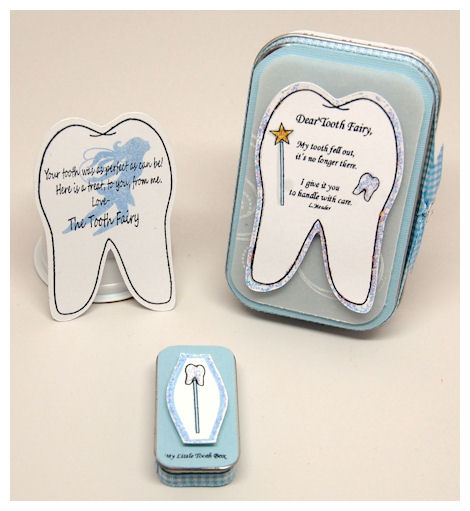
While I think the fairy is still appropriate I think that the stars and teeth are even more so!
That eing said this was my boy version, which can also be used for girls!
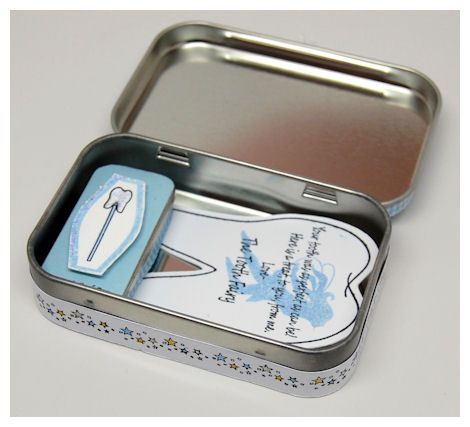
This time I the tooth and added it as my main focus to the tin!
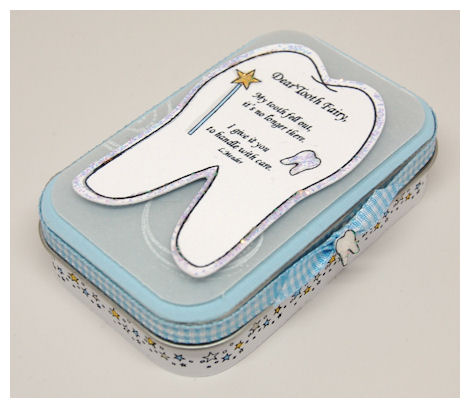
With the poem TO the tooth fairy, I chose to use the small tooth image, and the “build a wand” using the star as my topper. See, nothing girly about it. There is even BLING without it being over the top “ew” to boys.
I layered the tooth onto a vellum cardstock layer which was stamped using the Fanciful Flourishes set.

Around the bottom I varied my pattern from the purple one to use just the stars. I cut out the small tooth as my embellishment to replace my personal need for a “bow”, and kept it boyish with a ginham check ribbon.
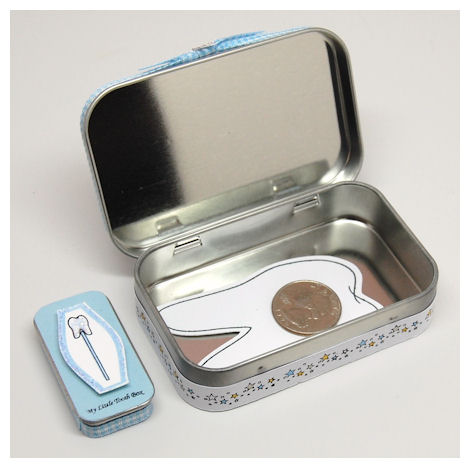
Here is the tin opened with the “goods” from the tooth fairy. Honestly my kids get more than a quarter (much to my hubby’s shock with the years of inflation from what he as a child received! LOL! But you could adhere a stack of quaters too.
All in all the note from the tooth fairy is such a cute surprise to kids 😀 Money on it or not.
Use the tins for that!
Supplies from My Time Made Easy ™ LLC
Pretty Impressions Stamp Set: Lost My Tooth © , Fanciful Flourishes
Cardstock by Couture Cardstock: OSW white,
Pretty Pieces Cut File: Lost My Tooth © Pretty Pieces Cut File
So this was *just* the tip of the iceberg of ideas! I hope it sparked some ideas for you and your creative gift giving. Maybe even some possible projects for you to do with your children, or for children you know.
Be sure you come back each day this week, because we are just getting started.
My Etsy

Who I Designed For
Blogroll
- Alicia
- Alli Miles
- Ally Blankenship
- Amber
- Andi @ crafts on a whim
- Angel R
- Angie Z
- Anne Kranitz
- Becky O
- Bee
- Beth Silaka
- Bethany Paull
- Beverly Nash
- Bobbie
- Cambria
- Cammie
- Card of the Week
- Card Positioning System (CPS)
- Cards for Cancer
- Catherine Doucette
- Charmaine
- Cheryl Sims
- Chriss Rollins
- Christina
- Christine Ewing
- Christine Wooden
- Colleen Schaan
- Craft Critique
- Craft Gossip
- Crystal
- Dawn Easton
- Emily Giovanni
- Geny
- Holly
- Igne Groot
- Inspirational Craft Blogs
- Irene
- Jami Sibley
- Jeanne Streiff
- Jen del Muro
- Jeni Bond
- JenMarie
- Jenn Balcer
- Jenn Diercks
- Jenn O
- Jennifer E
- Jennifer Mick
- Jennifer Pereda
- Jennifer-Sweet Treat
- Joanne Basile
- Jodi Collins
- Julia Stainton
- Julie Masse
- Karen
- Kathryn Berthiaume
- Katie Cotton
- Kelley Holland
- Kendra
- Kim Scholfield
- Kris’s Color Stripes! Get inspired here
- Kristen Dubosque
- Kristin Eberline
- Kristine
- Laura @ Sunshine Stamper
- Laura Turnmire
- Laurie Schmidlin
- Lesa Rapp
- Linda Duke
- Linda-LSN
- Lindsey Botkin
- Lisa (lakind scs)
- Lisa Kind
- Lori Craig
- Maggie
- Mara Campbell
- Maria
- Maria Levine
- Mary
- MaryJo
- Melanie M
- Monique Hansen
- Moxie Fab World
- Pam Imholz
- PaperCrafts Connection
- Peppers and Pollywogs Kids party site
- Rebecca Grohall
- Rita
- Robyn
- Rose Ann
- Sarah Vrolyk
- Sharon Harnist
- Sharon Johnson
- Sharon Rivera (a chemisrty with paper)
- Sherrie
- Sophia Landry
- Storage Units, Ink, & More Blog
- Sue Berker
- Susan (Rainy)
- Tangii Crane
- Tracy
- Tricia Traxler
- Trudee
- Velta
- VivLyn
- Zena
MTME Pretty Palette Color Team
MTME Pretty Patterns Sketch Team
My Time Made Easy TM LLC
Shop till you drop!
Lauren Meader
About Me
Copyrighted material
Subscribe To My Blog
Pages
- About me
- Alexa’s Story!
- My Crafty Corner!
- My Time Made Easy™ LLC
- Our Make A Wish Trip to Disney!
- Resume/Publication List
Calendar
Archives
- August 2013
- July 2013
- June 2013
- May 2013
- April 2013
- March 2013
- February 2013
- January 2013
- December 2012
- November 2012
- October 2012
- September 2012
- August 2012
- July 2012
- June 2012
- May 2012
- April 2012
- March 2012
- February 2012
- January 2012
- December 2011
- November 2011
- October 2011
- September 2011
- August 2011
- July 2011
- June 2011
- May 2011
- April 2011
- March 2011
- February 2011
- January 2011
- December 2010
- November 2010
- October 2010
- September 2010
- August 2010
- July 2010
- June 2010
- May 2010
- April 2010
- March 2010
- February 2010
- January 2010
- December 2009
- November 2009
- October 2009
- September 2009
- August 2009
- July 2009
- June 2009
- May 2009
- April 2009
- March 2009
- February 2009
- January 2009
- December 2008
- November 2008
- October 2008
- September 2008
- August 2008
- July 2008
- June 2008
- May 2008
- April 2008
- March 2008
- February 2008
- January 2008
- December 2007
- November 2007
- October 2007
- September 2007
- August 2007
- July 2007
- June 2007
- May 2007
- April 2007
- March 2007
- January 2007
Categories
- About Me
- All That Scraps
- blogger challenge
- camera/photo play
- Cards
- Contests
- family stuff
- FOR SALE
- Home decor/3-D items
- How to FAKE it!
- Introduction
- JUGS Challenge
- JustRite Stampers
- Lizzie Anne Designs
- My family stuff
- My Stamping Space
- My Time Made Easy
- My Time To Color Challenge
- My Time to Create Challenge
- My Timeless Template Challenge
- My Timeless Templates
- Mytime Mail
- MYTIME MOVIE/VIDEOs
- Papertrey Newsletter
- Pink Cat Studio
- Pretty Palette Challenge
- Pretty Patterns Sketch
- Product Opinions and Must haves
- Recipe's
- Saturday Sketch
- Smilebox Creations
- Stampavie
- Tutorials
- Uncategorized
- videos
Most Popular
- Create your own Onesie Card Tutorial-and important NOTE! PLEASE READ (2529)
- Saturday Sketch-Boxed bag holder (2333)
- Going GREEN! Fancy Flower Flourish-Closure Video (1478)
- Fabulous Favorite - Giveaway! (1336)
- a Prayer Request (1232)
- QUICK-Easter Baskets from Nestabilities-PTI style-and blog challenge (1063)
- Teaser Sketch (999)
- February Release Giveway! (and a little peek) (996)
- Group Post and Rambling Rose Video Tutorial (985)
- GIVEAWAY! Who wants it all?! (895)
Recent Comments (RSS)
- 첫충사이트: 완전히 흥미로운 블로그 게시입니다. 저는
- sarah: Wow, Lauren, what a stunning
- hedie: خرید راهبند
- 야동: Love to read it,Waiting For
- 야동: This seller is in a
- 바카라사이트: 여기 처음 왔어요. 나는이 게시판을
- 야동티비: I was surfing the Internet
- 바카라사이트: 비슷한 주제에 대한 흥미로운 정보를
- 바카라사이트: "여기에 제공해 주신 귀중한 정보와
- 온라인홀덤: 유익한 웹 사이트를 게시하는 데
Copyright © 2007 - My Time, My Creations, My Stampendence - is proudly powered by WordPress
This blog has been Tweaked and Designed by Sara Williams