Makin Metal
Jun 10, 2010BUSY! BUSY! BUSY!!
The things I’ve crossed off my to do list the last few days are INSANE! How about you?
We are getting ready for vacation, so I’m back to workin my hiney off to be swim suit ready within the next month, and I have 2 things to say:
1) OUCH!
My body hurts!! I know its a good hurt because I’m using muscles that have been neglected. The ONLY muscle getting any use the last few months has been my BUTT cause I’ve been sitting on it typing and makin files! LOL! OH and then I guess my finger too
2) I’m STARVING!
LOL! When I work out I eat WAY more than I usually do, because my body/metabolism is actually working! I eat more than usual and LOSE weight. Typically I don’t eat breakfast or lunch, and then by 3pm I’m starving. I can generally live off coffee the first few hours of life, so hunger normally doesn’t occur. This is BAD. I NEED to eat. its good for you to eat several smaller meals a day. Keeps everything moving, and you body burning calories, so I am getting back to that.
OK totally off topic but I felt the need to just say it, since all I can think of is how SORE and HUNGRY I am! LOL!
Its the end of the year, and teacher gifts need completing, so WHY am I typing this post instead?
(You may want to check out the Boxed Lunch Perfect Package if you ARE making gifts :D)
I don’t know, maybe its my therapy! LOL! My little connection to the world. I enjoy sharing everything here. Its kinds like a virtual diary of creativity 😀 Its the coolest thing to know others may get enjoyment or inspiration from me in any way 😀 So I keep doing my best to keep creating.
My husbands jokes “Don’t you worry about running out of ideas?” While I giggle, YES! That does freak me out! LOL! But I have so many ideas jotted down it may take a lifetime to get them all made, so I won’t worry about that just yet.
Speaking of ideas and creativity, I figured I share a fun little project using a technique I’ve not tried in a long time, so I hope you have a minute (or like 5)
The official June release week at My Time Made Easy ™ LLC is over, but I made SO much stuff I still have plenty to keep sharing! Certainly NOT a bad thing.
So I figured I’d share some samples I created using the rose bud flourish image from the A Spot of Tea set! I LOVE the way that turned out, so I wanted to showcase it a little. I think the tags, and that flourish a SUPER on thier own 😀
First up here is a simple card I made.

I really loved using the Rambling Rose Cut File, combined with the flourish image from the A Spot of Tea !! It makes a stunning combination!
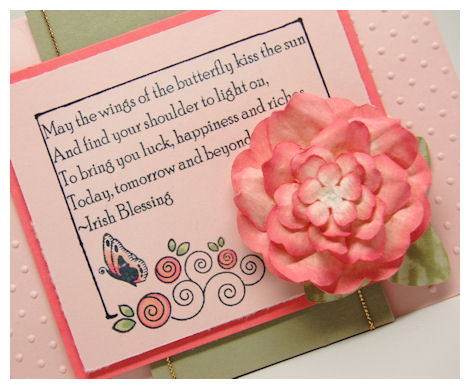
I drew a frame around the sentiment, which is from the All A Flutter Sentiments. I really love this sentiment, and has forgotten all about it until I got a birthday card from Pam! When I read it I was just like “WOW! I so love that sentiment. I swear I have that somewhere!” Then it dawned on me “DUH!! You MADE it into a set! LOL!” So I knew that was going to be what I wanted for my card 😀 I then obviously needed a butterfly (I swear I could use a butterfly on EVERY project and never tire of them) so I used the butterfly from Just For You set. I’m finding I turn to that set A LOT too 😀 I love incorporating older sets/products with the newer sets/products!
Next, you may have seen this on the website, so I figured it would be a good one to share (Plus I got some HOW DID YOU DO THAT? emails :D)
Now keeping the focus on that same rose bud flourish, from A Spot of Tea, I decided to make a “faux metal” embellishment for my candle!
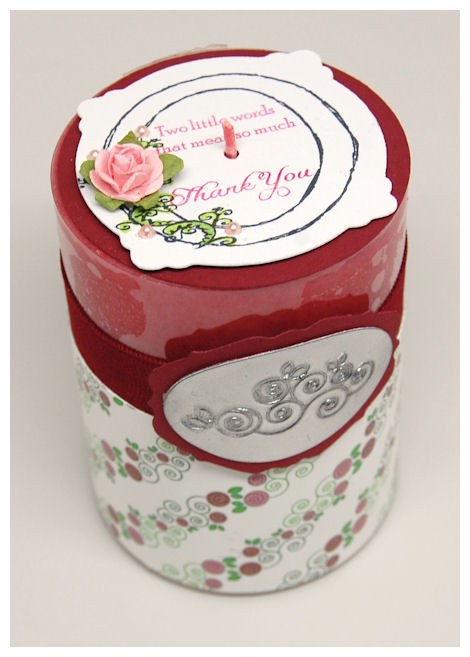
I knew I wanted to take a simple candle and “step it up”.
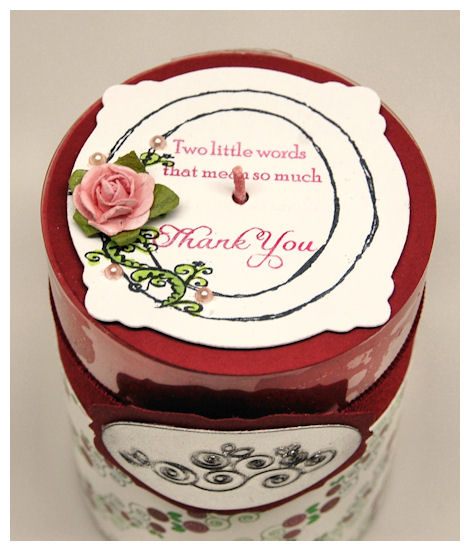
So, I made a fancy schmancy topper for the candle.
I used the Killer Curves Frame to cut my label. Then I stamped it with the Killer Curves : Fancy Framesborder, which I colored in with my Copic markers.
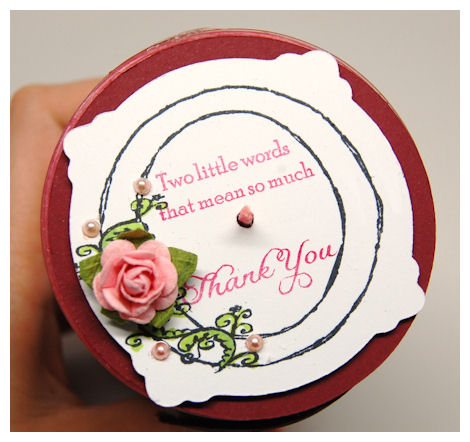
Punched a hole in the center, to pull my wick though, then stamped the sentiment from Sensational Sentiments. Note: you will want to punch your hole FIRST so you can ensure it is in the center! The stamps are clear photo-polymer, so lining things up is a breeze.
Then I added some pearls and a Prima flower! Love it.
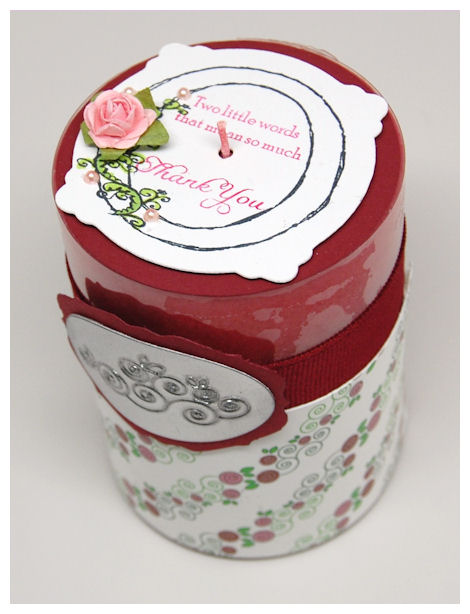
This was wrapped with the Tea Parlor: Bow Bells Lagoon paper. It was designed using the rose bud flourish so it is a PERFECT match! Love matchy matchy stuff!
How AMAZING does that look? Can you believe its NOT real metal?!
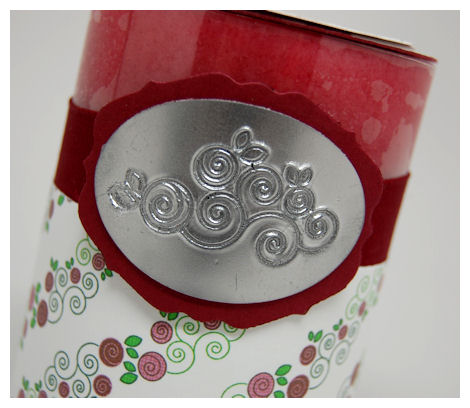
DIRECTIONS:
All I did want use my Versamark ink pad, smooshed it onto my cardstock. Ensuring lots of ink got on there evenly.
Layered on some Silver embossing powder, then heat set.
Repeat at LEAST 5 X’s-Smoosh ink pad, add embossing powder, heat set!
On the LAST time for the heat setting that last layer, make sure you ink your stamp in either versamark ink ,or you can use a permanent black for a cool look.
JUST as you finish heat setting QUICKLY stamp your image into the HOT powder!
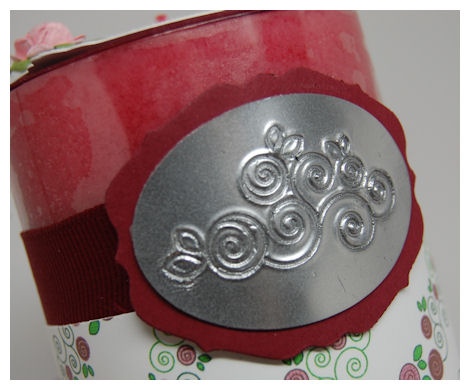
This is the look you get!
Pretty cool huh?
This just went from a sweet smelling $1 candle to being worth far more than that! And its OH SO PRETTY!
Well that does it for me. I have an Ice Cream Social to go to with the kids (I PRAY I can stay away from getting a scoop myself!).
I’ll be back really soon with more to share!
Thanks for stopping by and letting me share a piece of my world with you.

My Etsy

Who I Designed For
Blogroll
- Alicia
- Alli Miles
- Ally Blankenship
- Amber
- Andi @ crafts on a whim
- Angel R
- Angie Z
- Anne Kranitz
- Becky O
- Bee
- Beth Silaka
- Bethany Paull
- Beverly Nash
- Bobbie
- Cambria
- Cammie
- Card of the Week
- Card Positioning System (CPS)
- Cards for Cancer
- Catherine Doucette
- Charmaine
- Cheryl Sims
- Chriss Rollins
- Christina
- Christine Ewing
- Christine Wooden
- Colleen Schaan
- Craft Critique
- Craft Gossip
- Crystal
- Dawn Easton
- Emily Giovanni
- Geny
- Holly
- Igne Groot
- Inspirational Craft Blogs
- Irene
- Jami Sibley
- Jeanne Streiff
- Jen del Muro
- Jeni Bond
- JenMarie
- Jenn Balcer
- Jenn Diercks
- Jenn O
- Jennifer E
- Jennifer Mick
- Jennifer Pereda
- Jennifer-Sweet Treat
- Joanne Basile
- Jodi Collins
- Julia Stainton
- Julie Masse
- Karen
- Kathryn Berthiaume
- Katie Cotton
- Kelley Holland
- Kendra
- Kim Scholfield
- Kris’s Color Stripes! Get inspired here
- Kristen Dubosque
- Kristin Eberline
- Kristine
- Laura @ Sunshine Stamper
- Laura Turnmire
- Laurie Schmidlin
- Lesa Rapp
- Linda Duke
- Linda-LSN
- Lindsey Botkin
- Lisa (lakind scs)
- Lisa Kind
- Lori Craig
- Maggie
- Mara Campbell
- Maria
- Maria Levine
- Mary
- MaryJo
- Melanie M
- Monique Hansen
- Moxie Fab World
- Pam Imholz
- PaperCrafts Connection
- Peppers and Pollywogs Kids party site
- Rebecca Grohall
- Rita
- Robyn
- Rose Ann
- Sarah Vrolyk
- Sharon Harnist
- Sharon Johnson
- Sharon Rivera (a chemisrty with paper)
- Sherrie
- Sophia Landry
- Storage Units, Ink, & More Blog
- Sue Berker
- Susan (Rainy)
- Tangii Crane
- Tracy
- Tricia Traxler
- Trudee
- Velta
- VivLyn
- Zena
MTME Pretty Palette Color Team
MTME Pretty Patterns Sketch Team
My Time Made Easy TM LLC
Shop till you drop!
Lauren Meader
About Me
Copyrighted material
Subscribe To My Blog
Pages
- About me
- Alexa’s Story!
- My Crafty Corner!
- My Time Made Easy™ LLC
- Our Make A Wish Trip to Disney!
- Resume/Publication List
Calendar
Archives
- August 2013
- July 2013
- June 2013
- May 2013
- April 2013
- March 2013
- February 2013
- January 2013
- December 2012
- November 2012
- October 2012
- September 2012
- August 2012
- July 2012
- June 2012
- May 2012
- April 2012
- March 2012
- February 2012
- January 2012
- December 2011
- November 2011
- October 2011
- September 2011
- August 2011
- July 2011
- June 2011
- May 2011
- April 2011
- March 2011
- February 2011
- January 2011
- December 2010
- November 2010
- October 2010
- September 2010
- August 2010
- July 2010
- June 2010
- May 2010
- April 2010
- March 2010
- February 2010
- January 2010
- December 2009
- November 2009
- October 2009
- September 2009
- August 2009
- July 2009
- June 2009
- May 2009
- April 2009
- March 2009
- February 2009
- January 2009
- December 2008
- November 2008
- October 2008
- September 2008
- August 2008
- July 2008
- June 2008
- May 2008
- April 2008
- March 2008
- February 2008
- January 2008
- December 2007
- November 2007
- October 2007
- September 2007
- August 2007
- July 2007
- June 2007
- May 2007
- April 2007
- March 2007
- January 2007
Categories
- About Me
- All That Scraps
- blogger challenge
- camera/photo play
- Cards
- Contests
- family stuff
- FOR SALE
- Home decor/3-D items
- How to FAKE it!
- Introduction
- JUGS Challenge
- JustRite Stampers
- Lizzie Anne Designs
- My family stuff
- My Stamping Space
- My Time Made Easy
- My Time To Color Challenge
- My Time to Create Challenge
- My Timeless Template Challenge
- My Timeless Templates
- Mytime Mail
- MYTIME MOVIE/VIDEOs
- Papertrey Newsletter
- Pink Cat Studio
- Pretty Palette Challenge
- Pretty Patterns Sketch
- Product Opinions and Must haves
- Recipe's
- Saturday Sketch
- Smilebox Creations
- Stampavie
- Tutorials
- Uncategorized
- videos
Most Popular
- Create your own Onesie Card Tutorial-and important NOTE! PLEASE READ (2529)
- Saturday Sketch-Boxed bag holder (2333)
- Going GREEN! Fancy Flower Flourish-Closure Video (1478)
- Fabulous Favorite - Giveaway! (1336)
- a Prayer Request (1232)
- QUICK-Easter Baskets from Nestabilities-PTI style-and blog challenge (1063)
- Teaser Sketch (999)
- February Release Giveway! (and a little peek) (996)
- Group Post and Rambling Rose Video Tutorial (985)
- GIVEAWAY! Who wants it all?! (895)
Recent Comments (RSS)
- 첫충사이트: 완전히 흥미로운 블로그 게시입니다. 저는
- sarah: Wow, Lauren, what a stunning
- hedie: خرید راهبند
- 야동: Love to read it,Waiting For
- 야동: This seller is in a
- 바카라사이트: 여기 처음 왔어요. 나는이 게시판을
- 야동티비: I was surfing the Internet
- 바카라사이트: 비슷한 주제에 대한 흥미로운 정보를
- 바카라사이트: "여기에 제공해 주신 귀중한 정보와
- 온라인홀덤: 유익한 웹 사이트를 게시하는 데
Copyright © 2007 - My Time, My Creations, My Stampendence - is proudly powered by WordPress
This blog has been Tweaked and Designed by Sara Williams
36 Responses for "Makin Metal"
Super cool project–love the candle topper and the faux metal! And just think about how you can indulge yourself on your vacation after all that working out!
Hey Lauren, just wanted to give a quick note has nothing to do with stamping or crafts… I read the story about your mother a while back and this past Sunday a friend of my daughter showed up at my home in tears.. she had been dating a guy for aprox 9 months and they had broke up several times along the way and they would allways get back together … this time he punched her and threw her around and tried choking her… as she sat at my house she started to minimize it… she grew up in a home where abuse was present and even commented on her step dad was much worse… i pulled up your old article about your mom and made her read it … after several hours of talking to her she decided to file a report … and is now going to press charges… i just wanted you and your mother to know that you made a difference… by the way she is 20 and just absolutley beautiful young lady… inside and out… and they met in church … a wolf in sheeps clothes… and what upset me the most he used that to control her… make her think her family and friends were all devils out to get her… just very sad… but i praise God that she is finding the courage to change her future… not allways easy to do… thank you and your mother for sharing your story !!!!!
STUNNING _ love the card and the decorated candle is beautiful!!
I love your project Lauren!! Now I must get the Rambling Rose cutting file!! I love it!! Thanks for always sharing such creative ideas!! Blessings and Hugs!
I really like how you did the card.. and the candle too! ‘Thanks for the “how to” on the faux metal….really cool! Have fun at the social! I say, go ahead on the one scoop… you can make up for it tomorrow. 😉
Hugs and love,
Renee
Love, love, love the “metal” tag. I’ve never done any heat embossing, but now I’ll have to give it a try!
It looks good,I have learn a recruit!
ed hardy clothing outlet
cheap gucci outlet
cheap gucci outlet
ed hardy sale
ohhhhhhhhhh love that metal tag you created! Awesome look! GREAT way to dress up a candle! Fabulous set girl!
I love the look of faux metal. You take an ordinary item and make it look amazing!
I have no idea when it was created or posted but I just purchased Pick of the Petals to make for my sister’s bride’s maid gifts and I am doing a serious happy dance. LOVE LOVE LOVE This pattern…
HOLY MACKEREL! I thought that WAS metal until I started reading!!! AWESOME Lauren!
And Latrica’s comment made me cry. I’m so GLAD you shared that very personal story on your blog.
Hello!
Your projects are beautiful! With your talent and skill I have no fear that you may run out of ideas! :<) Love everything you do!
Wishing you a great weekend!
Barbara Diane
Beautiful card, gorgeous candle packaging! You are such an inspiration, Lauren! I hope the ideas keep filling that creative brain of yours because we all benefit! Take care of that beautiful body of yours…it encloses such a loving, caring, awesome spirit!!!
All gucci shoes Outlet are made from superior material and crafted carefully and intricately to ensure the best quality. Gucci shoes are some of the finest designer shoes on today’s market. As leaders in high fashion, Gucci’s line always features the latest, most stylish shoes. As they are high in demand and well-made, gucci sneakers For Sale garner expensive prices. You can, however, find more affordable Gucci shoes, if you know where to look
Beautiful card and love the metal look accent you added to the candle. Just lovely!
I really like this. Please continue the great work. Regards.
Fabulous Lauren – so glad you “rediscovered” your sentiment LOL Love the metal look. Great release this month.
Christian Louboutin pumps strange that the change in the name of the woman in the verb. It has allowed women to show their best form
Your projects are beautiful! With your talent and skill I have no fear that you may run out of ideas! :<) Love everything you do!
how lovely!
Hey,are you interested in caps?Pls link my name.
Thank you for the information provided, of course, everyone’s interests and hobbies are different, but I think I have always liked this content, also has been concerned about this content, of course, hope to be able to see this article and more, and perhaps To send a lot of time and effort. But the content is my favorite. Thank you!
Nice topic and post, as we were just talking about what things can happen in the medicine industry.
I would like to thankx for the time you have contributed in composing this article. I am hoping the same best blogpost from you in the upcoming as well.
foundation, search no more, these are what you will have been searching for
Dear friends, thank you for visiting our website ,we are an international trade company,which specializes in http://www.hats-trade.com.We at competitive price,providing a huge range of hats of different teams,such as Arizona Cardinal, cheap new era cap,Atlanda Falcons ,Baltimore Ravens,etc.You can buy cheap caps. Welcome to visist here.
I really enjoyed this post, especially the “examples in this post” portion Chicago White Sox Hatswhich made it really easy for me to SEE what you were talking about Los Angeles Dodgers Hatswithout even having to leave the article. Thanks
First off I want to say great blog! I had a quick question in which I’d like to ask if you don’t mind. I was interested to find out how you center yourself and clear your thoughts prior to writing. I have had a tough time clearing my mind in getting my ideas out there. I do take pleasure in writing but it just seems like the first 10 to 15 minutes are usually wasted simply just trying to figure out how to begin. Any recommendations or hints? Many thanks!
I was interested to find out how you center yourself and clear your thoughts prior to writing.
One again, Keep working. Thanks. . .
There is a popular and fashionable element, our goal is to be popular and fashionable vane, offer the best products and service, the most preferential price.
There is a popular and fashionable element, our goal is to be popular and fashionable vane, offer the best products and service, the most preferential price.
uniform. It implies that you can not present the folks
thank you so much for these post…. could you explain all about shot blasting machine on your new next post?
aluminium fabrications
Fantasy Power 11 if you have a good knowledge of Cricket you Can earn real Money or Paytm Cash. Download Link And Review If You have Skills related to Cricket, Football, Kabaddi Basketball so you can Play Fantasy Cricket in Fantasy Power11 and win Real Cash.Fantasy Power 11
Leave a reply