Archive for March, 2010
Don’t forget to enter our giveaway! —>CLICK HERE FOR DETAILS
Today Catherine Doucette has a super cute and amazing project for you…..
Words from Catherine:
One of the many things I love about Lauren’s templates, is how you can create many different things with the same template…you just need to use your imagination! Hop on over and take a peek at what I thought the “Cute Lil Chick” cut file looked like :0)
Be sure to stop by and visit Catherine Doucette
Now it is my turn to share…….
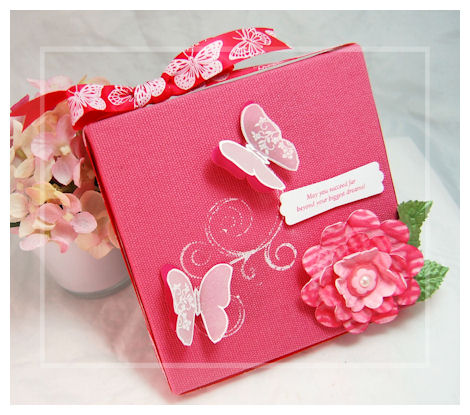
Big Dreams Canvas
Now how about creating your own canvas? Something inspirational that makes you smile.
Your stamps and papercrafting supplies can be used for SO many amazing creations! Don’t limit your creativity to just cardstock.
There is nothing like taking your materials and making some amazing wall art! It can be SO SIMPLE and still be a WOW!
It is so fun to personalize your home and or workspace or make something inspirational. I love creating “wall art”.
I recently found this pink plain canvas at Michael’s. I fell in love with the color, and knew it wouldn’t take much to create some wall “art”.
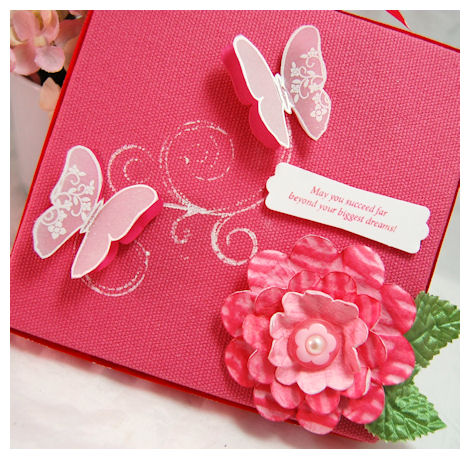
“May you succeed far beyond your biggest dreams”
This sentiment is from the So Sentimental © set. I love it! Now talk about inspiring.I stamped it in pink ink, onto a punched label.
I used some Making Memories paint and “painted” on my large swirly flourish from Fanciful Flourishes ©.
I then cut some sweetheart colored cardstock using the Flutters and Flowers Cut File © and layered it onto my canvas, where I wanted my butterflies.
For my butterflies I used the outlined butterfly image from the All A Flutter © set. I stamped it in versamark onto vellum cardstock. I then used some detail white embossing powder and heat set it. I also used the small flourish image from the So Sentimental © set, and stamped it on one side of the butterfly wing on either butterfly. Once cooled, I cut out the butterflies and adhered them to my canvas over the cardstock butterflies, using a clear glue dot
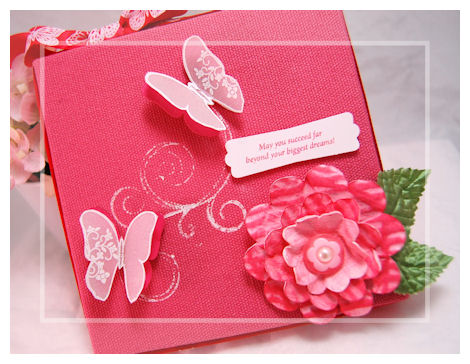
My flowers were created using the NEW! Fanciful Flowers Cut File © I used one of the scallop flowers in the set. I love making my own flowers.
I cut them from white cardstock. I cut each set of petals (3 total) resizing to 75%. I used some paint to “paint” my paper. Once dry, I ran them through my crimper in various directions for a fun texture, and distressed look. To complete the look I sponged on some ink. Each one is layered with dimensionals.
Once the flower was complete I added it to my canvas!
I tied on some butterfly ribbon I purchased at Michael’s a few months back. Just that little something extra
This project took about 25 minutes in all.
This will look so amazing on the wall of my girls room. To think it cost me only $2.50 to make!
I hope you give this a try some time 😀
Supplies:
Pretty Impressions stamp set: So Sentimental, Fanciful Flourishes, All A Flutter
Pretty Pieces Cut Files: Flutters and Flowers, Fanciful Flowers
cardstock: Couture Cardstock sweet heart and vellum
button, pearl, label punch by SU!, paint, canvas
Come back by tomorrow because our entire team has some more samples for you to keep you drooling and get those creative juices flowing!
A Happy Life
Mar 6, 2010 Author: mytime | Filed under: Cards, Home decor/3-D items, My Time Made EasySorry this is late.
I had much to do and I am caring for my 1 yo niece! I forgot how much they fill up the day and that you can’t turn your back for a SINGLE second! Thank goodness I have 3 of my own helpers! It has been a while since my own children were that small. I often wonder how I got anything done. I so enjoy having her. She is just the sweetest thing on 2 lil feet.
OK projects for today…..you need to go and see Tracey’s project! You are sure to be inspired. Also check out her projects from earlier in the week 😀

Words from Tracey:
“Even though I have girls, I do have LOTS of nephews, and I enjoy making things for them as well, though I think I’m naturally inclined towards girl stuff, lol. Today I have a twist on an old favorite, and something new…”
You won’t want to miss it—-> Visit Tracey Cuccia <—-click there
Now for my project.
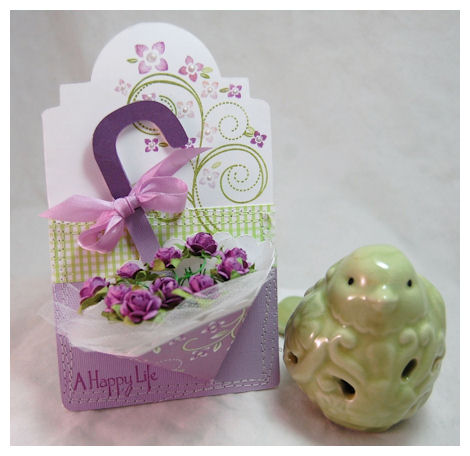
A Happy Life
Now that saying says it all doesn’t it?
This is a sentiment that I have personally always wanted. I feel that it is a wonderful “wish” for someone and is perfect for a few occasions such as New Home, Marriage, Wedding Shower, New Baby, even a promotion….any new beginning. So Sentimental © is sure to have something to suit every occasion.
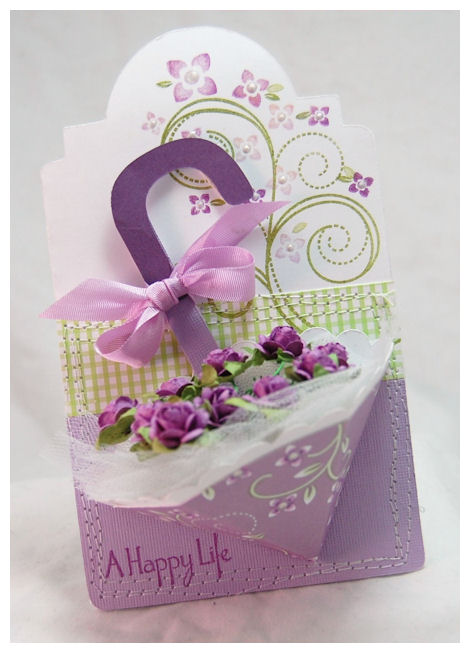
I have a bridal shower to attend in a couple of weeks and knew that was just the sentiment for my card. I am giving a gift card to one the the places that they registered. Since it is a bridal shower I decided that the It’s A Shower © template would make the perfect focal point for my card.
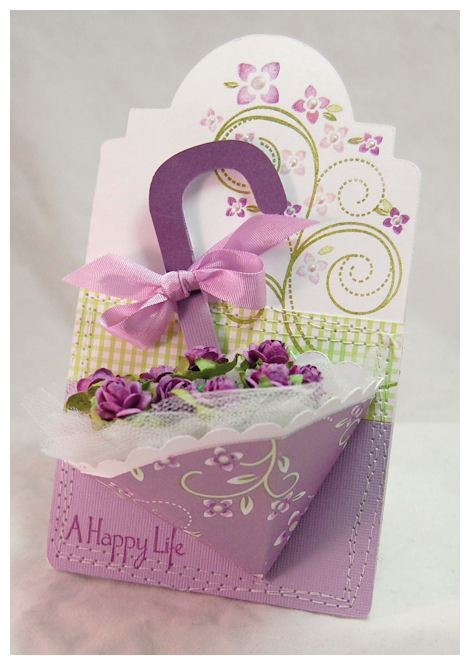
I used one of the tag shapes from the Tag You’re It © Cut File (also available in PDF) and welded it to another tag to create my tag card! That is something that is fun and easy to do. I really love the shape of this too. I resized this one to be about 4 1/2 inches wide (and whatever that converted to tall! LOL! Just click “maintain proportions”). Normally I like to resize by percent to ensure all my pieces are the same scale. For this, since I was doing a card with the same shape it was easy to just use “inches”.
I layered on my Ga Ga for Gingham ©paper and Carousel cardstock layer. I then stamped my flourish from the Fanciful Flourishes ©stamp set. I added liquid pearls to the flower centers. I then got to sewing! I just went around it 3 x’s in a whimsical pattern. Then I stamped my “A Happy Life” sentiment from So Sentimental©.
Now for the umbrella…
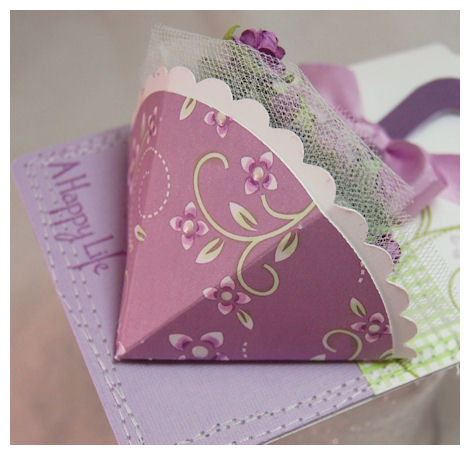
I resized my It’s A Shower © Umbrella and all the pieces to 60% the original size. I mentioned when this 3D It’s A Shower © Umbrella was released that it could also be used on cards, so here it my sample!
I created my umbrella from the Fanciful Flourishes © paper in Fortune Teller. Prior to assembling, I added the scallop layer in white. I used my copic markers to lightly color in some of the white in flower pieces on the paper! It was PERFECTION!!! Then I added some liquid pearls to the flower centers. Once dry, I assembled my umbrella template, making my back piece flat, so it would adhered flat on to my tag card.

I then filled my umbrella with tulle, and some tiny Prima roses I had. Then attached to my tag shaped card base.
I think this looks so stunning! It is perfect for my gift card.
I am wrapping this in a gusset cello bag, and tying with some lavender floss. DONE!

I really loved how this turned out, and think it will be much appreciated. It isn’t your typical card.
BRIDAL SHOWER TIP:
To accompany my gift card….I am making the larger 3D version of this template for the actual shower as well. The idea for it is that each guest is filling out a slip of paper with either their marriage wishes for the couple, or marriage advice! Once everyone has thier slipped filled out, I will wrap the tuelle around it (like in the store sample) and they can treaure all the advice for many, many years to come.
Supplies:Pretty Packaging © template: It’s A Shower
Pretty Impressions stamp set: So Sentimental, Fanciful Flourishes
Cardstock from Couture Cardstock:OSW white, Carousel
Matte Photo Paper (super for printing digital paper :D) Printworks Matte Photo Paper (Target)
Pretty Impressions Digital Paper: Fanciful Flourishes, GaGa For Gingham
Pretty Pieces Cut Files: Tag You’re It
Tulle, Prima Flowers, Liquid Pearls, Ribbon from MS, sewing machine
Thank you for coming by and seeing another day of projects! I still have much to share too 😀
Please return tomorrow for even more ways to use the products from our latest release at My Time Made Easy ™ LLC
GIVEAWAY ALERT!! Do you want to be featured?
Mar 5, 2010 Author: mytime | Filed under: Contests, My Time Made Easy2 posts today-so scroll down.
ATTENTION ALL MTME CUSTOMERS!! This is a giveaway post! So read all of it.
We have a giveaway! (well 2 actually) But we want to see YOUR samples!
Once you enter (details below) I am going to pick my favorite project and they are going to win our ENTIRE April release!! That release will be valued at almost a $100! Your project will also be featured on our websiteas a sample with a link to your blog/gallery!! So do your best work.
What is the additional Give Away?
Canda Craft is sponsoring a give away of the SURE CUTS A LOT!! This is the additional software needed to utilize SVG files. It works with ANY of the Cricut Machines and you are able to resize all our templates/cut files 😀
The winner of this giveaway will be chosen via www.random.org
(NOTE: All our templates ARE available in PDF too as well as SVG, GSD, DXF, GSD)
This software is an AMAZING value!! All you have to do to enter to win is something we ALL love to do-CREATE something!
How do you enter to win?
Link your creations on Katies Blog —->HERE!
Make ANYTHING using ANY of the My Time Made Easy™ LLC products.
You don’t HAVE to spend money to enter. We have a FREE Pretty Packaging template called Cutesy Cover, a FREE set of Pretty Printables Paper and a FREE Digital stamp image called Water & Waverly Wiggles! So no reason not to play along.
You have until the 8th to make your creations-so what are you waiting for?
Non-Traditional Baby Boy
Mar 4, 2010 Author: mytime | Filed under: Home decor/3-D items, My Time Made EasyToday our Design Team member Kristin Bueter has some cards for you to view! You won’t want to miss the versatility she shares with you today using ONE lay out and 4 different color combination/patterns.
——————————————————————-
When you think baby boy you generally think BLUE. It is the obvious choice, and let’s face it, perfect!
I really enjoy making gifts using some non-traditional colors at times. You can get inspired to use new and fun color combinations by browsing clothing! Obviously clothing has all the latest color trends and combinations you may never have envisioned.
Take this sweater I saw at Target
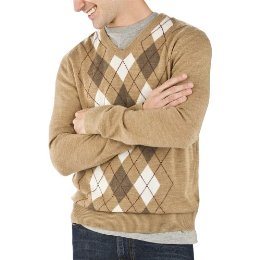
This is one of those times that I used a clothing item to inspire a gift. You most likely wouldn’t look at this and think BABY would you?
This is what the outcome would possibly turn out to look like if you did!
Baby Boy in Brown
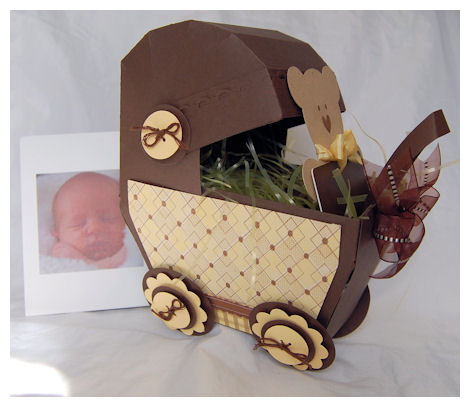
How is this for a boy themed carriage?
I used the Bouncing Baby Buggy © for this creation.
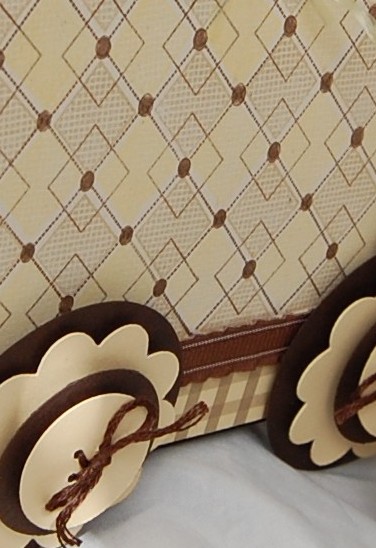
I used my Argyle Amazement © set to create the pattern on the carriage panels. I used the squared pattern in one of the diamonds for some texture. For the bottom portion I used GaGa for Gingham paper. I printed the brown pattern on Nomad cardstock.
Sure Cuts A Lot software recently upgraded their software, and now it has a super new baby selection shapes! (Just in time for my release :D) ENTER TO WIN a SCAL program at Katie Cotton‘s blog!!
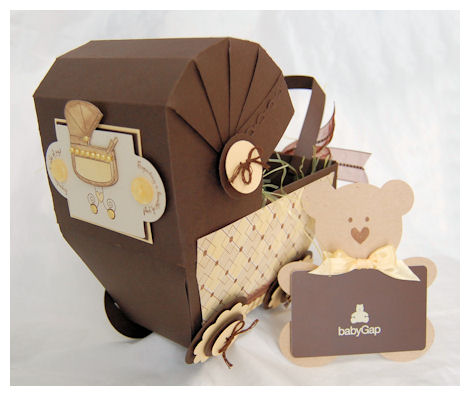
I used the button image from the baby file for my wheels and carriage hood detail. It was perfect! The scallop shaped are from our NEW! Fanciful Flowers Cut File. We have a super scallop like flower shape in there 😀
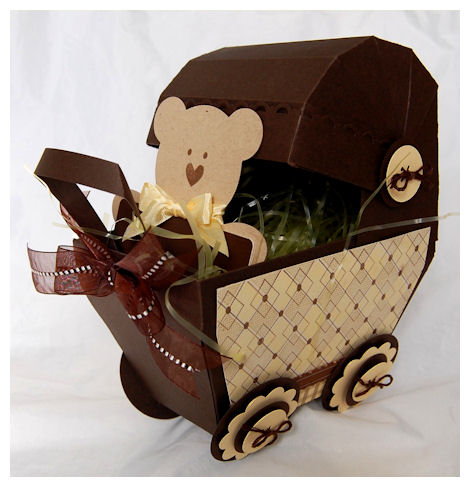
Now look at that CUTE teddy bear!
I was really inspired by the BABY GAP gift card I purchased for our friends recent birth of a sweet baby boy name Milo. It matched my color scheme to perfect too! Don’t you love happy accidents?
I wanted to put in in this carriage but didn’t want it to get “lost”. So, I cut the bear shaped file from my SCAL software to adhere the card to. I couldn’t leave it plain…….so I did this
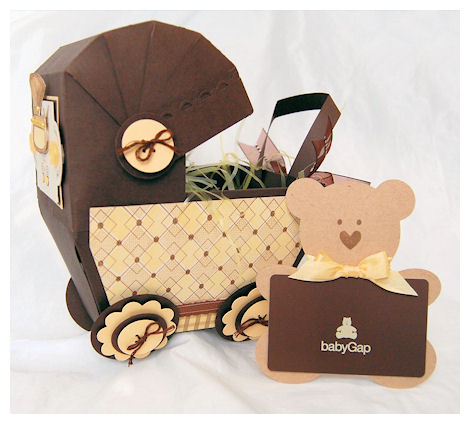
I made him about 4 inched from Kraft cardstock. Just like the bear on the gift card I used the dots from the Argyle Amazement © set, and the solid heart image from the You’ve Got Mail © set to create his face. Tied on some butter yellow ribbon from Martha Stewart and BAM! Adorable baby card holder, that looks ULTRA cute sitting IN my carriage (with yellow Easter grass)!
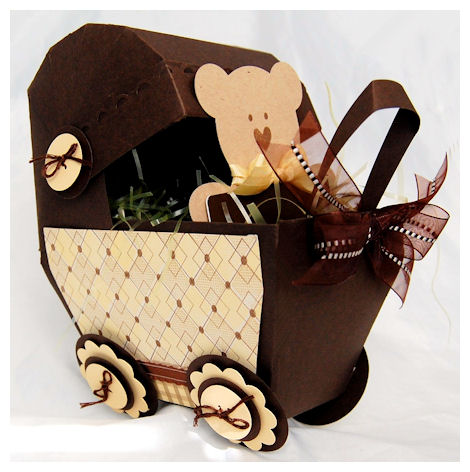
The ribbon in the front is by May Arts too. it’s a stitched brown ribbon. I’m in love with May Arts! They are in CT so I get my stuff in LESS than a day! I kid you not. I order in the afternoon and its on my doorstep at like 9:30 am!
OK focusing back on the project….
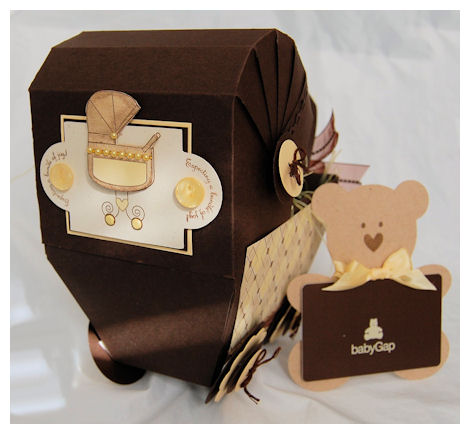
The back of the carriage is the perfect place for adding a tag or personalizing!! I used the NEW! Tag You’re It cut file for the back tag on this one. I stamped some images from Bringing Home Baby ©. This set really is SOOOOO cute and perfect with this template too!
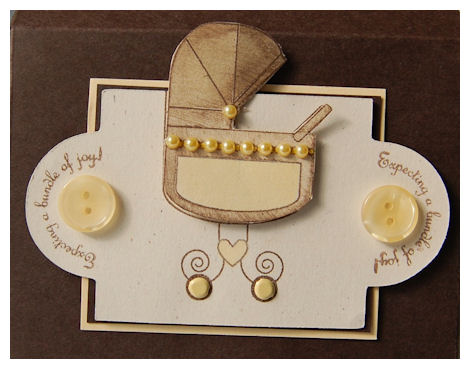
Here is my tag detail.
The sentiment “Expecting a bundle of joy!” fits in this tag perfectly!! Of course I made the carriage 3D. It is easy to cut out the top portions. I added brads to the wheels. I made my carriage from Kraft ink then “distressed it” Yellow pearls were a simple touch.
You could write the baby name in the carriage base too! (I did that later)
So now we have a personalized gift for a new bundle of joy.
Go searching store of catalogs to inspire your next FAB creation!
MTME has everything you need to make coordinating your own personal cards, gifts and tags easy and affordable!!
Thanks for stopping by.
Supplies from todays post:
Pretty Packaging © template: Bouncing Baby Buggy
Pretty Impressions stamp set: Bringing Home Baby, Argyle Amazement, You’ve Got Mail
Cardstock from Couture Cardstock: Oat, nomad, ganache
Pretty Pieces Cut Files: Tag You’re It ©, Fanciful Flowers
SCAL pieces: Teddy Bear & Buttons
May Arts & Martha StewartRibbon, embroidery thread, adhesive pearls, buttons
Super Quick, Super Simple and Still Something Sensational
Mar 4, 2010 Author: mytime | Filed under: Home decor/3-D items, My Time Made Easy(Sorry this is late! I hit the wrong post time-I set it for NOON instead of midnight! OH! BOY!!)
Sometimes you need to keep it simple!
Not every projects needs all the bells and whistles of layering and fine detail.
Let’s face it, we don’t always have a half hour (or more) to spend creating something. Sometime we have maybe 15 minutes. MAYBE! Just because you have little time doesn’t mean you can’t make your own packaging and still make it special.
I decided I would share with you a “under 15 minute” creation using the NEW! Card Catch All © template and Fanciful Flourishes © stamp set. Honestly this box went together quicker than MOST cards I make!!
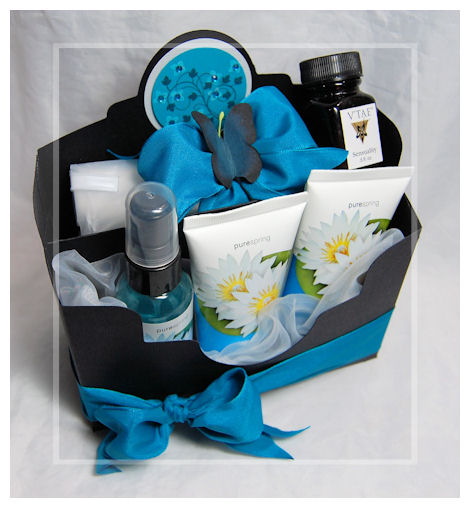
Taken with Teal

Now this went quickly because my Cricut did the cutting! That right there it saved me time.
I cut my Card Catch All © and the All A Flutter © butterfly (resized) from Black Lineal cardstock. That texture alone dressed this up (you cannot see it in the photos) It went together in MAYBE 4 minutes.
I tied around a teal wired ribbon from May Arts. I wanted a SIMPLE WOW factor so I used my gift as my FOCUS and color inspiration, rather than embellishing and having my packaging be the initial focus and WOW!
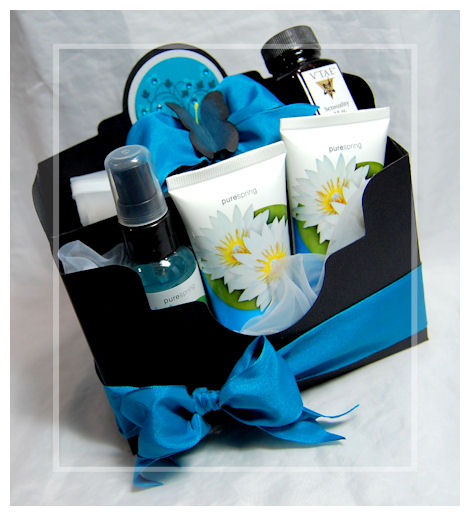
Look how the colors of my bath set stand out against the black. My template base is just plain colored textured cardstock. Nothing fancy. The simple teal bow picks up the colors in my bath products and really adds to the plain box.
Now the box DESIGN itself is very elegant, and can stand alone because of its killer curves!! You will definitely fall in love with it.
Inside this box I did utilize the divider.I have body wash, body lotion, body spray and in the back a large bag of bath salts with a Serenity bath oil!
Perfect gift set.
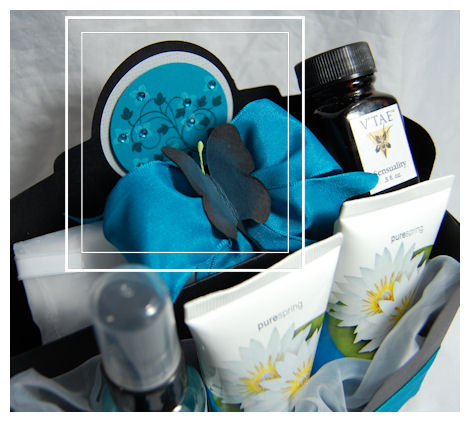
My only “decoration” on this box was the circle tag I stamped in black using one of the leaf flourishes in the Fanciful Flourishes © set. I added the smallest of the flowers to the flourish in white raft ink, the added adhesive rhinestones that I colored in teal to match my project. I punched it out with a circle punch, and layered it onto a piece of white vellum, then adhered to the back of the template. That set makes gifts like this so simple. I LOVE that set!!!
The butterfly was “colored” by dabbing on some versamagic ink in a teal color. I added some stamens to the back, then adhered it to the bow that was tied around my bath salts bag.
All under 15 minutes!
Now we do have another project for you to view today! Keeping it simple…..
From Pam Imholz

Here is what Pam had to say
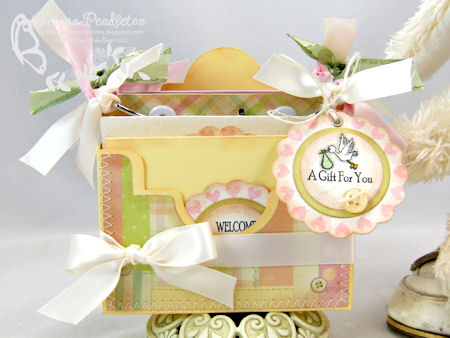
A tisket a tasket…
A pretty birthday basket…
Yes girls I have “A Gift For You” to share today so stop by and see a
simple birthday basket for that special someone in your life. 🙂
Visit Pam Imholz for the full project and details!
Here are the supplies from today’s project:
Supplies:
Pretty Packaging © template: Card Catch All ©, All A Flutter
Pretty Impressions stamp set: Fanciful Flourishes ©
Cardstock from Couture Cardstock: Black Lineal and Lagoon
Ink: Black and craft white
Other : May Arts Ribbon
As always thanks for stopping by.
Tomorrow I will have some more eye candy for you as will one of our designers! See you then!
From a baby buggy, to a Easter Basket….from a basket to a boat…then from a boat to a barrow!
Mar 2, 2010 Author: mytime | Filed under: UncategorizedThere is just SO much that can be done with this month’s release!
Today Mona Pendleton is sharing something special!
Be sure to check her out!
Also Katie Cotton has a GIVEAWAY on her BLOG for the SCAL software!!! This comes courtesy of CandaCraft! If you have been wanting the software for your Cricut, so you can cut SVG files the go head on over and enter to win!!
OK time for my project!
I’m so excited.
I know many of you are intimidate by templates still. You really don’t need to be. ALL my templates come with very clear step by step written directions with photos. It really is easy, I promise. We even have a FREEBIE for you to try risk free!!! We have a freebie for our templates, digital paper and digital stamps! If you try it and need help or have a question, just email me! I do my best to help any/everyone to the best of my own abilities 😀
I encourage those of you who have tried my templates to write a review on our website! This is really helpful to others! Simply click on a product to read a review, or write one yourself. There are tabs to guide you.
OK speaking of templates……
Bouncing Baby Buggy ©© is an especially versatile template! I have so many ideas for it, my head just SPINS!! I know many of you are still seeing “child themed” projects, given the samples you’ve seen thus far, and the template “name”! I hope today will totally change your mind.
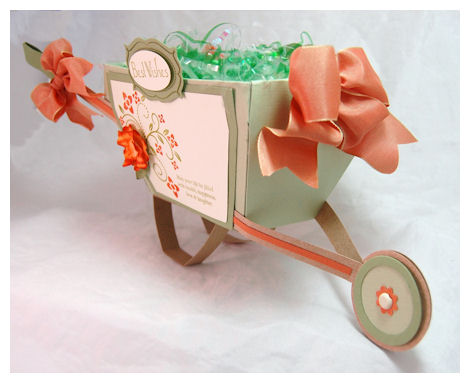
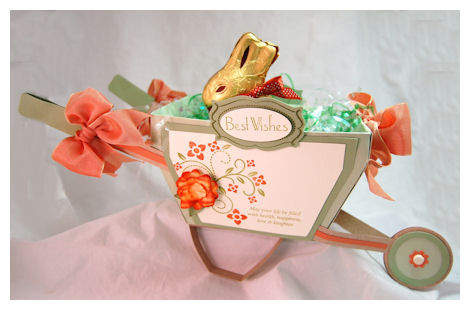
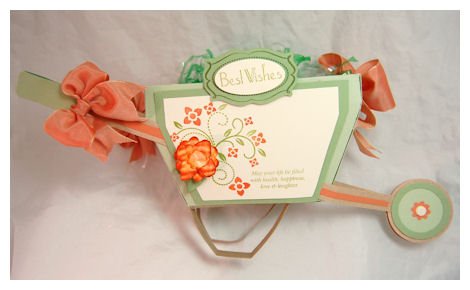
How about using the Bouncing Baby Buggy © template to create a Wheel Barrow??
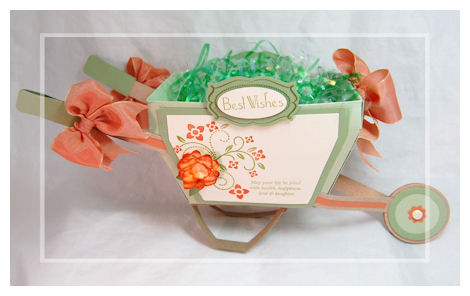
Yes! This is seriously a Wheel Barrow made purely out of cardstock 😀 Isn’t it SO pretty! I about did a cartwheel over this one!
This template is so perfect paired with our newest release So Sentimental © and the Fanciful Flourishes ©Pretty Impressions stamp set! Those two sets are a match made in HEAVEN!! So many ways to use them both, and they were designed to coordinate too (like everything we do at MTME!)
The colors used are Santa’s Beard, Pasture, Thistle Stalk, Acorn Squash and Oat are perfect for Spring. I’m so in love with these colors. I am also in Love with Couture Cardstock! They have GORGEOUS textured papers and amazing colors to choose from. I feel like I have been able to add even more WOW to my projects with all the colors I have now.
I pulled up a photo that I GOOGLED of a actual wheel barrow when creating this. My first attempt was true to the actual wheel barrow style, and the wheel/handle bars were on the outside of the template.They covered my stunning design so I made them go under my decorative layer for my new and improved version!
The wheels are the same wheels (for size comparison if you were wondering) you receive in the template. I just made mine purty 😀 That STUNNING May Arts ribbon helps too.
This could easily be for a Wedding, house warming, gardening party….tea…..anyone!!!
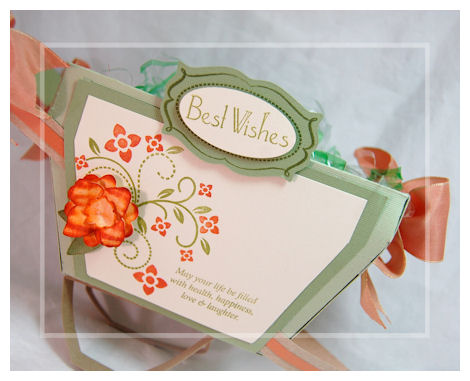
Here you can see a closer view of the flourish pattern stamped in a green, and the added flowers stamped in rusty orange. It was so quick and easy but really POPS. I love that I can build my flower pattern, or choose no pattern at all.
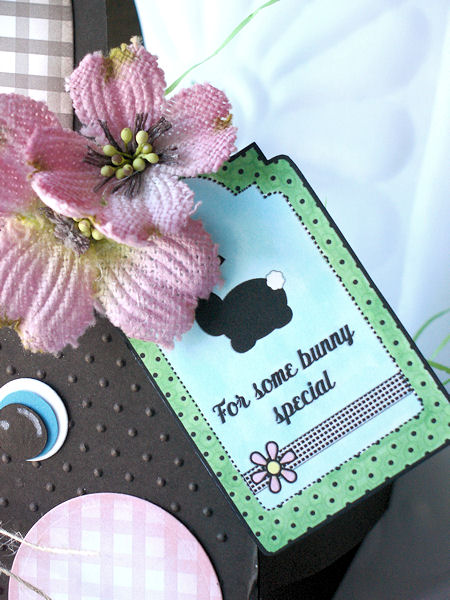
The “Best Wishes” and sentiment from are So Sentimental © . The tag was cut using the So Sentimental Frame which is a perfect match to our set!! It makes the perfect cut every time 😀 The oval is created using a SU! Oval punch. Quick and easy.
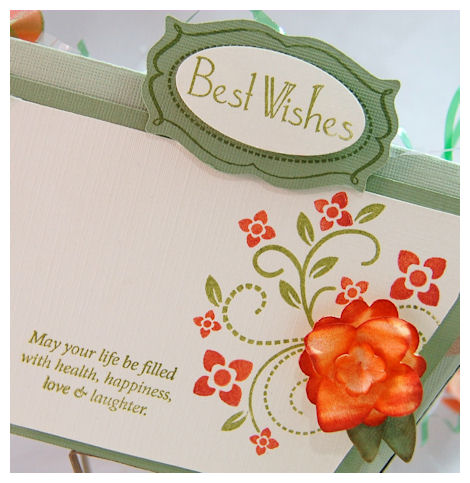
Look at this GORGEOUS flower that I created myself to add to the flourish! The flower was created from our coordinating cut file Fanciful Flowers I will be taking some time soon to show how I create these. I think it really adds to this project.
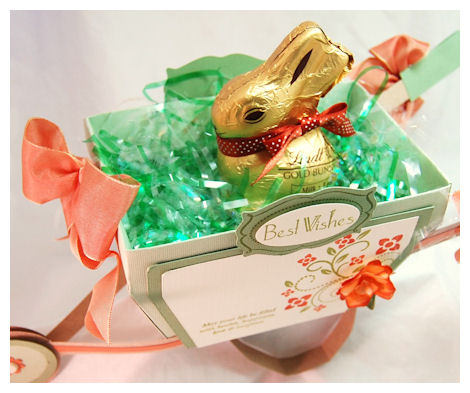
When I think gardens I think bunnies! So I added a delicious Lindt Chocolate bunny to my Wheel Barrow
He come with a red ribbon around his neck……

I removed it an added my own to match my project.
I did put a block inside do he didn’t fall to the bottom! LOL!! It is now hidden by grass! Now is the time of year to stock up on “grass” filler too. I use it all year round.
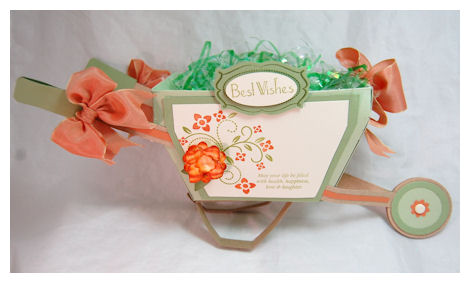
This is the other side of the wheel barrow.
It is ALWAYS important to make your project look complete on all side. Don’t get lazy 😀 or messy!
This could also get filled with flower/vegetable seeds, maybe a small planter?! You could fill this up with all sorts of yummies.
Or just like me…this cute lil chocolate bunny.

Here are the supplies from today’s project:
Supplies:
Pretty Packaging © template: Bouncing Baby Buggy ©
Pretty Impressions stamp set: So Sentimental ©, Fanciful Flourishes ©
Cardstock from Couture Cardstock: Santa’s Beard, Pasture, Thistle Stalk, Acorn Squash and Oat
Ink: Studio G ($1 at Michael’s)
Pretty Pieces Cut Files: So Sentimental Frame, Fanciful Flowers
Other : SU! Brad, May Arts Ribbon, Copic Air Gun, Paper Crimper, corner rounder
As always thanks for stopping by.
Tomorrow I will have some more eye candy for you as will one of our designers! See you then!
It’s a Boy, It’s a Girl….its a perfect baby set!
Mar 1, 2010 Author: mytime | Filed under: Cards, Home decor/3-D items, My Time Made Easy OK I’ve been pushing all limits and creating all sorts of samples that I am hoping are getting you inspired to create! I am just giddy over the projects that I have shared, and what is to come. It truly just gets better and better. Are you enjoying the samples so far? Now lets get down to business!! The new arrival!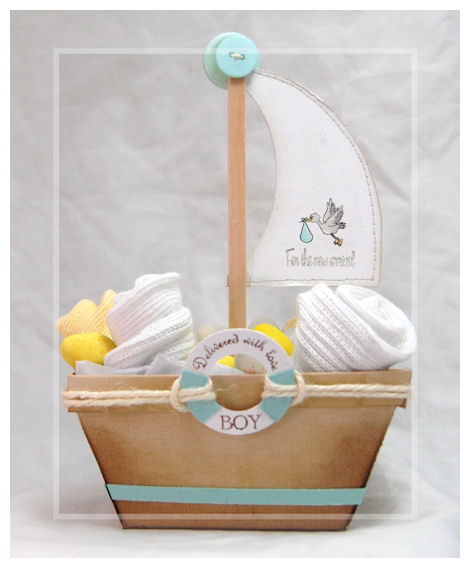 Today I want to share with you some ideas using my NEW! Bringing Home Baby © set, and I thought this was *uber* cute!!!!!!! I’ll get back to this project in a minute! Today Katie has an AMAZING sample to share with you using our precious Bringing Home Baby © set! Take a look!
 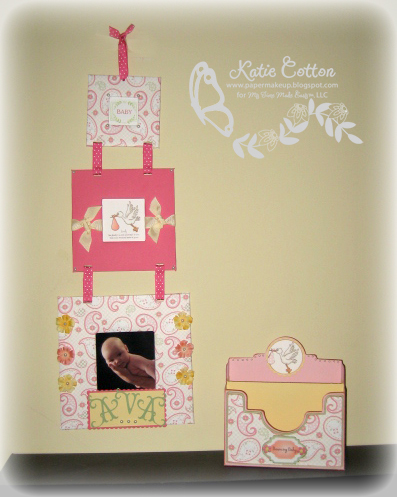 Words from Katie:
I adore anything baby so when i saw the oh so cute templates, stamps and papers being released this month I was over the moon with happiness! And since I don’t have any girls myself, i particularly like making girly baby gifts! This is the perfect addition to a new baby room! Check out my Baby Catch All with matching wall art!
So be sure to check out Katie Cotton
Now even if you don’t know someone who is having a baby this set is still AMAZING 😀 If you purchased the Bouncing Baby Buggy © template you will definitely want this set too!! 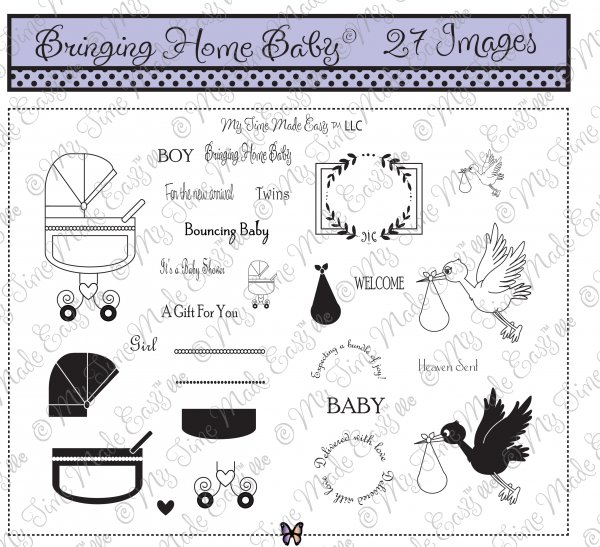 So many options!! There is an amazing group of sentiments here. Open line art for those who love to color, and of course solid images for easy color fill-ins, or those who’d rather not color. There is just so much you can do with this set. What is not to love? If you have NO other baby sets, then this it THE ONE. Even if you do have other baby sets I’m certain this has something NEW! or special to offer to your collection :DNow on to boy themes.Many “boy” themes and gifts can be difficult. This set has made it easy for me to get inspired to finally do some BOY stuff!! Now a lot boy themes fall around “boat/sea/beach” and I thought that using the Bouncing Baby Buggy © template to create a sail boat would be PERFECT!! OK I was honestly challenged by Kristin to do it, and after about 20 minutes this was done 😀
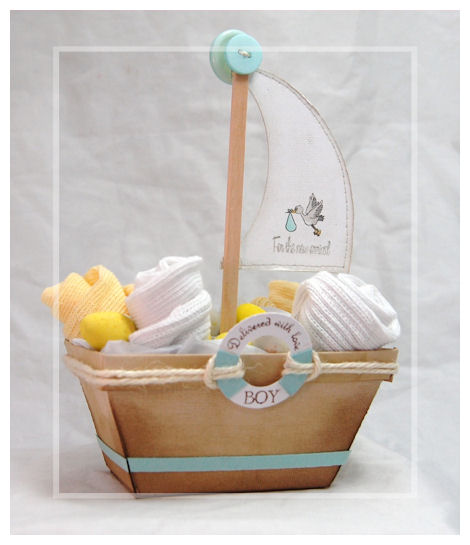 YES! That IS the Bouncing Baby Buggy © template!!! I just cut it down,about 1 inch above where it tapers…..scored at a 1/2 inch in, and folded the top over to the outside.I told you this template was VERY versatile! I have much more to share with that soon :DI sponged the edges for a rustic look 😀 Added a simple cardstock strip around the bottom.My son is named Noah. I would have LOVED something like this back then! (I didn’t papercraft at that time). I’m sure I could make this an ARK now that I sit here typing!!!! OH!! I may just do that as a personal challenge!!! Sorry, my brain went in another direction-like it usually does. One idea sparks another…..My sail….
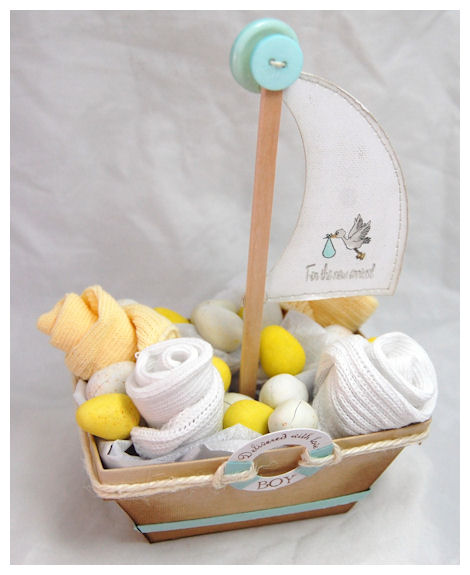 (Note: honestly I had NOTHING baby on hand so I put in some booties and cadbury eggs. Sorry! LOL! But sometimes you have to improvise! LOL!)I had a craft stick, which I stuck into a Styrofoam egg (cut in half). I hot glued that to the bottom of my sailboat.
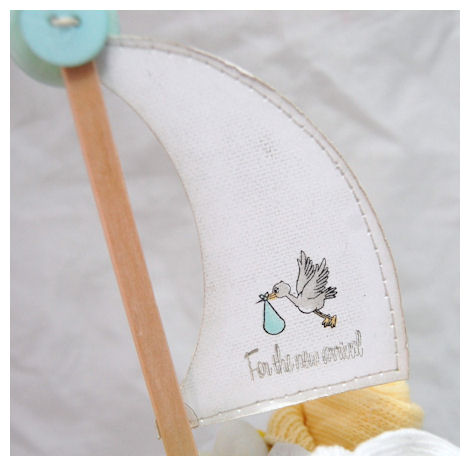 Hand cut with sail using my Coluzzle oval template. Stamped my adorable mini Stork image ( I so truly LOVE it!!!), which was colored with Copic markers. I then faux stitched it and applied a linen bkgd stamp to it. WAY TOO EASY!! You can make a TON of these. Adhered it to the stick with clear glue dotsIs this not AMAZING???
  I created a life saver (whatever that thing is called!) using the sentiments in the set, combined with some circles I cut! Isn’t that a cute idea? May Arts has some natural burlap that I used to tie it on to my boat (adding dimensionals of course). I am in love!Now how about a card? Now all these coordinating stamps/templates/paper/and cut files are meant to make the entire process of papercrafting FUN, EASY and AFFORDABLE! You don’t have to use them on *just* templates!!They make perfect cards too!How about the Boy themed card?Little Boy Blue…..
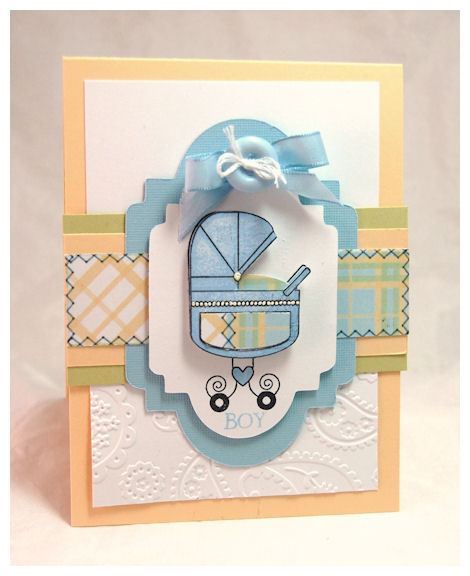 This carriage is ADORABLE! Its so cute and easy to use.I stamped the outlined carriage, then stamped the solid carriage pieces inside for EASY color. I did cut it out and put it on dimensionals too. I believe in using as much dimension as possible. It really makes a card!
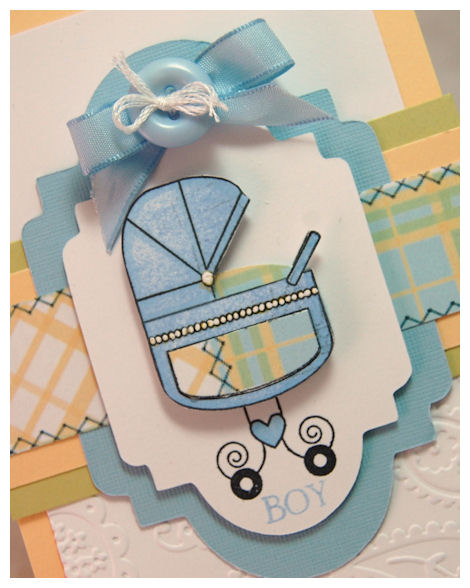 Many of the sentiments were designed to fit in the center panel of the carriage!! I decided to use the Bringing Home Baby Boy © themed Pretty Printables paper for this! LOVE IT! It already looks stitched so the hard part is done 😀 Many of the patterns AREN’T just for baby! Be sure you check them out.
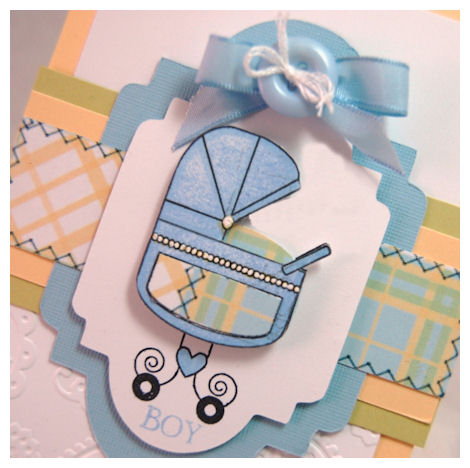 I used a small SU! oval punch to create what looks like a baby in a blanket inside the carriage too! That was so simple but really adds to this.I used the Tag You’re It © cut files for this. I just resized the white layer to may my larger tag cut from blue. Easy peasy!Now you KNOW I had to throw a girly card in here too! Thank Heavens for Little Girls
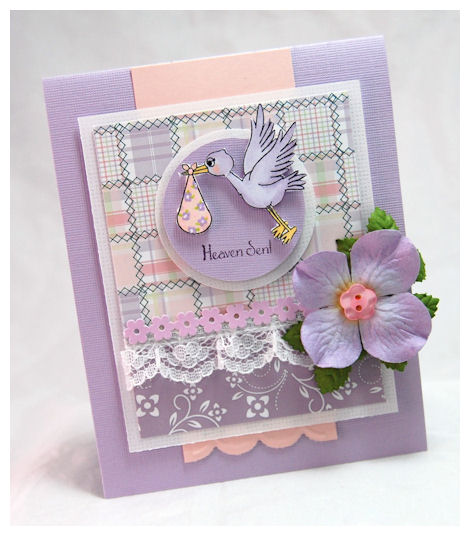 AWE! That is all I can say when I see this one! SO girly!!Clean and simply sweet is never a bad thing-especially for baby themed projects.If you haven’t noticed… purple is my favorite color and it has been quite inspiring for me these days. A color I normally don’t take into my crafting, but an truly enjoying.I used the stitced plaid square of the Bringing Home Baby Girl paper for this one, and the Fanciful Flourishes (perfect match!) paper too. It is STUNNING!
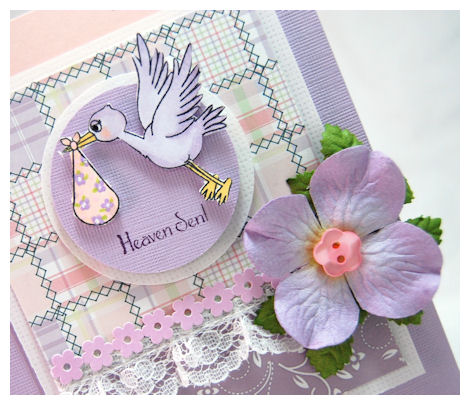 I simpley colored in my open line stork, and doodled her baby bag with my markers. She is cut out and on dimensionals too. She actually wasn’t too bad to cut out!!The flower adds to the softness and sweetness this has, as does the lace (something I rarely use but aways love to see other add) and flower frill.Supplies from todays post:
Pretty Packaging © template: Bouncing Baby Buggy
Pretty Impressions stamp set: Bringing Home Baby
Cardstock from Couture Cardstock: OSW white, day at sea, millet, nomad, rain drop, pasture, blushing, carousel,and vellum
Matte Photo Paper (super for printing digital paper :D) Printworks Matte Photo Paper (Target)
Pretty Impressions Digital Paper: Bringing Home Baby Girl & Boy
Ink: Copic makers and Momento black
Pretty Pieces Cut Files: Tag You’re It ©
May Arts Ribbon, SU! Buttons/Ribbon, Prima Flowers. lace, paper frills, paisley folder by provocraft
Well thank you again for stopping by.I’d love to hear what your favorite item from this release has been so far! Your feedback inspires me :DI hope you all have a great day! I’ll be shipping orders, and I cannot wait to see what you all create with this new release too!Stop back by tomorrow, where there will be so much more!
My Etsy

Who I Designed For
Blogroll
- Alicia
- Alli Miles
- Ally Blankenship
- Amber
- Andi @ crafts on a whim
- Angel R
- Angie Z
- Anne Kranitz
- Becky O
- Bee
- Beth Silaka
- Bethany Paull
- Beverly Nash
- Bobbie
- Cambria
- Cammie
- Card of the Week
- Card Positioning System (CPS)
- Cards for Cancer
- Catherine Doucette
- Charmaine
- Cheryl Sims
- Chriss Rollins
- Christina
- Christine Ewing
- Christine Wooden
- Colleen Schaan
- Craft Critique
- Craft Gossip
- Crystal
- Dawn Easton
- Emily Giovanni
- Geny
- Holly
- Igne Groot
- Inspirational Craft Blogs
- Irene
- Jami Sibley
- Jeanne Streiff
- Jen del Muro
- Jeni Bond
- JenMarie
- Jenn Balcer
- Jenn Diercks
- Jenn O
- Jennifer E
- Jennifer Mick
- Jennifer Pereda
- Jennifer-Sweet Treat
- Joanne Basile
- Jodi Collins
- Julia Stainton
- Julie Masse
- Karen
- Kathryn Berthiaume
- Katie Cotton
- Kelley Holland
- Kendra
- Kim Scholfield
- Kris’s Color Stripes! Get inspired here
- Kristen Dubosque
- Kristin Eberline
- Kristine
- Laura @ Sunshine Stamper
- Laura Turnmire
- Laurie Schmidlin
- Lesa Rapp
- Linda Duke
- Linda-LSN
- Lindsey Botkin
- Lisa (lakind scs)
- Lisa Kind
- Lori Craig
- Maggie
- Mara Campbell
- Maria
- Maria Levine
- Mary
- MaryJo
- Melanie M
- Monique Hansen
- Moxie Fab World
- Pam Imholz
- PaperCrafts Connection
- Peppers and Pollywogs Kids party site
- Rebecca Grohall
- Rita
- Robyn
- Rose Ann
- Sarah Vrolyk
- Sharon Harnist
- Sharon Johnson
- Sharon Rivera (a chemisrty with paper)
- Sherrie
- Sophia Landry
- Storage Units, Ink, & More Blog
- Sue Berker
- Susan (Rainy)
- Tangii Crane
- Tracy
- Tricia Traxler
- Trudee
- Velta
- VivLyn
- Zena
MTME Pretty Palette Color Team
MTME Pretty Patterns Sketch Team
My Time Made Easy TM LLC
Shop till you drop!
Lauren Meader
About Me
Copyrighted material
Subscribe To My Blog
Pages
- About me
- Alexa’s Story!
- My Crafty Corner!
- My Time Made Easy™ LLC
- Our Make A Wish Trip to Disney!
- Resume/Publication List
Calendar
Archives
- August 2013
- July 2013
- June 2013
- May 2013
- April 2013
- March 2013
- February 2013
- January 2013
- December 2012
- November 2012
- October 2012
- September 2012
- August 2012
- July 2012
- June 2012
- May 2012
- April 2012
- March 2012
- February 2012
- January 2012
- December 2011
- November 2011
- October 2011
- September 2011
- August 2011
- July 2011
- June 2011
- May 2011
- April 2011
- March 2011
- February 2011
- January 2011
- December 2010
- November 2010
- October 2010
- September 2010
- August 2010
- July 2010
- June 2010
- May 2010
- April 2010
- March 2010
- February 2010
- January 2010
- December 2009
- November 2009
- October 2009
- September 2009
- August 2009
- July 2009
- June 2009
- May 2009
- April 2009
- March 2009
- February 2009
- January 2009
- December 2008
- November 2008
- October 2008
- September 2008
- August 2008
- July 2008
- June 2008
- May 2008
- April 2008
- March 2008
- February 2008
- January 2008
- December 2007
- November 2007
- October 2007
- September 2007
- August 2007
- July 2007
- June 2007
- May 2007
- April 2007
- March 2007
- January 2007
Categories
- About Me
- All That Scraps
- blogger challenge
- camera/photo play
- Cards
- Contests
- family stuff
- FOR SALE
- Home decor/3-D items
- How to FAKE it!
- Introduction
- JUGS Challenge
- JustRite Stampers
- Lizzie Anne Designs
- My family stuff
- My Stamping Space
- My Time Made Easy
- My Time To Color Challenge
- My Time to Create Challenge
- My Timeless Template Challenge
- My Timeless Templates
- Mytime Mail
- MYTIME MOVIE/VIDEOs
- Papertrey Newsletter
- Pink Cat Studio
- Pretty Palette Challenge
- Pretty Patterns Sketch
- Product Opinions and Must haves
- Recipe's
- Saturday Sketch
- Smilebox Creations
- Stampavie
- Tutorials
- Uncategorized
- videos
Most Popular
- Create your own Onesie Card Tutorial-and important NOTE! PLEASE READ (2529)
- Saturday Sketch-Boxed bag holder (2333)
- Going GREEN! Fancy Flower Flourish-Closure Video (1478)
- Fabulous Favorite - Giveaway! (1336)
- a Prayer Request (1231)
- QUICK-Easter Baskets from Nestabilities-PTI style-and blog challenge (1063)
- Teaser Sketch (999)
- February Release Giveway! (and a little peek) (996)
- Group Post and Rambling Rose Video Tutorial (985)
- GIVEAWAY! Who wants it all?! (895)
Recent Comments (RSS)
- 바카라사이트: 비슷한 주제에 대한 흥미로운 정보를
- 바카라사이트: "여기에 제공해 주신 귀중한 정보와
- 온라인홀덤: 유익한 웹 사이트를 게시하는 데
- 홀덤나라: 나는 당신의 블로그를 정말 좋아합니다.
- lisa: Technology, too, has left an
- 주소모음: 흠 !! 이 블로그는 정말
- FutureGen Apps: Thank You For Sharing fantastic
- 웹툰사이트: 터키에서 온라인 스포츠 베팅을 할
- 툰코: It is a really very
- 온라인홀덤: I’ll be sure to come
Copyright © 2007 - My Time, My Creations, My Stampendence - is proudly powered by WordPress
This blog has been Tweaked and Designed by Sara Williams