Archive for March 4th, 2010
Non-Traditional Baby Boy
Mar 4, 2010 Author: mytime | Filed under: Home decor/3-D items, My Time Made EasyToday our Design Team member Kristin Bueter has some cards for you to view! You won’t want to miss the versatility she shares with you today using ONE lay out and 4 different color combination/patterns.
——————————————————————-
When you think baby boy you generally think BLUE. It is the obvious choice, and let’s face it, perfect!
I really enjoy making gifts using some non-traditional colors at times. You can get inspired to use new and fun color combinations by browsing clothing! Obviously clothing has all the latest color trends and combinations you may never have envisioned.
Take this sweater I saw at Target

This is one of those times that I used a clothing item to inspire a gift. You most likely wouldn’t look at this and think BABY would you?
This is what the outcome would possibly turn out to look like if you did!
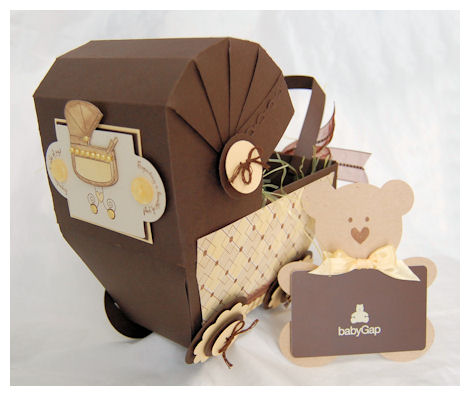
Baby Boy in Brown
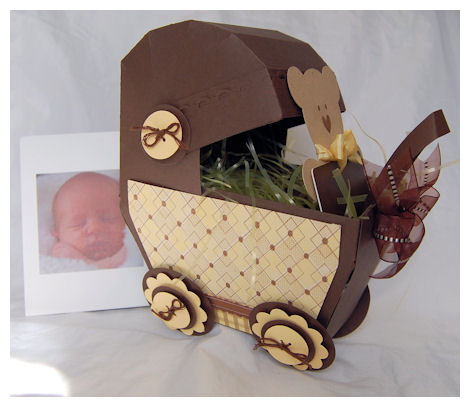
How is this for a boy themed carriage?
I used the Bouncing Baby Buggy © for this creation.
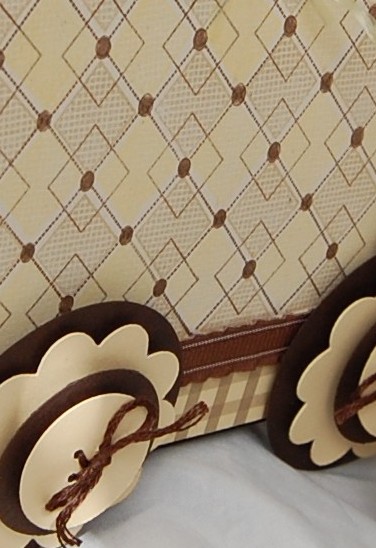
I used my Argyle Amazement © set to create the pattern on the carriage panels. I used the squared pattern in one of the diamonds for some texture. For the bottom portion I used GaGa for Gingham paper. I printed the brown pattern on Nomad cardstock.
Sure Cuts A Lot software recently upgraded their software, and now it has a super new baby selection shapes! (Just in time for my release :D) ENTER TO WIN a SCAL program at Katie Cotton‘s blog!!
I used the button image from the baby file for my wheels and carriage hood detail. It was perfect! The scallop shaped are from our NEW! Fanciful Flowers Cut File. We have a super scallop like flower shape in there 😀
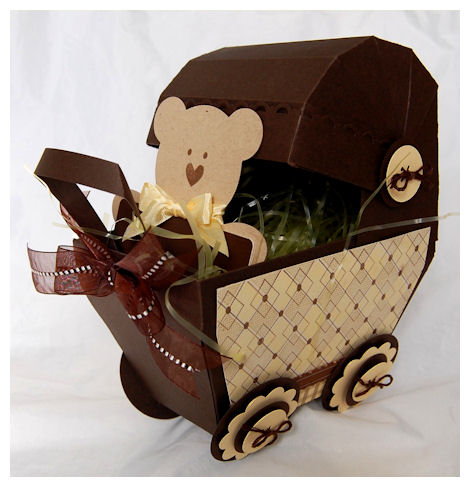
Now look at that CUTE teddy bear!
I was really inspired by the BABY GAP gift card I purchased for our friends recent birth of a sweet baby boy name Milo. It matched my color scheme to perfect too! Don’t you love happy accidents?
I wanted to put in in this carriage but didn’t want it to get “lost”. So, I cut the bear shaped file from my SCAL software to adhere the card to. I couldn’t leave it plain…….so I did this
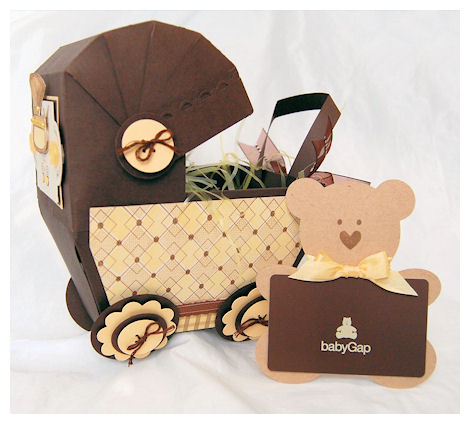
I made him about 4 inched from Kraft cardstock. Just like the bear on the gift card I used the dots from the Argyle Amazement © set, and the solid heart image from the You’ve Got Mail © set to create his face. Tied on some butter yellow ribbon from Martha Stewart and BAM! Adorable baby card holder, that looks ULTRA cute sitting IN my carriage (with yellow Easter grass)!
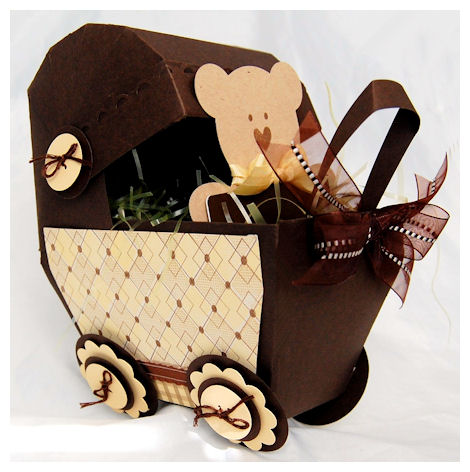
The ribbon in the front is by May Arts too. it’s a stitched brown ribbon. I’m in love with May Arts! They are in CT so I get my stuff in LESS than a day! I kid you not. I order in the afternoon and its on my doorstep at like 9:30 am!
OK focusing back on the project….
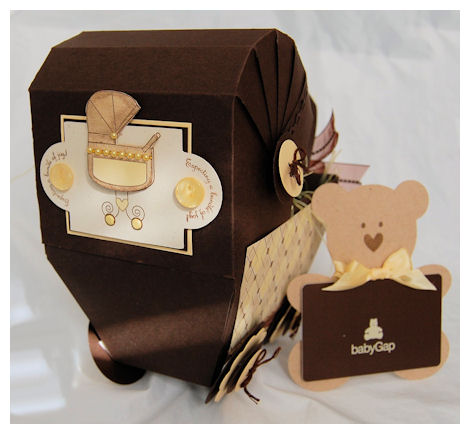
The back of the carriage is the perfect place for adding a tag or personalizing!! I used the NEW! Tag You’re It cut file for the back tag on this one. I stamped some images from Bringing Home Baby ©. This set really is SOOOOO cute and perfect with this template too!
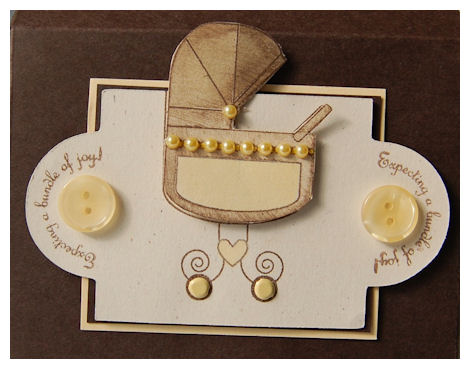
Here is my tag detail.
The sentiment “Expecting a bundle of joy!” fits in this tag perfectly!! Of course I made the carriage 3D. It is easy to cut out the top portions. I added brads to the wheels. I made my carriage from Kraft ink then “distressed it” Yellow pearls were a simple touch.
You could write the baby name in the carriage base too! (I did that later)
So now we have a personalized gift for a new bundle of joy.
Go searching store of catalogs to inspire your next FAB creation!
MTME has everything you need to make coordinating your own personal cards, gifts and tags easy and affordable!!
Thanks for stopping by.
Supplies from todays post:
Pretty Packaging © template: Bouncing Baby Buggy
Pretty Impressions stamp set: Bringing Home Baby, Argyle Amazement, You’ve Got Mail
Cardstock from Couture Cardstock: Oat, nomad, ganache
Pretty Pieces Cut Files: Tag You’re It ©, Fanciful Flowers
SCAL pieces: Teddy Bear & Buttons
May Arts & Martha StewartRibbon, embroidery thread, adhesive pearls, buttons
Super Quick, Super Simple and Still Something Sensational
Mar 4, 2010 Author: mytime | Filed under: Home decor/3-D items, My Time Made Easy(Sorry this is late! I hit the wrong post time-I set it for NOON instead of midnight! OH! BOY!!)
Sometimes you need to keep it simple!
Not every projects needs all the bells and whistles of layering and fine detail.
Let’s face it, we don’t always have a half hour (or more) to spend creating something. Sometime we have maybe 15 minutes. MAYBE! Just because you have little time doesn’t mean you can’t make your own packaging and still make it special.
I decided I would share with you a “under 15 minute” creation using the NEW! Card Catch All © template and Fanciful Flourishes © stamp set. Honestly this box went together quicker than MOST cards I make!!
Taken with Teal

Now this went quickly because my Cricut did the cutting! That right there it saved me time.
I cut my Card Catch All © and the All A Flutter © butterfly (resized) from Black Lineal cardstock. That texture alone dressed this up (you cannot see it in the photos) It went together in MAYBE 4 minutes.
I tied around a teal wired ribbon from May Arts. I wanted a SIMPLE WOW factor so I used my gift as my FOCUS and color inspiration, rather than embellishing and having my packaging be the initial focus and WOW!
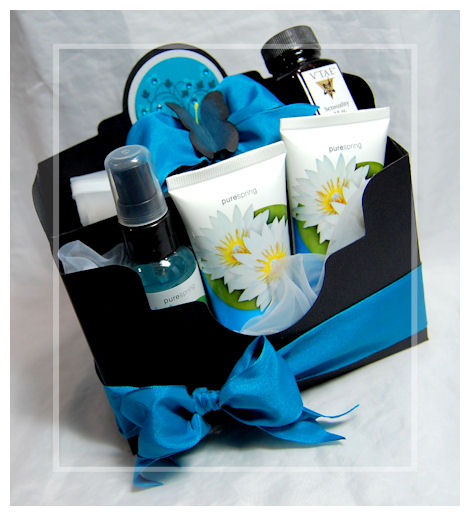
Look how the colors of my bath set stand out against the black. My template base is just plain colored textured cardstock. Nothing fancy. The simple teal bow picks up the colors in my bath products and really adds to the plain box.
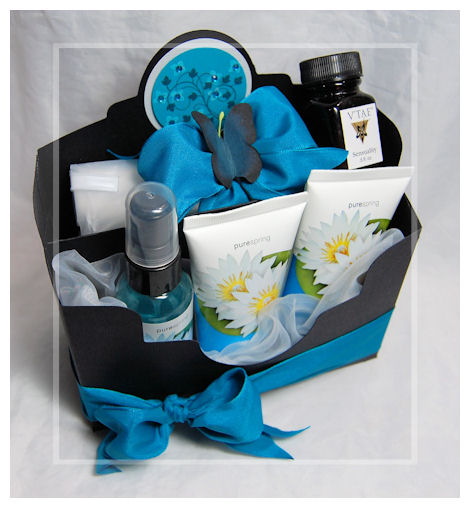
Now the box DESIGN itself is very elegant, and can stand alone because of its killer curves!! You will definitely fall in love with it.
Inside this box I did utilize the divider.I have body wash, body lotion, body spray and in the back a large bag of bath salts with a Serenity bath oil!
Perfect gift set.
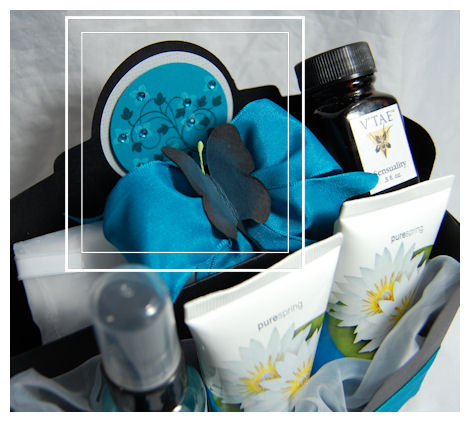
My only “decoration” on this box was the circle tag I stamped in black using one of the leaf flourishes in the Fanciful Flourishes © set. I added the smallest of the flowers to the flourish in white raft ink, the added adhesive rhinestones that I colored in teal to match my project. I punched it out with a circle punch, and layered it onto a piece of white vellum, then adhered to the back of the template. That set makes gifts like this so simple. I LOVE that set!!!
The butterfly was “colored” by dabbing on some versamagic ink in a teal color. I added some stamens to the back, then adhered it to the bow that was tied around my bath salts bag.
All under 15 minutes!
Now we do have another project for you to view today! Keeping it simple…..
From Pam Imholz

Here is what Pam had to say
A tisket a tasket…
A pretty birthday basket…
Yes girls I have “A Gift For You” to share today so stop by and see a
simple birthday basket for that special someone in your life. 🙂
Visit Pam Imholz for the full project and details!
Here are the supplies from today’s project:
Supplies:
Pretty Packaging © template: Card Catch All ©, All A Flutter
Pretty Impressions stamp set: Fanciful Flourishes ©
Cardstock from Couture Cardstock: Black Lineal and Lagoon
Ink: Black and craft white
Other : May Arts Ribbon
As always thanks for stopping by.
Tomorrow I will have some more eye candy for you as will one of our designers! See you then!
My Etsy

Who I Designed For
Blogroll
- Alicia
- Alli Miles
- Ally Blankenship
- Amber
- Andi @ crafts on a whim
- Angel R
- Angie Z
- Anne Kranitz
- Becky O
- Bee
- Beth Silaka
- Bethany Paull
- Beverly Nash
- Bobbie
- Cambria
- Cammie
- Card of the Week
- Card Positioning System (CPS)
- Cards for Cancer
- Catherine Doucette
- Charmaine
- Cheryl Sims
- Chriss Rollins
- Christina
- Christine Ewing
- Christine Wooden
- Colleen Schaan
- Craft Critique
- Craft Gossip
- Crystal
- Dawn Easton
- Emily Giovanni
- Geny
- Holly
- Igne Groot
- Inspirational Craft Blogs
- Irene
- Jami Sibley
- Jeanne Streiff
- Jen del Muro
- Jeni Bond
- JenMarie
- Jenn Balcer
- Jenn Diercks
- Jenn O
- Jennifer E
- Jennifer Mick
- Jennifer Pereda
- Jennifer-Sweet Treat
- Joanne Basile
- Jodi Collins
- Julia Stainton
- Julie Masse
- Karen
- Kathryn Berthiaume
- Katie Cotton
- Kelley Holland
- Kendra
- Kim Scholfield
- Kris’s Color Stripes! Get inspired here
- Kristen Dubosque
- Kristin Eberline
- Kristine
- Laura @ Sunshine Stamper
- Laura Turnmire
- Laurie Schmidlin
- Lesa Rapp
- Linda Duke
- Linda-LSN
- Lindsey Botkin
- Lisa (lakind scs)
- Lisa Kind
- Lori Craig
- Maggie
- Mara Campbell
- Maria
- Maria Levine
- Mary
- MaryJo
- Melanie M
- Monique Hansen
- Moxie Fab World
- Pam Imholz
- PaperCrafts Connection
- Peppers and Pollywogs Kids party site
- Rebecca Grohall
- Rita
- Robyn
- Rose Ann
- Sarah Vrolyk
- Sharon Harnist
- Sharon Johnson
- Sharon Rivera (a chemisrty with paper)
- Sherrie
- Sophia Landry
- Storage Units, Ink, & More Blog
- Sue Berker
- Susan (Rainy)
- Tangii Crane
- Tracy
- Tricia Traxler
- Trudee
- Velta
- VivLyn
- Zena
MTME Pretty Palette Color Team
MTME Pretty Patterns Sketch Team
My Time Made Easy TM LLC
Shop till you drop!
Lauren Meader
About Me
Copyrighted material
Subscribe To My Blog
Pages
- About me
- Alexa’s Story!
- My Crafty Corner!
- My Time Made Easy™ LLC
- Our Make A Wish Trip to Disney!
- Resume/Publication List
Calendar
Archives
- August 2013
- July 2013
- June 2013
- May 2013
- April 2013
- March 2013
- February 2013
- January 2013
- December 2012
- November 2012
- October 2012
- September 2012
- August 2012
- July 2012
- June 2012
- May 2012
- April 2012
- March 2012
- February 2012
- January 2012
- December 2011
- November 2011
- October 2011
- September 2011
- August 2011
- July 2011
- June 2011
- May 2011
- April 2011
- March 2011
- February 2011
- January 2011
- December 2010
- November 2010
- October 2010
- September 2010
- August 2010
- July 2010
- June 2010
- May 2010
- April 2010
- March 2010
- February 2010
- January 2010
- December 2009
- November 2009
- October 2009
- September 2009
- August 2009
- July 2009
- June 2009
- May 2009
- April 2009
- March 2009
- February 2009
- January 2009
- December 2008
- November 2008
- October 2008
- September 2008
- August 2008
- July 2008
- June 2008
- May 2008
- April 2008
- March 2008
- February 2008
- January 2008
- December 2007
- November 2007
- October 2007
- September 2007
- August 2007
- July 2007
- June 2007
- May 2007
- April 2007
- March 2007
- January 2007
Categories
- About Me
- All That Scraps
- blogger challenge
- camera/photo play
- Cards
- Contests
- family stuff
- FOR SALE
- Home decor/3-D items
- How to FAKE it!
- Introduction
- JUGS Challenge
- JustRite Stampers
- Lizzie Anne Designs
- My family stuff
- My Stamping Space
- My Time Made Easy
- My Time To Color Challenge
- My Time to Create Challenge
- My Timeless Template Challenge
- My Timeless Templates
- Mytime Mail
- MYTIME MOVIE/VIDEOs
- Papertrey Newsletter
- Pink Cat Studio
- Pretty Palette Challenge
- Pretty Patterns Sketch
- Product Opinions and Must haves
- Recipe's
- Saturday Sketch
- Smilebox Creations
- Stampavie
- Tutorials
- Uncategorized
- videos
Most Popular
- Create your own Onesie Card Tutorial-and important NOTE! PLEASE READ (2529)
- Saturday Sketch-Boxed bag holder (2333)
- Going GREEN! Fancy Flower Flourish-Closure Video (1478)
- Fabulous Favorite - Giveaway! (1336)
- a Prayer Request (1232)
- QUICK-Easter Baskets from Nestabilities-PTI style-and blog challenge (1063)
- Teaser Sketch (999)
- February Release Giveway! (and a little peek) (996)
- Group Post and Rambling Rose Video Tutorial (985)
- GIVEAWAY! Who wants it all?! (895)
Recent Comments (RSS)
- hedie: خرید راهبند
- 야동: Love to read it,Waiting For
- 야동: This seller is in a
- 바카라사이트: 여기 처음 왔어요. 나는이 게시판을
- 야동티비: I was surfing the Internet
- 바카라사이트: 비슷한 주제에 대한 흥미로운 정보를
- 바카라사이트: "여기에 제공해 주신 귀중한 정보와
- 온라인홀덤: 유익한 웹 사이트를 게시하는 데
- 홀덤나라: 나는 당신의 블로그를 정말 좋아합니다.
- lisa: Technology, too, has left an
Copyright © 2007 - My Time, My Creations, My Stampendence - is proudly powered by WordPress
This blog has been Tweaked and Designed by Sara Williams