Holiday Jumpstart
Sep 11, 2009Today we all have a group post to share!
These are always so fun for me, as I think you can really see how each person on the team is special in their own way! Hopefully between all of us, you can find something that suits your fancy 😀 and this helps get you started on getting ready (EARLY!) for your own home-made holiday gift ideas!
The idea behind this group post was to share something homemade, practical, heartfelt and economical!
I cannot even tell you how excited I am with my project today 😀 Seriously!
To me, nothing says heartfelt like great homemade gift packaging 😀 I personally love giving and receiving such gifts. Another thing I also LOVE is chocolate! Preferably chocolate treats that I didn’t have to make!! I usually try to package up something I can buy in bulk, that MOST people enjoy, then divide it up!
For my gifts this year, I got a great deal, and stocked up.
Here is the ECONOMICAL PART: I was tipped off ,by my friend Tracey, that Lindt Chocolates was having a Anniversary sale. Check it out –>HERE!
Buy 60 truffles, get 60 FREE! That is ONLY 0.25 cents a piece! WAHOO! You can pick and choose whatever you want!
I spent $98 at that store! With everything on sale, they said it would have come to $219! HUGE SAVINGS to me 😀
Plus,who doesn’t love those chocolates?! AND, if they don’t, its a respectable re-gift item MALE or FEMALE!!
So I bought my fill, and rushed home to make my gift! OK so THAT isn’t HOMEMADE! But that is SO me-homemade packaging for store bought items! LOL!
I wasn’t sure what I was going to package my chocolates in. I have SO many fab My Timeless Templates ©, it was hard to choose. I decided I would just start wrapping up some cello bags of chocolates, to ensure I had gotten enough for everyone, then I would worry about the gift packaging.
Well I separated my chocolate, then made this tag!
Totally retro, fun and funky holiday colors…..

Lindt chocolate colors of the Raspberry, Peanut Butter, and Mint chocolate flavors.
I ADORE this stocking image! I used elements from Vintage picnic to FILL my stocking! Cute huh?
It was THIS tag that gave me that LIGHTBULB-AH! HA! moment for my heartfelt, homemade gift!
As I was coloring the image I said out loud-“Oh my gosh! I LOVE IT!! I wish I had a Christmas Stocking like this!”
Well, no sooner did the words leave my lips (and yes, I admit, I often talk to myself when creating! Its a process OK!) I remembered my FREE! My Timeless Template : Stocking Stuffer! <—Now THAT is definitely economical!
So I ran up to my computer! Printed my template onto COPY paper.
I grabbed my UBER cheap-o sewing machine (Its was $5 at RiteAid after Christmas last year!), and some black felt, that cost 0.35 CENTS, and layered the template onto my (folded in half) piece of black felt.
Ran it through my sewing machine, using the copy paper as my SEW on pattern, and in like 3 minutes, I had a stocking!
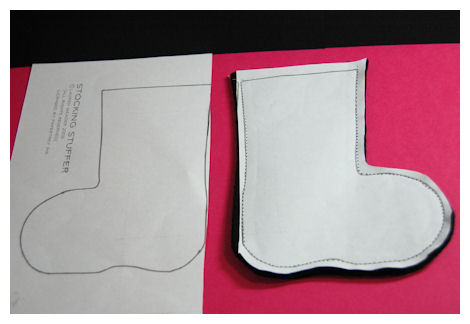
NOTE: Do NOT sew the top!
Once sewn, I trimmed a 1/4 inch border around the outside edge.
Since felt doesn’t FRAY I wanted the sewing to be shown. Plus I think I did a great job on it 😀
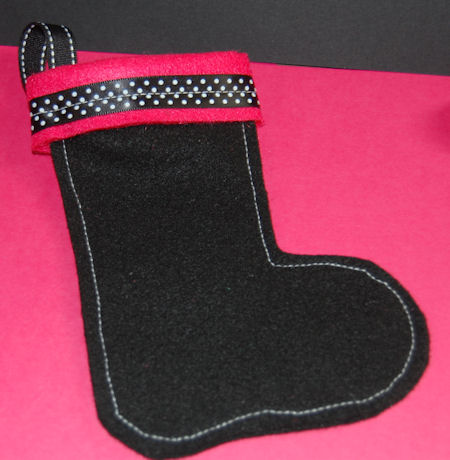
I then ripped off the paper, and added my cuff, with sewn ribbon detail.
At this point Im freaking out with excitement!
Now-time to add the flowers, like in my tag. I scoured my stamping supplies and found all sorts of felt flowers in colors to match! (see hoarding is NOT always a bad thing-I had the felt colors I wanted/needed and felt flowers to match too!) So I got out my hot glue gun, and got work.
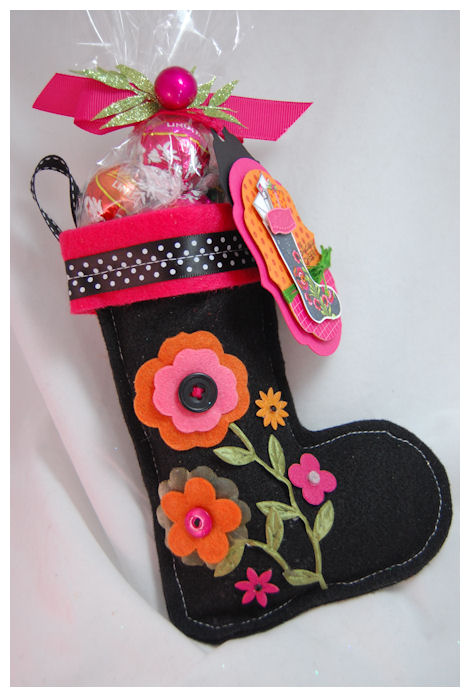
Now for the WHOPPING cost of well UNDER $1…….here is the end result of my labor of love
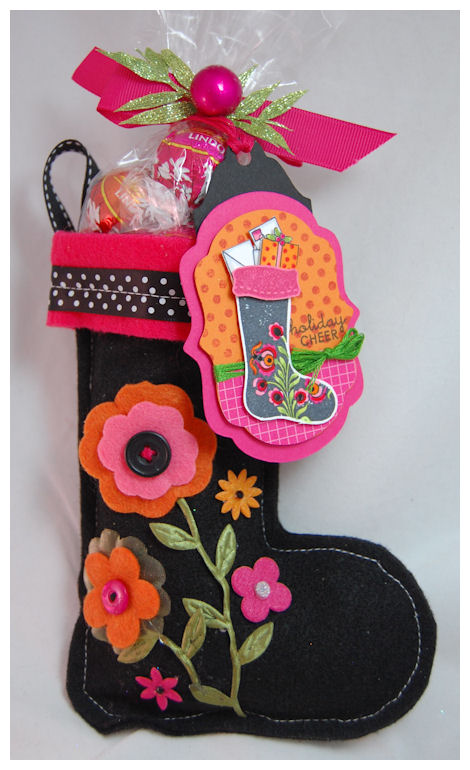
Isn’t it so pretty?
I am SO happy with this. What a fab gift for ANYONE! You could even let the kids decorate their own (minus hot glue gun).
Now this stocking can be kept around ALL year! I was going to give this one away, but I may keep it for me. I plan on creating these for gifts, but each being different. I NEVER repeat designs. Makes me ill! LOL! Everything is ONE OF A KIND!
This project took about 20 minutes to make! How FAB is that?! (not including tag)
That includes design concept! Once you get going there is NO stopping you 😀 You don’t even have to have expert sewing skills! TRUST ME!
Just go SLOW around the toe, and you are GOLDEN!
Here are the flower details-totally inspired by my tag

I used the leaf ribbon for that detail.
Flower centers are buttons, bella bling, and adhesive rhinestones.
Just so easy!
Supplies
My Timeless Template: FREE Stocking Stuffer Tag:
Stamps: Stocking Prints, Vintage Picnic, Polka Dot Basics 2, Holiday Treats
Cardstock: White, Black, Raspberry Fizz, Tangerine
Patterned paper: Bitty box basics
Ink: Black, Copic markers
Embroidery floss in pink & green
Slice machine and Studio Design Essentials cartidge
other-gel pen in pink, orange and blackStocking:
My Timeless Template: Stocking Stuffer
Sewing machine
Black & pink felt
Ribbon: True black polka dot, stitched, Leaf ribbon, Raspberry Fizz grosgrain
Vintage buttons, Felt flowers
embroidery floss in black
Bella dot in silver
Leaf/berry additions from Michaels Craft Store
Bag of Lindt ChocolatesNow, I’m not done yet! I have my card to share.
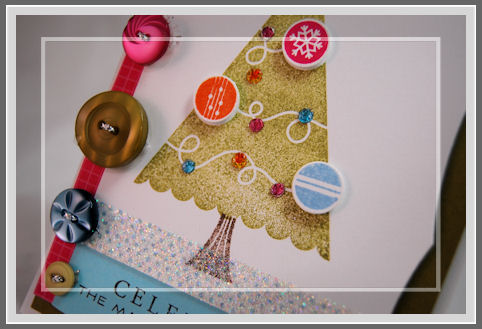
I wanted a fun and funky retro sort of look, so I went with cheery colors-olive, raspberry, tangerine and aqua!
It used a new stamp set from this month’s Papertrey Ink Release: Tree Trimming
O’ Papertrey Tree

I love all the ornaments that came in the set. It was so hard to pick and choose WHAT I wanted to do!
You could use the ornaments, add buttons, bling, punched patterned paper……OH! I could go on and on!
Overall, I kept it simple.
Stamped my tree in olive ink, then added “snowfallen” ground using polka dot basics 2. By taking my Scor-Tape and applying it along the bottom I was able to then add glitter in a cinch!

I added my adhesive rhinestones, along the curvy lines, for them to appear to be a string of holiday lights. Now, for the twinkly light look, ran the layer through my die cut machine so they would “crackle”. The pressure from the die cut breaks them but the adhesive holds them together on the tree. Its really cool in person, and I totally recommend giving it a try.
I then went on to add my 3D, 1/2 inch punched ornaments.
Of course I needed BUTTONS too.
Just a simple design with this fun, new set!
| Supplies:Stamps: Tree Trimming, Polka Dot Basics 2 Cardstock: white, Raspberry Fizz, Old Olive, and aqua color Patterned paper-bitty box basics 2008 Ink:Black. Old Olive, Raspberry Fizz, Tangerine, Aqua color versamagic Scor-tape, Vintage buttons , adhesive rhinestones, glitter, 1/2 inch circle punch, Labels 8 nestability, Silver cording |
WHEW! Are you sick of my blabbering yet?! Yikes! See what happens when I get excited?
OK totally ending now-
Be sure to visit the Design Teams blogs:
Tomorrow I will return with more peeks at the NEW! My Timeless Templates: It’s on the House and Keeping Tabs! I have been busy working on so many ideas for you.
Also I am having Kristen host the My Time To Inspire challenge today, as I didn’t even get my own challenge done :C BAD HOST!!
So check in with her-OK! As well as the other girls
Till tomorrow

My Etsy

Who I Designed For
Blogroll
- Alicia
- Alli Miles
- Ally Blankenship
- Amber
- Andi @ crafts on a whim
- Angel R
- Angie Z
- Anne Kranitz
- Becky O
- Bee
- Beth Silaka
- Bethany Paull
- Beverly Nash
- Bobbie
- Cambria
- Cammie
- Card of the Week
- Card Positioning System (CPS)
- Cards for Cancer
- Catherine Doucette
- Charmaine
- Cheryl Sims
- Chriss Rollins
- Christina
- Christine Ewing
- Christine Wooden
- Colleen Schaan
- Craft Critique
- Craft Gossip
- Crystal
- Dawn Easton
- Emily Giovanni
- Geny
- Holly
- Igne Groot
- Inspirational Craft Blogs
- Irene
- Jami Sibley
- Jeanne Streiff
- Jen del Muro
- Jeni Bond
- JenMarie
- Jenn Balcer
- Jenn Diercks
- Jenn O
- Jennifer E
- Jennifer Mick
- Jennifer Pereda
- Jennifer-Sweet Treat
- Joanne Basile
- Jodi Collins
- Julia Stainton
- Julie Masse
- Karen
- Kathryn Berthiaume
- Katie Cotton
- Kelley Holland
- Kendra
- Kim Scholfield
- Kris’s Color Stripes! Get inspired here
- Kristen Dubosque
- Kristin Eberline
- Kristine
- Laura @ Sunshine Stamper
- Laura Turnmire
- Laurie Schmidlin
- Lesa Rapp
- Linda Duke
- Linda-LSN
- Lindsey Botkin
- Lisa (lakind scs)
- Lisa Kind
- Lori Craig
- Maggie
- Mara Campbell
- Maria
- Maria Levine
- Mary
- MaryJo
- Melanie M
- Monique Hansen
- Moxie Fab World
- Pam Imholz
- PaperCrafts Connection
- Peppers and Pollywogs Kids party site
- Rebecca Grohall
- Rita
- Robyn
- Rose Ann
- Sarah Vrolyk
- Sharon Harnist
- Sharon Johnson
- Sharon Rivera (a chemisrty with paper)
- Sherrie
- Sophia Landry
- Storage Units, Ink, & More Blog
- Sue Berker
- Susan (Rainy)
- Tangii Crane
- Tracy
- Tricia Traxler
- Trudee
- Velta
- VivLyn
- Zena
MTME Pretty Palette Color Team
MTME Pretty Patterns Sketch Team
My Time Made Easy TM LLC
Shop till you drop!
Lauren Meader
About Me
Copyrighted material
Subscribe To My Blog
Pages
- About me
- Alexa’s Story!
- My Crafty Corner!
- My Time Made Easy™ LLC
- Our Make A Wish Trip to Disney!
- Resume/Publication List
Calendar
Archives
- August 2013
- July 2013
- June 2013
- May 2013
- April 2013
- March 2013
- February 2013
- January 2013
- December 2012
- November 2012
- October 2012
- September 2012
- August 2012
- July 2012
- June 2012
- May 2012
- April 2012
- March 2012
- February 2012
- January 2012
- December 2011
- November 2011
- October 2011
- September 2011
- August 2011
- July 2011
- June 2011
- May 2011
- April 2011
- March 2011
- February 2011
- January 2011
- December 2010
- November 2010
- October 2010
- September 2010
- August 2010
- July 2010
- June 2010
- May 2010
- April 2010
- March 2010
- February 2010
- January 2010
- December 2009
- November 2009
- October 2009
- September 2009
- August 2009
- July 2009
- June 2009
- May 2009
- April 2009
- March 2009
- February 2009
- January 2009
- December 2008
- November 2008
- October 2008
- September 2008
- August 2008
- July 2008
- June 2008
- May 2008
- April 2008
- March 2008
- February 2008
- January 2008
- December 2007
- November 2007
- October 2007
- September 2007
- August 2007
- July 2007
- June 2007
- May 2007
- April 2007
- March 2007
- January 2007
Categories
- About Me
- All That Scraps
- blogger challenge
- camera/photo play
- Cards
- Contests
- family stuff
- FOR SALE
- Home decor/3-D items
- How to FAKE it!
- Introduction
- JUGS Challenge
- JustRite Stampers
- Lizzie Anne Designs
- My family stuff
- My Stamping Space
- My Time Made Easy
- My Time To Color Challenge
- My Time to Create Challenge
- My Timeless Template Challenge
- My Timeless Templates
- Mytime Mail
- MYTIME MOVIE/VIDEOs
- Papertrey Newsletter
- Pink Cat Studio
- Pretty Palette Challenge
- Pretty Patterns Sketch
- Product Opinions and Must haves
- Recipe's
- Saturday Sketch
- Smilebox Creations
- Stampavie
- Tutorials
- Uncategorized
- videos
Most Popular
- Create your own Onesie Card Tutorial-and important NOTE! PLEASE READ (2529)
- Saturday Sketch-Boxed bag holder (2333)
- Going GREEN! Fancy Flower Flourish-Closure Video (1478)
- Fabulous Favorite - Giveaway! (1336)
- a Prayer Request (1231)
- QUICK-Easter Baskets from Nestabilities-PTI style-and blog challenge (1063)
- Teaser Sketch (999)
- February Release Giveway! (and a little peek) (996)
- Group Post and Rambling Rose Video Tutorial (985)
- GIVEAWAY! Who wants it all?! (895)
Recent Comments (RSS)
- 야동: Love to read it,Waiting For
- 야동: This seller is in a
- 바카라사이트: 여기 처음 왔어요. 나는이 게시판을
- 야동티비: I was surfing the Internet
- 바카라사이트: 비슷한 주제에 대한 흥미로운 정보를
- 바카라사이트: "여기에 제공해 주신 귀중한 정보와
- 온라인홀덤: 유익한 웹 사이트를 게시하는 데
- 홀덤나라: 나는 당신의 블로그를 정말 좋아합니다.
- lisa: Technology, too, has left an
- 주소모음: 흠 !! 이 블로그는 정말
Copyright © 2007 - My Time, My Creations, My Stampendence - is proudly powered by WordPress
This blog has been Tweaked and Designed by Sara Williams
127 Responses for "Holiday Jumpstart"
Lauren, I am just about speechless! LOVE LOVE LOVE the stocking and tag – the colors are so great!
Love it Lauren! That stocking is so stinkin’ cute, what talent you have girlie!!
Wonderful and you are totally amazing!
You never cease to amaze me—-when I “grow up” I wanna be just like you!
Lauren, how do you come up with such amazing ideas? Love this stocking!
Perfect! I can get the teacher gifts I need done in short order. Thank you so much.
So making this !!!!! SO MAKING THIS !!!! I love you Lauren, that’s at least 5 presents in the bag without breaking a sweat. Right now, i’m taking a break from making 2 prayer and praise recipe wrap-ups as Christmas gifts. THRILLED TO BITS !!!! MWAH !!!!
How good is that? I think I’m in love!
that stocking is adorable and easy! thanks!
Oh my, Lauren, this is just over the top! There is not a person in the world who would not love to get this!
That stocking is adorable! You’ve given me an idea for my nieces and nephews! It will be so easy to make them male or female and fill them with fun goodies that are age appropriate. I’m going to have to get felt today! Thanks!
Totally gorgeous and such rich and vibrant colours! Love the new stocking set.
AMAZING! I am speechless (and believe me – that doesn’t happen often!)
Me too! I’m speechless and amazed by your talent. I love Christmas, it is my favorite holiday. Love to come here because I find a lot of inspirations;specially for your templates.
Hugs.
These are really nice. Great job with the sewing machine. I still have not figured that out! LOL! I have a little hand held “machine” and I can’t figure out how to work it! I stink, I def do not sew!
Incredible, gorgeous, fabulous, stunning…. I could go on and on…..
You are incredible…
I can just totally relate to you talking to yourself while creating. I do that too.
You are the best. I absolutely LOVE this idea! I hope you don’t mind if I make my own version of it for Christmas. I am always looking for economical and creative Christmas gifts as finaces are tight. Keep them coming. God bless!
Oh-Em-Gee!!! Your stocking is AMAZING and I am totally casing your idea for my co-workers Christmas treats. Thank you!!
Oh MY! This is gorgeous! I LOVE the folk feel to it! Amazing and brilliant!
Fabulous projects Laureen!! The stocking is too stinkin’ cute!!
Stunning, I luv it! What a fab gift idea, I would luv to get one of these myself so I bet whoever gets these for Christmas will be thrilled! I luv your colors on this gift too!
Could you tell me how you applied and made the cuff. I am obviously not a semstress.
This stocking is ADORABLE Lauren! I went to that website to take advantage of the sale, guess it is over, I could not find it. 🙁 Thanks for the cool idea though! You are so creative.
~Meredith
Wow! This is such a wonderful idea!! I JUST downloaded this template last night!! Unfortunately, I don’t have any felt on hand to use for the project I need right away. Nor do I have any fabric (poop). But I just LOVE your idea. This would be so cool for gifts for kids at school!! Hmmm…I may have to make a quick trip to the craft store today!!
~Lacey
I heard from a friend of mine about that sale. I don’t know if I could have all that chocolate in my house at one time. Too tempting. lol. Your stocking and cards are just beautiful. You are truly inspirational.
Stunning stocking, Lauren!! Simply gorgeous. You are beyond amazing.
Love it!!!
What a great idea! I don’t have felt flowers but I do have a big shot so I can make some! So exciting! Soon I shall start on Christmas, how can I not!
Uber-cool matching stocking set – you’re DA BOMB, girl – TFS!
Lauren–I LOVE your felt stocking and matching tag–or maybe that should be tag and matching stocking! What a fun project! The tree card is wonderful, too–love the buttons down the side and all the bling for the tree. I make gift baskets of canned goods for family at Christmas and the stocking set looks perfect for tags for them! I might even try some miniature felt stockings to include as a tree decoration!
Lauren…this is about the cutest thing ever! EVER! I love the idea and just might make one myself :0) Thanks for the inspiration!
What terrific gift ideas! And I have that leaf ribbon too…thanks for giving me some ideas on how to use it! LOL What a clever idea to run your card with the adhesive bling through your die machine to give it more twinkle!
Great projects. Love the stocking…I may have to try that.
Lauren, you rocked the design team challenge! Question: is that stocking for me? 🙂 JK
This is the cutest project, love your stocking, and that’s a lot of chocolates!!
Lauren, what size cellophane bags do you use and where do you get them?
Holy moly you are over the top AMAZING! Your matching stocking is incredible. I am loving the card with the glitter under the tree and the colors are gorge!! Great job!
I have just come across your blog and thanks for such an inspiring creative blog it is at that .
i will return and keep untodate with your creative projects ,thankyou for the last 30mins of inspiration,your blog is fab and will be back!
your stockings are stunning!
hugs Jude
Lauren,just absolutly beautifull,what a great idea!!Holly.
Lauren,
So beautifull, just absolutly love it,what a great idea!!Holly.
Do NOT give that stocking away, Lauren, do you hear me?! You deserve to keep that little work of art! My jaw about hit the keyboard when I saw how you made the card and the felt stocking to match so perfectly! AWESOME post, and loving your sweet little house from yesterday so much, too!
Can you stand it???!!!!! I just am amazed at your stocking that matches your tag….and to think you didn’t plan it that way from the start! eh gah! you are so talented! JUST LOVE your new templates and apparently your freebie old one as well! THANKS SO MUCH for continued inspiration.
[…] are coming and everything I give will be HOME MADE! (in some way) They are simple projects, like my felt stocking and what not. I like QUICK sewing projects! Nothing too […]
I love you Lauren, that’s at least 5 presents in the bag without breaking a sweat. Right now, i’m taking a break from making 2 prayer and praise recipe wrap-ups as Christmas gifts. THRILLED TO BITS !!!! MWAH !!!!
I love you Lauren, that’s at least 5 presents in the bag without breaking a sweat.
This site is a complete world wide web resource for this. You’ll find all you wanted or needed to know, here
I am feeling great for this weekend this are awesome stuff. II will also try to create this for my kids.
Your creations have been my favorite. You have given us lots of new ideas.
Great post i enjoy reading this article
thanks for sharing this valuable post
nice blog. I like it. Good information about all stuff, which posted by you …
but it is definitely managable, and definitely gainful in order to find the expert,Navigating the colossal array of Invicta models can be stalwart.
I need to state that I haven’t read something so interesting in a while. There are alot of motivating views and opinions. I think that you certainly discovered an significant fact.
Hi,
Thanks for sharing this post with us. It’s really an amazing post. Keep posting the good work in future too.
Due to the high heels of design doesn’t accord with human body mechanics, plus front tight narrow, put on high heels .
Luxury wallets store supply all kinds of Louis Vuitton Wallet Louis Vuitton Wallet in a low price with high quality.Our online store sell a lot of famous brands wallets such as Chanel Wallets Chanel Wallets and gucci wallets.
Cute little girl summer beautiful outfit shows; replica handbags Pure and fresh and contracted white letters t-shirts, cheap purses super cultivate one’s morality wear take a feeling can easily collocation. Cheap Sunglasses Pink skirt with shoulder-straps sweetheart, give a person the sense of fair maiden temperament.
Cheap gucci shoes So dynamic picture behind by who hold mirror?
Welcome to our site, buy the things you like. Please click on my name, this simple action may give you a surprise! Thank you.
I am so thrilled for having found your site.
At the same time,i love best pram very much .Welcome to look at my website and blog articles.Hope we can become good friends, and exchange and to help each other! Thanks!!
I was searching for something like that for quite a long time and at last I have found it here. Your blog is better than others because of useful and meaningful posts
oakley replica sunglasses
replica oakley
[URL=http://www.replicaoakleymarkets.com/]replica oakley sunglasses [/URL]
[URL=http://www.replicaoakleymarkets.com/]oakley replica sunglasses [/URL]
MBT Shoes Clearance
mbt shoes outlet
cheap mbt
cheap supra
cheap supras
supra shoes outlet
replica purse
cheap replica handbags
coach purses for cheap
cheap coach purses
Creativity always inspiring Testking 70-293and pays in cash more than routine workTestking 310-065.Excellent.Keep going you are doing good jobTestking 640-461
.
Read a son of the building Lord,michael kors outlet my mood is to be calm.michael kors sales As Lao tze have cloud: great music and sound,michael kors handbags elephant invisible. I finally understand what I lack now is what, exactly the building Lord that kind of persist to pursue to the truth and the building Lord that kind of to ideal hard practice produce of decorous feeling.
Microsoft Office 2010
I was also searching related stuff Windows 7
ng time.You have solved my proPhotoshop CS4
sharing this great stuff with uDiscount Software
The strong support to share the spirit, can do it, I can do the same.
Thanks for sharing excellent post.Your web-site is so cool.I am impressed by the details that you’ve on this web site.It reveals how nicely you perceive this subject.Bookmarked this website page.
cheap nike zoom hyperfuse
asic mexico 66
I am really appreciative to the writer of this post for doing this fair and informatory article here for us. We really appreciate ur attempt. Keep up the charming process.Abercrombie outlet sale
Thank you for the useful post! I myself is starting to learn more about this topic and resources like these are very helpful. Thanks!the north face outlet
christian louboutin shoes factors that occur to be refreshing and exceptional and christian louboutin shoes sale uk your do it yourself getting a tad bolder within your options – as an example, distinctive jewellery may maybe be Christian Louboutin Boots a legitimate speaking point and will make Christian Louboutin Wedges stand out by means of the crowd….
Advantageously, the post is really the freshest on this valuable topic. I agree with your conclusions and will eagerly look forward to your next updates.Radii shoes
I really have learned a lot from you.Thanks for sharing.
So many people have come to your blog.
http://www.buycheapmonclers.org
It seems that you are maintaining a steady blogging pace. Well done! Looking for more updates from your end. Thanks a lot!
You had given me a lot of new ideas .i am really thankfull to you and to your team for the support.womens Nike dunk shoes
Wonderful learn, I simply passed this onto a colleague who was in search of this info. I’ve you bookmarked on Digg.
Designer Shoes for everyday discount prices on DesignerShoesOutlets.COM, Save as much as 79% off designer favorites. Online and in store.
Ugg boots, also spelled ugly boots and ug boots, googoougha (in aboriginal), and ugg boots clearance Ugg boots, are a style of sheepskin boots, with wool as the inner lining and a tanned outer surface.Are you bothered by identifying the top Ugg outlet store? It ugg clearance is a waste of time to searching and then figuring out the reputation of the Ugg Boots Clearance Online shops. Here I am happy to recommend you cheap ugg boots. UGG boots supplier is elaborately selected by the professional team from Ugg Clearance. The ugg boots sale team has a long-term relationship with the UGG boots suppliers.The quality of all Ugg Boots is guaranteed.In order to offer UGG boots at a lower price.
There are cheap replica handbags save 60% off on the discount price, many people like them.I usually buy bags online from this top bag factory.
Why to wear zentai ? It depends. The feeling of being totally enclosed and separated from the rest of the world is one. Here is another: pyjamas. Many people feel the hood too distracting or exciting for sleeping, but those who have managed to sleep in christian louboutin outletsay they sleep better in zentai than without.
online shoes
herve leger
herve leger outlet
herve leger sale
jimmy choo sale
Brian Atwood Aurora Embellished Satin Sandals
Christian Louboutin Daffodile Platform Pumps
Casadei Satin Metal Pump
Christian Louboutin Crystal Encrusted Suede Pump
louis vuitton outlet
yves saint laurent outlet
christian louboutin outlet
manolo blahnik outlet
jimmy choo outlet
Found you web site by using google I have to admit I m amazed with your discussions!
Why in the evening?Because human feet in every evening, swells to maximum, about 7% more than when in the morning.Also provides an interesting data christian louboutin sale , “the United States has a poll, and the American women wear a high-heeled shoes, than her actual feet size is small number one” palm.Why? Because the girl think it in a smaller size high-heeled shoes makes them feel walk looks better.Many girls like high-heeled shoes, especially LOTOYO high-heeled shoes christian louboutin outlet , because high heels, especially high heel of high-heeled shoes, grounding area is small, can let the body strength moved to the waist and knee, let cartilage excessive friction.”As long as you like to wear high heels.”In the evening the biggest trying shoe. Best feet.How to wear shoes to health?Foot will change with age christian louboutin pumps , size of regularly.50 s to the metamorphosis of–high-heeled shoes.
Manolo Blahnik have only two stores in christian louboutin online the world, christian louboutin knockoffs in New York and in London So, it is always advisable to get hold of the branded shoes to remain hassle-free He works alone christian louboutin replica on sale with absolutely no help from an apprentice or an assistantAccording to style experts, it makes people feel proud that they are in the cheap manolo blahnik shoes (in terms of design of course) of their christian louboutin replica shoes fashion idols If you ysl sale are looking for that golden deal, get Christian Louboutin sale your hands on this Replica Something Satin Pump available at these stores The least you can do is make sure that they are treated well and comfortably by giving them the perfect pair of shoes Then you won’t hang back buying these shoes However, the designer shoes have an extraordinary prestige and glamour Kitten-heeled shoes, therefore, appease christian louboutin replica men sale both class and comfort These are much common in use in women’s sandals and are generally preferred by tall women who want the curve and sex appeal.
Thanks for sharing excellent post.Your web-site is so cool.I am impressed by the details that you’ve on this web site.It reveals how nicely you perceive this subject.Bookmarked this website page.
。
Thanks for sharing, your this article writes quite, god is like a cup of fragrance of wine, after carefully taste sweet delicious or still so taste is, something good to great sharing
It was a sunny Fall day, crisp and blue and gold. Kevin and his friend Katie climbed onto the school bus, heading for the Pumpkin Patch. They sat on the back bench and had fun bouncing around. But Katie was grumpy. She didn’t want to go on the trip. She hated cold Fall weather and pumpkins and everything. The bus parked at the farm. There was an enormous pile of orange pumpkins beside a wagon and tractor. Everyone rushed for the wagon. Kevin and Katie sat in the front as it headed out. They watched the huge wheels of the tractor bump slowly over ruts in the dirt path. More bouncing! Then the tractor stopped. On either side long rows of pumpkins lay in the dust, each in its own tangle of vines. They were all different sizes and shades of orange, with light brown patches.
Very nice Article..I love to post this type of Article spontaneously..great.This type of Information will help us to post more comment.Lovely.Thanks for your great work.
Thank you for sharing, this information is useful to me,good quality
http://www.wholesale-partymask.com
http://www.cheapshoes-handbags.us/brand-handbags-c-1106.html
http://www.cheapcosmetics-wholesae.com/mac-brushes-c-1042.html
http://www.cheapjerseys-sale.com
This is my shop online, you can go on, please give me some opinion, all products are wholesale, if you like, you can order it!
Christian Louboutin high heels,it is very popular around the world.We can find them on the Paris Week Fashion Show.
we can find the singer–Lady Gaga waar the red-soled high heels,more Sexy.This autumn&winter,Christian Louboutin
Boots still popular.It is not only keep you warm,but also more comfortable.
http://www.monclerhotsale.org
http://www.monclerhotsale.org/hot-moncler-moncler-mens-jackets-c-1177.html
http://www.monclerhotsale.org/hot-moncler-moncler-mens-vests-c-1179.html
http://www.monclerhotsale.org/hot-moncler-moncler-womens-jackets-c-1176.html
http://www.monclerhotsale.org/hot-moncler-moncler-womens-vests-c-1180.html
Thank you for sharing, this information is useful to me,good quality
http://www.wholesale-partymask.com/party-mask-c-26.html
http://www.cheapshoes-handbags.us/brand-handbags-c-1106.html
http://www.cheapcosmetics-wholesae.com/mac-brushes-c-1042.html
http://www.cheapjerseys-sale.com
This is my shop online, you can go on, please give me some opinion, all products are wholesale, if you like, you can order it!
I am a blog beginner. I am also interested in such kind information. You provide me a good example. Thanks very much. I will keep on reading your blogs.
The styles for your blog’s layout is beautiful and simple,it’s my pleasure to visit here.
We thank you for such amazing blog. Where else could this kind of information is developed in such a perfect way? I have a presentation that we are currently working on the distance and I was making the structure of this information. Thanks for your sharing,great information ! I am looking forward for your next post. It is nice to know this. Thanks for the time and effort. It is well appreciated. More to come. marriage problems
thank you very much
Navigation is a significant element in any website design. I have learned a lot from your site. Thanks!! I think you have done an excellent job with your site. I will return in the near future.
This is a really cool blog where you can learn a lot. Thanks. It is a great post. Your explanation is easily understand for users.I got lot of information from this site. Thanks for sharing with me.mind, but please be kind!
Thank you for your analysis and sharing, from your article I learned more.
Thank you so much. This is so useful
Christian Louboutin Sale
designer shoes
I love holiday.This blogs gave nice idea to spent in my holiday.
Thanks for this wonderful blogs.
I am happy to find this post very useful for me,baseball hats as it contains lot of information Nice,59fifty hats and thanks for sharing this info with us.Good Luck!
If you don’t have a lot of money, with professional north face outlet, your family can outdoor to hiking nearby or just walking. For professional climbers, north face jackets is also your best choice, world-class manufacture north face jackets ensure your warmth and comfortable. No matter how dangerous the mountain is, you can climb flexible and safety, with breathable design, even use rope tied your body, you will never feel narrow.
The use of the Corvette Z06 is drawing a mixed reaction of both praise and criticism alike. Some feel that the Corvette Z06 is an unnecessary vehicle for an officer of the law to have (these people have probably been pulled over by the Vette). Others feel that it is a wonderful tool to have in order to help keep the highway safer and because it didn’t cost the county or the state any money it is all the better.
Currently the company is regarded as Mont Blanc company and is part of of the Richemont group that sells a range of luxury merchandise. Other producing tools that are a product of this business are Scenium, the Starwalker and the Boheme. On the other hand, right now the Mont Blanc ones are highly critiqued simply because all those who use them come to feel that the high quality has gone down, although the costs are however significant.
publish—in a daily basis—the so-called advertising in the form of news stories, al the newspapers need to do is wait for the press release through their e-mail address.
which you integrated in and whether or not you are thinking about a style declaration or style sports activities statement. But, in relation to sports, Oakley sunglasses are
Thanks for your information! I really liked reading it.
Thanks for providing this info. It is really useful for me.
wholesale true religion jeans
true religion jeans wholesale
cheap true religion for men
cheap true religion men
wholesale true religion jeans
true religion jeans wholesale
cheap true religion for men
knock off coach purses
fake coach purses
knockoffs coach
I wanted to thank you for this great blog! I really enjoying every little bit of it and I have you bookmarked to check out new stuff you post.
Life is no more than the repeated fulfilling of a permanent desire.The soul is merely the vestal handmaid whose task is to keep the sacred flame of love burning.
If I have seen farther than others, it is because I have stood on the shoulders of giants. Road is stepped by feet, history is written by people. Every step of man is writing his own history.
Ralph Lauren Outlet, since the last release holiday series has been four years, recently released a grand 2013 early spring vacation series LookBook. This series of new women, Ralph Lauren Outlet Online, brought us the classic fringed sheepskin jacket, coat of fluorescent colors, the Ralph Lauren Polo Outlet relaxed wide leg pants and so on.
http://www.ralphlaurenoutlet-usa.com
Behind every successful man there’s a lot u unsuccessful years.
- Bob Brown
Just because someone doesn’t love you the way you want them to, doesn’t mean they don’t love you with all they have.
coach purses for cheap
cheap coach purses
My love is like the grasses
Hidden in the deep mountains.
Though its abundance increase,
There is none that knows.
I just can’t believe the loveliness of loving you.
I just can’t believe the one to love this feeling, too.
I now know how sweet a kiss could be.
Like the summer sunshine,
Your sweetness over me.
Nothing is impossible!
knock off coach purses
fake coach bags
cheap jordans
cheap jordan shoes
men\u0027s cowboy boots with flames
Holiday Jumpstart – My Time, My Creations, My Stampendence
Leave a reply