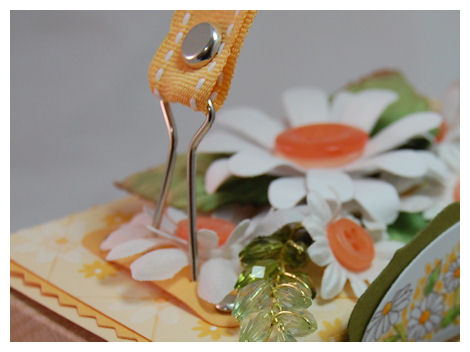
Video: How to make a handle using a binder clip
Aug 13, 2009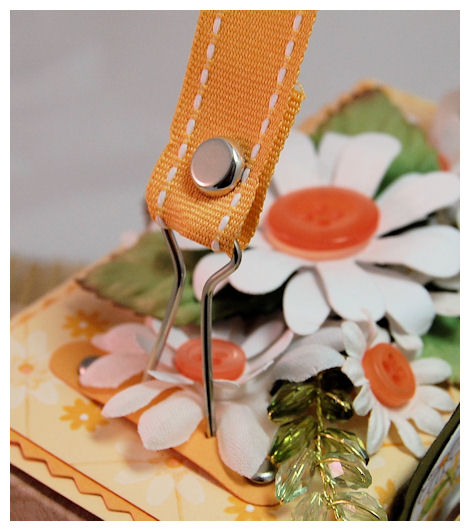
I love using all the My Timeless Templates ©. I am often looking for new ways to dress them up, and make each one more fun and different than the last! It really is ALL about the details.
Today, in a video, I am going to show you how ONE little binder clip, can make the cutest, inexpensive handle, for just about ANY My Timeless Template © you wish to put it on!
Now you have seen how easy it really is to make these handles, I’ll share some details about the project I designed.
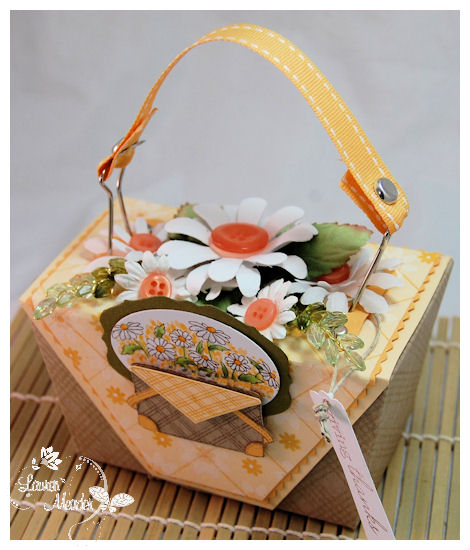
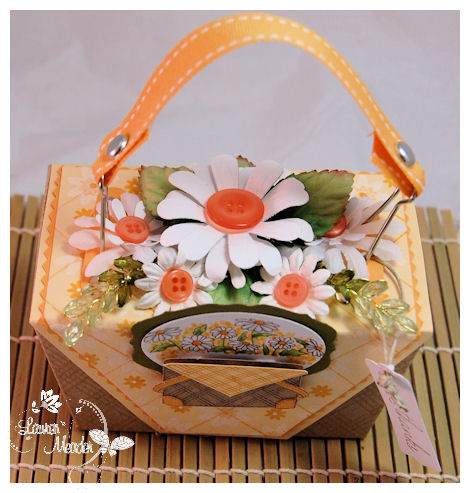
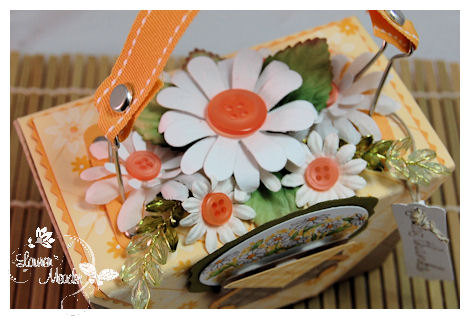
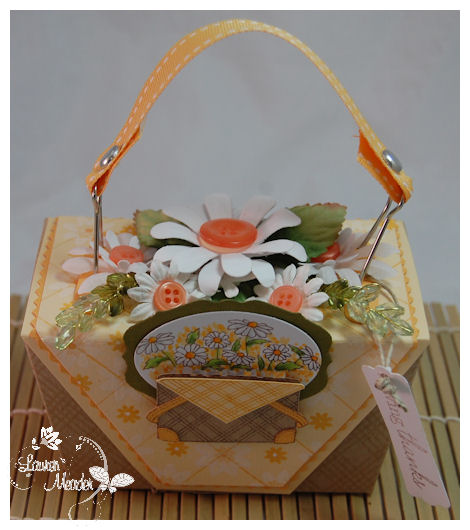
Basket of Thanks
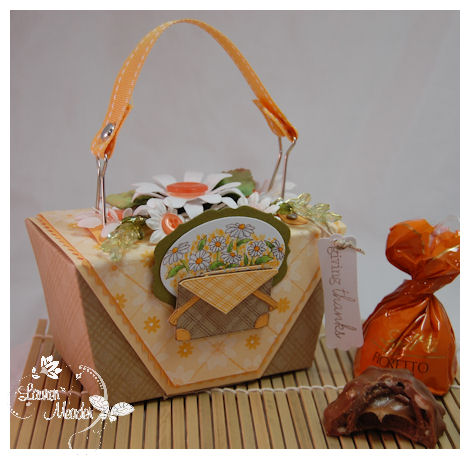
Today’s project, I utilized the NEWEST! My Timeless Template © Tucked Away.
This is the large version of the template.
I designed my box to look like a basket, with the fabric napkin overhanging, and flowers inside-*just* like the colored image from Vintage Picnic (a MUST have set-in my opinion!)
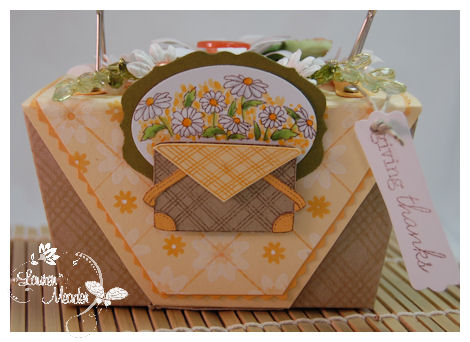
I stamped the Kraft bottom of Tucked Away © , to look similar to a basket weave by using the Tea Dye Duo ink, with Background Basics: Retro image.
I also created the “pattern” on my “napkin” (aka the template lid – mat layer), using Guidelines grid, and the flowers from Around and About, in white craft ink, and Summer Sunrise!
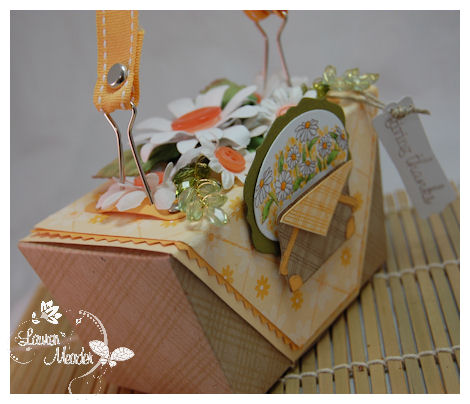
For the additional mat layer, I just adhered a layer of Summer Sunrise, to my stamped layer, then used my pinking edge scissors, to easily cut my decorative layer-perfectly.
Then, for the top-I used various punched flowers to create my “paper garden”.
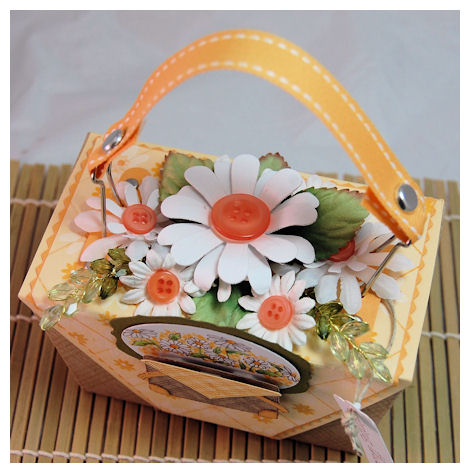
I added some beaded leaves, as well as Prima paper leaves to complete the “look”.
This made my basket look like it was filled with flowers! Just like the stamped basket image from Vintage Picnic.
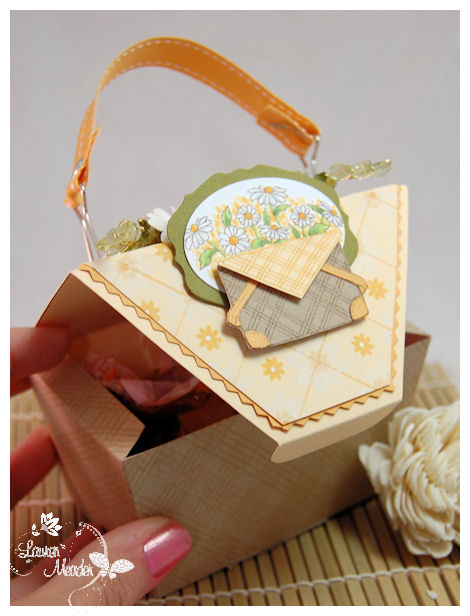
Once you “un-tuck” the top, inside there are 4 large, Lindt Chocolate Caramel Clusters inside!

Totally YUMMY!
As you can see the binder clip ribbon handle really adds a nice detail to the overall design! Now because this template “tucks” closed, you can use your handle to present such a pretty “basket” of thanks!
This project took less than a 1/2 hour total-and that was design concept included, and the MAKING of my own patterned papers! You now have a design idea, you could whip up numerous “baskets” in no time!
Supplies:
My Timeless Template © Tucked Away
Stamps:Vintage Picnic, Retro Bkgd, Guidelines, Around and About Sentiments
Cardstock: White, Kraft, Summer Sunrise, Lemon Tart, Ripe Avocado
Ink: Tea Dye Ink Duo, Dark Chocolate, Summer Sunrise, White
Ribbon: Stitched Grosgrain in Summer Sunrise
Buttons: Melon Berry
OTHER: Leaves by Prima, Brads by SU! ,Word Window Punch by SU! Pinking scissors, Various Flower punches by Marvy, Labels die by SU, Oval punch by SU! tag punch by SU! Singlo Gel pen, Beadded leaf cluster from Michaels Craft Store
Well that is all for me today! I hope you enjoyed today’s project/tutorial.
Tonight is the Papertrey Ink Release! I hope to see you on the forum 😀
In the meantime be sure to check out Nichole’s Blog for more samples & creative clicks, as well as Debbie’s post today (she is filling in for Becky :D) as she shares the last of the countdown peeks!
Till tomorrow

My Etsy

Who I Designed For
Blogroll
- Alicia
- Alli Miles
- Ally Blankenship
- Amber
- Andi @ crafts on a whim
- Angel R
- Angie Z
- Anne Kranitz
- Becky O
- Bee
- Beth Silaka
- Bethany Paull
- Beverly Nash
- Bobbie
- Cambria
- Cammie
- Card of the Week
- Card Positioning System (CPS)
- Cards for Cancer
- Catherine Doucette
- Charmaine
- Cheryl Sims
- Chriss Rollins
- Christina
- Christine Ewing
- Christine Wooden
- Colleen Schaan
- Craft Critique
- Craft Gossip
- Crystal
- Dawn Easton
- Emily Giovanni
- Geny
- Holly
- Igne Groot
- Inspirational Craft Blogs
- Irene
- Jami Sibley
- Jeanne Streiff
- Jen del Muro
- Jeni Bond
- JenMarie
- Jenn Balcer
- Jenn Diercks
- Jenn O
- Jennifer E
- Jennifer Mick
- Jennifer Pereda
- Jennifer-Sweet Treat
- Joanne Basile
- Jodi Collins
- Julia Stainton
- Julie Masse
- Karen
- Kathryn Berthiaume
- Katie Cotton
- Kelley Holland
- Kendra
- Kim Scholfield
- Kris’s Color Stripes! Get inspired here
- Kristen Dubosque
- Kristin Eberline
- Kristine
- Laura @ Sunshine Stamper
- Laura Turnmire
- Laurie Schmidlin
- Lesa Rapp
- Linda Duke
- Linda-LSN
- Lindsey Botkin
- Lisa (lakind scs)
- Lisa Kind
- Lori Craig
- Maggie
- Mara Campbell
- Maria
- Maria Levine
- Mary
- MaryJo
- Melanie M
- Monique Hansen
- Moxie Fab World
- Pam Imholz
- PaperCrafts Connection
- Peppers and Pollywogs Kids party site
- Rebecca Grohall
- Rita
- Robyn
- Rose Ann
- Sarah Vrolyk
- Sharon Harnist
- Sharon Johnson
- Sharon Rivera (a chemisrty with paper)
- Sherrie
- Sophia Landry
- Storage Units, Ink, & More Blog
- Sue Berker
- Susan (Rainy)
- Tangii Crane
- Tracy
- Tricia Traxler
- Trudee
- Velta
- VivLyn
- Zena
MTME Pretty Palette Color Team
MTME Pretty Patterns Sketch Team
My Time Made Easy TM LLC
Shop till you drop!
Lauren Meader
About Me
Copyrighted material
Subscribe To My Blog
Pages
- About me
- Alexa’s Story!
- My Crafty Corner!
- My Time Made Easy™ LLC
- Our Make A Wish Trip to Disney!
- Resume/Publication List
Calendar
Archives
- August 2013
- July 2013
- June 2013
- May 2013
- April 2013
- March 2013
- February 2013
- January 2013
- December 2012
- November 2012
- October 2012
- September 2012
- August 2012
- July 2012
- June 2012
- May 2012
- April 2012
- March 2012
- February 2012
- January 2012
- December 2011
- November 2011
- October 2011
- September 2011
- August 2011
- July 2011
- June 2011
- May 2011
- April 2011
- March 2011
- February 2011
- January 2011
- December 2010
- November 2010
- October 2010
- September 2010
- August 2010
- July 2010
- June 2010
- May 2010
- April 2010
- March 2010
- February 2010
- January 2010
- December 2009
- November 2009
- October 2009
- September 2009
- August 2009
- July 2009
- June 2009
- May 2009
- April 2009
- March 2009
- February 2009
- January 2009
- December 2008
- November 2008
- October 2008
- September 2008
- August 2008
- July 2008
- June 2008
- May 2008
- April 2008
- March 2008
- February 2008
- January 2008
- December 2007
- November 2007
- October 2007
- September 2007
- August 2007
- July 2007
- June 2007
- May 2007
- April 2007
- March 2007
- January 2007
Categories
- About Me
- All That Scraps
- blogger challenge
- camera/photo play
- Cards
- Contests
- family stuff
- FOR SALE
- Home decor/3-D items
- How to FAKE it!
- Introduction
- JUGS Challenge
- JustRite Stampers
- Lizzie Anne Designs
- My family stuff
- My Stamping Space
- My Time Made Easy
- My Time To Color Challenge
- My Time to Create Challenge
- My Timeless Template Challenge
- My Timeless Templates
- Mytime Mail
- MYTIME MOVIE/VIDEOs
- Papertrey Newsletter
- Pink Cat Studio
- Pretty Palette Challenge
- Pretty Patterns Sketch
- Product Opinions and Must haves
- Recipe's
- Saturday Sketch
- Smilebox Creations
- Stampavie
- Tutorials
- Uncategorized
- videos
Most Popular
- Create your own Onesie Card Tutorial-and important NOTE! PLEASE READ (2529)
- Saturday Sketch-Boxed bag holder (2333)
- Going GREEN! Fancy Flower Flourish-Closure Video (1478)
- Fabulous Favorite - Giveaway! (1336)
- a Prayer Request (1231)
- QUICK-Easter Baskets from Nestabilities-PTI style-and blog challenge (1063)
- Teaser Sketch (999)
- February Release Giveway! (and a little peek) (996)
- Group Post and Rambling Rose Video Tutorial (985)
- GIVEAWAY! Who wants it all?! (895)
Recent Comments (RSS)
- 야동: Love to read it,Waiting For
- 야동: This seller is in a
- 바카라사이트: 여기 처음 왔어요. 나는이 게시판을
- 야동티비: I was surfing the Internet
- 바카라사이트: 비슷한 주제에 대한 흥미로운 정보를
- 바카라사이트: "여기에 제공해 주신 귀중한 정보와
- 온라인홀덤: 유익한 웹 사이트를 게시하는 데
- 홀덤나라: 나는 당신의 블로그를 정말 좋아합니다.
- lisa: Technology, too, has left an
- 주소모음: 흠 !! 이 블로그는 정말
Copyright © 2007 - My Time, My Creations, My Stampendence - is proudly powered by WordPress
This blog has been Tweaked and Designed by Sara Williams
87 Responses for "Video: How to make a handle using a binder clip"
This is just so awesome and love the colors. You are just so creative and to think of using a binder clip this way. You ROCK! Thanks for a fabulous video.
Oh, what a terrific idea! You have the best ideas. Thanks for the video, they are always so informative.
I LOVE that handle idea! Thank you for sharing all of your genius with the rest of us. :0)
You are so creative Lauren. What a smart idea for a handle. Thanks for sharing your idea!!!
This is a fabulous idea Lauren! This is the cutest little box ever! Thanks for taking the time to share how you created this great binder clip handle.
Lauren, you are amazing! Thanks so much for the tutorial showing us your fabulous handles! WOW! WOW! WOW! Your Tucked Away gift box is so adorable! I love the flowers and your layering.
You are incredibly talented and generous!
Your time and hard work are so appreciated!
Well, I know these templates WILL be in my cart on the 15th, but this idea with the binder clip is just too cool. Thanks for the video directions Lauren.
this is absolutely fabulous Lauren. I am definitely going to grab this one tomorrow. Love the idea for the handle and the flowers and bead leaves are amazing.
WOW! That was awesome video! So easy to make those handles!!! Thanks so much for the video. The box came out way too CUTE!!!!! You always come up with such awesome ideas!!!
Thanks!
Nadya 🙂
This is beautiful! Thanks for the inspiration
I am totally in love with this project. One of the best ever. Can’t wait to get this template and finally start my collection of PTI.
this is way cool! thanks for the video idea-and the template is on my list to buy.
Thanks Lauren, you made my day with the video!…Love it!
Mary
Lauren this is beautiful, I love watching your tutorials so inspirational, thank you for sharing :o)
Absolutly cool video! The idea is awesome!
Thanks!
Greetings from Germany,
Bianca
awesome video!! Great idea.
Love the darling paper clip handles! I learned a lot from your wonderful tutorial. Thanks!!! You’re so talented!
I love your project. I do have an irresistable urge to use some of PTI’s rustic twine on your buttons, though. I love that stuff with buttons.
What a fabulous idea!!! I never knew you could take the clips apart like that. Pure genius! Thanks for sharing.
I look forward each day to see your wonderful creativity. You have given me much incentive. This project is amazing and I will be making many. Thank you for my daily smiles.
Great idea for the binder clip handle!!
Great tutorial and a brilliant idea. Love your work. Thanks for sharing.
This is way too cute! And what a great idea to use the clip prongs for handles. How do you come up with all these ideas? Everyday is a new adventure on your blog…lovin’ it!
Thanks for sharing…
so pretty and thanks for the tut
Hugs
Norine
Just so stunning Lauren, beautiful!!
What a lovely idea! Thanks for the video, everything was so clear and well organized!
Really cute handle idea! I just might use a grommet or eyelet or a rivet would be great, so that the little pieces from the brad are not sticking out from the back of the handle.
AACKKK!! you are just SO creative in your stamping and embellishing of your wonderful templates Lauren! I LOVE the woven bg stamping on top and bottom – and your wonderful ‘bouquet’ of punched flowers – and your clip idea for the handles is super!
*sigh* another totally beautiful project. I wanna be you when I grow up! *tee hee* Have a great weekend. Hugs girl.
That is just absolutely stunning! and what a great idea.
Lauren, thank you so much for your wonderful idea and video to show us how to do it! You are fantastic!
CindyB
What a fabulous idea!
Adorable Lauren! Such a fabulous idea. You have this video thing down it’s great. OK so where do you put the camera over you? Just wondering… LOL!
That basket is so adorable!! I love the flowers on top. And the use of binder clips is genious!!
~Lacey
You got me today Lauren! You have truly blown me away. I want you to know that I will be copying this for me dear friend. She is having her birthday, ON THE FIRST DAY BACK TO SCHOOL!!! (we are teachers) So I hope you have a minute to smile on the 24th because me freind Erica sure will because of you. Maybe I will email you a pic of her and her tuck away gift!
SOOOO creative. I loved the handle idea can’t wait to try it myself.
Thank you Lauren…as always, you are a gift of inspiration. This template is so perfect for so many gifts and the handle is brilliant. I have a stash of binder clips that will now become Tucked Away handles! Thanks so much for the video. Can’t wait to create!
Lauren, you’re a genius! I think I have a whole box of these clips lying around somewhere. . .
Lauren, this is just the cutest thing I have ever seen! I love the way you’ve made the patterned paper, and I will def. be trying the idea with the binder clips.
Absolutely amazing Lauren! I have a box full of binder clips that I bought for recipe or photo holders, but this is a brilliant way to spice up my templates. Thanks for sharing.
Lauren, your inginuity never fails to amaze me! LOVE those binder clip handles and that box is drop-dead gorgeous!!!!
Absolutely LOVED the video!! Wonderful idea and the boxes are so adorable!!
Love it! Love it!! Love it!!
Lauren, I LOVE this idea. It is so creative and happy. I really like that the handles stand up and away from your project leaving plenty of room on top for decoration. I have a couple of your temps and they are great, and SO uber useful. Thanks for sharing!
pink
Lauren, it’s gorgeous! Thank you for sharing! 🙂
Efrat, Israel
BRILLIANT! 🙂 You always amaze me – I’m sorry that I don’t comment often enough…you deserve to know how great your ideas and work are!
how awesome of an idea TU for sharing
What will you think of next???? You are so creative :>) Thanks for sharing all these wonderful ideas!!
Lauren this is so cool! I’ve just purchased some tiny office clips so I hope to make some real little cute handles for my gift boxes now! You are no doubt a genius!
Aimes
x
what a great idea! so creative to use office clips as a cute handle for your gift boxes…. you never cease to amaze!
Lauren, this is beyond beautiful! So so gorgeous and creative! I’ve got to try it. Thanks!!!
Pardon me while I pick my jaw off the ground!! That is so incredibly creative!! Thanks for the awesome idea!!!!
This is just such an adorable template!!! I love your end project, it’s so sweet! I also love the tip on how to use the office clips – fabulous idea!!!
Thank you Lauren for such a fabalous idea using binder clips. Can’t wait to try it. You are so creative. Thanks again.
Love this basket, what a great idea!
I would have never thought to use the clip for a handle. Didn’t even realize it would come off. You really are amazing. I look forward to reading your new ideas EVERYDAY! THANK YOU SO MUCH for inspiring me!
Ingenius!! How cute!!
This is totally awesome! Tks so much for sharing with us!
what a clever idea!
Lauren this is just the cutest, most creative thing ever! I have so many of the same clips thanks so much for such a cute idea!
Good morning wow the pretty limps am marvellous I am impatient to be able to order your model you have the talent to be sold retail you should pass to the TV. to make you connaitre once again Bravo suzie
I know I commented earlier and now that I’ve watched the video to see how you did this I am even more in awe! What an incredible idea – since I am a HUGE fan of MTTs I’ll be using this idea for SURE! Can’t wait to try it 🙂 THank you, Lauren for always sharing with us your ideas.
I have always admired the lovely handles and hardware that you add to your projects but this is so pretty AND simple. I’m so glad I watched your tutorial!
BRAVO! What an incredible project. I love the handle idea.
FABULOUS Project. Thank you for promoting the Scor-Pal line of products. It is very, very generous of you and we are very honored to be associated with such an awesome person as yourself.
hugs,
Diana
Hi Lauren, your handles are absolutely fabulous!! Thanks for sharing with us. Donna x
FANTASTIC IDEA FROM ONE WHO USES HER BRAIN MORE OFTEN THAN I DO!!
What a beautiful project! You are so innovative too! The colors are just amazing and I think that Melon Berry is one of my faves.
God definitely gave you the gift of craft making. You are awesome. I would have never thought of something so simple and fabulous. Genius!
Lauren: absolutely gorgeous! I love this project as well as all you create. Thanks for sharing.
Lauren, thanks for the great video. You always have such creative ideas. Can’t wait for tonight to get the new templates!!!
What a fantastic idea, thank you so much for sharing such a wonderful idea, your blog gives us all so much inspiration
Hugs Julie x
Great tutorial Lauren! This template is awesome, I love all your templates. Thanks for sharing your cards and projects.
SO CUTE! I love the ribbon handle! Another fabulous idea!
Do you do anything with the white flowers you added besides punch them out? They look so nicely laid out and they don’t look flat…?
Thanks!
You are the einstein of crafting! Here’s me bowing to the master- you! I have LOTS of your templates & will be using this idea! TFS!
You are a genius! I love the handles, but I would have never thought of this. I can’t wait to add handles to all my 3-D projects now! 🙂
You are soooooo clever! I didn’t realize that the clip even came apart, tell your video. You are just soooo clever! Thank you so much for the nice video!
Pattyjo :+)
This is one of MANY reasons why I love your blog! I love this handle idea and will definitely incorporate it in a future project. The video was fantastic. TFS.
Your box is just darling, and your handle is so creative and to darn cute, great idea, tfs!
I just loved the video on creating the handle. That was an AWSOME idea and it made the box look so professional. Love Love Love it!
Oh my goodness – how extremely CLEVER you are!! Thanks so much for sharing this great idea.
OMG! You are just the smartest girl ever! So brilliant! Love it Lauren!
Lauren – the handle on the basket using binder clips is brilliant!!! I LOVE, LOVE, LOVE the treat boxes with the owl that matches your daughters’ room! So clever and awesome!!!!!!!!!!!!
I’m really late to the party – but my oh my those little handle clips are tooooooo totally adorable for words! Thanks for the excellent video! 🙂
I have made only one simple rule for my own happiness: Every day above ground is a GOOD day.
did some police stuff earlier than capping the film off together with the epic
and now legendary automotive chase by means of San Fran. Puma has designed UNI
Leave a reply