Everyday Button Bits
Jul 10, 2009Hi everyone!
2 posts today! Don’t miss —> this one <— Peeks my other template this month!!
This is always my favorite time of the month!
Im so happy you all loved yesterday’s post using my newest (to be released July 15th template Milk Made ©) The idea for that one came to me some time ago, after making Cocoa to Go, which later lead to my Candy Carton Carrier :D, all mixed together to get a fun version I like to call Milk Made © THAT Candy Carton Carrier project lead to my use for the sample again today!
SO with that being said, let me move along!
Today we are all sharing a group post for the Papertrey Ink countdown, using a FUN new set called Everyday Button Bits!! This set has SO many crazy possibilities! I am over the moon for it!
The “idea” of the set is genius. All these little stamp pieces are meant to FINALLY get you to USE those buttons that you covet so much, IN your projects! They are taking the MAIN STAGE!!
I LOVE this set like CRAZY!
I decided I would use the ADORABLE little bird image for my project today! It just jumped out at me when I saw all the amazing images 😀
I wanted to package some home-made honey granola I whipped up the other day, in a fun way! I love snacking on this during the day. Its delicious, and better than a candy bar! LOL! If you want some chocolate, as some chocolate chips to the recipe 😀
Just a little something
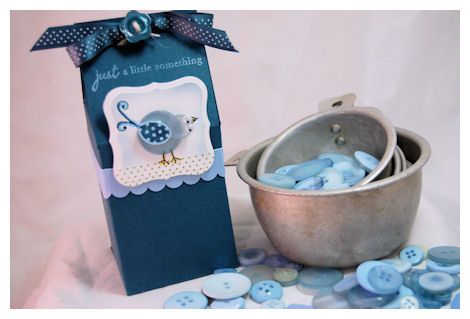
I would use my newest template (Release is July 15th!) Milk Made © for my project. It was PERFECT!! This template can totally be use on it’s own! As you are seeing here! Especially when you have a bajillion gifts to make! Perfect size, and goes together with ease 😀
Given the fact that I wanted my granola to be packaged in a bag for freshness, I wanted it to be easily accessible to the recipient, while keeping the adorable topper in tact 😀 The idea of someone ripping out the bow KILLED ME! LOL!
So I made the package so the topper can come off!

Seriously how cute is that?
Now here is my bag of granola inside! Easy to access, and this is totally re-giftable! You can fit so many great items in here now without worry about ruining your overall packaging design! Great for KID parties too!! They can decorate them themselves as a party activity too! This stamp set would be PERFECT too! Kids LOVE crafting, and using buttons or BLING pieces 😀
Now before I get flooded with requests for the recipe:
Fruit n Honey Granola
- 4 cups quick cooking oats
- 1 cup chopped toasted almonds
- 1/4 cup toasted wheat germ
- 1/4 cup sunflower seeds
- 1/4 cup ground flax seeds
- 1 teaspoon cinnamon
- 1/2 teaspoon ground nutmeg
- 1/3 cup canola oil
- 2/3 cup honey
- 1/2 cup raisins
- 1/2 cup sweetened dried cranberries
- NOTE: add 1/2 cut of choc. chips if you want some in there
DIRECTIONS
- Preheat oven to 300 degrees F (150 degrees C). Line a large baking sheet with parchment paper.
- In a large bowl, mix the oats, almonds, wheat germ, sunflower seeds, flax seeds, cinnamon, nutmeg, canola oil, and honey. Spread evenly over the prepared baking sheet, pressing down lightly with the back of a spoon.
- Bake 20 minutes in the preheated oven, or until lightly browned. Allow to cool completely.
- In a large bowl, break the cooled granola into large chunks. Mix in the raisins, and sweetened dried cranberries (and choc. chips if you decide). Store in an airtight container.
Here is the close-up of the Button Bird
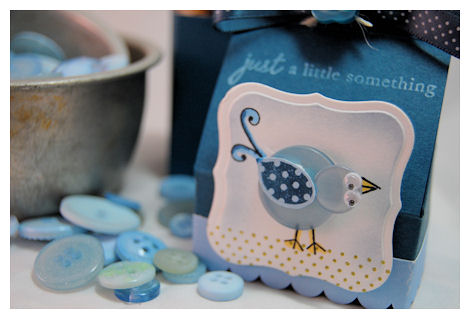
Button Bird-close up
I wanted a pretty little label on my Milk Made © Carton,so I stamped my bird image in black ink. The tail, beak and legs are ONE image. There is a large and small bird in the set, I went with the largest bird. I then colored the beak/tail with Copic markers.
I used Polka Dot Basics II (new set :D) for my “grass”. I then die cut it with Labels 1 nestability and sponged my bordering sky!
I used 2 Spring Rain buttons. I knew I wanted to have a “bluebird”. I also wanted a body and a head! I chose 2 buttons that were very similar in color, and had a bit of a shimmer to them, with the same sheerness.
The large button made up the body. I stamped the polka dot wing in Enchanted Evening ink, onto spring rain cardstock, then cut out. Adhered it with a dimensional to the button. This “hid” the button holes.
For the “head” I had a little button with 2 mini holes to the side. I was going to use the button holes as NATURAL eyes, but decided that the Googlie eyes would be WAY cute, so I went with it!
My buttons are adhered to each-other, and my cardstock using mini glue dots! These are strong and virtually undetectable! LOL!
Now prior to assembling my Milk Made © Carton, I cut an inch below the score mark, of my Milk Made © Carton top.
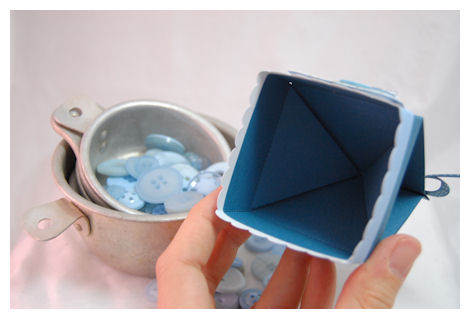
I then assembled my bottom, as I normally would, had the top been on.
I then stamped my sentiment on the carton top. and assembled that separately, completing as if it were ON my bottom.
Now the KEY to making this become a topper that STAYS IN PLACE: add a border around the topper lid!
See the inside of my topper?
By having a border overlap the topper edge, it gives that base something to slip into!
Easy on, easy off!
This tip will be included in the Exclusive Milk Made © TemplateIdea Catalog, that you receive when you purchase the template. The idea catalog has 5 exclusive projects, that are ONLY featured in the idea catalog! All the catalog designers put lots of time, effort and details into this catalog to ensure you have some super ideas! You get detailed step by step instructions, as well as a full list of supplies!!
Supplies:
My Timeless Template : Milk Made © Carton/ Crate
Stamps: Everyday Button Bits, Polka Dot Basics II
Ink:Snow White, Enchanted evening, Black, Copic Markers
Cardstock: White, Enchanted Evening, Spring Rain
Ribbon: Enchanted evening bitty dots ribbon
Vintage buttons: Spring Rain
Googlies eyes, Scallop border punch, labels nestability 1
*Be sure to check out Nichole’s blog for all the designer’s peeks and links to their projects!*
Thanks for stopping by!

My Etsy

Who I Designed For
Blogroll
- Alicia
- Alli Miles
- Ally Blankenship
- Amber
- Andi @ crafts on a whim
- Angel R
- Angie Z
- Anne Kranitz
- Becky O
- Bee
- Beth Silaka
- Bethany Paull
- Beverly Nash
- Bobbie
- Cambria
- Cammie
- Card of the Week
- Card Positioning System (CPS)
- Cards for Cancer
- Catherine Doucette
- Charmaine
- Cheryl Sims
- Chriss Rollins
- Christina
- Christine Ewing
- Christine Wooden
- Colleen Schaan
- Craft Critique
- Craft Gossip
- Crystal
- Dawn Easton
- Emily Giovanni
- Geny
- Holly
- Igne Groot
- Inspirational Craft Blogs
- Irene
- Jami Sibley
- Jeanne Streiff
- Jen del Muro
- Jeni Bond
- JenMarie
- Jenn Balcer
- Jenn Diercks
- Jenn O
- Jennifer E
- Jennifer Mick
- Jennifer Pereda
- Jennifer-Sweet Treat
- Joanne Basile
- Jodi Collins
- Julia Stainton
- Julie Masse
- Karen
- Kathryn Berthiaume
- Katie Cotton
- Kelley Holland
- Kendra
- Kim Scholfield
- Kris’s Color Stripes! Get inspired here
- Kristen Dubosque
- Kristin Eberline
- Kristine
- Laura @ Sunshine Stamper
- Laura Turnmire
- Laurie Schmidlin
- Lesa Rapp
- Linda Duke
- Linda-LSN
- Lindsey Botkin
- Lisa (lakind scs)
- Lisa Kind
- Lori Craig
- Maggie
- Mara Campbell
- Maria
- Maria Levine
- Mary
- MaryJo
- Melanie M
- Monique Hansen
- Moxie Fab World
- Pam Imholz
- PaperCrafts Connection
- Peppers and Pollywogs Kids party site
- Rebecca Grohall
- Rita
- Robyn
- Rose Ann
- Sarah Vrolyk
- Sharon Harnist
- Sharon Johnson
- Sharon Rivera (a chemisrty with paper)
- Sherrie
- Sophia Landry
- Storage Units, Ink, & More Blog
- Sue Berker
- Susan (Rainy)
- Tangii Crane
- Tracy
- Tricia Traxler
- Trudee
- Velta
- VivLyn
- Zena
MTME Pretty Palette Color Team
MTME Pretty Patterns Sketch Team
My Time Made Easy TM LLC
Shop till you drop!
Lauren Meader
About Me
Copyrighted material
Subscribe To My Blog
Pages
- About me
- Alexa’s Story!
- My Crafty Corner!
- My Time Made Easy™ LLC
- Our Make A Wish Trip to Disney!
- Resume/Publication List
Calendar
Archives
- August 2013
- July 2013
- June 2013
- May 2013
- April 2013
- March 2013
- February 2013
- January 2013
- December 2012
- November 2012
- October 2012
- September 2012
- August 2012
- July 2012
- June 2012
- May 2012
- April 2012
- March 2012
- February 2012
- January 2012
- December 2011
- November 2011
- October 2011
- September 2011
- August 2011
- July 2011
- June 2011
- May 2011
- April 2011
- March 2011
- February 2011
- January 2011
- December 2010
- November 2010
- October 2010
- September 2010
- August 2010
- July 2010
- June 2010
- May 2010
- April 2010
- March 2010
- February 2010
- January 2010
- December 2009
- November 2009
- October 2009
- September 2009
- August 2009
- July 2009
- June 2009
- May 2009
- April 2009
- March 2009
- February 2009
- January 2009
- December 2008
- November 2008
- October 2008
- September 2008
- August 2008
- July 2008
- June 2008
- May 2008
- April 2008
- March 2008
- February 2008
- January 2008
- December 2007
- November 2007
- October 2007
- September 2007
- August 2007
- July 2007
- June 2007
- May 2007
- April 2007
- March 2007
- January 2007
Categories
- About Me
- All That Scraps
- blogger challenge
- camera/photo play
- Cards
- Contests
- family stuff
- FOR SALE
- Home decor/3-D items
- How to FAKE it!
- Introduction
- JUGS Challenge
- JustRite Stampers
- Lizzie Anne Designs
- My family stuff
- My Stamping Space
- My Time Made Easy
- My Time To Color Challenge
- My Time to Create Challenge
- My Timeless Template Challenge
- My Timeless Templates
- Mytime Mail
- MYTIME MOVIE/VIDEOs
- Papertrey Newsletter
- Pink Cat Studio
- Pretty Palette Challenge
- Pretty Patterns Sketch
- Product Opinions and Must haves
- Recipe's
- Saturday Sketch
- Smilebox Creations
- Stampavie
- Tutorials
- Uncategorized
- videos
Most Popular
- Create your own Onesie Card Tutorial-and important NOTE! PLEASE READ (2529)
- Saturday Sketch-Boxed bag holder (2333)
- Going GREEN! Fancy Flower Flourish-Closure Video (1478)
- Fabulous Favorite - Giveaway! (1336)
- a Prayer Request (1231)
- QUICK-Easter Baskets from Nestabilities-PTI style-and blog challenge (1063)
- Teaser Sketch (999)
- February Release Giveway! (and a little peek) (996)
- Group Post and Rambling Rose Video Tutorial (985)
- GIVEAWAY! Who wants it all?! (895)
Recent Comments (RSS)
- 야동: Love to read it,Waiting For
- 야동: This seller is in a
- 바카라사이트: 여기 처음 왔어요. 나는이 게시판을
- 야동티비: I was surfing the Internet
- 바카라사이트: 비슷한 주제에 대한 흥미로운 정보를
- 바카라사이트: "여기에 제공해 주신 귀중한 정보와
- 온라인홀덤: 유익한 웹 사이트를 게시하는 데
- 홀덤나라: 나는 당신의 블로그를 정말 좋아합니다.
- lisa: Technology, too, has left an
- 주소모음: 흠 !! 이 블로그는 정말
Copyright © 2007 - My Time, My Creations, My Stampendence - is proudly powered by WordPress
This blog has been Tweaked and Designed by Sara Williams
41 Responses for "Everyday Button Bits"
That button bird is too cute!
Love this project! It is sooo adorable!
Sweet as can be…I just adore that little blue bird. You are amazing.
Melissa
Oh my Lauren! What a cute project!
What a fantastic little bird project. I love it!!
Very. very, very cute!
the buttons are perfect. Looks like a fun project to make.
That bird is adorable. This project is awesome and I am going to go broke with this release.
Lauren, you never cease to amaze…another fabulous idea…and so cute! Great idea for using the large buttons. P. S. Anyone on Synthroid should avoid flaxseeds. Thanks, Lauren!
so cute and a great way to use up the buttons I have. TFS!
LOVE your little bird – those googly eyes are perfect! I must have this set! And the granola recipe sounds delish – I’ve been wanting to make my own granola for a long time, so I’ll give this a try!
That bird is WAY CUTE!!!
get out! this bird is the cutest ever! love the milkbox and what you do……THANK YOU
so cute!…this set just seems so “you” 🙂
SO CUTE! ANd I love how you sponged the sky like that. Curious about the Polka Dots 2 you referenced! Was just about to place order for original but will definitely wait and see what other cuteness is being released. Oh, my poor wallet!
Ohhhhh….. what a great post! I see you mentioned a new color and stamp set! I’m really excited about both!
Love your project today – it’s so cute! It does look like a fun set to play with.
Yummy recipe too – thanks for sharing it!
Hugs,
Renee
Fantastic Lauren! I love the new colour!!! Wowzers!
Hmmm, Enchanted Evening ink??? Looks great; I am in love with your Blue Bird project! I love googlie eyes, so fun!
This is great! Love that template.
Lauren. . .simply adorable!! I so look forward to everything you create. . .literally everything because it’s all amazing! Just had to share that you are one of my top 5 favorite blogs!!
I am in love with this new button set…cute projects as always, Lauren!
shut up – this is TOO adorable! This milk template is really original and the bird is soooo cute! love it!
The eyes are just the cutest idea…makes me think he looking around for a worm :0) Another great job!
This is so cute, Lauren!!! Love your cute little bird with the googlie eyes!
Your take on the button bird is just the cutest!! This set looks like so much fun!
Lauren,
You are always thinking outside the box….. Love the way you used 2 buttons and the google eyes!! This is so stinkin’ cute! I love it!!!
Just one word: ADORABLE! As always, you have really created a unique and extraordinary gift. TFS.
Love the button bird!! Great idea going with the googlie eyes because that’s just how the Robins in my backyard look just before they are about to pounce on a worm:)
SO creative! The wing is perfect – the bird adorable!
OK, I’ve stopped laughing hysterically! This is so original!! You should be so proud of your creation!
You mentioned Milkmade Template idea catalog. Is this out already? Where do I get my grubby little paws on it?
Sharon L
So stinkin cute, really!!!!!!!
Just love that bird you made! This is a must have set!
The bird is just adorable, love the way you did the face way too cute!!
Gosh this is a fun post. A recipe too.
The pictures look great. Love the way you set it all up.
You don’t kid around one bit. I love it, you go ALL OUT!
What a fun set. And the buttons look like candy!!
Thanks for sharing.
Lauren, you always seem to amaze me!! I love the new templates. The new color is what I have been waiting for.
Cute!!! Lauren you are so creative! I love this template!!
Thank you for the recipe. I’m going to make some this weekend. I look forward to eating it too.
Hi There Laurenm,
Very interesting, i had my belly button pierced, just under a week go, it has been hurting a bit, but nothing unbearable. It is red around the openings and looks a little dry. It hurts a little if i bend or get into a certain position, or if i touch it. I haven’t yet got sea salt as everywhere i go i cannot seem to find it in the shops. I also haven’t washed my hands EVERY time i have touched it. I have been using the solution that the piercing place gave me, its an antibacterial Solution, which i have used everyday. BUT IS THIS NORMAL OR IS IT INFECTED?
Cheers
Hey Laurenm,
I take your point, I’m not sure why could this happen? I have a big belly. I’m little bit overweight, but not very big. I was perfectly fine for two weeks until I felt a pain inside my belly button. When I look at my belly button, I saw little bit of leak, also little bit of blood are coming out, and slowly filling up at my tunnel of my belly button. One thing I hate about this, it gives some unpleasant smell. It leaves some stains at my t-shirts I was wearing everyday. I have to change my shirt MANY TIMES. I decided to check my belly button, figuring out how does it leaks. Every time, my belly squish or bend when I’m about to sit. It leaks. When I sleep (laying on the bed) It doesn’t leaks. To prevent this leaking, I did some cleaning like using a cotton ball with alcohol, so the bacteria won’t spread over. Then I put a small paper towel on the top of my belly button. I know I need to go to doctor to check my belly button. But I need your suggestions first. How did this happen?
Keep up the posts!
Hey Laurenm,
I was wondering on a similar note,, I got my belly button pierced almost three weeks ago, and last night for the first time it bled a bit. Ive heard that it’s normal because I hit a scab inside the piercing, but there’s also been discharge (just white) I’m pretty sure it’s all normal. I’ve been cleaning it with this “simple cleanse” from a piercing store but I also have spectroderm and spectrojel. And of course, a sea salt soak almost everyday. Is this normal?
Good Job!
used golf balls pro v1…
Everyday Button Bits – My Time, My Creations, My Stampendence…
Leave a reply