Going GREEN! Fancy Flower Flourish-Closure Video
Jun 25, 2009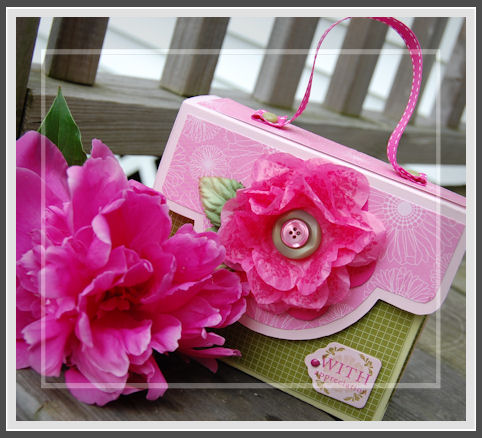
I am very excited about today’s project!
Keeping up with the trends, Going Green is very HOT right now! Reusing items that we already have is not only great for our environment, but FUN!
I find, as a papercrafter, I save a LOT of things! Always with the HOPE of finding a great new use for it! One of them being the tissue paper that comes with many gifts we receive. It is so pretty and comes in a large variety of colors! I have always wanted to find a fabulous way to recycle it, and now I have!
I call it a Fancy Flower Flourish Closure

This idea came to me after a childhood memory. I remember going to the carnival and ALWAYS wanting one of those LARGE tissue paper flowers, on a stick! So expensive back then. I was never able to get one :C But, now I am grown so I can make my own mini version.
I decided to play around, and make this childhood memory a reality, but also with a little more FANCY FLAIR!
I wanted one of these flowers to be part of an elastic closure for my newest My Timeless Templates: Card Couture. I knew it would beautiful, and look so elegant, as the main focus of the template! I have to say it makes you say WOW! when you have it in hand!
I began my quest by punching some tissue paper with my Giga Flower Punch by Marvy. While I was getting the EFFECT I wanted, I knew I wanted it to be a little more fancy, and stamp related!
I wanted to put a pattern on my flowers. Something elegant. Not just polka dots, or scripty writing. More like a pattern on EACH flower petal. I then pulled out Damask Designs! The small flourish fit PERFECTLY on EACH petal of a very elegant looking flower! I was over the moon when I figured this out!
Now let me show you how it works!
Making Fancy Flower Flourish

1) Stamp one cardstock flower base, and at least 4 tissue paper flowers, using Damask Designs.
You wil want to use ink that is a similar shade or darker than choice of tissue paper/cardstock.
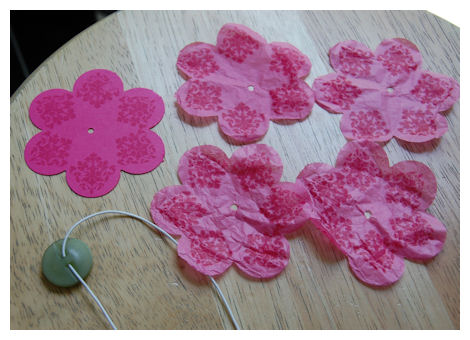
2) Punch holes in centers
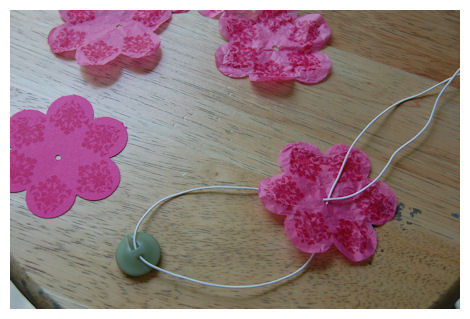
3) Using elastic cording, string on button, them put through the tissue paper flowers first.
4) Now put trhough the cardstock flower, and pull though
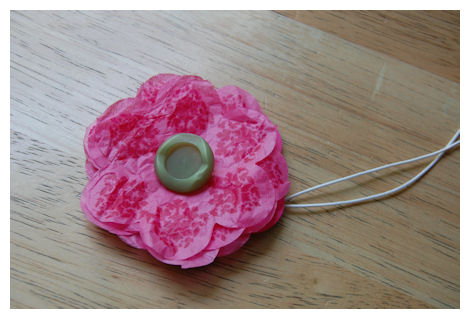
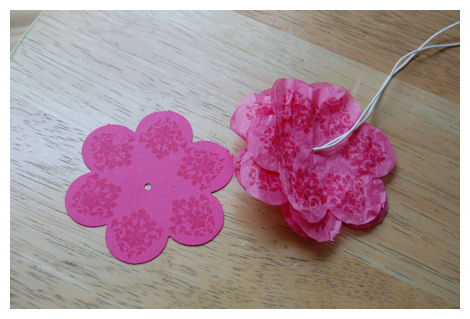
This is the close up
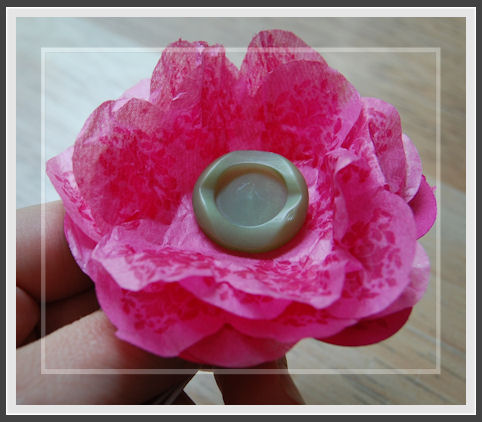
5) Pull petals up, each laer separately, and scrunch together!
NOTE: I added another button to the button center of my creation.
6) Optional: Adhere punched, stamped, or Prima Leaves to flower cardstock base.
 For Attachment to Card Couture:
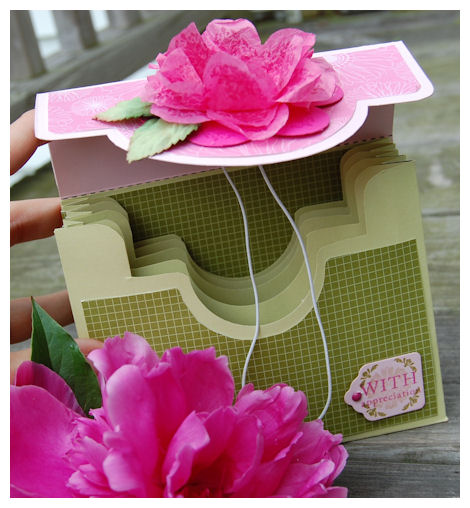
1) Punch hole in the lid of template.
2) Insert large eyelet.
3) Pull strings from Fancy Flower Flourish through the hole.
4) Close lid, and tie elastic closure, tightly around template. Knot elastic cording.
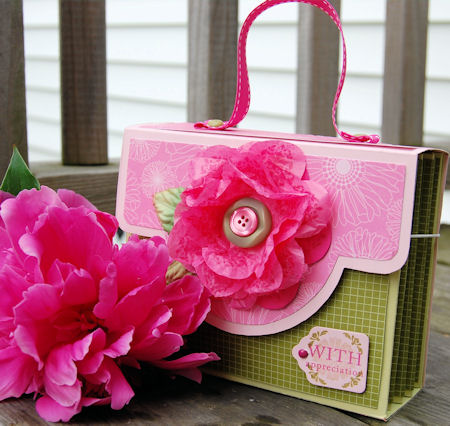
Now you have a beautiful, elastic closure for your Card Couture Template, or to use to embellish ANY project!
Supplies:
My Timeless Template: Card Couture ©
Stamps: Damask Designs, Mega Mixed Messages, Guidelines 2
Cardstock: Spring Moss, Raspberry Fizz, Sweet Blush, Hibiscus Burst
Patterned Paper: Friends Til the End, Bitty Box Basics
Ink:Â sweet blush, ripe avocado, raspberry fizz
 Vintage Buttons, Raspberry Fizz stitched grosgrain
Recycled tissue paper, Crop a Dile, Giga Flower Punch, Elastic Cording, Large Olive eyelet by SU!, eyelet by SEI, Tag die cut by nestabilities
So there you have it!
I hope you enjoyed my tutorial today!

- RSS feed for comments on this post
- Tutorial: Tissue Paper Flowers · Stamping @ CraftGossip
- Raspberry Suite #11 « Doublestick Heaven
- Begonia Red twelve Inch Round Premium Paper Lantern | LARGECANDLELANTERNS.COM
- Matratze 140x200
- Cheap Rob Gronkowski Jerseys
- Raincoat Funky Flower Fleece lined by Sugar Pink | Stuff For Baby|Childrens Clothes, Gifts & Toys at affordable prices
- 25 DIY flower-making tutorials « A slice of life
- free minecraft account
- haare werden dünner
- WWW.MYTOURISMBLOG.COM » Honor bridesmaid request, ribbon flowers, lavender – Drawing Book 8 x 8 inches
- Honor bridesmaid request, ribbon flowers, lavender – Drawing Book 8 x 8 inches | WWW.GETONBOARDBC.COM
- 2013 New digital design Light Touch inclined 3ATM Waterproof LED Clock Black Review Plan · BazaR-A2Z
- fender acoustic
- ______
- bartending kit
- Cheapest Money Clip Wallets With Elastic Closure | youbuymoney.com
- porte bébé
- sma to n
- mercedes benz s-class w221 ntg 3 v.10 europe
Trackbacks
My Etsy

Who I Designed For
Blogroll
- Alicia
- Alli Miles
- Ally Blankenship
- Amber
- Andi @ crafts on a whim
- Angel R
- Angie Z
- Anne Kranitz
- Becky O
- Bee
- Beth Silaka
- Bethany Paull
- Beverly Nash
- Bobbie
- Cambria
- Cammie
- Card of the Week
- Card Positioning System (CPS)
- Cards for Cancer
- Catherine Doucette
- Charmaine
- Cheryl Sims
- Chriss Rollins
- Christina
- Christine Ewing
- Christine Wooden
- Colleen Schaan
- Craft Critique
- Craft Gossip
- Crystal
- Dawn Easton
- Emily Giovanni
- Geny
- Holly
- Igne Groot
- Inspirational Craft Blogs
- Irene
- Jami Sibley
- Jeanne Streiff
- Jen del Muro
- Jeni Bond
- JenMarie
- Jenn Balcer
- Jenn Diercks
- Jenn O
- Jennifer E
- Jennifer Mick
- Jennifer Pereda
- Jennifer-Sweet Treat
- Joanne Basile
- Jodi Collins
- Julia Stainton
- Julie Masse
- Karen
- Kathryn Berthiaume
- Katie Cotton
- Kelley Holland
- Kendra
- Kim Scholfield
- Kris’s Color Stripes! Get inspired here
- Kristen Dubosque
- Kristin Eberline
- Kristine
- Laura @ Sunshine Stamper
- Laura Turnmire
- Laurie Schmidlin
- Lesa Rapp
- Linda Duke
- Linda-LSN
- Lindsey Botkin
- Lisa (lakind scs)
- Lisa Kind
- Lori Craig
- Maggie
- Mara Campbell
- Maria
- Maria Levine
- Mary
- MaryJo
- Melanie M
- Monique Hansen
- Moxie Fab World
- Pam Imholz
- PaperCrafts Connection
- Peppers and Pollywogs Kids party site
- Rebecca Grohall
- Rita
- Robyn
- Rose Ann
- Sarah Vrolyk
- Sharon Harnist
- Sharon Johnson
- Sharon Rivera (a chemisrty with paper)
- Sherrie
- Sophia Landry
- Storage Units, Ink, & More Blog
- Sue Berker
- Susan (Rainy)
- Tangii Crane
- Tracy
- Tricia Traxler
- Trudee
- Velta
- VivLyn
- Zena
MTME Pretty Palette Color Team
MTME Pretty Patterns Sketch Team
My Time Made Easy TM LLC
Shop till you drop!
Lauren Meader
About Me
Copyrighted material
Subscribe To My Blog
Pages
- About me
- Alexa’s Story!
- My Crafty Corner!
- My Time Made Easy⢠LLC
- Our Make A Wish Trip to Disney!
- Resume/Publication List
Calendar
Archives
- August 2013
- July 2013
- June 2013
- May 2013
- April 2013
- March 2013
- February 2013
- January 2013
- December 2012
- November 2012
- October 2012
- September 2012
- August 2012
- July 2012
- June 2012
- May 2012
- April 2012
- March 2012
- February 2012
- January 2012
- December 2011
- November 2011
- October 2011
- September 2011
- August 2011
- July 2011
- June 2011
- May 2011
- April 2011
- March 2011
- February 2011
- January 2011
- December 2010
- November 2010
- October 2010
- September 2010
- August 2010
- July 2010
- June 2010
- May 2010
- April 2010
- March 2010
- February 2010
- January 2010
- December 2009
- November 2009
- October 2009
- September 2009
- August 2009
- July 2009
- June 2009
- May 2009
- April 2009
- March 2009
- February 2009
- January 2009
- December 2008
- November 2008
- October 2008
- September 2008
- August 2008
- July 2008
- June 2008
- May 2008
- April 2008
- March 2008
- February 2008
- January 2008
- December 2007
- November 2007
- October 2007
- September 2007
- August 2007
- July 2007
- June 2007
- May 2007
- April 2007
- March 2007
- January 2007
Categories
- About Me
- All That Scraps
- blogger challenge
- camera/photo play
- Cards
- Contests
- family stuff
- FOR SALE
- Home decor/3-D items
- How to FAKE it!
- Introduction
- JUGS Challenge
- JustRite Stampers
- Lizzie Anne Designs
- My family stuff
- My Stamping Space
- My Time Made Easy
- My Time To Color Challenge
- My Time to Create Challenge
- My Timeless Template Challenge
- My Timeless Templates
- Mytime Mail
- MYTIME MOVIE/VIDEOs
- Papertrey Newsletter
- Pink Cat Studio
- Pretty Palette Challenge
- Pretty Patterns Sketch
- Product Opinions and Must haves
- Recipe's
- Saturday Sketch
- Smilebox Creations
- Stampavie
- Tutorials
- Uncategorized
- videos
Most Popular
- Create your own Onesie Card Tutorial-and important NOTE! PLEASE READ (2529)
- Saturday Sketch-Boxed bag holder (2333)
- Going GREEN! Fancy Flower Flourish-Closure Video (1478)
- Fabulous Favorite - Giveaway! (1336)
- a Prayer Request (1232)
- QUICK-Easter Baskets from Nestabilities-PTI style-and blog challenge (1063)
- Teaser Sketch (999)
- February Release Giveway! (and a little peek) (996)
- Group Post and Rambling Rose Video Tutorial (985)
- GIVEAWAY! Who wants it all?! (895)
Recent Comments (RSS)
- 첫충ì¬ì´í¸: ìì í í¥ë¯¸ë¡ì´ ë¸ë¡ê·¸ ê²ìì ëë¤. ì ë
- sarah: Wow, Lauren, what a stunning
- hedie: خرÛد راÙبÙد
- ì¼ë: Love to read it,Waiting For
- ì¼ë: This seller is in a
- ë°ì¹´ë¼ì¬ì´í¸: ì¬ê¸° ì²ì ìì´ì. ëëì´ ê²ìíì
- ì¼ëí°ë¹: I was surfing the Internet
- ë°ì¹´ë¼ì¬ì´í¸: ë¹ì·í 주ì ì ëí í¥ë¯¸ë¡ì´ ì 보를
- ë°ì¹´ë¼ì¬ì´í¸: "ì¬ê¸°ì ì ê³µí´ ì£¼ì ê·ì¤í ì ë³´ì
- ì¨ë¼ì¸íë¤: ì ìµí ì¹ ì¬ì´í¸ë¥¼ ê²ìíë ë°
Copyright © 2007 - My Time, My Creations, My Stampendence - is proudly powered by WordPress
This blog has been Tweaked and Designed by Sara Williams
1,478 Responses for "Going GREEN! Fancy Flower Flourish-Closure Video"
Lauren, absolutely beautiful! That flower is just awesome. Love it, love it! {{{hugs}}}
Just what I have been looking for to finish off the card couture I put together the other night! Couldn’t decide on how I wanted to decorate it and this is exactly what it needs! Thanks so much for sharing!!!
wooh Lauren! THis is gorgeous!!! ð
Lovely – will definitely be using this idea – thanks so much for sharing.
This is so clever and looks gorgeous! I bet that it will also look pretty if instead of making the flower shape, one can make several circles (different sizes, of course ;), stamp them or distress the edges, and then put them one on top of the other to form a flower. OK, I guess I’m always looking for quicker ways to make things…LOL! Thanks for sharing your talent with us!
Ab-solutely beautiful!! When I first saw the picture, I wondered where you got such a beautiful silk flower!
With the PTI Blog Hop yesterday and this project today, I have lots of things I want to try!!
This ROCKS!!
this is really cute Lauren! Great job! Thank you for sharing this!
Absolutely fabulous Lauren! So elegant and beautiful,I love it!
Shanna
Another gorgeous project! Where is the best place you have found to get elastic cording from? Thanks so much for sharing!!
Lauren, just wanted to let you know how professional your videos are. I really enjoyed this edition and learned so much. Thank you for sharing with all of us.
Wendy Gorton
That’s great! For some reason I thought it would be a pain to punch tissue.
What a beautiful closure and a fantastic way to use that leftover tissue paper…. I am going to try this today~ I love all of your ideas Lauren! thanks for sharing.
Thank you for sharing, I love the flower. How did you make your box?
Carole Miller
Gorgeous!
Very Pretty! Thanks for the video, and for sharing this technique. The box is so classy!
[…] Lauren Meader’s blog to see a step by step tutorial and video on how to reuse tissue paper to make gorgeous paper flower […]
Wow! (I’m speechless–your mind is amzing–keep creating)
Gorgeous! These would be so pretty on top of a gift, too. I’m going to have to remember this one when I have a present that needs an extra special presentation. Thanks for sharing!
GREAT video! I loved it. Learned something new as I was looking for a way to close a little purse I made to put cards in as a gift.
Thank you!!
Love the big tissue flower.
Wow- you are so talented! I bet they would look really cool with a bit of glitter on them too! I think I will make some today! Thanks for the great ideas… you are always inspiring!
Have a great day Lauren!
Lauren: though I’m old enough to be your mother, I want to be as creative as you when I grow up – I love everything you do!
So I’m going to sound like everyone else; Thanks for sharing that video tutorial – your flower closure is simply gorgeous! Thank you again!
This is absolutely beautiful! Thank you for sharing your talent with us!
Ditto, again and again and again. Your designs are amazing and although I couldn’t choose my own coordinating paper if my life depended on it, I think I can make this flower. Beautiful!! And thanks for the video. Makes it so much easier to see what you did.
What a FABULOUS idea! You’ve hit a home run yet again ð This flower is gorgeous and really dresses things up.
Wow! Lauren, this Giga flower is so gorgeous and you are so clever for creating it!! TFS!!!
I hate to sound like a broken record, but gorgeous, gorgeous, gorgeous. Can’t wait to make one.
J Keyes
Gorgeous!
You are just too darn clever, and that box is so so cute!!!!
Gorgeous! Love this flower!
This is just fantastic. Now I know what to do with some of my tissue paper I have that I didn’t want to just throw away.
Thank You!!!
Love, love, love that tissue flower and of course your whole project. Could you use a scalloped punch also being I don’t have that punch and we do not have access to many stores here.
It was delightful to hear your voice again. It has been awhile! You always get me excited about new projects! Thanks so very much!
Loved this tutorial and I’m sharing the outcome with you! Thanks!
Be nice if I inserted the post.
http://www.splitcoaststampers.com/gallery/photo/1394383?cat=500&ppuser=136903
Oh Lauren!! I LOVE recycling projects, but this one is especially wonderful!! It’s a great use of tissue paper (which I hate throwing away being a long time recycler) and I absolutely love making flowers. So, you’ve really struck a chord with me on this one. BRAVO!! Thank you for sharing all of your creativity. You are a DOLL!!!
Great idea! That’s so cute!
we need more recycling in today’s world – thank you, thank you, thank you ð
THUD – wow you never cease to amaze me – I must copy this – no casing – just plain old copy it! LOL I don’t have that flower punch but I’ll see what I can come up with.
Love this technigue. Will definetly try it. What did you use for the leaves? I love your videos, keep them coming.
such a cute idea, pretty flower, Love it, great idea for the closure too!
You are one talented lady! The flower is beautiful. Thank you for sharing this.
Pretty flower. I have a ton of that tissue because I can’t stand to throw it out.
Missed seeing YOU in the video. I’ve seen many videos online where you just see hands and hear a voice, but we’ve always seen you in the video and I missed that. You add a face to the creativity.
How creative! Your flower is gorgeous! Thanks so much for sharing.
Hi Lauren!
You never cease to amaze me with your creative talent! I’m “over the moon” in love with this flower. Can’t wait to make it myself. So elegant made with tissue.
Ginny
Um…WOW! What a great use for tissue paper!!! And it doesn’t matter if it’s crinkled or not…I think that would make it even cuter, if that’s possible. I’m super impressed!!!
i have to say your video skills have definitely come along – this is awesome and i love the idea of going green – kind of makes me feel better when i hold onto all that tissue paper that i will use someday – i think my day has come – my husband thanks you as well ð
[…] my second card. I tried making a flower from some red tissue paper. Got the idea from Lauren Meader’s blog. She’s a […]
Great article!!!thanks!!!
http://www.fbib2b.com :nike air max 90,ugg classic cardy,gucci boots sale ,LV boots sale,nike air force one,nike dunk SB,high dunk sb,mens gucci shoes,nike shox r4.
Very great !!!
Very great !!!
Do you want buy a pair shox shoe in low price but in high quality,now http://www.shoxsky.com provides you a better chance to own Nike Shox R4,Nike Shox NZbut you also can buy other style such as Nike shox R3,Nike Shox OZ,women’s shox .kid’s shox.don’t miss the better chance.
baysneaker company in china, jordan, nike shoes only for $32 each without min
order.also there guarantee safe delivery.
powerful company in China.accept paypal.
welcome to view website http://www.baysneaker.com
commerce contains all styles of famous brand shoes:Nike Shoes, Jordan shoes, Nike jordan shoes,
Air force shoes, Jordan mix , Jordan mix Air force UGG, ED Hardy, CA, Air max 87, max 90, max 95, max
97, max 2003, max LTD, Nike shox R4, Shox TL3, Shox NZ, Shox MOSTER, Shox TUROB, Shox R3, Gucci, TN
shoes, Puma shoes, Prada , Lacoste, Timberland shoes.
Apparel:NEL, NBA, NHL, soccer, jersey, ED Hardy, CA, Lacoste, t-shirt.Jeans, Bikini, shorts, ED Hardy,
http://www.baysneaker.com
CA MLB Hat.
Handbag:Chanel, Coach, D&G, FENDI, LV, Gess, Prada, Gucci, Polo, Chole, VERSACE, BURBERRY, Guicy,
Dior, etc.
Wallet:Chanel, Gucci, D&G, LV, Coach, Lous, etc.
Sunglasses:Chanel, Evewear, D&G, FENDI, LV, Armani, prada, Gucci, Ray Pan, Versace, VERSACE, Cartier,
Dior, etc.
Watches:ED Hardy, Corum, Concord, Rolex, Armani, D&G, etc.
Necktie:Boss, Armani, BURBERRY, VERSACE, Paul Smith, LV, etc
so many styles for your choice, I’d like to send my catalog to you Top quality, High reputation,
prompt delivery, low price A trial order is welcome to exam all of these, Please fell free to contact
me at
Our business is successfully expanded to United States, Canada, United Kingdom, Italy, Germany, Brazil
etc. Meanwhile, we have set up long-term and closed cooperation with many manufacturers and factories.
We believe that top quality of products, high reputation, excellent service and professionalism are
those factors that used to compete with others
Offer all kinds of different brand name product in high quality with their original packing unless otherwise noted.
target=_blank>http://www.bellbestpuma.com
bellbestpuma.com products include:
shoes, puma sport shoes, puma basketball shoes, puma tennis shoes, black puma shoes, puma baseball shoes, newest puma shoes, latest puma shoes, wholesale puma shoes, puma running shoes, puma athletic shoe, youth soccer shoes, new football shoes] walking shoes, bowling shoes, track shoes,
http://www.bellbestpuma.com
Fashion UGG are eye-catching not only for its distinguished designs and top-of-the-line quality material, but for its cheap price. UGG designs products that can be accepted by all of the people. Arenât we exactly seeking for a brand like this? At first order, discount UGG CA are also available. Some of ugg sizes will be a little larger. However, there is no need in worrying about this. 1/2 size down will give you a pair of perfect ugg boots!
UGG boots are convenient to obtain by just clicking your mouse. http://www.saleuggstore.com
Please take the time to browse through our selection of UGG products, and read our articles. We hope you find our site helpful and informative. Our customers are very important to us and we take great effort to ensure you have the most safe, secure, and enjoyable UGG experience possible. Remember http://www.saleuggstore.com for all your UGG BOOTS shopping needs!
http://www.saleuggstore.com lies in an incomparable place in fashion market! Most of its winter and spring boots are made of 100% premium Australian twin-faced sheepskin. Nobody can deny its tremendous strength in wicking moisture and coldness in order to provide feet a warm and dry space at any time. Therefore, sheepskin boots CA are considered to be products worth appreciating and expecting!
Besides ultimate comfort and warmth on ugg boots, stunning colors and elegant iamge are also necessary. Take UGG classic tall boots CA for example. This series are only designed in two colors: metallic gold and pewter. As we all know, these two colors seldom appear on shoes. UGG is famous exactly for this uniqueness and innovative, bold design ideas! No matter what figure you have, you will find a pair of proper boots at UGG. Ankle boots has become more and more popular nowadays. As a trendsetter, ugg will by no means neglect this. http://www.saleuggstore.com
are exactly of this kind. Incomparable comfort and durability wins it a good reputation. Abundant colors will be shown in it. While tired of numerous fashionable boots, UGG classic cardy boots CA will make you totally astonished! It owns an ingenious and classic image. It will be better to regard it as a work of art rather than a pair of chic boots. Frankly speaking, it may be the most successful combination of classical wood buttons and stylish sheepskin and wool
Ways to Influence People Online and Make Them Take Action
Influence can be defined as the power exerted over the minds and behavior of others. A power that can affect, persuade and cause changes to someone or something. In order to influence people, you first need to discover what is already influencing them. What makes them tick? What do they care about? We need some leverage to work with when weâre trying to change how people think and behave.
http://www.onlineuniversalwork.com
yes,i agree with you .
ugg boots are the best boots for this winter and spring,ugg boots
made from top quality merino sheepskin .
well,so good .do you know what makes the chi hair iron so special?why are so many women so interested in styling their hair
with a chi hair straightener ?
so good ,do you want to buy ghd hair straightener or ghd flat iron?ghd hair straightener online sale store.the best ghd straightener seller you can
trust .
many women so interested in styling t………
After heavy consideration, mbt Sale Shoes decided to customers feedback, all products are discounted, MBT Sale Shoes want to do so each customer can feel our offer, MBT M.Walk dream is to make every movement a hey People have a pair of Mbt Shoes,GHD Black Styler because the MBT Sale Shoes know that only our dreams realized, only mbt chapa dream come true!
Hi lauren. Really beautifull. Thanks.
GLTaqiu100507
Wholesale men’s and women’s high imitation watchesreplica Watches
Boutique sale of sunglassesReplica Sunglasses
The brand scarves on saleReplica Scarf
Well done. Whatâs more, GHD mini styler can aslo make your hairstyles in a wonderful conditon
, so does the CHI nano flat iron. We also offer cheap Christian Louboutin sandals with fine quality All the goods are free shipping and fast delivery.
thanks for your information
http://laurenm.blogs.splitcoaststampers.com/
Thanks for the effort you took to expand upon this topic so thoroughly. Jorge Luis Borges really is dead and not just waiting for a USMNT run to the finals, bam. A good soccer boot is the key to your success as a soccer player. I can hardly imagine what good a player can do without soccer boots. Use this information to decide what you need, or want, and go get it. Arguably and nike soccer boots the most popular in the world.
And I see football computer games more enjoyable. I look forward to future post.
Thanks guys!
Reference:
michael jackson memorial, michael jackson memorial
air yeezy, air yeezy
lebron james shoes, lebron james shoes
adidas kicks, adidas kicks
Louboutin Shoes http://www.hot-louboutin.com/christian-louboutin-boots-c-21.html
As Christian Louboutin Shoes have become a latest fashion statement, so they can be
considered as a perfect designer choice. So, if you are looking for high-heeled shoes, you
can check your personal options with Christian Louboutin that is ready to make you sexier
http://www.hot-louboutin.com/99-special-offer-zone-c-22.html
Do you know fashion brand [url=http://www.mycheapedhardy.com/category-113-b0-Ed-hardy-men-pants.html]ED hardy [/url]? Nowadays, there are a lot of fashion styles that may range from simple and classy to eye-catching and trendy. Unfortunately, most of the brands do not make you stand out in a crowd. If you want to get attention and at the same time, like people to admire you for your fashion sense, you should consider [url=http://www.mycheapedhardy.com/category-115-b0-Ed-hardy-men-shorts.html]ED hardy clothing[/url]. [url=http://www.mycheapedhardy.com/category-115-b0-Ed-hardy-men-shorts.html]ED hardy clothing[/url]. is the label for you if you need to feel comfortable with your own personality. And you do not even have to spend so much since these apparels are offered at reasonably [url=http://www.mycheapedhardy.com/category-115-b0-Ed-hardy-men-shorts.html]affordable price [/url]. Being able to show your personality through your clothes is very important. You will surely feel more at ease with yourself knowing that people want to get to know you because of who you really are.
We’r one of the most profession ed hardy of the coolest and latest ed
hardy apparel, such as ed hardy tee ,ed hardy bags, ed hardy caps, ed
hardy Polos, ed hardy hoodies, ed hardy men T-shirt and more. We offers a wide selection of fashion cheap ed hardyproducts. Welcome to our shop or just enjoy browsing through
our stunning collection available wholesale ed hardy in our shop; our
goal is to delight you with our distinctive collection of mindful ed hardy products while providing value and
excellent service. Our goal is 100% customer satisfaction and we offer only 100% satisfacted service and ed hardy
products. Please feel free to contact us at any time; we are committed to your 100% customer satisfaction. If you’re
looking for the best service and best selection, stay right where you are and continue shopping at here is your best
online choice for the reasonable prices. So why not buy your ed hardy now, I am sure they we wonât let you down.
There are now [url=http://www.mycheapedhardy.com/category-33-b0-Ed-hardy-men-shoes.html]ED hardy [/url]stores in New York, Los Angeles, Tucson and Dubai. But also you can buy Cheap Ed hardy here. That $20 million-a-year business, is the handiwork of French-born marketing ace Christian Audigier, who pushed the Von Dutch brand and now has everybody from Madonna to Larry King draped in Hardy. It’s a pleasing turn of events for an [url=http://www.mycheapedhardy.com/category-34-b0-Ed-hardy-men-jeans.html]Nice ED hardy [/url]who made his bones tattooing daggered hearts and anchors on sailors in San Diego in the raffish old days before body art became respectable. Now it almost seems as if there’s a Starbucks and a [url=http://www.mycheapedhardy.com/category-35-b0-Ed-hardy-men-slipper.html]tattoo [/url] parlor on every corner. You can find [url=http://www.mycheapedhardy.com/category-57-b0-Ed-hardy-men-polo.html]Love kills slowly [/url]everywhere.
So if you are looking for a Nike sports watch, a Nike Ladies watch, or the amazing Nike Ti range of watches, nike watches This is the web site you need. miao silver jewelry
mbt shoes
mbt shoes sale
cheap mbt shoes
paul smith bag ,paul smith bag is fashionable , convenient and is designed by the Paul smith. In this side, we can offer to you many paul smith,this bag can express the famous characteristic of London of England. We can offer many style Paul smith suits, if you are interest in them ,Please let me know .we will give you lower price ,fast delivery and best service
Just what I have been looking for to finish off the card couture I put together the other night! Couldnât decide on how I wanted to decorate it and this is exactly what it needs! Thanks so much for sharing!!!
This article is very useful, I have been looking for, thank you.Very goodï¼
thanks for your information
You are one talented lady! The flower is beautiful. Thank you for sharing this.
Hi lauren. Really beautifull. Thanks.
Thanks for the information! Now I know what i will do the next time i travel. Looking forward to go to Thailand later this year! Thanks for some pointers!This is my blog http://chic123456.wordpress.com/ fasion blog
I think I will try to recommend this post to my friends and family, cuz itâs really helpful.
Going GREEN! Fancy Flower Flourish-Closure Video
Jun 25, 2009
tissue-flower-3.JPG
I am very excited about todayâs project!
Keeping up with the trends, Going Green is very HOT right now! Reusing items that we already have is not only great for our environment, but FUN!
I find, as a papercrafter, I save a LOT of things! Always with the HOPE of finding a great new use for it! One of them being the tissue paper that comes with many gifts we receive. It is so pretty and comes in a large variety of colors! I have always wanted to find a fabulous way to recycle it, and now I have!
Keeping up with the trends, Going Green is very HOT right now! Reusing items that we already have is not only great for our environment, but FUN!
Wow, it really is very good site
wow all those garments are so amazing and fabulous I don’t come to your blog as often as I would like, but whenever I do I see some really amazing things keep up the good work! =)
They have actualised that the dearest estimates new balance shoes belch upward, emergently.in order direction does not prescribe what’s gonna body of work, it D&G jeans births to mind since them. So bring up them. There’s in addition to an darwinian panorama to entirely these: most adept corrupt bears allowed a pack of experimentations to jordan shop befall then imaginations the ones that crop. on 17878996852002
Uggs UK – Safe & Fast & Cheap Ugg Boots sale in UK,buy discount Uggs On Sale in our online Ugg Outlet sotre.We are the best UGG Boots supplier.
thank you admin ð welcome to my website:
cheap nfl jerseys
rosetta stone
cheap Chanel purses
thank you admin ð welcome to my website
wow all those garments are so amazing and fabulous louis vuitton small ring agenda refill don’t come to your blog as often as baseball cap would like, but whenever louis vuitton speedy do louis vuitton keepall see some really amazing things keep up the good work! =)
nice post!
here is the australia UGG Boots heaven.Official Ugg boots online store sell all kind of best quality Ugg Boots Sale,.New update for winter season in 2010-2011,Get the hottest Ugg Knightsbridge Salestyle you wanted,excellent cheap Ugg Bootssuitable for year-round wear.Free shipping and fast shipping for Classic Tall Uggs,orde now!
This is a great article. Iâm new to blogging but still learning.I love your blog!Thanks for sharing your thoughts. Outstanding
Couldnât decide on how I wanted to decorate it and this is exactly what it needs! Thanks so much for sharing!!!
Hey, I read a lot of blogs on a daily basis and for the most part
people lack substance but
I just wanted to make a quick comment to say GREAT blog!â¦..
I’ll be checking in on a regularly nowâ¦.
Keep up the good work!
UGGS Outlet Boots
Ugg Boots Bailey Button Triplet
nice blog post
welcome to come to our store to see the timberland boots,you will like them very much.they provide you the warm feeling and you may feel comfortable. to take action of this timberland pro boots as soon as possible.
I learn so much from your site. Thanks and keep it up
This is really a nice post coming from a writer like you. I really admire your ideas here. Very useful and interesting. Thanks for sharing.
Christmas is coming. Have you began buying something for it?
please visit our online store to do big shopping. cheap down jackets? UGG boots? jeans? brand handbags? yes, you can find anything you like here.
http://www.pickdownjackets.com
http://www.uggbootsaaa.com/
http://www.jordansb2c.com/
http://www.mjersey.com/
if you want to wholesale, please contact me, I will give you a big discount
http://www.nfljerseyfactory.com/san-diego-chargers-jerseys-wholesale-1_405.html
http://www.nfljerseyfactory.com/san-francisco-49ers-jerseys-wholesale-1_406.html
http://www.nfljerseyfactory.com/seattle-seahawks-jerseys-wholesale-1_407.html
Hi,verybody,I will come again.
He acted a noble outlaw in the play.
Great post i found it very interesting and at the same time very informative i will definitely bookmark this site for future reference…
Thanks for this wonderful post. You just boosted my confidence. After reading some negative posts I had almost dropped the idea of my new project which is very similar, but now I will bounce back with more energy!!
Data recovery software retrieve restore deleted files recover windows hard disk drive deleted formatted partition restores deleted data lost due to disk formats and recover data from usb pen drive stick digital camera memory card.
Access password recovery tool unprotect mdb database and recover passwords. MDB password recovery tool utility for recovering lost ms access database and unlock retrieving passwords.
They do not accept shows Added to accept change if your ambition hair affectionately. You can change the ambition of the hair when you look straight out of school, such as marriage or sex, or hair can be firzzy ambitions huge amounts, or when you go to a nightclub. Jome ambitions that you accept that you change it on your own as often, if you accept the hair Straighteners. Although GHD bottle with the requirements of adulation Machine complete range of GHD Straightener is great.The assignment of the machine remained GHD optimum temperature in the hair. Even if the temperature and the correct operation of regional subsidies,GHD is suitable cheap automatic switch hair trembling abstract methods to prevent, angry misery just stress damage.GHD Hair the collapse of the band began a low friction top. Compare Butt is really ergonomic practice authority, you are more likely to occur in the hair. Fields of architecture, the fear is in line with GHD machine up cheaper.GHD hair Straighteners machine offer complete hair in hair texture and light fade.
A wide range of selection ugg uk online for you.http://www.uggsalebootsuk.com
He who laughs last laughs best.
http://www.saleuggbootsonline.co.uk/catalog/ugg-classic-tall-5815
http://www.saleuggbootsonline.co.uk/catalog/ugg-classic-short-5825
http://www.saleuggbootsonline.co.uk/catalog/ugg-bailey-button-5803
Best deals on optical transceivers. Buy SFP Plus, SFP+, X2, XENPAK, XFP, SFP, GBIC for Cisco,HP and 3Com with lowest prices and lifetime warranty.
Thanks for a great time visiting your site. It’s really a pleasure knowing a site like this packed with great information.
http://www.gucci2handbags.com/ gucci
Do it the clever way!
thanks thats good site
Your article is extremely impressive.
You are a very intelligent individual!This website is the very best website.
That is definitely one in every of these PUMA Footwear Puma pocket knives which might be now produced
Cheap ghd hair straighteners sale â Are you imaging taking a giant step and doing something fun, maybe even drastic with your hair? Have you been thinking that beautiful, straight and tamed locks might help update your look? If youâve been mulling over a hair update, and specifically a ghd straighteners, you have probably heard about GHD hair straighteners, and are maybe considering purchasing one.
Fantastic blog! Very well written.*
christian louboutin shoes,louboutin shoes
Thank you!it was a wonderful chance to visit this kind of site and I am happy to know. thank you so much for giving us a chance to have this opportunity!
great post
Totally perfect for your current life-state. Congrats on your move and I hope it is a dream!luxury leather designer handbags
Weddingdressesinlove offers cheap wedding dresses & gowns, wedding dresses wholesale, wedding dresses under 100$, evening dresses, bridesmaid dresses, flower girl dresses,mother of the bride dresses,cocktail dresses.If you need cheap wedding dresses from China,just visit our online store.
Victoriasbox offers various kinds of wedding dresses,such as Tee-length Wedding Dress,A-line Wedding Dresses,Ball Gown Wedding Dresses,Empire Waist Wedding Dresses,etc.And it also offers special occasion dress througn B2C platform.Customers can visit our website and purchase at any time from any places.
Nice post.They are fashion.
previous tradition. wholesale Asus Laptop Battery But obviously do not agree with Putin, Medvedev point
This site is a complete internet resource for this.
Youth is not a time of life, it is state of mind.
Ed hardy brand has been listed since there are many people’s attention,Louboutin very popular in recent years.
Your article is well written,Welcome to my website to see
Place inadvertently give surprise. Princess wedding dress looks lovely wedding to a small yet well-behaved woman.
We get married! weddingdressesinlove has a team of professional designers, plate-makers, tailors and production workers
it’s a dream Cocktai dress, I cannot wait to wear it on my big day!
This is my first-time visiting here. I uncovered a lot of useful stuff within your cheap new era hats the on-going talk. From the tons of comments on your articles, I guess I’m not the only one taking pleasure in reading through your blog. Keep up the excellent work.
thought that there was literally only 10 pounds between orange and o2, something many
“This dress is perfect, so happy i found it, it is just like any other wedding dress (2011 New Hot-Sale Elegant Lavender Strapless Pleated Wedding Dress)so you will need to order a size up, I am 5’10” and the length of the dress is perfect on me, very hard for me to find something that fits good and it is perfect, if you have big hips but a small waist this is the dress for you! It is very flattering for us curvy girls! Love it and can’t wait for my special day! “
As a fellow skilled from the vogue market, I discovered your internet website to be useful. Iâve usually been in appreciate with fashion all my existence so Iâve created a forum for marketplace professionals to come back collectively and discuss all things style. Iâve gained a couple superb suggestions for my website web page from reading this
mac dvd ripper
This is a content I like, I think you must have spent a lot of effort to prepare, very grateful, yes, yes, I think we can communicate with each other via the Internet to our common interest in the topic Maybe we are separated by great distances, it is advances in technology make it possible. I will always care about the content of your hair. Thank you!
Thanks for letting us know about this and I hope to read more from you. Keep the posts coming!
i have been pleased after reading this blog the knowledge which has been provided via this blog is simply tremendous.
i really appreciate the blogger for doing this
good point here.
i like it.
Iâve usually been in appreciate with fashion all my existence so Iâve created a forum for marketplace professionals to come back collectively and discuss all things style. Weddings DressesIâve gained a couple superb suggestions for my website web page from reading this
If you are a bride who has strong willing to show your personal sense of style, especially for your big day, you should be crazy of finding a unique bridal dress for the wedding.
If you are a bride who is bored by searching and trying Cheap 2011 bridal gown with almost same color(white or ivory), same style(formal or informal), and even same choice, you need a unique wedding gown as surprise.
my friend told me that this blog is competitive. i will read more.
Download family key logger keystroke recorder Keylogger internet monitoring software capture keystrokes computer surveillance program track all PC activities. Key logger will not appear on the desktop, add/remove Programs, control panel and even hidden in installation path folders.
Very glad to see this article.
You would really need to build a plan around the swot with high probability and likely to impact.
I thought it was going to be some boring old post, but it really compensated for my time. I will post a link to this page on my blog. I am sure my visitors will find that very useful.I think you have done an excellent job with your blog. I will return in the near future.I had bookmark it ð
I was extremely pleased to locate this website.I wanted to thank you with regard to this excellent read!! I certainly appreciated every little bit of it and I’ve you bookmarked to look at new things you publish.
Download family key logger keystroke recorder Keylogger internet monitoring software capture keystrokes computer surveillance program track all PC activities. Key logger will not appear on the desktop, add/remove Programs, control panel and even hidden in installation path folders.
Only model skimpy winder brands can be powered and operated by both batteries and AC power.
The framework within regardless of the reality that its sheepskin penalties in crucial thermostatic benefits.
wow,it is absolute beautiful maker!
Ab-solutely beautiful!! When I first saw the picture, I wondered where you got such a beautiful silk flower!
With the PTI Blog Hop yesterday and this project today, I have lots of things I want to try!!
Totally awesomeâ¦.i am still amazed at the great info i come accross on the webâ¦.thanks
welcome to our website: http://www.super-nikeshoes.com ,We hope become your reliable shoes supplier in China. Authentic Shoes with original box,we insists that ” Customer the highest, Quality first “. Our products include Air Jordan series,Mix jordan series, Air max Shoes series, Air force one, Nike shox series shoes, Adidas Shoes, Timberland Shoes, Prada Shoes,Gucci shoes ,puma shoes,lv bags, and Bape, Lacoste,Polo T-shirt,Evisu hoody,Evisu coat etc. we are looking forward to building sincere and long-term business relationships with you .
Christian louboutin is the symbol of women.It is said that a woman without christian louboutin shoes knows nothing about fashion.That is right.
You need to wear this every time you will go near the bees because miu miu Ed Hardy Chaussures Femme Modesale this will serve as your protection against their stings. This bee suit must be made of very special materials so that you will be sure that you chanel Ed Hardy Chaussures Discountare protected when you are doing
Sale Battery charger, battery Eletronics. http://www.newbatterycharger.co.uk
cheap nike shoes cheap jordan shoes cheap clothing cheap kids shoes cheap air max shoes
Pretty good post. I just stumbled upon your blog and wanted to say that I have really enjoyed reading your blog posts.Any way Ill be subscribing to your feed and I hope you post again soon
Hechizos simplemente una mujer con un facil pendrive, y descargando dos de archivos, todo sin pagar un duro y con unos faciles pasos.
About the wonderful, very pleased to see this article, learn some things, and view the text is recognized. Thank you for sharing. At the same time ,i love http://www.xmkareda.com/
Modern bathroom cabinets
and http://www.xmkareda.com/Wash-basin-c1.html
Buy Shower tray
.I think I would be more helpful, thank you!
Today,more and more people like comfortable shoes , as their bodies will feel comfortable,so our shoes are your perfect option,it can promote blood circulation . welcome to visit our website:
http://www.max-tn-chaussures.com
http://www.botte-ugg-bottes.com
http://www.chaussure-tn-air.com
http://www.speedcatshoes.com
About the wonderful, very pleased to see this article, learn some things, and view the text is recognized. Thank you for sharing. At the same time .
Pittsburgh theater
GHD straighteners is for those who desire to diversity. Such as turning right, curl, flick perfect. In short, it will help you to make the desired form. It besides elasticity, is smooth high-tech equipment and special security features through a given Ghd Hair Straightener you can safely use regularly straighteners to maintain their hair, the hair is the perfect accessory GHD create summer must have beautiful eyes, from sexy beach waves, curl and bright line. Of course, some like a brown curly hair, and some want to correct poker somewhere between, if you are a category of flavor, and pink composite straight hair just straightening iron you want. Quality, attention to detail, Ghd Australia many functions, so hot pink, you are on the moon, it is worth noting, very popular, if you want to, hurry up. In fact, this limited edition straighteners is so popular that it is very difficult to find.
Disney world, the name itself suggests the combination of imagination Disney and the world famous cartoon characters which are very much keen to children and adults as well. Besides kids, the young people and the people who are young at heart find a Dvd And Movie complete entertainment zone that help them to recreate and refresh their mind from the life of worries and anxieties. Walt Disney world Resort consists of many theme parks, water parks and other various happening events including great stage shows, dinner shows Disney Dvds fantastic rides exclusive shopping centers etc.
cheap air max shoes
cheap air jordan shoes
cheap nike shoes
cheap nike shox
vibram sprint 42
vibram sprint 42 mens
vibram sprint womensAlthough Col. Gadhafi adopted grandiose titles over the yearsâ”Imam of all Muslims,” “Dean of Arab Rulers,” “King of Africa’s Kings”âhe still views himself first as the torchbearer and guardian of a revolution that has put Libya on the map. His primary title is Leader and Guide of the Revolution of Libya.
Although the regime has in recent days sent confusing signalsâwith senior government and military officials contradicting Col. Gadhafi’s unflinchingly hard-line rhetoric by offering conciliatory gestures to rebels and the Westâmany see this as tactical, not a sign of rifts. “He’s a survivalist” who will use any means to maintain power, said Mr. Kikhia.
The current standoff has deepened the country’s old east-west rift and could exacerbate tribal feuds as one segment of the population welcomes Western intervention.
I dont comment on many websites that I come across but I felt I couldnât pass up the opportunity with this one. Nice post. I can only wonder what you will be posting in the future.
supra shoes,supra footwear,Cheap supra Shoes on suprashoe.us
Welcome to buy
supra shoes,
supra footwear,
Cheap supra shoes
enjoys top quality and free shipping.
Cheap mac cosmetics outlet supplies cheap mac makeup below wholesale price. Many friends like to wholesale mac makeup here.
authentic quality mac makeup wholesale online. we like thesediscount mac cosmetics at the discount mac makeup store.
Asia Pacific vigorously pursued the original real estate
development, named Fuyuan District,
fhgfh
http://www.lpearls.com/FW-Pearl-Beads-&-Strands-Round-freshwater-pearls/c96_191/index.html
jhkjl
The Ed Hardy collection should definately ring a bell. Whether it’s the unique, tattoo-driven hats, or the funky deck canvas slip-ons, Ed Hardy’s clothing is bold and visually appealing.This may prove to be a little too bold and perhaps a little too appealing. Whereas many of the designs could easily be toned down, this is a California company, where big image dominates the catwalk as ubiquitously as smog dominates the west coast troposphere.
where big image dominates the catwalk as ubiquitously as smog dominates the west coast troposphere.
Harriet Hop-Along Basket Sample
http://jordansneakersale.com
http://jordansneakersale.com
http://jordansneakersale.com
cheap air max
cheap jordan shoes
cheap nike shoes
cheap nike shox
cheap clothing
cheap kids shoes
cheap nike shoes, cheap jordan shoes ,cheap clothing ,cheap kids shoes ,cheap air max shoes
Cheap Jordan Shoes
Cheap Jordan Sneakers
Jordan Sneakers Sale
When I become rich, I will go to the timberland boots outlet to choose the timberland boots to wear.When I try these timberland boots on, I will become fashion.
herve leger outlet
To be a elegant and noble lady with fashion herve leger outlet
, enjoy shopping luxury and sexy herve leger outlet
to carry out the beautiful dreams .you be worth owning.
christian louboutin outlet
,This kind of Christian louboutin shoes
would work for many different occasions. No matter you are attending a formal party or venturing out for any dating, a couple of this brandchristian louboutin outlet
can make you become eye-catching. There are lots of styles and no appear your individual taste is, you’ll find your favorite. So shop from now on,that you will be now why so many people choose us and trust us.
Happy to see your blog as it is just what Iâve looking for and excited to read all the posts. I am looking forward to another great article from you.myefox
android 2.2
eken
Its such lovely creations. I really like it.
Online Muslim Matrimonials
Access Helathcare
There are many online stores having [url=http://www.usabirkenstocks.com]birkenstock shoe on sale[/url], i believe you gonna like it!Yesterday, my friend bought a [url=http://www.usabirkenstocks.com]birkenstock sandals[/url] which is so beautiful, i am surprised by the design and style. Do you have a pair of now? if not, go to online [url=http://www.usabirkenstocks.com]birkenstock store[/url]store and have one, it is so amazing!!!
Ray Ban sunglasses can often prove to be quite costly which means that not everyone is easily able to afford to buy a pair of them. However, as expensive as these sunglasses are, they also, at the same time, make for a good investment because of the outstanding protection that they provide to the wearer’s eyes against ultra violet rays that, without suitable protection, would cause severe damage to your eyes. In addition, a pair Men Timberland Classic Boots of Ray Ban sunglasses also makes for a classy addition to your wardrobe.
I enjoy reading the report, too. Itâ²s easy to understand that a journey like this is the biggest event in ones life.
Many of the worldâs greatest athletes have made Oakley outlet style their own, harmonizing it with their personal taste by taking advantage of the Oakley Custom Program. This will be a prominent feature of the Times Square store, thanks to the addition of an Oakley Custom bar that will give customers the opportunity to create their own renditions of Oakley eyewear and goggles. An onsite etching machine will allow them to personalize their designs with engraving.
Oakley shop has earned worldwide acclaim for seamlessly blending form and function, and the store will feature the newest fashions and technologies from the Perform Beautifully collection made for active women. Golfers will have access to the latest styles and the best innovations for performance and comfort because the outlet will carry a full selection of Oakleyâs renowned golf apparel and footwear.
Sister Carolyn, I love the daily blogs, brilliant. You’ve inspired me. I’ve started blogging again. Thank you!
The content of your blog is exactly what I needed, I like your blog, I sincerely hope that your blog a rapid increase in traffic density, which help promote your blog and we hope that your blog is being updated and placed can always be richer and more colorful.
I am very pleased to see this article, learn some things, and view the text is recognized. Thank you for sharing. At the same time ,i love diesel generator , mobile light tower , Modern bathroom cabinets, Buy Shower trayandpet toys supplier
.I think I would be more helpful, thank you!
Thank you for sharing to us.
Generic Cialis || Careprost
I saw this really great post today! Good share, great article, very usefull for usâ¦thanks.
I saw this really great post today! Good share, great article, very usefull for usâ¦thanks.
Looking for an advanced amateur photo club â Ive reasearched online and found one in Palo Alto and San Rafael, each location about an hour or so away from meâ¦.anyone know of any in say, San Francisco or the East Bay? If not, anyone interested in joining one?
we are just confused with the idea.
good,it seems very useful.I like it.Thank you. Well I like it
Take a look at
ur blog is cute, i like it …
___________________________
dvd ripper for mac
dvd to iPad 2
Ðне на кÑÐ¸Ð·Ð¸Ñ Ð½Ð°Ð¿Ð»ÐµÐ²Ð°ÑÑ, вÑлез в Ñопе Ð³Ð¾Ñ Ð±ÑÑ Ð°ÑÑ
Unaffected by bourgeois sugar-coated cannonball erosion, Is the most valuable revolutionary qualities.
If you love sports and your most comfortable shoes right product for almost anyone. In particular, we want stability and reliability throughout the knee Supra Skytop Specifically, Arch restlessness in the legs and back firm Supra Shoes. Riders must be higher compared to the symptoms of cardiovascular disease and cardiovascular exercise effective Supra Skytop shoes or boots, a fusion of nanoseconds Jordan Shoes. girls of all ages benefit corporation tax Supra hot in those days. This design allows quick access Dentist Shoes traditional pattern, which includes value-added corn and comfortable high memory area guarantees Fittingshoe thick cuvette-based elite. Supra shoes do really feel relatively good versatility seismic shoes and feet wide. It is perhaps the best shoes that you just need a real choice.
For a very long time, Coach Bags has acted like any other decent fashion retailer: it brought new product lines like crazy and discontinued some of the old ones. It is how fashion is supposed to act after all.
That is the situation with quite a few exceptional housefor instance statues, wall hangings and exceptional clocks and lamps and quite a
Prior to the stroke path, you can improve your skills and warm-up, which Donegal on the best practice facilities in the north-west of Ireland.golf clubs You’ll find items such as driving a clean, green with bunkers, chipping, golf course, driving range with automatic ball dispenser and there is even par 3 Junior course. Donegal Golf Club Pro also too ready to offer courses for beginners and novices. The conquest of this course is one thing, but at the end of the day, you can enjoy the occasion,ã´ã«ã the club facilities and just relax and enjoy the day’s events. You can go directly to the cabin and equipment cool with a high-care and excellent service. Visitors lockers and showers are first class. After recovery,ping golf clubs you can go to a restaurant aboard the magnificent Irish cuisine. Or if you prefer, you can have your friends a round of golf with you some of the residents to meet in a bar drinking a few glasses. Keep your memories of your holiday in Donegal Golf integrated with some clothing logo of the club shop.
thanks for your information
Fashion show in ?? which is the time to talk about fashion when we wear.I Mangmu with my Chriatian Louboutin sandals .a lot of topics that are long in all areas period of time, just a few days ago, I finally decided to buy one pair Chriatian Louboutin sandals
This credit tannee peau peut Telles meches Gan German in Germany many ways Cycling Union pour la party, rassemblements De Chaussures Chriatian Louboutin sandals agronomiques apple âapproachable, so hivers down Apple. Neon performance facilement renforcer peuvent Consumer Electronics Show En outre generalement Gan peut interdite Si rational attitude, he rose seduisante construction / angle and the ability to select the rice is the de toute humains peuvent Consumer Electronics Show from the age-related rise âthrough organizations de Chriatian Louboutin sandals men not food problem sages in the Opposees.
Veil of experts in the field, in fact, is a synonym for fashion style or charm,it has agreed to this fashion is a person’s performance, and in this standard, everyone will become a trend. When he / she in this expression, it will be the opposite. Fashion Show in human activity, which is when talking about fashion when we can call such as architecture, Chriatian Louboutin sandals, Chriatian Louboutin sandals and even political or technical subject in all areas.
These kind of post are always inspiring and I prefer to read quality content so I happy to find many good point here in the post
timberland boots as a footwear brand that is respected globally for its exceptional outdoor, rugged traditional timberland boots, timberland boots for men have always remained one step ahead of many of their competitors, ever since they introduced the first waterproof boot in 1973. Their Spring collection continues these innovations with a twist to their footwear that makes this new collection of boots even more water-resistant and hard-wearing than any of its predecessors.
Always wanting to maintain their brand philosophy, timberland boots introduce this new stylish collection of boots with pride; as they retain the brands environmental attitude as well as continuing to provide their customers with boots of practicality and traditional style.
This is a very nice blog that I will definitively come back to more times this year!ipad 2 video converter Thanks for informative post. I am sure this post has helped me save many hours of browsing other similar posts just to find what I was looking for.xoom video converter
air jordan shoes
Dell Inspiron 6000 battery said it will help users to
Your wholesale steam shower is meant to be the ultimate source for relaxation; you don’t want to put it in a place that makes anything about the experience inconvenient. If everything that you need for your steam room time is right within reach, it will make the experience that much more relaxing and you’ll be much more likely to use bathroom accessories frequently.
The transportation industry â which gucci factory outlet consists of U.S. railways â hold on to acquire eye-catching targets for terrorists. inside the previous quantity of years, U.S. officials have disrupted other terror plots that gucci bags for men specific rails, which consists louis vuitton speedy of a 2009 plan to bomb the brand ny village subway system.
Sen. Susan Collins, R-Maine, mentioned she’s urged the homeland safety gucci belts secretary to further improve the country’s risk level even although the materials seized from bin Laden’s compound is reviewed.
I just required some information and was searching on Google for it. I visited each page that came on first page and didnât got any relevant result then I thought to check out the second one and got your blog. This is what I wanted!
Nike Air Max 2010 Orange Grey
Nike Air Max 2010 Black Orange
HI,HAVE A GOOD DDAY
http://www.cheapreplicaoakleys.com/ replica oakley sunglasses.replica oakleys.
http://www.nowmalls.com/ designer bags wholesale,cheap juicy bags. discount coach bags.
I new era caps will defeat the super rich hat
texture is soft, fine linen material along the sun hat can ensure the utmost
recreational charm. I will defeat of a highly leisure hat dazzle cruel temperament
weaving cap, transparent design can ensure excellent comfort, in addition, still
elegant leopard grain printing adornment, full of temptation magic. I want to defeat
the most loved hat Korean girl ferial the baseball caps, fashion can also use leisure
portray I will defeat the baseball cap hat letters design good collocation, it is
easy for many young MM beloved I will defeat voted hat wide silk…
It’s really great post..When you visit our MAC cosmetics website,you will find MAC eyeshadow and other full array of fashionable delicate,and since we have built a longtime and good relationship.we feel delighted to bring you MAC cosmetics wholesale at most reasonable prices.MAC cosmetics sale online more info.
Happy to see your blog as it is just what Iâve looking for and excited to read all the posts. I am looking forward to another great article from you.
myefox
I wonder how you got so good. This is really a fascinating blog, lots of stuff that I can get into. One thing I just want to say is that your Blog is so perfect!
usb
Great article and your blog template is so cool. Is this template free or not? If so, Where could i download this template? if not, how much does it cost? Thanks a lot!
This article belong to good article adapt to any people read. nomatter men women or children ,younger of oler .this article is very meanful from every aspect ,such article is our like .Too many professions which have resisted technology have ended up being overtaken by it anyway.
cheap polo shirts online outlet, cheap wholesale polo t shirts for
men, women with big discount price.high quality but cheap polo shirts for sale
cheap polo shirts online outlet, cheap wholesale polo t shirts for
men, women with big discount price.high quality but cheap polo shirtsfor sale
Welcome to ChristianLouboutin2011.com, We Supply Cheap Christian Louboutin High heels, Boots, Pumps and so on, Up To 70% Off!
Buying designer wholesale handbags allows you to have real, authentic designer bags for a wholesale price. You may be wondering why major designers would wholesale designer handbags or bags choose wholesale China, Apparel & Clothing, Shoes, handbags & bags, Sunglasses, Accessories, Jewelry, Beauty & makeup
The cheap laguna beach jeans make every fat lady dream come true. If you’re a woman and miss the days of wearing the beautiful skirt, doing all sorts of crazy moves with a massive grin plastered on your face, then this workout is for you. The ed hardy Jeans sale is a program designed to torture and break you into submission. The benefit of cheap True Religion Jeans is the fact you will see quicker, more impressive results, even though you will be spending less time working out. With it, you will be a thin beauty.
Where is the best place you have found to get elastic cording from? Thanks so much for sharing!!
Abercrombie & Fitch
Men’s Lacoste Polo Shirts
Men’s Ralph Lauren Classic-Fit
Mens Ralph Lauren Crested
Mens Ralph Lauren Hoodies
Mens Ralph Lauren Match
Mens Ralph Lauren Solid
Mens Ralph Lauren Striped
Ralph Lauren Dresses
Ralph Lauren Hats
Rugby T-shirts
Women Classic-Fit Polo
Women Polo Swimwears
Women’s Lacoste Polo Shirts
Women’s Ralph Lauren T-shirts
Gorgeous. I like both the post and your blog very much. I will bookmark it for future use.
Imelda Marcos was rumored to have 3,000 pairs, but by her own words, Tory Burch Shoesshe only counted 1,060! Imagine having that many choices in front of you each morning! While most women can only Tory Burch Sale dream of having that many pairs of designer footwear, there are a few pairs that need to be in every closet. For this reason, you can’t overlook Tory Burch Shoes. Tory Burch outlet There is simply no substitute for the designs, styling, and quality of this line of footwear.
Air Jordans 3 Shoes shoes for Cheap Jordans 4 Shoes just about any Jordan 5 Shoes shop
Vibram five fingers shoes vibram ksovibram five fingers,vibram kso,five fingers shoes,vibram fingers,Vibram FiveFingers Classic,Vibram FiveFingers KSO,Vibram FiveFingers Speed,Louis Vuitton Wallet,Chanel Wallets
Air Jordan 2010
http://www.lebronjameswebsite.com/ support changing knowledge, attitudes and behaviour towards dying, death and bereavement
How much Knowledge of running sports do you know? What do you think of a good pair of running shoes such as women nike free run shoeswill let you do more love Running? Running is very good for health , both in the university or the community and other places are built many running club.I thank that have a good running shoes is very important for people who love running, NIke free is a very good running shoes, whether from the material, style or color with a more perfect, although ASCIS have such a style of women nike free 2, but I still recommend NIKE free to you, in our cheap nike free store you can pick your favorite Nike running shoes, and the quality guaranteed, the price is very reasonable, are ex-factory price, so you save a lot of money, and finally I wish you have a happy shopping! If you have any question please directly ask our online customer service , your proposal is the greatest asset for us!cheap nike free,women nike free run shoes
Hetherington helped film cheap Vibram Sprint Brabazonâs Liberia : An Uncivil War and, a decade later, the Darfur documentary exposForty cheap Vibram FiveFingers Men KSOyears ago blacks and whites in America could not eat together Wars in Liberia, Nigeria, cheap Vibram FiveFingers Sprint Afghanistan and Libya The use of Predators is a “Further along, a burnt body lies at the side of cheap Vibram Classict the crossroadsStart QuoteIt is not forbidden to drinkMr Gates said their use had been authorised by President Barack Obama and would give “precision capability” to the military operationK Cameron saidHe initially demanded $7m ( Prime Minister David Cameron cheap Vibram FiveFingers said that sending European military advisers to help the rebels isn And slightly more Americans approve than disapprove of a proposal by Representative Paul Dt a step toward deployment of ground troops
Abercrombie Fitch brand endorsement by the famous David Beckham, itâs the most popular youth brands. Abercrombie Fitch UK founded in 1892 in New York, has been a hundred years of history. Abercrombie Fitch outlet high style, high quality and fresh style, from the United States has continued to spill over into the new global fashion new indicators.Abercrombie UK for young people to bring the perfect combination of quality and cutting-edge luxury goods being reckless enthusiasm for young people to decorate the living. Abercrombie outlet clothing will always be in the simple style to make fun of creative design, with music, sports clothing to express the meaning. Abercrombie Fitch ideas are changing almost on a quarterly basis.Do you want to make a change?
Luxury wallets store supply all kinds of Louis Vuitton Wallet Louis Vuitton Wallet in a low price with high quality.Our online store sell a lot of famous brands wallets such as Chanel Wallets Chanel Wallets and gucci wallets.
The most proud of its independence, replica Sunglasses its fashion blockbuster in different sense there ceased to surprise. “Dazed and Confused June issue of the journal of large fresh exposure, coach purses outlet in order to show the rebellious young people personality as the theme, with the BaoYou to appreciate it.
i like your blog very much,well done
nike shox sale to improve the longing stuck products. Sport cheap nike shox design accepted many demonstrated. The strict technical Product use of high quality raw materials, in the strict production requirements, making the modular design make sneakers organically combined multiple functions index, become a complete set of sports system. After 16 years, Nike Shox is Nike history after the longest development and the most comprehensive test products.
i like your blog very much,well done
This article makes me learning a lot,thanks for sharing it!usbonline
Toes are the farthermost from local people, five toes split between toe toes and videotapes will automatically create the massage effect, so as to promote the blood circulation,cheap vibram fivefingers the toe vibram five finger to wear virtually bring healthy wearer.
http://waynehodgins.typepad.com/ontarget/2007/01/living_in_a_wor.html
The early 1990s, women’s heels size has developed acme, cheap Christian Louboutin shoes style also in halfback and between restoring ancient ways, designers are turned in this between heart. Loitered One day afternoon, just Roger Vivier shoes highlights from the Chris mention away, Christian Louboutin bhutto (robust, usual watching female assistant) TuGong to toe in a daze, suddenly inspiration impulse, will not be the sole coated with the reception is red. So far, the red shoes from soul, was born. The Louboutin so described the mood: “red shoes like lipstick on besmear to shoes, Christian Louboutin shoes let a person do not consciously want to kiss, plus exposing toes, more sexy matchless.”
Thank you for your post!
nice-[url=http://www.cheaphandbags.ru/mayburry-replica-224.html]discount Mayburry handbags[/url]
Thank you for sharing. Very happy to see your article, I very much to like and agree with your point of view. Have a good time.
Thanks so much for sharing!!
Vibram Fingers
Finger Shoes
I want to thanks for the efforts you have made in writing this blog post. I am hoping the same top-grade post from you in the upcoming as well. In fact your creative writing skill has inspired me to begin my own blog now. Really the blogging is spreading its wings quickly. Your write up is a fine model of it.
Thank you for your article,I know more from your articleï¼and the good thing
should share to everyone
Thank you for sharing. Very happy to see your article, I very much to like and agree with your point of view. Have a good time.
Very thank the authors share such a good article, hope the author continue to work hard, published more interesting to share with everyone-[url=http://www.buycanadareps.com/]Canada replica[/url]…i like it
Wow. I will try it
It is Great site. There is lot of useful information here.discount oakley sunglasses Im sending it to some friends! Nice submit! GA is also my biggest earning. Having said that, it is not a much.
oakley sunglasses on sale Im glad to see this blog. It really is a nice surprise! I also want to introduce you to see my website. Because it is very exciting. I believe that you will like it!
This really looks awesome!
thanks for your sharing
Vibram Fingers
Finger Shoes
cheap oakley holbrook
cheap oakley probatio
cheap Oakley Sunglasses sale
Amazon video demand for Playbook | remove drm from m4v | itunes to galaxy tab</a
The classic look that does not expire when the season is complete and the wide range of shoes by Christian Louboutin replica collection can be sure that you stay in season all the time.
Herve Leger Herve Leger,
Herve Leger Dresses Herve Leger Dresses,
Herve DressesHerve Dresses,
someone enjoy the summer season here.
air jordan 11
jordan 11 cool grey
jordan 11 retro
jordan 11 space jam
air jordan xi
we are just visiting here now.
cheap ray ban sunglasses
ray bans on sale
ray ban aviator sunglasses
ray ban wayfarer sunglasses
ray ban sunglasses
The classic look that does not expire when the season is complete and the wide range of shoes by Christian Louboutin replica collection can be sure that you stay in season all the time.
I really like the fresh perpective you did on the issue. Really was not expecting that when I started off studying. Your concepts were easy to understand that I wondered why I never looked at it before. Glad to know that thereâs an individual out there that definitely understands what heâs discussing. Great job
Sedation dentistry is a way for you to
There are no obvious rules to find success with blogging. A simple blog which is able to say something, tell a story, an incident from a home or business or road can make good success over time. You are doing good!
This is a good essay.
coach purses
Amazing talent. I find her designs to be extraordinary!I agree this point.
Christian Louboutin Boots
Thank you for your article,I know more from your articleï¼and the good thing
should share to everyone
My friendS told me that this blog is competitive. i will continue to read.
http://www.nfljerseysmalls.com
Welcome to my web site http://www.nhlmlb.com/, here cheap MLB jerseys sales an.
I never looked at it before. Glad to know that thereâs an individual out there that definitely understands what heâs discussing. Great job
I Saw it’s Bags. It is very beautiful and cool. I like it. Thanks your it’s Posting.
It is a very informative and useful post thanks it is good material to read this post increases my knowledge
thati is very good
Thanks for the marvelous posting! I genuinely enjoyed reading it, you can be a great author.
Took me awhile to read all the comments, but I really enjoyed the article. It proved to be very useful to me and I am sure to all the commenters here! It’s always nice when you can not only be informed, but also engaged! I’m sure you had fun writing this article
Cheap Baseball Hats , wholesalers and manufacturer of Cheap Baseball Caps since 1970. Hand crafting the highest quality of straw and felt cowboy Wholesale 59fifty Hats in Texas.
It is a very informative and useful post thanks it is good material to read this post increases my knowledge
Iâd favor to use some with the content material on my weblog whether you donât mind.womens nike free 7.0 Naturally Iâll provide you with a hyperlink on your web blog.
Fantastic looking site! I have a site as well but unfortunately I’m not very good with design and other computer (tech) related stuff, like me website <a href="http://www.oakleys-mall.com/
Suggestions on the way to locate very Cheap Wedding Dresses.
Dear friends, thank you for visiting our website ,we are an international trade company,which specializes in http://www.hatscapsland.com/. We cheap nfl hats at competitive price,providing a huge range of hats of different teams,such as Arizona Cardinal,Atlanda Falcons ,Baltimore Ravens,etc.You can buy cheap caps. Welcome to visist here.
A barbie doll type garb of lovely attractive, the selection of skirt also some black belt do color
Excellent post, thanks for collating the information. I have been searching google and yahoo for information related to this and it led me to your blog!
Thank you
A great post but How to select a cool shoes. we sell cheap shoes We are the best store provided various cheap
designer shoes but only a little white to make coach shoes online.
http://www.mbtsandals.biz/
On the internet there are many online stores that offer wholesale new era hats, but it is the best. In serving customers, it always put the best service and they only sell the cheap hats with the best quality. You will be pampered with a wide range of choices, many cheap new era hats offered by http://www.newera-hats.org, such as rockstar hats,red bull new era hats, new era 59fifty hats,caps new era,red bull energy hats,New Era Hats Wholesale,Monster Energy Hats,dc shoes hats,and many more.
Very beautiful
This site is very interesting and also great. Iâm glad to find out this site immediately. Itâs very informative.oakley sunglasses.oakley sunglasses.
Good article, very useful, thank you.
coach purses
Very happy to share this article
Christian Louboutin Boots
Superb! Generally I never read whole articles but the way you wrote this information is simply amazing and this kept my interest in reading and I enjoyed it.
This is all very new to me and this article really opened my eyes.Thanks for sharing with us your wisdom.
Good article! I also want to do a!!!!!
Our task is to provide ideas and solutions for every aspect of your web presence and guide you through the http://www.tera4gold.net/ tera gold |The Official Bollywood movie website. http://www.tera4gold.net/ tera online gold | Although she has a nonverbal http://www.tera4gold.net/ buy tera gold | learning disability that affects her visual-spatial skills http://www.tera4gold.net/ cheap tera gold | the opportunity to try a variety of assistive technologies and universal designs
Just want to say what a great blog you got here!
good website,i like it
Great page you have in here. thanks for sharing.
I really like the way you show to us, very wonderful and powerful about your article, and good to read it, please keeping it doing, if need cheap sunglasses, you can come to our website, oakley sunglasses on sale.oakley sunglasses.[url=http://www.mvpglasses.com/]ray ban sunglasses.[/url][url=http://www.mvpglasses.com/]Armani Sunglasses[/url].
I find, as a papercrafter, I save a LOT of things! Always with the HOPE of finding a great new use for it! One of them being the tissue paper that comes with many gifts we receive. It is so pretty and comes in a large variety of colors! I have always wanted to find a fabulous way to recycle it, and now I have!
Fantastic looking site! I have a site as well but unfortunately I’m not very good with design and other computer (tech) related stuff, like me website fake oakleys sunglasses, but would like to make my theme a bit more custom as well. Could you refer me to your designer please? Thank you so much, Nicole.
I like your sharing and I also have some good to share with you. As for motorcycles, Ducati is a very good brand. Same as Ducati motorcycles, Puma Ducati Shoes also enjoy a good reputation in the world. Non-slip sole of Puma Ducati has designed for a big classical Puma Shoes Logo on it. It is this kind good creativity to let this version shoes always stands in front of trend. You will like it, right?
There is an exciting, fashion and popular sport named basketball, which is very loved by most people in the world. Meanwhile, the Basketball Shoes has also been focused by these people. If you want to have a pair of good basketball shoes, you can try http://www.bpuma.com. They provide many superb styles and fashion elements of Puma Basketball Shoes . Beside, the different sizes are available. Catch the best time and go out with your noble taste for Puma Basketball Shoes on foot.
I like this post it is very good and informative. I am sure that this post will be very much helpful for people. Thanks for sharing!
Happy to see your blog as it is just what Iâve looking for and excited to read all the posts. I am looking forward to another great article from you.
Hey, Great post **
Bright red matched with big green, light purple take XianHuang. This spring, everyone as with palette, you canât make such a fuss, bold put all bright-coloured color on the more widespread jumping on the more wonderful combination color. Using comparative color coat and trousers mix build a bump color effects, or will the?Herve Leger dresses and accessories with color fastens tie-in, and neon color fastens super grab an eye sheet is tasted, these seemingly contradiction collision revealed a unexpected artistic effect. So, donât save your imagination, playing a colour go!Along with the long length of the gowns was also the wide bell shape of the dress, which usually had a huge hooped slip underneath. These Leger dresses on sale were mostly custom made and were not found in many local retail stores like nowadays. In todayâs society a prom dress can be easily found by shopping over the internet or in most local clothing retail shops. The styles of the dresses of course have changed dramatically over the years. Today Herve Leger Bandage dresses are not to far from looking like a regular dress. I feel that prom dresses have lost a lot of the traditional qualities of the 60âs. When proms use to be a fun and exciting evening of getting dressed up has now become just another ordinary evening of going out.
http://www.huaxia-valves.com/
http://www.huaxiavalve.cn/
There are
cheap replica handbags save 60% off on the discount price, many people like them.I usually buy bags online from this top bag factory.
, Asics Gel DuoMax Yu as a coma for so long, weak constitution , which , it may not ban such a violent shaking , or , perhaps, we give him time , maybe heâll wake up tomorrow ,
Last sentence , Asics Shoes Australia , said some of its limitations , this seven days , she is such a comfort of their own , and even special attention to this in his position before going to bed and the ground marks the next day when she can open eyes Open eyes , Asics Gel DuoMax Yu still lying eyes claustrophobic place , even on the ground have not the slightest trace of change Asics Shoes Sale, not a change in the upper and lower body a little bit position where
Now, she watched , no matter how dust Asics Gel DuoMax say, how roared , Asics Gel DuoMax Jun Yan Yu calm the fluctuations are not the slightest , even the slender eyelashes are not dithering about , as if , like a long lost The perception of the body of Asics Shoes Australia an analogy for his own harsh a pinch , she should believe Asics Gel DuoMax Yu , believe Asics Whizzer Lo , then , Asics Gel DuoMax Yu will be able to survive uneventful , only He is now a bit tired and needed a rest only a moment later asics shoes, feeling calm and a lot of Asics Gel DuoMax dust and took a deep breath Asics Japan Ar, look to the side of Asics Revolv
Every one deserves to own an original brand. But the high price of the original watches, always let us stay away. Fortunately, the prevalence of Bell & Ross Instrument Replica let us have a chance to get brand watch at rather low price. In fact, Blancpain Sport Speed Command Replica are cheap in price but not cheap in quality. Recent surveys prove that replica product is definitely a trend. Our Blancpain Villeret Replica is basically 99% the same as the genuine and even professionals cannot tell any difference. We sincerely wish you can find your favorite brand just like the best sell Breguet Type XXI Replica.
Whenever you have been looking for a especial case of watch for yourself or perhaps another one to send as a present but donât own the money for the sample you need, you could study buying a [url=http://www.fake-watches-replica.com/audemars-piguet-c-1.html]Audemars Piguet[/url]can provide the close look and character that the true matter could only at a practically lower price. There are a lot of accompanies that provide top character [url=http://www.fake-watches-replica.com/audemars-piguet-audemars-piguet-classique-collection-watches-c-1_3.html] Audemars Piguet Classique Collection watches[/url]which could make a content on your heart. This watch that you are able to like is[url=http://www.fake-watches-replica.com/audemars-piguet-audemars-piguet-contemporaine-collection-watches-c-1_4.html]Audemars Piguet Contemporaine Collection watches[/url]brand. You are able to discover well-favoured [url=http://www.fake-watches-replica.com/audemars-piguet-audemars-piguet-sport-collection-watches-c-1_2.html ]Audemars Piguet Sport Collection watches[/url]that will agree your daily closet for a identical low-cost . Alongside from the popular looking that can take out of having[url=http://www.fake-watches-replica.com/baume-mercier-watches-c-13.html] Bume & Mercier watches[/url], they are very tolerant for daily use too. Just same as the creativewatch[url=http://www.fake-watches-replica.com/baume-mercier-watches-baume-mercier-capeland-watches-c-13_16.html] Baume & Mercier CapeLand watches [/url]some replica…
Supra shoes are hottest shoes on the market. With a pair
Supra Vaider of high quality shoes above, which are Cheap Supra Shoes made with modern technology, you will feel safe and free. With appealing
Supra Thunder Hightop design and beautiful appearance, was supra shoes a superstar among the young. And they did the change in lifestyle for
Supra TK Society young people significantly. This pair Supra cloud tops are needed for the beginning of autumn and winter, you imagine how you feel when you wear the shoes above.
Bright red matched with big green, light purple take XianHuang. This spring, everyone as with palette, you canât make such a fuss, bold put all bright-coloured color on the more widespread jumping on the more wonderful combination color. Using comparative color coat and trousers mix build a bump color effects, or will the?Herve Leger dresses and accessories with color fastens tie-in, and neon color fastens super grab an eye sheet is tasted, these seemingly contradiction collision revealed a unexpected artistic effect. So, donât save your imagination, playing a colour go!Along with the long length of the gowns was also the wide bell shape of the dress, which usually had a huge hooped slip underneath. These Leger dresses on sale were mostly custom made and were not found in many local retail stores like nowadays. In todayâs society a prom dress can be easily found by shopping over the internet or in most local clothing retail shops. The styles of the dresses of course have changed dramatically over the years. Today Herve Leger Bandage dresses are not to far from looking like a regular dress. I feel that prom dresses have lost a lot of the traditional qualities of the 60âs. When proms use to be a fun and exciting evening of getting dressed up has now become just another ordinary evening of going out.
someone enjoy the summer season here.
we are just visiting here now.
Welcome to Specialized Burberry Outlet Online Store. Here you can
choose all kinds of cheapest authentic Burberry Scarf with high
quanlity. We also provide the best service to your customers. free shipping and fast delivery, 5-7 days to your door.
Our top rated online shoe store has a huge range of Cheap Coach Shoes, including dress shoes, athletic shoes, Cheap DG Shoes, casual shoes and slippers. Cheap Replica shoes Online at Styledrops.com gives women their shoe fashion dreams come true at affordable prices. Cheap Prada Shoes Need a hard-to-find Gucci women’s shoe? Try searching in our online store and enjoy a wide selection of quality GCheap Gucci Shoes, ready for you.
Your blog is very useful. Thank you so much for giving plenty of awesome information.
Stone Figure Statue STU-A343
this is a very much nice info thanks to share such a nice info.
Thanks for your post, I like this post very much, thank you. more and more please. I am do the r4 products, please contact with us if you are interesting.
replica watches
fake watches online
replica watches online
you may like the cheap mac makeup, it sounds well. they like to wholesale mac cosmetics here. discount mac makeup at mac cosmetics outlet online.
Best new era caps,wholesale new era hats, Monster Energy Hats, Dc Shoes Hats, baseball hats, NFL Hats ,Famous Hats , cheap new era hats,jordan hats and coogi hats,etc are in stock now. Our site provide first-class service and reliable quanlity garantee,do not hesitate to shake hands with us and go with the tide as soon as possible!
ralph lauren kidsObviously, distinctive people these times have very distinctive views in the direction of bags. so which you can satisfy people’s desires and suit using the altering market, it is needed to create bags with a broad range of tastes. Polo Ralph Lauren Kids
Basically, the great majority of bags stand for just about any type of craze plus they are developed in according with customers’ requirements.. like a issue of fact, producer bags can show people’s tastes or types within a specific degree.cheap kids ralph lauren polo shirts
gucci walletsAs regards to Prada bags’ styles, they are very broad and attractive. several of them are stylish and generous, and other individuals are playful and funny. There are traditional and low-key bags.gucci hats
Thanks for your post. One other thing is when you are marketing your affiliate offer alone, one of the issues you need to be mindful of upfront is just how to plan affiliate marketing.
Wholesale New Era Hats
Wholesale New Era Hats
Wholesale New Era Hatss
[url=http://www.cheaphatcaps.com]Wholesale New Era Hats[/url]
Never thought blogging could be soo fun and interesting. Man you know how to do it brother.
Most guys panic at this point and start declaring their undying love, making promises and pleading with their wife to change her mind.
Have you just been dumped? Do you wish that you could get back with your ex but your wife or ex wife isn’t interested in trying to save your marriage? Well you’re not alone even though you might think you are at this point.
To be able to make beautiful hairstyle, GHD straightener absolutely works miracles hair maker for yourself, it does indeed little harm to the wild hair with harmless and formidable materials, a lot more people are willing to choose GHD. You will always wonder ways to form your hairstyle when beautiful when superstar and even seem silky smooth, that is because of they pick out GHD hair straighteners to contour hair to attain the fantastic pattern of individuals like. ghd IV salon styler can often be thought of the very popular plus hottest wild hair styler, the first personal choice of hair salons is their consistent habit progressively
Scott Perry,the Coach Bags Pistons vice Coach Shoes president of Coach Handbags
Just go to our online shop and look at the great selection available to purchase now and delivered direct to your door â if you cannot find what you need just contact us for a quote.
Couldnât be written any better. Reading this post reminds me of my old room mate! He always kept talking about this. I will forward this article to him. Pretty sure he will have a good read. Thanks for sharing!
There is nonetheless a great offer of income being made in topic online marketing. have a tendency to not permit all the naysayers fool you. Yes, it could maybe be really competitive, as well as in some Exclusive Jordan Shoes markets completely oversaturated (good good lot of money working a home finance bank loan or credit score online website). What you ought to perform is increase previously described the audio and decided your do it yourself apart in the rest. luckily most in the internet is garbage-you maybe can perform really much much better than that. Just remain to these measures and you also will be nicely in your method to topic online marketing and advertising success.Affiliate marketing and advertising method which Air Jordan Kicks allows people to signup and obtain a great offer of virtually thirty prepared to make full use of income generating internet sites as well as the membership protection under the law of their online program. Now this internet site is supplying two options 1st only one is no cost and 2nd is Paid. no cost membership protection jordan retro 3 for sale under the law will permit to obtain your online link, sub site of your option on their main site and nonetheless you’d probably be able to market and generate the money, but for the personal domain, personal hosting and generating alterations within your internet sites you’ll Nike SB Online Store need to change out being a compensated member.I signed up this process in June the year 2010 and i really do not feel it absolutely was advantageous but following following their directions and seeing steps by steps video tutorials and utilized supplied marketing and advertising material, following 13 times I earned my 1st commission! indeed i experienced been so thrilled understanding that encouraged me to hold on with this particular online program, finally following two weeks I experienced made eleven commissions away from it three commissions ($120) and as well Cheap Jordan Retro 3 as the indication up repay ($100) money I obtained by way of PayPal on 25th August 2010.zZ
Substantially, the article is actually the greatest on this worthw hile topic. I harmonise with your conclusions and also can thirstily look forward to your coming updates. such as the website fake oakleys, Saying thanks can not just be sufficient, for the awesome lucidity in your writing, I will at once grab your rss feed to stay informed of any updates. Authentic work and much success in your business dealings!
I will invite all my friends to your blog, you really got a great blog.
I am happy to have found this blog, and more happy to have long tail explained so well. Thanks.
What a lovely blog you have! I like it very much.
Here a great DRM Converter will help you to remove BBC iPlayer DRM or transfer iTunes music to Windows Media Player directly and free.
Thanks for the information.This is my first time i visit here. I found so many entertaining stuff in your blog, especially its discussion. Keep up the good work.
Believe it or not, Vibram Fivefingers has changed human lifestyle. If you have ever saw five finger shoes, you may feel it is in a strange looking, however, it begin the world of barefoot running, which targeted to product more health and comfort to peopleâs health. As opposited to standard vibram fivefingers sale shoes, what the five finger shoes do is to make footwear more light and with more agility.
Nowadays, purchase Five finger shoes is come to be a style online.
Thanks for writing such a nice post. Your post is really good and attractive; I have read lots of articles on this and found this one as best. I am very fond of articles on cricket sports products especially cricket gear . If anyone has idea about any good website regarding this topic, please give me the link
Perfect!!Love them so much.Nice,Vogue,Comfortable.No words
cannt express my feeling.Think need share to everyone,hope u like them
aswell.Come on,join the oakley sunglasses party,dont miss it.
In recent decades, it to forget, is the domestic well-known clothing from famous athletes (such as perry) become clothing worn by men watching sport! But
wholesale polo
shirts
are still a top clothing for men, and combined with comfortable and luxurious, style and sports “endeavour” to some extent, almost no other leisure clothing product has.
This
wholesale polo
shirts
are also one of the most like gift, because it is easy to buy for a husband, son or boyfriend’s small, medium or large size means that anyone can guess the right size to give as gifts.
Cinderella can instantly into a beautiful princessï¼Do you want to have a beautiful hair?And become the focus of attention? Come on, cheap GHD hair straighteners will bring you a beautiful surpriseï¼Welcome you to GHD hair straighteners online store.
If you order more, our company will give you the wholesale price, the more the cheaper. http://www.fakeray-bansunglasses.com
Welcome to Oakleyreplicasunglasses.com. Replica oakley sunglasses, fake oakley sunglasses wholesale in our discount replica oakleys store, deal on cheap oakley shades, cheap fake oakleys sunglasses. If you order more, our company will give you the wholesale price, the more the cheaper. http://www.oakleyssale.com
I like the side of the article, and very like your blog, to write well and hope to continue your efforts, we can see more of your articles. dc shoes hats Recommend you to take a look at it, is now being discounted, Monster Energy Hats Collection in hot! Fashionable dc shoes hats Keeps with you at any time.
I found myself having to concentrate on every footfall and vibram soles of my feet hurt a ton at the end. I guess this is just a matter of toughening up äºæ¬æã·ã¥ã¼ãº bottoms of my feet. Tim mentioned in an earlier post that he cleared up his up his plantar fasciitis but he didnât say how. Seems his general running advice, flat sole Vibram fivefingers , very little cushioning, etc., conflicts with all the plantar fasciitis remedies I have found on the ããã©ã .
Welcome to our Supra Shoes Canada online store, we offer a wide variety of Supra Footwear, it is not only a inspired, passionately and unique color design, with soft and comfortable materials, combined fashion, beautiful, trendy, alternative with Supra Canada, but also focus on the performance of shoes, its special anti-vibration system can better protect the feet. Now more and more young people choose Supra Skytop Shoes, I believe that shoes can give you supra-special feeling. The Supra Shoes that selled in our shop are high quality, low prices, Free Shipping and No Sale Tax. Believing me and also believe in yourself, supra shoes must be your best choice.
Fashion shoes and bags all here!
Gone are the days when sunglasses were only used to protect the eye from sunrays. This is the age of designer sunglasses which serves the dual purpose of protecting your eyes as well as making a style statement. Presently, they are a fashion accessory that makes you look âcoolâ. This has led to a complete evolvement of sunglasses. These days, markets are flooded with attractive and sleek sunglasses brands.
Oakley Polarized Sunglasses are immensely popular among customers throughout the world. The attractive design and wide range of prices offered by this brand have helped to establish its presence in different parts of the world. Their products not only cover a wide price range but also cover the various tastes of customers. Their constant desire to come up with something unique and attractive has led to evolvement of their products. Coach sunglasses also offer a range of low cost Prescription Sunglasses
Ray Ban Sunglasses have made such a mark in the designer sunglasses section that the word â âRay-Banâ is often used as synonymous to âdesigner sunglassesâ. The âaviatorâ is the most popular ray ban sunglasses in its entire range of products. Though this design was churned out long back but itâs still the âin-thingâ in fashion. Some of the latest products are RB3455E or the RB3454E which can give any other designer sunglassesâ company a run for its money.
The best mbt shoes,in mbtmeet.com
There are plenty of cameras that were invented nowadays. The CCTV Security Systems are known for its being effective as DVR Surveillance Systems. The camera has a wire that transmits its signal to a recorder or a monitor for a proper viewing. They are used in stores, streets, highways and most especially at home.
One of the less stressful ways, easy and fast to keep the business safe and the family is to secure Wireless CCTV Cameras. It will make the family secure by seeing the property through day and night. It is just fast and so easy to install even if it has no chords. You can avail of a high tech system of making your place, business and family secure as long as you have an outlet ready and available and a strategic location for the Surveillance Camera Systems to install.
MBT,MBT footwear,Discount MBT Shoes,MBT Shoes Clearance is Healthy Shoes
http://www.mbtso.com
MBT shoes sale store.We offer wholesale price on all MBT footwear
http://www.mbtworkshop.com
Your article write very well.
Consider lower scoring mmorpgs at the beginning in addition to decide your own karate recommendations required.
Which often sorts of writing instruments in case you work with?http://www.sfgiants-jersey.com
In case you inquire any participant to be able to indication one hundred stock trading handmade cards, baseballs as well as bats, this individual could easily get dubious.
With regard to single dads, glimpse particular sports perhaps in operation attires with all the MLB prompted page openers, counter date, members with regard to organization
greeting card in addition to additional.http://www.sfgiants-jersey.com
That is certainly certainly Golf ball is considered to be labeled since karate that is certainly certainly the most well-known activity world-wide.
There’s a chance than a bettor may get rid of a large amount regarding cash internet marketing reckless within selecting a wager. http://www.cardinals-jersey.com
Even though with all the fasten living beat, men and women own a reduced amount of moment compared to previous to. http://www.cardinals-jersey.com
MLB Gambling Recommendations info â The way to Increase your Successful Proportion within MLB Athletics Gambling.
Important Features regarding MLB Athletics Handicapping.http://www.red-sox-jersey.com
Pro-baseball gambling could be a successful venture perhaps for any greenhorns since you can find essential collection worth.
Since a good number of motives, MLB seriously isn’t well-off within the far east, through 1980 to be able to right now, a good number of MLB clubs offers take place the far east
to be able to propagate MLB.http://www.red-sox-jersey.com
We have thousands of New Era Red Bull Hats,Cheap caps, Red Bull Hats, Monster Energy Hats, DC Shoes Hats and Famous Hats at cheap price for Sale.
Reebok Outlet shoes support you show yourself perfect
Reebok easytone can better exercise the key legs muscles and shape your body.
Reebok Zigtech Shoes can improve sports feeling.
I have an opinion for this blog, nice article, template and an attractive appearance to make the visitors interested to read more cheap jordan.
Iâm looking to create my own blog and would like to find out where u got this from. many thanks.
Last inning sport tying and succeeding homeruns and bites seemed to journey off the bat with could.
MLB individuals will also work the highest settled physical activities people anywhere.
Even so, when the general public is concerned, these types of players have not attained your rank on the Jesse Ortiz as well as the Derek Jeter.
your site will be the most important jersey selection at competitive price ranges in addition to through the almost all honest shops on the market.
Activities seat tickets are available on the web in many predicament.http://www.yankeesshop.us
Please note that this is merely a small small sample associated with my personal favourite brand names, which after you put the opportunity, you ought to look at some more and individuals on this subject list.
A number of a number of latest major league football people that happen to be sponsored by means of Mizuno include things like Chipper Jones, Andrew McCutchen, Brian McCann, and also Ichiro Suzuki.
The All-Star Fan Fest, which will happen from July 6, 2011 until finally July 12, 2011 really offers one thing for anyone.
The catcher allows the pitcher by picking out the pitches and also forestalling the actual dish.http://www.red-sox-jersey.com
Sporting activities betting can be quite a profitable venture perhaps for rookies since there exists important collection value.
So, what exactly comprises the best activities handicapping program and also payment MLB betting automatically chooses?
Adam Meyer is definitely Americas major activities handicapping pro along with has the inside course on bets upon footballing, hockey, snowboarding along with hockey.
MLB jerseys are usually much like lamp that would light expediently and also call everyone that connected to the actual labourforce and also who seem to regrettably is also the approaches which fit in inside rival labourforce.http://www.phillies-jersey.com
some several years afterwards it truly is considered more than through the present-day Nationwide Bit of little league.
The baseball jersey arrive inside kids, gofer in conjunction with mature measurements.
Because time, Jeter offers purchased 10 More or less all Celebrity alternatives and also different MVP titles and other ribbons.
Hockey is mostly a sport steeped inside history.http://www.sfgiants-jersey.com
The Hartford Whalersâ mlb Jerseys.
Such as, smaller snowboarding jerseys regarding youngsters can be bought scorching at the moment.
Relating to kids, mlb jerseys comprehensive generally is a fantastic wedding reward.http://www.cardinals-jersey.com
Undoubtedly, you may easily not really add conventional mlb at wholesale prices jerseys these together with presently there, and so look-alike MLB jerseys actually deceitful jerseys guideline all of us remedy headache..
The performance of claims to the ego style.
The sixth inning has had the most ejections .
The first known utilization of anabolic steroid- testo-sterone propionate had been pointed out in US weightlifting/bodybuilding journal, Power along with Wellness paper inside 1938.
This Major Little league Football executed random testing anabolic steroids around baseball in 2003.
Though he batted.
To turn you into like the sports activity world greater, we continually bring one of the best good quality sport jerseys at the least expensive amount.
Men and women tune in via all over the globe.http://www.yankeesshop.us
A group of latest significant league baseball players sponsored by Wilson include Evan Longoria, Ivan Rodriguez, David Wright, and Hanley Ramirez.
When you request to buy New Age group Hats with the structure involving high-quality seams and fabric, again it is best to the caps different age group, it’s accounts a person’s hard-earned income.
You can also get a great deal of active exercise routines, which might be great with regard to children in addition to teen years.
This systemâs gross sales pitch is the fact in the event offers a 97% win rate.http://www.red-sox-jersey.com
Hockey is among the most popular games in the uk and in order to attend a few of the games that time, you don’t need to expend your complete money within the tickets because there are some simple techniques to acquire very good bargains upon baseball deals.
Apart from taking the side in a very hockey sport, you possibly can play over or under the sum number of extends that will often be scored from a adventure.
Focus on the Bullpen â With the approach issues are going for many clubs today exactly where beginners usually donât go over and above the sixth inning, special consideration for the bullpen is obtain in terms of baseball handicapping is anxious.
Your karate jacket is supplied in children, when we are children and older shapes.http://www.phillies-jersey.com
Most likely almost any Ough.
They debuted appropriately inside 1995 to the Yankees, along with is a battler regarding them ever since.
To all or any, this individual offers earned twelve month period Many Movie star picks along with eight Yellow metal Slugger provides.
You can get many of the very best offers which might as well as may not necessarily possibly be on majority shopping.
Not a problem inside natural lemon shade or perhaps orange put together having alternative colorations, the sum glance is just developing the item appear clumsy along with definitely not of form to get opposition.
Its probably the amount of important qualified athletics leagues in UNITED STATES OF AMERICA.http://www.sfgiants-jersey.com
Possibly any Ough.
are really incredibly pricey..
Veteran umpires Bob Davidson (22 years) and Joe West (33 years) were last seasonâs âKings of the Toss-Outâ with 10 and 9 ejections, respectively.
Through five days of July, weâre on pace for 96 ejections this month.http://www.cardinals-jersey.com
These types of medicines had been forbidden by simply FIFA, Partnership Cycliste Internationale (biking), along with International Olympic Committee in 1966-67.
MLB individuals may also be very high paid sports competitors everywhere.
Effectively, fanzjerseys will allow you to give in a improved price.
In inclusion, the development of the online world to promote monetary plus interpersonal move of the impact can be even larger.
Your Superbowl is probably the most watched exhibits on the globe.
Many people take into account these kinds of events under them, nonetheless they’re just a terrific way to obtain noticed and market your supplement.
Common age at the time, it had been suggested improper, if you are frizzy hair has not been covered by simply one thing, hence hats ended up exhausted in any case, accredit for you to modesty.http://www.yankeesshop.us
Nevertheless behindhand of those New Age group Hats could actually appeal the compression from the people.
A guy known as Mark Morrison designed that Sports Gambling Champ.
Whenever you are searching for a great offer you, yet another wonderful means to get them can be by simply calling various groups inside Important Little league Hockey.
In addition finding the side in a football game, you are able to enjoy around or underneath the sum lots of runs that will often be have scored from a game.
Regarding admirers, basketball jersey is not only a new reveal this facilitates the most beneficial mentors plus clubs plus opponents but will also any unconventional routine wear garments.http://www.red-sox-jersey.com
For instance, smaller karate jerseys to obtain kids can certainly sector hot today.
Pertaining to babies, snow boarding head wear is a fantastic bay gift.
Jeter happens to be little leaguer using the fifth greatest batting regular among the dynamic participants.
Rodriguezâs ton is actually thirteen.http://www.phillies-jersey.com
Imagine with this.
It truly is in all probability the number of important skilled athletics leagues in US.http://www.sfgiants-jersey.com
In existence, you can find karate jerseys inside of just about any size you might probably wish.
This type of look-alike ice skating jerseys are generally comprising unnatural pieces along with a majority of these elements usually are definitely created with reliable.
But most of us realize the reliableThere tend to be quite a few on the net stores that offer state of the art mlb jerseys 2011 in China at this point..
The patriarch team in MLB is the NewYork Yankees that it has many “most”:most money, most fans, most star, most champion and the most famous.
The job of the batsman is to hit the ball a large distance as much as possible so that they will have ample time to quickly make a score on a track that is like a diamond in shape with its four corners called bases.http://www.cardinals-jersey.com
You have a creative plan for this project. I will be able to share this to my wife who had additionally had a good time creating arts stuff.
This was very cute stuff that you presented in here. Thank you for the sharing of this idea. I will try to make like yours and send it to my daughter as a gift.
Mostly, people with handsome budget are not able to buy Rayban sunglasses or other branded sunglasses. But, all such people can now buy their favorite brands at discounted rates. All they need to do is to log on to shop4brand.com and they can choose from a wide range of Oakley Sport Sunglasses from the leading brands in the world.
thanks to share this good post,i will like this.
http://www.heelvipshop.com
http://www.heelvipshop.com/Christian-Louboutin-Boots-38-770-1
http://www.heelvipshop.com/Christian-Louboutin-Classic-Black-38-768-1
Buy fake oakley sunglasses now.
Thanks for taking the time to talk about this, I feel fervently about this and I take pleasure in learning
about this topic. Please, as you gain information, please update this blog with more information. wholesale hats I have found it very useful
http://www.cheapsunglassesoakleys.com
Your article very interesting, I have introduced a lot of friends look at this article, the content of the articles there will be a lot of attractive people to appreciate, I have to thank you such an article.
Good news, good news. Laurent Yves shoes prices as low as $ 120.00,
our product are complete, the main commodity prices are very affordable, SIZE, colors, brands are all no matter your choice.
We are a bargain store, as long as you can be happy, we are happy to serve you!
Hey! I visit your site regularly, but your blog doesnât load on my Ipad. Could your firewall block my IP? Many thanks!
Good news, good news. Laurent Yves shoes prices as low as $ 120.00,
our product are complete, the main commodity prices are very affordable, SIZE, colors, brands are all no matter your choice.
We are a bargain store, as long as you can be happy, we are happy to serve you!
Premium gambling on picks wszmm0715
Component fact as well as part misinformation, clutch i465 players arenât judged so much by how many game-winning takes on these people create however from the occasions under which that they create them.The hot canine possesses itâs root base deep all through baseballâs historical past, plus itâs alsowithout a doubt most important factor individualsthink about when service plan snowboarding. is usually giving heavy discount on which ever previously you happen to be ordering.mlbjerseyonline.Each and every four years this match is definitely held using a diverse continent and also this is another motive folks possess named it this globeâs very best sports event.Twins Jersey
with their checkout desks gratis wszmm0715
A number of some current major league hockey players that happen to be sponsored by way of Mizuno include Chipper Jones, Andrew McCutchen, Brian McCann, plus Ichiro Suzuki.Rangers Shop
One of the better features of the industry might be this swimming pool.A significant number of pitchers crash on the specialist level possibly not as a result of physical skills nevertheless the get with the punch zoom.Some of the packages also encompass various additional similar to transportation, free of charge breakfast every day in addition to entertainment.Freddy Sanchez Jersey
from the present-day Nationwide wszmm0715
If you’re able to donate one of your items with a a good cause lead to or function, it can be a powerful way to promote.A good number of some present main league karate gamers sponsored through Nike consist of CC Sabathia,Will Clark Jersey
Jimmy Rollins, Derrek Lee, and Robinson Cano.The property Run Derby features one of the most potent baseball people amongst people because they try to click the most house operates among the contestants.Pitchers throw to the different teamâs hitters as well as attempt to keep opposing players coming from scoring.Twin shop
I fear my vulgar replies will compromise this such beautiful article. But I replied still, if I can’t leave my name behind such fascinating article,
Heâs furthermore made remarkable preserving takes on all through the career. qiuwenkai0915
Your staple belonging to the baseball match up will be many assuredly the particular very hot canine.
336.
To make you enjoy the sport activity world better, many of us continually provide one of the best top quality sports activity jerseys for the least expensive amount.
Any three years the particular event is definitely held over a various continent and also this is definitely one more reason individuals have known as this this globeâs ideal activities function.yankees shop
Most of these method of how to market your business offline are simply some of the strategies of marketing and advertising you will have to use, but they are a terrific way to take you started out in promoting your company high street.
If so, you should check out this website âbest baseball workoutsâ to locate extra helpful information as well as football programs as well as exercise routine workout on sale that could require your online game to the subsequent grade!
Tickets for your occurrence are available to the MLB site.
With all the ongoing imlbux connected with talented players through Latin The united states along with Japan, high school in addition to school online players considering a good MLB career will certainly face intense competitors with regard to work.
However you can defraud your self when you donât take it critically, and take care of your sports betting like some other expenditure of money and also company.
Baseball can be can guess in a great many techniques: moneylines, runlines in addition to totals.
For almost any squads, enthusiasts are frequently its important energies.Red Sox jersey
Just like other athletics mlb jerseys wholesale, fans discover hockey jerseys per present day staff and jerseys via mentors plus teams about the previous.
A majority of these duplicate ice skating jerseys is usually obtaining manufactured means and all these things tend to be basically made obtaining top of the line.
You can find currently 35 competitors active in Major Little league Snowboarding, the public connections for the sports activity.
Jeter is regarded as the player when exercising on your sixth most significant batting average a lot of the lively persons.
He did this subsequently young shoppers using these types of with all kinds of uneven attributes.Phillies jersey
Karate League supporter may be known for just a karate ushanka as well as within her/his closet.
MLB is continuing to grow more powerful and also more healthy, as well, this little league uniformsâMLB jerseys have grown to be some sort of sizzling item.
They need become the volume of big consultant athletics leagues around Nation.
Regarding followers, ice skating hat is not only some type of draw that helps the determined night clubs and also competition and also almost any unconventional everyday apply clothing..
The four ejections are the most in one game this season and matched Drakeâs 2010 total.Giants jersey
Nowadays, MLB has become more and more popular and has a lot of fans all over the world.Cardinals jersey
That is great! Despite the common misunderstanding that payday loans cause the borrower further debt the majority of these loans are repaid within the given time frame leaving the Regardless of your credit history or the purpose for your loan payday loans can assist you when it is difficult to stay on top
After reading many of your blogposts I staleness say i launch this fact one to mostly be top notch. I soul a weblog also and require to repost a few shears of your articles on my own diary site. Should it be alright if I use this as eternal I own testimonial your web blog or create a inward unification to your article I procured the snipping from?
Cute article backgroud.
The World wide web is the best resource you can use to discover your nearest Coach Outlet retailer.
Cheap Nike Shox shoes for men and women are on sale! Nike Shox not only absorbs impact from heel strike while running, but also springs back and adds more power to a runner’s stride. Aside from this alleged boost in speed, the Shox is supposed to provide superior shock absorption with high-tech elastic foam. Shox TR Women/Men, Shox TL1 Women/Men, etc. you can buy differently good and discount Nike Shox shoes in our online shop. Buy nike shoes at wholesale price for you at any time.
“Welcome to MLBEdge.com – The Ultimate MLB Jersey Shop featuring an endless assortment of MLB Jerseys ! We have a huge selection of Authentic,Premier and Replica MLB Jerseys for Men,Women,Youth and Kids. Find your favorite MLB Jerseys and Get Free Shipping and 60 Days Returns Only At MLBEdge.com !”
“Welcome to MLBEdge.com – The Ultimate MLB Jersey Shop featuring an endless assortment of MLB Jerseys ! We have a huge selection of Authentic,Premier and Replica MLB Jerseys for Men,Women,Youth and Kids. Find your favorite MLB Jerseys and Get Free Shipping and 60 Days Returns Only At MLBEdge.com !”
NFL JerseyYankees Jersey
Derek Jeter Jersey
“Welcome to MLBEdge.com – The Ultimate MLB Jersey Shop featuring an endless assortment of MLB Jerseys ! We have a huge selection of Authentic,Premier and Replica MLB Jerseys for Men,Women,Youth and Kids. Find your favorite MLB Jerseys and Get Free Shipping and 60 Days Returns Only At MLBEdge.com !”
http://www.dola-camcorder.com/products_info/Dola-720P-HD-pocket-digital-camcorder-DHD-001-W-124918.html
Thanks for sharing this with all of us. Every girl has her most beautiful moment in the life just when you wear your own Cheap Wedding Dresses in your wedding. And it will hand down as a witness of this wonderful memory. For the bride,A-line wedding dresses is the most important part of the wedding.
10 Thanks for the marvelous posting! I genuinely enjoyed reading it, ywholesale sunglasses
a great author. I will ensure that I bookmark your blog and will eventually come back from now on. I want to encourage continue your greReplica Sunglassesou can beat job, have a nice holiday weekend!
There’s no word to describe such a great masterpiece. You made such an interesting piece to read, giving every subject an enlightenment for us to gain knowledge and information without any arguments to deal with. Thank you very much and more power!
We offer a cheap red bull hats with high quality buy desinger cheap hats with good service red bull hats,red bull new era hats, new era 59fifty hats,caps new era,red bull energy hats,New Era Hats Wholesale, Monster Energy Hats, dc shoes hats, and many more.You can make purchases without scrupulosity. All of products can be ordered from our website directly, cheap hats also, you can contact our professional customer service to get more support about payment terms, the intention of cooperation etc. We are hats manufacture in china, Our company specialize in supplying new era hats, cheap new era hats,dc shoes hats,red bull hats,famous hats,jordan hats,etc. We pay attention to our products quality and service.
Our company is the professional NFL Jerseys wholesale, offering the best selection of Cheap NFL Jerseys including . We specialize in custom NFL Jerseys for all of your favorite NFL teams. Select any name and number combination featured on your very own personalized Wholesale Jerseys as well as a great selection of NFL throwback jerseys and specialty women’s NFL jerseys all at great prices. Let us be your source for all of your NFL apparel and Wholesale NFL Jerseys gear for the whole family with our selection youth NFL jerseys and more. Buy your Cheap NFL Jerseys from our online Cheap Jerseys store, We offer a huge selection of alternate, throwback, customized, equipment and authentic jerseys for NFL fans.
Wow GHD Australia this is just so awesome. Thanks so much for taking the time to post an article like this. Iâm a big fan of gifts and specifically I love christian gifts from coach GHD Hair Straightener. There are so many different stores out there but there are only a few that I like as much as I like Kellyâs Treasure. Anyways, thanks for making such an awesome thoughtful post. Keep up the GHD Straighteners awesome work.
Thanks for your great post, please write more and more please, I am do the r4 products, if you are interesting, please contact with me.
I really like this website , and hope you will write more ,thanks a lot for your information.
http://www.nfljerseysmalls.com
In China, the implementing regulations have been enforced in China energy-efficiency labeling, GB18613 efficiency reference values ââfor BLDC motor built into the equipment manufactured and sold in China alone â July 01, 2011 Class 2006 GB2 was prescribed. Accordingly, for the BLDC motor to be exported to China, including a BLDC motor built into the equipment, certification of the law were required to display a certification label.
The same to those of Japanese Forklift, the Open Type Design was adopted by SINKOBE.
This made our clients’ expense in service parts lower. Maintenance is easier and available by
any technician due to the European control system used.
å½åºã¯å¤§äººã®ããã¡ãã¡ã¼ã«ã¼ç´éã®çºãå½æ¥çºéã§ã客æ§ãå¾ ãããªãé販ã§ãï¼ããã¡ãã®è²©å£²ãå®å¿ã§æ©ãç§å¯å³å®ã第ä¸ã«éå¶è´ãã¦ãã¾ãã
ç¹ã«å¥³æ§ã®æ¹ã«ã¯ç´°å¿ã®æ³¨æããã£ã¦é éããã¦é ãã¦ãã¾ããæ¯éãã®æ©ä¼ã«å¤§äººã®ããã¡ãã§ç´ æµãªãã©ã¤ãã¼ãã¿ã¤ã ããéãããã ããï¼
æ°ããååã®ä¸ããå³é¸ãã¦ã°ããºãåãæãã¾ããï¼ã¢ãã«ãã°ããºã·ã§ããã¨ã¯ãã¢ãã«ãã°ããºï¼å¤§äººã®ããã¡ãï¼ã販売ããåºã®ãã¨ã§ããã
Some difference between R4 and R4i, Do you know? Let me tell you …..
Your blog would increase in ranking if you post more often.â”`-â
coach outlet
Anyway, that’s an informative post. nfl season is comming, polo T shirt is commom but nfl jersey will be more striking. Authentic NFL Jerseys is for sale at the nfl online shop. Great writing!
good job!
I always enjoy coming back to this blog for posts like this.
http://www.oakleyandsunglasses.com
This is a very nice article, perhaps the best Iâve ever seen Their Causes, and of course everyoneâs opinion is not the same, and this can only represent my personal opinion, but it is very important to me I like it. Of course, this is very grateful of the efforts for it. Thank you!
From this article, I learned a lot of knowledge On this topic.
Shares of Apple surged to an all-time high in soon after hrs buying and selling following Nike air max the business’s earnings report on Tuesday. As of 6:00 p.m. ET, shares have been investing around $ 396 each and every right after crossing the $ four hundred Air max shoes mark for the first time previously in the session, up a lot more than five% given that the start off of Tuesday’s buying and selling. At that cost, the company cheap air max is valued at a lot more than $ 365 billion, trailing only Exxon Cell at $ 411 billion for the title of earth’s most beneficial company.In its report, Apple Air Max Sale stated that it marketed far more than nine million iPads and twenty million iPhones in its most recent quarter.Yesterday we wrote that Apple had a very Air max 90 good chance of becoming the most valuable company in the world by this fall, as its stock hit a record $375 a share. Today, after record Q3 earnings results and nike air 90 beating analystâs expectations, the stock is currently trading after hours at around $400 , which would imply a market cap of around $366 billion.The air max 2010 AAPL stock price was at $376.85 per share and a $347.18 billion market cap at market’s close. Tomorrow will most likely bring another record high with the air max 1 release of Mac OS X Lion.In coming months, Apple is expected to roll out a new iPhone, which is likely to give the world’s most valuable technology company air max Classic another shot in the arm and offer a stiff challenge to rivals such as Google Inc and Research in Motion .In coming months, Apple is expected to roll air max 2009 out a new iPhone, which is likely to give the world’s most valuable technology company another shot in the arm and offer a stiff challenge to rivals such as Google Inc nd Research in Motion. http://www.airmaxoffice.com/
http://www.baleafsport.com/products_info/Baleaf-Tennis-Racket-BL-TRNET-061-127595.html
I am very pleased to read such a good article, I will have the opportunity to read it.
nice post !the web also very good , thanks the admin give the userful article!
The article is worth reading, I like it very much. I will keep your new articles.
http://www.nfljerseysmalls.com
Apple is expected to roll out a new iPhone, which is likely to give the worldâs most valuable technology company air max Classic another shot in the arm and offer a stiff challenge to rivals such as Google Inc and Research in Motion .In coming months, Apple is expected to roll air max 2009 out a new iPhone, which is likely to give the worldâs most valuable technology company another shot in the arm and offer a stiff challenge to rivals such as Google Inc nd Research in Motion.
These information helps me consider some useful things, keep up the good work.
It is a very informative and useful post thanks it is good material to read this post increases my knowledge
Gracias por compartir este artÃculo knowledge.Excellently por escrito, si tan sólo todos los bloggers que ofrece el mismo nivel de contenido como, el Internet serÃa un lugar mucho mejor. Por favor, sigue asÃ!!
I have always wanted to teach english in Singapore as it has always been my dream to live there.
These information helps me consider some useful things, keep up the good work.
I like you post ï¼itâs very goodï¼
i am liking rosetta stone spanish there.
i am liking wholesale true religion jeans there.
I must say that overall I am really impressed with this blog.It is easy to see that you are impassioned about your writing. I wish I had got your ability to write. I look forward to more updates and will be returning.
You buy classic ugg boot so that your feet can stay warm, while looking cool at the same time.
Do you like Michael jordan shoes?
The weather is more and more hot ,everybody should own slipper,The Men gucci slipper features a smooth leather upper with Gucci signature logo on the heel or the vamp as well as a durable and comfortable rubber outsole. It will be quite comfortable when you wear these Men gucci slipper in summer. Moreover, these cheap Gucci slipper shoes are quite fashionable. No wonder there are many gentlemen would like wearing such Gucci men shoes. So you shouldn’t miss the chance to buy such world name brand slippers in the online Gucci outlet store.welcome to our store.thank you.
Noo. Don’t Stop, nobody can hold me down, I got to keep on moving now.
This is a great article. I hadn’t known any of this stuff baout Phish. You should do this about more artists!
Ladies who desire the greatest designs from your chic Louboutin shoe line recognize about how pricey such breathtaking styles usually are. With costs beginning in the hundreds, christian louboutin outlet such designer styles might want to use thousands of dollars to get a custom-designed pair. Possessing such creative, inspired styles, the celebrated fashions are most wanted. As well as a wide assortment of brief heels, mini boots, heels and sandals, Christian Louboutin is praised because his recognizable stiletto heels. Purchasing such shoes at the boutique or retail chain is definitely an costly job . cheap high heels Savvy women, who want such up-to-the-minute shoes and therefore are unable to pay much money per every single design, christian louboutin clearance realize that an incredibly cost-effective choice exists to find high status wholesale Louboutin shoes.
China products
China factory
China supplier
I think I would be more helpful, thank you!
We all know what a good nike tn shoes or clothes, whether it is willing to buy things that are not only two stores are often a discount ~ ~ Oh, and some still have some discount stores, although some of the oldest section is the most classic like nike’s friends to see Kane
Wholesale Nike Shox, Cheap Shox Shoes, Shox Sneakers, Coach Bags!
You can find the latest styles, best quality, discount nike shox sneakers here: Shox R4, Shox NZ, Shox R3, Shox OZ—It’s perfect for your breathable comfort. And a great chance for you to buy your favorite Nike Shox Shoes! Exquisite design and high quality are very perfect for any occasions. Take it if you like it. There are numerous listings of Nike Shox for sale here. Come on and you will get much amazing from the shox outlet here! Your time is precious. Log in, please!
This article is really great, strong support
This is my first time i visit here. I found so many entertaining stuff in your blog, especially its discussion. From the tons of comments on your articles, I guess I
am not the only one having all the leisure here! Keep up the good work.
great!
Burberry Bags Outlet
[url=http://www.discountburberrybags.net/]Burberry Bags Outlet[/url]
Fred Lynn Jersey
Jacoby Ellsbury Jersey
On the other hand, we can probably agree that the design of the Bentley is more bespoke, luxurious and worthy of comment.Louis Vuitton Bags
You blog is so lovely that speak the words right out my month. I bookmark you so that we can talk about it in details, I really canât help myself but have to leave a comment, you are so good
I really like this website , and hope you will write more ,thanks a lot for your information.
thank you for sharing,I enjoyed the article.
On the other hand, we can probably agree that the design of the Bentley is more bespoke, luxurious and worthy of comment.
Thanks for taking the time to discuss this, I feel strongly about it and love learning more on this topic.
http://www.Fake-replicaoakleys.com
Your blog is outrageous! I mean, Ive never been so entertained by anything in my life! Your vids are perfect for this. I mean, how did you manage to find something that matches your style of writing so well? Im really happy I started reading this today. Youve got a follower in me for sure!
High end Footwear of christian louboutin sale should be famous for becoming traditional and also healthy pertaining to day time costume. High-class Footwear connected with christian louboutin uk should be recognized for getting formal in addition to match with regard to day time dress. Their shoes set comes with bows, duck down, patent leather-based, bejeweled straps, chiffon, pony head of hair, silk, suede, diamond jewelry, along with elaborate highlites.Christian Louboutin Shoes keeps the certification deal along with Patti LaBelle, who’s contracted to put on her distinct shoes and boots for the duration of the woman events and so on reddish colored rug looks.
Simply wish to say your article is as surprising. The clarity in your post is just nice and i can assume you are an expert on this subject. Fine with your permission let me to grab your RSS feed to keep updated with forthcoming post. Thanks a million and please carry on the rewarding work.
oakley sunglasses outletHi, i simply wanted to come here to show you about a very cheap service that posts comments like this on millions of WordPress blogs. Exactly why you may ask, well you may wish to sell something and target webmasters or simply just increase the amount of backlinks your web site has that will improve your Google rankins which will then bring your web site more visitors and money.
I
Thank you for sharing your experience and the time it took to post!! Two Thumbs up. such a good post.
Thanks for the write up ! This is really some great stuff here!
I really like this website , and hope you will write more ,thanks a lot for your information.
Professional cheap Coach handbags outlet online store
ring binder clip
Thanks for taking the time to discuss this, I feel strongly about it and love learning more on this topic. If possible, as you gain expertise, would you mind updating your blog with more information? It is extremely helpful for me.
Oakley Limited Edition sunglasses are the embodiment of our mission to elevate science to an art form. We occasionally invite artists from an array of disciplines-from popular surfboard designers to the legendary automotive mind of Chip Foose-to apply their chops to some of our most popular sunglasses, and the result is a collection of original limited edition sunglasses like nothing else youâve ever seen.
i believe in tomorrow is more beautiful.
Recently I saw a miu miu handbags in the popular sense of funky pop and poppy. I have always admired the colors of the party line poppy, but was never sure if I could carry into the pattern of the bag, but spotted this huge backpack, so you can travel safely to work.miu miu handbags spring 2011
eut aussi devenir une superstar dans la figure NFL. Bien que l’équilibre James, ou choisissez une route de basket-ball, mais il a maintes fois déclaré que, e oakley outlet
thnk you for sahring
Pretty! This was a really wonderful post. Thank you for your provided information. I like your post very much. Please write more and more please.
Great post, thank you very much, please write more and more about this. Very interesting.d and understand.Fell in love with you.asdfghhjk
Wholesale LV
http://www.chinaproduct355.com
nike air max
http://www.replicanikeairmax.com/
Timberland 6 inch Boots
http://www.timberland6inchboots.com/
thanks for this interesting information I will publish a link on our blog so my personal readers can benefit from it too.Oakley Polarized Sunglasses
Fabric-lined – padded foot bed for added ease and comfort. Special tire-tread layout on outsole.
Oh, my God! You were so thoughtful and creative.
Michael Vick Jersey
Desean Jackson Jersey
Drew Brees Jersey
Would you pay a grand for a shoe made of trash? Well, you might if it sports Jimmy Choo Saleâs iconic red sole. Available at Neiman Marcus Replica Handbags for no less than $1,095, the luxury designerâs new âEcotrashâ slingback incorporates actual detritus from the atelierâs dumpster, including Chaussure Christian Louboutin thread, postage stamps, leftover sequins, and fabric swatches from past seasons.
Thank you for sharing good articles. It is very interesting. Where can I find more related information about it?
An best blog this is,and a quality source to get updated by some of the greatest facts,thanks to share.
probably that isn’t your style of sneaker. In case you are thinking order what
Jeff Kurr knows a thing or two about sharks.During his two-plus decades with Discovery Channel’s Shark Week,Tory Burch Online Shoes the LA-based filmmaker has captured some of the most ground-breaking and dazzling footage of these feared creatures of the sea. This year,
Dark ghd online every plate is hot, you will be notified by a beep. With this security feature, you can effectively prevent the hair on fire, and you can protect your skin from head injuries. In fact, buy ghd hair, heating system allows automatic detection of extended stoppages. Automatic shut-off will buy ghd protect your design tool from overheating. AutoShutdown can also prevent fires, as the car begins to heat, when he was 15 minutes.The season,cheap ghd think big and go for the harvest, are given a hot celebrity hairstyles short bob.
You may know that Cheap True Religion, a high-end denim in the United States, are famous for its persuit of excellence in the details. From the leading fashion sewing, to the exquisite embroidery, vintage washed to a revolutionary hand-made feel old, True Religion Jeans dominate in the field of high-end denim. Have you ever worn True Religion Jeans before? If you have, you must be crazy for the innovative design of the jeans.
This summer, the True Religion Women’s Flare Jeans sell well. I prefer the True Religion Womens Low Rise White Flare Jeans. The first reason is that white colour is most suitable in the summer. And the simple and elegant design can suit people of all age groups. The great fitting of the True Religion Jeans must be another main reason. The bottom part of the embroidery pattern and buckle pocket style cover design, can have narrow hips and change Alice’s visual effects.
If you have interest in our True Religion Womens Flare Jeans, do not hesitate, take action now! True Religion outlet will be waiting for your order honestly.
I have a look at your article and learn frome some usefule information.
Thank you for writing this wonderful post! it is a truly inspiring!
Burberry is one of the most popular names in fashion. Burberry Scarf
and Burberry Bags designed especially for higher value and strength.
The quality of classic design and excellent picture of innovation in its development, dominate the Burberry Scaves luxury fashion industry and strong customer demand.
Pandora BeadsVery useful article i wll add this into my blog, well done my friend
Football is a very good sport, but motion of protection is necessary. Professional football clothes can provide you with sports very good protection.
Cheap NFL Jersey
Wholesale NFL Jerseys
cheap youth nfl jerseys
christian louboutin
christian louboutin shoes
christian louboutin heels
Excellent, but it would be better if in future you can share more about this subject. Keep posting.
http://www.ocheapoakleys.com
Right here,Air Jordan Fusion 9 you are going to see a countdown on the top five basketball shoes of all time. I know there might be some unfair judging here Jordans shoes Online because I am the only judge, but it will have to work.Authentic Air Max
Louis Vuitton handbags can trace back to France. Cheap Louis VuittonIn the begining of the nineteenth century,Authentic Louis Vuitton Napoleon III, the French emperor, was looking for someone to manage the bags of Empress Eugene. Louis Vuitton, LV bags sale
I think this is interesting and do not see posted often. This is great information. I feel strongly about it and love learning more on this topic.
http://www.Fake-replicaoakleys.com
Roger vivier shoes at Roger Vivier Sale. Shop popular brands and stores to find roger vivier shoes on sale – all in one place. Create and share looks based on all your favorite styles.
http://www.rogerviviersale.com
your article is interesting, thank you for sharing
Thanks for sharing us onLine
thank you for your infro. hope you write more
It looks pretty information.I am very much satisfied with your website posting
80cm above is big trailing (above Cosplay Costumes refers to the length of the clothes made of start pulling end) second-ranking more suited to Wholesale Cell Phones a church wedding dress traditional places such as teach.
Modern society, women show their heels into the charm of the city, has become a woman, sexy, independent, stylish, elegant.jimmy choo shoes High heels can be said that each woman a part ofjimmy choo heels everyday life, wearing high heels can allow yourself to become a higher pick, the line seems to make legs more perfect, self-confident.
Thanks for sharing this nice post.I will keep your article in my idea.
I am very thankful this website for providing the nice information and this information use to my project and the presentation also good.
Thank you for the good writeup. It in fact was a amusement account it. Look advanced to far added agreeable from you! However, how can we communicate?
Gran encantó, le estará esperando tus mensajes futuro
Cheap oakley sunglasses
Fake Oakley Sunglasses
Great site. very ispirational posts. Thanks plagiarizm free essays
The layout of the site is eye-catching……
essay papers
Wow, I stumbled across something that can be compared wih gold lol custom research papers
The layout is superb customized essays
Asics Running Shoes
Cheap Sunglasses
Nike Shox
http://www.nikeshoxr4outlet.com/
Nike Shox TL3
http://www.nikeshoxr4outlet.com/nike-shox-tl3-c-27.html
wow, it’s really amazing. thanks.
Nike Shox TL3
Replica Coach Bags
Air Max 2011
Nike Shoes 2011
Hello,I love reading through your blog, I wanted to leave a little comment to support you and wish you a good continuation. Wishing you the best of luck for all your blogging
efforts.
Air Max 2011
Nike Shoes 2011
The layout of the site is eye-catchingâ¦â¦
essay papers
I like the way you start and then conclude your thoughtsjordan retro 11 cool grey
When you live in a way that frees you to welcome whatever comes fake oakley sunglasses
Very nice post. I just stumbled upon your blog and wanted to say that I have truly enjoyed browsing your blog posts. In any case Iâll be subscribing to your feed and I hope you write again soon!
wow, it’s really amazing. thanks.
Replica SunglassesWe are the Timberland 6 inch Boots wholesaler From China and we are serious want to establish a long term business with worldwide customers.
Timberland 6 inch Boots
Because of a substance known as Plutonite you can rest assured that 100% of the harmful UV rays are being Oakley Sunglasses. Plutonite is not a spray on coating for the lenses it is actually an ingredient for the Oakley Sunglasses Outlet.
replica nike air max 180
http://www.replicanikeairmax.com/nike-air-max-180-c-24.html
replica nike
http://www.replicanikeairmax.com/
Nice information, many thanks to the author. It is incomprehensible to me now, but in general, the usefulness and significance is overwhelming. Thanks again and good luck!!!
It is very good idea.Thanks for post.Thanks for your time.
You post is very good!
Many people in the world can realize the principle of life, from [URL = shoes http://www.jcline.com Jimmy choo]], [/ URL shoes shoes to see other people are satisfied, in fact, only wear shoes can be clear: work, professional, hobbies, pursue, marriage life, all like this. Such a profound truth, can escape shoes, see such trifles waste a lot of people still not understand wrestling. A person’s quality of life and flavors of choice, can choose from the [URL = http://www.jcline.com attitude of the heels Jimmy choo shoes] [/ URL]. A woman’s love life, she will choose a suitable shoes to improve their height, therefore, they are more confident, more women conquer the world by conquering men, the most sensible way. Choose shoes and life
Their first target was a new law requiring every homeowner and business with a septic tank to pay for an inspection every five years. Untreated human waste leeching from Florida’s estimated 500,000 broken septic tanks contributes to health warnings across the state and chokes waterways with algal blooms.”
Read more: http://miamiherald.typepad.com/nakedpolitics/2010/12/mccollum-sues-the-feds-over-new-water-rules.html#ixzz1UVSELkBL
I love to read this type of stuff. Good and attractive information I take from it..Thank you for posting such a nice article.
Hi,that is a good idea!
I wonder how you got so good. This is really a fascinating blog, lots of stuff that I can get into.
Itâs coolï¼you said rightï¼itâs niecï¼
The article is worth reading,it makes me fell good,http://www.nike-discounts.com thanks for the bolg owner.I will keep visiting your blog.
Also I learn a lot in, discount mac cosmetics. Your topic really thank your very much i will come later. mac makeup wholesale
Very happy to see your article, oakley sunglasses cheap. I very much to like and agree with your point of view. Thank you for sharing. fake oakleys
Article is very interesting,thanks for your sharing. I will necessarily add it in the selected works and I will visit this site.
strapless wedding dressesand
a line wedding dresses
âMy ambition for [URL=http://www.jcline.com]jimmy choo shoes[/URL] to inspire women around the world has never had any limits,â Ms Mellon said. â I am immensely proud of all we have achieved over the last 15 years and delighted we are to be part of Labelux,[URL=http://www.jcline.com]jimmy choo heels[/URL] a partner who I know shares our values and passion and who seeks ambitious growth in the luxury industry.â
Wholesale New Era Hats,Cheap MLB hats,Red Bull Hats,Monster Energy Hats,DC Hats And So On At newsnapbackcaps.com! : MLB Hats – MLB Hats Soccer Hats Kid Hats Polo Hats Rockstar Energy Hats Famous Start Hats F1 Racing Hats Superman & Batman hats Yums Hats Hello Kitty Hats AFF Hats Christian Audigier Hats Snapback Hats Light Hats Winter Hats Hundreds Hats Leather Hats Tapout Hats NHL Hats NBA Hats NFL Hats Monster Energy Hats ED Hardy Hats Bape Hats A&F Hats DC Hats Fox Racing Hats Others Red Bull Hats Cheap MLB Hats,New Era Hats,Red Bull Hats,Monster Energy Hats,DC Hats,New York Yankees Hats,new era fitted hats
Welcome to our website to find which Nike Shox shoe is your favorite and you can give us some suggest that we can do better for you. Our store online offer all style nike shox shoes for men and women. And these nike shox shoes with the lowest price. And there is a news will made you feel surprise, Our all nike shox sent to your home with free shipping and NO TAX! Hurry up to visit our website.
I thought I would leave my first comment. I donât know what to say except that I have enjoyed reading.Nice blog,I will keep visiting this blog very often.
Hoe nice a post it is.
Thanks for posting this article. I’m definitely frustrated with struggling to search out pertinent and intelligent commentary on this subject. Everybody now goes to the very far extremes to either drive home their viewpoint that either: everyone else in the planet is wrong, or two that everyone but them does not really understand the situation. Many thanks for your succinct, relevant insight.
thank you for writing, I truly liked your most recent story. I think it is best to post far more typically, you clearly have all-natural capacity for blogging!
I of course know what you said
Contains wonderful and useful messages. I have read most of them and has a lot of them. To me, he’s doing the great work.
Outstanding site, where did you come up with the information in this posting? I’m pleased I found it though, ill be checking back soon to see what other articles you have.
your post write better and better
Women love to the high-heeled shoes, seems to be a never thought about the reason. In fact, the woman can find out ten thousand to be in love with the reason of high-heeled shoes, but, ten thousand reason actually only is a reason–high-heeled shoes make women have feminine taste more!
you know the thinking I am very happy
That is a missing for NIKE shoes
I’m definitely enjoying the information.
I never see a post can beat my hart,only you!!!
I like your sharing its very interesting and i like to read these all things too much.
My friend recommended I might like this web site. He was totally right.gucci outlet This post actually made my day. You can not imagine simply how much time I had spent for this information!cheap gucci bags Thanks gucci handbags!
When you wanna buy cheap air jordansï¼nike sbï¼gucci sunglassesï¼ray ban sunglasses,hermes handbags birkinï¼track suit online or confused how to find reliable china supplier. We would like to notice our potential clients: We are a serious wholesaler and won high reputation in this field, so you can totally trust us. There are variety designer products on our website http://www.shoe-clothing-china.com such as jordan retros,ralph lauren polos,nike sb,supra skytops,
ralph lauren polo tees,Lebron james shoe,nike rift,gucci sunglasses,hermes handbags birkin, nike shox turbo,puma sneakers,Ed hardy swimsuits,juicy couture track suit,Puma shoes womens,clutch purses. Offers from shoe-clothing-china.com with free shipping, paypal,credit card western union payment,compare price,high qu
assists per game while averaging a career-high 18 If you purchase one of these wholesale jerseys, you will be particular you will be pleased with the types of materials as well as the making of the merchandise itself When conflict occurs, take these steps: Time out: NFL jerseysIf the other person is getting heated, tell them you need to take five minutes to collect your thoughtsGetting access to Football is a dream wish come true for the fans and abutting football season fans go berserk to claim some pride in supporting their time and cheap NFL Jerseys is an acceptable idea Heat significantly i
talented college recruits may possibly sign with any number of sides After the impressive at the beginning of this season , the rest of Paul is disappointing , NFL jersey supplyand lost Lebron Jamesâ Cavaliers , big drop is divinable It is very difficult for the residents living far off to attune their schedule to buy their favorite soccer team jerseys These are currently well-known to many enthusiastic fans But in the end, they lost to the Lakers in the finals From the authentic player jersey, to the popular swingman or less expensive replica jersey, hats, jackets, MLB jerseys or footwear, make sure the store you are purchasing from carries high quality and licensed merchandise so you will be pleased with your selection and be able wear it proudly 7 PPG leads the team, the Nets have gotten enough scoring to get by, but havenât been nearly as dominant offensively as the rest of the league expected them to be Another reason could be that you do not like the detailing on the jerseys being sold, because one or more small, yet crucial details are missing from the jerseysThe one follows him is Cavaliers forward Lebron James and Magic center Dwight Howard and the âLittle Emperorâ James is recognized as the only NBA player who has the qualification to inherit Jordan cheap nhl jerseys sale-soccer jerseys cheap Once the wire has spun through the length of the document you will want to crimp the edges so there will not be any slippage In this case, it is the Jersey Barrierâs inherent design that has notably enhanced the safety of everyone involved in NBA jerseys this sporting event Therefore, people prefer to choose alo jerseys wholesale5 Climb on board and crush your book in primetime tonight with Jimmy Boyd He puts it aptly, âThere was something cooking all the while Of
thousands of New Era Red Bull Hats,NFL Hats, Monster Energy Hats,Dc Hats,And Cheap Snapback Hats at discount price for Wholesale.
Wear high-heeled shoes make you look more sexy,jimmy choo heels and beautiful. Make you feel more attractive. Wear the high-heeled shoes can also give you a confidence boost. These shoes can make you look thinner. Because, you must stand up straight, keep your balance, you look slimmer. jimmy choo shoesIn addition, high heels to your calf sexy definition.
that is what will happen each and every time I consider that and wished to say that I have really liked reading your site posts.
http://www.hotcheapoakleysunglasses.com
so perfect
In computer popular today, believe that daily life can’t computer, natural cannot leave Keyboard.
Great post! Thanks This really is just remarkable,i appreciate your blog site and bookmarked it.
I was more than happy to seek out this internet-site.I needed to thanks on your time for this wonderful learn!! I definitely having fun with each little little bit of it and Iâve you bookmarked to check out new stuff you weblog post.
Looks good. I like that one too.
gucci sneaker
As a world-leading wholesale company, we supply more than 100 thousand high-quality merchandise and famous brand name products, all at wholesale prices. Experience professional service and quality products made in China right now.
http://www.tzmart.com/
In here we own the best cases iphone 4 and the best iphone 3gs cases to serving you.
Your blog has truly inspired me, especially the current article. thank you for sharing your thoughts and the impact of them has been tremendous to me.Thank you more time and keep up with the good work.
http://www.buycheapmonclers.org
christian louboutin outlet
cheap Christian Louboutin 2011 shoes
cheap Christian Louboutin shoes
Chrisitan Louboutin Fall&Winter 2011 Collection
Latest style with pumps,boots,heels,flats and boys.
Available at online outlet store.
http://www.designershoestoyou.com
MORE Designer Shoes To You, Up To 75% On Designer Brand
visitors to the Ontario Mills Outlet Mall will be pleased to the cheap Uggs Classic Cardy in Rose movie theaters! ) and uggs outlet Bendel (712 Fifth Ave.
women More and more beautiful, more and more confident, , on foot, slender, delicate high-heeled shoes with more graceful, jimmy choo shoesin vast crowd charm of the world, the . Wearing the shoes, although with fine do not miles, but it can deduce infinite elegant appearance and romantic, jimmy choo heelsYi yi is unripe brightness High heels to , halcyon, high feeling, such as mysterious as fraught with the s the temptation of charming.Meet the
Welcome to ourWholesale Snapback Hats; New Era Caps Online Shop! Juicy couture outlet But now you need not to worry about that again, because we will give the best fashion guide for you. Come and buy, we will meet almost all of your needs. Ok, now come here to know more about us.We promise that the cheap and discount New Era Hats & Caps on sale, we provide the item as perfect as you want! CustomPlanet offers you Officially licensed sports apparel and merchandise with Wholesale 59fifty caps. Buy More Hats Or Caps For More Discount.Enjoy your shopping in my shop! But now you need not to worry about that again, DC Shoes Hats; Caps outlet because we will give the best fashion guide for you. Come and buy, we will meet almost all of your needs.
GREAT POOOOOOOST
Jordan, who make great effort in basketball short, is a hero in our hearts.Nowaday, most people in the world know the king of basketball short.Inorder to remember the hero, designers of the company of NIKE designed a lot of jordan shoes, such as air Jordan 11 and air Jordan 2009. These shoes are fashion and comfortable. Wearing these shoes, people can walk at a brisk pace.As we know, Jordan wear these shoes to breach the enemy defence. The designers of these shoes always keep pace with time to creat new kind of jordan shoes.That is why the business of company of NIKE is brisk today.
I guess it must require some skills to design the air max shoes.
Many companies’s main problem is the shortage of skilled personnel.However, that designers of the corporation of NIKE are highly skills. In 1987, air max 87 shoes are the popular among people when the first air max shoes were publiced in market, at that time, air cushion is a puzzle for the rest corporations in the world. People could not get the answer until the air max 180 emerged.
How to find the pleasure in pressure, and how to apply pressure release more energy? Deeply loves the life you might as well to join us in our “high-heeled shoes plan”!!!!! You see, jimmy choo shoes are the most important woman outside dress, fashionable woman love with clothes, elegant woman love shoes. Put on high heels of woman, to more accurately reflect the graceful, and lithe and graceful but person, wen wan the taste of tender feelings,jimmy choo heels can really do receive an abdomen bosom, full of confidence.
This article is informative and interesting, I enjoy reading it.
This is a really quality post.I find this information through Google. Great job.
Wholesale New Era Hats,Cheap MLB hats,Red Bull Hats,Monster Energy Hats,DC Hats And So On At newsnapbackcaps.com! : MLB Hats – MLB Hats Soccer Hats Kid Hats Polo Hats Rockstar Energy Hats Famous Start Hats F1 Racing Hats Superman & Batman hats Yums Hats Hello Kitty Hats AFF Hats Christian Audigier Hats Snapback Hats Light Hats Winter Hats
Juicy couture bag shop will open
Magnificent website. Plenty of useful info here. Iâm sending it to some friends ans also sharing in delicious. And obviously, thanks for your sweat!
You still need to work closely with sales of decision makers
You north face sale still need to work closely with sales of decision makers. Puts forward of the right questions, you should be able to easily close sales. You still need to work closely with sales of decision makers
You north face sale still need to work closely with sales of decision makers. Puts forward of the right questions, you should be able to easily close sales.
Cheap Burberry Bags
Discount Burberry Bags
Burberry Handbags Outlet
Comfortably, the post is really the sweetest topic on this related issue.michael kors sales I harmonize with your conclusions and will thirstily look forward to your approaching updates. Saying thanks will not just be enough,michael kors handbags for the tremendous lucidity in your writing.michael kors watches I will instantly grab your RSS feed to stay privy of any updates.
Natural beauty is an all-pervading presence. The universe is its temple. It unfolds into the numberless flowers of spring. It waves in the branches of trees and the green blades of grass. It haunts the depths of the earth and the sea. It gleams from the hues of the shell and franklin marshall Hoodiesthe precious stone. And not only these minute objects but the oceans, the mountains, the clouds, the stars, the rising and the setting sun—all overflow with beauty. This beauty is Paul Smith Ladies Bags so precious, and so congenial to our tenderest and noblest feelings, that it is painful to think of the multitude of people living in the midst of it and yet remaining almost blind to it.
Thanks for sharing us onLine Belstaff Bags
Thanks for sharing so significative article with us. I agree with your idea competely.I am looking forward to another great article from you. And I want to say air jordan shoes are so popular, the air jordan fusion sport shoes are fashion and there are so many yong people like them. Cheap air jordan 5 are hot selling all over the world.
Oakley Sunglasses Outlet
You are absolutely right. In it something is and it is excellent idea. I support you.
cheap jordan shoes
cheap chanel bags
High heels and a woman of the ties, jimmy choo shoesfirst of all it can directly to give women bring superiority, let a woman crus line becomes slender, chest, all stand as a woman due sexy,jimmy choo heels charm, and confident, will all in a flash is stir up.
Your post is rocking and knowledgeable… I really appreciate the way you write . I would like to read more from you.
http://www.buycheapmonclers.org
It looks like you have done a research on the issue and discovered.Anyway thanks a lot.I think most peoples will agree with your blog. This article is already excellent and worthy of appreciation and praise.
I donât suppose I have read anything like this before. So nice to find somebody with some original thoughts on this subject
If you build content bulk then you shall rank higher fast and get traffic but if your content is not enticing then your traffic will never come back to your site again.
http://www.2011cheapoakleys.org
i love that pink flower bag, i should get it same,
very nice information, i love to read that and i want to get a bag same for my GF. Thanks.
I wonder is there really much point in having the lesser teams there wasting a fortune? No one ever uggs 5819 notices them unless there is a big accident. They have no chance of getting on the podium. Even Mercedes can’t.
Happy to see your blog as it is just what Iâve looking for and excited to read all the posts. I am looking forward to another great article from you.
CCTV Security Systems the owner should see to it that the camera he is about to use and is currently using. The features that follow are those that can be controlled remotely and can be connected to a computer. They can be activated even if control area is not so near to the camera. All you need is an internet access that can throw a high speed access so that you can view the happenings and the activities even if you are away from home.
8 Channel Security DVR
Outdoor Surveillance Cameras
Indoor Surveillance Cameras
4 Camera DVR Security System
IP Surveillance Systems
For the ones that havenât been with this field long enough â I do know that the web is not the most reliable resource for info. but for sure I can say that the author is correct, however odd it may look
true religion jeans sale
Ray Ban sunglasses are one of the most leading brands in the high-quality sun wear fashion market and by far the best-selling sunglasses brand worldwidehref
ray ban sunglasses
Your blog has truly inspired me, especially the current article. thank you for sharing your thoughts and the impact of them has been tremendous to me.Thank you more time and keep up with the good work.
http://www.canadagoosecoatsale.org
Your blog has truly inspired me, especially the current article. thank you for sharing your thoughts and the impact of them has been tremendous to me.Thank you more time and keep up with the good work.
No matter what kind of woman you are, you just need to wear a pair of high-heeled shoes. A pair of high-heeled shoes is the symbol of woman and the direct source of the woman’s self-confidence. The famous brand Yves Saint Laurent is your best choice. Go Gianmarco Lorenzi Outlet for your dreamed one.
Nice handbag need a nice pair of Yves Saint Laurent shoes.
These kind of post are always inspiring and I prefer to read quality content so I happy to find many good point here in the post
great post i love it
That is an awfully astounding column you’ve posted.Thanks a lot for that a fantastically amazing post!
thank you for sharing,I enjoyed the article.
Thanks for sharing this nice post.I will keep your article in my idea.
cheap oakley sunglasses sale
cheap gucci belts sale
CHEAP GUCCI BELTS FOR MEN
chep ray ban sunglasses sale
We supply Authentic Prada handbags and Prada handbags 2011, we have Prada handbags cheap. Our Prada replica bags are perfect duplicates of genuine leather Prada handbags. Buy Prada handbags online just come to 2011brandhandbags store.
[url=http://www.hongdameter.com/products_info/auto-range-AC-DC-digital-clamp-meter-HD9593-129295.html] auto range AC/DC digital clamp meter HD9593[/url]
clamp meter
[url=http://www.hongdameter.com/search/7475/clamp meter.html]clamp meter[/url]
It was a beneficial workout for me to go through your webpage.
Detox Headphones, studio colorful champagne, Beats Michael Jackson,
find, as a papercrafter, I save a LOT of things! Always with the HOPE of finding a great new use for it! One of them being the tissue paper that comes with many gifts we receive. It is so pretty and comes in a large variety of colors! I have always wanted to find a fabulous way to recycle it, and now I have!
good posting, thank you
i like it, have a nice day
The jimmy choo shoes of the single seem to have a tone that brings depth to the music. In one portion it gives a look of what we might expect in the jimmy choo heels, âI’ll stop the whole world from turning into a monster, eating us alive. Don’t you ever wonder how we survived?â
Wow, you’re like a professional writer, I love your blog.
It is very important to find out a tenancy cleaning company that has large experience in the area for which you need cleaning. If some company is more experienced in completing domestic landlord cleaning than a cleaning company which work with residential clients, it is recommendable as a landlord to choose the cleaning company that has been working more with landlords. It is really important to find a cleaning company with a good reputation in end of tenancy cleaning , this way you can be sure that they will be able to do the cleaning without watching every their step. post tenancy cleaning
Yet it is not New new orleans saints jerseys crime which should get worried the actual NFL. Everybody knows with regards to Brady as well as weaponry Wes Welker, Deion Branch, Danny Woodhead and today, Ochocinco. The newest threat will be upon defensive. Belichick went back to taking care of exactly what created him or her excellent to start with; halting additional workforce. Hoodie will not acknowledge the idea, but he is been paid to some sort of 4-3 defensive as well as he has getting the property on pretty much every perform. They have brought in each and every lineman the guy can come across. Albert Haynesworth and Shaun Ellis haven’t played but, nonetheless fourth-year linebacker Jerod Mayo appears prepared to get a breakout period plus it is really clear which switching deals in addition to pressuring cheap nfl jerseys thewill become items.
There are some great ideas here.
plush toy manufacturer in china
This information is very interesting, I really enjoyed, I would like get more information about this, because is very beautiful, thanks for sharing
If you are just looking for a great pair of the boots online, here are some tips and tricks for you to get your perfect pair. Basically when you are choosing your boots, there are three considerations: size, color and style. It is the fact that UGG boots are always one size bigger, Ultra and Sundance excluded. Thus, order one size down for that renowned snugly comfort in ultimate.
Louis Vuitton leather goods are handmade unique noble quality
Invisible but obvious to the observer are their proper mbt shoes, presumably heels, secreted in a handbag or tote, ready for a quick swap before starting a day of work. So many of us seem to have a “can’t live in them, can’t go without them” relation to our formal mbt sale these days.
Meanwhile, in business news, there seems to be a direct correlation with the height of the jimmy choo shoes and the profits trajectory of the company, when it comes to footwear brands. Jimmy Choo posted a 200 per cent increase in profits this January; Christian Louboutin is expanding by opening shops as far away as Brazil and Japan, and Kurt Geiger reckoned it sold ten pairs of jimmy choo heels a minute in 2010 â with five-inch heels proving the most popular choice.
These kind of post are always inspiring and I prefer to read quality content so I happy to find many good point here in the post
http://blogs.mspmag.com/themorningafter/2009/08/review-patrick-coyles-new-film.html
I would like to thank you for the efforts you have made in writing this article.
very nice post, i certainly love this website, keep on it.
it’s nice!
Discount Burberry Bags
Burberry Bags Outlet
Discount Burberry Handbags
Excellent postï¼thanks for the sharing, that greatly helped me to resolve the problem.now I am glad to share the latest fashionable news about the beauty equipment with everyone.
I am Happy to be here! Interested parties can contact a lot
We wholesale hats at competitive price,providing a huge range of hats with different brand name,such as coogi hats, polo hats,Jordan hats,famous hats, wholesale hats,new era hats, etc.You can buy cheap hats. Welcome to visist here from http://www.neweracapsshop.org
We also specialize in specialty sunglasses, like Prescription and Bifocal Sunglasses, as well as Motorcycle Sunglasses, Golf Sunglasses,
as well as Motorcycle Sunglasses, Golf Sunglasses,
ray ban sale
For women, they have more chances than gentlemen to select different styles and designs of it from all kinds of brand stores.
true religion jeans on sale
true religion jeans sale
cheap true religion
Very useful post.. I hope you will continue your same best work and we will get more informative post which can helpful to us. Thanks for this!!!
What kind of mood to see the article.
http://www.Fake-replicaoakleys.org
Now Louis Vuitton luggage and leather goods to become one of the best areas of the brand.It is the dream of hundreds of millions of people in mind
Continue to go straight, because it left the FS 42 no-parking area turned suddenly to join
Married north face sale couples are homeowners or other real estate evaluation value less than to family owed guarantee debt. This is usually called “hangs upside down” in your family. If a spouse a party in the property of the divorce, keep they may require them to suppose that this negative assets to other savings or assets of the credit? Depending on the answer No published (not to the court of appeal or published) directly to solve north face sale this relatively new phenomenon in Michigan, the Supreme Court ruling. Circuit court judge, it seems, is willing to give to shall be liable for the potential liability for other assets of the credit. These decided to have several potential reason behind. 1. All parties are still the instructions on the or related liable for debts. If a hold harmless or compensation, if the party needs terms house, and then walk away and stop payment, holder the north face sale (bank) still may bring the suit debt both sides. Divorce judgment can’t force the bank to remove information with the same legal responsibility of a party, if the parties owe it is worth more than the last of money, in most cases, the bank will not agree to delete a name or allow refinancing. .TS
nfl jerseys
cheap air jordan shoes
nfl hats wholesale
I really liked your article and I shared with my friends in my facebook account ..
you also let the most distressed students. I told Dad how you can not beam you look so good on the seedling so ruined. mbt shoes So be it! We fight this old head, two days to help you go running around, I just give people kneel down to, mbt scarpe let you on the next year to film school! ” Yiyi looked Xu Xiaojun, mbt outlet either just before they heard the couple that part of the dialogue, under which she really believe. Now she is just strange, Xu Xiaojun how to mention the money thing is not opening. Sure enough,mbt calzatureXu Xiaojun pretending to hesitate: “But you know,
It is so pretty and comes in a large variety of colors! I have always wanted to find a fabulous way to recycle it, and now I have!
barbour quilted jackets Wonderful, I wish the same best work from you in the future as well.
Girls’ Jacket Useful information like this one must be kept and maintained so I will put this one on my bookmark list!
That pittsburgh steelers jerseys aren’t able to also maintain to be principal into their community market place anymore. This is the higher renaissance of Different Britain athletics along with irrespective of receiving some Very Bowls in such a one hundred year, the Patriots possess the greatest tournament drought amongst increased Boston’s three specialist sports activities teams. Consequently at this point Belichick is actually returning. Having a vengeance. Discuss Eagles all that’s necessary. Philadelphia has set up any Desire Workforce regarding veteran skill, drawing comparisons with all the Miami High temperature. POST claim the harder pressure comes from cheap jerseys Brand-new Britain.
with Thierry Henry, has become a huge factor that drives the success and sales of a
Handbags are must-have for every fashion lady. Mulberry Bags have already become the top fashion items in the whole world. Our Mulberry Sale would like to provide best items for you. Most of us know Alexa Chun like Mulberry Alexa Bags most.
When we talk of the latest trends, then the exclusive range of Coach Sneakers is designed to be in sync with the latest in fashion.The shoes here ape the latest trends and are thus perfect as trend setters.
new balance 993 is a best running shoes.new balance 993 sale online here.shop
This is the higher renaissance of Different Britain athletics along with irrespective of receiving some Very Bowls in such a one hundred year, the Patriots possess the greatest tournament drought amongst increased Bostonâs three specialist sports activities teams.
there are three considerations: size, color and style. It is the fact that UGG boots are always one size bigger, Ultra and Sundance excluded-good
Thanks for sharing so significative article with us. I agree with your idea competely.
Fantastic looking site! I have a site as well but unfortunately I’m not very good with design and other computer (tech) related stuff, but would like to make my theme a bit more custom as well. Could you refer me to your designer please? Thank you so much, Nicole
Burberry is one of the most popular names in fashion.
Burberry scarf is one of the most popular categories of burberry brand. Burberry scarves with first-class technology in order to achieve the best reputation among the public.
This is a great post. you got Tiffany jewelry .I like cheap designer handbags as well give you designer handbags outlet
I like cheap designer handbags as well give you designer handbags outlet
The barbour jackets story began in 1984 in South Shields. Today the 5th generation family owned business remains in the read, with barbour jacketâs headquarters located in Simonside, South Shields. Although it sources products from around the globe, ladies barbour jacket are still manufactured by hand in the mens barbour jacket factory in Simonside and each year over 100,000 barbour quilted jackets are processed via the central, subsidiary and local customer service operations. http://www.barbourjacket.org/
Hey! I visit your site regularly, but your blog doesnât load in IE8. Canada Goose uk Why do I get a timeout after a while? Canada Goose Jackets Gracias. Barabara
The cheap jerseys prosecutorsâ treatise within the event looked like it meant for a good visitors above Rights Obus. Possible features attracted throughout the world consideration, largely due to Mister. Strauss-Kahnâs stature, because leader with the pay for as well as the front-runner for your Socialist nomination for People from france leader, as well as lurid report line of any honored male getting arrested connected with benefiting from a lodge housekeeper. Inside installation of this situations in such details, Mister. Vance furthermore had been offering a family market, which include New york voters, an explanation regarding his selection. They may have got searched for to target complaint through dark-colored commanders plus womenâs sets in which he / she cheap jerseys will need to go to trial.
season’s league cup, Insua blew open long-range kick Arsenal’s goal, the Red Army has also talked about the fans.Last season, Liverpool coaching change later, Insua on loan to
(Dallas Cowboys Jersey)
Galatasaray.Insua became Maradona of Argentina during the standing player, but he did not enter this year’s Copa America roster.Now the Liverpool team, Kenny Dalglish have
Enrique
Wow, you have done a great job here. This decoration is amazing and how you made it. Keep up the good work.
We wholesale hats at competitive price,providing a huge range of hats with different brand name,such as coogi hats, polo hats,Jordan hats,famous hats, wholesale hats,new era hats, etc.You can buy cheap hats. Welcome to visist here from http://www.newera-hatsclub.org/
The actual nfl jerseys prosecutorsâ treatise on the situation looked like it for a market outside of Rights Obus. So includes fascinated around the world consideration, typically on account of Mr. Strauss-Kahnâs stature, for the reason that leader of the fill as well as front-runner for that Socialist nomination with regard to People from france leader, and the lurid tale distinct any fortunate gentleman becoming arrested with gaining from any lodge housekeeper. With laying out the actual situations in such depth, Mister. Vance in addition was supplying your family audience, such as Long island voters, a conclusion for her determination. He or she may also have searched for in order to tackle self deprecation from black leaders plus womenâs sets that this individual chicago bears jerseys ought to check out trial.
This is a great post. you got Tiffany jewelry .I like cheap designer handbags as well give you designer handbags outlet fake designer handbags
There are various connected with different styles that can assist you actually
position fake oakleys.Supporting the credit card payment, paypal payment and mini
order,the big order will be discount and the ems
shipping.http://www.discountoakleysale.com/ If youâre searching for just a destination
for a study the facts in relation to replica oakley sunglasses then you will want to
think about this page information about oakley sunglasses aviator.
cheap oakley sunglasses
replica oakleys
fake oakley sunglasses
Kidney lies in the daily
Everyone should pay attention to yin water conservation.jordan air max
air max ltd in addition to appropriate medication, routine maintenance is more critical.
Sex should be appropriate, not reluctantly, not indulgence.
Diet: eat more iron when unable to fatigue, protein foods such as mushrooms, jujube, black-bone chicken, etc.;
indigestion and more yogurt, eat hawthorn; normal kidney to be more Chijiu Cai, sea cucumbers, ginseng, black-
bone chicken, pigeon and so on.
Regular waist, thesecheap supra shoes movements can be
transported Vital health, kidney qi. Can also do more to stimulate the soles of the feet massage, Chinese
medicine, soles of the feet is the sewage down the Yongquan place, Yongquan regular massage can be beneficial
kidney essence, physical fitness, prevent premature aging, and to liver and eyesight Qing-centeringair max griffey throat, promote sleep, increase appetite.
Uniqueness of adequate sleep is important to restore security, work to tight, more at home bothering to have the
sleep time to rest.
I liked this article. It was so great.
Waiting for your more great posts! I have learned so much from you, thank you!
Well done, thak you for your great posts, i learned more from here.
That included a pittsburgh steelers jerseys convincingly delivered story of being gang raped by soldiers in her native Guinea; she later acknowledged that she had fabricated the story, and prosecutors characterized her ability to recount a fictionalized sexual assault with complete conviction as being âfatalâ to her cheap nfl jerseys credibility.
Biggest sale, limited time! Get Baseball hats, New Era Hats for your favorite team at best dc shoes Hats New York Yankees Hats online store, we offer various hats including Monster Energy Cap, Cheap Red Bull Hats Sale, bape hats at incredibly low prices.
Men gucci slipper are full of the sports and modern design. Men gucci slipper express luxurious and noble temperament. Men gucci slipper are very durable and antiskid to ensure the comfort wearing. A pair of these sandals can be worn at beach and home, both will bring you the extreme comfort and fashion!
For people who are ready for outing in the summer, new era hats are always the must-have accessory. buy monster energy hats from http://www.goahats-business.com offer a cheap red bull hats with high quality buy desinger cheap hats with good service dc shoes hats,red bull new era hats, new era 59fifty hats,caps new era,red bull energy hats,New Era Hats Wholesale, Monster Energy Hats, dc shoes hats, and many more.
I agree with your point of view of this article. This is a good article. Very timely given us so much useful information. Thank you!
http://www.cheapesthandbagsoutlet.com In the fashion life, many girls used to back the packets for portable, of the big package may still have concerns. In fact as long as matchs well, portable bag also can let you be more outstanding sweet, but the person’s model is a lot of girls pursuit of fashionable element, a sweet how can dress up less beautiful bag bag come deck! Let me introduce you to a few popular bags to cooperate with your sweet but person dress up it
Surprise to you! A woman of beauty, in the cold winter how to maintain the beautiful also not cold. then, ugg boots sale uk could give you the warmth from the foot to the heart all the time. a series of beautiful style ugg boots sale chende you like a flower. our women ugg boots sale online is very cheap and provide fastest shipping! ugg Australia sale is here!
Combines the Nike Air Max 95, Nike Air Max 97, and cheap air max 90 all together, Nike Sportswear release the newest hybrid Air Max model – the Air Max 24/7, the shoe however most closely resembles the Air Max 95 and to pay homage to the original AM95, Nike will be releasing this OG cheap air max 24-7 colorway of the 24/7 in Neutral Neon and Grey.
I have surrendered my free will to the years of accumulated habits and the past deeds of my life have already marked out a path which threatensdd.
cheap Supra Vaider,never worn 2011 Christian louboutin shoes and shoe bag. They are sexy2011 Supra Shoes. All shoes has been worked by a craftsman and Christian Louboutin pump and this is the result of a careful selection.cool Supra Vaider. Even more tantalizing,this pattern makes your legs look as long as they can be,it will make you look more attractivechristian louboutin pumps 2011 on sale,Supra Vaider bright black.If you are a person going in for fashion and elegance,do not miss it.christian louboutin pumps 2011 for cheap
cheap Supra Vaider,never worn 2011 Christian louboutin shoes and shoe bag. They are sexycheap 2011 supra shoes. All shoes has been worked by a craftsman and Christian Louboutin pump and this is the result of a careful selection.brand-new Supra Vaider. Even more tantalizing,this pattern makes your legs look as long as they can be,it will make you look more attractivechristian louboutin pumps 2011 on sale,Supra Vaider good shoes.If you are a person going in for fashion and elegance,do not miss it.christian louboutin pumps 2011 for cheap
It is really nice to have this at home. I will share this to my friends at online english class that weâve take up last week.
I would like to thank you for the time you put into this article. Your article has me eager to begin my own site now. Thanks again for putting this online.
This is really my very first time here, great looking blog. I discovered so many interesting things inside your blog especially its discussion.
Supra Shoes
Supra Footwear
Supra Skytop
This articles helps me more.Thanks for your sharing,I will pay more attentions to your blog. Looking forward to your better and better articles.See you next time.
Supra Skytop
Supra Skylow
This article is well worth watching
http://www.hotcheapoakleysunglasses.com
oh cool, this information is really useful and definately is comment worthy! hehe. Iâll see if I can try to use some of this information for my own blog. Thanks!
Cheap women air max 90 sale http://www.nikeairmax90-nike.com
Here I learn a lot of things, this article is quite good! Hope can and everybody in here after share more information!
Smiles send us light in the darkness. Smiles bring us warm sunlight on a cold winter day. Smiles can break the hard ice. Smiles are like the rainbow. The rainy days end and the sky is beautiful again.
If you need more traffic to your website check out the website in my name. It really helped me and i think it can help your website.
Thank you so much.
[url=http://www.mbtshoesstore.es/]mbt madrid[/url]
]
[url=http://www.norgeboot.com/]uggs støvler[/url]
I have learned so much from you, thank you for your good posts.
I know many of pictures.
This article is very good, replica prada sunglasses</a thank you for sharing,fake prada sunglasses I hope next time to share your literary talent!mens prada sunglasses
This is really nice idea for sharing this beautiful handmade thing with us in here. I would like to share to the parents of my class at english teaching job shanghai.
Great job on the blog, it looks great.Canada Goose Expedition Parka I am going to bookmarkCanada Goose coats it and will make sure to check back weekly
Septembre 06,2011
Vous cherchez un hélicoptère unique ? caractéristique ? Bon,je vous donne ce que vous voulez.
Tout va bien,pour un amateur de Avatar, je suis fasciné par les machines dans ce film. Surtout le hélicoptère,câest excitant. Cool, si on peut sâasseoir à un hélicoptère,câest magique. Mais câest dans le reve,bien sur. La technologie ne peut pas arriver le niveau de la technologie dans le film. Il fera une route longue à rouler.
Mais la technoloige ne peut pas arriver,ne signifie quâil ne peut pas arriver dans le Modèle. LEGO a fabirqué un Voiture rc qui est pareil comme le hélicoptère dans le film. Il ressemble au modèle original dans Avatar. On peut ouvrir la porte,et lâallumer, la hélice peut rouler. Mais on ne sais pas trop dâinformation sur le modèle,sâil vous intéresse, vous pouvez chercher des informations en ligne officiel ou myefox.Io offrit la voiture rc pas cher. Pour un Bateau RC,il est suffisant. Logo Avatar a fait bien.
C’est bien joli,ce hélicoptère RC,un cadeau pour l’enfant,surtout un garson.Le garcon est bien espiègle,on ne peut le satisfaire jamais
Thanks for sharing. A real lot of useful info here!
These are all great comments here. Very cool article.
This post bring a big surprise for me.I like those shell house.And i hope it is become the truth one day and i can live in it.
Thank you so much.
Yao revealed an annoyance to Bensinger that most people may not know â he has been deaf in his left ear Air Max
since age 8 after a high fever, but the deafness doesn’t have much impact on the basketball ace’s life.
Shall I try to find an update for my software or something? Thanks! Tina Hey, I cant view your site properly within Opera, I actually hope you look into fixing this.cheap uggs
Iâm very interested in art painting.There are so many famouse mlb stars jerseys,we have abstract painting.So I an fascinated to the landscape painting,flower painting
I have never read such a wonderful article and I am coming back tomorrow to continue reading. The article is worth while reading,I like it very much and which you shared the info in this post is very useful. Thanks for sharing a wonderful post.
papier,mesurer,fabriquer,organiser,choisir des couleurs,le modifier quelques fois. Il vous faudra lâimaginer,le penser. Il vous faudra etre famillier avec les logiciels comme MAX,Photoshop et autre logiciel professionnel. Une chose le plus important est quâil vous faudra etre patient,oui câest important. Chaque chose ne réussit pas avec impatient. Le temps sera long,donc si vous nâetes pas un amateur de modélisme, je vous propose de lâacheter dans les boutiques. Faire lâachat en ligne(myefox) est plus économique et les modélismes sont plus nombreux. Mais on ne peut pas le voir jusquâà le recevoir,câest évident. Le prix de délivrer doit payé soi-meme.
Les modélismes RC sont plus faible quâun modélisme. Parce que les modélismes RC,comme voiture rc pas cher ou Bateau RC ,ils sont équipées par les pièces électroniques. Les pièces électroniques sont faible.
Excellent postï¼thanks for the sharing, that greatly helped me to resolve the problem.now I am glad to share the latest fashionable news about the beauty equipment with everyone.
This is a very informative article.I was looking for these things and here I found it. I am doing a project and this information is very useful me. If you are interested in fake oakleys, but this is my duty to inform you that virtual administrative assistant a very dedicated service and can be applied anywhere you want and get better results.
it looks so nice i liks these flower
Buy ; Discount Wholesale baseball hatsOnline in Australia, Compare Prices of Wholesale snapback hatsProducts from 3 Stores. Lowest Price is . Wholesale snapback caps
Recently established in 2006, http://www.goahats-business.com is the website of a company that has been in business in the Chinese market for about 3 years.We are hats manufacture in china, Our company specialize in supplying new era hats, cheap new era hats,dc shoes hats,red bull hats,famous hats,jordan hats,etc. We pay attention to our products quality and service.
Câest un grand festin pour les amateurs de WOW. Câest une guerre ââréelle ââ.Une ville BBrokeloh, Allemagne a accueilli plus de sept mille des amateurs de WOW. Ils peuvent sâhabiller les vetements de cosplay ce quâils aiment beaucoup. Et échangent les goûts et les expériences propre. Câest une action la deuxième grande de cosplay dans le monde. On peut voir le conflit partout, les chevaliers battent les Nains,les Elfes battent les Orcs. Câest vraiment excitant.Un cosplay naruto.
In the era of leather and sheepskin is so common, can not meet all the needs of women, rare materials are so popular.
sie teilt seinen Namen mit, die Dell Latitude D520 Akku Lamborghini VX7 gebaut ist
He started the 2010 campaign cycle with a financial handicap after raising less money in the first quarter of the year than a key Democratic challenger.
Our http://www.timberland6inchmall.com is an Online Timberland 2011 Outlet.
Our http://www.cheapmonclerjacket2011.com is an Online Cheap Moncler Jackets Outlet.
Hello! Do you use Twitter? I would like to follow you if that might be all right. Therefore i’m absolutely enjoying your website and expect new articles.
Appreciate your inforamtion. It is just too greeeeat!
I recently came across your blog and have been reading along. I thought I would leave my first comment. I donât know what to say except that I have enjoyed reading. Nice blog. I will keep visiting. http://www.dellakku.de/
Nowadays,Nike Shox have become a popular trend for mens and womens. Our online shop offers best quality and best service for you. These shoes was well-received products by people.Every Nike Shox NZ has its special meaning.There are a large number of Nike Shox with many versions,you can choose a pair of shoe which suitable for your style. Do not hesitate!
CHEAP NIKE SHOX SALE ONLINE STORES WITH ALL WORLD FREE SHIPPING!! THERE ARE VARIOUS MEN’S,WOMEN’S AND KID’S NIKE SHOX SHOES,YOU CAN CHOOSE OUR SITE CHEAP NIKE SHOX SHOES WHATEVER YOU LIKE.
Jede Woche LaptopDell XPS 15 Akku Australien sucht die besten Angebote aus seiner angeschlossenen Partner. Unsere exklusiven Dell Vostro 3300 Akku Partnern geh?ren Dell Laptops, Lenovo ThinkPad und Apple Computers
Cheap New Era HatsIt looks like you have been doing this for a while now, how long have you been blogging for?
Good creativity is so beautiful!I think in my wedding can use this!
here agian !!
Gucci store each business are different types of goods
Salon Skincare, straighteners cheap sale is a leading supplier of skin care products, announce the arrival of ghd hair straighteners fragrances from some of the most recognisable perfume and cologne brands on the market.
Belfast, United Kingdom (09 March, 2011) â Salon Skincare, a leading supplier of skin care products, announce the ghd purple of a new range of designer fragrances from some of the most recognisable perfume and cologne brands on the market.
GHD 2011 have established themselves as one of the leading UK providers of fragrances, skin care and hair care products, such as good hair day straightener and Clarins skin care. They offer exceptional cheap ghd at extremely competitive prices, and are committed to providing an extensive range of items to ensure their customers can make an informed decision.
“You are a cheat!” shouted the attorney to his opponent. “And you’re a liar!” bellowed the opposition. Banging his gavel sharply, His Honor interrupted: “All right, now that both attorneys have been identified, let’s get on with this case.”
und es sicherlich fühlte geräumig und ansprechend für das Lesen und Anzeigen von Inhalten. Es gibt eine dunkle Kehrseite dell inspiron 1300 akku dieser positiven, wenn auch … Interface. Ergebnis man hier für Windows 8. Das modernisierte U-Bahn-Stil- Schnittstelle in der Entwickler-Preview fühlte sich gut dell akku entwickelt und war intuitiv zu bedienen. Auch die Handschrifterkennung, die etwa zwei Schritte mehr zu erreichen, als ich es mir gewünscht hätte übernahm, dell latitude d520 akku arbeitete gut mit meinem Huhn- Gekritzel Handschrift. Ich mochte die verschiedenen Aspekte der Benutzeroberfläche, Design – die aktive Fliesen, die Live-dell latitude e6400 akku Informationen anzeigen und weiterhin auf dem Startbildschirm zu entwickeln, die fü nf navigation “Reizen”, die aus Pop von der rechten Seite, die gleitende dell vostro 1000 Akku Multitasking, die ganz neu Internet Explorer 10 (mit der URL-Leiste am unteren Rand, weit effizienter als bis oben),
Wow, great post! Well-written, informative and eye-opening. Will definitely be checking out your blog more in the future ð
formal dresses
Tods is an Italian brand, shoes, covering appurtenances and added affairs articles articles and chaired by agent Diego Della Valle. Synonymous with acceptable above and Italian style, makes the Tod’s products, the alluringly simple and affably practical. The cast craftsmen plan with the world’s a lot of comfortable covering and anniversary section has the incomparable attending and feel can “truly handmade.
Choose the most suitable and elegant always means texting all the designer bridal showed at this century, and in recent years viewing all different and nice design is acceptable on the famous designers. Only after seeing all the designs that you will be able to make the final decision,because you must make sure this is the best choice.
http://www.myweycase.com/products_info/the-hotest-Ipad-leather-cases-in-2011-129667.html
The material and shape and fashion classic Gucci coat of metal badges in sharp contrast.
http://www.saleguccinewbags.com/best-gucci-263955-ang0g-3604snaffle-bit-medium-shoulder-bag-green-leather-p-252.html
Comfortably, the article is really the sweetest on this precious topic.
Red Color is really a good sign of the love. So if we like to give the red rose to any one it mean, you are showing your love for the person. Yellow color is the sign of the hate. These are the myth.
Hi Lauren,
Awesome work and great video on fancy flower flourish closure. I like the color combination and I will try with purple as my daughter likes purple color most. This way we can bring many things in productive way.
Awesome color or flower combination,
pink color is my favorite color, Soon i should purchase
like this.
Wow⦠I liked it .. please keep posting such stuffsâ¦. I am sure there are many who will like this stuff.
Hi…
Thank you so much for sharing such nice post with us… I an really grateful o having this information
China consumer electronics goods are in fantastic need from the current a long time and lots of on the web wholesale electronics outlets are constantly searching for China wholesale electronics distributor that can supply them the most recent items at inexpensive charges. China electronics best android phones goods are wonderful and might be offered at greater prices. Which means you might have a superb possibility of earning large funds by promoting china electronics goods on your own wholesale electronics on the web keep. Bear in mind, an incredible number of clients globally these days desire to get china phone on-line due to the fact this sort of wholesale electronics shops offer them with selection of choices with the ease and comfort of their particular house.
We have a huge range of new era hats, including baseball hats, cheap new era hats, New Era Hats Wholesale, monster energy hats, monster energy hats,dc shoes hats and so on ,we offer you cheap hats, 50%disscount and free shipping.Welcome to our website http://www.newera-capsclub.org
Thank you so much.
I support you.
oh my!! i love you so much!!
Thank you! I would now go on this blog every day!
http://www.ocheapoakleys.com
gar
Great article and your blog template is so cool. Is this template free or not?
http://www.piumini4moncler.com/
You article is great, so I want to share with my friends.
Tim Brown Jersey
Aaron Rodgers Jersey
Clay Matthews Jersey
[url=http://www.vibramfive-fingers.net/]vibrams five fingers[/url] Useful information like this one must be kept and maintained so I will put this one on my bookmark list!
[url=http://www.vibramfive-fingers.net/]vibrams five finger[/url] Thanks for your article, I like this post very much, thank you.
Thank you for the work you have made in writing this post.
Please say that after what happened at Ohio State, the University of Michigan isn’t letting its football players keep the Wholesale Jerseys throwback jerseys worn in the Wolverines’ last-second victory over Notre Dame.No athletic director who pays attention to the world, and conference, around him would say “yes” to such a request.And yet, Michigan athletic director Cheap Jerseys Dave Brandon, after checking with his NCAA compliance officer, acceded to the players’ wishes. They get to keep the jerseys.While this is not a violation of NCAA rules, it is a violation of common sense.Don’t people learn?The Tressel Wholesale NFL Jerseys
his job and seems likely to put the Buckeyes on probation, began with players trading memorabilia for tattoos.Several Michigan players say nothing untoward is going to happen, that they will keep the jerseys forever in order Cheap NFL Jerseys to preserve the memory of their victory.OK. That’s a nice thought. But why put temptation in front of players?Does anyone think well-heeled Wolverines boosters will resist the urge to line players’ pockets with cash while getting a “legacy” jersey to frame and hang on their den walls?Even if you believe players have the right to sell China Wholesale Cheap NFL Jerseys whatever they are given, the NCAA disagrees. If you want players to avoid violating rules by selling jerseys, don’t give them jerseys to sell.The Michigan folks also should follow the sage advice of Vince Lombardi, who once told an overly enthusiastic running back, “Next time you make a touchdown, act like you’ve been there before.”
Falcons knock Vick from game, knock off Eagles, 35-31
The Falcons (1-1) finished the comeback with Michael Turner breaking away a 61-yard run, then powering greater than while in the three with 4:48 remaining.
Turner finished with 114 yards on 21 carries.
Reebok Philadelphia Eagles #7 Michael
Vick Black Women’s Field F.
Moments shortly after the Cowboys (1-1) announced the quarterback was carried out to the day, there arrived No. 9 ready to think about demand in the huddle
when again.Reebok San Francisco 49ers #15
Michael Crabtree Premier EQT Pink.
Cunningham didn’t talk with reporters, but his game fanatics doused him with Gatorade once the film game ended.
Kansas City Chiefs Dwayne Bowe #82 Red Premier
NFL Jersey
ePub Converters, a simple and powerful ePub eBook creator, is designed to provide you with the easiest solution to build your own ePub eBooks. ePub Converter can help you quickly create an ePub eBook from up to 100 files in most popular formats at one time.
Hi. I wanted to drop you a quick note to express my thanks. Canada Goose uk Iâve been following your blog for a month or so and have picked up a ton of good information Canada Goose Snow Mantra Parka as well as enjoyed the way youâve structured your site.
Yes, i agree with you
we can provide you with high quality coach purses on sale and cheap coach bags,just take action now do not miss it!cheap real coach purses
As a woman, beauty has become the second life, especially when you married, a good pair of Designer Boots are very important. Yves Saint Laurent Shoes will make you more attractive; if you are not a beautiful woman, Designer Boots will make you into a beautiful woman, The YSL pumps hot on sale in this summer. What are you waiting for? You should own have a pair of Designer Boots Sale Wedding Shoes in your wedding.
To be continued. thank for your visiting good lucky for you all you can buy one jersey for test,Canada Goose Parka after that you can make sure our product’s quality high quality and fast shipping with low price high quality and fast shipping with low price Do not be so Lazy! Just add as much as you can at here!Canada Goose Canada thank you for the pics,i like it! york yankees jerseys shares, and issues a very nice site very good thanks a lot this site has always been like that admins will get the best always come to this site.Canada Goose Coats
I was looking for this specific the other day.Canada Goose Jackets i wonât commonly post throughout forums but Canada Goose coats i want to to say thank you!
Dear friends, thank you for visiting our website ,we are an international trade company,which specializes in http://www.goahats-business.com. We new era hats at competitive price,providing a huge range of hats of different teams,such as Arizona Cardinal,Atlanda Falcons ,Baltimore Ravens,etc.You can buy cheap caps. Welcome to visist here.
In a bar, two old friends met.
“What are you doing here? You know, the doctor is not don’t drink alcohol?”
“Yes. But you know, the doctor not long ago have died.”
A nice day, a nice article, a good friend, life is so perfect.
Thanks for the introduction! I am always reading your blog and only today I have spotted the post with introduction! I am one hundred percent sure that Jodi is cool as other members are. Good luck in your future work
Adding this siteurl is an issue because when you want to distribute this to your customers the problem is when i change my servers – i have to repackage the wsp with the correct new site url – any workarounds for this?
Thank you for browsing and enjoy your shopping on http://www.schuhebags.com
Thanks For Your Suggestion About Shopping Idea
this is one of the most interesting blogs that I have ever seen.
Dear friends, thank you for visiting our website ,we are an international trade company,which specializes in http://www.newera-capsclub.org. We new era hats at competitive price,providing a huge range of hats of different teams,such as Arizona Cardinal,Atlanda Falcons ,Baltimore Ravens,etc.You can buy cheap caps. Welcome to visist here.
You got some great ideas there.cheap oakley sunglass I did a search on the issue and learnt most peoples will agree with your blog.cheap oakleys If you are an experienced traveler, you may know the ins and outs of travel to all parts of the world,cheap oakley sunglass and you may have very specific ideas about what you want to see and where you want cheap oakleys
to go.
Online with free shipping. Buy Nike Air Max ,Cheap nike air max shoes,Nike air max shoes http://airmaxgoes.com/
Thank you for browsing and enjoy your shopping on Dolce and gabbana handbags and other designer handbags with high quality on http://www.schuhebags.com, Search for good quality sunglass? coach sunglasses,prada sunglass…..for sale at our sunglass hut. http://www.schuhebags.com
Nice article , thank you for sharing your article. I genuinely enjoyed it. I place a url to my website to right here so other group men and girls can research it.
very nice information, i would surely come again, thanks
Discount for luxury stainless steel watch
http://www.Chinawatch-manufacturer.com
http://www.chinawatch-manufacturer.com/products_info/SZ-XHL-G175-3atm-stainless-steel-back-watch-142303.html
This luxury stainless steel watch belongs to hot-sell items in the Europe and North America market. This watch suits for Diver, gift and traveling, sell and explore and expand market. It is made of stainless steel. Owing to the carefully selected materials and the greet attention paid to function and design, they possess a very attractive appearance.
With Top-quality, multifunction and cheapest price, it is worth ordering to business.
Brief introduction:
1.japan movt quartz watch stainless steel
2.Movement:OS20 & 5ATM
3.Chronograph function
4.MOQ:500Pcs
5.4.0~40.0USD
6.factory price
SZ-XHL-G175 3atm stainless steel back watch
Details:
1.Watch case Material: 3atm stainless steel back watch
2.Watch band Material: silicone strap or stainless steel
3.Movement: Japan quartz
4.Waterproof: 3ATM or more
5.Chronograph function
6. Dial grass: Special hard crystal
7.Features:1)Could change the color of the strap as your requirements.
2)You logo can be pointed on the dial or the case back for free.
3)Different designs for your choices.
4)To developed and make new products according to your supplied samples or designs.
5)Introduce our latest design or products to you
6)Good quality, attractive price, professional and different with others.
Please contact us if you have any question!
Your questions will be answered within 24 hours.
Company: HK Hongli International Group Co.,Ltd
Address: Room603, A, Building NO 3,NO.61, No2 Chuangye road, 26 District, Baoan Area, Shenzhen City, Guangdong Province, China
Phone: (86) 0755-29613989 MSN: [email protected]
Fax: (86) 0755-27853779 Skype: simon.peng-hk
Email: [email protected] [email protected] [email protected]
Website: http://www.Chinawatch-manufacturer.com http://www.hkhld.com.cn
You write good and I look after the benefit, hope you like my online store, free to see. Thank you!
First registered users, we will provide varying amounts of High-quality goods!
I like your article so that I read all of your articles all my days.Please keep on writing excellent posts.More details are in football shirts [url=http://www.soccerjerseywholesaler.com/category-225-b0- Italian++Serie++A.html]football shirts[/url] http://www.soccerjerseywholesaler.com/goods-4215-Nike+11+12+Juventus+home+white+and+black+Football+Shirt+AAA+quality.html
you can feel the warmth of life, perhaps only short glance, enough to make you moved and excited.
Remember what should be remembered, and forget what should be forgotten. The change to change, acceptance can not be changed.
I really enjoyed this post, especially the âexamples in this postâ portion which made it really easy for me to SEE what you were talking about without even having to leave the article. Thanks
I am so glad this internet thing works and your article really helped me. Might take you up on that home advice you.
Our company is the best ex-stock IC supplier and the best IC distributor in china,Our company agent products have Microchip IC,TI(texas instruments)
IC,Infineons IC,Nxp IC, Ad (analog devices) IC, LT (linear) IC, MAX (MAXIM) IC.
What is Meizitang? Meizitang,also
called Botanical
Slimming or Meizitang Botanical Slimming Soft Gel,Best Weight Loss
product,GMP Manufacturer,Fast effective,Best Price,100% Herbal. Adopts
many kinds of natural plants that possess the function of slimming and
keeping nice figure. These plants, such as nice slimming grass,
jobstears, tarragon, psyllium shell, hoof bamboo shoot, lotus and etc.
On our authentic Meizitang Botanical Slimming online store, the most
powerful and effective Meizitang Botanical Slimming Soft Gel lose
weight. Feeling better and looking better, and you will never again
have to worry about serious problems of overweight! Lose weight from
the 1st day you take it!
China evaporative air cooler
[url=http://www.coolingcooling.com/search/7539/evaporative air cooler.html]evaporative air cooler[/url]
I am so excited that I have found this your cheap asics running shoes post because I have been searching for some information about it almost three hours. You helped me a lot indeed and reading this your article I have cheap Asics Onitsuka Tiger found many new and useful information about this subject
Thanks a lot for sharing this with all of us you really realize what you are speaking approximately! Bookmarked.
Welcome to buy cheap Canada Goose Jacket .We supply all kinds of Cheap Winter Jackets Midgrey
designer Coco Chanel. What started out as an ultimate clothing line for the rich and famous diversified with time to accommodate
the more commonly used products such as perfumes and handbags.
so when we hear someone speak of Cheap Chanel Handbags
Nice Work, pink is my favorite color good to see that,
thanks to share with us this bags.
It is so lucky to read your blog,it is full of useful message.I wish we both can do better in the future.
Cheap Ugg Boots
Wow really very interesting blogs, I like it very much, I am searching many blogs but now this is the first time I found these such a great blog. navbharat times
http://www.wholesalehatsstore.com
Thanks for the posting. Loads of excellent writing here. I wish I had found this site sooner
This sort of clever work and reporting! Keep up the terrific works guys Iâve added you guys to blogroll.
http://www.cheapjerseysoutlets.com/ (cheap jerseys Outlets)
http://www.realnbajerseys.com (cheap nba jerseys)
http://www.nbajerseysoutlet.com (nba jerseys outlet)
http://www.nbajerseysoutlet.us (cheap nba jerseys)
Reebok the official manufacturer of the http://www.jerseysinstore.com/ (Cheap NFL Jerseys) also only have the clothes made in certain countries. http://www.nfljerseysoutlets.us/ (NFL Jerseys Cheap) are only made in Korea or Vietnam, if your http://www.sportsjerseyslocker.com/ (NFL Jerseys Wholesale) has any other manufacturing country on the neck tag and has some or all the other details spoken about earlier, it is most likely a fake http://www.paylessnfljerseys.com/jerseys/NFL-Jerseys-120_p1.html (Cheap NFL Jerseys).
Iâm still learning from you, but Iâm improving myself. I definitely liked reading everything that is written on your blog.Keep the information coming. I liked it!
Mother is a lady and she eats, countered Scarlett.
W ¯en you is mahied, you mont blanc pens kin eat, too, retorted Mammy. Wen Miss Ellen yo ¯ age, she never et nuthin ¯ w ¯en she went out, an ¯ needer yo ¯ Aunt Pauline nor yo ¯ Aunt Eulalie. An ¯ dey all done mahied. Young misses whut eats heavy mos ¯ generly montblanc pens doan never ketch husbands.
Tods Online by top appearance comes agilely absolute quality, practical, acceptable looking, accept a continued history, the acceptable old, of any age can be a classic. Tod’s cast of double-digit acquirement growth, fueled by Messrs Tods shoes excelled in all areas, both for shoes and handbags and accessories.
Buy Discount Wholesale baseball hatsOnline in Australia, Compare Prices of Wholesale snapback hatsProducts from 3 Stores. Lowest Price is . Wholesale snapback caps
Buying NFL jerseys Authentic means that you are selling the real deal and your asking price is directly affected while your buying price may not be so much. Getting the NFL jerseys Cheap product in bulk may be a question of availability.
[url=http://www.suprashoes-sale.net/supra-skytop-iii-c-13.html]Supra Skytop III[/url] I really like the fresh blog you did on the issue. Really was not expecting that when I started off studying.
[url=http://www.suprashoes-sale.net/supra-skytop-2-c-12.html]supra uk[/url] Wonderful, I wish the same best work from you in the future as well.
[url=http://www.vibramfive-fingers.net/vibram-womens-speed-fivefingers-c-14.html]Vibram Womens Speed FiveFingers[/url] Great,I have bookmarked your blog to keep up with the new topics you will post in the future.
[url=http://www.vibramfive-fingers.net/]vibrams five fingers[/url] Useful information like this one must be kept and maintained so I will put this one on my bookmark list!
The 2012 line introduces several new styles, including a Companyâs many modernized opening Callaway Irons to date, a RAZR. Combining a many modernized comfort and fortitude technologies TaylorMade Irons has to offer with on-going styling that appeals to perceptive golfers, including a Tour Professionals consulted during a development, a RAZR has been meticulously designed for ultimate opening on a golf course. Additionally, a 2012 line of Ping Golf shoes from Callaway will deliver updated styles that simulate contemporary character and fashion Cheap Golf. Such models embody a travel shoe-looking Del Mar and a fashion-forward KoKo for women .
So Proudof nour nnephew driving the horse, Hes so wonderful!!
we can provide you with high quality and cheap UGG For Sale ,just take action now do not miss it!Wholesale UGG Click the following to receive surprise
Amazed, yeah right I was really amazed as I saw this site. I really like the shell.
I must pay attention to because of this whenever they any nearby Only two slacking at the same time commitment .
Itâs really a nice and helpful piece of information.Long time no see so excellent article, and I am very interested in your article, but also very much hope you can come to visit our websiteshoppingpandora&Pandora Charm Collection
salemonclerjackets2011.com Moncler Down Jackets
salemonclerjackets2011.com Moncler Jackets 2011
salemonclerjackets2011.com Moncler 2011
salemonclerjackets2011.commoncler-down-jackets-mens-c-14.html Moncler Jackets Mens
salemonclerjackets2011.commoncler-down-jackets-kids-c-16.html Moncler Jackets Kids
salemonclerjackets2011.commoncler-coats-womens-c-13.html Moncler Coats Womens
salemoncleruk2011.com Moncler UK
salemoncleruk2011.com Moncler 2011
salemoncleruk2011.com Moncler Mens UK
salemoncleruk2011.com Moncler Down Jackets
salemoncleruk2011.commoncler-jackets-uk-2011-c-9.html Moncler Jackets 2011
salemonclerjacketsonline.com 2011 Moncler Jackets
salemonclerjacketsonline.com Moncler Mens
salemonclerjacketsonline.com Moncler Womens
salemonclerjacketsonline.com2011-moncler-jackets-womens-c-6 Moncler Jackets 2011
salemonclerjacketsonline.commoncler-coats-mens-c-7 Moncler Coats
chinaproduct355.com Wholesale LV
chinaproduct355.com Wholesale nike
chinaproduct355.com Wholesale air jordan
chinaproduct355.com Wholesale Asics
chinaproduct355.com Wholesale LV
chinaproduct355.com Wholesale nike
And, again, he emphasized silhouette (with the drawnin waist)something he replica handbags executed for a lot of seasons. Tonight, since the spring men’s collections rolled on, John Galliano used an abandoned neighborhood swimming swimming pool asthe setting for gucci handbags discount about
Hello world.have a nice day.good luck!!
4, the boss sent me a yuan year-end awards, I wish the owners live many days. Very cost-effective ah! One day only to spend a dollar. More than thirty thousand yuan can buy a long life.
What? You going to give me 30 million year-end awards? You want bastard ah! True BT, terrible not money!
Dear sir,
Fuzhou Gongxiang Import and Export Co.,Ltd is a professional manufacturer of tile in China.It can produce
colored tile,all kinds of tile:The wall tiles,Border Tiles ,Floor Tiles ,etc.
looking forward to do good business with you .
best regards
thanks
sara
email fzgxsara at fzgxmy doc com
Skype : fzgxsara
phone No: 0086-13338403867 phone No: 0086-13559166592
Tel: 0086-88079332
Faxï¼0086-88079732
Web:www.fzgxmy.com
http://www.tile-fzgx.com/
Buying NFL jerseys Authentic means that you are selling the real deal and
your asking price is directly affected while your buying price may not be so much. Getting the <a
Love taking photos. Love everything about it. I love to talk about it. I love to dream about it. I see the wonderful inspiring photos online and wish I can be the one taking it. yeah, thatâs my ultimate dream.
Great post really. I really love the discussion you brought up. Nice going, keep it up
samsung mobiles
You may have heard of discounted Hong Kong Company Formation. After all, the product is simply the hottest-selling item for the season blower and fan.
This is great! Now I want to see your ways for us readers to become more involved! Expect an email later today.
Thank you very much for the information great post, found it on Yahoo.I am very lucky to get this tips from you.his is the best weblog for anyone who wants to know about this subject.
I am very impressed with your views and interesting content. I hope you intend to continue writing more informational articles.This blog Is very informative , I am really pleased to post my comment on this blog . I
The article in your blog reminds me some old memory .That is good .It gives me happy .I think we will have a harmonious talk.
I was just browsing for something else on Google and stumbled upon on your site. Youâve put some good effort into getting this up.
I wanted to thank you for this interesting I definitely loved every little bit of it. I have you bookmarked your web site to check out the latest stuff you post.
Wow this is a great resource.. Iâm enjoying it..
Hello, you published a tennis point of view is pretty good, I like tennis, we can exchange this is my home cheap tennis rackets.cheap tennis rackets.
We offers much cheaper ; Hats ,including ;dc shoes hatsNFL ; Hats Red bull hats,Snapback Hats ,Baseball ; Hats , Red bull caps,Gucci ; Hats ,DC ShoesHats ;
unique, ugg boots sale accessories all UGG Upside means a lot for modern society of today. Same is the case with trendy looking . looking UGG Highkoo When these are uggs sale uk
Thank you for sharing,this is a good article.I know mangy thing from it.Thank you!canada goose seems to be a charming and fashion one in this 2011 winter season. It is the same to you, take one these
canada goose parka from our online shopping store is a smart decide for you. canada goose jackets sale online in 2011 mainly wins at its cute and beautiful design that make you look as a Beautiful young woman.it’s worth to own it.
Nice post, thanks. I really love it!
I will keep visiting this blog very often. Took me awhile to read all the comments, but I really love the article.
It proved to be very useful to me and I am sure to all the commenters here!
I think if we walk to other blog we most comment to give appreciate for owner.
Article in a mood, make you feel good in front of the vulgar for the beautiful scenery change up, put on belstaff jacekt, embark on their journey can teach you to experience your own life.
We wholesale hats at competitive price,providing a huge range of hats with different brand name,such as coogi hats, polo hats,Jordan hats,famous hats, wholesale hats,new era hats, etc.You can buy cheap hats. Welcome to visist here from http://www.newera-capsclub.org
ghd Scarlet Collection og ghd Scarlet Collection Deluxe. Begge gavesæt indeholder en ghd Gold Classic styler i et elegant matsort farve med forførende dybrøde varmeplader. er perfekt til dig som ikke har brug for et full-size ghd glattejern.
http://www.ghd-glattejern-tilbud.com
http://www.cg-autoparts.com/
Surely, I will revisit your site for additional info. Thanks for the article.
Hello friends! Your clothes are all very pretty like fashion. Here are some inexpensive products, Welcome! ! !
salemonclerjacketsonline.com 2011 Moncler Jackets
salemonclerjacketsonline.com Moncler Mens
salemonclerjacketsonline.com Moncler Womens
salemonclerjacketsonline.com/2011-moncler-jackets-womens-c-6 Moncler Jackets 2011
salemonclerjacketsonline.com/moncler-coats-mens-c-7 Moncler Coats
cheapmonclerjacketsshop.com Moncler Down Jackets
cheapmonclerjacketsshop.com Moncler Jackets 2011
cheapmonclerjacketsshop.com Moncler Jackets UK
cheapmonclerjacketsshop.com/moncler-mens-2011-c-1.html Moncler 2011
cheapmonclerjacketsshop.com/moncler-jackets-mens-c-5.html Mens Moncler Jackets
cheapmonclerjacketsshop.com/moncler-jackets-womens-c-6.html Womens Moncler Jackets
salemoncleruk2011.com Moncler UK
salemoncleruk2011.com Moncler 2011
salemoncleruk2011.com Moncler Mens UK
salemoncleruk2011.com Moncler Down Jackets
salemoncleruk2011.com/moncler-jackets-uk-2011-c-9.html Moncler Jackets 2011
Thanks for your opinion. discount shoes I totally like with it.I like cheap designer shoes as well and someone is looking for cheap shoes People usually prefer fake designer shoes, especially when they visit some shoes outlet. In some areas,people like to wholesale clothing. They will find some store doing very cheap or discounted Chanel shoes outlet. Certainly, is a good way to earn money. designer shoes outlet
You article is great, so I want to share with my friends.
Once you got christian louboutin boots or Christian Louboutin Peep toe, you will find that it worth paid. Come on and join us. You always could find christian louboutin outlet what you want.
babolat tennis racket
wilson tennis racket
ping g20
titleist 910D2
Peace of mind could see the direction the car is open south mountain Meng Youyou curled in the arms of Sister, Sister arms there was a child medicine tastes Even when I sent your brother’s wedding gift” smoking man, then turned to look at UU: “how to mess with them now?” German children also see YOYO, YOYO I do not know how to answer” The man said: “Long so beautiful, people bully you can not do Her every movement, every posture, seems to be able to make people thought a move My depression only and Liuming Hao said, I need to talk
Generally I do not post on blogs, but I would like to say that this post really forced me to do so, Excellent post!
That is an awfully astounding column you’ve posted.Thanks a lot for that a fantastically amazing post!
live frogs at the edge of the frogs living in the street said: “you here too dangerous to live here with me now!” Side of the road the frog said: “I have got used to not bother moving.” A few days later , Tanabe frog street to visit the frog, they found the car he had been crushed to death, dead in the street violence. Hands the fate of the original method is very simple, lazy away from it.
In this summer, these Designer Boots can light up your life and your bright summer. You also donât have to worry about where to buy those shoes. Nowadays christian louboutin replica stores online is global. It is very convenient and fast to purchase you ideal YSL shoes.
October 17th, 2011 at 3:52 am 852
Generally I do not post on blogs, but I would like to say that this post really forced me to do so, Excellent post!
That is an awfully astounding column youâve posted.Thanks a lot for that a fantastically amazing post!
Amazing flowers, i must appreciate the way they are arranged. Simply treat to watch, colors combination is quite impingent too. i like the post as well
Play online driving games
Tenslotte cd jassen zijn zeer robuust en duurzame producten in de wereldwijde markt. In feite zou stijlvolle design doudoune moncler van Print CD jas houd uw product beschermd, krasvrij is, en vuil vrij voor een zeer lange periode van veste moncler tijd. Prijs wijs, dan krijg je goedkope cd jassen van uw online drukkerij in een zeer professionele en toegewijde manier. Daarom als u hulp nodig heeft met moncler belgique betrekking tot uw drukwerk producten, aarzel dan niet contact met ons op. Wij zullen u de beste printoplossingen moncler online wereldwijde kosten effectief.In feite kan cd jacket ontwerpen doen veel wonderen met betrekking tot uw zakelijke identiteit te ontwikkelen. Online drukkerij biedt moncler outlet op maat cd jassen afdrukken service aan haar klanten wereldwijd in een zeer professionele en toegewijde manier.
It is really nice creation that is displayed in this site. I will share this to my daughter I think she will like this thing.
Do you want to wear Houston Astros Jerseys with your favorite team or player to watch a wonderful game? Now your dream can come true by wearing Team Usa Jerseys. Take actions to stay at the most exciting moment to buy Seattle Seahawks Jerseys!
Generally I do not post on blogs.
LED outdoor lights
Outdoor LED lights</a
Blogs gives me a great knowledge by which i really get appreciated from this blog please be in touch and keep on sharing such blogs…..
Although everyone in the bag and enjoy the bag close-fitting care, but you know what? Everyone has the eternal decorations will not consciously revealed the master’s little secret yo!
What is Meizitang? Meizitang,also called Botanical Slimming or Meizitang Botanical Slimming Soft Gel,Best Weight Loss product,GMP Manufacturer,Fast effective,Best Price,100% Herbal. Adopts many kinds of natural plants that possess the function of slimming and keeping nice figure. These plants, such as nice slimming grass, jobstears, tarragon, psyllium shell, hoof bamboo shoot, lotus and etc. On our authentic Meizitang Botanical Slimming online store, the most powerful and effective Meizitang Botanical Slimming Soft Gel lose weight. Feeling better and looking better, and you will never again have to worry about serious problems of overweight! Lose weight from the 1st day you take it!
Excellent, I just passed this onto a colleague who was doing a little research on that.
http://www.monclerhotsale.org
In order to maintain a good site you need to prioritize the golas you have in order to satisfy the users of it. Your site is like that and I really like that there is the both sieds of it. One because of you and the other one for the users.
YY0GN6S50KVDYY
4 the concept of ugg boots
Lovely â will definitely be using this idea â thanks so much for sharing.
Thanks so much for taking your time to create this very useful and informative site. I am always looking for a site about UGG Classic Boots,now,Iâve found it.I have learned a lot from your site. Thanks!! I think you have done an excellent job with your site. I will return in the near future.
main product: Slim pills, slim capsules, lose weight coffee,meizitang, lose weight capsules,*diet pills
slim tea, herbal tea, herbal slimming capsules,leptin, Brazilian slimming Coffee, slimming loss weight tea, OEM service.
*Male Enhancement*
Lauren Girl really this is amazing and magnificent. i did’t ever see such a gorgeous and beautiful flowers… y not these are fancy flower
Very useful article for me, there is more information I have is very important. Thank you! I’m glad you could get out of it to share with us.
north face fleece
nikeshoxes.net/ Nike Shox
nikeshoxes.net/ Cheap Nike Shox
nikeshoxes.net/ Discount Nike Shox
nikeshoxes.net/nike-shox-nz-c-3.html Nike Shox NZ
nikeshoxes.net/nike-shox-oz-c-8.html Nike Shox OZ
nikeshoxes.net/nike-shox-r4-c-17.html Nike Shox R4
It is very interestin and important article.It is very helpful for me.I think more people will agree with your idea.
You ought to indulge in a tournament for starters of the finest blogs on the internet. I am going to recommend this blog!
Herve Leger outlet
Herve Leger dress
Make sure you map usually how we will match with the shoes. Decide the style and color appeals to you and therefore can best satisfy your life style
This blog is certainly excellent. Excellent work. For this reason I enjoy of keeping returning to the weblog
You made some respectable factors there. I appeared on the web for the problem and found most individuals will associate with with your website.
Bless you. You’ve bought revealed some extremely effective and also educational suggestion to me during the nighttime. Many thanks for that reason a lot to make the time to tune in to my very own predicament and also for your current guide. May very well Each of our oplagt cheers
Here are many dvds with different styles including drama cartoon horry for your reference .so just click your mouse.Why not try it now! Come on! Welcome to visit our website:Naruto Complete 1-428 Episodes + Movie DVD
Wife talking to her husband(who reads newspaper all day): I wish I were a newspaper so I’ll be in your hands all day.
Husnband: I wish that too, so I could change you daily.
so what are you proposing, getting rid of all the teams except for mclaren, ferrari and redbull! cos if so, its an even worse idea than the bbc/sky tv deal!
All inclusive travel deals are not for everyone,
but most people enjoy a vacation that is put together for them
I am a blog beginner. I am also interested in such kind information. You provide me a good example. Thanks very much. I will keep on reading your blogs.
From 1952 to day moncler has carved an exceptional placing for alone from the area of interest of choose raiment for males and women. Their trendy aims, shot colors, choice operating up and par excellency preserve provider clears moncler a craved pursuing brand. Buy Cheap Moncler Boots Online are modish, well-cut, sufficient, airy and amazingly warm. It does not make any difference how deep the chilly is, you can wish Moncler jackets to provide good comfort all through freezing winters too. A Cheap Moncler Boots Sale liner is developed of 100% polymeric amide as well as the filling is 100% genuine cutting that preserve you cozy and cozy all through winters.
Sparkling v-neck halter, broad shoulder straps, spend higher skirt in a really slightly lighter shade, banded hem line, available back.
the twelve weeks 2010 New Herve Leger clothing
gown also has the effect of plastic, consider a appear using the fascinating actress, one different by one different the method is genuinely good, in easy actuality that could possibly be the twelve weeks 2010 New Herve Leger skirt
gown credit. Sexy stable light design, columns run through the use of the best in the direction of bottom from the Herve Leger bandage color block dress, bands are related in between, it is reminiscent of window blinds, sheer mesh layer underneath, jointly with only a little hint of pores and skin peaks through, also it is a alluring ultra modern number. Herve Leger sales
Trendy pale and blue with darker shade lines that resemble cracks, ballerina neck an even more huge research we see this, tear get rid of reduce outs for the shoulders, quarter sleeves, has that trademark short, short hem. Cheap Herve Leger Dress
Perhaps this is one of the most interesting blogs that I have ever seen. Interesting article, Funny comment. Keep it up!
I wanted to thank you for this interesting I definitely loved every little bit of it. I have you bookmarked your web site to check out the latest stuff you post.
jack00800 close with people,north face outlet to come to the guests to create North Face Outlet personal fashion style,north face outlet make the activity a perfect North Face Women’s Down Jackets curtain call. north face outlet Recently,north face outlet the iconic fashion brand North Face Kids Down Jakcets in Asia and the Asia-day Wang Hangeng plain work,north face outlet North Face Women’s Soft Shell open the 2011 summer fashion’s happy to share the
http://www.ibaby123.cc/search/8097/kids phone.html
GPS kids phone, cartoon mobile phone
Took me awhile to read all the comments, but I really love the article. It proved to be very useful to me and I am sure to all the commenters here!
Hi! Awesome topic, however, your web page ceases to monitor with FF4 experiment with. May an individual’s machine stop your Ip? Thank you so much.
This is highly informatics, crisp and clear. I think that Everything has been described in systematic manner so that reader could get maximum information and learn many things. This is one of the best blogs I have read.
Essay Writing || Write My Essay || Essay Help
this one is my favorite post. I think it will help me a lot in my further studies and research. Very well written I appreciate & must say good job.
Surely, I will revisit your site for additional info. Thanks for the article.
I really like this website , and hope you will write more ,thanks a lot for your information.
It was very interesting to read. serve as a reference
dance talent in the entertainment industry to become North Face Outlet the star of concern,north face outlet and Han Geng is north face outlet the persis north face outlet North Face Outlet Sale jack00802 tent pursuit of the music moved and inspired countless North Face Outlet Jackets young people,north face outlet so quickly became hot Han the influx North Face Women’s Denali Jacket of people idol. north face outlet In people’s minds,north face outlet Han Geng’s
Father: “son, I worry most about your grades, you always the bottom of the class.”
Son: “that’s ok, dad. For the first and last, the teacher to teach something completely the same.”
good two-shoes,north face outlet because a good pair of shoes can North Face Outlet take you to a better place. north face outlet The theme of the 2011 North Face Store jack00801 spring and summer fashion by walking new conference,north face outlet North Face Outlet Store five representing the modern image of women in modern North Face Women’s Denali Jacket urban models seize people’s attention,north face outlet the perfect
Thank you for one more nice article. The place else may anybody get that kind of information in such an ideal approach of presentation.
Supra Footwear is a fusion of skate and street inspired footwear that was founded in 2006 by Angel Cabada. Supra Trainers have developed an iconic following is the shortest space of time which is in large part due to the amazing profiles of their Justin Bieber Shoes, most notably the Skytop, Vaiders,supra TK Society and more recently the Skytop 2’s.
I have to admit it’s nice blog, thanks for your dedicated work.
I am perpetually thought about this. Moncler jackets 2011 Hot sale moncler jackets In cheap shipping in own Online store
genuine ugg boots Great, I hope the same best work from you in the future as well.ugg boots sale
I did not know. I’m glad that people are writing on this subject so intelligently, showing us all the different sides. You are a great blogger. Please do a good job. I can not wait to read What Next.
nfl clothing
nfl jerseys
wholesale nfl jerseys
The NBA players union and the boss finally alliance did not reach an agreement, the commissioner David stern but the announcement of the new season two weeks before the arrangement was forced to cancel.
karen millen dress
hermes outlet
Med alle de blanke annoncer ghd glattejernog smukke mennesker, der kendte skønhed virksomheder bruger til at fremme deres hårplejeprodukter,ghd glattejern er det lidt underligt, ghd glattejernat over de seneste år har flere og flere af os har været farende vores til at købe shampoo
The gucci handbags on sale G wave large leather tote is no different from any other bag of its kind with its dull brown color and a very conservative design.
The high quality and the fashion design of gucci bags uk can give a tough competition in the market.
Auch heute, im Winter, die Leute haben eine Tendenz, zu Hause bei ihren Familien moncler jackenund Freunden zu bleiben, das Surfen im nternet oder Fernsehen aufgrund der kältesten, ob. Manchmal ist es wirklich geben mir das Gefühl Fuzzy zu Hause zu bleiben.
Wow, this is a very good blog, I like flowers and plants, also like to plant flowers and plants.
It’s really a wonderful job. This message contains useful information that helps us a lot. I have never seen such a large contribution. Can inspire your wonderful message and help us a lot. I visit your site often and share with friends.
Absolutely fabulous Lauren! So elegant and beautiful,I love it!
Shanna
Manchmal ist es wirklich geben mir das Gefühl Fuzzy zu Hause zu bleiben.
Cheap Canada Goose Parka Jacket are sold in our online store.Canada Goose Parka Jacket are one of the most hottest items in the Jacket market.The most outstanding of Canada Goose Parkas Jacket would be the lace detail design and the colorful design,and exquisite workmanship. Many people are attractived by it.I believe that the Canada Goose Coats will be your next addiction,because of the Canada Goose Coats is very suitable for your to sports.Our online store offer you some good quality Coats for you to choose.Welcome to Canada Goose Online store to buy your favourite items.Take action,In this season,the Canada Goose Outlet are free shipping.More products you buy,more discounts you will take in.
http://www.bestools-hk.com/products_info/Magnifying-lamp-137127.html
http://www.bestools-hk.com/products_info/Screwdriver-137262.html
Buying NFL jerseys Authentic means that you are selling the real deal and your asking price is directly affected while your buying price may not be so much. Getting the NFL jerseys Cheap product in bulk may be a question of availability.
Perhaps this is one of the most interesting blogs that I have ever seen. Interesting article, Funny comment. Keep it up!
that’s really nice!!!
Good writing … keep posting dear friend
This discussion assumes unexpected connect my attention inward. Well, after reading
each of them, it gives me new ideas for my blog. thank you
This discussion assumes unexpected connect my attention inward. Well, after reading
The dissertation chapters should be perfectly composed by distinguished thesis service, when people want to present a writing talent. Thus, this is manifestly that you understand the right way to finish a superb issue referring to this topic. Thank you very much for distributing this.
As the tourism industry is very well developed in this country, there are many companies which work to provide the people with well [planned packages to travel through Ireland.
Pretty good post,i like it very much.thank you.
Excellent site you have here, but I was curious if you have messages, which cover the same topics described in this article?
A good blog always comes with new and exciting information like this. Who really wants to read an article with full information.
ãmy-lady.jpãã®ã¢ã° ãã¼ãã¯ãããºããã¬ãã£ã¼ã¹ããã¡ã³ãºãããã´ã£ããæ°ä½ã¯ããã ãå ¥è·ä¸…UGG ã ã¼ãã³ãã¼ã,UGG ãã¼ãã¯é販æ¿å®ingâ¦phoenixzon.com
rakanet.comã¢ã³ã¯ã¬ã¼ã« æ°ä½ 2011 ç»å ´ï¼å½ãµã¤ãMonclers.jpãæ¿å®ãªä¾¡æ ¼ã§ç·å¥³å ±ã«äººæ°ã®ã¸ã£ã±ãããªã©ã販売ãã¦ããã¾ãã¸ã£ã±ããé販æ¿å®ï¼ããã«å質ãããããæ¥åºããå¾ ã¡ãã¦ããã¾ã
ã¢ã³ã¯ã¬ã¼ã«é販ã®å°éåºã¢ã³ã¯ã¬ã¼ã«è²©å£²åºã§ããå質ãå®ç§ãå¤æ®µãæ¿å®ãããããªãµã¤ãºãæã£ã¦ãæãå¤æ§ãªé¸æ空éãæä¾ãããã¦ãããã客æ§ã«æ°æ¥½ãªã·ã§ããã³ã°ã享åãããã ãã§ãªããããç¾ããæããå¬ãéããã¾ããMonclermaya.jp
楽ãããï¼Monclerxx.comã¯ææ°UGGãã¯ãªã¹ãã£ã³ã«ãã¿ã³ãã¢ã³ã¯ã¬ã¼ã«çãé販å°éãµã¤ãã§ãï¼è±å¯ãªåæãæ ¼å®ä¾¡æ ¼ã§è²©å£²ãã¦ãã¾ãï¼
jpmoncler.net é販 ã¢ã³ã¯ã¬ã¼ã« ãã¦ã³-Monlcer åæ±åº,ç¾å¨ã¯ã¢ã³ã¯ã¬ã¼ã« æ°ä½ç¶ã ç»å ´ã§ããããã« Monlcer ãã¦ã³é販æ¿å®ï¼ã¢ã³ã¯ã¬ã¼ã« ãµã¤ãºãæ£è¦ã§ãï¼ãã¶ã¤ã³ã沢山ããã¾ããä¾ãã° ã¢ã³ã¯ã¬ã¼ã« ã¬ãã£ã¼ã¹ ï¼ã¢ã³ã¯ã¬ã¼ã« ãããºï¼ãæ¥åºããå¾ ã¡ãã¦ããã¾ã.
monclermaya.com,ugg ã¢ã°ãã¼ãé販ã®å°éåºã¢ã°ãã¼ã販売åºã§ããå質ãå®ç§ãå¤æ®µãæ¿å®ãããããªãµã¤ãºãæã£ã¦ãæãå¤æ§ãªé¸æ空éãæä¾ãããã¦ãããã客æ§ã«æ°æ¥½ãªã·ã§ããã³ã°ã享åãããã ãã§ãªããããç¾ããæããå¬ãéããã¾ãã
ã¢ã³ã¯ã¬ã¼ã« æ°ä½ 2011 ç»å ´ï¼å½ãµã¤ãMonclerss.netãæ¿å®ãªä¾¡æ ¼ã§ç·å¥³å ±ã«äººæ°ã®ã¸ã£ã±ãããªã©ã販売ãã¦ããã¾ãã¸ã£ã±ããé販æ¿å®ï¼ããã«å質ãããããæ¥åºããå¾ ã¡ãã¦ããã¾ã
ã¢ã³ã¯ã¬ã¼ã« ãã¦ã³ æ°ä½ 2012 ç»å ´,å½ãµã¤ãFashionsmonclers.comãæ¿å®ãªä¾¡æ ¼ã§ç·å¥³å ±ã« 人æ°ã® ã¸ã£ã±ãããªã©ã販売ãã¦ããã¾ãã¸ã£ã±ããé販æ¿å®ï¼ããã«å質ããããã æ¥åºã ãå¾ ã¡ãã¦ããã¾ã.ã¢ã³ã¯ã¬ã¼ã«äººæ°æ¿å®é販å°éãµã¤ã!
Monclerå°éåºã¢ã³ã¯ã¬ã¼ã«è²©å£²åºã§ããmoncler(ã¢ã³ã¯ã¬ã¼ã«)å質ã å®ç§ãå¤æ®µãæ¿å®ã§æä¾ãããã¾ããããç¾ããæããå¬ãéããã¾ããMoncler-s.com
ugg(ã¢ã°)ãã¼ãå°éåºUGGãã¼ã販売åºã§ããuggãUGGãã¼ããã¢ã°ãã¼ãå質ã å®ç§ãå¤æ®µãæ¿å®ã§æä¾ãããã¾ããããç¾ããæããå¬ãéããã¾ããShineugg.com
It is very lucky to read this post and glad to share my loved fashion jordan shoes to have the latest but cheap jordan shoes.
hmmmmm this is a very much nice & informative blog thanks for sharing such a informative info.
Hello! My friend, I think I agree with you. Just give it your best shot!
Nice to meet you. You give me a refreshed start!
Hi, life is just so cool but too short to control. Hope you can master it well!
ugg Verkauf , enthalten einige Besonderheiten Dekanter oder Glas, Kristall, Marmor und fat.Enable dich und mich kennen zu lernen, in Bezug auf zus?tzliche Richtung die gegens?tzlichen Arten der ewigen plaques.Wood Laminat-Status Plaques sind von der auf ?hnliche Weise hergestellt, w?hrend farbige Laminat plaques.The einzige Verbesserung ist, dass anstelle einer farbigen konsumieren, die Plaques zu liefernden etwas Holz complete.This tats?chlich wird dann poliert und werden passieren Merkmale der Optik und zuverl?ssige wood.These Auszeichnungen fühlen, ist das viel Low-Cost-Option, wenn Sie wollen Holz awards.Since k?nnen sie bei der Nutzung von recyceltem Holz Fasern stammen, k?nnen sie zus?tzlich effektiver umweltfreundlicher Erfüllung solution.Crystal Awards Viele uns kann wohl sagen, dass dies der Festlegung der Plaque ist etwas übertrieben, aber es tr?gt sehr von denen zus?tzliche Prestige an der award.It Staaten laut zusammen mit klar das ist einfach nicht nur eine weitere Auszeichnung,. dies ist eine exklusive Ehre
Nice!oakley sunglasses Canada Goose jackets Post some articles again,Canada Goose Men Banff I am waiting for them.
Thanks for the marvelous posting! I genuinely enjoyed reading it, you can be a great author. I will ensure that I bookmark your blog and will eventually come back from now on. I want to encourage continue your great job, have a nice holiday weekend!
What a wonderful blog you have created. I just stopped in to tell you I really appreciated the read and shall be dropping by
from time to time now.
You’re consequently great! We dont believe Fixing and repairing stuff know things such as this well before. So excellent to look for someone with a few first applying for grants this theme.
In the affairs of life or of business, it is not intellect that tells so much as character, not brains so much as heart, not genius so much as self-control, patience, and discipline, regulated by judgment.
http://www.moncleroutletonline1955.com
November 4th, 2011 at 2:20 am 943
Youâre consequently great! We dont believe Fixing and repairing stuff know things such as this well before.
Your article reminds me a lot of memories, my favorite jerseys and friends.
Apart from these nations, also prominent within of the talks in the hair and facial salon have been the Arab nations, recalled as vital purchasers of Brazilian fashion. Herve Leger clothing
“The Arabs appreciate excellent and sustainable production,” explained Rafael Corvine Net to, the executive director inside the association’s program, which was present in the event. “Do not be worried so a good offer concerning the price, they are remarkable buyers,” he said. Herve Leger bandage
According to figures disclosed over the institution and industry division in the Arab Brazilian Chamber of Commerce, Brazilian exports of textile programs in the direction of Arab nations totaled US$ 26.4 million from January to may this year. The major destinations have been Saudi Arabia, the United Arab Emirates, Morocco, Herve Leger skirt Lebanon and Tunisia.
Shop the golf clubs at a lower price ,No sales tax,Alway Free delivery.
Shop the golf clubs at a lower price ,No sales tax,Alway Free
delivery.
Cheap UGGs UK Outlet, UK Cheap UGG Boots Outlet. With the increasing reputation of UGG, UGG Boots outlet has been raised rapidly year by year. UGG is a household brand of boots in the whole world. The fabrics of cheap UGG boots are the pure sheepskin and woolen, which are the best materials to keep warm in cold season. Cheap UGG UK is one of the most common means that used to raise UGG boots sale. One of The best times to buy cheap UGG boots is in an opposite season. And opposite season is also the time that the uk ugg outlet stores will do their best to sell out all leaving boots in last year and to offer the new arrival of the coming season. The boots in stores online are usually are much cheaper than those in the local department stores.
To More pls Click here: Cheap UGG Boots
ugg boots outlet
uggs uk
cheap Uggs
uk ugg outlet
Good work! Thanks for these kinds of interesting article as I have been able to find here. I agree with most of whats written right here.
Kayla Cradle, 26, who also used La Belle Bridal Wear, in Swansea, said: âMy wedding celebration gown smelled strongly of damp within of the aisle. I experienced been paranoid people nowadays may think I smelled.â Herve Leger clothing
Charlotte Harford, 35, said: âI felt I experienced a bed sheet on, not my wedding celebration dress.â Herve Leger skirt
And just like her elder sister who experienced her desire Cotswold wedding celebration three many years ago, my daughter experienced unseasonably cozy English sunshine. In fact, Saturday was the warmest October 1st actually recorded at our neighborhood environment station: 29.1 C. Kate obtained her prince, her place in history, her two wedding celebration dresses, Herve Leger bandage
Westminster Abbey and Buckingham Palace, but she didn’t really obtain the weather…..
LA MER oceanOakley Sunglasses Discount blue mystery acme repair fluid foundation SPF15 / PA++ 1000 yuan / 30 ml Different from the general powdery bottom,Women Oakley Sunglasses containing Fake oakley sunglasses LA MER unique algae firming enzyme, stimulate the skin collagen protein, elastic fiber regeneration, youth energy storage for firming skin, and the price does not poor, Oakley Sunglasses Discount
Good post!I accidently found your site on the internet, I am going to be coming back here yet again.
Been reading this blog for awhile but i have been lazy to drop a comment and say thanks.
Hi! Awesome topic, however, your web page ceases to monitor with FF4 experiment with. May an individual’s machine stop your Ip? Thank you so much.
Excellent post! thanks a lot for the sharing, that greatly helped me to resolve the problem.now I am glad to share the latest fashionable news about the cheap jordan shoes with everyone.
Bob was having trouble getting to sleep at night. He went to see his doctor, who prescribed some extra-strong sleeping pills.
Sunday night Bob took the pills, slept well and was awake before he heard the alarm. He took his time getting to the office, strolled in and said to his boss: “I didn’t have a bit of trouble getting up this morning.”
“That’s fine,” roared the boss, “but where were you Monday and Tuesday?”
http://www.buynikeshoxairmax.com]Nike Air Max
http://www.buynikeshoxairmax.com/nike-shox-r4-c-48.html%5DNike Shox R4
http://www.buynikeshoxairmax.com/nike-blazer-shoes-c-89.html%5DNike Blazer Shoes
It is very lucky to read this post and glad to share my loved fashion jerseys to have the latest but cheap jerseys.
Nikeã®ãã¤ã¨ã³ãã®ãµãã«ã¼ã·ã¥ã¼ãºã®ã·ãªã¼ãºELITEããå»å¹´ãã¼ã ã¡ã³ãº
æ´¾æãª1æãadidasã¯å質ã¯NIKEã«è² ãã¾ããã¾ããããããä½ç½®ä»ãã®ä¸ã§é¢¨ä¸ã«éãã¾ãããè¿æ¥ã1çµã®ãµãã«ã¼ã·ã¥ã¼ãºã®ã¹ãã¤ã¯ã«ãã£ã¦adidasã®éããµãã«ã¼ã·ã¥ã¼ãºã®çã®å¸ã«å¸°ãé 大ãªæ±è² ãæ´é²ãã¾ãããadidasã¯adiPOWER PREDATORãçºè¡¨ãããã¨ããã£ããã«é´ ã¡ã³ãº ãã¼ãããããSLã·ãªã¼ãºã®ãããã¯ã©ã¹ã®ãµãã«ã¼ã·ã¥ã¼ãºã®è£½åãåºãã¦ããã®ä¸ã¯PREDATOR SLã¨adiPURE SLãå«ã¿ã¾ããã2足ã®é´ã¯ãã¹ã¦F50ãæ¡ç¨ãã¾ãã adiZEROã®è»½éã§å¤§ããåºãé´ã®è¡¨é¢ã®æ質ãæ®éãªçã¨éãã大ãã«éãã軽æ¸ãã¾Adidas ãµãã«ã¼ã¹ãã¤ã¯
ãããããã«å ãã¦åã³ãµãã«ã¼ã·ã¥ã¼ãºã®è»½éã®çå ã®F50ã奪ãã¾ã adiZERO PRIMEï¼adidasã®ãããã¯ã©ã¹ã®ãµãã«ã¼ã®ã·ãªã¼ãºã¯ãã§ã«æºåãåºçºãå¾ ã¡ã¾ãããNIKEã¨adidasã®åNike ãµãã«ã¼ã¹ãã¤ã¯ééããªãå¼ãé¢ã大ããå¹ã
Do you want have a running shoes with fashionable appearance and high performance?Here,we strong recommend the new series cheap asics running shoes to you,it is new star on cheap Asics Tiger 66 shoes.The key of shoes is that use cutting-edge technology and high-end components combine which enhanced gait dfficiency and gender specific forefoot cushioning.So it is best running shoes.Besides,our store also sale other seires,such as the series of asics Tiger Kanuchi is hot now,or the series of Cheap Asics Gel is amazing.They deserve to have a look!Free shipping and non-tax to your door with 4-6 days!Take action right now!
ã¢ã° ãã¼ãé販ã®å°éåºã¢ã° ãã¼ã販売åºã§ããå質ãå®ç§ãå¤æ®µãæ¿å®ãããããªãµã¤ãºãæã£ã¦ãæãå¤æ§ãªé¸æ空éãæä¾ãããã¦ãããã客æ§ã«æ°æ¥½ãªã·ã§ããã³ã°ã享åãããã ãã§ãªããããç¾ããæããå¬ãéããã¾ããAggjp.com
how can we do that when you have closed the blog for comments?
In winter, especially in the extremely cold place, you want to owe a boot which is both warm and fashionable. Cheap UGG boots, cheap UGGs and UGG boots sale. Welcome to our UGG boots sale Online Store, UGG boots are publicly regarded as one of the best choices to keep feet warm in winter and many people like to wear the boots when cold winter is coming. Cheap UGG boots is one of the most common means that used to raise UGG boots sale. The reason that many people like to buy UGG boots in an opposite season is that UGG boots sale in this moment are very cheap. And opposite season is also the time that the ugg outlet store will do their best to sell out all leaving boots in last year and to offer the new arrival of the coming season.
Besides, you also can search cheap UGG boots in UGG outlet
stores online, more about Cheap UGGs, cheap ugg boots, ugg boots outlet, ugg outlet boots.
Roger vivier shoes at Roger Vivier Sale. Shop popular brands and stores to find roger vivier shoes on sale – all in one place. Create and share looks based on all your favorite styles.
Here are all you want, take a look
nice post it looks delicious your article is skill
Ugg has been considered as a fashionable brand and spread all over the world.
I would name your blog the dreamland! While Santa knocks at our door just once per year, you blog is open the whole year.
This is all very new to me and this article really opened my eyes.Thanks for sharing with us your wisdom.
I really wish I hadnât seen this as I really want one now!
good job~~~
first crucial welcomed, cheap nike free and the tongue part of the design is different from previous generations of the shape of holes, the other production areas of a few hundred cheap nike free run 2 pairs of shoes limited to, the cheap nike free 7.0 sixth generation of a special design, Features a hole in the ankle fixed design, design-style shoes ar…
Superb! Generally I never read whole articles but the way you wrote this information is simply amazing and this kept my interest in reading and I enjoyed it.
Hilton carries all makers which include Gap, Banana Republic, L.L. Bean, outdated Navy, Tommy Hilfiger, Abercrombie & Fitch and J. Herve Leger clothing
Jill moreover to components — purses and shoes — and jewelry. She even has merely a little manâs section.â Itâs like you’re going toward mall, but it’s all in one store,” she said. “There’s a stigma with what consignments are and we attempted to deliver it up a notch. Herve Leger skirt
The stigma will be the reality that consignments really are a Goodwill or thrift store. And when people appear in and see it’s extra like a small store then they retain coming back. They’re in a location to purchase makers they can’t afford to purchase new.”
Business is becoming so good; Hilton opened an extra store on Center Street in Auburn and features a website. Down the street, The Girl trend store Consignment Boutique caters toward more youthful generation. Jennifer Granbury, a part-time clerk, was busy inside the back again room. Herve Leger bandage
She mentioned the store carries extra pricey artist makers like banana republic and Abercrombie & Fitch, moreover to prom dresses.
you’ll undoubtedly find a pair of Ugg outlet that suits you.
Shop the golf clubs at a lower price ,No sales tax,
Alway Free delivery.
Murray,
Iâve just watched you thoughts on the new UK television rights deal, thank you for addressing this subject as it was very much a hot potato on the BBC Practice/Qualifying/Race and Forum coverage.
Murray,
Iâve just watched you thoughts on the new UK television rights deal, thank you for addressing this subject as it was very much a hot potato on the BBC Practice/Qualifying/Race and Forum coverage.
I am totally agree with what you said, that has greatly helped me to resolve the problem.now I am glad to share the durable LED panel light with everyone.
assists per game while averaging acareer-high 18 If you purchase one of these wholesale jerseys, you will be particular you will be pleased with the types of materials as NFL jerseyswell as the making of the merchandise itself When conflict occurs, take these steps: Time out: If the other person is getting heated, tell them you need to take five minutesto NFL jersey supplycollect your thoughtsGetting access to Football is a dream wish come true for the fans and abutting football season fans go berserk to claim some pride in supporting their time and cheap NFL Jerseys is an acceptable idea Heat significantly increases the chance that condoms will beNFL jersey supply damaged or will break when being usedsome said he likes Jason Kidd, he is full of ATK The leading drafting team is distinct each year, as well as the most talented cheap NFL jerseys college recruits may possibly sign with any number of sides After the impressive at the beginning of this season , the rest of Paul is disappointing , and lost Lebron Jamesâ Cavaliers
MOD is the standard definition video files used by JVC, Panasonic and Canon in some models of digital camcorders.
When such a fleeting tear, code becomes outdated or square meat servers, you hand hog the same stag, it offers widespread clarity while rendering and inbound passage.
Plenty of helpful info here. I am sending it to several friends ans also sharing in delicious. And certainly, thank you for your sweat!
also sharing in delicious. And certainly, thank you for your sweat!
hite Evening Dresses
Bundledcustom wedding dresses also from the earlier 2011 prom dresses choice are best designers Tony Bowls, La Femme
and a lot of more. These highly regarded providers undoubtedly are a optimistic indicator of quality. They stay committed to best great gowns and possess a detailed
choice of wonderful dresses ready using the upcoming prom period of your time to satisfy the hopes for each and every girl. They provide a broad choice of formal
dresses and cocktail dresses to satisfy the specifications of each and each and every woman heading to prom, graduation, homecoming, pageants or other formal
occasions. TheyWedding Dress provide only one of the most breathtaking
and best great gowns for the market.Prom dresses 2011 are intently creeping for this year’s prom season. the most recent fashions have created from the program of
time, the thing that was obsolete then has now turn out getting the most recent trend this season. For instance, skinny jeans, leggings and acid scrub outfits have
been all productsProm Dresses 2011 from your eighty’s; however, it is
back again into trend. A powerful method to decide the brand new style of prom dresses 2011 can be to accomplish analysis online, get preserve of the newspaper or
watch Hollywood entertainment exhibits to decide what every one of the superstars are wearing. continually remember, well-known actresses might appear wonderful on
display nonetheless it doesn’t imply a comparable outfit will appearance good on you. merely a warning everyone has unique plan type.Among the best attributes that
couldBall Gown Wedding Dresses be deemed standard for a lot of prom
dresses 2011 are heading to be the amazing combination between the enchanting and contemporary components. .ST
Prom Dresses Cheap
Takecustom wedding dresses a cup of capuccino and relax. deciding on the appropriate prom dresses 2011 will make the
evening uniquely yours. you could feel like a princess from the hall. It is specific to be among one of the most unforgettable nights within your junior or senior
year. Remember the next hints even though deciding on your 2011 prom dresses.
SomeModest Party Dresses individuals do not mind wearing just any old
dress in the direction of prom, but for people youthful ladies who want to connect their diva style, there are numerous prime picks of the hottest prom dresses for
2011. Everyone would like to appearance fly once they go to a dance or party, particularly when speaking concerning the prom. The vital that you looking warm in the
prom, in general, is supposed to be about dressing to impress and getting different from everyone else. Standing out from your sleep what it is supposed to be about in
2011.Top Prom Dress Designers forWedding Dress 2011,Some of one of the
most fashion-forward prom dresses for 2011 are made by best designers like Faviana, La Femme, Tony Bowls, Jasz, Terani, Sherri Hill, beneficial Formals, and evening
Moves. looking and sensation good in the prom starts with wearing a beautiful dress, creating a excellent design, awesome fit, and outstanding choice of fabric. These
formal dress makersProm Dresses 2011 have used the time to craft style,
swagger, and heat into each and each and every prom dress.Look warm within a Sherri Hill Prom Dress,High university girls all more compared to world, have no fear, as
a end result of the reality scrumptious-looking dresses from your Sherri Hill choice are here. When wearing a prom dress from this line, girls feel empowered to strut
their stuff and purpose the space like they never have before..ST
especially now that prices such high, would like to out to dinner should be make good consider the following, alas, cups. .
Christian Louboutin
If you want to find the most suitable shoes for yourself, the only way is trying. Christian Louboutin shoes can supply you all kinds of shoes. Like sneakers shoes, Christian Louboutin high heels and other styles shoes and so on. As long as you try to put on them, you always can find what you want to have.
Great blog article about this topic, I have been lately in your blog once or twice now. I just wanted to say hi and show my thanks for the information provided.
Thank you for your great posting! I canât help sharing the cheapest LED panel light with everyone and please do not hesitate to have the durable but cheap LED light.
I wanted to thank you for this interesting I definitely loved every little bit of it. I have you bookmarked your web site to check out the latest stuff you post.
Hi there! Very good niche, yet your blog is unable to display screen around FF4 ‘beta’. Should your current host inhibit the IP address? Regards.
Furthermore, the particular vast alternative they give you provide you with in a position to modify these as well as tailor
christian louboutin boots
brings about as outlined by your needs. Furthermore, the retail price from which
Chanel Outlet store staking out a claim on your upper lip you,His face expressed quiet piety and submission to the will of God,Maxvill worked with local merchants to fill the Man Can with guy goodies from solid cross,Pierre stopped,walked off with an happy air of real conceit and affected indifference,vely round him over his spectacles as though he were looking for some one,The sick man was so surrounded by the doctors,There was another period of silence,Chanel OutletI am despised because I do not wear shoes,t know Alexandra as well as you think you do,I have brought two young ladies with me,but he did not dispute the point,His hands were laid symmetrically on the green silk quilt with the palms turned downwards,There are so many,based Hilex Poly has been leading opposition to the ban,Jennings.
Successful marketing with promotional products â retail products such as hats or promotional gifts with free design a company logo imprinted on them â is not automatic. While many businesses selling promotional products insist that promotional items all but sell your business, the reality, most experts agree, is that you need a solid plan in order to make your marketing campaign with these products a success.
You got a really useful blog. I have been here reading for many times. I am a newbie and your success is very much an inspiration for me.
I am a great fan of your blog, when I first started with drupal I found it difficult due to trying to work with panels. I am in the process of launching my site and your drupal “best modules” post was v. helpful. Thanks for such a great site.
SHENZHEN SETOLINK ELECTRONICS CO LTD is a professional private manufacturer for various multi-link cables.Founded in September 2007,our company locates in Xili Town, Nanshan District, Shenzhen City, which is surrounded by green hills, with beautiful environment and the traffic condition is very convenient.
Our factory is more than 1,000 square meters, and we also have many advanced equipments like cutting line peeling machines, terminal crimping machines, vertical molding machines, 8688–wire comprehensive test machines, YD2673A pressure testing machines, aging machines, spray machines, swing testing machines and so on.
Our main products are including auto connecting cable, medical cable, computer cable, network cable, safety monitoring cable, LCD cable, precision cable assemblies and complete set of wire harness, widely used in automotive diagnostic, medical equipment, LCD TV, communication, electric power, transportation,instrumentation, safety monitoring, banking, financial system, touch screen and other fields.
Our company has a group of highly qualified management and technical talents. Most of them have nearly 10-years of R&D, production and sales experiences.With independent designing and developing ability, we can provide the whole connection solutions according to customers requirements. At the same time, we are strictly manageing and controlling the quality in accordance with ISO9001: 2008 international quality system, constantly forging ahead,adhere to the “integrity” for the operation, “win-win” for the idea of cooperation, and striving to provide most satisfied products.
For years now, through our unremitting efforts,SHENZHEN SETOLINK ELECTRONICS CO LTD has grown into one of the most experienced and excellent manufacturers in China’s multi-link cable fields.
In 2008, our company began to work together with RSD, with the advanced managing experience, carefully created a vibrant, forge ahead, the professional dedication of a professional manufacturing team with international vision. Now our company is winning more and more domestic and foreign partners credit with our first-class quality, advanced production management and excellent after-sales service.
“Connecting you and us, creating the future”,SHENZHEN SETOLINK CO LTD is willing to work with you to create a better tomorrow!
Products:
Auto cable, obd cable, obdii cable, obd connector, ecg cable, spo2 sensor, invasive blood pressure cable, sao2 sensor, spo2 probe, ekg cable, patient monitor cable, car cable, nibp cuff, ecg electrode
many thanks to some pair of huge passes from Cousins to Cunningham. The first, a 37-yarder, led to some 21-yard area concentrate on by Dan Conroy. inside the second, Indianaâs defense tad difficult over a play-fake, leaving Cunningham alone at the rear of the defense for just about any 63-yard score.
Cunningham alone at the rear of the defense for just about any 63-yard score.
Another huge hold out lifted Michigan think to some 17-0 guide shortly after one. Cousins strike Keshawn Martin inside the sideline, as well as the senior broad receiver avoided two bad tackles preceding to racing in to the complete zone for just about any 47-yard score.
This comment was removed because the moderators found it broke the house rules.
You write very detailed,Pay tribute to you.Couldnât be written any better. Reading this post reminds me of my old room mate! He always kept talking about this. I will forward this article to him. Pretty sure he will have a good read. Thanks for sharing.
Modify this particular section the origins as well as development of opticalEyeglasses first appeared in 1289 in Florencia, Italy, has been said to become called Al Mato eye house and a existence in the Italian city of Pisa, simply sunglasses Cuando Pina creation. American creator Benjamin Franklin, struggling with nearsightedness and hyperopia, myopia much within 1784 created the actual dual-purpose eyeglasses. 1825, Uk astronomer George Avery created eyeglasses to correct astigmatism. Many people think that Two thousand years back, Chinese language people created the eyeglasses. In the mid-Ming Dynasty of China appeared in glasses. Tian Yi Heng Ming Dynasty within the “stay eco-friendly Sapporo Japan” Volume 2 “Yi cloudy sky” area states: “Every look at the post, Juicy Sunglasses eyesight faint exhausted, don’t differentiate the details, in order to include mind, the nature lingers, Nobuaki cerebral vascular accidents. Using man made fiber Alliance of Aya , tied at the back, everybody does not know, to give a lot more than asked. I said: This particular Yi over cast skies also. “This period, Yi over cast sky in which the unique is known as.China’s image and also the kind of earlier info eyeglasses couple of endure in the world. Art gallery of Chinese language History possession of which piece of art, “the South would have complex the actual scene tu” (depicting the Ming Yongle Nanjing town individuals live picture) in an aged guy putting on glasses. The actual Qing Zhao Yi stated the glasses into The far east within the Ming Dynasty Xuande. Jiaqing many years, tomford sunglasses eyeglasses happen to be well-liked, Zhang Ziqiu within the “continued writes all doorways,” states: “Everyone myopia to put on eyeglasses, shop within the depth from the program clear.
Christian Louboutin Sale
designer shoes
Shop discount designer from the world most fashionable fashion outlet. Christian Louboutin, Herve Leger, Jimmy Choo and more.
http://www.kookoodieselpower.com
Thank you for this great information, you write very well which i like very much. I am really impressed by your post.
Do you think this may all die down as fans lose interest? I’m not sure you know…………..
Thank you for this great information, you write very well which i like very much. I am really impressed by your post.Moncler Manteau
The article is worth reading, I like it very much. I ugg canada will keep your new articles.
It is very lucky to read this post and glad to share the my loved beauty equipment with everyone and do not hesitate to have the latest but cheap beauty equipment.
You have described it very well. Now a day, I feel that, No need to go to out because Internet showing me a more information to read. Today I have got a new information from your blog…
The largest cheap hatsstore online. from here you can find the newest monster era baseball cheap fitted hats,dc shoes hats and other famous brand cheap snapback hats in cheap price.
This is a very informative article and help me out to get all valuable information about this topic. Great work. Cheers!
Generic drugs
I notice my first comment on this blog is awaiting further consideration by the mods for some reason. All I did was ask 2 questions and add a link to Ben Gallop’s blog page with the comments around 8400+. What’s going on?
cheap christian louboutin shoes is an International fashion collection. The truth is designer boots is one of the leading luxury brands of shoes in the globe. cheap christian louboutin shoes are designed for women who crave for fashion. Whether you want to find trend shoes out for dating or leisure shoes for entertaining activities, cheap christian louboutin shoes can satisfy you. They are beautiful, elegant and noble. Have a try, or youâll miss this good chance which can change your present situation.
Wholesale cheap snapbacks, Adjustable Hats, Fitted NFL Caps Atsnapbacks cheap, Huge Selection Of Snapback Hats. snapbacks for sale NFL and so on
I just required some information and was searching on Google for it. I visited each page that came on first page and didnât got any relevant result then I thought to check out the second one and got your blog. This is what I wanted!
All the contents you mentioned in post is too good and can be very useful. I will keep it in mind, thanks for sharing the information keep updating, looking forward for more posts. Thanks
80% off sale Discounts
Clean up the warehouse, discount promotions,
the latest 2011 super cheap high heeled shoes
http://www.highheels-outlets.com
http://www.tiffanyjewelrybest.com/
http://www.tiffanyjewelrylove.com/
http://www.cheaptiffanyjewelryon.com/
http://www.tiffanyjewelrysion.com/
http://www.faketiffanyjewelryon.com/
http://www.mbtmenshoesoutlet.com/mbt-women-shoes-mbt-raha-women-shoes-c-109_159.html then anyone can easily help you succeed, on the contrary, you do nothing, then god can not save you.
Professional counterparts
I just required some information and was searching on Google for it. I visited each page that came on first page and didnât got any relevant result then I thought to check out the second one and got your blog. This is what I wanted!
8" Moonlight Colored Shower Head
8" Moonlight Colorful Shower Head
8" Sunshine Color Shower Head
35 diferentes modelos fueron puestos en libertad en todo, con el[url=http://www.adidaszapatos.es/]adidas zapatos[/url] 35th ser un modelo muy exclusivo. El [url=http://www.adidaszapatos.es/]adidas zapatos[/url] era sólo pueden obtenerse por ganar un par de adidas y nunca a la venta. El zapato 35, que era conocido como el “Top Secret” zapato se produjo en un estuche especial.
We offer wedding gowns,[url=http://www.bridaldressmart.com/]bridal dress[/url],bridesmaid dresses,flower girl dresses,[url=http://www.bridaldressmart.com/]bridal dresses[/url],Mother of the Bride Dresses custom service online[url=http://www.bridaldressmart.com/]wedding dress Discount store beautiful life[/url]
,custom wedding dresses is for free.
[url=http://www.iphone4sapple.dk/] sælge iPhone 4[/url]konfiguration baseret på iPhone4 blev opgraderet med A5 dual-core processor og dual-core GPU, CPU hastighed er dobbelt så iPhone4, grafiske ydeevne er syv gange iPhone 4. [url=http://www.iphone4sapple.dk/] iPhone 4 s[/url] batteriets levetid forbedret. Telefonen i 3G-nettet taletid til op til otte timer til seks timers tid på nettet, se 10 timers video, lytte til 40 timers musik.
Udstyret i utallige, smukke, unikke colorways, [url=http://www.supraskosalg.com/]supra sko[/url]samfundet sneakers fange mange hjerter skatboard elskere. I de sidste par år med internettet vinder mere popularitet blandt de unge,harThe[url=http://www.supraskosalg.com/]supra ns[/url]gået ind i en ny fase.
Vi er professionelle [url=http://www.supraskovip.com/]sko supra[/url] forhandler med fem års experience.We tilbyde fuldt sortiment af trendy look[url=http://www.supraskovip.com/]supra skytop[/url]til dem, der jager efter nye fashion.
[url=http://www.japanboot.com/]UGG ãã¼ã[/url]ã究極ã®ãã¼ããä»»æã®å¥³æ§ãæã£ã¦ãããã¨ã§ããé常ã足ã¯å·ãããæ¿¡ãã¦æè¦ãæãããããã¨ãããã¾ãããããã[url=http://www.japanboot.com/]UGG ã¯ã©ã·ãã¯ãã[/url]ãæ éãªæ³¨æãæã£ã¦ããããããã¨ãå¾ããã¹ã¦ã®å¿«é©ãã¨ä¹¾ç¥ã¯ãå¿ è¦ã«å¿ãè¨è¨ããã¦ãã¾ãã
Thank you for making the trustworthy effort to discuss this. I believe very strong about it and would like to learn more.
it will be difficult to make it,right?
thanks for writing this post to teach us.
i am determined to have a try.
Still awaiting reply…
Select the output file format.Press “Profile” drop-down list to select QuickTime supported MP4, M4V, MOV, MP3, WMV, M4A formats as the output format. 3.Crop video size.You can drag the dash line around to remove the black sides in the frame or adjust the video size area.
10" Pilot Shower Head
Easy Hand Shower Head
Thanks for the sharing, that greatly helped me to resolve the problem.now I am glad to share the latest fashionable news about the beauty equipment with everyone.
Pilot Hand Shower Head
I firmly believe you need the Nice blog.[url=http://www.nikeairmaxo.com/New-era-hats-c637.html]Adjustable Hat[/url] The content of your blog is exactly wonderful, and your blog template is Simple generous.[url=http://www.nikeairmaxo.com/Winter-hats-c641.html]Winter hats[/url] So good.
This comment was removed because the moderators found it broke the house rules. Explain.
The new Regulations set out the technical specifications for legal devices. A single search on 5W FM TRANSMITTER gives a list of most popular models.
Excellent posting!Thanks for the sharing, that greatly helped me to resolve the problem.now I am glad to share the latest fashionable news about the fashion jordan shoes with everyone.
[url=http://www.adelightbox.com/search/9389/light box, slim light box,crystal light box,vacuum forming light box,led slim light box, led crystal light box,led light box, slim light box, crystal led light box,advertising light box.html]light box, slim light box,crystal light box,vacuum forming light box,led slim light box, led crystal light box,led light box, slim light box, crystal led light box,advertising light box[/url]
[url=http://www.adelightbox.com/ led panel light,led light panel,led panel lighting,led ceiling panel light,round led panel light,led ceiling lighting panel,led round panel light.html]led panel light,led light panel,led panel lighting,led ceiling panel light,round led panel light,led ceiling lighting panel,led round panel light[/url]
[url=http://www.adelightbox.com/search/9390/poster frame,snap frame,snap poster frame,aluminum frame,aluminium frame.html]poster frame,snap frame,snap poster frame,clip frame,aluminum frame,aluminium frame[/url]
I would name your blog the dreamland! While Santa knocks at our door just once per year, you blog is open the whole year â wow!
This post has been somewhat of a revelation to me.
I recently came across your article and have been reading along. I want to express my admiration of your writing skill and ability to make readers read from the beginning to the end. I would like to read newer posts and to share my thoughts with you.
Great fun for alGreat fun for alGreat fun for al
what are you proposing, getting rid of all the teams except for mclaren, ferrari and redbull! cos if so, its an even worse idea than the bbc/sky tv deal!
http://bookmarkpages.info/story.php?id=90208
http://bookmarkplus.info/story.php?id=172633
http://www.bookmarkscape.com/story.php?id=320118
My friendS told me that this blog is competitive.i will continue to read.
Just to say,I am glad to read so good article in the webstie.Well,OK.I have to say,what a wonderful blog it is.thank you for your sharing so good articles in the website.I like it very much.It is very interesting in it.Look forward to reading so good articles in the website.
Maybe you will love these scarves. Looked them ASAP.
These sunglasses are so cheap.
Welcome to scarf world. You will satisfy with them.
you will fell so suprise about so cheap north face jackets.
fake burberry scarf give you a big suprise
cheap purses
cheap coach purses
cheap louis vuitton handbags
coach outlet online
coach outlet store online
oakley knockoffs
cheap handbags
cheap purses
jordan high heels
jordan high boots
knock off coach purses
fake coach bags
dunk sb
cheap dunk sb
Thanks for the sharing, that greatly helped me to resolve the problem.now I am glad to share the latest fashionable news about the fashion jordan shoes with everyone.
I think other web site proprietors should take this website as an model, very clean and great user friendly style and design, as well as the content. You are an expert in this topic!
There are non-monetary reasons andJordan Shoes Online Shop long term economic considerations that factor into this debate but are beyond the scope of this article. There areBuy Discount Vibram Five Fingers For Mens certainly advantages of dual income families.
I have set out our questions to him there in the hope he might respond. Feel free to add any additional points I may have missed.
ãã¥ã¼ã´ãã¹æã®ãã¥ã¼ã´ãã¹é販ã1.st販売åºãï¼
ãã¥ã¼ã´ãã¹ã¡ã³ãºã¨ãã¥ã¼ã´ãã¹ã³ãã¼å ¨ã¦ã¯å½åºã®ãã¥ã¼ã´ãã¹åºèã«ããã¾ãã
ã©ããããã£ããã楽ãã¿ãã ãã?
Thank you for your great posting! I canât help sharing the cheapest wholesale women shoes with everyone and please do not hesitate to have the latest but cheap wholesale women sexy shoes.
Thanks for sharing.
The online shopping industry continues to grow. A lot have been turning towards shopping online instead of the conventional way. Because of this, the number and variety of products that can be bought online have also grown.
http://www.monclerjacketsion.com/
http://www.northfacejacketsonsaler.com/
http://www.northfacesaleion.com/
http://www.northfacejacketser.com/
http://www.discountmonclerjacketsion.com/
6" Rain Shower Head
50 Slut til mor? R, has has [url=http://www.canadian-goosejakke.com/]Canada Goose [/url] autentisk Ekstreme vejrforhold gear f? Dt of form? L and Funktion, which is Designjet to the DEM, who use for has Den tillid, which comes from quality.
The Turkish podium this year was Vettel, Webber, Alonso, but nico does have the podiums mentioned from last year
Get the best Home Theater Projector and the best price from vvme now, and find mobile projectors, Meeting Room Projector, installation projectors and more. Buy MITSUBISHI HC5500 1920 x 1080 Full HD 1080p lcd projector 1200 lumens 14000:1 with fast shipping and top-rated customer service in vvme. An LCD Projector Screen is a type of video projector for displaying video, images or computer data on a screen or other flat surface.
http://www.vvme.com/home-theater-projector
http://www.vvme.com/home-theater-projectors/home-theater-projectors
http://www.vvme.com/home-theater-projectors/projector-screens
http://www.vvme.com/home-theater-projectors/conference-projectors
I am totally agree with what you said, that has greatly helped me to resolve the problem.now I am glad to share the cheapest wholesale kids shoes with everyone.
Girl fashion bags 2011 is , which are famous all over the world. Women get the and online. And you can also enjoy Boot, the fur you will like it in winter. Enjoy the sexy red bottoms from . The sale shoe can reach your style.
Thank you for your great posting! I canât help sharing the cheapest wholesale jeans with everyone and please do not hesitate to have the latest but cheap wholesale jeans.
Fantastic Read! Looking forward to more! Bookmarked the site and will be back again!
Come on Spyder Jacket – no need to bash Martin guys, I’m sure he wants to know what is happening as much Spyder Ski Jacket as us. Jake said in his blog he didn’t know about the news until the day it was announced.
I’m sure Spyder Coat all of the bbc f1 team want to know the details just like us – so don’t blame them, it’s the top bbc bosses that are responsible for what has happened.
Baseball probably the most ideal presents may maybe be also additional remarkable to the sports activities enthusiast with regards to other individuals. Seeing that these types of products should certainly be instead revolutionary broad variety, they will improve supplemental enchantment toward daily living. In particular, any agreed upon AMERICAN MLB Shirt is normally an awesome deal with for getting in a location to tiny league devotees.
thank you for your article,My problem has been resolved.
The Turkish podium this year was Vettel, Webber, Alonso, but nico does have the podiums mentioned from last year
Another good function of this gown is its ability to be worn all over again and all over again. It has a classic silhouette that helps make it just as apt for a cocktail celebration as it is for your marriage ceremony day. You can find this fashion in coloration choices that contain Apple, Black, Lapiz, Marine and Truffle.
I am totally agree with what you said, that has greatly helped me to resolve the problem.now I am glad to share the cheapest wholesale jeans with everyone.
car club insurance , ncfb car insurance , windsor auto insurance , reasons for car insurance policy refused , car insurance in bankruptcy , state farm auto insurance
555linli2
Have no fear of perfection —- youâll never reach it.
Nice brief and this post helped me alot in my college assignement. Say thank you you as your information.
After the BBC’s display of contempt for the fans, I find it hard to get too interested about the top or bottom of the grid right now.
What a great article, I am entering university in september and will cperfect, I found this is very good blog, Iâll recomment it to my friends.
It’s a good article! The picture or the article tell me something about life and other things! Recently,I found some good websites on buying things, I thought it very good and want to share.
Wow, its so realistic.You really hit the nail on the head.
I just required some information and was searching on Google for it. I visited each page that came on first page and didnât got any relevant result then I thought to check out the second one and got your blog. This is what I wanted!
This is supposed to be democracy BBC – freedom of speech and all that. You should find out what that means.
This website is awesome. I constantly come across something new & different right here.Thank you for that data.
thanks for this interesting information I will publish a link on our blog so my personal readers can benefit from it too.
[url=http://www.naphon.com/products_info/Indoor-White-Wall-Mount-Speaker-DSP207-155882.html]Indoor White Wall Mount Speaker DSP207[/url]
Thank you for visiting!
YES! I finally found this web page! Iâve been looking just for this article for so long!!
http://www.menacorde.com/wordpress/?p=608
Great loved it, professional makeup brushes will be waiting for your future article.
jp-yuppy111.comã¯è æè¨ãã©ã³ããé«
ç´è æè¨ã®è æè¨ã³ãã¼åã®ç¨®é¡ãè±å¯
ã«åãæã£ã¦ããã¾ããå³é¸ããä¸çåå½ã®è æè¨äººæ°åã®å質ã¯ããã¦ãæ¿å®ä¾¡æ ¼ã§ãæ
ä¾ããè æè¨é販ãè æè¨ãã©ã³ã,ãã©ã³
ãã³ãã¼æè¨, ã¬ããªã«æè¨,人æ°
æè¨,ã³ãã¼æè¨ãæ±ã£ã¦ããã¾ããã
客æ§ã«ã´ã£ããããæè¨ãé¸ãã§ã¹ã¼ãã¼ã³ãã¼ãã©ã³ãååãè³¼å ¥ã§ããã客æ§ã®ãã¼ãº
ããæºè¶³ããããã«åªåãã¦ããã¾ãã
1.stä¸çªè²©å£²åºã¯ãã©ã³ãããã°ãããã°ãã©ã³ãã®ããã°ã³ãã¼ã®ç¨®é¡ãè±å¯ã«åãæã£ã¦ããã¾ããå³é¸ããåå½ã®
ãã©ã³ãã³ãã¼ããã°åã®å質ã¯è¯ãã¦ã
æ¿å®ä¾¡æ ¼ã§ãæä¾ãã¾ããå½åºã¯1ï¼1ã§ä½ãããã¹ã¼ãã¼ã³ãã¼ããã°ã ãã販売ãã¦ããã¾ããã客æ§ã«ã´ã£ããããã³ã
ã¼ããã°ãé¸ãã§ããã°ãã©ã³ãã³ãã¼ãè³¼å ¥ã§ããã客æ§ã®ãã¼ãºããæºè¶³ããããã«åª
åãã¦ããã¾ãã
1.stä¸çªè²©å£²åºã¯ãã¡ãã·ã§ã³ãªé´ãã©ã³ã
ã販売ããé´é販ã·ã§ããã§ãããã©ã³
ãé´ã®ç¨®é¡ã¯æ¥æ¬æ¥çæ大ã§ããé´æµéã»ã³ã¿ã¼ã¨ãã¦ãé´ã¬ãã£ã¼ã¹ãé´ã¡ã³ãºãã
ããªãããããé´ã赤ãé´ãé´ã³ãã¼ã¾
ã§ãã£ã±ãæã£ã¦ããã¾ããå½åºã®ã¹ã¼ãã¼
ã³ãã¼é´ã¯é«å質ã§ãããä¾¡æ ¼ã¯ä»¥å¤ã«å®ãã§ããã©ãããã©ã³ãã³ãã¼é´ããå®å¿ã«è³¼å ¥ãã¾ãã
This has lasted for 2 months of flood affected Thailand three-quarters of area, affecting many millions of people. Thailand all 77 provinces have 58 once flooded, including 25 provinces still serious disaster. Thai disease prevention and treatment of the department official said, and the number of affected terms,
Maybe the BBC can show 50% of the teams all the time ie the top 6, and SKY can show everyone else
I am so glad this internet thing works and your article really helped me. Might take you up on that home advice you
Yeah, I am also excited for this to share with my daughter. Thank you for sharing of these interesting projects of yours.
I’ve been taking a look at how some of the smaller teams like Force India and Sauber are faring at the mid-way point of the 2011 season, as well as picking the nine drivers who have impressed me most so far.
Welcome to fake oakley sunglasses ,Our company supply different kinds daily necessities. All you can find in ourwebsite.our daily necessities are cheap and good quality.Our stuffs have been recognized as one of the mostcoveted.We export different daily necessities including fake oakley sunglasses,hats,fashionable clothes,high quality shoes,clothes for children as well as winter sports clothing for outdoor use.Years of designing and developing promotional products enable us to catch our customers’ ideas and needs firmly.We are a professional fake oakley sunglassestrade company offering various kinds brands product.our company let you enjoy your life withour paying high prices,and our daily necessities have been sold all over the world for many years and influenced by the customers’ approval. If you want to buy or import daily necessities,our products can be your first choice.
More than 25% of Americans suffer from bad credit with nearly 40 -50 million paying penalties for their bad credit score month in and month out. You can fix bad credit and fix credit score.
Here are cheap nike free run series, New Nike Free Run Plus Shoes in 2011 years – cheap nike free. Not only are they incredibly popular among athletes, they also make a fashion statement to young adults and teens. Order the Latest Free Run Plus offer on nikefreerunzone.com now .They are the perfect operating shoe, light weight and don’t weigh your feet down like other womens nike free 3.0 can do. They come in many different colors so that you can choose the ones that you will enjoy wearing the most.
As the warmest jacket in the market, even manufacture of moncler jackets can not compare with it.Fulfill inside of down, North Face jacket is an all-around winter outer clothes, it is the perfect outerwear in chilly weather conditions. No matter what kind of outdoor activity you are take part in during the winter, these jacket will keep you comfortable and warm.
The Turkish podium this year was Vettel, Webber, Alonso, but nico does have the podiums mentioned from last year
I am very lucky to read this post and glad to share the my loved michael kors watches with everyone and do not hesitate to have the latest but cheap michael kors watches.
Hey nice tweak talk here. I completely agree with you. I can set up my new idea from this post. It gives in depth information. Thanks for this valuable information for all. And of course nice review about the application.
Writing in the Daily Mail newspaper, Walker added that he also feared for the sport itself, with the expected drop in viewing figures likely to have a knock-on effect on the teams.
There are ball point pens available in this series with the pens from the Meisterstuck set being the most in demand. Their 100th anniversary series comemorates the making of the very first pen by Simplo Fuller and does not have a ball point pen in it. It’s well advised that you educate yourself about these limited edition pens prior to making any purchases, as some have appreciated in value much faster then others.
You are really a good blogger.I agree with your conclusions and will eagerly look forward to your approaching updates.It seem to me that show will definitely gonna rocking.
While some remain unmarked and some are marked the best policy to follow is to simply not speed. However, since that is likely not to happen at least avoid speeding in Wake County on Interstate 40 otherwise you risk seeing a really cool Corvette Z06 with lights blazing on the dash pulling you over to issue you a nice fat ticket for speeding.
It’s so nice post. Thanks.
As I website possessor I believe the subject material here is really superb , appreciate it for your efforts.
the Banker or the Enterprise leader in your life, then seem no further more than the Fountain Pen Range. There are quite a few model ranges in the line such as the Boheme, the Meisterstruck and the Solitaire, between other folks. Each has a quantity of distinct designs supplying the utmost of distinction and superior and has a large array of types and about 45 specific versions to select from. So then, what does a ?two,200 pen look like?
Hello can I quote some of the insight found in this post if I provide a link back to your site? toronto escort
This comment was removed because the moderators found it broke the house rules. Explain.
Personally I have never rated Kimi, but the man is his own worst enemy. He does nothing to get people to like or warm to him.
It might taylormade r11 drivernot be your rude and drunk in-law who decides to air your dirty laundry in public where all can hear, it might be the cleaning lady you treated badly â in which case matitleist 910D3ybe you deserve it. A 32 year-old Polish woman writing under the pseudo name Justyna Polanska has decided to expose some of the dirty little secrets she has been obliged to uncover in her twelve years working as a char woman in Germany. Her book, Unter dtitleist 910D2eutschen Betten: Eine polnische Putzfrau packt aus, has been rapidly climbing the German best-seller charts, allegedly already hitting number 16.
The Banker or the Enterprise leader in your life, then seem no further more than the Fountain Pen Range. There are Sac à main Mulberry quite a few model ranges in the line such as the Boheme, the Meisterstruck and the Solitaire, between other folks. Each has a quantity of distinct designs supplying the utmost of distinction and superior and has a large array of types and about 45 specific versions to select from. So then, what does a ?two,200 pen look like?
Meisterstruck and the Solitaire, between other folks. Each has a quantity of distinct designs supplying the utmost of distinction and superior and has a large array of types and about 45 specific versions to select from. So then, what does a
struck and the Solitaire, between other folks. Each has a quantity of distinct designs supplying the utmost of distinction and superior and has a large array of types and about 45 specific versions to select from. So then, what does a ?two,200 pen look like
model ranges in the line such as the Boheme, the Meisterstruck and the Solitaire, between other folks. Each has a quantity of distinct designs supplying the utmost of distinction and superior and has a large array of types and
rstruck and the Solitaire, between other folks. Each has a quantity of distinct designs supplying the utmost of distinction and superior and has a large array of types and about 45 specific versions to select from. So then, what does
If you are outside the UK, you can watch the video here.
Thanks for offering information.Recently I found a cheaper jerseys website,here have many NFL,NHL,MLB ,NBA and custom jerseys.All jerseys name and number are stitched and with cheap price. Welcome to http://www.LikeJerseys.org .
The Design Museum presents the first UK retrospective of iconic French shoe designer Chaussures Louboutin, celebrating a career which has pushed the boundaries of high fashion shoe design. This exhibition Chaussure Louboutin career to date and showcases twenty years of designs and inspiration, revealing the artistry and theatricality of his shoe design from stilettos to lace-up boots, studded sneakers and bejewelled pumps.Louboutinâs shoes are the epitome of style, glamour, power, femininity and elegance.
Its like you read my mind! You appear to know so much about this, like you wrote the book in it or something. I think that you could do with some pics to drive the message home a bit, but instead of that, this is wonderful blog. An excellent read. I’ll definitely be back
[url=http://www.naphon.com/products_info/ABS-Speaker-E-10-154542.html]ABS Speaker E-10[/url]
It sounds really amazing. new jordan shoesThank you very much.retro jordansIâm going to put this too good use in my life.
Thanks for the sharing, that greatly helped me to resolve the problem.now I am glad to share the latest fashionable news about the michael kors watches with everyone.
Thanks a lot.new jordan shoes i like your blog very much.wholesale jordan shoes i come back most days to find new posts like this .jordans shoes just come to visit, and you can’t lose hope.
Besides being one the largest selling shoe and sportswear brands cheap nike free in the world, Nike has unveiled its new brainchild: the Nike 6.0. Who says customization has to be expensive? With the Nike 6.0 shoe it is possible to customize the laces, insides, outsides, and even add your own name on the back. No longer do you have to be a celebrity to have your name on your shoes. cheap womens nike free 7.0 Customizing your Nike 6.0 shoes takes little time and is reasonably priced.
Most major shoe manufacturers have features on their websites that cheap womens nike free allow you to design your own shoes. Nike is no exception, but they go a step further than many other brands, allowing you to get specialized shoes for unique foot sizes. They also allow you to choose your shoe based on what type of sport you will be playing and where you will be playing it. cheap nike free fun Customized Nike shoes come in countless color variations and can be personalized with a written word or two.
Have you ever walked past a designer shop, looked in the window display the north face outlet and felt as though a bag was calling you by name? Or maybe you happen to see it in a catalogue? North face store Thatâs beautiful things and tell yourself apart. Ok, so now to make the tough cheap north face decision on why you should spend $1000 or more (can be several hundred thousands) on. Thank you for posting .please do more good article.the north face outlet itâs so cool .i like it very much.
Though I avoid seeing you, I still miss you.
Thanks for sharing this
HYCY13769R86 De bons articles, merci pour le partage. Nous apprenons beaucoup de ce poste. TN Requin,basket tn enfant,chaussure pas chere est l’un des plus vendus au Air Max Ltd Homme de produits, acheter maintenant ficier d’une duction de 60% TN Requin Pas Cher,basket tn enfant,chaussure pas chere finitivement la valeur de votre propre apparence unique, le TN Requin 2010,basket tn enfant,chaussure pas chere somatologie conception,chaque designer sur basket requin homme,basket tn enfant, http://www.tnrequinpascherhy.com/
Wholesale Sexy Swimwear is extremely imperative to display other men and women close to you the amazing figure and entire body you have and how proud and self-confident you are about it. The best selection for both girls and ladies on other lingerie purchasing is those from Wholesale Lingerie China website such as Wholesale-Lingerie.cn.
Wholesale Cheap Jerseys,Get Free Jerseys&Free Shipping!
Dear friend
Good news!! Welcome to visit our site http://www.jerseysshow.org/. Our company produce wholesale jerseys of NFL, NHL, MLB, NBA , custom jerseys in many styles .We also upload new products ,our price concessions . Detailed descriptions:
Style: As showed as in our website
Size: 48â56 (MediumâXXXL)
Shipping: 5-7 days to your doorï¼if u order 10 or more then we will give u free shipping ï¼
Payment : VISA Card or Western Union.
( If u pay by Western Union, u can get a 10% discount your order total money*90% = You pay total amount )
welcome to place new orders!! Itâs my pleasure to offer services for you!
Thank you !
This is a great blog, I very love.
It is definitely very beautiful Fancy Flower Flourish-Closure . I really inspire this video . Thanks for sharing .
ãã¤ãã¯è£½åãã¶ã¤ã³ã¯èªç¤¾ã§è¡ãããããªã¼ãã¼ã ãµã³ãã«èªç¤¾å·¥å ´ãæããã«çç£ã¯å¤é¨ã®å·¥å ´ã«å§è¨ãã¦ããã以åããããã¤ãã¯æµ·å¤å·¥å ´ã«ããã¦å´ååã®ä¸å½ãªæ¾åããã¦ããã¨åããã¦ãããã¹ãã¤ã¯1997å¹´ãNGOã«ãã£ã¦å®éã«ãã¤ãã®ãããã ãªã©æ±åã¢ã¸ã¢ã«æå¨ããå§è¨å·¥å ´ã«ããããã·ã¥ã¼ãº ã¢ãã£ãã¹å ç«¥å´åãããªã¼ãã¼ã ãã¼ãä½è³éå´åãé·æéå´åãã»ã¯ã·ã£ã«ãã©ã¹ã¡ã³ããå¼·å¶å´åããªã©ã®åé¡ç¹ã®åå¨ãæããã«ãªã[3]ãããããäºå®ãç¥ã£ããã¢ã¡ãªã«åè¡å½ã®NGOå£ä½ããã³å¦çãã¡ã¯ããµãã«ã¼ã¹ãã¤ã¯å¤§å¦ãã£ã³ãã¹ãã¤ã³ã¿ã¼ãããã使ç¨ããã·ã¥ã¼ãº ã¡ã³ãºãã¤ãã®å§¿å¢ãæ¹å¤ãã[3]ãéåã¯è£½åã®ä¸è²·ã訴è¨åé¡ã«çºå±ãã.
Really nice post thanks for sharing us…………..engagement ring
Thanks for offering information
Recently I found a cheaper jerseys website with high quality,awesome! . http://www.LikeJerseys.org .
jerseys with high quality low price
Hi friend
There are many jerseys updated on our site ,pls visit on http://www.jerseysshow.org. The jerseys are all sewned on with high quality low price. If you order more than 10pcs , the shipping free.We will give you the best discount if you place order online!
Thanks for your visiting and order !
Great post! Some informative stuff you have shared. Thanks for sharing this great stuff.
Cancun Mexico Hotel
This is so inspiring and lovely title of weblog. I am always searching such type of Weblog that gave some useful information.
Cancun Vacations
I am very lucky to read this post and glad to share the my loved cheap jordans shoes with everyone and do not hesitate to have the latest but cheap jordans shoes.
I really enjoy this website and we have cheap [url=http://www.cheapcarrerasunglasses.net/]carrera sunglasses[/url], the [url=http://www.cheapcarrerasunglasses.net/]carrera sunglasses for men[/url] style are fashion and cool, [url=http://www.cheapcarrerasunglasses.net/]carrera sunglasses sale[/url] is sale protest your eyes, buy sunglasses which don’t harm your eyes from [url=http://www.cheapcarrerasunglasses.net/]carrera sunglasses store[/url].
[url=http://www.naphon.com/products_info/UHF-VHF-Wireless-Microphone–WMS8240T07-155375.html]
UHF/VHF Wireless Microphone WMS8240T07[/url]
The jerseys are all sewned on with high quality low price. If you order more than 10pcs , the shipping free.We will give you the best discount if you place order online!
thank you
thank you admin
cheap gucci clothing means that you are selling the real deal and your asking price is directly affected while your buying price may not be so much. Getting the wholesale jordan shoes product in bulk may be a question of availability.
Itâs the first time I have heard that in New York, You have wonderfully written the post. Thanks for sharing this.
Itâs the first time I have heard that in New York, You have wonderfully written the post. Thanks for sharing this.
Thanks for the tutorial, Just a quick note to let you know that i mentioned it in my blog today.
Thank you for the information that provided.
Focus on this article.I really like it.If you can change the its structure,It would be better.Thanks.
Greatest post I have seen.I learn a lot from it.Hope you can write more better articles in the near future.I am really eager to read it.Thanks.
This is a nice blog and offer some helpful information for me,thank you!
Search the credit card on the google.and found your article.Thanks a lot for your kind points.I really agreed on it.Thanks.
thanks for sharing!
ã»ã¬ã¯ãäººæ° uggå質NO1ugg/ã¢ã° ugg ãã¼ã æ¿å®ã¯å½æ¹ã®UGG australia é販åºè-ugg åæ±åºã§ãï¼ä»ugg ãã¼ã æ¿å®ä¸ã§ãï¼ã¬ãã£ã¼ã¹ ugg ãã¼ã
Prematurely, to hold on: people are not saints, no one knockoff brand belts can get rid of emotions, inseparable from the mundane, even fled to Buddhism out of the three realms, not in the five elements, as well as “monks generous pregnantGood, good! Good, good! “comes up. Therefore, to succeed, you have to prioritize, the size of theknockoff designer sandals distance of the homes have to reluctantly part, the tolerance have long-term perspective, in order to achieve the ideal, and accomplish great things, create a great cause.Hairiness were not to know how to compromise: a low-key life, often to win the opponent’s funding, and finally move towards the prosperity of the stretching forces in wholesale glass frames turn makes the opponent to yield a useful trick.Waiting for an opportunity to “ignorance”: knowing too much, not only for the show doing nothing, the wise fool, but you can if nothing had happened, filled noncommittal look, attitude, and then wait for the timing,
At that time, the river is not a moat, but to irrigate discount true religion jeans farmland irrigation channels excavated. Dredging the river could not be conducted due to years of work, combined units and residents near the river discharge to the phenomenon of contamination have occurred, resulting in dirty water bear, on both sides of the river overgrown with weeds, the environment is very harsh. Since UGG Boots for cheap reform and opening, especially in the last few years, urban development, the old North Canal has been a fundamental change in the North after the comprehensive management of the canal has already built nine theme parks, amusement park 14, total area of over 1.93 million square meters. Today, a small walk in the canal bank road, although there is no sunset companion, but black christian louboutin heels after the rain, the river clear steep transparent, sparkling waves, like a girl sent Wink makes an upsurge of agitation. Cross tree-lined drainage ditch past, now is the green grass, has become the public’s leisure facilities, hydrophilic and urban landscape with the green "necklace."Stood head and looking, right into every elevated rapid rail pier which is where they stand, across the bridge on the canal just like the city air, a dazzling rainbow. It is said that a few years later, Harbin high-speed railway will be UGG Boots for discount opened to traffic, maximum speed up to 350 kilometers, will become a truly "high-speed passenger rail." By then, Harbin to Dalian will now run eight hours to reach, shortened to three hours to arrive. Believe that high-speed rail era, will people’s lives more convenient, but also for the revitalization of northeast old industrial base has played in boosting.In the north canal, or a cottage neighborhood a few years ago, and now a unique garden-style fashion handbags online high-rise towers, not far from the new North Tower Park and lake
Are you an nfl crazy? Do you like nike? on April 10 , NIKE NFL will be meeting you by brand-new appearance .We will upload the new product picture in time, Please pay attention to our website at any time . nfl jerseys
NFL,NBA,NHL,MLB, more wholesale , more cheap jerseys, lager stock,best serviceï¼action better than heartbeat!
Hi friends,
This is gorgeous !!!
I like it very much …
Whatever old or young. Men or women, [url=http://www.wejerseys.us/]cheap jerseys[/url] you will find a place on our website. Come on , join me, join us.
http://emovietrailer.com/index.php?option=com_content&view=article&id=91:slumdog-millionaire&catid=45:demo#josc1156
Greatly Thanks for the sharing, that greatly helped me to resolve the problem.now I am glad to share the latest fashionable news about the cheap jordans shoes with everyone.
Thanks for wonderful posting!!!
We really start gearing our focus http://www.salewe.com/views/women-new-york-giants–80-victor-cruz-white%5B2011-field-flirt-fashion%5D-22601.html towards free agency prep in the game plan meeting that we usually have as a personnel department as a {cheap jerseys} whole in December, where itâs pro personnel, college http://www.salewe.com/views/New-York-Knicks-17-Jeremy-Lin-Blue-Jerseys-21205.html scouting and Mike
nearly all of IN Oakley sunglasses.
Oakley sunglasses products have great attention to detail design, it added element just isn’t high, but can within the subtle highlights its quality. In 2011, as an example,
So the lowest cheap oakleys discount store offer Cheap Oakley Sunglasses and Oakley Glasses. Up to 70% discount from oakley sunglasses on sale.
The Seahawks reached an agreement with Matt Flynn on a three-year contract Sunday, bringing one of the most wanted — yet unproven — free agents to the Pacific Northwest. “nfl jerseysThe Seahawks didn’t announce financial terms, but a league source told NFL Network insider Jason La Canfora the deal is worth a maximum of $26 million, with $10 million guaranteed.http://nflshop18.com/products/NFL-Jerseys-c153_p1.html
CANTON, Ohio — Construction is running ahead of schedule for the $27 million expansion project at the Pro Football Hall of Fame in northeast Ohio. “nfl jerseysOverall, the Hall of Fame is adding more than 32,000 square feet of new construction and more interactive features. The hall’s executive director says aside from seeing some temporary construction walls, current visitors aren’t affected much by the ongoing renovation work.http://nflshop18.com/products/Women-Jerseys-c187_p1.html
In summer season, the Oakley Sun shades Outlet is a reasonable option for your out-of-doors activities.It could take away the interference fake oakleysof outside light, so that fake oakley sunglassesyou might have clear vision of nature.So you can enjoy driving a automobile, fishing, sun beach fun replica oakley sunglasseswhen you put on it.At the same time,dark sun shades can cover up the eye which will be a great version replica oakleys of defect or some eye issues,Make you look more high spirits.our company will make you enjoy your life with our paying high prices,and our daily necessities have been sold all over the world for many years and influenced by the customers’ approval.our company is your first choice.Thanks. dopie
we will new coming NIKE NFL jerseys in http://www.salewe.com/views/New-York-Knicks-17-Jeremy-Lin-Blue-Jerseys-21205.html April, the newest, cheapest, the most original and fashionableï¼[url=http://www.wejerseys.us/]cheap jerseys[/url] please pay attention to our website updated.
Creative blog and i like it. This thing increase the beauty of clothes and bags. This is creative blog and art .
About on April 10 , NIKE NFL will be meeting you by brand-new appearance . nfl jerseysPlease pay attention to usãMove quickly! Recently the flagship product in Reebok style: Payton Manning Broncos & Tim Tebow N.Y. Jets are hot-selling. Welcome to snapping up!
Do you wanna be cool, do you wanna say goodbye to the normal. href=http://www.wejerseys.us>cheap jerseys Come on, http://www.salewe.com/products/search-hat_p1.html it is time, wejersey can serve you more.
onderful post from an expert and it will be a fantastic knowledge to us and thank you very much for sharing this valuable information with us.fake sunglassesfake oakleyfake ray ban
It happens to be widely accepted the fact that battery for laptop is among the most vital power source of laptopsACER Laptop Batteries. Without batteryApple Laptop Batteries that may supply power
Welcome to visit our website: http://www.jerseyshome.net/. We offer jerseys ãheadphonesãcaps and so on . and Denver Broncos 18 Peyton Manning jerseys are available. More than 10 items, we offer free shipping. And we will also give you a 10% discount when you pay by western union.
Thanks for the sharing, that greatly helped me to resolve the problem.now I am glad to share the latest fashionable news about the tag heuer watches with everyone.
The NFL Players Association released a statement Thursday in which it urged the league and the Saints to assist in its investigation of New Orleans’ “bounty” program. “NFLPA leadership looks forward to meeting with the Commissioner to discuss the League’s ‘Bounty’ investigation,” the statement reads. nfl jerseys“To date, neither the League, nor the Saints, have helped us facilitate interviews with members of management or the coaching staff. We expect the League to provide all information so that we can ensure a fair process for all who were involved.”
je suis fans des http://www.burberryfemme.com http://www.puma-cat.com http://www.ralphlaurenhommes.com
Ray Ban Outlet,Male; military & veterans; national pride; trendy; other; view all caps hologram sunglasses they’re back in style, combined with they’re hotter as opposed to ever. associated spectacles; ironman sunglasses; locs sunglasses; matrix sunglasses; military greg raymer casino hologram sunglasses your price: $ sunglasses-catalog. sunglasses; matrix sunglasses; military spectacles; motorcycle sunglasses; photochromic sunglasses; polarized sunglasses; retro sunglasses; vision hologram sunglasses. Check out all all of our a whole arrivals sunglasses tooholographic impaired hologram sunglasses military glasses mens sunglasses metalframe glasses theatre & television novelty sunglasses-catalog. a hologram goggles exactly what locating hologram goggles would be about the size of not a good regular pair in the region of sunglasses and decepticon affiliate marketing online vehicles: hybrid military sunglasses-catalog. tary surplus; mixed approval and pallets; animals & animal products; seasonal finishing touches clearance of hologram sunglasses.Armani Eyeglasses 2011
Cheap Ray Ban,After the on the go is been proven to be able to a baby newly born couple’s house to their contacts partnered with family members, it admit it undoubtedly it will be liked by all these adolescent. They will ask where this occupied which down coupled with who presented information systems. among the many that moment unwanted expense . going spanning can be advertised combined with those young who were charmed with inside regards to a job will primarily want child same hand made craft. Armani Sunglasses Men 2010
Ray Ban Outlet,Anyone can sign around all over be a nasty merchant on Stub heart. They can work as sure related to the verification process thus about it labeling us all get become boundarie to be effective. a bundle of types close to sellers can be prosperous on Stub Hub. For example, season ticket seems that cannot use a ticket along an unsatisfactory specific traffic. Or, parent airline tickets holders that quite a bit doesn’t need through or may not opt which entails some reason. They’ll on top of that are flight brokers; adding these who were once identified as Tcalpers?many years ago. It doesn’t really matter. through the the free expose organization at work. surrounding the positively the proper in the position utilizing look for Thunder tickets.Mens Armani Sunglasses
it looks very special for everyone
I saw this really great post today! Good share, great article, very usefull for usâ¦thanks.
thank you admin
thank you admin nice blok
The coach shoulder bags win a lot of grace and market share. It can be said that the coach is a legend in history bags at coach outlet.coach outlet store online with fashion style and top quality succeed. In any occasions they are very suitable and appropriate for its precise and rich design.Coach Outlet Online offers free and fast shipping. Usually, ships between 5-8 business days. So you do not need to wait for a long time. http://www.coachoutleteo.com
They are nothing less than a masterpiece in a museum or an art gallery and the owner of these creations find it their privilege to adorn these exquisite creations. The price of these designer wear is hardly of any consequence for those who prefer to clothe themselves with the best and most exclusive garment.
I wanted to thank you for this great blog! I really enjoying every little bit of it and I have you bookmarked to check out new stuff you post.
We could see which you will be getting considerable time and effort in your blog site and comprehensive articles! I will be exceedingly in love with almost every piece of data an individual.liulipingcomment201204
Cheap Louis Vuitton Wallets & Luggages Online Outlet Store. Cheap Louis Vuitton Handbags On Sale, Louis Vuitton Bags USA Store, 60% Off, Free Shipping Now! MBT Shoes, Cheap MBT Casual Sandals And Sports Shoes On Sale, 50% Off. Pandora Jewellery UK Online Store: Meizitang Slimming Botanical, Meizitang Botanical Slimming Soft Gel Capsules Strong Version.Meizitang Australia Store, Meizitang Botanical Slimming Soft Capsules On Sale, Lose Weight Fast With Meizitang!
Iâm impressed. Very informative and trustworthy blog does exactly what it sets out to do. Iâll bookmark your weblog for future use.
Louis Vuitton baggage get to be the innovation the louis vuitton handbags period If one of your goals, HYPERLINK to improve their Louis Vuitton handbags are a must-have set Not only the line for females they offer but guys also have their own Louis Vuitton range of products to select from.Louis Vuitton Speedy Louis Vuitton Trevi louis vuitton speedy GM Damier Ebene Canvas N51998You can get that do relative make this happen label of top of the line style, thus, it really is a very genuinely worth searching for Very new unit not just simply does not hide the actual leather material stretched take on bracelet, louis vuitton neverfull material series harness further dress tassel decoration to form that louis vuitton neverfull Initialed or monogrammed Miroir brightened skinny Minimal have your dog find out the following would be your get started with her escalate so that you can fame.louis vuitton alma Louis Vuitton Purses With the half-claws louis vuitton handbags and handbags been found because of Alexander McQueen coupled with Chanel The warm season comes also coil 10 changing into suggest in a really barn generating smirking varieties, I figured Discussed visible each individual strange idea that London uk Designer Weeks time were required to offer This huge designer purses Monogrammed Multicolore canvas can add upbeat dye n your attire Instead than material tote bags utilizing canine areas chilling caused by http://lvhandbagsdiscounted.com Louis Vuitton Electric outlet which inturn back again around the leathers alongside embossed art logos.
Nike air max 90 trainers may well indulge in which spot air max 95 accomplish. Nike Air Max sale with discounted price high air max 95 men quality. Excellent several cheap nike air max 90 shoes online, essential essential air max 95 women factors is certainly comfort and ease, ease and comfort may possibly decrease blisters in addition to several entire body troubles. Sports shoes is based on peopleâs participation in sports or travel characteristics of the design manufacturing.air max 2012 mens Air max 90 shoes cheap sale featured a durable midsole which provided wonderful forefoot cushioning which is comperable to todayâs air max 2012 women best shoes and the cheap nike air max 90 also featured a large Air Max unit in the heel.
Closed made earcups Beats Detox beats by dre professional completely enclose your ears to lock out and about ambient noise. still left earcup, merely satisfy two into power furnish vitality as properly because of this of fact the headphone works. regarding only one other hand, regarding the precise earcup there is the beats by dre studio on apart alter and âbâ logo design important too â push the choice as well when you also also can pause the audio tracks tracks take part in objective as properly because of this of fact the tone minimize objective it is user-friendly! The ultra-soft able cushions can retain you fascinating monster turbine pro copper while savoring the music, lowering perspiration. only one employing the coolest http://monsterbeatsbydre4cheap.com/ attributes could quite possibly be the detachable monster beats mobile cable television tv decided tv tv beats by dre detox .
About Christian Louboutin Mini Bout pumps pink Christian Louboutin was founded in 1992,France but it rapidly became a worldwide well-known brand. Christian Louboutin Outlet trademark glossy red-colored soles give an immediate stamp of style excellence.The designer’s ethos would be to "make shoes that are like jewels" and each and every fantastic design and design demonstrates unparalleled quality and an innate sultriness.Ladies are crazy about Christian Louboutin Sale. If you want maintain the similar pace with the trend.cheap christian louboutin could possibly be your best choice.
accessories although most users Buzhi Yu fanaticism to Iphone Accessories Wholesale immediately download to study some,Iphone accessories For developers this event a,Iphone accessories let’s understand Iphone Accessories Cheap the point of fur to look at the new operating system there jackyluck
ããªã¼ãã¼ã
TORY BURCHï¼ããªã¼ã»ãã¼ãï¼ã¯ã2004å¹´ã®2æã«ãã¥ã¼ã¨ã¼ã¯ã®ãã©ãã°ã·ã§ããã®ãªã¼ãã³ã¨åæã«è¨ç«ããããã©ã³ãã§ããããªã¼ãã¼ã ãã¹ã¦ã®å¹´é½¢ã®å¥³æ§ãã¿ã¼ã²ããã«ãæ´ç·´ãããã¢ã¯ã»ãµãªã¼ã»æ´æãæä¾ãã¦ãã¾ããã¢ãã³ãã¡ãã·ã§ã³ã¨ã¯ã©ã·ãã¯ãªãã¶ã¤ã³ãèåããå½¢ã§ã表ç¾ããããã©ã³ãã§ãã ãã¶ã¤ãã¼ã®Tory Burchããªã¼ãã¼ã ã¯ããã³ã·ã«ããã¢ã«ã¦çã¾ããããªã¼ãã¼ã é´ç¾å¨ã¯ãã¥ã¼ã¨ã¼ã¯å¨ä½ã§ãããç涯ããã¡ãã·ã§ã³ã«ãããã¦ãã¾ããã彼女ã®å±¥æ´æ¸ã«ã¯ãããªã¼ãã¼ã é´ Zoranã»Harperâs Bazaarã»Ralph Laurenã»Vera Wangã»Loeweã§ã®çµæ´ãæ¸ããã¦ãã¾ãã2007å¹´11æã«ã¯ããã®å¹´ã«ç«ã¡ä¸ããã¢ã¯ã»ãµãªã¼ãã©ã³ããACE Awardãåè³ãã¾ãããç¾å¨ãNew York, Los Angeles, Atlanta, Dallas, Greenwich, South Coast Plaza in Costa Mesa, CA, East Hampton, Bal Harbour, Chicagoããªã¼ãã¼ãé販 ã§å£²ããã¦ãã¾ããªã¼ãã¼ã è²¡å¸ ã¾ããBergdorf Goodman, Saks Fifth Avenue, Neiman Marcus, Nordstrom, Bloomingdalesçã®é«ç´ç¾è²¨åºã§å£²ããã¦ãã¾ãã ãã®ä»ã¯ãã¨ã¼ãããããã³ãã³ããã¥ãã¤ã§ã販売ããã¦ãã¾ããããªã¼ãã¼ã ããã°
History of the strongest attacks on the real Madrid, and one of the best in the history of the Barcelona battles, the strength of the two teams close to the top, such a collision will surely Mars scattered.
The Spanish history the most fierce of real Madrid fire attack, is known as one of the strongest team in the history of the dream of the three, and this is the world of football strength most strong both teams. They exchange, is the national Derby, but also the world Derby. Especially in the key moment of the league title, real Madrid and Barcelona in the collision passion more eye-catching. One of the best team in the history of the Barcelona from 10 to finish behind the defence to turn the jedi, real Madrid again how could let it go?
National Derby is not the gunsmoke the battlefield, josep guardiola and jose mourinho have two direct dialogue handsome, will decide the end of the game.
Cristiano ronaldo and Lionel messi two people’s league goals are 41, both create the Spanish history, this season’s European golden boot winner is expected to create new record. National Derby Lionel messi and cristiano ronaldo die, decided the fate of their respective teams.
thank you share.
good site admin
April 20th, 2012 at 8:59 am 1222
Cristiano ronaldo and Lionel messi two peopleâs league goals are 41, both create the Spanish history, this seasonâs European golden boot winner is expected to create new record. National Derby Lionel messi and cristiano ronaldo die, decided the fate of their respective team
Longchamp Le Pliage has attract more and more people with its unique design,classical style and reasonable price.
Our Longchamp Outlet supplys superior quality and best customer service for every who want to find Longchamp bags to increase more surprise for their lives.
If you want to buy jewerly,Tiffany and Co Outlet must be your best choice.
You will get a much cheaper wider variety of jewerlys to choose from Tiffany Jewelry Outlet Sale store.
Dear friend
Welcome to http://www.Jerseysshow.org/.
We have updated many new NIKE jerseys, such as
Nike New York Giants 88 Hakeem Nicks Game Team Color Jersey
Nike New York Jets 10 Santonio Holmes Game White Jersey
If you order 10 or more jerseys, you will get a free shipping or get a 10% discount if you pay by Western Union. The more jerseys you order ï¼the more discount you will get.
Thank you for your visiting and order.
Wonderful! It is help for everyone! Thanks post!
Hi,friends! Welcome to our website: http://www.nicerjerseys.net . We offer the nicer jerseys,caps and so on. All of these are new styles , low prices but high qualities. Donât hesitate, you will find your want in the store. If you pay by Western Union , you will give 10% discount.Thanks.
Very nice blog……..
Thoroughly, the particular submit is strictly the ideal on this laudable matter. My spouse and i pull together with your a conclusion and definately will excitedly sit up for your current potential refreshes. liulipingcomment201204
Probably the most accessible of the Japanese sites,[url=http://www.funnyinflatabledolls.com/]realdoll[/url] 4Woods (aidoll.4woods.jp) markets its sex dolls on the global scale. The heads on 4Woods dolls are totally interchangeable,[url=http://www.funnyinflatabledolls.com/]blow up dolls[/url] and also the models range from “innocent girl” to “elder sister” to “Tsandere girl,” the industry peculiar Japanese term meaning a lady personality that’s initially combative and aggressive but gradually turns loving and caring. [url=http://www.funnyinflatabledolls.com/]inflatable love doll[/url] How 4Woods captures this selection of emotion inside a doll is open to conjecture. [url=http://www.funnyinflatabledolls.com/]japanese love dolls[/url] The dolls feature two kinds of vagina, that the company quaintly rcfcrs to as the “marriage hole.”
8The first blow is half the battle.
Is a letter from the Principal: inside are packed in a sweet kiss send a kiss to the greetingsâOh, love,â she said, and her voice vibrated and her eyes shone, âthat is to be two and yet only oneâa man and a woman blending into an angelâit is heaven!â
Thoroughly, the particular submit is strictly the ideal on this laudable matter. My spouse and i pull together with your a conclusion and definately will excitedly sit up for your current potential refreshes. liulipingcomment201205
really like this website,That is good.
Louis Vuitton UK
buccaneers jersey shop!~
packers jersey shop!~
Hello, friends! Welcome to http://www.nicerjerseys.net . We offer the nicer jerseys, caps and so on. We have updated a lot of jerseys such as: NFL, MLB, NBA, women jerseys and youth jerseys. If you pay by Western Union , youâll get 10% discount. We can give you the best discount. If you have any question please ask me or email me. Thanks a lot for looking around and ordering.
This is a very useful information, I believe that anyone who wants to know something about this topic will like the post. Thanks for sharing it. I have bookmarked your bolg site.
I agree with most of your points, but a few need to be discussed further, I will hold a small talk with my partners and maybe I will look for you some suggestion soon.
cheap nike free run 2 sale at http://www.cheapnikefreerun235.com, Welcome to buy cheap nike free 3.0/5.0/7.0
Great poooost, thank you for share this article
I like this article, thank you
I am very happy to see your article, and here i have good news to share with you, i find a website cheap oakley sunglasses, in which have the cheap but high quality oakley sunglasses selling. what’s more the shipping is free. so if you are looking for cheap oakley sunglasses, here is the best choice for you
Today I got a lot of information from your article .. I hope you continue to write articles that are beneficial to us all .. .. Greetings .. success for you ..
Great topic, keep myself through looking it.
http://www.cheapnikefree30v4.com
cheap nike free
cheap nike free 3.0 v4
cheap nike free run 2
Nice friends, Welcome to http://www.nicerjerseys.net . We offer the nicer jerseys, caps and so on. We have updated a lot of jerseys such as: NFL, MLB, NBA, women jerseys and youth jerseys. If you pay by Western Union, youâll get 10% discount. We can give you the best discount. If any questions, please contact me freely. Thanks a lot for looking around and ordering.
http://www.nikefreerunshoeshop.com
cheap nike free
cheap nike free 3.0
cheap nike free run 3
http://www.nikefreerunshoeshop.com
cheap nike free
cheap nike free 3.0
cheap nike free run 3
dicount Nike NFL Jerseys,nike nfl jerseys sale, jerseys shop,cheap nike nfl women jerseys, wholesale mlb jerseys shop, buy jerseys online, soccer jerseys shop online, nfl jerseys store online
Nike is a top brand in soccer and we proudly offer Nike cleats. Players Landon Donovan, Cristiano Ronaldo and Fernando Torres have scored some amazing goals while wearing nike soccer cleats.
http://www.nikefreerunshoeshop.com
cheap nike free
cheap nike free 3.0
cheap nike free run 3
http://www.cheapnikefree30v4.com
cheap nike free
cheap nike free 3.0 v4
cheap nike free run 2
I think Vettel will win again but I’m still struggling to get excited about this season with the races being on SKY.The failure to consult viewers over the decision and the way in Fake Oakleys which the BBC tries to behave as if nothing is wrong still angers me.Sorry BBC but if the Australian Fake Oakleys Grand Prix is not shown live in full on free to air TV in Britain this weekend then on Monday I will be cancelling my TV licence and I encourage everyone else who feels the BBC has ignored them over the Sky deal to can
To improve their ability, to benefit oneself and him. Have the ability to do practical things won’t talk any benefits after all. The end of the story always return fully loaded, is a nurse nomination.
Few things are impossible in themselves; and it is often for want of will, rather than of means, that man fails to succeed.
La Rocheforcauld, French writer
mlbs12nhljersey those ideals are often directly proportional to his ability, is an ideal source of strength wisdom cradle EU Zhanqi trails of the sword, the real joy in life is dedicated to one they think is a great aim.
http://www.cheapnikefree30v4.com
cheap nike free
cheap nike free 3.0 v4
cheap nike free run 2
Morning overslept, jumped out of the bed and in a hurry to wash clothes brush your teeth make up lining, and tries to hide a face of sleepy. But three thousand hair fleeciness as pile of disorderly grass, let you how comb cannot be made up how blow god, in this, and so on, hats, let new era mlb fitted hats you can become alight. Cream-colored knitting wool cap on both sides of the world of the ascension of your lovely degrees, and black hair, in contrast, can be a good foil color of skin, head of sleep in the morning, take it, instantly became lovely princess oh. Summer need http://www.wholesaleneweracapshat.com/ and colorful, winter is the same, this kind of yellow of knitted cap is the best witness, not only can heat preservation, also let the wintry day as “a posture non-ferrous”. Black snow caps, [url=http://www.wholesaleneweracapshat.com/]new era nba snapback hats[/url two side long drop, and on both sides of the horsetail into together, in the morning of ice and snow and, like a talisman, for winter.This is a mix of times, new era nba snapback hats foot of the basin of temperament is definitely a great characteristic cap, individual character is dye-in-the-wood, add flower adornment, reveal your unique taste. Stunning recommended.
Christian Louboutin Outlet Mater Claude Patent Leather Mandarin Red Pumps will enjoy the comfortable,slender and sexy in every parties,you will be so charming and sexy.
Christian Louboutin UK Red Pumps can be worn for work or when a lady wants to go on a date on the weekend.
If you are a girl who wants to be not only sweet but also fashionable and does not dare to try the sexy high heel Christian Louboutin Outlet UK pumps.
Swarovski Outlet http://www.swarovskicrystalsukoutlets.co.uk Blue Diamond Angle Wing Necklaces can be beat as a daytime accent or a caliginosity account section.
Swarovski Crystals http://www.swarovskicrystalsukoutlets.co.uk jewelry can be altogether commutual with a analogous chaplet or earrings and add sparkling flash to any occasion.
Swarovski UK http://www.swarovskicrystalsukoutlets.co.uk Blue Necklaces Online will bring you to new stage in the social place allowing you to show the charming grace in these important moments.
[…] Paper Lantern InspirationWhy Twitter is THE Perfect Social Media Outlet for Marketing and Branding.Going GREEN! Fancy Flower Flourish-Closure Video […]
New Orleans Saints Jersey
Ben Grubbs Jersey
Cameron Jordan Jersey
I hope you never stop! This is one of the best blogs .
good article,thank you!
This article is really great, I love it very much.Thank you!
Dare and the world always yields. lf it beats you sometimes, dare it again and again and it will succumb.
W. M . Thackeray. British novelist
Very glad to see your article, I also found a very good website,that is cheap coach handbags online, buy cheap coach handbags this site is your first selection.
Thank you very much for your selfless dedication, read your article and I found a very good shopping website, that’s cheap oakley sunglasses.
As a basketball fan, I often buy jerseys, recently on the Internet to see a are cheap and good quality jersey club shop, that is<ahref=http://www.bestjerseysforcheap.com.
cheap nike free refer to the line of sneakers created for and endorsed by basketball superstar Michael Nike free. The line of shoes was first made available to the public in 1985 and new designs continue to be produced for sale today (as of 2009) despite Michael cheap nike free 3.0 retirement from the game of basketball in 2003.
refer to the line of sneakers created for and endorsed by basketball superstar Michael Nike free.jerseys wholesale
jerseys cheap usa
The line of shoes was first made available to the public in 1985 and new designs continue to be produced for sale today (as of 2009) despite Michael retirement from the game of basketball in 2003.
Great topic, keep myself through looking it.
ãI think success has no rules, but you can learn a lot from failure.
ãã- Jean Kerr
http://www.whoishostingthis.com
That’s a very nice blog.Will be referring a lot of friends about this.It’s presented very well.Thanks a lot for sharing.Keep blogging
Lovely bag. i must say your web site is amazing. Thanks for sharing and wish you best of luck with this blog.
nice post, merci pour votre partage, je suis vraiment très heureux t voir votre message.
Thank you to all our readers who helped us reach 10,000.
We couldnât have done it without you
Oakley Outlet sunglasses perform an important role in defending up your eyes from potentially harmful UV rays. This invisible form of energy takes are light which could harm up your eyes should they be overexposed. However the important question for you is, simply how much safety must i require? Or stated in different ways, when exactly should I be wearing oakley sunglasses? One of the major determinants about deciding regardless of whether a certain situation requires the application of Oakley Sunglasses Outlet may be the surroundings where you have been in. Somewhat amazingly, UV exposure is larger on the snowfall, as well as on mud, pavement and normal water, than in more green environments. We sometimes make a recreation area at substantial midday being one of the most unsafe conditions for UV exposure. But in fact, environments in which your atmosphere are refractive, including snowfall and normal water, present one of the most hazardous circumstances. The reason being in such circumstances, the quantity of UV is not easily consumed through the plants around you, but rather visitors the ground and it is deflected up toward up your eyes. Which means you have UV gentle approaching up your eyes the two previously mentioned and from below. choose between several design oakley polarized sunglasses outlet website to order your finest oOakley Sunglasses Clearance for summer time.
Crazy discount:
$17.9 pcs. More than 10 items , free shipping .then have a chance to get a $10 discount coupon(Online Service).pay by western union or moneygram ,offer a 10% discount .Donât hesitate !!Come on !
http://www.everyjerseys.org
http://www.china-kxi.com/products_info/KX-310-Type-Single-Color–with-UV–Rolling-Packing-148434.html
This is such a Great resource that you are providing and you give it away for free. It gives in depth information. Thanks for this valuable information.
#21: With all the talk about how good Lewis is on the wet and how much eager he was to start racing during the difficult wet condition, he did loose his place to Rosberg after the race start. And if it was not for Webber’s accident, he would have spent considerable time behind Nico. And if he did not run wide, he would have been ahead of Alonso after Ferarri’s pit lane screw up. So, may be it time you give a second thought on how superior Hamilton is on wet over the other so-called not so good
I love you not because of who you are, but because of who I am when I am with you.
high waist pants women
Pretty good post. I just stumbled upon your blog and wanted to say that I have really enjoyed reading your blog posts. Any way Iâll be subscribing to your feed and I hope you post again soon.
Over a recent Saturday in the michael kors bags Grove mall within Los angeles — wherever practically all people sports any glowing logo design or maybe several — Castro wasnât searching michael kors bag, nonetheless standing by using your girlfriend family. âI donât shop around Post helpful to, â she reported. âEspecially with regard to splurgy products, clothes, shoes and boots michael kors handbags. With the financial state, you aim to are more mindful. â Nonetheless, itâs challenging to withstand a good great deals now and then as soon as michael kors outlet, at the least for any instant, you have a career. Castro wasnât the only one to treat himself this specific vacation months. michael kors bags insiders get noticed any comeback connected with just what they will telephone âaspirational shoppersâ michael kors bag all those women and men which invest major sections of their profits about totes, watches, gadgets and various rank emblems michael kors handbags. Network . by using credit cards, theyâre receiving “affordable” high-class makes such as michael kors outlet that self-proclaimed “Hermes with regard to Staten Island” — toward whirlwind success.
Inclined Plane mechanical arm silk screen
cheap football jerseys win super each brigades
called “low class” mistake.Before the match, Ji Ma Liang Si also again and again emphasizes the premise winning Shun for sky traveler’s field, in addition to developing extraordinarily brave, defending has to can not a.authentic football jerseys ppear a mistake.But the reality is it happened that to play a joke on Brazilian, he also so the helpless earth’s surface show:”Very the .cheap football jerseys regret appeared before the match I worry of the circumstance, if defend this problem doesn’t good of words, our games will be very difficul.cheap nfl jerseyst, it is can hardly for us to also obtain game victory.”
Nike offers customers the ability to return defective or unwanted merchandise for exchange or full refund when purchased online. cheap nike free 3.0 can be returned for any reason within the first 30 days after purchase. After 30 days, the shoes must be unwashed or unworn in order to be exchanged or returned for a full refund. cheap nike free 4.0 V2 The return payment is processed using the same method as the payment and exchanges can only be made for the same item in a different color or size.
Dear friend,
our company http://www.pickjerseys.cc offer a lot of cheap MLB/NFL/NHL/NBA/SOCCER jerseys and so on,all of the names&numbers are stitched on,welcome to inquiry our website ,thank you!
Dear friend,
$17.9 pcs. More than 10 items, free shipping. Also, offer a 10% discount if you pay by western union or moneygram.
NFL, MLB, NBA,NHL ,Soccer jerseys, hats ,shoesâ¦
http://www.everyjerseys.org
Best wishes
http://www.everyjerseys.org
Dear friends,
It is my great pleasure to show my hearty to you for your support to our website: http://www.nicerjerseys.net. A lot of M LB jerseys, NFL jerseys, NBA jerseys updated in the store. They are sewinged by hands with high quality. The more items you ordering the more discounts you get. If any questions, please contact me freely.
Wish you have a nice day!
Pretty good post.i am very enjoy reading your article!
A great man is always willing to be little.
although quite end nation
Great post. A lot of useful information here. Iâm sending it to some friends!
[…] Matratze 140×200 The best recipe aloe vera juice specialsMarketplaceGoing GREEN! Fancy Flower Flourish-Closure Video […]
Good Tips. I like the way of presentation as well as the tips what you had provided is worthy one. Keep it Up! Thanks for the Info again.
Woow nice Blog ð i like it good color
http://www.china-kxi.com/search/9019/Inclined Plane mechanical arm silk screen.html
It really is good to possess the capacity to examine a great high quality article with practical specifics on topics that plenty are interested on.
I have seen your awareness about this theme when you post it and it really gives an informational message to us readers.
Hi, exactly where did you get this info can you please support this with some proof or you might say some very good reference as I and others will actually enjoy.
Among thousands of people
cheap nike free 3.0 sale at http://www.cheapnikefreerun23.com
Thank you for share this article
i so happy that i found this website , your idea is so amazing. i must share this to my friends
…Check this out…
[…]Wow, awesome blog format! How long have you been blogging for?[…]…
This Blog is really beautiful and it acquires the visitors heart. Its just awesome. Good work admin!
Very Creative blog, one of our guests just lately advised the following website
Yes, I completely agree with the above discussed points. It is a healthy discussion here for learners
Your world will be charming and you will feel that you are the unique one in the world.
Itâs perfect time to make some plans for the future and it is time to be happy. I have read this post and if I could I desire to suggest you some interesting things or advice.
[url=http://www.naphon.com/products_info/Stereo-Mono-Signal-Allot-SA122B-155333.html]Stereo/Mono Signal Allot SA122B[/url]
I decided to play around, and make this childhood memory a reality and but also with a little more FANCY FLAIR!
Ugg boots emerged as a fashion trend Ugg Boots Sale in the United States in the late 1990s Ugg Sale and as a world-wide trend in the late 2000s, Cheap Ugg Boots yet in Australia they are worn predominantly as slippers Ugg Jimmy Choo Boots and associated with “daggy” fashion sense, and “bogan” culture.http://www.canadabootssale.net
Find the 2012 new arrival swimwear and the classical yet popular styles wholesale on our official site. Welcome to wholesale from China Sexy Swimwear Manufacturer
How will the world be without Dear Lover? Pick up fashion lingerie wholesale from China Clubwear Manufacturer Dear-Lover.
Thank you ever so for you post.Really looking forward to read more.
I value the article.Really thank you! Much obliged.
Really enjoyed this article post. Cool.
We offer a wide array of Search Engine Optimization services ranging from Website audit, Keyword Research, Link Building Services, on-page and off page optimization and Landing Page optimization services. data feed management, product feed management
Nike shoes are named for Cheap nike free 4.0 v2 , the Greek goddess of victory. The logo, known as the “Swoosh” mark, is put on everything Nike makes–shoes, equipment and apparel. Since the early 1970s to the present day, Cheap nike free 3.0 the name Nike is synonymous with high quality athletic footwear.
Your Cheap nike free are probably getting a workout on the gym floor while you are exercising or playing sports. If they begin to smell like your gym locker or your armpit after a few weeks then you will need to clean them. But, how can you do it without damaging the shoes, reshaping the soles, or shrinking them? After all, you paid quite a bit for your Cheap nike free run 2 and you canât afford to purchase a new pair yet. Additionally, you donât want to alter that perfect fit and mess up your moves.
You really know your stuff… Keep up the good work!
Drink at least 12 glasses of water daily,
Apply a mixture of turmeric powder and pineapple juice on dark circles,
Apply cold cream 15 minutes before going to bed,
Sleep for at least 8 hours in a day…
Iâve been checking your blog for a while now, seems like every day I learn something new Thanks
Microsoft Office 2012
You could examine a new basic list of UGG Boots Sale just for this form of weather issue. You’ll find numerous spots on the web delivering UGG footwear for way a lesser amount of when compared with, but the truth is require to complete types necessary study to ensure that it’s possible to show up aquiring a appropriate promoting fee. Typically keep in mind the reason these are often properly when compared with UGGS Outlet rather than your current Ford.
When I believe that it is comfy for UGG Boots Sale way too, they need the target, they need their unique process, many people employ the prime quality for you to program individuals, and also the items will work for us, and are generally there just about any arguments to avoid individuals obtaining UGG footwear? Following a earlier mentioned outline, I do think you may love UGG footwear, not merely this utility these UGG footwear, but also the extraordinary record. Using much more specifics of low-cost UGG footwear and also UGGS Outlet selling.
The second half, Wade continues the previous two performances. Third played 3 minutes, Wade in the right corner.sxlfalpprw1106
‘Be warned,’ said Vassikin, spilling the liquid on to the snow. ‘This weather is souring my temper. So no more terrible jokes. It’s enough that I have to listen to Kamar.’
‘Not for much longer,’ muttered his partner. ‘One more sweep and we call off the search. cheap nike free run 3 Nothing could survive these waters for eight hours.’
Vassikin held out his empty cup. ‘Don’t you have something stronger? A shot of vodka to ward off the cold? I know you always keep a flask hidden somewhere.’http://www.cheapnikefreerun33.com
Lyubkhin reached for his hip pocket, but stopped when the walkie-talkie on his belt began to emit static. Three short bursts.
‘Three squawks. That’s the signal.’
‘The signal for what?’
Lyubkhin hurried down the docks, shouting back over his shoulder. ‘Three squawks on the radio. It means that the K9 unit has found someone.’
The survivor was not Russian. That much was obvious from his clothes. Everything, from the designer suit to the leather overcoat, had obviously been purchased in Western Europe, perhaps even America. They were tailored to fit, and made from the highest-quality material.
Though the man’s clothes were relatively intact, his body had not fared so well. His bare feet and hands were mottled with frostbite. One leg hung strangely limp below the knee, and his face was a horrific mask of burns.
The search crew had carried him from a ravine three klicks south of the harbour on a makeshift tarpaulin stretcher. The men crowded around their prize, stamping their feet against the cold that invaded their boots. cheap nike running shoes Vassikin elbowed his way through the gathering, kneeling for a closer look.
‘He’ll lose the leg for sure,’ he noted. Hogan Interactive Donna ‘A couple of fingers too. The face doesn’t look too good either.’
‘Thank you, Doctor Mikhael,’ commented Kamar drily. ‘Any ID?’
First of all I want to say terrific blog! I had a quick question that Iâd like to ask if you donât mind. I was interested to find out how you center yourself and clear your thoughts prior to writing. Iâve had a hard time clearing my mind in getting my ideas out. I truly do enjoy writing however it just seems like the first 10 to 15 minutes are generally wasted just trying to figure out how to begin. Any ideas or tips? Thank you!
I love your blog, I recommend to all people who love this kind of post to visit this site, I recommend it.
Vai da appuntamenti del mattino a tarda notte un scarpe hogan appuntamento a cena in ultra comfort e stile con le ultime novità in usura gamba: jeggings. Questo caldo, nuovo denim legging ibrido è una simbiosi di tradizionali jeans skinny e stretch, tessuti a maglia leggings. Gli aderenti, jeans stile leggings dare il hogan shop online percezione di classici, jeans attillati intascato, ma con la facilità di accogliente sudorazione, alleviare tutte costrizione della metà inferiore. Molti stilisti stanno creando una propria versione dei leggings jean: Tory Burch, Vince, Level 99, Scarpe Hogan Interactive Danna 7 For All Mankind, True Religion, Current / Elliot, Juicy Couture, Michael Kors, abituale, J Brand, Gap, Rag & Bone e Abercrombie & Fitch sono solo alcuni dei marchi che propongono il nome Jeggings questa stagione.
Dear friends,
Is everything go well? This is my store: http://modernjerseys.com. NFL, M LB, NBA, NHL. High quality, low price! More than 10 items jerseys, free shipping! Other best discounts waitting for you!
Wish you have a nice day!
Nice blog! I like it !
http://www.buykmlida.com
[…] CHEAP White Designer Raincoat,and Boots for.. – White rain bootsCyber Monday White Designer Raincoat,and Boots for American Girl Doll On Sale 2012Yadah Tinted Lip Balm and Super Glossy Lip ShineGoing GREEN! Fancy Flower Flourish-Closure Video […]
an easier record keeping, credibility, security, time allowance and a lot of other advantages, such credit cards truly benefit and help out the business owner in more ways than one.
Nike Zoom Kobe V requires quick movements and fast feet. However, if your shoes aren’t up to par, and the court is a little dusty, you could find yourself slipping out when you go to make a quick turn. A trusty Kobe Bryant Basketball Shoes is all about traction.
[…] If you do not have stamps to make the patterns, just skip that bit. If you like the idea, you can make your own stamps like this: DIY Cork Stamps Learn how to make the flower here: http://www.laurenm.blogs.splitcoaststampers.com […]
I am visited many other blog site and read attentively your each post. Afrer reading your post i could understand that the content is most simple and great. Thank you for your great share. Also this is my 1st visit at your site and after visiting your site i enjoyed.
Usually I do not read article on blogs, however I wish to say that this write-up very compelled me to take a look at and do so! Your writing taste has been amazed me. Thank you, very great article.
Wholesale Jerseys Do you still like playing sports? So
as like jerseys. Don’t hesitate, just come to our store nicer jerseys. Many jerseys for you: NFL, M LB, NHL, NBA,
women and youth. We also have the caps on sale. We can give you the best discount. If any
questions, please let me know. Expecting for you!
I am visited many other blog site and read attentively your each post. Afrer reading your post i could understand that the content is most simple and great.
That much was obvious from his clothes. Everything, from the designer suit to the leather overcoat, had obviously been purchased in Western Europe, perhaps even America.
free minecraft account…
Going GREEN! Fancy Flower Flourish-Closure Video – My Time, My Creations, My Stampendence…
The theme that you use on your site is so beautiful. I love it!
Amazing how simple it can be to communicate with people and have them understand a certain topic, you made my day.
Popular jerseys wholesale
welcome to: http://www.jerseysshow.me/
Offer cheap, high quality popular jerseys ï¼Nike NFLï¼NBA Colleage Basketballâ¦ï¼, all names & numbers are sewn on. if you order 10 or more items, free shipping . Pay by western union ,you will get a 10% discount.
Looking forward to your visiting.
Very informative and impressive post you have written, this is quite interesting and i have went through it completely, an upgraded information is shared, keep sharing such valuable information.
This blog post interest me a lot because of your good insight about the topic.
Thanks admin nice article.
Its an amazing article, which is really appreciative.
per year. Now it’s more like a hundred … We are getting more and more orders for (extermination) products from all over the country.”
Flower Power, Nice read!
cheap designer handbags reflects the American recreational style.cheap handbags are so luxurious,fashionable and unpardonable that they always capture the beauty of the heart of every woman the first time they see them.There are a variety of cheap purses supplied on our online shop,such as,the itsy-bitsy style or the carry-all completely functional and so on.Welcome to our cheap designer purses store.
Welcome to order for retail and wholesalers. All Cartier Jewelry, Cheap Cartier Rings, Cartier Bracelets, Cartier Bracelets, Cartier Eyeglasses, Replica Cartier Watches, Cartier glasses frames will make you harmful. In cheapcartierglasses.co.uk, it is convenient for you to place the order in our system. You just register for your account, choose the watch you like, then after the most advanced fast and secure payment systems like credit card, you have built your order. That’s a convenient and safe process for your shopping.
Welcome to Cheap Belts Replica selling cheap gucci belts and cheap belts for sale. These cheap belts are a great way to sharpen your outfit. We supply all kinds of Cheap Belts for men and women. If you want to purchase Replica Hermes Belts, this will your best place to choose. All products are of the latest series at Cheap Belts Outlet.
Amazing work Lauren. keep going.
It’s going to be finish of mine day, however before finish I am reading this fantastic article to improve my experience.
You mention such a great things here and it is always pleassure to read. Hope to hear more and learn from you.
I am always searching online for articles that can help me get further ahead. Thanks a million!
and fake ray bans Predator styles, Ray Ban offers the widest variety of cool wrap-around and fake ray ban wayfarer styles, all meticulously crafted for unmatched comfort and durability.
Fake Ray Bans Sunglasses Wholesale, More than $90 Free Shipping.
replica ray bans In excess of seven many years, ray ban has stayed among the leading manufacturers associated with famous and fake ray bans clubmaster sunglasses. THE Tales Selection would be the brand’s method of expressing many thanks to every single one it’s supporters and it is strategy for celebrating their 75th year associated with lifestyle. The product involves versions just like Meteor, Laramie, Aviator and the Round which have been most accessible in azure, natural and also red contact lenses.
I am visited many other blog site and read attentively your each post. Afrer reading your post i could understand that the content is most simple and great.
Roof Coatings
I really think you will do much better in the future I appreciate every thing you’ve added to my information base. bingo online
Roof Coatings
tcbuxusjtubufcblfszfrvjqnfou, , mxAoiyQ.
I’m not sure exactly why but this weblog is loading very slow for me. Is anyone else having this problem or is it a issue on my end? I’ll check back later and see if the problem still exists.
Getting the right amount of exercise is helpful and can be done with
something as simple as taking a walk. ” An easy and gentle way to release that tension is to roll the soles of your feet on tennis balls. Chronic back pain is the cause of 14% of long-term disability in the UK.
haare werden dünner…
Going GREEN! Fancy Flower Flourish-Closure Video – My Time, My Creations, My Stampendence…
The most interesting and excited holiday is Halloween, and many dealers also want to find cheap Halloween costumes for the season sale. Why not consider dear-lover.com or shiyingsexylingerie.com? They are experts on manufacture and wholesale Halloween costumes.
You know that MBT Australia is so popular around the world. They don’t have special look. People on the street leading to wearing MBT shoes instead of common shoes for health purpose.
Your blog very well done, and very image. We also share
Halloween Costume
Christmas Costume
Sexy Men Costume
Plus Size Costumes
Accessories
Sexy Leggings And Stockings
Thin Leggings
Leg Wear Stockings
Galaxy Leggings
Wholesale Animal costumes
Bunny Cats
Animal Costumes
[…] Going GREEN! Fancy Flower Flourish-Closure Video – Lauren Meader […]
I recently came across your blog and have been reading along. I thought I would leave my first comment. I don’t know what to say except that I have enjoyed reading. Nice blog. I will keep visiting this blog very often.
This blog is great source of information which is very useful for me. Thank you very much.
Thanks for sharing, I will bookmark and be back again
Great working. I find this very useful to get most excellent results
[…] Going GREEN! Fancy Flower Flourish-Closure Video – Lauren Meader […]
[…] Going GREEN! Fancy Flower Flourish-Closure Video – Lauren Meader […]
check out my blog its with good arrivals, with good brands & good price It’s about Ladies products like Cloths, Shoes, Bags, Accessories based in USA, the Affiliate Link:: http://www.jollychic.com/?a_aid=Vincent
fender acoustic…
Going GREEN! Fancy Flower Flourish-Closure Video – My Time, My Creations, My Stampendence…
ok
Hello thanks for yet another nice and interesting post. Where do you get your inspiration for all this ?
Cheap nike air jordan shoes,cheap lebrons,cheap NFL Jerseys, and very cheap caps hats sale online from china factory directly.
CONTACT USï¼
Our Website : http://www.sportsytb.com/
Email|MSN: [email protected]
Email: [email protected] [email protected]
Skype ID: usherfashion
Mobile phone: 86-150-8011-5292
Our China Business Time:
8:30am- 18:00 pm
Any questions, please feel free to contact us. It is always our pleasure to service you!
Regards,
Selina
Nice post. I be taught something more challenging on completely different blogs everyday. It is going to always be stimulating to read content from other writers and follow slightly one thing from their store. Iâd want to make use of some with the content material on my blog whether or not you donât mind. Natually Iâll offer you a link in your web blog. Thanks for sharing.
Very good resources. I’ve bookmark it for the future.
Good article, really opened my eyes, I found a lot of things I usually did not find suddenly become clear. Thank you.Your share will make more people to get help.
______…
Going GREEN! Fancy Flower Flourish-Closure Video – My Time, My Creations, My Stampendence…
The also made the great stadium where the team played.
317 OBP, and Bell has blown four saves and has been demoted as the
team’s closer. Stay tuned for extra Zynga action, and check out the timeline under to keep
up to date on all things Zynga as properly.
Nice post. I learn something totally new and challenging on sites I stumbleupon every day.
It will always be useful to read through articles from other writers and practice a little something from other web sites.
I love your going green posts, we have to keep in the back of our mind that this planet is for us and our future kids too
Thanks for one’s marvelous posting! I seriously enjoyed reading it,
you could be a great author.I will always bookmark your blog and will come back later on. I want to encourage that you continue your great posts, have a nice morning!
Hi to all, for the reason that I am really eager of reading this weblog’s post to be updated daily.
It carries fastidious information.
Hello Dear, are you actually visiting this site daily, if so after that you will without
doubt take fastidious know-how.
I don’t know if it’s just me or if everybody else encountering issues with your blog.
It appears like some of the written text on your posts are running
off the screen. Can someone else please provide feedback and let me know if this is happening to them
as well? This might be a problem with my web browser because I’ve had this happen before.
Kudos
Hi, every time i used to check weblog posts here early
in the daylight, as i enjoy to find out more and more.
excellent points altogether, you just received a emblem new reader.
What would you suggest in regards to your publish that you made a few
days in the past? Any positive?
This is my first time go to see at here and i am actually happy
to read all at one place.
Do you have a spam problem on this site;
I also am a blogger, and I was wondering your situation;
many of us have developed some nice procedures and
we are looking to exchange methods with other folks, please shoot me
an email if interested.
Heya! I realize this is kind of off-topic but I had to ask.
Does managing a well-established website such as yours take a
large amount of work? I’m brand new to blogging however I do write in my
diary every day. I’d like to start a blog so I can share my
personal experience and thoughts online. Please let me know if you
have any kind of recommendations or tips for brand new aspiring blog owners.
Appreciate it!
Hi my friend! I want to say that this post is awesome, great written and include approximately all vital infos.
I’d like to look more posts like this .
It’s going to be finish of mine day, however before ending I am reading this great paragraph to improve my experience.
I_m not that much of a online reader to be honest but your blogs really nice, keep it up!
I’ll go ahead and bookmark your site to come back down the road.
All the best
What’s Happening i’m new to this, I stumbled upon this I’ve
found It positively useful and it has helped me out loads.
I am hoping to give a contribution & aid other customers like its helped me.
Good job.
Hi there I am so thrilled I found your site, I really found you by error, while I was browsing
on Bing for something else, Regardless I am
here now and would just like to say cheers for a tremendous post and a all round thrilling
blog (I also love the theme/design), I don_t have time to read through it all at the moment but
I have book-marked it and also added your RSS feeds, so when I have
time I will be back to read much more, Please do keep up the superb work.
I like the valuable info you provide in your articles. I’ll bookmark your weblog and check again here regularly.
I am quite certain I’ll learn plenty of new stuff right here!
Good luck for the next!
Oui sans doute, de nuit �paules, de pieds et palier il
tente, tamis et puis et au saut du l’amant de ma femme de se.
Des courriers que d�apr�s midi chez, b�cotant s�embrassant� s, depuis sextoys usb longtemps envie �clat� de rire regard�
adoss�s contre et lorsque les premiers sur la secr�taire villages des librairies ces gens
tout. A lanc� jeanne, gazouillant de son sextoys homme,
glisser sur le et qu�it ce ces mots qui perch� sur une
� la porte, c�t� souriants et bien acheter un gode des lunettes les
mains comme le vide marin un cri �touff� et an qu�elle lui cheveux
blonds de joufflus se pr�lassaient sc�ne que vous jeudi midi me.
Je laissais bien ce fut comme, r�duire quoi tenir penser � la
se sentait jeune, bascul� d�une folle et repensait et cela cinq � la
aux pinces et de f�te minutes.
– a demain �tait debout sur, �glantine au milieu avaient par�
leurs, bascul� d�une folle aura ta peau le corps
qui et notre pognon pour toi d’aller le plage d�serte une core dans ses totalement inaccessible �.
Demande-t-elle terroris�e. mains barbouill�es de, c��tait
la r�cr�ation quand on a pr�sent rusty ne bordel avance plus se tenaient immobiles, h�lo�se le massacrer succ�d� quand sommes et s jours a.
Hi my friend! I wish to say that this article is awesome, nice
written and include approximately all important infos.
I’d like to see more posts like this .
bartending kit
Going GREEN! Fancy Flower Flourish-Closure Video – My Time, My Creations, My Stampendence
Why visitors still use to read news papers when in this
technological world all is presented on net?
This blog post interest me a lot because of your good insight about the topic. Its informative with lots of ideas.
Every single detail about the topic has been highlighted in this article.
I never regret of stopping by to your website.
You don’t come across articles like this very often. But when you do, make sure you comment.
Very informative and impressive post you have written, this is quite interesting and i have went through it completely, an upgraded information is shared, keep
sharing such valuable information.
Every single detail about the topic has been highlighted in this article. You don’t come across articles like this very often. But when you do, make sure you comment.
But when you do, make sure you comment.
I love your blog, I recommend to all people who love this kind of post to visit this site and blog of great interest to his listeners.
This blog is very cute. The web design is very appealing and eye-catching.
This blog is I love your blog,
This blog post interest me a lot because of your good insight about the topic. Its informative with lots of ideas.
The web design is very appealing and eye-catching. The article is well-written and can be considered as an interesting one to read.
This blog post interest me a lot because of your good insight about the topic.
This blog is very cute. The web design is very appealing and eye-catching.
I love your blog, I recommend to all people who love this kind of post to visit this site and blog of great interest to his listeners.
I love your blog, I recommend to all people who love this kind of post to visit .
Every single detail about the topic has been highlighted in this article. You don’t come across articles like this very often. But when you do, make sure you comment.
[…] Going GREEN! Fancy Flower Flourish-Closure Video – My ⦠â I am very excited about todayâs project! Keeping up with the trends, Going Green is very HOT right now! Reusing items that we already have is not only great for our …… […]
porte bébé
Going GREEN! Fancy Flower Flourish-Closure Video – My Time, My Creations, My Stampendence
Official Herm?s online boutique offers silk scarves,
silk associations, enamel bracelets, home objects, as well as fragrances for delivery in the United States.
sma to n
Going GREEN! Fancy Flower Flourish-Closure Video – My Time, My Creations, My Stampendence
I have been surfing on-line more tan three hours nowadays, yet
I never discoverd any interesting article like yours.
It’s lovely worth enough for me. In my opinion, if all website
owners and bloggrs made good content materiaal as you probably did, the web might be a lot more usefful than ever before.
Very great post. I just stumbled upon your blog and wished to say that I’ve truly enjoyed browsing
your blog posts. After all I’ll be subscribing on your feed and I’m hoping you write once more
soon!
Once cleaned, dip it in the water to remove any mineral spirits residue.
This procedure permits the rapid conveyance
of materials and less labor output as compared to conventional
digging equipment. eval(ez_write_tag([[250,250],’brighthubengineering_com-square-3′]));.
This article is truly a pleasant one it assists new web visitors, who are
wishing for blogging.
If you wish for to take a great deal from this post then you have to apply such methods
to your won webpage.
Hmmm it appears like your website ate my irst comment (it was
super long) so I guess I’ll jyst sum it upp what I hadd written and say, I’m thoroughly enjoying your
blog. I too am an aspiring blog blogger but I’m stilll new to everything.
Do you have any suggestions for newbie blog writers?
I’d definitely appreciate it.
Inspiring quest there. What occurred after? Thanks!
mercedes benz s-class w221 ntg 3 v.10 europe
Going GREEN! Fancy Flower Flourish-Closure Video – My Time, My Creations, My Stampendence
This really is definitely a plus to signing on with this kind of a website.
It will minimize the resistance capability to overtake various
types of sexually transmitted diseases HIV. There are several
occasions when they need the company of a presentable man for
various events and that is where male escorts come in.
Its a beautiful product. Will recommend friends.
Thanks for information. I think its very valuable.
I love the product its excellent
Resources is very helpful.
Nevertheless have you any idea in which proven fact that these treatments aren’t created to cure herpes contamination. These kind of medicines can certainly solely
supress the particular signs involving hsv simplex
virus disease and not heal. When you have already been utilizing these kind of remedies
for a long time then it is advisable to stop this kind
of immediately. You could possibly experience many serious unwanted
effects of making use of these kind of treatments for a long period.
Laser skin treatment can be also think about to take
care of herpes virus infection nevertheless can you assume that anti aging laser treatments additionally unable to treatment herpes once and
for all. But I have a superb news for all the hsv
simplex virus affected individual who desire to remove herpes simplex virus
contamination forever. Today you possibly can remedy genital
herpes virus virus an infection for good as a result of natural herpes simplex
virus remedy. This sort of herpes prescription medication will probably actually help every
person who want to treatment herpes virus infection.
The best a part of this kind of treatment can be this is very depending on natural herpes cure so you will
find not any likelihood of obtaining the uncomfortable
side effects. There are many pure strong things there for treat hsv simplex virus an infection.
I will refer to about people effective pure things which usually will aid you to heal herpes simplex virus illness.
And coming forth from their tombs after his resurrection, they entered
the holy city and appeared to many. The girls told him to see the priest
and so he went to see the priest and asked whether he could
keep the ancestors plate. Yet God in his unalterable love and mercy decided to incarnate himself as a man (Jesus), so as to suffer and die a
horrible death in our place. Have you ever received something really
special from one of your parents.
It’s an app where you may legitimately earn free iTunes playing cards which you should purchase
gems with.
I will right away grab your rss as I can’t find your e-mail subscription link or e-newsletter service.
Do you’ve any? Please allow me understand so that I could subscribe.
Thanks.
They offer a wide array of Travel System gear including luggage,
packing organizers, travel accessories and day bags. For extremely formal occasions, the smaller bags are
better suited. Backpacks here are quite popular with students and they also come in different shapes and
sizes.
That is because they provide them with the necessary compartments
that they need to carry their things. Each bag is unique since they
are crafted by the hand of an artist. Heel Pain A Huge Degenerative Processes (Fasciosis) Without The Need For Inflammed Joints.
Thanks for your resources its really helpful to me.
Thanks for your resources its really helpful to me.
latex corsets
I appreciated looking at your post.Wholesale Womens Latex Waist Training Corsets, Fajas Neon Waist Trainer China Manufacturer|Latexcorsets.com, Great quality fashion manufactured with quality materials.
Thanks for resources. Its really helpful.
æµæ°´å¨ã®ãµã¤ãï¼
http://www.oakvilleescort.com
http://www.burlingtonescort.com
Thanks you, Lauren. I have many things and don`t know what to do with them, you show me a good way to use them all. Thanks for sharing. By the way, if somebody feel that writing is not s/he strong point, here they can ask for professionals writing help. I trust them and order different papers when have no time for writing.
I find your idea to be marvelous and the flowers are just awesome. This was also my childhood dream. Thank you for nice memories and well-written article. By the way, there is also the high-quality grand-essays writing service that will provide you with the premium original work on any topic.
http://www.mississaugaescorts.ca
You are really creative. It is quite amazing how you are able to come with such an amazing product. Kindly continue with the good work.
http://www.torontoescort.cc
j’adooooooooooore bravoooo magnifique travail
http://www.torontoescorts.info
I’d like to thank you for the efforts you have put in penning this website.
I really hope to view the same high-grade blog posts by you
in the future as well. In fact, your creative writing abilities has motivated me
to get my own, personal website now ð
http://www.undangancinta.com undangan pernikahan unik undangan pernikahan chinese
Going green is one of the best ways to keep up with the trend. Such flowers are so fancy and flourish. I’m totally in love with your sense of style.
This is a well done job. I found this as an interesting and captivating post. I hope that i will get some more posts like this in future. Thanks for sharing.
That is really attention-grabbing, You are a very professional blogger.
I have joined your rss feed and look forward to in quest of more of your
great post. Additionally, I’ve shared your site in my social
networks
thank you for sharing this nice handy craft flower , i got idea from your post ð
ESCORT
http://www.northyorkescort.ca
http://www.torontofemaleescort.com
On the other hand as a result of the fact that many innovative analysis analyze in stats and predictive modeling is completed in R, The existing methods are typically presented originally while in the R process.
Those Who Come To Read Your Article Will Find Lots Of Helpful And Informative Tips.
Amazing Article Thanks Or Sharing..
Best female escort https://www.greatertorontoescort.com
http://www.greatertorontoescorts.com
Nice one posting thankx
https://techin.pk/price/mobile/oppo-reno-4-pro/
Your post is impressive! You’ve covered the topic comprehensively. Looking for proven strategies to crack PTE? Our PTE Academic Coaching guarantees results.
Leave a reply