#1 Pack Me a Cupcake Picnic-Template Peek! Announcement :D
Jun 9, 2009Oh my gosh! It’s THAT time of the month! YIPPEE!!
The 10th is becoming my favorite day of the month! Then of course everyday from then till the 15th! LOL!
When its the 10th that means it’s my turn to share a Papertrey Ink Countdown Peek, AND share one of my NEWEST My Timeless Templates © with you!
This month I have a UBER cute stamp set designed by Nichole Heady called Cupcake Collection!
Its a super adorable set of “build-a-cupcake” type elements! I’m in LOVE!!! SO much so that the stamp set inspired my gift idea and perfect packaging to match!!!
So I used my Pack a Picnic for today’s project! This template will be available for purchase on June 15th —>HERE
There is post about the original design —–>HERE! That way if you are seeing this you aren’t asking “How is that a “Pack a Picnic” type of template?!
This is by far my fave to date.
Now for my project
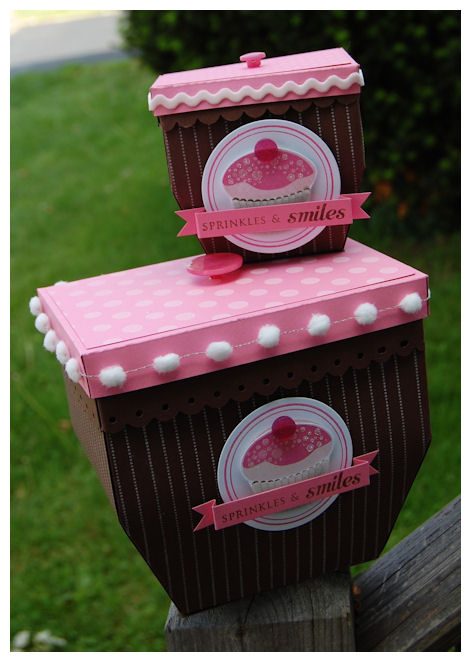
Cupcake Pack a Picnic Duo-
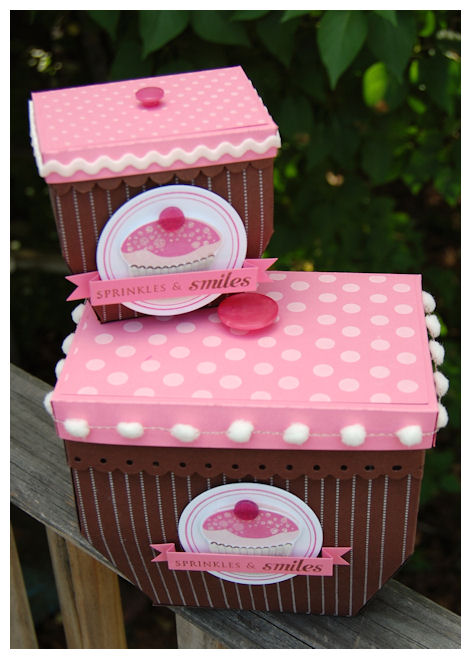
I decorated my Pack a Picnic templates (yes template”s”), to LOOK like cupcakes!
I think they are super CUTE!! Now think what adorable things you can make, having a large and small version of the same template!
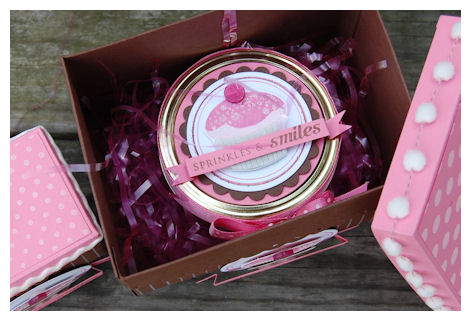
This holds my gift of a Cupcake in a Jar! Keep reading for more on that
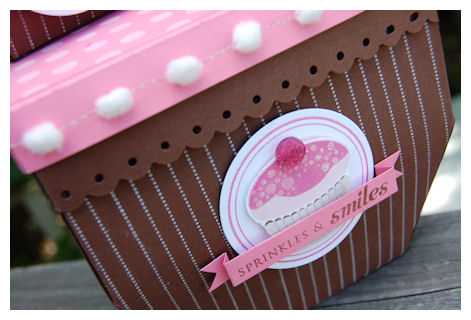
Close up of the box detail
Now I mentioned yesterday that I had a special announcement about this template!
In case you missed the BIG news in my description-
The Pack a Picnic template will also feature a MINI Pack a Picnic template for you!!!
This is a close up photo of the 50% smaller template: Pack a Picnic mini

ALL the files for a large and small version of the template, for ONE great price–> $5!!!
Here is another size comparison
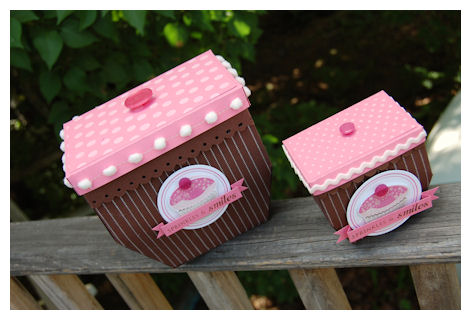
It is 50% smaller than the original template
I think its uber adorable!!
COST EFFECTIVE!
Now I decided I would share how INEXPENSIVE it is to MAKE the boxes using My Timeless Templates!
Given the fact you can use them UNLIMITED, they pay for themselves with ONE gift 😀 (In my opinion-this box set would cost WAY more to BUY!)
When you buy your cardstock in the 50 pack it comes to 0.18 CENTS a sheet.
The large template used 3 sheets of cardstock-2 Chocolate, and one Hibiscus Burst
so it cost ONLY 0.54 CENTS for the cardstock! (You can feel free to add a few more cents for the decorative pieces-but Im certain we ALL have PLENTY of scraps!)
The mini used 1 1/2 sheets of cardstock-costing ONLY 0.27 CENTS!
EVEN well embellished- you can do the math, WAY most cost effective (and FUN!)
OK-back to the project!
I just stamped my template base with Just Journaling Lines, in white craft ink, for the cupcake bottoms.
My “cupcake frosting” lids use polka dot basics. Buttons for the “cherry”.
The large lid has a pom pom border, and the smaller lid has ric rac ribbon in white for added “cupcake decor”.
Cupcake in a Jar-
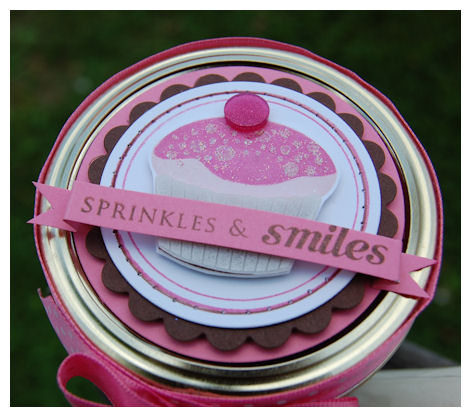
About the cupcake image:
The center cupcake design is the same on all my boxes.
I used borders & corners circle set for my border, then die cut it. I also pierced the edge on the design for the jar-only.
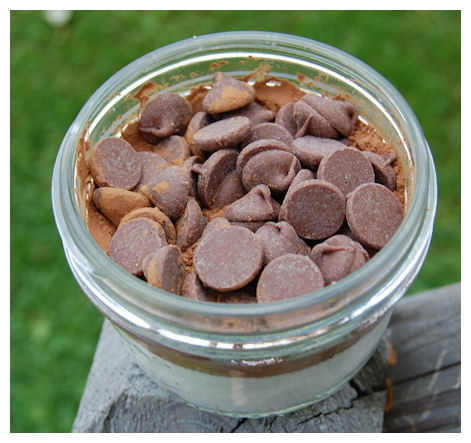
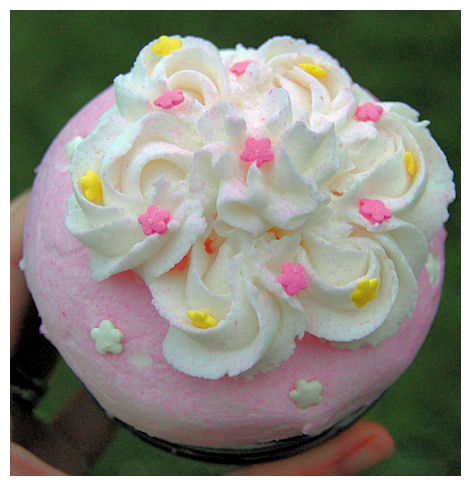
The bottom is stamped in chocolate ink. The top in Sweet Blush, then the “frosting layer” in Hibiscus Burst. I used White craft ink and glitter for my “sprinkles”. Added a Hibiscus Burst flat button for the “cherry”.
I stamped a solid cupcake base, in white craft ink, onto vellum cardstock, to make my cupcake bottom! Cut it out, and layered it on. So easy and CUTE!
Side view of the jar
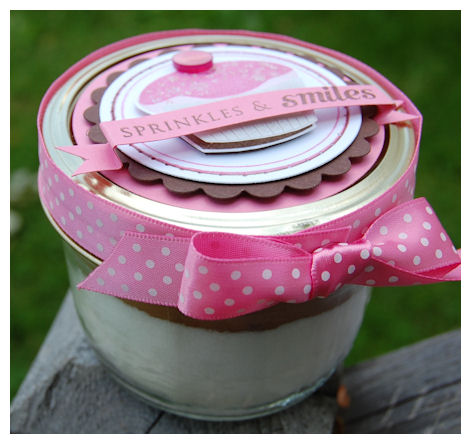
This was complete with homemade frosting in disposable decorator bag
This is the side view of the cupcake in a jar mix, all layered!

Isn’t it just SOOOOO pretty?
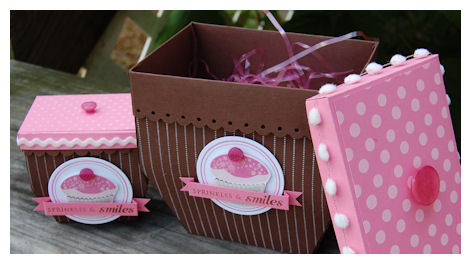
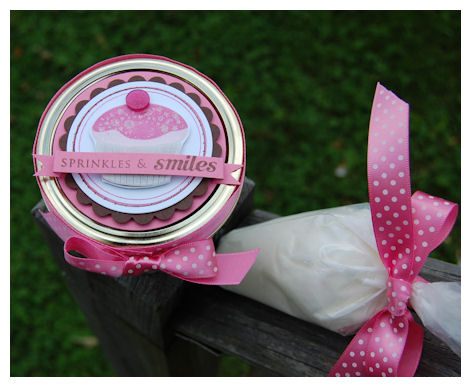
Now you can FILL your Pack a Picnic
You can put the mini pack a picnic-filled with sprinkles and the frosting bag inside the larger one

OR You can put the little Cupcake in a Jar mix in the box-with room to spare :D)
Now onto the FUN!!!
This is the mix when you open the jar
I’m sure you ALL want to know HOW to make these for family, friends and teachers! (its not too late! My kids get out of school on the 19th! WHEW!)
The idea for this Cupcake in a Jar came to me after purchasing some DELICIOUS cupcakes from Bangerang Bakeshop Cupcakes in a Jar!
You have to try the Pinch Me Cupcake! MY FAVE!
They come in a 8 oz Ball glass jar-which is what I used in my project.
Now I was just going to order a few cupcakes (I know! BAD LAUREN!) when someone emailed me about making Teacher Mug Cakes! She was looking to find a template to package her mugs to give as gifts. We got to “chatting” and I asked her about using her mix on my blog for an upcoming project! She said yes.
Next thing you know one idea, turned into another-and this project was made!
I want to thank Tracy Burtt for sharing this with me, and giving me permission to use it here :D)
5 MINUTE Cup Cake in a Jar !!
4 tablespoons flour
4 tablespoons sugar
2 tablespoons cocoa
1 egg
3 tablespoons milk
3 tablespoons oil
3 tablespoons chocolate chips (optional)
A small splash of vanilla extract
1 80z. Ball Glass jar
Add dry ingredients to your jar and mix well.
Add the egg and mix thoroughly.
Pour in the milk and oil and mix well.
Add the chocolate chips (if using), vanilla extract, then mix again.
Put your mug in the microwave and cook for 3 minutes at 1000 watts (high).The cake will rise over the top of the mug, but don’t be alarmed!
Allow to cool a little, and tip out onto a plate if desired.
———————————————————————————–
NOTE: Now I layered my DRY ingredients, and would then print a tag with the instructions and remainder of ingredients needed for the recipient to make the Cupcake in a jar.
When I made mine, I dumped the dry mix OUT of the jar, mixed it, then poured it back in.
HONESTLY-Me being the NON baker, that I am-I would just buy some cupcakes in a jar (from Bangerang Bake Shop! LOL!)and package it in my Pack a Picnic Cupcake box!!! You can MAKE the boxes while you wait for your order to arrive! LOL! But this is definitely more COST EFFECTIVE.
That is how “I” do things 😀 I call it the busy mom recipe. I’d rather work on the packaging (wink), than the BAKING stuff
Now here is my baked in a jar goodie
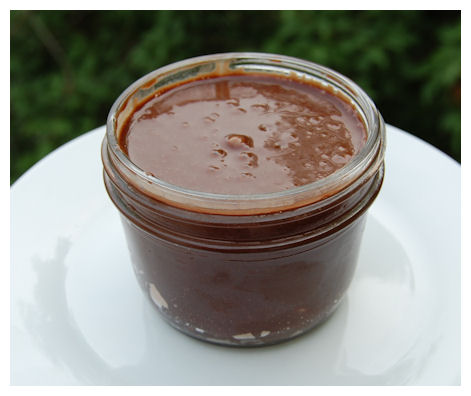
Cupcake in the jar-mixed
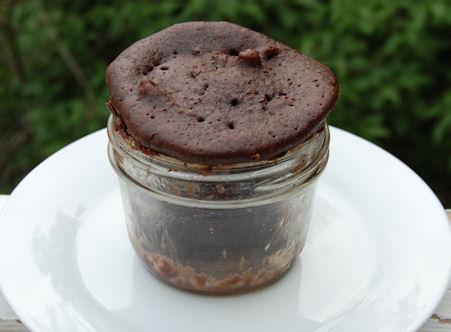
Cupcake in the jar, all cooked
This is the cupcake all decorated
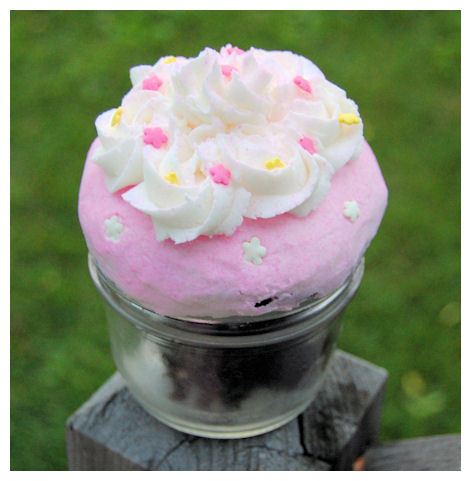
I took it OUT of the jar, and cleaned it! It looked too messy! LOL!
Then I put it back into the jar to decorate with homemade buttercream frosting!
Yes! I actually cooked and frosted a cupcake! LOL! Who’d of thunk it.
(PS Yes I strategically placed each sprinkle too)
My husband was in shock! The cool thing is you can even out the volcano top with the frosting!
YUM!!!!!!!!!!!!!!
Granted my frosting skills are RUSTY!
Now seriously, who wouldn’t DIE over this gift set?! I love it!
Supplies:
My Timeless Template: Pack a Picnic
Stamps: Cupcake Collection, Just Journaling Line, Borders & Corners Circle
Cardstock: Dark Chocolate, Hibiscus Burst, White, Vellum cardstock
Ink: Dark Chocolate, Hibiscus Burst, Sweet Blush, Snow White Craft ink
Ribbon and Vintage Buttons: Hibiscus Burst Collection
Ric Rac and Pom Poms in white
Glitter
Nestabilities, SU! Scallop border punch for lip
8 oz. jar
I’m putting this up in my Esty Shop! (sometime today-fingers crossed) So SOMEONE can use it 😀 Complete with cupcake in a jar mix! No frosting though-I think that has to be refrigerated.
(I made the cupcake in another jar, and saved the one for my project!)
So that is my template/countdown peek today! I SOOOOO hope you liked it. I put a lot of time and thought into it!! If it helps or inspired just ONE of you, it was worth it.
Now for MORE template peeks:
Be sure to stop by this months My Timeless Template Guest designers blog Leigh Ann Baird
Also Kelly has a peek too!
Then don’t forget to hop on over to Nichole’s Blog (I know! Like you need a reminder), Lisa and Candice also have sets this month too.
Come back tomorrow-I have my 2nd template to peek for you!
Thanks for stopping by, and sharing my excitement every month! You are the best. I kow I say that all the time, but I mean it. You make all the hard work worth it, and your comments and completed projects just put me in complete AWE!
THANK YOU!

My Etsy

Who I Designed For
Blogroll
- Alicia
- Alli Miles
- Ally Blankenship
- Amber
- Andi @ crafts on a whim
- Angel R
- Angie Z
- Anne Kranitz
- Becky O
- Bee
- Beth Silaka
- Bethany Paull
- Beverly Nash
- Bobbie
- Cambria
- Cammie
- Card of the Week
- Card Positioning System (CPS)
- Cards for Cancer
- Catherine Doucette
- Charmaine
- Cheryl Sims
- Chriss Rollins
- Christina
- Christine Ewing
- Christine Wooden
- Colleen Schaan
- Craft Critique
- Craft Gossip
- Crystal
- Dawn Easton
- Emily Giovanni
- Geny
- Holly
- Igne Groot
- Inspirational Craft Blogs
- Irene
- Jami Sibley
- Jeanne Streiff
- Jen del Muro
- Jeni Bond
- JenMarie
- Jenn Balcer
- Jenn Diercks
- Jenn O
- Jennifer E
- Jennifer Mick
- Jennifer Pereda
- Jennifer-Sweet Treat
- Joanne Basile
- Jodi Collins
- Julia Stainton
- Julie Masse
- Karen
- Kathryn Berthiaume
- Katie Cotton
- Kelley Holland
- Kendra
- Kim Scholfield
- Kris’s Color Stripes! Get inspired here
- Kristen Dubosque
- Kristin Eberline
- Kristine
- Laura @ Sunshine Stamper
- Laura Turnmire
- Laurie Schmidlin
- Lesa Rapp
- Linda Duke
- Linda-LSN
- Lindsey Botkin
- Lisa (lakind scs)
- Lisa Kind
- Lori Craig
- Maggie
- Mara Campbell
- Maria
- Maria Levine
- Mary
- MaryJo
- Melanie M
- Monique Hansen
- Moxie Fab World
- Pam Imholz
- PaperCrafts Connection
- Peppers and Pollywogs Kids party site
- Rebecca Grohall
- Rita
- Robyn
- Rose Ann
- Sarah Vrolyk
- Sharon Harnist
- Sharon Johnson
- Sharon Rivera (a chemisrty with paper)
- Sherrie
- Sophia Landry
- Storage Units, Ink, & More Blog
- Sue Berker
- Susan (Rainy)
- Tangii Crane
- Tracy
- Tricia Traxler
- Trudee
- Velta
- VivLyn
- Zena
MTME Pretty Palette Color Team
MTME Pretty Patterns Sketch Team
My Time Made Easy TM LLC
Shop till you drop!
Lauren Meader
About Me
Copyrighted material
Subscribe To My Blog
Pages
- About me
- Alexa’s Story!
- My Crafty Corner!
- My Time Made Easy™ LLC
- Our Make A Wish Trip to Disney!
- Resume/Publication List
Calendar
Archives
- August 2013
- July 2013
- June 2013
- May 2013
- April 2013
- March 2013
- February 2013
- January 2013
- December 2012
- November 2012
- October 2012
- September 2012
- August 2012
- July 2012
- June 2012
- May 2012
- April 2012
- March 2012
- February 2012
- January 2012
- December 2011
- November 2011
- October 2011
- September 2011
- August 2011
- July 2011
- June 2011
- May 2011
- April 2011
- March 2011
- February 2011
- January 2011
- December 2010
- November 2010
- October 2010
- September 2010
- August 2010
- July 2010
- June 2010
- May 2010
- April 2010
- March 2010
- February 2010
- January 2010
- December 2009
- November 2009
- October 2009
- September 2009
- August 2009
- July 2009
- June 2009
- May 2009
- April 2009
- March 2009
- February 2009
- January 2009
- December 2008
- November 2008
- October 2008
- September 2008
- August 2008
- July 2008
- June 2008
- May 2008
- April 2008
- March 2008
- February 2008
- January 2008
- December 2007
- November 2007
- October 2007
- September 2007
- August 2007
- July 2007
- June 2007
- May 2007
- April 2007
- March 2007
- January 2007
Categories
- About Me
- All That Scraps
- blogger challenge
- camera/photo play
- Cards
- Contests
- family stuff
- FOR SALE
- Home decor/3-D items
- How to FAKE it!
- Introduction
- JUGS Challenge
- JustRite Stampers
- Lizzie Anne Designs
- My family stuff
- My Stamping Space
- My Time Made Easy
- My Time To Color Challenge
- My Time to Create Challenge
- My Timeless Template Challenge
- My Timeless Templates
- Mytime Mail
- MYTIME MOVIE/VIDEOs
- Papertrey Newsletter
- Pink Cat Studio
- Pretty Palette Challenge
- Pretty Patterns Sketch
- Product Opinions and Must haves
- Recipe's
- Saturday Sketch
- Smilebox Creations
- Stampavie
- Tutorials
- Uncategorized
- videos
Most Popular
- Create your own Onesie Card Tutorial-and important NOTE! PLEASE READ (2529)
- Saturday Sketch-Boxed bag holder (2333)
- Going GREEN! Fancy Flower Flourish-Closure Video (1478)
- Fabulous Favorite - Giveaway! (1336)
- a Prayer Request (1232)
- QUICK-Easter Baskets from Nestabilities-PTI style-and blog challenge (1063)
- Teaser Sketch (999)
- February Release Giveway! (and a little peek) (996)
- Group Post and Rambling Rose Video Tutorial (985)
- GIVEAWAY! Who wants it all?! (895)
Recent Comments (RSS)
- 첫충사이트: 완전히 흥미로운 블로그 게시입니다. 저는
- sarah: Wow, Lauren, what a stunning
- hedie: خرید راهبند
- 야동: Love to read it,Waiting For
- 야동: This seller is in a
- 바카라사이트: 여기 처음 왔어요. 나는이 게시판을
- 야동티비: I was surfing the Internet
- 바카라사이트: 비슷한 주제에 대한 흥미로운 정보를
- 바카라사이트: "여기에 제공해 주신 귀중한 정보와
- 온라인홀덤: 유익한 웹 사이트를 게시하는 데
Copyright © 2007 - My Time, My Creations, My Stampendence - is proudly powered by WordPress
This blog has been Tweaked and Designed by Sara Williams
97 Responses for "#1 Pack Me a Cupcake Picnic-Template Peek! Announcement :D"
Love It!!! (said in my best Weezy from Dragon Tales voice) : )
Lauren-
WHAT A BEAUTIFUL IDEA! 🙂 I LOVE THIS! 🙂
You crazy crazy creator YOU! THis is awesome! Love the cupcake in a jar gift pack. so cool!
Just too cool! So many ideas…so little time! Can’t wait to partake! Thank you…and yum…
Absolutely adorable! I will have to get this template and do the Cupcake in a Jar thing…..
How DO you get such fantastic ideas? I love your blog!
Lauren, this is the CUTEST!!
This is way too cute!! I am going to be making these very soon and I’ll be mailing some to. Love it, love it!!! Thanks for sharing and inspiring 🙂
Unbelievable… You never cease to blow my creative little mind. Thanks for this amazing, motivational inspiration!!!!
Absolutely the cutest idea! Can’t wait to see all the PTI releases. And your templates are the best!
I loved it yesterday, and I love it even more today! I just wish the next 5 days would go quicker so I can get my hands on the template! Can’t wait to see the next one – I KNOW I’m going to love that one too! I GET it! Every month, I say this one is my favourite yet – and they all are! You are so creative – thankyou for all the wonderful ideas.
Brilliant as usual Lauren – you always make your templates look so pretty and being in the UK I can get my hands on them immediately for my monthly PTI fix!
I love it. Too bad my kids are done with school on Friday, otherwise all of their teachers would be getting this for their end of the year gifts!! Thanks for continuing to inspire me, to do more and create more 🙂 can’t wait to see what else you came up with!!!!!
Lauren, Lauren, Lauren. . . This is totally AMAZING. I love the colors and those cute boxes! I am thankful for the hours that you put into them for us! I can’t wait to see more samples. . .
Hi Lauren,
Delicious!!!!!! And so cute. I am so happy that I could be a part of it, and I already let all of my stamping friends know that I was “Famous”….. you are awesome!!
Tracy
Love this!!! My head is spinning with ideas on what I can “pack” in my picinic basket. Can’t wait until the 15th!
Hope
Lauren,
I, too, am OVER THE MOON with this template and the cupcake in a jar idea! My mind is just racing with ideas of how to use both of these ideas! I live in Massachusetts, and my daughter doesn’t get out of school until June 21st, so I’m trying to think if I have enough time to make some of these templates for end of the year teacher gifts or not. Your templates are SO easy to re-create that I think I shouldn’t have any trouble! Thank you, thank you, thank you for your incredible talent, and your time and effort into creating these templates and projects! And, most of all, thank you for being willing to share all of this with all of us!
Wow! This is gorgeous and I want it! You are such an amazing talent! I have to try the banner!
This is just so cute! Love it!
How Cute! And I love the idea of being able to send a mix to someone to bake in the microwave. Thanks for all the ideas and inspiration.
Oh, you are good! I’ll be buying these too 🙂
oh wow!!! This has got to be my favorite so far! I love all your templates! I’ve been playing with the file one and having a blast! (need to get those uploaded to show you. Ü)
Fabulous as usual Lauren!!! You are one creative lady! I can’t wait until the 15th – my daughter’s last day of school is the 25 so that should give me enough time to put something together for the teachers. Thanks for all the inspiration!!
That is probably my favorite thing you have ever made you’ve outdone your self this time, it’s gorgeous!! Cute cupcake too!!
What a neat project idea using your new template! I’m very excited to purchase the new template and it is a HUGE value to get two templates for the price of one. Thanks for sharing the cupcake recipe, too!
I love this, it is so cute!
Very cool Lauren! I love the boxes you made. They look like they came from an expensive boutique!
I love the bangerang bakeshop too! My favorite is the Chocolate Envy cupcake, but I don’t think they have it all the time. It’s chocolate cake with chocolate ganache filling and caramel buttercream frosting.
This is so so so adorable!! I LOVE the cupcake in a jar idea! I think I’ve worn out the Peeps in a jar – now I’ll have to move on! Thanks so much for the templates and the great ideas to use them. You rock!
Wow! Another fantastic idea!! Love the cupcake in a jar and love your new Pack A Picnic templates!!!
OH MY GOSH!! These are the CUTEST EVER!!!!!! This template is so versatile – I will definitely be buying this one. And I was just sitting here trying to figure out what to give the dance teachers for their end of the year gift – this is just perfect. They can even make themselves a little cupcake treat right at the studio. Adorable!! You have outdone yourself this time!
Vicki (who is still fat, by the way – but I do find you inspirational until I’m stressed and hit the chocolate)
[…] #1 Pack Me a Cupcake Picnic-Template Peek! Announcement 😀 – My … #1 Pack Me a Cupcake Picnic- Template Peek! Announcement :D. Jun 9, 2009. Read more here: #1 Pack Me a Cupcake Picnic-Template Peek! Announcement – My … […]
That has to be the cutest thing ever. Thank you to both you, Lauren, and Tracy Burtt for this fantastic combo. A cupcake you make for yourself all in one little decorative spot. Unbelievable!!!!
Your box alone and the wonderful cupcake in a jar recipe will sell Nicholes cupcake stampset!!! this is just as you say UBER adorable!!!! my mind is already clicking – can’t wait to order this wonderful box Lauren!!
Another fabulous template and project/gift idea with it!! Love the journaling lines on the chocolate cardstock….it looks like pinstriped fabric to me…uber chic! :>
You’re amazing! LoVe this !!!
So yummy – my tummy’s growling now!!! 😉
Lauren, you are so creative and make the presentation so wonderful there is no resisting to yor templates. Thanks for all of the inspiration,
You always have the BEST ideas! Brilliant and oh so cute!
phenomenal – absolutely love this one – too bad my kids are already out of school – they get out in mid-May in Phoenix – love, love, love this…..thanks …. you rock!
Love it Lauren. You have my mind racing with all sorts of cool things to do with the template and the cupcake idea. I have a question about the company you say sells the cupcakes in a jar. Do they come prebaked and frosted in the jar? If so, how long is their shelf life for sending? Maybe you can direct us to the place to find this out. Thanks.
Melissa
Oh I love it! I wish it were in the etsy shop so I could buy it… After a day like today, I need a pick me up…bad :o(
Wow, Lauren every month it gets better! Thanks for all the eye candy!
Love this! The cupcake in a jar is fantastic and it is likely my teacher gifts for this year. Last day of school is on Friday and I’m way behind!
OMG Lauren – I can think of lots of people who would love this and the template is to die for – oh goody goody! ANother cool template YIPPEE!
OK Lauren, seriously SLOW DOWN!! You’re making the rest of us slackers look bad. Honestly, that is the MOST AMAZING and adorable thing I have seen yet. You have completely outdone yourself. The template is A-M-A-Z-I-N-G. And the cupcake in a jar – WHAT? Get outta here. I can not believe how incredibly creative and productive you are. I’m WAY inspired. Can’t wait to see what you’ve got in store tomorrow.
Hello Lauren incredible work I love it!!! Is such a perfect little basket!!!
Lauren those are just the cutest boxes. Could you tell me if a 12 oz coffee mug would fit in the box. I have these cute little cook books called Mug’Ems. It is like your cupcake in a jar, you just put the ingredients in a coffee mug.
Thanks,
Marla
Lauren, this would be awesome for someone as a get well present, or a pick me up when they’re down. Perfetct!!
Hi Lauren –
Another great template and what an adorable project, although it’s not fair to make us drool while we read your blog. LOL!
Oh my gosh, what I’ve been missing!!!!!!! My computer is down, so I only get to use my husband’s computer once a day – which is not enough =( I LOVE this project, it’s way too cute and the cupcake looks delicious. Great job on the frosting!!! You’re a totally Martha Stewart =) Congratulations!!!!
Ok, my eyes like totally Bulged out when I saw this last night! LOL!!! What a perfect gift!!! OH and the COLORS and the Template oh MY!!!! This is absolutely amazing Lauren! Again you ROCK!! TFS!!!
EEEEEEEEEEEEEEEEEEKKKKKKKKKKKKKKKKKKKK; coolest packaging EVER!!!!!!! LOVE IT!!!
GRAMMY HERE, LAUREN, I THINK THIS WOULD ALSO
BE A GREAT GIFT FOR SOMEONE IN A NURSING HOME
OR ASSISTED LIVING, EVEN SOMEONE IN THE HOSPITAL (ie) NEW MOMS, THEY TAKE IT HOME AND
HAVE A TREAT TO REMEMBER HOW THOUGHTFUL YOU WERE! I THINK OF THOSE OF US WHO ARE UNABLE TO STAND AND BAKE AND ARE HOME BOUND, WHAT A TREAT! HOW ABOUT CHANGING THE
COLORS TO CHRISTMAS FOR TEACHER GIFTS AND
FRIENDS AND NEIGHBORS, HOW ABOUT EASTER,
TAKE HOME GIFTS FOR BIRTHDAYS, BABY SHOWERS, WEDDING SHOWERS, OR THANKYOU’S
ETC. THANK YOU AGAIN LAUREN FOR YOUR WONDERFUL IDEAS AND SHARING.
LOVE GRAMMY!
LOVE IT!!!!! I can’t wait to see it as a watering can! TOO CUTE!
Where did you purchase the ball glass jars? Can’t seem to find jars in that shape and size!! Love your template. Can’t wait to make them.
Thanks
Elise in Canada
Hallo
Das ist eine Sehr schöne Box Template,die ich leider nicht kaufen kann ich habe keine Kreditkarte.Picnic Template free?
Your article is very interesting, I have introduced a lot of friends look at this article, the content of the articles there will be a lot of attractive people to appreciate, I have to thank you such an article.
Se un’artista vera!!!!Amazing NG
dentro del diseno esta muy bien
Thank you for sharing your admin would get ready a severely beneficial write-up I congratulate.
First aid kits, outfitted definitely for pools, can likewise be purchased.
This year qiu dong, Chris mention · lu Christian Louboutin) bhutto (for our presents again big heat tassel yuzui .
we are just confused with the idea.
he let someone bit on that.
I don’t suppose I have read anything like this before. So nice to find somebody with some original thoughts on this subject
Rachael bell sen Rachel Bilson) is Ray (Ban Wayfarers sunglasses – “like-minded fans”. replica Sunglasses She often wears the Ban two Wayfarers Ray – vice, a pair of black box a pair of tortoise box, coach purses outlet are the basic of super joker. We’ll see rachael bell’s Rachel Bilson) are (how demonstration of!
I am really enjoying reading your well written articles. I think you spend Numerous effort and time updating your site. I have bookmarked it and I am taking a look ahead to reading new articles. Please keep up the good buy tenormin articles
Your buy ultracet concepts were simple to understand that I wondered why I in no way looked at it prior to. Glad to know that there’s a blogger out there that certainly understands what he’s discussing. Great job
Thanks so much for providing individuals with such a spectacular possibility to read critical reviews from this web site.men sunglasses It is always very useful and also full of amusement for me personally and my office acquaintances to visit your web site no less than three times weekly to read the fresh guidance you have got.cheap oakley sunglasses Of course,cheap ray ban sunglasses we are usually amazed for the surprising things served by you.
This summer, the True Religion Women’s Flare Jeans sell well. I prefer the True Religion Womens Low Rise White Flare Jeans. The first reason is that white colour is most suitable in the summer. And the simple and elegant design can suit people of all age groups. The great fitting of the True Religion Jeans must be another main reason. The bottom part of the embroidery pattern and buckle pocket style cover design, can have narrow hips and change Alice’s visual effects.
Thanks a lot for enjoying this beauty article with me. I am apreciating it very much! Looking forward to another great article. Good luck to the author! all the best!Ireland flower delivery || deliver flowers to brazil
Free downloads are available at websites so you
Found very cool and unique info here in this blog. This is a great addition in my favorite blog list.
I am sure to all the commenters here!
don’t know what gastritis is, but I sure as h-e-double-hockeysticks know what bile reflux is. And it’s horrible.
All inclusive travel deals are not for everyone,
but most people enjoy a vacation that is put together for them
I am a blog beginner. I am also interested in such kind information. You provide me a good example. Thanks very much. I will keep on reading your blogs.
Great, this story really touching Moncler Jackets, beautiful new beginning Moncler Outlet the end of impressive. Thank you!
I like this article. its so nice.You’ve got style, class, bravado. I mean it. Please keep it up because without the internet is definitely lacking in intelligence.
Perhaps this is one of the most interesting blogs that I have ever seen. Interesting article, Funny comment. Keep it up!
To this end, he wanted a lot of methods to perform a lot of testing, but without success. One day following the rainfall, Bacon came to the garden stroll, begin to see the index internet obtained many of the raindrop, the raindrop to see with the leaves he or she found, a lot enlarged veins, Sunglasses for sale even the simply leaves on slim hair is visible. He saw this particular trend, thrilled. Sausage immediately ran home, rummaging, and located the cup ball. However through the glass golf ball, reading through the text, or even blurred. He also discovered a diamond with a hammer, Dior sunglasses reduce a bit of glass, keeping a piece of cup near to the book a look, the text truly amplified. Check is successful, Sausage ecstatic. Later he or she got the wood, dig a hole, the actual glass ball items place some thing, then the placement of a handle, simple to hand, so that individuals read far easier. This particular zoom lens had been through continuous improvement, Chloe Sunglasses is becoming now individuals put on glasses. Gentle alone, there are young people with eyesight modification associated with myopia and also the elderly to wear reading eyeglasses, glasses for various reasons, there are other people discover, work even more handy. Bacon and improvement associated with human civilization makes a contribution.
Thanks for your great post
Outdoor sports was once considered to be an activity for the whole family during weekends, vacation or anytime anytime everybody is absolutely free, but time has changed for that reason is the existence of parents in addition to kids. During weekends you will find kids playing laptop or computer or sitting into their living room doing nothing while eating junky good. What developed to healthy way of living?
administration, which could include insignificant “achievements” such as the ceremonial opening of a water faucet carrying water from a well recently outfitted with a pump.
I agree with you. This post is truly inspirational. I like your post cheap oakley sunglasses Congratulations on your helpful post,It sounds interesting. The facts and particular suggestions are specifically what I was hoping to fineOriginally,discount oakley sunglasses The particulars and exact recommendations are specifically what I was wanting. I’ve book marked and will definitely be returning.This post is truly inspirational. I like your post cheap Ray Ban sunglasses and all you share with us is up to date and quite informative, i would like to bookmark the page,Originally,discount sunglasses Ray Ban so i can come here again to read you, as you have done a wonderful job,and this is a really good read for me, Must admit that you are one of the best loggers I ever saw .Thanks for posting this informative article.
I am very happy to be your space,mbt scarpe prezzi let I learned a lot,mbt scarpe prezzi I will continue to focus on,mbt scarpe donna hope to have more new things waiting for me
Reynolds signés headshot couleur,sacs louis vuitton connue pour son rôle mémorable dans “Singin ‘in the Rain”, a fait don d’un sac à main noir unique.louis vuitton 2012 Le sommet de la bourse s’ouvre http://www.france-louisvuitton.com/ pour révéler un miroir, où elle autographed.Texas basée sur évangéliste Moore a fait don d’un embrayage entraîneur.
Thank you for the extremely impressive article. It has great detail that are easy to understand and it also has great tips. I cant wait to read more of your blogs, interesting to read this great article indeed because I have known many great and new things from you. Thanks a lot one more time.
I’m seriously deeply in love with all solitary part of info anyone submit below. Will be rear typically to study much more revisions! liulipingcomment201204
Life is no more than the repeated fulfilling of a permanent desire.The soul is merely the vestal handmaid whose task is to keep the sacred flame of love burning.
To improve their ability, to benefit oneself and him. Have the ability to do practical things won’t talk any benefits after all. The end of the story always return fully loaded, is a nurse nomination.
Behind every successful man there’s a lot u unsuccessful years.
- Bob Brown
Just because someone doesn’t love you the way you want them to, doesn’t mean they don’t love you with all they have.
I have been sleeping all alone,
You have been staring in my dreams.
I want to kiss you, my baby,
I want to kiss you tonight.
I just can’t believe the loveliness of loving you.
I just can’t believe the one to love this feeling, too.
I now know how sweet a kiss could be.
Like the summer sunshine,
Your sweetness over me.
Nothing is impossible!
Nothing is impossible!ghjhgj
Elvis bucketed through time and space. He was becoming somewhat seasoned to it by now. It was merely a toothbrush in the top pocket number. And for all the Time Sprout’s early fears, he showed no signs whatever of ill effect. In fact he seemed to thrive on it. He never got any smarter, though.
i am glad that i found this great blog,t has very unique content i will keep visiting this site thanks for sharing.
Leave a reply