Archive for May 30th, 2009
Video is loaded! YEAH!
May 30, 2009 Author: mytime | Filed under: Uncategorized2 posts
May 30, 2009 Author: mytime | Filed under: UncategorizedOK we have 2 posts again today. Im just one busy girl these days.
My video for the technique is taking its SWEET time loading to YouTube. Ill be back in a bit to post it.
Sorry for the delay
Today I have a quick peek at another release from C.C. Designs.
We are attempting to put together the large swing set for the kids, so I gotta be quick.
The release for C.C. Designs is Monday June 1st. LOTS of cool stuff releasing!
Check out the BLOG for your chance to win a set
This is from the Swiss Pixie’s set-her name is Gretal
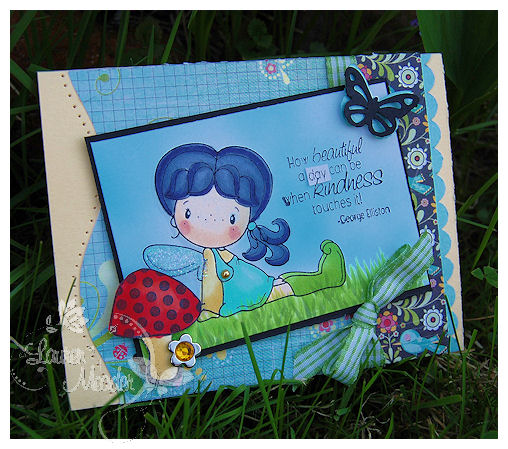
She is just SOOOOO adorable. Sorry for the DARK photo. YIKES!! I wanted her leaning against a mushroom-so I used one from Unity Stamp Co.
I colored her with Copic’s then airbrished my sky. I think it looks cute-far better in person (due to my lighting). Sometimes I just get LAZY when it comes to the photography part, which isn’t a good idea because you can spend so much time making the BEST creation, ever-and get a bad photo and it doesn’t matter! No one can tell.
Im not saying this was one of those stellar creations, just that my photo is lacking-and I should not skimp on the photography and let myself get lazy. Ive just had a crazy few weeks and my time/deadlines were closing in on me. I thought ANY photo was better than NO photo. Lesson learned.
I also used AmyR’s Thank You sentiments on here as well.
The paper line is Basic Grey: Urban Prairie. It was perfect.
In case you missed it-I did a peek of the Swiss Pixie: Heidi—>HERE!
OK off to get assembling.
Please pray Jay and I don’t kill each other in the process of assembling this huge swing set. When it comes to traveling (finding our way places) and assembling things/house projects we are NOT our usual “happy couple” We always joke we’d make for great TV if we went on the Amazing Race TV show or some other thing like that! LOL! Its funny because we don’t really fight or argue, but throw in a house project, and watch out! Let the snarky remarks fly! LOL!
OK going now-Im getting the EVIL eye already.
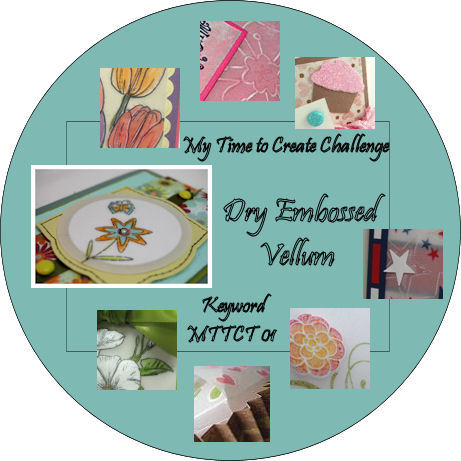
My Time to Create Technique Challenge
May 30, 2009 Author: mytime | Filed under: Cards, My Time to Create Challenge, Tutorials, videosWell today is the 5th weekend in the month.
I generally have 4 scheduled challenges a month for My Time To Create Challenge Team.
I let them opt to take a break this week! I should have taken one myself! LOL!
Anyway-I decided to do a technique challenge instead. I hope you find it fun and inspiring 😀
Dry Embossed Vellum
I LOVE using Vellum Cardstock. Today’s challenge is to DRY EMBOSS it!
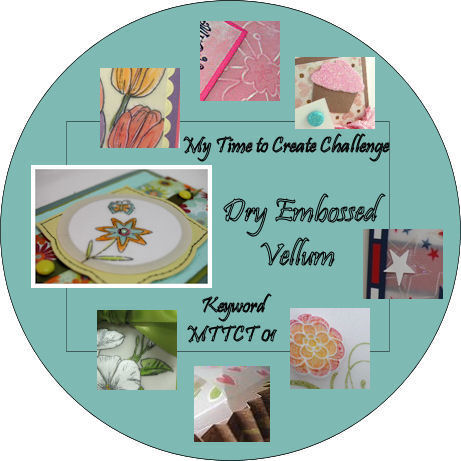
If you play link your creation HERE
Here is who is playing:
Me
Here is a quick video to give you the HOW TO! My card for this technique uses a stamp set from My Favorite Things Presents: Sara Williams Spring Sprouts.Bloomin vellum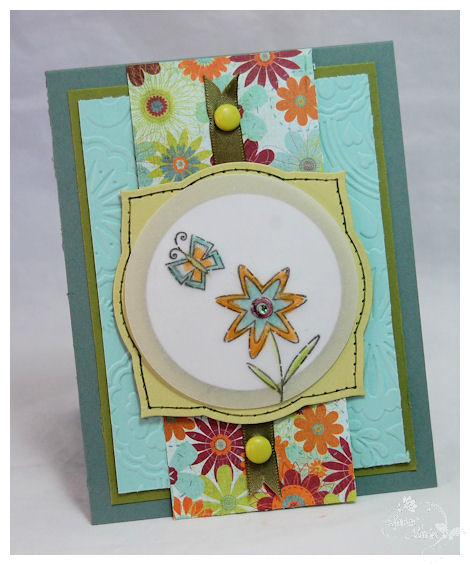
I had just picked up this fun and funky patterned paper. I felt that the flower and butterfly from this set not only MATCHED my paper, but showcased how fun and EASY this technique can be!
The open lines of the flower and butterfly are raised up. So cute in person.
All you need is:
An OPEN line image
Permanent ink
Vellum Carstock
Embossing Stylus with mouse pad/embossing/piercing pad
Copic or other markers
Close up dry embossed vellum detail
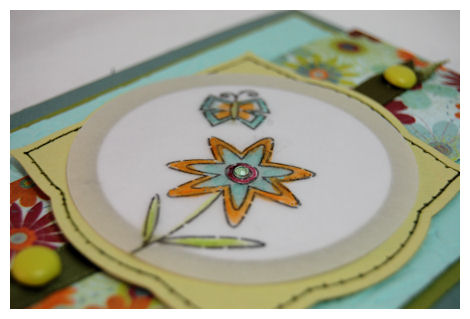
Obviously it is very difficult for you to get a visual of the actual effect this has on your creation, but trust me, its that little extra POP that makes it a WOW! The detail is raised up and pops out at you!
A fun and easy technique.
Just stamp you image in permanent ink.
Turn over
Dry emboss area/areas of choice (don’t press too hard!)
Flip over to front, and gently color!
Use glue dots to adhere to layer of choice-
and DONE!
Now its YOUR turn.
So have fun with it.
I cannot wait to see what YOU come up with.
My Etsy

Who I Designed For
Blogroll
- Alicia
- Alli Miles
- Ally Blankenship
- Amber
- Andi @ crafts on a whim
- Angel R
- Angie Z
- Anne Kranitz
- Becky O
- Bee
- Beth Silaka
- Bethany Paull
- Beverly Nash
- Bobbie
- Cambria
- Cammie
- Card of the Week
- Card Positioning System (CPS)
- Cards for Cancer
- Catherine Doucette
- Charmaine
- Cheryl Sims
- Chriss Rollins
- Christina
- Christine Ewing
- Christine Wooden
- Colleen Schaan
- Craft Critique
- Craft Gossip
- Crystal
- Dawn Easton
- Emily Giovanni
- Geny
- Holly
- Igne Groot
- Inspirational Craft Blogs
- Irene
- Jami Sibley
- Jeanne Streiff
- Jen del Muro
- Jeni Bond
- JenMarie
- Jenn Balcer
- Jenn Diercks
- Jenn O
- Jennifer E
- Jennifer Mick
- Jennifer Pereda
- Jennifer-Sweet Treat
- Joanne Basile
- Jodi Collins
- Julia Stainton
- Julie Masse
- Karen
- Kathryn Berthiaume
- Katie Cotton
- Kelley Holland
- Kendra
- Kim Scholfield
- Kris’s Color Stripes! Get inspired here
- Kristen Dubosque
- Kristin Eberline
- Kristine
- Laura @ Sunshine Stamper
- Laura Turnmire
- Laurie Schmidlin
- Lesa Rapp
- Linda Duke
- Linda-LSN
- Lindsey Botkin
- Lisa (lakind scs)
- Lisa Kind
- Lori Craig
- Maggie
- Mara Campbell
- Maria
- Maria Levine
- Mary
- MaryJo
- Melanie M
- Monique Hansen
- Moxie Fab World
- Pam Imholz
- PaperCrafts Connection
- Peppers and Pollywogs Kids party site
- Rebecca Grohall
- Rita
- Robyn
- Rose Ann
- Sarah Vrolyk
- Sharon Harnist
- Sharon Johnson
- Sharon Rivera (a chemisrty with paper)
- Sherrie
- Sophia Landry
- Storage Units, Ink, & More Blog
- Sue Berker
- Susan (Rainy)
- Tangii Crane
- Tracy
- Tricia Traxler
- Trudee
- Velta
- VivLyn
- Zena
MTME Pretty Palette Color Team
MTME Pretty Patterns Sketch Team
My Time Made Easy TM LLC
Shop till you drop!
Lauren Meader
About Me
Copyrighted material
Subscribe To My Blog
Pages
- About me
- Alexa’s Story!
- My Crafty Corner!
- My Time Made Easy™ LLC
- Our Make A Wish Trip to Disney!
- Resume/Publication List
Calendar
Archives
- August 2013
- July 2013
- June 2013
- May 2013
- April 2013
- March 2013
- February 2013
- January 2013
- December 2012
- November 2012
- October 2012
- September 2012
- August 2012
- July 2012
- June 2012
- May 2012
- April 2012
- March 2012
- February 2012
- January 2012
- December 2011
- November 2011
- October 2011
- September 2011
- August 2011
- July 2011
- June 2011
- May 2011
- April 2011
- March 2011
- February 2011
- January 2011
- December 2010
- November 2010
- October 2010
- September 2010
- August 2010
- July 2010
- June 2010
- May 2010
- April 2010
- March 2010
- February 2010
- January 2010
- December 2009
- November 2009
- October 2009
- September 2009
- August 2009
- July 2009
- June 2009
- May 2009
- April 2009
- March 2009
- February 2009
- January 2009
- December 2008
- November 2008
- October 2008
- September 2008
- August 2008
- July 2008
- June 2008
- May 2008
- April 2008
- March 2008
- February 2008
- January 2008
- December 2007
- November 2007
- October 2007
- September 2007
- August 2007
- July 2007
- June 2007
- May 2007
- April 2007
- March 2007
- January 2007
Categories
- About Me
- All That Scraps
- blogger challenge
- camera/photo play
- Cards
- Contests
- family stuff
- FOR SALE
- Home decor/3-D items
- How to FAKE it!
- Introduction
- JUGS Challenge
- JustRite Stampers
- Lizzie Anne Designs
- My family stuff
- My Stamping Space
- My Time Made Easy
- My Time To Color Challenge
- My Time to Create Challenge
- My Timeless Template Challenge
- My Timeless Templates
- Mytime Mail
- MYTIME MOVIE/VIDEOs
- Papertrey Newsletter
- Pink Cat Studio
- Pretty Palette Challenge
- Pretty Patterns Sketch
- Product Opinions and Must haves
- Recipe's
- Saturday Sketch
- Smilebox Creations
- Stampavie
- Tutorials
- Uncategorized
- videos
Most Popular
- Create your own Onesie Card Tutorial-and important NOTE! PLEASE READ (2529)
- Saturday Sketch-Boxed bag holder (2333)
- Going GREEN! Fancy Flower Flourish-Closure Video (1478)
- Fabulous Favorite - Giveaway! (1336)
- a Prayer Request (1232)
- QUICK-Easter Baskets from Nestabilities-PTI style-and blog challenge (1063)
- Teaser Sketch (999)
- February Release Giveway! (and a little peek) (996)
- Group Post and Rambling Rose Video Tutorial (985)
- GIVEAWAY! Who wants it all?! (895)
Recent Comments (RSS)
- 첫충사이트: 완전히 흥미로운 블로그 게시입니다. 저는
- sarah: Wow, Lauren, what a stunning
- hedie: خرید راهبند
- 야동: Love to read it,Waiting For
- 야동: This seller is in a
- 바카라사이트: 여기 처음 왔어요. 나는이 게시판을
- 야동티비: I was surfing the Internet
- 바카라사이트: 비슷한 주제에 대한 흥미로운 정보를
- 바카라사이트: "여기에 제공해 주신 귀중한 정보와
- 온라인홀덤: 유익한 웹 사이트를 게시하는 데
Copyright © 2007 - My Time, My Creations, My Stampendence - is proudly powered by WordPress
This blog has been Tweaked and Designed by Sara Williams