2nd Template Reveal :Let’s Do Lunch Triple Take
May 11, 2009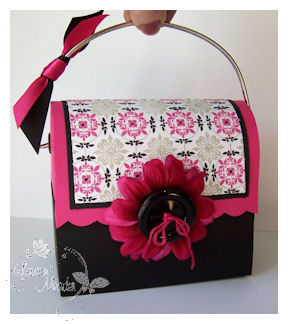
NOTE: templates released on the 15th!
Great Guide-This was my concept project for this template. AKA hard copy from my original template.
I am so excited about this template that I nearly did a cartwheel . I’m OVER THE MOON that I was able to figure out HOW to get a CARDSTOCK version of one of my most favorite gift packaging items ever–>the rounded top, metal lunch box, is NOW a gift packaging template for papercrafters! WOOT! WOOT!!
I cannot tell you HOW MANY, metal lunch box tins I have personally purchased for my children and/or for their friends for gifts! I mean let’s face it, they are pretty darn cute! They can hold a boat load of fabulous stuff , and look super cute altered.
BUT………..there is always a BUT!………… They cost UPWARDS of $6 EACH!! If you don’t believe me-price them out yourself.
Lots of time and money wasted, I finally decided that my paper version is just what was needed, to not only make life easier, but personalization, as well as the expense! Now there is NO FUSS! You get an amazing Lunch Box Tin, every time, in much less time than it takes to cover something you don’t like to begin with.You can make it for ANYONE!
Here are some links to the kind you BUY in a store
https://www.lunchboxes.com/lunchboxes.html
https://www.nextag.com/Howie-Hearts-Fashion-Lunch-646537837/prices-html
CRAZY!!!
Now we have the Let’s Do Lunch by My Timeless Templates!
You can just print, cut, score and assemble! EASY PEASY! I promise. Seriously goes together very quickly.

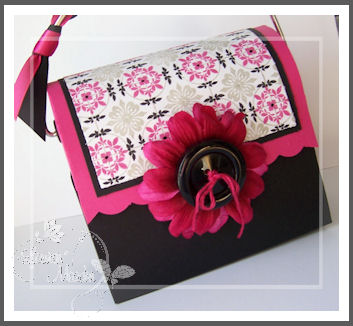
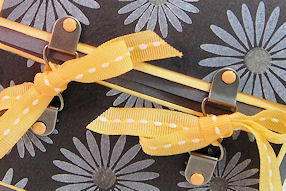
Side/back view
Supplies:
My Timeless Template: Let’s Do Lunch
Stamps: Guidelines 2
Cardstock : True LBack, Raspberry Fizz, Guidelines 2
Ink: Gray, Raspberry Fizz, Black
Ribbonin Prasberry Fizz, True Black
Vintage Button in True Black
Other: Scallop punch, large eyelet colored black with Sharpie marker, Paint can handle, Prima Flower
As you can see they are 2 pieces so you can mix and match. So many possibilities.
And HELLO! ONLY $5! For LESS than ONE metal lunch-box, you get our template, 5 exclusive ideas, and unlimited gifts that you can easily design for yourself, over and over again. Just ONE use of this template pays for itself.
This template is SERIOUSLY easy and fabulous 😀 Yes I’m tooting my own horn, because it wasn’t easy to figure out HOW to get this one perfect. It took me MANY HOURS to design this so that the lid had a PERFECT curve-that is ONE piece, and folded together SMOOTHLY, and EASILY!
For handle options you can:
Use a thick wire, and bend your own (template provided!)
Use paint can handle-with large eyelets (like sample above)
Use Ribbon
Use cardstock
or omit handle and make it a gift box, or decorative box.
Buy purse handle at store for $1.99
Now we have another project sample!
Darling Daisy
Supplies:
My Timeless Template: Lets Do Lunch
Stamps: Floral Frenzy
Cardstock: Smokey Shadow, Black, Lemon Tart
Ink: Snow White, Craft ink in yellow, Smokey Shadow
Ribbon-Michaels stitched ribbon
Other: Hodge Podge Hardware, banana brads, purse handle
Included in the template is the scoring guide, to help you get the PERFECT curve when folding, a guide to create a perfect hidden latch closure (if you want that type of closure), as well as the curved decorative side panels for EASY layering for the sides of your Let’s Do Lunch Box! We also added a printable guide for you to create your own decorative handle from special wire 😀
For my box I purchased a metal pocketbook handle at Michaels Craft Store of only $1.99!
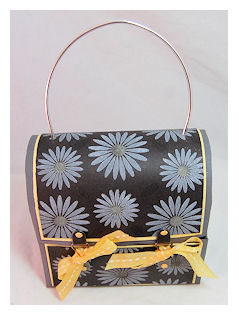
You just unscrew the bottom, and insert it into the box top 😀 In the idea book, I have another idea using the same handle 😀 BUT you gotta purchase the template to see the Idea Book 😀
You can also use many ways to CLOSE your box!
Here I used some Hodge Podge hardware to make closures to tie my Let’s Do Lunch Box closed!
Other easy Latch Options:
Use latch template provided
Use hardware to close
Use ribbons to tie shut
Use scallop borders to secure closed
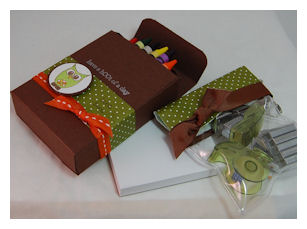
Inside this box I purchases some Gourmet Popcorn from PoppyCock-Caramel Cashew! YUM-A-Licious!
I just put it in a adhesive bag, and wrapped it in tulle, then added a Prima Flower.
Fits perfectly in here, and make a nice keepsake for the receiver to keep and use at their discretion.
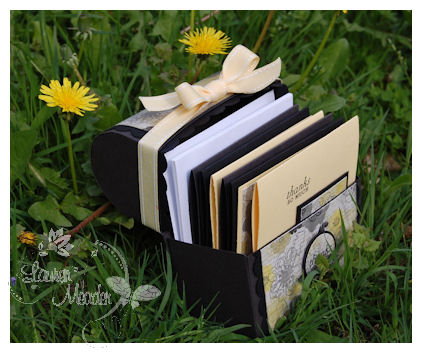
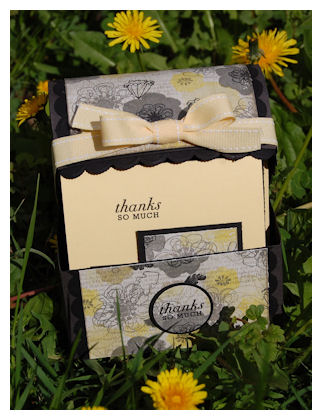
Now I loved the Black , Smokey Shadow and Lemon together, so I made another variation of this box, only this one is being used with NO handle, and given as a CARD BOX!
Let’s Do Lunch goes Decorative Gift box!
Poppy Color Pop OSW

I LOVE making my own patterned paper! Which is exactly what I did in ALL three samples today. Its CHEAP, FUN and EASY. I can make as much or as little as I want, and not worry about “running out”.
I think this is SUCH a pretty BOX! Weather you use a fun and funky handle, or closure, or just keep it BASIC-its stunning for packaging anything!
I made this a card box-but it would be a STUNNING Recipe box too 😀
Supplies:
My Timeless Template: Let’s Do Lunch
Stamps: Remember, Mega Mixed Messages, Background Basics :Text Style
Cardstock: Smokey Shadow, Soft Stone, True Black and Lemon Tart
Ink: Smokey Shadow, Sahara Sand, Lemon Tart, True Black
Ribbon: Lemon Tart
Vintage Buttons in True Black
Other: Scallop Border punch, circle punches
Here is the lid open. I made a scallop border, which I adhered INSIDE the top lid, so that the scallop borders fits IN the box bottom, and hold it closed, but looks SO pretty when you open it!
I designed 6 cards (and 6 envelopes for 4 1/4 squared) 2 lemon base, 2 smokey shadow base, and 2 black base
2 each of the 3 different designs you see here-and put them in the box
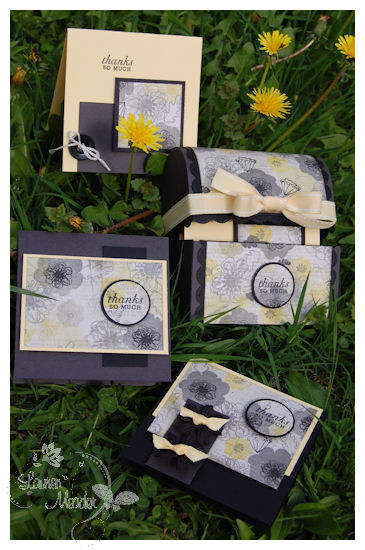
I basically stamped a One Sheet Wonder, and used the elements from that ONE sheet of stamped cardstock to make my gift set!
I love the look. I hope you do too!
Now I would SO love to hear your thoughts on the newest templates!! It took forever to get this one done, so I hope you are as excited by it as I am!!
So that is my peek for tonigh! I have SOOOOO many more ideas 😀 As always! So wait until you see my next post. More of making my own patterned paper too. These projects are what keep me SOOOO crazy busy-but its a good crazy and a fun kind of busy 😀
I LOVE my job. I feel like the luckiest girl in the world being able to share what I LOVE to do daily. I can’t even express how much enjoyment it brings me. Then when I see what YOU do with the templates, its the best feeling ever!!!!!!
So thank you all for the excitment, love and support. Thank you for allowing me to share my dream and love of papercrafting with each of you, every time you visit, and when you share your ideas with me 😀
Now for more peeks be sure to check out Kelly’s blog for another template peek (tomorrow), as well as Nicholes blog, Melissa, Lisa and Candice.
Thanks again for stopping by!

My Etsy

Who I Designed For
Blogroll
- Alicia
- Alli Miles
- Ally Blankenship
- Amber
- Andi @ crafts on a whim
- Angel R
- Angie Z
- Anne Kranitz
- Becky O
- Bee
- Beth Silaka
- Bethany Paull
- Beverly Nash
- Bobbie
- Cambria
- Cammie
- Card of the Week
- Card Positioning System (CPS)
- Cards for Cancer
- Catherine Doucette
- Charmaine
- Cheryl Sims
- Chriss Rollins
- Christina
- Christine Ewing
- Christine Wooden
- Colleen Schaan
- Craft Critique
- Craft Gossip
- Crystal
- Dawn Easton
- Emily Giovanni
- Geny
- Holly
- Igne Groot
- Inspirational Craft Blogs
- Irene
- Jami Sibley
- Jeanne Streiff
- Jen del Muro
- Jeni Bond
- JenMarie
- Jenn Balcer
- Jenn Diercks
- Jenn O
- Jennifer E
- Jennifer Mick
- Jennifer Pereda
- Jennifer-Sweet Treat
- Joanne Basile
- Jodi Collins
- Julia Stainton
- Julie Masse
- Karen
- Kathryn Berthiaume
- Katie Cotton
- Kelley Holland
- Kendra
- Kim Scholfield
- Kris’s Color Stripes! Get inspired here
- Kristen Dubosque
- Kristin Eberline
- Kristine
- Laura @ Sunshine Stamper
- Laura Turnmire
- Laurie Schmidlin
- Lesa Rapp
- Linda Duke
- Linda-LSN
- Lindsey Botkin
- Lisa (lakind scs)
- Lisa Kind
- Lori Craig
- Maggie
- Mara Campbell
- Maria
- Maria Levine
- Mary
- MaryJo
- Melanie M
- Monique Hansen
- Moxie Fab World
- Pam Imholz
- PaperCrafts Connection
- Peppers and Pollywogs Kids party site
- Rebecca Grohall
- Rita
- Robyn
- Rose Ann
- Sarah Vrolyk
- Sharon Harnist
- Sharon Johnson
- Sharon Rivera (a chemisrty with paper)
- Sherrie
- Sophia Landry
- Storage Units, Ink, & More Blog
- Sue Berker
- Susan (Rainy)
- Tangii Crane
- Tracy
- Tricia Traxler
- Trudee
- Velta
- VivLyn
- Zena
MTME Pretty Palette Color Team
MTME Pretty Patterns Sketch Team
My Time Made Easy TM LLC
Shop till you drop!
Lauren Meader
About Me
Copyrighted material
Subscribe To My Blog
Pages
- About me
- Alexa’s Story!
- My Crafty Corner!
- My Time Made Easy™ LLC
- Our Make A Wish Trip to Disney!
- Resume/Publication List
Calendar
Archives
- August 2013
- July 2013
- June 2013
- May 2013
- April 2013
- March 2013
- February 2013
- January 2013
- December 2012
- November 2012
- October 2012
- September 2012
- August 2012
- July 2012
- June 2012
- May 2012
- April 2012
- March 2012
- February 2012
- January 2012
- December 2011
- November 2011
- October 2011
- September 2011
- August 2011
- July 2011
- June 2011
- May 2011
- April 2011
- March 2011
- February 2011
- January 2011
- December 2010
- November 2010
- October 2010
- September 2010
- August 2010
- July 2010
- June 2010
- May 2010
- April 2010
- March 2010
- February 2010
- January 2010
- December 2009
- November 2009
- October 2009
- September 2009
- August 2009
- July 2009
- June 2009
- May 2009
- April 2009
- March 2009
- February 2009
- January 2009
- December 2008
- November 2008
- October 2008
- September 2008
- August 2008
- July 2008
- June 2008
- May 2008
- April 2008
- March 2008
- February 2008
- January 2008
- December 2007
- November 2007
- October 2007
- September 2007
- August 2007
- July 2007
- June 2007
- May 2007
- April 2007
- March 2007
- January 2007
Categories
- About Me
- All That Scraps
- blogger challenge
- camera/photo play
- Cards
- Contests
- family stuff
- FOR SALE
- Home decor/3-D items
- How to FAKE it!
- Introduction
- JUGS Challenge
- JustRite Stampers
- Lizzie Anne Designs
- My family stuff
- My Stamping Space
- My Time Made Easy
- My Time To Color Challenge
- My Time to Create Challenge
- My Timeless Template Challenge
- My Timeless Templates
- Mytime Mail
- MYTIME MOVIE/VIDEOs
- Papertrey Newsletter
- Pink Cat Studio
- Pretty Palette Challenge
- Pretty Patterns Sketch
- Product Opinions and Must haves
- Recipe's
- Saturday Sketch
- Smilebox Creations
- Stampavie
- Tutorials
- Uncategorized
- videos
Most Popular
- Create your own Onesie Card Tutorial-and important NOTE! PLEASE READ (2529)
- Saturday Sketch-Boxed bag holder (2333)
- Going GREEN! Fancy Flower Flourish-Closure Video (1478)
- Fabulous Favorite - Giveaway! (1336)
- a Prayer Request (1231)
- QUICK-Easter Baskets from Nestabilities-PTI style-and blog challenge (1063)
- Teaser Sketch (999)
- February Release Giveway! (and a little peek) (996)
- Group Post and Rambling Rose Video Tutorial (985)
- GIVEAWAY! Who wants it all?! (895)
Recent Comments (RSS)
- 야동: Love to read it,Waiting For
- 야동: This seller is in a
- 바카라사이트: 여기 처음 왔어요. 나는이 게시판을
- 야동티비: I was surfing the Internet
- 바카라사이트: 비슷한 주제에 대한 흥미로운 정보를
- 바카라사이트: "여기에 제공해 주신 귀중한 정보와
- 온라인홀덤: 유익한 웹 사이트를 게시하는 데
- 홀덤나라: 나는 당신의 블로그를 정말 좋아합니다.
- lisa: Technology, too, has left an
- 주소모음: 흠 !! 이 블로그는 정말
Copyright © 2007 - My Time, My Creations, My Stampendence - is proudly powered by WordPress
This blog has been Tweaked and Designed by Sara Williams
71 Responses for "2nd Template Reveal :Let’s Do Lunch Triple Take"
This is such a great template! I love this little box and I love all the projects you made with it. And your patterned papers are beautiful. I am always so in awe of all your templates — they are so versatile and so DOABLE! What a talent you have. Thanks so much for sharing it with us.
Absolutely fabulous Lauren! This is so cute!!! I’d love it for a recipe box too!
Lauren I can’t imagine how long it must have taken to figure this out! You are amazing! I can’t wait to purchase both of your new templates. I always look forward to the 15th!
Lauren, This is so cute! Oh, how I would love to be able to get it today. You have such amazing ideas and I always want to see what you have come up with. Thank you for all that you do.
Note to self: must stop drooling on the keyboard. This may just be your best one yet! Woohoo!!!
Oh my goodness!!! These are so awesome and adorable!! And to hear you made it all today! Wow! And, the Smokey Shadow & Soft Stone….now I think I need those colors! Wasn’t so sure about those cardstocks, but they are going on my list now! Your templates are always so easy to follow, with fabulous results!! Thank you so much for all your hard work!
Love this Lauren! What a great template and your ideas are fabulous!
This is all so beautiful!
I am having trouble typing through the blurry eyes I have after reading Alexa’s story! You are both amazing. She is a wonderful and gorgeous little girl!
This template is the best yet! I love how the top curves and I’m thinking that’s going to be difficult to do that. Knowing your templates though, you’ve probably got it cased and have made it easy for all of us. I loved the pink and black one, then I saw the yellow and black and I loved that too. I was just thinking how great they’d be for teacher gifts! You could put almost anything in there!
Another fabulous template! I love these more and more. Your three samples, and Nichole’s sneak peak are making this another “must have”.
Simply WOW!!!! Awesome little box, I can’t wait to try and make one. Looking forward to tomorrow!
—Jacqui
PS and also looking forward to making my own designer paper!
Beautiful as always Lauren! I really like the first one, so pretty. I made your Get a Handle on it the other day and it was so quick and easy. I will definitely be buying others.
Luuuuuve this! I Finally (yes, I know it took awhile!) used one of your templates for the first time for Mom’s Mother’s Day project. (I’ve had some from the beginning….you even posted what worked for me on Vista on here after you saw it on the PTI forum….under TiikkiStars…but, I just had not gotten around to trying them yet…oh, what a silly mistake that was! :>) I LOVED using your template! Is it possible to print the lines lighter?? I keep thinking it is, but I have not figured it out yet. Anyhow…..I do LOVE this template and can see a ton of uses for it! It will definitely be making its way into my checkout cart soon! :> Thanks for all the effort, creativity, and joy you put into your work! :>
Excuse me?!!??? YOU are the coolest giurl in school with this lunchbox template. Seriously, seriously CUTE!
You are amazing. Where do you get all of your energy? You are a creative genius and I really love all the detail of you put into each of your projects. I so appreciate all the tutorials and help. Love the templates and have purchased several. Keep up the fabulous work!
Ohhhhhhhhhhmigosh………. sooooo gorgeous. You’ve outdone yourself… AGAIN! How DO you do it?
These are simply FAB-U-LOUS! Just gorgeous. You are truly amazing. I’ve just got to have this template now.
Thanks for sharing your creativity so generously with us.
This box is super cute! Love the diffrent ideas of use you provide and the papers you’ve made yourself are gorgeous. Love it!
XX /Hanna
I love this! Those shaped lunch tins are almost impossible to find here in NZ (like $20 or more at scrapbook stores) so I am super excited to see this. After several months of dithering I bought my first two templates last week and hope to try them out tonight. Thanks so much!
Lauren,
You amaze me…..your job would be as good as working in a lolly shop!(translation for you…..a sweet shop 😀
Thank you for being you.Its great to see someone get so much enjoyment out of what they do.
Keep up the good work.
Brilliant – I can’t wait to buy and try for myself. And I love making my own paper too – much easier than cutting into my stash papers – which I find soooo hard to do!!
I agree with Dana…cutest lunchbox in the cafeteria! Super cute, Lauren! Such creativity and so clever! Love it!
Too stinkin’ cute! I can see my son running around with about a hundred of these! Very cool my friend. Have a great day! -Molly B
How cute is this??? All I keep thinking about how cute this would be for teachers appreciation gifts/lunches, secretary day…love the one with no handle with the cards inside. CUTE!! 😉
WOW! I am amazed! You are THE most talented person on the planet! I can’t wait to use by birthday money to purchase the new templates and stamps!
I LOVE this lunch box Lauren! I saw Nichole’s yesterday and all your samples today are super! thanks for sharing all the different ways to close it – I’ll be getting this on 5/15 that’s for sure!! I love containers!
What a wonderful new template you have created. I love all of your projects you do, thanks for all of your hard work!
You can tell how many hours you worked on this template! It’s FABULOUS! It’s one of my top 3 favorites so far and I don’t even have it yet. 😉
Okay, you’ve convinced me to give templates a try with this one. This looks absolutely fabulous. Do you really promise that it’s easy?- I think I’m template challenged.
what an awesome template Lauren! love your ideas for using it.
Stop it! You’re killing me…
Seriously… I know how much you time, love, and energy you put into your templates, and it shows!
You have out did yourself on this one!
I can’t wait to get this one! LOVE it! ♥
Hugs and love!
This is amazing! I can’t wait to order it.
As always, ADORABLE! You are amazing!!
Awesome template Lauren! LOVE it! I’m a sucker for purses.
Lady, you have outdone yourself with this box! Figuring out the tricky details like the curve and the fitting-together of the pieces… that’s what I love about really good templates. All that frustrating, make-you-give-up trial and error is eliminated!! And, you get a gorgeous item that’s so much more interesting than a plain rectangle shape.
I can not WAIT to get this one and enjoy its full design booklet as well!
You have outdone yourself with these two new templates. I have decided these are must haves and will be in my cart ant 12:01 on the 15th. Thanks for all of your work that you put into your templates and projects.
You have outdone yourself with these two new templates. I have decided these are must haves and will be in my cart at 12:01 on the 15th. Thanks for all of your work that you put into your templates and projects.
You did it!! I’m so thrilled. I’ve been waiting for this release and love what you’ve done with it. Looks fabulous!!
This box is super cute! Love the different ideas you provide and the papers you’ve made are gorgeous. Love it!
You are so talented!!
Congratulations!!!
Counting the minutes for the 15, so I can purchase the template. It´s espectacular, I just fell in Love. Congrats on an awesome template and continue on.. You always surprise me, your work is so cute and you do things I can´t even imagine how. God bless
Love, love, love it! and…………gotta have it! I am ordering this as soon as it’s available! I love the papers you used too, so darn cute!
absolutely love this…….what a great template and for so many uses….yippee!!!
i can see my 5 year old son having a great time with this one…..
is it the 15th yet……
Love it!!!
Thanks for all of the tips that you included about the handle. I was wondering about that. This template will make the perfect gift box. You are so talented.
xoxo, Christine
Wow Lauren, I keep thinking you’ve topped out but you continue to surprise and amaze me. This is just fabulous! You know, if you changed the opening to the side it would look like a mail box!
Great job!
OMGoodness!! Stunning, beautiful and practical! I love it!
Add me to the list of people that will be placing an order on the 15th @12:01 am. The lunch box is so cute and I am thinking it would be great to use at a b.day party or a luncheon, as you say the possibilities are endless. Thank you for sharing your creativity with us.
Also, (as a previous poster) I have been wondering if there is a way to make the cut/score lines lighter when printing out a template
These are absolutely precious. I love them. This would be great for so many gift giving ideas. TFS!!!
Lauren your ideas are amazing. I think it is wonderful you are able to create more and more templates each month. You have such a nack for this. Can wait to see what else you have up your sleeve.
WoW what an amaZING story. This template ROCKS!
This is awesome!! Be sure that this is be on my order on th 15th!! Great job 🙂
~Lacey
You are so amazing–it is always such fun to see your wonderful new creations! Such a great template!
THis is super Lauren!!
Awesome template, Lauren, and fantastic examples. This is definitely on my “Gotta have it!” list. Thanks for sharing your creative ideas with us.
I love all your templates – and the terrifically creative things you do with them! I was wondering if you could put a small ruler next to them when you photograph them, to give us a better idea of the size. I often find myself wondering how big or small a finished project is… and it is sometimes hard to guess with nothing you can relate its size to.
Thanks, Swedie
Thank you for releasing these templates to all of us, I have been able to complete a lot of creative keepsakes for friends and family because of your templates.
This one is adorable!!!!!
Sincerely,
Corina
OK!!!!!!! LOVE IT!!!!! BEautiful Projects too! 🙂
they are amazing Lauren! Can’t wait to try one out!
This template is amazing, I can’t even begin to think how you figured this all out. It is in my checkout cart already!! By the way, who would have thought that dandelion flowers would have made such beautiful flowers for your lunch pail shots. Aren’t they suppossed to be weeds? Well, they look gorgeous in your photos! Thanks for all your hard work and your enthusiasm is so catching.
Love them Lauren!!!
OMG! How absolutely fabulous is this template?! I can’t wait to get my hands on it :O) I bought four templates the other day and the ideas for them are consuming my thoughts at work…this is not good! LOL
Great work! Your pain (craziness) is definitely our gain :O)
Kristin
oh my gosh!!!
Lauren this is SPECTACULAR!! I need to buy this one too!!
tomorrow is the day, right????
I can’t wait ….
Hugs,
Odette
Wow! Seriously, wow! Love the amazing projects!
You are blowing me away with these templates! I want to know WHERE you find time to do so much!! Send some my way. LOL!
I love all of your projects. They are all so much fun and I love that they are “doable”, not just some lovely idea that one feels like they can’t even attempt.
STOP STOP STOP – LOL I can’t take it any more – let me just hand over my paycheck – HEY how come you can put your projects in the grass and make them look SO good – mine never look quite to wonderful – Love this new template.
Wow…another fantastic template!! Your samples are gorgeous, Lauren!!
I can’t wait to play with this template! Not only do the metal lunch thingies cost a ton, they’re hard to get paper cut ‘just right’ for! Your samples are gorgeous. Thank you SO much for using YOUR time so I can save so much of MY time!
Your color combinations are fabulous! Cute cute, cute!
Wow I’m loving this template. What an awesome idea.
Hugs
Nic
It’s the first appearance of Idie Okonkwo, one of the five lights of Generation Hope. She’s one of my favourites. Well, they’re all my favourites, but she’s intermittently hilarious and scary as hell to write. She’s also the one of the five who required the most research to write.
Im grateful for the blog article.Much thanks again. Cool. eddgbaddcd
Very nice site! cheap goods
You have it figured out for sure. I adore how you have found the most convenient and inexpensive ways around. It’s very helpful to save money and time when you can. Hotels in Neelum Valley
Leave a reply