Archive for March, 2009
NOTE: This is POST #2 for today! Don’t miss my template peeks below this post!!
—————————————————————————————
OH BOY! I need to NOT do sketches when Im in the middle of a template/Papertrey Ink release! YIKES! This is so much more work. Its KILLING me! LOL!
But todays post is well worth it
Anywho………………(a term I get from my mom! LOL!)
If possible, I would like for us to use this weeks Saturday Sketch to RAK my dear friend Alicia and her family. If you aren’t aware her son has caner (you can read that by clicking the link I provided) and they could use some cheer!!
I have already gotten so many emails for her address already (thanks), but if you need it Email me .
Granted you don’t HAVE to use this as a RAK but if you were stumped for a starting plcae this is it!
Thank you in advance for the RAKS, prayers and wishes for the Weiman family. It personally had touched my life and my heart.
Alicia will be obviously taking a break from the sketches to be with her son as they go through a very difficult time.
I DO have an Ethan update for you! Im so happy Alicia has found time to keep me posted.
You may know Ethan received a barn with 2 horses from Make A Wish. I believe a week or so before Christmas his favorite horse passed away! Isn’t that terrible!! Anyway, Make A Wish just sent him a NEW! Horse on Thursday (I think) and he is just over the moon happy. It really warmed my heart to read that.
Ethan deserves for his life to be blessed and a miracle to happen. Thats what I am praying for.
I made a couple cards for Ethan, Ava and the parents (I have to wait to share some as they are upcoming releases!).
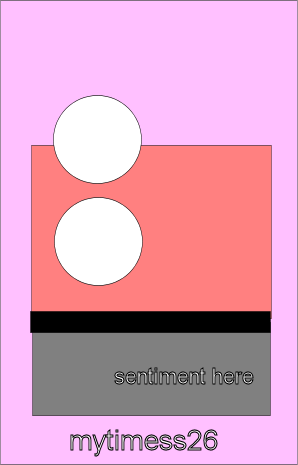
So with all that being said here is your sketch! It would be great flipped too!
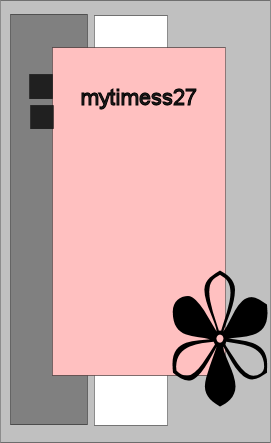
Keyword mytimess27
Be sure to link your creation here!!
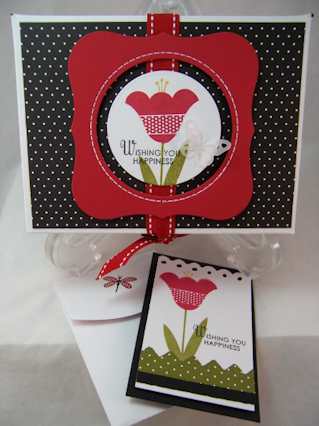
Now here is my card for Alicia and Dave using the NEW! Papertrey Ink– Wishing You set:
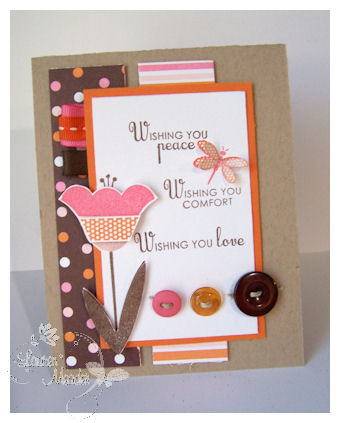
I found this to really help me convey my feelings for this family.
I wanted something cheery. Like a ray of sunshine in the mail. A paper hug, from my family to theirs!
I took several of the sentiments in the set, and grouped them into my card front. I love how this turned out.
Th tulip is 3D, as is the dragonfly.
I love the colors that I pulled from my SU! paper.
I LOVE tulips! They are my favorite flower.
The meaning of tulips is generally perfect love. Like many flowers, different colors of tulips also often carry their own significance. Red tulips are most strongly associated with true love, while purple symbolizes royalty. The meaning of yellow tulips has evolved somewhat, from once representing hopeless love to now being a common expression for cheerful thoughts and sunshine. White tulips are used to claim worthiness or to send a message of forgiveness. Variegated tulips, once among the most popular varieties due to their striking color patterns, represent beautiful eyes.
Instead of a flower I used buttons.
I think its cute. I needed something there, just wasn’t sure WHAT.
Now don’t miss the samples from the Sketch Team!
I can’t wait to see your take on this!!
Ill see you later tonight at the release party.
In the meantime don’t miss Nichole’s blog as well as
and last but not least Maggie’sblog, as this is her last release with us as a Distinguished Guest Designer!
She really rocked it out I think.
Thanks for stopping by.
See you tonight at the release party!
Over the top template ideas!
Mar 13, 2009 Author: mytime | Filed under: Cards, Home decor/3-D items, My Timeless Templates, Papertrey Newsletter(NOTE: I will return later with the Saturday Sketch!)
I spent a LONG time uploading my PTI stuff and editing this, so bear with me OK!
OK- maybe Im blowing this post up to high expectations, but I really am in LOVE with todays projects. REALLY LOVE
Every month I get FLODDEd with so many ideas for samples with each template my head spins. I dream about templates (I WISH that was a joke sometimes!! LOL!)
OK now I am gearing up for thePapertrey Ink Release TONIGHT!!
Im beyond excited about this release and todays post.
I saved the best for last! In my opinion 😀
Are you excited?? You all got me excited more than I was! LOL! That is PRETTY excited, let me tell you.
I do have some more samples using the templates to share tomorrow too, so check in again to not only see those but the release samples as well. I had a blast. The team really knocked it out of teh park with thier samples. Wait till you see them all.
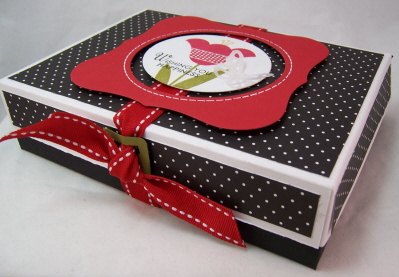
OK first up is my favorite File it with Flair © using my NEW! Favorite set Wishing You.
This set and Bitty Dots 2008 patterned paper
Now many of you stated how cool it would be to organize your cards in this box! Well you have NO IDEA how awesome and easy it will be. Now this is not only easy, but a great gift!!!
OK enough blabbering-see for yourself.
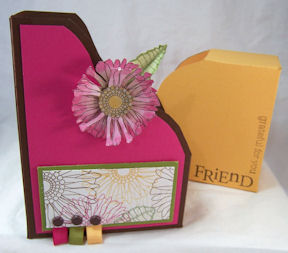
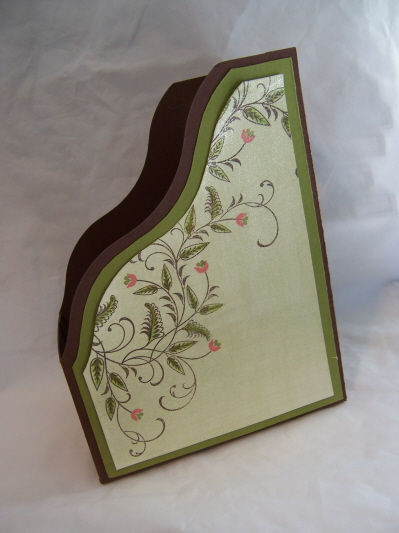
Pretty Petal Pocket Set
Now this is a template combo!!
The boxes you see are the pocket template from All Boxed Up! Now that pocket template alone is fabulous. I totally love it.
I am in LOVE with this set!! LOVE! The tulips, colors, and everything.
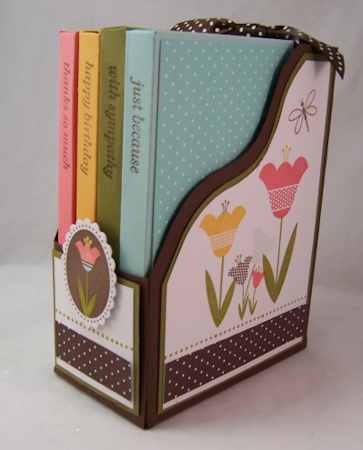
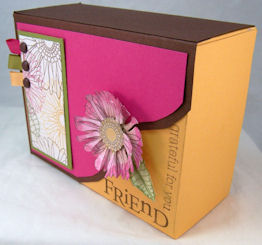
Here is the other side
No matter what way you turn it-its just stunning. I like to always decorate an entire project so all angles are purty 😀
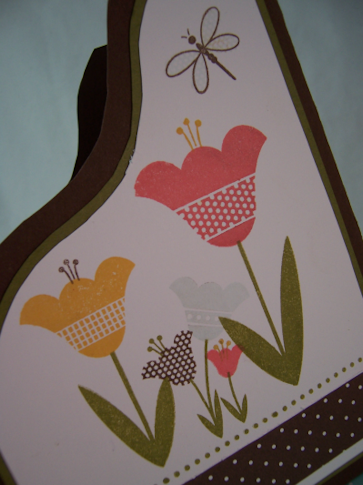
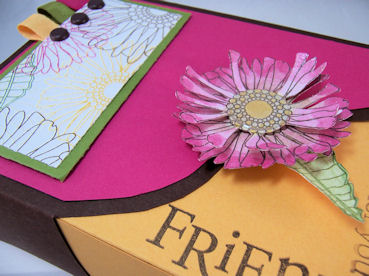
Look at the close-up
The open part goes in the back of the template, and I stamped the ends with the category of cards I want to fit into each file. I used last years PTI anniversary set for the pocket labels.

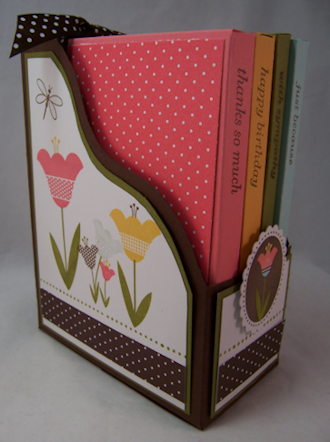
Now is the top view
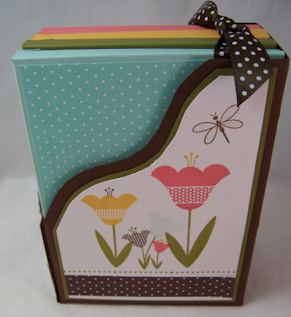
I tied some ribbon around the set-so I can easily pull it up all in one. The templates do come out easy, and look SO nice and organized don’t they?
I’d love to hear your feedback on this one since I was TOTALLY bouncing over it. I just love versatility, and this template is by far one of the most versatile ones yet! The curves make is SO stunning.
I cannot wait to see what everyone makes when they get their own.
OK now moving on to another Epiphany!!
Hello Kitty!! Using Captured Card Case
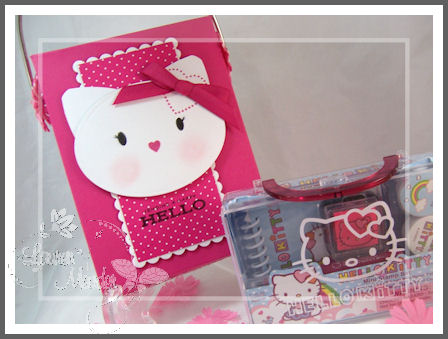
Can you seriously BELIEVE how cute this is?
Obviously, my creation is inspired by a gift set, that Amber is giving to her friend Abby for a birthday party she is attending on Sunday. We saw this plastic purse with Hello Kitty stamps, and other items, so we brought it home, in hopes of transforming it.
I think I did a good job making my own version of Hello Kitty with 100% of Papertrey Ink products!
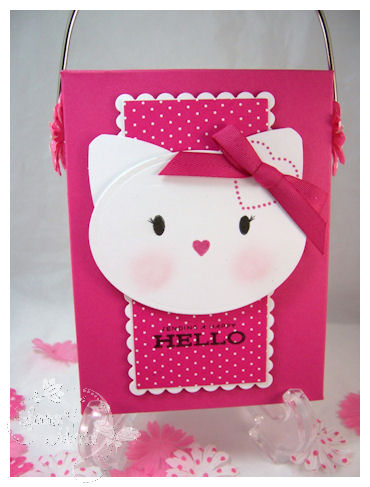
I used a oval nestability to create the face.
I then took the large heart punch, and punched two ears (using a corner rounder on the tip) and adhered them behind the head-upside-down!!
The eyes are the oval flower centers from Floral Frenzy 😀 I added some eyelashes with a marker tip.
I used Hearts Borders and Cornersfor the little heart stamped by her ear (like in the acrylic box the gift came with), and for the little heart nose!
Pebble Pearlescent Pastels made my perfectly rosy cheeks.
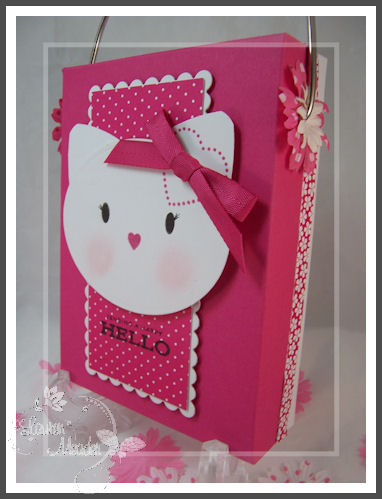
Side view
This is a take along “purse” just like the case it came in, only it utilizes my Captured Card Case template!
I just punched a notch in the lid, so the handle would fit with the hinge style lid.
I really like how a little girl can carry this around with all her supplies. WAY CUTE!!

I trimmed the lid with some Raspberry Fizz patterned paper for some POP!
The fabric flowers cover the notch ( I used fabric ones since they are much more durable than paper), an the heart eyelets that were punched and inserted, so that my paint can handle would fit perfectly. I used heart eyelets so if you DO see the eyelet holes they look nice and match well!!
NOTE: Install your brads PRIOR to assembling the template!
This is what is INSIDE
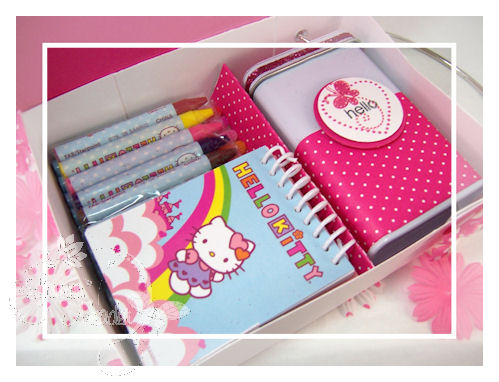
There are a set of mini markers, mini pencils, and crayons on the left-with a notebook.
I altered a bandaid tin, and put the little stampers and stickers in there. There is another notepad underneath.
I had SO much fun making this!
Poor Amber doesn’t want to give it away! LOL! That made me feel so good to hear. I hope her friend likes it.
I loved using PTI items to create a Hello Kitty themed gift for my daughters friend! It was surprisingly EASY!
Supplies:
My Timeless Template: Captured Card Case
Stamps: Borders & corners hearts (for heart nose/ear), Floral frenzy (little oval), Everyday celebrations (sentiment)
Cardstock: white, Raspberry Fizz
Paper: Bitty Dots 2008 collection
Ink: True Black, Raspberry Fizz
Ribbon: Raspberry Fizz Twill
Pebble pearlescent pastels for cheeks
Heart punch (by marvy)-to create the ear!
Corner Rounder
Rectangle/oval nestability
Flowers by Prima
Paint can Handle
Large Heart eyelets
———————————-
Now lets move onto a elegant box!
Im shocked at how much I can do with this template: Bun in the oven
Wait till you see the 2 tutorials I have coming your way using this box! A true must have.
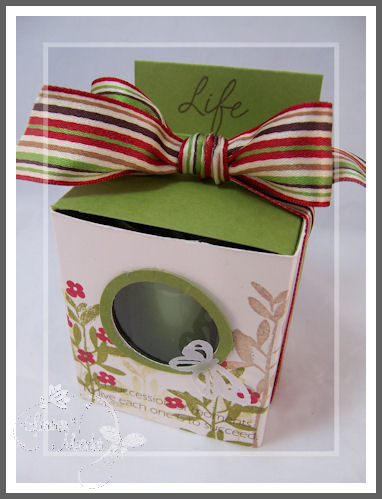
Close up-I love making a circle window.

I am just in LOVE with the sentiment on this!
Life-is a succession of moments.
To live each one is to succeed.
Inside this box is a scented candle. Always a nice gift for any occasion. It matches perfectly too.
I got a bunch of them at Target 😀

This is the other side. I love the flower garden, stamped all around the entire box! This set makes it SOOOO easy.
I was so inspired by my ribbon for my colors. I got this one at My Little Ribbon Shop. Its got such a nice feel to it. Its a wide satin, and very easy to manipulate!
My Timeless Template: Bun in the oven
Stamps: Life, Forest Friends (little flower)
Cardstock: Vintage cream, ripe avocado, acetate, vellum
Ink: Ripe avocado, pure poppy, briliance beige, summer sunset, dark chocolate
Ribbon- May Arts
Circle punches
butterfly punch by Martha Stewart
AH!!!!!!!!!!
Feels good to share all the ideas I have been working on the last 2+ weeks!! So much goes into these templates monthly, and hehind the scenes I generally create 1-3 more amonth for the future. Each one getting better and better, all because YOU inspire me.
I hope enjoyed todays peeks.
I also hope to chat with you all tonight during the release.
Thanks for reading and all the love, support and kinds comments. I read every one, and they mean SO much to me and the time I spend sharing it all.
Till tomorrow
Celebrating Mothers-a story of my Mom
Mar 12, 2009 Author: mytime | Filed under: Cards, Home decor/3-D items, Papertrey Newsletter
Nichole asked her team to come up with a gift for our mother.
This is a keepsake box I created for my mom.
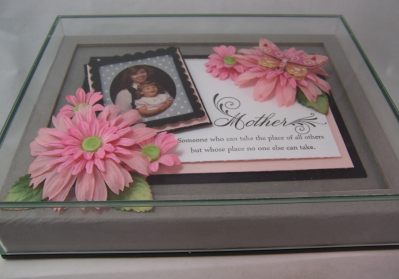
It is enclosed in a glass case. I found this “document” keepsake frame at Target for only $3.22 CLEARANCE!
I have to say when I saw the sentiments in the Mother set, I got very sentimental. Each one had so much meaning that I could relate to my own mother-but this one stood out most to me:

I also made this card to match-using Friends ‘Til the End.
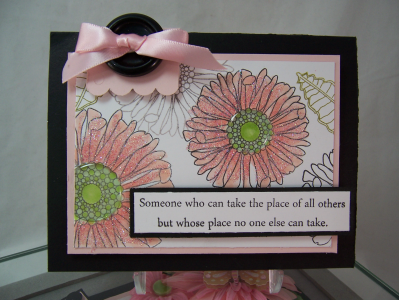
Mother
Someone who can take the place of all others, but whose place no one else can take.
When I saw that, I was flooded with feelings, memories and emotions I have had for my mom since my 30 years on this earth. Its funny that some stamps can bring up so much in a person.
To be able to capture or convey such emotion with a little acrylic and ink.
Here is a close up
I have so many thoughts about my mom.
My mom, my hero.
She is the true rock.
The duck on water, floating by effortlessly, while under the water paddling like crazy.
We never knew all she really did. Not until later in life.
She is an amazing person. Always sees the best in people, even when she shouldn’t. She’s very open, loving, giving, and patient. I could go on and on.
My mom was the glue that held our family together. My father wasis, an alcoholic. So growing up in that house, my mom did everything she could to give us the best life possible.
She basically raised us on her own, all the while, battling with my father. I guess mothering him too. Taking care of him as he was like having another child. Trying to make up for all he did or didn’t so. He was unable to hold a job, terrorizing our household whenever he could. My mom was always “taping” everything back together.
She was always holding out hope he’d step up to the plate of fatherhood. He never made it to bat. My mom eventually called off the game. A difficult time for her, but it made her so much stronger.
She was there or me, at every point in my life.
She played so many roles, wore so many hats. I truly admire her.
She quit high-school as a young girl. She went back while we were kids to get her GED. She then went to college when my brother and I were about 8, and 6. We made it SO hard on her. We would make her feel guilty for studying and being at school at night. We would fight while she tried to study. I look back and want to slap myself! I really don’t know why we made her life so tough when we didn’t have to.
I don’t know HOW she did it, but she was the Valedictorian in her class. At that time I was about 10. I was so proud of her. Now having kids I don’t know HOW she managed the house, work and us kids, while going to school.
She built such a loving, trusting relationship with me as I grew. I knew I could tell her anything, and count on her-always. I only PRAY to have a fraction of that with my girls. I don’t know HOW she did it, but she did.
She came to every event, helped with our school projects, teacher meetings, sporting events. The house was always clean, and yes, we ALWAYS had a home baked goodie when we walked through the door. She also made a home-cooked breakfast, lunch and dinner-everyday! (That is much more than I can say for myself! LOL!)
Birthday’s were always a big deal, she made us a special cake-every year! I remember every single one too.
Then every holiday was made special. Different traditions we had, that I try to pass onto my children.
Looking back on our limited income, I don’t know how she did everything! I’m just in awe of her. SHE is the reason I became the woman I am today. The reason I had the strength to do what I have. I learned it all from her. She taught me how to be strong. She was the model of strength, and doing what you have to do to get through a difficult time. She didn’t quit, or give up, she put one foot in front of the other, and made the BEST out of every situation.

I don’t think I TRULY appreciated my own mother, until I became a mom myself. I don’t get what it really meant, all she had really done. Everything.
The minute I held Alexa compounded all my mom truly did for me, her whole life.
It was then that I realized how difficult it really was. It was then I realized you have to be selfless.
It was then that I appreciated all the sacrifices my mom made for us kids. Sacrifices she made because she loved us so much.
It was then that I realized she meant when she said “No matter what, I will always love you.” That type of unconditional love a mother can only have for a child.
I still have moments being a mom myself, when I say “How did my mom do that!” or “Oh my gosh! My poor mother! I must have driven her crazy!’
I hear her words flying out of my mouth on MORE days than I care to admit. But if I can have with my own children, what I have with my mom, then I guess being like her isn’t so bad.
For my gift, I wanted to capture one of my most cherished photos of her and I.
I was only 2.
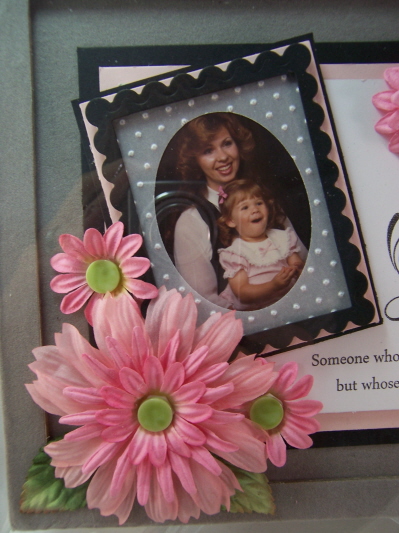
I just love this photo of us to pieces.
I don’t have as many together photos or her and I as I would like, now having done this project. We need to get more.
Here is one last group shot

So with that plan, I hope to see my mom very SOON! Her birthday is April 8th! I will give this to her. I want to do a mom & me spa day with her! I just need to get her to take a day off to let me pamper her!!! She deserves it.
Anywho-
Make sure you check Nicholes blog for all the teams project details!!
And check out the design team blogs
Thanks for reading.
I pretty much went all over the place with my “mom” post. I just let it all pour out here. Im not editing it. It is what it is.
So thanks for letting me get it all out there.
My frame truly was made from the bottom of my heart!
Im going to print this post and put it in her card.
I’d love to hear something about YOUR mom or a special woman in your life that impacted you, or taught you something. Maybe a special memory?? I so enjoy getting to read your stories too.
Till tomorrow-more template peeks to come.
More template peeks!
Mar 12, 2009 Author: mytime | Filed under: Home decor/3-D items, My Timeless Templates, Papertrey NewsletterOK I have a whopper of a post to share tomorrow with the templates.
We have a big Mother’s post to do, so Im keepin this short and SIMPLE!
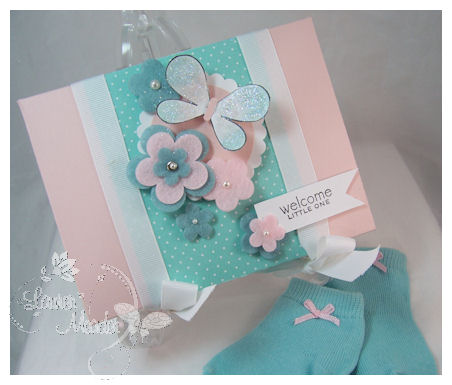
Welcome little one
This is perfect for baby gifts!
I was so inspired by the cutest set of onesies, and baby booties-for this gift box.

I think its so precious, and girly!!
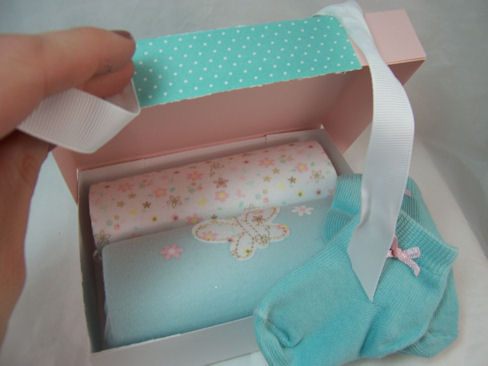
Its a great way to package up something simple for a baby!! A pretty handmade sweater would be gorgeous, or a baby hat!
I used Butterfly Kisses, and Bitty Baby Blessings.
I paired it with the bitty dots 2008 paper.
I had some felt flowers and adhesive pearls to match!
Simple, yet elegant, and EASY gift box.
Now using Bun in the Oven:
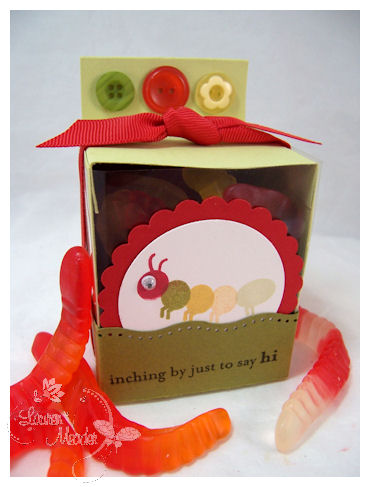
A gummy garden
This is a uber cute way to give some gummy worms!
I used Pond Life for this 😀 A great party favor for a bug/garden/ or any boy event!
I just made an acetate wrap for this one (directions included in template). Another easy one.
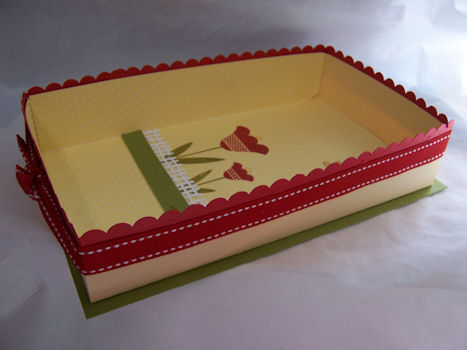
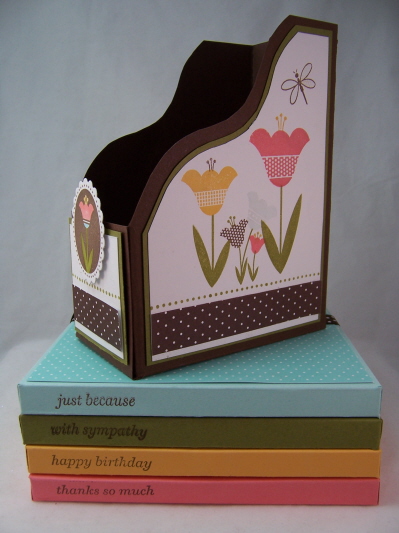
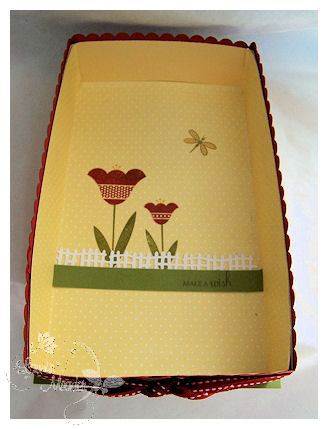
This uses JUST the letter tray protion of the template, to make-you guessed it! A letter tray! LOL!
See! ALL the elements of the template are useful 😀
This will sit on our office desk (colors match the room perfectly) to collect the random mail we get.
I just lined it with the bitty dots paper, and stamped the Tulips from the newest release Wishing You set, directly on it. Kept it flat and simple, since it will get filled with mail! LOL!
The fence is a Martha Stewart punch.
This project took like 7 minutes to make. I kid you not! You could layer the bottoms with cardstock-like I did, and make them into stackable mail storage too! Maybe one for YOU, one for your hubby…. something like that? I like that idea.
WAIT till you see the template samples I have for tomorrow! WOW!!
Wait till you see 😀
Template Trio
Mar 11, 2009 Author: mytime | Filed under: Cards, Home decor/3-D items, My Timeless Templates, Papertrey Newsletter, TutorialsAre you loving the Papertrey Ink Peeks this month?
Just when I think it can’t get better, somehow, someway, it always does.
Well now you have had some peeks at the TRIO of My Timeless Templates © that are being released on the 15th! I really can’t wait 😀
We have :
File it with Flair © Captured Card Case © and Bun in the Oven ©
Now I hope you are up for MORE ideas using each one. So let me share some more ideas, and show some MORE versatility.
File it with Flair is INSANELY versatile. INSANE! I totally love this template 😀
File it with Flair Goes GIFT BOX?!
Say what!
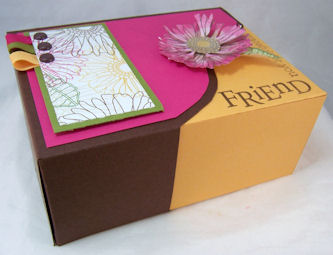
This is seriously the best gift BOX I have ever seen! LOL!
These colors are inspired by a bathing suit on a TV show Alexa watches called iCarly.
Dark Chocolate, Raspberry Fizz, Ripe Avocado, Summer Sunset & white.
For today’s peek I printed 2 File it with Flair templates .
2 boxes separately
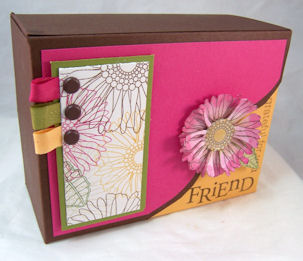
I used FriendsTil the End set
This is a detail photo
I used Shimmerz to paint it, and added a Making Memories page pebble for dimension.
So one file template is in chocolate, the other in summer sunset. Cut, scored, and assembled as directed-except when I made the summer sunset one, I cut down the top by 1/4 inch. So, instead of making it FILES boxes, I slide the summer sunset one into the dark chocolate one-and VIOLA! TOTALLY rockin gift box.
Look how the curves make it SO cool looking. This is such a great box for a teen.
NOTE: Just make sure you slide it in the correct way-as shown here

If you slide it in with the (summer sun box) tall end at the top, you get a large gap, amking you think it doesn’t go together. So basically a tall end at top, and tall end at bottom. Just ensure you are putting it together correctly BEFORE stamping ! LOL!
I could go on and on about this box! But I won’t. Instead Ill move on to the next template.
How about another version of the Bun in the Oven template?
Now the previous samples are all cutesy and whimsical. Well, what if YOU aren’t that cutesy type? Can this template STILL be one you would use?
Well I would have to say YES! Of course it can.

Sending you a happy hello…
Well how about an more “elegant sample? I ADORE this box!
Same “oven” template. Can you believe it? I don’t see an OVEN at all, do you?
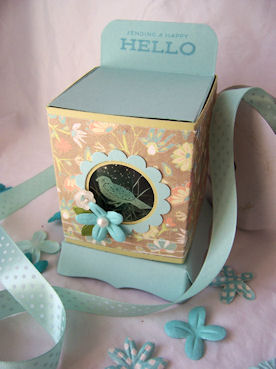
All I did was round the tab top corners, and instead of using the “oven door” template, I simply made a slider cover (directions for that come with template) instead.
I also punched a window, where I used my Poppin Acetate technique to give the bird some color, and shimmer.
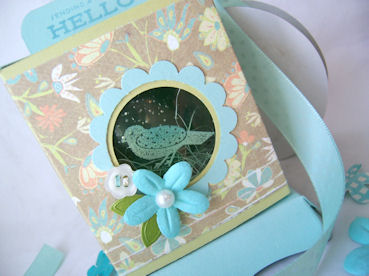
This used the PTI anniversary set-Everyday Classics. I love the paper, but for the LIFE of me cannot remember WHO makes it. Its like 2 years old. It match Aqua Mist perfectly!!
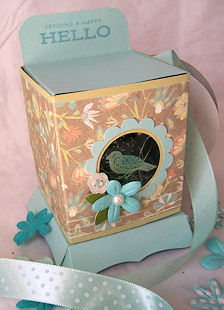
Now you may notice another “difference” with this sample-look at the pretty scalloped base. Doesn’t it make this look like a special display case or a fancy “jewelry” box type of presentation with that added base on it?
I used the largest Label #1 nestability to make my base. I think it gave the template a nice twist. I snipped the edges and adhered with Scor-tape for a sturdy base for the box to be layered onto.
I just love it.
OK now moving onto the third template- Captured Card Case
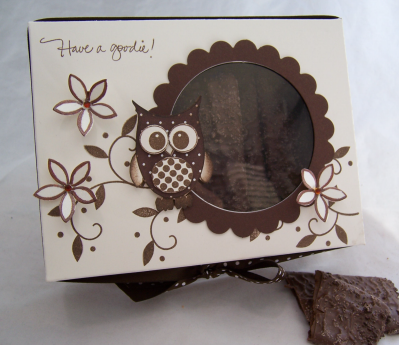
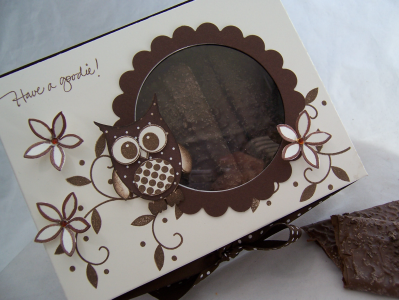
Have a goodie
As I said before, and I’ll say it again-this isn’t JUST a card case! How about a candy box? These are chocolate cookies, covered in chocolate, and more crushed cookies. TDF!!! I got them at Target 😀 I LOVE Target!
Yes! I did eat a “couple” :C Only the broken the ones!! I gave this box to my dad who came to visit this past weekend.
He LOVED it.
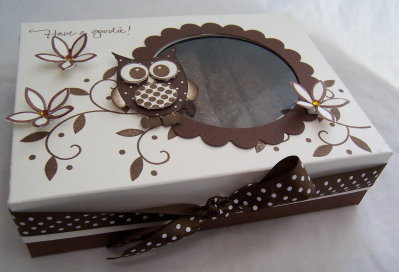
I have to say I LOVE the dual colors for this box template:D Makes a nice presentation, and while simple has a big impact. A great template for mass producing a NICE gift. EASY PEASY!
So I “repackaged” the pre-bought cookies (cause you all know how much I LOVE to cook/bake-NOT!) and now they look so much more special than throwing a box of store bought cookies to a friend-KWIM? I’d much rather spend my time putting thought INTO the gift packaging than MAKING it. If you do both, there goes the whole day! I like to call it TIME MANAGEMENT skills.
I used Wise Owl, Handwritten Note, and Beyond Basic Borders.
I cut my window in my lid PRIOR to assembling!
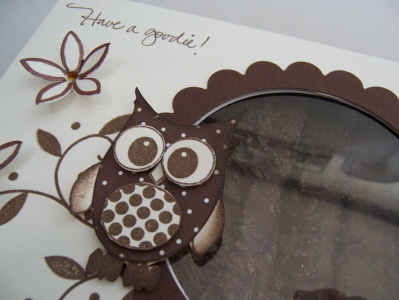
How cute is that owl?
I outlined my Bridal Confetti flowers with a marker. I like the look.
Well that is all for me.
Check in on Nicholes Blog, as well as Lisa, and Melissa
Tomorrow I have even MORE to share. I have been in creative mode for a week, now you get to SEE what keeps me SOOOOOOO crazy busy the last 2 weeks (on top of family stuff! LOL!)
Well thank you again for checking in here. All the emails and comments make every second of hard work (heck the time it take to POST alone) all worth it.
I’d love to hear which project is your fave and why!!
Till tomorrow
Here’s the BUZZZZ-on how to design it with Flair (2 more template peeks!)
Mar 10, 2009 Author: mytime | Filed under: Home decor/3-D items, My Timeless TemplatesIm so excited for today’s peek!! I’m sharing sample with my other 2 templates!
I hope you will NEED to give this a try and will be just as excited.
So here is the BUZZ! on one of the next My Timeless Templates ©! All templates shown are being released on the 15th–>HERE!
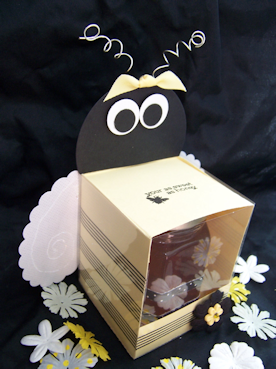
This is my favorite project 😀
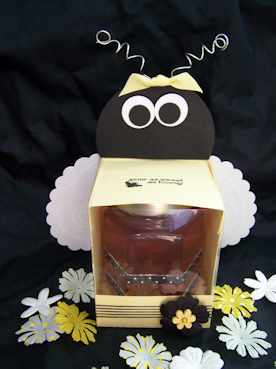
How cute is this little bee (box)? I was “buzzin” around my stamp room with excitement when I made this for 3 reasons
1) What a fabulous, and TOTALLY different use of the “original template
2) Its VERY easy to do. I love project that LOOK difficult but take MINUTES 😀 (yeah like 10 to be exact :D)
3) Its way too cute!
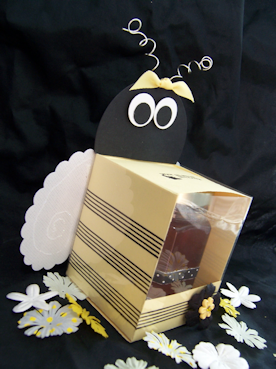
She is holding a jar of honey in her belly 😀

Now do you recognize this box?
Here is another view
Do you recongize it now?
Here is a hint!
It was one of my most REQUESTED templates to make for the past 9 months!!
Thats a pregnancy term!(another hint!)

How about now?
Do you know what template this is from?
Well, if you guessed Bun in the Oven YOU are correct!!
Did you ever think that an “OVEN” template could NOT be an oven?
This template was one I have gotten numerous emails about WEEKLY, since posting it back in May of last year.
Everyone has waited, and NOW it is time 😀
You can now not only make as many little ovens (easily!) as your heart desires, and MANY other gifts too.
When we thought to (finally) release the Bun in the Oven template, we thought-I don’t think it can be anything other than a oven! LOL! Well were we ever wrong! I have been playing around with it, and it is actually quite the amazing little box!
You can use the “oven door” hinge template, that comes with or without the window cut out, OR you can make a slider cover using patterned paper, acetate (as seen in this one), vellum or cardstock.
Endless possibilities-which I will continue to share during the countdown.
I mean look at this little bee!!
She could be a chick, a bunny, a lady bug……….seriously anything!
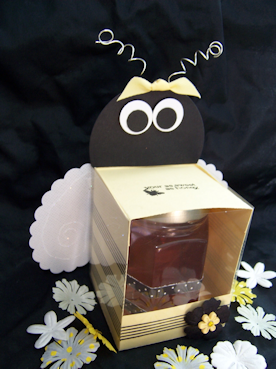
What I did for MY bee was Print template onto lemon tart cardstock, cut, and scored the box as directed. I then stamped my “bee” lines using Background Basics Retro, prior to assembling. I also stamped my sentiment from Honey Bees on the top.
Then put together per instruction 😀
I made my antennae using wire, and a pencil 😀 Adhered it to the little tab flap.
I then took mycircle nestability in made the head from black cardstock, cut it down , and adhered the bee head to the little flap (covering the antennae). Used circle punches for the eye 😀 Applied a ribbon to her head.
I then made an acetate slider cover (directions included with download of course), and adhered a flower to the front.
For the “wings” I punched 2 Marvy oval s(purple punch) from lined vellum cardstock, used my glue pen to draw on “swirls” for the wings, and added some glitter. They are adhered to my aceate slider withscor-tape-which is my adhesive of choice for ALL my templates!!
Now I can’t tell you HOW versatile this is ! I will share ANOTHER peek tomorrow 😀
Now we are on to one of my BEST template yet!
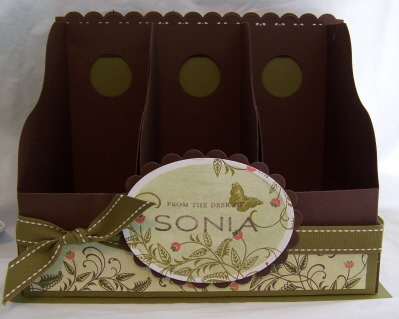
This one is called File it with Flair ©
(NOTE: I punched holes in my back panels-you don’t have to do that.)
Can you believe it?! Isn’t it gorgeous?! I can just see teachers desks all over the WORLD being adorned with stamper mom’s, personalized versions- of the File it with Flair © desk organizers!

This particular template is FAB-U-LOUS!
(Note: I made a backing to mine as well.)
It can easily fit a nice variety of items. It is especially made to be able to hold a large mount of A2 size cards/envelopes as well. Wait until you SEE all you can do with this particular template. WOW.
This is our File it with Flair box template-which is FABULOUS to use on its OWN. But the box you are looking at- the “File box” template-is printed, cut, scored and assembled THREE times, to create this organizer. So its a multi purpose file box.
So when you purchase this template (STILL ONLY $5!!) you will get
1) the File Box template, which has a really pretty curve to it
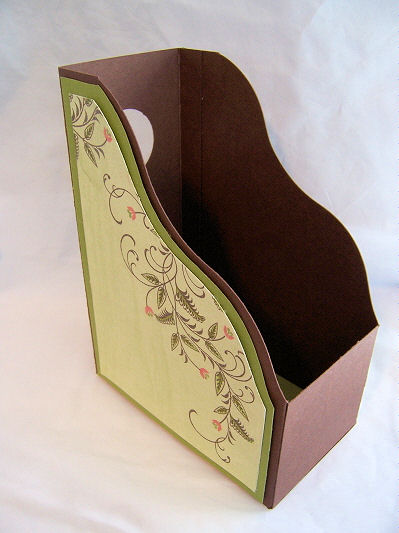
Photo of the SINGLE file-
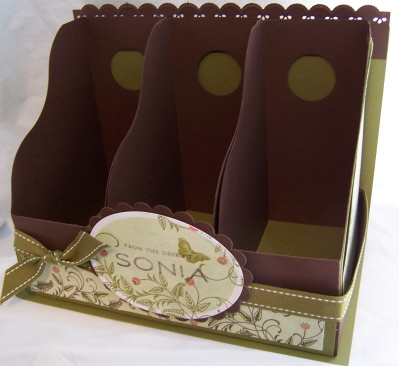
2) The “letter box” which perfectly fits the completed 3 File boxes inside, and/or can be used all on its own! Its a great way to contain the 3 completed file boxes perfectly.
Now you can see the letter box base-ribbon wrapped around top.

3) You also get 2 mat layers to print! So that means you can EASILY decorate the sides of your File it with Flair © box! I created 2 layers, already with the PERFECT curves for you to print with NO FUSS layering, to make your design quicker, easier, and perfect-everytime. I know those angle cuts (let alone CURVES-) can be a challenge! You should have seen me perfecting those! OH BOY!
Now you know how much I LOVE organization! Well I also love personalizing it. I have been very inspired by office products these days, and formatting them to be used by people like me, in a much more personal, and STYLISH fashion.
I love the large wooden versions, but they can run $70! That is INSANE!!! So I looked at it and figured out how to make a cardstock version 😀
Now you may be wanting to know WHAT supplies I used 😀
I used With Sympathy. I LOVE that set!
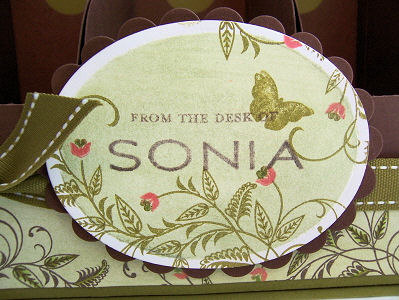
I made this for my friend Sonia 😀 I personalized it using Fresh alphabet.
stamped my vines in ripe avocado ink, then stamped my flowers separately in berry sorbet.
When it was ALL done, I used Shimmerz to paint the olive color. Really pretty in real life I think!
So! Thats it for peeks today 😀
I hope you are “buzzin” with excitement. I love hearing your feedback on the templates. I think this months release is the best yet.
OK now for more creative clicks-check Nichole, Lisa, Melissa and Heather’s blog!
Come back tomorrow for a special Group post, and of course MORE samples with the newest templates!
Thanks for stopping by.
Till tomorrow
#1-Video: Wishing you Captured Card Case © envelope tutorial
Mar 9, 2009 Author: mytime | Filed under: Cards, My Timeless Templates, MYTIME MOVIE/VIDEOs, Papertrey Newsletter, TutorialsHi everyone!
Let the excitement begin!
Before I go on & on in my usual BLABBER, I truly-from the bitty bottom of my heart, want to thank ALL of you. I am always in true awe by the love and support you offer to me, and so many in the stamping community. You know everything about me and my family (much to my husbands dismay! LOL!) You all let me blabber, and offer so much support! You laugh with me, cry with me-all of it. All over the world! You share a piece in my life, every time you check in. When I get ready to post my peeks every month, you all share the joy and excitement too! Its always amazing. I love when YOU all get personal with me too, and leave funny comments-the longer the better(wink), and I crack up. Some of you get me crying too! Anyway-I just really appreciate each and every one of, for all you give to me during my time spent here. I think YOU are all amazing, and YOU inspire me to keep sharing, and just plug along, everyday.
Seriously-huge hugs and THANKS!
Day 1 of the Papertrey Ink sample peeks 😀 I have lots to share daily for the next few days, so don’t miss a day 😀
I’m so beyond excited for today’s post! You have NO IDEA!
I am peeking a set by Melissa Bickford called Wishing You. It is FABULOUS! My new favorite MUST HAVE set ever!
I LOVE tulips-LOVE! My favorite flower 😀 This set is ALL super cool, fun and funky, inter-changeable tulips that are to die for. The sentiments alone ROCK the house. I kid you not! I had to make myself STOP using it.
Normally, monthly Nichole emails us peeks of the release, then posts our assignments. When I saw this set I couldn’t BARE the thought of NOT peeking it! A total Lauren set! LOL! So I immediately begged to let me peek it (this is not a usual occurrence at PTI! LOL!) Im usually a good girl and use what I am assigned, but this had to be an exception.
I also get to share a template peek 😀 We are releasing 3 templates this month 😀 Can I get a YAHOO!! One that I have been begged to do for almost a year!
Any guesses?
Well, you will see that one tomorrow.
I can’t wait to show you all the samples I have worked on! I’m just bouncin over here.
But, today I will share a video that features a great project using my FAVORITE set: Wishing You, and my newest My Timeless Template © Captured Card Case ©.
[veoh v17963042FhazMysw]
NOTE: DO NOT CLICK ON THE THUMBNAILS !If you click ON the thumbnails AFTER the video it takes you to the Veoh site. Some of the content there I am told is “R” and “X”rated and you may not want to do that around young children. So if you just watch the video here on my blog, and avoid the thumbnails you should be OK. Not sure WHY they don’t have ONLY stamp related videos pop up, but I guess some aren’t.
Bottom line: Click at your own risk!
I am not responsible for content that links to the videos from the Veoh site.
Thank you ![]()
Captured card case is a template that easily holds your standard, A2 size cards and envelopes. It is a hinge style box, that is perfect for so many treats! The way this template folds together allows you to use two colors of cardstock, giving you a striking look by having one color for the base, and another for the lid 😀
Here my base is done in True Black, and my lid is done in White

Again, don’t get stuck in the rut of thinking of it as JUST a card case! After today you will see many other uses for it. It will be a go to template for sure. Especially when mass producing gifts, like around the holidays, or for a class, maybe and event?
Now, speaking of “cards” and A2 size, I think we ALL get stuck in the A2 size card RUT!
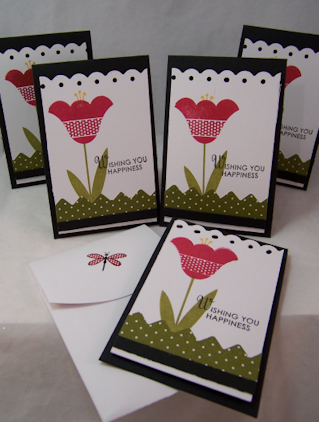
So today’s video I will show you how to EASILY mass produce a UBER cute set of cards (THAT ARE NOT A2 size!) in not time, using the Wishing You set.
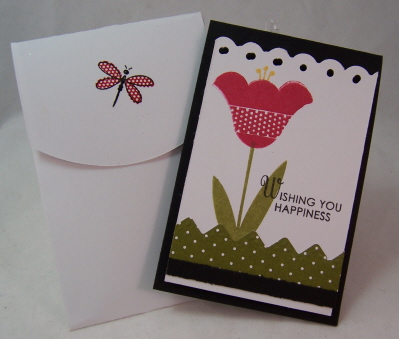
I also did a step by step tutorial, for my formula, for making your very OWN envelopes (ANY size!) to match your card creations. Includes a “liner” tutorial too.
You can see my “formula” —> here. I have had MANY requests for the VISUAL 😀
I really hope this helps you want to custom make your own envelopes more often. Better yet, try this version to give as a gift in my Captured Card Case ©! How much more fun are little note cards?
Today’s Captured Card Case easily fits my unusual sized cards and custom made envelopes! I think you will love it. Well I hope you do because it took me FOREVER to get this done. My computer deleted my first 2 videos, so I had to re-shoot, re-edit, and the whole nine yards of it. I just don’t have “luck” with this stuff KWIM?
OK onto the project!!
This is the close up of the box top

So I printed, cut, scored and assembled my Captured Card Case, as directed. I then decorated it to match what will be my card/envelope set.
(All this info is on the video, but for written reference) It is a bit overwhelming if you LOOK at the typed up version, but if you watch the video, you will see how SIMPLE it really all is 😀
CARD DIRECTIONS:
My finished cards are 2 3/4 X 4 1/4 (fold at top)
You need 2 sheets of 8 1/2 X 11 cardstock in True Black
Score along the 8 1/2 inch side at 4 1/4
Then along the 11 inch side-cut 4 pieces size 2 3/4 (do that for both pieces-giving you 8 card bases total)
——————————————————-
1 sheet of white cardstock 8 1/2 X 11
Cut 2 strips (along the 8 1/2 inch side) at 4.
This gives your 2 4 X 11 strips.
Punch a scallop border, along one side of each strip.
Cut strips at 2 1/2. You will get 4 per strip (8 total)
——————————————————
Stamp flower bud in Pure Poppy Ink
Flower buds in Summer Sunrise
Stamp stem in Ripe Avocado
————————————————-
Now punch a zig zag border from Bitty Dots 2008 paper in Ripe Avocado.
Cut down to 3/4 X 8 inches. You will need 4 strips.
—————————————————————–
Now cut 4 – 1/8 of an inch X 8 1/2 inch strips from true black cardstock, and layer onto bottom of zig zag “grass” border.
Layer these pieces, onto bottom of stamped layer, trimming excess.
————————————————————-
Stamp sentiment in True Black ink
————————————————
Layer completed mats onto black card bases using dimensionals
DONE! In MINUTES!!! *
8 Uber cute cards 😀
—————————————————————–
ENVELOPE TUTORIAL
Now for the mini envelopes-made using my formula
Envelope Paper Size Formula
1. Measure size of your finished card
2. Length of card plus 1 1/4″ = Width of Paper
3. Width of Card x 2 plus 1/2 of the width = Length of paper
——————————————————————————————–
I like to use PrintWorks photo paper in Matte finish (30 sheets for $4.99=0.16 a sheet=0.66 for our project envy cost!)
Cut photo paper 4 X 11 ( I left excess due to the type of curvy cut at the top)
Along the 4 inch side score at 1/2 inch then 3 1/2
Along 11 inch side score at 3, then 7 1/2.
Trim off excess on side from top and bottom panel.
Use corner rounder to round top sides of middle panel.
Placing the broken border part of the coluzzle ON the top flap score line-Use largest curve of coluzzle to round top flap.
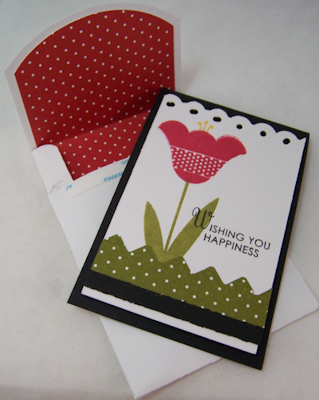
For patterned paper insert-cut 2 3/4 X 4
Along 2 3/4, align coluzzle to top of patterned piece, Cut 2nd largest circle curve.
Mat into envelope, leaving even border.
Apply adhesive to bottom side flaps.
Fold in side panels, and adhere bottom flap to sides.
Apply Scor-Tape to end of closure (leaving protective layer on) for future use.
———————————————————————————
Insert cards and envelopes into the Captured Card Case-perfect fit
Now they are ready to be presented to someone special 😀

Aren’t they adorable?!
DETAILS:
Now the stamp set, and template will not release until the 15th at Papertrey Ink
Be sure to check out Nichole & Melissa’s Blog for more samples!
Tomorrow I will share MORE template samples, and reveal the other 2 templates we are releasing!
I’d LOVE to know what you thought of today’s post/video!
I get so excited this time of the month 😀
Also, let me know if you give any of it a go-OK!
Cards for Ethan or the Weiman Family
Mar 9, 2009 Author: mytime | Filed under: UncategorizedI sit here feeling helpless over Ethan
See the post below here!
Thank you so much for all leaving her well wishes/prayers!
ONE thing I can do is help her with emails.
So if you want to send a card to their family please email me
I will send you their address!!
I think it would really brighten their days, to get some HAPPY mail 😀
Thank you to the stamping community for embracing them in your thoughts and prayers!
Once I get out my emotional funk today I will post the cards I make for them as well!
Prayers needed! Candy for a cause!
Mar 9, 2009 Author: mytime | Filed under: UncategorizedYes I am here. Im super busy wrapping up Papertrey Ink release stuff (which you will begin to see TOMORROW!), staying AWAY from the candy 😀
We are releasing THREE templates this month! WAHOO!! Im very excited, but with the extra template comes a bunch more “work” for me, so you can see the versatility in the release 😀
That being said-I know its Monday-and you are ALL waiting for my video 😀 but I will post it tomorrow with my countdown peek for Papertrey Ink! OK!
In the meantime…….I was alerted to some Blog Candy for a cause! Raising money for the benefit of Childrens Cancer
LOTS of companies donated to this cause 😀 Obviously Im so up for helping in any way I can!
Now to the prayer part. PLEASE send up prayers for Ethan!!
I had a post planned for today, but am just totally heart broken and emotionally drained for my friend Alicia. I cried for this family all night last night. My heart is so heavy right now.
I have come to know her over the last few months, as her son Ethan has Cancer. It has been a HUGE roller coaster ride for them, as he has relapsed and now thing have gotten worse. She emailed me some terrible news last night.
You can read her blog here
This is so close to home for me. I’m so upset for them. There are just not words.
Im sorry I can’t be all cheery, and post a cheery card, when I just need a good cry and lots of prayers for her. As a mom I can only imagine what she is feeling.
OK I’m ending here.
Squeeze your loved ones! OK! There are no guarantees of tomorrow, for anyone.
Life is cruel, Saturday Sketch Time, a linky, and work out stuff!
Mar 7, 2009 Author: mytime | Filed under: Cards, Saturday SketchSaturday! My favorite day of the week! Watch out because Im LONG winded today
I have been creating up a storm here, and my mojo is on FULL SPEED AHEAD!
In creative mode I took a leap of insanity! This leads into my ” life is cruel “spiel.
On huge whim I chopped over 8 inches OFF MY HAIR!!!!!!!!!!!!!! It hasn’t been this short since I was 12! Granted it was almost at my waist so its not BOY hair, but to me its close! LOL!
Im freaking out a bit, I must say. You’ll see it in my next video. I want to die! LOL!!! I don’t know what came over me. I knew it needed a TRIM, so I started, then just kept CHOPPING. I mean CHANGE isn’t that bad right?
After I was done, I went to get some retail therapy to heal my upset over my poor hair episode! It was better than eatting the HUNDRED plus candy bars we have to sell for t-ball!! More of the life is cruel rant……
Now we are talking 112-KING SIZE yum-a-licious candy bars-Take 5 (my fave), Caramellos (OMW! another fave) Kit Kats, Reese Peanut butter cups, Hersheys’ and Hershey’s with Almonds.
LIFE can be so cruel sometimes! Can it get much worse in the area of temptation? Add PMS to the mix and forget it!
Not only is it EASTER candy time (my weakest time of year because of Cadbury Cream egge, and the Cadbury mini eggs which ONLY come out at Easter), but I get stuck with these 2 huge boxes of candy. NOT COOL!!!
I work out EVERYDAY! I have worked SOOO hard to get healthy, and avoid BINGING on candy! I’d probably get SICK-literally from the chocolate if I even attempted it.
have lost 62lbs and fit into my pre-kid clothes! I’m starting to get those 6 pack abs!! YEAH! I see definition starting! I have a “2 pack”! LOL! My stomach is flat-arms toned, thighs tight!! My butt looks good, and I can slip on a size 7! For being 5’10 -30 years old, and having 3 kids, thats awesome in my book! I REFUSE to let myself break down and feed (literally) into the temptation of those candy bars. I may have to lock them up, but I am not going to do it.
I had ONE Take 5 yesterday-after the box starred at me for almost a WEEK, and swear that is my limit!! I’m ready to raffle them off here, just to get rid of them.
This is what happens when you put TWO kids in t-ball. Not only do you have to pay $30 per child to register, but you then have to SELL 56 candy bars PER kid! If you don’t, you STILL have to pay for the box!
With the economy being so bad I think thats a little insane! Its basically costing $86 per kid to play baseball! Now MY kids aren’t old enough for “baseball camp” and other stuff. We are talking, whack the ball off a TEE kind of baseball. Can’t cost THAT much.
Anywho, can you tell Im stressed?!
If I can’t sell both boxes (we have to pay for them anyway) Im totally doing a LITERAL Blog Candy here! I’ll keep you posted!
I took a quick break to blog, and share the sketch for this week with you all.
I know! Did you forget that was the point of my post! LOL! Boy did I get off track today.
CLICK ON Mister Linky below to add your link!
———————————————–
Now if you blog hop you will know that Mister Linky is become QUITE popular! So I am jumping aboard and giving him a go. I think this feature will also help YOU blog hop to see other peoples versions of the sketch, each week!
Now MY Mister Linky is a bit different! I did join the membership, so I can have the “usual” Mister Linky you see everywhere else. BUT, I have to have a special template enabled on my blog template, before I can post that style of Mister Linky. So I hope to get that going next week. Its up to the blog powers that be-when they have time.
SUPER TIP!!
Now for those of you who blog, and are more FRUGAL 😀 I found there is a FREE version! YEAH! Who doesn’t love free right??
That is the version I have installed here on my blog!
Does the SAME thing-just click it to add and view the links. Now they are all in one place, just pop up on a separate page.
Again this is the FREE version, and the other one will get installed here soon.
OK now onto the sketch!
I am so in love with it. I do want to take more time to make a few more, but have “work” to get done first.
Its Keyword mytimess26
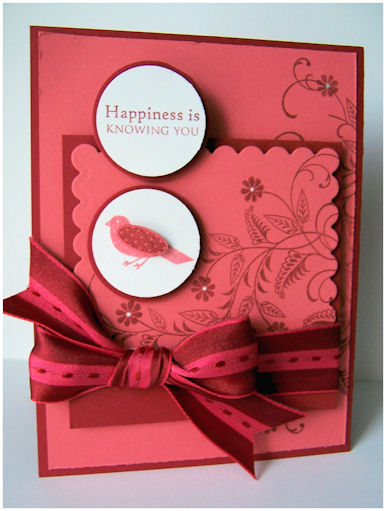
Happiness is…
I in going to say “I love” a lot in the post I think! LOL!
I Love the outcome of this card!
I also love that I used 4 different stamp sets to get 1 complete look.
I used With Sympathy,on the base, and the scallop panel. I love the swirlyness of it. I added some flowers from Honey Bees.I actually like pulling flowers from various sets for adding to the vine, rather than using the ones that come IN the set! LOL!! You really should try mixing up your sets and maximizing the look. You don’t HAVE to stick to ONLY the images that come in a set. Take some creative liberty and try to mix and match. You will have so much fun if you do that.
I also used the PTI anniversary set, Everyday Classics. That can be seen HERE! I love the bird in that set, and found it was perfect for this too. The sentiment is from Tags for Spring. Another FAB set.
I adore the monochromatic feel this has. The monchromatic look is always a great way to go if
1) you are in a color rut!
2) have limited time
3) limited supplies
4) want to quickly mass produce a card set-that matches perfectly
5) want a striking look-easily!
I got this combo idea from my GORGEOUS dark pink new ribbon from —->My Little Ribbon Shop
The colors in this particular ribbon match Papertrey Ink Berry Sorbet cardstock, and then Stampin Up! Cranberry Crisp.
Its been a LONG time since I ordered ribbon, and have been sick of the ones I already have, so I ordered a few to spice up my collection 😀 I got my order in 2 days! That was way quick!
Anywho, thats for stopping by, and I hope you try Mister Linky to add YOUR take on the sketch today.
Don’t miss what the Sketch Team did
I’m heading back to the stamp cave 😀 I hope to get my template peeks done (WHEW!!) and 2 videos this weekend.
That should all keep my mind OFF the candy!
On a side note I have some new workout videos Im loving!! Since I talked so much about candy, I better discuss working out too! LOL!
One video I LOVE-Jason got me called Skinny B*tch (I got the body one)
( I know-not a nice name :C, and they do swear on the video, so if this language offends you, you won’t want to purchase it (or do it when the kids are home from school!!)) I will say that are pretty amusing during the workout (not the swearing part! LOL! Just the talking)
This is a fabulous workout! Talk about targeting areas I didn’t know existed even with other videos! That is great!! You want to keep your body guessing and always work new areas. I like that they are like 20 minute segments for particular “areas’. Its a great 6am workout (which is when I do it-pre-coffee too!). You aren’t JUMPING around, but get a amazing workout. Really works those are to tone areas. I think you can do it not matter what your fitness level is. I do have to say they are fabulous with the INSTRUCTIONS on HOW you do the exercises-you just gotta follow along and pick up where you can. You will get the moves on some after a few times doing the video. Like most, I say just go at your own pace, do what you can, and if you don’t make it through ALL of exercises just keep trying to improve!
Remember you don’t NEED to got the the gym to work out and get HEALTHY (remember NO DIETS! Diets are temporary and don’t really work long term for a reason!) Just make Healthier choices!
You can do it.
Now another I love is Denise Austin 5 minute Target Toners!
(Now Im not saying that I don’t still LOVE Mitch Gaylords workout! I do, and he still visits me once a week or so-but I need to mix it up or Ill get BORED!)
You MUST know WHO Denise Austin is! She has been around since I was a kid! My mom use to get up at 6am and do her workouts by the beach! LOL! I remember it like it was yesterday! LOL! All I can say is if THIS workout is what she does, to look THAT HOT at her age, count me in!!! She is in killer shape and has had 2 kids. When I grow up I want to be Denise Austin! LOL!
Another FABULOUS one-excellent for everyone! No jumping around either. Works on TARGETING those hard to tone areas. I swear she is the reason I lost another 4lbs, and 1 inch off my waist! I do her videos at 6 am too!
Now if you are going to TRY to tell my you can’t find 5 minutes in a day to get some areas worked on, YOU are only fooling yourself!
You can pick ONE area to work out, customize your workout, OR work the GROUP of a certain area-like Upper body lower body. it will group the workouts to target that area. I usually to the GROUP (so a whopping 25 minute workout) and alternate what parts I work each day.
The downfall-she talks in tune with the music and its a little weird at first! LOL! The first time I did this work I laughed more than I worked out because of the way she spoke through it. Basically its a current version of a workout vid-you’d expect to see in the 1980’s. If you get it you will see what I mean.
I can tell you, its worth every penny. Especially her ab workout and waist cincher! LOVE it!!!!!!!!!!!!!
OK now Im really going! I hope if you set some goals for yourself you are working on them DAILY! Its like AA. You need to work on it daily, one day at a time! LOL! Avoiding each temptation as it comes. Choose better snack foods and keep yourself “full” so you don’t BINGE!
On a quick side note…anyone else’s kids KILLING eachother these days? Or is it just mine?
If I didn’t chop my hair off I’d have surely pulled it all out by now. Where is SPRING?!!
OK, really going now.
Until tomorrow…….
My Etsy

Who I Designed For
Blogroll
- Alicia
- Alli Miles
- Ally Blankenship
- Amber
- Andi @ crafts on a whim
- Angel R
- Angie Z
- Anne Kranitz
- Becky O
- Bee
- Beth Silaka
- Bethany Paull
- Beverly Nash
- Bobbie
- Cambria
- Cammie
- Card of the Week
- Card Positioning System (CPS)
- Cards for Cancer
- Catherine Doucette
- Charmaine
- Cheryl Sims
- Chriss Rollins
- Christina
- Christine Ewing
- Christine Wooden
- Colleen Schaan
- Craft Critique
- Craft Gossip
- Crystal
- Dawn Easton
- Emily Giovanni
- Geny
- Holly
- Igne Groot
- Inspirational Craft Blogs
- Irene
- Jami Sibley
- Jeanne Streiff
- Jen del Muro
- Jeni Bond
- JenMarie
- Jenn Balcer
- Jenn Diercks
- Jenn O
- Jennifer E
- Jennifer Mick
- Jennifer Pereda
- Jennifer-Sweet Treat
- Joanne Basile
- Jodi Collins
- Julia Stainton
- Julie Masse
- Karen
- Kathryn Berthiaume
- Katie Cotton
- Kelley Holland
- Kendra
- Kim Scholfield
- Kris’s Color Stripes! Get inspired here
- Kristen Dubosque
- Kristin Eberline
- Kristine
- Laura @ Sunshine Stamper
- Laura Turnmire
- Laurie Schmidlin
- Lesa Rapp
- Linda Duke
- Linda-LSN
- Lindsey Botkin
- Lisa (lakind scs)
- Lisa Kind
- Lori Craig
- Maggie
- Mara Campbell
- Maria
- Maria Levine
- Mary
- MaryJo
- Melanie M
- Monique Hansen
- Moxie Fab World
- Pam Imholz
- PaperCrafts Connection
- Peppers and Pollywogs Kids party site
- Rebecca Grohall
- Rita
- Robyn
- Rose Ann
- Sarah Vrolyk
- Sharon Harnist
- Sharon Johnson
- Sharon Rivera (a chemisrty with paper)
- Sherrie
- Sophia Landry
- Storage Units, Ink, & More Blog
- Sue Berker
- Susan (Rainy)
- Tangii Crane
- Tracy
- Tricia Traxler
- Trudee
- Velta
- VivLyn
- Zena
MTME Pretty Palette Color Team
MTME Pretty Patterns Sketch Team
My Time Made Easy TM LLC
Shop till you drop!
Lauren Meader
About Me
Copyrighted material
Subscribe To My Blog
Pages
- About me
- Alexa’s Story!
- My Crafty Corner!
- My Time Made Easy™ LLC
- Our Make A Wish Trip to Disney!
- Resume/Publication List
Calendar
Archives
- August 2013
- July 2013
- June 2013
- May 2013
- April 2013
- March 2013
- February 2013
- January 2013
- December 2012
- November 2012
- October 2012
- September 2012
- August 2012
- July 2012
- June 2012
- May 2012
- April 2012
- March 2012
- February 2012
- January 2012
- December 2011
- November 2011
- October 2011
- September 2011
- August 2011
- July 2011
- June 2011
- May 2011
- April 2011
- March 2011
- February 2011
- January 2011
- December 2010
- November 2010
- October 2010
- September 2010
- August 2010
- July 2010
- June 2010
- May 2010
- April 2010
- March 2010
- February 2010
- January 2010
- December 2009
- November 2009
- October 2009
- September 2009
- August 2009
- July 2009
- June 2009
- May 2009
- April 2009
- March 2009
- February 2009
- January 2009
- December 2008
- November 2008
- October 2008
- September 2008
- August 2008
- July 2008
- June 2008
- May 2008
- April 2008
- March 2008
- February 2008
- January 2008
- December 2007
- November 2007
- October 2007
- September 2007
- August 2007
- July 2007
- June 2007
- May 2007
- April 2007
- March 2007
- January 2007
Categories
- About Me
- All That Scraps
- blogger challenge
- camera/photo play
- Cards
- Contests
- family stuff
- FOR SALE
- Home decor/3-D items
- How to FAKE it!
- Introduction
- JUGS Challenge
- JustRite Stampers
- Lizzie Anne Designs
- My family stuff
- My Stamping Space
- My Time Made Easy
- My Time To Color Challenge
- My Time to Create Challenge
- My Timeless Template Challenge
- My Timeless Templates
- Mytime Mail
- MYTIME MOVIE/VIDEOs
- Papertrey Newsletter
- Pink Cat Studio
- Pretty Palette Challenge
- Pretty Patterns Sketch
- Product Opinions and Must haves
- Recipe's
- Saturday Sketch
- Smilebox Creations
- Stampavie
- Tutorials
- Uncategorized
- videos
Most Popular
- Create your own Onesie Card Tutorial-and important NOTE! PLEASE READ (2529)
- Saturday Sketch-Boxed bag holder (2333)
- Going GREEN! Fancy Flower Flourish-Closure Video (1478)
- Fabulous Favorite - Giveaway! (1336)
- a Prayer Request (1232)
- QUICK-Easter Baskets from Nestabilities-PTI style-and blog challenge (1063)
- Teaser Sketch (999)
- February Release Giveway! (and a little peek) (996)
- Group Post and Rambling Rose Video Tutorial (985)
- GIVEAWAY! Who wants it all?! (895)
Recent Comments (RSS)
- 첫충사이트: 완전히 흥미로운 블로그 게시입니다. 저는
- sarah: Wow, Lauren, what a stunning
- hedie: خرید راهبند
- 야동: Love to read it,Waiting For
- 야동: This seller is in a
- 바카라사이트: 여기 처음 왔어요. 나는이 게시판을
- 야동티비: I was surfing the Internet
- 바카라사이트: 비슷한 주제에 대한 흥미로운 정보를
- 바카라사이트: "여기에 제공해 주신 귀중한 정보와
- 온라인홀덤: 유익한 웹 사이트를 게시하는 데
Copyright © 2007 - My Time, My Creations, My Stampendence - is proudly powered by WordPress
This blog has been Tweaked and Designed by Sara Williams