Archive for March 9th, 2009
#1-Video: Wishing you Captured Card Case © envelope tutorial
Mar 9, 2009 Author: mytime | Filed under: Cards, My Timeless Templates, MYTIME MOVIE/VIDEOs, Papertrey Newsletter, TutorialsHi everyone!
Let the excitement begin!
Before I go on & on in my usual BLABBER, I truly-from the bitty bottom of my heart, want to thank ALL of you. I am always in true awe by the love and support you offer to me, and so many in the stamping community. You know everything about me and my family (much to my husbands dismay! LOL!) You all let me blabber, and offer so much support! You laugh with me, cry with me-all of it. All over the world! You share a piece in my life, every time you check in. When I get ready to post my peeks every month, you all share the joy and excitement too! Its always amazing. I love when YOU all get personal with me too, and leave funny comments-the longer the better(wink), and I crack up. Some of you get me crying too! Anyway-I just really appreciate each and every one of, for all you give to me during my time spent here. I think YOU are all amazing, and YOU inspire me to keep sharing, and just plug along, everyday.
Seriously-huge hugs and THANKS!
Day 1 of the Papertrey Ink sample peeks 😀 I have lots to share daily for the next few days, so don’t miss a day 😀
I’m so beyond excited for today’s post! You have NO IDEA!
I am peeking a set by Melissa Bickford called Wishing You. It is FABULOUS! My new favorite MUST HAVE set ever!
I LOVE tulips-LOVE! My favorite flower 😀 This set is ALL super cool, fun and funky, inter-changeable tulips that are to die for. The sentiments alone ROCK the house. I kid you not! I had to make myself STOP using it.
Normally, monthly Nichole emails us peeks of the release, then posts our assignments. When I saw this set I couldn’t BARE the thought of NOT peeking it! A total Lauren set! LOL! So I immediately begged to let me peek it (this is not a usual occurrence at PTI! LOL!) Im usually a good girl and use what I am assigned, but this had to be an exception.
I also get to share a template peek 😀 We are releasing 3 templates this month 😀 Can I get a YAHOO!! One that I have been begged to do for almost a year!
Any guesses?
Well, you will see that one tomorrow.
I can’t wait to show you all the samples I have worked on! I’m just bouncin over here.
But, today I will share a video that features a great project using my FAVORITE set: Wishing You, and my newest My Timeless Template © Captured Card Case ©.
[veoh v17963042FhazMysw]
NOTE: DO NOT CLICK ON THE THUMBNAILS !If you click ON the thumbnails AFTER the video it takes you to the Veoh site. Some of the content there I am told is “R” and “X”rated and you may not want to do that around young children. So if you just watch the video here on my blog, and avoid the thumbnails you should be OK. Not sure WHY they don’t have ONLY stamp related videos pop up, but I guess some aren’t.
Bottom line: Click at your own risk!
I am not responsible for content that links to the videos from the Veoh site.
Thank you ![]()
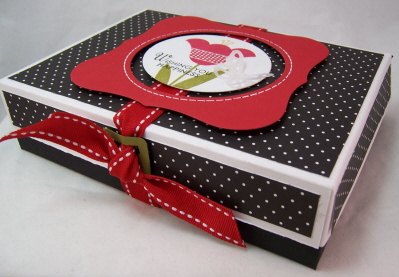
Captured card case is a template that easily holds your standard, A2 size cards and envelopes. It is a hinge style box, that is perfect for so many treats! The way this template folds together allows you to use two colors of cardstock, giving you a striking look by having one color for the base, and another for the lid 😀
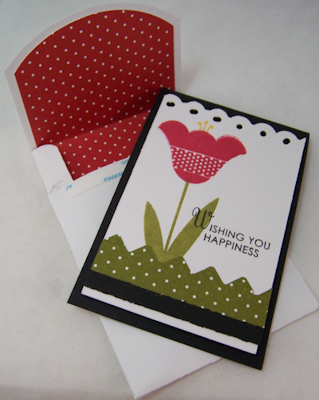
Here my base is done in True Black, and my lid is done in White

Again, don’t get stuck in the rut of thinking of it as JUST a card case! After today you will see many other uses for it. It will be a go to template for sure. Especially when mass producing gifts, like around the holidays, or for a class, maybe and event?
Now, speaking of “cards” and A2 size, I think we ALL get stuck in the A2 size card RUT!
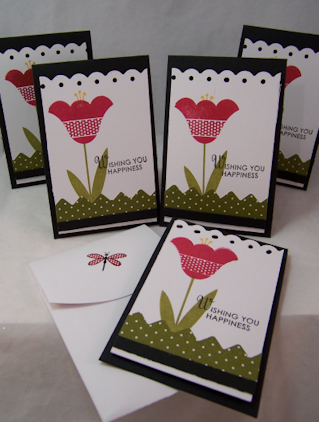
So today’s video I will show you how to EASILY mass produce a UBER cute set of cards (THAT ARE NOT A2 size!) in not time, using the Wishing You set.
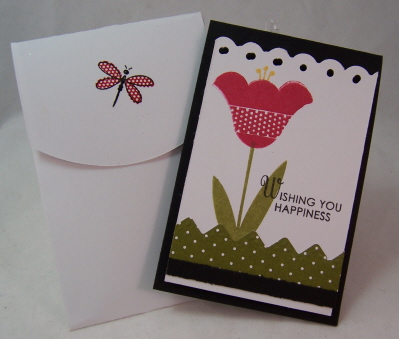
I also did a step by step tutorial, for my formula, for making your very OWN envelopes (ANY size!) to match your card creations. Includes a “liner” tutorial too.
You can see my “formula” —> here. I have had MANY requests for the VISUAL 😀
I really hope this helps you want to custom make your own envelopes more often. Better yet, try this version to give as a gift in my Captured Card Case ©! How much more fun are little note cards?
Today’s Captured Card Case easily fits my unusual sized cards and custom made envelopes! I think you will love it. Well I hope you do because it took me FOREVER to get this done. My computer deleted my first 2 videos, so I had to re-shoot, re-edit, and the whole nine yards of it. I just don’t have “luck” with this stuff KWIM?
OK onto the project!!
This is the close up of the box top

So I printed, cut, scored and assembled my Captured Card Case, as directed. I then decorated it to match what will be my card/envelope set.
(All this info is on the video, but for written reference) It is a bit overwhelming if you LOOK at the typed up version, but if you watch the video, you will see how SIMPLE it really all is 😀
CARD DIRECTIONS:
My finished cards are 2 3/4 X 4 1/4 (fold at top)
You need 2 sheets of 8 1/2 X 11 cardstock in True Black
Score along the 8 1/2 inch side at 4 1/4
Then along the 11 inch side-cut 4 pieces size 2 3/4 (do that for both pieces-giving you 8 card bases total)
——————————————————-
1 sheet of white cardstock 8 1/2 X 11
Cut 2 strips (along the 8 1/2 inch side) at 4.
This gives your 2 4 X 11 strips.
Punch a scallop border, along one side of each strip.
Cut strips at 2 1/2. You will get 4 per strip (8 total)
——————————————————
Stamp flower bud in Pure Poppy Ink
Flower buds in Summer Sunrise
Stamp stem in Ripe Avocado
————————————————-
Now punch a zig zag border from Bitty Dots 2008 paper in Ripe Avocado.
Cut down to 3/4 X 8 inches. You will need 4 strips.
—————————————————————–
Now cut 4 – 1/8 of an inch X 8 1/2 inch strips from true black cardstock, and layer onto bottom of zig zag “grass” border.
Layer these pieces, onto bottom of stamped layer, trimming excess.
————————————————————-
Stamp sentiment in True Black ink
————————————————
Layer completed mats onto black card bases using dimensionals
DONE! In MINUTES!!! *
8 Uber cute cards 😀
—————————————————————–
ENVELOPE TUTORIAL
Now for the mini envelopes-made using my formula
Envelope Paper Size Formula
1. Measure size of your finished card
2. Length of card plus 1 1/4″ = Width of Paper
3. Width of Card x 2 plus 1/2 of the width = Length of paper
——————————————————————————————–
I like to use PrintWorks photo paper in Matte finish (30 sheets for $4.99=0.16 a sheet=0.66 for our project envy cost!)
Cut photo paper 4 X 11 ( I left excess due to the type of curvy cut at the top)
Along the 4 inch side score at 1/2 inch then 3 1/2
Along 11 inch side score at 3, then 7 1/2.
Trim off excess on side from top and bottom panel.
Use corner rounder to round top sides of middle panel.
Placing the broken border part of the coluzzle ON the top flap score line-Use largest curve of coluzzle to round top flap.
For patterned paper insert-cut 2 3/4 X 4
Along 2 3/4, align coluzzle to top of patterned piece, Cut 2nd largest circle curve.
Mat into envelope, leaving even border.
Apply adhesive to bottom side flaps.
Fold in side panels, and adhere bottom flap to sides.
Apply Scor-Tape to end of closure (leaving protective layer on) for future use.
———————————————————————————
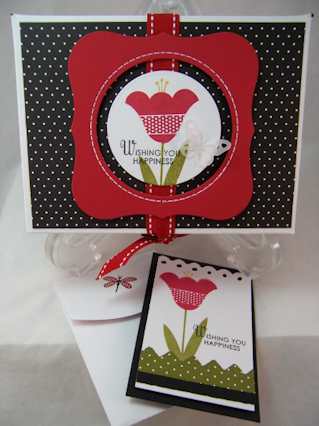
Insert cards and envelopes into the Captured Card Case-perfect fit
Now they are ready to be presented to someone special 😀

Aren’t they adorable?!
DETAILS:
Now the stamp set, and template will not release until the 15th at Papertrey Ink
Be sure to check out Nichole & Melissa’s Blog for more samples!
Tomorrow I will share MORE template samples, and reveal the other 2 templates we are releasing!
I’d LOVE to know what you thought of today’s post/video!
I get so excited this time of the month 😀
Also, let me know if you give any of it a go-OK!
Cards for Ethan or the Weiman Family
Mar 9, 2009 Author: mytime | Filed under: UncategorizedI sit here feeling helpless over Ethan
See the post below here!
Thank you so much for all leaving her well wishes/prayers!
ONE thing I can do is help her with emails.
So if you want to send a card to their family please email me
I will send you their address!!
I think it would really brighten their days, to get some HAPPY mail 😀
Thank you to the stamping community for embracing them in your thoughts and prayers!
Once I get out my emotional funk today I will post the cards I make for them as well!
Prayers needed! Candy for a cause!
Mar 9, 2009 Author: mytime | Filed under: UncategorizedYes I am here. Im super busy wrapping up Papertrey Ink release stuff (which you will begin to see TOMORROW!), staying AWAY from the candy 😀
We are releasing THREE templates this month! WAHOO!! Im very excited, but with the extra template comes a bunch more “work” for me, so you can see the versatility in the release 😀
That being said-I know its Monday-and you are ALL waiting for my video 😀 but I will post it tomorrow with my countdown peek for Papertrey Ink! OK!
In the meantime…….I was alerted to some Blog Candy for a cause! Raising money for the benefit of Childrens Cancer
LOTS of companies donated to this cause 😀 Obviously Im so up for helping in any way I can!
Now to the prayer part. PLEASE send up prayers for Ethan!!
I had a post planned for today, but am just totally heart broken and emotionally drained for my friend Alicia. I cried for this family all night last night. My heart is so heavy right now.
I have come to know her over the last few months, as her son Ethan has Cancer. It has been a HUGE roller coaster ride for them, as he has relapsed and now thing have gotten worse. She emailed me some terrible news last night.
You can read her blog here
This is so close to home for me. I’m so upset for them. There are just not words.
Im sorry I can’t be all cheery, and post a cheery card, when I just need a good cry and lots of prayers for her. As a mom I can only imagine what she is feeling.
OK I’m ending here.
Squeeze your loved ones! OK! There are no guarantees of tomorrow, for anyone.
My Etsy

Who I Designed For
Blogroll
- Alicia
- Alli Miles
- Ally Blankenship
- Amber
- Andi @ crafts on a whim
- Angel R
- Angie Z
- Anne Kranitz
- Becky O
- Bee
- Beth Silaka
- Bethany Paull
- Beverly Nash
- Bobbie
- Cambria
- Cammie
- Card of the Week
- Card Positioning System (CPS)
- Cards for Cancer
- Catherine Doucette
- Charmaine
- Cheryl Sims
- Chriss Rollins
- Christina
- Christine Ewing
- Christine Wooden
- Colleen Schaan
- Craft Critique
- Craft Gossip
- Crystal
- Dawn Easton
- Emily Giovanni
- Geny
- Holly
- Igne Groot
- Inspirational Craft Blogs
- Irene
- Jami Sibley
- Jeanne Streiff
- Jen del Muro
- Jeni Bond
- JenMarie
- Jenn Balcer
- Jenn Diercks
- Jenn O
- Jennifer E
- Jennifer Mick
- Jennifer Pereda
- Jennifer-Sweet Treat
- Joanne Basile
- Jodi Collins
- Julia Stainton
- Julie Masse
- Karen
- Kathryn Berthiaume
- Katie Cotton
- Kelley Holland
- Kendra
- Kim Scholfield
- Kris’s Color Stripes! Get inspired here
- Kristen Dubosque
- Kristin Eberline
- Kristine
- Laura @ Sunshine Stamper
- Laura Turnmire
- Laurie Schmidlin
- Lesa Rapp
- Linda Duke
- Linda-LSN
- Lindsey Botkin
- Lisa (lakind scs)
- Lisa Kind
- Lori Craig
- Maggie
- Mara Campbell
- Maria
- Maria Levine
- Mary
- MaryJo
- Melanie M
- Monique Hansen
- Moxie Fab World
- Pam Imholz
- PaperCrafts Connection
- Peppers and Pollywogs Kids party site
- Rebecca Grohall
- Rita
- Robyn
- Rose Ann
- Sarah Vrolyk
- Sharon Harnist
- Sharon Johnson
- Sharon Rivera (a chemisrty with paper)
- Sherrie
- Sophia Landry
- Storage Units, Ink, & More Blog
- Sue Berker
- Susan (Rainy)
- Tangii Crane
- Tracy
- Tricia Traxler
- Trudee
- Velta
- VivLyn
- Zena
MTME Pretty Palette Color Team
MTME Pretty Patterns Sketch Team
My Time Made Easy TM LLC
Shop till you drop!
Lauren Meader
About Me
Copyrighted material
Subscribe To My Blog
Pages
- About me
- Alexa’s Story!
- My Crafty Corner!
- My Time Made Easy™ LLC
- Our Make A Wish Trip to Disney!
- Resume/Publication List
Calendar
Archives
- August 2013
- July 2013
- June 2013
- May 2013
- April 2013
- March 2013
- February 2013
- January 2013
- December 2012
- November 2012
- October 2012
- September 2012
- August 2012
- July 2012
- June 2012
- May 2012
- April 2012
- March 2012
- February 2012
- January 2012
- December 2011
- November 2011
- October 2011
- September 2011
- August 2011
- July 2011
- June 2011
- May 2011
- April 2011
- March 2011
- February 2011
- January 2011
- December 2010
- November 2010
- October 2010
- September 2010
- August 2010
- July 2010
- June 2010
- May 2010
- April 2010
- March 2010
- February 2010
- January 2010
- December 2009
- November 2009
- October 2009
- September 2009
- August 2009
- July 2009
- June 2009
- May 2009
- April 2009
- March 2009
- February 2009
- January 2009
- December 2008
- November 2008
- October 2008
- September 2008
- August 2008
- July 2008
- June 2008
- May 2008
- April 2008
- March 2008
- February 2008
- January 2008
- December 2007
- November 2007
- October 2007
- September 2007
- August 2007
- July 2007
- June 2007
- May 2007
- April 2007
- March 2007
- January 2007
Categories
- About Me
- All That Scraps
- blogger challenge
- camera/photo play
- Cards
- Contests
- family stuff
- FOR SALE
- Home decor/3-D items
- How to FAKE it!
- Introduction
- JUGS Challenge
- JustRite Stampers
- Lizzie Anne Designs
- My family stuff
- My Stamping Space
- My Time Made Easy
- My Time To Color Challenge
- My Time to Create Challenge
- My Timeless Template Challenge
- My Timeless Templates
- Mytime Mail
- MYTIME MOVIE/VIDEOs
- Papertrey Newsletter
- Pink Cat Studio
- Pretty Palette Challenge
- Pretty Patterns Sketch
- Product Opinions and Must haves
- Recipe's
- Saturday Sketch
- Smilebox Creations
- Stampavie
- Tutorials
- Uncategorized
- videos
Most Popular
- Create your own Onesie Card Tutorial-and important NOTE! PLEASE READ (2529)
- Saturday Sketch-Boxed bag holder (2333)
- Going GREEN! Fancy Flower Flourish-Closure Video (1478)
- Fabulous Favorite - Giveaway! (1336)
- a Prayer Request (1231)
- QUICK-Easter Baskets from Nestabilities-PTI style-and blog challenge (1063)
- Teaser Sketch (999)
- February Release Giveway! (and a little peek) (996)
- Group Post and Rambling Rose Video Tutorial (985)
- GIVEAWAY! Who wants it all?! (895)
Recent Comments (RSS)
- 야동: Love to read it,Waiting For
- 야동: This seller is in a
- 바카라사이트: 여기 처음 왔어요. 나는이 게시판을
- 야동티비: I was surfing the Internet
- 바카라사이트: 비슷한 주제에 대한 흥미로운 정보를
- 바카라사이트: "여기에 제공해 주신 귀중한 정보와
- 온라인홀덤: 유익한 웹 사이트를 게시하는 데
- 홀덤나라: 나는 당신의 블로그를 정말 좋아합니다.
- lisa: Technology, too, has left an
- 주소모음: 흠 !! 이 블로그는 정말
Copyright © 2007 - My Time, My Creations, My Stampendence - is proudly powered by WordPress
This blog has been Tweaked and Designed by Sara Williams