Archive for February, 2009
FYI re: Videos
Feb 16, 2009 Author: mytime | Filed under: UncategorizedI was informed that if you read my blog through Google Reader, News Gatoe and a few other sources, you cannot SEE the video with that program.
So in order to view them you would have to visit my actual blog to view it.
Thanks
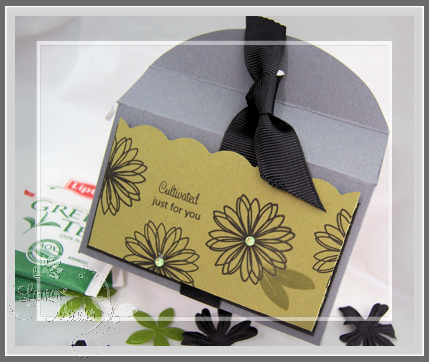
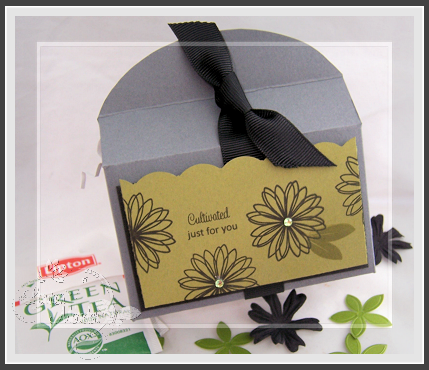
Video-Versatility Box
Feb 16, 2009 Author: mytime | Filed under: Home decor/3-D items, MYTIME MOVIE/VIDEOs, Tutorials, UncategorizedI hope you all enjoy today’s video.
NOTE: If you click ON the thumbnails AFTER the video it takes you to the Veoh site. Some of the content there I am told is “R” rated and you may not want to do that around young children. So if you just watch the video here on my blog, and avoid the thumnails you should be OK. Not sure WHY they don’t have ONLY stamp related videos pop up, but I guess some aren’t.
You won’t want to miss this one, let me tell you 😀
I had SO much fun making this box. I’m definitely getting the hang of this I think 😀 I’m so excited that the editing process is getting so much easier!
You’ll have to let me know what you think. I work really hard to get these done, so I hope they are helpful. All in all they are still time consuming, but I have enjoyed it.
I’m also wide open to things you want to see in the future 😀
NOTE: This is the type of project you need to SEE, so you get HOW it goes together. Too hard to “explain”, so I am not providing instructions here. They are all on the video. Write down the steps/measurements. The hard work has already been done for you-the design part!
I have been REALLY busy with my family, so thank you for understanding, and I hope the video provides you with all you need to make this. It’s nice to be busy for a “good” reason. Not due to illness. My brother and I have grown closer as we grow older and the birth of his daughter has made us closer than ever. I feel so blessed to have him in my life and his little addition. Valerie has been an amazing mom too. She’s a natural. Gabriella is a REALLY good baby so far too. I would love to just take her home with me and keep her for myself 😀 Guess this is the next best thing! LOL!
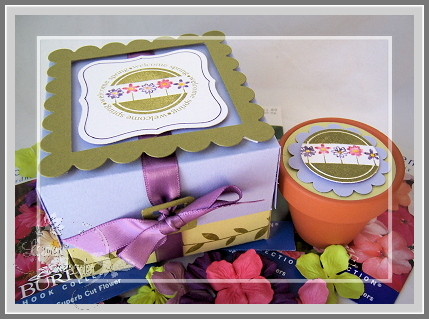
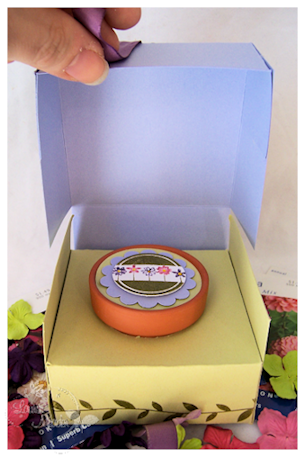
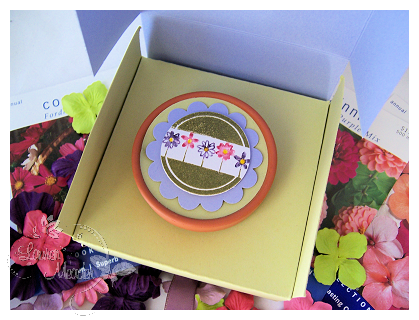
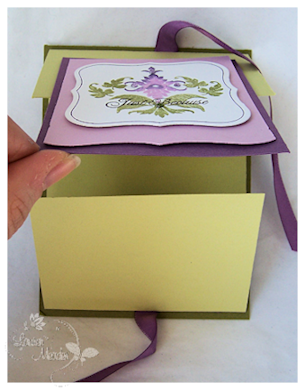
Versatility Box
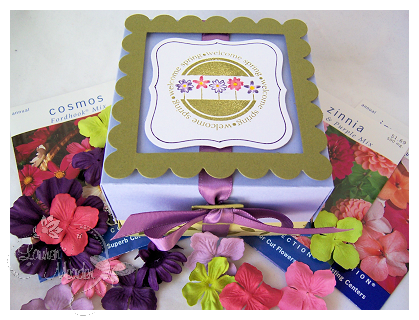
I was very excited by this one 😀 The finished size is 3 1/2 squared by 2 1/2 inches tall.

I call it the versatility box due to the opening you can create to fit a variety if items!
This one will hold a little $1 flower pot!
Did you think a little gift could be so cute?
Here is a closer view of the little pot!
Many would like to think of it as a “cupcake” style box. I develop my own idea of this style and shared it via video just for you.
I HOPE you give it try!
SUPPLIES:
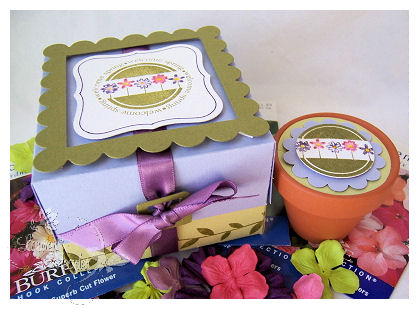
Welcome Spring Flower Pot Box-label close up
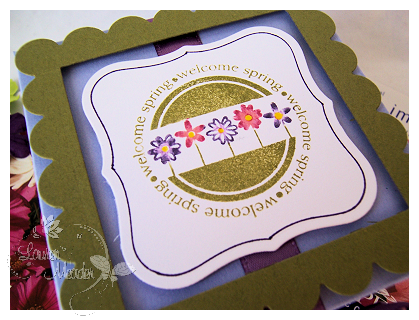
Supplies:From Papertrey Ink
Stamps : Tags for Spring, Beyond Basic Borders
Cardstock : Almost Amethyst, Ripe avocado, white
Ink- Various markers, Ripe avocado, eggplant marker
Ribbon-Plum pudding satin
Other-nestabilities lable 1, square nestability, buckle punch, coluzzle, 2 inch circle punch, scallop circle punch
INFO!
The following info is being provided for you due to the MANY comments and emails I have received. I am not affiliated with this company AT ALL (in other words I get nothing for promoting them! LOL! Although I wish I did get some adhesive) but I love their prices and SPEEDY service!! Seriously top notch. The shipping is a bit high, but I try to order as much as I can afford up front to make it worth it.
SOOOOOO FYI-the large tape runner you see in my videos is called an ATG Gun. I have the Red 714.
I purchase mine HERE for ONLY $41.69 (Don’t choke! Its SOOOO worth the $ you save on adhesive, and that is the cheapest place ever found.)
I used the GOLD 1/4 inch adhesive with my gun found HERE! Its photo safe. You get 36yds of tape for ONLY $3.49! You can’t beat that.
So that is all for today.
I hope to get back into the swing of things after this release.
Thank you ALL so much for the kind words, comments and support here and for my Timeless Template line. You all make every minute I spend doing ALL of this so worth my while! Just knowing you can inspire ONE person is amazing!
SO SMOOCHES to you all!
Feb 15, 2009 Author: mytime | Filed under: Uncategorized
Sorry about the HUGE photos! Im workin with a new editing program.
YIKES! I had no idea they’d be so large when editing.
OK I had to share some more photos.
I just got back from the movies with my own kids so figured I’d take a quick break to post.
I totally have “new mommy” brain and she isn’t even mine. I totally forgot to post the sketch let alone get one done :C SORRY about that.
I’m already anxious till next time I see her. Luckily the kids are on vacation after this week so I hope I can steal her for a bit 😀
I HOPE I can get her name gift done BEFORE then, cause once I get my hands on her its all over.
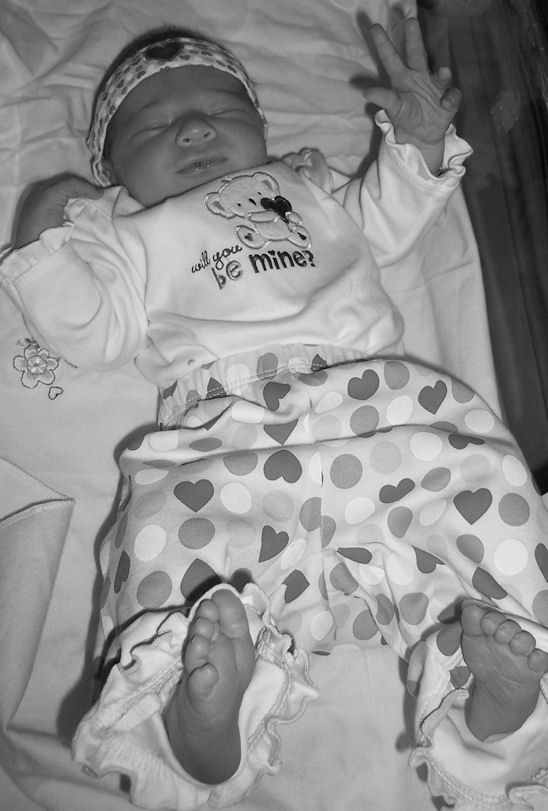
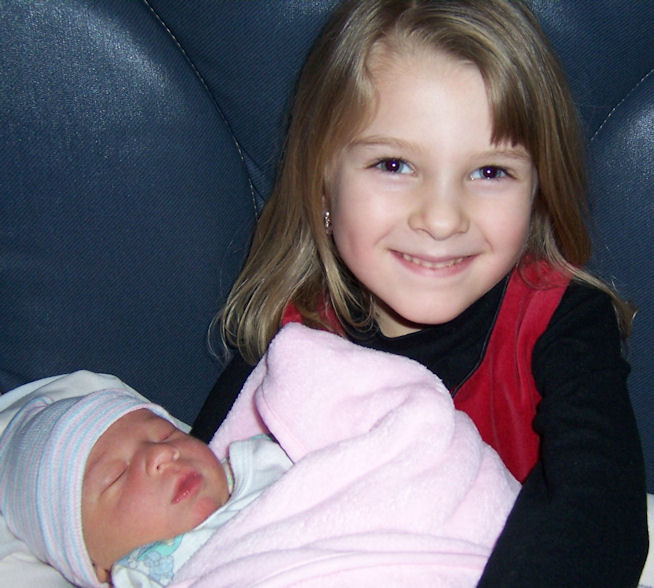
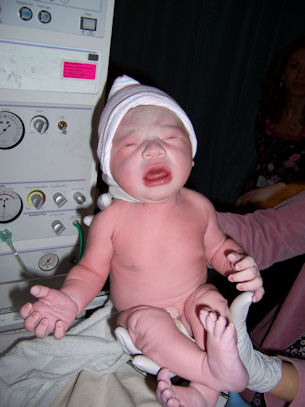
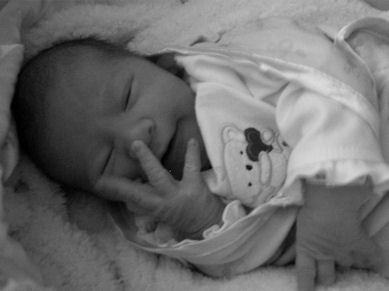
So here she is getting ready to go home.

I bought her this outfit to go home in! She came HOME Valentines Day.
I think she looks FAB in pink!! She has a gorgeous complexion great shaped head, with an even covering of hair.
The pants have a heart on the butt too. She makes so many little noises and faces, its hilarious. She scrunches up her face a lot too-like in these photos.
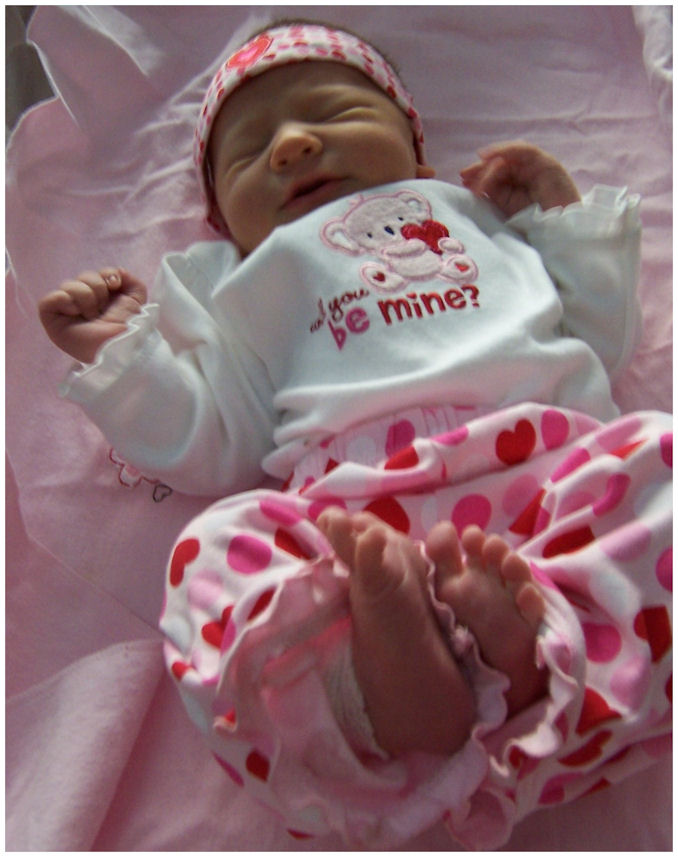
Look at her FEET! Her toes are SO long! Oh and big hands.
I call her Monkey. I found the most adorable monkey (girly monkey) jammies, that I can’t wait to see her in.
More stretching!! Black and white does her no justice.
This is proud mom & dad

AH! Don’t they look so eager, bright eyed and bushy tailed? I can’t wait to see them in 2 weeks! LOL! So far Gabby likes to be wide awake at 2am.
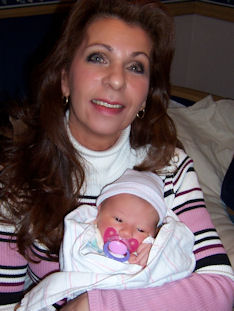
Proud Auntie Lauren-right after she was born
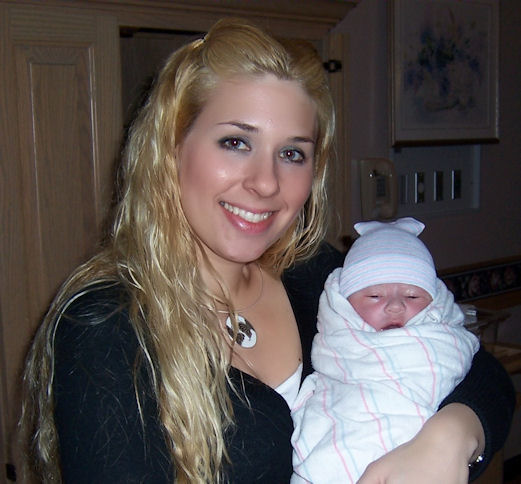
Amber loves the baby (Noah saw her yesterday (didn’t hold her) and Alexa hasn’t seen her yet)
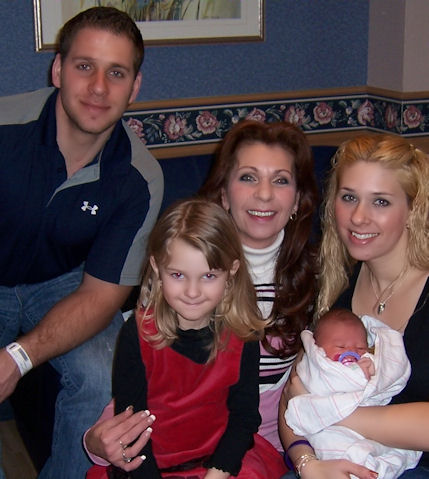
This is my mom-proud nanny
Here is my brother, mother, me, Amber and Gabriella
Thats all for now. I just had to share more photos.
I wish I could bottle up that new baby smell don’t you?
Be back tomorrow with a video!!
Papertrey Ink February Release
Feb 14, 2009 Author: mytime | Filed under: Cards, My Timeless TemplatesWell with this month’s Papertrey Ink release was SO much was revealed during the countdown, and boy was it fun!! You can scroll on down through the last week to see everything else I had to share 😀 There was a TON!!!
Boy was I hopping busy! Add that to no email due to the Verizon takeover, a new computer (had to transfer files) and the arrival of my niece, and all I can say is TAILSPIN 😀
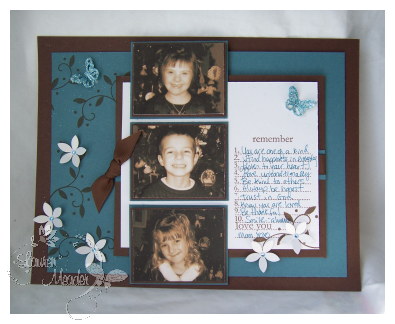
My most favorite project for the release was this “framed art” piece (Lauren’s version of scrapbooking!)
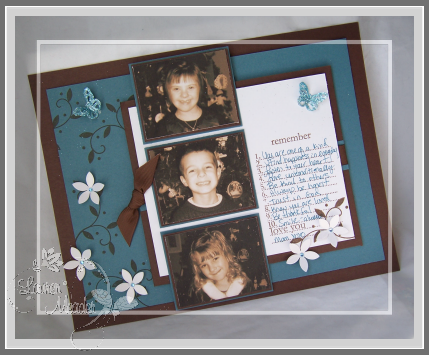
I have to say Im proud of this one
If you know “me:, you know, I DON’T scrap!! But I was quite inspired by Heather’s new set, and decided to challenge myself! I love stepping out of that comfort zone. Keeps it fresh. I felt like I would use this challenge to capture this moment in my life. A moment I want to always remember-my children at these ages.
I looked at this challenge to myself NOT as a scrapbook page, but a framed piece of art for my home 😀 Much easier when the “scrapbook” term isn’t at me to be a GREAT scrapper artist! It’s just not me.
So I just thought ALTERED ITEM, ART! Not scrapbook page.
Remember framed art
Remember 10 things-photo close up
I love the swirly leaf pattern! I used some bridal confetti flowers, and some vellum butterflies, I punched and glitterized 😀

Look at those faces! I still see my babies. Not so baby anymore.
I made this page for my bedroom, so I could frame it. My children are at the BEST ages right now Alexa 9, Noah 6 and Amber almost 5. Amazing time to be their mom.
Where does the time go? I’m just in awe of how big they are, how much they have changed, and how fast it has flown by!
I know it sounds so cliche, but it is SO true. Holding my little niece reminds me of when each of my babies was that small. Seems like only a few weeks ago, let along years!
Its funny when they are born you think you couldn’t love them a smidgen more, but every day that passes and the older they get, you love them just that much more everyday. WAY more than ever imaginable. The older they get, the more they develop into little people with personalities. There is more to love, more memories, more amazingess than you ever imagined possible.
This is a close up of some of the things I want to remember (and want my children to live daily)
Remember
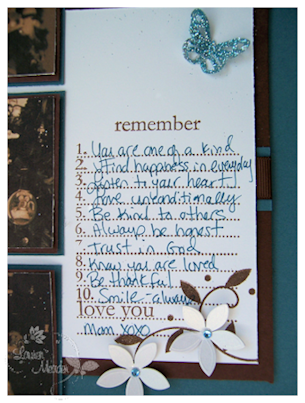
It is 10 thing I want my children to always remember about themselves, as they grow.
1. You are one of a kind
2. Find happiness in every day
3. Listen to your heart
4. Love unconditionally
5. Be Kind to others
6. Always be honest
7. Trust in God
8. Know you are loved
9. Be thankful
10. Smile-always
Love you-mom
Supplies:
Stamps: Beyond Basic Borders, Journaling Lines
Cardstock : Blue Bayou, Dark Chocolate, White
Ink: Dark Chocolate, Blue bayou marker
Dark Chocolate grosgrain ribbon, bridal confetti, adhesive rhinestones, butterfly punch by Martha Stewart, glue, art glitter in ocean
Just Because:
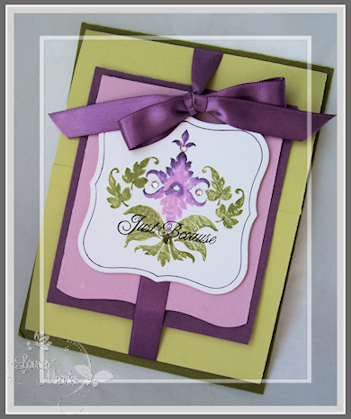
Well I LOVE purple! So I just went with it!!
I had fun using the large Damask design as my main focal point.
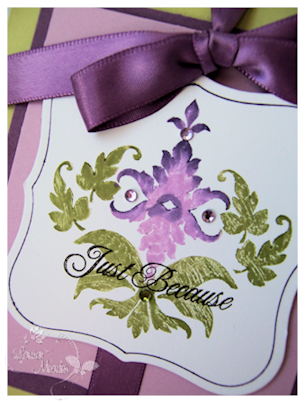
Using a rock -n-roll technique
I created a simple tri-fold card for some added “elegance”
Supplies
Stamps : Damask Designs
Cardstock- Spring Moss, Lavender Moon, Plum Pudding, White
Ink-Spring Moss, Lavender Moon, Plum Pudding, Ripe Avocado, black
Ribbon- Plum pudding satin
Labels 1 nestability
Eggplant marker, adhesive rhinestones
Seriously Handbag

I made this fun patterned “purse”, using my Rounded Wrap Up! template and stamps listed in supply list! Like using stamped patterned paper.
I just had too much fun with it. In case you didn’t notice. The seriously sentiment reminds me of a teen or tween girl!
The flower actually covers the oval “clasp” which inserts into a slot to keep the template closed.
Supplies:
My Timeless Template -Rounded Wrap Up!
Stamps- Hand written note, guidelines, beautiful Blooms
Cardstock-sweet blush, dark chocolate
Ink-Dark chocolate, copic markers
white gel pen, oval punches, making memories brad
Now I DO have a fabulous New Release project to share, but am using it for tomorrow Monday’s with My Time video 😀
So stay tuned! And until then, thanks for stopping by.
Welcome to the World!!
Feb 14, 2009 Author: mytime | Filed under: UncategorizedI want to stop in here fast to announce my new niece was born!
Congratulations to my brother Rob and Valerie who did an AMAZING job pushing through her SPEEDY labor of only 4 hours!!!
I have some better photos but don’t have ANY time because I am going back to the hospital to drive them home and spend the night helping them settle in!
Welcome to the world!
Gabriella Amber Vigeant
February 12th, 2009
3:10 pm
8lbs 8 oz, 20 inches long
All I can say is I’m in love with her!
I’ll be back with lots of better photos and stuff later. The right after birth photo does her no justice!
Happy Valentine Day-Template Style
Feb 13, 2009 Author: mytime | Filed under: Home decor/3-D items, My Timeless Templates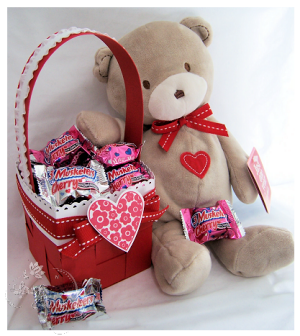
Happy Valentines Day!!
I am sending you all big hugs from my computer 😀
I have SOOO much to be happy about.
I have a very happy marriage to a wonderful man. He is loving, loyal, caring, sensitive, thoughtful, selfless, understanding, and treats me like we are still dating! Every where we go, he has always made me feel like I am the only woman on earth ♥ He is my best friend, and actually listens to me. I could go on and on about him. We have a wonderful relationship. Seriously. Everyday I feel so blessed to have been given such an amazing person who shockingly loves me-the good and the bad. Then to top it all off-he is an amazing father! Patient, tender, caring, and very into playing with the kids and doing kid things. He is there with me at 2am holding puke buckets and changing sheets. No complaints. He lives for his kids. Then to accept Alexa as his own, is just amazing to see and feel the love he has for her. Never treating her differently than his own 2 children. I think he often forgets he isn’t her biological father.
Now my children. Oh! boy. The absolute centers of my universe. They are why I do everything! I cannot remember life before being a mom. I feel like I have such purpose in the world. Its really the strangest thing how you think you have your life all set and you know WHO you are, then the INSTANT they are born your world is never the same-and for the better.
As I sit here I can honestly say they are the best part of my life.
No matter how INSANE they make me, there is at least ONE moment that each one of them has, that makes me so happy to be their mom-everyday. Usually its something small. Like a random kiss from them or hug for no reason-maybe something funny they say or do or a little talk we have- (a recent conversation with Noah) Hey mom! Knock! Knock! (me) Who is there? (Noah) Love. (Me) Love who? (Noah) its me and I love you!
Or listening to them play together and “mock me”, but its all the nice things I say, not the times Im yelling at them to clean up or stop fighting! LOL!
Or the REALLY nice pictures they draw me (not the ones I sneak in the trash! LOL! The real drawings!).
I even made a SPECIAL project-that I can’t share till release day (OK so tomorrow! LOL!) to share my kids with you!
That is why I chose “3 Musketeers” Cherry Bite Size candy bars. Reminds me of my 3 kids.
I am so thankful to have so many people that I can share what I love to do with, and they “get it”. You all understand my insanity, and love for this hobby/craft! What would I do without you all? My husband would be crazy!
Now I will share some easy gifts that were made with LOVE!
You may not be able to get these in time for Valentines Day but don’t let ONE day be the ONLY day you tell/show the one’s you love how you feel-OK!
I love being able to make all sorts of gifts for these “Hallmark” holidays more affordable! Now giving every teacher and student something to say “you are special” or thought of, doesn’t have to break my bank!!! Plus it makes it more fun, and Im all about that.
So here are some of my Templates used for today’s special occasion

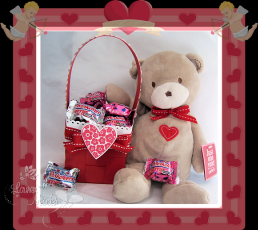
Here is a little basket-holding mini 3 Musketeers bite size candies, for my kids. I just loved that soft teddy bear I found at Target.
Sometimes you want a smaller basket. So I altered this template a bit.
I cut down the basket by about 1 1/2 inches (prior to assembling), then added a pretty punched heart border. I like to finish off the top either by punching the template strips, or adding a nice border, which is what I did in this case.
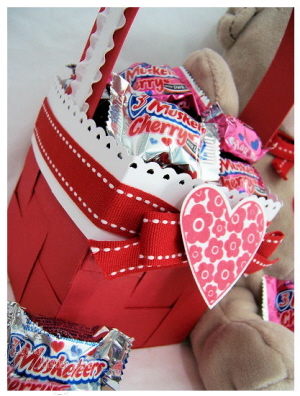
This was a really easy project, but I like the end result of the heart in the front!
I used Heart Prints for this project with Pure Poppy cardstock/ink.
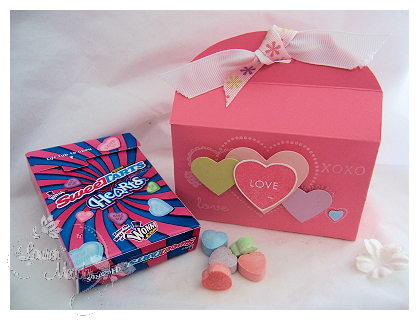
Next up-we have a Valentine treat using the Rounded Wrap Up! ©
For your Sweet Tart Heart
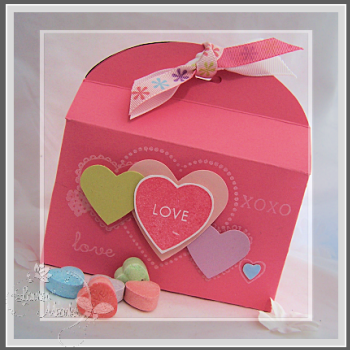
I made these little boxes for my kids 😀 ( yes along with the Moon family treat holders :D)Noah’s will be in red! He would freak if I gave him a pink box of candy! LOL!
I can fit all kinds of cute little treat in this.
Now you may wonder WHAT is inside…..
Lookie here!
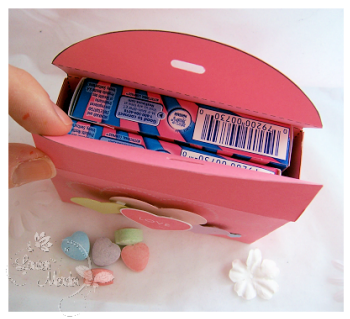
See you can fit 2 boxes of these perfectly!
The kids will have no idea what is inside.
I just kept them simple so I could easily mass produce them. By using my Heart punches, it was a blast.
I stamped Borders & Corners Heart set, and Heart Prints for my design as well.
I hope this helps you see how easy making treats for anyone in your life can really be. You don’t have to spend HOURS designing something to make a great impression! Just knowing YOU made it is enough ♥
So now go hug your loved ones, or make them something special.
I would love to hear what YOU do to show someone you love (like your kids) how you care! Or your favorite Valentine gift/memory. Maybe something special someone did for you??!! Whatever you can share.
My mom used to put little notes in my lunch box! I loved getting them. They made me feel SO special.
I now do the same for my kids. Or I surprise them with little treats here and there for no reason.
Now its your turn.
Don’t forget to check Nichole’s blog for more peeks and the creative clicks!
Thanks for reading, and give your loved ones a squeeze!!!
Papertrey Ink Bunny Hop
Feb 12, 2009 Author: mytime | Filed under: Home decor/3-D items, My Timeless Template ChallengeWelcome to one of the *official* stops on the Papertrey Bunny Hop!

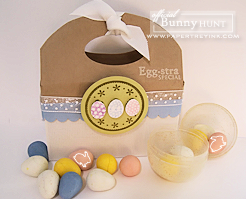
Egg*stra Special Basket
Look closely and you may find
a hidden bunny that’s one-of-a-kind.
Perhaps there are more than one or maybe even none!
The challenge is yours, enjoy and have fun!
If you are starting out here, make sure that you stop by Nichole’s blog to read about all the details along with the GRAND prize affiliated with this fun contest!
Today’s post features a “basket” I made using my newest Rounded Wrap Up! template.
I made my base from lined vellum cardstock, then my top (with punched handles :D) from Kraft cardstock. By adding the punched oval handles it creates a perfect little basket.
The tag was done using Tags for Spring!
I put Cadbury chocolate eggs in it! YUM! The perfect treat for Easter! One of my fave treats this time year.
What is your favorite Easter Candy?? Mine is Cadbury Creme Eggs! That is my TOP favorite candy of ALL time. I have a HARD time resisiting those, since they are seasonal! LOL!
Good Luck!!
Just plain cute
Feb 12, 2009 Author: mytime | Filed under: Home decor/3-D items, My Timeless Templates, Papertrey Newsletter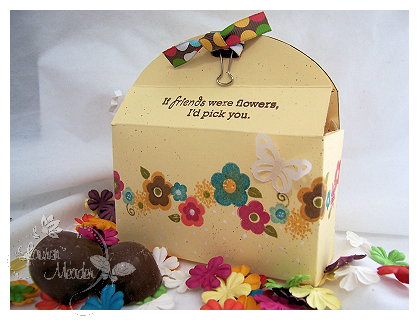
If friends……
As you have witnessed, the Rounded Wrap up! © box can be a variety of things. It can be a character, can have layers, or be very simple! Any way you decorate it, its just so adorable!
I love it because there are so many “little” treats we look to package ALL year, and this really fits the bill. Especially if you are mass producing.
I was inspired by my Prima flowers to make the design for this box-which holds some YUMMY decadent truffles (OK honestly I DID snitch 2! LOL! But thats it I swear)
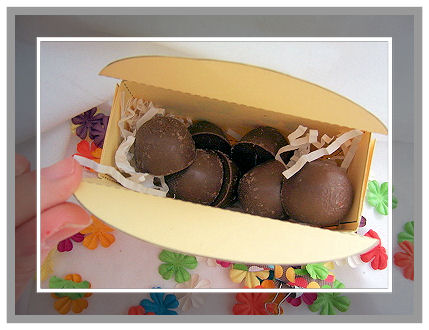
I will say that unless I were giving this immediately I would have added them inside a ziplock bag for freshness 😀
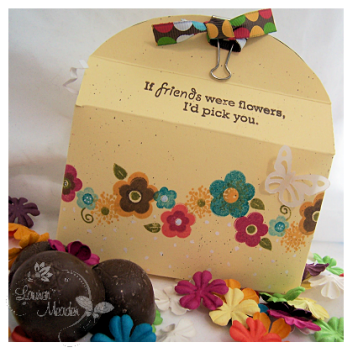
I printed my template onto Lemon Tart cardstock. Very cheery I think.
I used a clip to keep this one closed, tied with a little ribbon.
Now I just used Green Thumb and layered my flowers for a fun look. I used a white gel pen to add my “dots”.
I loved the colors and simple look this has! The flowers go all the way around. This came together really quickly-like most of my projects.
Thanks for checking in 😀
I’d love to hear what your favorite CHOCOLATE is!!
Mine is Godiva 😀 Raspberry Starfish-YUM!! Or for a CHEAP alternative I LOVE Caramello bars 😀 and Take 10. Oh and Flipz (chocolate covered pretzels)
OK I need to STOP talking about chocolate.
Till tomorrow
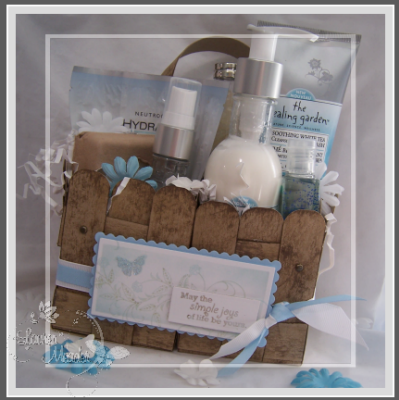
Ahhh…..The simple joys…..
Feb 11, 2009 Author: mytime | Filed under: Home decor/3-D items, My Timeless Templates, Papertrey NewsletterWOW! Has this been an exciting month at Papertrey Ink or what?!!
I’m going to have quite the creative meltdown when its over.
I have my favorite project to share with you today that I made using my Basket Basics © template (being released the 15th)
Simple Joys
For today’s project I combined 2 of the completedBasket Basic’s templates to make a basket duo!! Just make 2 baskets as directed, then using redline tape, adhere the sides together to give you one larger basket with 2 compartments.
Now you could even made it a quadruple basket and add all kinds of amazingness to it!
I used Kraft cardtock for my template, then distressed it with Tim Holtz tea and walnut inks.
I was so inspired by the design on the bath products that I used that as my inspiration for the gift. Its great to be able to personal your packaging to match you gift!
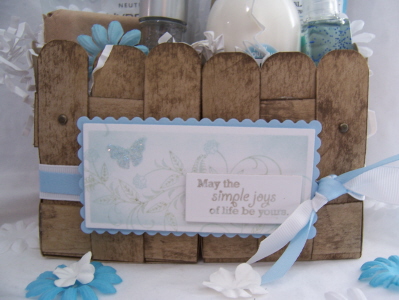
Its quite sparkly in person.
Spring rain was the perfect color.
The With Sympathy was used for my main image. Sentiment is from Green Thumb.
I put my handle in the back to look like many other store bought baskets I have purchased.
I LOVE packaging bath and beauty products, and now with this template you can save your money on the packaging (since the template is SO CHEAP!! with endless use :D) and use it on what’s inside.
Here is the side view:

Look at everything that can fit in there!
Top view:

We have a large body lotion, body wash, hand sanitizer, bath salts tube. body spray, bar of soap and a hydrating face mask! With a little room to spare.
Now speaking of a little pampering and SIMPLE joys……..
How about using our Round Wrap Up! © to package some tea packets?
Better yet, green tea!!
I know I package this stuff with like every template! LOL! But it really can be a thoughtful gift. Plus its very inexpensive. I love that.
You can get 1/2 a box of tea packets into this little template (OK I drank some so not all shown in photo-sorry! But you get the idea)

I’m on a gray and black kick. Add that pop of Ripe avocado and its really pretty striking don’t you think?
Another view:
This box of tea literally took me a commercial break to make! Cutting and assembling included!!
I LOVE the Garden of Life set, and thought the sentiment was PERFECT for this little gift.
So there you have my peeks for today.
I hope you enjoyed them!
Thanks for checking in with me 😀
Be sure to checkNichole’s blog for more creative clicks and samples.
Till tomorrow 😀
My Etsy

Who I Designed For
Blogroll
- Alicia
- Alli Miles
- Ally Blankenship
- Amber
- Andi @ crafts on a whim
- Angel R
- Angie Z
- Anne Kranitz
- Becky O
- Bee
- Beth Silaka
- Bethany Paull
- Beverly Nash
- Bobbie
- Cambria
- Cammie
- Card of the Week
- Card Positioning System (CPS)
- Cards for Cancer
- Catherine Doucette
- Charmaine
- Cheryl Sims
- Chriss Rollins
- Christina
- Christine Ewing
- Christine Wooden
- Colleen Schaan
- Craft Critique
- Craft Gossip
- Crystal
- Dawn Easton
- Emily Giovanni
- Geny
- Holly
- Igne Groot
- Inspirational Craft Blogs
- Irene
- Jami Sibley
- Jeanne Streiff
- Jen del Muro
- Jeni Bond
- JenMarie
- Jenn Balcer
- Jenn Diercks
- Jenn O
- Jennifer E
- Jennifer Mick
- Jennifer Pereda
- Jennifer-Sweet Treat
- Joanne Basile
- Jodi Collins
- Julia Stainton
- Julie Masse
- Karen
- Kathryn Berthiaume
- Katie Cotton
- Kelley Holland
- Kendra
- Kim Scholfield
- Kris’s Color Stripes! Get inspired here
- Kristen Dubosque
- Kristin Eberline
- Kristine
- Laura @ Sunshine Stamper
- Laura Turnmire
- Laurie Schmidlin
- Lesa Rapp
- Linda Duke
- Linda-LSN
- Lindsey Botkin
- Lisa (lakind scs)
- Lisa Kind
- Lori Craig
- Maggie
- Mara Campbell
- Maria
- Maria Levine
- Mary
- MaryJo
- Melanie M
- Monique Hansen
- Moxie Fab World
- Pam Imholz
- PaperCrafts Connection
- Peppers and Pollywogs Kids party site
- Rebecca Grohall
- Rita
- Robyn
- Rose Ann
- Sarah Vrolyk
- Sharon Harnist
- Sharon Johnson
- Sharon Rivera (a chemisrty with paper)
- Sherrie
- Sophia Landry
- Storage Units, Ink, & More Blog
- Sue Berker
- Susan (Rainy)
- Tangii Crane
- Tracy
- Tricia Traxler
- Trudee
- Velta
- VivLyn
- Zena
MTME Pretty Palette Color Team
MTME Pretty Patterns Sketch Team
My Time Made Easy TM LLC
Shop till you drop!
Lauren Meader
About Me
Copyrighted material
Subscribe To My Blog
Pages
- About me
- Alexa’s Story!
- My Crafty Corner!
- My Time Made Easy™ LLC
- Our Make A Wish Trip to Disney!
- Resume/Publication List
Calendar
Archives
- August 2013
- July 2013
- June 2013
- May 2013
- April 2013
- March 2013
- February 2013
- January 2013
- December 2012
- November 2012
- October 2012
- September 2012
- August 2012
- July 2012
- June 2012
- May 2012
- April 2012
- March 2012
- February 2012
- January 2012
- December 2011
- November 2011
- October 2011
- September 2011
- August 2011
- July 2011
- June 2011
- May 2011
- April 2011
- March 2011
- February 2011
- January 2011
- December 2010
- November 2010
- October 2010
- September 2010
- August 2010
- July 2010
- June 2010
- May 2010
- April 2010
- March 2010
- February 2010
- January 2010
- December 2009
- November 2009
- October 2009
- September 2009
- August 2009
- July 2009
- June 2009
- May 2009
- April 2009
- March 2009
- February 2009
- January 2009
- December 2008
- November 2008
- October 2008
- September 2008
- August 2008
- July 2008
- June 2008
- May 2008
- April 2008
- March 2008
- February 2008
- January 2008
- December 2007
- November 2007
- October 2007
- September 2007
- August 2007
- July 2007
- June 2007
- May 2007
- April 2007
- March 2007
- January 2007
Categories
- About Me
- All That Scraps
- blogger challenge
- camera/photo play
- Cards
- Contests
- family stuff
- FOR SALE
- Home decor/3-D items
- How to FAKE it!
- Introduction
- JUGS Challenge
- JustRite Stampers
- Lizzie Anne Designs
- My family stuff
- My Stamping Space
- My Time Made Easy
- My Time To Color Challenge
- My Time to Create Challenge
- My Timeless Template Challenge
- My Timeless Templates
- Mytime Mail
- MYTIME MOVIE/VIDEOs
- Papertrey Newsletter
- Pink Cat Studio
- Pretty Palette Challenge
- Pretty Patterns Sketch
- Product Opinions and Must haves
- Recipe's
- Saturday Sketch
- Smilebox Creations
- Stampavie
- Tutorials
- Uncategorized
- videos
Most Popular
- Create your own Onesie Card Tutorial-and important NOTE! PLEASE READ (2529)
- Saturday Sketch-Boxed bag holder (2333)
- Going GREEN! Fancy Flower Flourish-Closure Video (1478)
- Fabulous Favorite - Giveaway! (1336)
- a Prayer Request (1231)
- QUICK-Easter Baskets from Nestabilities-PTI style-and blog challenge (1063)
- Teaser Sketch (999)
- February Release Giveway! (and a little peek) (996)
- Group Post and Rambling Rose Video Tutorial (985)
- GIVEAWAY! Who wants it all?! (895)
Recent Comments (RSS)
- 야동: Love to read it,Waiting For
- 야동: This seller is in a
- 바카라사이트: 여기 처음 왔어요. 나는이 게시판을
- 야동티비: I was surfing the Internet
- 바카라사이트: 비슷한 주제에 대한 흥미로운 정보를
- 바카라사이트: "여기에 제공해 주신 귀중한 정보와
- 온라인홀덤: 유익한 웹 사이트를 게시하는 데
- 홀덤나라: 나는 당신의 블로그를 정말 좋아합니다.
- lisa: Technology, too, has left an
- 주소모음: 흠 !! 이 블로그는 정말
Copyright © 2007 - My Time, My Creations, My Stampendence - is proudly powered by WordPress
This blog has been Tweaked and Designed by Sara Williams