Archive for January, 2009
Get your sketch on……
Jan 24, 2009 Author: mytime | Filed under: Cards, Home decor/3-D items, Saturday SketchAWE! How can I thank all of you for cheering me up so much? I mean that with all my heart.
I’m also trying to focus on what is TRULY important in life-and that is my kids, and my husband. If I got a phone call that Alexa’s cancer was back, nothing else in the world would matter. The bottom from the bucket would just fall out. This hurt I feel is nothing by comparison. Its just another bump in the road. I hope that makes sense. I just wasn’t expecting it, thats all. Sometimes thing take us by surprise. So Im diving into stamping and letting it roll off my back.
Your words really meant a lot to me. You have no idea how down I was. Thank you-a million times over.
Many of you expressed concern for my stamp-insanity! LOL! I have to say that doing all the stamping I do, and sharing here IS my therapy. I truly enjoy it. Trust me I don’t get paid to blog! LOL! I wouldn’t enjoy it if it was a “job”. I do it for the enjoyment of it.
As far as the videos……….well I enjoy making them and sharing them, the editing-well I could hang myself! LOL! Part of it is my editing software, the other part is YouTube restrictions. I simply can’t edit myself that much! LOL! I feel its all worth it.
Also thanks for the congrats on my weight loss!! I have worked hard, and exercise daily, so I appreciate that 😀
Anyway…….I’ll pick a winner tonight. I’m typing this Friday eve so a winner right now would be “unfair”. So, in the meantime, it is time for another sketch!
I hope you like it! I am lovin it.
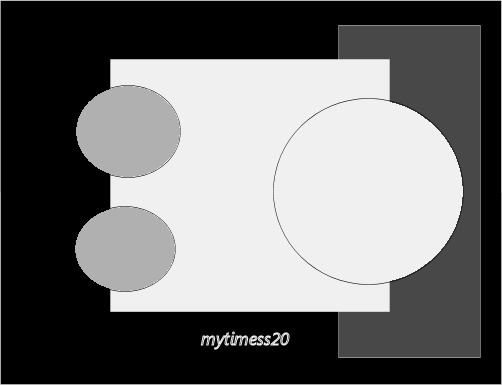
WARNING: blonde working PSP program.
Im sorry that the sketch double layered itself-see my card for better “visual”.
UPDATE! I replaced the sketch!! Deanne Burton fixed it for me!! Thank you
Here is the mytimess21
Now here is my card.
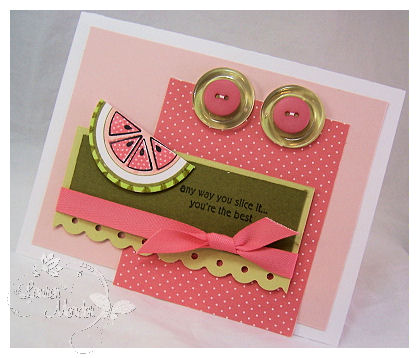
Anyway, you slice it
I LOVE the patterned fruit set called Tutti Fruity by Lizzie Anne Designs.
When I was the set I immediately wanted to make a watermelon. I don’t have ANY fruit sets! Crazy. The sentiments in this ROCK! Im so over the moon with it.
ONE PROBLEM: Making a watermelon required not only stamping the polka dot wedges (I used Berry Sorbet ink) but also the black seed wedge outline. Now these are RUBBER stamps, so I dusted off my Stamp-a-ma-jig and went to town. It was REALLY easy using that, and I felt happy with the outcome.
I then colored in the edge with a pink marker. The outer edge I colored green, then drew lines for a rind 😀
How summer is that? Its freezing here and this card warms me right up.
Now who’d of thunk it!
This “watermelon” image sparked all this!
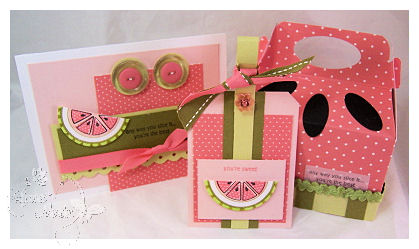
How flippin yummy is this gift set?!
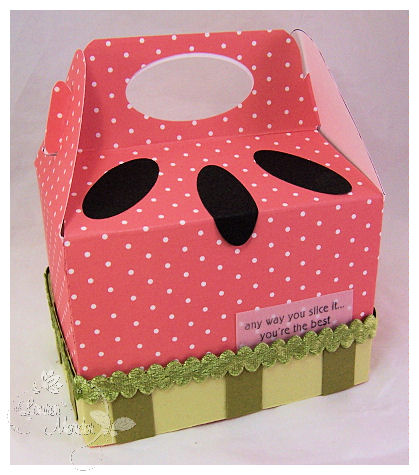
We have a card-a “watermelon” gable box- I made myself-from scratch, by looking at a smaller version of a box, and a tag to match. I used 2 pieces of patterned paper, adhered together to get a good size. That was one of those-I can’t sleep at 2am projects! LOL!
The box was NOT an easy task. Im beyond excited over it though. It was refining MANY template desings, then finally tracing one I perfected onto my patterned paper.
In the future I’m just going to BUY some boxes in a large size.
ALWAYS use SCRAP first!! Then create and save a final template for future use 😀
I used Papertrey Ink Pink patterned paper for my watermelon “wedge” paper. The “seeds” are True Blackcardstock punched with my SU! oval 😀 The handle is a oval nestablity.
The bottom is just strips of spring moss cardstock, and ripe avocado-layer on some may arts ribbon and my friends we have a watermelon rind! I added a vellum tag for my sentiment
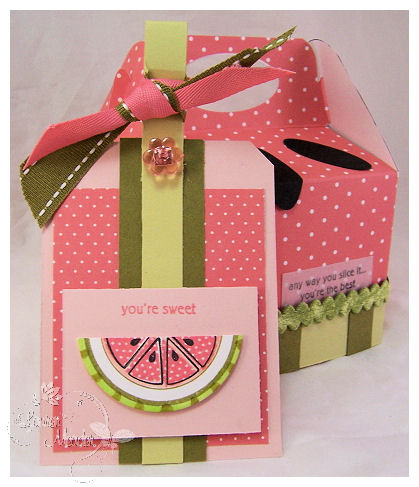
Here is a closer view of the tag.
I like the tag. I don’t make many “tags” so this was fun.
I stamped the round image first, then filled it in with the watermelon wedges using my Stamp-a-ma-jig. I then cut it out, so from ONE image, I got my card and tag watermelon slice!
I like it all. I hope you do too.
Now time to go check the Sketch team samples!
Please send us a link here if you give the sketch a whirl.
I’ll be back in a bit to post a winner for my Birthday Box Organizer!
As always thank you for stopping by 😀
Video time: Birthday Box Organizer GIVEAWAY!
Jan 22, 2009 Author: mytime | Filed under: Home decor/3-D items, My Timeless Templates, MYTIME MOVIE/VIDEOsOK girls I had a REALLY bad day.
One of those days where something comes up, and takes you by surprise. Just hurts. Not the end of the world kind of thing, but just makes you feel awful about yourself, and self doubt settles in. Makes you question everything you do, and why. I was going to take a break from blogging and dive into some chocolate.
Well, if you didn’t know….. that was how I USE to deal with things when I was upset or stressed. Now that I’m down over 55lbs (yeah me!!) I’m so NOT going there again. Not anymore! Instead I decided that I would DIVE head first into another project, for all of YOU, who always cheer me up (and lock up all the chocolate in the meantime!). I will just be positive, and push through this time, like I always do. No sense in getting upset over something I can’t change. Right? It is what it is.
Now to make me feel even better-I am giving this project away to one of you! You all cheer me up everyday, and giving you a chance at today’s video project will definitely cheer me up! I hope you like it.
Just leave a comment on the project here, and I will pick a random.org winner on Saturday! OK!
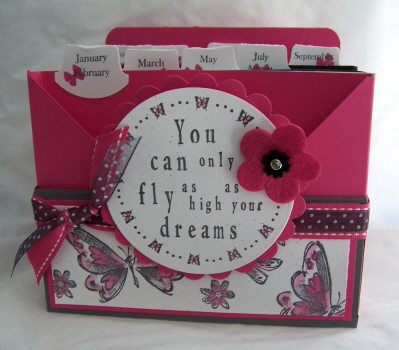
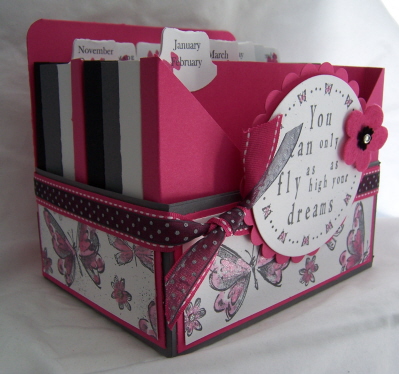
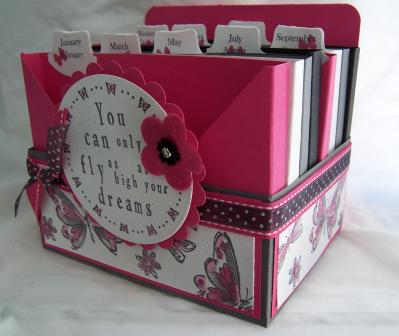
So this is what you have a chance at winning……….
As high as your dreams-I created the sentiment and LOVE IT!
I love the whimsical feel it has, and the colors are perfect! It has the perfect amount of shimmer too. Can’t go wrong 😀
Woot! Woot!
So this project is up for grabs, and is the subject of a 3 part video I have for you all.
You KNOW Im too long winded to stick to UNDER 10 minutes! Seriously!
I hope you don’t get sick of hearing me. Let me tell you this project for you all was a true joy and stress reliever for me today. I had fun.
What I LOVE about doing these videos is I get to ENJOY teaching, without all the prep work! My own little classroom from home-heaven!
Video 1-Start to finish My Timeless Templates-card box pockets
[veoh v17296879Qpns5Xq6 ]
——–>Click Here!!<———
SORRY YouTube REJECTED this because it was 44 seconds too long!! GRR!! So you need to go to Veoh. Now I just wish I uploaded it all to ONE place. Im very annoyed with YouTube. Plus I couldn’t edit it any more than it was :C
Video 2-Making the box base
Video 3-Creating the center sentiment with JustRite Stampers
——————————————————————–
Thanks for watching 😀
After much anticipation, many of you asked for a few things:
1) To see My Timeless Templates used-start to finish-CHECK! see video #1
2) For the directions for the Birthday Card Organizer-CHECK! That is what the video is for-all 3!
3) To see how theJustRite Stamper’s sets work-CHECK! See video #3
4) Most you you didn’t like Veoh because you couldn’t view it, so you asked that I separate the videos into 3 parts-so I tried! Honestly that was a HUGE ole pain in my derriere, and my site crashed 3 times, making me re-do 2 of the 3 videos! UGH! I should soon have the plug-in here for longer stuff. Im just waiting in the SCS guy to fix it 😀
5) Longer wording in between segments-I tried that too. I can read these just fine, and with so many wordings, it cuts into precious video timing-so pause if needed. I think I timed it well this time. I am getting better. Its only #3 and I see a big difference.
PS tell me if you like me shooting from that angle instead or not!
6) Written instructions for my videos, along with the video. OK Im not sure how often that is going to happen because this is all so time consuming already. I pour so much of myself into my projects, and the behind the scenes stuff, now videos…….AND updating here DAILY. Lets not forget I have 3 kids, so not sure if thats always going to happen.
Bottom line-you talk, I listen! So I hope you know I appreciate every comment and email, and ALL the feedback. Thanks!
Now for more photos, and an IMPORTANT note
After video #1 I had to re -create 1 & 2. After re-doing it twice, I forgot the put the segment in the video where I made my label tabs on the pocket segments :C
Sorry about that. I think you will agree, the videos share enough info, and this was a minor detail. I do apologize!
I stamped 2 months per label, and made sure they were all staggered! Not too much more than that was shared.
I put them on AFTER all my pockets are done.
Thanks!
Supplies:
My Timeless Template: All Boxed Up
Stamps:JustRite Stampers Upper/lowercase New Times Roman alpha (sentiment made using these)
JustRite Stampers Harmony Circle III border (butterfly border around sentiment)
Butterfly of Happiness from Stampin Up!
Wedding Day -used for label months/butterfly on labels
Punches/Die Cuts: Stampin Up! Label punch, Circle nestabilities , corner rounder
Cardstock: White, True Black, Raspberry Fizz, and SU! Gray
Ink: SU! gray, raspberry fizz
Other: Scor-Pal , Shimmerz in Magenta, SU! Felt flower, Maya Road black velvet flower, diamond brad by Making Memories.
Now I have the quick directions for the basic box!
Pockets
1) Print 8 pocket templates using All Boxed up Template (linked above).
2-white
2-Raspberry Fizz
2- Gray
2-on copy paper to make true black pockets
2) Cut, score and assemble.
3) Punch 8 white tags. Stamp with months using gray ink. Stamp butterfly in scattered pattern.
4) Adhere tags to pockets, being sure to stagger them for easy viewing.
Birthday Box Base
8 1/2 X 11 piece of cardstock for base
1) Along 11 inch side score at 2 1/2 & 8 1/2
2) Along 8 1/2 side-score at 2 1/2 & 7
3) Along both 11 inch sides-cut on scored tabs, to scored edge.
4) Assemble box (there will be ONE long end that is shorter-this is what your back panel will adhere to/cover)
Apply decorative panels if you wish.
Back Panel
1) Take 6 X 11 sheet of cardstock for back panel. Along 11 inch side-score at 5 1/2
2) Apply adhesive to entire back, and fold over adhere to back (of short panel) on assembled box.
Stamp panels as desired
Insert pockets-then fill with cards and envelopes!
———————————————————-
So that is it!
So leave me a comment telling me your thoughts, or whatever.
Thanks for the pick me up, and enjoy the video 😀
Tommorrow is another day.
Check in Saturday too, for another Saturday Sketch.
Till then
P.S. I love you
Jan 21, 2009 Author: mytime | Filed under: Home decor/3-D items, My Timeless TemplatesYou didn”t actually think I’d let the day go by without a post now did you?!
Oh boy, oh boy! have I been a busy girl! My head is spinning with ideas 😀
I am working on MORE templates, and my projects for the next reveal! I think I just developed my best one yet! HAPPY DANCE!!
I have so many things I want to share all at once but not real time to do that-yet!! Plus Im loving this whole video thing! My last one (you haven’t seen it yet) was SO much easier! And Im only on #3!!
Many of you asked about Veoh. Well Veoh allows me to post LONGER videos! Me being long winded. I like that 😀 I am getting a feature enabled here soon, so YOU can ALL see them HERE! So that will be exciting.
I so hope you don’t get sick of “me”, and seeing ideas using my templates, because believe you me-I have a ton of ideas.
I promised before the holiday that I would share with you another version of what you can do with the base template from the Lolli-pop Along ©. You may remember —>THIS POST. I told you that you could also switch it up to be for Valentines Day!
So here it is
P.S. i love you. (and giving Dove chocolates, believe me they will love you back! LOL)
How sweet -literally- is that?!
Raspberry Fizz is my newest FAVORITE color! Im beyond in love with it. Pair it with chocolate, and we have HEAVEN!!!!!!!!!!
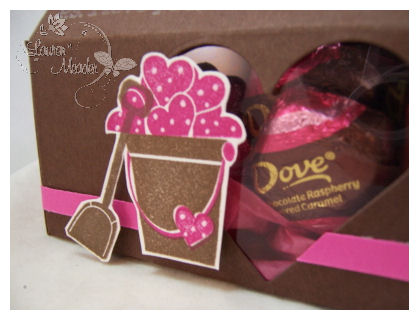
Taking the colors from my YUM-A-LICIOUS Dove raspberry chocolates, I made this box from my Lolli-pop Along © base.
That is the thing with my templates. SO many uses 😀
I LOVED the bucket image from the Love Songs set. The hearts are suppose to be piled up on the cake stand, but I stamped them into my bucket and trimmed out.
I used a heart nestability, and added some acetate to create my window.
Now you get a peek at the yumminess you are about to embark into.
Isn’t that so cute.
OK one last photo, then I’m off.
I am working on a project and would LOVE to hear little treats that you WISH you had a cute packaging for OR would like to see me use in an upcoming template-made all cute!
Thanks for stopping by! I always appreciate all the love & support you give me-believe me, it means the world to me.
You all rock!
Simple Take Along
Jan 20, 2009 Author: mytime | Filed under: Cards, Home decor/3-D items, My Timeless TemplatesWell guess who just got another video done! Whoot! Whoot!
Its all videographed, now I just need to do photos and editing. I can’t wait, because the Birthday Card Box Organizer came out SOOOOO pretty-IMO!
Thank you all for sharing the excitment with me 😀
Its cool to be able to share with your HOW the templates work! So I hope you all enjoy it when the time comes 😀 Seeing them in action !! I’m really so proud of that line 😀
My goal with My Timeless Templates © is to give you a inexpensive way to create great gifts, and an easy jump start on packaging your items, so that you can spend as much, or as little time focusing on the details and designing it to suit your project/style.
Some of you like to cut back on your time even MORE by simply replicating a design idea you have already seen.
Well if you want QUICK and EASY PEASY then this is the post for you!!
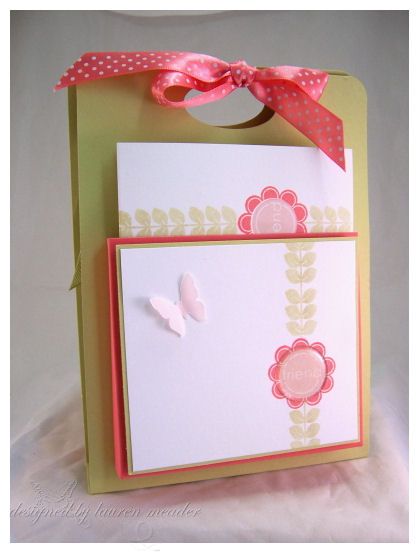
This was my concept project for the Take Along Tote ©, so I thought I’d share it with you today.
My Friend Take Along Tote ©
This is the front view. This holds 8 simple cards.
I love the clean and simple look this has. The BIG pop is the use of the page pebble in the flower center, everytime the image is used.
This gift set uses the leaf pattern from Wise Owl, and the flower from Floral Frenzy.
The cardstock/ink are white, spring moss, berry sorbet, sweet blush.
Berry sorbet polka dot ribbon, and patterned paper-pink patterned
But you know me by now that the back is *just* as important!
Now the back is designed just like the front, and it hold 8 stamped envelopes to match!
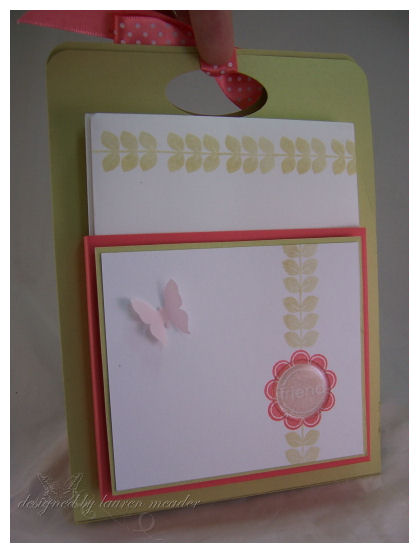
This is the side view
Butterfly punch is from Martha Stewart.
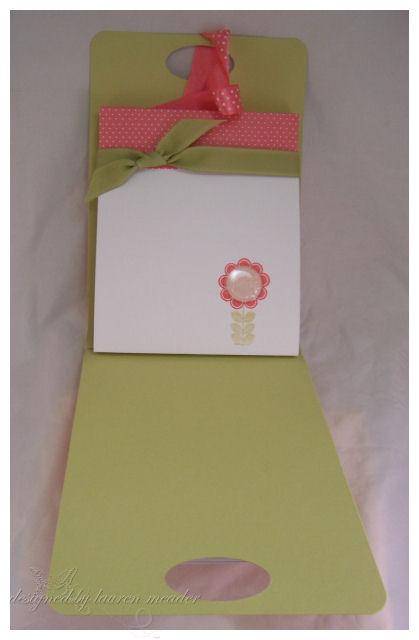
Now the inside is perfect because it holds a Legal not pad, cut to fit-and wrapped to match (of course)
It featured the same design as my cards.
Here are my notecards/envelope design.
Very clean and simple! Great for when you are tight on time, or have much to make!!
Speaking of tight on time, I need to RUN!
Just wanted to do a quick post done today for ya (wink).
Thanks for looking 😀
Till tomorrow.
Monday’s with Mytime Video-My Craft Space
Jan 19, 2009 Author: mytime | Filed under: MYTIME MOVIE/VIDEOs[veoh v17263404QFNw4NPT]
Watch My stamping space in Faith Videos | View More Free Videos Online at Veoh.com
OK Crossing my fingers that this video loads!
Thank you again to Sara Williams!! I LOVE YOU!
The most requested video I have had was for all of you wanting to see my craft space!
So, this video is of my stamping space! I hope you enjoy it. Its jam packed with stuff.
As I said there are 2 parts I would like to have had music during the “tour” but that didn’t happen :C
My upcoming videos include :
*the Birthday Organization Box (I know you are ALL anxiously awaiting that) called File and Find
* Copic coloring tutorial-no idea why you want to see ME color-but OK
* a template project with My Timeless Templates-start to finish
* and how to take professional photos-Im not a professional but I do think I have some really good tips on using a photo box and lighting!!
Now I need some more ideas for what YOU want to see!! This only gives me a months worth!
Thanks for checkin in here
Now just in case this video DOESN’T load you can view it here!
My Stamping Space by Lauren Meader
Let me know what you think-
Till tomorrow
OK so here is the scoop
Jan 19, 2009 Author: mytime | Filed under: UncategorizedI have my Monday’s with Mytime video done, and edited.
I uploaded somewhere else since its like 18 minutes long! I know-BORING! right. But you know how long winded I am by now don’t you????
I don’t want to ALWAYS be limited to under 10 min , so I uploaded elsewhere so i do have another option.
I just need the special plug in to get enabled before I can post it. SO I am waiting on the powers that be to do that.
I was going to cut it down even more, but my edit site CRASHED and didn’t save ANY of the editing I had already done before it was cut down to the 18 minutes, so I just went with that edited version. I was SOOOOOO mad, and have no patience for this after so long.
This video thing is going to be the DEATH of me!! I need better software or my computer may get tossed! LOL!
I also wanted to add music to one part but wasn’t sure how to do that either :C I couldn’t discriminate what part of the song I wanted to play where, and yadayadayada
Bottom line I still have a LONG way to go to get the hang of this, but I feel I did get better this time.
Once my plug-in is enabled, you will have my next video.
Sorry Im not posting anything else till then. I’ve been working hard and am so annoyed with it all :C
Half the recipe, but not half the fun
Jan 18, 2009 Author: mytime | Filed under: Home decor/3-D items, My Timeless TemplatesBRRR! Its so cold here in New Hampshire. The snow is falling, and I am already awaiting Spring!
I am getting ready to work out, then record my Monday with Mytime video!! I’m excited to get going, and take all the advice, and put it into fruition! Thank you for all the advice, and excitement. You all made me feel OK and comfortable doing this, and sharing myself-so THANK YOU.
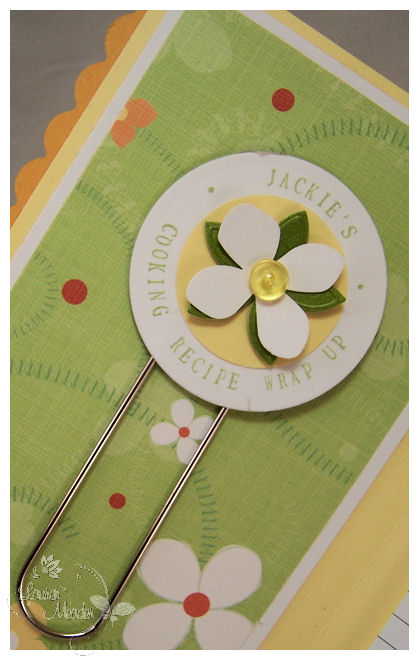
Jackie’s Cooking Recipe Wrap Up
Today’s project is another Christmas gift I made for Amber’s other teacher. You may remember I did one similar-for a Cookie Swap—–>HERE!
I made so many awesome gifts that were personalized this year using my JustRite Stampers. I’m actually shocked that my small letters aren’t worn out! LOL! I actually did invest in another set because sometimes I use a lot of a particular letter, and have lost a few because I’m too lazy to get on my floor and LOOK for them! LOL! They are cheap enough! You can never have too many letters-right?
Keep watching because I do have a NEW! JustRite Stampers product release to share (I was fortunate that they sent it to me and asked me play, and share an opinion! It was perfect for this project!And what was NOT to like?!)
Now this is a gift was made using one of my FREE! My Timeless Templates © the Recipe Wrap Up!
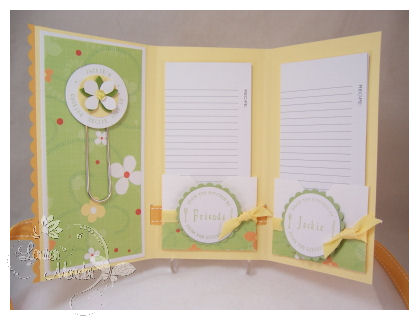
In the “original” design of the template, the idea was to create 6 fold out pockets, with Recipe cards. Well, if you are tight on time, have many gifts to mass produce, you may want to use only HALF the template!
This project only used 1/2 of the recipe wrap template!
So, untie it…………
Isn’t it the perfect size for a project?!
You don’t really need more than the 2 pockets for a simple, and thoughtful gift.
You may only use half the template, but it is just as nice of a gift idea.
I used white, Lemon Tart ,Summer Sunrise, and Spring Moss cardstock. My Ribbon is stitched Summer Sunrise stitched grosgrain. My pretty paper is by Imaginesce. Last Springs line :C I hoard, sorry! What can I say?!
Close up of the clip-to hold notes, recipes, coupons…..whatever!
I think having the clip is a great feature. I got my large Paperclips in the office section of Walmart for uunder $2 of a large container! They are FABULOUS.
I just used a Martha Stewart flower punch, to match the flowers on my paper. The “leaves” are my bridal confetti flowers, in olive. Love those things. You get a paincan FULL at Michaels for under $5-in the bridal section. (Sorry I get hundreds of emails asking about this everytime I post). The flower centers are dew drop like pieces also found at M’s like a year ago.
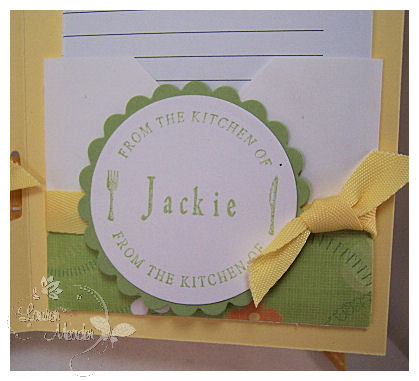
Now moving on to my pockets-instead of the printable pocket template (I was tight on TIME), I used little envelopes that came with some LOVE NOTES, I purchases from Stampin Up! like 3 years ago. They are meant to hold 3X3 notecards. Well, I cut down the top to 2 1/2 and they are PERFECT for my recipe cards.
Here is the close up of From the Kitchen of Jackie pocket tag-
This is where the NEW! product comes in!! Notice: I have upper AND lowercase letters?!
How awesome! They are FINALLY adding a lower case set to the New Times Roman font! HAPPY DANCE!!
Doesn’t it look so much better with the mix of upper and lower letters! I mean it was great before, but not its even better!
I just popped in my border, then spelled out her name. Easy Peasy!
Now make sure you check out—-> their blog <—-because they have been sharing what new products they are releasing! I may be in trouble. Looks like they are revealing 25 new items at CHA!
If you are going to CHA you will see a few of my creations in their booth! I was asked to send some along, since they enjoyed some of my posts shared 😀
2 projects you haven’t seen, and I didn’t get GREAT photos before I sent them :C
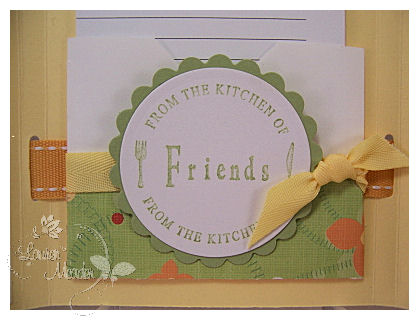
From my friends kitchen tag close up
Now the “From the Kitchen” border is from—> THIS set. I get a lot of use from that one too. I LOVE circles, so that adds to my love for those borders.
Now to go with the gift-I purchased a Tastes of Home (my absolute FAVORITE place to get recipes from! We have had our very best meals from this site! All of it is very easy too!!) slow cooker recipe book.
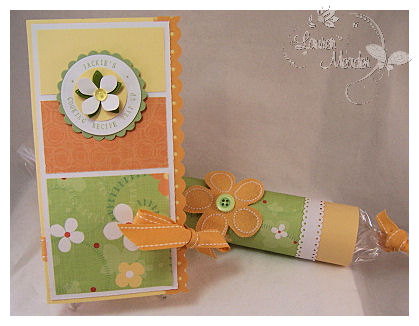
I decided to make a special magazine tube to present it to her, wither her Recipe Wrap Up! © gift.
Isn’t that just a fun way to present a magazine/book? Just untie the ends and slide out.
Here is the set, presented together
It’s just so cute!
It was well received too.
So that is it for today. I hope you liked today’s feature. I’m off to get going on my video.
Wish me luck 😀
Need your help-some news and a sketch
Jan 17, 2009 Author: mytime | Filed under: Cards, Saturday SketchI have so many feelings right now.
#1 Exhausted!
#2 Elated
#3 Even MORE motivated
#4 Excited to get going.
#5 Everything rolled into one = I want to hug.
I can’t tell you all how happy I am that the overall response to my first videos was SO positive! Thank you so much for that. I know I’m not “professional” -yet! LOL! I can assure you when I set my mind to something I WILL make it happen. I am getting some new video editing software! Thanks to all of you! My hubby realized there is a “need” here! LOL! So yeah, for that.
I know I have lots to change and learn, and that particular tutorial was MUCH longer that most will be, so it was ahrd to cut down. Especially just filming and having NO clue what the entire process entails.
I was very limited on my time and what I could fit. After seriously 12 hours of editing (due to having to cut it down like 5 times!) I was so over it. Didn’t look like it would take that long did it? Granted Im far from computer savvy, but now I know what I need to do next time.
Bottom line Im glad you enjoyed it, and I have taken the advice you all have given me, and hope to put it into my next video. I am expecting my next one to be awesome! I think given all the feed back and just the recording/editing process I learned SOOOOO much. So thank you for making me feel comfortable.
Many asked that I stay “myself”. No worries there! I have no plan on being anyone else or “acting”. I’m not like that. What you see- is what you get, like it, or hate it.
People here whom know/met me in real life can tell you that. I’m a huge talker (yes with my hands too!) and it definitely got easier as I went on. I think too knowing you all didn’t think I was a HUGE geek will help me feel more confident next time. Now I just have to get over the “talking to myself” weirdness. Doing the tutorial wasn’t hard at all, as far as the talking goes, because I had a plan and direction.
All that being said-if I could hug you all I absolutely would!
OK so this weekend I have to get my first Mondays’ with Mytime video ready, and by the sounds of it most of you want 2 things-a view of my craft space and organization, and a coloring tutorial. Well Im flattered that you want to watch ME color-but I’m no expert! That one *MAY* be too intimidating! LOL! But it’s on the list.
So to get me started-feel free to leave a comment about anything specific you want to ask me, or have addressed-like a product or technique. I know many want to know about HOW I come up with a template-maybe I can answer and explain that on one as well.
SO I need your help-I don’t know what else you want if you don’t tell me! SO lets hear it!
In the meantime-lets get started on our Saturday Sketch!
I love this one :D! I am going to do another sample sometime today I hope.\
Use keyword mytimess20!
If you can send us a link here so we can enjoy your creation. I have to say the “regular” participants I have seen as well as the Sketch Team, keep improving their samples, week after week! Have you noticed? You all just rock it out! So on that note, thank you for participating. I enjoy giving you a tool to spark or jumpstart some point to begin with some stamping and creativity !
Before I begin to share my sample, I have some FUN news to share. I was going to be a guest designer this month forStampavie. I LOVE their style to pieces, and after creating some things, Heidi asked me stay! Here <—-is that post.
Now if you look at their other designers, they are truly amazing and talented. Their coloring is INSANE! They all seem to use Prismacolor pencils, which I have no interest in now that I have my Copic’s! LOL! But the look they achieve is stunning.
It’s very intimidating to design next to these girls, as my overall style is very different than all of theirs, but all I can do is be myself, and offer you MY take on the images. I just know my jaw hits the floor when I see their stuff.
I’m excited to start fresh in the new year. I LOVE “cutesy” and this company is JAM packed with it 😀
So I hope you get to enjoy seeing more of my creations here with the company line. I have cut back on many other areas and design work with the new year as well. I need more time to focus on other areas in my life. My requirements are minimal so that works for me.
I also wanted more time to work on my resolutions -like vamp up my blog (aka my videos) and photos/tutorials and other ideas I have in the works, create MORE jaw dropping templates (yes we have over 2 years worth already, but that doesn’t mean I don’t get MORE ideas in the meantime :D), start an ETSY shop (so I can sell and get rid of what I create, rather than most of it sitting in a box!), and maybe get back to submitting for publication! I haven’t been able to do it in SO long, its time to start that again.
Anyway-should be a fabulous year.
All that being said, here is my sample :
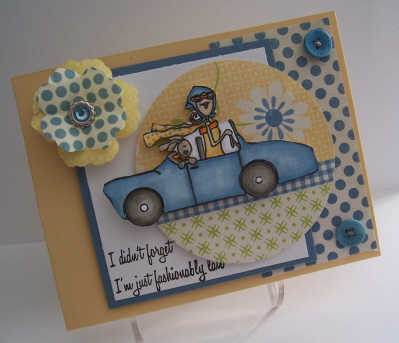
Always on the go!
This card uses a NEW! line by Leere Aldrich. A NEW! “to be released” stamp line from Stampavie
Yes, they are cute, and yes you will need them!! LOL! If you want the “Details” of WHEN you can get them and about them —> HERE you go! Bottom line, you have to wait till after CHA :C
These girls are so beyond cute! (I have to say when you see the Spring line from Rachelle Anne Miller you will just FREAK!!!!!!!!!! Sorry I had to add that in there!)
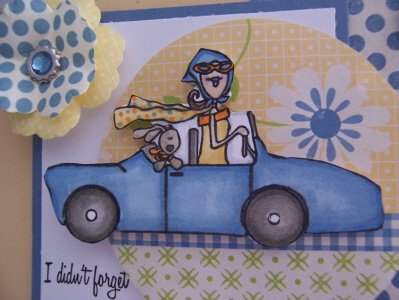
When I saw this cute car image I was over the moon for her.
I had to color and cut her out. I think she looks so fabulous driving into the circle!
I recently got some new paper by Making Memories, and it was my color inspiration for this. Not my typical colors, but SO Spring! Loved them. I also got the embellies to match! I love no brainer stuff.
I really like trying to get out of my comfort zones often, and try new things. I don’t want to stay stuck in a trend or “rut”.
There was a layered patterned sheet, that I die cut, because to me it was like the grass, the road, then the sky! I know Im a nerd. But that is what I saw.
My sentiment is from Amy’s set- Boutique Sentiments
Instead of the circle details, I used a flower, and sentiment. No worries, I’ll make another sample that more suits the sketch.
Sometimes you just have to go with what feels right. It may not be EXACTLY like the sketch, but thats OK! I had fun and used what I felt worked!
Also, if you have time, can you check out our Sketch Team!
Each week they work on the sketch to provide you with even more amazing samples!
Speaking of shopping…………….let me share ONE more with ya!
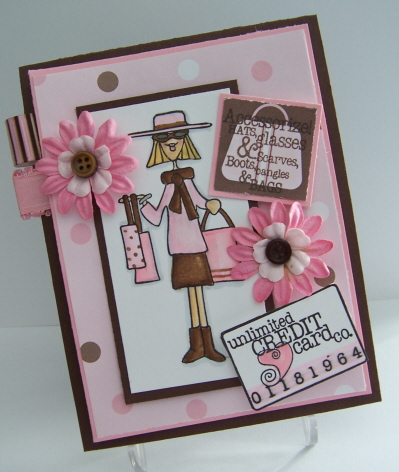
Unlimited Credit
Another Leere Aldrich image/sentiment from Stampavie
I was freakin out when I saw the sentiments that are also coming out with these sets! I HAD to use the shopping girl, and cut out the credit card. The sentiment is stamped over an image from my paper pack I had. Its perfect because the girl has all that stuff on! LOL!
I made this one yesterday, while I was on the phone with my friend Tracey. If you didn’t know I’m a huge multi-tasker! I can’t just do ONE thing.
I had the paper by Marcella from K&Co for years, and now was the PERFECT time to dust it off.
Don’t you love her?! I think shes just so cute.
So there you have it. My peeks for today.
I hope you get some “my time” in. We are off to shop! My 2nd favorite thing to do -next to stamping 😀
Till tomorrow-I’ll have a post of a Christmas gift I made for another one of Amber’s teachers.
Sketch is coming
Jan 17, 2009 Author: mytime | Filed under: UncategorizedSorry Im running late-I didn’t get my photos done/edited.
Ill be back after Noah has basketball. Hang tight.
Sometime around noon EST.
Little House on the Papertrey
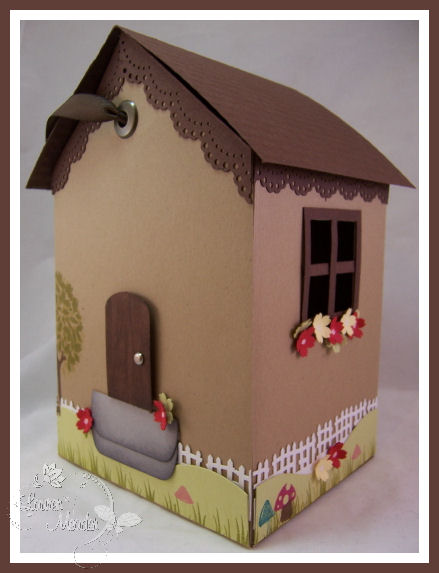
Jan 15, 2009 Author: mytime | Filed under: Home decor/3-D itemsWant a special box to package a gift for a housewarming? This os perfect for the gardener, or bird lover. How about that perfect little doll-she would look great in here too. You might just want to WOW! them with your presentation.
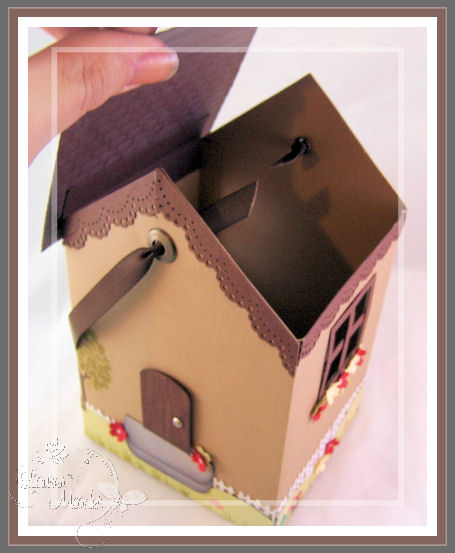
Well I designed a house shaped gift box for just about any occasion!
Lo and behold Papertrey Ink had the perfect sets to make my “dream home” box a reality.
Come see!
Here is my very FIRST YouTube tutorial on video if you want a visual step by step!
Be kind, as this my first video and I did learn SO MUCH about the recording, lighting, editing process.
I made 6 of these boxes getting this to work right, and I have to say they got easier and easier, faster, and faster, and better and better.
I do need to change my video settings. I had to drastically edit this to get it to load-I had an hour of work, to cut down to 20 minutes-then found out I had to get it UNDER 10 minutes! OH BOY! Do you have any idea how long winded I am? Thats so hard. Its too bad because I had some funny conversations with myself for you! LOL! Another time I guess.
So bottom line I kept the most important parts.
For those of you on dial up, or just wanting the eye candy-I still included step by step directions for you here!
This was my first time editing and whatnot and I learned SO much, so Im certain that this will be the worst video ever. From now on it should go much smoother, as I know what to do, and not to do filming.
I will get a better angle/lighting in the future as well.
It has been so hard as I have been sitting on this project for over a month!
DYING to create a gift box that looks like a house! I wanted to create one that would fit a Groovy Girl doll or other dolls to give as a special gift.
Now lets get to work!
House Base
2 pieces of Kraft cardstock-81/2 X 11
1) Along the 8 1/2 side-score at 4 1/4 & 8
2) Along 11 inch side score at 4 1/4
Repeat steps for both pieces of Kraft cardstock.
Making the peek of the house
You will repeat this step on both pieces. (use scrap on 2nd box panel to ensure even peeks)
(along the 8 1/2 inch side) From the center of the 4 1/4 panel-Cut from the middle, at an angle / to the outer corner. Take the scrap piece, and trace it from the center to the other corner, and cut at an angle \.
Once your / \ peek is cut, you will want to cut in from outer edge, in up to the peek. This becomes the flat sides to the box, allowing the peeks to pop up.
Now, on the bottom of the house pieces, trim on score lines, up to bottom score for your bottom.
NOTE: On the 2 panels with the peeks you will cut down the bottom flap to 3 3/4. This eill ensure a even base when box is folded.
Now pick a panel to become the front of your house.
Stamp the tree from Father Knows Best in the corner.
Grass
I used my Creative Memories wavy cutter to cut 2- 1 X 11 inch strips of grass. Put them together to wrap around my house base.
I then stamped grass from Forest Friends, as well as some of the Mushrooms.
Fence
I used the Martha Stewart Fence punch to punch 2- 1 1/2 X 11 strips of fence.
I adhered this fence behind my stamped grass hills.
Once adhered I attached it to the bottom of my house, all the way around both panels.
Trim under the roof
I used another Martha Stewart punch to line the top of my box, all the way around. It gives a nice finished look.
Windows
You will make 2.
Simply take your 1 3/8 square punch, and punch a square on either side of the house box along the flat portion. If you push the punch to the end it will ensure even windows on both sides of the house.
Take your 1 1/4 square punch and punch a square into some dark chocolate cardstock. Trim 1/8 around 3 sides, and 1/4 inch on one side.
Now take 1/8 inch strip of dark chocolate cardstock, and make your window panes by making a “t”. Once done adhere window panels over punched squares in house.
Now put the house box together!
The steps
Punch 2 pieces of gray cardstock using the Key Tag punch.
Sponge the edges, and cut down top step, to be flat. layer onto house front.
Door
Punch a piece of dark chocolate cardstock with key tag punch.
Rub chocolate ink pad over door.
Cut down bottom.
Insert a brad for a door knob.
Roof
I took a piece of dark chocolate cardstock 4 1/2 X 6 1/2. Score in half at 3 1/4.
Ran it through my cuttlebug using the brick pattern Fiskars texture plate.
Adhered a 1 inch strip of cardstock (scored at 1/2 inch), and adhered on part of the score to the inside of my house box. This will allow my roof to stay attached, and hinge open/closed.
Now you get to decorate it, as you please with little punched flowers, or other fun items you wish to add to bring out your own personality!
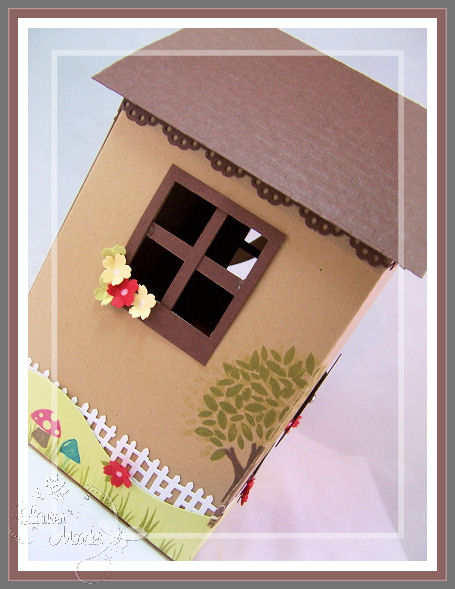
Left side view-all decorated
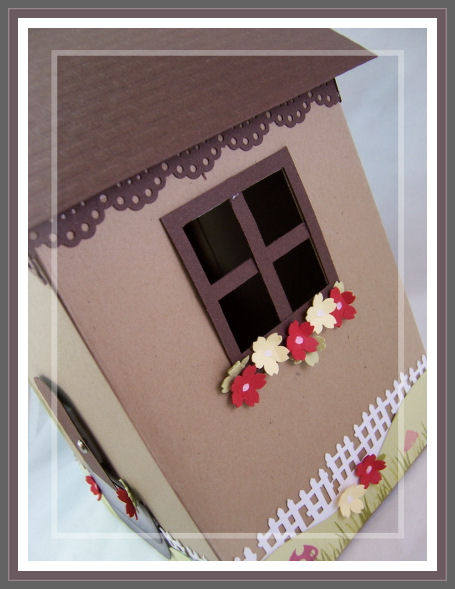
Right side view
There you have it. The perfect little house box!
I would love to hear your thoughts! I know its not the best video in the world but after having to drastically edit 6 times I know what to do next time.
I hope you enjoyed the project 😀
Thank you for visiting me.
My Etsy
My Time Made Easy © LLC
Who I Designed For
Blogroll
- Alicia
- Alli Miles
- Ally Blankenship
- Amber
- Andi @ crafts on a whim
- Angel R
- Angie Z
- Anne Kranitz
- Becky O
- Bee
- Beth Silaka
- Bethany Paull
- Beverly Nash
- Bobbie
- Cambria
- Cammie
- Card of the Week
- Card Positioning System (CPS)
- Cards for Cancer
- Catherine Doucette
- Charmaine
- Cheryl Sims
- Chriss Rollins
- Christina
- Christine Ewing
- Christine Wooden
- Colleen Schaan
- Craft Critique
- Craft Gossip
- Crystal
- Dawn Easton
- Emily Giovanni
- Geny
- Holly
- Igne Groot
- Inspirational Craft Blogs
- Irene
- Jami Sibley
- Jeanne Streiff
- Jen del Muro
- Jeni Bond
- JenMarie
- Jenn Balcer
- Jenn Diercks
- Jenn O
- Jennifer E
- Jennifer Mick
- Jennifer Pereda
- Jennifer-Sweet Treat
- Joanne Basile
- Jodi Collins
- Julia Stainton
- Julie Masse
- Karen
- Kathryn Berthiaume
- Katie Cotton
- Kelley Holland
- Kendra
- Kim Scholfield
- Kris’s Color Stripes! Get inspired here
- Kristen Dubosque
- Kristin Eberline
- Kristine
- Laura @ Sunshine Stamper
- Laura Turnmire
- Laurie Schmidlin
- Lesa Rapp
- Linda Duke
- Linda-LSN
- Lindsey Botkin
- Lisa (lakind scs)
- Lisa Kind
- Lori Craig
- Maggie
- Mara Campbell
- Maria
- Maria Levine
- Mary
- MaryJo
- Melanie M
- Monique Hansen
- Moxie Fab World
- Pam Imholz
- PaperCrafts Connection
- Peppers and Pollywogs Kids party site
- Rebecca Grohall
- Rita
- Robyn
- Rose Ann
- Sarah Vrolyk
- Sharon Harnist
- Sharon Johnson
- Sharon Rivera (a chemisrty with paper)
- Sherrie
- Sophia Landry
- Storage Units, Ink, & More Blog
- Sue Berker
- Susan (Rainy)
- Tangii Crane
- Tracy
- Tricia Traxler
- Trudee
- Velta
- VivLyn
- Zena
MTME Pretty Palette Color Team
MTME Pretty Patterns Sketch Team
My Time Made Easy TM LLC
Shop till you drop!
Lauren Meader
About Me
Copyrighted material
Subscribe To My Blog
Pages
- About me
- Alexa’s Story!
- My Crafty Corner!
- My Time Made Easy™ LLC
- Our Make A Wish Trip to Disney!
- Resume/Publication List
Calendar
Archives
- August 2013
- July 2013
- June 2013
- May 2013
- April 2013
- March 2013
- February 2013
- January 2013
- December 2012
- November 2012
- October 2012
- September 2012
- August 2012
- July 2012
- June 2012
- May 2012
- April 2012
- March 2012
- February 2012
- January 2012
- December 2011
- November 2011
- October 2011
- September 2011
- August 2011
- July 2011
- June 2011
- May 2011
- April 2011
- March 2011
- February 2011
- January 2011
- December 2010
- November 2010
- October 2010
- September 2010
- August 2010
- July 2010
- June 2010
- May 2010
- April 2010
- March 2010
- February 2010
- January 2010
- December 2009
- November 2009
- October 2009
- September 2009
- August 2009
- July 2009
- June 2009
- May 2009
- April 2009
- March 2009
- February 2009
- January 2009
- December 2008
- November 2008
- October 2008
- September 2008
- August 2008
- July 2008
- June 2008
- May 2008
- April 2008
- March 2008
- February 2008
- January 2008
- December 2007
- November 2007
- October 2007
- September 2007
- August 2007
- July 2007
- June 2007
- May 2007
- April 2007
- March 2007
- January 2007
Categories
- About Me
- All That Scraps
- blogger challenge
- camera/photo play
- Cards
- Contests
- family stuff
- FOR SALE
- Home decor/3-D items
- How to FAKE it!
- Introduction
- JUGS Challenge
- JustRite Stampers
- Lizzie Anne Designs
- My family stuff
- My Stamping Space
- My Time Made Easy
- My Time To Color Challenge
- My Time to Create Challenge
- My Timeless Template Challenge
- My Timeless Templates
- Mytime Mail
- MYTIME MOVIE/VIDEOs
- Papertrey Newsletter
- Pink Cat Studio
- Pretty Palette Challenge
- Pretty Patterns Sketch
- Product Opinions and Must haves
- Recipe's
- Saturday Sketch
- Smilebox Creations
- Stampavie
- Tutorials
- Uncategorized
- videos
Most Popular
- Create your own Onesie Card Tutorial-and important NOTE! PLEASE READ (2529)
- Saturday Sketch-Boxed bag holder (2333)
- Going GREEN! Fancy Flower Flourish-Closure Video (1478)
- Fabulous Favorite - Giveaway! (1336)
- a Prayer Request (1232)
- QUICK-Easter Baskets from Nestabilities-PTI style-and blog challenge (1063)
- Teaser Sketch (999)
- February Release Giveway! (and a little peek) (996)
- Group Post and Rambling Rose Video Tutorial (985)
- GIVEAWAY! Who wants it all?! (895)
Recent Comments (RSS)
- 첫충사이트: 완전히 흥미로운 블로그 게시입니다. 저는
- sarah: Wow, Lauren, what a stunning
- hedie: خرید راهبند
- 야동: Love to read it,Waiting For
- 야동: This seller is in a
- 바카라사이트: 여기 처음 왔어요. 나는이 게시판을
- 야동티비: I was surfing the Internet
- 바카라사이트: 비슷한 주제에 대한 흥미로운 정보를
- 바카라사이트: "여기에 제공해 주신 귀중한 정보와
- 온라인홀덤: 유익한 웹 사이트를 게시하는 데

