Template/Stationery Papertrey Peek #1-
Jan 9, 2009Hi everyone!
Boy have I been scrambling to get some cool samples ready for you this week as we have ourPapertrey Ink countdown! Countdowns, for me are now busier than ever as I work hard to design my projects, as well as share some sample ideas daily, using my monthly release of My Timeless Templates. If you are new to my templates-read all about them here! AND make sure you try the 2 FREE downloads 😀
If you have tried them, thank you! I get so excited with each release, and seeing what you all do truly makes my day.
This month is another exciting one. I hope you enjoy it as much as I do.
Introducing my newest template from My Timeless Templates ©!
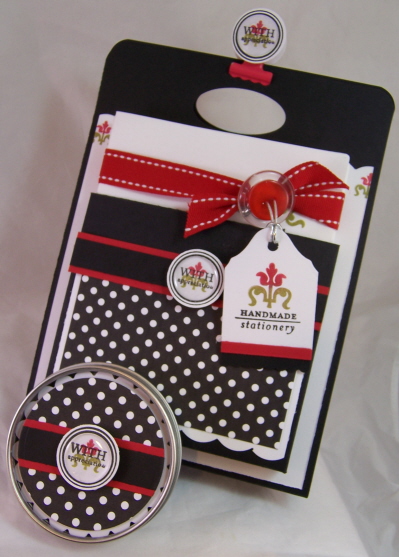
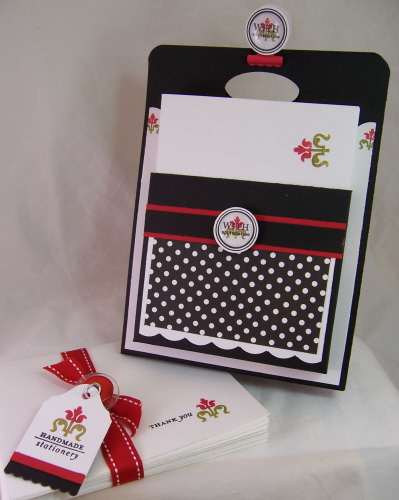
It is called the Take Long Tote© This template will be available for purchase on the 15th.
It is a perfect holder for all those beautiful cards we all make! With 2 pockets to hold your cards/envelopes or whatever else you can dream up, it the perfect tote for anyone. YES! This fits your standard A2 size creations.
Keep reading.
This template works perfectly for this months stamp set release, which I am so excited to be peeking today as well, called Simply Stationery. It was designed by Candice. It is a set that is so up my alley, as I adore making card/stationery sets for people. (Justa in case you didn’t notice.)
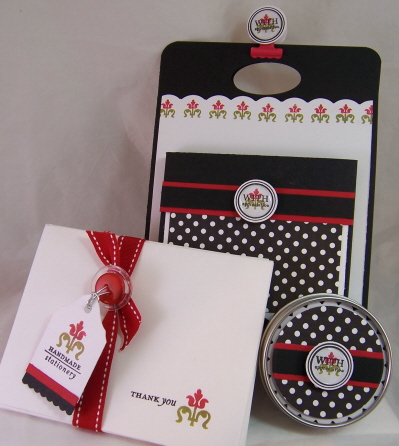
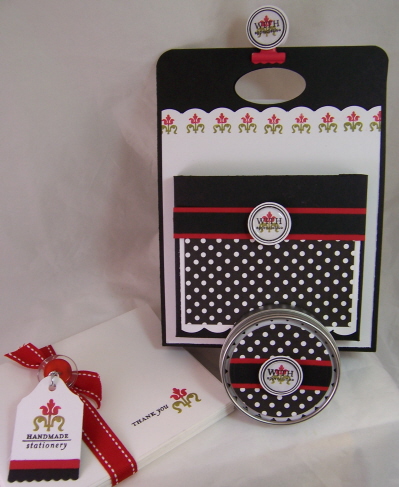
This set I made was created using the DELUXE Stationery Kit. I hope you like it.
You can never have too many card holders. As the days go on I will of course give you other ideas for this template too.
Stationery and cards are always the perfect gift, that keeps on giving. Having a perfect, easy to make package, to coordinate is a huge bonus, and really completes the package. It is so nice to have a variety of ways to present/store all your beautiful creations.
I decided use Black, Pure Poppy , Ripe Avocado, and white .
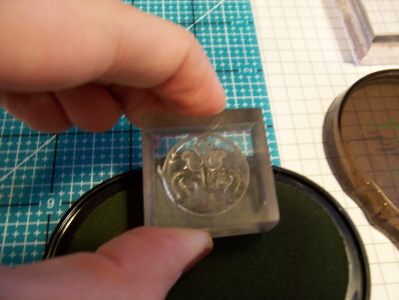
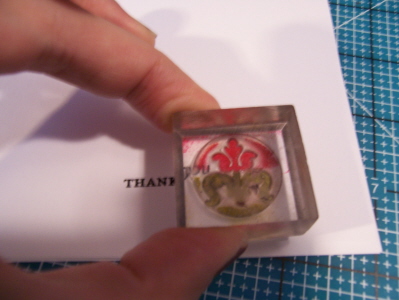
Now upon looking at this set, one of the images caught my eye. It is a flower-like flourish. To me, it was just like my favorite flower-a tulip. I had to use it as my main focus.
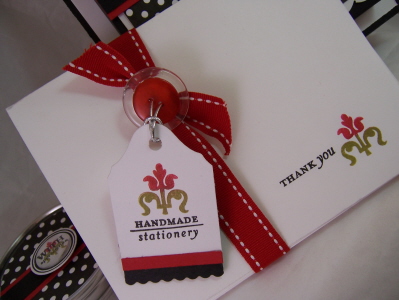
Close up view of the tag
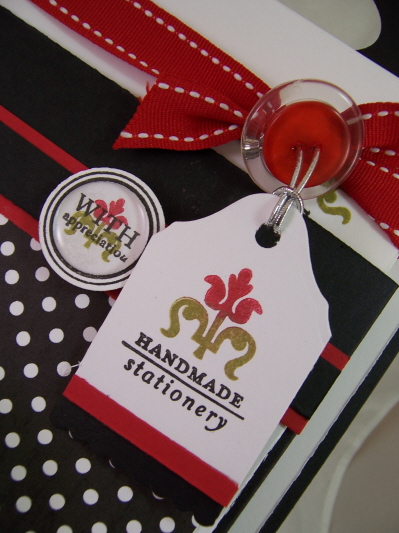
My tag uses one of the sentiments in the stationery set.
Now the “with appreciation” is from Mixed Messages. The circle border is from Borders & Corners.
I added the flower element to tie the set together. I love how it can showcase your gift set is handmade.
Now inking my flower with dual inks was very easy.
I inked just the stem in Ripe Avocado ink.
Then I used the shape of the ink pad to ink just my blossom in Pure Poppy.
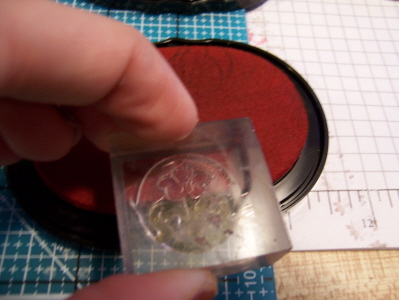
Stamped where desired. It went very quickly.
Now for the tag part.
I made my tag using the Labels 1 nestability, and a rectangle scallop border!
Here is a visual:
My white stamped tag was about 1 1/2 inches wide, then I die cut it.
Layered the tag piece, with the scallop border for the bottom. Punched a hole, and had a elegant tag for my stationery set.
Getting an elegant tag is easy peasy!
This is a side view of the Take Along Tote ©
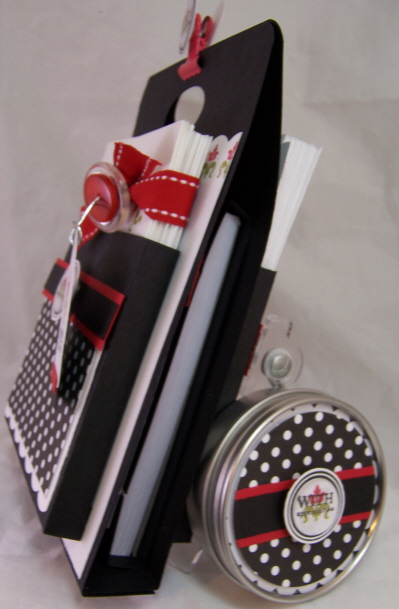
As you can see, it has 2 pockets. One on the front, and one on the back. The choice of 2 is of course optional.
The front panel holds my stationery sheets from the Deluxe Stationery Kit. I folded mine in 1/2 like a card.
Here are the cards out of the pocket-
As you may notice I did a scalloped panel. I stamped the flower along that panel for a pretty simple touch.
I TRULY love this set
Now the back panel -this holds my stamped envelopes to match.
See the envelope corner?
A stamped envelope is a little touch that can really make a big difference.
Here is a closer view of the card set all tied together: simple elegance
Now un-clip the top of the tote, and inside you can hold even MORE fun items.
Note: I just added 2 punched circles, stamped to match to make my clip (by making memories-as are the page pebbles that are in the center of my “with appreciation elements) a perfect closure for my tote. You can always punch a handle in the tote, or use ribbon etc, as you will see over the next few days here.
Tote open to reveal inside storage
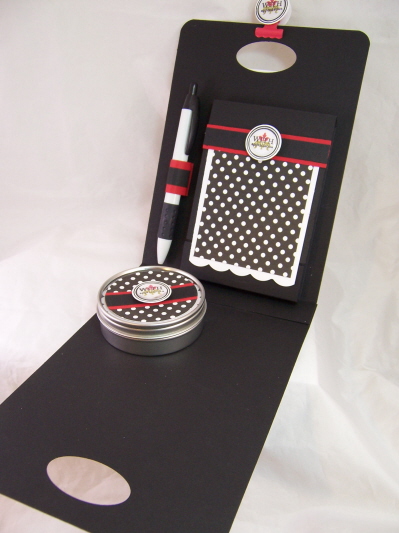
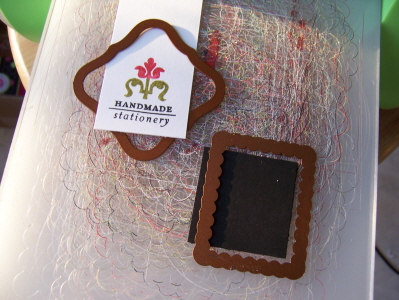
I decorated the little tin to match, to hold stamps for mailing.
Inside this one I decided I would cover a note pad (I got a set of 6 at Staples for about $2). It has a magnetic closure. Designed to match perfectly, of course!! Very easy. This will help someone jot down any important reminders and such.

I also included a pen in the set as well, with a little cardstock pen holder to match.
Isn’t that a nice surprise? Not only do you have two pockets as an option, but you can open it up for another great surprise, and more storage!
Well, that is it for me . I had so much fun making this. I hope you enjoyed my peek at the new stamp set, and md my latest template release!
Giveaway:
I love to hear your feedback. Leave a comment if you want a chance to win my completed project featured in todays post!
For more peeks make sure you check out Nichole’s blog!

My Etsy

Who I Designed For
Blogroll
- Alicia
- Alli Miles
- Ally Blankenship
- Amber
- Andi @ crafts on a whim
- Angel R
- Angie Z
- Anne Kranitz
- Becky O
- Bee
- Beth Silaka
- Bethany Paull
- Beverly Nash
- Bobbie
- Cambria
- Cammie
- Card of the Week
- Card Positioning System (CPS)
- Cards for Cancer
- Catherine Doucette
- Charmaine
- Cheryl Sims
- Chriss Rollins
- Christina
- Christine Ewing
- Christine Wooden
- Colleen Schaan
- Craft Critique
- Craft Gossip
- Crystal
- Dawn Easton
- Emily Giovanni
- Geny
- Holly
- Igne Groot
- Inspirational Craft Blogs
- Irene
- Jami Sibley
- Jeanne Streiff
- Jen del Muro
- Jeni Bond
- JenMarie
- Jenn Balcer
- Jenn Diercks
- Jenn O
- Jennifer E
- Jennifer Mick
- Jennifer Pereda
- Jennifer-Sweet Treat
- Joanne Basile
- Jodi Collins
- Julia Stainton
- Julie Masse
- Karen
- Kathryn Berthiaume
- Katie Cotton
- Kelley Holland
- Kendra
- Kim Scholfield
- Kris’s Color Stripes! Get inspired here
- Kristen Dubosque
- Kristin Eberline
- Kristine
- Laura @ Sunshine Stamper
- Laura Turnmire
- Laurie Schmidlin
- Lesa Rapp
- Linda Duke
- Linda-LSN
- Lindsey Botkin
- Lisa (lakind scs)
- Lisa Kind
- Lori Craig
- Maggie
- Mara Campbell
- Maria
- Maria Levine
- Mary
- MaryJo
- Melanie M
- Monique Hansen
- Moxie Fab World
- Pam Imholz
- PaperCrafts Connection
- Peppers and Pollywogs Kids party site
- Rebecca Grohall
- Rita
- Robyn
- Rose Ann
- Sarah Vrolyk
- Sharon Harnist
- Sharon Johnson
- Sharon Rivera (a chemisrty with paper)
- Sherrie
- Sophia Landry
- Storage Units, Ink, & More Blog
- Sue Berker
- Susan (Rainy)
- Tangii Crane
- Tracy
- Tricia Traxler
- Trudee
- Velta
- VivLyn
- Zena
MTME Pretty Palette Color Team
MTME Pretty Patterns Sketch Team
My Time Made Easy TM LLC
Shop till you drop!
Lauren Meader
About Me
Copyrighted material
Subscribe To My Blog
Pages
- About me
- Alexa’s Story!
- My Crafty Corner!
- My Time Made Easy™ LLC
- Our Make A Wish Trip to Disney!
- Resume/Publication List
Calendar
Archives
- August 2013
- July 2013
- June 2013
- May 2013
- April 2013
- March 2013
- February 2013
- January 2013
- December 2012
- November 2012
- October 2012
- September 2012
- August 2012
- July 2012
- June 2012
- May 2012
- April 2012
- March 2012
- February 2012
- January 2012
- December 2011
- November 2011
- October 2011
- September 2011
- August 2011
- July 2011
- June 2011
- May 2011
- April 2011
- March 2011
- February 2011
- January 2011
- December 2010
- November 2010
- October 2010
- September 2010
- August 2010
- July 2010
- June 2010
- May 2010
- April 2010
- March 2010
- February 2010
- January 2010
- December 2009
- November 2009
- October 2009
- September 2009
- August 2009
- July 2009
- June 2009
- May 2009
- April 2009
- March 2009
- February 2009
- January 2009
- December 2008
- November 2008
- October 2008
- September 2008
- August 2008
- July 2008
- June 2008
- May 2008
- April 2008
- March 2008
- February 2008
- January 2008
- December 2007
- November 2007
- October 2007
- September 2007
- August 2007
- July 2007
- June 2007
- May 2007
- April 2007
- March 2007
- January 2007
Categories
- About Me
- All That Scraps
- blogger challenge
- camera/photo play
- Cards
- Contests
- family stuff
- FOR SALE
- Home decor/3-D items
- How to FAKE it!
- Introduction
- JUGS Challenge
- JustRite Stampers
- Lizzie Anne Designs
- My family stuff
- My Stamping Space
- My Time Made Easy
- My Time To Color Challenge
- My Time to Create Challenge
- My Timeless Template Challenge
- My Timeless Templates
- Mytime Mail
- MYTIME MOVIE/VIDEOs
- Papertrey Newsletter
- Pink Cat Studio
- Pretty Palette Challenge
- Pretty Patterns Sketch
- Product Opinions and Must haves
- Recipe's
- Saturday Sketch
- Smilebox Creations
- Stampavie
- Tutorials
- Uncategorized
- videos
Most Popular
- Create your own Onesie Card Tutorial-and important NOTE! PLEASE READ (2529)
- Saturday Sketch-Boxed bag holder (2333)
- Going GREEN! Fancy Flower Flourish-Closure Video (1478)
- Fabulous Favorite - Giveaway! (1336)
- a Prayer Request (1231)
- QUICK-Easter Baskets from Nestabilities-PTI style-and blog challenge (1063)
- Teaser Sketch (999)
- February Release Giveway! (and a little peek) (996)
- Group Post and Rambling Rose Video Tutorial (985)
- GIVEAWAY! Who wants it all?! (895)
Recent Comments (RSS)
- 바카라사이트: 비슷한 주제에 대한 흥미로운 정보를
- 바카라사이트: "여기에 제공해 주신 귀중한 정보와
- 온라인홀덤: 유익한 웹 사이트를 게시하는 데
- 홀덤나라: 나는 당신의 블로그를 정말 좋아합니다.
- lisa: Technology, too, has left an
- 주소모음: 흠 !! 이 블로그는 정말
- FutureGen Apps: Thank You For Sharing fantastic
- 웹툰사이트: 터키에서 온라인 스포츠 베팅을 할
- 툰코: It is a really very
- 온라인홀덤: I’ll be sure to come
Copyright © 2007 - My Time, My Creations, My Stampendence - is proudly powered by WordPress
This blog has been Tweaked and Designed by Sara Williams
391 Responses for "Template/Stationery Papertrey Peek #1-"
Lauren, this is so awesome! I love your colors and all your little touches!
As usual I LOVE it!!!! I can’t wait till the 15th!!! All of your templates ROCK!!!!
Enjoy the snow storm we are expecting 😉
~K
Wow! Love it! You are so talented!
wow! great work as always. You are so detail oriented, and I love it. I am too, but often my lack of patience gets in the way. 🙂 Could you post a pic of an unaltered notebook from Staples so I know what to look for? Again, great job! Thanks for the chance to win!
Lauren, you make beautiful and elegant projects so easy. This looks like another template that I will need to get. Absolutely stunning. Congratulations Lauren!
Lauren –
This is an amazing project! I can’t wait to attempt it myself. Your template looks very cool and I can’t wait to purchase it!
Thanks for sharing all of our creativity,
Kimberly
I am really loving the black and white. I used a couple of your templates for teachers gifts over the holidays, and I got a lot of positive feedback. (I felt a little guilty, and I actually told them you were the designer, although none of my son’s teachers are crafters). It looks like I am going to have to try this template as well. Also, Nichole sold me on your stationery template, so that will also be in my box on the 15th.
I love this project! You are so talented!!
This is such a wonderful project, so classy. I am having a ball with your templates. You are sooo creative. Thanks so much for the opportunity to win your yummy goodie, here.
Looking forward to getting this template it is a great idea, well done! Also love the colours you used to make your set.
Oh, this is completely beautiful! I can’t wait to get this template too! :o)
This is beautiful! I love all your projects! I really like the white scalloped border with the “tulip” stamped in red and green. It was so clever of you to turn that stamp into a tulip. Also very clever to use the Labels I die to make your tag. You are so inspiring!
WOW, this is so beautiful! Such a clever idea! Loved the colours used and it is such a practical gift!
What a beautiful project! This will be perfect for a friend of mine; I’m so going to steal this idea!
Love this template – can’t wait to get it and put it to use!
everything was beautiful but the creative way you made that tag using two nestabilities was priceless! you’re so smart!
Wow! These templates keeping surprising me! You are SO talented 🙂 This is a perfect gift for someone!!!
I love having everything together all in one place…it makes it so much easier for busy Moms. Thanks for your creativity!
Lauren – This template is amazing, I love your project. The color combo is perfect!
Your creativity leaves me breathless! and would I like to win it? Would I ever!
Your creativity leaves me breathless! and would I like to win it? Would I ever!
Lauren, our project is BEAUTIFUL, as always! I LOVE this template! And it works perfectly with the new stationery set!
Love your template – red – white – black —-can’t beat that color combination! Keep up the GREAT work!
This project is wonderful! I can’t wait to get my hands on this template and play with it.
Lauren, you’re one talented lady! You amaze me with each PTI’s releases! I’ve loved all your templates so far and this one is no exception. can’t wait!
Amazing is all I can say. I just love this project! In fact, every project you make and every template you design just blows me away. I am in awe at your creative talent. *Ü*
Love it! Have just been planning teacher gifts–sets of notecards in black and white and I discover PTI’s colors this month are black & white! What great timing!
Lauren, you always make such beautiful projects. I read every day to see what new and exciting things will inspire me! I love your templates and can’t wait to buy this one!! I love making stationary for people and all these ideas are wonderful!! Thank you!
I LOVE IT AND I WANT IT!!!!!! This is amazing, I just left Nichole’s blog and I am so excited about this release.
Thanks
Kisha
WOW!!! you really are an inspiration on what a paper crafter can do. I love it, thanks for sharing as always.
Seriously Lauren…this is SO classy looking from the colors to the beauty of the design. Just gorgeous!
Wow I love it, so eye catching! I really love the little tag
Oh my this project is just ROCKIN’ as usual!! Love it!
Girl! You amaze me every month with all your ideas. I love it. Don’t run yourself down. You are super woman. I don’t know how you do it all and look great doing it. Looking forward to your other peeks.
Janin
This is beautiful. I already have one of your templates — desk top — and Love it, so this looks like another must have!
This is really gorgeous!! There is always something so inspiring to see when I visit your blog.
Well – as usual it is super clever and darling:)
This is amazing. Your templates are awesome!
Lauren….YOU are Amazing!
I just love ALL of your creations!
Your creations are like flowers ……never ending blooms!
Lauren, this is simply beautiful! In this day and age, not too many people write handwriten notes anymore. Email seems to be the norm. With this idea, I must say, you’ve taken my breath away! What a fun idea. Love your ideas and blog. Keep it up.
Judi
Lauren Love your New Timeless Template!! I have purchased all of them so far and know I’ll add this one to the others as well. Your Project you made using your Timeless Template and the new “Deluxe Stationary Set” is Gorgeous!! I would love to win it! I also appreaciate very much, the chance at your drawing…..Thanks for the Great Inspiration and sharing all your Talent.
Cynde
You never cease to amaze me. I have bought one template and tried the two free ones and they are AWESOME. I used the stocking stuffer for Christmas for my employees and it only took me 3 hours to make (print, decorate, assemble, and fill) 9 stockings. That’s no time at all for a hand made gift. Can’t wait to see your other uses for this template. Have a great day.
Heather J.
That’s awesome !
Pick ME,,,,,, What a fantastic give away….. This is doable so TFS,
As always I love your work. It’s so matched and colorful and joyful. The stationary idea is marvellous since the era of e-mail ofcourse is handy but there is no such feeling as getting a “real” mail in the post.
This is an awesome project – it would be great for my mom or m-i-law or a teacher gift – thank you for all of the awesome ideas!
Another winner this project is so elegant. I will have to buy this template. My Mom still writes to old friends and she would love this set. TFS Ann Lind
Lauren–I am addicted to your blog and your Timeless Templates!! Each month your templates inspire me to take up my supplies and start creating!! Thank You!! Blessings and Hugs!!!
How do you do it? I can’t even imagine having a creative mind like you have. You are truly talented. Thanks for sharing it with the rest of us!
Lauren-You are so clever. Your templates and projects continue to amaze me. You consistently inspire me to try something new.
Wow. I love this project. The color combination is just the right thing for such a great project. Thanks for showing us all the details of how you arrived at your finished project, too.
Soooo beautiful! I love your templates and have used a couple for holiday projects – so easy to use!
I love how you made the tag with the edge of a labels one die. I would have never thought of that. Your new template looks amazing. Can’t wait to see what else you have to share this week.
This is lovely. I am someone who believes in sending out Thank you’s after receiving a gift and this would be a wonderful place to store prepared notes of appreciation.
Wow, what a great give away! Your ideas and creations always blow me away! I’m in complete awe!
Lauren this template and project are amazing – so cute!!!!! And such a different way to present handmade stationery – it’s awesome. Can’t wait until it’s available for purchase!
Thanks for sharing all your creativity with us and look forward to seeing what’s coming next!
Your creativity never ceases to amaze me. I am just addicted to your blog. I love watching what you come up with. Happy New Year!!
Wow, this is so beautiful….I adore your work, you are amazing! I look forward to your blogs every morning with my cup of coffee, Thanks so much!!!!!!!!!!
What an awesome set! Great job!
Lauren, your creativity is amazing!! The stationery set is so elegant. All I can say is WOW! 🙂 🙂
Your templates are awesome. Your samples are simply amazing. What a great pairing this month!!
This project is one of the best I have see you create. The template is going to be great for a variety of projects/gifts. I love the color combination that you used.
Fabulous! I love the templates, but after I see what you create, they are must haves.
It’s a good life!
Terri E.
Lauren, this is so cute. I love your color combination. All I can say is I am speechless with this set.
Beatiful!!! I am looking forward to purchasing this template!
What a beautiful set – lots of neat special touches! Love the tag created with using parts of nesties – ingenious!
Wow–you continue to amaze me with these awesome templates not to mention the projects themselves. Love the way you made the tag, it’s nice to get ideas for varied uses of the tools we already have on hand. Thanks Lauren!
Lauren, Great Job as always! I recently stumbled upon your blog and I LOVE it. You are so inspiring. You are my first ‘stop’ in the morning!:)
This is a great project. You are a wonderful designer with many wonderful talents. Good luck with this realease.
Wow – this is just so elegant! Love the simplicity of the look – right up my alley! Thanks so much for the idea… can’t wait to see what other ideas you have for the tote!
Beautiful, Lauren. I love the way you see things a little differently, making sets so much more versatile (like turning the little flourish into a tulip). The inside of this template would be a great place to keep addresses, too. Then you’re really all set to jot a note to someone on the run. . . or when you’re waiting in a carpool line to pick up the kids. Great idea!
Love the sneek peek of this set!! I am loving your templates and the fact they are so easy!!! Your creation today is simple elegance!
Hope J
I think this is beautiful. You are incredibly talented.
YOur project is BEAUTIFUL! Good luck to all!
Leora
This project is awesome. I love all the finishing touches you add to your designs. The elegant tag is so cleverly made. I have all your templates, and this one will be added and used just as much. Thank you, thank you, thank you.
Lauren every project just gets better and better. I think this makes a great gift for friends and teachers. I especially love that you made it my signature favorite colors “black and white”
Love your blog and I love this project!! I was just trying to find some ideas like this to make some cards for a birthday present for my step-mother. What a great project.
Wow! I love it. What a great gift idea.
very cute Lauren, can’t wait to try one!
Great template once again!
That is so beautiful,Lauren.
Lauren, I am constantly blown away by your creativity. This project ROCKS!
Love this design. I’m trying to figure out 2009 Christmas gifts for my coworkers (one of my resolutions for this year) and this looks like a perfect presentation. Beautiful and very cost effective (extremely important in today’s world). Thanks for a great template.
This is so creative! I love the classic, yet functional use of this tote! What a great gift idea!
WOW…this is absolutely fabulous, Lauren!! Such a beautiful gift idea!
Lauren, you are amazing! I love your templates and especially love to see what all you do with them. They are so versatile. Can’t wait to see what else you do with this one. Thanks for sharing.
Oh my freaking goodness Lauren! This totally rocks girl! I love the colours you used…now I’m not usually one who uses black but this creation is FANTASTIC!
Thanks for the idea about the tag and scallops 😉
You just amaze me when you see something that I would never see…the “flower” from that flourish and cutting the tag using the corner of the nestie! You are truly gifted! Lovely project!
Beautiful! U love the colors!
I can’t wait to try this new template!
Awesome project! The colors are stunning! : )
OH STOP IT… WHAT!! GIRL you sooo rock that is amazing.. I actually need to make some gifts (I am working w another of temp.you have as well) I have to make 10 gifts and have 3 done YIKES! lol.. and I want to use this one too this is prefect because its a holder and I am needing it for some of the eldery ladies at my church and I think this would be prefect for them to have everything together and just take it with them.. MY GOSH you super genius you! 🙂
Lauren,
I love your templates!!!!!!!!! I used the keepsake box for Christmas gifts. I am using the purse-onality template for my stamp club member gift. I will use the tote bag for my stamp club project. These are very easy to use and still have so many options to personalize them.
Donna G.
…very classy…love the color combo…your blog is always so inspiring !!!!…
That’s amazing as usual! Fantastic job Lauren!
Oh my…I LOVE your templates and can’t wait for this one. Is it the 15th yet?
Mary
lauren, you are truly amazing!! i love everything you create! thank you for the chance to win!!
OMG Lauren, this is fantastic! What a great idea to hold a card/stationary set. I cannot wait to see what else you have up your sleeve :O) You truly captured what I was thinking while reading your post…simple elegance. Very classy, Lauren. Thanks for the details on how you created the tags, etc.
Absolutely gorgeous. I love the red, green and black colour combination. It is very elegant.
Beautiful – great as always!
I LOVE it! What a perfect gift for someone. Thanks for a chance to win. Terry
Chalk up another amazing project from Lauren! Fantastic!
That is wonderful! So many little touches! I love it.
I love this project – this is probably my favorite of yours so far! Can’t wait for the template!
That is just gorgeous! Love the colours you chose as well. Great job!
Wow, Lauren! I am stunned again!!! Looks like I will be purchasing several of your templates this month that are perfect for these sorts of projects! Your creation is lovely!!!!!
OMGosh! This is so gorgeous! I love all the details, colors and of course the whole concept. Well done Lauren!!!
I love this. Can’t wait to try one of my own.
This is so cute! I am going to do this. I love it! This and your trendy tubes are “must haves”!
This is just wonderful Lauren! So much thought went into this and it just shows! I can’t wait for the template to be released.
Lauren, That is just awesome. Who would have thought you can make so much with just a bit of paper and ribbon. Great job my friend. -Molly B
Absolutely wonderful – you are too clever! How do you come up with these great templates? Keep up the good work.
I don’t know how you do this. What a wonderful talent you have!
Oh my goodness this is so cute. I love this. You’re templates are awesome, I don’t know how you come up with all of this.
You KNOW I need to win me a Lauren Meader creation to take to work at my new job and smile at!
LOL
Great work girl! Keep it up!
Absolutely love this, Lauren! So professional and beautiful! I can’t wait to read you other posts!
Great job – and thank you for sharing! Hugs to you and the kiddies!
♥Renee
Wow! This has so many great details! You’ve thought of everything. I love using your templates and it looks like this will be another that I will use often. Can’t wait to see what else you do with this.
Lauren – awesome project! I love being in suspense waiting to see what your next template will be ; ) Absolutely love your work! Know that you are appreciated by so many!! Thank you for all you do! : )
Awesome template!!! I’m already planning who I can make this for. Thanks for sharing!
Love the templates…and your projects are truly inspiring…they are so beautiful.
I love this. And i love how you made the tag! Fantastic!
As usual a great project with all those little Lauren special touches.
what a great new template!!! and the colors you chose are just beautiful together. very elegant~~
What a creative and inspiring template. I just love the colors and layout.
Happy Blogaversary to YOU! I would love to be the lucky stamper to win this sweet giveaway. Thanks for a chance.
Whoa baby! THis is amazing!!! I love this new template. So cool!!! ANd black, white, and red is my fav. color combo. Awesome job!
That is just beautiful! I love everything about it — the colors you chose, the combination of stamps, the placement of everything, and of course, your new template! It’s gorgeous. Thanks for sharing!
Lauren, you come up with the greatest projects! I love all the little details added to each item which make for a really special gift. Your templates are to die for! Thank you for your inspiration each day. You truly are a Master Crafter!!!
Gorgeous!!! I wish I had an ounce of your talent! I’m a good copier, but not coming up with my own idea. Thanks so much for sharing and for the chance to win!! You’re amazing!!!
Another great template and another beautiful stationery gift set! Very classy with a youthful spirit!!
Lauren this is stunning! When isn’t your work? Love the color combo!
It’s beautiful, Lauren! Great job!
OMG! Ohhhh, please let me be the one………………
Love your work to pieces.
Awesome, awesome, awesome!! I just LOVE coming to your blog every day. I know there was always be something that blows me away! I would *love* to win this!
How beautiful!!! I wish my brain worked like yours : )
You’ve really been turning out lots of wonderful projects!
You’ve really outdone yourself on this one, girl! I LOVE this new template & what you’ve done with it! Brilliant!!!
This is a beautiful project! Love it!
OMG Lauren – I am SO salivating here to get my hands on that template. You have really inspired me with this one. If you happen to see this comment I was wondering where the tulip stamp came from?
This is fabulous, so inventive and I love the colour combination you used!
Lauren, You’re amazing, Thanks for sharing, Julie
Absolutely BEAUTIFUL! The colors are so pretty together:o)
Very classy and elegant, Lauren! I love it!
Lauren!!! You did it again! I am so excited for the new sets and templates to come out. I wish I could get my hands on this a little sooner — I have a couple of birthday gifts to make this month! Your set is just gorgeous!
Wow, You and Nicole are killing me today. My husband recently told me i could not do any spending. Hopefully the overtime i did this week will allow me to buy the sets to make these gift ideas you and Nicole have given me. kim
The detail on this project is what blows me away and yet it isn’t overdone. Very elegant and understated. Such class!
Mary
http://www.primitiveseasons.blogspot.com
WOW! WOW! WOW!
Now this project is absolutely beautiful! Funny as I was carefully reading all the details & thinking to meself ” I could never make something this beautiful, wonder if it can be bought? ” and then you are offering it! Sweet! Whomever wins this is winning a treasure! You (as usual) did one amazing job!
Wow.
The colors are so great for February especially, but I love the whole set, and would love to win too. You make things look so easy and elegant.
You have blown me away AGAIN Lauren! So cute! I am a BIG FAN of your templates! I love to WOW people with the projects I make with them! (My mom thinks I’m a papercrafting genius…LOL! So thanks for THAT!) LOL!!!
I look forward to using this one too! You ROCK girl! 😉
Every month your templates just keep getting better! I can’t wait to use this one. Thank you for taking all of the hard work out of making custom gift packaging.
Lauren, every project you do is a home run. I adore this template and what you have done with the PTI new release. Thanks for the chance to win.
Cheryl Sims
This is such a beautiful set, it’s amazing !!
Claudia
[email protected]
what an adorable set, Lauren! can’t wait ’til the 15th!
Lauren, this is absolutely BEAUTIFUL! What a great teacher – or anyone – gift! Thanks for sharing your talent with us all!
Kerrie
This is a very striking ensemble and I would love to call it my own!
This is so elegant looking! I just love to visit your blog every day and see the wonderful things you create! You are just so talented! Thank you for the chance to win this beautiful set!
Laurie
Lauren,
Love the color combination and the many “options” this template offers! Amazing!
Thanks, Barb
Lauren, this sample is rocking. I’m totally in love with the new template can’t wait for the 15 to get it.
Another great project Lauren! I love this color combo, it’s a real knockout! Thanks for the chance to win it!
Kathy Camasso
one question: Do you ever sleep? Your creativity knows no bounds…thanks for sharing.
Rebecca
Wow Lauren, I love it. Of course, you make everything look so easy and perfect. What are the overall dimensions for this template?
WOW this is super Cute. I downloaded one of your free templates and have two I am ordering from PTI… You are so creative. =O)
Angie
super template! so many little pockets/compartments and love the details on how you decorated it!
I love the contemporary look! And I always loved black, white, and red together! I love everything you do, Lauren, and I really think I’m going to have to invest in your templates!
What a great project! I always look forward to seeing the new templates that make gift giving so much fun!
love everything about this the colors are great what a really wonderful project
Hugs
Norine
Wow, Lauren… this stationery set is just stunning!!! And to think I could make something like this with one of your templates!! I am loving the preview to the PTI set, too. What an honor it would be to win this… thank you for the opportunity!
Lauren, I am a frequent reader of your blog from Germany and all I can say is, I love your creations. You do so wonderful things. I sometimes really can’t believe it. And I am sure, with your ideas you bring so much joy to people.
Please go on and provide us with more beautyful pictures of what you do! It’s great!
I also read all of the posts about your wonderful children. As a mother of two little girls the eldest at Ambers age, I am always interested in reading about the adventures of your three little cuties. 🙂
Best Regards
Corinna
What a super fun project!!
you never cease to amaze me. another hit, Lauren. this is so stunning in the black and white.
I love it! Lauren, you are so talented and come up with the coolest ideas! I love that these make such special gifts that one can make for another.
Oh WOW; this would be so awesome to win! Will you autograph it for me if I’m the lucky one?!!! Please?!!!
I am amazed at your creativity. I already have one of your templates and am anxious to add this one to the collection. I love the classic look of this project. Thanks!
Oh my GOSH!!! A chance to win a gorgeous handmade project from THE Lauren Meader!!! I’ll take it! All of your creations are just perfect! LOVE the colors, the new template, and all the extra little details. I can’t wait for the 15th!
You are absolutely amazing Lauren! I’ve been wanting to do something with stationery and stationery holders and just didn’t know where to start. I can’t wait until the 15th to purchase this template and start playing. Your attention to detail is second to none. You are truly an inspiration! Thanks for sharing your gift!
Oh!! I love this, what a great gift! This is a great template.
Carla
I love your cards and ideas. You are so creative! What a wonderful present to give someone and make from the heart which makes it even better.
Thank you for sharing your gifts with me.
You amaze me. I just love it. It’s creative and very versatile. I can’t wait to see some other ideas.
Thanks for the chance to win.
I just started using your templates and they are so great. This project is very classy, I love it.
Just another fabulous idea from you! I love this. The color scheme you chose is beautiful. This template is perfect for gifts. I can’t wait for all of the new releases this month!
Lauren, this new template is wonderful! Your project is so sophisticated. I love it. It would be a great gift for anyone! I don’t know where you find the time to do all that you do!
I LOVE IT! You are so creative and talented! thanks for sharing and for the chance to win it!
Elizabeth
WOW!!!!!! Your ideas are just endless! This is so clever – how do you come up with these ideas? Simply adorable!
You awe me with your talent! Love your projects and your blog.
Wow…you always amaze me in your designs….your so talented. Do you think of this in your sleep?
This is AWESOME!! How you continually come up with these amazing ideas is so inspiring!!
Lauren you are extremely talented. You’re an inspiration to many of us. THanks for theis chance to win.
I L-O-V-E this template. They have packs of those little notepads at the dollar store too!!!! I am all about a bargain…LOL
I can’t believe you would give this away, it’s amazing. I check your blog everyday and love something every time!
I don’t know how you do this day after day. Your projects are so beautiful and you make them seem so simple to do. I love this one.
Lauren — I am amazed by your talent and energy. You are an inspiration to me. This is a beautiful set — and in my favorite color combo!
Vicki
Oh, Lauren you have done it again!! This is so amazing. Love everything about it.
I haven’t tried these yet. I love them all but never really used a template to make a box or anything else. You make it look so easy:)
I really love this template and all the posiblities.
Thanks for the chance;)
What a great project! I am definately going to try this one. So simple and elegant! I am hoping to purchase your templates this month. It has been killing me that I couldn’t get any until now. They are so versitile. Keep up the GREAT work!!! 🙂
Lauren,
I love this! The colors are beautiful! I can’t wait until the 15th so I can download this. I have all of your templates and have made them for friends and family and they are all so impressed! If only they knew how easy your templates are to use. (I don’t tell them!)
I would love to win your beautiful creation!
Natalie
I would so love to win this! I think you do an awesome job of creating templates and sharing your samples! Thanks for the inspiration.
The possibilities are endless! You are so very clever! I also liked the sample that Nichole used with your previous template. You are truly amazing!!!!!!!!!!!! Love the depth that the black does to add such pop to many projects. Love your design work! Thanks again for creating these templates for us!!!!!!
Can’t wait till the 15th, I love your work.
This is just BEAUTIFUL!!! I would love to have one for myself…..oh !!if I win I can make one. LOL. No really what a wonderful gift idea …more please.
Thanks
Janet
Stunning! Absolutely stunning! You are such an inspiration.
Thanks for the opportunity to win this work of art.
Teresa
I just love this project and your blog. I look forward to you daily posts!!! I truly enjoy your projects!! Thank you very much! Jenny
Geez Louise, is that great or what. I may just be getting this template….
Thanks
Kathy
Girl, you absolutely ROCK! I would love to have a smidgen of your creativity! Awesome job, as always. LOVE IT!!!
This is sooooo cute! I love black and white with a pop of color.
Robbie
Love this one Lauren, and the colors you used really make it pop. Thanks for another great template!
wow! you never seize to amaze me! You are so talented, and thank you for the chance to win!
Lauren, this is awesome!!! What a beautiful gift! There are endless possibilities with a template like this! Thanks once again for the inspiration!
This project is stunning! Thanks for sharing your awesome talent with us.
great idea Lauren! As always you are taking handmade to a new level!
just like always….you outdid yourself!! i would love to have a chance to win your handmade gift set!
i may have to find a night job! this set & template are too fabulous. win or lose this set & template will be mine.
thanks for never disappointing. this project is the ultimate!
–cheers
WOW! This TOTALLY ROCKS! I love it and would LOVE to win it! Gorgeous!!!!
I LOVE LOVE LOVE this. Your templates are the best and the colors are my favorites. Thank you for giving me so many fab ideas!
Wow! I’ve never seen so many comments! I think this new template with the stationery is really cute. I need to make some stationery. I’m still trying to sell my crib to get it out of my soon to be craft room. Wish me luck. 🙂
Lauren I am always amazed at the creations you dream up! They are always stunning!!!! Love your work, and would LOVE to win this template! It looks like soooo much fun to play with! Thanks for the chance to win!
hugs~ Kim
Wow Lauren!! You out did yourself (again)! This template is amazing as is your creation. Can’t wait to see what else you have up your sleeve. Hope you get some time to slow down and relax this weekend. You soooooooo deserve it!
Hi Lauren
We all love cards and stationery…
and this set is sooo elegant…
I love the colors you used too!
Hugs
Marcia
Love the colors…can’t wait for this template to make it’s debut. You are so very talented!
Wow!!! It’s your creativity that keeps me going…love the stationary sets and the templates!
Love, love your timeless templates. It has been lifesavers. Thanks for this chance to win,
Shayne
this is really cute!
Oh Wow! You are actually giving away your project? I would be honored to win it. I think this template is exactly what I’ve been looking for to make my some a little stationary set. He’s 5 and ALL about writing letters and notes, and even little stories. This take along tote is perfect for him.
This template is so clever. I would love to win it and them make a few sets for my sisters!
Love the colors. So crisp. This is the perfect teacher gift for the end of the year. Thanks for sharing your creativity!
This is so gorgeous. I lov ethe red and green touches with the black.
This is just absolutely amazing. I love all of it, from the colors, to the tiny details. So beautiful. I can’t wait to make some of my own. YEah for Timeless Templates!!
k
Nicely done! Love that you built in so much storage, and convenience in your template. Great idea for the notepad and stamp tin! Thanks so much for all the work you put into your templates. It makes life so much easier.
Good luck with your new release!
Jan
Wow this is just awesome! I really love it! Love the colors too.
This is too cute Lauren. What an awesome template to come up with.
That was just way too clever and cute!
This may be my favorite template so far. The colors you used are excellent.
You are amazing! I love your templates! This one may become one of my favorites. I used the heck out of your templates for Christmas gifts. This one no doubt will become heavily used for gifts as well. Thanks for sharing your creativity!
Oh my goodness! This is just amazing!!! Can I live in your brain for like 10 minutes?!?!? You’re unbelievably creative, and I can’t wait to try this template!!!
This project is awesome- the black, white & red colour scheme is very striking! I so agree with you – we can never have too many ways to hold the card sets we make. I can see this template will join “All Boxed Up” at the top of my list of great presentation ideas. Thanks for sharing.
Lauren, I love your templates and this one is really cute and practical too. Thanks as always for all of your wonderful ideas. It would be an honor to win this set and have an original Lauren for my own.
Oh I love the new template! Your sample is just adorable.
Oh, I like this new template of yours!! I can’t wait to get this make it myself. You are so awesome!! Thanks for the tutorial!!!
I’d love to win. Did you add the magnet to the paper pad or did it come like that? It us a bit hard to see being black. All the more reason to win!
Brilliant! I LOVE the template and can’t wait to seee what else you will do with it! You decorated it beautifully. I really like the poppy red as a little color pop to the black and white. It looks so elegant.
wow, Lauren – amazing. I love the colors you used! I think I’m going to be buying this one. Thanks so much for sharing your ideas with us (and the chance to win this).
This is such a great project! LOVE the colors – the whole presentation is a winner! Counting down until the 15th! Thanks for sharing – as always! You are awesome!
Wow – love it! Of course! We are missing you at The Paper Tree.
Wow, once again, Lauren! I am always looking for better ways to present my handstamped cards and this is a winner! I love seeing all that you create, THANKS for sharing so much! Hugs, Monica
Wow, what a beautiful project, and a great template. This would make a great gift. TFS. Look forward to seeing more.
I am a huge fan of your Timeless Templates!! I get them as soon as they release and have used them too – awesome christmas gifts. I also love to make stationary sets for family and friends and this, never a doubt Lauren, is beautiful!! I love your seeing your new templates! Can’t wait to see the rest. thanks
This is so awesome, I would love to win this.
Thanks,
-Cher
http://stampingwithcher.blogspot.com/2009/01/todays-blog-candy-giveaway-gina-k-is.html
Lauren,
You were BORN with the creative gene!! I love it all. I never have seen anything you do and not liked it ALL. Usually there is some part i would do differently or a different color….but not you. What can I say…I have a bit of a ‘stamping crush’ on ya lol!!
Wow, this is awesome, I love your tag you made with labels 1 and a scalloped rect. die. I would never have thought of that.
WHOA, Lauren! Babe, you blew this release out of the water–this is fantastic–so elegant! I don’t know anyone else who can work under as much pressure as you do and consistently pull it all off with grace and panache!
Lauren, I love visiting your blog for inspiration. Your templates are wonderful. I use to fuse with measurments and scoring to get my boxes and templates just right. You sure seem to have a talent for coming up with fresh new ideas!!!
Beautiful! I love the color combination, it looks so elegant.
I have to tell you… If I won this project (An original Lauren Meader!), I could never part with the cards. Wish me luck!
Cute, cute, cute! I love seeing such different projects with the same stamp set….which looks incredibly versatile. Looks like your template offers a lot of options. I’m looking forward to seeing more!
I have one word for this idea…..speechless……….. This is simply amazing Lauren.
Thanks much
Lauren, your templates just get better and better! thanks for sharing and thanks for the chance to win!!!
Lorene
I can’t believe we are getting a chance to win this wonderful project!!! You are so talented and someone is going to be a VERY lucky person!!! I hope it is me!
Thanks so much for all your wonderful ideas and hard work! You are an amazing inspiration!!!
Crossing my fingers, toes and everything else! Smiles, Maria
Beautiful! You inspire me daily and never cease to amaze! I am so in love with your templates! Thank you for all of your time and effort and for sharing your talents with us!!
Oh, my heart! I think I am going to die. This is so classy!
You have created a template for a project that combines two of my absolute faves 🙂 organizing and stationary. And I truely love, love, love your templates. Thank you so much for sharing your creativity!
I just love what you came up with, I look forward each day to opening my email and seeing something from you….don’t tell anyone else…but I open yours first. Looking forward to your next release!!!!
Lauren, I just adore what you are designing with your templates…they are incredible! smiles…
OMGosh! That is absolutely GORGEOUS! How DO you come up with these wonderful projects??????
This is just beautiful!! Would love to receive this in the mail!!
This is awesome! You think of everything! I love it! =)
COOL! I would love to win this project. It is so nice to have a sample sitting in front of me for inspiration. Thanks for the chance to win.
I want to tell you that I have been reading your blog for some time now and I LOVE all your work. I look forward each day to when I get a chance to get on the computer to look at your beautiful work. You inspire me a great deal. Thank you so much.
I would LOVE to win that. Hopefully.
Have a great day.
Nicole M.
Lauren, you are one of the most creative people I know. I love your templates. I know I would never be able to think them up, so I am glad you can.
I enjoy your blog, not just for the ideas (which are wonderful), but also for the family news etc. I feel like you are a neighbor dropping in for coffee and chit chat. Thanks. Pat
Love this idea. Can’t wait until the release.
Charmaine
Your project is stunning! I love your blog!
Lauren this is an awsome project! I think anyone would love to get a gift like this. I love the colors you used.
TOO CUTE! Thanks so much.
Very classy and I like how you made the tag using only part of the nesties.
I would love nothing more than to win this gift! Once again, wow! what a project!
I am always amazed at your creativity but this has got to be my absolute favorite must have for this PTI release!
Awesome job, thanks so much!
Wow! As usual your stuff rocks!! I can’t get over how almost effortlessly you craft your projects. I try to duplicate them and it can take me HOURS!! Love your work, Lauren!
Wowwwww, I gotta tell ‘ya that this project is stunning. The color combination is beautiful. Your template is brilliant as well. I think this is on the top of my must have list. Thanks.
Beautiful work, as always…Love your colour choices too!
BA
This is absolutely gorgeous!!! I love the color combos, also. Can’t wait for the 15th!!
WOW!!! I love it! You did such a beautiful job putting that together!
WOW!!! This is the cutest thing ever! I work with all women so this would be perfect for birthday gifts. Yummy!
Lauren, You are a genious! I love all your creative ideas and am so in awe that you keep coming up with more! You amaze me! Thanks for the chance to win.
Love this stationary set. I am sitting here tonight doing your all boxed up stationary. What fun.
Kathy P
This is just gorgeous! WOW! Who wouldn’t want a chance to win it?
Although I do not have the time to dedicate to this craft, I live vicariously through you! Your work is beautiful.
I absolutely love to get the email from you with your latest blog posts. I am certain to find something beautiful and amazing and you have inspired me to continue with my crafty abilities.
However, I don’t think I’ll ever have 1/2 the creative juices you have….but I am certainly happy to have you to go as a resource for my creativity:-)
Thanks so much and keep up the good work!
Annie
Wow! Love love love your stationery set. It’s gorgeous! Thanks for sharing!
woooooo! you are a creative machine. How do you do it, girl? Wow’d us again!
Wow! Lauren this is stunning! I love the black, white, poppy and avacado! It is beautiful together. Your new template is so great. This would be a wonderful gift to give. You are so creative, I love visiting your blog. Not only are you so creative but inspirational also. I printed out your weight loss motivation post and read it when I am feeling like quitting. I am trying to lose weight for my daughter’s upcoming wedding – 10 pounds by May 30th! Thanks for everything!!
I’d love to have a Lauren project! Black, white and red is my favorite color combo. Can’t wait to see more with this template.
Awesome as usual! Girl, do you ever sleep????
What a wonderful project! I have a friend who recently made a prolonged move to NYC, and I wanted to do something similar for her, but I just couldn’t wrap my head around how to do it. Thanks for the pics and your directions – I think I can make one now, too! (of course, winning yours would be delightful, too!) ;o)
This is so phenomenal!!!
[…] just so happy you liked my post yesterday! I’ll be picking a winner for […]
Well you know me I always love your stuff.
I love making gifts for friends/family, and this template looks fantastic. I don’t have any of your templates yet, but I can see myself really wanting to buy this one!!
Wow! Everytime I go through your site and see all your projects, that’s the only word I can say all the time! Wow! I love your work and check your blog daily for more:)
Oh my goodness, this is so lovely, I’d have trouble using it, and you’re giving it away! what a great project.
What an elegant card! Very creative!!
You are such a talented gal! 🙂 I just love your creativity and your project is so delish!!
SOOOO cool, Lauren! I love the project, the colors and what you shared today!!!
Absolutely gorgeous!! Love the colors. I see a perfect gift for teachers at the end of the year using the same colors, just adding an apple in the circle. Thanks for your inspiration.
Love it! Thanks for giving us a chance to win! Can’t wait to see what else you’ve come up with.
Pam
I love your stuff! You make everything so cute!
Lauren, Beautiful as always. I love the colors you used in the tote. The templates are awesome. Keep them coming!
Thanks, Michele F
Beautiful!! I always love seeing what wonderful template you come up with next and this one is wonderful!! Great job!
The stationary set is beautiful, beautiful, beautiful. The color combination is awesome, the touch of green really adds a lot. You come up with some amazing ideas.
Lauren you are amazing! I love all the templates that you come up with, how do you do it! This stationery set is beautiful. I love the color combination that you used.
Lauren, I visit your blog several times each week. Your creations are exceptional and I always admire them so much! Thank you for your hard work!
Sincerely,
Joey
I am a daily visitor of your blog. WOW! You are inspiring!
Lisa
Lauren, you continue to amaze me with all of your templates! This is another winner. You are so creative and such an inspiration to all of us. Keep those templates coming!
OMGNess!This is so adorable, sophisticated, trendy, fun…..I could go on and on. I have purchased most of your templates and can’t wait for this one! You amaze me Miss lauren!!!
Thanks for the chance to win a great prize
Lauren….again, you have done it! You are such an inspiration with all of your projects and as a SAHM (I have 5 kids, 2 of them are autistic 3 yr old twins), I find inspiration from your projects and strength daily. I am so glad to have found your blog. Thank you a million times for the blog-therapy! =) You are a blessing in disguise! =)
This is beautiful, as are all your projects! I love all the details.
The details in the set you made are fantastic! My favorite color combo is black and red. Thanks for the chance to win this beautiful stationery set!
What a creating ‘machine’ you are! I seriously don’t know how you keep coming up with all theser great projects! Your blog is one of my favorites…
Janet M.
What a creating ‘machine’ you are! I seriously don’t know how you keep coming up with all theser great projects! Your blog is one of my favorites…
Janet M.
This is just a classy looking project…love all your details. I spend a lot of time stalking your blog, but had to comment on your great template!
This is just drop dead gorgeous!! You continue to amaze us with your original creativity. And how it comes with so much going on in your life, make it all the more amazing. I love everything about this!!
Awesome!
Lauren, this is fantastic! Love the template, love the project! Thanks so much for sharing!
Lauren, This set is beautiful! I have always wanted to create something like this but have yet to do it. This maybe what I needed to spur me on. I’dlove to see it in person though. Thanks for sharing all your great ideas and for being such an inspiration to us all. SharriC
what a gift to give to someone – the colors are bold but classy…thanks for sharing
I’m all for homemade gifts! And, YES this would be another one to make (or win 😉 Thanks for bringing such inspiration!
I love it! I am always looking for simple and unique gifts to someone who has everything. This is Just Perfect! Thank you!!
WOW – all I can say is WOW! You always amaze me Lauren. Thanks so much for always being such a wonderful inspiration – both as a creative paper artist and also as a super hero mom.
You ROCK!
Teresa
Wow….I just love this set. I need new ideas for gift sets for my daughter……she love to send my handmade cards. You do wonderful work.
I would love the chance to win these wonderful creations!!
Thank you!
As with all of the templates you’ve created so far – this one is just as amazing! You are so very talented – thank you for sharing with us!!
Your creativity amazes me. This is fabulous!
Is there anything you cannot accomplish? lol! You are truly an amazing artist – I love your creations 🙂
This is beautiful!
TFS! ~ margie
How inpiring, Lauren! Your “style” is so classy and lovely!
Thank you for sharing all that you do.
THIS IS JUST TOO CUTE…..
Oh my goodness. Where do you come up with these ideas? You are so creative and talented. I love your long tote. Great pick of colors and stamps and decorative elements. So so cute.
I am amazed at your creativity…I love hearing how you wake up and have an idea! Isn’t the process fun? Thanks for sharing and for the chance to win!!
wonderful ideas as always, I don’t know how you do it. keep up with the inspiration, God Bless
Eileen
I just loved your “all in one tote”. Great job. I’m was glad to find your template releases too for purchase. Carry on! Thanks.
Lauren I absolutly love all of your creations. Everything is so practical.
Lauren I absolutly love all of your creations. Everything is so practical.
Love the colors of this stationery box! You have great ideas! Thanks!
Lauren – you have wonderful ideas and your templates are so creative! This set is so cute! pampered_stamper75(at)yahoo(dot)com
This is a truly fabulous set. I love it! You have created such amazing templates. Your final projects always blow me away.
Lauren – I just love your stationery set and enjoy checking out your blog for ideas! Thanks for inspiring us!
another great one! so purdy! they are just so amazingly versatile! way to score again! lisa k in tx
Just gorgeous (as usual)! Don’t know how you do it all but keep doing it, we love it!! Thanks for the chance to win.
🙂 Tracy in Michigan, [email protected]
I really enjoy your templates and your writing. You are such an inspiration. Heres to 2009 and more great projects to come.
Lauren, you amaze me each and every time you post something. I LOVE this project and can’t wait to order the template so that I can start creating some gifts. I am still playing with the template I ordered from the last release and am having so much fun. Keep them coming:-)
Lauren, I love it, you always come up with the most beautiful projects ever!!!! Thanks for the chance to win!!!
WOW! You are so creative and imaginative! How do you do it?? This is stunning and elegant and absolutely gorgeous! Thanks so much for sharing such wonderful projects…Mary
What a beautiful set. You must be constantly scanning the store aisles for paper crafting items. What a fabulous idea to incorporate the notepads in with this project. I can’t wait for the template release. So far, I have every one!
I’m just in love with this set!! Its beautiful and useful project! PTI is awesome, thanks for the chance to win!
I LOVE this set! So clean, classy and professional looking. Hard to believe it’s hand made. All your details are awesome. And polka dots rock!
You are so talented and I love your ideas! I can’t wait for the 15th to purchase one of these – it is quite extraordinary with the black and red. Renee
Once again you have amazed me with your work. You are one of the most talented people!
How do you find the time girl?? These things are great, I really like the note card assortment. What a great job! I love checking your site everyday.
Wow! I wish I had ideas like this that woke me up in the middle of the night! LOL!
Thanks for a chance to win this.
WOW WOW WOW Is that a comment on its own? I think this is amazing. your creativity and talent are exciting to watch. thanks for sharing beth g.
This is soo cute! I love the color combo!
What a great presented package. Makes me want to go and try it.
WOW! I’d love that project! What a treat~I can’t wait to see what else you have come up with for this month!
That is a great project! I love it! The tag, the tie through the button – I think that is fabulous! Beautiful!
Kelly W.
this is gorgeous! i am loving the color combo! thank you for sharing this great project!
I’m always in awe of your templates. I’ve never tried one before, but as I start my wish list for the next PaperTrey release…your templates are on the top! I absolutely LOVE the one Nicole showed, as well, on her blog the other day that will hold stationary on her desk top. Using your new templates and her soon-to-be released stamp sets, I think I have birthdays and Christmas presents all wrapped up…and it’s only January! Woo Hoo!
Sally
Wow!! I am always SO impressed by your talents!! Keep it up! 😉
WOW! I totally love this! The colors are so beautiful! Thank you so much for sharing. I can’t wait to place my order. I really like that stamp set, too.
Gorgeous! Lauren you are so talented, thank for sharing all the details.
Lauren I wish I were one tenth as talented as you> Of course I would like to win this adorable project. Thanks for the chance. Keep up the good work.
very cool, amazing how you can come up with this stuff!
Love the way the tag hangs from the button, so cute!
Love it!!! i can’t wait to get my hands on it….. you are so talented.
regards,
Great gift idea! I love the black and red choice 🙂
OK you made me want it. Love your work!
Awesome project, Lauren! Another great template.
I absolutely LOVE this template. You are amazing and do such wonderful work. Thanks for taking the time and sharing your creations with all of us. Jen
Wow, this is a cute idea. I love the black/white/red especially
[…] Stationery and cards are always the perfect gift , that keeps on giving . Having a perfect, easy to make package, to coordinate is a huge bonus, and really completes the package. It is so nice to have a variety of ways to present/store …[Continue Reading] […]
I don’t mind that you have been using Red, Black and Green here lately. I am just loving all of the projects you are doing with these colors.
Super duper cute! Love the colors, the little pockets, everything!
I love it! No surprise I love all of your projects. Thanks for always sharing
You are one of the most talented people I have ever seen! Your creativity just blows me away! LOVE, LOVE, LOVE IT!
I like how vibrant you made the black look w/ red as your accent.
Your stamp you’re using is this clear plastic? Not a clear cling stamp?
I sorted thru blogs, I kept yours, I love the stories of your dau”s plus your step by step card designs.glograbear
Lauren I visit your blog daily and you never cease to amaze me. Your ideas and unlimited talent are bind blowing. I have loved every template you have released so far and all the examples that go with them. I look forward to the next release. Thank you for sharing your wonderful ideas and talents with us everyday.
Blessings
Debbie/Phx AZ
Hi Lauren,
that is just the cutest thing… I absolutely LOVE it!!!
thanks for all your great inspiration!
Love Roslyn
[…] the winner of the With Appreciation Take Along Tote: drawn via random.org […]
Wow, Lauren! This is gorgeous and by far my most favorite template that you have created…Love the color combo you used (very elegant). You are so creative! Thanks for all of the inspiration.
– Alma =)
Hi Lauren,
I agree with a previous comment, this just might be the best template design yet? Although when I think back of some of the other beautiful things you have created…….
Thanks for all the wonderful ideas you share with us. I have copied so many of them and I am truly grateful!
Jeanne
Oh my word – this project is absolutely adorable! You thought of everything and I LOVE it. Thanks for sharing your creativity.
Your templates are awesome!! Love each and everyone. You are toooo clever making an adorable tag out of nesties. Are the words on the tag a stamp or ?
Look forward to more of your creativity.
This is beautiful….fun….creative…and practical. I love it.
Leora
Lauren,
This set is just beautiful. Red black and white are my favorite color combinations. You are such an inspiration to all of us. Thanks so much for sharing your talent.
Janet
Your creations a AWESOME. You are so talented. Thanks for a chance to win. I’ll definitely be checking out your blog.
Amy
-Alberta, CANADA-
Sensational Work Lauren!
Truely a gifted crafter!
All your work is top quality and proffessional!
I hope to see a book of your creations published oneday.
Keep it up.
#KM38 chore chart eight year old…
Template/Stationery Papertrey Peek #1- – My Time, My Creations, My Stampendence…
help search…
Template/Stationery Papertrey Peek #1- – My Time, My Creations, My Stampendence…
What’s up Dear, are you truly visiting his web page regularly, if so then you will
definitly get pleasant knowledge.
Very nice post. I just stumbled upon your blog and wanted to say that I have truly enjoyed browsing your blog posts.
In any case I will be subscribing to your rss feed and I hope you write again soon!
Quality articles is the secret to invite the users to pay a visit the web page, that’s what this website is providing.
Leave a reply