Archive for December, 2008
Sweets for the Sweet
Dec 12, 2008 Author: mytime | Filed under: Home decor/3-D items, My Timeless TemplatesI really hope you are all enjoying the countdown, and the peeks.
Well this month as part of our countdown, Nichole asked her team to come up with a Valentine Day treat. While I LOVE all the holidays and coming up with fun ideas, by now you may know my love does not lay with any type of cooking or baking. I’m sorta the type that likes home-made containers, and prefers wrapping something store bought in a fun way! LOL! I enjoy taking the time to create the packaging, not the baking process! LOL! I’ll leave those cool cooking ideas to the rest of the girls 😀 Plus it saves me more time to stamp.
So for baking, cooking or anything like that, this is as home-made as I will get this season-
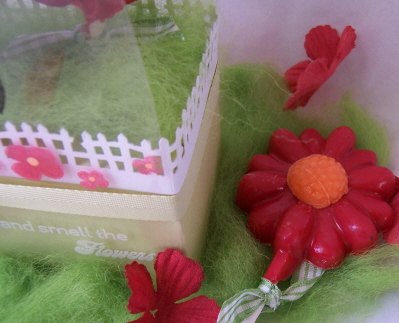
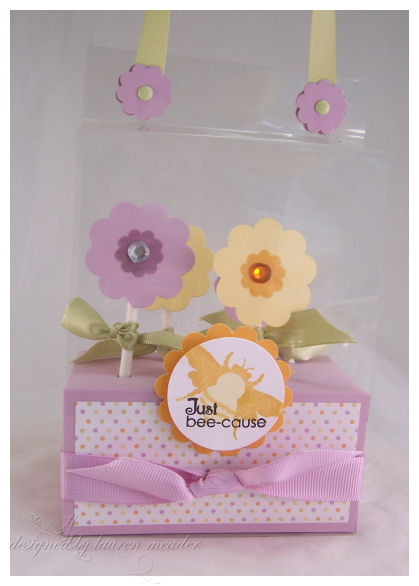
Home made chocolate flower lollipops, in my NEW! My Timeless Template -the Lollipop Along
Stop and smell the flowers

Could this skunk be any cuter? I think this is so stinkin adorable! (pun intended). This gift item uses the NEW! RELEASE-Forest Friends. I’m totally loving that set!!!
I used my lollipop along template to create a traveling chocolate lollipop garden.
When I saw this skunk I fell in LOVE! He/She is adorable. I also laughed so hard when I saw it because I don’t know what it is, but Alexa (my 9yo) has a love/hate relationship with skunks. BIG TIME! So this is for her.
The handle is made from cardstock. I punched 4 flowers from pure poppy, and secured my handle between them with brads. I think its a nice touch 😀
Now the close up details-
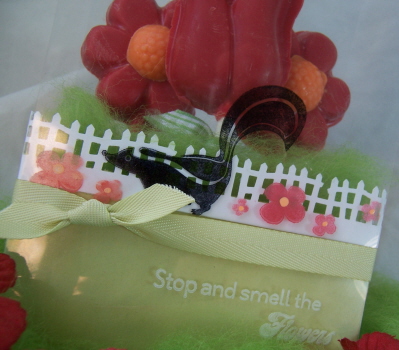
I made my base from Spring Moss. Punched my holes for the lollipop sticks. These pops are large and I wanted them well seen, so I only used 3. I then punched a fence border (a Martha Stewart punch) and wrapped it around my template.
The “grass” is what is called wool roving. A hobby I THOUGHT I would try, but never did get to. I’m happy because the wool came in handy for my grass. I love when that happens.
I made my wrap from acetate, and stamped my sentiment in white stazon. I then stamped my skunk in black pallette ink (lightly heat set), then my flowers in white stazon. I used my Poppin acetate technique with Pebbles Inc pearlescent chalks for the flower to pop out in color. I then took a Souffle gel pen for the flower centers.
Easy peasy.
This project took MAYBE 20 minutes. Really simple.
Make sure you check the other design team member blogs for their treat ideas 😀
Tomorrow’s peeks are my favorite items 😀 So I hope you are ready!
Thank you for stopping by.
Sketch time and another template peek!
Dec 12, 2008 Author: mytime | Filed under: Cards, My Timeless Templates, Saturday SketchWe interrupt this weekend of countdowns to bring you a sketch challenge! Oh and a uber cool new template peek too!
I have NO IDEA where the month is going. I’m no where near done my Christmas stuff! YIKES!
We have had no power on & off due to ice storms so sorry this is late.
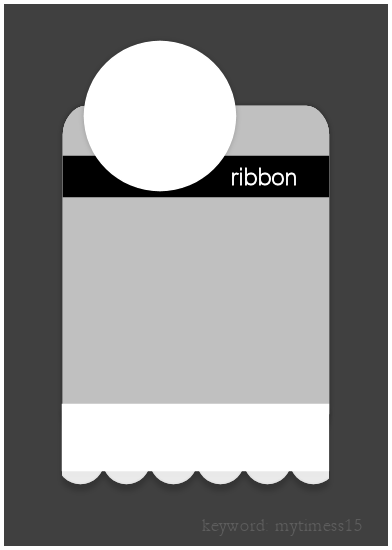
Keyword mytimess15 (thank you Dawn for making the image for me :D)
Here is my sample
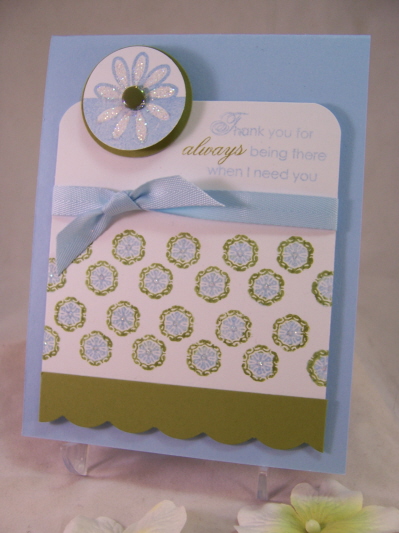
I used the Out of the Box image-popped out with a circle punch. The sentiment is Heartfelt Basics (love that set). My “patterned paper” was done using the background basicis stars, colored in olive and blue. I stamped them in blue first, then colored the edges with a marker before stamping them. I used my glue pen to add some bling to the centers. I think they look like cute flowers.
Don’t miss the sketch team samples too!
Now I’m moving on with a template peek 😀 This time using the Desk Top Stationery box. Only 2 more sleeps! Unless you stay awake for the release 😀
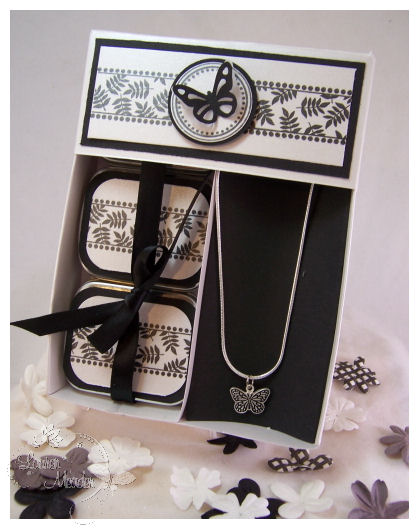
Now how is this for a gift presentation?
Black and shimmery white is just an elegant and stunning color combo. Perfect for any style.
I made this gift to re-package a jewlery kit. This will be for my MIL. She loves making jewelry.
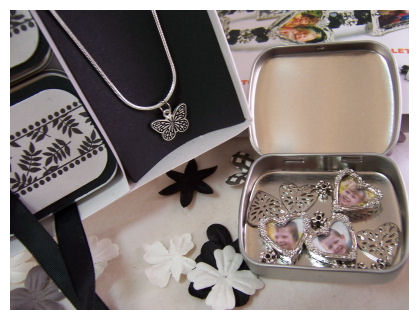
I purchased a make your own photo bracelet kit. I cannot for the LIFE of me remember where! I want to say Michaels, on SALE for $3 after Christmas last year. I KNEW it would come in handy-someday.
In this Desk Top Stationery holder, I have put 3 of the small hinge tins. They are a PERFECT fit. I think you can fit 6 of the tins in this template. Not positive. I covered each tin which is stamped with the leaf pattern label from Limitless labels ( I LOVE that set-and not just for candy nuggets!). I just created 2 sections for my gift. the 3 tins on one side, with my jewelery supplies, which tie in with some satin ribbon, and my necklace.
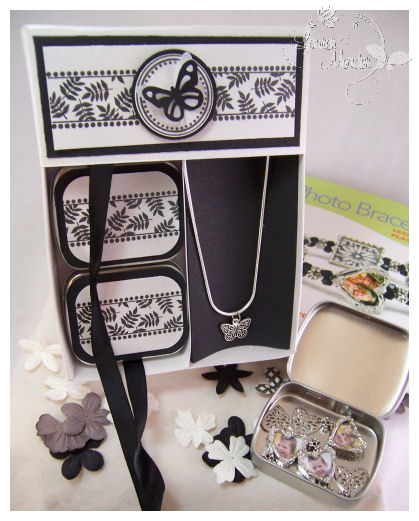
You can see the gift packaging in the background.
The bracelet kit included 3 heart shape photo holders which I put in one tin (and I already put the kids photos in there) and 3 rectangle ones, which are in the other tin (that has myself, Jay and a photo of Daisy in there).
The third tin had the string and additional beads in the kit. I whipped up the necklace myself by purchasing the butterfly charm, and necklace separately.
Another great, inexpensive gift idea ![]()
Well I hope you get inspired to try the sketch, or more uses for the templates!
I’m excited to share todays peek at our next new template! I hope you keep an open mind at the possibilities this one has to offer as well. I will, of course be filling your brain with creative ways to utilize this as the days go on (HOPEFULLY!).
You can NEVER have enough great ways to package your card creations, and sets! Its the gift that keeps on giving, and perfect to keep on hand for any occasion. I hope this template will peak your interest. I know one of the most popular, well received, handmade gift items that I personally make are my card sets. I am always trying new ways to present my sets, and this box is a keeper.
With all that being said, here is a peek at our next My Timeless Template: Desk Top Stationery!

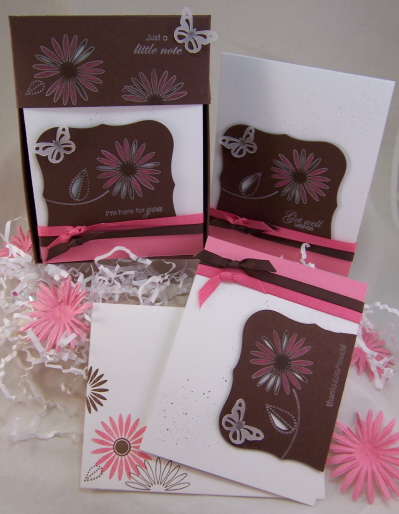
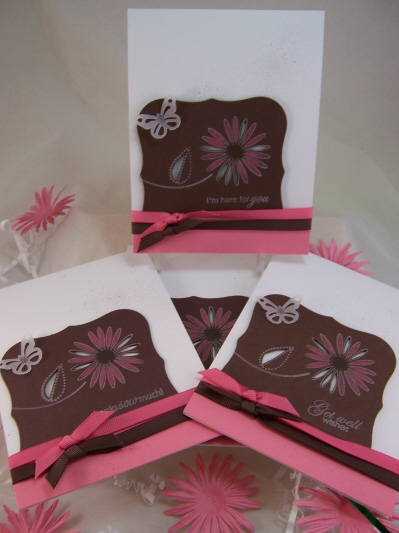
Petal Pink Set
I printed my template onto chocolate cardstock, then cut, scored, and assembled.
In this box there are 8 A2 size, well embellished cards, with stamped envelopes to match! The box was designed to match the cards that are inside, perfectly!
Now the main purpose for this template wasn’t JUST for boxing up some pretty cards. It is meant to store your cards or stationary sets, on a desk or area out in the open. We work hard to make pretty packaging, why not make it so its not stuffed in a drawer, but a functional part of the room, office or creative space of the receiver? Maybe remind them of the note they are suppose to send off.
Think of the person’s room decor, and design it to match!
This particular gift set is going to Alexa’s 1:1 aide, who I love to pieces.
Now let me share my details with you
You can see the 2 designs that are included in this box set.
Each card uses the same elements. There are 8 in a set. 2 different designs. So, 4 of each design. Envelopes stamped to match. Each card also has different sentiments from the sets Floral Frenzy, flower garden sentiments, and Butterfly Kisses

Here is set #1 Birthday Wishes, thanks sow much, Get Well Wishes, and we also have I’m here for you.

Now onto set #2
I’m not big on mass production, but these were fun! I think they are just SO pretty too. But not over the top busy.
Now, a more close up view
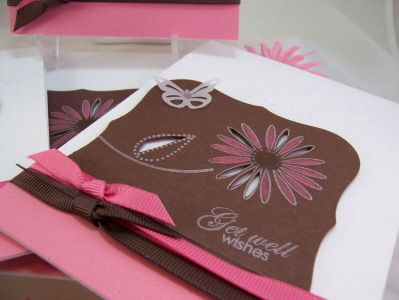
Each set uses the same pieces, just arranged differently. I like doing that. Keeps it balanced too.
A die cut label from dark chocolate, that is stamped with Floral Frenzy in white craft ink. The petals are colored with a Prisma Color Pencil. Gives a nice look I think. Sentiments vary, an are also stamped in white. Some of the petals on each flower, and the leaf is cut away, so the white peeks through. I am totally in LOVE with that look. Then the perfect touch, my signature-a vellum butterfly. I have to use butterflies with every release! It’s my thing 😀 Then the finished card is spritzed with some chocolate ink.
I think this set is just SO pretty! I hope you do too. You can get started on the cards while you wait for the 15th to order 😀
Now should I share what else you can use this template for?
OK! One more peek!!
How about a treat holder?
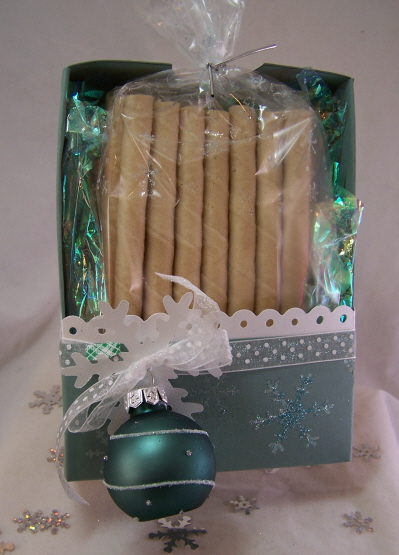
Pretty Pirouettes Package
All you have to do is flip it, and you have a super cute treat holder!
I used Snowflakes for this set.
I don’t know about you but I LOVE Pirouette Sticks. They fit perfectly in this container too.These are filled with white chocolate. It was SO hard to not eat them during this packaging venture. OMW! I used about 1/2 my container for this little treasure.
Its packaged goodies like this that make such nice “for no reason” surprise, or inexpensive gifts for the mailman, secretary, or anyone else you may want to acknowledge. Maybe you have a large group of people in an office? Sam’s Club sells these in bulk, for a pretty good deal, so I think I’m going to go get some this week for gifts 😀 Jay likes to give things out to his staff and this may just do thr trick in time for the holiday. I like that its not Christmas, entirely, in case there are other reilgious preferences in the group.
For freshness sake, I did put mine in a gusset bag (stamped with my white stazon, and glitter sprinkled onto the bag) and tied the top.
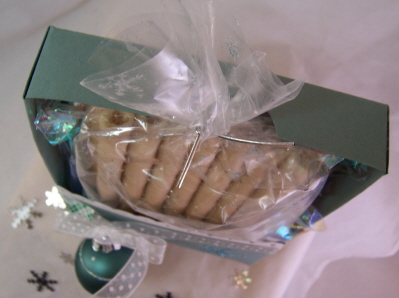
I used the optional notch cut out so that my bag doesn’t get squished.
Now for the details-

As you can see, this entire design was inspired by my little 2/$1.00 ornaments I got at Michaels last week! It makes the perfect little embellishment keepsake for an extra $0.50! It matched my Ocean Tides cardstock to perfection!! I punched a white vellum snowflake, and tied through some white polka dot ribbon. The scallop border is a Fiskars punch, and is done in shimmery white.
So there you have it! One template, 2 totally different uses! Wait until you see what else I have done with it 😀
More on that later! I have 2 projects that I could scream over 😀
Thank you, as always for taking the time to check in with me here. I so enjoy the excitement that builds, and you amazing emails and comments.
Tomorrow I have more template ideas, as the team shares a group post! So don’t miss that.
More creative ideas today on Nichole’s blog, as well as Lisas.
Till tomorrow.
My Time for a template peek!
Dec 10, 2008 Author: mytime | Filed under: Home decor/3-D items, My Timeless TemplatesTo start-Many of you always ask about Alexa (thank you!) she had a great appointment, things are good, and Amber’s Christmas recital went great too.
OK let the My Timeless Template excitement begin! I am so over the moon with this template.
PLEASE NOTE: The template shared today will not be available for download until the 15th.
If you are new to this whole template thing-read this.
Got some questions? Maybe they are answered here. Also you can email me anytime at [email protected] for any questions you may have as well.
Want to see some samples with the past templates go HERE, and don’t forget each download has an exclusive full color idea booklet with supplies/instructions.
First I really, from the bitty bottom of my heart-want to say thank you to all of you who have purchased/used my past templates! I can’t tell you how great it feels to see that, and I love hearing your feedback 😀 Because of that we are including general instructions for assembly with the templates, and (for some) if needed, photos for some of the steps, if it sounds like it is confusing.
If you missed it Julie Campbell wrote a super sweet critique on the My Timeless Template line HERE! I’m still in awe over it! I think it also helps reading reviews of “customers” not my, the creator, who of course loves what I do.
Today I will get to share my first of several peeks. Now, like ALL my templates, it starts with a concept, and a catchy title, but each template can be much more versatile than the given name! So don’t get hung up on the “name”! Just sit back and watch all that can be done with each template (outside its given title) as the days progress.
Well its about that time of year when you give homemade treats, or like to package up some goodies in a fun new way! It’s not too late to use these templates for the holidays either. Now don’t just think holidays! Think-any occasion. The friend who is sick, someone did something nice for you, someone had a baby, a birthday, surgery………you name it. Maybe there is NO reason.
I love presenting simple things in a fun, creative way. I say this repeatedly but, it really IS all about the PRESENTATION!! Oh and our time. That too is precious. My idea is based on the concept for you to maximize creative time !!
Now speaking of easy, and home made, I often make home-made chocolate lollipops (I loathe cooking so these are so up my alley) Im always stumped as to HOW I present them. I designed this template to make just a gift like that presentable, fun and functional!
Now everything being said-let me introduce you to the Lollipop Along ©!
This template totally rocks ![]() Wait until you see what I have up my sleeve over the next couple of days with this one
Wait until you see what I have up my sleeve over the next couple of days with this one ![]()
This was my template concept project. Every template design starts with an idea and actual project. Then I go on from there. Now these concpet samples are one’s that I don’t put much time and effort into these samples, as they are just a quick way to get my concept out into a tangible template!
The flowers are made using the cuttlebug #1 flowers die cut. I stamped my Beautiful Blooms flower in the center, then popped out. They are covering the flat lollipops you buy at the store. I KNOW! I said home made lollipops, but we don’t always have time for that either.
All you do is insert the sticks into the holes, and just use the handle to carry it to where ever you are going, to present it! I thought a sweet lil tag in the front would be cute. So I used honey bees & sentiments, since I wanted this to be similar to a paper garden!
Just a cute way to present one of those everyday items you may like to give out.
How cute would this be from the tooth fairy, or placed on the desks for some co-workers?
Side view.
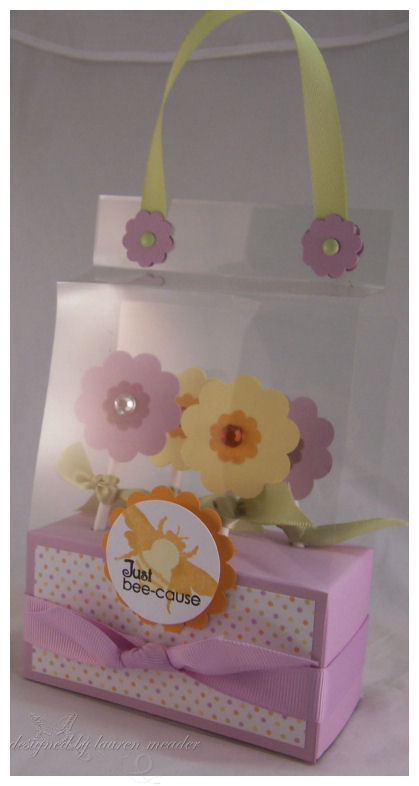
Its super cute and sturdy. You can make it hold up to 6 pops. Depending on how you want them presented.
You can reach right in the side, and grab a pop, or remove the ribbon – and the box bottom holder can slide out the side! OR undo the top closures and it can open from the top. You can adhere the bottom to the wrap base if you wish, or secure in there as I did with the ribbon. Its all about creative liberty, and depending on what you are putting inside. There is no right and wrong to the templates! Use them in a way that suits you and your creative style.
You may be wondering HOW do I print my template on acetate?
Well you don’t! You print it on your copy paper, and since you can see through it, you use it as your cutting/scoring guide for your acetate. Same thing with vellum. You can print direct on cardstock for your cover wrap if you wish.
Even if your printer doesn’t take cardstock, you can still use all my templates! Just print onto copy paper, and layer it over your patterned paper or cardstock, and use it as a guide to cut, and score where necessary. Easy peasy. I like to use removable adhesive (just like what you most likely already use-it just says removable) to keep mine perfectly together as I go along. Throw the cut/scored copy paper template in the trash when done. You aren’t double cutting or printing if you layer it over what you want to use and use it at the same time.
Many people asked me what type of printer I own that prints on cardstock:
I own a Canon Pixma IP 4000, and it does print on PTI cardstock. It works like a dream 😀
Now onto another sample.
Now so you aren’t stuck on the name “Lollipop Along” let me share more with you!
Right now you *may* be thinking “How is a lollipop holder versatile? Seriously! What am I going to do with that after the ONE time I give out some suckers?”
Well how about altering that bottom box, and making it into a bucket style holder (insteqad of a abox base) for some bath and body products? Maybe a pedicure kit. Instead of acetate, use vellum cardstock (or patterned paper/cardstock)!
Happy Lil Target Take Along

Yes! That is a fabulous idea!!
How can you NOT feel happy looking at this?
Again I was inspired by Target 😀 for my creation
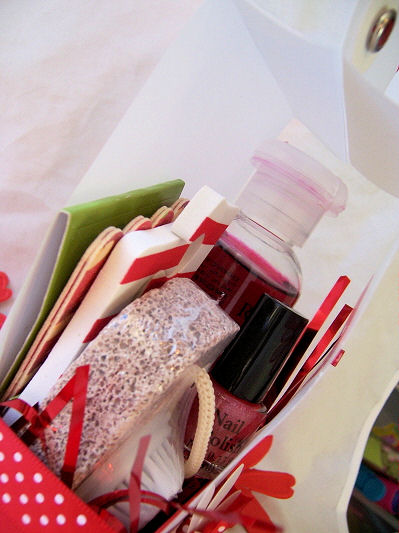
I took the bottom pattern from my template, and made it into a sturdy little box-ket (aka box/basket) to hold some super smelling foot scrub, a pumice stone, toe separators, nail files, chapstick and nailpolish from the Target $1 spot! Can you believe how cute this looks?
Here is a peek inside
That makes these gifts SOOOOOO affordable people!
The files, toe separators and nail polish were in one kit for $1. Then the foot scrub and pumice stone were each a $1! So for $3 I packaged these contents for a FRACTION of ANY gift set you could actually buy. Given that my template cost is only $5 and you can use it forever, I didn’t put a price on the end gift-but one use pays for itself. Even for $8 (cost with template included) this is a rockin gift for anyone who loves to be pampered! That doesn’t count the fact you can use the template in many ways, over & over!!!!!!!!!!
Just personalize it to suit the person or the fragrance, and you are on your way to be the QUEEN of gift giving 😀
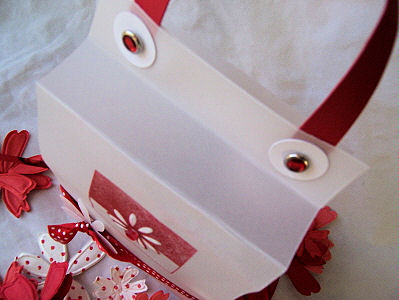
Now, as you can see, I used vellum cardstock on my wrap instead of acetate!

I used last months release set-Out of the box. Stamped in Pure Poppy ink, then dry embossed from the back-for some POP! Stamped “happy” in white StazOn.
I tied around a poppy polka dot ribbon, and tied it through asheeer pretty white prima blossom! A perfect match to my stamp 😀 A pretty bella bauble for the flower center
View from the top!
Just grab the handle and go……
AND YES! You should use a redline tape or scor-tape for these projects! The bottom holds this stuff no problem.
I like to use cardstock, or even ribbon for my handle. Depends on the weight of your items inside. I just secure it in place with brads! By adding cardstock or other accents you not only make it purty, but you hide the ugly backing of the brad!
So there you have it! That is the peek of the day.
I hope you are excited about this. I can’t wait to hear your thoughts.
Now, just wait until you see my other projects with this template! WOW! I’m letting them get better as we go! LOL!
Tomorrow I have a peek using my other template 😀 So, ya’ll come back now ya hear!
For more peeks also be sure to check Nichole, Heather & Lisa’sblog
Till tomorrow.
Well its the 10th! That means its day 1 of the preview samples for Papertrey Ink!
Tomorrow begins my peeks at my 2 newest templates too!! I have so many amazing things planned for those, so I hope you will check in again ![]()
Today’s post I am sharing a NEW! stamp set by Candice called Forest Friends. It is SOOO cute, and is releasing on the 15th. Let me tell you its really just so ADORABLE! I had a hard time trying to decide just what to share from it for my countdown post with you! I had too much fun with it. I will say it was very hard to make the switch from Christmas to Valentines Day for me this month, as I am working feverishly to complete gift sets for everyone. Crazy times.
OK enough blabbering.
I figured I would share yet ANOTHER treat holder made using the Nestabilities and this fun set.
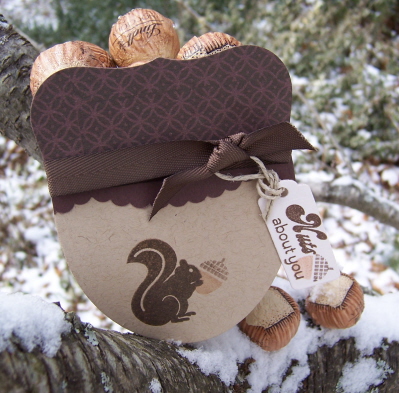
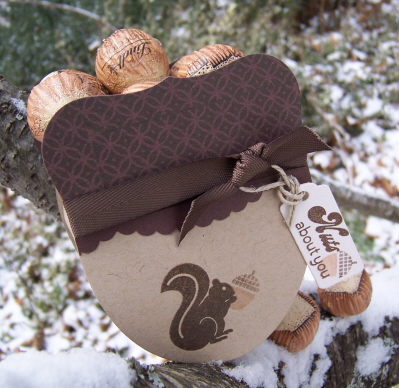
Nuts for you Acorn Holder
Is this not the CUTEST thing ever?!
I was inspired by these little “nut” wrapped Lindt chocolates that Noah got with his birthday gifts (I quickly claimed them as my own! LOL! But promised to give them back after my creative venture was over. Thankfully Noah gets it, and didn’t mind letting me borrow some). They are just so cute and perfect to present to anyone.
So seeing these, and this little squirrel I had to try a way to make my own acorn holder. Then this idea was born. I love it. Its great for the guy’s too.
This project took like 20 minutes to make. It could go faster, but I had no idea WHAT or HOW I was going to do what was in my head.
Now when you begin just align the Labels die with the oval die to ensure a compatible topper. You don’t one one that is too big or small. I believe I used the 2nd from the largest of the large set for both die sets on this project.
We are decorating BOTH sides of this box. A completed look on both sides makes it not only more professional looking, but appealing as well.
Lets begin.
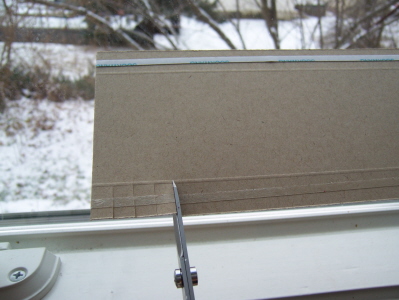
Using Kraft cardstock die cut 2 large ovals.
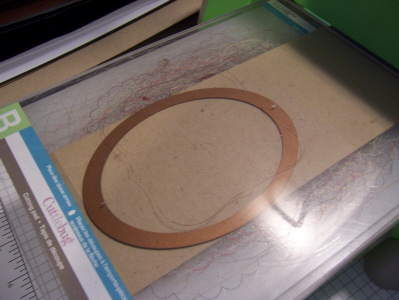
These become the acorn bottom. You will cut down the top, so that your oval measures 3 inches. See photo below.
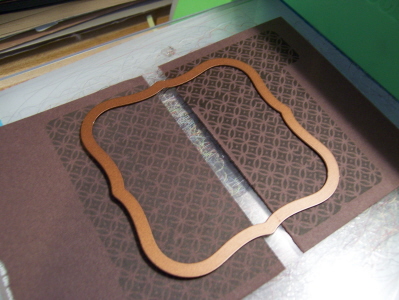
Now for our acorn toppers!
I stamped my circular pattern from Limitless Labels in dark chocolate ink, on dark chocolate cardstock to mimic the texture of an acorn top. I then used the labels one nestability to cut 2 acorn toppers.
This is what you are going to have for pieces.
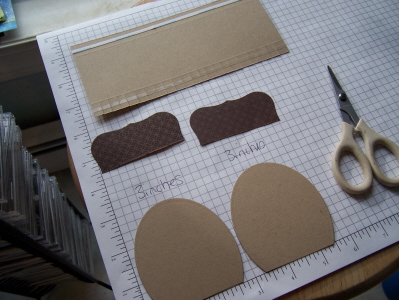
See acorn toppers cut down.
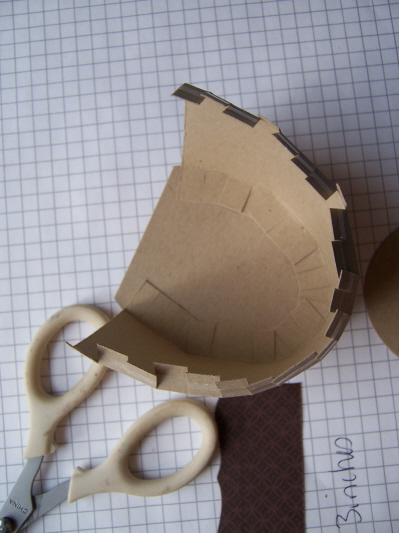
Then you want to cut a box bottom/connector piece size 3 X 7.
Score that piece at 1/2, then 2 1/2.
Apply score tape and remove backing, before you cut! Otherwise you are removing tiny snippets of paper backing from the project, wasting precious time. Can you tell I HAVE done that before?
Snip edges to score line all the way across on both sides.
This will allow you to easily bend, and apply the box piece to the curved oval acorn.

You slowly adhere it, and curve it as you go, to your acorn back. The box edge go to edge of front and back panel.
Soon it will be adhered all the way around.
Now before you put your front panel on you need to stamp it!!
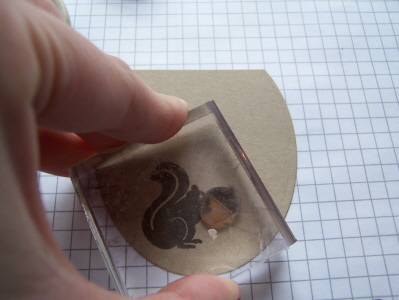
I LOVE acrylic stamps for this purpose alone! Easy peasy.
I stamped my squirrel image with dark chocolate ink. I then colored my acorn image (also from limitless labels) with markers, and stamped it into the squirrels hands.
Now adhere the front panel.
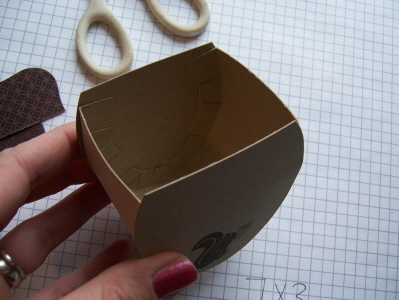
This is the box with the front panel on.
Last but not least we add the topper!

I just used a scalloped border punch from Martha Stewart, to first to make a nice finished edge. Layered it on, then trimmed the excess. You can omit the scallop border portion and its still super cute. This was a last minute detail I wanted.
For my final acorn topper, I tied on some dark chocolate twill, with my tag ready to go!
(You would adhere this as is if omitting the scallop layer)
I just die cut my tag, and added the same acorn as in the squirrels hands. Then attached it through my ribbon.

Put it on the acorn box, and VOILA!!
DONE!
Thats all there is to it 😀 And yes I did crawl out my window again!
There was an actual squirrel by this tree collecting the nuts the kids piled up for him at the bottom. I spent an HOUR trying to get him in my photo!! Wouldn’t that have totally rocked!! It was a no go though :C Apparently Im not furry and friendly enough to be trusted my a squirrel, as I invade his personal space to get get my photo op. I did have some crazy stray orange cat though, that would NOT go away! He kept climbing up the tree next to my box, and making it fall over. How annoying that was. The stories I could tell from my stamp room, I swear. I think my neighbors in the back must think I’m totally mad!
Well thats it, for here anyway.
Be sure you check out Nichole and Lisa’s blog as well for more peeks!
I can’t even wait for tomorrow 😀 Lots of eye candy to come. You are going to love this months templates ( I HOPE!)
Today Alexa has a post chemo check up, so wish us well! AND Amber has a Christmas recital at the nursing home this afternoon. Busy day.
Thanks for checking in and reading 😀
Till tomorrow
Mytime’s Top 10 things you need for Christmas -and poop garland
Dec 8, 2008 Author: mytime | Filed under: Cards, Product Opinions and Must havesI know-what a title right?
I am here to tell you that YEAH! my cat finally pooped out the 4 ft of balloon string. Oh! what a site that was! Poop-attached to some string, more poop, some more string…….you get the idea. Amber exclaimed “Its like a bunch of poopy Christmas garland! Do we hang it up on the tree now?!”
EW! No! Amber, we throw it away. Kids say the darndest things let me tell you. On her behalf it was quite the “garland” LOL!
As I reflect on this past year I have dealt with many poop issues! Not sure what is up with that, but I certainly hope this upcoming year doesn’t include any of that. I also don’t think I will ever have balloons at a home party again!
I am certainly thankful we didn’t TRY to come up with the $3,100 for the surgery since he was able to pass it. Crazy cat. How delicious can 4ft of balloon string actually be? Can you imagine choking that down? Geesh.
Now I know you don’t come here to read about poop garland, so let me find some to share shall we?
Top 10 things you NEED for Christmas:
Every year I am asked what should YOU ask for this holiday. This is a list of my TOP 10 must haves that “I” personally find useful and amazing. This is just my opinion, so feel free to chime in here with your opinions and must haves if you like.
NOTE: most of this is expensive. That is why you ask for it for a holiday! LOL!
1) Well you know I HAVE to list My Timeless Templates first! LOL! Seriously give them a try. They make gift giving fun & easy. Plus they are CHEAP! If you aren’t into 3D items yet, you will be. Cost $5 each! OR try 2 of them FREE! Even the kids can get in on the fun for an afternoon craft while mommy stamps 😀
2)SU Ink ink storage-I am loving mine! If you are in the market for a storage caddy this is really awesome. It holds so much, and is a pure dream if you own a lot of ink. Unlike the Stampin Up! Ink caddy (I own 2 of them) they don’t BEND/Buckle. Mine is like buckling under the pressure of all the ink. AND my SU ink one spins like a dream. Its all wood but not too heavy to lift and move. Recently my MIL borrowed ALL my SU! Craft ink and took the entire caddy with her to the battered woman’s shelter she volunteers at. So no problem with portability!
3) A Scor-Pal and Scor-Mat (oh and their adhesive Scor- tape and glitter cloth ROCKS the house too!!) I know I put this on the list every year, but that is because it really is THAT good!! You can make a bunch of scores on your cardstock without even moving the paper! And with the mat you never have to take it off your workspace! I LOVE IT!!
Oh and while you are at it buy the little Fiskars fingertip Craft Knife. I use my regularly and LOVE it! So cheap too! No more soar fingers from pressing down. Handles so easy too.
Shop @ ATS, Scor-Pal direct, or Papertrey Ink
4) A photo tent with lighting! HERE is my post a long time ago about my softbox photo set up. I got mine on EBAY-and this is just like the one I have. It comes with the lighting which is a fab deal!! This is a must for any of us in this papercraft industry! Photos day or night! I use mine as often as I can. I do recommend you getting a extra set of lighting bulbs immediately! That way when one goes out you can still use your tent. They last a while but I have dropped my lights on numerous occasions! LOL! Mine folds right up when I am done and goes in the closet of my stamp room. Seriously a MUST. Many of you out there wanting to get into design teams or move to a “professional” level-well photos is a BIG KEY to your work. I have been trying to take the time to take better photos as of late.
5) A good camera and printer. This is also vital to any papercrafter who wants to showcase their art! Bad photos don’t show the lovely details of all your hard work. The better the photos the more appealing the artwork. Think about your favorite crafters. How are their photos? This also helps with submissions to magazines!
The ONLY thing I NEED and want for Christmas is a Canon Rebel XT camera!I NED it it for my “work” don’t i? I can use it as a write off even. I’d be happy with that one OR I’m thinking the Canon 50D . Im certain AFTER Christmas maybe there will be a sale! Right now I have a Kodak EasyShare Z730? Its OK and does the job, but I would be over the moon with a professional grade camera. I do have a Canon printer, and it prints out on Papertrey Ink cardstock like a DREAM!!!!!!!!!!! Oh and my new love for Digi images.
6) Good photo editing software-one goes with the other right! I haveCorel PaintShopPro & love it. Its easy to use, and the “directions” are there as you try to use it, so you aren’t stumped or needing to look up every little thing in a book. I can edit, brighten, darken, add photos over eachother, remove any flaws, get watermarks, cool borders….stuff like that. Cool stuff. Granted its NOT stamping, but its cool.
7) Copic markers. SERIOUSLY people, they are a must have! I use mine everyday. I color A LOT. I enjoy it immensely. If you like to color-these are a MUST. Start with set A , then onto B etc. You need NO OTHER coloring medium if you have these-I swear. Love them.
8)ANY nestabilities! These all just rock. I also use these just about every time I stamp! How did the world survive before this? I am over the moon for these, and use them endlessly. Start with your favorite shape, and go from there. I would get anything scalloped FIRST since you can make your own straight cuts, like the square and rectangles, then Id get “shapes” like circles or ovals-then on from there. NOTE: I ONLY purchase the LARGER selection from ALL the shapes. I never use the smaller sizes, although I have the entire collection of rectangles, since its my most used shape.
While you are buying this PLEASE tell me you have Cuttlebug or some other die cut machine. If you don’t get that FIRST!!!!!!!!!!!!!
9) I still love my ATG 1/4″ Applicator Gun. Its the best adhesive gun-ever! IMO. I get 36yds of adhesive for only $2.54 each roll! OR the Gold for photo safe stuff for only $3.33 a roll.That saves you LOTS of $$ on adhesive!! This place ships uber fast too.
10)A good Paper Cutter! This is a very subjective topic- as each person is different, and something that is worth the investment. I think one that allows you to cut 12X12 is VITAL!!
I now have the Tonic Paper Cutter and it works fabulous (thanks Sonia!!) but I do still use my cheap Fiskars time to time 😀
BONUS : Anything organizational, and of course Gift certificates!! Looks like all our fave online stores carry them. Thats a great start! Then you can buy what YOU want, when you want it.
How about some eye candy now?
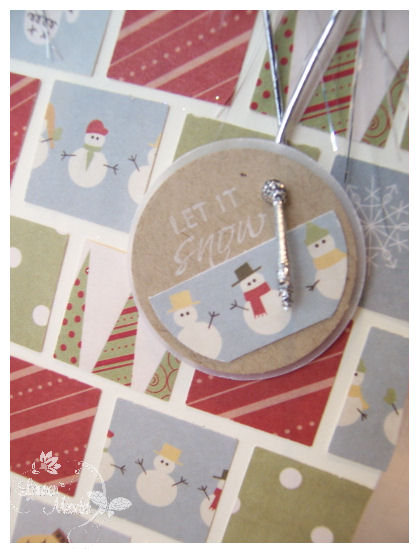
Got Snow?

This uses my photo tent, photo editing software, and my Copic markers! LOL!
I love this little image from SugarPlums Snowmen–
Here is my close up view
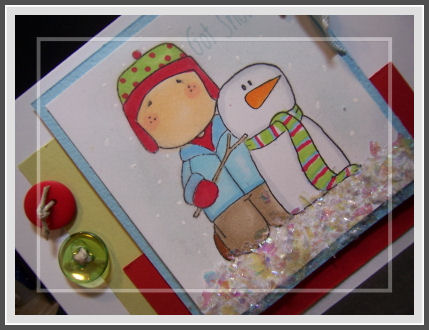
Added some chunky glitter too.
OK that is all for me. I need to run.
I hope whatever you do today you enjoy the day. Thanks for stopping by here
Digital Download images
Dec 7, 2008 Author: mytime | Filed under: CardsI am here! Im OK. Just as crazy busy as you all.
WOW! I have so much going on here I don’t even know where to begin. Some AWESOME news-my brother and his girlfriend found an apartment!! They will be moving (only 25 min away) the first week of Jan! You have no idea how great that is. They will have about a month to settle in before the baby is due.
That means my life may just get back to my own weird version of “normal” again. Or at least I HOPE that is what will happen.
I’m sure you can tell the holidays are upon me! I am busy. I have been bustin my butt getting some ROCKIN samples done in time for my newest release of My Timeless Templates © which will begin peeking on the 11th HERE!! This always gets me busy, but add holiday stuff on top of it and Im INSANE! Although I am getting gifts done.
We are releasing 2 a month, and if you order on the 15th, that should give you PLENTY of time to still whip up MORE fun handmade gifts, just in time for the holidays. Since its a download you get it INSTANTLY, and no shipping! WAHOO!! Plus-totally affordable 😀 There is no limit to the amount of gifts you can create with ONE easy peasy template purchase.
OK so speaking of downloads, todays post is going to share JUST digital images.
Now I’m by NO means a digital image expert. In fact I’m quite challenged, and was still able to do it-somehow! LOL! I do like that I can get a variety of sizes, and get images instantly. I think these are a wave of the future, but I will still LOVE my stamps ALWAYS:D However, when $$ is tight and you really like an image, this option is nice.
First up is from a new company calledSquigglefly. Brand new. All digital download images. Pretty cool.
She has a bunch of images in various style there to choose from, and being digital makes them very affordable.
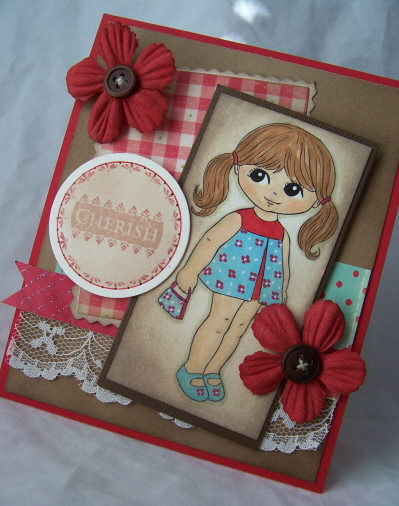
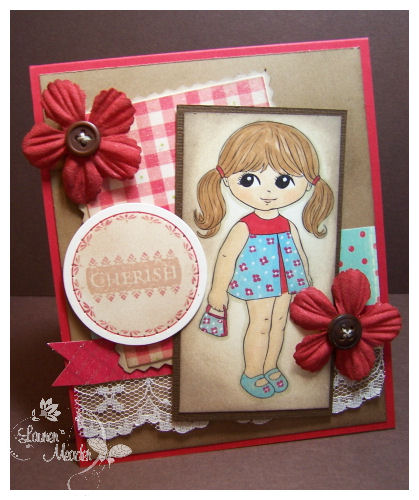
Cherish you-
This one I am sharing is called Pigtail Cutie! You can even see this card there 😀
Isn’t she so cute?! I think she looks just like a Campbell’s Soup girl! I had fun adding the floral pattern to her dress, bag, and shoes with the tip of my marker.
The paper is actually a Christmas slab by K & co I believe.
The “cherish” sentiment is from10 desinger centers & Borders set from JustRite Stampers. I just used my marker to color the middle caramel, and the edges ruby red. The border of the center sentiment is from the same set.
When I die cut it with my nestability I sponged the center, and faux stitched the outter circle edge.
Also JRS is having a 25% off thank you sale-view that here.
These girls bring out my whole “other” side of stamping 😀 and I enjoy that. I did lots of sponging on this and love all the vintage touches-like the lace, and buttons. I even used my pinking sheers! Gotta love it.
Next up I have some more digital images from all that scraps called Sweet Pea & Tiger
I call this one snowball fight 😀
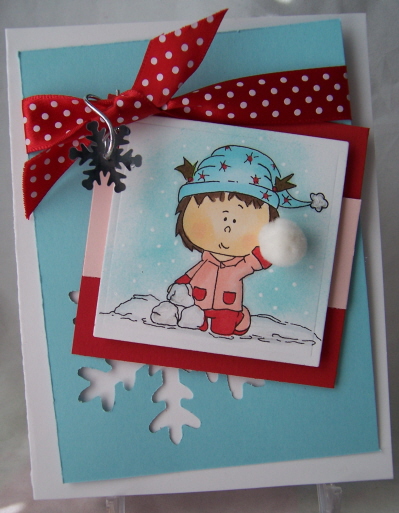
Is this not so cute? I think she is just adorable. She seriously looks like Alexa! LOL! Her hair is the exact same way when I put it in mini pony tails, cause its short! LOL! Cute if you are 2, NOT cute when you are 9! Although putting one to the side has been working. I have some photos to edit, and Ill share that another time with her “new” pony to the side style. She is excited its getting longer to do stuff with. Granted not much, but better than just a barrette that she always removes.
Back to the card-
I love the colors on this. The lopsided layering. I get so sick of everything being all aligned and “perfect” sometimes. Its nice to just mix it up! Tilt things, make them interesting. Granted it still my typical style-clean and detailed, but not too much I think, but a little more interesting with some tilt!
I also love the hanging snowflake confetti tag. Its the little details sometimes.
I used myMarvy snowflake punch (the pink one) to pop out a snowflake on my Caribbean layer. I like that 😀
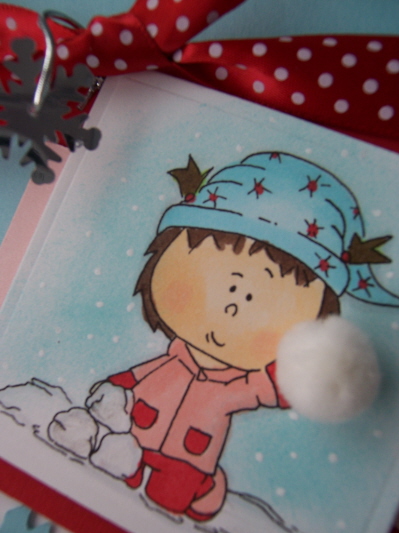
With the cute “snowball” (aka pom pom) it looks like she is ready to haul one right at you. There are clear sparkly stickles on the snow in this photo. Can’t really see it though :C
Now we have Tiger-
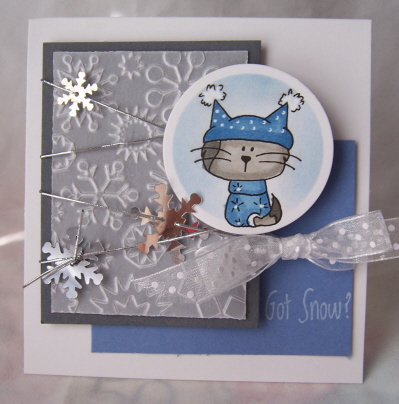
his name may be fierce but he is just TOO cute if you ask me
I wanted to keep him simple, since he is relatively small here. I love the snowflakes CB folder, so I used it on some vellum cardstock. I them stringed on some silver snowflake table confetti for some more WOW! Simple again.

I like anything blingy. I love this little cat. I am also on a white singlo gel pen kick. I think its getting a little compulsive. Do you go through stints of using one thing in particular ALL the time, then never again, again? I do that a lot. Not sure why. Its like a new found love, then hate relationship with product.
This little kitty image makes me think of my poor sick cat-who STILL hasn’t passed the 4 ft of balloon string yet. and its been ALMOST a week. I hope it comes out soon. He seems OK right now. Not sure.
Anyway that uber cute sentiment if from the SugarPlums Snowmen set.
Doesn’t he look ready to take on the snow?
OK that is all I got for you today-I must finish decorating the house for Christmas, before its time to take it all down.
Till tomorrow.
Raising awareness
Dec 6, 2008 Author: mytime | Filed under: UncategorizedI had to post this before I forgot! Im so super busy and did NOT want to miss the oppourtunity to help a cause I know SO MANY people are affected by!
My friend Nancy is raising money for Autism through O.A.R.
You can get all the details HERE! Tis the season!!! A great cause.
If your life has been impacted by someone with Autism, or you know someone else who it has- check it out, and pass it along! Each person, when working together can make a difference!
Every little bit helps!
Thanks 😀
OK I am off to Breakfast with Santa so this is uber fast OK!
OK Update: Moo moo is still alive. Seems to be feeling “normal” no signs of string yet, or obstruction. Family issues looking positive, and I may have found and apartment for my brother and his girlfriend! PRAISE GOD!! Amber got better and we went to Alexa’s concert-although she didn’t sing, it was cute. I am feeling better-exhausted but can’t complain. Lost 4 more lbs! Go me.
I have a bajillion emails that I will get to. With my computer service going in & out and being sick (and deadlines for my Templates (YEAH!) I have been so busy your head could spin.
Lastly all the awesome stamp and stores having great sales for us stampers is a KILLER isn’t it? I know I can’t be buying anything for me right now-not that I NEED anything KWIM? CRAZY.
Here is the sketch
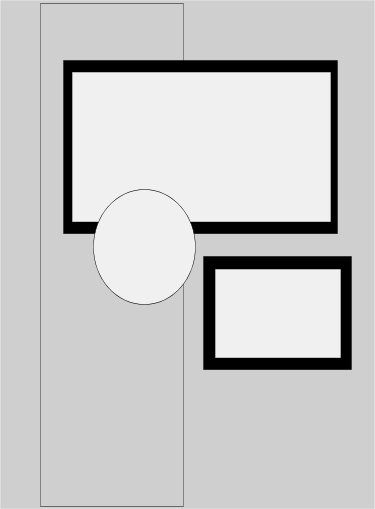
Keyword mytimess14
Todays sketch was a fun one for me. I want to apologize for the AWFUL lighting. The photo was taken LATE last night. I may re-take it later. My computer has been running awful, and with everything going on this was taken at like 1 am.
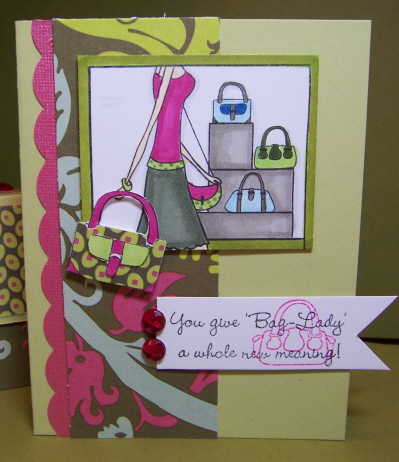
Upon looking at the sketch – I noticed how I even altered my own design! LOL! I really wanted to used this NEW! Release image (and sentiment) from MFT called-Toteally Fantastic-which I adore, loving handbags myself ! I cut it down to fit my layout preference.
So I made it work! The sentiment was rather larger than my sketch block so I improvised. I was going for the funky Vera Bradley style look for this one 😀 and in place of the circle I chose my paper pieced handbag! The paper is a fave of mine from K & co.
Speaking of handbag-
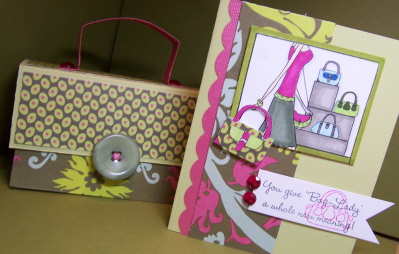
Then I went on to use My Timeless Template Purse-onality Clutch to create a purse to match (this time of year I need to maximize every creation I can for gift giving, and this is for a teen!).
I used the same fun papers, and created a funkier handle-then was done.
OK Im running so check out the sketch team to see what they did OK!
I hope you get to try the sketch, and send us a link here. I do plan on visiting those who have done last weeks-Ive just been crazy here.
Enjoy the day, and I hope you get some MY TIME in 😀
All this talk about templates…..
Dec 4, 2008 Author: mytime | Filed under: My Timeless Templatesgot me wanting to share some more samples 😀
Thanks everyone for the love and kind words re: my template post! You all just put the biggest smile on my face! I so needed that. It means a lot because I have so much family drama going on, that I can’t discuss (nothing to do with my kids!), but has taken quite the emotional toll on me the last few days, on top of being sick. Then on top of that mess, Amber has had an on and off fever of almost 104 since last night too, and they “think” its a virus.
Im stressing because Alexa has her Holiday Concert tonight, and I wanted us to go as a family. I needed that Holiday cheer. Now we will see how the day goes. I guess there is a lot going around right now. The important thing is to get Amber back to health and keep the rest of us that way.
AND to make matters worse, my poor moo moo (my boy cat) who has had all the urinary issues in the past, decided to eat about a 4ft string to a popped balloon (no idea where he even found that! I clean my house a bajillion times a day and missed that somewhere), and I spent hours in the animal ER, while I was sick, till about 2 am. Cost us a tad over $500-just for the check up, x-rays, IV fluids, some high fiber food and laxatives! We have to wait and watch him. We couldn’t afford the $3,100 for surgery. CRAZY!!! Just what I needed. We did find out during that visit that he has kidney disease and kidney stones :C Poor baby. Now after this string drama (God willing he survives it) we have to totally revamp his diet to a new food.
Sorry. This is such a downer post. It started happy. YIKES! I just feel very overwhelmed right now, I spent the entire day yesterday in tears. Not like me. Anyway-onto happier stuff.
This has to be brief-so here we go!
I’m going to share 3 template samples today using My Timeless Templates© and one I free handed 😀
I am also using Rockin Holiday, Holiday Script (for the sentiments) and Pretty Papers in the Winter Wonderland collection- for all the projects you see here too!
First up, a pretty little ornament box, or something to house some holiday treats (not sure what I’m doing yet) using my For Keep{Sake} template

I used vellum in the window, which I stamped my tree onto, them dry embossed from the back to make it pop forward. Rather 3D. I used various gel pens and glitter to finish off the festive tree. Rather than cut out the rectangle, for my window-like on the template, I used the nestabilities Label die to cut this shape instead 😀 I ran my gold marker along the inside edges of the frame, before I attached my vellum inside.
Top view
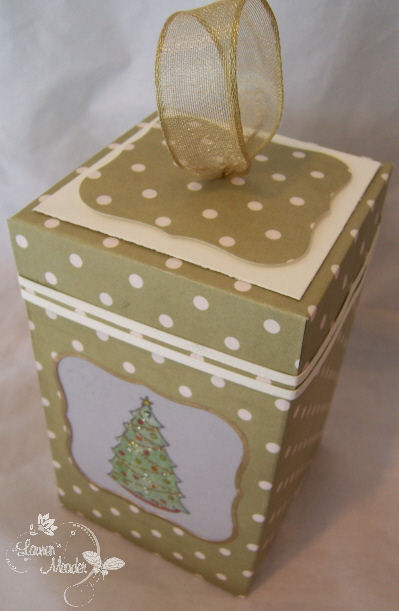
I used my scrap piece from the front window as a decorative accent on the lid! No waste here. The gold ribbon is from the Gold Couture collection!
Lid off

This template is the Music Makeover-This is a CD case cover, but can be so much more (check my sidebar for more My Timeless Template ideas!) but this time Im sticking with music.

I loved the image & sentiment from Rockin Holiday-it is perfect for this to hold Christmas Music 😀 I am making this for the kids to keep in their room with their fave Holiday songs.
I printed my template on ivory cardstock, then I added Pretty Paper Winter Wonderland collection to the front & back panels
I didn’t burn my CD yet, but here is the open view.
I just die cut the Spellbinders Lables nestabilites, and used the inner rim of the die to add holes and faux stitch it. Really quick and simple. The pretty papers really dress this up without lots of work for me. Considering this is for my kids, I won’t care if it gets ruined over time so much.
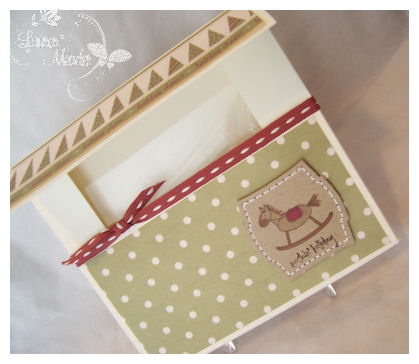
This next template is a FREE download from My Timeless Templates© called Stocking Stuffer. There are also more uses, but with the holidays here its just the cutest holder for so many things!

This uses mainly the patterned paper. I just printed on copy paper, and layered it onto my patterned paper when it was time to cut. I used a faux suede technique on the toe & heel.
Here is a close up of the tag.
I used the stockings on the fireplace image from Rockin Holiday. Snowflake is a old punch from SU!
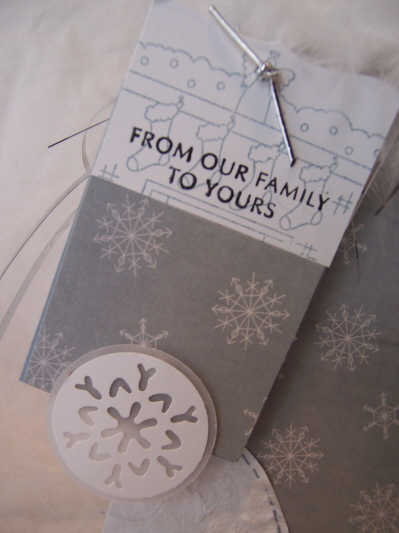
LAST but not least (I LOVE this project) I hand cut a cute Mitten (front & back) that I made into a boxy bag!

Isn’t is so pretty?
The best part, all the squares are punched pieces of the Pretty Papers Winter Wonderland collection, all pieced together!! I little furry trim, and a simple tag-done!
I have to say the piecing took at least an hour! I wanted it to be perfectly balanced!
Its pretty good size too. I was so happy with it.
Here is the close up tag-
Well that is it for me. I don’t have much time today. I’m feeling awful, my daughter is sick too, and I have a TON of deadlines to meet, and so much else going on, I hope I can get it all done! The day just began, and already I need a nap :C
Thanks for stopping by 😀
Lauren
My Etsy

Who I Designed For
Blogroll
- Alicia
- Alli Miles
- Ally Blankenship
- Amber
- Andi @ crafts on a whim
- Angel R
- Angie Z
- Anne Kranitz
- Becky O
- Bee
- Beth Silaka
- Bethany Paull
- Beverly Nash
- Bobbie
- Cambria
- Cammie
- Card of the Week
- Card Positioning System (CPS)
- Cards for Cancer
- Catherine Doucette
- Charmaine
- Cheryl Sims
- Chriss Rollins
- Christina
- Christine Ewing
- Christine Wooden
- Colleen Schaan
- Craft Critique
- Craft Gossip
- Crystal
- Dawn Easton
- Emily Giovanni
- Geny
- Holly
- Igne Groot
- Inspirational Craft Blogs
- Irene
- Jami Sibley
- Jeanne Streiff
- Jen del Muro
- Jeni Bond
- JenMarie
- Jenn Balcer
- Jenn Diercks
- Jenn O
- Jennifer E
- Jennifer Mick
- Jennifer Pereda
- Jennifer-Sweet Treat
- Joanne Basile
- Jodi Collins
- Julia Stainton
- Julie Masse
- Karen
- Kathryn Berthiaume
- Katie Cotton
- Kelley Holland
- Kendra
- Kim Scholfield
- Kris’s Color Stripes! Get inspired here
- Kristen Dubosque
- Kristin Eberline
- Kristine
- Laura @ Sunshine Stamper
- Laura Turnmire
- Laurie Schmidlin
- Lesa Rapp
- Linda Duke
- Linda-LSN
- Lindsey Botkin
- Lisa (lakind scs)
- Lisa Kind
- Lori Craig
- Maggie
- Mara Campbell
- Maria
- Maria Levine
- Mary
- MaryJo
- Melanie M
- Monique Hansen
- Moxie Fab World
- Pam Imholz
- PaperCrafts Connection
- Peppers and Pollywogs Kids party site
- Rebecca Grohall
- Rita
- Robyn
- Rose Ann
- Sarah Vrolyk
- Sharon Harnist
- Sharon Johnson
- Sharon Rivera (a chemisrty with paper)
- Sherrie
- Sophia Landry
- Storage Units, Ink, & More Blog
- Sue Berker
- Susan (Rainy)
- Tangii Crane
- Tracy
- Tricia Traxler
- Trudee
- Velta
- VivLyn
- Zena
MTME Pretty Palette Color Team
MTME Pretty Patterns Sketch Team
My Time Made Easy TM LLC
Shop till you drop!
Lauren Meader
About Me
Copyrighted material
Subscribe To My Blog
Pages
- About me
- Alexa’s Story!
- My Crafty Corner!
- My Time Made Easy™ LLC
- Our Make A Wish Trip to Disney!
- Resume/Publication List
Calendar
Archives
- August 2013
- July 2013
- June 2013
- May 2013
- April 2013
- March 2013
- February 2013
- January 2013
- December 2012
- November 2012
- October 2012
- September 2012
- August 2012
- July 2012
- June 2012
- May 2012
- April 2012
- March 2012
- February 2012
- January 2012
- December 2011
- November 2011
- October 2011
- September 2011
- August 2011
- July 2011
- June 2011
- May 2011
- April 2011
- March 2011
- February 2011
- January 2011
- December 2010
- November 2010
- October 2010
- September 2010
- August 2010
- July 2010
- June 2010
- May 2010
- April 2010
- March 2010
- February 2010
- January 2010
- December 2009
- November 2009
- October 2009
- September 2009
- August 2009
- July 2009
- June 2009
- May 2009
- April 2009
- March 2009
- February 2009
- January 2009
- December 2008
- November 2008
- October 2008
- September 2008
- August 2008
- July 2008
- June 2008
- May 2008
- April 2008
- March 2008
- February 2008
- January 2008
- December 2007
- November 2007
- October 2007
- September 2007
- August 2007
- July 2007
- June 2007
- May 2007
- April 2007
- March 2007
- January 2007
Categories
- About Me
- All That Scraps
- blogger challenge
- camera/photo play
- Cards
- Contests
- family stuff
- FOR SALE
- Home decor/3-D items
- How to FAKE it!
- Introduction
- JUGS Challenge
- JustRite Stampers
- Lizzie Anne Designs
- My family stuff
- My Stamping Space
- My Time Made Easy
- My Time To Color Challenge
- My Time to Create Challenge
- My Timeless Template Challenge
- My Timeless Templates
- Mytime Mail
- MYTIME MOVIE/VIDEOs
- Papertrey Newsletter
- Pink Cat Studio
- Pretty Palette Challenge
- Pretty Patterns Sketch
- Product Opinions and Must haves
- Recipe's
- Saturday Sketch
- Smilebox Creations
- Stampavie
- Tutorials
- Uncategorized
- videos
Most Popular
- Create your own Onesie Card Tutorial-and important NOTE! PLEASE READ (2529)
- Saturday Sketch-Boxed bag holder (2333)
- Going GREEN! Fancy Flower Flourish-Closure Video (1478)
- Fabulous Favorite - Giveaway! (1336)
- a Prayer Request (1232)
- QUICK-Easter Baskets from Nestabilities-PTI style-and blog challenge (1063)
- Teaser Sketch (999)
- February Release Giveway! (and a little peek) (996)
- Group Post and Rambling Rose Video Tutorial (985)
- GIVEAWAY! Who wants it all?! (895)
Recent Comments (RSS)
- 첫충사이트: 완전히 흥미로운 블로그 게시입니다. 저는
- sarah: Wow, Lauren, what a stunning
- hedie: خرید راهبند
- 야동: Love to read it,Waiting For
- 야동: This seller is in a
- 바카라사이트: 여기 처음 왔어요. 나는이 게시판을
- 야동티비: I was surfing the Internet
- 바카라사이트: 비슷한 주제에 대한 흥미로운 정보를
- 바카라사이트: "여기에 제공해 주신 귀중한 정보와
- 온라인홀덤: 유익한 웹 사이트를 게시하는 데
Copyright © 2007 - My Time, My Creations, My Stampendence - is proudly powered by WordPress
This blog has been Tweaked and Designed by Sara Williams