Tubular Template ideas!
Dec 13, 2008OK if you read my blog even some of the time, you may know how much I LOVE packaging up test tubes filled with whatever I can cram into them 😀 I just love little containers of all kinds. I always have, since I was a girl.
My templates have provided me with some amazing presentations of those ideas, and this month is no exception. I am beyond in love with my projects today! You have no idea. I truly hope you get inspired by them as well.
As a SAHM, with this economy, living on ONE fixed income, we don’t always have a lot of $$ to get gifts for people we want to. I’m endlessly thinking of ways to acknowledge people, without breaking the bank, and not making it “chincy”. Like I just threw it all together. I want people to SEE the thought I put into their gifts, and I think my templates definitely help me accomplish that, and taking not so much actual TIME to create 😀 That is what I REALLY love about my templates 😀 Fast, functional and affordable. Since you use them limitlessly, its such a huge savings. No guess work everytime you make a 3D item, priceless.
So I am over the moon with excitement to tell you that Papertrey Ink is now going to be carrying the silver cap test tubes, and that they fit PERFECTLY with My Timeless Templates!!!!!!!!!!
The silver top tubes will be sold in sets of 3, and they are also going to be carrying the square plastic tubes in sets of 3 as seen HERE!! Is that not exciting news?
Can life be any sweeter?
So let’s start with how they fit with my Lollipop Along © first. Remember this won’t be available to download until the 15th. But when it is live, you can purchase it, and get it INSTANTLY!!! You can start making gifts at 12am on the 15th!
OK I feel like the “exclaimation mark” Queen today. Can you tell I’m so excited? If you were standing in from of me, and I were talking to you, you would probably ask me to be quiet. I know I also tend to talk loudly too when I’m excited. Loud and fast. Its a Vigeant trait (my dad’s side of the family).
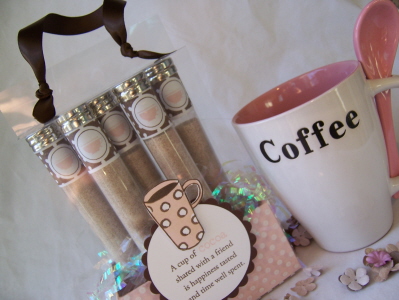
Cafe To Go! Go!
You KNOW how much I LOVE coffee. I do still drink it, but in less quantity, and now without real sugar and fat free cream. So, I had to do a coffee themed set with a new found product I love! Pink & brown are like my favorite combo-so this was a perfect set.
Now see the tubes. They are an exact fit! The lollipop along base holds 5 of the PTI tubes perfectly, so each one can be on display.
In these tube, there is 5 tsp of General Foods Inernational Sugar Free French Vanilla Coffee Mix. SUPER yummy. You technically only need 4 tsp, but I like it sweeter!! And it fills the tubes more. All you do is add 8oz of boiling water, and you are ready to go!
I found some uber cool-make your own mix recipes HERE! There is quite the variety, and they all sound YUM-A-LICIOUS!
So if you have many people, this may be the way to go. Maybe even a $5 limit Yankee swap?
I used sweet blush cardstock to print my base template. I added a cute little chocolate piece to where the tubes insert for some interest, then cut my little circles for my tubes. I used the smallest circle on my Coluzzle circle template for this package. Then I put in some fun filler!
I created my wrap using acetate. I stamped my acetate bottom with the polka dot basics stamp, in white StazOn. I purchase mine in bulk at Staples. I get like 100 sheets for $20 (I believe) Its been a while since I had to buy them. They are just window transparencies. Basically for use with classroom projectors.

For my tubes-I used Holiday Treats, as it pairs perfectly for this project with Warm Happiness. I wanted them to be a little fancy schmancy, so I stamped my labels to match, and wrapped them around the tops. This is quick and easy, and adds so much detail.
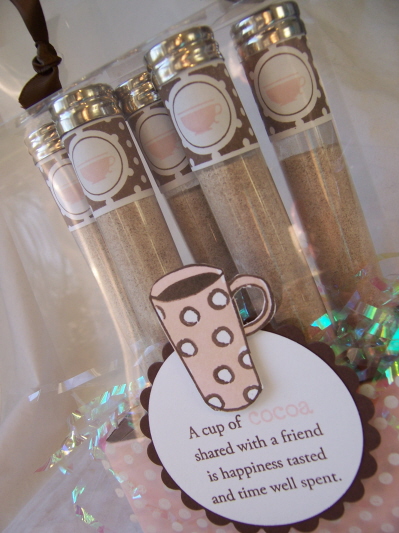
My tag is pretty straight forward. I think its a nice addition to the design. Stamped my sentiment (it technically should have said coffee, but I THOUGHT this was cocoa mix! Blond moment.)
View from the top-Just add water
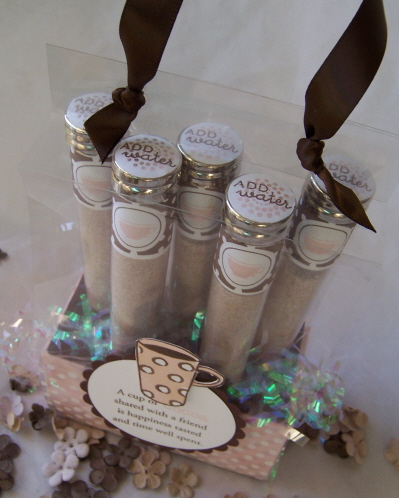
That was also done stamping the labels, then punching them out with my 3/4 inch circle punch.
That is truly all you do! Pour it in the cup-add your 8oz of boiling water, and you have super yummy coffee with friends 😀
As you can see I used ribbon for my handle. Easy peasy. Just grab the handle and go.
Who wouldn’t love that? I think its just so cute. Plus you can get the kids in on it 😀 Let them mix the ingredients up and use a funnel to pour in the mix.
OK moving on-
Now for a super way you can use the tubes with the Desk Top Stationery holder!
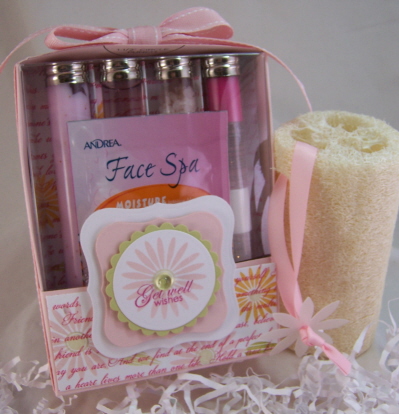
I call this Spa in a Box.
Supplies-
Desk top organizer template
Stamps- Floral Frenzy
Ink-Sweet Blush, Spring Moss, summer sunset, the dark pink – its a Pallette ink pad that is that close to Raspberry Fizz by ribbon comparison
Cardstock-Sweet Blush, spring moss, select white
Raspberry Fizz patterned paper
Ribbon-sweet blush stitched grosgrain, sweet blush twill
clear cardbox, Labels nestability, nestability circle, dew drop, test tube, May Road frosted flowers
Who doesn’t love to be pampered right? This is a gift for all ages too. I always make things I would personally love to receive. When you buy one larger product of each item, you can repackage it in many tubes, for several gifts. This gives that person a day or two of pampering.
Look how PERFECT the tubes fit in this box, which is flipped up side down. You can easily fit 4, if you want to use dividers. I also believe 5 fit snuggly.
Is this not SO pretty, and professional/store bought looking? Only YOU had fun creating it.
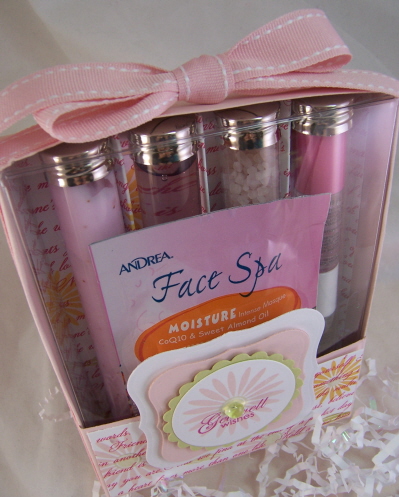
I have 4 tubes-Body lotion, body wash, bath salts, 2 lip glosses (2 fit in 1 tube), and a face spa packet! I used my label maker to mark what is in each tube (in case you are wondering how the receiver will know what is in each) The face packet inspired my color combo for this gift!
Now for the clear cover insert!

Clear cover insert:
Cut off the just the back panel of the card box.
Now cut down the card box to about 5 inches.
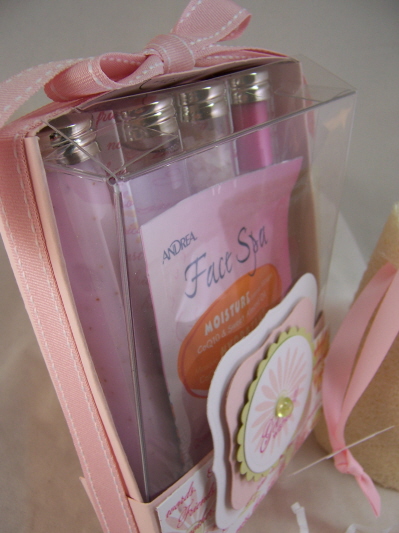
Insert box front, into box
This step is optional, as they stay in place just fine without it.
Now lets move onto the sections:
Sections close up
.
Now what I did for this set was to take my patterned piece of Raspberry Fizz paper, and stamped flowers from Floral Frenzy randomly all over, in co-ordinating colors.
For the tube insert- You will make mountain/valley folds.
Apply adhesive to back, and insert into holder.
Adhere the 2 ends to the sides of the holder.
For label-die cut 2 labels.
Large label from white cardstock, layered label onto sweet blush cardstock.
Die cut a scallop circle from spring moss cardstock. Layer on white die cut circle- stamped with flower & sentiment. Add dew drop with glue dot.
Wrap stitched grosgrain ribbon around box.
Last but not least-
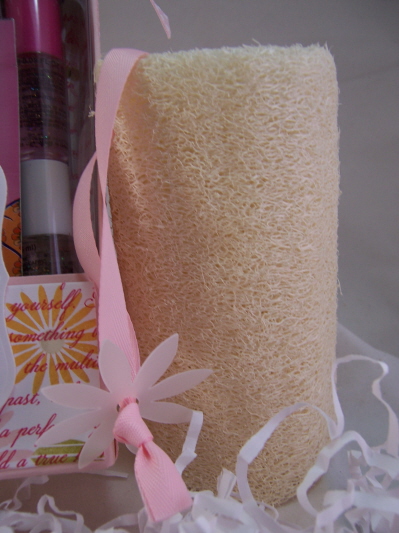
Loofa-
Remove original string from loofa
String through ribbon to match.
Insert through center of Maya Road flower, and make a knot.
Trim excess.
This was a simple addition, but really makes the set a WOW!
Its all about the details.
So there you have my projects for today. I hope you like them, as much as I do.
I’d love to hear your thoughts!!
Be sure to check out more samples on Nichole’s blog, as well as Lisa & Debbie!

- RSS feed for comments on this post
- ezineaerticles » Blog Archive » Tubular Template ideas! - My Time, My Creations, My Stampendence
- Hot Ebay Store » Blog Archive » Tubular Template ideas! - My Time, My Creations, My Stampendence
- Easy Auction Ebay » Blog Archive » Tubular Template ideas! - My Time, My Creations, My Stampendence
- Ebay Blog » Blog Archive » Tubular Template ideas! - My Time, My Creations, My Stampendence
Trackbacks
My Etsy

Who I Designed For
Blogroll
- Alicia
- Alli Miles
- Ally Blankenship
- Amber
- Andi @ crafts on a whim
- Angel R
- Angie Z
- Anne Kranitz
- Becky O
- Bee
- Beth Silaka
- Bethany Paull
- Beverly Nash
- Bobbie
- Cambria
- Cammie
- Card of the Week
- Card Positioning System (CPS)
- Cards for Cancer
- Catherine Doucette
- Charmaine
- Cheryl Sims
- Chriss Rollins
- Christina
- Christine Ewing
- Christine Wooden
- Colleen Schaan
- Craft Critique
- Craft Gossip
- Crystal
- Dawn Easton
- Emily Giovanni
- Geny
- Holly
- Igne Groot
- Inspirational Craft Blogs
- Irene
- Jami Sibley
- Jeanne Streiff
- Jen del Muro
- Jeni Bond
- JenMarie
- Jenn Balcer
- Jenn Diercks
- Jenn O
- Jennifer E
- Jennifer Mick
- Jennifer Pereda
- Jennifer-Sweet Treat
- Joanne Basile
- Jodi Collins
- Julia Stainton
- Julie Masse
- Karen
- Kathryn Berthiaume
- Katie Cotton
- Kelley Holland
- Kendra
- Kim Scholfield
- Kris’s Color Stripes! Get inspired here
- Kristen Dubosque
- Kristin Eberline
- Kristine
- Laura @ Sunshine Stamper
- Laura Turnmire
- Laurie Schmidlin
- Lesa Rapp
- Linda Duke
- Linda-LSN
- Lindsey Botkin
- Lisa (lakind scs)
- Lisa Kind
- Lori Craig
- Maggie
- Mara Campbell
- Maria
- Maria Levine
- Mary
- MaryJo
- Melanie M
- Monique Hansen
- Moxie Fab World
- Pam Imholz
- PaperCrafts Connection
- Peppers and Pollywogs Kids party site
- Rebecca Grohall
- Rita
- Robyn
- Rose Ann
- Sarah Vrolyk
- Sharon Harnist
- Sharon Johnson
- Sharon Rivera (a chemisrty with paper)
- Sherrie
- Sophia Landry
- Storage Units, Ink, & More Blog
- Sue Berker
- Susan (Rainy)
- Tangii Crane
- Tracy
- Tricia Traxler
- Trudee
- Velta
- VivLyn
- Zena
MTME Pretty Palette Color Team
MTME Pretty Patterns Sketch Team
My Time Made Easy TM LLC
Shop till you drop!
Lauren Meader
About Me
Copyrighted material
Subscribe To My Blog
Pages
- About me
- Alexa’s Story!
- My Crafty Corner!
- My Time Made Easy™ LLC
- Our Make A Wish Trip to Disney!
- Resume/Publication List
Calendar
Archives
- August 2013
- July 2013
- June 2013
- May 2013
- April 2013
- March 2013
- February 2013
- January 2013
- December 2012
- November 2012
- October 2012
- September 2012
- August 2012
- July 2012
- June 2012
- May 2012
- April 2012
- March 2012
- February 2012
- January 2012
- December 2011
- November 2011
- October 2011
- September 2011
- August 2011
- July 2011
- June 2011
- May 2011
- April 2011
- March 2011
- February 2011
- January 2011
- December 2010
- November 2010
- October 2010
- September 2010
- August 2010
- July 2010
- June 2010
- May 2010
- April 2010
- March 2010
- February 2010
- January 2010
- December 2009
- November 2009
- October 2009
- September 2009
- August 2009
- July 2009
- June 2009
- May 2009
- April 2009
- March 2009
- February 2009
- January 2009
- December 2008
- November 2008
- October 2008
- September 2008
- August 2008
- July 2008
- June 2008
- May 2008
- April 2008
- March 2008
- February 2008
- January 2008
- December 2007
- November 2007
- October 2007
- September 2007
- August 2007
- July 2007
- June 2007
- May 2007
- April 2007
- March 2007
- January 2007
Categories
- About Me
- All That Scraps
- blogger challenge
- camera/photo play
- Cards
- Contests
- family stuff
- FOR SALE
- Home decor/3-D items
- How to FAKE it!
- Introduction
- JUGS Challenge
- JustRite Stampers
- Lizzie Anne Designs
- My family stuff
- My Stamping Space
- My Time Made Easy
- My Time To Color Challenge
- My Time to Create Challenge
- My Timeless Template Challenge
- My Timeless Templates
- Mytime Mail
- MYTIME MOVIE/VIDEOs
- Papertrey Newsletter
- Pink Cat Studio
- Pretty Palette Challenge
- Pretty Patterns Sketch
- Product Opinions and Must haves
- Recipe's
- Saturday Sketch
- Smilebox Creations
- Stampavie
- Tutorials
- Uncategorized
- videos
Most Popular
- Create your own Onesie Card Tutorial-and important NOTE! PLEASE READ (2529)
- Saturday Sketch-Boxed bag holder (2333)
- Going GREEN! Fancy Flower Flourish-Closure Video (1478)
- Fabulous Favorite - Giveaway! (1336)
- a Prayer Request (1231)
- QUICK-Easter Baskets from Nestabilities-PTI style-and blog challenge (1063)
- Teaser Sketch (999)
- February Release Giveway! (and a little peek) (996)
- Group Post and Rambling Rose Video Tutorial (985)
- GIVEAWAY! Who wants it all?! (895)
Recent Comments (RSS)
- 야동: Love to read it,Waiting For
- 야동: This seller is in a
- 바카라사이트: 여기 처음 왔어요. 나는이 게시판을
- 야동티비: I was surfing the Internet
- 바카라사이트: 비슷한 주제에 대한 흥미로운 정보를
- 바카라사이트: "여기에 제공해 주신 귀중한 정보와
- 온라인홀덤: 유익한 웹 사이트를 게시하는 데
- 홀덤나라: 나는 당신의 블로그를 정말 좋아합니다.
- lisa: Technology, too, has left an
- 주소모음: 흠 !! 이 블로그는 정말
Copyright © 2007 - My Time, My Creations, My Stampendence - is proudly powered by WordPress
This blog has been Tweaked and Designed by Sara Williams
55 Responses for "Tubular Template ideas!"
SO cute!!! 🙂 I’ve been waiting to buy some test tubes, but after seeing this project …. don’t think I can wait any longer 🙂 Thanks for sharing such darling ideas – I absolutely love seeing them!! 🙂
I love these. Sorry if someone has asked this and you’ve answered, but were do you get the adorable test tubes?
WOW These are amazing! I’m not good at following directions but I think I may break down and trey them, Lauren! I love the ideas you’ve shared day after day!! 🙂
hugs,
Elaine
Lauren, I seriously want to come and hang out with you for one day in hopes that some of your creative genius will be transferred to me! I am in awe of your projects every single day!!!
[…] Original unknown […]
What beautiful gift packages you have made. You make such nice things!
GET OUT! you’re too much – your nails are even polished pretty!
You are obviously bubbling over with excitement! Good for you! Its always nice to be able to read (literally and figuratively) someone’s excitement. :> I love your new projects with both your templates and those fun tubes! I also really liked how you stamped over the raspberry fizz patterned paper…..making your original and unique paper for your personal gift! Thanks for all of your great ideas! :>
Lauren–another home run! You *do* realize that you will have made these so wildly popular that there won’t be any left to order by the 22nd though, right? ;-D
Knocked right out of the park my friend! WOWZA!! These are both awesome – and you may have made me re-think a few things…so much for having it all figured out! 😉
Brilliant, magnificnet, marvelous – oh and yummy too 🙂
I’ve got a ton of the silver capped tubes already…now I just need your template…22 more hours 😉
Awesome Lauren – completely Awesome…
Oh – and tell Debbie I’ll hook her up if PTI runs out 😉 I could probably part with 20 and still have plenty to use for myself… 🙂
Lauren, both sets are just adorable.. How nice and finished they are. They don’t look like the sets you can buy that are afforable, but look like cheap… You know what I mean. I think I said it wrong though. They really look quality. I love that you can divide your own good brand of stuff, and still afford to give to 3 or 4 friends. If you spent what it costs for good stuff on 3 or 4 containers you couldn’t afford it. This is great….Thanks Lauren! Your ideas are always so Great!
The test tube idea definitely excites me! I love your gift ideas today.
You have every right to be excited, these are amazing projects. Love them all. Thanks for the recipes for the flavored coffees. I’m a huge fan of Suisse Mocha International House Coffee, so I will be trying that recipe. Can’t wait until midnight.
Thank you so much for sharing all your creative ideas.
Wow, you should make and sell these (some day when you have more time). Amazing creativity and top notch craftsmanship. So gorgeous!
Today is the 15th, today is the 15th, today is the 15th!!!! oh bummer tomorrow is the 15th. Hurry
Gorgeous presentation! I’ll be ordering the tubes at 12:01!! Can you tell me what stamp is used under the “add water”? I can’t place it.
I swear you ARE SOOOOOO AMAZING hmm do you need my address to get those goodies to me?? LOL.. WOW.. I love those projects so beautiful! You made my mind go blank.. WOW girl just WOW! lol
Just fantastic, Lauren!
Awesome projects, Lauren! You just amaze me!
Thanks for the link to the drink mixes — I’ll definitely be making some sets like these! 🙂
These are both absolutely stunning! I love the coffee one especially because I too love the colour combo! They look so professional!
I wish I could find tubes in Canada, shipping stuff here tends to cost a fortune, but now you’ve given me so many more ideas!
Awesome ideas…I feel some major shopping coming on!!
Wow! You’ve done some amazing stuff the last few days. These are such fabulous gift ideas.
Just beautiful Lauren!!!
Simply freakin’ amazing! I am in awe as always. Can I live in your brain for just a few hours? I promise not to take up too much room!
Your creativity is mind-blowing! Thank you SO much for sharing your ideas. I’ve been a lurker on your blog for a long time…enough is enough, I MUST start commenting. 🙂
Laueen, with excitement each day, I look forward to your blog. In my opinion, truly the best one out there. Your templates – wowinng and simply the best!!!! (see I like the exclamation mark also) As I said it before, I will be getting both of these templates. I can not wait to use them. Thank you from all of us crafters for designing them and for sharing them at a very reasonable cost.
I’ve been reading your blog thru bloglines. But today I just had to comment on how awesome your projects are. Those are super gifts that I would totally enjoy receiving!! thanks for showing them and please keep giving more ideas!! I love it!
I want the coffee/cocoa sample!!! 🙂 I am on your Christmas list right? hehe Seriously, my friend, I agree with Debbie, Nichole better have already put in a second order for those test tubes because she’ll be sold out on release night already I think.
You just keep amazing me with all your ideas!! They are wonderful.
WOW!!! Lauren, these are beautiful!!! WOW!
Lauren..
These are all Beautiful and Fabulous Gifts!!
Perfect for the Holidays 🙂
TFS
WoW! These are just the cutest tubes. Your creative and inspiring MOJO is awesome. Thanks so much for sharing your talents with us.
I HAVE HAD THE HARDEST TIME FINDING THESE TEST TUBES HERE IN UTAH SO GREAT NEWS!!! CUTE STUFF! YOU GO GIRL.
ToTaLLy…AweSoMe…TFS..i need to get my hands on some of those tubes to make that coffee carrier..your creativity is awesome
I just want one tenth of your creativity. I absolutely LOVE your blog and it makes my day. Not only do I get excited to see what you have created but I so enjoy hearing about your delightful children. Your husband sounds like a gem too:-) I purchased one of your templates last month and am using it like a mad woman to create gifts for my kids’ teachers. I love how easy it is to use and how the finished product shows how much thought and care went into making it. Like you we live on one income so making gifts for everyone on the list is the way to go. Thank you for making it so easy for me this year. Can’t wait to purchase more of your templates. Thank you for keeping them affordable.
What awesome gifts! Great job!
[…] unknown wrote an interesting post today onTubular Template ideas! – My Time, My Creations, My StampendenceHere’s a quick excerptTubular Template ideas! – My Time, My Creations, My Stampendence: […] in sets of 3,; Katy Frame: I am OVERWHELMED with all; Justine: I think I am gonna; Ebay Online » Blog Archive » 2 posts today – My Time, My Creations, … […]
Lauren, You are AMAZING!!! These projects are better than something you would find in a store! I think anyone would be thrilled to get any of your projects! I am so lucky to have found your blog and my mind races at all the great things you do! I need to get those test tubes and your templates…but first I need to find the time to create! don’t know how you do it!
Thanks so much for all your inspirtation!!!
Girl! You are freaking amazing! Those are so stinkin’ cute. I absolutely love all of your ideas and your templates. Keep up the awesome work you do!
I can’t wait to make this. Love it. I know what you mean about making your own gifts, even if we can afford a gift, I find it so much more rewarding to create something. Anyone can make a purchase but not everyone will “make the time” to put so much thought and effort into a personalized gift.
I love all of your My Timeless Templates and these new ones are fabulous. For the Desk Top Stationery holder can you give the dimensions of the tube insert as well as the measurements for the mountain and valley folds? Thanks!
Did you use the larger test tubes? This will be the perfect finish to my Christmas list.
It’s a good life!
Terri E.
[…] unknown wrote an interesting post today onTubular Template ideas! – My Time, My Creations, My StampendenceHere’s a quick excerptSo if you have many people this may be the way to go. Maybe even a $5 limit Yankee swap? I used sweet blush cardstock to print my base template. I added a cute little chocolate piece to where the tubes insert for some interest, … […]
Lauren, you are amazing!!!!!!! I don’t know how and when you have the time to create such wonderful projects. I am so excited with all of your templates! They really help me be more time efficient when I want to create a gift! I am loving those tubes for packaging special items. This is really an exciting time! Good luck with the release tonight! Just think, we all get to have the release party, receive our orders and have a Merry Christmas in just ten days!
Lauren, your ideas are exceptional. Girl, there is no question what one of your God given talents is! Keep up the good work. I look at your blog several times a week and thoroughly enjoy it. THANK YOU!!!
Lauren,
I had been looking for test tubes everywhere. I was inspired by your blogs to get these. Now I will definitely order some one minute after midnight!! I love your ideas. You are also making me want to learn to like coffee. I love your ideas and your templates are awesome. I always look forward to reading your blogs!! You are one awesome creative lady! Thank you for sharing all these ideas with us.
completely gorgeous! Amazing detail – just love your project
I wish you had a shop….lol
These ideas as you say are “over the moon”! I hope that Papertrey has ordered a truck load of those tubes because you know they are going to fly off the shelves! Your ideas are beyond great, thanks
cute! i love making things with the tubes from impress. looks like we’ll be seeing more of these projects around now! hugs-jd
[…] unknown wrote an interesting post today onTubular Template ideas! – My Time, My Creations, My StampendenceHere’s a quick excerptI do still drink it, but in less quantity, and now without real sugar and fat free cream. So, I had to do a coffee themed set with a new found product I love! Pink & brown are like my favorite combo-so this was a perfect set. … […]
how exciting about the test tubes being carried by papertrey! I love your coffee idea!
WOW!! Amazing work!! I wish I had talent like that.
I love your work and templates and they have found their way into my to do file.
Leave a reply