Archive for December 11th, 2008
I’m excited to share todays peek at our next new template! I hope you keep an open mind at the possibilities this one has to offer as well. I will, of course be filling your brain with creative ways to utilize this as the days go on (HOPEFULLY!).
You can NEVER have enough great ways to package your card creations, and sets! Its the gift that keeps on giving, and perfect to keep on hand for any occasion. I hope this template will peak your interest. I know one of the most popular, well received, handmade gift items that I personally make are my card sets. I am always trying new ways to present my sets, and this box is a keeper.
With all that being said, here is a peek at our next My Timeless Template: Desk Top Stationery!

Petal Pink Set
I printed my template onto chocolate cardstock, then cut, scored, and assembled.
In this box there are 8 A2 size, well embellished cards, with stamped envelopes to match! The box was designed to match the cards that are inside, perfectly!
Now the main purpose for this template wasn’t JUST for boxing up some pretty cards. It is meant to store your cards or stationary sets, on a desk or area out in the open. We work hard to make pretty packaging, why not make it so its not stuffed in a drawer, but a functional part of the room, office or creative space of the receiver? Maybe remind them of the note they are suppose to send off.
Think of the person’s room decor, and design it to match!
This particular gift set is going to Alexa’s 1:1 aide, who I love to pieces.
Now let me share my details with you
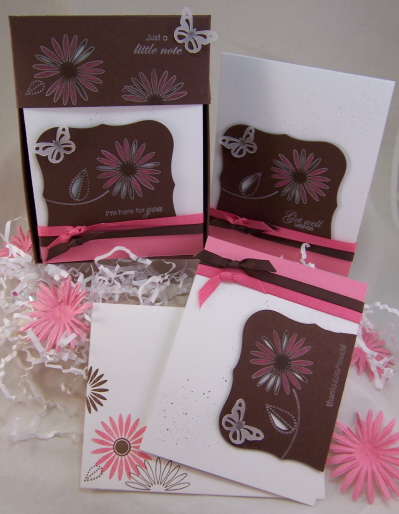
You can see the 2 designs that are included in this box set.
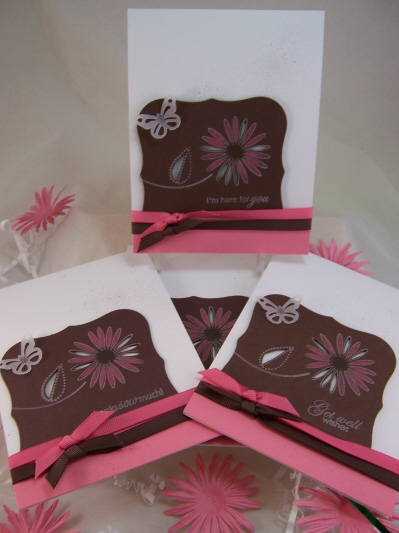
Each card uses the same elements. There are 8 in a set. 2 different designs. So, 4 of each design. Envelopes stamped to match. Each card also has different sentiments from the sets Floral Frenzy, flower garden sentiments, and Butterfly Kisses

Here is set #1 Birthday Wishes, thanks sow much, Get Well Wishes, and we also have I’m here for you.

Now onto set #2
I’m not big on mass production, but these were fun! I think they are just SO pretty too. But not over the top busy.
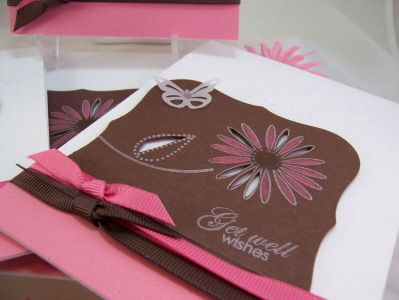
Now, a more close up view
Each set uses the same pieces, just arranged differently. I like doing that. Keeps it balanced too.
A die cut label from dark chocolate, that is stamped with Floral Frenzy in white craft ink. The petals are colored with a Prisma Color Pencil. Gives a nice look I think. Sentiments vary, an are also stamped in white. Some of the petals on each flower, and the leaf is cut away, so the white peeks through. I am totally in LOVE with that look. Then the perfect touch, my signature-a vellum butterfly. I have to use butterflies with every release! It’s my thing 😀 Then the finished card is spritzed with some chocolate ink.
I think this set is just SO pretty! I hope you do too. You can get started on the cards while you wait for the 15th to order 😀
Now should I share what else you can use this template for?
OK! One more peek!!
How about a treat holder?
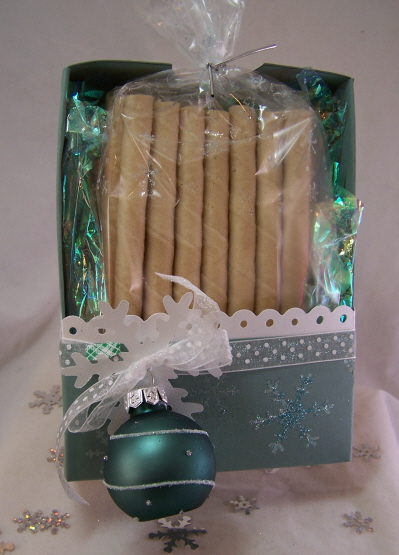
Pretty Pirouettes Package
All you have to do is flip it, and you have a super cute treat holder!
I used Snowflakes for this set.
I don’t know about you but I LOVE Pirouette Sticks. They fit perfectly in this container too.These are filled with white chocolate. It was SO hard to not eat them during this packaging venture. OMW! I used about 1/2 my container for this little treasure.
Its packaged goodies like this that make such nice “for no reason” surprise, or inexpensive gifts for the mailman, secretary, or anyone else you may want to acknowledge. Maybe you have a large group of people in an office? Sam’s Club sells these in bulk, for a pretty good deal, so I think I’m going to go get some this week for gifts 😀 Jay likes to give things out to his staff and this may just do thr trick in time for the holiday. I like that its not Christmas, entirely, in case there are other reilgious preferences in the group.
For freshness sake, I did put mine in a gusset bag (stamped with my white stazon, and glitter sprinkled onto the bag) and tied the top.
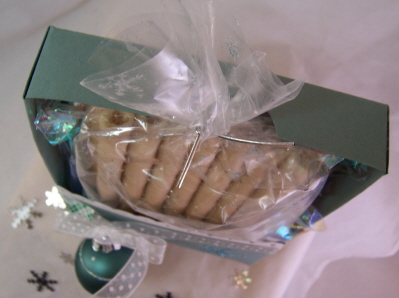
I used the optional notch cut out so that my bag doesn’t get squished.
Now for the details-

As you can see, this entire design was inspired by my little 2/$1.00 ornaments I got at Michaels last week! It makes the perfect little embellishment keepsake for an extra $0.50! It matched my Ocean Tides cardstock to perfection!! I punched a white vellum snowflake, and tied through some white polka dot ribbon. The scallop border is a Fiskars punch, and is done in shimmery white.
So there you have it! One template, 2 totally different uses! Wait until you see what else I have done with it 😀
More on that later! I have 2 projects that I could scream over 😀
Thank you, as always for taking the time to check in with me here. I so enjoy the excitement that builds, and you amazing emails and comments.
Tomorrow I have more template ideas, as the team shares a group post! So don’t miss that.
More creative ideas today on Nichole’s blog, as well as Lisas.
Till tomorrow.
My Etsy

Who I Designed For
Blogroll
- Alicia
- Alli Miles
- Ally Blankenship
- Amber
- Andi @ crafts on a whim
- Angel R
- Angie Z
- Anne Kranitz
- Becky O
- Bee
- Beth Silaka
- Bethany Paull
- Beverly Nash
- Bobbie
- Cambria
- Cammie
- Card of the Week
- Card Positioning System (CPS)
- Cards for Cancer
- Catherine Doucette
- Charmaine
- Cheryl Sims
- Chriss Rollins
- Christina
- Christine Ewing
- Christine Wooden
- Colleen Schaan
- Craft Critique
- Craft Gossip
- Crystal
- Dawn Easton
- Emily Giovanni
- Geny
- Holly
- Igne Groot
- Inspirational Craft Blogs
- Irene
- Jami Sibley
- Jeanne Streiff
- Jen del Muro
- Jeni Bond
- JenMarie
- Jenn Balcer
- Jenn Diercks
- Jenn O
- Jennifer E
- Jennifer Mick
- Jennifer Pereda
- Jennifer-Sweet Treat
- Joanne Basile
- Jodi Collins
- Julia Stainton
- Julie Masse
- Karen
- Kathryn Berthiaume
- Katie Cotton
- Kelley Holland
- Kendra
- Kim Scholfield
- Kris’s Color Stripes! Get inspired here
- Kristen Dubosque
- Kristin Eberline
- Kristine
- Laura @ Sunshine Stamper
- Laura Turnmire
- Laurie Schmidlin
- Lesa Rapp
- Linda Duke
- Linda-LSN
- Lindsey Botkin
- Lisa (lakind scs)
- Lisa Kind
- Lori Craig
- Maggie
- Mara Campbell
- Maria
- Maria Levine
- Mary
- MaryJo
- Melanie M
- Monique Hansen
- Moxie Fab World
- Pam Imholz
- PaperCrafts Connection
- Peppers and Pollywogs Kids party site
- Rebecca Grohall
- Rita
- Robyn
- Rose Ann
- Sarah Vrolyk
- Sharon Harnist
- Sharon Johnson
- Sharon Rivera (a chemisrty with paper)
- Sherrie
- Sophia Landry
- Storage Units, Ink, & More Blog
- Sue Berker
- Susan (Rainy)
- Tangii Crane
- Tracy
- Tricia Traxler
- Trudee
- Velta
- VivLyn
- Zena
MTME Pretty Palette Color Team
MTME Pretty Patterns Sketch Team
My Time Made Easy TM LLC
Shop till you drop!
Lauren Meader
About Me
Copyrighted material
Subscribe To My Blog
Pages
- About me
- Alexa’s Story!
- My Crafty Corner!
- My Time Made Easy™ LLC
- Our Make A Wish Trip to Disney!
- Resume/Publication List
Calendar
Archives
- August 2013
- July 2013
- June 2013
- May 2013
- April 2013
- March 2013
- February 2013
- January 2013
- December 2012
- November 2012
- October 2012
- September 2012
- August 2012
- July 2012
- June 2012
- May 2012
- April 2012
- March 2012
- February 2012
- January 2012
- December 2011
- November 2011
- October 2011
- September 2011
- August 2011
- July 2011
- June 2011
- May 2011
- April 2011
- March 2011
- February 2011
- January 2011
- December 2010
- November 2010
- October 2010
- September 2010
- August 2010
- July 2010
- June 2010
- May 2010
- April 2010
- March 2010
- February 2010
- January 2010
- December 2009
- November 2009
- October 2009
- September 2009
- August 2009
- July 2009
- June 2009
- May 2009
- April 2009
- March 2009
- February 2009
- January 2009
- December 2008
- November 2008
- October 2008
- September 2008
- August 2008
- July 2008
- June 2008
- May 2008
- April 2008
- March 2008
- February 2008
- January 2008
- December 2007
- November 2007
- October 2007
- September 2007
- August 2007
- July 2007
- June 2007
- May 2007
- April 2007
- March 2007
- January 2007
Categories
- About Me
- All That Scraps
- blogger challenge
- camera/photo play
- Cards
- Contests
- family stuff
- FOR SALE
- Home decor/3-D items
- How to FAKE it!
- Introduction
- JUGS Challenge
- JustRite Stampers
- Lizzie Anne Designs
- My family stuff
- My Stamping Space
- My Time Made Easy
- My Time To Color Challenge
- My Time to Create Challenge
- My Timeless Template Challenge
- My Timeless Templates
- Mytime Mail
- MYTIME MOVIE/VIDEOs
- Papertrey Newsletter
- Pink Cat Studio
- Pretty Palette Challenge
- Pretty Patterns Sketch
- Product Opinions and Must haves
- Recipe's
- Saturday Sketch
- Smilebox Creations
- Stampavie
- Tutorials
- Uncategorized
- videos
Most Popular
- Create your own Onesie Card Tutorial-and important NOTE! PLEASE READ (2529)
- Saturday Sketch-Boxed bag holder (2333)
- Going GREEN! Fancy Flower Flourish-Closure Video (1478)
- Fabulous Favorite - Giveaway! (1336)
- a Prayer Request (1231)
- QUICK-Easter Baskets from Nestabilities-PTI style-and blog challenge (1063)
- Teaser Sketch (999)
- February Release Giveway! (and a little peek) (996)
- Group Post and Rambling Rose Video Tutorial (985)
- GIVEAWAY! Who wants it all?! (895)
Recent Comments (RSS)
- 야동: Love to read it,Waiting For
- 야동: This seller is in a
- 바카라사이트: 여기 처음 왔어요. 나는이 게시판을
- 야동티비: I was surfing the Internet
- 바카라사이트: 비슷한 주제에 대한 흥미로운 정보를
- 바카라사이트: "여기에 제공해 주신 귀중한 정보와
- 온라인홀덤: 유익한 웹 사이트를 게시하는 데
- 홀덤나라: 나는 당신의 블로그를 정말 좋아합니다.
- lisa: Technology, too, has left an
- 주소모음: 흠 !! 이 블로그는 정말
Copyright © 2007 - My Time, My Creations, My Stampendence - is proudly powered by WordPress
This blog has been Tweaked and Designed by Sara Williams