Archive for November, 2008
Template Peek-Momogrammed One Sheet Wonder
Nov 13, 2008 Author: mytime | Filed under: Cards, Home decor/3-D items, My Timeless TemplatesOK if this post doesn’t get you excited about making monogrammed cards, holiday gifts, and of course the All Boxed Up© template, then I truly give up! (OK maybe not totally! I do have more to share tomorrow 😀 but I’m hoping you are already drooling) This is sure to make these types of gifts a BREEZE!
Here we go!

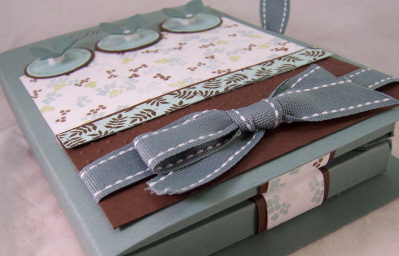
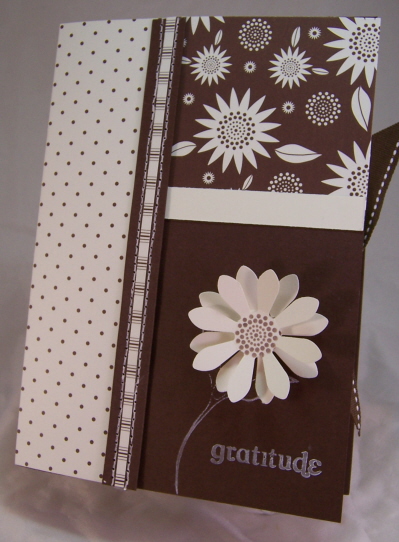
Out on a limb- All Boxed Up cover
I am over the moon for this next gift set I have to share with you! The template I am using today is peek of a new release template called All Boxed Up © from my line of My Timeless Templates. Available on the 15th.
Its ALL stamping and super easy.
View from the bottom
I am sharing a SUPER project that will save you all so much time with those gifts that WOW! Even if you stamp it ALL.
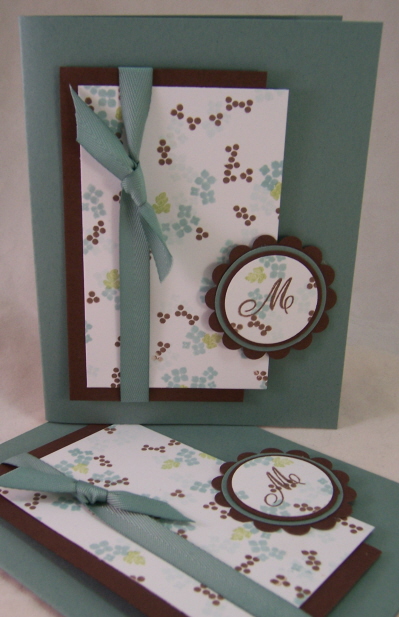
Who doesn’t LOVE monogrammed notecards? Seriously HOT, right? Well to resolve my own personal dilemma, since I DESPISE mass producing the SAME thing over and over, was to make my teacher’s monogrammed gift sets, but make the sets with different cards, to sway my pure boredom! What better way to do that than create a ONE SHEET WONDER set!
Basically what this means is you either cheat BIG time, and use an 8 1/2 X 11 sheet of patterned paper, OR (start now :D) and get back to your roots of stamping your own patterned paper, which is not only more fun, but then you LOOK even MORE crafty to people! LOL!
Many people have asked in the past if I had ever designed something they could save like this. Until now, the answer was NO! I have done my own OSW but never kept track of what I was cutting, I just went with it. Now I did keep track, just for you.
So here is the OSW guideline that I personally designed and used for my cards here today. Further cutting instructions below. You will get a set of 8 notecards from this sheet!
PS BEFORE anyone even brings it up-I am aware I forgot the “e” at the end of envelope. TOO LATE! I designed this template at 2am so bear with me OK! It won’t affect your OSW!

I hope you find it useful 😀 You can get started on your monograms while you wait for the 15th to order the All Boxed Up! Remember you get it right away! No waiting or paying for shipping, so you could have a majority of your teacher/holiday gifts DONE BY Thanksgiving!
So onto the monograms! You will make 2 of each card. I love the different layouts this OSW offers! It doesn’t have that mass produced look, or the feel you had to scrounge for cardstock to come up with nice layouts.

This gift set is going to be for Alexa’s teacher Ms. Mahanes. I think she has been fabulous for Alexa this year, and I am so thankful for all her help and guidance. Her 1:1 aid will get her own set too, and a few other goodies 😀
Supplies:
My Timeless Templates-All Boxed Up ©
For my set I used the flower & berry elements from Out on a Limb Rev., and Out on a limb additions (the little leaf). Limitless labels for my leafy border. Box sentiment is from the Remember set. I also used borders & corners circle set with the Ambassador monogram.
I used coordinating ink and cardstock in : white, dark chocolate, aqua mist, and ocean tides. I also used the ocean tides/dark chocolate twill ribbon on my cards, as well as the stitched grosgrain ribbon in ocean tides. I also stamped the flaps of my envelopes to match!
I used my 1 3/8 circle punch, a layering circle punch, the SU! Scallop circle, a Martha Stewart flower punch, cuttlebug swiss dots embossing folder
SO I just randomly stamped my entire sheet of 8 1/2 X 11 cardstock with my flowers in aqua mist, then again in ocean tides. I went on to add the berry dots in chocolate. When that was complete I randomly added the SINGLE leaf image where I needed it. Cut as listed above.
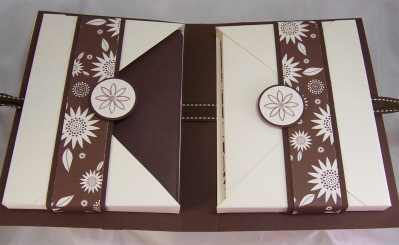
My envelope pockets wraps
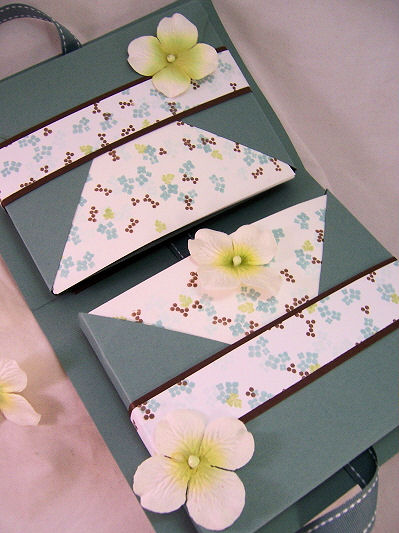
Blossoms box cover opened
This uses the (2) 1 X 11 strips. Layer onto 1 1/4 X 11 chocolate strips and adhere around pockets.
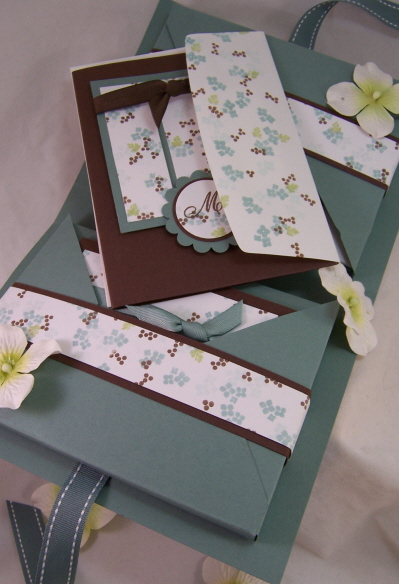
In the top photo, you are seeing my envelope’s in the front of my cards, in the holder . Flaps stamped to match. By putting them first, the completed cards slide in easier, and it-looks very clean and professional.
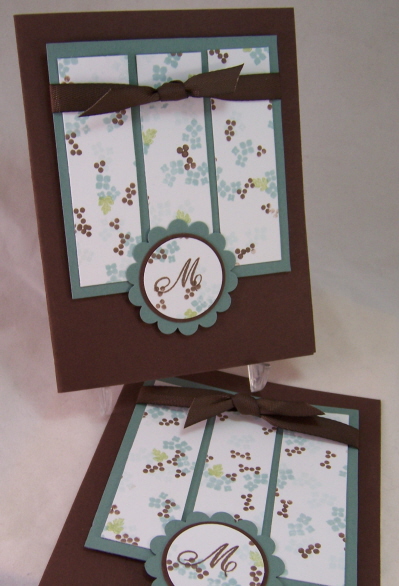
Card 1

White base
Embossed strip is 2 1/4 X 4 1/4
Each of these cards uses the (2) 2 X 4 strip. Layer on a 2 1/2 X 4 1/4 piece of dark chocolate cardstock for your main panel. Stamp your monogram on a scrap white piece of cardstock, and punch with 1 3/8 circle. Layer with chocolate circle.
Card 2
Chocolate base
This card set uses the (3) 1 X 6 1/2 inch strips. Each strip is cut at 3 1/4. This gives you 6 strips of paper size 1 X 3 1/4.
Layer onto 4 X 3 3/4 piece of Ocean Tides cardstock.
Use (2) of the punched patterned 1 3/8 circles for the monograms. Layer onto chocolate circle, and then add a scallop circle in Ocean Tides.
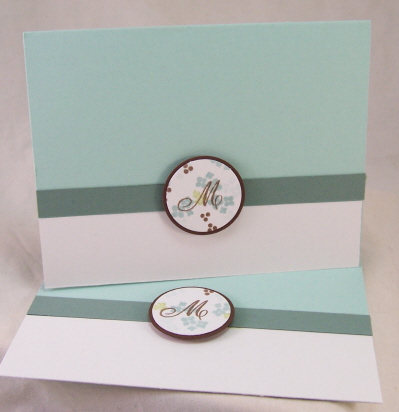
Card 3
Ocean Tides base
This card uses the 2 X 8 strip. Cut that piece in 1/2. So you now have (2) 2 X 4 inch pieces. Layer onto a chocolate piece that is 4 1/2 X 2 1/2.
Use 2 of the 1 3/8 punched circles for your monogram. Layer onto chocolate, and ocean tides circles, then onto a larger scallop circle.
Card 4
By now we are getting low on patterned cardstock! So we are keepin it simple! NOTHING wrong with that.
Card base is Aqua mist.
Cut (2) 1 1/2 X 5 1/2 inch strip of white cardstock, and layer at bottom.
Cut (2) 1/2 X 5 1/2 inch strips of Ocean Tides cardstock, and layer above white strip.
Use last (2) 1 3/8 punched circle for monograms. Layer onto chocolate circle.
Now you are done your set of 8 monogram notecards! Each one as pretty as the last, with little to no waste of cardstock!
I hope you enjoyed today’s peek with my template. I know I had fun making it. All this template work is helping me get holiday gifts done early, and better yet, keeping it all handmade. Not only is that special, but it saves me $$, which makes Jay VERY happy! LOL! For the cost of ONE $5 printable template you can make unique endless gifts over & over 😀 That is PRICELESS!
Thanks for checking in here.
More to come…………..tomorrow!
Teacher’s Gifts Galore
Nov 12, 2008 Author: mytime | Filed under: Cards, Home decor/3-D items, My Timeless TemplatesThis is post # 3 for today so be sure to go to the 2 others so you don’t miss anything! All template samples 😀
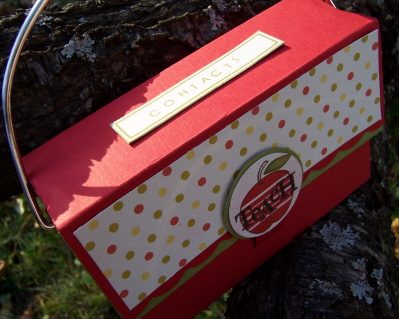
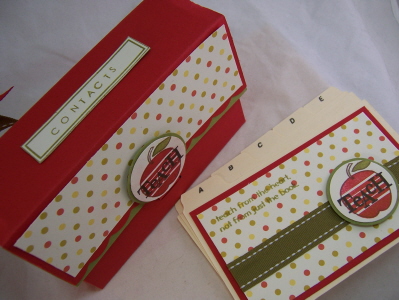
Teacher Contacts Clutch- a modern version rolodex!
With a Timeless twist
Nichole has challenged her design team to come up with some great Teacher gift ideas for you to use this holiday season. She has an AMAZING set releasing called Teacher’s Apple. Its the CUTEST set-ever! Let me just tell you I had to make a concious decision to STOP using it. I kid you not. What a GREAT time of year to release a teacher set!!! The images, and especially the sentiments are A-M-A-Z-I-N-G!!!
I know this is the time of year I focus on teachers, and make teacher gifts. I never make anything at the start of the school year, and by Christmas, anything I did buy is long forgotten. So yes, November is a great month to release this set IMO.
I loved the challenge because it made me get started on my teacher gifts early this year-YEAH!
Given the fact I have 3 kids, and each has NUMEROUS teachers, I try my best to make each one something every year, never repeating the same gifts. Always gotta top last year! LOL! I hope they like what I have planned, and you do as well!
Ever go shopping and see something, and the light-bulb goes off?
Well that is what happened to me!
I was at Staples, and I knew I needed some “stuff”. (I always need stuff) I walked by one section and came across these “Rolodex” type of index card inserts. Cost a WHOPPING $2.99!!!!!!!!!!
Well there went the light! I checked the size on them and YES! not only would they fit in my NEW! Purse-onality Clutch, but they would fit PERFECTLY!!! HAPPY DANCE!!
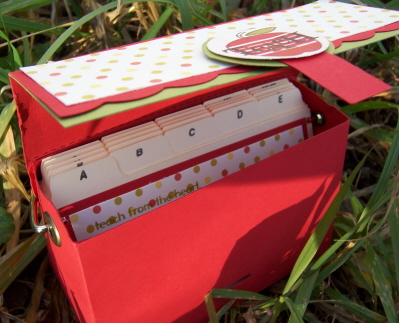
Contact’s Clutch open
So I flew home, printed my template, cut and score, and YEAH!! They DID fit in my Purse-onality Clutch © In just a few minutes, this is what I had done.
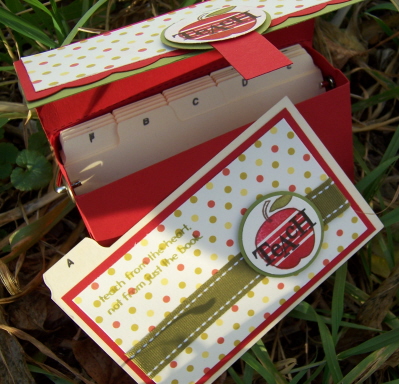
This little beauty is going to be able to sit right on every teachers desk, every year! The teacher’s can file their parents or other personal contact info and keep it handy. Remove and change out what need’s to be, yearly.
Isn’t it cute? I loved the idea, and the fact I can use my own template is a HUGE bonus and TIME SAVER 😀
Supplies:
My Timeless Template-Purse-onality Clutch
Stamps- Teachers Apple, Recipe Box Label, Simple Alphabet
Cardstock– Pure Poppy, White, Ripe Avocado
Ink-dark chocolate, black, pure poppy, ripe avocado
ribbon- stitched ripe avocado
other- paint can handle, large brads, Rolodex cards
Be sure to check in on the design team.
Papertrey Design Team
- Niki Estes
- Nichole
- Michelle Wooderson
- Melissa Phillips
- Lisa Johnson
- Lauren Meader
- Heather Nichols
- Geny Cassady
- Debbie Olson
- Dawn McVey
- Betsy Veldman
- Becky Oehlers
I am sure you will find your light-bulb moment!
Thanks again for reading! Feel free to share your thoughts 😀
Happy 6th Birthday Noah! Template activity
Nov 12, 2008 Author: mytime | Filed under: Cards, My Timeless TemplatesPOST 2 FOR TODAY! Be sure to check the other entries!
WOW! I cannot believe my baby boy is 6 today! That means he needs 2 hands to show his age. Where has the time gone? Before I know it he’ll be driving.
Oh boy I get teary just thinking about it. He is already so “old” for his age to me. Its like he is the oldest child most times.
I have SO much to say about him and his day, but will save all that for his actual birthday party post (YIKES! I still have Amber’s to do-bad mommy!), which I am also trying to get the favors and stuff for that done in between everything else.
Anyway, before I go WAY off on a tangent of emotion, not meant for this entry, I have to move on. I have shared before that my kids and I always do an afternoon craft. I have to say My Timeless Templates have been a great part of that!! Making my planning for the craft SO much easier. No, Im not just saying that 😀 Its true.
Noah draws
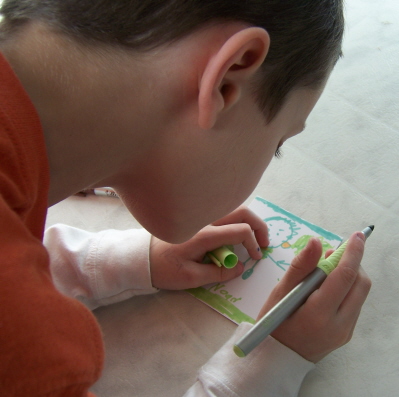
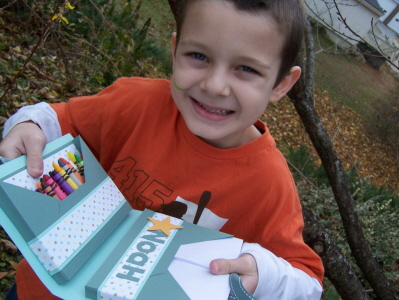
So we are all (me & the 3 kids) crafting in my stamp room, and I’m whipping up samples for my templates to share with you all, and Noah says to me “Hey mom, can I make one of what you are making?” I told him that I wasn’t sure what we were doing yet. He then told me “But mom I have a super duper cool idea for you” (yes just like that! LOL! He really cracks me up) I said “Oh yeah?! What’s this idea?” Not thinking he actually DID have an idea besides coloring it, let along a cool one. Then Noah said “I can decorate that thing with my pictures, and in that little thing inside (the pockets), I can put my crayons and my notebooks to take with me in the car when we go far away” Now where we live even the food store is about a 1/2 hour so that “far away” is every place we go! LOL!
SO I listened to his idea and this is what we did!
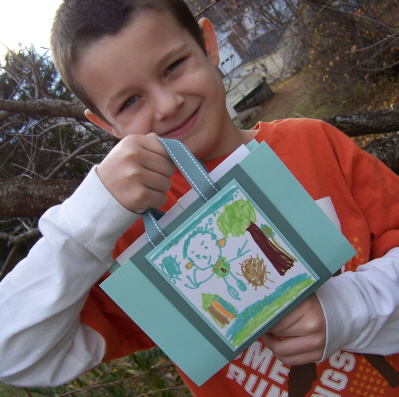
Noah and his All Boxed Up tote
(love the drawing)
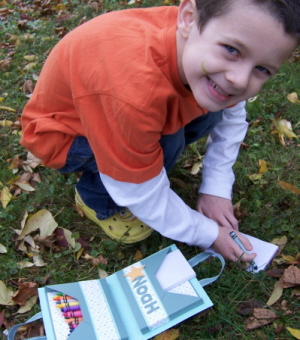
WOW! Was I ever floored! I need to ask my kids opinions MORE. That WAS a cool idea!! So we did it!! Noah picked the colors, paper, and the fact he wanted his name and a star. I put the All Boxed Up together (I had to have it perfect since he was actually using it!), and Noah helped with the whole thing! Gluing and deciding where things would go! He was SOOOOOO excited my his project, it was really cool to see.
Side 2 of his tote
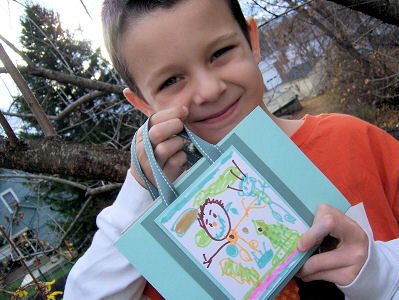
Yes that is a Christmas tree in the lower right corner! LOL!
Now here is the open view
Marker on his face from his labor of love.
He couldn’t even wait for a car ride. He started using it as soon as I told him we were done getting photos.
What mom wouldn’t be proud?!
I had a nice mommy moment and he had a creative epiphany! It was a good day. One I will cherish always.
We have a full day of fun things to do for his day. One which includes playing hookey!!
I love you Noah! Happy Birthday my sweet, amazing boy! I hope you always want to spend time with me, even when you grow up, and Im no longer “fun” 😀
My Timeless Template FREEBIE :D
Nov 12, 2008 Author: mytime | Filed under: Cards, My Timeless TemplatesTHIS IS POST # 1 of 3 for today!! Each post is for a template sample, so you will definitely want to scroll down to the next post!!!
Well I am sure you are all DYING to know what the FREE My Timeless Template © is going to be this month. I received many emails and guesses. Your excitement is just awesome!!! It truly makes my day. This time of the month is CRAZY for me, but in a fabulous way. So thank you for making it awesome! ♥
If you are wondering what the template it you may want to Check this out!
After literally HUNDREDS of emails (awe you make a girl feel special) Nichole and I decided that you may be pretty happy to have the Recipe Wrap Up© as your FREEBIE!
NOTE: The newest templates and NEWEST FREE download aren’t available unil the 15th!
Now if the whole “recipe” idea is not your thing I’m sure the idea catalog that you get to download with the template (remember the idea book comes with EVERY download, is in full color with 5 EXCLUSIVE projects, supplies and instructions) will fill your brain with many creative ideas!
But before then, I want to share another idea for the template download. Don’t let yourself get limited by the original name of the first few samples! The hardest part of these projects is DONE! You just have to print , cut, score and go! The rest is up to your creative imagination 😀
This projet uses ONE of the printable wrap up’s (for the original wrap up you would print 2 templates) and one of the envelope’s from the template (original project uses 6).
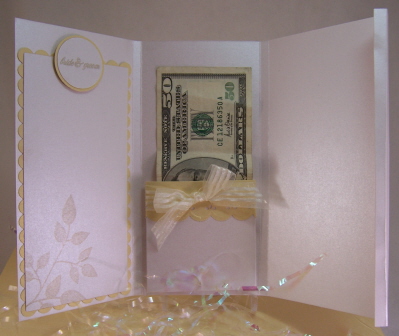
How many times do you wish you had a unique money holder? For maybe a pretty wrap up for some notecards? Well now you can whip them up, every time.
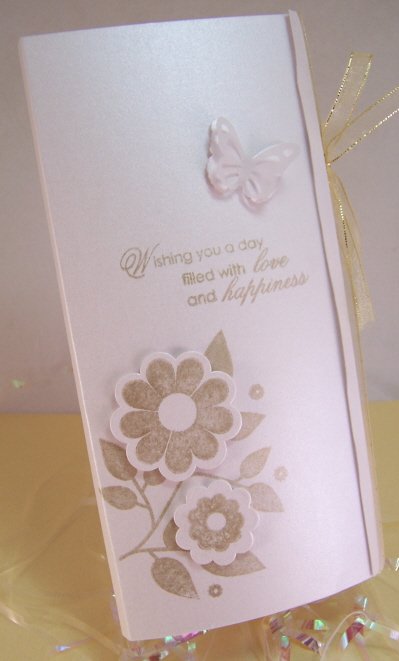
Wedding Wrap Up-Money Holder
I love simple and elegant wedding cards. This template makes this style of card so easy!
I printed my wrap, and scored. I then added another little score, and what is normally the side seam, attaching the 2 wrap up panels. This little extra score makes the little lip you see on the right, that helps hold this closed.
I secured it closed with my gold ribbon
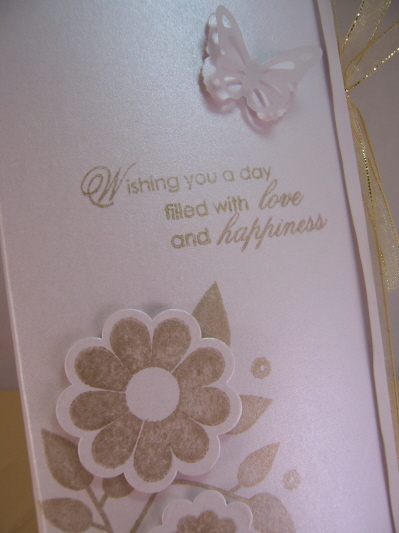
This sentiment is PERFECT! It is from the upcoming release on the 15th Heartfelt Basics. It really conveyed the perfect message for the newlyweds!
I used a shimmery white cardstock as my base. Now that really say’s elegance to me.I stamped my Beautiful Blooms in Encore Gold Ink. I used my cuttlebug flowers #1 die to die cut my flowers.
The butterflies are both Martha Stewart Punches. I LOVE those punches!!
Now when you unfold it…………….

Wa-La!
You see this.
Isn’t it just the prettiest money holder (I know my $50 isn’t “pretty”. I used what I had for my photo purposes. This is actually going in Noah’s new wallet as part of his birthday gift today! Yes its his bday!!) ever . I told you I love simple!
I also chose to use Wedding Day for my “bride & groom” sentiment-it was the perfect touch.
The panel on the right is plain, but a photo of the happy couple would be REALLY nice to add without BULK! Don’t you think? I should have dug one up! Oh well.
Now on the notecard, you can attach our written wishes/advice for successful & happy marriage for the newly wed couple. You should use remove-able adhesive for that panel so that they can save it in a book 😀 OK that is just what I would do-you don’t HAVE to.
SO that is just ONE other idea for the Recipe Wrap Up!
You will have to let me know what you think! I know I’m pretty excited with this template, and giving you another shot at a FREEBIE!!!
Template Talk-
If you are NEW to my blog and have NO IDEA what I am speaking about-read this!
My templates are for various gift packaging, and they are SO EASY! Just download once, print, cut, score and assemble. Done in minutes. EASY PEASY! You can make great gifts over and over again for the purchase of one template.
If you want to see our other templates (we just started this product line last month) then click here! You can also try a FREE template there as well ![]() Also see my sidebar. I have a My Timeless Template category that you are able to click and view any past projects I have created here, for some ideas.
Also see my sidebar. I have a My Timeless Template category that you are able to click and view any past projects I have created here, for some ideas.
———————————————
Be sure you check in with Nichole for more peeks, and links, as well as Melissa & Lisa!
Thanks for reading
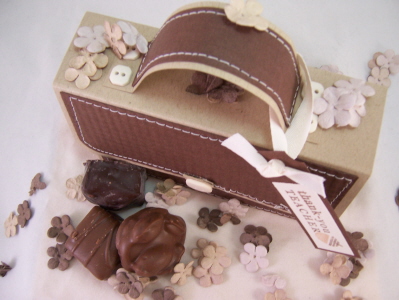
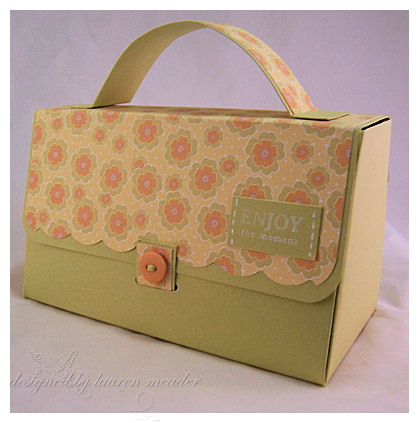
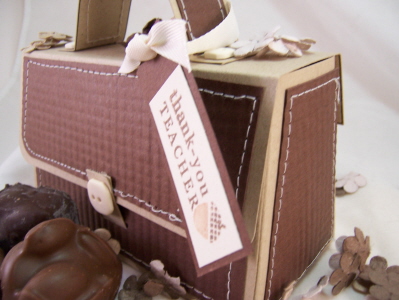
My Timeless Template © Peek #2 Purse-onality Clutch
Nov 11, 2008 Author: mytime | Filed under: Home decor/3-D items, My Timeless TemplatesToday I have a FUN peek for you 😀 It uses my NEW! Purse-onality Clutch template that is being released on the 15th. I cannot tell you how much I LOVE this particular template. (OK well I guess I love them all, but you get the idea)
I KNOW when you read “purse” you thought GIRLY right?! Well think again!
I am making it MASCULINE!
Just because it is called a “Purse”-onality clutch doesn’t mean its just for girls! Not that it isn’t adorable, but it can be masculine too. Each “purse” can take on a whole new look when you put your very own personal touch to it. Males can be some of the toughest gifts for we papercrafters! Why not try a little briefcase?
By making your cardstock look a bit like a “leather” or textured fabric you can change the entire project.
Here we have “Let’s Be Brief!”
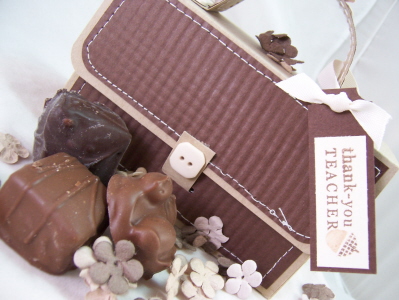
There is nothing feminine about this bag. With a little texture you have a super cute briefcase that makes any guy beam with delight. Fill’er up with his favorite box of chocolates, truffles, turtles, peanuts, cookies, or a great gift card, and he is sure to be happy!
I have some MALE teachers for my kids that are generally neglected in the “handmade” gift department. Well, not this year!
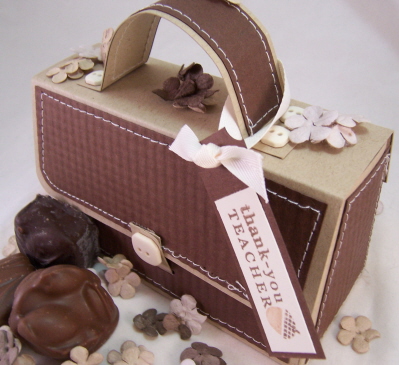
I hope you can see that this clutch is very different. It has a nice double angle to it on the sides, making it super fun to make, and even better to receive!
More ideas will follow!
The tab fits into a perfect little slot, and holds the lid closed. Its a nice touch that finishes it off.
Supplies:
stamps-Limitless Labels
paper-Kraft, Dark Chocolate, Vintage Cream
ink- Dark Chocolate, Creamy Caramel
other-Vintage Cream twill, Paper Crimper, cream buttons, sewing machine
Instructions:
1. Print purse-onality clutch template onto Kraft cardstock.
2. Cut, and score per template guide.
3. Cut layers for each panel from dark chocolate cardstock.
4. Run each panel piece through your paper crimper, going in opposite directions, to give it a textured look of leather.
NOTE: DO NOT over squeeze your crimper handle as you go in the opposite direction. It will crimp out the other lines is you do, and we don’t want that!!
5. Sew panels using method of your choice. I sewed mine directly onto my template prior to assembly. Didn’t even think to sew the panels FIRST, then adhere! A huge DUH! moment. YOU get to benefit from my mistakes! LOL!
OPTIONAL METHODS: You can faux sew using a white gel pen, and paper piercer. OR you can sew your panels prior to adhering them to the purse-onality template. OR after they are adhered, sew them on.
6. Once faux leather panels are adhered, assemble template. Add buttons or other embellishments of your choosing.
7. Create a tag to suit the receiver. In this case a MALE teacher!

6. Fill with something delicious.
In this box we have the Mrs. Fields chocolate trio’s that sell for a $1 at the Target $1 spot!
Cute and inexpensive too 😀
Template Talk-
If you are NEW to my blog and have NO IDEA what I am speaking about-read this!
My templates are for various gift packaging, and they are SO EASY! Just download once, print, cut, score and assemble. Done in minutes. EASY PEASY! You can make great gifts over and over again for the purchase of one template.
If you want to see our other templates (we just started this product line last month) then click here! You can also try a FREE template there as well ![]() Also see my sidebar. I have a My Timeless Template category that you are able to click and view any past projects I have created here, for some ideas.
Also see my sidebar. I have a My Timeless Template category that you are able to click and view any past projects I have created here, for some ideas.
————————————————–
SO that is all for this template for today! Tomorrow I will share what our FREE download will be for this month, and MORE samples that you won’t want to miss. TRUST ME, I can barely contain myself.
Be sure you check in with Nichole for more peeks, as well as Melissa & Lisa!
My Timeless Template © Peek #1 All Boxed Up!
Nov 10, 2008 Author: mytime | Filed under: Home decor/3-D items, My Timeless TemplatesYIPPEE!! I am so very excited to share my first peek at my next round of My Timeless Templates © I lose sleep over sharing this stuff with you all, so I hope you are inspired in some way over the next few days here. A lot of time and planning goes into everything we have done for the templates so that you get so many ideas and inspiration. Most importantly, you are able to re-create your own gifts!
This month we have THREE templates! Two available for purchase (ONLY $5 each) and ONE for FREE!!! Yes we are doing ONE more freebie 😀 It was a popular request, so I hope you will be happy when you see what it is.
Today I kept the project SIMPLE. I have lots of other behind the scenes stuff to complete for the countdown. You don’t need a ton of time to make this project. In fact typing everything up takes WAY longer than the actual project. Hence why I’m keeping today simple.
If you are NEW to my blog and have NO IDEA what I am speaking about-scroll down for all the details 😀
This one is called All Boxed Up ©!
It is THE perfect card box/holder, just in time for the holidays 😀 (yes I do have other amazing holders coming out for your cards-we are afterall CARD makers right?!)
When you use patterned paper this project looks so detailed but comes together so quickly! I decided that the Au Chocolat paper line was PERFECT for my first peek. This project took LESS than 15 minutes to make, and like an hour to type (since Im tired).
I designed my cover to look like a book. I used the stem from my Flower Garden set, stamped in white Craft ink. I used my flower punch for the bloom. I made the leaves pop forward, and layered with dimensionals. The center is from Text Boxed. Sentiment is from Beautiful Blooms
View from the side-tied closed

View from the bottom
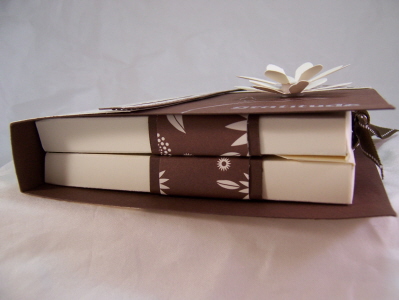
I know many of you wanted some nice card packaging so I hope you are as happy with this as I am 😀 It can easily hold 8 A2 sized, embellished cards, and 8 envelopes 😀 I have an over the top AMAZING gift set to share with you during my peeks here, using this template. You are going to want CASE it for ALL your Christmas/ Hanukkah gifts this year 😀 I swear.
I am also certain you can find other uses for this handy holder once you get it into your hot little hands.
Here is a view, opened up-with cards and envelopes in the pockets
I really love the angle at which the card pockets come together. They alone are a great template (you’ll see more on that later :D)
Now we have my simple cards to match- out of the holder

I lined my inner pocket for a quick detailed, and finished look.
Not to get you drooling, but wait until you see my other projects I created for the countdown! A real WOW!!
Template Talk
If you are NEW to my blog and have NO IDEA what I am speaking about-read this
My templates are for various gift packaging, and they are SO EASY! Just download once, print, cut, score and assemble. Done in minutes. EASY PEASY! You can make great gifts over and over again for the purchase of one template.
If you want to see our other templates (we just started this product line last month) then click here! You can also try a FREE template there as well ![]() Also see my sidebar. I have a My Timeless Template category that you are able to click and view any past projects I have created here, for some ideas.
Also see my sidebar. I have a My Timeless Template category that you are able to click and view any past projects I have created here, for some ideas.
——————————————————–
Be sure you check in with Nichole for more peeks, as well as Melissa & Lisa!
I’ll be back tomorrow for MORE peeks!
Thanks for taking the time out of your busy day, to check in and see what I have for you. All the comments, emails and support ( I read every single thing you send me) make every minute I have invested in this, worth every second. You all truly make my day. I really want to thank you for the bitty bottom of my heart ♥ (<—–YEAH! I *just* figured out how to do that! LOL!)
Well, till tomorrow.
#1 Men of Life-Stained Glass Dixie Cup Cover
Nov 9, 2008 Author: mytime | Filed under: Papertrey Newsletter, TutorialsToday is the 10th. That means its my mother-in-law’s birthday (Happy Birthday Mom!) and its Day #1 of thePapertrey Ink peeks!
(Tomorrow we will start peeks for My Timeless Templates© too-so check back in OK!)
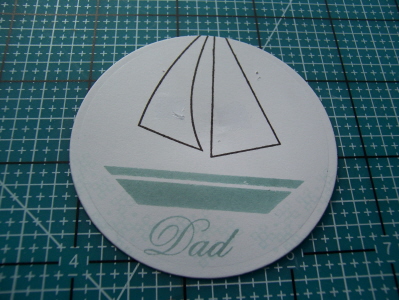
My peek today uses Men of Life, designed by Melissa Bickford. It will be released on the 15th.
I love this set, and all the different images for the sails of the boat. When coming up with what I should share with you, I figured a technique would be fun. Its one of my favorites for open line images and it is called Stained Glass. I hope something I share today is new to you.
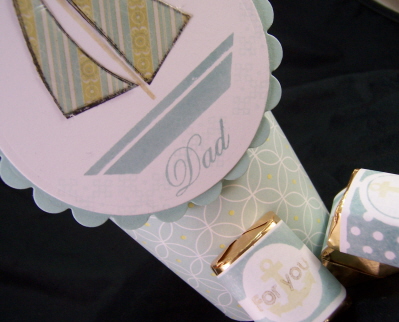
I wanted to use the sailboat image, and wrap up some Toffee Hershey nuggets for my dad. Having no more nugget tins (which I neer use for nuggets! LOL!) I figured a little altered Dixie Cup favor would be a cute variation to share too.
So here we go!
With the holidays approaching and 3 kids, I strive for crafts that they can do themselves, and are fast, fun & easy 😀 I remember making these in 5th grade, so I thought it would be fun to revisit in my adult years. Its not only a kid friendly activity, but its pretty cheap too 😀
I hope you like it.
HONESTLY think how cute these would be for a BABY SHOWER ! Add a little ribbon handle! Oh so cute. LOL! Make it baby colors…………oh boy!
Dixie Cup Cover
Make a template for your dixie cup cover. To do this just cut apart one cup as a sample.
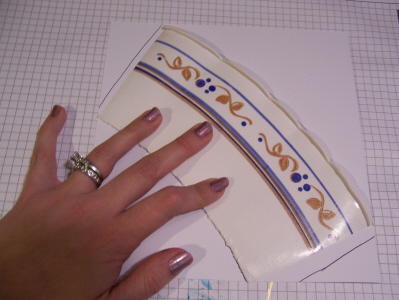
Then trace, leaving a little extra for a seam allowance
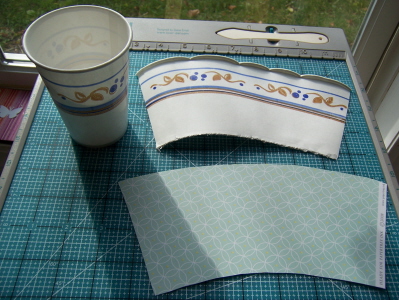
Cut out from patterned paper. I used Everyday Blessing for my creation here.
Then wrap the cup!
I decided to line to top portion with some pretty cellophane, that I attached at the inner top of my cup using redline tape.
I then put in some pretty filler, and added my stamped nuggets, to match!
(I used the anchor image and sentiment from the Men of Life set, and Limitless Labels and Holiday Treats, for my candy labels) I also used Spring Moss, Aqua Mist & Ocean Breeze and Encore gold ink.
View of inside, from top of Dixie Cup.
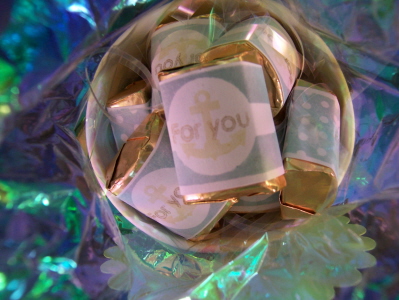
I then tied it closed, with a little tag.
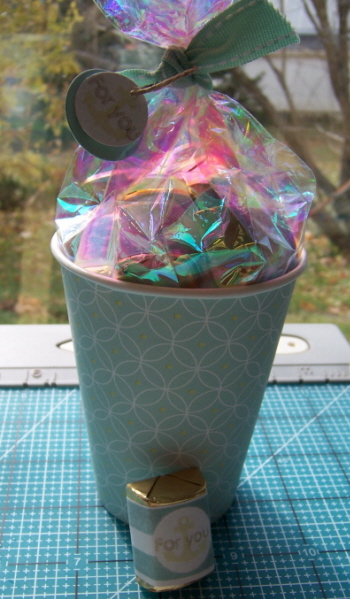
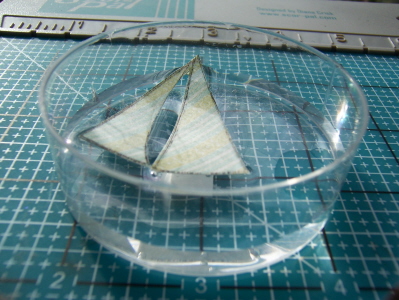
Now all I need to do is make my sailboat designer label.
Stained Glass Technique-
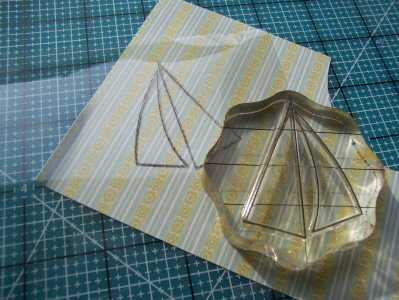
Stamp open line sail image onto acetate, using Pallette black ink. Heat set carefully.
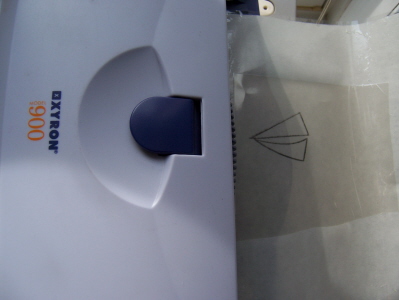
Run acetate sheet through Xyron sticker machine.
Peel off paper backing
Place where desired on patterned paper. Use a rubber brayer to ensure a good stick.
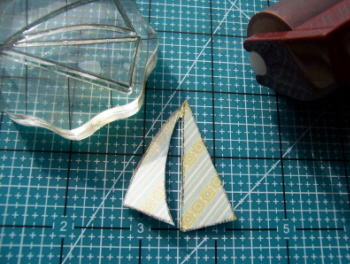
Trim out sails
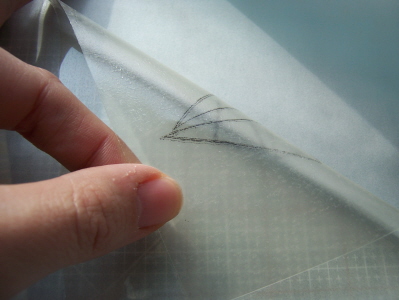
Soak image in water for several minutes.

Remove from water, then GENTLY rub off the paper backing. Don’t rub off too much!
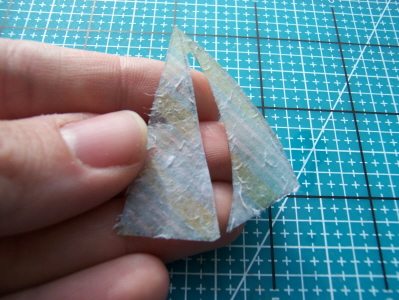
Be sure you still have a light paper coating on the acetate when done. This layer will get re-sticky! Now you have a SHEER pattern that appears on the front of your acetate sails!
Let dry.
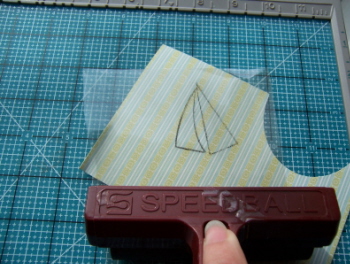
Now layer onto stamped main layer image-apply a little bit of adhesive for extra stick.
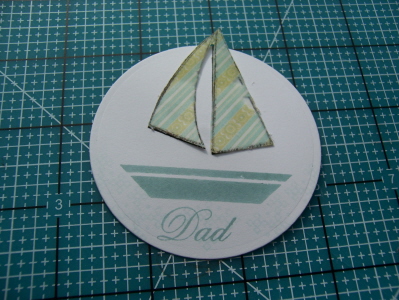
I wanted my sails to pop out over the circle, so I die cut mine to be a bit smaller. I then layered onto a scallop circle.
DONE!
This will then get adhered to my Dixie Cup front!
Can you see the lightly stamped “water” on my label? A subtle touch.
There you have it! A super cute and easy favor or little treatlet idea for any occasion!
Be sure to check Nichole’s blog for more peeks, and stop in tomorrow for the start of My Timeless Template© peeks!! It’s going to be a BUSY, and AMAZING next couple of days here! Each post will be jam packed with creative ideas, just in time for the holidays, using my newest release of templates!!
Let me know what you think 😀 and ALWAYS thanks for checking in with me 😀 You all make my day.
Till tomorrow.
Dinner with dad
Nov 9, 2008 Author: mytime | Filed under: Cards 
Last night we did have dinner with my father.
It went well. My dad is looking well. Last time I say him he looked awful, but this time he looks much more healthy.
It was bittersweet seeing him again. Makes me very sad. Jason thought I was going to have a meltdown, but I held it together. Its hard to see him. I have gone on to accept him for WHO is is, not who I think he should be. It’s a hard thing to do, but after so many years I don’t expect much. I’m trying to have that mentality with many people in my life.
I look just like my mother my dad says, so I think its hard for him to see me. I know he misses my mom, and still loves her. It’s like looking at my mom when she was my age for him. Im sure it brings waves of raw emotion for him.
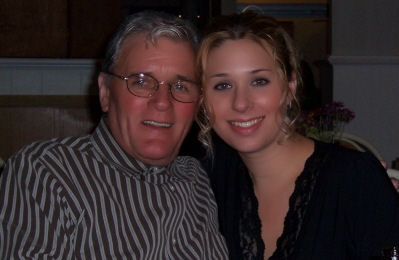
Here we are at dinner. I really wanted to get some nice photos since I have NONE of my father. Who knows when I will see him next.
Here is a family shot
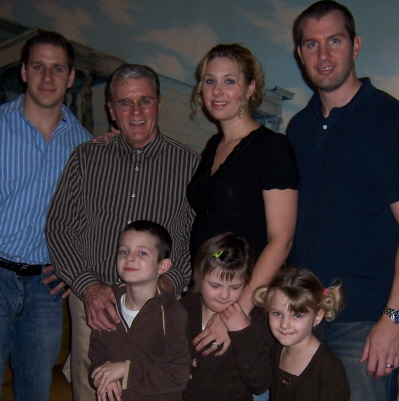
From left ot right- my brother Rob, my dad, me, Jay
bottom-Noah, Alexa & Amber
The kids were a little unsure of him, but by the end of the night were OK with talking to him. He is after-all a stranger to Noah and Amber. Alexa seemed to remember him a bit.
He promised the kids each a special book, and that got Noah very intrigued. Now I pray he follows through. I can see I am going to have to hunt down the Sponge Bob, Scooby Doo, Princess and Dora books that were promised. Noah thought my dad was pretty funny.
He did attempt to cancel our dinner, but my brother convinced him otherwise. My brother has a different relationship with my dad, as he is always seeking his approval. He doesn’t realize that will never happen, but he does go out of his way to try. Must be a father son thing, because I don’t get it.
My brother is so much like my dad its freaky.
I like this photo of them though.
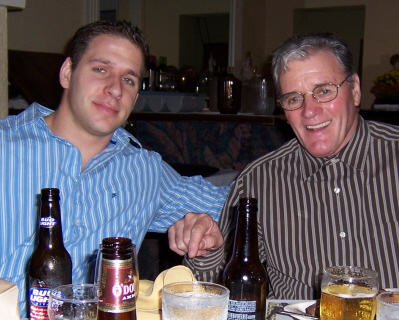
Here they are together at dinner.
I still think of my brother as a little boy. I’m reminded he is not when I see he towers of me and my dad. I never thought I’d see the day!
Now that my brother is going to be a father I hope he chooses to be a good father and role model. It is so important.
Now here are a few a photos of the 3 of us
This one is blurry-sorry
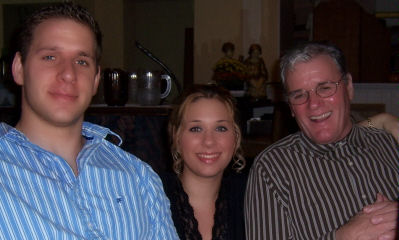
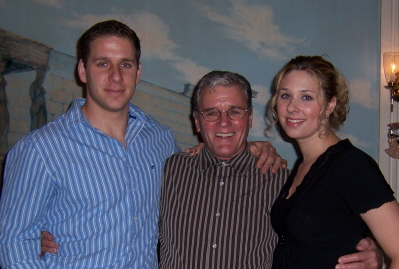

Then the 3 of us with my brothers girlfriend Valerie

Now we have a nice photo of my brother and Valerie

Then one of Jay and I.

I NEVER wear my hair up when I go out somewhere, but it was a REALLY bad hair day! I hate when that happens. You got to the food store and your hair is amazing!! then you have somewhere you want to look good for and its a disaster! Awful.
OK now I DO have a card to share-
I made this for my brother to give to him. The sentiment ALWAYS reminds me of them
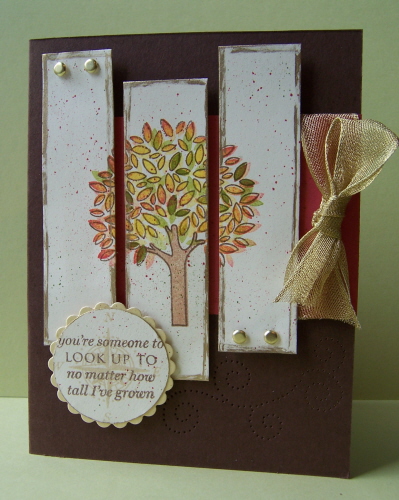
I know-everytime I think guy card I think Father Knows Best. Plus I already had it out! LOL! I used dark chocolate, and vintage cream with all golden accents-gold cardstock, and gold sheer metallic ribbon
I cut the tree into 3 pieces, and ran my edges with a gold pen. Its very shimmery in real life. The leaves are stamped then restamped for layering. I then spritzed some color on. PERFECT!
THE HUGE bummer is you can’t see my piercing! It came out really nice. Maybe if you scroll up to the top photo…………
Anyway thanks for sharing with me. I received MANY emails from yo who can relate. WOW!
Tomorrow is the 10th!! That means I have the first Countdown project for Papertrey Ink, and SOON you will see my next peek at the newest round of My Timeless Templates ©!!!!!!!!!!!!!!!!!!!
Im beyond busy and excited prepping for that, along with the release.
Enjoy your day 😀
Later
NOTE: SORRY this is WAYYYYYY late :C My brother and his girlfriend bought a car! YEAH! So I had to drive them to get it, and all that blah blah blah, so YES! That cut into my stamp stuff.
Today is my father’s birthday.
We are meeting up with him to take him out for dinner.
Doesn’t sound like a big deal, but I haven’t seen my dad in 3 years. Dinner is a HUGE deal. Haven’t seen him since the Christmas before Alexa got sick. He hasn’t seen her ONCE. That is a long time. He always worries about his bar room friends dying, but never cared enough to see his own granddaughter when she got sick. I can’t forgive that. I still have his Christmas gifts wrapped for all the past holidays. My dad is much older than my mom by 15 years. We aren’t as close as we should be. He is getting up there, and I don’t want to keep letting the years pass, until the next time I see him I’m planning his funeral.
My dad was IS an alcoholic, and continuously chooses that life over one with our family. It’s hard to explain. I’m the only one who chooses to distance myself from that. That also means I’m the only one less affected by his disease. I won’t get into all the drama that living with an alcoholic can do to a person. If you have been there then you already know. He was just never there for me- ever. Lots of broken promises. Who knows, by the time everyone reads this there may even be another “excuse” to NOT meet. I almost expect that! Sad isn’t it?
My dad’s years are catching up with him. He has no relationship with my children either. I don’t think he even really cares about that. I have a lot of anxiety about our meeting today. I want to see him, but his life makes me so sad sometimes. Mainly because he chose the bottle over us my entire life. He likes his life. I wish he at least regretted everything, but he doesn’t. Holidays come & go and he has all kinds of plans with his bar friends. He is happy that way. A loner of sorts.
It is his many mistakes as a parent that make me strive to be a “super mom”. My mom was and is super mom. She always “did it all”. I always knew I could count on her. I think she was forever trying to make up for what my dad didn’t do, or lacked. I knew if my dad DID show up somewhere, Id most likely end up getting embarrassed. My mom was married to him for so many years, yet she was alone. She never even realized it. That is just so sad to me.
Anyway, I hope it goes well. I want to get some photos. I don’t have any really.
SO here is my card for his Birthday, and the Sketch for today
If you are uploading to a gallery use keyword mytimess11
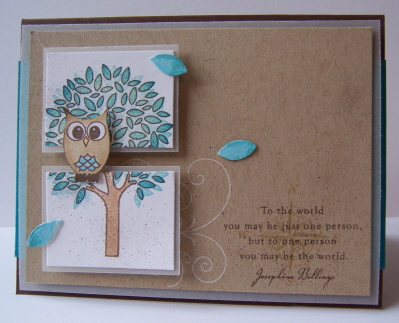
One person
I ALWAYS go to Father Knows Best for my guy cards. Its perfect. I had to add the little wise owl in the tree. I used some of my dad’s favorite colors. This is dark chocolate, Kraft, vellum, and teal. The “leaves ‘ are cut & colored bridal confetti. So pretty.
This sentiment, to me was what I wanted to convey to him. No matter what, he matters to me and my family. I think he feels like a failure at times, that his life didn’t go as planned. In the end it doesn’t matter, you need to try to pull together with family.
Anyway, my sentiment is from a favorite set of mine-Out on a Limb sent. set . I love how the flourish from Silent night draws your eye to it.
Thats it for now. I’ll share photos of our dinner tomorrow, and the card I made for my brother to give to my dad.
Thank you all for coming here to visit me. Sorry to be such a downer today. I never know when this stuff gets dredged up! YIKES! Oh well, feels good to get it out there.
I hope you get a chance to play and check in on the Sketch Team!
Till tomorrow 😀
Glam Girls III
Nov 8, 2008 Author: mytime | Filed under: CardsOK so I have another PEEK for you!
C.C. Designs is releasing a set called Glam Girls III on the 10th! It’s pretty cute 😀
There are 3 main images, and some super sentiments in it.
First up I will use my favorite image from the set-
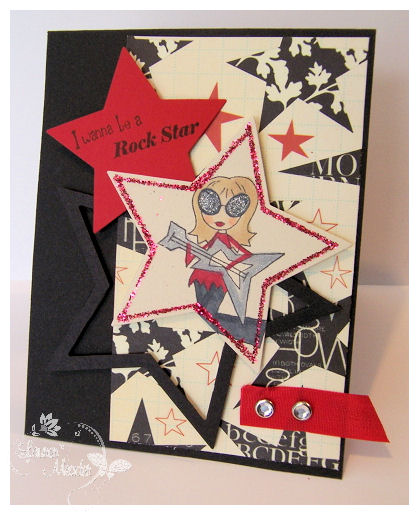
I have had this Scenic Route paper for a while and have been DYING for the perfect card to use it. I LOVE my star nestabilities, and they were a nice addition to my card 😀
Given her ROCK STAR status lots of BLING was in order 😀
Next up its PARTY TIME!
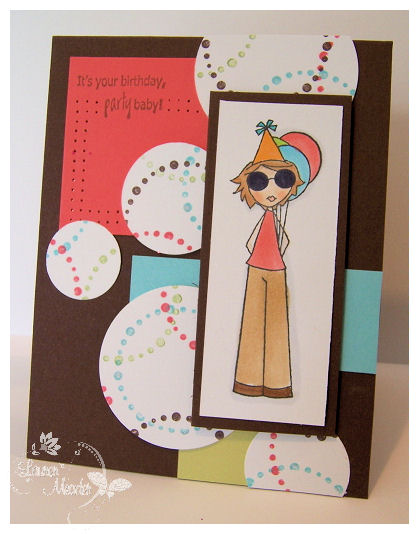
She just looks so “chill” celebrating for her party doesn’t she?
I adore these colors together, and I made my own “patterned paper” using my dotted circle border from JustRite’s Sonnet Stamper Kit, inking in various colors, and overlapping them, then popping out with different size circle punches for a funky look.
To continue the “dotted” theme, I pierced a border.
Easy Peasy.
Release party will be–> HERE <–November 10th! Be sure to check the ATS blog DAILY to enter the give-aways!
Here is the list of what is left of several sets being released from C.C. Designs, and the days they pre-viewed
4th- Brandon & Sadie Soccer
5th-Christmas Around the World
6th-Cupcake Occasions
7th-Forrest Friends
8th Glam Girls III
and 9th-North Pole
Stay tuned for more 😀
Later!
My Etsy

Who I Designed For
Blogroll
- Alicia
- Alli Miles
- Ally Blankenship
- Amber
- Andi @ crafts on a whim
- Angel R
- Angie Z
- Anne Kranitz
- Becky O
- Bee
- Beth Silaka
- Bethany Paull
- Beverly Nash
- Bobbie
- Cambria
- Cammie
- Card of the Week
- Card Positioning System (CPS)
- Cards for Cancer
- Catherine Doucette
- Charmaine
- Cheryl Sims
- Chriss Rollins
- Christina
- Christine Ewing
- Christine Wooden
- Colleen Schaan
- Craft Critique
- Craft Gossip
- Crystal
- Dawn Easton
- Emily Giovanni
- Geny
- Holly
- Igne Groot
- Inspirational Craft Blogs
- Irene
- Jami Sibley
- Jeanne Streiff
- Jen del Muro
- Jeni Bond
- JenMarie
- Jenn Balcer
- Jenn Diercks
- Jenn O
- Jennifer E
- Jennifer Mick
- Jennifer Pereda
- Jennifer-Sweet Treat
- Joanne Basile
- Jodi Collins
- Julia Stainton
- Julie Masse
- Karen
- Kathryn Berthiaume
- Katie Cotton
- Kelley Holland
- Kendra
- Kim Scholfield
- Kris’s Color Stripes! Get inspired here
- Kristen Dubosque
- Kristin Eberline
- Kristine
- Laura @ Sunshine Stamper
- Laura Turnmire
- Laurie Schmidlin
- Lesa Rapp
- Linda Duke
- Linda-LSN
- Lindsey Botkin
- Lisa (lakind scs)
- Lisa Kind
- Lori Craig
- Maggie
- Mara Campbell
- Maria
- Maria Levine
- Mary
- MaryJo
- Melanie M
- Monique Hansen
- Moxie Fab World
- Pam Imholz
- PaperCrafts Connection
- Peppers and Pollywogs Kids party site
- Rebecca Grohall
- Rita
- Robyn
- Rose Ann
- Sarah Vrolyk
- Sharon Harnist
- Sharon Johnson
- Sharon Rivera (a chemisrty with paper)
- Sherrie
- Sophia Landry
- Storage Units, Ink, & More Blog
- Sue Berker
- Susan (Rainy)
- Tangii Crane
- Tracy
- Tricia Traxler
- Trudee
- Velta
- VivLyn
- Zena
MTME Pretty Palette Color Team
MTME Pretty Patterns Sketch Team
My Time Made Easy TM LLC
Shop till you drop!
Lauren Meader
About Me
Copyrighted material
Subscribe To My Blog
Pages
- About me
- Alexa’s Story!
- My Crafty Corner!
- My Time Made Easy™ LLC
- Our Make A Wish Trip to Disney!
- Resume/Publication List
Calendar
Archives
- August 2013
- July 2013
- June 2013
- May 2013
- April 2013
- March 2013
- February 2013
- January 2013
- December 2012
- November 2012
- October 2012
- September 2012
- August 2012
- July 2012
- June 2012
- May 2012
- April 2012
- March 2012
- February 2012
- January 2012
- December 2011
- November 2011
- October 2011
- September 2011
- August 2011
- July 2011
- June 2011
- May 2011
- April 2011
- March 2011
- February 2011
- January 2011
- December 2010
- November 2010
- October 2010
- September 2010
- August 2010
- July 2010
- June 2010
- May 2010
- April 2010
- March 2010
- February 2010
- January 2010
- December 2009
- November 2009
- October 2009
- September 2009
- August 2009
- July 2009
- June 2009
- May 2009
- April 2009
- March 2009
- February 2009
- January 2009
- December 2008
- November 2008
- October 2008
- September 2008
- August 2008
- July 2008
- June 2008
- May 2008
- April 2008
- March 2008
- February 2008
- January 2008
- December 2007
- November 2007
- October 2007
- September 2007
- August 2007
- July 2007
- June 2007
- May 2007
- April 2007
- March 2007
- January 2007
Categories
- About Me
- All That Scraps
- blogger challenge
- camera/photo play
- Cards
- Contests
- family stuff
- FOR SALE
- Home decor/3-D items
- How to FAKE it!
- Introduction
- JUGS Challenge
- JustRite Stampers
- Lizzie Anne Designs
- My family stuff
- My Stamping Space
- My Time Made Easy
- My Time To Color Challenge
- My Time to Create Challenge
- My Timeless Template Challenge
- My Timeless Templates
- Mytime Mail
- MYTIME MOVIE/VIDEOs
- Papertrey Newsletter
- Pink Cat Studio
- Pretty Palette Challenge
- Pretty Patterns Sketch
- Product Opinions and Must haves
- Recipe's
- Saturday Sketch
- Smilebox Creations
- Stampavie
- Tutorials
- Uncategorized
- videos
Most Popular
- Create your own Onesie Card Tutorial-and important NOTE! PLEASE READ (2529)
- Saturday Sketch-Boxed bag holder (2333)
- Going GREEN! Fancy Flower Flourish-Closure Video (1478)
- Fabulous Favorite - Giveaway! (1336)
- a Prayer Request (1232)
- QUICK-Easter Baskets from Nestabilities-PTI style-and blog challenge (1063)
- Teaser Sketch (999)
- February Release Giveway! (and a little peek) (996)
- Group Post and Rambling Rose Video Tutorial (985)
- GIVEAWAY! Who wants it all?! (895)
Recent Comments (RSS)
- 첫충사이트: 완전히 흥미로운 블로그 게시입니다. 저는
- sarah: Wow, Lauren, what a stunning
- hedie: خرید راهبند
- 야동: Love to read it,Waiting For
- 야동: This seller is in a
- 바카라사이트: 여기 처음 왔어요. 나는이 게시판을
- 야동티비: I was surfing the Internet
- 바카라사이트: 비슷한 주제에 대한 흥미로운 정보를
- 바카라사이트: "여기에 제공해 주신 귀중한 정보와
- 온라인홀덤: 유익한 웹 사이트를 게시하는 데
Copyright © 2007 - My Time, My Creations, My Stampendence - is proudly powered by WordPress
This blog has been Tweaked and Designed by Sara Williams