#1 Men of Life-Stained Glass Dixie Cup Cover
Nov 9, 2008Today is the 10th. That means its my mother-in-law’s birthday (Happy Birthday Mom!) and its Day #1 of thePapertrey Ink peeks!
(Tomorrow we will start peeks for My Timeless Templates© too-so check back in OK!)
My peek today uses Men of Life, designed by Melissa Bickford. It will be released on the 15th.
I love this set, and all the different images for the sails of the boat. When coming up with what I should share with you, I figured a technique would be fun. Its one of my favorites for open line images and it is called Stained Glass. I hope something I share today is new to you.
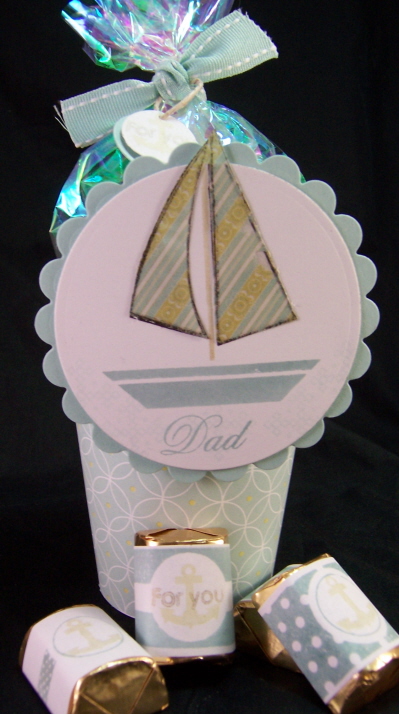
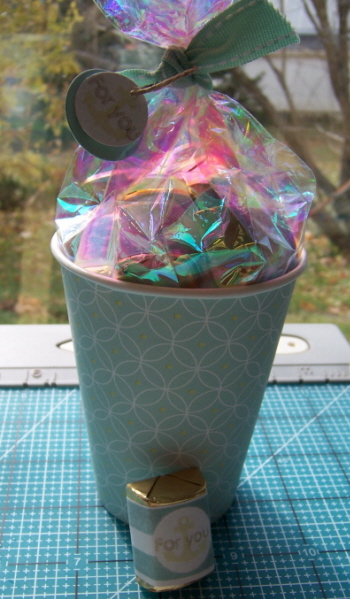
I wanted to use the sailboat image, and wrap up some Toffee Hershey nuggets for my dad. Having no more nugget tins (which I neer use for nuggets! LOL!) I figured a little altered Dixie Cup favor would be a cute variation to share too.
So here we go!
With the holidays approaching and 3 kids, I strive for crafts that they can do themselves, and are fast, fun & easy 😀 I remember making these in 5th grade, so I thought it would be fun to revisit in my adult years. Its not only a kid friendly activity, but its pretty cheap too 😀
I hope you like it.
HONESTLY think how cute these would be for a BABY SHOWER ! Add a little ribbon handle! Oh so cute. LOL! Make it baby colors…………oh boy!
Dixie Cup Cover
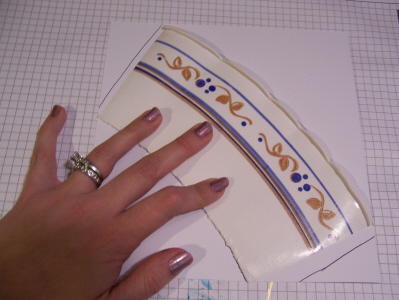
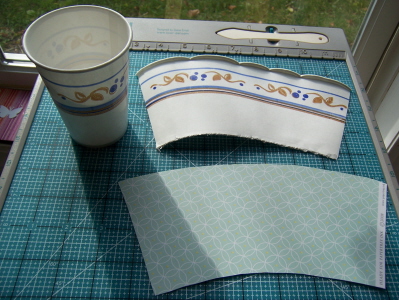
Make a template for your dixie cup cover. To do this just cut apart one cup as a sample.
Then trace, leaving a little extra for a seam allowance
Cut out from patterned paper. I used Everyday Blessing for my creation here.
Then wrap the cup!
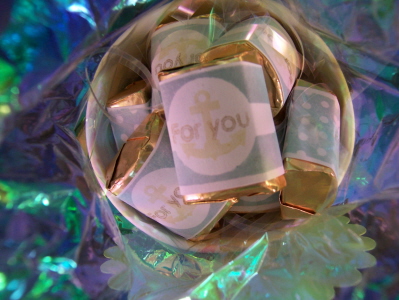
I decided to line to top portion with some pretty cellophane, that I attached at the inner top of my cup using redline tape.
I then put in some pretty filler, and added my stamped nuggets, to match!
(I used the anchor image and sentiment from the Men of Life set, and Limitless Labels and Holiday Treats, for my candy labels) I also used Spring Moss, Aqua Mist & Ocean Breeze and Encore gold ink.
View of inside, from top of Dixie Cup.
I then tied it closed, with a little tag.
Now all I need to do is make my sailboat designer label.
Stained Glass Technique-
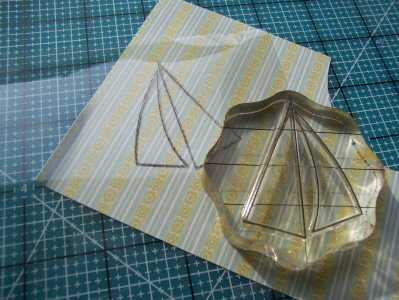
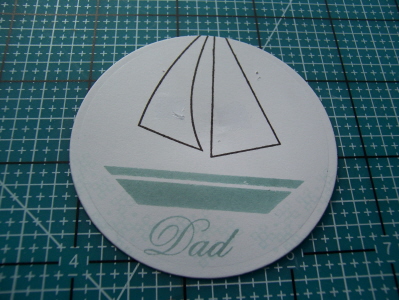
Stamp open line sail image onto acetate, using Pallette black ink. Heat set carefully.
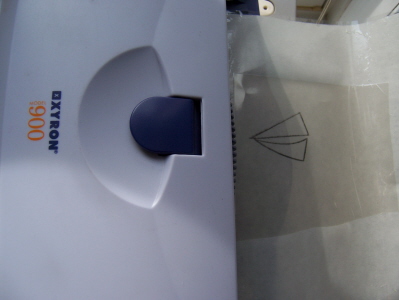
Run acetate sheet through Xyron sticker machine.
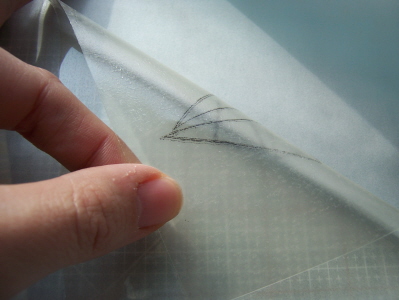
Peel off paper backing
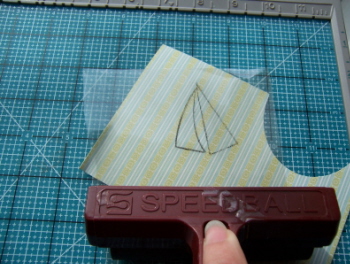
Place where desired on patterned paper. Use a rubber brayer to ensure a good stick.
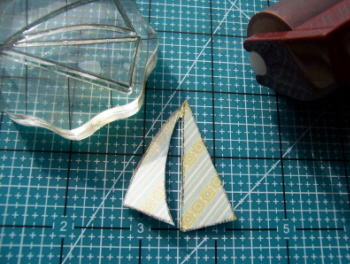
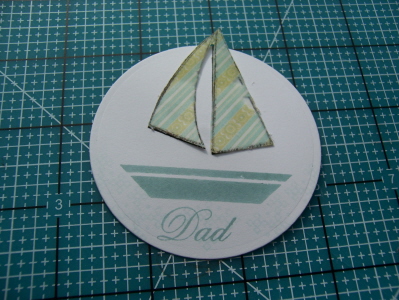
Trim out sails
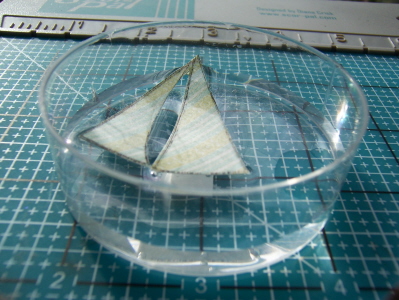
Soak image in water for several minutes.
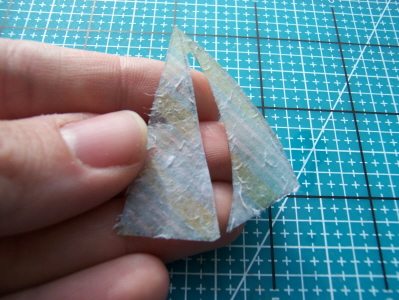
Remove from water, then GENTLY rub off the paper backing. Don’t rub off too much!
Be sure you still have a light paper coating on the acetate when done. This layer will get re-sticky! Now you have a SHEER pattern that appears on the front of your acetate sails!
Let dry.
Now layer onto stamped main layer image-apply a little bit of adhesive for extra stick.
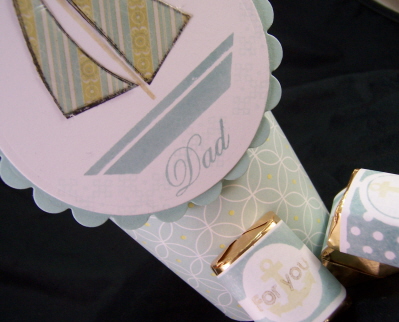
I wanted my sails to pop out over the circle, so I die cut mine to be a bit smaller. I then layered onto a scallop circle.
DONE!
This will then get adhered to my Dixie Cup front!
Can you see the lightly stamped “water” on my label? A subtle touch.
There you have it! A super cute and easy favor or little treatlet idea for any occasion!
Be sure to check Nichole’s blog for more peeks, and stop in tomorrow for the start of My Timeless Template© peeks!! It’s going to be a BUSY, and AMAZING next couple of days here! Each post will be jam packed with creative ideas, just in time for the holidays, using my newest release of templates!!
Let me know what you think 😀 and ALWAYS thanks for checking in with me 😀 You all make my day.
Till tomorrow.

My Etsy
My Time Made Easy © LLC
Who I Designed For
Blogroll
- Alicia
- Alli Miles
- Ally Blankenship
- Amber
- Andi @ crafts on a whim
- Angel R
- Angie Z
- Anne Kranitz
- Becky O
- Bee
- Beth Silaka
- Bethany Paull
- Beverly Nash
- Bobbie
- Cambria
- Cammie
- Card of the Week
- Card Positioning System (CPS)
- Cards for Cancer
- Catherine Doucette
- Charmaine
- Cheryl Sims
- Chriss Rollins
- Christina
- Christine Ewing
- Christine Wooden
- Colleen Schaan
- Craft Critique
- Craft Gossip
- Crystal
- Dawn Easton
- Emily Giovanni
- Geny
- Holly
- Igne Groot
- Inspirational Craft Blogs
- Irene
- Jami Sibley
- Jeanne Streiff
- Jen del Muro
- Jeni Bond
- JenMarie
- Jenn Balcer
- Jenn Diercks
- Jenn O
- Jennifer E
- Jennifer Mick
- Jennifer Pereda
- Jennifer-Sweet Treat
- Joanne Basile
- Jodi Collins
- Julia Stainton
- Julie Masse
- Karen
- Kathryn Berthiaume
- Katie Cotton
- Kelley Holland
- Kendra
- Kim Scholfield
- Kris’s Color Stripes! Get inspired here
- Kristen Dubosque
- Kristin Eberline
- Kristine
- Laura @ Sunshine Stamper
- Laura Turnmire
- Laurie Schmidlin
- Lesa Rapp
- Linda Duke
- Linda-LSN
- Lindsey Botkin
- Lisa (lakind scs)
- Lisa Kind
- Lori Craig
- Maggie
- Mara Campbell
- Maria
- Maria Levine
- Mary
- MaryJo
- Melanie M
- Monique Hansen
- Moxie Fab World
- Pam Imholz
- PaperCrafts Connection
- Peppers and Pollywogs Kids party site
- Rebecca Grohall
- Rita
- Robyn
- Rose Ann
- Sarah Vrolyk
- Sharon Harnist
- Sharon Johnson
- Sharon Rivera (a chemisrty with paper)
- Sherrie
- Sophia Landry
- Storage Units, Ink, & More Blog
- Sue Berker
- Susan (Rainy)
- Tangii Crane
- Tracy
- Tricia Traxler
- Trudee
- Velta
- VivLyn
- Zena
MTME Pretty Palette Color Team
MTME Pretty Patterns Sketch Team
My Time Made Easy TM LLC
Shop till you drop!
Lauren Meader
About Me
Copyrighted material
Subscribe To My Blog
Pages
- About me
- Alexa’s Story!
- My Crafty Corner!
- My Time Made Easy™ LLC
- Our Make A Wish Trip to Disney!
- Resume/Publication List
Calendar
Archives
- August 2013
- July 2013
- June 2013
- May 2013
- April 2013
- March 2013
- February 2013
- January 2013
- December 2012
- November 2012
- October 2012
- September 2012
- August 2012
- July 2012
- June 2012
- May 2012
- April 2012
- March 2012
- February 2012
- January 2012
- December 2011
- November 2011
- October 2011
- September 2011
- August 2011
- July 2011
- June 2011
- May 2011
- April 2011
- March 2011
- February 2011
- January 2011
- December 2010
- November 2010
- October 2010
- September 2010
- August 2010
- July 2010
- June 2010
- May 2010
- April 2010
- March 2010
- February 2010
- January 2010
- December 2009
- November 2009
- October 2009
- September 2009
- August 2009
- July 2009
- June 2009
- May 2009
- April 2009
- March 2009
- February 2009
- January 2009
- December 2008
- November 2008
- October 2008
- September 2008
- August 2008
- July 2008
- June 2008
- May 2008
- April 2008
- March 2008
- February 2008
- January 2008
- December 2007
- November 2007
- October 2007
- September 2007
- August 2007
- July 2007
- June 2007
- May 2007
- April 2007
- March 2007
- January 2007
Categories
- About Me
- All That Scraps
- blogger challenge
- camera/photo play
- Cards
- Contests
- family stuff
- FOR SALE
- Home decor/3-D items
- How to FAKE it!
- Introduction
- JUGS Challenge
- JustRite Stampers
- Lizzie Anne Designs
- My family stuff
- My Stamping Space
- My Time Made Easy
- My Time To Color Challenge
- My Time to Create Challenge
- My Timeless Template Challenge
- My Timeless Templates
- Mytime Mail
- MYTIME MOVIE/VIDEOs
- Papertrey Newsletter
- Pink Cat Studio
- Pretty Palette Challenge
- Pretty Patterns Sketch
- Product Opinions and Must haves
- Recipe's
- Saturday Sketch
- Smilebox Creations
- Stampavie
- Tutorials
- Uncategorized
- videos
Most Popular
- Create your own Onesie Card Tutorial-and important NOTE! PLEASE READ (2529)
- Saturday Sketch-Boxed bag holder (2333)
- Going GREEN! Fancy Flower Flourish-Closure Video (1478)
- Fabulous Favorite - Giveaway! (1336)
- a Prayer Request (1232)
- QUICK-Easter Baskets from Nestabilities-PTI style-and blog challenge (1063)
- Teaser Sketch (999)
- February Release Giveway! (and a little peek) (996)
- Group Post and Rambling Rose Video Tutorial (985)
- GIVEAWAY! Who wants it all?! (895)
Recent Comments (RSS)
- 첫충사이트: 완전히 흥미로운 블로그 게시입니다. 저는
- sarah: Wow, Lauren, what a stunning
- hedie: خرید راهبند
- 야동: Love to read it,Waiting For
- 야동: This seller is in a
- 바카라사이트: 여기 처음 왔어요. 나는이 게시판을
- 야동티비: I was surfing the Internet
- 바카라사이트: 비슷한 주제에 대한 흥미로운 정보를
- 바카라사이트: "여기에 제공해 주신 귀중한 정보와
- 온라인홀덤: 유익한 웹 사이트를 게시하는 데



34 Responses for "#1 Men of Life-Stained Glass Dixie Cup Cover"
Wondered where you got the pretty cups great Idea thanks for another great tutorial and a super gift idea. Ann Lind
[…] and its Day #1 of thePapertrey Ink peeks! (Tomorrow we will start peeks for My Timeless Templates© too-so check back in OK!) My peek today uses Men of Life , designed by Melissa Bickford. It will be released on the … Read more […]
Very clever, Missy! Great idea! I love how yours turned out!
I can’t wait until tomorrow to see what you have in store for all of us!
Have a great one!
Hugs!
You are one clever lady. I’m sure your Dad is proud of you!
I just love that cup – I’ve never seen this done before – very cool!!
hugs, Jami
Love the idea of using a cup Lauren!
Super cute. I love the stained glass idea. Have a great day! -Molly B
Just darling, what a way to dress up a dixie cup, like how you did the sail too, so creative and cute!
WAY cool Lauren – I love the Stained Glass technique, though I’ve never tried it.
Too cool! I saw that dixie cup, and thought “Of course! Why didn’t I think of that?” I’ll have to try the stained glass technique — that is awesome!
These are so cute would make nice gifts, decorated with Christmas paper for the day care teachers. Thanks for a cute idea.
Very cute. I too was wondering where you found the pretty Dixie cups. Leave it to you to cover it with paper. What a great idea!
Very cute idea … I have never tried the Stained Glass technique. You make it look real easy! Looking forward to your next round of Timeless Templates!
I love it. I will be casing this idea for all my neice’s boyfriends who come at Christmas. Thanks for the wonderful idea.l I love your blog and all the wonderful ideas you have.
Another amazing and creative idea. Your gift is just beautiful.
What a great idea! My 4 yr olds birthday is later this month and this is a perfect idea for all those little goodies and favors. 🙂 As a designer for Xyron I am super happy to see you showing off the 900. It is one of my personal favorites.
Another awesome creation!
You know Lauren that cold states and alchohol go together. I had alchoholic parents and I am a non-drinker. I think you did a great job of over-coming your reservations and moving forward. Life has a way of taking things away from you before you come to understand them and then you don’t get a full opportunity to ever understand them. I love what you did and all that you do. Lovely work.
I haven’t done one of those cups since my grade-school days (last century – lol) but I can see I need to do them again. Very cute technique with the sails.
I’ve been wondering when we would see your Timeless Templates – now I know. I’ll be around with bells.
loove the cup cover idea! thanks for your great instructions!!
Awwh…how sweet! What a cute little gift! Thanks for the quick tutorial!
Did you notice that Lisa Johnson has a sneak peak of one of your new templates?? I LOVE IT!!!!! Can’t wait to order :O) I’m getting excited about the release!!
Here is the link to Lisa’s site since it’s not working in my previous post:
http://poppypaperie.typepad.com/poppy_paperie/2008/11/out-of-the-box-lisa-johnson-papertrey-ink-marvy-punches.html
Just in case your followers want in on the sneak peek to one of your new templates :O)
Very clever my friend, very clever. You never run out of ideas do you.
Great technique…
Beautiful project!!!
[…] share with you, I figured a technique would be fun. Its one of my favorites for open source: #1 Men of Life-Stained Glass Dixie Cup Cover, My Time, My Creations, My […]
[…] just made a template, and cut a cover from my pink cardstock. I then took some super cool adhesive paper from Scor-Pal […]
Hey good stuff…keep up the good work!
That is some inspirational stuff. Never knew that thoughts might be this varied. Many thanks for all of the enthusiasm to offer such beneficial data right here.
Excellent weblog, many thanks a lot for your awesome posts!
Trouver une fourniture dentaire, comparer les prix des fournitures dentaires 100Z
Thanks! it’s helpful to me!
Great Post, Do you have a Twitter Account and I will Twitter you,Love it @ http://www.kisslouboutin.com/
I absolutely love your post,These are fantastic http://www.louboutinlure.com/
I eagerness a locket – great about carrying photos around your canoodle makes me reaction connected.
Leave a reply