Archive for October, 2008
BIG ANNOUNCEMENT!! READ HERE!! :D
Oct 10, 2008 Author: mytime | Filed under: Home decor/3-D items, My Timeless TemplatesMy day to announce my HUGE news. News I have been sitting on for MONTHS! Yes, months! Who says I can’t keep a secret?! I think it almost killed me, but I did it.
I really don’t even know where to start with this announcement, as I have a bajillion things going through my head. I haven’t slept all week. No kidding. You all know when I get excited I babble, use lots of (!!!!) and capitalize my words due to excitment, so bear with me.
This is an amazing new chapter in my life.
Big to me, like other major life events. Events like when I graduated from nursing school, got married to Jason, like the day I gave birth to each one of my children, bought our first home, getting published for the first time, like the day Alexa finished her last day of chemo…………..huge milestones and events. Events that being a new path in life. BIG! Events that are forever burned into our memory and effect us forever 😀 Yes I’m that serious. Even if this isn’t “big” to some, this is how it feels to me.
I feel so very blessed to have had the ability and opportunity to turn a true passion into a reality. I can’t even begin to say how thankful I feel, or how excited I am. I work hard for everything, and when it pays off its amazing. When dreams turn into a tangible reality.
I received MANY emails guessing what my BIG news was. Many of you naughty, asking to tell “just you”! LOL! As tempting as that was……………….I giggled at your guesses.
They ranged from me being pregnant AGAIN (um, no we fixed that problem years ago!), me adopting a child (WOW! That is an amazing thing to do, but 3 is my sanity limit-actually I think I may even be past the point of sanity), moving to a new home (that would be nice someday), me being on the Martha Stewart show or QVC (that cracked me up-Im no where near that-not yet anyway!), opening my own store (Im definitely not that much of a wonder woman and I like CREATING ,not “selling stuff” ), beginning work with another stamp/stamp related company (nope, not that) to the most popular – me starting my very own stamp line. While I am flattered by the many requests for that, that is not in the cards for me, just yet.
No one even came close to guessing my big news! Now I get to FINALLY share it all with you!
If I were ever going to entrust something that I do, to anyone, I can think of no better person than the AMAZING Mrs. Nichole Heady 😀
After much time, thought, and collaboration, I was convinced (OK she didn’t have to work too hard to pitch her idea to me! LOL!) to start my own product line through Papertrey Ink!
So here it is!
Now you may be asking “OK well, WHAT exactly is this new product?This is a line of downloadable packaging templates that can be printed directly from your home printer onto 8.5 x 11 cardstock. Two templates will be released each month, all of them very versatile and fun. Let’s also not forget EASY PEASY!! Some even kid tested! (Yes I made my kids try a few of them!)
Like most of you, I am a busy woman. I wear many hats. I value every second of my creative time. As a stay at home mom to 3 children “my time” is often limited, as are my stamping dollars! I like to maximize all that. I wanted to create really nice quality gift packaging, that is affordable, and looks like we all spent a ton of time on them, when in fact it was quite easy. (Well for this product I actually have spent a lot of time! LOL! But because of that, you won’t have to)
Now how much does it cost?
When you purchase the download for a $5 fee (no shipping!! and you receive it instantly after your purchase! So a BIG yeah!! to all my out of US readers!), not only will you get the printable file, but you will also get a full-color, high quality pdf. document that will include six EXCLUSIVE project ideas using the that template with supply lists and instructions, in TRUE Papertrey Ink style and quality.
These templates can be used over and over again!
Like my product line name “timeless” templates ©, these templates take literally no time at all to print and put together! You literally print it out, cut, score and design as desired. No guess work! It has all been done for you 😀 Those of you who feel challenged by tutorials or all the step by step mess, can now make creations for your own gifts like a pro.
We are so happy about this new venture, and want you ALL to be able to give it a try- RISK FREE!
So what does that mean?
Well to kick off my very first month, and let you give it try, we are giving away one FREE download to EVERYONE, for one of My Timeless Templates© called Stocking Stuffer! This will not be available as a FREE download until the official Papertrey Ink release on October 15th!
That is right! Everyone gets to try one FREE! This way you get to know first hand just how easy these templates are to work with 😀 Oh and FUN!
Are you excited yet? I hope so! I have put every ounce of my creative being into this line. Its like one of my children 😀
Every month for at least the next 2 years, will be releasing 2 exclusive- My Timeless Templates ©!
I have worked long and hard on so many various packing ideas that I felt we, as papercrafters, would all be able to use regularly! I really hope this product gets you all making affordable and amazing gifts, and helps stretch your creativy to a whole new level! YOU CAN DO IT!
There are no limits now. Just print and go!
Think party activities, party favors, all of it with endless possibilities.
OK Im done blabbering on about how awesome this entire product concept is. Soon enough you will get to try it. Now it is time for me to share what we are releasing this month!
As I said, we are releasing 2 templates a month. This month we have 3 due to the FREE download.
The FREE Download – Stocking Stuffer © Then the other two available for purchase will be:
For Keep {sake} © and Music Makeover ©
Now Im am sure you want to SEE samples of what these templates are! I will be sharing exclusive daily peeks and ideas for the templates up to the countdown here! So keep checking in daily.
The first one I will share is called For Keep{sake} ©
For Keep {sake} box
Now this box template has MANY variations and uses, as you will soon see. I am certain you can envision your own ideas for it too.
The sample you are looking at was made to be a ornament keepsake box! It is so simple and fun to create. Even the windows are printed out for you to decide to cut! But, you don’t have to cut them out at all, or maybe just cut one window. The sky is the limit.
I cut out 2 windows so that you may see my ornament inside from both sides of the box. Now for photo purposes I did not put acetate over the windows. I wanted you to SEE what was inside.
What a great box to present and store a precious ornament in!
Quick and simple ornament I made printing a photo of my children on vellum cardstock. I them painted the bulb to be like a snow cube. Adding glitter inside. I didn’t spend much time on the ornament-it was shall we say a “prop” for my box!
This is the view from the top

Now you can use the holes in the lid (should you choose to punch them out) to tie on your box top, or like in this case, tie your ornament through!
Box top removed
Isn’t that beautiful? Imagine the look on the face of the person who opens that?
Supplies : My Timeless Template © Keep {sake} box
Stamps- Beautiful Blooms, Believe
Cardstock- Pure poppy, white, black
Ink- craft white, black
Other- tag nestabilties, corner rounder, wide white organdy ribbon. silver cord
Now because I can’t even stand waiting, I am going to share one more peek of a variation using this same template!
Au Chocolate Keep{sake}
These tube are so HOT right now. At least to me. I am really enjoying all the possiblities to present them. While creating I said why not in my Keep{sake} box!
YES! It worked! See! This same template can serve as a glass tube holder! Just die cut circles in the lid top, and insert! Pretty cool huh?
Doesn’t this look yummy? Those are chocolate skittles inside (yes they are new and amazingly yummy).
Here is the tops-I just punched out the pieces from patterned paper and adhered!!
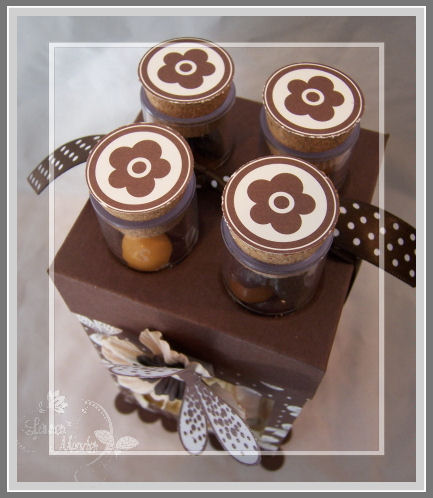
Another view-

I did put acetate over this window either simple because it didn’t need it! That is part of the beauty.
Trust me there are more things that this template can be used for, as you will soon see! Just wait.
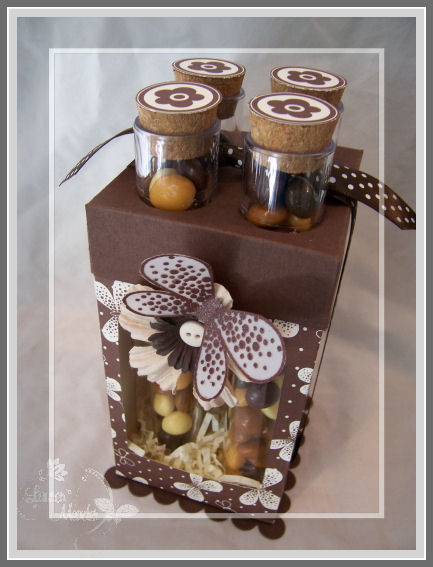
OK last photo I promise!
It is just such a pretty box, filled with yummy treats, using my favorite paper, and chocolate color! You know me and my butterflies! How could I NOT kick off my peeks without something butterfly!
Supplies
My Timeless Template ©-For Keep {sake}
Chocolate Remix patterned paper, dark chocolate cardstock, Dark chocolate polka dot ribbon
OK so Im just DYING to know what YOU think?! So dish.
Also feel free to email me with suggestions for templates YOU may want to have in the future!
Can you imagine how crazy busy I have been?! Really nuts, but that gets me going 😀
Well that is it for me today. Feels so good to finally get this out in the open. Each month will be so exciting!
Thank you all so much for the support during my new venture. I am dying for you all to get these in your HOT creative hands, and give it a try!
I will be back tomorrow with more peeks of another template!! HAPPY DANCE!
In the meantime don’t miss more DETAILED info, and a chance to win the first release of My Timeless templates and a detailed peek on Nicholes blog! Also check out Heather Nichols, and Melissa Bickford as they have much to share too.
Thank you again for taking the time to stop in and share my joy!
Till tomorrow 😀
I am very excited about the first peek I get to share here for the October Papertrey Ink release!
If you haven’t noticed I LOVE party planning. Love it.
I am always seeking new and fun party ideas for my children. Parents Magazine is a favorite for me, with their yearly special birthday issue. Years ago, when I subscribed, they had a recipe card invite idea. I used that idea to have a cookie decorating party for Alexa when she turned 4. To date it was one of my favorite parties, ever!
Anyway……when I saw Nichole come out with these new Recipe cards (get this, you get 100 in a pack!!), and a co-ordinating Recipe stamp set, with Recipe Labels, I was over the moon! Not only did I have a bajillion gift ideas pop into my head, but I immediately thought of a Papertrey themed “Recipe for a fun party” invite.
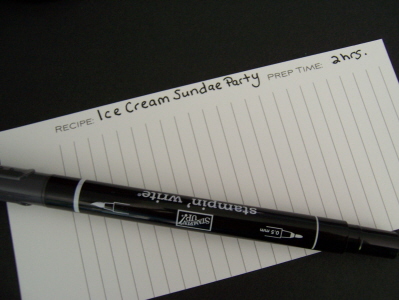
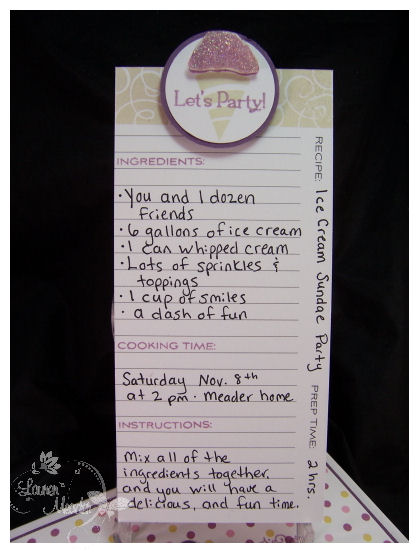
So I took my recipe card, and filled out what my party theme was going to be in the “recipe” section.
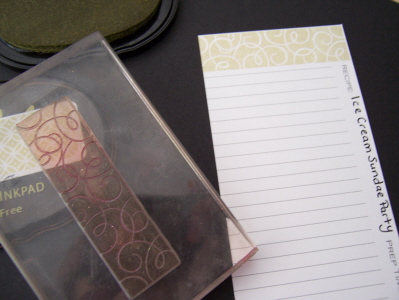
Label image
In the set there are several label images. I stamped my recipe card label topper with the swirly pattern, in spring moss.
There are also sentiments you would see on a recipe card. Since they are stamps you can place them where you want/need, depending on where your info starts and stops!

I used the elements from the set to give instructions about the party, and keep with the recipe theme. I wrote out my info in black, then stamped the recipe elements in Plum Pudding ink.
See, after I write my necessary info, I then can space the next category, where I left off.
No more SQUISHING it into the place you are given! You just write what you need, then stamp the next category. The recipe card is 2 sided, so you can continue info on the back! No need to worry about fitting everything in the front.
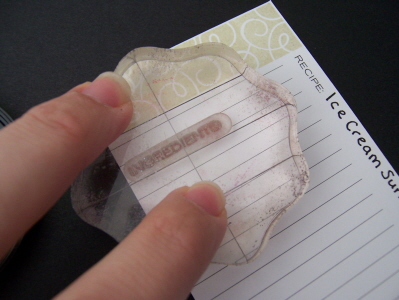
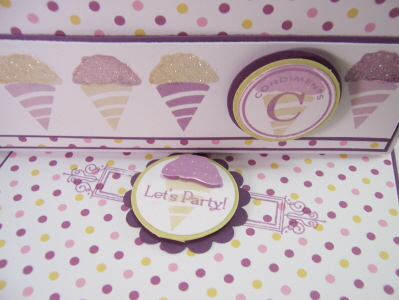
Once my card was filled out ,I then made a topper using the It’s a Celebration set. Instead of party hats, and cupcakes, I decided that one of the party hats would be a “cone”, and the cupcake top would be my scoop of ice cream.

Now a fun and EASY way to get that glittery scoop, with perfect coverage:
Get some double sided CLEAR adhesive (like wide red line tape). Stamp your image, and cut out. Layer the tape onto the front of your image.
Trim excess tape off.
Remove protective layer, and sprinkle on iridescent ice embossing powder. Tap off excess, and heat set!
Layer onto scoop on label.
It works PERFECTLY! No need to get messy with the versamark anymore. Cute huh?
This is the completed recipe invitation (Don’t mind my horrible handwriting-I am a TYPER, not a writer! LOL!)
Now the Recipe cards are made to fit perfectly with the Just Hatched Egg boxes. Hooray for awesome gift ideas this holiday. Knowing that, this entire party idea just fell together perfectly!
I had to use the absolutely YUMMY new paper collection from Papertrey Ink called Polka Dot Parade, as my color inspiration. This pattern is the petite plum moss moon dots!! Wait until you see this months paper, you will just be in heaven.
This is what I came up with.
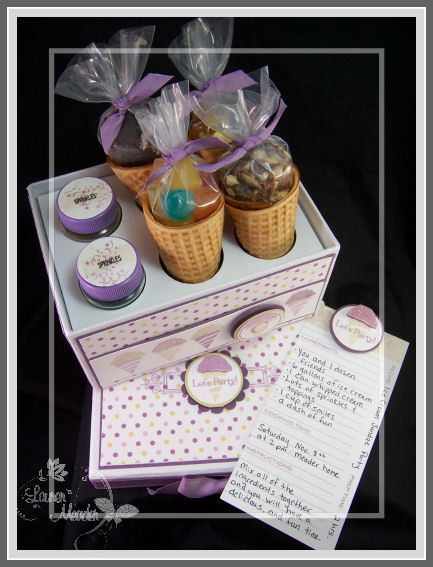
Sundae Party Box/Invite
Recipe for a : Ice Cream Sundae Party invitation
How fun does this sound? You come to the party and make your own YUMMY ice cream sundaes!
There are stamps in this Recipe set that you can use for your “categories” to file your recipe’s into.
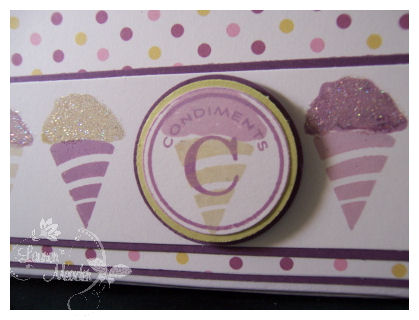
Example, my set used the “condiments” label. There are also desserts, appetizers, entrees….the list goes on.
Now the front of my box was decorated to match my theme. I used the Condiments label for the front to show that ice cream sundae condiments were included in my Sundae Party Box. These are the labels you could otherwise use to section off your recipe’s inside the Just Hatched box.
I think its always cute stamping something that appears to be UNDER the label. You can do this by making sure your label is stamped in a darker ink. EXAMPLE: My ice cream cone was stamped in spring moss ink, and my scoop was stamped in Lavendar Moon ink. So my condiments label was stamped in Plum Pudding.
Now for a view of my box lid.
In this photo the open box is sitting on top of my lid, but I wanted you to see the label for the top. I used the Recipe Label, and then decorated the top cone to match!
Now what is inside the box……
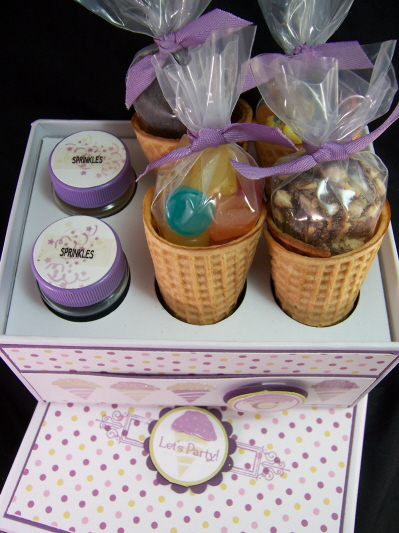
This is what is included in my box.
I have 4 ice cream cones. Each filled with a fun yummy ice cream topping!
We have 2 jars of different sprinkles. I totally lucked out having purple tops to match!! I just stamped the confetti image from the Its a Celebration set, and made my labels.
Then we have 4 ice cream cones. I used disposable frosting bags (I purchased mine at Michaels), and filled them with gummy dots, crushed chocolate covered toffee pretzels, crushed oreo’s, and Jelly Belly jelly beans, then tied with twill Plum pudding ribbon. The tops were cut down, and they fit PERFECTLY into the cones!
I would put different toppings into each party box.
Now WHO wouldn’t want top come to such a fun party? I cannot wait to have one of these!
This is the box. All closed up, for after the party.

You can decorate these and place them on your party table. It would looks so pretty and festive! OR you can send this off with your guests as a favor, and put in any condiments you want for them to use in the future. If you have the cones in the holders with the candy (as presented above) it obviously would NOT close! You may even decide to omit the lid! I did a great project using my lid –>here<–, so no waste!
Well I hope this is just the tip of the iceberg of ideas you get for this awesome set!
I know this recipe set will be used on many of my holiday gift’s this year.
Thanks for reading 😀 and be sure to check Nichole’s blog for more details.
Tomorrow I have a HUGE announcement here, so check back in, as you will NOT want to miss it 😀
You know you’re old when…
Oct 9, 2008 Author: mytime | Filed under: CardsHi world!
Just popping in super quick here.
I have a Papertrey Ink peek tomorrow to kickoff the countdown 😀 So I have to finish getting that done, and again finish up stuff for my big news! AND, I have to get my butt in gear for my classes at The Paper Tree. YIKES -Tick, tock.
In the meantime here is the card I made Jason, for his 31st birthday!
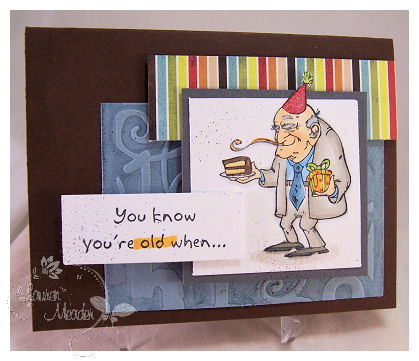
You know you’re old when-set is by Gina K Designs
I don’t know what it was about this set, but I really just HAD to have it. Granted it has never seen ink until 2 weeks ago, but the important thing is it was there when I NEEDED IT!
I think the set is hilarious and has the best sentiments! I fell in love with this old guy for some reason. He isn’t my “usual” style and I like that sometimes.
Jason is the one with the sense of humor in the relationship. So, when thinking of WHAT set to use for his card (he gets really mad if I don’t make him a card, and holds me to high standards! LOL!) this one came to mind because of the OLD MAN 😀
I colored him all up to match my strip of paper (Basic Grey paper- Cucpacke collection??), using my Copic markers. I then added fun flock to the hair on his head, and in his ears! LOL! Its really cool in person.

OK blurry photo-sorry.
Anyway, for the inside I stamped ALL the hilarious sentiments from this set.
It turned out really cute, and was such a Jason card 😀
I swear he is going to look just like this when he gets old! LOL!
I used my number collage embossing folder, inked up for the bkgd piece on this card too.
All in all this card took about 20 minutes. The layout was what stumped me most.
Well thanks for checking in with me everyone. I still have SO much stuff to share but LIFE is demanding to be first these day, and deadlines! LOL!
Don’t miss tomorrow’s post.
Later!
Forgot to add-
Oct 8, 2008 Author: mytime | Filed under: UncategorizedWOW! Im so wrapped up in everything going on I forgot to say you can now get the new releases from C.C. Designs —->HERE!!
There are 3 new lines!
Cookie Crumbs Annabelle
Sadie (3 different girls to choose from-or heck, get em’all)
and Eric and Chrissy go Prehistoric
and the Sugar Plums have a few new additons (I do have stuff made, juist not photographed :C)
Don’t miss my new post below 😀
Chill out Rosemary!
Oct 8, 2008 Author: mytime | Filed under: CardsWOW! I never should have teased you all about my big announcement! I got lots of emails and guesses 😀 I didn’t reply to any because, honestly I can’t share it yet, and it only a few days away! Trust me, it kills me more than you! LOL! I’m really excited that you all are so excited already too! Just wait ……..good stuff!!
OK Im still busy so Im keepin this quick-well as quick as chatty me can.
I have totally fallen for this new line from MFT Presents-Anne LaPointe. Maybe that is because I love flowers so much? Anyway I got 2 totally different looking cards to share today.

This single is called Chill Out
I’m generally not a “bright” color person, but this tub made me feel so happy I could not resist.
Plus this Scrum-diddilly-umscious (thats not a brand, but my own word I use) Chatterbox paper makes me smile! I am just in love with it. So I colored my bath tub to match, making it funky and cheery. I guess it doesn’t really have those “calm down” colors! LOL! Lemon tart is just AWESOME!!
Side Note: I had a meeting with Noah’s teacher yesterday, and she was “concerned” because he colors things “untraditional” colors. She said “He doesn’t care if his tree leaves are blue, the trunk is yellow, and his dog is purple (he always makes purple dogs because he says that is our dog Daisy in my favorite color :D)” Well she obviously has no idea WHO she is talking to! I told her I encourage my kids to be creative and think “outside” the box. Picasso was a famous painter and his people often didn’t even look like people!!! AND to chill, because Noah is in Kindergarten!! Geesh. I think his drawings are all fabulous!
OK back to MY “untraditional” creation……..
I sponged behind my flowers with Lemon Tart ink, then colored my flowers with my singlo white gel pen. I’m really happy with the layout too! I think its a fun one. Not centered and layered all perfect, but balanced at the same time!!
The flowers are a Martha Stewart punch, with some Michaels vase filler bead thingy’s for the centers. The leaves are my famous bridal confetti find from Michaels, colored green.
The sentiment in the corner-Define you life is from a Stampin Up set.
OK moving on to a totally different look-
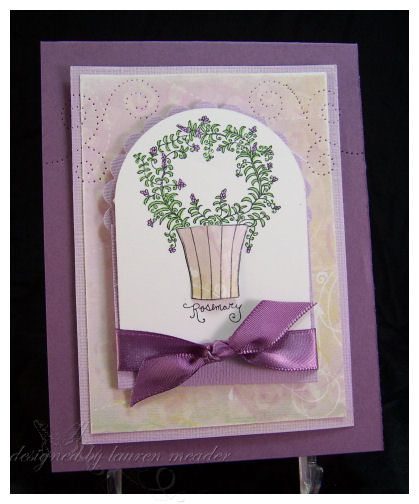
I can’t even tell you how much I LOVE this image! Its very different than her other vases.
I LOVE pruple and realized that it may be my favorite color, but I rarely use it in my creations! GASP! I am shocked by this finding. I checked out my scrap paper stash and saw that yellows, greens, chocolate, black and pink are my TOP colors! So I went with this card instead, and am very happy with it.
I used Plum Pudding from Papertrey ink (matching satin ribbon too). I also used my Core-din-ations cardstock in Lilacs, which added not only a nice contrast, but some texture!!
I used my coluzzle circle cutter (I personally LOVE that thing-I know others don’t like it, but I would recommend it for cutting 😀 It also has different size circles than the Nestabilities, so yes you need it! LOL!) to create my rounded top. I then layered a scallop circle cut from my nestabilities behind the layer to give me that look! Pretty cool huh?!
I challenge YOU to try that too. SO FUN!
I chose the Sprout collection from Memory Box for my patterned paper. I felt it was just so soft and feminine. I stamped the vase in the pattern as well, and adhered it with dimensionals, so it pops forward.
Now once I was done-SOMETHING was missing!! So I pierced a the top for interest and to draw your eye into the center, keeping it subtle, using an onare piercing template (which I LOVE!!!!). Then I was done!
Well I’m off. Only 3 more days to wait 😀
Till tomorrow-
2 School meetings, babysitting, soccer, dance and deadlines….
Oct 7, 2008 Author: mytime | Filed under: CardsBasically Im super busy but wanted to post some sort of eye candy for you 😀
Read to the end because I have a bit of a challenge for you all who, like me, am short on stamp time this week.
SHORT POST TODAY
Saturday I have a super HUGE announcement that is going to get every stamper excited! I know I can’t even sleep over it! Because of that, Im tying up some loose ends here to get everything ready for everyone 😀 Trust me, its a DO NOT MISS! The biggest thing I have ever done-enough said.
In the meantime, I have been meaning to post these 4 cards, all done with the Silent Night from Lizzie Anne Designs.
I went with the attempt at under 5 minutes each.
Sometimes its gorgeous, other times, maybe a few extra minutes would help! LOL!
Here is what I got-

Wise men
I think this card is STUNNING! 😀
I just used glossy cardstock, and sponge daubers with my ink.
Layered it with vellum cardstock, and in seriously like 4 minutes this card was born
A perfect under 5 card!
Keeping with simple……
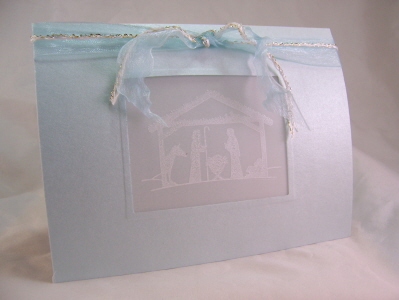
Silent and soft
OK Im truly not crazy about this but again I tried to get this done in under 5 min. Not my best work.
I stamped the vellum cardstock with white StazOn and made it a soft window card.
The cardstock is a shimmer baby blue.
I think its a bit too plain, but the die cutting of the windows took me a little time, so keeping with my time limit, its OK.
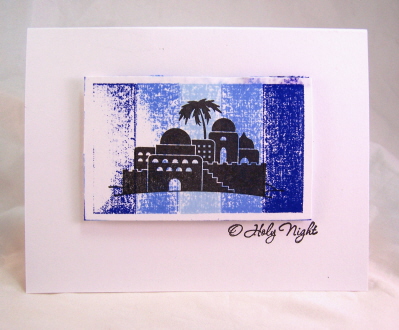
Spectrum City
OK remember “back in the day” when people would stamp their Spectrum ink pad onto some cardstock, then stamp the image onto it? Well that is what I did with this. Not loving the brightness of the blues, but I do like the look.
I then cut out the layer and layered it onto white.
Stamped my sentiment, and done!
Well that is it for me.
I’ll be back later-the release for All That Scraps release party is tonight! 8pm EST-don’t miss it.
As always thianks for stopping by! I hope you get inspired in some way when you visit.
Today I want to challenge YOU to make 3 cards, same stamp set-in under 5 minutes!!
DON’T over think it!! Just go with it. Use an old layout, and keep it SIMPLE! OK!
Ready-set-GO!
Book Tracker
Oct 6, 2008 Author: mytime | Filed under: Home decor/3-D itemsThis is a super simple project, great for ANY age.
One thing my kids LOVE to do is read.
That is a total God send to me, especially with Alexa. You cannot go anywhere in life if you cannot read. How can you take a bus to the right place, or take medication? How would we BLOG HOP!! EEK!!Seriously, there are a million reasons why reading is important. This isn’t a lecture or anything, Im just sharing my excitement over my own children’s enjoyment in reading books.
I think its important to keep that excitement going, and reward their accomplishments.
This project is one even they themselves can create, to get them more involved and excited too.
![]()
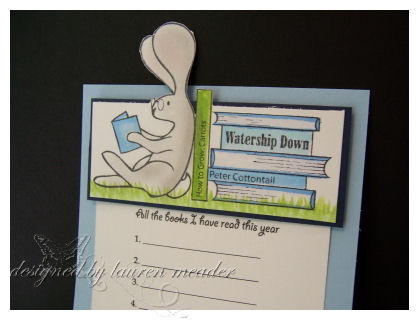
Flopsey Book Tracker
After seeing the Reading Flopsy set from MFT, I knew it was time to make a special project to encourage my kids to do more reading. With the tracker it will remind us all what we have read, and let us reflect on each book, so my children can talk about each one, and which was the favorite.
I created a magnetic book tracker to go on the fridge. Once the kids have read 20 books, they will be rewarded with a trip to the book store, to purchase more books! They will each get their own money to spend (that helps with math too!!) and can pick something else to read then.
Let your children write the book titel names on the tracker to encourage spelling and writing skills too!
I just created a document to print out onto my cardstock! Easy Peasy!! That way I can make more each time they fill this one up! If you NEED the document, shoot me an email, and I can send it to you that way. I have NO IDEA how to attach it here-SORRY! This is where my computer challenged issues comes into play.
Also think, what a great gift addition this would be! Get a child a book for their birthday or Christmas, make them a book tracker, and include a gift card to the book store!! Now THAT may just be what I will do for a party we have this weekend!
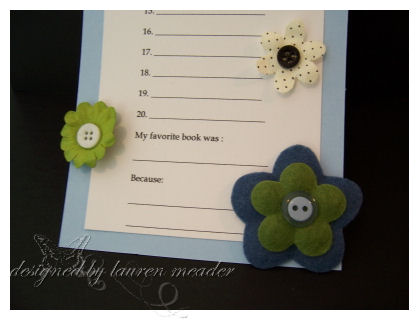
If you are wondering about my GORGEOUS flowers, they are felt and Paper. I believe they are American Crafts! I love them. The box even comes with buttons to match! Totally inspired my colors too. When you have a boy you can’t girly up everything-KWIM?
A fun project even the kids can do-a large Paper-clip bookmark.

Now I didn’t come up with this idea myself, but it certainly was a great one!
This is one I created, and plan on letting the kids make their own to match their new books. I just used my Marvy Giga Flower and the sentiment from the Reading Flopsey set for this one. Just get a large Paper-clip (sold everywhere is the office section-really cheap!), and use punches and cardstock to decorate. I kept mine super simple.
Note: yes that is a Vera Bradley Catalog 😀 It matched my project OK! LOL!
So that is it.
I hope you like my project and I encourage you to try your own.
I soon have a few photos to share of gifts from friends. Many from far away. So many amazing people out there!! I cannot even begin to tell you how many have blessed our lives 😀
So thank you to each of you, who come to visit me here, as I share daily, whatever goes through my cluttered brain. I appreciate each one of you!
Later
More peeks…..and blah blah blah
Oct 6, 2008 Author: mytime | Filed under: CardsI told you this week is insane for me and you haven’t seen the half of it, I promise you. Only a few more days!!
I still have to plan my projects for my class at The Paper Tree. I need to actually go there and get my supplies so I can get my samples done. I am teaching 2 classes this month on the 25th. Check it out, and if you can sign up!! I’d LOVE to meet you 😀 I wanted to do more, but with all my kids activites-birthdays, soccer, dance, girl scouts…to name a few, then throw in yearly check ups and doctor appointments, color me insanely busy 😀
I know I always say I’m busy. That is because I am. You know what though, I don’t know what to do with myself if I’m NOT busy. I think I really thrive on the one thing after another. Seriously! Also the less busy I am the creative! isn’t that wierd? I swear its true. Its like my brain won’t work if Im not thinking about a bajillion things at once, or if Im not stressed.
See stress = creativity for me. Its my outlet.
I have so many amazing things to share with you over the next couple days, I really hope you will share my excitment when the time comes 😀
In the meantime, while I sit on my excitment, I have some peeks to share. I have done so much work lately that I ran out of my ATG Adhesive! OMG! How am I going to work without that?!!
This one is quite SIMPLE!
I do have a couple other designs to share, but none that I really like, so its back to stamping I go. Don’t you hate when that happens. Everything turns out SO not like you planned. Or you have a dream that is about an AWESOME card/creation and forget! BLAH!
OK enough rambling…….
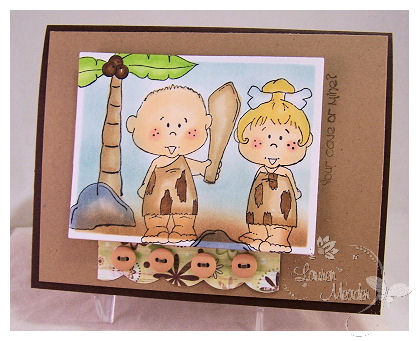
Your cave or mine?
I love that sentiment. I made this cared for my hubby. How can you not? Its so cute.
They remind me of the cartoon Caiiou (?sp) or Dennis the menace. Please tell me you know what Im talking about. I love their pudgy lil faces
The boy & girl are a separate stamp (just so you know), and I used elements from the set fo make my “scene”.
This set I used for this card is a new set called Eric & Chrissy GO Prehistoric. It will be released tomorrow at All That Scraps, with the rest of the sets I have shared here. There is such a wide variety to choose from this month with the introduction of 3 new lines.
So the party is tomorrow night 8pm EST. Check out the forum–> here! The release of the sets is at 10pm!
So if you like any of the new stuff, there you go!
Be back with more shortly
I have SO much to share today. I didn’t realize it until I began going through all the recent photos.
I have 3 Smileboxes to share! I know, its alot ot take in for one post. But I know many of you follow my family, and enjoy what I share. The funny thing is our family time is NOT perfect, and I think anyone with kids will laugh at some of what I am sharing. I know I laugh, AFTER its over.
I LOVE making these Smileboxes because they take NO TIME, and I don’t even need to resize my photos. I also like that I am preserving memories without having to scrapbook! LOL! Sorry that is just not my thing. Plus I think its more interesting to view photos this way. You can send these via email too. Great for long distance family. I know my own mother keeps up on my CRAZY life by reading my blog-so you usually know as much about me as my family! LOL!
 |
| Make a Smilebox slideshow |
Alexa turns 9!
As promised I have the Smilebox of Alexa’s Bowling party from last weekend. Many of you sent her cards and whatnot! Thank you!! She felt very special.
We all had a blast at Alexa’s party. I spent the day taking photos.
Some fun details:
Alexa’s friends would hand her each ball, when it was her turn. She likes being “waited” on. Her very first ball she got 9 down! I thought that was really cool since it was her 9th b-day!! I did get a photo of it, but you can’t see it, so I was bummed. She even won the very last game! YEAH!
Noah was a bowling pro and may do his party at the bowling alley.
Amber cracks me us because this girl can do anything, and still twirl her ponytails in the process. Im mean she is running and playing soccer, kicking the ball down the field, and twirling her hair at the same time. Hilarious.
I didn’t include too many photos of her friends, kept it mainly our family. I think you will see how much fun she had. I also didn’t include her home gift opening. Its sort of the same thing. The faces she makes when she opens gifts always makes me laugh. She always has a look of “OH THAT IS THE BEST GIFT I EVER GOT!” and totally surprised. Too funny.
Now I have one of my most favorite things to do with the kids-apple picking. I think I look forward to it more than they do! Each year gets better and we all have so much fun. Some of my favorite photos every year come from this time, as you will see why.
 |
| Make a Smilebox photobook |
This day was for Amber’s class field trip. I kept Noah & Alexa out of school to got with all of them! SHH! Don’t tell! LOL!
Now we have a Smilebox of our time at the Deerfield Fair, and Canobie Lake. Lets just say we were tortured at both! LOL!
At the fair-it was cold and rainy, which we tried to smile through. Noah complained about the “smell” of the animals and would NOT go in any of the barns! Well, given it was a FAIR, and aside from rides (which hello it was pouring) that was the only thing to do. It is usually a favorite, but not for Noah this year.
 |
| Make a Smilebox slideshow |
Now as for Canobie Lake Park, that is a park of rides. Once the kids found the “kiddie” rides they only wanted to go on them. I know its selfish but Jay and I were BORED out of our skulls 😀 We did go on some big rides but Alexa was not happy about that!
Her and I were on the Rooster ride, when she began freakin out and telling me she was scared. OK nothing I can do about that right now. Then she says “Im going to pee my pants!” I screamed!! LOL! I was lie you better not pee on me! I will not be happy. Thankfully she didn’t, but after the Tilt a whirl it was time to go. They had enough. Oh well, we tried.
OK that is it for today.
I am going to share Amber’s birthday Smilebox later today or tomorrow. Lots of photos to go through for her. She had a amazing time, as did her friends!
Thanks for reading, and I hope you are enjoying the day!
Sweet little Sadie
Oct 4, 2008 Author: mytime | Filed under: CardsThis is my 3rd post for today-so scroll down! Oh and don’t miss the Sat sketch OK!!
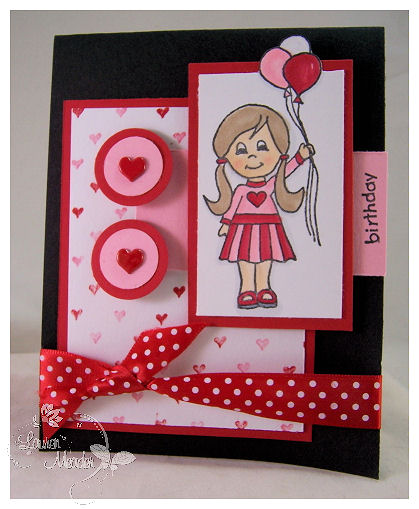
Birthday Girl
This card was made for Amber’s friend. We are going to her party next weekend. She looks just like this little girl, I swear.
Well if you haven’t seen yet, my dear friend Jen Ofiana has come out with her very own line (I know crazy!) called Stampin Spot. HUGE Congrats to Jen!! She is also having a giveaway –> here! That is an amazing accomplishment. I can only imagine how weird it would be to see your drawings made into stamps, then used by others!
This little girl is named Sadie. This month you can choose from 3 different Sadie singles. I think each one is super cute, but the birthday is my favorite 😀 She will be released on the 7th.
Of course seeing the heart on her shirt made me think pink, red and black. I love that combo of V-day stuff, so figured why not? I think she also looks like a cheerleader (yeah!).
So I used the Big Ol’hearts bkgd stamp colored direct to stamp with red and pink markers for my patterned piece. It was a match made in heaven!
OK I need to run. We have company coming over, and I have things to whip together before they get here. Guess I will NOT be stamping on WCMD :C Oh well. There is always tomorrow. I was already “informed” that football is on in the afternoon-BLECH.
My Etsy

Who I Designed For
Blogroll
- Alicia
- Alli Miles
- Ally Blankenship
- Amber
- Andi @ crafts on a whim
- Angel R
- Angie Z
- Anne Kranitz
- Becky O
- Bee
- Beth Silaka
- Bethany Paull
- Beverly Nash
- Bobbie
- Cambria
- Cammie
- Card of the Week
- Card Positioning System (CPS)
- Cards for Cancer
- Catherine Doucette
- Charmaine
- Cheryl Sims
- Chriss Rollins
- Christina
- Christine Ewing
- Christine Wooden
- Colleen Schaan
- Craft Critique
- Craft Gossip
- Crystal
- Dawn Easton
- Emily Giovanni
- Geny
- Holly
- Igne Groot
- Inspirational Craft Blogs
- Irene
- Jami Sibley
- Jeanne Streiff
- Jen del Muro
- Jeni Bond
- JenMarie
- Jenn Balcer
- Jenn Diercks
- Jenn O
- Jennifer E
- Jennifer Mick
- Jennifer Pereda
- Jennifer-Sweet Treat
- Joanne Basile
- Jodi Collins
- Julia Stainton
- Julie Masse
- Karen
- Kathryn Berthiaume
- Katie Cotton
- Kelley Holland
- Kendra
- Kim Scholfield
- Kris’s Color Stripes! Get inspired here
- Kristen Dubosque
- Kristin Eberline
- Kristine
- Laura @ Sunshine Stamper
- Laura Turnmire
- Laurie Schmidlin
- Lesa Rapp
- Linda Duke
- Linda-LSN
- Lindsey Botkin
- Lisa (lakind scs)
- Lisa Kind
- Lori Craig
- Maggie
- Mara Campbell
- Maria
- Maria Levine
- Mary
- MaryJo
- Melanie M
- Monique Hansen
- Moxie Fab World
- Pam Imholz
- PaperCrafts Connection
- Peppers and Pollywogs Kids party site
- Rebecca Grohall
- Rita
- Robyn
- Rose Ann
- Sarah Vrolyk
- Sharon Harnist
- Sharon Johnson
- Sharon Rivera (a chemisrty with paper)
- Sherrie
- Sophia Landry
- Storage Units, Ink, & More Blog
- Sue Berker
- Susan (Rainy)
- Tangii Crane
- Tracy
- Tricia Traxler
- Trudee
- Velta
- VivLyn
- Zena
MTME Pretty Palette Color Team
MTME Pretty Patterns Sketch Team
My Time Made Easy TM LLC
Shop till you drop!
Lauren Meader
About Me
Copyrighted material
Subscribe To My Blog
Pages
- About me
- Alexa’s Story!
- My Crafty Corner!
- My Time Made Easy™ LLC
- Our Make A Wish Trip to Disney!
- Resume/Publication List
Calendar
Archives
- August 2013
- July 2013
- June 2013
- May 2013
- April 2013
- March 2013
- February 2013
- January 2013
- December 2012
- November 2012
- October 2012
- September 2012
- August 2012
- July 2012
- June 2012
- May 2012
- April 2012
- March 2012
- February 2012
- January 2012
- December 2011
- November 2011
- October 2011
- September 2011
- August 2011
- July 2011
- June 2011
- May 2011
- April 2011
- March 2011
- February 2011
- January 2011
- December 2010
- November 2010
- October 2010
- September 2010
- August 2010
- July 2010
- June 2010
- May 2010
- April 2010
- March 2010
- February 2010
- January 2010
- December 2009
- November 2009
- October 2009
- September 2009
- August 2009
- July 2009
- June 2009
- May 2009
- April 2009
- March 2009
- February 2009
- January 2009
- December 2008
- November 2008
- October 2008
- September 2008
- August 2008
- July 2008
- June 2008
- May 2008
- April 2008
- March 2008
- February 2008
- January 2008
- December 2007
- November 2007
- October 2007
- September 2007
- August 2007
- July 2007
- June 2007
- May 2007
- April 2007
- March 2007
- January 2007
Categories
- About Me
- All That Scraps
- blogger challenge
- camera/photo play
- Cards
- Contests
- family stuff
- FOR SALE
- Home decor/3-D items
- How to FAKE it!
- Introduction
- JUGS Challenge
- JustRite Stampers
- Lizzie Anne Designs
- My family stuff
- My Stamping Space
- My Time Made Easy
- My Time To Color Challenge
- My Time to Create Challenge
- My Timeless Template Challenge
- My Timeless Templates
- Mytime Mail
- MYTIME MOVIE/VIDEOs
- Papertrey Newsletter
- Pink Cat Studio
- Pretty Palette Challenge
- Pretty Patterns Sketch
- Product Opinions and Must haves
- Recipe's
- Saturday Sketch
- Smilebox Creations
- Stampavie
- Tutorials
- Uncategorized
- videos
Most Popular
- Create your own Onesie Card Tutorial-and important NOTE! PLEASE READ (2529)
- Saturday Sketch-Boxed bag holder (2333)
- Going GREEN! Fancy Flower Flourish-Closure Video (1478)
- Fabulous Favorite - Giveaway! (1336)
- a Prayer Request (1231)
- QUICK-Easter Baskets from Nestabilities-PTI style-and blog challenge (1063)
- Teaser Sketch (999)
- February Release Giveway! (and a little peek) (996)
- Group Post and Rambling Rose Video Tutorial (985)
- GIVEAWAY! Who wants it all?! (895)
Recent Comments (RSS)
- 야동: Love to read it,Waiting For
- 야동: This seller is in a
- 바카라사이트: 여기 처음 왔어요. 나는이 게시판을
- 야동티비: I was surfing the Internet
- 바카라사이트: 비슷한 주제에 대한 흥미로운 정보를
- 바카라사이트: "여기에 제공해 주신 귀중한 정보와
- 온라인홀덤: 유익한 웹 사이트를 게시하는 데
- 홀덤나라: 나는 당신의 블로그를 정말 좋아합니다.
- lisa: Technology, too, has left an
- 주소모음: 흠 !! 이 블로그는 정말
Copyright © 2007 - My Time, My Creations, My Stampendence - is proudly powered by WordPress
This blog has been Tweaked and Designed by Sara Williams